Don't wanna be here? Send us removal request.
Text
Processes and Components of Studio Recording (1.3)
There are a lot of fundamental components that are needed in order to be successful at studio recording and there I also a range of equipment that are needed for the process of recording. First of all, it is a good idea to have access to a fairly good computer with a decent sized RAM which is the random access memory or system memory in which you will need for these programmes to run smoothly and also so you can save your work without a hard drive rive, although it would be a good idea to back up your work on a hard drive. The second thing you will need is a DAW (Digital Audio Workstation) which I have mentioned below in the log ‘Recording Formats 2.1. You will also need an audio interface or some kind of tie line like in the studios at college in order to patch in to the mixing studio with individual inputs for both instruments and headphones, having a few of these will help as you will use more than one instrument during a recording. These will also help the people in the mixing studio to hear you during the recording in case someone has a question or their levels aren’t high enough or even if the people in the mixing studio have certain commands for the people performing. Another component of studio recording is to have a variety of different microphones, these are used to record an instrument or vocal straight into the computer using the DAW system. Another component is both headphones in order for the performers to hear themselves and also to communicate with the people in the mixing studio, also the mixing studio will need monitors so they can hear what’s going on in the live room in case for some reason they need to start the recording again or re do a certain section of the recording. The mixing studio will need a mixing desk which will control the levels, gain, tone and overall level of sound that is coming through from the studio/live room and to also control the levels in which the performers hear themselves and everyone else in their headphones.
0 notes
Text
Studio Planning Strategies (4.3)
There are few different ways in which you can plan your studio recording time in order to make the most out of it and make your recording as fast paced and successful as possible, especially the setting up and patching in process as these things could potentially be very time consuming. The type of strategies you can use to make your recording session a success is for example; having a practice run of setting up all the different microphone techniques and different ways in which you can set up the studio you are using and taking photographs as a reference just in case you forget how it is supposed to look, these can help greatly and are a good thing to refer back to. I personally did this and found it to re-jog my memory to what the different types of microphones looked like etc. Another way in which you can plan your studio session is by making a tracking sheet, this is something that you will have to write out using a table and going through the list of all of the equipment you will be using for the session including instruments and microphones. Something else that should be included in a session plan is what tie line the XLRs are going to be patched into for each individual instrument/vocals. Planning all of this in the session before hand could greatly decrease the time in which it takes to set up everything because you will already have a head start. Another thing that could help you plan your session is having a picture of the layout of the room and drawing diagrams of where each individual instrument will be placed within the live room, this way you won’t have to bother anyone else by asking and this will save time. We also took a note of which microphone techniques we were planning to use for each instrument, this way we knew which ones to practice before hand so when we did that actual recording itself we all had a good idea of how the techniques where set up.
Another thing that you may want to add on a tracking sheet or session plan is the start and finish time of your recording, this way you can follow a set plan and have a target of what time you want everything to be finished for and you can work on improving your setting up skills if this takes longer than anticipated. It is also a good idea to write down which track you will be recording as each track will have a different set up when it comes to which instruments you need and how many vocalists there will be and also depending on which microphone works best for a certain vocalist you may not use the same microphones for everyone.
0 notes
Text
Mixing Desks (2.2)
A mixing desk is a mixing console that allows you to have more control over the sound you are wanting to record, Throughout the ages, mixing desks have been both analog and digital, starting off with analog which contained a small number of channels and used the same characteristics as a tape in the form of a reel. As the years went one, mixing desks became much more developed and larger because of the added features such as controlling gain, volume levels, tone and dynamics where as the analog mixing desk had three parts, channel inputs, master controls and audio level metering where as the digital mixing desk has many different ways in which you can manipulate the recording. In order to do this, for example; if you wanted to change the level of gain to prevent clipping you would just simply turn it down on the computer but it is being controlled externally and transfers whatever you are doing on the mixing desk onto the computer and then it becomes internal. On a mixing desks their a number of different knobs, usually in a straight line and each one does a different thing within the recording and helps the track or recording be ready for processing. These knobs will be connected to each individual section/instrument/vocals depending on where they are patched in on the bay. For my own work, the mixing desk that I used was both a digital and analog mixing desk which includes features from both, this contains an analog input during recording sessions and a digital output, this is where the DAW comes in (see Recording formats 2.1). Mixing desks also became lighter and portable over time as technology evolved.

0 notes
Text
Recording Formats (2.1)
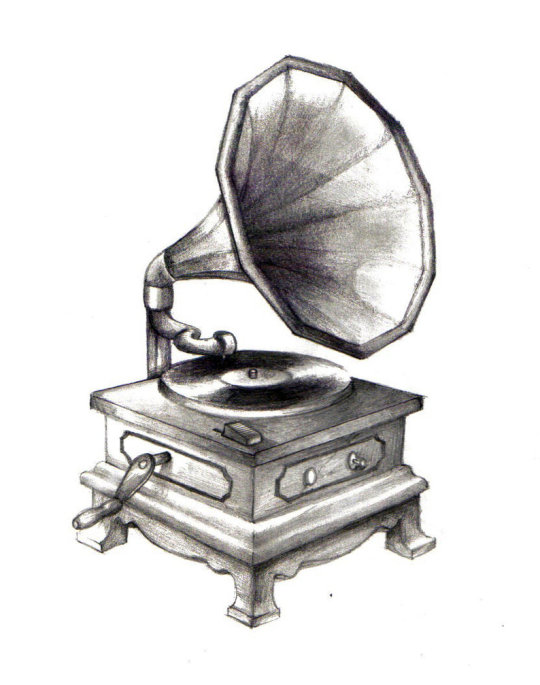
There are different types of recording formats which consist of either analog or digital. Analog recordings use analogue signals to record and play back sound physically rather than digitally. This type of recording can be found on a Phonograph, which was one of the first machines used to capture sound using a diaphragm (which I speak about in microphones 1.3). Another example of something that uses analog recording is the Gramophone which is similar to a record player.
Another old, but common way of recording was through a tape recorder, which was also a type of analog recording which could record and play back sounds even if the sound quality did not match up to what is available to us today, the sound would be quite grainy and distorted in some way. To record on tape they would typically use a magnetic tape in the form of either a reel or a small cassette tape, this is how they would store the sound.
Today, we are more commonly known to use a type of recording which is a digital type of recording and this is known as a DAW or a Digital Audio Workstation. A Daw is a type of computer software that enables the user to record, edit and create/produce audio files of their own making. These can be in the form of anything such as sounds effects, music for TV and film or radio and even something as simple as recording someone's voice.
There are many types of different components that you need in order to begin using this type of digital recording technique. The DAW setup usually consists of a computer (preferably a MAC if you are using LogicPro), a pair of headphones in order for you to be able to hear your work, some speakers also to hear, a MIDI keyboard in order to create music in step time/real time, an audio box in which you connect your headphones, speakers and microphone and also your instrument. This is all recorded digitally into the computer and enables you to edit and manipulate your tracks accordingly. A DAW is easier and simpler to use compared to an analog recording because you can do everything in pretty much one take, it is easier to edit if something goes wrong where as with an analog recording you would have to do the whole thing again where as with a DAW you can do everything in sections or remove a section and re-record easily. Personally, for my own work I used a DAW with the setup below, the reason I chose to record my work this way is because even though the sound quality is less raw and more robotic depending on how you plan to edit, it is easy to use and much quicker than analog recording as I have explained above.

0 notes
Text
Causes of and Solutions to Distortion (1.1)
Distortion of an instrument through an amplifier is usually an unwanted altered sound that sounds heavy and distorted due to the rise in an instruments gain which causes the sound of the instrument to clip. This happens because the amplifiers need a higher voltage in order to provide this level of sound. This in itself causes clipping which is a type of waveform when the amplifier is overdriven like I have explained before. Whilst doing my work in the recording studio, I could tell that my mix was clipping because the bar on the gain level would turn red and then I knew that I had to turn down the gain in order for this not to happen.
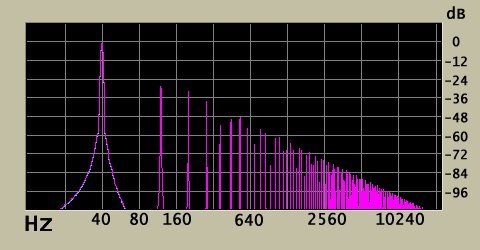
Distortion and clipping can be solved by simply finding the most suitable microphone for the recording because this could be a reason for distortion or clipping, or could create sounds that can be mistaken for distortion or clipping. Another way to solve this problem is by turning down the levels on the mixing desk prior to the actual recording so the levels are already done whilst mixing. Or you can even do it in the mixing process in order for the levels to be accurate and equal. An alternative to this would be to use a limiter so that the levels will not go over a certain point. In my work I simply turned down all of the levels myself in LogicPro and I did this individually to avoid confusion of which instruments’ level I was editing.
Intermodulation distortion is something that happens when two frequencies come together and do not work together harmonically. There are ways in which you can decrease the chances of this happening, for example; using equipment that is of a good/high quality in order to create the best possible sound. Another way to prevent this is to move away from anything that could cause unwanted transmissions or signals that can cause intermodulation.
0 notes
Text
Microphones (1.3)
Microphones are all used for the same thing, to amplify sound or to be recorded. There are many different types of microphones although they all have three things in common with one another. The are made up of a diaphragm, which produces high frequency sounds, a transducer which converts the vibrations of the diaphragm into an electronic signal. The last thing all microphones have is a casing which acts as protection for the diaphragm and the transducer.
They're are many different types of microphones, for example:
Dynamic Microphone
Typically used for vocalists
Expensive because of being complex
Very robust and sturdy/reliable
Peak in frequency response
Weak high frequency response
Ribbon Microphone
Flat frequency response
Good response compared to dynamic
Doesn't need external or internal power to work
Fragile/not reliable
Moderately expensive
Condenser Microphone
Good high frequency and upper harmonic response
Can be very expensive
Needs external powering
Bulky in size
Temperature can affect the performance
Should always use a pop filter
There are many specifications that you will need to know if you are planning on using one of these microphones.
Sensitivity: This tells you how loud a microphone is going to be and depending on how much sound pressure you put onto them, the quality of the sound may vary. Condenser microphones are the loudest. Ribbon microphones me need turning up to the point where noise becomes an issue.
Overload characteristics: Natural distortion that will get worse if it is constantly used for extremely loud sounds which can damage the diaphragm which will lower the quality of production greatly.
Frequency response: This is basically the range of frequency the microphone can pick up without any technical difficulties such as distortion, noise etc and is usually found problematic if the sounds are off axis from the microphones given directional pattern.
Noise: Noise is a disturbance in the recording or production such as handling noise or loose wires or even other mechanical vibrations from phones etc.
Directional response: The directional response of a microphone is determined by which way the microphone responds or picks up sounds coming from certain directions. There are different types of directional patterns in microphones:
Omni-directional
An Omni-directional microphone can pick up sounds from any direction equally and also of all frequencies.
Figure 8
This type of microphone can pick equal amounts of sound from both the front and the back.
Cardioid
This microphone has a strong pick up on the axis of the microphone which means that if you were to speak into the side or into the back of it, it would not receive sounds as well.
Hyper cardioid Microphones
This is where you change the amount of openings on the case therefore it opens up more ways to increase the directionality of the microphone.
Speciality Microphones
These types of microphones are used for things such as recording wildlife or even in a movie and on television so it is usually used outdoors.
Lavaliere
This microphone is extremely small that are worn on clothing, because of this they do create a lot of handling noise
PZM
This stands for Pressure Zone Microphone and is designed to decrease the amount of echo and reverberation when recording in a large room.
Wireless
A wireless microphone to ensure the freedom of performers so they can move around instead of being stuck to a wire.
Stereo Microphones
Two microphones in a single casting or body.
Parabolic
Commonly used in footballs games or on television, it is usually held up in the air like a satellite dish and picks up sounds from the game or location.
Microphone accessories
Pop Filters
Pop filters are used to prevent any plosives or pops that could cause any unwanted sounds in the recording.
Shock Mount & Windscreen
0 notes
Text
White Rabbit - Mixing Session
After we had successfully recorded our version of ’White Rabbit’ we repeated the process of save the unmixed recording and then individually mixed two tracks of our choice in Logic Pro. In order to begin the mixing process I selected all of my individual tracks in the mix and dragging them all the way down so that they where all at 0 volume. This would make it easier to individually pick out any faults in the mix on a certain instrument. This also made it easier to set volume levels for each instrument in order for one instrument to not clash or drown out another one.

Again, repeating the steps I took in the Mad Hatter recording I began creating my mix and decided to first concentrate on editing each instruments frequency in order to manipulate the tone and range to one which compliments the overall track and does not clash with the other instruments. In order to do this affectively I used an EQ chart which helped me determine the fundamental frequencies and harmonics of each individual instrument in order to know which frequency I needed to focus on for example, bass, mids and high Mids.
The first instrument that I began to edit was the electric guitar, just like I did with the Mad Hatter recording, I soloed the electric guitar in order to set the correct volume level, once again I had to improvise at this stage as I had no other instruments to compare this to so I would have to keep changing it as I worked my way through the mix. I kept referring back to the EQ chart in which showed me that the fundamental frequency started at 80HZ in the bass region and ended at 1.5KHZ in the mid range region. In my EQ mix I decided to lower the sub bass frequencies of the instrument to get rid of any humming coming from the guitar, I also decreased the sound of fullness in the 200HZ bass region as I wanted the guitar to sound muddy as it suited the song as we wanted it to sound quite dated like the original. I increased the high frequencies of the guitar to allow more bite to stop the guitar clashing with the vocals.

The next instrument I began to edit was the bass guitar, I again soloed it against the electric guitar in order to find the right level of volume that suited them and then proceeded with working on the EQ. The fundamental frequencies of the bass guitar start at a sub bass frequency at 40HZ and end at mid range at 1KHZ and the harmonic frequencies begin at 1KHZ and end at 4KHZ in the high Mids. For the EQ on my bass guitar I decided to keep the sub bass and bass frequencies the same as this track depends highly on bass. I increased the bottom of the bass at 100HZ in order to add roundness and that deep bass sound. I decreased the pop at 2KHZ in order to keep that smooth feel of the bass which I wanted to be quite heavy.

The next instrument I edited was the drum kit, for this I followed the EQ chart and began with the snare which I increased in the bass region of 240HZ to increase the fatness of the sound. I then increased it in the mid range of 2KHZ in order to add more bite to the snare, this harmonised with the fatness. I then proceeded to edit the Hi Hat of the drums which I decreased in the bass area to get rid of the gong sound and to make it sound less echoed and spacey/roomy.
For the bass drum I greatly increased the bass section because I wanted the song to have that continuous deep, bass sound throughout. I increased the bass at 60HZ in order to get more body to the bottom end. I also increased it middle section to add roundness and muddiness.

The final instrument that I edited was the vocals within the song, again like each time I referred back to the EQ chart in order to get the best from the EQ mixer. I began to raise the mid frequencies at 100HZ, this gave the vocals more fullness which made them sound brighter and more clear and stood out more. It also added more boom. I also added a lot of presence at 5KHZ because I wanted the vocals to become more present and aware in the song, as this is the main focus. If I could have done this differently I would have re-thought the process of adding high frequencies as it can cause sibilance which is the harshness of syllables like S, T and Z which is not pleasing for any listener.

I then added effects onto my vocals to make them stand out more in the track. Instead of using reverb this time I decided to use echo which gives the vocals a slight delay at first but then I changed the wetness of the echo to dry in which case made it seem more flat and not as spaced out but with a hint of delay that is very subtle. I also decided to add overdrive to my vocals in order to distort the sound slightly to give it that old and authentic feel.


0 notes
Text
White Rabbit - Recording Session
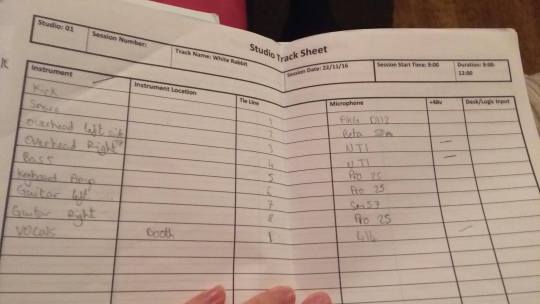
In this recording session, myself and my classmates decided to record a cover of Jefferson Airplane’s version of the song ‘White Rabbit’. For this recording we went through the same process of setting up as we did for the recording ‘Mad Hatter’, we followed a specific tracking sheet that we had decided on as a group and wrote down in a previous lesson so that we came to the recording prepared and so we knew what microphones we needed, what instruments we needed and where they were all going to be set up. As usual, we began by setting up the microphone stands for each instrument. In this case, the instruments we used where one set of vocals for myself, a drum kit, a bass guitar, a keyboard and finally an electric guitar. In order to begin setting up these instruments we needed to refer to the tracking sheet to see where we had decided to locate each instrument.
We decided that to decrease the chances of any spill, we would have the vocals being recorded in the booth which isolated the microphone and the vocalist away from the other instruments. We decided that the drums would be in the middle of the live room in an open space because the drums are so loud they needed to be a certain distance away from the guitar and the bass in order to prevent spill and leakage from the microphones.
We decided that the bass guitar would be on the left hand side of the drums, the electric guitar to the right of the drums and the keyboard was to be located where the drums usually go on the wooden floor next to the booths because there was more space to set up the amplifier and the laptop.
After we had set up the microphones stands and positioned them according to the session plan we then proceeded to refer back to the tracking sheet to see which microphones where needed for each instruments. For the vocals we used the microphone AKG 414 which is a condenser/cardioid microphone that is commonly used for vocals because of high sound quality for live and acoustic recording. We only used one microphone for this set up because we were planning to do overdubs in another session. For the vocals we also used a pop shield which was to prevent any hiss, sibilance or any unwanted breathing or noises that would interfere or make the recording sound unprofessional.
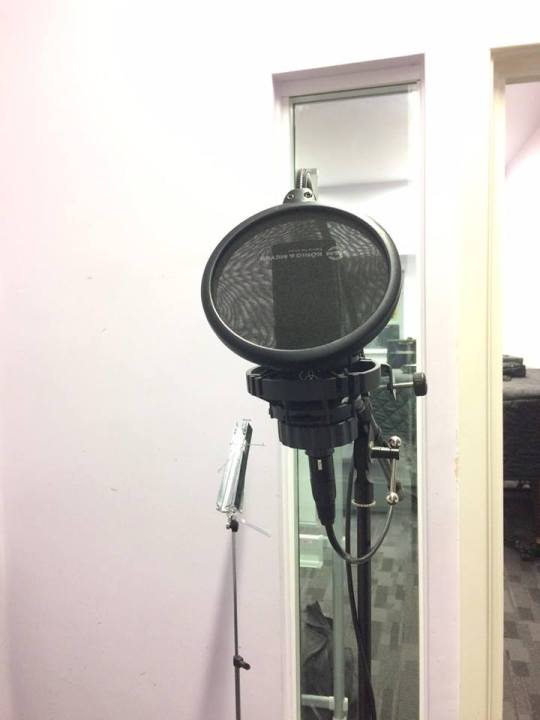
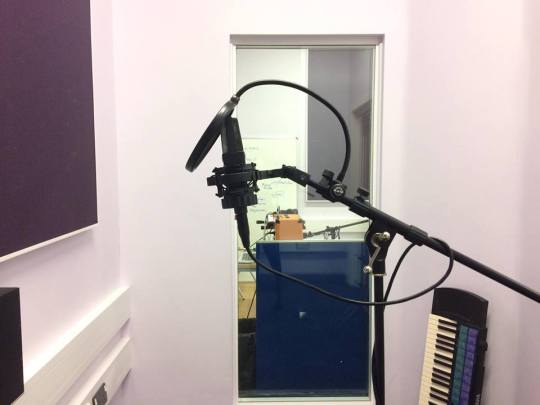
For the bass guitar we used the microphone AT PRO25 which is a dynamic microphone, that is commonly used for instruments such as brass and percussion. They are known to be durable, reliable and consistent in their sound. For the bass guitar we used the set up of setting the microphone about an inch away from the speaker at an axis.
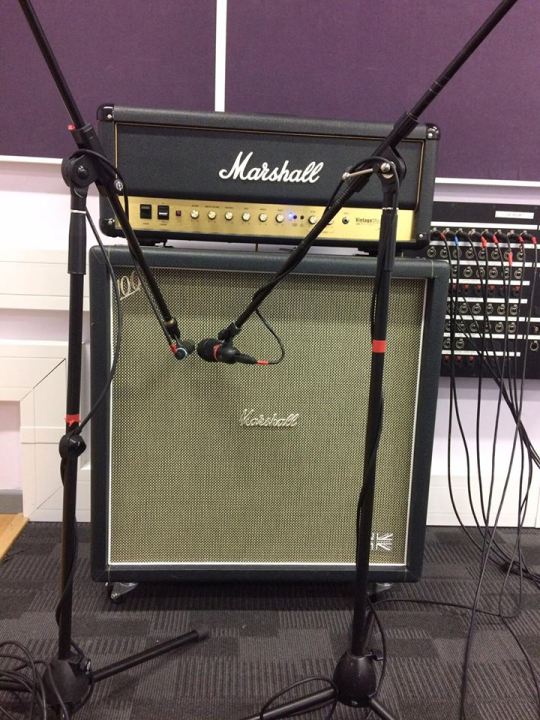
For the electric guitar we used the microphone AT PRO25 which was the same as the bass guitar and we also used another microphone which was the SM57 which is a dynamic cardioid microphone commonly used for instruments such as electric guitars and percussion. The technique we used for these microphones was the same duel technique that was used for ‘Mad Hatter’.
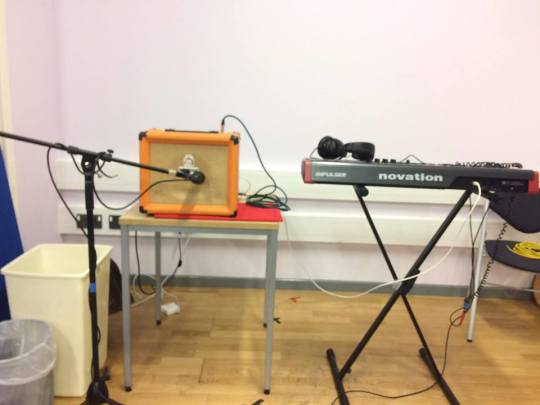
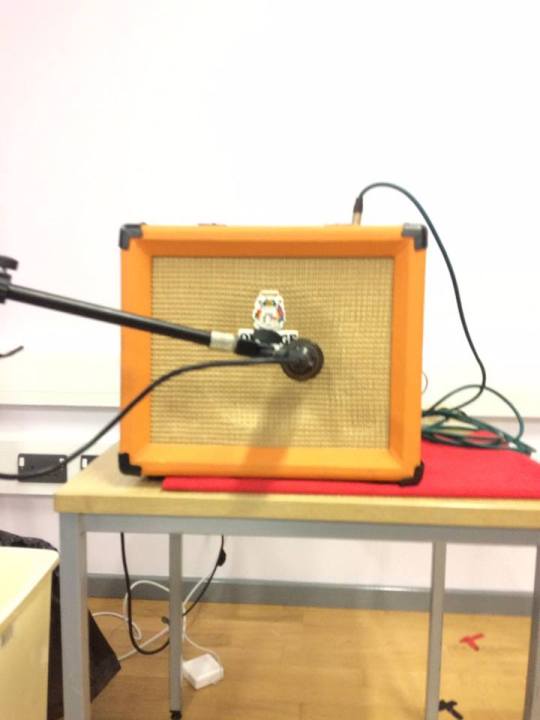
For the keyboard we used the microphone PRO25 that was placed next to the amplifier and we had a laptop that the keyboard was plugged into with logic running.
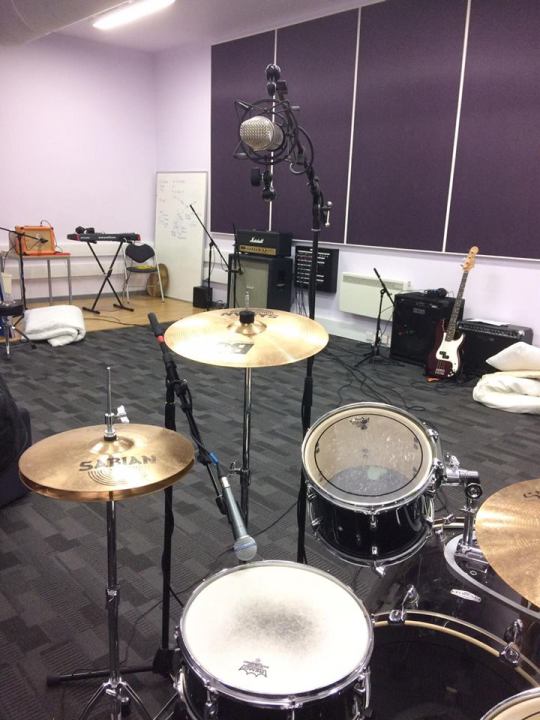
For the drums we used the Glyn Johns technique which using panning to get the best sound from every aspect of the drums, this also makes it easier to mix and separates each part of the drum kit in order to set levels and make everything layer well together. For the kick drum we used the AKG D12, for the overheads we used the Rode NT1, for the snare we used the Beta 58A. We also used blankets to dampen the sound slightly.
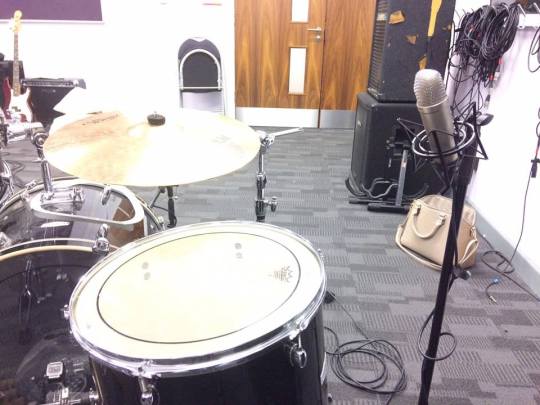
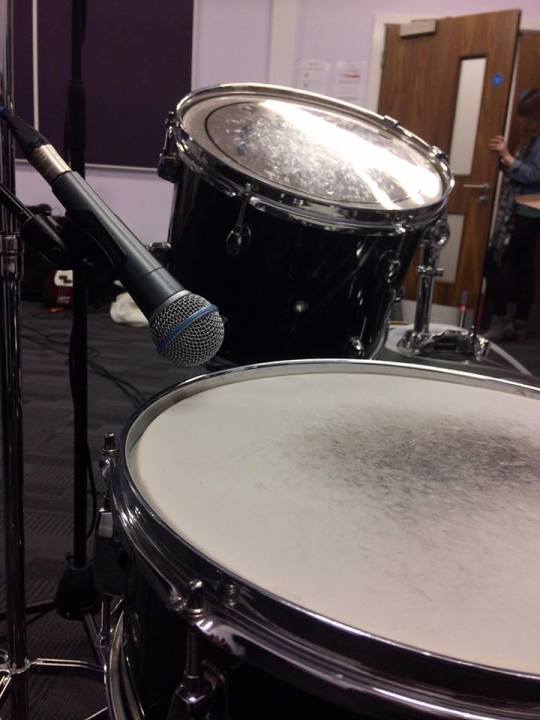
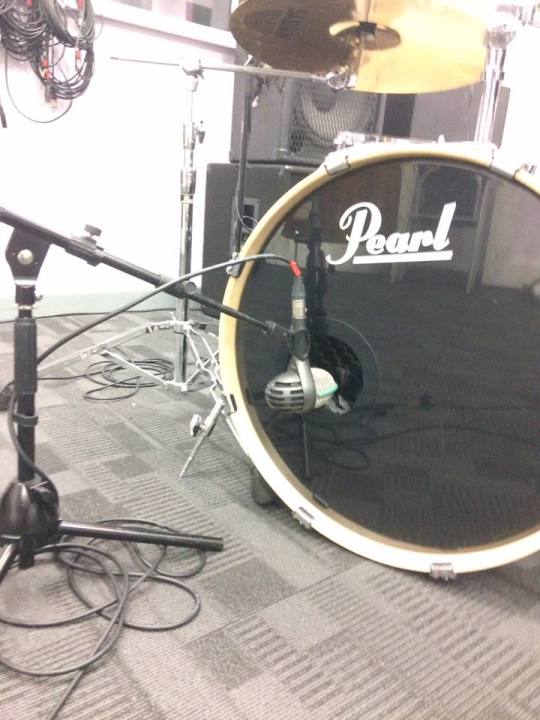
We then had to set up headphones which where also patched into the tie line in order for instrumentalists and vocalists to be able to communicate with the people in the mixing studio and they are able to tell them if their volume needs turning up or down or if another instrumentalist is being received louder than they like. The mixing desk is the same one as we used for ‘Mad Hatter’ and it was the Allen and Heath.
After the instruments had been set up and the microphones where in place we then had to connect them all to the tie line via the live room with XLRs and extension cables and patch them in to the mixing studio in order for the Mac to pick up the sounds and transfer them into the programme Logic Pro. But before patched them in we had to wrap all of the cables around the stands and make sure that the wires were straight along the floor in order to prevent anyone from knocking the microphones off the stands or from falling over the wires. As I have stated in a previous log, I feel as though Logic was the most suitable for us to record into because it is quick if you are familiar with the programme and not only can you record straight into the mixing process but you can also record individually and give each instrument their own track in which you can manipulate and change without changing any of the other instruments. It is also good because it tells you if a track is clipping in order for you to fix it before moving on to the mixing process.
Below is the tracking sheet and session plans in which we used to plan and successfully record this track.
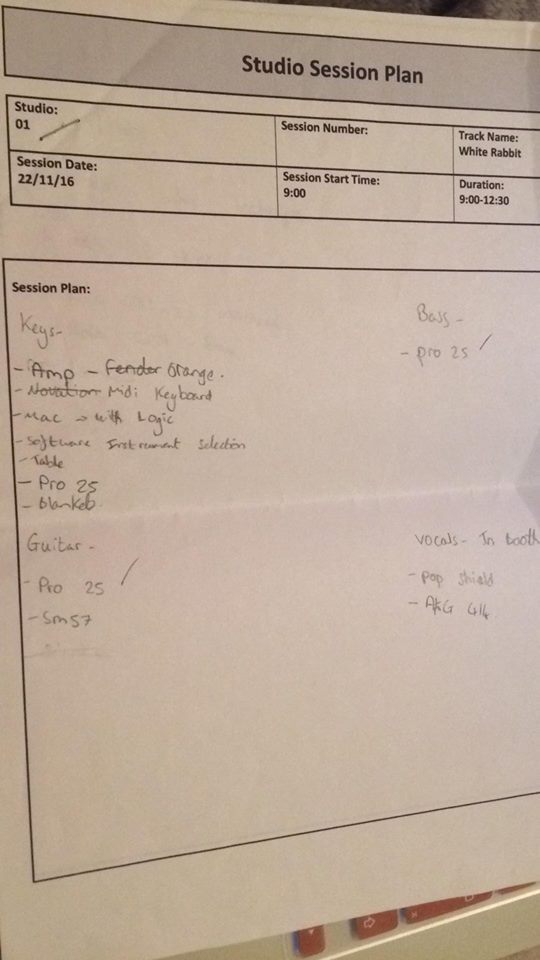
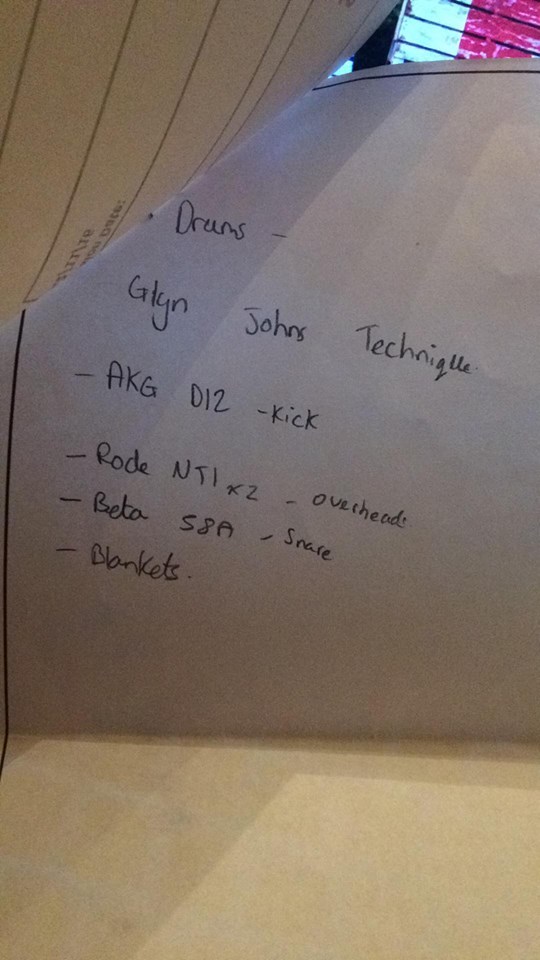
We did another recording session of this song when we realised that it was necessary to record overdubs of the vocals and the guitar, this was due to too much spill from the vocal microphone. This overdub just consisted of one microphone stand for myself on vocals and the same set up for electric guitar for Calum.
0 notes
Text
Mad Hatter - Mixing Session
After we had successfully recorded our version of ‘Mad Hatter’ we proceeded to save the unmixed recording and then break off from our group work and individually mix two tracks of our choice in Logic Pro. In order to begin the mixing process I selected all of my individual tracks in the mix and dragging them all the way down so that they where all at 0 volume. This would make it easier to individually pick our any faults or sounds that I did not want within the mix. This also made it easier to set volume levels for each instrument in order for one instrument to not clash or drown out another one.
In order to begin creating my mix I decided to first concentrate on editing each instruments frequency in order to manipulate the tone and range to one which compliments the overall track and does not clash with the other instruments. In order to do this affectively I used an EQ chart which helped me determine the fundamental frequencies and harmonics of each individual instrument in order to know which frequency I needed to focus on for example, bass, mids and high Mids.
The first instrument track that I began with was the electric guitar, I began by soloing the track so that this was the only instrument I could hear and then moved the levels to find the volume that I wanted the guitar to be. This was quite hard to do because all of my other tracks where silent at this time so I had nothing to compare it to so I would come back to this later if it needed changing.

As you can see from the picture above I also panned the guitar -36 to the left in order for the listener to get an equal amount of sound of both guitars in both ears as you can also see from the picture, I panned the second guitar to the right -36 also.
I then wanted to edit the frequencies of the guitar, to do this I found the EQ section in the mixer window and opened it up in order to bring up the EQ tab. I then referred back to the EQ chart to see which frequencies are the most concentrated on this instrument. The fundamental frequencies of the electric guitar start in the bass region of 80HZ and end at 1.5KHZ (mid range) and the harmonic frequencies begin at 1.5KHZ (mid range) and end at around 5KHZ which is high Mids. While I was listening to the guitar before mixing I could tell that there was a significant amount of noise coming from the guitar which was very distracting and made the recording sound quite old and harsh sounding. We had originally recorded two guitars and with both of them playing the noise sounded even harsher so I felt that the only way to decrease the harshness of this humming was to delete one of the guitar tracks altogether. This proved to decrease the harsh unnatural sound. For my electric guitar I decided to decrease the amount of sub bass and bass frequencies in order to lower the noise of humming but then raised it slightly to bring out some of the guitars fullness. It starts to decrease when it comes to the bite at around 2.5KHZ. I refrained from adding much brightness to the guitar as the muddy sound went quite well with the overall feel of the song.


The next instrument I edited was the piano, I began doing this the same way as I started my guitar, I muted the guitar and soloed the piano in order for me to concentrate on that instrument alone without any distractions from other instruments and when I wanted to bring them together I would just simply solo the guitar along with the piano to see if they worked well together. I then again worked on the levels, unmuting the guitar so they could work with each other and determine what needed to be louder or quieter, I felt like the guitar was a little bit loud on the first note against the piano so this forced me to go back and turn down the guitar level slightly. I then referred back to the EQ chart, in which I followed in order to find the fundamental frequencies that are common in piano. The chart showed that the fundamental frequencies of the piano started in sub bass at around 25HZ and ended in mid range at 1.5KHZ. I decreased the amount of sub bass frequencies in order to take away pedal noise and bottom. I raised the mid range frequencies at 1kHZ to the highest point at 2KHZ in order to improve the clarity of the piano, this made the piano sound quality much more clear and exact.

The next and final instrument that I edited was the vocals. I began the process in the same way as both the piano and the guitar by soloing the vocals and listening for any spill or sibilance which is easier to do when played on it’s own. In doing this I immediately noticed a bit of excess noise and hiss coming from the vocals or maybe it was even spill from the guitar but I fixed this quite quickly by reducing the amount of low end frequencies. Once was this was done, I then referred back to the EQ chart once again in order to correctly edit the frequencies. The chart showed that the fundamental frequencies for vocals (in this case, they were female vocals) started in the end of the bass region and more into mid range at 250HZ and ended in the mid range at 1KHZ. The harmonic frequency for female vocals is shown as mid range at 1KHZ to 8KHZ which goes into significantly high frequencies. Before I actually started to edit Jess’s vocals I had to find the right level because her voice is so quiet unless I turned it up quite loud the instruments drowned her out a little bit. But this caused the vocals to clip so therefore I thought it would be easier to adjust this on the EQ.
I decreased the sub bass and bass on the vocals a significant amount to take away any popping noises, especially because the lyrics in the song contained a lot of syllables and pronunciation that could cause that type of problem. I chose to increase the fullness at bass frequencies at around 100HZ - 200HZ just to make the vocals seem like they where more upfront. I also raised the presence at 2KHZ - 5KHZ just slightly to make the vocals sound more present and to bring out the tone more. At 10KHZ I greatly decrease the high frequencies to decrease to sounds of sibilance which is a tonal harshness which can make syllables like Z, T and S sound like hissing or buzzing which does not sound good in a mix and is not pleasing to listen to.

After I had corrected and edited the frequency to how I wanted them I then wanted to add an effect to the vocals to make them stand out more in the mix. I decided to use reverb on the vocals to give them more room and echo, I felt like this added something to the recording and also did a good job of hiding any minor errors or vocal tremors at the end of notes. I wanted the echo to be quite a dry sound in order to not cause any delay in the vocals and stay in time with the instruments.

After I had added the effects onto the vocals I then copy and pasted all of the changes I had made onto the other set of layered vocals (we had two copies layered over one another to make the vocals sound louder - this could be a disadvantage because it makes the vocals sound quite robotic, an alternative way to do this would have been to overdub the vocals).
0 notes
Text
Mad Hatter - Recording Session
In this particular recording session, my classmates and myself decided to record a cover of Melanie Martinez’s original song ‘Mad Hatter’.
In order to begin the recording process itself, as a group we helped each other to set up a range of different types of instruments that were essential for our recording. In order to do this correctly, as a class we came up with a session plan that we all followed in order to mix them professionally. This recording took place in Studio 1.
The instruments that we used for this particular recording where Piano, electric guitar and vocals, we chose to use minimal instruments because the vocalist wanted an overall acoustic feel to the song. The instruments where all recorded in the live room in order to make the setting up process and overall communication easier, even though this didn't turn out to be a disadvantage there was a chance that spill could have been introduced onto the recording, which would have been a bad thing and would have caused problems during the mixing process because spill causes a pick up of noises from different instruments which defeats the object of having all instruments on a different line when patching into the mixing studio.
We began the setting up process by giving out individual jobs such as setting up the stands for the microphones, this was an easy task because there was only four of us so we all concentrated on a section each.
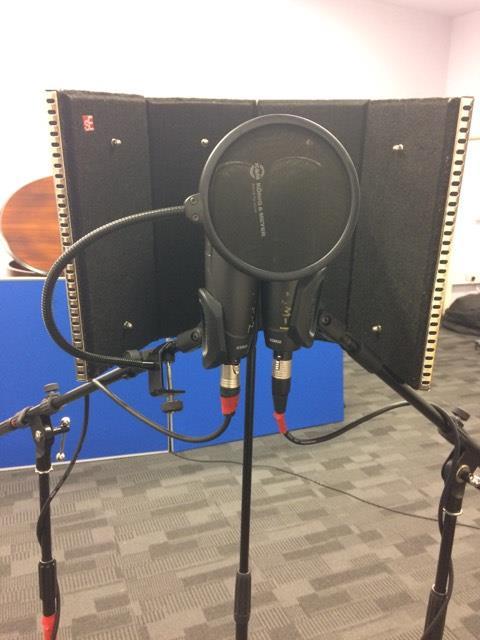
The first section I am going to talk about is the types of microphones that we used for this recording, this recording only included one set of vocals using the X/Y technique with two Shure KSM32 microphones which are Cardioid in order to layer the vocals for Mad Hatter which are commonly used for vocals because of it’s natural and high quality sound. We also used an isolation shield around both microphones to keep in the sound of the vocals and so they didn’t sound too roomy. We also used a pop shield in order to decrease the chances of the vocals causing popping and sibilance.
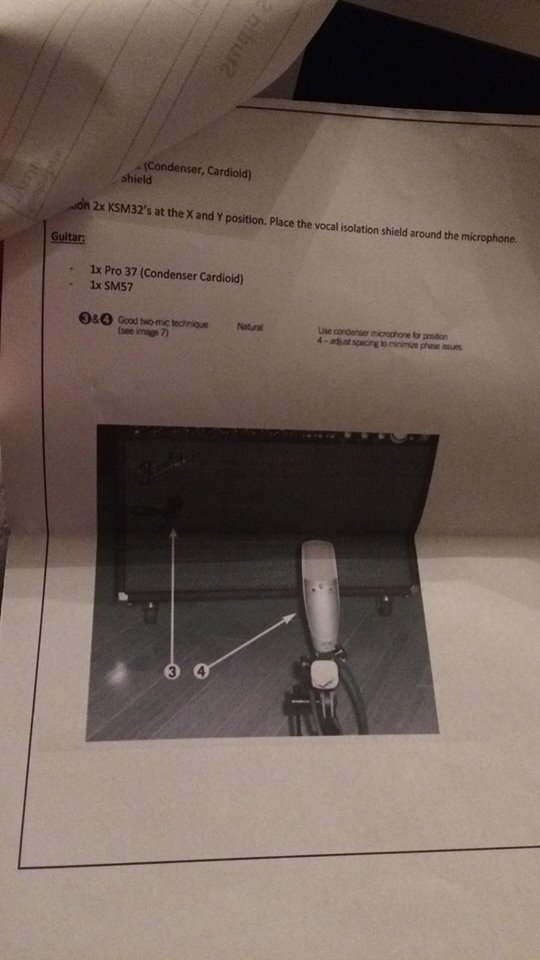
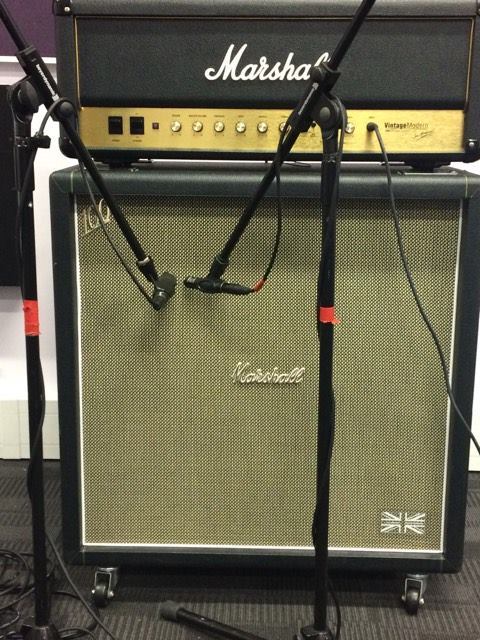
The next microphone I am going to talk about is the microphone we used for the recording of the guitar which where the Pro37 (Cardioid) and am SM57. We decided to use these duel microphones to stop phasing (which is something that happens when you use more than one microphone for the same instrument) when the position is adjusted accordingly. These microphones where also located in the live room with everything else. We set up the guitar to the right side of the room closest to the location where we patched everything in in order to create space between all three instruments. For the guitar we also used 2 bedsheets in which we covered the top of the amplifier to dampen the amplifiers volume. Below is a picture of the sheet that we used to guide ourselves through the process of setting up the guitar for this recording.
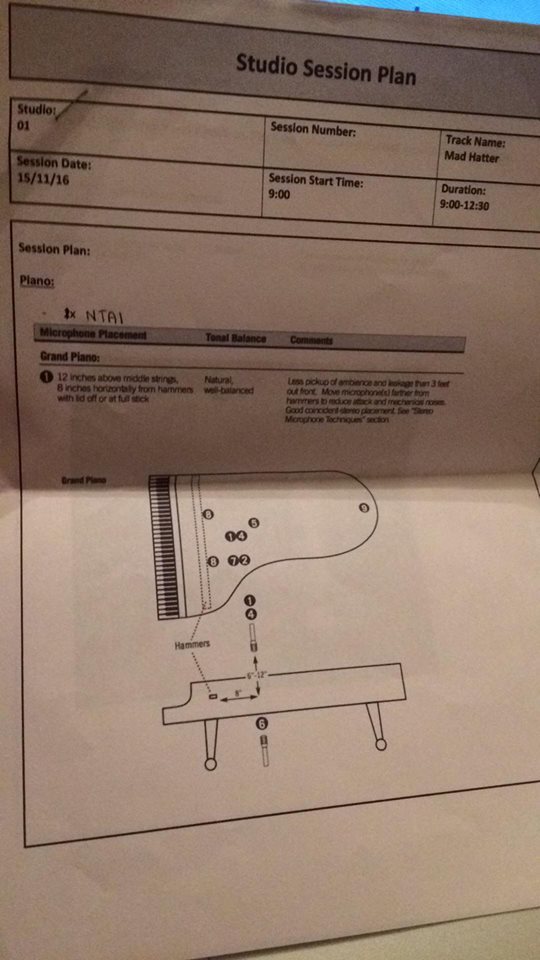
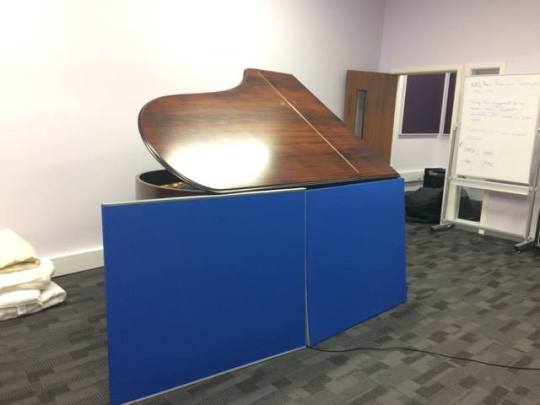
The next microphone set up we used was for the piano, for this instrument we used the NT1A condenser microphone which are common for piano recordings because of their high quality and frequency response. We placed this microphone 12 inches above the middle section of the strings inside the lid of the piano so this would pick up more of the mid range sounds in order to get a tone that was natural and well balanced. This set up decreases the amount of leakage and ambience. We also used a board to contain any sounds that may have a greater chance of spill or leakage. Below is a picture of the sheet that we used in order to guide us through the process of setting up the piano.

After everything was set up and in the location that we had planned it to be, we began to connect the microphones to XLR’s and patching them into the tie line that would connect them into the studios mixing desk and would allow us to record into logic. We made sure that the XLR’ s where not breaching any health and safety regulations by if needed, attaching them to extension cables if they did not reach the tie line and this also made the wires long enough so that we could wrap the wires around the microphone cables so they weren’t being pulled off the stands or being tripped over.
I think that overall, the setting up process of our Mad Hatter recording was a success although some things could have been changed in order to decrease things such as spill from instruments that leaked onto the vocals which made it hard to mix because of two layered vocals which both had spill coming in from the guitar. This type of thing could have been avoided to some extent by moving either the vocals or the guitar into the separate booth which could have isolated the sound a bit more and to shut out any sounds leaking into the vocal microphones. I also think that the amount of distortion that was added onto the guitar could have been decreased also, but this can be fixed to some extent in the mixing process. Also, from taking a closer look at the picture of the positioning of the piano microphone I feel as though it could have been positioned backwards a little bit so the microphone isn’t picking up as much range with the exception of the middle.
I will now explain the type of recording devices we used in order for the mixing studio to pick up our instruments. We used the tie line in the live room to connect each individual XLR connected to each individual microphone and that is connected to the tie line in the studio and transfers straight into the computer/mac in the studio and then the person who was not included in the performance would start the recording and it would record straight into a programme called Logic. I think that logic is the most suitable programme for us to use in this recording because once you have set everything up it is fairly simple to begin the mixing process. Logic makes it easy for you to distinguish the different layers in which you have recorded by letting you rename them and move them around accordingly. The only disadvantage I would say we came across during our recording in logic is that if you do not have much knowledge in the programme then it is very time consuming and could be fiddly but because we have used it before it was quite simple, also it is very easy to get confused and mess up if you do not patch the XLRs in to the tie line properly and this could mix the instruments up. This is why we followed a tracking sheet in order to stay away from problems like this.
I am now going to talk about the monitoring devices we used for this particular recording which were mostly in the form of headphones. These headphones where also patched into the live room and into the mixing studio so that the vocalists could hear themselves and other instrumentalists and also listen to orders from the mixing studio. Having headphones also helped the vocalists project properly as the can hear how loud or quiet the other instruments are. The mixing desk that we used in studio 1 was an Allen and Heath.
Because I was not involved in the performance of this track it was my job to act as studio engineer, therefore I had to set all the levels for each instrumentalist on the mixing desk to ensure that they weren’t clipping (when the bar reaches red). I also had to communicate with band members and ensure that they were all ready for when I began recording. It was also my job to ensure that each track on logic was correct and had a relevant name in order for everyone to know specifically which instrument was on which track.
Below is a picture of the audio track that we recorded in logic and from now is when we move onto the final mixing process in order to clean up the track and make it sound more professional and try to improve the quality of hearing.
0 notes
Text
Introduction
Within this log I will be explaining the planning, mixing and recording process of our recording sessions. I will be aiming to vocalise my understanding of mixing and recording and demonstrating how I came to produce my 2 final mixes.
0 notes