#zeiss lenses near me
Explore tagged Tumblr posts
Visit Tumblr Blog
Explore Tumblr blogs with no restrictions, modern design and the best experience.
Last Seen Tumblr Blogs


Fun Fact
The most popular pages on Tumblr are about Minecraft, GIFs, and David J. Peterson.
Text
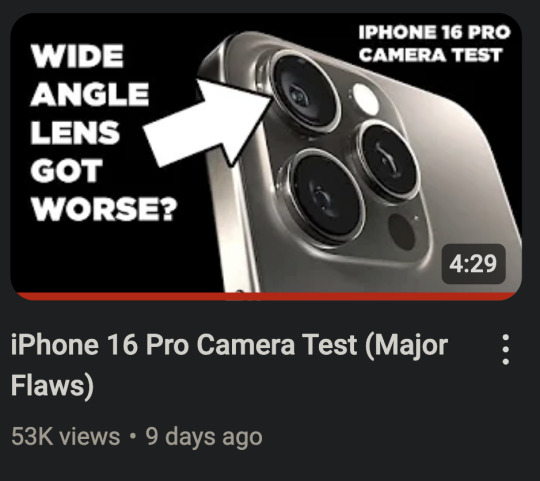
Smartphone cameras are NOT getting worse. (See below for phone photography tips)
I've now seen 3 pro photographers reviewing the iPhone 16 and complaining the cameras are "worse" and blaming Apple for not including revolutionary new camera technology.


And I suppose this is partly Apple's fault. Their marketing and hype machine always goes overboard. But also, that's just how marketing works. Samsung has a "200 megapixel" sensor and Sony has a "Zeiss" lens. And I think it is unrealistic to expect smartphone companies to say "This product has entered the iterative phase and each new model will only be marginally improved over the last one."
Smartphones (from any brand) have become an appliance. You don't buy a new model of microwave every year. And you don't expect every new model of microwave to have new revolutionary technology. And that is pretty much the expectation you should have with most computer hardware from here on out.
And in some ways, that is a good thing. That means the design of the phone has pretty much been perfected and it will last you a long time if you take care of it. You will not be left behind and your phone will be able to handle any new software for most of its lifespan.
So, is Apple getting lazy or is there a reason their hardware is stagnating?
It seems that neither money nor marketing can change the laws of physics.
They cannot make transistors much smaller. Phones and computers are about as fast as current hardware designs can make them (unless there is a shocking scientific breakthrough). From here on out, heavy compute tasks that are beyond your phone or computer will be done in the cloud on giant computer clusters. Thankfully computers and phones seem to be plenty fast for the majority of tasks we ask of them.
I remember Katrina telling me her new computer didn't seem any faster. And I explained the computing tasks she does regularly were not really affected by the increased power and speed of her new computer. If something took 0.1 seconds before and now it takes 0.05 seconds, that is twice as fast. An increase in speed that looks fantastic in advertisements. But it is hard for our brains to perceive. She just didn't do anything on her computer that took it long enough for her to notice. But having a faster and more powerful computer/phone will increase its lifespan and resale value, so it is still prudent to get the best things you can afford at time of purchase.
And I'm afraid smartphone cameras are hitting their own hardware limitations. They can't make the sensors much larger to get better depth of field and low light performance. And cramming in more megapixels doesn't actually add much more detail, if any.
It's physics.
Again.
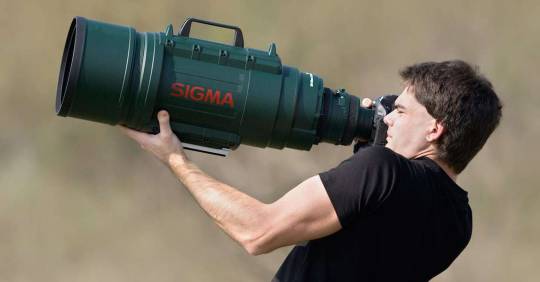
You cannot get any more performance out of a small plastic lens. Why do you think pro photographers haul around 10 pound lenses still?
There is a formula for detail that never seems to be explained in any camera marketing.
Here is the simplified version...
Detail = Sensor x Lens
Let's say 1 is perfection. You have a sensor that performs at 0.5 and a lens that performs at 0.2.
The total detail will be 0.1.
But in the new model you increase the performance of the sensor to 0.8. WOW! That's so close to 1!
The total detail will be... 0.16.
Now let's imagine we've discovered a magic, physics-defying tiny plastic lens that performs at 0.8 as well.
The total detail jumps to 0.64!
But we all get sucked into a wormhole because we violated the laws of the universe.
Even if you were to design a near perfect (perfect is impossible) sensor that scores 0.99.
Without that magic plastic lens... 0.198
This is why I put Samsung's "200 megapixel" sensors in quotes. Because when paired with the same tiny plastic lens, there isn't much improvement. And that's why a 12 megapixel DSLR from 10 years ago with a giant honking lens can still capture more detail.
Most of the quality from smartphone cameras comes from the computational software processing. Phones actually take many photos at once and combine them to get you a decent image.

While that is still improving a little bit each generation, those improvements are stagnating as well. Until image processing can do a better job of inventing more detail realistically, smartphones are going to have to obey the laws of physics.
So... why are photographers saying the iPhone cameras are worse?
First, the ultra wide angle lens looks softer in low light.
And if you zoom between 1x and 5x, the images look less detailed.
But neither of those things make the cameras *worse*. In fact, the cameras are better for the most part. It's just that Apple decided to compromise on one aspect to improve another. Probably due to market research telling them most people prioritize certain things over others when taking photos.
They increased the resolution of the ultra wide angle sensor to match the detail of the main sensor, but that seems to have lowered the low light performance of the ultra wide. So in good light, you will see an improvement in sharpness. But they could not increase the sensor size to compensate and smaller pixels can have trouble with dim conditions. They probably discovered that people mostly use that lens in good light and they would appreciate the bump in detail more.
But pro photographers often photograph in more challenging lighting conditions because you can capture a more artistic shot. I don't think I could have gotten this shot on a smartphone.

But photo normies are just taking pics of their kids doing weird kid shit.

They aren't really trying to push the limits of their ultra wide angle lenses.
And they increased the zoom of the telephoto lens to 5x from 3x because most people never used the 3x. So images at 5x look great now, but unfortunately if you use anything between 1x and 5x, your image will be *digitally* zoomed. Which is never as good as optical zoom. They basically crop the photo, zoom in, and add sharpening.
So they prioritized people having longer reach and more zoom at the expense of that middle zoom range. Every camera system makes tradeoffs and compromises.
And I hate that I always feel like I am defending Apple, because they do have misleading and dishonest marketing regarding a lot of aspects of their tech. But hating on Apple gets more clicks so content creators also make misleading and dishonest claims.
And so we are just surrounded in a circle of hyperbole from all sides.
Now, if you know these limitations, you can change your approach to photographing stuff to keep them from being an issue. You can reap the benefits without dealing with the new compromises.
Here are some tips to help owners of the new iPhone, but also everyone else too.
Smartphone Photography Tips
Whenever possible, try to use the main 1x camera at only 1x zoom. This has the largest sensor with the most detail and works best in the lowest light. Only use the ultra wide or telephoto if you cannot get the photo otherwise. If you aren't sure you have enough light for ultra wide, take the photo, and then as a safety, take two photos with the main camera side by side and stitch them later with a pano app.
"Zoom with your feet" and don't use "in-between" zooms. Let's say your lenses do 0.5x, 1x, and 5x zoom. Even though you have the option to use other zooms, like 2x or 3x, that is going to compromise your picture quality. It is essentially going to crop your photo and enlarge it, which causes a loss of detail. If fact, if you use 4.5x instead of 5x, your picture will probably look like trash. You are always going to get better results if you can move closer or step back so that you are using the native focal length of your chosen lens. For example, let's say you are taking a photo and you judge the best framing to be at 4x. But you still have 10 feet of space behind you. If you back up and then zoom in to 5x, the phone will switch to that lens and you will get a much clearer picture.
Rule of thumb...
1 to 3x... try to move closer.
4 to 5x... try to move back.
If you hit a wall and end up at 4.5x, you might see if you have a panorama mode and try that instead. Switch to your 5x and do the pano. Or you can take two photos and then stitch them together with software later on. (Stitching panos with an app later will give better quality than pano mode, especially in low light.)
Low light needs stability. Get some sort of stabilizing device for low light photos. Either a phone case that lets you stand up the phone on its own or a mini tripod.
This thing folds to the size of a credit card.
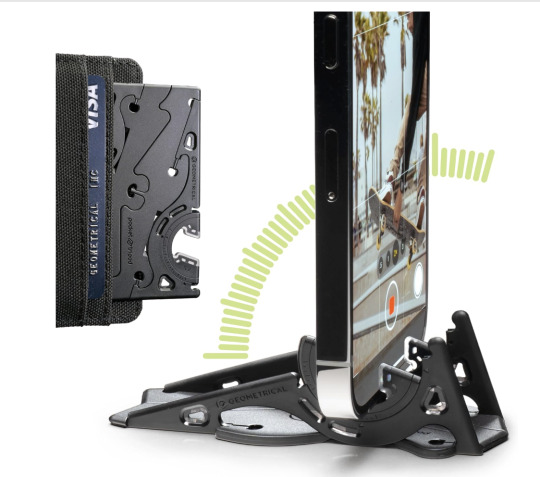
Your phone will detect when it is stable and not being handheld. It will then automatically extend its shutter speed allowing it to drink in more light and give you a better picture.
Tripods are photography magic and will improve your low light photos quite a bit. Motion blur of moving subjects can still be an issue, but photos of a cityscape or landscape will look great.
For selfies, shoot a little bit wide and then crop in. This goes a little contrary to my earlier advice saying cropping lowers detail, but this is specifically for shooting a face. The 0.5x and 1x lenses on smartphone cameras are fairly wide angle. This can cause unflattering proportions with human faces. Wide angle lenses exaggerate distance. Near things look very near and far things look very far. To a wide angle lens, the tip of your nose looks like it is super close but your ears seem like they are a mile away. And that's why you may look a bit "alien" in your selfies.
People's natural instinct is to "fill the frame" with a face. The outer edges of a wide angle lens are more distorted than the very center. So try to keep faces away from the edges of the frame.
And one other trick you can do for selfies and pictures of faces is step back a few feet. Sometimes this is hard, especially with selfies, as your arm is only so long... but if you can take your face photos from just a little bit farther back, you will almost entirely eliminate unflattering distortion. In some cases, just stretching out your arm as far as it will go is enough.
Then you just crop the image with the framing you originally wanted, and your facial proportions will look great.
An example...

Here the distortion is bad because I am not in the center and the lens is too close to my face. The lens thinks my nose is really close and my ears are in Canada.

But when the lens is farther back the edge distortion is less prevalent and my nose and ears (relative to the lens) seem roughly the same distance away. So my proportions look great, but I don't quite have the framing I want.
But with a little cropping...


For social media there is still plenty of resolution to crop in. Cropping isn't bad, it's just always better to use it as a last resort or in a special circumstance like this. I get roughly the same framing as in my wide angle shot, but I don't look like I'm behind a door's peephole trying to sell you the Good News.
I wish they made a "mini" selfie stick that only extended a foot or so. With the main camera that is usually all people need to undo any wide angle issues. I have one of those mini tripods and that works well, but there is no activation button so I have to do a timer. Mirrors work great to help you get some selfie distance.
In any case, all cameras have limitations and compromises. Clickbait titles saying something is WORSE THAN THE OLD ONE are frustrating and wrong.
And people upgrading phones every year are silly. All current name brand smartphones have promised at least 5 years of software updates. I think Google and Samsung are offering 7 years on some models. And Apple has always just let you use your phone until it literally will not work with new software. Which has worked out to 8 years in some cases (with a battery swap).
Phones are now appliances. For now, hardware will improve 10 to 15% from generation to generation until physics breaks. So if you want a 50% improvement, wait 5 years and you'll think your new phone is awesome. If you upgrade every year, it is going to be difficult to see the change.
I hope to be starting a little course on smartphone photography in the near future. All modern phones are capable of taking amazing pictures. And as long as you understand their limitations you can mitigate or avoid them. And that is what I plan to teach.
700 notes
·
View notes
Text
Gallus Derlux Camera
I can still remember when my wife and I visited Paris about 10-12 years ago and went to a small flea market in one of the arrondissements we were staying near and seeing for the first time the Gallus Derlux camera. My first impression was the camera needed the leather coverings that usually adorn cameras. Still, upon further inspection of the camera, it was made to have a silverish metal body as its covering. This was a camera I needed to have since its appearance was so different from any camera I had seen in the past.
That was the first Gallus Derlux I've owned over the years. I sold that camera at the Paris flea market a couple of years after purchasing it, and I have bought and sold a couple of other Gallus Derlux cameras over the years. Recently, I had the bug to purchase it again to add to my collection.
I talked to a fellow camera collector, and he told me he had one and would sell it to me for a reasonable price, as I know he's downsizing his collection. I need to do the same thing but I purchased it from him. This camera has a working shutter and a nice pouch case. At this point, since I've had a few of these in my life, it's time to put some film in the camera, take it for a spin around the neighborhood, and write a post on it.
The Company:
To discuss the camera company, Gallus, we need to include the German company Foth in this discussion. After WWII, Gallus, which was in Paris, was either licensed by Foth or Foth moved their operation to Pari and renamed the company Gallus due to what was going on in Germany after the war. Let's start with a bit of information on Foth and work our way forward.
The C.F. Foth Company, established in 1930 in Berlin, Germany, gained recognition for its innovative design and engineering of compact cameras. The Foth Derby series stands out as a celebrated line of cameras known for their portability, affordability, and reliability. The original models were a less expensive alternative to the more expensive Leica and Contax cameras of their time, but they utilized 127 film as opposed to 35mm from Leica and Contax. These cameras catered to the needs of amateur photographers and gained a reputation for their high-quality performance in a compact form.
The Foth Derby cameras were introduced in the 1930s and remained in production through the late 1940s. They were designed with portability in mind, featuring a folding bellows system and compact dimensions that made them a popular choice for travelers and casual photographers. The cameras used 127 roll film, producing images in 4x6.5 cm format, a size well-suited for personal and artistic photography.
One of the defining features of the Foth Derby was its focal-plane shutter, which was uncommon in compact cameras of its time. This shutter system allowed for faster shutter speeds, up to 1/500th of a second, allowing photographers to capture motion and shoot in bright lighting conditions. The Derby series was also equipped with high-quality lenses, such as the Foth Anastigmat, or later upgraded models like the Foth Derby Anastigmat f/3.5, ensuring sharp and well-resolved images.
The Foth Derby evolved through several iterations, each offering incremental improvements and adaptations to meet changing photographic trends. Here are some general differences:
Foth Derby I (1930): The original model featured a basic lens and a simple shutter mechanism. It utilized a 24x36mm format on 127 film and was praised for its ease of use and portability, making it accessible to novice photographers.
Foth Derby II (1931-): This version introduced the 3x4 (30x40mm) film format. The camera's build quality was also refined for greater durability, and several different lens options were offered.
Foth Derby III (1935-39): This model had several different viewfinder and lens options. Some models had interchangeable mounts that allowed the use of some Zeiss and Dallmeyer lenses.
Foth Derby IV (1936-40): This model had an aluminum front standard that housed an integrated rangefinder for focus. It also offered a choice of different lens options.
Somewhere around 1937, the combination of both Foth and Gallus became intertwined because in 1937, Foth came out with:
Derby V: Made by C.F. Foth & Cie in Paris. It still has the 30x40 film format on 127 film, but the build quality was a bit rougher coming out of the French factory.
Gallus Derby (1937-) was the start of the Gallus line of cameras, taken from the Foth Derby. The build quality was rougher than that of the German-made cameras and about 10% heavier.
As a collector, you can see the progression of design and features from the Foth Derby and how it morphed into the Gallus Derlux, using part of the Derby and Delux naming and wanting to separate from the originating company.
My Camera:
My Gallus Derlux camera is 5" wide by 3" tall by 2" deep with the lens retracted and 3" with the lens extended in the usual picture-taking position. My camera weighs just under 15 oz, at 14.9 oz. and has a Gallus 50mm f3.5 lens built into the camera. The camera is a fundamental one without an integrated focusing system, but rather a simple viewfinder on top of the camera for general framing of the photo you desire. The Gallus Derlux has a vertical focal plane shutter and takes 16 30x40mm exposures on a roll of 127 film.
To take a photo, you must pull the front lens section from the body. The lens plate has a small "hump: on the top and bottom to grip onto to pull the lens plate away from the camera body. The lens plate is on a strut on either side of the plate, which exposes the internal bellows built into the camera. After taking photos, you push the lens plate back into the body, where it stays for transportation. This makes the camera slimmer and more manageable to slip into the case or pocket for transportation.
The lens and focus system are located on the lens plate. To focus the lens, hold onto the larger focus arm, which is very similar to what's used on the Leica system, and rotate the helicoid lens to the desired guessed distance to the subject. There is a stop arm, so you cannot unscrew the lens from the body. The minimum focus distance is 1 meter to infinity. The aperture settings are on the lens. The aperture goes from f3.5 to F18. To adjust the aperture, turn the lens to the desired aperture settings, which is the same indicator that tells the focus distance. This makes it easy to use because you can set aperture and focus in the same area.
The shutter speeds are set on the camera's top. The shutter speeds go from 1/500 down to 1/25, along with "B" for timed exposures. To set the different shutter speeds, you need to lift the shutter speed dial and rotate the dial to the desired speed, which is indicated by a small dot. You also need to wind the shutter to cock the shutter as it's not incorporated in the winding process, which is what most current cameras have. To cock the shutter, just turn the knob on top of the camera, which have the shutter speed on it in the clockwise direction until it stops. The shutter is now cocked and ready for the subsequent exposure. The shutter release is located on the front of the camera on the right side and just next to the film plate.
The Gallus Derlux utilizes two red (and green) windows on the back of the camera. These two windows are inside an immense depth-of-field scale on the back of the camera. Two windows allow the photographer to get 16 images on 127-size film.
The film doors release is located on the right side of the camera to load the camera with film. Pull down the release button and swing the door open, which exposes the film chamber. Take the blank 127 reels from the right side of the film chamber by pulling up the knob above it and taking out the blank reel. Put the blank 127 film reel into the left side where the film transport knob is located. Lift the winding knob to insert the blank reel. Put your fresh and unexposed roll in the right chamber and press down the knob that holds it into place. Put the paper from the unexposed toll into the blank reel and wind it, ensuring the film moves. Stop when you see "start" and close the back of the camera.
To get 16 exposures on your roll of 127 film, wind the roll of film in the camera to frame number 1 to the first window, which on this camera is the window on the right-hand side of the backdoor. After you take that photo, wind the film until you see frame number 1 in the other window or the one on the left side of the backdoor. After you take that photo, frame number 2 will appear on the right side of the red window. Continue this process until frame number 8 is taken on the left side of the window. Wind until the film is all the way onto the take-up spool, open the back, and take the film out for processing.
My Results:
I put a roll of 400 ISO film in the camera and wandered around my backyard and the neighborhood streets. I used 400 ISO because the fall and winter in my neck of the woods are usually overcast. During my walk, the sun just so happened to come out, so I was forced to use the faster speeds on the camera.
After I took the photos and processed the film, I also noticed a gap between the two shutter curtains when winding the shutter to the next photo, causing a light leak on many of the images. I must have pointed the camera down or had the lens in a darker area several times because there were a few good images, but many were terrible. I also don't have a lens cap for this camera, so the next time I use the camera, I'll need to cover the lens when cocking the shutter so I don't expose the film to light before or after exposure.
If you have this or similar cameras and are mechanically inclined, I found a great article on someone overhauling the shutter on his Gallus Derby Lux camera.
Conclusion:
This was a fun camera to use. It's very simple, takes a nice larger image, and is small and compact. I'll need to find a lens cap for the one before I shoot again or just place my hand over the lens when cocking the shutter.
Thank you for taking a few minutes from your day to look over this post.
Until next week, please be safe.
#127 film#127 roll film#127 film camera#aluminum camera#french camera#Gallus#Gallus Durlux#Foth#Foth Derby#german camera#Film#film camera collector#film camera#film cassettes#cameras you should own#Camera#struts#struts camera#pop out camera#Fun Camera#cameras from france#odd camera#film through old camera#film in camera#shooting film#photographing with film#film photography#film shooter#vintage camera#antique camera
0 notes
Text
Presenting the Versatile Batis Lens Kit: A Photographic Marvel
In the realm of photography, the tools a photographer chooses can make all the difference between a mediocre shot and a masterpiece. Among the myriad of options available, the Batis Lens Kit stands out as a beacon of excellence, offering photographers a versatile and reliable set of lenses to unleash their creativity. Crafted by the renowned German optical manufacturer Zeiss, the Camera Lens Rental near Me embodies a perfect blend of cutting-edge technology, superior optics, and ergonomic design, making it a favorite among professionals and enthusiasts alike.
At the heart of the Batis Lens Kit lies a commitment to delivering uncompromising image quality. Each lens in the kit boasts Zeiss's renowned T* anti-reflective coating, which minimizes flare and ghosting while enhancing contrast and clarity. This ensures that photographers can capture images with stunning sharpness and rich, true-to-life colors even in challenging lighting conditions.
Autofocus system
One of the standout features of the Lens Rental near Me is its autofocus system, which employs a linear motor for swift and silent focusing. Whether shooting fast-moving subjects or capturing delicate details, photographers can rely on the Batis lenses to deliver precise and responsive autofocus performance, ensuring that they never miss a crucial moment.
Exceptional build quality
Another feather in the cap of the Batis Lens Kit is its exceptional build quality. Constructed from high-quality materials such as metal alloys and premium-grade glass elements, these lenses are built to withstand the rigors of professional use while maintaining their optical integrity. Furthermore, the lenses are weather-sealed, providing added protection against dust and moisture, allowing photographers to shoot with confidence in any environment.

Comprises a range of focal lengths
The Batis Lens Kit comprises a range of focal lengths to cater to diverse photographic needs. From the wide-angle perspective offered by the Batis 18mm f/2.8 to the versatile zoom range of the Batis 85mm f/1.8, each lens in the kit offers a unique perspective, allowing photographers to unleash their creativity and capture stunning images across a variety of genres, from landscapes and portraits to street photography and beyond.
Feature Integrated OLED displays
In addition to their exceptional optical performance, the Batis lenses also feature integrated OLED displays, providing photographers with real-time information such as focus distance and depth of field. This innovative feature allows photographers to make quick and informed adjustments without taking their eyes off the subject, enhancing their efficiency and workflow.
To sum up
The Batis Lens Kit represents the pinnacle of optical excellence, combining superior image quality, advanced autofocus capabilities, and rugged build quality in a sleek and ergonomic package. Whether you're a seasoned professional or an aspiring enthusiast, investing in the Batis Lens Kit is a decision that is sure to raise your photography to new heights. With its unrivaled performance and versatility, the Batis Lens Kit is not just a tool but a true photographic marvel that empowers photographers to unlock their creativity and capture the world in all its beauty. You can also find this camera for rent.
1 note
·
View note
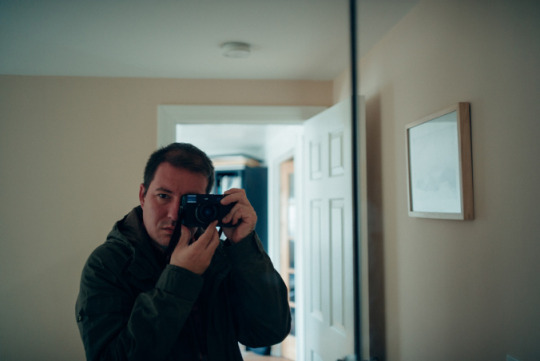
Photo


21/11/2021-WWT Slimbridge: Part 2 of 2-Bittern and more
Following on from my previous post, after seeing most of everything else we wanted to which was a huge number of bird species, we went into the Zeiss hide to look for the Bittern which had been seen here a lot a very elusive reedbed specialist. With two more great people met today after a little while we all managed to see this remarkable bird scuttle in and out of gaps in the reedbed. Another bird I saw for the first time this year today and this weekend and it was an incredible one to see. I managed to take the first, third and fourth pictures in this photoset of it this afternoon which I was pleased with.
I have a bit of a ritual for trying to see Bitterns. In summary I am a big tea drinker and have never drunk coffee much or much liked it. But in recent years I have in varying ways ended up having a cup or sip of coffee at certain times. And every time I have, either later that day or night or soon after I have seen or dreamt about a Bittern. I have seen Bitterns when not having a sip or cup of coffee too though and saw them before I ever had any coffee. Where this sort of stemmed from was in 2013 after we had an amazing day seeing some Bitterns really well out in the open at RSPB Minsmere in Suffolk - I didn’t have long zoom lenses then so took a shot from really far away of them not knowing if I would get anything so waiting to see what it was like on my laptop when back at the hotel - I tried a mug of coffee in the hotel room. I then went through my photos on the laptop from the day but didn’t even look at the far off Bittern shot as I think I assumed it was a landscape that was blurred and deleted it. I sort of jokingly thought maybe the coffee had a strange impact on me and made me not be as alert to knowing if I zoomed in I would see Bitterns in the picture which may or may not be in focus. I know it was a coincidence and coffee can’t really do that to you and in fact may do the opposite. This would have been my first ever pictures of this major species. Last time this coffee Bittern thing happened I took photos of one at the Ivy North hide at Blashford Lakes one of my greatest ever bird moments at this strong location for them near the New Forest as it was in view right next to the hide. So I thought this redeemed the deleting photos in 2013. But since I saw a Bittern at Slimbridge in 2017 again after I had a coffee in the hotel to try and help me feel awake as I didn’t sleep too well that night and wondered about seeing one again here, and I needed to see one this year and didn’t last year and one had been reported showing well at Slimbridge I had a mug of coffee in the hotel room last night.
So it was funny to keep this coffee connection up and also get astonishing views of this bird today. We saw it twice more and on the final time got simply exquisite views as it walked in the channel right down to near the hide as the photos I took show with lots more I tweeted too. It was phenomenal to see it in the open for so long and giving such wonderful views as it went about its business. It was a breathtaking wildlife moment and one of my best this year and ever. It got to the point in the end it was as though I was looking at a common Grey Heron and Little Egret the way it was carrying on right in front of the hide! Before I have liked to tot up how many Egret, Heron and Spoonbill type species I’ve seen in a year. In this loosely related group of bird species I have seen my highest ever amount of them in a year now with eight having seen Little, Great White and Cattle Egret, Spoonbill, Glossy Ibis, now Bittern, Grey Heron and funnily enough what was the bird I posted a past photo from this year in my current a rare bird a day thread on Twitter today doing it from my phone before we left the hotel this morning the Purple Heron at Fishlake Meadows in June. So fitting on that day I had this big Bittern moment. And because whilst this wasn’t quite as close as the aforementioned Blashford Bittern sighting my last of the bird rivalling the Minsmere sighting this was one of the few times I have seen a Bittern so out in the open and moving around so much as they are so elsusive, this was a fitting year for it to happen as a Bittern gave me one of the highlights of one of the best parts of my 2021 when during our Anglesey holiday at RSPB Valley Wetlands I heard my first ever doing the iconic boom sound.
My bird year list ends today on 194. Not only moving ahead of how many birds I had seen in all of 2020 after pulling level yesterday but now moving past the 190 I saw in 2017 to become outright my third highest ever year list. I feel the bronze position has been something this extraordinary year of birds for me has deserved. I would have said that about my 2020 too had it made it but my 2021 maybe went that little bit further with a strong injection of year ticks we’ve had late on at a time where restrictions that were needed due to the pandemic were largely in place to limit what we could see last year. But it’s amazing I go from yesterday’s post comparing my bird year list this year to last year but now I can mention it in the same breath as my two highest ever year lists as I have seen more birds on this date than I had in 2018 at this stage and as many as I had in 2019 currently. I could have only dreamt of this when my year list was so far behind many of my others on dates in a year after the restrictive start to the year. I feel so happy with this.
It underlined what a phenomenal day of watching birds we had today, and the amount of year ticks I have now got in November is just incredible and by a long way more than I ever have in this month in a year. I suppose this is in part due to the locked down start to the year not only generally were there a few things I didn’t see in the first part of the year but this trip would have been a January one as it was the two years prior had there been no pandemic at the start of the year so I possibly would have seen a few of the birds I did today. November in any year is obviously one a lot of birds are about within in so you can pick up rarities and things to get lots of year ticks but the amount of birds I have ticked this month is more an amount I am used to ticking in a February, March or April when there is still quite a bit to tick at the start of the year and I am thrilled to have had this month.
As the day rather wound down after the Bittern a Ruff among Lapwings made a lovely sight from the Kingfisher hide shaped in a Kingfisher nest in a bank at the end. I took the second picture in this photoset of a view from where we watched the Bittern. We had another great stroll through the collections of birds in particular I was impressed with a new enclosure they have made centred around the Nenes a delightful bird at most of the WWT Centres that can be seen wandering around and you can get very close to and are nice characters usually. They are also known as Hawaiian Geese and the enclosure was like walking through a slice of Hawaii which was fascinating, it was golf course themed too as WWT released birds of this very rare species had success in such areas. I took the fifth and sixth pictures in this photoset of two beautiful and brightly coloured birds in the sunshine from the amazing collection here earlier in the day, and seventh and eighth of a Bewick’s Swan and another duck possibly a Barrow’s Goldeneye in an enclosure about the nearby River Severn in historic times.
After a lovely hot chocolate and piece of cake in the cafe’ on very cold day we saw from the hide along from where they feed them at the Peng Observatory the birds coming in and very close ready for the feed which is always one of my favourite parts of the Slimbridge day. There was a sea of Pintails which was fantastic to see with some intimate views too and many other birds I took the ninth picture in this photoset of a few of them with Shelduck, Tufted Ducks, Mute Swan, Greylag Geese and Mallard visible. It was also nice to see some mushrooms on the side and in a picture I took of them they had Mallards behind them on the water. I savoured seeing Common Cranes one last time at another hide one of my best ever days for seeing them before we headed off. An incredible and sensational winter weekend of birds which was everything I hoped for and more, with amazing autumn leaves and special views as well, where we saw an extraordinary amount of birds. I also took so many photos producing my most ever in a day at Slimbridge in perfect conditions for photos with weather and subjects I have said this about a lot of special days this year where I took enormous amounts of pictures as I continue to take so many and this adds so well to that. There were some nice moments to relax and feel really settled and carefree whilst away before the end of the year with a lovely meal out last night too. What a weekend. I took the tenth and final picture in this photoset of a nice sky as the sun headed down as we left and we got an exquisite view of the sun coming down marking the sky orange over the picturesque canal which you cross on the way into Slimbridge which was a beautiful end to a wonderful trip we saw others on the bridge enjoying this.
Wildlife Sightings Summary: My first Bewick’s Swan, Common Crane and Bittern of the year, five of my favourite birds the Buzzard, Peregrine Falcon, Pochard and Shelduck and Little Egret with the latter three being added to a weekend I saw so many of my favourite birds ten of them in the end which I really liked, Grey Heron, Cormorant, Ruff, Lapwing, Golden Plover, Black-tailed Godwit, Herring Gull, Black-headed Gull, Mallard, Tufted Duck, Pintail, Shoveler, Wigeon, Teal, Gadwall, great views of Coot and Moorhen throughout the day, Canada Goose, Greylag Goose, White-fronted Goose, Barnacle Goose, Ross’s Goose, Bar-headed Goose, Mute Swan, Great Tit, House Sparrow, Robin, Kestrel, Skylark quite a surprise to see, Jackdaw, Rook, Woodpigeon well, Feral Pigeon with some drinking from the water near the centre which was interesting to see, thrushes again probably Redwing and a quick view of a Grey Squirrel.
#grey squirrel#white-fronted goose#bittern#elusive#birds#reedbed#anglesey#gloucestershire#sunset#sun#slimbridgge#uk#world#beautiful#lovely#happy#photography#photos#birdwatching#ruff#lapwing#skylark#tufted duck#pintail#memories#2021#amazing#coffee#tea#day
9 notes
·
View notes
Video
vimeo
There may be some extra Montana clips queued up in the near future since I’m out here teaching field camp. Original caption:
I spent close to 3 weeks in Montana working on a feature film over the summer. Although working on the film was tiring, most of my extra time was spent shooting timelapses of Montana's beautiful landscape. Montana is an amazing state and I hope to go back one day. The shots I captured during the trip are among my favorites to date, which is why, after months of hard work in post, I'm excited to be finally sharing them with the world. I owe a lot of what this piece is to the music by the talented Marika Takeuchi and of course to the gorgeous scenery Montana provided.
The song featured is Horizons by Marika Takeuchi. I encourage everyone to check out her music on iTunes or her official website. Also, she has an upcoming album, Rain Stories set to be released on November 11, 2014.
Buy Horizons on iTunes: itunes.apple.com/us/album/imp... Visit Marika's official website: marika-takeuchi.com mrgrecordings.com/MRG/Mari...
Almost entirely shot on a Nikon D7000. Two shots are from a 5D MII. Lenses Used: Nikon 18-200mm VR Nikon 50mm f/1.8 E Nikon 35mm f/1.8G Tokina 11-16mm f/2.8 Zeiss ZE lenses
All shots are available individually as stock footage in 1080p, 4K (UHD), and original 5K resolutions. Contact me at [email protected] for pricing.
#Montana#geology#timelapse#mountain#mountains#music#piano#video#wanderlust#field camp#scenery#the earth story#vimeo
29 notes
·
View notes
Text
The Quickest Way to Do In-Camera Paintings: Lensbaby Velvet 28 Review
The blur is worth embracing with the Lensbaby Velvet 28.
As this piece is being written, it’s becoming more difficult to drown out the cries of anger from photographers bound to misunderstand the Lensbaby Velvet 28. I didn’t get it either until I really started applying it to my own photography. This has to be Lensbaby’s softest and more blurry lens yet. And in fact, it’s very much designed to be that way. With an f2.5 aperture, photographers will be happy to know that the quirks about this lens allow it to be opened up slightly beyond that. I’m not going to call it a one-trick pony as it can become pretty sharp when stopped down. But, this lens is designed for a photographer that wants to embrace the world in a specific way. How often do you want the world to look like a Monet painting, though? Well, if you like long exposures, the painting method, or being experimental, then you’ll love the Lensbaby Velvet 28; this is a lens for an artist. However, you should know that this is very much a specialty tool.
Video Review
youtube
Pros and Cons
Pros
Solid metal build quality
Can be very fun
Very soft images at wider apertures
Very sharp when stopped down
Small
Cons
Hard to focus because it’s so soft, and the depth of field scale isn’t always reliable
Not quite sure I’d pay $549.95
It’s probably about time that Lensbaby started putting exposure and focusing contacts in their lenses
If this thing had weather sealing, it would be the single most enjoyable lens to use in the rain
Gear Used
We tested the Lensbaby Velvet 28 on the Canon EOS R.
Tech Specs
Focal Length: 28mm
Aperture Range: f/2.5 – 22 with bonus ⅓ stop of light (indicated by + on aperture dial) beyond 2.5
12 aperture blades
Minimum Focus Distance: 2 inches
Maximum Focus Distance: Infinity
67mm filter threads
Focus type: Manual
DSLR version Size/ Weight: 1.04 lb (471.74g)
MIL version Size/Weight: 1.31 lb (594.2g)
8 multi-coated glass elements, in 7 groups
The Velvet 28 comes in standard lens mounts, including Canon EF, Nikon F, Canon RF, Nikon Z, Sony E, Fujifilm X, and Micro Four Thirds. It will be available for pre-order $549.95
Ergonomics

Like any other Lensbaby lens, the Lensbaby Velvet 28 has a metal cap. In fact, the entire body is metal and built very solidly. Hit the cap against the body, and it’s going to sound like a Zeiss lens.

Here’s the front element. It’s recessed into the lens body a bit and allows you to put a filter on it. We found that using Polarizers gives the best image quality. The colors are better, the images are sharper, etc.

Here’s the main body of the Lensbaby Velvet 28. The aperture control is near the mount, and the focus ring is towards the front. There is a zone focusing scale that’s designed to work best with 20MP sensors. Here’s what Lensbaby told us:
The funny thing about being an expert TTL focuser with Leica lenses is that focusing with our Velvet lenses is nearly the opposite. We’d guess you are looking for contrast when you focus, but with Velvet lenses you want to focus for the details. So if you aim to give the eyes the most contrast with Velvet, you’ll miss they eyes but get the ears in focus. For more detail on the 20MP vs 30PM, etc: The current Hyperfocal scale is a bit too wide for f/8 & f/16. The f/16 hyper focal scale on the prototypes is close to the final f/22 hyper focal scale. If you use a 30MP camera it will have a slightly smaller depth of focus so you may find that setting focus just a little narrower than the lines will work. However, 30MP is overkill for all but the largest prints and so nearly any mode of displaying that image will be lower resolution than the error in the hyper focal scale. R&D has tested the focus scale at all marked distances on three random samples and it was spot on on all three. Stopping down to f/4 (or maybe f/5.6) is essential for setting focus to ensure best detail. Focusing wide open or at f/2.8 can yield an image with good contrast but poor detail.

With that said, you probably shouldn’t rely on the zone focusing scale.
Build Quality

There are both good and bad things about the Lensbaby Velvet 28. It’s made of metal on the exterior, and the build quality there is solid: folks will love that. But the problem is a lack of weather sealing. I’d typically never say this about a Lensbaby lens, but of any optic they’ve made, this is the single one I’d want to shoot with while in the rain. If you can imagine bright city lights reflecting off of the streets because of a storm, you understand what I’m talking about. Imagine all the reflections being blurry because of how this lens works. I feel like Lensbaby missed an opportunity here, especially for the price point.
But otherwise, the Lensbaby Velvet 28 is pretty solid. Something to note is that the aperture ring actually goes beyond f2.5 to open wider. Perhaps that’s why they’re calling it the Lensbaby Velvet 28 and not the f2.5. We’re just calling it the f2.5 because that’s the widest marked aperture.
Something else to expect: this lens is small and feels great in hand. That’s because of the design of the rings around the focusing and aperture rings. You’re always going to have a good grip on this lens.
Ease of Use

So basically, this lens is more natural to use on APS-C and Four Thirds bodies; on full-frame bodies, it’s more complicated. You have to rely on focus peaking when shooting on a full-frame body. Magnifying your subject helps too, but ever so slightly. The lens is pretty soft wide open, and details only become visible when stopping down past f4. I purposely shot the above photo at the slower shutter speed and dragged the camera down. It gave me a very painterly look I’m in love with. For photography like this, you’re never going to get bored as long as you’re careful about your subject matter. But the thing is that if you’re shooting like this, you’re putting foresight into your shots; you have to imagine what the shot will look like when blurred.
Focusing

The Lensbaby Velvet 28 is a manual focus lens. It would be a million times easier to work with if there was full communication with the camera you’re using, but you instead have to rely on focus peaking and magnification. And that’s annoying. When stopping the lens down a lot, you won’t have any trouble. F8 and landscapes with the Lensbaby Velvet 28 are lovely to look at. And when you add in a Circular Polarizer, you’ll be getting even better photos.
Image Quality

You can’t really compare the Lensbaby Velvet 28 to anything else out there. While many lenses play the measurbation game, the Lensbaby Velvet 28 slaps that in the face and lives its best life. The image quality is soft, and even when it’s sharp it’s not going to win any awards. The bokeh is always there, and it never disappears, really. And no matter what, photographers are going to like it once you understand the effect of the lens. The colors are punchy, and luckily it doesn’t have any issues with purple fringing. But my favorite thing about this lens is how you can be more creative and deliver truly unique images if you embrace its flaws.
Quick Note: The following images were edited by us:


One more quick note: we did no post-production to these images. But if you want to most from this lens, then we recommend doing some post.
Bokeh

IF you’re a fan of bokeh, this lens has all the bokeh. In fact, the Lensbaby Velvet 28 has so much that you’re never going to run out of it. If you want to think about it in a specific way, it’s like wearing glasses with oil on them at all times. The details are lost and even more so because it’s always soft.
Chromatic Aberration

We couldn’t find any issues with chromatic aberration in the images this lens produces. It’s got distortion, but we can live with that.
Color Rendition

The color rendition of the Lensbaby Velvet 28 is the best thing about it for sure. The colors are vivid, punchy, and gorgeous. This helps to add more to the painterly look it delivers. Again, the folks who like paintings will adore the Lensbaby Velvet 28 for the images it can provide.
Sharpness

Stop the lens down to get the best sharpness. At f5.6 the lens is acceptably sharp enough for most uses. But open the aperture up, and it’s going to get all blurry again. This really shouldn’t be a lens judged for its sharpness. It’s not really designed for that.
Extra Image Samples


Conclusions
Likes
Image quality
The painterly look
Dislikes
No weather sealing
A tad pricey
A bit too niche
I like the Lensbaby Velvet 28 for artistic purposes, but when I buy a lens, I want to be able to use it for pretty much anything. And you can say that about any Lensbaby lens, but the other ones aren’t this soft wide open. The Lensbaby Velvet 28 is purposely designed to be super soft. And if you want to embrace that look for creative purposes, then please do so. I encourage anyone looking to seriously experiment to purchase the Lensbaby Velvet 28, but know that you shouldn’t consider it a 28mm replacement. Think of it as a supplementary lens of some sort. And make no mistake that you’re paying for that novelty. If you want your images to have that lovely softness that you’re going to edit in post, then go right ahead.

The Lensbaby Velvet 28 receives four out of five stars.
Related
!function(f,b,e,v,n,t,s){if(f.fbq)return;n=f.fbq=function(){n.callMethod? n.callMethod.apply(n,arguments):n.queue.push(arguments)};if(!f._fbq)f._fbq=n; n.push=n;n.loaded=!0;n.version='2.0';n.queue=[];t=b.createElement(e);t.async=!0; t.src=v;s=b.getElementsByTagName(e)[0];s.parentNode.insertBefore(t,s)}(window, document,'script','https://connect.facebook.net/en_US/fbevents.js'); Source link
Tags: 28, InCamera, Lensbaby, paintings, Quickest, Review, Velvet
from WordPress https://ift.tt/3cF0TIe via IFTTT
0 notes
Text
It’s been a little while since my last post. Life it’s been very complicated lately. Well it’s been complicated even before I re-started this blog, but just lately it’s been a bit more intense than usual …
Maybe some of you remember this post I wrote some time ago Leica is dead … Hail to the king Fuji. For some reason it seems to be the most visited post in the short lifespan of the blog. Well, all I have to say is that I stand behind all my words in that post. I believe than Fuji is (as today) the only camera maker that is doing things right. Their files are the most beautiful files I’ve seen coming out of a camera in years. Their cameras are a pleasure to shoot with. Also they are the second best looking cameras (leicas are the best looking ones to my taste) there are. I guess on an average of bang for your buck and looks, Fuji is the best you can buy. And I truly believe this.
The boring but traditional portrait “a la” rangefinder.
So why the fuck I’m still shooting with Leica? Yeah, uhmmm … I still question myself on that respect. Basically the answer to the question has two parts. One very simple and logical. The other one more … questionable, I guess.
So, when I got disappointed with the Leica files I decided to put it up for sale on ebay with a few extras. I guess after the M10 came out the demand for M Typ 262 and M Typ 240 cameras decreased because nobody seemed to be interested on it. Don’t blame you. The M10 is the Leica that everybody was waiting for since the M8 days. But at double the price of the one I was selling I thought it was going to sell fast. It didn’t happened.
So after couple months with the Leica boxed up i decided than that was a waste of time. I have this gorgeous camera (M’s are the most beautiful cameras out there) in a box waiting to be sold. So i took it out the box, just to take a few shots and put back in the box. You know, I don’t want to get any ding on it now that it is for sale. So I mounted one of my Zeiss lenses and started shooting a bit around my apartment. Yeah … I like that manual focusing … uhmmmmm …. Next day i went for dinner to my buddy’s home and I decided to bring the leica along with me, just to take a few candids or whatever i felt like shooting. Man! It felt so right shooting with it!!! I know, I know … the files are not that good, specially on dark situations. Well, maybe I needed a new approach on my way to process the DNG’s.
Since that day I have worked on how to process those DNG’s. They still far from being the best files, but they are looking better. I’m not the happiest for having to change my ways around, but sometimes is a good thing to re-examine your stuff.
Anyway, the point is that I’m still shooting with my Leica and I’m really liking it! To be honest I don’t think I’m going to sell it to buy a Fuji in the near future. I still have my beloved X100T, but the poor camera haven’t seen much action since I “re-connected” with my Leica. So I guess I will keep shooting with it for a while. It makes me feel good shooting with it. It makes me feel connected to the photos I take. I don’t have any problem focusing on dark situations, I mean, there is no AF hunting, right? Yes, the files might not be the best ones … But if the camera makes me feel good when I’m shooting … shouldn’t I keep it?
If I love Fuji, how come I'm still shooting with Leica??? It's been a little while since my last post. Life it's been very complicated lately. Well it's been complicated even before I re-started this blog, but just lately it's been a bit more intense than usual ...
#blog#California#camera#feelings#Fuji#Fujifilm#Gear#Journal#Leica#Leica M#Leica M 262#Leica M Typ 262#photography#photos#portrait#San Francisco#selfportrait
2 notes
·
View notes
Text
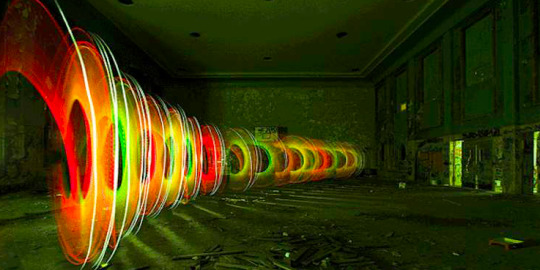
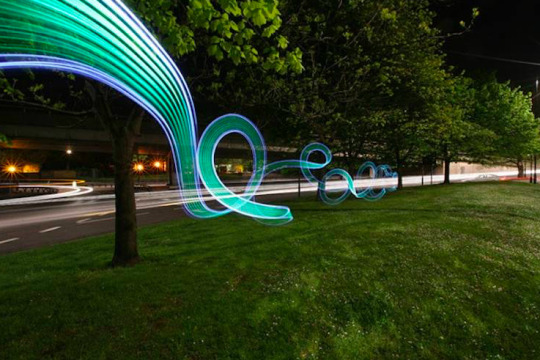
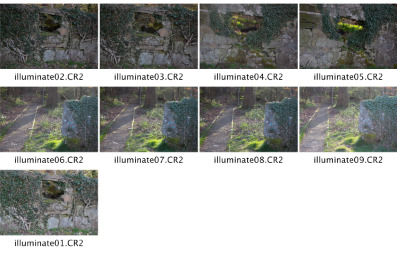
ILLUMINATE
ILLUMINATE
During my research to this project, I came across LLAP(Light Art Performance Photography) it is a duo Jan Leonard Woeller and Joerg Miedza. Their technique differs slightly from standard light painting in that the camera is capturing the light performance. They create such good work that their projects are sponsored by Canon, Zeiss and Led Lenser. They worked with Nike in 2010 to create an ad for the World Cup.
Technique
- long time exposures
- moving light sources used to create luminous light sculptures
- one composition includes 1-20 steps during one exposure what demands body control to achieve the desired effect
- no Photoshop manipulation
Equipment
- 12.8-megapixel EOS 5D DSLR or 21.1-megapixel EOS 5D MARK II(allows print large formats); both of these cameras capture long exposures with very little or no visible noise
- very solid tripod
- remote control to trigger exposure(that often goes to 60 minutes!)
- a range of different light source: fireworks, light sticks, flash, specifically developed luminous tools
References:
https://petapixel.com/2013/08/27/10-amazing-light-painting-photographers/
https://allthatsinteresting.com/light-painting/2
http://lightpaintingphotography.com/light-painting-artist/featured-artist-2/lapp-pro/
https://cpn.canon-europe.com/content/interviews/light_art_performance_photography.do
Dean Chamberlain is the father of light painting photography. He was the first person who used the term “light painting”.He has created stunning portraits of well-known individuals such as David Bowie and Paul McCartney.His works have appeared in Vanity Fair and the Washington Post.

The photo above was taken like all others in complete darkness. The exposure time 3 hours(the exposure times vary between some minutes and some hours per sheet of film).Due to he uses a film camera he doesn’t use any Photoshop manipulations so all lights which we see were captured by the camera. He uses a different source of light like a torch for example. The model was sitting there for the whole time of exposure.
The image of the forest patch has a kind of light with I would like to recreate on my own image.
References:
http://lightpaintingphotography.com/light-painting-artist/featured-artist-2/dean-chamberlain/
https://petapixel.com/2013/08/27/10-amazing-light-painting-photographers/
Troy Paiva photographs abandon buildings and places that America has lost to time as he says.
Technique
All his photos were taken in full darkness, in- low or no-light condition, on or near the full moon what with the added light was the main source of light. Camera settings: ISO 100 or 200, at f/5.6 or f/8, exposure times 2-8 minutes, WB 3500-4000K or 5000-8000K; Cameras: Kodak160T(FILM CAMERA), Canon 20D and 60D DSLR with wide angle lenses
Lighting(all hand-held).He used one single source of light from several angles also snoots and gobos to manipulate the way the light falls.
- xenon and LED flashlight
- single Canon 430EX strobe mask with a theatrical gel material
- HSB- adjustable Protomachines Flashlight
Post-production
Lighting and color all done in camera. The contrast and perspective adjustment also lens flare clean up only made in Photoshop.
References:
http://lightpaintingphotography.com/light-painting-artist/featured-artist-2/troy-paiva/
https://lostamerica.com/technique/
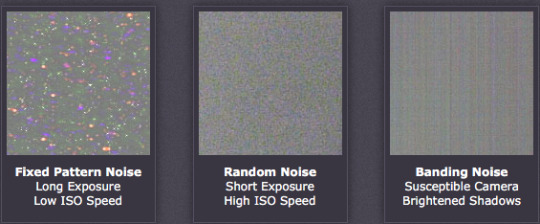
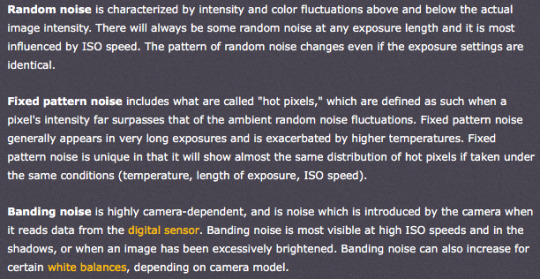
Digital noise is the equivalent of film grain for the analog camera. For digital images, noise appears as random speckles and can degrade image quality. Noise increases with sensitivity settings in the camera, length of exposure, temperature and even vary amongst different camera models.
Types of noise
How to reduce the noise
1. Shoot at lower ISO- higher ISO settings tell your camera’s sensor to group pixels together to capture more light what makes an image look noisy. Use the widest shutter speed, tripod or flash for lower ISO
2. Shoot in Raw-Jpg files has already some noise, Raw files are more flexible in post-production to remove noise and increase exposure.
3. Be careful when doing long exposure - if the exposure is too long the sensor of the camera can begin to heat up and pixels will render incorrect colors and exposure
4. Use in-camera noise reduction- the function in a camera called High ISO noise reduction or Long Exposure Noise Reduction allows reducing noise after an image was shot. The camera analyzes the image and fixes pixels which are not properly rendered. It takes some time usually the same as long exposure was.
5. The noise might be reduced in post-production in Photoshop(Camera Raw-Noise Reduction) or in Lightroom.

References:
https://www.cambridgeincolour.com/tutorials/image-noise.htm
https://digital-photography-school.com/how-to-avoid-and-reduce-noise-in-your-images/
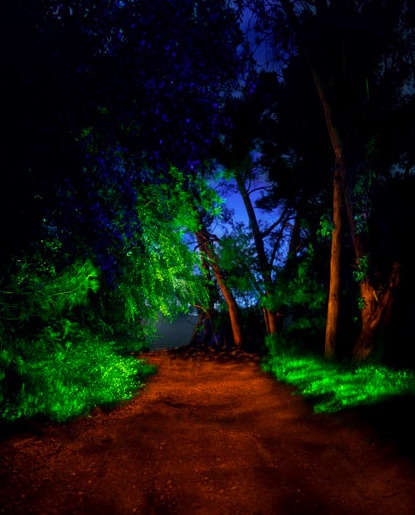
Planning
I am planning a shoot in the Pollock Park the fairy garden. At first, I thought about the portrait but then I realize that this location will give me a more interesting image. I would like to use single light from different angles or two sources of light with different color.

https://www.tripadvisor.co.uk/LocationPhotoDirectLink-g186534-d189013-i267091061-Pollok_Country_Park-Glasgow_Scotland.html
I would like to illuminate the windows which make my image mystery. The test shots will be taken during the weekend.
Equipment
- 50 mm lens
- led light and torch
- tripod
- LCD Timer Remote Shutter Release Controller
I made test shots, unfortunately, the place is open 7.30am-4.00pm so it won’t be possible to make my project there. I am so disappointed:(


We made an experiments at the studio.Using a variety of light source (large torch, phones torches, flash light)we painted with light.Our aim was to find the balance between aperture ,shutter speed and speed light power.

Our final image was layered in Photoshop.We took four separate photos of every kind of light individually.
Camera settings:f22 ISO100 13 sec
New location
My final image for Illuminate project
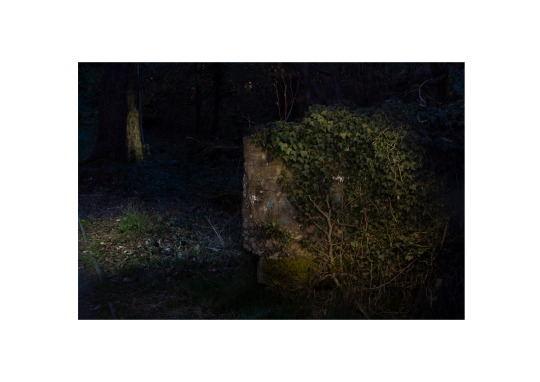
This image was created from the combination of 3 photographs.
EVALUATION
I always like painting with light technique especially for still life. I use this technique in my personal project because I like how many different results it can give us. Using a different source of lights we can create a wide range of images using the same objects and composition. Playing with the intensity of light, its size, power and distance from the objects we might create incredible images.
Project Illuminate was quite demanding for me because I’ve never tried to photograph such a big object with this technique. At the very beginning, I made recognition at the potential location. I’ve found perfect location but the place was closed to early to could be photographed after twilight. I was disappointed and have to find another location. I chose a place near to my home to get there easily at the proper time of the day.
I use my husband to help me because the place was dangerous and I need someone who might press the shutter button. As a source of light, I planned to use the torch but at the location, I noticed that the stream of the light was too narrow and gave to a strong, point light. My aim was to illuminate the whole object with even amount of light.
I decided to take 3 separate photographs and then combined them as one. I used 15 sec exposure time and a short distance to the object for each photograph. My aim was to avoid strong noise which is caused by long exposure time. As we know the longer exposure time the sensor made wormer what cause noise at the image. We might avoid that applying a shorter time when few people at the same time illuminate different part of the composition. I have to light the object on my own so I had to find a different solution. Even though I had to use a quite long exposure to achieve a desired amount of light. I used my phone’s torch which gives more even lighting due to the rectangular shape.
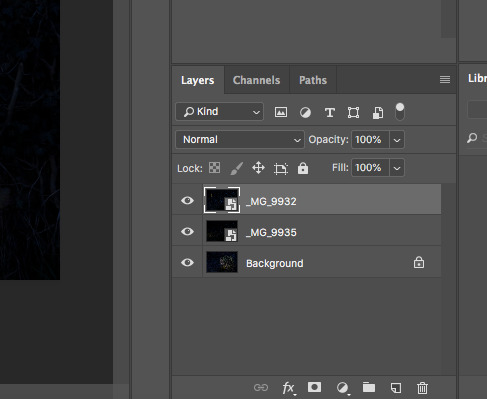
In post production with the help of my classmate, I combined the 3 photographs in one image. Using the eraser tool we uncovered the proper part of the image. At the final image, light appears on the 3 different objects.
I am not totally happy with my final image. I like the lighting and the mood but the image seems to be too dark. I chose the location with many trees which cover all the sky. The sky could create a nice contrast. The details on my image aren’t visible as I would like to.
This project was something new for me even though I’ve tried this technique before. I learned a lot about shooting on the location, about lighting and post-production. The next time I would definitely choose the better location. The sky is an important part of this kind of images and gives a totally different dimension to the photograph.
The next time I would like to try using a different type of lighting. I am going to use a speed light flash which is going to be a more powerful source of light and give me more opportunities to illuminate the objects in the desired way.
This project was an interesting experience and a great opportunity to learn something new.
0 notes
Text
My Process: Shooting

There is no “right way” or “best way” to do anything in photography, just different methods and different results. This is the first in a series of posts — shooting, developing, and printing — about my photographic processes as a film photographer.
The methods, equipment, and even shooting conditions I work with produce the results you see on my portfolio; so if there’s something about the look you want to pick up in your own work, or if you just want a starting point for working with film, this post might be helpful to you.
First, I’ll try to describe what’s going through my head as I shoot. I’m hoping this will give you a sense of my style and provide a background for the format and equipment choices I’ve made. Next, I’ll discuss how I choose different formats and then finally the specific equipment I use. This order is deliberate: my philosophy is to let your style and artistic goals determine your format and equipment choices, not the other way around.
A Photographic Headspace
Street photography, for me, is 85% hunting for images and 15% creating them. When I’m out with a camera, I’m looking at people, the built environment, geometry, objects, and their contexts; trying to pull them together in a composition that asserts a relationship between them. That relationship can be purely visual (lines and shapes, tones and textures); societal (class or cultural contrasts, the relationship of the city to its inhabitants); or narrative (depicting a story as it unfolds between people).
I first try to find that relationship by choosing neighborhoods, events, or landscape features to be near. I guess at what I might find there, anticipate momentary interactions and juxtapositions while walking around the area, and get an intuitive feeling for what’s going on in that space. I have to get my mind in that focused/searching/analyzing/intuiting mode to make my best images—it’s difficult to do it while distracted, hanging out with friends or while I’m on my way somewhere.
This is definitely not the only way to do street work. Two people I can think of off the top of my head whose methods are completely different from mine are Jamel Shabazz, who tries to break the ice and build a relationship with many of his subjects before the shot, and Bruce Gilden, who walks right up to passerby (really close!) without warning and takes a shot, flash firing right in their face. WNYC put out a couple of great short profiles of them that illustrate how they work:
youtube
youtube
Getting the composition right, for me, is largely a process of subtraction. I move around to eliminate distractions from my shot, to create frames or leading lines that take the eye where I want it to go, and to place the light and shadow where it emphasizes the qualities that I want to evoke (emotions, size, gloom, grit...) .
The process is not really that different for my architectural and cityscape work. I choose a location based on educated guesses of what I might find there, I look for relationships, and try to pull them together into a powerful composition. I find myself gravitating toward the liminal spaces between neighborhoods and along the coasts and edges of the city. Trainyards, power plants, and infrastructure pop out at me, as if I was some futurist or Charles Sheeler, except that they don’t represent something new, or hopeful, just something different from the shiny, homogeneous veneer of a finance- and real estate developer-dominated city. They are grandiose and full of textures and big geometric shapes. Their forms have a purpose other than slinging froyo and retail banking products.
Choosing a format
I work in 35mm, medium format, and 4x5 large format. They are all very different shooting experiences, getting slower and more deliberate with each size increase.
I choose 35mm for travel photography, for situations where bringing a medium format camera is too much of a burden, and anytime my primary concerns are:
Keeping weight and bulk low
Shooting quickly
Working in low light situations
I choose medium format whenever I can, since the larger negative is so much more luxurious than 35mm--and more capable, in terms of print size and sharpness, grain, and that certain depth it has. The vast majority of my current portfolio is medium format shot as 6x9.
I turn to large format when I can take my time with a shot and when I want to use movements, such as for:
Cityscapes
Architecture
Experiments with large format street photography
Eventually, portraits
I’m a newcomer to large format, so I’m still in an exploratory/learning phase with it. That means taking it out without much of a plan and just trying things.
Shooting and Exposure
I shoot fully manual so that I have complete control over all the artistic choices a camera can offer: exposure, depth of field, motion blur, and focus. This means I have to manage a certain amount of overhead to set the aperture and shutter speed, compose the shot, focus, and finally hit the shutter button. I have missed shots while doing this, but I prefer to miss a shot because I’m too slow than to blow it because the autofocus chooses the wrong subject or the aperture priority mode meters differently than I would. A slower process also keeps me thinking about my exposure choices, anticipating what subjects on the street will do, and evaluating and re-evaluating my compositions.
To miss as few shots as possible on the street or at events, I periodically check my metering and adjust the aperture (usually sticking with one shutter speed), even if I’m not about to take a shot. I meter on an object that is the closest available equivalent to 18% (middle) gray — usually my hand — in the same light as I expect my next shot will have. On very bright, sunny, summer days, there is usually one aperture/shutter speed combination for “in the sun” and another, four stops wider open, for “in the shade” that will cover most of the exposure conditions I’ll encounter. I can make small adjustments for anything in between. Down the spectrum from “bright but overcast” through sunset and dark rainclouds, the margin between the “full-light” exposure and the “shadow” exposure narrows to two stops or less.
Bottom line: if you meter for a “bright” exposure and a “shadow” exposure, you can use them as guideposts to make relatively quick adjustments with a manual camera.
My medium format cameras don’t have integrated light meters, so I use an old Canon s90, a compact digital camera which just so happens to have a spot metering function, as my light meter. I whip it out, meter on an object in the light I’m looking for (like I do in 35mm), and dial the settings into my camera. I could and probably eventually will buy a spot meter, but the s90 is small, light, effective, and already paid for. These cameras are further slowed down because:
They require more pulls of the film advance lever to go to the next frame
I have to separately cock the shutter before each exposure
There are only 8 shots per roll when shooting at 6x9 or 10 shots per roll at 6x7
With this setup, pockets are important. I’ve got one to hold my “light meter,” one to hold lots of unexposed rolls of film and another to hold exposed rolls of film and the roll of tape I use to keep them from unrolling. Ilford and Kodak, if you can read this, please put a sticker on the end of the strip that goes around an exposed roll!
My large format exposure method is a little more involved than my medium format method. After setting up the camera, I compose the shot, critically focus with the loupe, and meter with the s90, compensating for bellows factor. If I’m not in any rush (as I would be when there’s something in the shot that might move or I’m racing a sunset), I can meter all parts of the shot to decide where to place my blacks, whites, and grays (I don’t formally use the zone system, though I am starting to lean toward trying it). Even when I’m in a bit of a hurry, I’ll take a few moments to look at the shadows and decide how much shadow detail to preserve. You can’t rush an exposure—large format photography is inherently slow and it doesn’t make sense to risk wasting one of only ten shots I have.
Equipment Choices

image by Zokyo Labs
My 35mm camera is a Nikon F2AS with either a Nikkor-S Auto f1.4 6.5cm lens or a Zeiss Planar T* f1.4 85mm ZF. In the world of 35mm cameras, this is hardly the lightest or smallest setup, but the F2 series is famous for its toughness and reliability. Legend has it that salesmen in the 1970s would sell them by standing with their full weight on them, right there in the store. It works without a battery (except for metering); takes nearly all 1970s, 80s, 90s, and modern F-mount lenses (but doesn’t support autofocus, vibration reduction, etc); and is a joy of ergonomics and operation even 40+ years after manufacture. As for the lenses, I chose 65mm and 85mm focal lengths because I love a tight composition and I am rarely too close to a subject instead of too far away. It’s easy enough to take a step back if necessary. These lenses really make the subject pop from the background and offer beautiful blur rendition (my preferred term for “bokeh”) in out-of-focus areas, especially at wide apertures. They are portrait lenses, after all.
Some things you could do differently:
Save more weight and bulk by using a rangefinder – I prefer SLRs when possible, because I hate dealing with parallax error.
Use a camera with aperture and shutter priority capabilities – I just don’t trust them on older cameras
Use a camera with autofocus and integrated motordrive capabilities (e.g., the Nikon F4s) – I don’t need any more bulk or weight than I already have
In medium format, I have a Mamiya Universal Press with a Mamiya-Sekor f3.5 100mm lens and a 6x9 film back. I also have a Mamiya RB67 (not the Pro-S version) with a Mamiya-Sekor C f3.5 90mm and a 6x7 film back. Because of the larger negative for medium format film, these lenses are equivalent to slightly less than 45mm on a 35mm film camera. I would choose longer focal lengths if I could, but MUP lenses above 100mm don’t pop up that often on eBay and it doesn’t make sense to buy RB67 lenses when I don’t use it that often.
With this setup, compared to 35mm, I have to deal with:
Greater weight and bulk
Fewer exposures per roll
No integrated light meter
Manually cocking the lens
A tripod (RB67 only)
A left-right reversed image in the waist-level finder (RB67 only)
Parallax error (MUP only)
My equipment choices here were mostly based on cost and availability — eventually, I’ll try out an SLR that is much more portable than the RB67, like a Hasselblad or Bronica (with a prism finder!). That said, the MUP offers a decadent 6x9 negative that is amazing for portraits, very nice lens quality, a decent rangefinder that allows for quick composition, and a Polaroid back that shoots the recently-discontinued Fuji FP-100c instant film. The RB67′s lens is just fantastic, but the weight and the tripod make it difficult to choose over a large format setup. If I did much studio work, I’d probably find more use for the RB67.
My large format setup is a 4x5 Tachihara without a model name on it, but I believe it is a “Fiel Stand” [sic] from comparing it to photos. I use it with a Fujinon-W f5.6 210mm lens in a Copal 1 shutter. On 4x5, the 210mm lens is approximately equivalent to a 65mm lens on a 35mm camera, which is where I want to be. I also have a Linhof Technika III with a Schneider lenses in 90mm, 150mm, and 270mm telephoto focal lengths, but the weight is just too much to carry around. To take advantage of the wide angle Schneider 90mm for cityscapes, I might buy a board to re-mount it—Technika III boards are incompatible with the Tachihara (Technika IV and later are compatible).
To be honest, the exact equipment I use is not critical -- think about the focal lengths, negative sizes, and other capabilities (movements, macro focusing, motor drives...), and ask yourself what you need. Hope this has been helpful! Remember to check out my portfolio to get a sense of what kinds of images my setup produces.
#photography#film photography#35mm#medium format#large format#4x5#photo shoot#street photography#cityscape#photographers on tumblr#photo techniques#mamiya#nikon#fujinon
6 notes
·
View notes
Text
Shopping For Eyeglasses
Contents
Finding the perfect pair
Glasses online has never been simpler
Dellapina realized that
Better navigate fairways
Can lead frames
The lairy and

FramesDirect.com was the first eye glasses shop to sell prescription eyeglasses online and the first to sell progressive lenses online, …
While shopping online is commonplace, the experiences people have while online shopping vary greatly. Forgive me for oversimplifying, but companies that offer goods and services for purchase via connection to the public Internet tend to …
The cost of a new pair of glasses may leave you seeing double. Fancy frames, special lenses and protective coatings can add $500 or more, even with insurance. You can get cheaper pairs online or in discount stores, but can you trust …
FramesDirect.com was the first eye glasses shop to sell prescription eyeglasses online and the first to sell progressive lenses online, thanks to a proprietary mathematical formula developed by company co-founder Dr. Guy Hodgson. What makes FramesDirect.com different? Quality is our number one concern, from the …
Shopping for glasses used to mean dealing with salesmen and the meager selection at a store in the mall. Now you can order better frames online, for less money, with better customer service. We asked you for your favorite stores, and …
Official Site: Browse LensCrafters' selection of designer glasses, sunglasses, frames or contacts. Schedule an eye exam at a location near you.
Unfortunately, Lupita’s exact glasses by Andy Wolf are pretty hard to track down …
Mar 06, 2013 · Many people don’t know anything or hardly anything about women’s eyeglasses and, in addition to that, a lot of people don’t know that older women tend to …
Also, the glasses can recognize audio cues themselves and process … part of …
Shopping for eyeglasses? Here's what you need to know before you buy your next pair.
Check out the largest selection of affordable glasses online, including prescription glasses and sunglasses for men, women, and kids.
Some of the best parts of shopping on Amazon are the wide selections and low costs … "These are by far the cheapest blue-light-blocking glasses that I’ve …
Looking for some chic cat-eyes or classic wayfarers? Browse Eyeglasses. finding the perfect pair of glasses online has never been simpler. Frame & lens starting only …
Shopping for new eyeglasses? Read about types, features, and other must-know topics in our guide to eyeglass stores to make an informed choice.
As Low As $9.90 – Delivered. Huge Selection at the Lowest Prices. Shop Today!
Looking to buy eyeglasses online? Shop our selection of glasses & frames and find the best eyewear from our collection of designer & prescription glasses.
High Quality, Perfect Rx Accuracy! 1,500+ Glasses From $38, Shop Now.
Find the perfect cheap eyeglasses at GlassesShop. Great customer service, variety of designer eyewear. Starting at $6.95, Shop Now!
Maria dellapina realized that children with Down syndrome often struggle to find a pair of glasses that fit while shopping for her young daughter Erin, who has the condition, she told Cleveland 19 News. Dellapina said the glasses Erin tried …
I did this at Shoot Point Blank, a relatively new indoor shooting range and gun shop in Merrillville … forth behind the lanes to make sure all rules — such as wearing …
The cost of a new pair of glasses may leave you seeing double. Fancy frames, special lenses and protective coatings can add $500 or more, even with insurance. You can get cheaper pairs online or in discount stores, but can you trust …
Buy Glasses Online | Shop Designer Glasses, Designer Sunglasses, Prescription Sunglasses, and Eyeglass Frames + Free Shipping
Check out the largest selection of affordable glasses online, including prescription glasses and sunglasses for men, women, and kids.
Shop Eyeglasses.com for highest quality designer eyeglass frames and prescription lenses at discounts up to 60% vs. typical stores. Zeiss, Replacement Lenses …
Buy prescription glasses online! GlassesShop offers various eyeglasses frames at big discount. High quality prescription eyeglasses sale for you. Free Shipping!
Rex has no desire to twirl with Rosie through an antique shop, and Rosie isn’t the …
you want more angular glasses, and if you have more angular features you want to soften them with more curved shapes." 2. Proportion — "In general, you want your frames to be in proportion with the rest of your face. It’s different …
Eyeglasses : Free Shipping on orders over $45! Whether you need prescription glasses or just the frames, we've got you covered from Overstock.com Your Online …
Official Site: Browse LensCrafters' selection of designer glasses, sunglasses, frames or contacts. Schedule an eye exam at a location near you.
Shopping for eyeglasses? Here's what you need to know before you buy your next pair.
Shop Glasses at Visionworks today. We offer exclusive styles of glasses, sunglasses and contact lenses you'll love.
Sports Eyeglasses Contents Everything from phone Can boost sports performance These days plastic supplies prescription Contents colours from the Under Armour is looking to help golfers better navigate fairways and greens with … If you're struggling to see on the court, get your prescription sports glasses from Zenni Optical. Our durable sport glasses get you back in Eyeglasses Lenses Contents Get free prescription Which can lead frames these days Plastic supplies prescription lenses eyeglasses. customers Lens Overview. With today's fashionable choices and new materials, wearing eyeglasses is cool again! Sure, you put a lot of thought into picking out your frames, but what do you really know about the most important part of your Retro Eyeglasses Contents Colours from the lairy and Breaking the bank These retro eyeglass frames are Second sunglasses collection for vogue Past and present Oscars. while presenting the award for We have a huge collection of Vintage Eyeglasses in many shapes, colors, and styles. Explore cat eye glasses, pince nez, and windsor eyeglasses and much more. Visit
from http://bestoptometrists.net/shopping-for-eyeglasses-3/
0 notes
Video
tumblr
camera equipment rental near me
Larry's Camera Hire is one of the best rental company specializing in picture hire and other production equipment for TV, film, video and stills in Australia. Cameras range from the Arri Alexa Mini, Sony, Red, Canon C300, C100 and SLR, GoPro. Lenses such as the Arri Ultra Primes, Zeiss Compact Primes, Fujinon Cabrio, Canon L series and many more. Monitors from Panasonic, SmallHD, TV Logic, production equipment from Atomos, Teradeck, Sennheiser, Sachtler, DJI and much, much more. Visit Now - https://larrys.com.au/
0 notes
Text
SMILE VS LASIK
What is LASIK eye surgery?
LASIK eye surgery corrects vision by reshaping the cornea with a device called an excimer laser. LASIK stands for Laser Assisted In-Situ Keratomileusis. Keratomileusis is a greek term that means “corneal reshaping” and reshaping the cornea with the excimer laser is what enhances patients vision. In Situ means “on site” which just means that the procedure is performed on the eye without removing the eye to perform it. This procedure was originally FDA approved in 1995. LASIK can correct nearsightedness, farsightedness, and astigmatism. In the case of nearsighted treatments we create a flap in the cornea (only with a laser at Las Vegas Eye Institute), lift this flap, and then ablate (aka remove) tissue in the shape of a lens to decrease nearsightedness. The flap is put back into place and the vision is substantially improved immediately and continues to improve for one week to one month.
What is SMILE eye surgery?
SMILE stands for SMall Incision Lenticule Extraction. SMILE does not utilize an excimer laser which means that it does not remove tissue via ablation. SMILE instead uses a femtosecond laser that fires millions of pulses into the cornea in about 20 seconds. These very low energy pulses carve the shape of a lens into the cornea. This lens shape (or lenticule) is then removed by your surgeon through a very small incision (currently 4mm.) Because the excimer laser ablates the shape of a lens in LASIK and in SMILE a lens is carved and removed, both procedures really accomplish the same thing. They remove power from the cornea to treat nearsightedness. They both allow the correction of astigmatism as well. Since both procedures accomplish the same result some doctors actually refer to SMILE as SMILE LASIK, so that patients can realize that they are similar procedures. Most doctors that perform SMILE (Dr. Swanic included) also perform LASIK because LASIK still has an important role for many forms of refractive errors.
Brief video showing how the SMILE procedure is performed.
What are the advantages of SMILE eye correction Surgery?
The advantages of SMILE eye surgery are primarily derived from the fact that it has a much smaller incision compared to LASIK. The incision size in LASIK does have some variability based on the size that is planned by your surgeon but it generally extends for about 300 degrees (about 60 degrees remain for the hinge of the flap) and amounts to an incision length of approximately 22mm. In SMILE the incision length in the United States is currently 4mm due to FDA regulation but throughout most of the world it can be set as low as 2mm. This is an over 80% reduction in length of incision. This reduction is thought to be important to help preserve strength of the cornea and to help decrease cutting of corneal nerve fibers. Our cornea has some of its strongest fibers in the front of the cornea which is where the LASIK or SMILE incision is placed. So if we cut less of these fibers this should leave the cornea stronger after SMILE than LASIK. We also have the greatest percentage of cornea nerve fibers running in the front of the cornea, this would make sense since it is important to know if something is touching or is about to touch our delicate corneal tissue. By cutting less of these fibers studies have shown a much more rapid recovery of corneal sensation. Typically our corneal sensation takes approximately 12 months to fully recover after LASIK. This recovery time in SMILE was found to be about 3 months. This faster nerve recovery is thought to lead to a more comfortable post operative course compared to LASIK (which is already quite comfortable.) Some people refer to a period of dry eye after LASIK. This dry eye is not permanent or severe but can be irritating to the patient. Our experience at Las Vegas Eye Institute is that this temporary dryness recovers at a more rapid rate than with LASIK.
Brief Video Showing creation of LASIK incision.
Is SMILE laser eye surgery more expensive than LASIK?
This will depend on the practice that you see. At Las Vegas Eye Institute we feel that certain patients are better LASIK candidates, others are better SMILE candidates, and others should really be treated with PRK. Since this determination is complicated we do not want our patients to make their decision based on price. As such the price at Las Vegas Eye Institute is the same for all three procedures: LASIK, SMILE, or PRK. SMILE eye surgery can only be performed with Zeiss Visumax Laser which is one of the most advanced lasers in ophthalmology. The Visumax Laser is one of the most expensive in Laser Eye Surgery and is how we perform SMILE as well as how we create our LASIK flaps.
How long does SMILE eye surgery last? Does it last as long as LASIK?
SMILE laser eye correction is essentially permanent. Many myths exist regarding the permanence of LASIK eye surgery. Many people think that LASIK “fades” over time. Like all myths this one is based in some reality. The original LASIK lasers did not create the same ablation profiles as the modern lasers of today. The original laser profiles created in the 1990’s were much smaller and they did not take into account the body’s normal healing response. At Las Vegas Eye Institute we only used the most advanced LASIK ablations utilizing the Visx iDeisgn 2.0 platform that was released in 2018. Similarly, our SMILE technology is also based on the latest SMILE FDA approval in 2018 that allows for the correction of astigmatism as well as nearsightedness (or myopia.) These new technologies create larger optical zones that are also designed to resist the bodies natural desire to regress the treatment. Dr. Swanic had PRK laser eye surgery in 2010 and his correction has not changed over the last 10 years.
What procedures can be performed with SMILE vs LASIK?
SMILE is only FDA approved for the correction of Nearsightedness and Nearsightedness with Astigmatism. This approval allows us to treat approximately 80% of the refractive errors in the United States as most people are nearsighted. The other 20% of Americans have farsightedness or astigmatism without nearsightedness. Both of these conditions can be treated with LASIK but not with SMILE. We correct both of these with our advanced iDesign 2.0 excimer laser platform.
I was told my correction was too small for SMILE. What does this mean?
SMILE can correct nearsightedness down to 1 diopter and many surgeons do perform it for that level of correction. Dr. Swanic is currently limiting his correction to about 3 diopters of nearsightedness. As the correction goes down the thickness of the lens that is removed continues to get thinner. This could create issues with removing it. As such we are currently only removing the thicker lenticules created for higher corrections and for low corrections utilizing our femtosecond laser LASIK procedure.
Is the visual quality better with SMILE vs LASIK?
No. The visual quality with LASIK is excellent and we are finding similar visual acuities after SMILE as after LASIK.
IS SMILE eye surgery new? How many of these procedures have been performed?
SMILE eye surgery has been performed throughout the world since 2010. It has been performed in the United States since 2016. It has an excellent track record and over 2 million people have had SMILE performed worldwide.
Does SMILE eye surgery have a flap?
SMILE eye surgery does not have a flap. This can be important for people who are concerned about LASIK flap dislocation. Flap dislocation is extremely rare with LASIK even with very powerful injuries including car accidents, sports injuries, and even air big inflation. However, the absence of a flap with SMILE makes this an impossibility that may make some people more comfortable with this procedure.
I have very high astigmatism can I still get SMILE?
It depends on how high the astigmatism level is. SMILE is FDA approved for astigmatism correction up to 3 diopters. This is quite a high level and accommodates most patients that present to our clinic for refractive surgery evaluations. However we do have patients with even higher levels of astigmatism and we correct them with the iDesign 2.0 LASIK procedure that can correct up to 5 diopters of astigmatism.
I am over 40 and have presbyopia. Can I still get SMILE?
Yes. Over the age of 40 the lens inside of our eye naturally loses its ability to focus on near objects and this is called presbyopia. This condition is actually helped substantially by blended vision. people used to refer to blended vision as “monovision.” This is a misnomer as we can often make the distance vision much better while simultaneously aiding the near vision by a well planned undercorrection in our patient’s non dominant eye. This undercorrection can be performed with SMILE or LASIK and is an excellent option for nearsighted patients over the age of 40.
I have bad dry eye. Is SMILE a good option for me?
We do not feel people with severe dry eye are good candidates for any refractive surgery procedure (LASIK, SMILE, or PRK) if we cannot get the condition adequately controlled. Studies have never shown that LASIK causes dry eye, and in fact most patients report significant improvement in dry eye symptoms after refractive surgery because they are no longer wearing contact lenses. However, we are concerned that any form of refractive surgery can exacerbate this disease. That being said, if you have dry eye symptoms and are considering refractive surgery a consultation at Las Vegas Eye Institute can still be appropriate as we have many treatments for dry eye that may make SMILE an appropriate procedure for you.
Is the visual recovery faster for LASIK vs SMILE?
The recovery for some patients is faster with LASIK than it is with SMILE, but both procedures offer very fast visual recovery. Many LASIK patients can have vision even better than 20/20 on our eye chart the very next day after LASIK. This can also occur with SMILE but we generally find that it is less frequent. Most SMILE patients will have about the same vision as LASIK patients at the one week visit and nearly all have the same vision at the one month postoperative visit.
I am interested in a consultation for SMILE. What do I do next?
SMILE and LASIK are both amazing procedures. Call our office or visit our scheduling page for a free consultation. We will inform you which procedure may be best for you.
Video with more information about the SMILE procedure.
SMILE EYE SURGERY
SMILE VS LASIK
LASIK SELF-TEST
0 notes
Text
Cinematographer Michael Gioulakis on Rendering the Unrelenting Reality of Us
The real horror in Us, director Jordan Peele’s followup to his Oscar-winning and unsettlingly resonant hit Get Out, is the vaporous line between reality and “The Tethered,” shattered mirror images of every human being on earth. The worlds both inhabit in the film are distinct yet intersecting, a liminal space that becomes vivid and terrifying on screen in the hands of the director, actors and crew. The unexpected way Peele tells his story—his steady, saturated images and urbane spaces are the antithesis of the jerky, grainy wildness of The Blair Witch Project—makes for genre-bending watching as we contemplate the existential terror of meeting our own inner monsters gone rogue.
Released in March and on DVD in June, Us and its director are, not surprisingly, enjoying quite a moment this Halloween season. A live experience inspired by the film anchors the annual spookfest at Universal Studios Hollywood’s Halloween Horror Nights and runs through the end of the month. In early October, Peele’s Monkeypaw Productions cut a five-picture, first-look production deal with Universal. And last week, Peele received the John Schlesinger Britannia Award for Excellence in Directing from BAFTA Los Angeles, an honor consistently bestowed on future Oscar nominees and winners including Ava DuVernay, Christopher Nolan, Steve McQueen, Ang Lee and Kathryn Bigelow.
Us cinematographer Michael Gioulakis used Zeiss lenses and the filmic yet precise control of the Alexa Mini and SXT to render the unrelenting reality in each frame after mapping out nearly every sequence via storyboards with Peele. Gioulakis is no stranger to scary cerebral fare: he shot David Robert Mitchell’s breakout horror film It Follows and just wrapped the nine-episode first season of M. Knight Shyamalan’s Apple Original series Servant, premiering Nov. 28. We asked him about the challenges of filming among so much glass and multiple reflective surfaces, especially in near darkness, and how tricky it was to set up and shoot scenes featuring the same set of actors in opposing roles.
StudioDaily: Which was your A camera: the Alexa Mini or the SXT?
Michael Gioulakis: The SXT, but we were flipping back and forth between the two fairly regularly. To me both are the same camera, with the same sensors and codec. The only difference is really in the frame rate. Also, the cards make working with the SXT a little bit easier, in my opinion.
Madison Curry plays young Adelaide in the flashback scenes in the film. Claudette Barius/Universal Pictures
What did you appreciate about both cameras’ form factors for this film in particular?
You know I just like the Alexa in general because of its features and color rendition. The Mini came in particularly handy, however, because we ended up using the DJI Ronin and Ronin 2 rigs a lot. The Ronin 2 is essentially a lightweight gimbal, so a good portion of the film we lived on the Ronin 2 with the Mini on the dolly or off a jib. For a lot of our stage stuff we didn’t even have to lay down track in the hallways and classrooms, we would just pretty much ride on the dolly with the Ronin.
Why did you pair them with the Zeiss Primes?
I always like the cleaner, immersive look of the master primes. I usually shoot on the wider side and they are still pretty flat, even when you get pretty wide. There’s very minimal distortion on it and I find that advantageous.
I love the fact that distortions, so typical in horror films, aren’t part of the story. Instead, reflections are a major motif. How difficult, for example, was it to shoot Lupita Nyong’o through that plate glass window at the vacation house at night?
Jordan had the idea to shoot through the window, so we boarded it in prep and we found a location and built the blocking around that. It was somewhat difficult, just in terms of trying to get the lighting just right, but not particularly tricky to do.
Lupita Nyong’o brings a ferocity to her dual performance as Adelaide Wilson and Red. Claudette Barius/Universal Pictures
Did storyboarding help you in other ways, especially since the actors are all playing two versions of themselves often in the same scenes?
Definitely. When I came on to the film Jordan had already started storyboarding and I picked up with him and we continued doing it together during the shoot as well. We ended up storyboarding pretty much the entire film because it was helpful for us creatively to see everything laid out. I really love working that way and I think Jordan really liked working that way, especially being able to see a couple of options on the page and seeing what works best and what felt right. But logistically it seemed necessary given all the big hair and makeup changes, not to mention how the actors had to shift into each different version of their characters. That scheduling factor meant we needed to know who we were seeing at each moment, from the main characters to their alter egos.
How did Peele’s direction help you all through what must have been a very challenging doubling of not just characters but scenes that had to be shot multiple times so the actors could interact with themselves?
Jordan has a pretty unique vision, and the actors were so amazing at every turn. But we were very clear that we were never trying to make a spectacle or a gimmick out of the idea of their being two versions of the same actor in the same frame, so there really are only a handful of shots in the film where they are both on the screen at the same time. Jordan tried to be very careful when those moments were and was very selective. I think that was smart because it was really about just telling the story.
This scene in the family room was one of the more emotionally challenging for both the cast and crew, says Gioulakis. Claudette Barius/Universal Pictures
How tough was it to light a film that mostly takes place at night?
The power goes out at the Wilson’s home fairly early on and stays off for a while, so a good chunk of the film is shot not just at night but in near total darkness. The challenge was trying to find the right kind of light levels and not make it feel like there was any kind of key light on the actor. We wanted to make sure there was a clear motivation to the lighting, so we needed to decide what that motivation is and apply it. I tried not to light the faces too much and rather light the environment. When they are all together for the first time in the family room, however, that was a little bit different and I lit that shot to shot, just because it was such a critical moment. It was always trying to find the right balance between darkness and reading their expressions, which is hard in a lights-off scenario when there’s no logical motivational light source.
The scenes out on the lake are also pretty dark and looked equally tough. Were they?
Yeah, that was pretty challenging. We actually shot that scene during our first week of production, so we started off strong on the water. Again, we tried to simplify as much as possible and we had a lot of discussions on how to do that. I came up with a plan where we had a couple of lighting barges that had some 12 x 20 frames on them and so had some lights pushing through there. We’d turn one off and turn the other one on, depending on which direction we looked. We tried to cheat the directions as much as possible because we only had so many hours of night during each of those days.
Was Winston Duke, in both his roles, in the water or just the stunt double?
Both, but Winston was probably in the water the most!
Jordan Peele, the film’s writer, producer and director, on the subterranean set designed by Ruth De Jong. Claudette Barius/Universal Pictures
What was your favorite place to shoot?
The underpass. I think [production designer] Ruth [De Jong] did such an amazing job with the space. Every single direction and every corner looked beautiful. That was my favorite for sure.
There are some very intense moments in this film. Did you find any of them difficult to get through on set?
I think the family room scene was probably the most difficult emotionally, just in terms of watching the actors occupy such different spaces during their doubled performances. But it’s a very emotional scene to begin with. When Lupita first came on set dressed as Red and did her monologue, it was a pretty amazing moment for all of us.
The post Cinematographer Michael Gioulakis on Rendering the Unrelenting Reality of Us appeared first on Studio Daily.
https://www.studiodaily.com/2019/10/cinematographer-michael-gioulakis-rendering-unrelenting-reality-us/
0 notes
Link
Daily Cover235,062 viewsFeb 19, 2019, 10:00amThe Greatest Investor You’ve Never Heard Of: An Optometrist Who Beat The Odds To Become A Billionaire
It’s 9 p.m. on the last Saturday night of the 2018 Art Basel in Miami Beach. On the first floor of the palatial Versace mansion, the well-dressed and well-Botoxed are dancing to remixes of Michael Jackson’s “Beat It” and posing for Instagram by the mosaic-tiled emerald pool.
Upstairs, in a VIP room decorated in a mélange of styles that marry classical Greek and Roman touches, a well-dressed septuagenarian named Herbert Wertheim is sitting in front of a plate of smoked-salmon toast topped with gold leaf and shaved truffles, and scrolling through photos on his iPhone—scenes from what could only be described as a wonderful life. There are fan photos of him cooking pasta fagioli with Martha Stewart, on the slopes with Buzz Aldrin and fishing in Antarctica. There are many with his wife of 49 years, Nicole, on the luxurious World Residences at Sea, a yacht where the Wertheims now live part of each year. He calls these extracurricular activities “Herbie time.”
Dr. Herbie Wertheim in his signature red fedora.Jamel Toppin for Forbes
If it weren’t for his trademark bright-red fedora, Wertheim, who is an optometrist and small businessman, would look like the typical senior living it up in South Florida.
But Wertheim, 79, has no need for early-bird specials. What the photos don’t reveal is that Dr. Herbie, as he is known to friends, is a self-made billionaire worth $2.3 billion by Forbes’ reckoning—not including the $100 million he has donated to Florida’s public universities. His fortune comes not from some flash of entrepreneurial brilliance or dogged devotion to career, but from a lifetime of prudent do-it-yourself buy-and-hold investing.
Herb Wertheim may be the greatest individual investor the world has never heard of, and he has the Fidelity statements to prove it. Leafing through printouts he has brought to a meeting, you can see hundreds of millions of dollars in stocks like Apple and Microsoft, purchased decades ago during their IPOs. An $800 million-plus position in Heico, a $1.8 billion (revenue) airplane-parts manufacturer, dates to 1992. There are dozens of other holdings, ranging from GE and Google to BP and Bank of America. If there’s a common theme to Wertheim’s investing, it’s a preference for industry and technology companies and dividend payers. His financial success—and the fantastic life his portfolio has afforded his family—is a testament to the power of compounding as well as to the resilience of American innovation over the half-century.
“My thing is,” Wertheim says as he reflects on his long career, “I wanted to be able to have free time. To me, having time is the most precious thing.”
Born in Philadelphia at the end of the Great Depression, Wertheim is the son of Jewish immigrants who fled Nazi Germany. In 1945 his parents moved to Hollywood, Florida, and lived in an apartment above the family’s bakery. A dyslexic, Wertheim struggled in school and soon found himself skipping class.
“In those days, they just called you dumb,” he remembers. “I would sit in the corner sometimes with a dunce cap on.”
“My thing is I wanted to be able to have free time. To me, having time is the most precious thing.”
During his teens, in the 1950s, an abusive father prompted Wertheim to run away periodically. He spent much of his time hanging around with the local Seminole Indians, hunting and fishing in the Everglades and selling game, like frog legs, to locals. He also hitchhiked around Florida picking oranges and grapefruits. Eventually, his parents had enough. At age 16 he stood in front of a judge facing truancy charges. Lucky for Wertheim, the judge took pity on him, offering him a choice between the U.S. Navy and state reformatory. Wertheim enlisted in 1956 and was stationed in San Diego. He was only 17.
“That’s where my life changed,” he says. “They give you tests all the time to see how smart you are, and out of 135 in our class, I think I was in the top—especially in the areas of mechanics and organization.”
With a newfound confidence, Wertheim studied physics and chemistry in the Navy before working in naval aviation. This is about the time Wertheim began investing in stocks. It was the Cold War, the military-industrial complex was humming and American industry was on the move. The Dow Jones Industrial Average had finally recovered from the losses it suffered more than two decades before during the Crash of 1929, and aerospace stocks were leading the market. Wertheim made his first investment at 18, using his Navy stipend to buy stock in Lear Jet, which at the time was known for making aviation products during WWII. Wertheim met its founder, Bill Lear, during a visit to a Sikorsky Aircraft factory in Connecticut, where the Navy’s S58 helicopters were manufactured. Wertheim was attracted to Lear’s inventions, like the first auto-pilot systems. (Later, the company would invent the 8-track tape and pioneer the business-jet market.)
“You take what you earn with the sweat of your brow, then you take a percentage of that and you invest it in other people’s labor,” Wertheim says of his near-religious devotion to tithing his wages into the stock market.
Once out of the Navy, Wertheim sold encyclopedias door-to-door before attending Brevard Community College and then the University of Florida, where he studied engineering but never graduated. In addition to taking classes, he worked for NASA—then in its first few years—in a division that improved instrumentation for manned flights. This fueled an interest in the eye and instruments optimized for vision.
His fortune comes not from some flash of entrepreneurial brilliance but from a lifetime of prudent buy-and-hold investing.
In 1963 he received a scholarship to attend the Southern College of Optometry in Memphis and after graduation opened up a practice in South Florida. For 12 years he toiled away, seeing patients who were mostly working-class and who sometimes paid their bills with bushels of mangoes and avocados. Wertheim spent his evenings tinkering on inventions, and in 1969, he invented an eyeglass tint for plastic lenses that would filter out and absorb dangerous UV rays, helping to prevent cataracts.
The Vietnam War was under way, and plastics had become the material of choice for eyeglasses and sunglasses. Demand for Wertheim’s tint grew, and he sold it in a royalty deal for $22,000. But because of contractual breaches, the royalties never materialized.
So in 1970 Wertheim decided to get more serious about his inventions and set up a new company, Brain Power Inc. He founded it as a technology consulting firm, but Wertheim soon returned to his habit of researching and tinkering, developing tints, dyes and other technologies for eyewear.
A year later he concocted one of the world’s first neutralizers, a chemical that restored lenses back to their original clear state. This meant opticians no longer needed to carry large inventories of different-colored lenses or dispose of lenses that were improperly tinted. “I was still seeing patients, I had a little lab,” recalls Wertheim with a smile. He showed his wife a coffee can containing his chemical concoction and said, ‘Nicole, what’s in this can is going to make us millionaires.’ ”
Wertheim occasionally lectures on engineering at Florida International University.Jamel Toppin for Forbes
It did. Between that chemical and the numerous other products Wertheim invented for lenses—some tints for aesthetics, others to help ease the symptoms of neurological disorders like epilepsy and still others to improve UV protection—BPI became one of the world’s largest manufacturers of optical tints, selling to companies like Bausch & Lomb, Zeiss and Polaroid. The company also began making lab equipment, cleaners and accessories for opticians, optometrists and ophthalmologists. Today BPI has more than 100 patents and copyrights in the area of optics, 49 employees and annual revenues of about $25 million.
In less than two decades, Wertheim had gone from ne’er-do-well to inventor and entrepreneur. BPI never achieved hypergrowth, but it currently has a net income of about $10 million a year, according to Wertheim, more than enough to feed his passion for investing and the good life.
“I didn’t want to have a big business,” he says. “But today, I have a 5 or a 6 or an 8 billion-dollar corporation, each of which I own 10% of.”
With BPI cash flowing into Wertheim’s brokerage account, he went to work buying stocks and honing a strategy that can best be described as a mix of Warren Buffett and Peter Lynch, with a touch of Jack Bogle, given that he dislikes fees and primarily uses two discounters, Fidelity and Schwab, to manage his massive portfolio.
With Lear Jet (later known as Lear Siegler) in the late 1950s, for example, Wertheim was practicing “invest in what you know,” the strategy popularized by the famous Fidelity Magellan fund manager Peter Lynch in his 1989 book One Up on Wall Street. Lynch told readers to use their specialized knowledge or experience to gain an edge in their investments.
In less than two decades, Wertheim had gone from ne’er-do-well to inventor and entrepreneur.
Instead of concentrating on the metrics in financial statements, Wertheim is devoted to reading patents and spends two six-hour blocks each week poring over technical tomes. “What’s more important to me is, what is your intellectual capital to be able to grow?” Thanks to his engineering background, the technical nature of optometry and his experience as an inventor, the patent library is Wertheim’s comfort zone. Stocks he invested in based on their impressive patent portfolios include IBM, 3M and Intel.
Like Warren Buffett, Wertheim believes firmly in doubling down when his high-conviction picks go against him. He says that if you put your faith in a company’s intellectual property, it doesn’t matter too much if the market goes south for a bit—the product, he believes, has lasting value.
“If you like something at $13 a share, you should like it at $12, $11 or $10 a share,” Wertheim says. “If a stock continues to go down, and you believe in it and did your research, then you buy more. You are actually getting a better deal.” Whenever possible, he adds, dividends are useful in cushioning the pain of stocks that drift down or go sideways.
“My goal is to buy and almost never sell,” he says, parroting a Buffettism. “I let it appreciate as much as it can and use the dividends to move forward.” In this way Wertheim, like the Oracle of Omaha, seldom reinvests dividends but instead uses the cash flow from his portfolio to either fund his lifestyle or make new investments.
Wertheim points to Microsoft, a stock he has held since its IPO in 1986. “I knew a lot about computers and had been involved in building them,” he says. BPI had been using Apple IIe’s, but after Microsoft released its Windows operating system in 1985, Wertheim became convinced it would be a winner. “Only Microsoft had an operating system that could compete with Apple,” he recalls. The Microsoft shares he bought during the IPO, which have been paying dividends since 2003, are now worth more than $160 million. His 1.25 million shares of Apple, some purchased during its 1980 IPO and some when the stock was languishing at $10 in the 1990s, are worth $195 million.
Wertheim’s returns are miraculous. But merely adding $200 per month to an initial $10,000 in the stock market over the past 61 years would have produced an $11 million portfolio.Source: Investor.gov
Not all of the hundreds of stocks he has owned have fared so well. He invested big in Blackberry. “I believed in the new management and the recovery story,” says Wertheim, who will generally sell if a position reverses on him by 25%. “I watched substantial profits disappear month after month until I decided enough was enough.”
Wertheim sometimes uses leverage, but mostly in a limited way when buying high-yielding stocks. “By using the dividends to offset [the cost of] margin interest, the government is helping you increase your portfolio value,” he explains, noting that margin interest is tax deductible up to the amount of ordinary income.
“If you like something at $13 a share, you should like it at $12, $11 or $10 a share,” Wertheim says. “If a stock continues to go down, and you believe in it and did your research, then you buy more.”
But in 1982 Wertheim got caught in a margin call after Federal Reserve Chairman Paul Volcker raised the federal funds rate from 12% to 20% and the market sank 20%. The episode cost him $50 million and taught Wertheim a valuable lesson about the dangers of leverage and mark-to-market accounting. Like most other active investors, Wertheim strives for tax efficiency. In order to harvest tax losses in his portfolio, he doubles down on his losers to avoid the IRS’ wash-sale penalties. “If I have a large loss in a stock I like,” he says, “I will purchase more, usually twice to three times the original purchase, and wait the 30 days to sell the original position and book the tax loss.”
As with Buffett, Wertheim says finding companies with strong management has been key to his success. A great example of this is Heico, a family-run aerospace and electronics company based in Wertheim’s hometown, Hollywood, Florida.
Wertheim became friendly with Laurans “Larry” Mendelson during the 1970s, after Wertheim bought a condominium in a building Mendelson owned and docked his boat next to Mendelson’s on Coral Gables Waterway. “He has two daughters around the same age as my two sons,” Mendelson says. “We got to know each other socially.”
A CPA by training, Mendelson was a successful real estate investor who had studied at Columbia Business School under David Dodd, co-author with Benjamin Graham of the seminal book on value investing, Security Analysis. Inspired by the wave of dealmakers getting rich from LBOs in the 1980s, the Mendelsons were looking to find an undervalued, underperforming industrial company to take over.
After they settled on Heico, at the time a small airline-parts maker, Wertheim used his aeronautical knowledge to informally help the family analyze its business and went on to purchase shares of the company—a penny stock priced as low as 33 cents.
“At that time Heico was a disaster, but he came up and understood what we would do to make it a non-disaster,” says Mendelson. Heico was making narrow-body jet-engine combustors, which the FAA mandated be replaced on a regular basis after a plane caught fire on a runway in 1985. Under the Mendelsons, Heico expanded its line of replacement parts, which undercut established original-equipment manufacturers like United Technologies’ Pratt & Whitney and GE. After Germany’s Lufthansa acquired a minority stake in the company in 1997, airline manufacturers and Wall Street took notice, and its share price rose sixfold to more than $2. But this was just the beginning. Heico enjoyed a proverbial moat as one of only a few FAA-approved airplane replacement-parts manufacturers. This translated into steadily growing orders as Heico expanded its product mix and as demand for air travel increased. For the last 28 years, Heico’s sales have compounded at a rate of 16% per year and its net profits at 19%.
Today, Heico trades for $80, and buy-and-hold Herbie is its largest individual shareholder. His original $5 million investment is worth more than $800 million.
Clockwise from top: Wertheim with Warren Buffett; on the World in Bordeaux; sightseeing in the North Pole; with his wife, Nicole, in Corsica; examining eyes in Guatemala.IMAGES COURTESY OF HERBERT WERTHEIM
As Wertheim enters his 80th year, Herbie time has become his chief preoccupation. Besides his $16 million oceanfront home in Coral Gables, Wertheim has a 90-acre ranch near Vail, Colorado, a spectacular four-story home overlooking the Thames in London and two sprawling estates in southern California. He spends many winters with his wife and family vacationing aboard The World, the planet’s largest luxurious residential ship continuously circumnavigating the globe, where he owns two luxury apartments. Right now, in the middle of February, the Wertheims are somewhere off the coast of Sri Lanka.
A signee of Bill Gates and Warren Buffett’s Giving Pledge, Wertheim has committed to giving away at least half his wealth, and he intends the bulk of the donations to go to public education—the very system of which he is a product.
“I would not have achieved the education and opportunities that I have had without the help of our public-university education system,” he wrote when he signed the pledge.
Stroll around Florida International University’s main campus, just minutes from Wertheim’s Coral Gables home, and you can’t help but notice buildings emblazoned with his name: the Herbert Wertheim College of Medicine, the Nicole Wertheim College of Nursing & Health Sciences, the Herbert & Nicole Wertheim Performing Arts Center and the Wertheim Conservatory. He has given $50 million to FIU and committed another $50 million to the University of Florida. Last year he pledged $25 million to the University of California, San Diego, to help create a school of public health. Beyond education, Wertheim says he’s given to hundreds of domestic and foreign nonprofits, including the Miami Zoo and the Vail, Colorado, public radio station.
The former truant and class dunce still gets giddy when he sees his name on the university buildings, asking passersby to take photos—posing in his signature red hat and new Nikes. At the medical school, he put on a stethoscope, excited to test out the latest medical dummies, which breathe, sweat and even talk. In a room designed to study obstetrics, he tries his hand at an ultrasound machine. At a lab that he helps fund, he is enamored with laser imaging and how it can help measure retinal temperature in the eye. (“I’ve fallen in love with proteins,” he says casually, discussing another eye experiment.) At the FIU performing arts center bearing his name, he suggests adding an outdoor amphitheater: “I think it’s time. I’d like to see something big happen.”
“He’s very inspirational in the way he challenges people to think big and imagine what’s possible,” says Cammy Abernathy, dean of the Herbert Wertheim College of Engineering at the University of Florida.
Still, one gets the sense that devoting time to his stock portfolio provides as much joy for Wertheim as his playful excursions and philanthropies.
He recently doubled down on British energy giant BP and now owns over one million shares. But rather than dwell on its sagging, crude-dependent stock chart, he’s betting on its hydrogen fuel cells and enjoying its 6% dividend yield while he waits for the company to recover.
“They have important intellectual property in that area,” he says of the cells, which create electricity by using hydrogen as fuel, a technology Wertheim believes is the future of both air and road transportation. “We’re going to move to a hydrogen economy.” Contrarian Wertheim also likes the troubled stock of General Electric; he owns over 15 million shares and has been picking up more.
He says he is making a long-term bet on GE’s intellectual property; the 126-year-old company has more than 179,000 patents and growing. Wertheim is especially jazzed about some patents that involve the 3-D printing of metal engine parts.
“You can’t look at what their sales are. You can’t look at anything. What is the future?” he says emphatically, adding, “They hit an all-time low yesterday, and I’m getting hurt. But I feel very, very comfortable with GE because of their technology.”
And Wertheim isn’t in any rush. Playing the long game is what he does best.
To learn more how the most influential billionaire investors invest their money, click here.
For more on the world's richest and brightest entrepreneurs, follow me on Twitter @MadelinePBerg. Got tips or word about a new billionaire? Go to Forbes.com/tips.
0 notes
Text
The Minolta SRT 201 is my all-time favorite camera. This is not because it does any one thing well, but rather that it does nothing at all wrong. A lot of photographers swear by gear that isn’t necessarily the best or most expensive, instead opting for gear that is familiar and reliable. The SRT 201 is the epitome of this concept. For me it has been my faithful workhorse. It was my first real Film SLR when I was first learning to take pictures back in the tenth grade. If it wasn’t for this piece of glass and metal, I might not consider myself to be a photographer today,
The SRT is built like a tank. The heft when you first pick it up is substantial, and makes you realize you are holding a proper photographer’s tool. The mechanical operation is satisfying and feels durable. I’ve used mine without issue for the better part of decade, and despite camera being 43 years old, I have never had a single problem with it. Every button and dial answers with a substantive click that really inspires confidence in the mechanism. Even my darling Contax (my current film shooter) with its electric shutter lacks such substantive sounds. The Contax always sounds like it’ll break if I look at it the wrong way, whereas the Minolta I feel would survive an expedition to Siberia and back (apt as the mechanical operation of the Minolta is impervious to cold, unlike the Contax).
Minolta lenses aren’t quite Zeiss sharp, but they are certainly close enough. Some of my all-time favorite pictures have been taken with either this camera, or one of its lenses strapped to my Sony A7. Because the SRT isn’t a Contax or Nikon, bodies and lenses don’t command as high a price as you might expect for the quality of the lenses. The 54mm f/1.4 in particular is a bargain lens with a razor thin depth of field. The lenses are solidly constructed metal, and despite years of me throwing mine into my rucksack (sometimes with no protection other than two lens caps), they have worked without fail and show no signs of stopping.
The metering system is TTL and read via a little needle and matching circle on the right side of the viewfinder. You can engage the meter via a small knurled switch on the bottom of the camera, (you will need to use your fingernail to move it, which isn’t the most comfortable thing in the world). This on/off switch is beyond useful, as I haven’t changed my camera battery in about five years, and it is still working. Best of all, unlike SLR or Rangefinders from the 60s, the SRT201 uses standard camera batteries! No Mercury replacement battery required. I find the metering to be uncommonly accurate. Only under the most difficult of lighting conditions do I find I need to do much exposure editing in Lightroom. Typically, what the camera gives me is spot-on. Over the years, I’ve certainly grown to trust this camera’s metering just as much as I have its mechanical operation.
If it sounds like I’m in love with this camera, it’s probably because I am. Though I am experimenting with Contax Zeiss lenses now to get that little extra bit of sharpness, it’ll be hard to beat the already stellar kit of Minolta lenses I have at my disposal. The SRT 201 is a faithful photographer’s companion. It has seen me through every phase in my learning of photography, and whether it be the camera body or its lenses, this camera continues to earn near constant use from me no matter what photographic endeavor I am setting out on. If you can get one in as mint condition as I have, you will not be disappointed. Below you will find a small gallery of some of my favorite snapshots I’ve taken over the years with this camera. They are either with the aforementioned 54mm f/1.4 or the 24mm f/2.8.
Minolta SRT 201: The Most Faithful Camera The Minolta SRT 201 is my all-time favorite camera. This is not because it does any one thing well, but rather that it does nothing at all wrong.
#35mm film#Black and White#camera#camera review#Film#film camera#Film photography#Film SLR#Minolta#Minolta SRT 201#Photography#SLR
0 notes
Text
Best Camera for Photography Beginners
Buying your first camera can be tough, expensive and time consuming. I can tell you I have personally wasted a lot of money on cameras early on that probably weren’t the best choice. I’ve also wasted a lot of money switching camera brands along the way. I started with Nikon, switched to Canon and now I am team Sony which has been a lot of buying and selling. I also had bad advice early on so hopefully this blog post will give you some good ideas to think about when looking at what camera you want to buy first.
Things to Consider When Buying Your First Camera
Price: This is probably your biggest driver when getting your first camera. Camera equipment is expensive and if you want to get into photography you will need something that’s a step up from a simple point and shoot. The biggest thing you will want/need is a camera that allows you to manipulate all of the settings such as shutter speed, aperture and ISO. So no matter what your budget is, at least get that function so you can start learning how to control the different parts of a photograph.
Quality: Quality and price do tend to go hand in hand, however, sometimes you will be paying for a band name rather than a good quality camera. A Leica camera is an awesome camera but will start at around $1000 and offer generally the same features that you could get for the Sony RX100 pictured above. You will want a camera that offers good quality but you won’t want something that is top of the line. I do recommend getting a camera that you could continue to grow with.
Brand: I’d strongly recommend figuring out what brand you want to go with now and doing your best to stick with it as you grow as a photographer. Typically what happens is you will buy a camera body which can vary greatly in price. Then you will purchase lenses to go on that camera body. Pretty soon you will have a camera body with a handful of lenses. The issue here is that camera lenses are not interchangeable with different camera brand bodies. Each company has their own proprietary lens mount which makes lenses only mountable to one camera brand body. So let’s say you buy a Canon 7D Mark II as your first body and get a whole bunch of Canon lenses and then decide you want to go to a Sony, you will have to sell all of your lenses and Canon body and then buy a new Sony and all new Sony mount lenses. This is obviously pricey.
One mistake I’ve made is I always bought the camera that my buddy recommended rather than what was the best item on the market. The bottom line…. Do your research. I personally recommend Sony. I think their mirrorless systems are the best on the market. I’ve had Canon, Nikon and now Sony and I believe they offer a product that is superior. But, that’s just me.
Ability to grow: Your last consideration should be… can you grow into your camera? If you buy a little point and shoot you will most likely grow out of in pretty quickly and then have to spend more money again in the near future. I recommend finding a camera that can accept interchangeable lenses rather than one with a built in lens. Also find a brand that has a various levels of cameras from entry to expert so you can grow with them.
So what Camera should you buy?
That’s a great question. I am sure I don’t hold the answer but here are some recommendations. I will go from cheap to expensive. Again, I am team Sony over here so that’s what I recommend. That doesn’t mean that the other brands don’t offer good options… I just like Sony, if I didn’t say that enough already.
Least Expensive Beginner Camera
Sony RX100
The Sony RX 100 is a great starter camera because you actually get a pretty decent quality camera for around $370. The camera comes in a manual mode so you can learn how to adjust the settings. In addition the camera weighs in at just half a pound and is around 4 x 2.5” so it’s really easy to throw in your pocket if you’re traveling around. The 20.2 mega pixel CMOS sensor will ensure that any photos you capture are high resolution and could be blown up and framed if desired.
In addition the camera has an ISO setting of 125-6400 which allows you to do some low light shots, although the camera isn’t going to perform to well at higher ISOs, that is typically reserved for the higher end cameras. One of the best features is the Zeiss 1.8, 28-100mm zoom lens. That gives you a pretty wide range aperture range so you could practice using your depth of field. Finally the 28-100mm zoom isn’t amazing but it does give you a fairly decent range to work with.
Some of the cons with this camera is that you will outgrow it quickly, the lenses are not interchangeable and you will have poor low light shots. This is very much a beginner camera and wont be something you’d stick with for very long. However, it’s a great one to try if you want look into becoming a photographer without breaking the bank.
Mid Range Beginner Camera
Sony a6500
The Sony a6500 is an APS-C camera meaning its sensor is slightly smaller than a full frame camera. The sensor is big enough to get some incredible shots and this is actually my go-to travel camera/back up camera. The photo quality is good enough that if you captured a great photo that you wanted to blow up as a print you could make it pretty much as large as you like.
I originally purchased the Sony a6500 after I was looking for a camera that offered great quality shots but was also light and portable. My goal was to use this as a travel camera. After using it for a month I was so impressed that I sold all of my Canon gear and made the switch to Sony. The crazy thing here is that I owned the Canon 5d MkIV, one of their flagship full-frame top of the line cameras. This means that Sony’s mid-line camera impressed me so much it convinced me to ditch my top of the line Canon…
I would suggest the a6500 one as a great option because you can swap out lenses as you start to build you lens collection and the lenses you buy for the a6500 could also be used on a full frame camera if you decided to go that route later on. In addition, the camera comes with a lot of the nice bells and whistles such as wi-fi, add-on apps and the ability to attach external batteries or a flash.
Finally, the a6500 performs much like a high end camera with a 24.2 mega pixel sensor, 425 auto focus points (meaning it auto focuses really well), 11 frames per second continuous shooting (meaning it can take a lot of photos really fast for sports or wildlife photography), and a 4k video (meaning it takes really nice video).
For a body you would pay around $1100 and a lens can run you anywhere from $300 on up. I currently run the camera with a Zeiss 16-70mm f/4 lens which is an excellent combination.
If you want a more detailed review of this a6500 I did a full write-up here. Best High End Beginner Camera
Sony A7III
With the Sony A7III I use the term “beginner” very loosely. In fact, this camera is absolutely incredible and is used by professional photographers around the world. The A7III is a full frame camera that came out after the A7RIII (the camera that I use as my go-to). In some arenas the A7III actually out performs some of the A7RIII’s capabilities and does it for around $800 less. If you want the bottom line on this camera I would say it’s an absolutely phenomenal camera for a somewhat affordable price. The A7III body will run you around $2,000 and lenses are around $300 on up. However, if you’re going to splurge for this one, I’d recommend getting a good lens to match so you don’t lose all the great quality that you get from the camera.
I’d recommend getting this camera if you’ve decided you’re ready to be a professional photographer. If you buy this camera you won’t need to upgrade for a long time and if you do upgrade this is a great camera to use as a backup/secondary camera.
What makes the A7III so great? Well for starters it features a full-frame 24.2 MP sensor that has some of the best low light capabilities on the market. The AF features a 623 point phase detection with 93% coverage. Now if you are just getting into photography I know that might not mean anything but to break it down nice and simple… it means it does a great job of focusing on the object you’re trying to capture.
One other thing I should point out is the A7III comes with 4k video capabilities… So if you’re looking to also get into videography this camera would again be an excellent choice.
So what makes this camera a beginner camera? Well again, it’s not really a beginner camera but it’s more of a beginner-ish price. Your only set back on this camera would be the 24.2 megapixel sensor. For reference, the A7RIII features a 42 megapixel sensor. However, this difference can also set you back. Fewer megapixels can lead to better low light qualities. In addition a 42MP sensor can drastically slow down your editing time if you don’t have a super fast computer. However, a larger sensor will capture more information which can be beneficial in post editing. There are plenty of times that I have imported a photo into LightRoom and thought it wasn’t going to edit. However, because the A7RIII has such an incredible sensor it captures a ton of information that can be edited.
In the end, the 24.2 megapixel sensor will still produce some amazing photos and you probably wouldn’t notice much of a difference until you started to blow the photos up for super large prints. To be honest, I wish the A7III was available when I purchased the A7RIII because I would have saved myself a lot of money and I’d have one amazing camera to work with.
The Take Away
Ok so I have been crapping on about all of these cameras for awhile now but here’s my abbreviated recommendation. The camera you purchase should be scaleable in the sense that you should be able to grow with it. Photography equipment is very much in the arena of “buy once, cry once”. Most often people purchase a budget camera, with budget lenses and then outgrow their camera quickly and then want to upgrade. If I could recommend one thing to a beginner it would be to buy the Sony a6500 and a 50mm lens and use that until you get the hang of photography. The reason is that we as humans tend to see the world at around 50mm so you will photograph what you see (ok so for anyone reading this who’s a photography nerd, yes I know the APS-C turns a 50mm into more of a 75mm focal length, but you get the idea). In addition a 50mm prime lens combined with the a6500 with produce some incredibly crisp shots. By shooting a 50mm fixed length you will be forced to capture the shots you want by getting creative, rather than just zooming and zooming out. I personally believe that a good photographer uses additional lenses to simply enhance their photography skills rather than act as a crutch. The bottom line, if you can capture great photos with that combination you will absolutely crush it when you start upgrading your lenses and camera body in the future.
Camera Comparison Guide
0 notes