#xTool
Explore tagged Tumblr posts
Text



Dragon Age Inquisition Romancer Earrings ❤️
I made these to celebrate the release date of Veilguard and that stunning trailer!
These are laser cut plywood (spent my dice cash on an XTool M1) and epoxy resin (5 shades!). I lightly modified the in-game design to work better for cutting. Have to say I was positively surprised by how these turned out 🥺
25 notes
·
View notes
Text
Crafting for my Craft. Using my laser on natural materials.


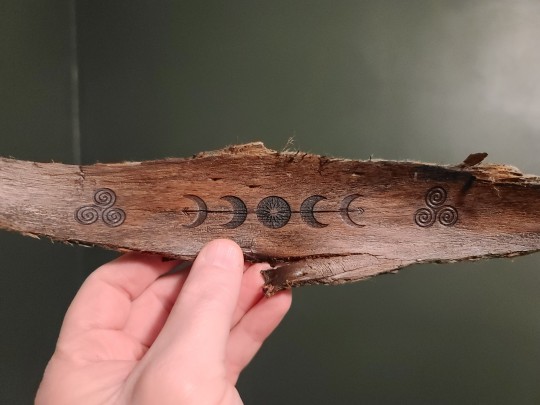
#gay pagan#gay magic#gay mystic#gay witch#pagan#queer pagan#queer mystic#queer witch#paganism#mysticism#xtool#lasercut#pagan crafts
38 notes
·
View notes
Text
xTool M1で木材を加工してみる
先日購入したレーザー加工機「xTool M1」で木材を加工してみた話です。

レーザー加工機「xTool M1」を買った話の続きです。ひとまずパッケージを開梱して設置してみたので、続いてはレーザー加工機購入の主目的である切断・彫刻加工を試してみました。
Inkscapeで描いた図を基に切断加工をやってみる
xToolシリーズには専用のソフトウェアとして「xTool Creative Space(XCS)」というソフトウェアが付属しているのですが、単体で複雑なデザインを作るのは大変そうなので、フリーのドローソフト「Inkscape」でデザインを作成し、それをXCSにインポートするフローを試してみます。
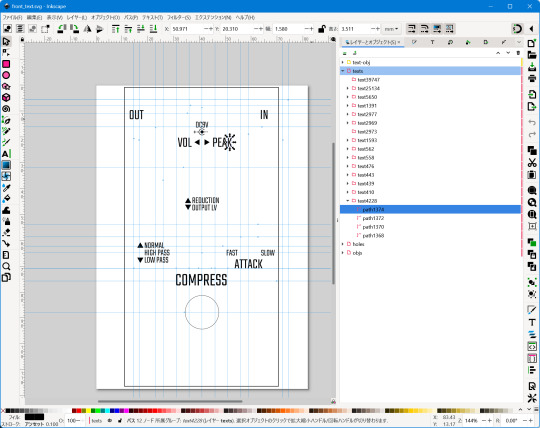
まずInkscapeでカットする部分をパスで描きます。ちなみにこち���は自作のLEDコントロールユニットをモジュラーシンセケースの1U部分にマウントするためのパネルです。
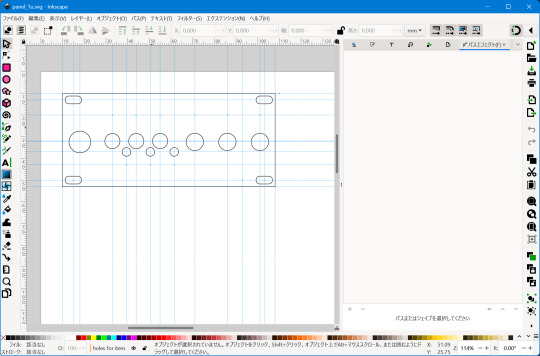
続いてXCSを起動して、まず加工対象の設定をします。

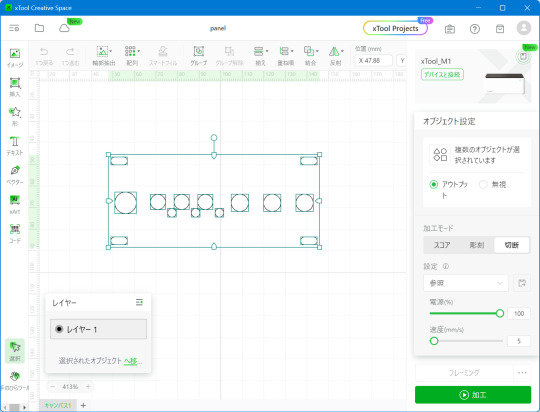
今回は2.5mmのMDFを使用したのですが、素材のプリセットに同等のものがなかったので多分似たような感じの3mmバスウッド(=シナ)合板を選択しています。また、M1に付属する三角柱を板の下に敷いて加工するので、「底上げした高さ」は「三角柱」を選択しました。
続いてInkscapeで作成したファイルをXCSに読み込ませます。Inkscapeのデフォルト保存形式はSVGで、XCSではこれを直接読み込むことができます。XCSに読み込ませたあとにパスを選択し、加工モードとして「切断」を選択して「設定」を参照にすると、自動的に加工パラメータが設定されます。
続いてxTool M1の電源を入れてPCと接続した状態で「再読み込み」ボタンをクリックすると、内蔵カメラで加工機内の状態が撮影され、加工される大まかな位置を確認できます(この段階で画面キャプチャを撮るのを忘れていたので次の画像は別のときに撮影したものです)。

ただ、この写真の位置通りに厳密に加工が行われるわけではなく、若干ずれが発生します。そのため、加工エリアの外周にそって光を照らすだけのレベルのレーザーを照射して加工範囲を確認する「フレーミング」を行います。これは「フレーミング」ボタンをクリックすれば実行できます。
加工範囲が素材内に収まっていることを確認したら、その後「加工」を実行します。なお、フレーミングも加工もXCS上で操作を行ったあとに、本体側の前面にあるボタンを押して初めて開始されるする仕組みです(必ず本体の状況を確認してから加工を始めさせるための制約と思われます)。
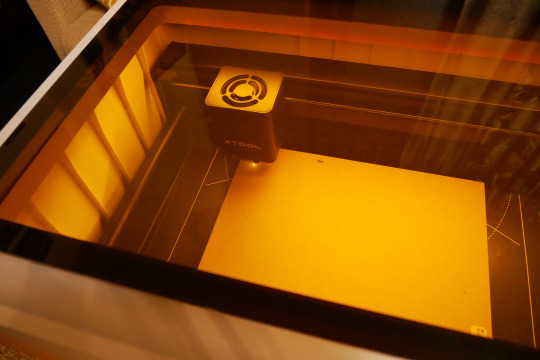
本体側のボタンを押して加工をスタートさせたら、あとは加工の様子を眺めるだけです。今回は加工範囲が小さいので1~2分ほどで完了。次のようなものができました。

レーザー加工機は対象を高熱で焼き切って切断するので、木材の場合切断面が焦げて黒くなります。さらに切断した部分の付近にスス汚れも付きますが、これは中性洗剤(食器洗い洗剤)で水洗いすればおおむね落とすことができます。上の画像も若干表面が汚れていますが、そちらは水洗いできれいに落とすことができました。
洗浄後、基板を取り付けたものがこちら。設計通りにできました。

彫刻加工をやってみる
続いては、文字や図形をレーザーで彫る彫刻加工で、自作エフェクターのパネルを作成してみます。XCSでは要素ごとに加工方法として彫刻と切断を選択でき、同時に彫刻と切断を行えるようなのですが、今回は彫刻用のデータと切断用のデータをそれぞれ別々に作成していた関係で、切断→彫刻の順で別工程で加工をしてみました。
切断工程については基本上記の手順と同じなので割愛。彫刻に関しては以前写真用紙に印刷してパネルを作ったデータを流用しました。なお、文字データに関しては適切にインポートできない可能性があるため事前にパスに変換しています。
これを先ほどと同じようにXCSにインポートして、加工方法として彫刻を選択します。
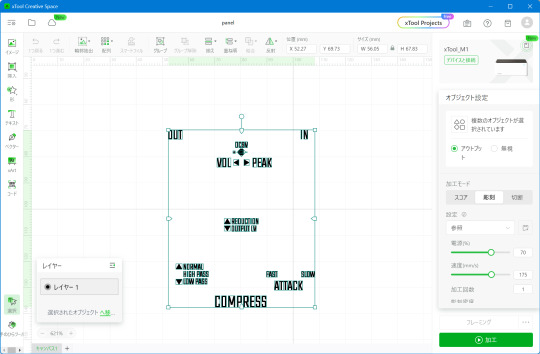
あとは同じようにフレーミング→加工を実行するだけです。なお、彫刻の場合は切断の場合と比べて加工速度がとても速い設定になっているのですが、細いレーザーを彫刻する面積全体に照射するため、切断よりも時間がかかりました。
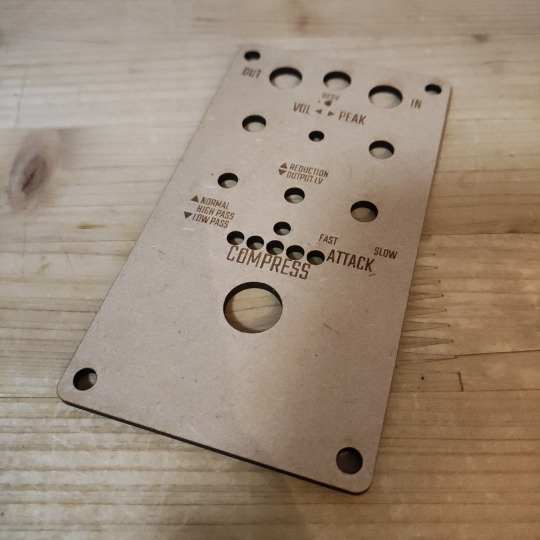
最終的な完成品はこちら。文字の部分をもっとしっかり焦がした状態にできると良いのですが、そのあたりは試行錯誤が必要そうです。
5 notes
·
View notes
Text

xTool P2 Review: 55W CO2 Laser Cutter Tests, Tips and Settings
Review by: Will Zoobkoff, StudioZombie3D
3 notes
·
View notes
Text
xTool Promo Code: 30% OFF on Hardwood
xTool Promo Code: 30% OFF on Hardwood
0 notes
Text
Xtool InPlus IP919 Review: A Very Fast, Complete, and Nearly Universal Diagnostic Scan Tool
0 notes
Text
Transform your business swag! These items were for an amazing seller on #poshmark @akatavy (go check her out! She has a show tonight 😉 )
Whether it's for your business, a special gift, or a gift for yourself, lets bring your vision to life!
#small business#handcrafted#laser engraving#business swag#xtool#xtoolf1#poshmark seller#kck#gift bag#custom keychain#your logo#make it yours
1 note
·
View note
Text
Laser Engraver Showdown: Glowforge Aura vs xTool M1 Comparison
Glowforge vs. xTool, I did the research, so you don't have to.
In this post, we’ll be digging into the increasingly popular world of laser cutters. If you’re just getting started, finding the right laser cutter can be a game-changer for your projects. For some, it can even open up a small business opportunity. At this point, you’ve likely done a lot of research to find the perfect laser cutter and engraver, just as I have. And trust me, there are tons of…

View On WordPress
#Art#Blog#Craft Tools#Glowforge#Glowforge Aura#Hobbies#Laser Cutter#Laser Engraver#Maker Tools#Product Comparison#Vinyl Cutter#xTool#xTool M1
0 notes
Text
How to Connect Xtool KC501 with Tablet or PC?
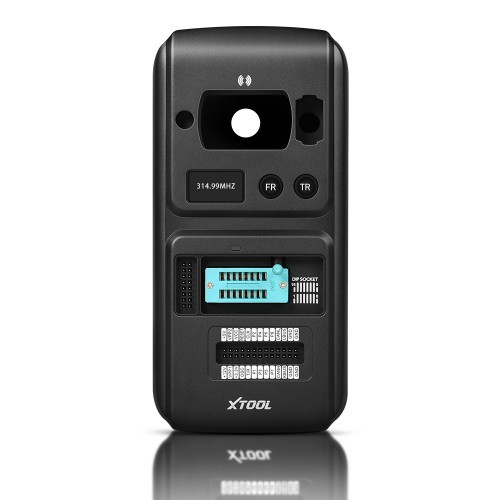
Xtool KC501 can work with Xtool tablet to read and write MCU/EEPROM chips, read and write keys including Mercedes infrared keys. It also can connect to the tablet as an anti-theft match, and supports the connection of X100 PAD3, Auto Pro PAD. Moreover, it also can connect with a PC to be a programmer. Check the connection methods below.
Kindly Notice:
Xtool KC501 Chip Programming Tool only can connect to the Xtool tablet which has USB 3.0 interface through USB cable.
Compatible Xtool tablets: X100 PAD3 (X100 PAD Elite), X100 PADS, InPlus IK618, InPlus IP616, InPlus IP819, D9 EV, D9 HD Diesel & Gasoline, D8
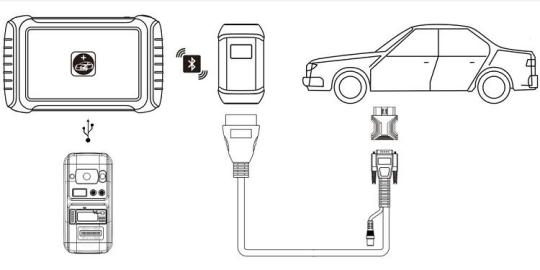
Method 1: Connect with Bluetooth device
1.Connect VCI and main cable with car’s OBD port, which is usually under the dashboard.
2.Turn on our device and pair Bluetooth with VCI.
3.Connect a 12V power adapter to KC501.
4.Connect Xtool tablet and KC501 with a USB cable. Then enter immobilization menu and follow the instructions on the device.
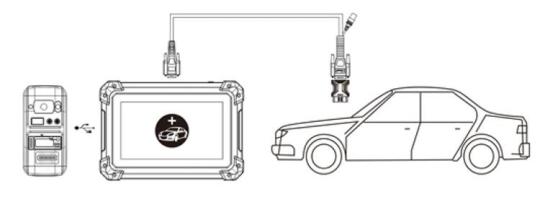
Method 2: Connect with wire device
1.Turn on Xtool tablet
2.Connect car's OBD port with wire. OBD port is usually under the dashboard.
3.Connect Xtool device and KC501 with a USB cable. Then enter immobilization menu and follow the instructions on the device.
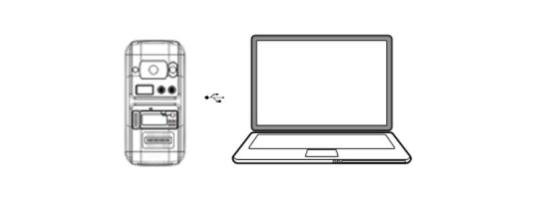
Method 3: Connect with PC
Use a USB cable to connect Xtool KC501 Key Programmer and PC directly, and then perform the available function.
KC501 software download (V1.0.0.4)
Related posts:
XTOOL X100 PAD3 Plus KC501 Read Remote Frequency & Transponder ID & Key Chip Type
Xtool X100 PAD3 Plus Xtool KC501 OBD Add Benz Infrared Key
XTOOL X100 PAD3 with KC501 Program 2014 Audi A4L
0 notes
Text

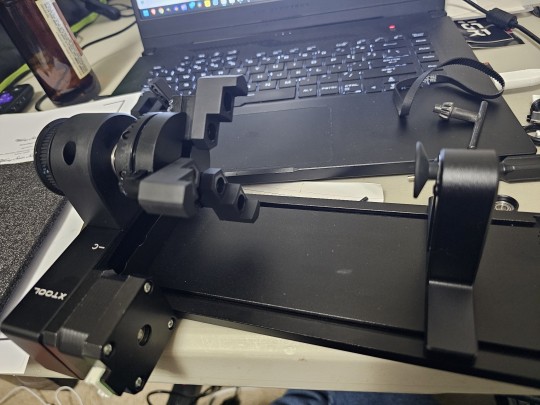
Laser engraver toys.
1 note
·
View note
Text
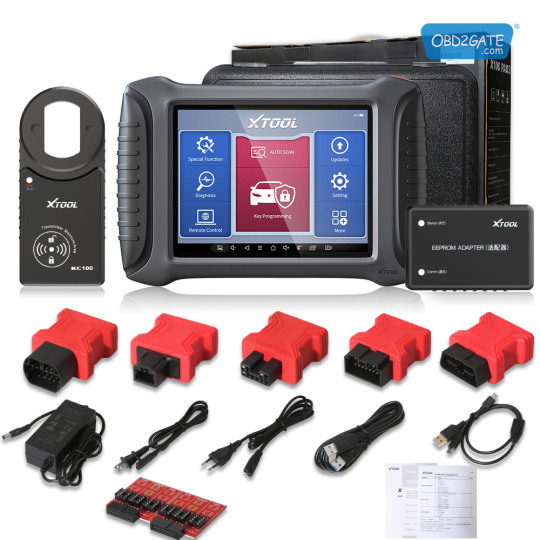
🚀 XTOOL X100 PAD3 Professional Tablet Key Programmer! 🔑
🔹 All-in-One Solution: Oil service light reset, EPB reset, tire pressure warning light reset, steering angle calibration… 💪 🔹 Limitless Compatibility: Supports a wide range of vehicles from top brands in Asia (Toyota, Honda, Nissan, etc.), EU (Audi, VW, BMW, etc.), US (GM, Ford, Chrysler, etc.), and even China (Great Wall, Chery, BYD, etc.)! 🌏 🔹 Smart Key Simulation: With the KS-1 Smart Key Simulator, X100 PAD3 supports Toyota/Lexus All Key Lost without disassembly! 🗝️ 🔹 Stay Updated: 2 years of hassle-free online updates with just one click! 🔄 🔹 Multilingual Support: English, German, French, Spanish, Italian, Japanese… 🌐 🔹 Versatile Special Functions: Get access to 16 special functions for an enhanced driving experience and smoother vehicle maintenance! 🛠️
0 notes
Text
#Xtool #Laserengraving #Prayandhaveablessexday #WhiteTumbler #BlackTumbler #FrankSmithIII #sidehustle2023
1 note
·
View note
Photo

A little test run of a custom Bad Bunny sad heart wall hanging I'm making for someone special. Need to tweak a few things and re-cut. ❤🌴☀️ . . . . . . . #badbunny #unveranosinti #sadheart #xtool #xtoold1 #xtoold1project #xtoollaser #xtoolmade #xtoolprojects #lasercut #lasercutting #laserengraving #lasercutter #makersofinstagram #makersofig #homicidalhomemaker #thehomicidalhomemaker https://www.instagram.com/p/CpGgVYePJq0/?igshid=NGJjMDIxMWI=
#badbunny#unveranosinti#sadheart#xtool#xtoold1#xtoold1project#xtoollaser#xtoolmade#xtoolprojects#lasercut#lasercutting#laserengraving#lasercutter#makersofinstagram#makersofig#homicidalhomemaker#thehomicidalhomemaker
0 notes
Text
レーザー加工機(xTool M1)の臭い対策
レーザー加工機を買ったあとで知ったのですが、レーザー加工はレーザー光で対象物を加熱して切断や彫刻を行うため、その際に臭いが発生します。一般居室でやると臭いがこもって不快な感じになってしまうので、対策を行いました。
発生するのは木材であれば炭のような臭い、アクリルであればプラスチックを溶かしてしまったような臭い。xTool M1は排気ダクトチューブも付属しているので、その先を屋外にまで伸ばしてやれば大丈夫だろうと思っていたのですが実際はそんなことはなく、木材の加工後2、3日は部屋に炭の臭いがこもる感じになってしまいました。以前室内で七輪を使って肉を焼いたことがあるのですが(当然換気はきっちりやった)、そのときと同じような感じです。
原因を調べてみたのですが、まず加工中はそれなりに大きな音でファンが回るものの、加工完了後しばらくするとそれが止まってしまうようです。電源ON状態でなんらかのノイズは常に出ているので、加工後にファン風量を下げる、もしくは一部のファンだけを回し続けている、といったような動作をしているとは思うのですが、とりあえず加工機内に排気しきれない臭いが残り、それが外に漏れ出ているような雰囲気があります。
排気システムを作る
これに関して何か良い対策はないものか、と思って調べたところ、xTool公式でインラインダクトファンというものがありました。説明には内蔵排気ファンだけだと「切断中に煙が室内に充満します」という文言が……。それを先に言ってくれ、と思いつつ価格を見ると定価2万1,600円、なかなかのもの。
ということで、ひとまず別の方法を考えてみます。xTool M1の排気ダクトチューブ接続部はツバのついた円筒形のものを本体にねじ止めする形になっているのですが、このネジ穴を見ると、なんか上手い感じにファンをここに取り付けられそうな予感が。試しにたまたま手元に余っていたPC用8cmファンを確認してみると、見事にネジ穴のサイズが適合する感じでした。
ということで、まず風量の強い8cmファンと言われているオウルテックSF8シリーズの標準モデル(ヨドバシカメラで税込み1,780円)を買ってきて取り付けてみました。
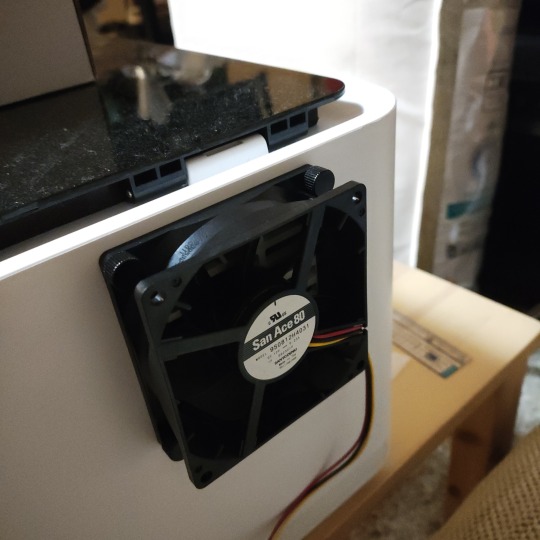
そして、適当なネジとナットでこの上からダクトチューブ接続部品を固定します。

あとはここにダクトチューブを接続すればファンの追加が完了です。ちなみにこのファンは12Vで動作するので、ちょうど手元にあったケースファン用コネクタと一般的なDCジャックをはんだ付けして変換アダプタを作り、ACアダプタで駆動させます。常に全力でファンが回転しますが、8cmファンなのでそこまでうるさくはありません。

続いて、ホームセンターで買ってきた5.5mm厚のベニヤ板をレーザー加工でカットし、丸穴を開けます。多少パラメータ調整は必要なものの、5.5mmの厚みであれば余裕で加工可能でした。
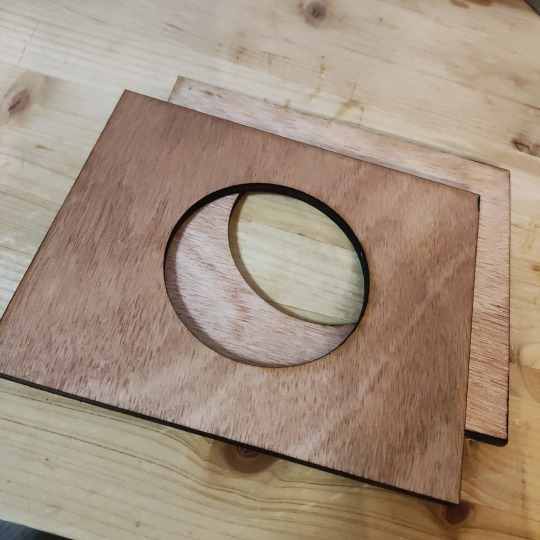
これを2枚作って重ねて、これまたホームセンターで買ってきた排気口をはめ込みます。
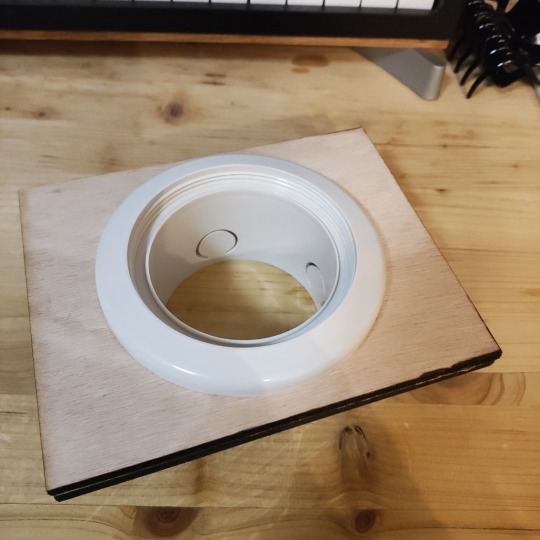
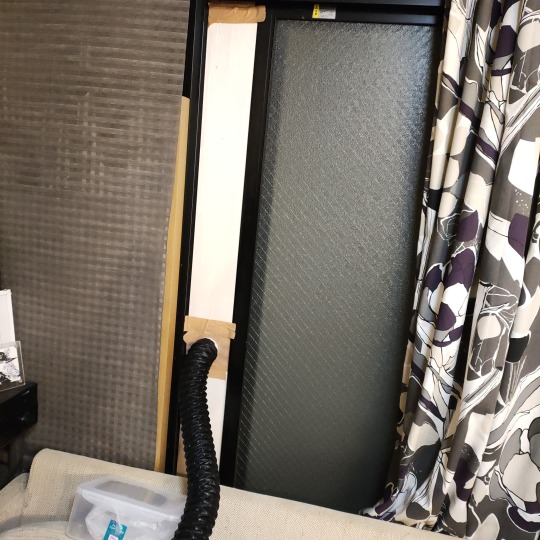
あとは同じくホームセンターで買ってきた細長い木材2枚と組み合わせてサッシにはめ込んで、なんとなく隙間をガムテープでふさげば排気口の完成です。
加工後の対策
この排気口は常に設置しておくことができないので作業が完了したら取り外すわけですが、加工時に発生した臭いがこびりつくのか、このダクトチューブ自体からも臭いがすることに気付きました。ということで、作業完了後には密封容器に入れておくことにしました。

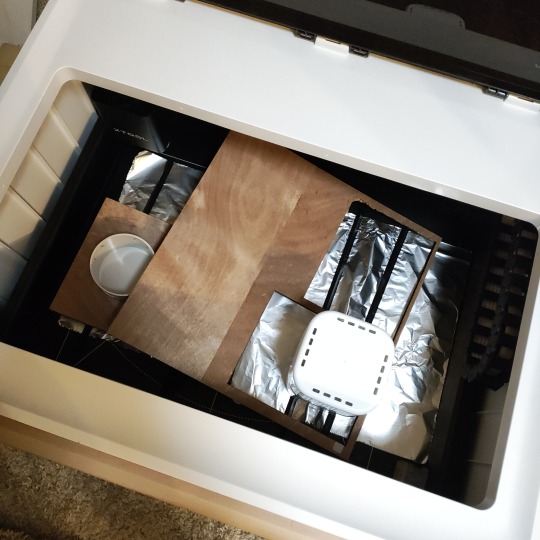
また、意外に加工後の端材にも焦げ臭いにおいが残ります。そのため、端材は本体内に入れて、さらに消臭剤も本体内に一緒に入れておくことにしました。
以上の対策でも、切断加工中の臭いを完全に防ぐことはできず多少は臭いが漏れる感じでありますが、作業完了後に換気をすればおおむね部屋に臭いは残りません。これで気軽に加工ができるようになりました。
4 notes
·
View notes
Text

xTool F1 Ultra Review: Laser Engraver and Cutter Tests, Tips, Settings
Will Zoobkoff has tested the xTool F1 Ultra through a series of laser cutting and engraving projects. He explored a variety of materials, including wood, anodized metal cards, brass, slate stone, and even jewelery. He also tested innovative embossing and 3D curve features. Check out the complete review, which includes numerous images of the detailed makes.
1 note
·
View note
Text
XTool Promo Codes And Discount Codes - DEALSisHERE.Com
xTool Promo Codes and Discount Codes
Find the latest xTool discount codes and coupon codes here. Buy for less!
0 notes