#wood filler will take care of the extra holes
Text
Instructions For Your Home Painting Project
You do not get to invest to paint your home very often. Finally when you have allocated the budget and hired professional Fayetteville painters for the job, you must go that extra mile to see that the job is done well to give the best value for your spending. The following instructions for your home painting project will help ensure best looks and will see the painting job last for more years.

Inspect the siding
Walk around the home exterior that is to be painted. Make note of the holes and cracks in the siding that need repair. Make a list of items that have to be removed like gutters, vent flaps, screens, drain pipes, and house numbers.
Measure the surfaces to paint
Measure the areas on the home that have to be painted. Subtract the areas of windows and doors. Also, take into account the smaller items that have to be painted like the railing, cupolas, gables, and the eaves. Measure the door trim and windows if they need a separate color of paint. Now go about calculating how much paint you will have to buy adding up 10% more paint to cover wastage.
Repair the major issues
Before getting started with the painting job, you must fix the problems in the exterior siding like replacing the broken siding, fixing the decayed or split window trim, replacing the damaged corner trim pieces, and rectifying the damaged foundation masonry.
Remove the loose paint
Inspect the existing paint surface closely and remove the bulging, flaky, and weak paints. For this purpose, you can use paint scrapers indifferent sizes and a heat gun.
Clean the house thoroughly
Though it is a tedious job to clean the house by hand, this can produce the best results. Many professionals use pressure water for the purpose. While cleaning, the spray must be set to the widest. Start from the top and clean downwards in horizontal rows.
After the house is cleaned and dried, take care to mask off the windows, lights, doors, and everything else that will not have to be painted.
Caulk, patch and then paint
Load the caulk gun with caulking tube, squeeze the caulk into the minute cracks and around the doors, intrusion paints, windows and vents. The caulk must cure for more than two hours. Use wood filler or wood putty to fill nail and screw holes. On patched areas, apply primer. Get started with painting once the preparation above is done well. Use sprayers, brushes and rollers as appropriate. Leave the paint to dry for a day and then paint the window and trim.
0 notes
Text
putting this bookshelf together would go faster if I didn’t get bored part way through and keep taking breaks
#ink speaks#i was doing pretty good up until it was time to screw on the backboard#it's monotonous and takes forever#i get like three screws in and want a break#this is ignoring the one board i put on upside down#wood filler will take care of the extra holes#probably
1 note
·
View note
Text
Bugs Getting You Down? Advice on How to Get a Better Night's Sleep
Anyone who lives in a house knows how aggravating it is to deal with pests. Pests can contaminate food, spread germs, and generally cause concern. Use these tips to do whatever you can to get rid of them from your home.
Steel wool can be used to plug holes that rodents, such as mice, can enter. Despite the fact that rodents can chew through a variety of materials, steel wool is too strong for them. Make sure all holes greater than 1/2 inch are filled. Keep in mind that these pests can squeeze through even the tiniest of gaps.
To keep bugs out, use a perimeter spray around your house. The substance can be used on windows, doors, foundations, and stairs. When you're spraying, keep an eye out for pest entry points such as crevices and cracks. Seal these areas with caulk or the appropriate filler.
Before placing containers in your recycling bin, make sure they are thoroughly rinsed. Since soda cans are filled with sugar, extra care should be taken when rinsing them out. Before storing them in the garage or outside, make sure they are thoroughly washed.
Plumbing that is incorrectly or poorly built will attract pests, so check your plumbing if you have a pest problem. Never leave a clogged sink, bathtub, or toilet for longer than necessary. Cockroaches and flies love the stuff that accumulate in drains. Once you've cleared the drains, inspect them once a month.
Check the whole house once in a while, even though you don't see any issues right now. When looking for bugs, don't forget to look underneath the house. Be sure to look at your basements and crawl spaces.
If all else fails, an automated system may be used to eliminate pests. They're plugged into outlets and make noises that keep vermin away. The sound is undetectable by humans, and it causes no damage to pets or humans. Rodents are able to tolerate the noise and will leave the field.
Learn all you can about the pest that is bothering you. Find out what attracts these rats and what repels them. It's important to adjust the strategies depending on the pest.
Hairspray can be used to destroy flying insects. It is nontoxic to you and any pets you might have, but it is extremely successful in eliminating these bugs. Before they can get to water or food, the hairspray can stick to them. This is useful if you have an insect, such as a bee, and you want to keep a safe distance from it.
If you find a hole in your floor or walls that seems to have been created by a rodent, you can fill it with steel wool. The mouse will die if it eats the steel wool. To prevent the rodents from returning, fill the holes with steel wool mixed with wood putty after they've died.
Be sure to put your new pest-eradication skills to good use. You don't want them to take over your house, so deal with them right away. To get rid of pests in your house, follow the steps outlined above. If the pest issue is out of control, click here to know more about pest eradication.
1 note
·
View note
Text
Pro StoneClean
Pro StoneClean is a professional, Floor cleaning, stone restoration company that provides its services to both domestic and commercial clients in Flackwell Heath, Buckinghamshire, covering Beaconsfield, Marlow, High Wycombe and its surrounding areas. A family-run business, Pro StoneClean has a fully insured team that has undergone extensive training in the cleaning and restoration of stones like Slate, Marble, Limestone, Travertine, Granite and Sandstone. We can also take care of Floor cleaning of Flooring that is made of Porcelain, Porcelain tile, Terracotta, Quarry tile, Terrazzo and Polished concrete. With our passion and expertise involving the use of Mortar, Putty, Grout and Cleaning agent, we will make sure that your floor is Cleaner and at its best for years to come.
Our services include:
Granite Floor Cleaning
Granite is produced by intense heat and pressure. Tremendously tough, non-porous and impermeable to acids like vinegar and citrus fruit, granite is also resistant to scratches and heat. However, oils can still stain it. Pro StoneClean makes use of a professional-grade cleaning solution and floor pad to clean the floor and grout lines using mechanical agitation. The floor is then rinsed, neutralized and extracted using an effective wet extraction system. A resurfacing technique that uses various grades of diamond abrasive pads will then remove scratches until the desired level of finish is achieved.
Karndean and Amtico Floor Cleaning
Amtico and Kardean are common brands of a product that has an appearance that is the same as real, genuine stone and wood flooring. It has several handy benefits over natural products and works perfectly well for areas that are frequently exposed to water like that of bathrooms and kitchens. The floor will be exhaustively cleaned with specialised rotary and agitation machines, a powerful cleaning solution and floor brush. After that step is concluded, the floor is rinsed and extracted with a wet extraction system. After that, the floor is speed dried with professional-grade air movers and once completely dry, a polymer dressing will be settled to give it even more protection. The finish will either be matte, satin or gloss depending on the clients’ wishes.
Limestone Floor Cleaning
Limestone is a sedimentary stone that is made up of calcium carbonate and is regularly mistaken for marble. Limestone is spongy and can stain rather easily. Acidic liquids like vinegar and citrus juices are regular causes of etching on limestone. In cleaning limestone floors, we peel away an old sealer and waxes to show the original floor surface. After that, we use an appropriate right cleaning blend and floor brush to painstakingly clean the floor using mechanical agitation. After that, the floor is then splashed, neutralized and extracted using a potent wet extraction instrument. An industrial air mover will then be used to dry the floor up before the tile and grout are prudently checked with a moisture meter. Once that is done, the floor can be sealed with an impregnator to give it extra protection from from oil and staining.
Marble Floor Cleaning
Marble is a soft stone that is known for its heavy veining and its wonderful shine. However, acids like vinegar or citrus juices will react with the calcium carbonate in the stone, causing dull spots called etching. The damaged surface of the stone will need to be repaired with the use of diamond abrasives with mechanical action to re-polish and refinish the surface. To clean marble, we use a suitable cleaning solution and floor brush and then clean it using mechanical agitation. The floor is then rinsed, neutralised and extracted with a high powered wet extraction system. We will then resurface the marble using different grades of diamond abrasive pads to remove all scratches and etch marks, leaving you with a matte, satin or a high shine mirror-like finish, depending on your preference.
Porcelain Floor Cleaning
Porcelain is a type of ceramic tile, but is harder, stronger and denser, making it more water-resistant. Porcelain is naturally stain-resistant and will not etch from acidic liquids. Its water resistance makes it easier to maintain and clean up but the grout lines are porous, making them susceptible to ingrained dirt and staining. To clean porcelain, we use an ideal cleaning solution and floor brush to deep clean the floor before rinsing and extracting the door with a powerful wet extraction system. The floor is then speed dried with an industrial air mover.
Quarry Tile Floor Cleaning
Quarry tiles are made of red clay that is fired to extremely high temperatures, making them durable and hard-wearing. Unlike terracotta, quarry tiles are non-porous and water-resistant. To clean this, we pick the right cleaning solution and then use mechanical agitation before finishing the job off with a high powered wet extraction system. The floor is then dried using powerful air movers and the tile and grout are checked using a moisture meter before it can be sealed.
Sandstone Floor Cleaning
Sandstone is a sedimentary stone, made by the accumulation of sand, clay and other carbon-based materials. It is a tough textured stone that has various natural earthy colours. Sandstone is absorbent and can be stained very easily. Spills will need to be cleaned up quickly, especially dark colours like that of red wine. We clean sandstone floors using a specific cleaning solution in a process called mechanical agitation. The floor is then washed and extracted with a wet extraction system. After it gets dried using an air mover, the floor is sealed with a water-based impregnator sealer or a colour boosting seal to bring out the shade and detail in the stone.
Slate Floor Cleaning
Slate is a natural stone floor material that is usually black, dark green and grey. This is because of the carbon and graphite found in the stone. Tans, reds and purple colours come to be when iron is existing. Green colours meanwhile, are due to the chlorite that is present. Slate is resistant to stain and not as porous compared to other stones and is not easily etched by acidic liquids. To clean slate flooring, we utilise appropriate cleaning mixtures in a procedure called mechanical agitation before the floor is washed and extracted with a wet extraction tool. The floor is then speed dried and the tile and grout are carefully inspected using a moisture meter. The floor can then be sealed with an impregnator, colour enhancing or surface sealer, depending on the finish the client wants.
Travertine Floor Cleaning
Travertine is a lot like limestone, but is created through a different geological activity. Travertine is made because of the precipitation of calcite from mineral springs. Because of this activity, travertine has a lot pits and holes that are either filled at the factory or if the client so desires, is filled with a grout and resin filler. The floor can be refinished to remove etching and scratches to either a honed, satin, or semi-polished finish. We clean travertine flooring with a particular cleaning mixture and mechanical agitation. Afterwards, the floor is washed and extracted with a wet extraction system. Once the floor is dry, the tile and grout are probed using a moisture meter. After that, the floor can be sealed using an impregnator seal to defend it from oil and staining.
Terracotta Floor Cleaning
Terracotta meaning "baked earth" and this has been used for centuries as a building material because of its durability and hard-wearing qualities. Terracotta comes in warm and natural reddish and brown colours. Because of the high porosity of the tiles, they should be professionally sealed and finished with a wax to bolster the natural colour tones of the tiles. We clean terracotta with a special cleaning solution and rinse and extract the floor with a wet extraction system. The floor is dried with an air mover and afterwards, it can be sealed using an impregnator seal with a matte or satin wax finish depending on the desired finish of the client.
Victorian Floor Cleaning
Victorian tiles are a specific type of encaustic tile that is famous for its stunning geometric patterns. Original Victorian tiles are made from clay and powdered glazes and are fired using a kiln while modern-day tiles are made from cement, colour pigments, sand and marble powder. These versions are sturdier and are more long-lasting than the original Victorian tiles. We clean Victorian tiles with a distinct cleaning solution and rinse, neutralise and extract the floor with a wet extraction system. The floor is speedily dried using an industrial air mover and once that step is done, it can be sealed with the use of an impregnator seal. A matte or satin wax finish can then be applied depending on what the client desires.
Our customers can rely on us to follow through on our pledge to have your stone floor looking as good as the day it was laid. Contact us today to find out what we can do for you!
About Us
Company: Pro StoneClean
Address: 8 Northern Woods, Flackwell Heath, High Wycombe, Buckinghamshire HP10 9JJ United Kingdom
Phone: 07737 137022
Google Maps: https://maps.google.com/maps?cid=7703051869822765605
Trello: https://trello.com/prostoneclean/activity
1 note
·
View note
Text
How To Build A Shed – A Step By Step Guide From.@|how to build your own garden shed@|https://whatshed.co.uk/wp-content/uploads/2014/08/How-to-build-a-shed-9.png@|21

Authored By: Joel Bird
[external_link_head]
Our resident shed building expert Joel was the 2014 winner of Channel 4’s Amazing Spaces Shed of the Year having beat over 10,000 applicants to win. He returned to the show the following year as a judge.
Building a Shed a simple step by step DIY guide
OK, so this page is dedicated to showing you in a general way what you need to do step by step to build a DIY shed. It’s a how to build a shed guide for the typical person that has not built a shed before. All sheds MUST have a strong base, if you want to read our guide on how to build a shed base then that would be fine starting point before you read this guide. Over the years this page has been live, a few of our readers have emailed us and asked us if we could provide some more specific step by step instructions that would help them build a more sophisticated shed. In response to that we have teamed up with the professional carpenter and pro shed builder Ryan Henderson. The plans for sheds Ryan uses are ones that many “professional” carpenters currently use when building bespoke sheds.
The below guide, while not as in depth as those we talk about above, it should however be fine if you are just looking at building something that is fairly simple and basic. If you feel like you would like to add more depth to the step by step guide (so if yo want detailed instructions to add a window or siding etc) then we can’t recommend the MyShedPlans highly enough. OK, so on to the WhatShed step by step guide on how to build a shed.
Step by Step Guide – How to Build a Shed
Step One: Getting the shed build started
Though the actual building of the garden shed/workshop will take more time than the construction of the foundation, it’s without a doubt the much more enjoyable part of the construction process. Watching your very own shed rise up from the ground offers a thrill rivaled only by gazing upon the finished product in its entirety. As you read this guide you will need to decide if you want to add fancy siding or pit in a window.
Keeping everything simple, this how to guide will assume that the shed being built will have a concrete-slab foundation. Though there are other sorts of foundation—including sunken pillar and wooden skid—we have a concrete slab foundation guide already in place.
Now, for those completely uninterested in the laborious endeavor it takes to build a shed from scratch—never fear!—there are several pre-fabricated kit options available. These kits typically come with step by step instructions and all the necessary construction materials pre-cut and pre-labeled. Sure, these kits take some of the fun out of it, but they can be a great time saver for those unaccustomed to working with their hands.
Still, it’s hard for anything to top the sights, smells, sounds and memories that come with the from-scratch build.
Step Two: Tools for the build
Before going any further, the acquisition of several basic tools are absolutely paramount when successfully building a shed.
You’ll need:
Measuring tape
Cross-Cut Saw
Jab Saw
A level
An electric drill with various bits/attachments
Clamps—C-clamps preferably
Claw hammer
Framing square
An array of fasteners—nails, screws, etc.
Carpenter’s pencil
Good pair of work gloves
Although they’re great from the convenience standpoint if already in your toolbox, things like a nail gun or a jig saw are not absolute necessities, so don’t feel the need to go out and spend money on elaborate power tools.
Step Three: Lumber/wood
Unless working with a massive budget and a great-deal of construction experience, the chances are this shed will consist of wood more than any other building material. Sure, steel and composite materials are great if you’re building a skyscraper, but for the purposes a small backyard structure it’s just a tad excessive for most circumstances.
Having said that, choosing the right lumber can make or break a project before it ever gets started, so examine this lumber guide to fully understand the finer points of your main construction material.
More than anything, just ensure the purchase of straight, tight-grain wood and make sure anything touching the concrete slab or surrounding ground has been fully pressure treated, specifically for ground-contact. Long-term, it will be worth the up-front cost.
As for how much lumber will be necessary, that’s difficult to say.
[external_link offset=1]
Depending on the size of the structure, it could be quite a lot, so take the measurements of the foundation to the local lumber yard and talk with them about the details of the project. In all likelihood, they’ve helped customers with similar builds before and will be able to provide accurate estimates.
Additional Perk: If you know the measurements of your foundation and the desired height of the shed, your lumber provider can cut all of your boards and headers to length, which will massively shrink down on prep time. Having already sized wood makes doing sections like roof panels and window areas much easier during construction of your DIY shed. Also, expect to purchase mainly 2×4’s and 2×6’s assuming your project is of relatively basic size.
Step Four: Laying the Base of and Raising the First Wall
Since the beautiful concrete foundation—complete with anchor bolts—has already been poured and set, it’s time to resume the build.
Start by laying your mudsill (sole plate) next to the anchor bolts sticking out of the foundation.
With the measuring tape and carpenter’s pencil, make a discernible tick mark 1 ½ inches from the end of the board, continuing the marking every 16 inches until reaching the end of the board. These marks will serve as indicators for the studs.
Also take care to highlight—using a different mark or indicator than used for the studs—where the anchor bolts line up with the mudsill.
Take your studs and—using the marks you’ve made as directional indicators—fix them to the mudsill by driving a galvanized nail or screw through the board and into the center of the stud bottom.
As they are fixed to the baseboard, go ahead and lay the top plate (the ceiling’s version of the mudsill) across the opposite end and fix it with nails or screws. The finished result should look something like this:
At this time, also drill holes into the mudsill for the anchors. The holes should be large enough to let the anchors to pass through, but not gaping.
Now complete, align the drill bored mudsill on top of the anchor bolts and set down onto the slab. The raising process can be particularly difficult if working alone with a large wall frame, so it may be necessary to get an extra pair of hands to help.
Step Five: Wall How to build and Plan for a Door
Though it would be easy to say “repeat the above process for the remaining three walls”, one of those walls will need to have a door if you ever want to actually go inside of your shed, so at least one wall cannot identically adhere to the instructions above.
Much like a shed, the avid builder can happily build his own doors, but often times it’s quite a bit easier to go with the manufactured door from the local hardware store. The only problem is, manufactured doors only exist in specific sizes, so proper planning and measurement are critical when setting about construction of that fourth, final wall.
The insertion of the door will mean the loss of at least one support stud. To compensate for the structural loss in the wall, installing a header immediately above the top of the door will help bear the weight of the roof.
The header can either sit on jack (trimmer) studs—additional boards secured to the framing connector (like a post anchor or joist hanger), though jack (trimmer) studs are more common and easier to install. A cripple stud—usually a pair of 2×2’s or a 2×4—will run between the header and the top plate.
Pro Tip: Also when considering doors that are best suited for sheds make sure the basic opening for any manufactured door is ½ inch larger (in width and length) than the purchased unit. The extra room will allow breathing room for any necessary adjustments and helps to ensure the flush fit during the DIY installation. Additional window or siding can also be added at this stage.
Step Six: How to build the Walls
With all four walls raised and set on the anchor bolts, create a few temporary buttresses to keep them upright and undamaged. As this is temporary bracing that will eventually come off, don’t use expensive lumber—cheap greenwood or even damaged boards are fine. Secure the brace to the wall with a screw or nail and to the ground by weighing the free end down with a heavy weight like a bag of concrete.
Pro Tip: For those up to going the extra-mile, secure the free end to the ground by driving one wooden stake into the Earth and nailing it to the brace board siding.
The wall frames now secure and semi-sturdy, check the squares. Rather than measuring the diagonal from the top corner of one side the bottom corner of the other, use the 3-4-5 rule to check for 90 degree angles.
Assuming square corners and level measurements all the way around, take the washers and nuts for your anchor bolts and secure them.
Though the shed seems solid at this stage, don’t remove the extra bracing just yet.
Lock the corners where the wall frames touch with extra framing, usually in the form of 2×4 blocks fastened to the two end studs. Install an extra corner stud to the filler block for added security if desired. Keep it all level, thats how to best stop misalignment later.
Double the top plate by taking additional boards measured to identically fit the existing top plates and secure them with nails or screw inserted every 8 to 16 inches this will ensure the siding boards are extra stiff. The addition of a booster plate helps to create the stronger, stiffer structure for the eventual support of the roof and roof panels.
[external_link offset=2]
Step Seven: Framing the Roof
Speaking of roofing, someone should probably address that.
Yes, there are various kinds of roofs, but if this is your first shed, it’s probably best to go with the most simple gable roof. Many types of gable roof exist, some with complex siding, some with a window. Whatever sort of roof gable you decide to add the one thing we would stress is that the more complex the roof the harder it will be to align all the roof panels. We have found the simpler the build the less problems you are likely to have later down the road.
For the unfamiliar, the basic gable roof consists of evenly spaced rafters secured to the top plates and the ridge board—which essentially serves the same purpose as a keystone would in a stone structure. The rafters will extend beyond the walls to form an overhang which will help protect the siding from excess moisture during the rainy season.
Although there are three main sorts of rafter, in the interest of simplicity this shed will only deal with common rafters—boards of equal size and length placed at common intervals—normally 12 to 16 inches—along the length of the top plates and ridge board. If possible, set up the rafters so they sit directly over the wall studs.
While the helpful hand at the lumber yard will probably mention this, it’s good practice to mention it again—make sure the ridge board is at least one size larger than the common rafters. For instance, if using 2×2 rafters use a 2×4 ridge board.
Know that the potential pitch of the roof (rise over run) is completely customisable. The steeper the pitch, the more challenging the construction—BUT—the more usable space the shed will ultimately have.
Again, as this guide is for a basic shed construction of modest size, there will be no joists. However, it’s important to note joists are absolutely indispensable for structures of more pronounced size—for example a shed that could house a mid-size car should have at least a couple of joists running across the top plates.
To properly install the roof frame, cut the common rafters—or have the lumber mill people do it—so the board fits flush where the wood meets the ridge board. Also notch cut the rafters with a 90 degree slot so they can stably sit on the top plates.
Pro Tip: Measure, cut and test a single rafter. Once confirming the test rafter properly sits on the top plate and fits flush with the ridge board, use it as a model for the rest of the common rafters. This will ensure that all cut placements and depth are identical.
Step Eight: How to add the Roof
Take the first two rafters and fix them with nails or screw to the first end of the roof ridge board. For those confused by the language, at this stage one end of the roof ridge board will still have nothing attached to it while the opposite end will have the basic slant-frame of your predetermined pitch.
Repeat this process with the opposite end of the roof ridge board.
Once complete, have someone help to lift the four-rafter roof panels onto the plating and then check for an even level along the set ridge board.
Assuming everything looks good, begin installing the remaining rafters at their predetermined intervals.
Don’t forget to safely fix the rafters to the top plates with framing connectors.
Once the rest of the rafters are installed, climb down of the ladder and take a look at the handsome handiwork. This super structure is the backbone of your homemade garden shed.
Common questions you might have on how to build a shed.
of the rafters are installed, climb down of the ladder and take a look at the handsome handiwork. This super structure is the backbone of your homemade garden shed.
How much does it cost to build a 12×14 shed?
How much do you want to spend? Honestly you get what you pay for an we think that anything from £1,000 up for materials would be a sensible starting point.
Is it cheaper to build your own shed?
If you want a stronger shed that will last longer then building your own can work out best. It also makes adding a window in the location of your choose much easier. A fantastic comparison of the backdown of a purchased off the shelf shed and a home made one was done by Ben over on wood-create.com, its worth a look at if you a seriously weighing up the two options.
How much does it cost to build a shed on your own?
That depends on how complex you want to make it. The addition of a window if you decide to go for cheap horticultural glass can be fairly cheap. If the window you add is double or triple glazed then obviously the cost will go up. Using the shed as as workshop
Do you need a permit or planning permission to build a storage shed?
That all depends, we have a guide on UK planning regulation that you might want to read.[external_footer]
source https://livingcorner.com.au/how-to-build-a-shed-a-step-by-step-guide-from-how-to-build-your-own-garden-shedhttps-whatshed-co-uk-wp-content-uploads-2014-08-how-to-build-a-shed-9-png21/
0 notes
Text
My TOP 10 episodes in all of television - spoiler free!
1. How To Get Away With Murder: Season 4, Episode 8 - Live. Live. Live
On the edge of my seat from start to end, this episode was extremely satisfying as we finally learnt what happened that night. One “what the actual fuck?” moment after the other, there is no better adjective to describe the story than ‘exciting’. Having just spent a season trying to prove that they are good people trying to move on from tangled murders, it was beyond juicy to see their lives unintentionally take a U-turn down Old Habits Road, even when their intentions were good. The writing needs to be commended in this episode not just for the witty and snappy dialogue, but for the actual intellect of the writers to think of stories of this caliber. The way the events unfolded that night were insanely satisfying and beyond my theory-brain’s ability to have ever imagined, yet, still managed to make me say “of course!” once revealed. Topped with EMMY-worthy acting from more than just the sensational lead Viola, the pure creativity and ingenuity of this episode left me feeling like these television writers could get away with murder.
2. How To Get Away With Murder: Season 4, Episode 9 - He’s Dead.
The perfect follow up to the perfect finale. This episode flowed from the previous so well that if we eliminated the “previously on”, the two episodes can stand alone as a mini movie revolving around one never-ending messed up night. The roller coaster doesn’t slow down, actually, it speeds up, which was a shock as I thought it was already going full speed. Seeing the characters fall deeper into the rabbit hole of their old habits, and then trying to dig themselves out, was entertainment at its best. Just because there were not as many “what the actual fuck?” moments as the previous episode, there were still plenty sighs of relief, grunts of anger, and throwing of the hands in the hair. The episode was very fast paced with lots of complicated stories occurring simultaneously, and successfully keeping up with them all felt like a reward in itself.
3. Pretty Little Liars: Season 7, Episode 20 - Til Death Do Us Part
Although this episode was generally not well received by most PLL veterans, I can only love this episode as it was essentially an on-screen adaptation of my written theories I made leading up to the episode. It was beyond satisfying to see that I had successfully theorised, almost to a tee, the series ending to a show that will forever be in my heart. The execution lacked, specifically in intensity and any sense of danger, however the overall story being told was very detailed and mostly clever - certainly free of plot holes, which was impressive given the convoluted state of the series at the time. The story was by no means flawless as the writers certainly missed easy opportunities to go out with a louder bang, however, after the difficult mental task of setting aside all the thoughts of what could have been, the episode can be perfectly summarised as satisfying and bittersweet. I think I will forever remember this day. June 27, 2017. It was an unforgettable experience.
4. How To Get Away With Murder: Season 2, Episode 9 - What Did We Do?
This episode elevated the show to a level I never knew it was reaching for. Other finales of this show had me screaming WTF out of pure disbelief and shock, however this finale had me screaming WTF out of disturbance - I was genuinely bothered, and made to feel uncomfortable, at the methods they used to get away with murder. This episode features one of the most iconic scenes of the entire series to date, which, if this episode had aired prior to the EMMYs, would have made Viola Davis the no-brainer winner (if she wasn’t at the time). As if the finale wasn’t gripping enough, it ended with a scene that was like a superfluous yet delicious cherry on top. The final scene redefined everything we thought we knew about two major characters and the episode overall was twisted and exciting to say the least.
5. Pretty Little Liars: Season 7, Episode 19 - Farewell, My Lovely.
The penultimate episode to the loveable series can be summarised with one word: satisfying. Unusual for this show, so much action and plot progression was perfectly fit into one episode. Further, the show finally reached my desirable ratio of mystery to romance: all mystery and no romance. An impressive amount of story was wrapped up, answering enough questions to begin the series finale without an immensely overwhelming amount of content to sort through. Whilst the answers themselves weren’t overly shocking, actually, some fan theories were more exciting than what the writers delivered, the story that was provided was undebatably logical and cohesive which made it tough to argue with. Unfortunately the writers missed a great opportunity to name-drop the show. “You’re not criminals. Not really.” Insert here: “You’re just a bunch of pretty little liars”. Whilst it would appear corny in that moment of first viewing, those feelings undoubtedly would pass with time and it would have been iconic in Pretty Little Liars history. Nonetheless, the penultimate episode served its purpose very well: it set up the series finale by answering questions that were not worth dwindling on for one more second.
6. The Fosters: Season 5, Episode 1 - Resist
Bone chilling. My goosebumps had goosebumps as I watch a mother race to find her daughter who is being held captive by a group of rapists - an action packed, nail biting story I would’ve never envisioned back at the show’s conception five years ago. Watching Callie value her friend’s lives more than her own, is upsetting but admirable, and the passion of the students protesting against the privatisation of their school that they are so proud of, is nothing short of beautiful. Leave it to The Fosters to make you feel what the characters feel, even when the character’s experiences are un-relatable. I for one, have never faced the problem of school privatisation, or, touch wood, rape. But the emotions are so raw and expertly crafted through the lens of the camera that it’s actually impossible to not feel for the characters.
7. The Fosters: Season 5, Episode 10 - Sanctuary
I’m not easy to crack, but this episode marked the first time I actually shed a tear or two of pure happiness at a television show. Trust The Fosters to pull on your heart strings. The episode deals with an immigrant who is wanted because her DACA status is pending, and the lengths that her friends go to to help her stay in the country she was raised in and calls home. It was somewhat surreal to reflect on what the show had now become: no longer is this show about a girl who wants to be adopted by a family. This is about a girl who constantly walks on fire for her friends and expects nothing in return. Police are involved, and stakes are higher than ever. The episode preached a message that isn’t said loud enough, and is one that any television-lover can watch regardless of their history (or non-existent history) with The Fosters. Whilst the juicy parts of the episode co-existed amongst a lot of romance filler which I do not care too much for, the story was so important to tell, and was told so damn well, that on this rare occasion, I was able to forgive and oversee the filler.
8. Riverdale: Season 1, Episode 12 - Anatomy of a Murder
Bombshell after bombshell, this episode surprised me not just in terms of the story’s reveals, but also the reveal that the writers want this to be a twisted thriller series. So much happened in a short time span yet it never felt overly condensed. It moved at an impressive pace that comfortably told the story in enough depth. This had everything a mystery show needs in its big important episodes: family drama, a death, alternative suspects gained or freed, the reveal of the true killer’s identity, impressive acting, another death, and a cliff hanger (literally, wink wink). It’s clear the writers gave this everything. All of this occurred in a visually stunning episode; beautiful and grand sets, vibrant and punchy colours, and powerful camera perspectives. This episode definitely could’ve proudly served as the season finale and actually, is my benchmark I use to compare all other Riverdale episodes, whereby this is what a ten out of ten looks like.
9. Supergirl: Season 2, Episode 22 - Nevertheless, She Persisted.
Excuse the cliche, but never judge a book by its cover. I never would’ve thought, ever, that a superhero show will make me feel more than just excitement at the action-packed dangerous story lines: this episode made me feel heartbreak, sorrow, shock, fear, disbelief and joy. Ruling out superhero shows because you’re not into fantasy and super-powers, is a silly move, since this episode proved yet again that Supergirl is grounded in reality, and the powers and super villains are just extra for the sake of fun. The emotions Kara goes through are human and relatable, and the emotions Supergirl goes through are still relatable, but you must dig to find the underlying meaning rather than take the red cape for face value. This episode flows so perfectly from the previous episode, Resist, that they could both pass as a two-hour movie. I struggled to decide which episode to place on this list however I ultimately decided to place this one because of its slightly higher stakes.
10. The Fosters: Season 4, Episode 1 - Potential Energy
Here The Fosters tackles the prominent issue of school shootings. It was captured in a way that sent chills down my spine, and I thanked God that I never experienced anything like that, and, honest to God, said a prayer that night that this madness stops. The brilliance of the episode is that it emphasised the shooter’s perspective too in a way that obviously didn’t justify the decision to bring a gun to school, but instead showed a range of variables that can lead someone to do this - therefore sparking conversations to potentially avoid such horror and danger. As with every single episode of The Fosters, it is simply a joy to watch Stef and Lena show their love for their kids and this episode in particular, when their lives are at risk, was heightened for the show and a damn joy to watch.
#top 10 TV episodes#top 10#personal to me#I watch a lot more shows than listed here!!!#but these are the ones that are closest to me of the numerous episodes ive ever seen#this took a lot longer than i thought to put together#TV#television
10 notes
·
View notes
Link
Best Laminate Flooring Repair Service Las Vegas Nevada | McCarran Handyman Services
More information is at: http://www.handymanlasvegasnv.com/linoleum-flooring-installation-near-me.html
Youtube link: https://youtu.be/QhwVg2E88Ho
Facebook link: https://www.facebook.com/292645991337522/videos/523976734849821/
Looking for Laminate Flooring Repair Service near Las Vegas Nevada? McCarran Handyman Services is the premier Laminate Flooring Repair Service in the Las Vegas Nevada. Best Laminate Flooring Repair Service in Las Vegas Nevada. Cost? Free estimates! Call now or Send a quick message for an estimate.
REQUEST A FREE QUOTE NOW
LAMINATE FLOORING REPAIR SERVICE IN LAS VEGAS NEVADA
The Laminate Flooring Repair will At McCarran Handyman Services, our experienced flooring experts can provide the best Laminate Flooring Repair in Las Vegas Nevada at a very reasonable price. We take pride in offering the best Laminate Flooring Repair. Laminate flooring has been taking the home decor market by storm for over two decades now. And no wonder, with all it has to offer -durability, low maintenance, and glowing good looks, for a modest outlay of cash. laminate floor is not indestructible. Especially if you have children and/or animals in your home, laminate is subject to both normal wear and tear and occasional damage. Our McCarran Handyman Services experts take pride in providing the best service in the Las Vegas Nevada area.
An advantage of this type of flooring, however, is that it is installed as a "floating floor," rather than being nailed in place. This means that in case of damage, a small section can be fixed -you do not have to replace the whole floor. Find out the facts about laminate flooring repair.
DAMAGE PREVENTION
To minimize the possibility of scratches to your flooring, cushion the feet of your furniture with felt floor protectors. And speaking of feet, keep your pet's claws trimmed too. Doormats at each entrance to your house will avoid the tracking in of potentially harmful sand and debris, as well as moisture.
Wipe up any spilled liquids - even plain water- promptly to avoid staining and/or bubbling of the laminate floors.
REPAIR PREPARATION
Clean the floor with a microfiber mop before attempting any repair. Many of the fixes listed below will work best if no one walks on the floor for a period of up to 24 hours afterwards. In case of major damage or stubborn stains, consult your flooring contractor; repair may be covered by your purchase warranty.
COVER-UPS AND FILLERS
1. Touch-up Pen or Filler Stick
To tackle minor scuffs, scratches, or nicks, try inexpensive, easy-to-use touch-up pens or filler sticks (similar to wax crayons). Pens may be bought individually, but for the most successful color match, it's best to purchase a set. This will include several wood tones varied from light to dark, such as oak, maple, walnut, mahogany, and so on, to blend as appropriate. The pens cost about $10 per set and dry completely in 5 minutes. They may be utilized for touch-ups on furniture, in addition to laminate flooring, but are only for indoor use. Filler stick sets are higher priced, but can fill small scratches and don't require any drying time.
2. Laminate Floor Repair Kit
A laminate floor repair kit is the most costly fix in the "cover-up and filler" category. However, in addition to giving a more precise color match, it can fill in somewhat larger gouges and holes. The kit may contain wax, paste, or putty, with a variety of tints that you custom blend to the shade you want. The tools you will need to prepare and apply the compound, such as a spatula and brush, are normally included.
BOARD REPLACEMENT
3. Remove and Replace
In case of more serious damage to your laminate floor, repair will involve replacing the damaged board(s). For the neatest results, carefully remove the baseboard closest to the area of laminate flooring which you need repaired. Then disassemble the floor, unlocking board after board from its tongue-and-groove arrangement, until you are able to take out the damaged one. Attach your replacement and work backwards to put the floor back together.
4. Cut and Glue
If floor disassembly proves to be too difficult, you can slice out the blemished area only and then carefully cut a laminate "patch," measured to fit the empty spot. After gluing the patch in place, put a heavy weight on top and leave it to dry undisturbed for 24 hours.
NOTE: The assumption here is that you have a few extra boards left over from your laminate floor installation. If this is not the case, take the damaged piece to your supplier to find the best match.
How can repair a damaged laminate board?
Light damage to your laminate floor can be easily repaired with the repair kit. Sometimes, however, a board is damaged so badly that you’ll have to replace it. Removing a board from the floor isn’t the easiest task, but we’ll show you how you can go about it, one step at a time.
You’ll need a couple of tools to replace the broken board: some tape, a knife, a pencil, a plunge saw with rail, a chisel, a hammer, a crowbar and a tapping block.
● Make sure you clearly mark the broken board with your pencil or a pen. Tape off the contours of the damaged floorboard so that it stands out.
● Take a new board and draw a sawing line on the click side of the new plank. Mark the underside of the board so that you know where exactly the edge comes. We’ll glue this part later on.
● Saw off the grooves of the new board with your plunge saw.
● Using the same circular saw, saw two parallel grooves in the middle of the damaged board, lengthwise. Bring the grooves as close to the edges as possible.
● At the end of the broken plank, make incisions at an angle with your saw. Let the incisions cross the grooves you made earlier. This will make it easier to remove the board.
● Remove the beat-up board with a chisel.
● Apply glue to one of the short and one of the long sides of the surrounding boards.
● Grab the replacement board and click it together with the part you didn’t saw off, into the sides you didn’t glue.
● Using a hammer, a crowbar and a tapping block, carefully tap the new board into its place and press well
● Spread about 40 kilos of weight over the board and let the glue dry for a few hours. Afterwards, you’ll have a floor that’s as good as new.
To obtain a free quote for Laminate flooring Repair in Las Vegas Nevada, please don’t hesitate to contact at McCarran Handyman Services Floor Services.
Call us for :
· Laminate Flooring Repair Filler
· Laminate Flooring Repair Kit
· How To Repair Laminate Flooring
· How To Repair Laminate Flooring That Is Separating
· How To Repair Laminate Flooring Water Damage
· Laminate Flooring Repair Near Las Vegas Nevada
· Laminate Floor Repair
· How To Fix Laminate Flooring That Is Buckling
BEST LAMINATE FLOORING REPAIR SERVICE IN LAS VEGAS NEVADA
MCCARRAN HANDYMAN SERVICES
REQUEST MORE INFORMATION. CONTACT US!
CONTACT:
McCarran Handyman Services
#1 Handyman Service in Las Vegas Henderson Nevada!
CALL (702) 570-4279 HANDYMAN 1, http://www.handymanlasvegasnv.com/
CALL (702) 514-3052 HANDYMAN 2, http://www.service-vegas.com/
CALL (702) 530-7597 CLEANING 1, http://www.mgmhouseholdservices.com/
CALL (702) 551-2023 CLEANING 2, http://www.cleaningserviceslasvegasnv.com/
CALL (702) 329-9729 JUNK REMOVAL, http://www.mgmjunkremoval.com/
Located in Las Vegas Nevada
Monday to Sunday 6:00 am – 11:00 pm
WEB: www.handymanlasvegasnv.com
EMAIL:[email protected]
http://www.handymanlasvegasnv.com/
HANDYMAN SERVICES:
· Bathroom Kitchen Basement Remodeling, Interior and Exterior Painting
· Cabinetry and Carpentry, Commercial Residential Painting
· Concrete & Masonry, Damage Restoration
· Decks & Railing, Demolition Services, Deck Staining
· Door Repair Installation Services, Drywall Repair and Installer
· Fences & Gates, Flooring and Foundation Services
· Gutter Cleaning Services
· Heating & Air Conditioning/HVAC
· Landscaping Services, Lawn Care, Hardscaping Services
· Painting, Plaster & Drywall Services
· Plumbing Services, Roofing and Room Additions and Siding
· Swimming Pool Maintenance and Cleaning
· Waterproofing, Windows Repair Installation Services
· Home Building and Home Remodeling
· General Contracting, Hauling and Property Management
· Solar Panel Services, Assembly and Installation Services
· House Office Building Cleaning, Maintenance and Junk Removal
SERVICE AREA: Las Vegas NV, Boulder City NV, Enterprise, Henderson, North Las Vegas, Paradise, Spring Valley, Summerlin, Sunrise Manor Nevada.
Las Vegas Neighborhoods:Aliante, Anthem/Anthem Country Club, Chinatown, Downtown Las Vegas, Green Valley, Lake Las Vegas, Las Vegas Country Club, MacDonald Highlands, Mountain's Edge, Paradise Palms, Queensridge & One Queensridge Place, Seven Hills, Southern Highlands, Summerlin, Summerlin South, The Lakes, The Ridges, West Las Vegas Nevada.
Service Area Zip Codes: 88901, 88905, 89101, 89102, 89104, 89106, 89107, 89108, 89109, 89110, 89116, 89117, 89124, 89125, 89126, 89127, 89128, 89129, 89130, 89131, 89133, 89134, 89136, 89137, 89138, 89143, 89144, 89145, 89146, 89147, 89149, 89151, 89152, 89153, 89154, 89155, 89157, 89158, 89161, 89162, 89163, 89164, 89166, 89185.
0 notes
Photo

The Tools (And Tricks) You Need To Install An Ikea Kitchen Yourself https://ift.tt/2EWSK2p
Many of you have asked for tips and tricks to make installing an Ikea kitchen go more smoothly and look (and function) the best it possibly can. And the good news is that after installing three of them in a little over a year and a half (!!!), we have learned A TON about how to make things a little easier and help you end up with a better result. So settle in, I’ve got twenty tools & tips that can make all the difference.

First off, we like Ikea cabinets and have personally installed them in five rooms: our laundry room & bonus room at home, our beach house kitchen, and now these two duplex kitchens. We have lived with the ones in our home for nearly five years and they’re great. Not a single issue. They are smartly made, very durable, and they have a great 25-year warranty and a great price tag (often thousands cheaper than other options). They also come with many thoughtful features like soft close drawers that come standard and tons of customization options. So yeah, some Ikea furniture is known for feeling a little cheap and wobbly, but that has not been our experience with their cabinets AT ALL.
Ok, but back to the point of this post – tips and tools to make your Ikea cabinet install easier. Some of the tools I’m listing here are absolutely necessary and some are optional (they’ll just make the process easier, faster, and less frustrating). And as you read through this list, I think you’ll also get a pretty good sense of the steps (and curveballs) involved too, which I hope will help as well.

I’ll include a short bulleted list of everything at the end of the post too, that way you can use it as a tool checklist. But let’s just get right into it.

1. Your Itemized Receipt/Order
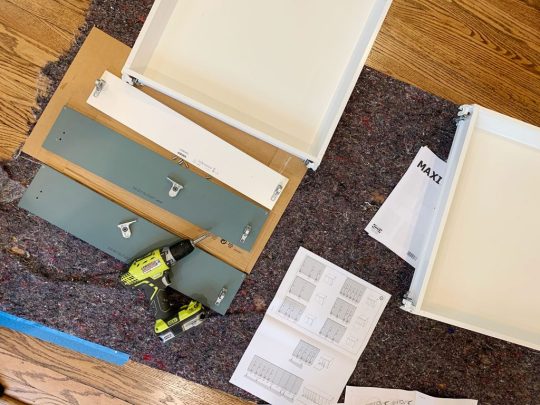
Before you build anything, you’ll want to take time to inventory and organize all of your boxes. We had over 200 boxes (!!!) delivered for our two duplex kitchens, so it helped to sort everything into piles beforehand.

We personally like to sort boxes by item (Sektion boxes over here, Maximera drawers over there, all of our cabinet fronts somewhere else, etc.) but you may find it helpful to sort yours by cabinet instead (ex: the box, drawer, hinges, and front for one cabinet all together in one pile – this is how Ikea breaks them up your order form). Either way you do it, this sorting process will help you identify any missing pieces and also make it faster once you start building.
2. Power driver (with Philips head)

This combo gets a lot of use in this install (especially the power driver/drill) – but they’re needed first to construct your cabinet boxes (Sektion pieces). We love constructing the boxes first because you quickly get to see the shape of your kitchen come to life.

And even though Ikea is known for their allen wrenches, you don’t use them AT ALL during a typical kitchen installation! So don’t worry about having lots of specialty drill bits. You just need a normal Phillips head to screw these puppies together.
3. Hammer
You’ll also need a hammer handy to nail the MDF backings onto the cabinet backs. It may also be useful if you need to tap any anchors into your drywall when it comes time to hang your cabinets.
4. Magnetic Drill Bit Holder
Having one of these on your drill can save you a lot of frustration while building your cabinets and drawers. You can buy one separately for about $2 or it often comes included in drill/driver sets like ours. It’ll magnetize your drill bits, meaning many of the screws that Ikea provides will stick to your drill handsfree (thanks to the magic of magnets). We found this VERY helpful when trying to screw into small spots that were too tight for our fingertips (we couldn’t reach in and hold the screw steady, so having a magnetized drill bit that held it for us was key).

5. Measuring Tape
The next several tools are needed for attaching your cabinets to the wall. Whether you’re doing upper or lower cabinets, Ikea’s system uses a metal track (called the Sektion suspension rail) that you attach to your wall and then the cabinet boxes hang from these. The rail system is extremely handy because if you make sure the rail is level, your cabinets all hang from that and are guaranteed to be level! I know, it’s GREAT. The only time I don’t use their rail is when I don’t have a wall behind my cabinets, like if you’re doing an island. In that case I’ve built my own bases from 2×4″s, but more on that later.
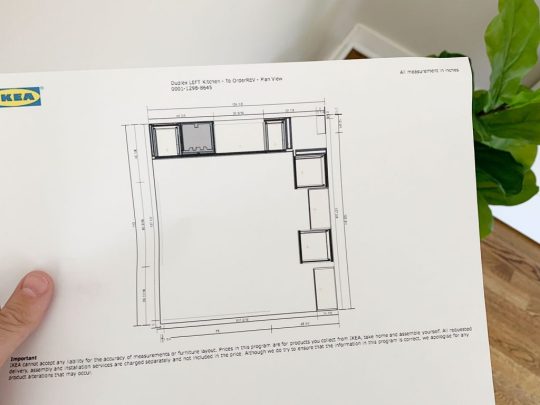
For now, just know the measuring tape will be useful in determining exactly where in your kitchen you’re placing your cabinets – both side-to-side on each wall, and how high the rails need to be hung (Ikea provides guides for this in their instructions). You will probably want to have your kitchen plan/schematic from Ikea handy too.

6. Dremel Or Hacksaw
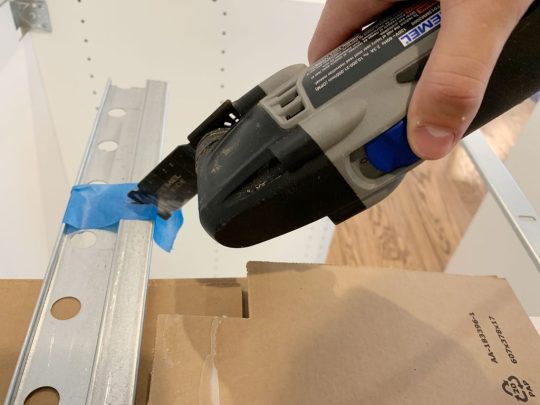
Once you know where each run of cabinets is going, you’ll need to cut your metal suspension rails to size. The rails are sold in 7 foot lengths, but if you only have 4 feet of cabinetry in one area – you only want 4 feet of rail.
You can cut these by hand with a hacksaw, but we find it much faster to use our Dremel Multi-Max with a metal cutting blade.

I typically mark my cut on a piece of painters tape and cut across the open top of one of our cabinet boxes (with a piece of cardboard to protect the cabinet underneath).
7. Stud Finder
You want to screw the rail into at least a few studs in your wall for maximum hold. So it’s smart to use a stud finder to locate and mark the studs that fall within the area you’re hanging the rail – that way you can be sure to go into them and get a nice firm hold. Since studs are typically 1.5″ thick, I like to mark the full width that my stud finder indicates, since you may not know exactly where the holes on the Sektion rail will line up.

8. Medium-Size Level
Once I know where my studs are, I hold my cut-to-size metal rail and, with a medium sized level (like this 24″ level) held against it, I mark the top line of my rail AND where the holes line up with my studs. I suggest amedium sized level for this just because they’re easier to wrangle during this step.

I also mark a few additional holes where I’ll use screws paired with anchors. I believe Ikea suggests at least having a screw every 12″ inches – but for short sections like this, I like to make sure I hit at least 2 studs and then have a screw at either end of the rail that goes into an anchor.
9. Heavy Duty Screws & Anchors
After some trial and error, we found that we like using these GRK Fastener Cabinet Screws to secure our rails into studs. They’re easy to drive, they hold really tight, and they include the star-head bit you need for them. We have tried other, cheaper “cabinet screws” and the heads kept breaking off. It was MADDENING.

We also like to have some anchors on hand too, like these E-Z Ancor packs that come with screws, for those additional support screws that we add.
10. Long Level
One of the biggest challenges we’ve found in this process is getting things level. Just because you’ve hung your rail level on the wall doesn’t prevent things like slopes in your floor or bows in your wall from chucking some additional curveballs in your direction. So your best defenses are a lot of patience and a nice long level, like this 4ft level we bought specifically for this task (after learning that it’s a lot harder to use a smaller level to solve these issues).
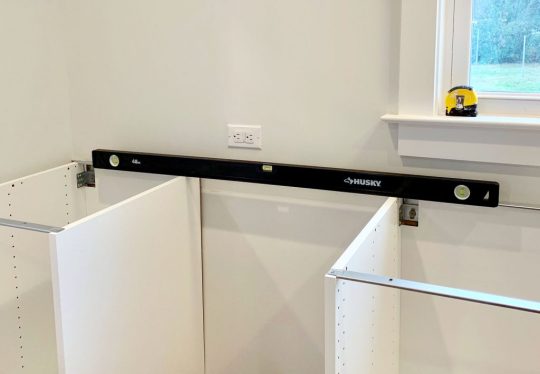
Your medium sized level will help with the process as well (especially in checking that each individual cabinet is level front-to-back) but you’ll want something bigger to check longer spans of cabinets. You could purchase an even longer level if you wanted, but they can start to get pricey, so we found a 4 foot long level to be sufficient, especially for checking across the gaps that you’ll leave for appliances like a 30″ stove or a standard 24″ dishwasher.
11. Shims
A lot of level issues can be corrected by twisting the adjustable plastic feet that come with your base cabinets, or by adjusting the placement of your metal rail. But if you’re dealing with bows in your wall (which you can find by placing your long level against it) you’ll want to have some wood shims on hand to place behind the metal rail. In these old houses, we had to use quite a few in a couple of places!
12. Jigsaw
When it comes time to install your sink base cabinet, you’ll need to make some holes for your plumbing. For smaller pipes like your water supply lines, you can just drill holes using a large drill bit (we used the 3/4″ bit in this set). But for things like your large drain pipe, you’ll either need to buy a larger hole bit or break out a jigsaw. Even though we don’t get the cleanest cut with it, the jigsaw gives us a little more wiggle room when placing the cabinet (since the drain pipe isn’t flexible like the supply lines) and we can also use it for other cuts like for exposing the outlets along the wall (the one below powers the garbage disposal under the sink).

Just be sure to make careful measurements before you cut. We usually put a layer of painters tape around the area we’re cutting. It allows us to mark our cut without marking the cabinet, plus the tape helps keep the white finish from cracking off. Either way, this stuff will all be hidden under the sink so it doesn’t have to look perfect.
13. Clamps
As you start to get your cabinets in place and leveled, you’ll want to secure any adjacent cabinets together. Ikea provides screws for doing this, but you’ll want to use some clamps (we like these 6″ bar clamps) to hold the cabinets tightly together before you begin screwing.
We didn’t get a picture of that process, but the clamps come in handy A LOT as an extra set of hands – like when we were installing this bracket for the exhaust hoods that we hung over the stoves.
14. Circular Saw and/or Table Saw
In addition to screwing cabinets together, you may find yourself attaching cover panels or filler pieces at some point. Cover panels go on exposed ends of cabinets (so you can’t see the metal rail they hang on) or, in our case, we used some large cover panels to create a box around the fridges at the duplex. So you’ll need some sort of larger saw to make long, straight cuts. Our cover panels were a bit too wide, so I used a circular saw to shave a few inches off one side.

I didn’t use a table saw for that panel because running an 8 foot tall panel that’s this wide across my table saw would’ve been tough. But for smaller pieces (like filler pieces that are only about 3 feet long) a table saw is often easier, especially if you’re only shaving off a little bit. But if that’s too pricey and you’ve got a steady hand, you can get by with the circular saw.
15. 2 x 4″ Boards
Every time we’ve installed an Ikea kitchen we’ve needed some 2×4″s at some point. At the beach house we used them to make some bases for the island cabinets.

Basically, they were just some boxes we made almost the same size as each cabinet (slightly narrower to account for the toekicks) that we secured to the floor using pocket holes. To drill the pocket holes, you can use something like a…
16. Kreg Jig
Now, a Kreg Jig isn’t absolutely necessary here, but I’ve had one for around nine years now so I’m accustomed to breaking it out for tasks like this. So while I’m a big fan of having one in your arsenal, I understand that you’ve just bought a new kitchen so tacking on another $99 tool to your budget isn’t always practical.
I did use it again for the duplexes to make more 2×4″s into boxes (this time for mounting the above-fridge cabinet away from the wall, so it sat closer to the front of the fridge).

The boxes acted as an extension of the wall. The top one was for mounting the metal rail, and the bottom one gave the base of the cabinet a spot to rest so it didn’t tip back wildly. They also gave us a way to mount that large cover panel to box in the fridge.
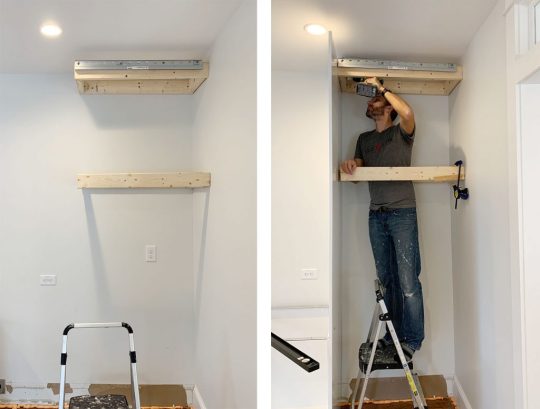
I guess I should add in here that a step ladder is also useful, so let’s officially put that on the list.
17. Manual Screwdriver
Once your cabinets and panels are hung, leveled, and secured to each other, the next part of the process is to add your doors and drawers. The instructions here are pretty self-explanatory and the main tool you need is a power driver to screw everything together. Our main word of warning is to pay close attention to screw placements when you’re assembling drawers! Depending on where each drawer goes in the stack (top, middle, or bottom) there are sliiiiight differences in the instructions. So while we find it most efficient to do multiple drawers at once, we still pay close attention – especially for the first few.
Ok, back to the manual screw drivers. One big part of installing doors and drawers is tweaking and adjusting them for even and level spacing. For this you’ll want to a regular ol‘ manual Philips head screwdriver. It can be kind of tedious and frustrating, but it’s worth taking your time with it. This video shows it in a bit more detail.
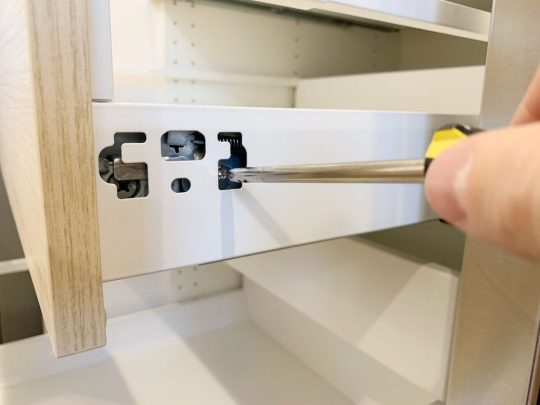
You also will want a flathead screwdriver for twisting the little piece of plastic that locks each cabinet onto the metal rail, which comes up earlier in the process.
18. Miter Saw
Tasks like cutting your 2×4″s or even your filler pieces will be made easier and faster by having a miter saw on hand (we own this miter saw). You’ll also find that it’s helpful when it’s time to cut and install your toekicks. Ikea’s sells toekicks to match your cabinet fronts and they clip on to the plastic feet you will have attached to the bottom of your base cabinets.

In our beach house kitchen we installed quarter round in front of the Ikea baseboards to help disguise some floor level issues, as well as using quarter round around the island where we built our own base (we used standard wood baseboard trim instead of the Ikea toekicks around the island). Meanwhile, we just used the Ikea toekicks in the duplex kitchens and the floors were more level (and we think the wood and blue cabinets were more forgiving than white ones) so we didn’t need to add quarter round and it looks great.

19. Nail Gun
In addition to using a nail gun to attach additional molding like quarter round if you’re adding that (again, the Ikea baseboards just snap on so you won’t need it for that) I also find a nail gun comes in handy sometimes for attaching small filler pieces. Especially in cases where they’re too thin to take a screw.
20. Others Tools
Real quick, here are some other items you may want to have on hand. Some I’ve mentioned or shown already, but haven’t officially listed:
Pen or pencil
Painters tape
Step ladder
Utility knife or scissors (for opening boxes faster!)
Crowbar (if you need to remove any baseboard or molding)
Broom, dustpan, and/or vacuum with a hose (we have this one)

Your Ikea Kitchen Installation Tool Checklist
As promised, here’s all of the items in one place so you can make sure you have everything you need on hand. I’ve organized it a bit differently than above, just to put like items together. You may have special circumstances for your project that require more, less, or other tools – but I’ve found this to be a pretty comprehensive set:
Your itemized receipt / order
Hammer
Manual screwdrivers
Crowbar
Measuring tape
Pen or pencil
Painters tape
Step ladder
Power driver
Drill bit set with magnetic bit holder & 3/4″ bit for plumbing holes
Dremel or Hacksaw
Stud finder
Medium level (24″)
Large level (48″)
Wood shims
Cabinet screws (roughly 4 per cabinet)
Screws with anchors (roughly 2 per cabinet)
Jigsaw
Circular saw and/or table saw
Miter saw
Utility knife or scissors
Nail gun
Clamps
2×4″s (optional)
Kreg Jig (optional)
Broom, dustpan, and/or vacuum with hose
Good luck and happy installing!
P.S. For other posts we’ve written about installing Ikea cabinets, here’s one about installing our laundry room cabinets 5 years ago, and another one about using Ikea cabinets to make a wall of built-ins for our bonus room.
*This post contains affiliate links*
The post The Tools (And Tricks) You Need To Install An Ikea Kitchen Yourself appeared first on Young House Love.


0 notes
Text
The Tools (And Tricks) You Need To Install An Ikea Kitchen Yourself
Many of you have asked for tips and tricks to make installing an Ikea kitchen go more smoothly and look (and function) the best it possibly can. And the good news is that after installing three of them in a little over a year and a half (!!!), we have learned A TON about how to make things a little easier and help you end up with a better result. So settle in, I’ve got twenty tools & tips that can make all the difference.

First off, we like Ikea cabinets and have personally installed them in five rooms: our laundry room & bonus room at home, our beach house kitchen, and now these two duplex kitchens. We have lived with the ones in our home for nearly five years and they’re great. Not a single issue. They are smartly made, very durable, and they have a great 25-year warranty and a great price tag (often thousands cheaper than other options). They also come with many thoughtful features like soft close drawers that come standard and tons of customization options. So yeah, some Ikea furniture is known for feeling a little cheap and wobbly, but that has not been our experience with their cabinets AT ALL.
Ok, but back to the point of this post – tips and tools to make your Ikea cabinet install easier. Some of the tools I’m listing here are absolutely necessary and some are optional (they’ll just make the process easier, faster, and less frustrating). And as you read through this list, I think you’ll also get a pretty good sense of the steps (and curveballs) involved too, which I hope will help as well.

I’ll include a short bulleted list of everything at the end of the post too, that way you can use it as a tool checklist. But let’s just get right into it.

1. Your Itemized Receipt/Order
Before you build anything, you’ll want to take time to inventory and organize all of your boxes. We had over 200 boxes (!!!) delivered for our two duplex kitchens, so it helped to sort everything into piles beforehand.

We personally like to sort boxes by item (Sektion boxes over here, Maximera drawers over there, all of our cabinet fronts somewhere else, etc.) but you may find it helpful to sort yours by cabinet instead (ex: the box, drawer, hinges, and front for one cabinet all together in one pile – this is how Ikea breaks them up your order form). Either way you do it, this sorting process will help you identify any missing pieces and also make it faster once you start building.
2. Power driver (with Philips head)

This combo gets a lot of use in this install (especially the power driver/drill) – but they’re needed first to construct your cabinet boxes (Sektion pieces). We love constructing the boxes first because you quickly get to see the shape of your kitchen come to life.

And even though Ikea is known for their allen wrenches, you don’t use them AT ALL during a typical kitchen installation! So don’t worry about having lots of specialty drill bits. You just need a normal Phillips head to screw these puppies together.
3. Hammer
You’ll also need a hammer handy to nail the MDF backings onto the cabinet backs. It may also be useful if you need to tap any anchors into your drywall when it comes time to hang your cabinets.
4. Magnetic Drill Bit Holder
Having one of these on your drill can save you a lot of frustration while building your cabinets and drawers. You can buy one separately for about $2 or it often comes included in drill/driver sets like ours. It’ll magnetize your drill bits, meaning many of the screws that Ikea provides will stick to your drill handsfree (thanks to the magic of magnets). We found this VERY helpful when trying to screw into small spots that were too tight for our fingertips (we couldn’t reach in and hold the screw steady, so having a magnetized drill bit that held it for us was key).

5. Measuring Tape
The next several tools are needed for attaching your cabinets to the wall. Whether you’re doing upper or lower cabinets, Ikea’s system uses a metal track (called the Sektion suspension rail) that you attach to your wall and then the cabinet boxes hang from these. The rail system is extremely handy because if you make sure the rail is level, your cabinets all hang from that and are guaranteed to be level! I know, it’s GREAT. The only time I don’t use their rail is when I don’t have a wall behind my cabinets, like if you’re doing an island. In that case I’ve built my own bases from 2×4″s, but more on that later.
For now, just know the measuring tape will be useful in determining exactly where in your kitchen you’re placing your cabinets – both side-to-side on each wall, and how high the rails need to be hung (Ikea provides guides for this in their instructions). You will probably want to have your kitchen plan/schematic from Ikea handy too.
6. Dremel Or Hacksaw
Once you know where each run of cabinets is going, you’ll need to cut your metal suspension rails to size. The rails are sold in 7 foot lengths, but if you only have 4 feet of cabinetry in one area – you only want 4 feet of rail.
You can cut these by hand with a hacksaw, but we find it much faster to use our Dremel Multi-Max with a metal cutting blade.
I typically mark my cut on a piece of painters tape and cut across the open top of one of our cabinet boxes (with a piece of cardboard to protect the cabinet underneath).
7. Stud Finder
You want to screw the rail into at least a few studs in your wall for maximum hold. So it’s smart to use a stud finder to locate and mark the studs that fall within the area you’re hanging the rail – that way you can be sure to go into them and get a nice firm hold. Since studs are typically 1.5″ thick, I like to mark the full width that my stud finder indicates, since you may not know exactly where the holes on the Sektion rail will line up.

8. Medium-Size Level
Once I know where my studs are, I hold my cut-to-size metal rail and, with a medium sized level (like this 24″ level) held against it, I mark the top line of my rail AND where the holes line up with my studs. I suggest amedium sized level for this just because they’re easier to wrangle during this step.

I also mark a few additional holes where I’ll use screws paired with anchors. I believe Ikea suggests at least having a screw every 12″ inches – but for short sections like this, I like to make sure I hit at least 2 studs and then have a screw at either end of the rail that goes into an anchor.
9. Heavy Duty Screws & Anchors
After some trial and error, we found that we like using these GRK Fastener Cabinet Screws to secure our rails into studs. They’re easy to drive, they hold really tight, and they include the star-head bit you need for them. We have tried other, cheaper “cabinet screws” and the heads kept breaking off. It was MADDENING.

We also like to have some anchors on hand too, like these E-Z Ancor packs that come with screws, for those additional support screws that we add.
10. Long Level
One of the biggest challenges we’ve found in this process is getting things level. Just because you’ve hung your rail level on the wall doesn’t prevent things like slopes in your floor or bows in your wall from chucking some additional curveballs in your direction. So your best defenses are a lot of patience and a nice long level, like this 4ft level we bought specifically for this task (after learning that it’s a lot harder to use a smaller level to solve these issues).

Your medium sized level will help with the process as well (especially in checking that each individual cabinet is level front-to-back) but you’ll want something bigger to check longer spans of cabinets. You could purchase an even longer level if you wanted, but they can start to get pricey, so we found a 4 foot long level to be sufficient, especially for checking across the gaps that you’ll leave for appliances like a 30″ stove or a standard 24″ dishwasher.
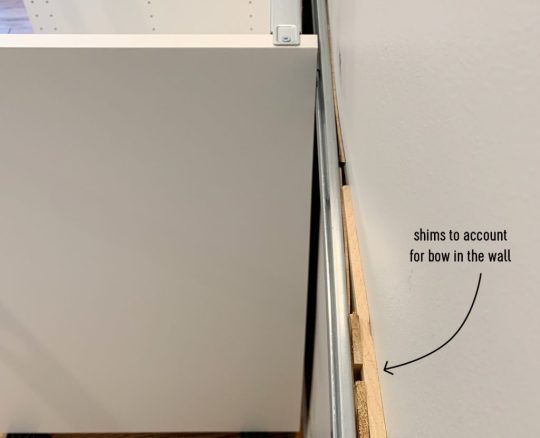
11. Shims
A lot of level issues can be corrected by twisting the adjustable plastic feet that come with your base cabinets, or by adjusting the placement of your metal rail. But if you’re dealing with bows in your wall (which you can find by placing your long level against it) you’ll want to have some wood shims on hand to place behind the metal rail. In these old houses, we had to use quite a few in a couple of places!

12. Jigsaw
When it comes time to install your sink base cabinet, you’ll need to make some holes for your plumbing. For smaller pipes like your water supply lines, you can just drill holes using a large drill bit (we used the 3/4″ bit in this set). But for things like your large drain pipe, you’ll either need to buy a larger hole bit or break out a jigsaw. Even though we don’t get the cleanest cut with it, the jigsaw gives us a little more wiggle room when placing the cabinet (since the drain pipe isn’t flexible like the supply lines) and we can also use it for other cuts like for exposing the outlets along the wall (the one below powers the garbage disposal under the sink).

Just be sure to make careful measurements before you cut. We usually put a layer of painters tape around the area we’re cutting. It allows us to mark our cut without marking the cabinet, plus the tape helps keep the white finish from cracking off. Either way, this stuff will all be hidden under the sink so it doesn’t have to look perfect.
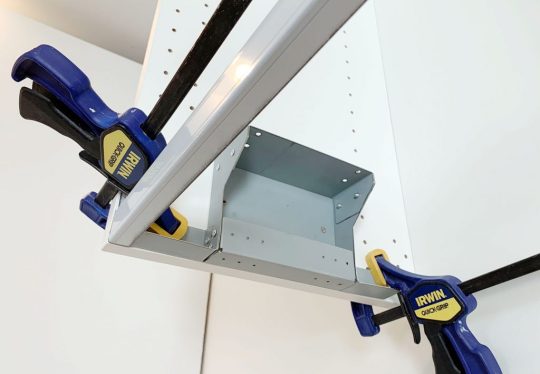
13. Clamps
As you start to get your cabinets in place and leveled, you’ll want to secure any adjacent cabinets together. Ikea provides screws for doing this, but you’ll want to use some clamps (we like these 6″ bar clamps) to hold the cabinets tightly together before you begin screwing.
We didn’t get a picture of that process, but the clamps come in handy A LOT as an extra set of hands – like when we were installing this bracket for the exhaust hoods that we hung over the stoves.

14. Circular Saw and/or Table Saw
In addition to screwing cabinets together, you may find yourself attaching cover panels or filler pieces at some point. Cover panels go on exposed ends of cabinets (so you can’t see the metal rail they hang on) or, in our case, we used some large cover panels to create a box around the fridges at the duplex. So you’ll need some sort of larger saw to make long, straight cuts. Our cover panels were a bit too wide, so I used a circular saw to shave a few inches off one side.

I didn’t use a table saw for that panel because running an 8 foot tall panel that’s this wide across my table saw would’ve been tough. But for smaller pieces (like filler pieces that are only about 3 feet long) a table saw is often easier, especially if you’re only shaving off a little bit. But if that’s too pricey and you’ve got a steady hand, you can get by with the circular saw.
15. 2 x 4″ Boards
Every time we’ve installed an Ikea kitchen we’ve needed some 2×4″s at some point. At the beach house we used them to make some bases for the island cabinets.

Basically, they were just some boxes we made almost the same size as each cabinet (slightly narrower to account for the toekicks) that we secured to the floor using pocket holes. To drill the pocket holes, you can use something like a…
16. Kreg Jig
Now, a Kreg Jig isn’t absolutely necessary here, but I’ve had one for around nine years now so I’m accustomed to breaking it out for tasks like this. So while I’m a big fan of having one in your arsenal, I understand that you’ve just bought a new kitchen so tacking on another $99 tool to your budget isn’t always practical.
I did use it again for the duplexes to make more 2×4″s into boxes (this time for mounting the above-fridge cabinet away from the wall, so it sat closer to the front of the fridge).

The boxes acted as an extension of the wall. The top one was for mounting the metal rail, and the bottom one gave the base of the cabinet a spot to rest so it didn’t tip back wildly. They also gave us a way to mount that large cover panel to box in the fridge.

I guess I should add in here that a step ladder is also useful, so let’s officially put that on the list.
17. Manual Screwdriver
Once your cabinets and panels are hung, leveled, and secured to each other, the next part of the process is to add your doors and drawers. The instructions here are pretty self-explanatory and the main tool you need is a power driver to screw everything together. Our main word of warning is to pay close attention to screw placements when you’re assembling drawers! Depending on where each drawer goes in the stack (top, middle, or bottom) there are sliiiiight differences in the instructions. So while we find it most efficient to do multiple drawers at once, we still pay close attention – especially for the first few.

Ok, back to the manual screw drivers. One big part of installing doors and drawers is tweaking and adjusting them for even and level spacing. For this you’ll want to a regular ol‘ manual Philips head screwdriver. It can be kind of tedious and frustrating, but it’s worth taking your time with it. This video shows it in a bit more detail.

You also will want a flathead screwdriver for twisting the little piece of plastic that locks each cabinet onto the metal rail, which comes up earlier in the process.
18. Miter Saw
Tasks like cutting your 2×4″s or even your filler pieces will be made easier and faster by having a miter saw on hand (we own this miter saw). You’ll also find that it’s helpful when it’s time to cut and install your toekicks. Ikea’s sells toekicks to match your cabinet fronts and they clip on to the plastic feet you will have attached to the bottom of your base cabinets.

In our beach house kitchen we installed quarter round in front of the Ikea baseboards to help disguise some floor level issues, as well as using quarter round around the island where we built our own base (we used standard wood baseboard trim instead of the Ikea toekicks around the island). Meanwhile, we just used the Ikea toekicks in the duplex kitchens and the floors were more level (and we think the wood and blue cabinets were more forgiving than white ones) so we didn’t need to add quarter round and it looks great.

19. Nail Gun
In addition to using a nail gun to attach additional molding like quarter round if you’re adding that (again, the Ikea baseboards just snap on so you won’t need it for that) I also find a nail gun comes in handy sometimes for attaching small filler pieces. Especially in cases where they’re too thin to take a screw.
20. Others Tools
Real quick, here are some other items you may want to have on hand. Some I’ve mentioned or shown already, but haven’t officially listed:
Pen or pencil
Painters tape
Step ladder
Utility knife or scissors (for opening boxes faster!)
Crowbar (if you need to remove any baseboard or molding)
Broom, dustpan, and/or vacuum with a hose (we have this one)

Your Ikea Kitchen Installation Tool Checklist
As promised, here’s all of the items in one place so you can make sure you have everything you need on hand. I’ve organized it a bit differently than above, just to put like items together. You may have special circumstances for your project that require more, less, or other tools – but I’ve found this to be a pretty comprehensive set:
Your itemized receipt / order
Hammer
Manual screwdrivers
Crowbar
Measuring tape
Pen or pencil
Painters tape
Step ladder
Power driver
Drill bit set with magnetic bit holder & 3/4″ bit for plumbing holes
Dremel or Hacksaw
Stud finder
Medium level (24″)
Large level (48″)
Wood shims
Cabinet screws (roughly 4 per cabinet)
Screws with anchors (roughly 2 per cabinet)
Jigsaw
Circular saw and/or table saw
Miter saw
Utility knife or scissors
Nail gun
Clamps
2×4″s (optional)
Kreg Jig (optional)
Broom, dustpan, and/or vacuum with hose
Good luck and happy installing!
P.S. For other posts we’ve written about installing Ikea cabinets, here’s one about installing our laundry room cabinets 5 years ago, and another one about using Ikea cabinets to make a wall of built-ins for our bonus room.
*This post contains affiliate links*
The post The Tools (And Tricks) You Need To Install An Ikea Kitchen Yourself appeared first on Young House Love.
0 notes
Text
The Tools (And Tricks) You Need To Install An Ikea Kitchen Yourself
Many of you have asked for tips and tricks to make installing an Ikea kitchen go more smoothly and look (and function) the best it possibly can. And the good news is that after installing three of them in a little over a year and a half (!!!), we have learned A TON about how to make things a little easier and help you end up with a better result. So settle in, I’ve got twenty tools & tips that can make all the difference.

First off, we like Ikea cabinets and have personally installed them in five rooms: our laundry room & bonus room at home, our beach house kitchen, and now these two duplex kitchens. We have lived with the ones in our home for nearly five years and they’re great. Not a single issue. They are smartly made, very durable, and they have a great 25-year warranty and a great price tag (often thousands cheaper than other options). They also come with many thoughtful features like soft close drawers that come standard and tons of customization options. So yeah, some Ikea furniture is known for feeling a little cheap and wobbly, but that has not been our experience with their cabinets AT ALL.
Ok, but back to the point of this post – tips and tools to make your Ikea cabinet install easier. Some of the tools I’m listing here are absolutely necessary and some are optional (they’ll just make the process easier, faster, and less frustrating). And as you read through this list, I think you’ll also get a pretty good sense of the steps (and curveballs) involved too, which I hope will help as well.

I’ll include a short bulleted list of everything at the end of the post too, that way you can use it as a tool checklist. But let’s just get right into it.

1. Your Itemized Receipt/Order
Before you build anything, you’ll want to take time to inventory and organize all of your boxes. We had over 200 boxes (!!!) delivered for our two duplex kitchens, so it helped to sort everything into piles beforehand.

We personally like to sort boxes by item (Sektion boxes over here, Maximera drawers over there, all of our cabinet fronts somewhere else, etc.) but you may find it helpful to sort yours by cabinet instead (ex: the box, drawer, hinges, and front for one cabinet all together in one pile – this is how Ikea breaks them up your order form). Either way you do it, this sorting process will help you identify any missing pieces and also make it faster once you start building.
2. Power driver (with Philips head)

This combo gets a lot of use in this install (especially the power driver/drill) – but they’re needed first to construct your cabinet boxes (Sektion pieces). We love constructing the boxes first because you quickly get to see the shape of your kitchen come to life.

And even though Ikea is known for their allen wrenches, you don’t use them AT ALL during a typical kitchen installation! So don’t worry about having lots of specialty drill bits. You just need a normal Phillips head to screw these puppies together.
3. Hammer
You’ll also need a hammer handy to nail the MDF backings onto the cabinet backs. It may also be useful if you need to tap any anchors into your drywall when it comes time to hang your cabinets.
4. Magnetic Drill Bit Holder
Having one of these on your drill can save you a lot of frustration while building your cabinets and drawers. You can buy one separately for about $2 or it often comes included in drill/driver sets like ours. It’ll magnetize your drill bits, meaning many of the screws that Ikea provides will stick to your drill handsfree (thanks to the magic of magnets). We found this VERY helpful when trying to screw into small spots that were too tight for our fingertips (we couldn’t reach in and hold the screw steady, so having a magnetized drill bit that held it for us was key).

5. Measuring Tape
The next several tools are needed for attaching your cabinets to the wall. Whether you’re doing upper or lower cabinets, Ikea’s system uses a metal track (called the Sektion suspension rail) that you attach to your wall and then the cabinet boxes hang from these. The rail system is extremely handy because if you make sure the rail is level, your cabinets all hang from that and are guaranteed to be level! I know, it’s GREAT. The only time I don’t use their rail is when I don’t have a wall behind my cabinets, like if you’re doing an island. In that case I’ve built my own bases from 2×4″s, but more on that later.
For now, just know the measuring tape will be useful in determining exactly where in your kitchen you’re placing your cabinets – both side-to-side on each wall, and how high the rails need to be hung (Ikea provides guides for this in their instructions). You will probably want to have your kitchen plan/schematic from Ikea handy too.

6. Dremel Or Hacksaw
Once you know where each run of cabinets is going, you’ll need to cut your metal suspension rails to size. The rails are sold in 7 foot lengths, but if you only have 4 feet of cabinetry in one area – you only want 4 feet of rail.
You can cut these by hand with a hacksaw, but we find it much faster to use our Dremel Multi-Max with a metal cutting blade.

I typically mark my cut on a piece of painters tape and cut across the open top of one of our cabinet boxes (with a piece of cardboard to protect the cabinet underneath).
7. Stud Finder
You want to screw the rail into at least a few studs in your wall for maximum hold. So it’s smart to use a stud finder to locate and mark the studs that fall within the area you’re hanging the rail – that way you can be sure to go into them and get a nice firm hold. Since studs are typically 1.5″ thick, I like to mark the full width that my stud finder indicates, since you may not know exactly where the holes on the Sektion rail will line up.

8. Medium-Size Level
Once I know where my studs are, I hold my cut-to-size metal rail and, with a medium sized level (like this 24″ level) held against it, I mark the top line of my rail AND where the holes line up with my studs. I suggest amedium sized level for this just because they’re easier to wrangle during this step.

I also mark a few additional holes where I’ll use screws paired with anchors. I believe Ikea suggests at least having a screw every 12″ inches – but for short sections like this, I like to make sure I hit at least 2 studs and then have a screw at either end of the rail that goes into an anchor.
9. Heavy Duty Screws & Anchors
After some trial and error, we found that we like using these GRK Fastener Cabinet Screws to secure our rails into studs. They’re easy to drive, they hold really tight, and they include the star-head bit you need for them. We have tried other, cheaper “cabinet screws” and the heads kept breaking off. It was MADDENING.

We also like to have some anchors on hand too, like these E-Z Ancor packs that come with screws, for those additional support screws that we add.
10. Long Level
One of the biggest challenges we’ve found in this process is getting things level. Just because you’ve hung your rail level on the wall doesn’t prevent things like slopes in your floor or bows in your wall from chucking some additional curveballs in your direction. So your best defenses are a lot of patience and a nice long level, like this 4ft level we bought specifically for this task (after learning that it’s a lot harder to use a smaller level to solve these issues).

Your medium sized level will help with the process as well (especially in checking that each individual cabinet is level front-to-back) but you’ll want something bigger to check longer spans of cabinets. You could purchase an even longer level if you wanted, but they can start to get pricey, so we found a 4 foot long level to be sufficient, especially for checking across the gaps that you’ll leave for appliances like a 30″ stove or a standard 24″ dishwasher.
11. Shims
A lot of level issues can be corrected by twisting the adjustable plastic feet that come with your base cabinets, or by adjusting the placement of your metal rail. But if you’re dealing with bows in your wall (which you can find by placing your long level against it) you’ll want to have some wood shims on hand to place behind the metal rail. In these old houses, we had to use quite a few in a couple of places!

12. Jigsaw
When it comes time to install your sink base cabinet, you’ll need to make some holes for your plumbing. For smaller pipes like your water supply lines, you can just drill holes using a large drill bit (we used the 3/4″ bit in this set). But for things like your large drain pipe, you’ll either need to buy a larger hole bit or break out a jigsaw. Even though we don’t get the cleanest cut with it, the jigsaw gives us a little more wiggle room when placing the cabinet (since the drain pipe isn’t flexible like the supply lines) and we can also use it for other cuts like for exposing the outlets along the wall (the one below powers the garbage disposal under the sink).

Just be sure to make careful measurements before you cut. We usually put a layer of painters tape around the area we’re cutting. It allows us to mark our cut without marking the cabinet, plus the tape helps keep the white finish from cracking off. Either way, this stuff will all be hidden under the sink so it doesn’t have to look perfect.
13. Clamps
As you start to get your cabinets in place and leveled, you’ll want to secure any adjacent cabinets together. Ikea provides screws for doing this, but you’ll want to use some clamps (we like these 6″ bar clamps) to hold the cabinets tightly together before you begin screwing.
We didn’t get a picture of that process, but the clamps come in handy A LOT as an extra set of hands – like when we were installing this bracket for the exhaust hoods that we hung over the stoves.

14. Circular Saw and/or Table Saw
In addition to screwing cabinets together, you may find yourself attaching cover panels or filler pieces at some point. Cover panels go on exposed ends of cabinets (so you can’t see the metal rail they hang on) or, in our case, we used some large cover panels to create a box around the fridges at the duplex. So you’ll need some sort of larger saw to make long, straight cuts. Our cover panels were a bit too wide, so I used a circular saw to shave a few inches off one side.
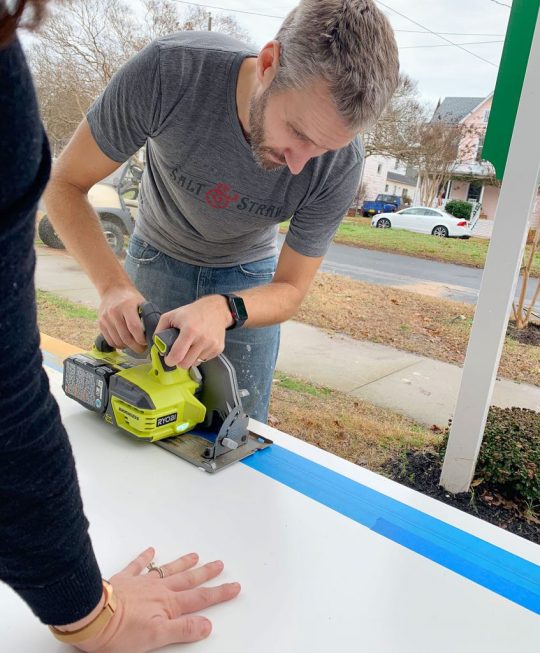
I didn’t use a table saw for that panel because running an 8 foot tall panel that’s this wide across my table saw would’ve been tough. But for smaller pieces (like filler pieces that are only about 3 feet long) a table saw is often easier, especially if you’re only shaving off a little bit. But if that’s too pricey and you’ve got a steady hand, you can get by with the circular saw.
15. 2 x 4″ Boards
Every time we’ve installed an Ikea kitchen we’ve needed some 2×4″s at some point. At the beach house we used them to make some bases for the island cabinets.
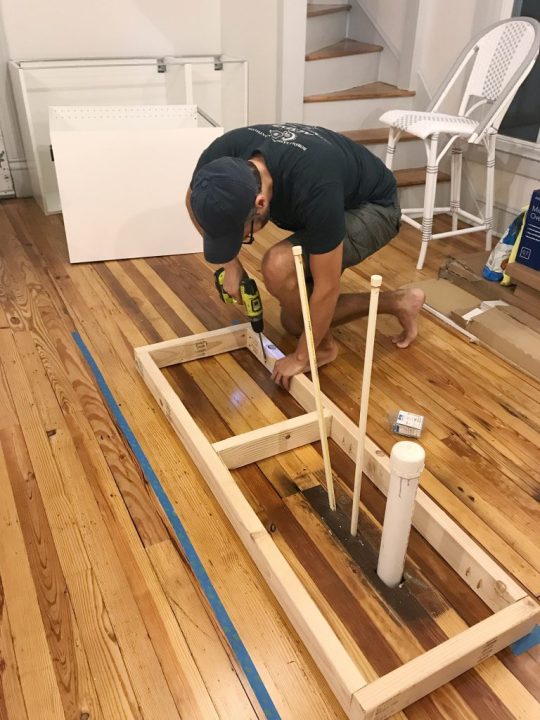
Basically, they were just some boxes we made almost the same size as each cabinet (slightly narrower to account for the toekicks) that we secured to the floor using pocket holes. To drill the pocket holes, you can use something like a…
16. Kreg Jig
Now, a Kreg Jig isn’t absolutely necessary here, but I’ve had one for around nine years now so I’m accustomed to breaking it out for tasks like this. So while I’m a big fan of having one in your arsenal, I understand that you’ve just bought a new kitchen so tacking on another $99 tool to your budget isn’t always practical.
I did use it again for the duplexes to make more 2×4″s into boxes (this time for mounting the above-fridge cabinet away from the wall, so it sat closer to the front of the fridge).

The boxes acted as an extension of the wall. The top one was for mounting the metal rail, and the bottom one gave the base of the cabinet a spot to rest so it didn’t tip back wildly. They also gave us a way to mount that large cover panel to box in the fridge.

I guess I should add in here that a step ladder is also useful, so let’s officially put that on the list.
17. Manual Screwdriver
Once your cabinets and panels are hung, leveled, and secured to each other, the next part of the process is to add your doors and drawers. The instructions here are pretty self-explanatory and the main tool you need is a power driver to screw everything together. Our main word of warning is to pay close attention to screw placements when you’re assembling drawers! Depending on where each drawer goes in the stack (top, middle, or bottom) there are sliiiiight differences in the instructions. So while we find it most efficient to do multiple drawers at once, we still pay close attention – especially for the first few.

Ok, back to the manual screw drivers. One big part of installing doors and drawers is tweaking and adjusting them for even and level spacing. For this you’ll want to a regular ol‘ manual Philips head screwdriver. It can be kind of tedious and frustrating, but it’s worth taking your time with it. This video shows it in a bit more detail.

You also will want a flathead screwdriver for twisting the little piece of plastic that locks each cabinet onto the metal rail, which comes up earlier in the process.
18. Miter Saw
Tasks like cutting your 2×4″s or even your filler pieces will be made easier and faster by having a miter saw on hand (we own this miter saw). You’ll also find that it’s helpful when it’s time to cut and install your toekicks. Ikea’s sells toekicks to match your cabinet fronts and they clip on to the plastic feet you will have attached to the bottom of your base cabinets.

In our beach house kitchen we installed quarter round in front of the Ikea baseboards to help disguise some floor level issues, as well as using quarter round around the island where we built our own base (we used standard wood baseboard trim instead of the Ikea toekicks around the island). Meanwhile, we just used the Ikea toekicks in the duplex kitchens and the floors were more level (and we think the wood and blue cabinets were more forgiving than white ones) so we didn’t need to add quarter round and it looks great.

19. Nail Gun
In addition to using a nail gun to attach additional molding like quarter round if you’re adding that (again, the Ikea baseboards just snap on so you won’t need it for that) I also find a nail gun comes in handy sometimes for attaching small filler pieces. Especially in cases where they’re too thin to take a screw.
20. Others Tools
Real quick, here are some other items you may want to have on hand. Some I’ve mentioned or shown already, but haven’t officially listed:
Pen or pencil
Painters tape
Step ladder
Utility knife or scissors (for opening boxes faster!)
Crowbar (if you need to remove any baseboard or molding)
Broom, dustpan, and/or vacuum with a hose (we have this one)

Your Ikea Kitchen Installation Tool Checklist
As promised, here’s all of the items in one place so you can make sure you have everything you need on hand. I’ve organized it a bit differently than above, just to put like items together. You may have special circumstances for your project that require more, less, or other tools – but I’ve found this to be a pretty comprehensive set:
Your itemized receipt / order
Hammer
Manual screwdrivers
Crowbar
Measuring tape
Pen or pencil
Painters tape
Step ladder
Power driver
Drill bit set with magnetic bit holder & 3/4″ bit for plumbing holes
Dremel or Hacksaw
Stud finder
Medium level (24″)
Large level (48″)
Wood shims
Cabinet screws (roughly 4 per cabinet)
Screws with anchors (roughly 2 per cabinet)
Jigsaw
Circular saw and/or table saw
Miter saw
Utility knife or scissors
Nail gun
Clamps
2×4″s (optional)
Kreg Jig (optional)
Broom, dustpan, and/or vacuum with hose
Good luck and happy installing!
P.S. For other posts we’ve written about installing Ikea cabinets, here’s one about installing our laundry room cabinets 5 years ago, and another one about using Ikea cabinets to make a wall of built-ins for our bonus room.
*This post contains affiliate links*
The post The Tools (And Tricks) You Need To Install An Ikea Kitchen Yourself appeared first on Young House Love.


0 notes
Text
The Tools (And Tricks) You Need To Install An Ikea Kitchen Yourself
Many of you have asked for tips and tricks to make installing an Ikea kitchen go more smoothly and look (and function) the best it possibly can. And the good news is that after installing three of them in a little over a year and a half (!!!), we have learned A TON about how to make things a little easier and help you end up with a better result. So settle in, I’ve got twenty tools & tips that can make all the difference.

First off, we like Ikea cabinets and have personally installed them in five rooms: our laundry room & bonus room at home, our beach house kitchen, and now these two duplex kitchens. We have lived with the ones in our home for nearly five years and they’re great. Not a single issue. They are smartly made, very durable, and they have a great 25-year warranty and a great price tag (often thousands cheaper than other options). They also come with many thoughtful features like soft close drawers that come standard and tons of customization options. So yeah, some Ikea furniture is known for feeling a little cheap and wobbly, but that has not been our experience with their cabinets AT ALL.
Ok, but back to the point of this post – tips and tools to make your Ikea cabinet install easier. Some of the tools I’m listing here are absolutely necessary and some are optional (they’ll just make the process easier, faster, and less frustrating). And as you read through this list, I think you’ll also get a pretty good sense of the steps (and curveballs) involved too, which I hope will help as well.
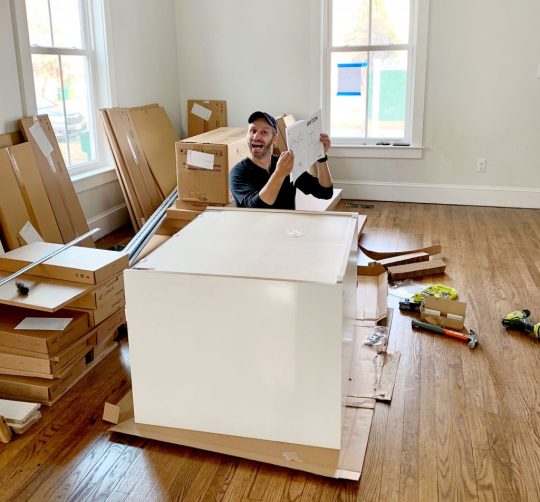
I’ll include a short bulleted list of everything at the end of the post too, that way you can use it as a tool checklist. But let’s just get right into it.
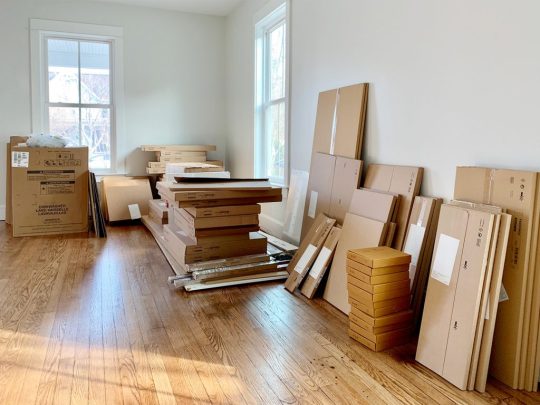
1. Your Itemized Receipt/Order
Before you build anything, you’ll want to take time to inventory and organize all of your boxes. We had over 200 boxes (!!!) delivered for our two duplex kitchens, so it helped to sort everything into piles beforehand.

We personally like to sort boxes by item (Sektion boxes over here, Maximera drawers over there, all of our cabinet fronts somewhere else, etc.) but you may find it helpful to sort yours by cabinet instead (ex: the box, drawer, hinges, and front for one cabinet all together in one pile – this is how Ikea breaks them up your order form). Either way you do it, this sorting process will help you identify any missing pieces and also make it faster once you start building.
2. Power driver (with Philips head)

This combo gets a lot of use in this install (especially the power driver/drill) – but they’re needed first to construct your cabinet boxes (Sektion pieces). We love constructing the boxes first because you quickly get to see the shape of your kitchen come to life.
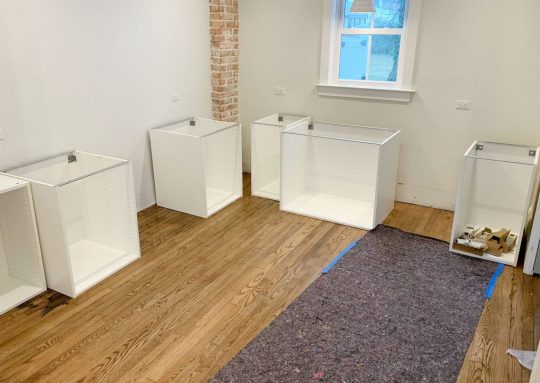
And even though Ikea is known for their allen wrenches, you don’t use them AT ALL during a typical kitchen installation! So don’t worry about having lots of specialty drill bits. You just need a normal Phillips head to screw these puppies together.
3. Hammer
You’ll also need a hammer handy to nail the MDF backings onto the cabinet backs. It may also be useful if you need to tap any anchors into your drywall when it comes time to hang your cabinets.
4. Magnetic Drill Bit Holder
Having one of these on your drill can save you a lot of frustration while building your cabinets and drawers. You can buy one separately for about $2 or it often comes included in drill/driver sets like ours. It’ll magnetize your drill bits, meaning many of the screws that Ikea provides will stick to your drill handsfree (thanks to the magic of magnets). We found this VERY helpful when trying to screw into small spots that were too tight for our fingertips (we couldn’t reach in and hold the screw steady, so having a magnetized drill bit that held it for us was key).

5. Measuring Tape
The next several tools are needed for attaching your cabinets to the wall. Whether you’re doing upper or lower cabinets, Ikea’s system uses a metal track (called the Sektion suspension rail) that you attach to your wall and then the cabinet boxes hang from these. The rail system is extremely handy because if you make sure the rail is level, your cabinets all hang from that and are guaranteed to be level! I know, it’s GREAT. The only time I don’t use their rail is when I don’t have a wall behind my cabinets, like if you’re doing an island. In that case I’ve built my own bases from 2×4″s, but more on that later.
For now, just know the measuring tape will be useful in determining exactly where in your kitchen you’re placing your cabinets – both side-to-side on each wall, and how high the rails need to be hung (Ikea provides guides for this in their instructions). You will probably want to have your kitchen plan/schematic from Ikea handy too.

6. Dremel Or Hacksaw
Once you know where each run of cabinets is going, you’ll need to cut your metal suspension rails to size. The rails are sold in 7 foot lengths, but if you only have 4 feet of cabinetry in one area – you only want 4 feet of rail.
You can cut these by hand with a hacksaw, but we find it much faster to use our Dremel Multi-Max with a metal cutting blade.

I typically mark my cut on a piece of painters tape and cut across the open top of one of our cabinet boxes (with a piece of cardboard to protect the cabinet underneath).
7. Stud Finder
You want to screw the rail into at least a few studs in your wall for maximum hold. So it’s smart to use a stud finder to locate and mark the studs that fall within the area you’re hanging the rail – that way you can be sure to go into them and get a nice firm hold. Since studs are typically 1.5″ thick, I like to mark the full width that my stud finder indicates, since you may not know exactly where the holes on the Sektion rail will line up.

8. Medium-Size Level
Once I know where my studs are, I hold my cut-to-size metal rail and, with a medium sized level (like this 24″ level) held against it, I mark the top line of my rail AND where the holes line up with my studs. I suggest amedium sized level for this just because they’re easier to wrangle during this step.

I also mark a few additional holes where I’ll use screws paired with anchors. I believe Ikea suggests at least having a screw every 12″ inches – but for short sections like this, I like to make sure I hit at least 2 studs and then have a screw at either end of the rail that goes into an anchor.
9. Heavy Duty Screws & Anchors
After some trial and error, we found that we like using these GRK Fastener Cabinet Screws to secure our rails into studs. They’re easy to drive, they hold really tight, and they include the star-head bit you need for them. We have tried other, cheaper “cabinet screws” and the heads kept breaking off. It was MADDENING.
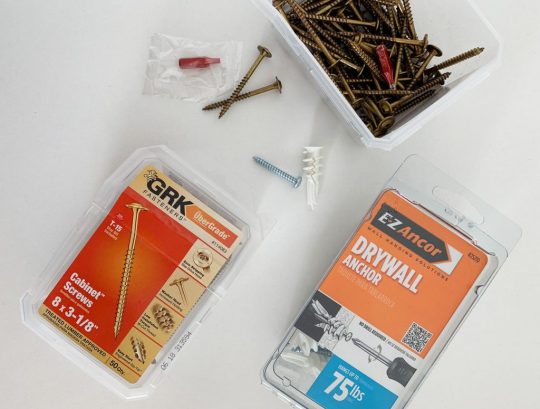
We also like to have some anchors on hand too, like these E-Z Ancor packs that come with screws, for those additional support screws that we add.
10. Long Level
One of the biggest challenges we’ve found in this process is getting things level. Just because you’ve hung your rail level on the wall doesn’t prevent things like slopes in your floor or bows in your wall from chucking some additional curveballs in your direction. So your best defenses are a lot of patience and a nice long level, like this 4ft level we bought specifically for this task (after learning that it’s a lot harder to use a smaller level to solve these issues).

Your medium sized level will help with the process as well (especially in checking that each individual cabinet is level front-to-back) but you’ll want something bigger to check longer spans of cabinets. You could purchase an even longer level if you wanted, but they can start to get pricey, so we found a 4 foot long level to be sufficient, especially for checking across the gaps that you’ll leave for appliances like a 30″ stove or a standard 24″ dishwasher.
11. Shims
A lot of level issues can be corrected by twisting the adjustable plastic feet that come with your base cabinets, or by adjusting the placement of your metal rail. But if you’re dealing with bows in your wall (which you can find by placing your long level against it) you’ll want to have some wood shims on hand to place behind the metal rail. In these old houses, we had to use quite a few in a couple of places!

12. Jigsaw
When it comes time to install your sink base cabinet, you’ll need to make some holes for your plumbing. For smaller pipes like your water supply lines, you can just drill holes using a large drill bit (we used the 3/4″ bit in this set). But for things like your large drain pipe, you’ll either need to buy a larger hole bit or break out a jigsaw. Even though we don’t get the cleanest cut with it, the jigsaw gives us a little more wiggle room when placing the cabinet (since the drain pipe isn’t flexible like the supply lines) and we can also use it for other cuts like for exposing the outlets along the wall (the one below powers the garbage disposal under the sink).

Just be sure to make careful measurements before you cut. We usually put a layer of painters tape around the area we’re cutting. It allows us to mark our cut without marking the cabinet, plus the tape helps keep the white finish from cracking off. Either way, this stuff will all be hidden under the sink so it doesn’t have to look perfect.
13. Clamps
As you start to get your cabinets in place and leveled, you’ll want to secure any adjacent cabinets together. Ikea provides screws for doing this, but you’ll want to use some clamps (we like these 6″ bar clamps) to hold the cabinets tightly together before you begin screwing.
We didn’t get a picture of that process, but the clamps come in handy A LOT as an extra set of hands – like when we were installing this bracket for the exhaust hoods that we hung over the stoves.

14. Circular Saw and/or Table Saw
In addition to screwing cabinets together, you may find yourself attaching cover panels or filler pieces at some point. Cover panels go on exposed ends of cabinets (so you can’t see the metal rail they hang on) or, in our case, we used some large cover panels to create a box around the fridges at the duplex. So you’ll need some sort of larger saw to make long, straight cuts. Our cover panels were a bit too wide, so I used a circular saw to shave a few inches off one side.

I didn’t use a table saw for that panel because running an 8 foot tall panel that’s this wide across my table saw would’ve been tough. But for smaller pieces (like filler pieces that are only about 3 feet long) a table saw is often easier, especially if you’re only shaving off a little bit. But if that’s too pricey and you’ve got a steady hand, you can get by with the circular saw.
15. 2 x 4″ Boards
Every time we’ve installed an Ikea kitchen we’ve needed some 2×4″s at some point. At the beach house we used them to make some bases for the island cabinets.

Basically, they were just some boxes we made almost the same size as each cabinet (slightly narrower to account for the toekicks) that we secured to the floor using pocket holes. To drill the pocket holes, you can use something like a…
16. Kreg Jig
Now, a Kreg Jig isn’t absolutely necessary here, but I’ve had one for around nine years now so I’m accustomed to breaking it out for tasks like this. So while I’m a big fan of having one in your arsenal, I understand that you’ve just bought a new kitchen so tacking on another $99 tool to your budget isn’t always practical.
I did use it again for the duplexes to make more 2×4″s into boxes (this time for mounting the above-fridge cabinet away from the wall, so it sat closer to the front of the fridge).
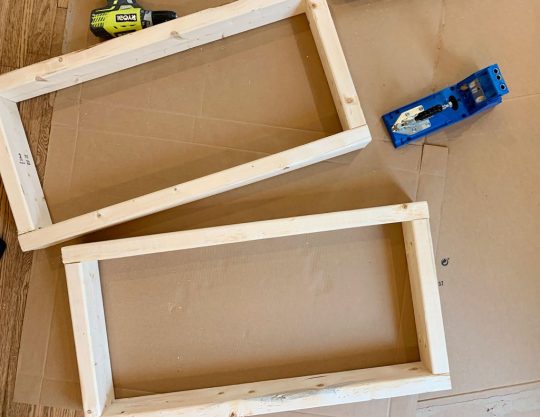
The boxes acted as an extension of the wall. The top one was for mounting the metal rail, and the bottom one gave the base of the cabinet a spot to rest so it didn’t tip back wildly. They also gave us a way to mount that large cover panel to box in the fridge.

I guess I should add in here that a step ladder is also useful, so let’s officially put that on the list.
17. Manual Screwdriver
Once your cabinets and panels are hung, leveled, and secured to each other, the next part of the process is to add your doors and drawers. The instructions here are pretty self-explanatory and the main tool you need is a power driver to screw everything together. Our main word of warning is to pay close attention to screw placements when you’re assembling drawers! Depending on where each drawer goes in the stack (top, middle, or bottom) there are sliiiiight differences in the instructions. So while we find it most efficient to do multiple drawers at once, we still pay close attention – especially for the first few.

Ok, back to the manual screw drivers. One big part of installing doors and drawers is tweaking and adjusting them for even and level spacing. For this you’ll want to a regular ol‘ manual Philips head screwdriver. It can be kind of tedious and frustrating, but it’s worth taking your time with it. This video shows it in a bit more detail.

You also will want a flathead screwdriver for twisting the little piece of plastic that locks each cabinet onto the metal rail, which comes up earlier in the process.
18. Miter Saw
Tasks like cutting your 2×4″s or even your filler pieces will be made easier and faster by having a miter saw on hand (we own this miter saw). You’ll also find that it’s helpful when it’s time to cut and install your toekicks. Ikea’s sells toekicks to match your cabinet fronts and they clip on to the plastic feet you will have attached to the bottom of your base cabinets.
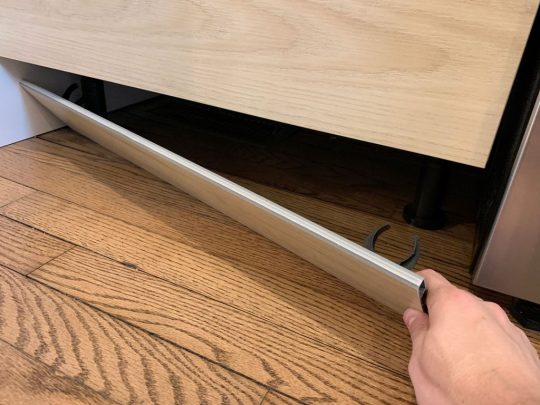
In our beach house kitchen we installed quarter round in front of the Ikea baseboards to help disguise some floor level issues, as well as using quarter round around the island where we built our own base (we used standard wood baseboard trim instead of the Ikea toekicks around the island). Meanwhile, we just used the Ikea toekicks in the duplex kitchens and the floors were more level (and we think the wood and blue cabinets were more forgiving than white ones) so we didn’t need to add quarter round and it looks great.

19. Nail Gun
In addition to using a nail gun to attach additional molding like quarter round if you’re adding that (again, the Ikea baseboards just snap on so you won’t need it for that) I also find a nail gun comes in handy sometimes for attaching small filler pieces. Especially in cases where they’re too thin to take a screw.
20. Others Tools
Real quick, here are some other items you may want to have on hand. Some I’ve mentioned or shown already, but haven’t officially listed:
Pen or pencil
Painters tape
Step ladder
Utility knife or scissors (for opening boxes faster!)
Crowbar (if you need to remove any baseboard or molding)
Broom, dustpan, and/or vacuum with a hose (we have this one)

Your Ikea Kitchen Installation Tool Checklist
As promised, here’s all of the items in one place so you can make sure you have everything you need on hand. I’ve organized it a bit differently than above, just to put like items together. You may have special circumstances for your project that require more, less, or other tools – but I’ve found this to be a pretty comprehensive set:
Your itemized receipt / order
Hammer
Manual screwdrivers
Crowbar
Measuring tape
Pen or pencil
Painters tape
Step ladder
Power driver
Drill bit set with magnetic bit holder & 3/4″ bit for plumbing holes
Dremel or Hacksaw
Stud finder
Medium level (24″)
Large level (48″)
Wood shims
Cabinet screws (roughly 4 per cabinet)
Screws with anchors (roughly 2 per cabinet)
Jigsaw
Circular saw and/or table saw
Miter saw
Utility knife or scissors
Nail gun
Clamps
2×4″s (optional)
Kreg Jig (optional)
Broom, dustpan, and/or vacuum with hose
Good luck and happy installing!
P.S. For other posts we’ve written about installing Ikea cabinets, here’s one about installing our laundry room cabinets 5 years ago, and another one about using Ikea cabinets to make a wall of built-ins for our bonus room.
*This post contains affiliate links*
The post The Tools (And Tricks) You Need To Install An Ikea Kitchen Yourself appeared first on Young House Love.


The Tools (And Tricks) You Need To Install An Ikea Kitchen Yourself published first on https://landscapingmates.blogspot.com
0 notes
Text
I. Am. So. Pumped
Finally. For the first time in months, I'm this close to finishing something for the van. I don't even want to get sleep till I've finished attaching this last sheet of felt to this last curtain. After the felt is sewn on and the weight pockets are sewn to the felt, the insides of all three curtains will be done. I'll need a warm-ish day (Tuesday is looking ideal but may stretch my patience; wish I'd been finished today) to go to the storage bin and spray the curtains with some clear fixative. Once the glitter is fixed, I'll be able to flip them right side out, cut and stitch the button-holes for the curtain rod, and that'll be the end of this project.
Of course, that's merely the beginning. One at a time, I'm taking down the curtains currently in the windows of my van, and adding an extra panel to each, and then I may just go ahead and tape off the windows as I remove the curtains. With the windows taped off, I'll just need another fairly warm day, and plenty of spray foam, to spray in the frames. It's honestly the fastest, most straightforward but still functional method I can think of. Windows are notorious for the unwanted escape of energy, so to at least seal my windows, while creating a frame that I can hang tension rods in, seems like a reasonable investment of time and money. I'm aware I may have to get other materials involved, like automotive filler, but the other idea was trying to fit a wall of sheathing. That would've just driven me nuts. I hate working with wood....
It goes without saying that winter was a major setback, so I don't care what the weather forecast says, we're on this side of the solstice and this close to the equinox: It's spring as far as I'm concerned, and it's time to make tracks. Double-time, we have to make up for lost time.
Don't tell anyone, but that woman smells ill, just wretchedly sick. Ugh....
0 notes
Text
The Tools (And Tricks) You Need To Install An Ikea Kitchen Yourself
Many of you have asked for tips and tricks to make installing an Ikea kitchen go more smoothly and look (and function) the best it possibly can. And the good news is that after installing three of them in a little over a year and a half (!!!), we have learned A TON about how to make things a little easier and help you end up with a better result. So settle in, I’ve got twenty tools & tips that can make all the difference.

First off, we like Ikea cabinets and have personally installed them in five rooms: our laundry room & bonus room at home, our beach house kitchen, and now these two duplex kitchens. We have lived with the ones in our home for nearly five years and they’re great. Not a single issue. They are smartly made, very durable, and they have a great 25-year warranty and a great price tag (often thousands cheaper than other options). They also come with many thoughtful features like soft close drawers that come standard and tons of customization options. So yeah, some Ikea furniture is known for feeling a little cheap and wobbly, but that has not been our experience with their cabinets AT ALL.
Ok, but back to the point of this post – tips and tools to make your Ikea cabinet install easier. Some of the tools I’m listing here are absolutely necessary and some are optional (they’ll just make the process easier, faster, and less frustrating). And as you read through this list, I think you’ll also get a pretty good sense of the steps (and curveballs) involved too, which I hope will help as well.

I’ll include a short bulleted list of everything at the end of the post too, that way you can use it as a tool checklist. But let’s just get right into it.

1. Your Itemized Receipt/Order
Before you build anything, you’ll want to take time to inventory and organize all of your boxes. We had over 200 boxes (!!!) delivered for our two duplex kitchens, so it helped to sort everything into piles beforehand.
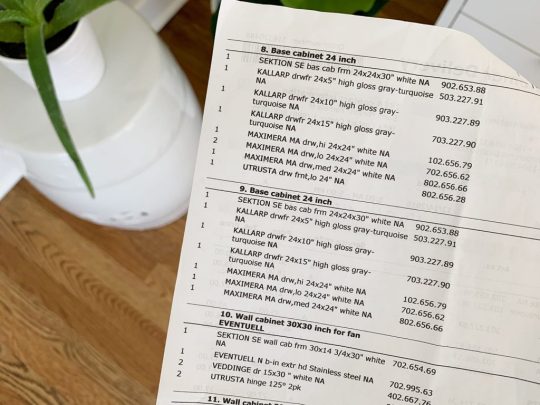
We personally like to sort boxes by item (Sektion boxes over here, Maximera drawers over there, all of our cabinet fronts somewhere else, etc.) but you may find it helpful to sort yours by cabinet instead (ex: the box, drawer, hinges, and front for one cabinet all together in one pile – this is how Ikea breaks them up your order form). Either way you do it, this sorting process will help you identify any missing pieces and also make it faster once you start building.
2. Power driver (with Philips head)
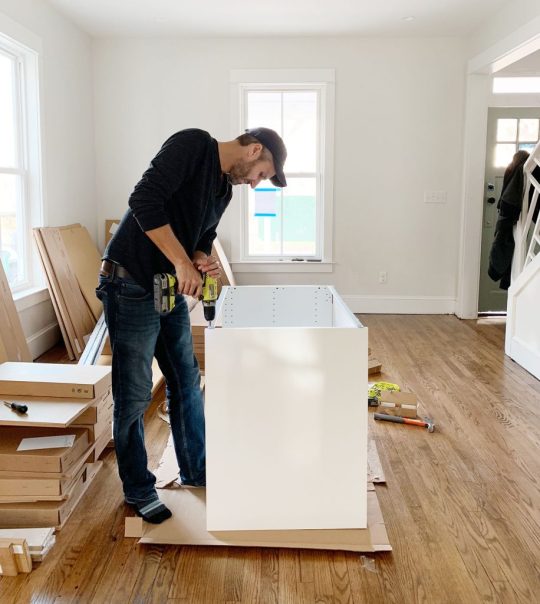
This combo gets a lot of use in this install (especially the power driver/drill) – but they’re needed first to construct your cabinet boxes (Sektion pieces). We love constructing the boxes first because you quickly get to see the shape of your kitchen come to life.

And even though Ikea is known for their allen wrenches, you don’t use them AT ALL during a typical kitchen installation! So don’t worry about having lots of specialty drill bits. You just need a normal Phillips head to screw these puppies together.
3. Hammer
You’ll also need a hammer handy to nail the MDF backings onto the cabinet backs. It may also be useful if you need to tap any anchors into your drywall when it comes time to hang your cabinets.
4. Magnetic Drill Bit Holder
Having one of these on your drill can save you a lot of frustration while building your cabinets and drawers. You can buy one separately for about $2 or it often comes included in drill/driver sets like ours. It’ll magnetize your drill bits, meaning many of the screws that Ikea provides will stick to your drill handsfree (thanks to the magic of magnets). We found this VERY helpful when trying to screw into small spots that were too tight for our fingertips (we couldn’t reach in and hold the screw steady, so having a magnetized drill bit that held it for us was key).
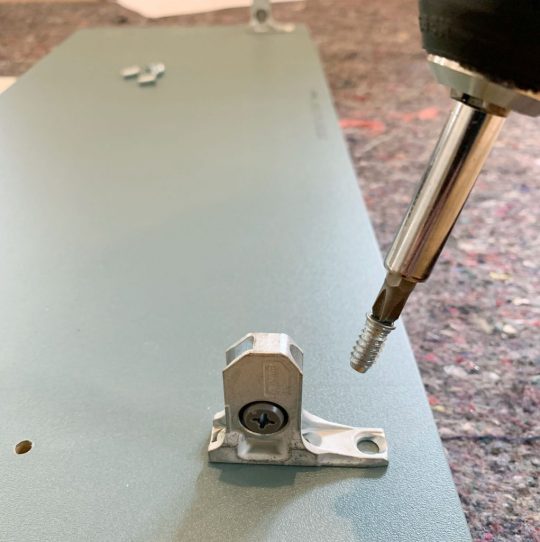
5. Measuring Tape
The next several tools are needed for attaching your cabinets to the wall. Whether you’re doing upper or lower cabinets, Ikea’s system uses a metal track (called the Sektion suspension rail) that you attach to your wall and then the cabinet boxes hang from these. The rail system is extremely handy because if you make sure the rail is level, your cabinets all hang from that and are guaranteed to be level! I know, it’s GREAT. The only time I don’t use their rail is when I don’t have a wall behind my cabinets, like if you’re doing an island. In that case I’ve built my own bases from 2×4″s, but more on that later.
For now, just know the measuring tape will be useful in determining exactly where in your kitchen you’re placing your cabinets – both side-to-side on each wall, and how high the rails need to be hung (Ikea provides guides for this in their instructions). You will probably want to have your kitchen plan/schematic from Ikea handy too.

6. Dremel Or Hacksaw
Once you know where each run of cabinets is going, you’ll need to cut your metal suspension rails to size. The rails are sold in 7 foot lengths, but if you only have 4 feet of cabinetry in one area – you only want 4 feet of rail.
You can cut these by hand with a hacksaw, but we find it much faster to use our Dremel Multi-Max with a metal cutting blade.

I typically mark my cut on a piece of painters tape and cut across the open top of one of our cabinet boxes (with a piece of cardboard to protect the cabinet underneath).
7. Stud Finder
You want to screw the rail into at least a few studs in your wall for maximum hold. So it’s smart to use a stud finder to locate and mark the studs that fall within the area you’re hanging the rail – that way you can be sure to go into them and get a nice firm hold. Since studs are typically 1.5″ thick, I like to mark the full width that my stud finder indicates, since you may not know exactly where the holes on the Sektion rail will line up.
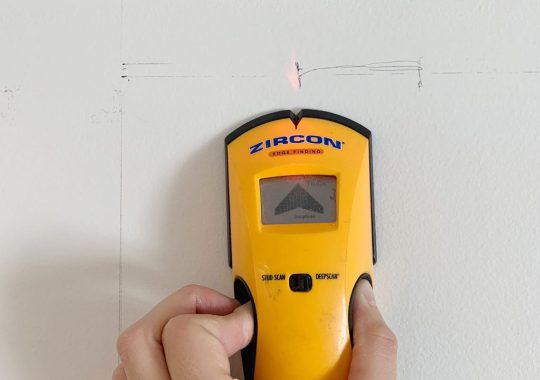
8. Medium-Size Level
Once I know where my studs are, I hold my cut-to-size metal rail and, with a medium sized level (like this 24″ level) held against it, I mark the top line of my rail AND where the holes line up with my studs. I suggest amedium sized level for this just because they’re easier to wrangle during this step.
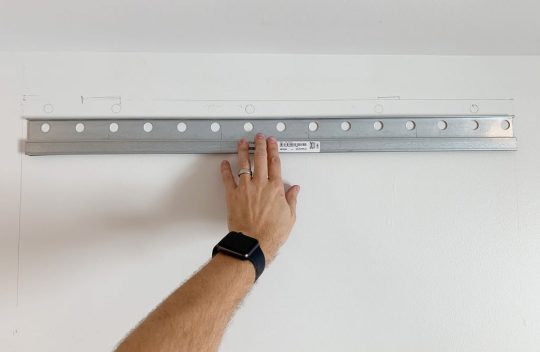
I also mark a few additional holes where I’ll use screws paired with anchors. I believe Ikea suggests at least having a screw every 12″ inches – but for short sections like this, I like to make sure I hit at least 2 studs and then have a screw at either end of the rail that goes into an anchor.
9. Heavy Duty Screws & Anchors
After some trial and error, we found that we like using these GRK Fastener Cabinet Screws to secure our rails into studs. They’re easy to drive, they hold really tight, and they include the star-head bit you need for them. We have tried other, cheaper “cabinet screws” and the heads kept breaking off. It was MADDENING.

We also like to have some anchors on hand too, like these E-Z Ancor packs that come with screws, for those additional support screws that we add.
10. Long Level
One of the biggest challenges we’ve found in this process is getting things level. Just because you’ve hung your rail level on the wall doesn’t prevent things like slopes in your floor or bows in your wall from chucking some additional curveballs in your direction. So your best defenses are a lot of patience and a nice long level, like this 4ft level we bought specifically for this task (after learning that it’s a lot harder to use a smaller level to solve these issues).

Your medium sized level will help with the process as well (especially in checking that each individual cabinet is level front-to-back) but you’ll want something bigger to check longer spans of cabinets. You could purchase an even longer level if you wanted, but they can start to get pricey, so we found a 4 foot long level to be sufficient, especially for checking across the gaps that you’ll leave for appliances like a 30″ stove or a standard 24″ dishwasher.
11. Shims
A lot of level issues can be corrected by twisting the adjustable plastic feet that come with your base cabinets, or by adjusting the placement of your metal rail. But if you’re dealing with bows in your wall (which you can find by placing your long level against it) you’ll want to have some wood shims on hand to place behind the metal rail. In these old houses, we had to use quite a few in a couple of places!

12. Jigsaw
When it comes time to install your sink base cabinet, you’ll need to make some holes for your plumbing. For smaller pipes like your water supply lines, you can just drill holes using a large drill bit (we used the 3/4″ bit in this set). But for things like your large drain pipe, you’ll either need to buy a larger hole bit or break out a jigsaw. Even though we don’t get the cleanest cut with it, the jigsaw gives us a little more wiggle room when placing the cabinet (since the drain pipe isn’t flexible like the supply lines) and we can also use it for other cuts like for exposing the outlets along the wall (the one below powers the garbage disposal under the sink).

Just be sure to make careful measurements before you cut. We usually put a layer of painters tape around the area we’re cutting. It allows us to mark our cut without marking the cabinet, plus the tape helps keep the white finish from cracking off. Either way, this stuff will all be hidden under the sink so it doesn’t have to look perfect.
13. Clamps
As you start to get your cabinets in place and leveled, you’ll want to secure any adjacent cabinets together. Ikea provides screws for doing this, but you’ll want to use some clamps (we like these 6″ bar clamps) to hold the cabinets tightly together before you begin screwing.
We didn’t get a picture of that process, but the clamps come in handy A LOT as an extra set of hands – like when we were installing this bracket for the exhaust hoods that we hung over the stoves.

14. Circular Saw and/or Table Saw
In addition to screwing cabinets together, you may find yourself attaching cover panels or filler pieces at some point. Cover panels go on exposed ends of cabinets (so you can’t see the metal rail they hang on) or, in our case, we used some large cover panels to create a box around the fridges at the duplex. So you’ll need some sort of larger saw to make long, straight cuts. Our cover panels were a bit too wide, so I used a circular saw to shave a few inches off one side.

I didn’t use a table saw for that panel because running an 8 foot tall panel that’s this wide across my table saw would’ve been tough. But for smaller pieces (like filler pieces that are only about 3 feet long) a table saw is often easier, especially if you’re only shaving off a little bit. But if that’s too pricey and you’ve got a steady hand, you can get by with the circular saw.
15. 2 x 4″ Boards
Every time we’ve installed an Ikea kitchen we’ve needed some 2×4″s at some point. At the beach house we used them to make some bases for the island cabinets.

Basically, they were just some boxes we made almost the same size as each cabinet (slightly narrower to account for the toekicks) that we secured to the floor using pocket holes. To drill the pocket holes, you can use something like a…
16. Kreg Jig
Now, a Kreg Jig isn’t absolutely necessary here, but I’ve had one for around nine years now so I’m accustomed to breaking it out for tasks like this. So while I’m a big fan of having one in your arsenal, I understand that you’ve just bought a new kitchen so tacking on another $99 tool to your budget isn’t always practical.
I did use it again for the duplexes to make more 2×4″s into boxes (this time for mounting the above-fridge cabinet away from the wall, so it sat closer to the front of the fridge).

The boxes acted as an extension of the wall. The top one was for mounting the metal rail, and the bottom one gave the base of the cabinet a spot to rest so it didn’t tip back wildly. They also gave us a way to mount that large cover panel to box in the fridge.

I guess I should add in here that a step ladder is also useful, so let’s officially put that on the list.
17. Manual Screwdriver
Once your cabinets and panels are hung, leveled, and secured to each other, the next part of the process is to add your doors and drawers. The instructions here are pretty self-explanatory and the main tool you need is a power driver to screw everything together. Our main word of warning is to pay close attention to screw placements when you’re assembling drawers! Depending on where each drawer goes in the stack (top, middle, or bottom) there are sliiiiight differences in the instructions. So while we find it most efficient to do multiple drawers at once, we still pay close attention – especially for the first few.

Ok, back to the manual screw drivers. One big part of installing doors and drawers is tweaking and adjusting them for even and level spacing. For this you’ll want to use a regular ol‘ manual Philips head screwdriver. It can be kind of tedious and frustrating, but it’s worth taking your time with it. This video shows it in a bit more detail.

You also will want a flathead screwdriver for twisting the little piece of plastic that locks each cabinet onto the metal rail, which comes up earlier in the process.
18. Miter Saw
Tasks like cutting your 2×4″s or even your filler pieces will be made easier and faster by having a miter saw on hand (we own this miter saw). You’ll also find that it’s helpful when it’s time to cut and install your toekicks. Ikea’s sells toekicks to match your cabinet fronts and they clip on to the plastic feet you will have attached to the bottom of your base cabinets.

In our beach house kitchen we installed quarter round in front of the Ikea baseboards to help disguise some floor level issues, as well as using quarter round around the island where we built our own base (we used standard wood baseboard trim instead of the Ikea toekicks around the island). Meanwhile, we just used the Ikea toekicks in the duplex kitchens and the floors were more level (and we think the wood and blue cabinets were more forgiving than white ones) so we didn’t need to add quarter round and it looks great.
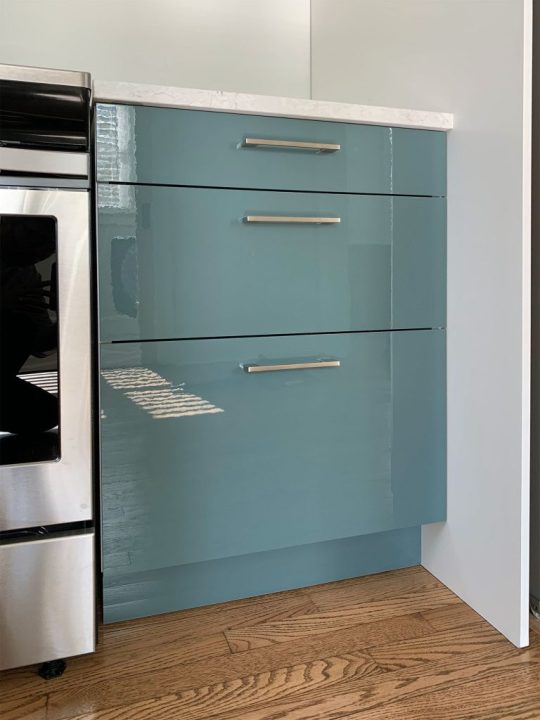
19. Nail Gun
In addition to using a nail gun to attach additional molding like quarter round if you’re adding that (again, the Ikea baseboards just snap on so you won’t need it for that) I also find a nail gun comes in handy sometimes for attaching small filler pieces. Especially in cases where they’re too thin to take a screw.
20. Others Tools
Real quick, here are some other items you may want to have on hand. Some I’ve mentioned or shown already, but haven’t officially listed:
Pen or pencil
Painters tape
Step ladder
Utility knife or scissors (for opening boxes faster!)
Crowbar (if you need to remove any baseboard or molding)
Broom, dustpan, and/or vacuum with a hose (we have this one)
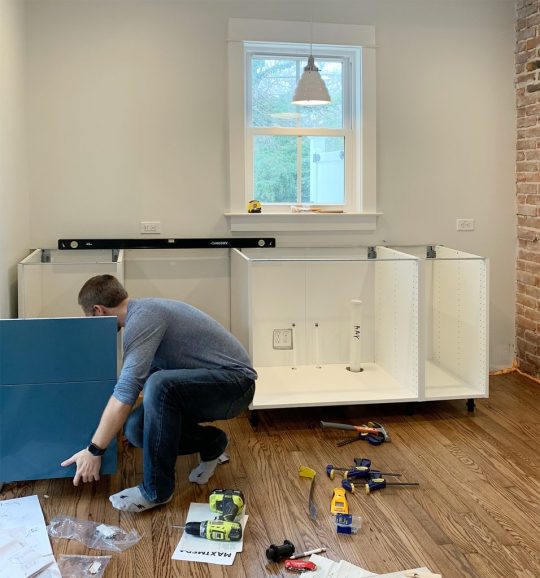
Your Ikea Kitchen Installation Tool Checklist
As promised, here’s all of the items in one place so you can make sure you have everything you need on hand. I’ve organized it a bit differently than above, just to put like items together. You may have special circumstances for your project that require more, less, or other tools – but I’ve found this to be a pretty comprehensive set:
Your itemized receipt / order
Hammer
Manual screwdrivers
Crowbar
Measuring tape
Pen or pencil
Painters tape
Step ladder
Power driver
Drill bit set with magnetic bit holder & 3/4″ bit for plumbing holes
Dremel or Hacksaw
Stud finder
Medium level (24″)
Large level (48″)
Wood shims
Cabinet screws (roughly 4 per cabinet)
Screws with anchors (roughly 2 per cabinet)
Jigsaw
Circular saw and/or table saw
Miter saw
Utility knife or scissors
Nail gun
Clamps
2×4″s (optional)
Kreg Jig (optional)
Broom, dustpan, and/or vacuum with hose
Good luck and happy installing!
P.S. For other posts we’ve written about installing Ikea cabinets, here’s one about installing our laundry room cabinets 5 years ago, and another one about using Ikea cabinets to make a wall of built-ins for our bonus room.
*This post contains affiliate links*
The post The Tools (And Tricks) You Need To Install An Ikea Kitchen Yourself appeared first on Young House Love.
The Tools (And Tricks) You Need To Install An Ikea Kitchen Yourself published first on https://bakerskitchenslimited.tumblr.com/
0 notes
Text
How to Install Butcher Block Countertops
How to Install Butcher Block Countertops
Butcher block countertops add a real good look and feel to your old and boring kitchen. They give your kitchen the aesthetic appearance that you wish to get without costing you a lot. These countertops are generally made from hardwood material like oak and birch and can last in your kitchen for a long time. So it is quite obvious that more and more home owners choose this inexpensive material for building their kitchen countertops.
If you too have decided to bring home butcher block countertops for your kitchen then this article is for you. We are going to explain how to install butcher block countertops in the easiest and simplest way possible. Let’s see how to install butcher block countertops for giving your kitchen the eye catching design that you are looking for.
TOOLS REQUIRED
Screwdriver
Sawhorses
Safety Glasses
Safety Gloves
MATERIALS REQUIRED
Butcher block Countertop
Miter Buckles
Wooden Biscuits
Attaching Box
How to Install Butcher Block Countertops | Step by Step
STEP 1
Prep the Area Prior to Install
First of all, you should make sure that you bring in the butcher block pieces a few days prior to installation to make them habitual to your home’s humidity and expand our shrink accordingly to prevent any breakage or rupture post installation. Then, attach the corner supports below the counters to provide proper support to the butcher-block countertops.
STEP 2
Join the Pieces Together
Place the butcher block on sawhorses so that you can access and work on them easily. Join the pieces of butcher block together by drilling miter buckle holes on the bottom side of each butcher block piece. Place the wood biscuit on the central part of the counters to level the section of butcher block.
STEP 3
Install the Countertops in Place
Place the butcher block countertop in the designated place. Put in the miter buckles inside the pre-drilled holes to securely fix them into space. Tightly fasten the miter buckles to place of the counter. Be careful not to screw in the corner supports to the butcher block piece before the sink is installed in place.
STEP 4
Install the Faucets
Take precise measurements of the size of the holes required for faucets and replicate them on the countertop. With the help of drill and forstner bit, drill the holes of appropriate dimensions and in the correct position for the faucet and the water holes. Fill out any extra bit drilled with the help of wood filler.
STEP 5
Install the Sink
Place the sink in place and seal the corners with silicone bead. Fix the corner support in place to secure the butcher block to in place.
K&B Cabinets For Professional Help
If you need any professional assistance for installing you butcher block countertops, you can contact K&B Cabinets without any hesitation. The highly experienced experts of K&B Cabinets make all your worries disappear and guide you all the way through your butcher block countertop installation. Now you don’t need to worry about how to install butcher block countertops by yourself. Simply contact K&B Cabinets and have your kitchen countertop installed quickly and efficiently.
from K&B Cabinet https://www.knbcabinet.com/how-to-install-butcher-block-countertops/
via Kitchen and bathroom design
0 notes
Link
(adsbygoogle = window.adsbygoogle || []).push({ google_ad_client: "ca-pub-4529487355065194", enable_page_level_ads: true });
(adsbygoogle = window.adsbygoogle || []).push({});
How to fit coving
How to fit coving & skirting
Difficulty rating: Medium
These tasks may be tricky so will suit you if you're experienced in DIY, or simply love a challenge.
(adsbygoogle = window.adsbygoogle || []).push({});
Before you get started on any of our 'how to' guides, please take a moment to read through our DIY safety tips.
What You'll Need:
Multipurpose adhesive
Tape measure
Spirit level
Mitre block
Cordless drill
Claw hammer
Step ladder
Saw
Paint scraper
Cable detector
Craft knife
Nails
Drill bit set (wood & masonry)
Sponge
Bolster Chisel
Screwdriver
OR
Electric Screwdriver
(adsbygoogle = window.adsbygoogle || []).push({});
Measuring up for coving and skirting boards
Measure the length of all the walls in the room to work out how much coving you need. Do the same for skirting but deduct the width of any doorways, cupboards and so on. To be safe, allow for 5% extra just in case.
Coving
Coving comes in a range of materials:
Polystyrene: This is the least expensive but it does need a number of coats of paint. Polystyrene coving is also easily damaged so take care when handling.
Paper-coated plaster: This coving is heavier and must also be painted. The smooth paper covering gives you the best base for painting.
Plaster: Plaster coving is the most expensive but it has a brilliant white, smooth finish that needs less painting. You can also buy a wide range of authentic period plaster mouldings.
Duropolymer: Duropolymer gives all the benefits of plaster coving but without the added weight. It's preprimed and comes in a choice of designs.
(adsbygoogle = window.adsbygoogle || []).push({});
Helpful hint...
If your walls are slightly bowed, you can still add coving as styles are flexible enough to give slightly to match the wall. To hold coving in place, fix it to the walls with brass screws. Countersink the heads and fill the holes with filler.
How to fit coving
Coving can be a lovely feature for any room and here are some easy steps on how you get the best finish.
Fitting the coving
Use a 100mm length of coving as a template to mark the top and bottom edges of the coving on the walls and ceiling of your room.
Make the marks at regular intervals and join them together with a straight edge.
Remove any loose wallpaper or flaky paint. Then score between the lines with a craft knife to give a key for the adhesive.
Start on the longest wall and use a mitre block to cut the end of the first piece of coving at a 45-degree angle. Cut the coving with a fine-toothed saw and sand-smooth any rough edges. Using a mitre block to cut the coving for both internal and external corners will give you a perfect fit.
(adsbygoogle = window.adsbygoogle || []).push({});
With a filling knife, spread an even layer of coving adhesive over the back of the first piece of coving - i.e. the areas that will be in contact with the walls and ceiling.
Hold the coving in place and line up the edges with the pencil guide lines on the wall and ceiling. Press gently along the whole length of the coving so the adhesive sticks evenly.
To hold it firmly in place, support the bottom and top edges with a few galvanised nails. When the adhesive has dried, remove the nails and fill the holes.
Use a damp paintbrush or sponge to remove any adhesive that oozes out from the top and bottom edges of the coving and to smooth the joint lines.
Work around the room, butting the ends of the coving together where they join on straight sections of wall. You can use a little filler to smooth over the joins once you've finished.
(adsbygoogle = window.adsbygoogle || []).push({});
Helpful hint...
Fix very heavy plaster coving with brass screws at 1m intervals. Hold the pieces in position and drill carefully through the coving and into the wall. Add wall plugs, spread on the adhesive and screw into place. Use filler to conceal the screw heads.
Skirting boards
Skirting boards obviously give you a decorative finish for your room. But they're also very useful for covering unsightly gaps caused by natural contraction. And they help reduce drafts too.
Skirting is typically made of wood and comes in many decorative shapes (also known as mouldings). It can be varnished or painted.
Before fitting your skirting, paint the back with wood preservative to extend its life.
Helpful hint...
When removing old skirting boards, tap the blade of a bolster chisel between the wall and the skirting with a hammer. Prise the skirting far enough to insert a crowbar. Using a thin piece of wood under the crowbar to protect the plaster, lever the skirting board away from the wall.
(adsbygoogle = window.adsbygoogle || []).push({});
Like coving, skirting gives a lovely finish to any room and is really easy to fit when you know how. Here are some top tips.
1. The right type of fixing for your walls
Any damp-proofed walls: Only use wood adhesive to fix skirting to where a wall has had a damp-proof course inserted. You don't want to drive nails or screws through the damp-proofing as this will damage the waterproof seal.
Masonry walls: Use two masonry nails or two screws every 600mm. Try to use old fixing points if you're replacing the skirting. If you use screws, hold the skirting board against the wall and drill a pilot hole through the skirting into the wall. Then, countersink the screw holes, insert a rawl plug and fix with a screw. To hide the screw head use a little filler and sand it flush. Important! Check there are no pipes or cables behind the fixing points when using screws or nails.
Stud walls: With a stud detector locate the studs in the wall. Use these as the fixing points - upright studs are usually 400mm or 600mm apart. Fix the skirting boards with two screws or two lost-head nails at each fixing point.
(adsbygoogle = window.adsbygoogle || []).push({});
Plaster walls: Try to find the studs and fix into these with either two screws or two lost-head nails. If you can't find the studs just fix at regular intervals.
2. Mitring corners for skirting
The neatest way to fit skirting boards at internal and external corners is to use a mitre block.
With a panel saw cut the end of the first piece of skirting at a 45-degree angle. Sand-smooth any rough edges.
Fix the skirting with the method that suits your walls (see above).
When joining two pieces of skirting at a corner, spread wood glue on cut ends. Hammer in two lost-head nails each side of the corner for extra strength.
(adsbygoogle = window.adsbygoogle || []).push({});
3. Joining lengths of skirting
If a single piece of skirting won't cover the whole length of a wall, you'll need to join two pieces.
To join two lengths, mitre the ends of both pieces at 45 degrees - one mitre going one way, and the other the opposite way. Check the two pieces fit together before fixing them.
Glue the cut ends of the two boards and fix them to the wall next to the join with lost-head nails.
4. Finishing off the skirting
Fill the gaps between the skirting and the wall with decorators caulk and leave it to dry.
If you're painting the skirting, fill all the screw and nail heads and then sand them flush.
Apply knotting solution to any knots and then paint on a primer. Next you'll need an undercoat and finally a topcoat of paint.
If you're varnishing the boards, use an acrylic filler that matches the colour of the wood. Apply the varnish according to the manufacturer's instructions.
Helpful hint...
Try to make as few joins as possible on the walls. It's worth buying an extra full-length piece of coving or skirting board rather than use up two shorter sections. It will look much neater.
(adsbygoogle = window.adsbygoogle || []).push({});
(adsbygoogle = window.adsbygoogle || []).push({});
0 notes
Text
10 Interior House Painting Tips & Techniques for the Perfect Paint Job
Here are 10 tips to make your interior house painting projects go smoother and faster while giving you a professional-looking finish that you’ll be proud of. You’ll also find ingenious tips that can cut your cleanup time in half and extend the life of your paint brushes.
TIP 1: TO AVOID LAP MARKS, ROLL THE FULL HEIGHT OF THE WALL AND KEEP A WET EDGE
Roll the full height of the wall
Lap marks are those ugly stripes caused by uneven layers of paint buildup. They occur when you roll over paint that’s already partly dry. (In warm, dry conditions, latex paint can begin to stiffen in less than a minute!) The key to avoiding lap marks is to maintain a “wet edge,” so each stroke of your roller overlaps the previous stroke before the paint can begin to dry.
To maintain a wet edge, start near a corner and run the roller up and down the full height of the wall, moving over slightly with each stroke. Move backward where necessary to even out thick spots or runs. Don’t let the roller become nearly dry; reload it often so that it’s always at least half loaded. Keep the open side of the roller frame facing the area that’s already painted. That puts less pressure on the open side of the roller, so you’re less likely to leave paint ridges
TIP 2: MIX SEVERAL CANS OF PAINT IN A LARGE BUCKET FOR A CONSISTENT COLOR THROUGHOUT THE ROOM
Mix paint in a large bucket
Paint color may vary slightly from one can to the next. If you have to open a new can in the middle of a wall, the difference may be noticeable. Mixing the paints together eliminates the problem. It’s best to estimate the amount of paint you’ll need and mix it in a 5-gallon bucket (a process called “boxing”).
When coverage is difficult to estimate, add more rather than less. You can always pour the leftover back into cans. For large jobs, use the bucket and a roller screen rather than a roller tray. It’s much faster to load your roller with the screen than to use a roller pan. Simply dunk the roller into the paint bucket, then roll it along the screen until it stops dripping.
TIP 3: LET THE PAINT DRY, THEN CUT THE TAPE LOOSE FOR A PERFECT EDGE
Cut tape when paint is dry
Once the paint is dry, you can’t just pull the tape off the trim. Paint forms a film between the wall and the tape and removing the tape tears pieces of dried paint off the wall. So before pulling off the tape, cut it loose.
Wait for the paint to completely dry, at least 24 hours, then use a sharp utility knife or box cutter knife to slice through the film. Start in an inconspicuous area to make sure the paint is hard enough to slice cleanly. If you cut the paint while it’s still gummy, you’ll make a mess. As you cut the paint, pull up the tape at a 45-degree angle.
TIP 4: PAINT THE TRIM FIRST, THEN THE CEILING AND WALL
Paint the trim first
Prime and texture wall
Pros usually follow a certain order when painting a room. They paint the trim first, then the ceiling, then the walls. That’s because it’s easier (and faster) to tape off the trim than to tape off the walls. And you certainly don’t want to tape them both off!
When painting the trim, you don’t have to be neat. Just concentrate on getting a smooth finish on the wood. Don’t worry if the trim paint gets onto the walls. You’ll cover it later when painting the walls. Once the trim is completely painted and dry (at least 24 hours), tape it off (using an “easy release” painter’s tape), then paint the ceiling, then the walls.
TIP 5: PRIME AND TEXTURE WALL PATCHES TO AVOID A BLOTCHY FINIS
Freshly painted walls often look blotchy
Freshly painted walls often look blotchy. The color is uniform, but the sheen isn’t consistent. This usually occurs over the holes and cracks you patched with a filler or drywall compound. The porous fillers absorb the paint, dulling the surface (a problem called “flashing”). When light hits these dull spots, they stick out like a sore thumb. The smooth patch also stands out in contrast to the slightly bumpy texture of the rest of the wall. A quick coat of primer is all it takes to eliminate flashing and texture differences.
Primer seals the patch so paint won’t sink in and look dull. To match texture, prime with a roller, feathering out the edges. Choose a nap thickness to match the surrounding wall texture (a 3/8-in. nap roller for smooth walls; 1/2-in. for textured).
TIP 6: CLEAN DIRTY SURFACES SO THE PAINT CAN FORM A STRONG BOND
Clean dirty areas before painting
If you paint over dirty, oily surfaces, the paint will easily chip or peel off. So before painting, clean grimy areas with a deglosser or heavy-duty cleaner intended for prepaint cleaning. They work well to clean painted, varnished or enameled surfaces to improve the adhesion of the new paint. They’re ideal for cleaning greasy or oily areas like kitchen and bathroom walls and removing hand marks around light switches and doorknobs.
Wipe on the cleaner in a circular motion using a lint-free cloth or abrasive pad. Start at the bottom and work up. After the surface is clean, fill in any nicks and holes, then sand them smooth before painting. The cleaners are available at paint stores and home centers. Be sure to wear rubber gloves and eye protection.
TIP 7: ROLL PAINT ALONG THE EDGES FOR CONSISTENT TEXTURE
Roll out paint near trim
Corners and areas next to trim that is painted only with a brush have a noticeably different texture than the surrounding paint. To ensure the finished texture will be consistent in these areas, brush on the paint, then immediately roll it out before the paint dries.
Use a 3-in. roller with a nap that’s the same thickness as the roller used for the rest of the wall. Roll as close as you can without bumping the opposite wall or slopping paint onto the trim. Finish brushing on the paint and rolling it out in one area before moving on to the next section.
TIP 8: USE COTTON DROP CLOTHS RATHER THAN PLASTIC
Protect floor with cotton drop cloth
Spills and spatters happen, regardless of how careful you are. It’s a lot easier to prepare for them than to wipe them out of your carpeting or off your wood floor later. All it takes is canvas drop cloths in your work area (a 4-ft. x 15-ft. cloth costs $15). The thick canvas stays in place, so you don’t need to tape it, and you can use it to cover any surface. Plastic drop cloths are slippery to walk on or set a ladder on and don’t stay in place. Even worse, paint spills on plastic stay wet, and they can end up on your shoes and get tracked through the house. Canvas is slippery on hard floors, so rosin paper ($10 for 400 sq. ft. at home centers) is better over vinyl, tile, and hardwood. Tape the sheets together and to the floor to provide a non-slip surface.
But even with canvas or rosin-paper drop cloths, large spills still need to get wiped up right away or they’ll seep through. Clean spills with paper towels or cloth rags. Likewise, if you splatter paint on any other surface, wipe it up immediately.
TIP 9: FEATHER OUT PAINT WHERE YOU CAN’T KEEP A WET EDGE
Feather paint with a dry roller in large areas
You can’t cover large areas like ceilings, extra-tall walls or stairwells in single, continuous strokes, so the best way to minimize lap marks on these areas is to feather out the paint along the edges that you can’t keep wet. The thinner, feathered coat of paint will avoid the buildup that causes the lap mark.
To paint a large section without leaving lap marks, roll the nearly dry roller in different directions along the dry edge, feathering out the paint as you go. After completing the entire length of the wall or ceiling, move to the next section and paint over the feathered edges. For the second coat, apply the paint in the opposite direction. This crisscrossing paint application sharply reduces (if not eliminates) lap marks.
TIP 10: SAND TRIM BETWEEN COATS FOR AN ULTRA-SMOOTH FINIS
Sand trim for a smooth finish
One coat of paint usually won’t hide the underlying color and sheen on a trim. And if you don’t sand the surface smooth between coats, the finish may have a grainy texture. For a smooth finish, sand the trim before applying each coat of paint.
Sand the trim with a fine-grit sanding sponge. Sponges get into crevices where sandpaper can’t go and let you apply even pressure. Then apply the first coat of paint, let it dry at least 24 hours, lightly sand it again for a completely smooth surface, and apply the second coat. After each sanding, vacuum the trim, then wipe it down with a tack cloth to remove the dust.
If you are in Calgary and are looking for interior house painting services then please give us a call @ (780) 800-8038. Painters Calgary is always there to help you.
.
Related Services:
https://calgary-painters.ca/interior-painting-calgary/
https://calgary-painters.ca/house-painting-calgary/
Source: 10 Interior House Painting Tips & Techniques for the Perfect Paint Job
By: Painters Calgary, AB | Interior, Exterior, House, Commercial Painting Contractors.
Calgary Painters – South
380 Canyon Meadows Dr SE #2106, Calgary, AB T2J 7C3 Canada
(587) 887-8374
Mon-Sat 8:00am – 6:00pm
Calgary Painters – North
528 710 20 Crowfoot Cres NW Calgary, AB T3G 2P6 Canada
(587) 887-8374
Mon-Sat 8:00am – 6:00pm
By: calgary-painters.ca
Also Check Out:Tumblr
Blogger
Wordpress
Youtube
0 notes
Last Seen Blogs

curao-posteo-mejor
Curao Posteo Mejor

rupertgrintsexriot
RUPERT GRINT SEX RIOT

actuallygoob
🩷 Goob! 🩷

ronfire-of-the-vanities
Ron F***ing Swanson

ui9o0lk511-blog
사설토토안걸리는법// FV43。COM //카지