#with a fresh pan of lemon pepper wings
Explore tagged Tumblr posts
Visit Tumblr Blog
Explore Tumblr blogs with no restrictions, modern design and the best experience.
Last Seen Tumblr Blogs


Fun Fact
Tumblr was attacked by a cross-site scripting worm deployed by the Internet troll group GNAA on Dec 3, 2012.
Text


Are you dating? | Next
#ts4#indya#black simblr#i have no comment other than the gifs might take a minute to load#I'll see y'all in the replies#with a fresh pan of lemon pepper wings#and ice cold Ghettosas™#ts4 story#sims 4 story#simblr#ch24
280 notes
·
View notes
Text
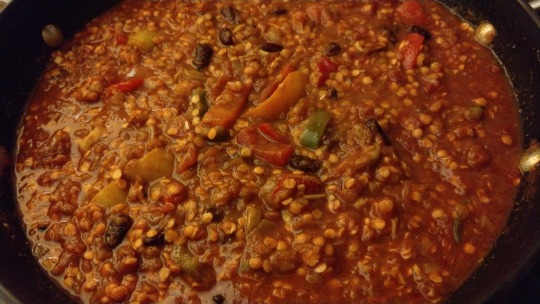
I COULD MURDER A CURRY... Well, at least commit a certain amount of violence on one.
In other words, I wanted something curry-ish the other day without taking much trouble over it, so I threw this together from what was in the cupboard, fridge and freezer.
(There was rather less than I expected. That's been fixed.)
When I discovered we had no lamb or chicken it ended up as unintended vegetarian, and can as easily become vegan; just leave out the ghee. If my result is anything to go by, all variations will taste great.
NB #1, there's no salt; the preserved lemon has plenty.
NB #2, metric measurements are correct, Imperial are approximate, but this whole recipe was pretty vague from start to finish, so wing it.
That's what I did. For instance, preserved lemon is Moroccan not Indian, yet it worked just fine.
Lemon and lime lentil curry
Ingredients
1 tablespoon ghee or coconut oil (I used a 50-50 combination)
2 onions peeled and chopped fine
2 tablespoon hot curry powder
1 tablespoon mild curry powder (or 1 hot / 2 mild if preferred)
6 cloves of garlic peeled and chopped fine
2 400g / 14oz tins chopped tomatoes in juice
1 400g / 14oz tin kidney beans, drained and rinsed
250 g / 1 cup red lentils
250 g / 1 cup each of red, green, and yellow peppers, sliced and coarsely chopped (optional; we had them in the freezer)
2 heaped tablespoons lime pickle, chopped fine (hot or mild as preferred; Patak brand is good. I used home-made hot)
2 heaped tablespoons preserved lemon, chopped fine (again, I used home-made) *
1 tablespoon garam masala
* If you can't source preserved lemons, use the zest and juice of at least one fresh lemon (two might be better). If you've only got bottled lemon juice, add 125ml / 1/2 cup of it when the tomatoes go in.
Method
Heat your preferred cooking fat in a pan (a wok is even better), add the chopped onions, and cook until soft and translucent. If desired, cook until starting to brown (this may take up to 45 minutes).
Push the onions to one side, allow the fat to flow into the centre of the pan, add the dry spices, combine well with the fat and cook for about five minutes.
Add the garlic and cook for a further five minutes.
Add the kidney beans and lentils to this mixture, stir well, add the peppers, lime pickle and preserved lemon, and stir again.
Add the chopped tomatoes, and one tomato-tin full of water. (Also add the lemon juice (and zest), if that's what you're using instead of preserved lemons.)
Stir well, turn the heat right down, cover, and simmer for about 30 to 45 minutes. (This is where I'd have added 2 cubed chicken breasts, if I'd had them).
Check occasionally to ensure nothing is sticking, adding a little water if required. Taste during this process, and adjust the seasoning. (Which means, if you're using fresh lemon or bottled lemon juice, this is when to add some salt.)
When the lentils are done (I like them a little al dente), sprinkle on 1 tablespoon garam masala, stir it in then serve.
Accompany with Basmati rice, or chapatis (flour tortillas / wraps will do just fine), or naan bread, or any combination of these. I did a mix of 1/3 brown Basmati / 2/3 white Basmati.
@dduane pointed out that what with the carbs, protein, dietary fibre etc., this is also quite healthy. That's an unexpected bonus for something I just thought was no trouble to make, tasted good...
And didn't involve committing even a minor felony, though a slice of apple tort to follow would have been nice... :->
#food and drink#indian food#curry#vegetarian curry#lentils#I COULD MURDER A CURRY#GNU Terry Pratchett
246 notes
·
View notes
Text
Savory Herb-Crusted Roast Chicken – A Simple Recipe for Flavorful Perfection
Hello, food lovers! 👨🍳
Today, I’m excited to share one of my favorite go-to recipes: Savory Herb-Crusted Roast Chicken. This dish is a true comfort food classic that’s incredibly easy to prepare but packed with flavor. The crispy, golden skin, combined with the tender, juicy meat, is simply irresistible.
Whether you're cooking for your family or hosting friends, this roast chicken will undoubtedly be a hit. Let’s get into it!
Ingredients:
1 whole chicken (about 4 lbs)
2 tablespoons olive oil
3 cloves garlic, minced
1 tablespoon fresh thyme leaves
1 tablespoon fresh rosemary, chopped
1 teaspoon salt
1/2 teaspoon black pepper
1 lemon, halved
1 onion, quartered
1 cup chicken broth (optional for basting)
Instructions:

Preheat the Oven: Start by preheating your oven to 425°F (220°C). This high temperature helps crisp up the skin while keeping the inside juicy and tender.
Prepare the Herb Mixture: In a small bowl, combine the olive oil, minced garlic, thyme, rosemary, salt, and pepper. This flavorful mixture will form the herb crust on your chicken.
Season the Chicken: Pat your chicken dry with paper towels. This step is crucial as it helps achieve that perfect, crispy skin. Rub the herb mixture all over the chicken, making sure to coat every part of it, including under the wings and drumsticks. Place the halved lemon and quartered onion inside the chicken’s cavity for extra depth of flavor.
Roast the Chicken: Place the chicken on a roasting pan, breast side up. Roast for approximately 1 hour and 15 minutes or until the internal temperature reaches 165°F (74°C). The skin should be golden and crispy, and the juices should run clear when you pierce the drumsticks.
Baste (Optional): If you want to take the flavor up a notch, you can baste the chicken halfway through the roasting process with a little chicken broth. This will keep the bird moist and enhance the savory flavors.
Rest and Carve: Once done, remove the chicken from the oven and let it rest for 10 minutes before carving. Resting helps the juices redistribute, ensuring every bite is tender and juicy.
Serving Suggestions:
This savory herb-crusted roast chicken pairs beautifully with roasted vegetables, mashed potatoes, or a fresh garden salad. It’s the perfect dish for a family dinner or a Sunday roast that everyone will enjoy!
About Chef Scott Biffin:
Hi, I’m Chef Scott Biffin! Cooking has always been a passion of mine, and over the years, I’ve honed my skills in both classic techniques and innovative culinary creations. My philosophy in the kitchen is simple: use fresh ingredients, combine them thoughtfully, and let the flavors shine. Whether I’m preparing a simple home-cooked meal or experimenting with new recipes, my goal is to create memorable dining experiences.
#Herb-Crusted Roast Chicken#Roast Chicken Recipe#Chicken Dinner Recipe#Savory Roast Chicken#Easy Roast Chicken#Scott Biffin
2 notes
·
View notes
Photo

𝐓𝐎 𝐂𝐎𝐍𝐓𝐈𝐍𝐔𝐄 𝐑𝐄𝐂𝐄𝐈𝐕𝐈𝐍𝐆 𝐌𝐘 𝐑𝐄𝐂𝐈𝐏𝐄𝐒 𝐓𝐘𝐏𝐄 "𝐘𝐄𝐒" 😍😍 𝑺𝒉𝒂𝒓𝒆 𝒘𝒊𝒕𝒉 𝒖𝒔 𝒚𝒐𝒖𝒓 𝒕𝒉𝒐𝒖𝒈𝒉𝒕𝒔 𝒂𝒏𝒅 𝒊𝒅𝒆𝒂𝒔 𝒊𝒏 𝒕𝒉𝒆 𝒄𝒐𝒎𝒎𝒆𝒏𝒕𝒔! 📌𝐂𝐡𝐞𝐜𝐤 𝐌𝐨𝐫𝐞 𝐚𝐭 : 🔍 Find More KitchMeTHAT Recipes HERE 🍽 ..........📍 𝑹𝒆𝒃𝒍𝒐𝒈 𝑵𝑶𝑾, 𝑪𝒐𝒐𝒌 𝑳𝒂𝒕𝒆𝒓! 📍 ......... 🍲 Rotisserie Chicken Noodle Soup 🍲 A comforting and delicious soup made with rotisserie chicken and fresh veggies! Ingredients: - 1 leftover rotisserie chicken, broken up into pieces - 4 tablespoons olive oil, divided - 10 cups water - 2 bay leaves - 1 tablespoon black peppercorns - 2 cups vegetable scraps (onion roots or skins, celery scraps, carrot scraps, parsley stems, garlic husks, lemon peels, etc) - 1 onion, diced - 4 garlic cloves, minced - 2 carrots, peeled and diced - 3 celery stalks, diced - 2 cups dried spaghetti, broken (fideo cut) - 2 cups reserved chicken meat from rotisserie - 1/4 cup fresh parsley, minced - 1 lemon, juiced - Oyster crackers, for serving Directions: 1. Prepare your rotisserie chicken by picking clean at least 1 ½ - 2 cups of residual chicken meat, then cut the carcass into pieces (legs, thighs, wings, breasts). 2. Preheat a large stock pot over medium-high heat with two tablespoons of olive oil. 3. Add cleaned chicken bones to the pan and brown for at least 2 - 3 minutes per side until golden. 4. Add all remaining broth ingredients to the pot and bring the mixture to a boil, then immediately reduce to low and cover for 1 hour. 5. Remove your chicken bones and drain broth over a mesh strainer into a bowl. Add chicken broth back to the pot and start to reduce the mixture by ⅓ to concentrate the chicken flavor. 6. Preheat a second pot over medium-high heat with remaining olive oil and add onion, garlic, pepper flakes, carrots and celery. Season with salt and pepper, then let cook for 6 - 8 minutes or until the veg is softened. 7. Add rotisserie chicken, egg noodles, and pour over your chicken broth. Season broth with salt and pepper. It will continue to reduce in the soup, so be mindful of not over salting this step. 8. Let the soup simmer until the egg noodles are cooked. Remove from the heat and garnish with fresh lemon and minced parsley. 9. Enjoy with oyster crackers! Prep Time: 15m | Cooking Time: 1h 20m | Total Time: | Servings: 6
#Rotisserie#Chicken#KitchMeTHAT#Recipess#recipe#foodgasm#food photography#cooking#delicious#foodporn#tasty#healthy recipes#food#How to Cook#Food Porn#FoodGasm#January
2 notes
·
View notes
Note
hiii im going to be living w my aunt over the summer and therefore buying my own groceries. I am going to be busy w summer classes and working on the weekends but I do rlly want to try cooking at least once or twice a week. I can make an egg and pasta but that’s about it. What are some of your fave recipes that aren’t super complicated that I could start with if you have any? (I am open to a minor challenge but cooking can overwhelm me so I like a challenge but not too much of one lol). I am also vegetarian (not vegan) if that matters! If you don’t get to this that’s okay !!! I hope u are well 🩷🩷🩷
now it's been a little while for me since i've had to use this model due to moving back home w my family for a time but when buying groceries for one person i found it helpful to follow this sort of structure about once a week! when i do this it feels a lot easier to 'wing it' in the kitchen and mix and match my meal components. and to preface, this is what i find to be helpful and everyone is different and finds different things to work for them!!
1-3 protein sources - i like to center my meals around this because i've found it helps me feel the most nourished and full, i always think of it as things that can be the 'star' of your dishes. i eat meat so i usually do salmon, chicken thighs, and alternate pork + beef. but for u that could b things like tofu, eggs, beans/lentils, mushrooms maybe, vegetarian 'meat' fakes lol, peanut butter if u like any peanutty noodle dishes
3-4 veggies - i love to snack on veggies so i usually get snap peas, cucumbers, + bell pepper just for snacking, and then something like brussel sprouts for roasting as a side dish w a dinner, these can also be frozen
2-3 types of fruit - i am a smoothie enjoyer bigtime so i get a combo of frozen and fresh, almost always mango, and then whatever is seasonal that i can see myself being excited to eat throughout the week
2-3 grains - pastas, premade pizza crusts, bread, rice, etc!! these rly round out ur meals!! and imo they make it simpler to make a meal on the fly. i am a huge fan of microwave rice LOL
2-3 multipurpose dips/spreads/sauces/condiments/pantry items - now here is ur golden ticket for being able to reliably make well rounded and varied meals!!! slowly building up your collection over time is the most cost effective way imo. it's helpful to stock up your pantry w things like baking supplies (flours, sugars, leaveners), spices, shelf stable canned goods (canned tomatoes, beans, vinegars, oils, soy sauces, fish sauce, cartons of things like oak milk), and 'fridge pantry' items (parmesan, herbs, lemons for juice and zest, miso, gochujang, ketchup, mayo, hot sauce, jam, pickles, etc). you can use these to season your food as you cook!
2-3 snacks/frozens - any microwave meals or chips or desserts you might want!!
using this structure makes it easier to look at what you have and be like, i have xyz and they would go together well.
EX. i have rice, tofu, and bok choy, now i can cook the rice and pan fry the tofu and bok choy with my pantry ingredients (soy sauce, miso, sesame oil, chili oil) and create a filling meal!
some of my favorites that could be made vegetarian -
ground pork seared on the bottom of a dutch oven in patties (you could sub tofu or use a fake meat replacement), broken up into smaller chunks, eaten with linguine, sliced snap peas or celery, + a garlicky peanut butter sriracha sauce
pizza w a store bought crust!! super easy, done in like 10 minutes! i like to make mine in a cast iron following this protocol
i really love to dress up ramen w sliced veggies and eggs
i like to make pasta dishes and then form a sauce w parmesan cheese, butter, pasta water, lots of lemon zest and juice and sometimes chicken stock, then adding in peas and fresh herbs at the end
idk if this was helpful at all, but i also have a recipe + recovery tag on my blog w more of these if that is helpful to you! im also on Instagram (@clementineoliveoil) and like to post what i cook there sometimes too!! i wish u all the most beautiful meals in your future!!
30 notes
·
View notes
Text
Spicy “Just wing it” chicken & champignons à la sheiruki
Read first please:
Fuck it, I wanna share my favourite recipe creation so far because I'm proud of it. All amounts are estimates (Hence, "just wing it"). Also, know that I'm literally just fucking around in my kitchen; I know jack shit about cooking besides "tastes good" and "doesn't taste good". I cooked this as dinner for myself without any side dishes so I'll view this as one portion. Can be split in 2 if served with something. I'd probably go with a type of flat bread...
For 1 Portion you’ll need:
Chicken steaks/breasts (~400g)
Champignons (250g)
1 Onion
Harissa paste (hot paprika & spice paste found in many MENA dishes)
Tomato paste (concentrated)
Puréed tomatoes
A few pods of cardamom
Sweet paprika powder
Allspice
Sugar
Extra virgin olive oil
3 cloves of garlic
Salt
Pepper
Chili flakes to taste
Sesame seeds (garnish)
Spring onions (garnish)
Something lime or lemon-y (garnish)
1 flat and 1 deep/spacious frying pan
You could probably do everything in one pan but I used two because I first tried searing the chicken in all of the marinade and thus couldn't get that nice, roasted aroma.
Marinade:
Add a generous amount of olive oil to an airtight or at least well sealed container. Peel and press the 3 cloves of garlic (you want garlic purée) and add them to the oil. Add ~2 tablespoons of tomato paste & 1 Tablespoon of Harissa paste (guessing values here but you want more tomato than Harissa). Add ~ 1 tablespoon of sweet paprika powder and ~½ tablespoon of freshly ground allspice. Roast, Peel and add the cardamom (I think I used 3 pods) & maximum a piled tablespoon of sugar. Idk if honey would work here but the types of honey I have were too malty. You want a sweet touch. Mix it all well.
Prepare your chicken, put it in the marinade, close your container and give it a good shake. Put it in the fridge and let it rest for a day (shake in between). The olive oil will eventually congeal slightly but that doesn't matter; the moment you add it to the hot pan it’ll become liquid again. Your chicken may still look pale but don't be fooled.
Frying:
Always make sure you really heat up the marinade-oil to kill off potential bacteria carried by the chicken.
1. Dice your onion and put it aside
2. Quarter your champignons (unless you got the super small ones) and put them aside
3. Take a normal frying pan, add a bit of the marinade so you don't have to add extra oil unless absolutely necessary, and fry your chicken at high heat until it's nicely seared on the outside but not cooked through yet. “Extinguish” with a splash of puréed tomato (~100-200 ml, you don't want to make soup). Turn the heat to low and let it cook for a bit while you focus on the champignons.
4. Take a deep pan, add the rest of the marinade, wait until it's hot and add the onion. Sear at high heat until glassy. Add the champignons and sear the until they shrink and turn brown (taste to check if they're good. They shouldn't be too mushy).
5. Add the chicken-tomato mix, stir well, reduce the heat and let it all cook together.
6. Add salt, freshly ground pepper (black), chili flakes and potentially more harissa to taste. Stir.
7. Once everything has a nice brownish coating of sauce/marinade*, check if your chicken is juicy but completely white inside.
*There can be a bit of extra sauce but most of it should be coating. It mustn't swim in sauce.
8. Garnish with chopped spring onions, sesame seeds and something “fresh” (I used chopped lemon balm but something lime-ish would fit even better. Get creative.)
Enjoy 😋
3 notes
·
View notes
Photo

Margaritaville | Carlo Sernaglia and Julia Turshen
Breakfast
Pineapple and Coconut Milk Smoothie
Key Lime Yogurt with Graham Cracker Granola
Baked Boatmeal Squares with Blueberries and Coconut
Huevos Rancheros
Key West Omlet
Key Lime Hollandaise
South Florida Eggs Benedict
Spicy Breakfast Quesadillas
Triple B (Buttermilk, Blueberry and Banana) Pancakes
Best-Ever French Toast
Our Breakfast Potatoes
Appetizers
Volcano Nachos
Warm Asiago Crab Dip
Grilled Oysters with Tarragon Butter
Peel-and-Eat Shrimp
Mustard Sauce
Drunken Shrimp Skillet
Lava Lava Shrimp
Conch Fritters with Calypso Sauce
Spanish Octopus Salad
JWB Crab and Quinoa Cakes with Curry Kale Slaw
Crispy Calamari with Peppadews and Lemon Aioli
Fried Oysters with Creamed Spinach
Lionfish Carpaccio
A Day on a Boat
Kusshi Oysters with Granny Smith, Cucumber, and Mint Granita
Veracruz Seafood Cocktail
Tuna Poke with Plantain Chips
Paradise Ceviche
Belizean Shrimp Ceviche
Pimiento Cheese Hushpuppies
Crispy Eggplant and Goat Cheese Stuffed Piquillo Peppers
Fried Baby Artichokes with Remoulade
Tostones with Mojo Sauce
Hollywood Burrata with Grated Tomato Dressing
Jalapeño Deviled Eggs with Pickled Mustard Seeds
Cajun Chicken Quesadilla (Blackening Seasoning)
Spicy Buffalo Chicken Wings with Buttermilk Blue Cheese Dressing
Sweet Chile Chicken Wings
Salads and Soups
JWB Caesar Salad with Sourdough Croutons
JWB House Salad with Cashew Dressing
Little Gem Wedge Salad
Avocado and Papaya Salad with Spicy Lime Dressing
Quinoa and Mango Salad with Seared Tuna
Fried Green Tomato Salad with Salsa Verde and Quesp Fresco
Andalusian Gazpacho
Luxurious Lobster Bisque (Lobster Stock)
Bahamian Conch Chowder
Chicken and Corn Chupe
Burgers, Sandwiches and Hot Dogs
Cheeseburgers in Paradise with Paradise Island Dressing
Black-and-Blue Burgers
Turkey Burgers with Cheddar and Barbecue Aioli
JWB Surf’n’Turf Burgers
Ultimate Veggie Burgers
Grilled Flank Steak Sandwiches with Horseradish Sauce
Cuban Meat Loaf Survival Sandwiches
A Day on The Beach
Tailgate Muffuletta for a Crowd
Beach Club Sandwich
New Orleans Fried Oyster Po’Boys
Delta Fried Catfish Reubens
Blackened Fish Sandwiches (Jalapeño Tarter Sauce)
JWB Lobster Rolls
Aloha Hot Dogs
Own-Damn-Fault Hot Dogs
Blackened Chili Dogs
Main Dishes
Best-Every Chili (alt: vegan version)
Margaritaville Family Recipe Cuban Meat Loaf
Veal Saltimbocca Pockets
Prime Sirloin Oscar
Steak au Poivre
Summer Grill Surf’n’Turf
Grilled Skirt Steaks with Carlo’s Chimichurri
Slow Cooker Pork Should with LandShark and Cola
Chicken Enchiladas with Salsa Verde, Smoked Ancho, Pasilla Sauce
Chicken Tinga
Jerk Chicken
Buttermilk Fried Chicken with Country Gravy
Shrimp Mofongo al Ajillo
Spear Fishing with Carlo
Outside-Optional Cajun Clambake
Sardinian Seafood Stew
Pan-Seared Halibut with Artichoke Ragout
Seared Grouper with Fresh Mango Salsa
Crispy Sicilian-Style Pounded Tuna Steaks
Coho Salmon in Lemongrass-Miso Broth
Salt-Crusted Whole Snapper
LandShark Beer-Battered Fish
Seafood Mac and Cheese
Lobster Pasta
Paella del Mar
Jimmy’s Jammin’Jambalaya
Baby Back Ribs with Guava Barbecue Sauce
Pizza à la Minute
Side Dishes
Pico de Gallo
Guacamole
Cilantro-Lime Coleslaw
Crispy Brussels Sprouts
Yukon Gold Loaded Mashed Potatoes
Spicy Red Onion Rings
Livin’ Floridays
Lobster Hash Browns with Jalapeño Cheese
JWB Creamed Spinach
Oven Fries
Fajita Black Beans
Island Rice Pilaf
Creamy Spinach and Cheese Grits
Skillet Cornbread with Honey Butter
Grilled Corn with Lime Butter
Pickled Jalapeño Mac and Cheese
Dessert
Baked Florida
Key Lime Pie
Banana Cream Pie with Caramel Rum Sauce
Coconut Tres Leches Cake
Island Rum Cake
Strawberry Sponge Cake Shortcake
Frozen Mango Cheesecake
Crispy Bananarama
Chocolate-Bourbon Croissant Bread Pudding
S’mores Nachos with Warm Chocolate Sauce
Drinks
Brunch Rum Punch
Perfect Bloody Marias
LandShark Micheladas
Incommunicado
Jimmy’s Perfect Margarita
Frozen Paradise Palomas
5 o’Clock Somewhere
Red Wine and Cherry Sangria
Cucumber and Mint Coolers
Watermelon Pink Lemonade
5 notes
·
View notes
Photo

𝗜 𝗻𝗲𝗲𝗱 𝘆𝗼𝘂𝗿 𝗼𝗽𝗶𝗻𝗶𝗼𝗻𝘀 𝗽𝗹𝗲𝗮𝘀𝗲 𝘀𝗮𝘆 𝘆𝘂𝗺𝗺𝘆 𝗼𝗿 𝘀𝗼𝗺𝗲𝘁𝗵𝗶𝗻𝗴 𝗱𝗼𝗻'𝘁 𝗯𝗿𝗲𝗮𝗸 𝗺𝘆 𝗵𝗲𝗮𝗿𝘁 😍😍 𝘁𝗵𝗮𝗻𝗸 𝘆𝗼𝘂 📌𝐂𝐡𝐞𝐜𝐤 𝐌𝐨𝐫𝐞 𝐚𝐭 : �� Find More KitchMeTHAT Recipes HERE 🍽 .............📍 𝑹𝒆𝒃𝒍𝒐𝒈 𝑵𝑶𝑾, 𝑪𝒐𝒐𝒌 𝑳𝒂𝒕𝒆𝒓! 📍 ............ 🍲 Rotisserie Chicken Noodle Soup 🍲 A comforting and delicious soup made with rotisserie chicken and fresh veggies! Ingredients: - 1 leftover rotisserie chicken, broken up into pieces - 4 tablespoons olive oil, divided - 10 cups water - 2 bay leaves - 1 tablespoon black peppercorns - 2 cups vegetable scraps (onion roots or skins, celery scraps, carrot scraps, parsley stems, garlic husks, lemon peels, etc) - 1 onion, diced - 4 garlic cloves, minced - 2 carrots, peeled and diced - 3 celery stalks, diced - 2 cups dried spaghetti, broken (fideo cut) - 2 cups reserved chicken meat from rotisserie - 1/4 cup fresh parsley, minced - 1 lemon, juiced - Oyster crackers, for serving Directions: 1. Prepare your rotisserie chicken by picking clean at least 1 ½ - 2 cups of residual chicken meat, then cut the carcass into pieces (legs, thighs, wings, breasts). 2. Preheat a large stock pot over medium-high heat with two tablespoons of olive oil. 3. Add cleaned chicken bones to the pan and brown for at least 2 - 3 minutes per side until golden. 4. Add all remaining broth ingredients to the pot and bring the mixture to a boil, then immediately reduce to low and cover for 1 hour. 5. Remove your chicken bones and drain broth over a mesh strainer into a bowl. Add chicken broth back to the pot and start to reduce the mixture by ⅓ to concentrate the chicken flavor. 6. Preheat a second pot over medium-high heat with remaining olive oil and add onion, garlic, pepper flakes, carrots and celery. Season with salt and pepper, then let cook for 6 - 8 minutes or until the veg is softened. 7. Add rotisserie chicken, egg noodles, and pour over your chicken broth. Season broth with salt and pepper. It will continue to reduce in the soup, so be mindful of not over salting this step. 8. Let the soup simmer until the egg noodles are cooked. Remove from the heat and garnish with fresh lemon and minced parsley. 9. Enjoy with oyster crackers! Prep Time: 15m | Cooking Time: 1h 20m | Total Time: | Servings: 6
#Rotisserie#Chicken#Noodl#EatoFit#recipe#foodgasm#food photography#cooking#delicious#foodporn#tasty#recipes#food#How to Cook#KitchMeTHAT#Food Porn
1 note
·
View note
Text
Aachi Chicken Masala Brings the Best Out of Chicken Dishes
Aachi Chicken Masala has earned its reputation as a trusted spice blend for creating flavorful and aromatic chicken recipes. This carefully curated mix of spices simplifies cooking while enhancing the natural taste of chicken. Whether you’re preparing a hearty curry, marinating for a grill, or experimenting with biryani, Aachi Chicken Masala adds depth and richness to every dish.
Why Aachi Chicken Masala Stands Out
The beauty of Aachi Chicken Masala lies in its thoughtful blend of spices, designed to make cooking easier and tastier. It eliminates the need to measure and mix multiple spices, saving time and ensuring consistent results. This makes it an excellent choice for home cooks and professionals alike.
Beyond traditional recipes, Aachi Chicken Masala adapts well to various culinary styles. From classic Indian curries to global-inspired dishes like tacos or stir-fries, this masala helps you explore new flavors while maintaining a balance of taste and aroma.

Key Ingredients in Aachi Chicken Masala
The distinctive flavor of Aachi Chicken Masala comes from its high-quality ingredients, each playing a crucial role:
Coriander: Offers a bright, citrusy flavor.
Cumin: Adds warmth and earthy depth.
Turmeric: Contributes a natural golden hue and subtle taste.
Chili Powder: Introduces a balanced kick of spice.
Black Pepper: Lends sharpness and a peppery undertone.
Cardamom and Cloves: Bring sweet-spicy notes and a rich aroma.
Fennel Seeds: Add a mild licorice-like accent.
Garlic and Ginger Powder: Enhance the savory profile.
Salt: Harmonizes the entire blend for a well-rounded flavor.
This thoughtful combination ensures that every dish prepared with Aachi Chicken Masala has a perfect balance of spices.
Versatile Ways to Use Aachi Chicken Masala
Traditional Chicken Curry:
Heat oil in a pan and sauté onions until golden brown.
Add ginger-garlic paste and stir until aromatic.
Toss in chopped tomatoes and cook into a thick base.
Add Aachi Chicken Masala and mix well.
Coat chicken pieces evenly with the spice mixture.
Pour in water or coconut milk for a creamy texture and simmer until tender.
Garnish with coriander leaves and serve with flatbreads or steamed rice.
Marinades for Grilling or Baking:
Combine Aachi Chicken Masala with yogurt, lemon juice, and a dash of oil to create a rich marinade.
Let the chicken rest in the marinade for at least an hour before grilling, baking, or roasting.
Biryani Flavor Enhancer:
Use Aachi Chicken Masala in your biryani spice mix to intensify the flavors.
Layer rice, chicken, and fried onions for a perfectly spiced one-pot dish.
Snacks and Quick Recipes:
Mix the masala into a batter for fried chicken wings or pakoras.
Sprinkle it over roasted nuts or chickpeas for a quick and zesty snack.
Beyond Chicken
While Aachi Chicken Masala is crafted for chicken dishes, its versatility extends to other recipes:
Vegetarian Alternatives: Add it to mushroom or paneer dishes for equally bold flavors.
Lentils and Soups: Use it to spice up dals or hearty soups.
Rice Dishes: Sprinkle it into fried rice or pulao for a quick flavor boost.
Storing Aachi Chicken Masala for Freshness
To maintain its aroma and flavor, store Aachi Chicken Masala in an airtight container away from moisture and sunlight. Proper storage ensures that the spices retain their potency, giving you the best results every time.
Transform Your Cooking with Aachi Chicken Masala
Aachi Chicken Masala is more than just a seasoning; it’s a gateway to exciting and flavorful meals. Its balanced blend allows you to create dishes that are aromatic, delicious, and satisfying. Whether you’re preparing a comforting family dinner or experimenting with a new recipe, this spice mix ensures success in every bite.
Add Aachi Chicken Masala to your pantry today and elevate your cooking experience. From traditional curries to innovative recipes, it’s the perfect ingredient to bring bold, authentic flavors to your kitchen. Discover the difference with Aachi Chicken Masala and let your meals shine with extraordinary taste.
1 note
·
View note
Text

Easy, No-Fuss Turkey
Serving: 16
Ingredients
1 12-20 pound turkey
1 onion , peeled and quartered
1 lemon , quartered
1 apple (your favorite kind), quartered
0.75 ounce container fresh rosemary
0.75 ounce container fresh thyme
0.75 ounce container fresh sage
For the herb butter
1 cup unsalted butter, softened
1 teaspoon salt
1/2 teaspoon freshly ground black pepper
6-8 cloves garlic , minced
fresh chopped herbs
Directions
If the turkey is frozen: Thaw in the fridge, 24 hours for every 5 pounds of Turkey. I like to give myself 1 extra day, just to be safe.
Remove the thawed turkey from the fridge 1 hour before roasting, to let it come to room temperature.
Adjust your oven rack so the turkey will sit in the center of the oven. Preheat oven to 325°F.
Make the herb butter by combining room temperature butter, minced garlic, salt, pepper, one tablespoon fresh chopped rosemary, one tablespoon fresh chopped thyme, and half a tablespoon of fresh chopped sage. (You’ll use the remaining fresh herbs for stuffing inside the cavity of the turkey)
Remove turkey from packaging and remove the neck and giblets from the inside the cavities of the bird. (Reserve them for gravy, if you want, or discard them). Pat the turkey very dry with paper towels.
Season the cavity of the turkey with salt and pepper. Stuff it with the quartered lemon, onion and apple and leftover herbs.
Use your fingers to loosen and lift the skin above the breasts (on the top of the turkey) and smooth a few tablespoons of the herb butter underneath.
Tuck the wings of the turkey underneath the turkey and set the turkey on a roasting rack inside a roasting pan.
Microwave the remaining herb butter mixture for 30 seconds (it doesn’t need to be completely melted--just really softened). Use a basting brush to brush the remaining herb butter all over the outside of the turkey, legs and wings.
Roast at 325°F for about 13-15 minutes per pound, or until internal temperature (inserted on middle of thigh and breast) reaches about 165 degrees.
(I remove the turkey from the oven once it reaches 160 degrees. Then, I tent it with foil, and let it rest on the counter. It will continue cooking under the foil, to reach 165 degrees F.)
Check the turkey about halfway through cooking, and once the skin gets golden brown, cover the top of the turkey with tinfoil, to protect the breast meat from overcooking. Alternately, you could start cooking the turkey with it tented in foil, then during the last hour or so of cooking you can take the foil off to let the turkey brown.
Allow turkey to rest for 20-30 minutes before carving.
Reserve any drippings and juice remaining in your roasting pan to make turkey gravy.
Notes
Herbs: to substitute dried herbs, use 1 teaspoon dried herbs per 1 tablespoon fresh chopped herbs.
Tips for covering with tinfoil: Start with the bird uncovered. Once the skin gets golden brown, tent the bird with a large piece of tinfoil. If you have a roasting pan, you can use the lid to the roasting pan instead.
For Disposable Roasting Pan: Place fresh chopped vegetables on the bottom of the pan to act as a rack to elevate the turkey. Use 4-5 ribs of celery and 4 large carrots, roughly chopped. The veggies will add great flavor for your dripping to use for gravy however I don't recommend eating them or using them in gravy.
For An Electric Roasting Oven: directions stay the same!
Convection Oven: You can use the same method to cook the turkey in a convection oven, just check the temperature sooner (start checking after 2 hours) as it will cook faster.
(Source)
0 notes
Text
The Ultimate Guide to Cooking with Frozen Chicken
Cooking with frozen chicken can be a real time-saver and a versatile option for many delicious dishes. Whether you're a busy parent, a culinary enthusiast, or someone who prefers to plan meals ahead, knowing how to properly handle and cook frozen chicken is a valuable skill. In this comprehensive guide, we'll explore everything you need to know about cooking with frozen chicken, from preparation tips to mouthwatering recipes.
Why Choose Frozen Chicken?
Frozen chicken offers several advantages over fresh chicken, primarily in terms of convenience and longevity. When properly frozen and stored, chicken retains its nutritional value and flavor. It also eliminates the need for frequent trips to the grocery store, making it a practical choice for meal planning.
Types of Frozen Chicken
Before diving into cooking methods, it's essential to understand the types of frozen chicken available:
Individually Frozen Pieces: These are chicken breasts, thighs, drumsticks, or wings frozen separately, making it easy to use only what you need.
Frozen Chicken Fillets: These are boneless, skinless chicken breasts or thighs that are typically flattened and individually frozen, ideal for quick cooking.
Whole Frozen Chicken: These are whole chickens that have been frozen, often requiring longer thawing and cooking times.
Thawing Frozen Chicken Safely
Thawing frozen chicken safely is crucial to avoid foodborne illnesses. Here are a few safe methods to thaw frozen chicken:
Refrigerator Thawing: Place the frozen chicken in its packaging or a sealed bag on a plate and allow it to thaw in the refrigerator overnight or for about 8-12 hours.
Cold Water Thawing: Submerge the frozen chicken in cold water in its sealed packaging or bag. Change the water every 30 minutes until thawed.
Microwave Thawing: Use the microwave's defrost setting, following the manufacturer's instructions and rotating the chicken periodically.
Preparation Tips
Once your frozen chicken is thawed, consider these preparation tips:
Marinating: Marinate thawed chicken in your favorite flavors to enhance its taste and tenderness.
Seasoning: Season chicken generously with salt, pepper, and any desired herbs or spices before cooking.
Cutting: If you need smaller pieces or strips for a recipe, cut the chicken while it's still partially frozen for easier handling.
Cooking Methods
Frozen chicken can be cooked using various methods depending on your recipe and preferences:
Baking: Preheat your oven, season the chicken, place it on a baking sheet, and bake until it reaches a safe internal temperature.
Grilling: Preheat the grill, oil the grates, season the chicken, and grill over medium-high heat until thoroughly cooked.
Stir-Frying: Cut thawed chicken into small pieces, heat oil in a pan or wok, and stir-fry with vegetables and sauces until cooked through.
Slow Cooking: Place thawed chicken, along with vegetables and broth, into a slow cooker, and cook on low for several hours until tender.
Instant Pot or Pressure Cooking: Add thawed chicken, broth or sauce, and other ingredients to an Instant Pot, seal, and cook under pressure for a quick meal.
Delicious Recipes Using Frozen Chicken
Here are two simple yet delicious recipes to try with frozen chicken:
1. Lemon Garlic Frozen Chicken Skillet
Ingredients:
4 frozen chicken breasts
2 tablespoons olive oil
4 cloves garlic, minced
1 teaspoon dried thyme
1 lemon, juiced and zest
Salt and pepper to taste
Fresh parsley, chopped (for garnish)
Instructions:
Thaw the frozen chicken breasts using your preferred method.
Heat olive oil in a large skillet over medium heat.
Add minced garlic and cook until fragrant, about 1 minute.
Season chicken breasts with salt, pepper, and dried thyme.
Place chicken breasts in the skillet and cook for 6-7 minutes per side, or until golden brown and cooked through.
Add lemon juice and zest to the skillet during the last few minutes of cooking.
Garnish with fresh parsley and serve hot.
2. Frozen Chicken Stir-Fry
Ingredients:
1 lb frozen chicken breast, thinly sliced
2 cups mixed vegetables (bell peppers, broccoli, carrots)
3 tablespoons soy sauce
1 tablespoon oyster sauce
1 tablespoon sesame oil
2 cloves garlic, minced
1 teaspoon ginger, minced
Cooked rice or noodles for serving
Instructions:
Thaw the frozen chicken breast using your preferred method and slice thinly.
Heat sesame oil in a large skillet or wok over medium-high heat.
Add minced garlic and ginger, cook until fragrant.
Add sliced chicken breast and cook until browned and cooked through.
Add mixed vegetables and stir-fry for 3-4 minutes until tender-crisp.
In a small bowl, mix soy sauce and oyster sauce.
Pour the sauce over the chicken and vegetables, stir well to combine.
Serve hot over cooked rice or noodles.
Conclusion
Cooking with frozen chicken is not only convenient but also allows you to prepare a variety of delicious and nutritious meals. By following proper thawing methods, using different cooking techniques, and trying out exciting recipes, you can easily incorporate frozen chicken into your weekly meal plans. Whether you're baking, grilling, stir-frying, or using a slow cooker, frozen chicken offers endless possibilities for creating flavorful dishes that will satisfy your taste buds and save you time in the kitchen. Enjoy exploring the world of frozen chicken and discovering new favorite recipes!
0 notes
Text
Roasting a Whole Chicken in a Cast Iron Skillet
A whole chicken roasted in a cast iron skillet is such a comforting meal. This is a simple one-pan dinner that's perfect for a family night.
Before roasting, you need to coat the chicken in olive oil and salt. This will help the skin to turn a golden brown and crisp up.

How to Roast a Chicken in a Cast Iron Skillet
A cast iron skillet is an excellent tool for roasting whole chickens. This is because it retains heat well and helps to crisp the skin of the bird. Plus, it cooks quickly and evenly so you can enjoy a tasty, tender roasted chicken that’s perfect for Sunday or holiday dinners.
To start, preheat your oven to 425 degrees Fahrenheit. Pat the whole chicken extremely dry with paper towels and season it all over with salt and pepper. Tie the legs together with kitchen twine and flip the wings under the breast, if you’re using fresh herbs, to stuff them.
Read more: What Are the Best Cuts of Chicken Thigh?
Once the oven is hot, place the chicken in the skillet and carefully place it in the middle of the oven. Check the chicken for doneness once it has roasted for about an hour and a half, or until it reaches an internal temperature of 165 degrees F (74 degrees C).
If you’re looking to add some extra flavor to your roasted chicken, try adding some aromatics to the skillet. This can include things like onions, garlic, lemons and rosemary. The aromatics will infuse the meat with flavor while also creating a delicious pan gravy.
After the chicken has roasted, remove it from the oven and let it rest for about 10 minutes before carving. This will help to keep the meat moist and allow it to hold up better when carved.
Afterwards, the drippings from the chicken can be used to create a delicious pan gravy that you can use with your favorite side dishes. To make the gravy, simply whisk together flour with broth until it becomes thick and creamy.
To serve, spoon the pan gravy over the roasted chicken and enjoy! It’s a meal that will satisfy all your family members.
You can also make this recipe ahead of time, and store it in the freezer to reheat for future meals. The leftover chicken can be picked apart and used for sandwiches, salads or soups. If you’re planning to freeze the leftovers, it’s best to thaw them out overnight in the fridge before reheating.
Preparation
There are a few steps that must be taken before you can roast a whole chicken in a cast iron skillet. These steps are necessary to ensure that the chicken cooks evenly and is cooked through.
First, the chicken must be seasoned to ensure that it cooks properly. This includes rubbing the chicken with melted butter and using a generous amount of salt and pepper. You can also add a variety of other spices to the chicken. For example, some cooks add a dry rub marinade to the chicken before roasting it to help it to cook more evenly and taste delicious.
See more: https://acadiahouseprovisi.wixsite.com/acadiahouseprovision/
Another option is to make a chicken broth, which is very easy and adds flavor to the dish. To do this, simply place the bones and any bits and pieces of extra skin from the chicken into a large pot and simmer for an hour. You can use this broth to serve over the chicken or to cook rice or mashed potatoes.
Before you roast the chicken, be sure to trim and tie it up. This will help the chicken cook more evenly and prevent the tips of the wings from burning. You can also tuck the wings under the body of the chicken, if you like.
When you are ready to start cooking, preheat the oven to 425 degrees Fahrenheit. The chicken will take 1 hour and 30 minutes to cook, or until the chicken reaches an internal temperature of 165 degrees.
Once the chicken has finished cooking, remove it from the oven and transfer it to a cutting board with a well in the center. Let it rest for about 10 to 15 minutes so that the juices can recoup.
After the chicken has rested, the drippings from the pan can be used to make a rich and tasty gravy. This gravy is the perfect accompaniment to mashed potatoes or a side of Garlic Green Beans, which are quick and easy to prepare.
If you’re looking for a new way to roast a whole chicken, this recipe is worth trying. It’s juicy, flavourful and full of the perfect combination of spices.
Cooking Time
When it comes to a delicious and easy meal that can be ready in a snap, nothing is better than roasting a whole chicken. It’s a one-pot dish that makes dinner super simple and is always a huge hit with the family.
When you are roasting a whole chicken in a cast iron skillet it’s important to keep it at a low temperature in order to cook the meat well and ensure it’s juicy and tender. This is also very important to prevent the chicken from drying out too quickly before it’s cooked all the way through.
Once the chicken is in the oven you will want to cook it until it reaches an internal temperature of 165 degrees. This is done by using a meat thermometer that can be inserted into the thickest part of the thigh and doesn’t touch the bone. Once this has been reached you will want to loosely tent the chicken with foil and rest it for about 15 minutes before removing it from the oven.
If you have a cast iron pan, then it’s very easy to roast a whole chicken in this way. However, if you don’t have a cast iron skillet, you can also use a regular oven safe pan large enough to fit the chicken. You will just need to adjust the cooking time and temperature accordingly in order for it to cook all the way through.
You will want to make sure to season the chicken generously as this is what helps the chicken to come to temperature and cook all the way through without over cooking it. Salt and pepper not only help render the fat, but they also add extra flavor to the chicken!
To season the chicken, you can use a variety of different spices. I like to use garlic and onion powder, as well as smoked paprika for extra flavor!
Before you start putting the chicken in the oven, make sure to cut the backbone of the bird down. This will allow it to lay flat in the oven and help with even cooking.
Serving
If you are looking for a delicious and simple whole chicken recipe that your family is sure to love, look no further than this cast iron skillet roasted chicken. It is super tender, moist and juicy on the inside, with crisp skin, and a rich pan gravy to serve on top!
This simple whole chicken recipe is quick, easy and perfect for any meal. It requires very little prep, and is ready in 30 minutes. It is also paleo, gluten-free and dairy-free!
Start by patting the chicken dry. This will help ensure the skin is extra crisp and the meat is more tender.
Season the chicken with a sprinkle of salt and pepper. Then stuff the cavity with lemon halves, a garlic head, and a few herbs.
Place the chicken in a well-seasoned cast iron skillet or oven safe frying pan. Rub the chicken with a bit of olive oil, and season with more salt and pepper.
When the chicken is finished cooking, remove from the oven and let it cool for a few minutes before transferring to a cutting board. You can carve the chicken if desired, but you can also serve it in chunks.
If you want to make a side dish with the chicken, sliced potatoes are a great choice. You can even add vegetables like asparagus or broccoli. Just be sure to place them around the bird to keep the vegetables from getting too browned on the bottom!
You can also use a small amount of white wine in the recipe for more flavor. You can even mix a slurry of cornstarch with water to thicken the gravy.
In addition to the savory and rich flavors of this simple cast iron skillet roasted chicken, it is incredibly easy to make! It only takes about 20 minutes to roast, plus you can use the pan drippings to make your own luscious pan gravy.
The serving size of this chicken will depend on the size of your bird, so it is best to double or triple the recipe if you are expecting more than 6 people. You can also freeze the leftovers for a later date!
youtube
0 notes
Text
Okay, I have tried to pare down everything I can to the barest essentials but in my opinion, the things you cannot truly have a galley without is:
common salt [orgprint.naclpure.ompf]
black pepper (try to find suldani peppercorns if you can find them, they are a beautiful resource)
chaat masala, garam masala or some kind of spice blend (again, the import is worth it, or grow the needed spices and herbs in a hydroponics bay and dry them out! Maybe I will make a guide on this someday. these alone will let you work wonders with printloaf and other tasteless proteins)
Neutral cooking oil [orgprint.polyfatstandard.ompf]
Bread, or at the very least flour to make bread with (if you can get your hands on a microbial starter colony, keep it in a section of your medical wing and it will give gifts forever)
Print-Capable Cheese Product and Deconstituted Milk, if no other dairy can be brought in stasis [orgprint.PCCP.ompf, orgprint.DM.ompf] (people snub their noses at these but I don't think they're actually all that bad).
Onion and Garlic, dried or fresh or powdered. If you do not have these then all is lost.
I also recommend looking up a number of basic organic-chem attachments that will help with flavoring in a pinch, both GMS and HA should have some databases to look through for these. They'll never quite come out as good as non-synthesized, but all the same! Consider also finding schematics for an electrostatic-lock cooktop and static-null gloves/tools, they'll help a lot.
WITH that said, I think we can try and make all these! I am going to start simply because we are going from the very scratch with this.
[S H]
Preliminary instructions:
Instruct your pilot to begin a low delta-V change to approximate gravity on a usable kitchen surface, or if you are the pilot like I am, just go ahead and do that.
If this cannot happen, then you need an electrostatic-lock cooktop to ensure that the food remains in one place. You will be sure to use null-static implements to prevent your hands or tools from sticking to the cooktop.
Mayonnaise and Cheese sandwich!
Take two slices of bread of any sort (although with flat-bread I think this may be a bit squidged). Ideally I would go for a white or refined loaf bread, such as a Pullman. If you wish to have some texture, then heat a pan to about 204 Centigrade and toast the bread (with one side of each slice treated with neutral oil or mayonnaise, see below) and toast until the heated side is golden in color and gently crunchy. These will be the interior of the sandwich, to create crunch while not interrupting the bite.
For the mayonnaise: I cannot lie, you need an egg. There is a way to cheat this with standard protein mix constituted with water-- ultimately this just allows for emulsification-- but you will need to season heavily to make it good. Take 105ml of whichever in a container, add 15ml acetic acid serum [orgprint.ACETac.ompf] or vinegar, 2.5ml common salt, about as much garlic processed fine if you know what is good for you, and 5ml of lemon juice or citric acid serum [orgprint.CITac.ompf]. Agitate with a whisk or fine aerating utensil until combined (something automatic is preferred). Now take 210ml neutral oil, and while agitating violently, stream oil down the interior side of the container gradually, so the mixture thickens and emulsifies as air enters the mixture. You have mayonnaise once it it is about as thick as burn paste.
Now once you have your bread spread well with mayonnaise (including after it is toasted, if such), take a slice of PCCP or lightly-flavored cheese of your taste that is sized to the bread and thick enough to be satisfying. Layer and close the sandwich, and enjoy!
--TO BE CONTINUED ONCE I CLEAN THE KITCHEN--
[S H]
Today I want to make something. Maybe we will try cooking with that printloaf, finally? I want to see how it plays with everything else.
I will be thinking of recipe ideas, but you must tell me if there is one you want to see. Our galley is surprisingly stocked!
[S H]
#saleh's takeover#I might just insist on doing this even when he is back#maybe some folks who have never been able to cook downwell will now learn!#{of all the things that could ever blow up that I make I pray it is space cooking with saleh}#lancer rp#lancer ttrpg#food in scifi
21 notes
·
View notes
Text
Alias: Sister Spy - Luau

The Waikiki Princess was new, but its Saturday night luau already featured prominently in tourist guides everywhere. The chef spared no expense, serving up everything from an array of fresh local seafood to hand-pounded poi on banana leaves...
The food was served in course upon course, traditional Hawaiian dishes, such as roast pork, sweet potatoes, poi, and leaf-wrapped bundles of fish, mixed with mainland favorites like chewy sourdough rolls, grilled shrimp, and creme brulee.
---------------------
A feast! My husband used to live in Hawai'i but it was his college days, so we were winging it a little bit. A major oops I made is that there are two fish called 'butterfish', and I got the wrong one. It has a lot more bones than the right one!
For fresh local seafood, I made:
Swordfish with lemon and garlic. It's a pretty dense fish, I don't recall having it before.
Ahi tuna in Hawai'ian marinade, using this recipe from Low Carbing Asian. I’ve had ahi tuna a few ways before, and this was good but I think I generally prefer letting restaurants handle it. There was a lot of smoke!
Mahi-mahi in a marinade of olive oil, lime, ginger, rice wine vinegar, honey, salt, and pepper.
Broiled butterfish - not very good, but as I said I got the wrong kind (shown top right)
Whole pan-fried smelt in tempura - these were fun and delicious, shown lower left.
Seared kanpachi in sesame oil - this was AMAZING, shown center. I was shocked at how delicious this was cooked, even better than the raw kanpachi I’ve had at sushi restaurants. Definitely want to get that again!
Roast pork is char siu pork - we used the recipe from here. Really delicious, definitely recommend.
Purple sweet potatoes are hard to get where I live, but we managed to get some and tried them boiled. They are thick and sweet, very good. The water turned a very amusing color of blue.
Poi is also near impossible to get in our part of the world. We got some powdered poi that had relatively good reviews, but it’s definitely a far cry from the real thing.
Leaf-wrapped bundles of fish are almost certainly lau-lau. We made some with butterfish (the wrong kind) and some with pork, but I’d like to try it again if I can get the right kind of fish for it.
Nothing fancy for the sourdough rolls - they are store bought because I couldn’t count on the timing of all my fish and potatoes to line up correctly and budget time to make them from scratch.
Grilled shrimp kept simple - lemon, garlic, grill.
Creme brulee recipe was from Binging with Babish - they came out perfectly and I highly recommend them.
I’m certain chocolate mousse was mentioned somewhere in these scenes, but my recipe for that also failed so we got some last-minute from the store.
If I had to pick a winner, the kanpachi and the creme brulee are neck and neck. So good.
#alias#alias:sister spy#luau#literary food#hawaii#feast#fish#creme brulee#kanpachi#mousse#poi#sweet potatoes
2 notes
·
View notes
Photo

Rosemary Lemon Roasted Chicken Ingredients: 4-5 pound whole chicken 8-10 sprigs, fresh rosemary 4 lemons, quartered 10 garlic cloves, peeled & smashed 2 tbsp. pepper 2 tsp. salt 1 tbsp. butter 8 carrots, peeled and chopped into large pieces 2 onions, sliced 2 tbsp. olive oil Instructions: 1.Preheat oven to 425° - great in the crockpot too! 2.Remove neck & gizzards from inside the chicken 3.Rinse the inside and outside of the chicken with cold water, very well 4.Pat dry with paper towels 5.In a small bowl combine pepper & salt 6.Season inside of the chicken and outside (on both sides) with salt and pepper 7.Separate the skin on the breast gently with your fingers, being careful to not tear the skin 8.Stuff 2 sprigs of rosemary under the skin of each breast 9.Place 2 garlic cloves under the skin of each breast 10.Place remaining rosemary sprigs, garlic cloves and quartered lemons into the cavity of the chicken 11.In a large roasting pan melt the butter 12.Place carrot pieces and onions into the bottom of the roasting pan 13.Place chicken, breast side up, into the roasting pan 14.Drizzle olive oil over the entire chicken, making sure to coat the wings, legs & breasts 15.Roast for 1 hour 30 minutes or until chicken reaches 165 degrees on the thigh with an instant read thermometer 16.Remove from oven and let rest for 10 minutes 17.Serve & Enjoy! https://www.instagram.com/p/CURZoELr-MX/?utm_medium=tumblr
5 notes
·
View notes
Photo

Chicken Wings with Korean Gochujang Sauce
My husband doesn’t conform to the Hollywood version of the Father’s Day grill master. I do the cooking, including anything made on the outdoor BBQ grill.
He eats.
Fortunately, he eats whatever I serve and loves whatever I cook.
He does have favorites, of course: any kind of Chinese food is in first place. Followed by specialties of several other Asian cuisines such as Korean and Indian. He also loves Jewish deli and Texas Brisket.
So this weekend he’s getting these wings, Korean in origin, made with Gochujang sauce. If you keep a kosher kitchen, check out @koreankosher (Koko brand), which manufactures several kosher Korean ingredients, including a really delicious Gochujang sauce.
I usually bake these but they come out just fine on the grill also, so take your choice.
CHICKEN WINGS WITH KOREAN GOCHUJANG SAUCE
3 pounds chicken wings
1/3 cup gochujang sauce
2 tablespoons soy sauce
2 tablespoons honey
2 tablespoons rice wine vinegar
1 tablespoon sesame seed oil
2 teaspoons chopped fresh ginger
2 large cloves garlic, chopped
1 large scallion, chopped, for garnish
white sesame seeds for garnish
Preheat the oven to 425 degrees. Place the chicken in a roasting pan. In a small bowl, mix the orange marmalade, lemon juice and curry powder together and spoon over the chicken. Season with salt and pepper to taste. Place the chicken in the oven. Roast for 10 minutes. Baste the chicken and turn the heat down to 350 degrees. Roast for another 25-30 minutes, basting occasionally, or until the chicken is cooked through and the skin is crispy.
Preheat the oven to 400 degrees. Wash the wings and separate the parts (discard the tips or use them for stock or bake them along with the other parts). In a large bowl, combine the ketchup, Sriracha, soy sauce, honey, sesame seed oil, ginger, garlic and scallion. Mix the ingredients to blend them thoroughly. Add the wings and coat them completely. Place the wings in a single layer on a foil-lined baking sheet. Bake for 15 minutes. Turn the wings over and bake for another 15 minutes or until the wings are crispy.
Makes 24 pieces, 6-8 servings for hors d’oeuvre
#chicken wings#grilled chicken wings#baked chicken wings#Korean chicken wings#Korean food#Chicken wings with Gochujang sauce#Father's Day
2 notes
·
View notes