#while powered by 5v from usb
Explore tagged Tumblr posts
Visit Tumblr Blog
Explore Tumblr blogs with no restrictions, modern design and the best experience.
Last Seen Tumblr Blogs


Fun Fact
Mobile US users spent an average of 115.8 minutes on Tumblr app monthly.
Text

Trying to design a great WLED board 🌈🦄🦃
While waiting for the turkey to finish brining, we're designing a board for using WLED - and we want to make like the bestest board in the whole world.
Our resident mermaid, firepixie
, makes a lot of projects with WLED, and she loves it! So, how can we make something that will be powerful but not too bulky? Here are some things we're thinking about as the design starts to congeal like cranberry sauce:
Power via USB Type C PD with a slide switch that selects between 5, 12, and 20V (24V pixels can usually run fine at 20V) OR via a 2.1mm DC jack. With ideal diodes, it's good for up to 5A from either.
ESP32-Mini module with built-in or optional wFL antenna port. The classic '32 has broad support, even if we'd prefer the 'S2 or 'S3.
There are three output signal terminal block sets, with power and ground for each. They'll be level-shifted to 5V.
Built in I2S microphone (we're still pondering this one).
Stemma QT I2C port to connect external sensors/OLEDs/etc.; separate analog/digital input JST port.
1.3"x1.75" / 33mm x 45mm size with mounting holes.
Anything we're missing, anything that's extraneous?
#electronics#wled#makerspace#esp32#usbtypec#diyprojects#arduino#adafruit#ledlights#hardwaredesign#microcontroller#iot#esp32mini#stemmaqt#circuithacks#ledart#makersgonnamake#powerdesign#tinytech#firepixie
21 notes
·
View notes
Text
setting up an ipod is harder than you fucking think
just spent the last life four+ hours setting up this ipod classic 4th gen. here's a summary of all the problems i ran into:
(1) ipod had files in it. they appeared as gray and un-editable on itunes, so i thought reseting the ipod to factory would be the fastest and easiest solution.
turns out the last step of the process is connecting ipod to a wall power source. i do this. nothing happens for at least an hour. ipod is stuck in "connect to the wall" icon screen no matter what i do. the internet says it needs to connect with an actual apple firewire wall connector, which i do not have. tried using my ipad's charger with a usb-to-usb-c adapter that i own. didn't work. eventually figured it out the problem had to do with the amps it needs to get defibrillated. i remember that i own a pretty hefty power bank with a 5v/2.1a output. it works. ipod is reset. i have a nice fun time adding the 6 or so songs i have downloaded on my computer (:
(2) i had downloaded soulseek a while ago and gotten frustrated with it but decided to give it another spin since piracy experts on reddit sing it many praises. it seems to have a heavy culture of egalitarianism: a pop up window informs you that a lot of people's download's are restricted only to other people sharing files.
__(2.1) it prompts me to enter my account and password but i don't have one. there isn't an immediatly visible 'create account' link. i google this. eventually i find this soulseek forum where a ton of normies are asking questions pretty regularly. excellent. i search my problems and someone else has already made a post and had the question answered. thank you normies. also: google groups is still a thing???????
the inability to create an account is a weird bug. someone's answer tells me how to circumvent it.
__(2.2) i still can't search for anything. there are no files in this wasteland. i turn on my vpn. put my humble six songs in a folder and share it. voila!!!!!!!
soulseek is actually VERY cool. you can browse other people's music folders, which opens an incredible secret world of possibilities re: finding new music similar to your tastes. EXTREMELY exciting. feels like i'm in a cool secret club of the internet. feels like the old internet.
i download one (1) lana del rey song that's stuck in my head. choose .flac (a lossless audio file) because i want to be fancy.
(3) ...........itunes doesn't read .flac files
__(3.1) searches: what files does itunes read? > which of these files is best for lossless audio? > how do i convert .flac files to itunes-compatible file types? > download foobar2000 > click around till i figure out how to convert .flac files to .wav files.
__(3.2) it works! (: the songs are now in itunes! (:
............but the metadata (album cover, genres, artist, album, etc) doesn't transfer. i don't want to manually input it again. searches: how to keep metadata when converting files? tutorial is slightly different from the version of foobar i have, but i eventually find the setting to keep the metadata.
(4) it works! (:
.............but it won't transfer to my ipod ): i get the message: your ipod can't read this file <- paraphrasing.
okay. searches: what kind of files can an ipod classic 4th gen read? (perhaps they are different from the files itunes can read. this is, after all, the last version of itunes ever released, many years and itunes versions after the ipod classic 4th gen.)
this information isn't in the wikipedia page. this isn't in the ipod wiki. can't even find this model in the official apple pages. it's mentioned in several reviews but it's the wrong model. christ almighty. ok. here it is. found it. allegedly it should be able to read it. ok. why isn't it.
read through forum threads. some people say older ipods get fussy with high bitrates. (search: what is a bitrate? oh ok. higher bitrate > higher audio quality. got it.)
bitrates reccomended by foobar: 180-300something. lossless file bitrate: 2000 and change. hm. surely that's a huge difference.
i convert the .flac file to .mp3 instead.
__(4.1) it works! (: the files are in my ipod! (:
.....but goddamnit, i'm stubborn, and this goddamn ipod is supposed to be able to read apple lossless files (basically a .flac file, but designed to be used with apple products. lol.) i don't want a lameass mp3, i want lossless goddamn quality! even if this brick of an ipod won't be able to play it! it's the principle of the thing!
______(4.1.1) okay. try to fuck around with bitrates in the settings of the apple lossless conversion on foobar. foobar is like "you don't have the right encoder pack, bitch" <- paraphrasing.
oooh. surely, this is the problem. i download encoder pack.
______(4.1.2) foobar is like: "you don't have the right encoder pack, bitch" <- paraphrasing.
me: [crying] but i did.
foobar: bitch.
______(4.1.3) search: why is foobar calling me a bitch? > reddit thread: look closely at the sphynx's riddles three: it doesn't say "you haven't downloaded the encoder pack." it says: you haven't installed the encoder pack. (<- NOT A JOKE.)
go to C: > program files > foobar > find the encoder pack i downloaded > click on all the .exe files. powershell windows appear and dissappear. basically: stuff happened. i'm certian.
_____________(3.4.3.1) i'm STILL getting the riddles three message, but the same reddit thread says: if you know you solved th riddles three, you can just ignore it (: so i do.
__(4.2) .flac files seem to have been successfully converted to apple lossless files !!!!!!!!!!!!!!
....but i am back to "your ipod can't read this shit!!!!!!!!!"
do some more searches > turns out it's a weird itunes glitch. the thing is just moody. try turning it on and off. try disconnecting and re-connecting. try resetting your ipod again.
try uninstalling and installing again.
(5) "iTunes Library.itl cannot be read because it was created by a newer version of iTunes"
.......................to be continued. if i don't kill mysuelf first.
#apple#ipod#itunes#i did a couple more things but i am tired and want to go to bed i hate it here#progress report
33 notes
·
View notes
Text
Good news: the PCB bus boards for my new Eurorack case came today!
Bad news: building and installing all of them requires 54 of the little 16-pin box headers, and I only actually have 10 on hand. And while I could order them, I really shouldn't until more money comes in, around about Friday.
At any rate, also included in the shipment were a couple of simple modules from Sourcery Studios: their ASMR (A Simple Mixer, Right?) five-channel mixer and their POW module, which provides power LEDs for each rail, a box header for plugging in modules for testing, and a USB-A jack for powering things from the 5V rail. (It also has a switch I won't be using, as it's meant for a different power setup than the one I'm using.) So I'll probably build those before I get to the actual case build.
5 notes
·
View notes
Video
youtube
Power Bank 10000mAh – Your Essential Charging Companion!
Introducing our innovative Power Bank 10000mAh that not only keeps your devices charged on the go but also supports wireless charging and features a convenient LED light! Crafted from durable ABS+Silicone materials and powered by a high-performance 10000mAh Li-polymer cell, this power bank is designed to meet all your charging needs with ease.
While this power bank doesn't support LED lighting or display, it offers fast charging capabilities with input and output volumes of 5V/2A and 5V/1A, 5V/2A respectively. The multiple input and output interfaces, including Micro-USB, Mini USB, and USB, ensure compatibility with a wide range of devices such as mobile phones, tablets, and cameras.
Equipped with wireless charging support, this power bank offers a convenient way to power up your Qi-enabled devices without the hassle of cables. The LED light function provides added utility, making it perfect for use in low-light situations.
With a sleek and compact design, recyclable materials, and compatibility with popular devices like iPhone, Galaxy S8, Huawei, and iPad mini, this power bank is a must-have accessory for tech enthusiasts. Choose from Black, Green, or Gray to match your style and preferences.
Experience the convenience and power of our Power Bank 10000mAh with LED Light and wireless charging support. Stay connected, stay charged, and stay juiced up wherever your adventures take you. Follow us at https://user185638.psce.pw/6x8baw if you’re interested!
#PowerBank #FastCharging #StayConnected #OnTheGo #TechGadgets #MustHave #PortableCharger #TechAccessories #Flashlight #ConvenientCharging #TechInnovation #GadgetLovers #PowerfulCharger #HighCapacity #StayConnectedEverywhere #StayJuicedUp #ChargeOnTheGo #TechEssentials #BatterySaver #MobileAccessories
2 notes
·
View notes
Text
a fun fact about me is that our house didn't have a PC until i was about 14 -- and even then, it was shared by the whole family, and didn't have internet access for a while. my dad eventually signed up for AOL around 2001, at which point we were able to surf the web™ via a 56k dial-up connection.
however, we did have internet access prior to that… via our TV:

source: https://web.archive.org/web/20190407175637/https://www.digitalspy.com/tech/cable/a3171/ntl-cr2-interactive/
this gave us a (single, shared) email address, and access to an extremely limited number of websites, such as leisuredistrict or everyoneswelcome.
(as an aside: you could unlock "full" web access by paying an extra £5 per month, which we eventually did… but not before discovering that if someone emailed us a clickable link, we could access that site without going through the "proper" menu option!)
anyway, to compose emails, enter your leisuredistrict password, or write an everyoneswelcome post, you had to use the remote control:
source: https://web.archive.org/web/20190407173228/https://www.digitalspy.com/tech/cable/a3231/ntlhome-digital-interactive-tv/
as you can imagine this was slow and awkward. however, as the image above indicates, you could buy a special keyboard to make things easier. since my dad used to play chess via email (using a physical chess set next to the television), he ended up getting one:
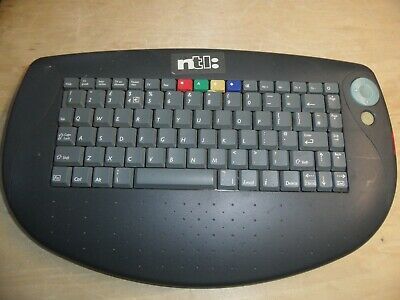
source: https://www.reddit.com/r/nostalgia/comments/hm5pfa/these_ntl_keyboards_i_think_im_on_an_ntl/
as you might have noticed, it has a somewhat strange layout, and doesn't have a wire coming out of the back. that's because this keyboard is actually just a really big remote control; you put 4 AA batteries in the back, and it communicates with the set top box via infrared signals, just like the standard remote control would.
of course, our set top box eventually outlived its usefulness, and all of this stuff went into a storage cupboard, whereupon it was promptly forgotten about… until a few months ago, when i rediscovered the keyboard whilst my dad was clearing out some old things. as you might expect, i saved it from being sent to silicon heaven (where all the calculators go) because i am a goblin who hoards old technology.
i put it to one side for a while, but a few days ago i decided to see if it was still working. it turns out that regular webcams can pick up infrared light, so i put some batteries in it and -- success! -- several white-ish lights were visible in my laptop's webcam app whenever i pressed a key.
as such, i think it would be cool to somehow get this thing working as an actual PC keyboard. i might need to write a custom program to do this, though it seems that it might Just Work.
of course, i'd need some kind of infrared receiver device to do that, and those can be surprisingly tricky to find:
there are plenty of "infrared extender" cables online, but their USB connector is only used to draw power; they don't actually show up as a "device" on your PC.
you can apparently get infrared-receiver-to-headphone jack cables, which you're supposed to plug into a special socket on certain set top boxes… though in theory you could plug them into the microphone input port of a PC and "manually" decode the data signal via software trickery. (disclaimer: i am not an expert on Hardware, so this might be A Bad Idea, but i think that the 5V output by the microphone port would be enough to power the IR receiver…?)
the thing i actually want (an IR-to-USB device) might as well not exist because it is no longer 2005 and no-one on the planet except me gives even half a shit about connecting an IR device to a PC. well, that's not entirely true -- but the things i did find cost £30-£50, which is way above what i'd want to spend on something like this.
eventually, though, i discovered that the magic phrase to search for is "Media Center IR receiver" (or, more simply, "MCE receiver"), whereupon i found someone selling an Acer MCEIR-210 on ebay for just over £10. its due to arrive here within the next few days, so hopefully i can make this somewhat-unusual device function again.
#infrared#old tech#keyboard#old web#please read this post like its a Cathode Ray Dude video for maximum effect
9 notes
·
View notes
Text
One of the most well-liked Bluetooth speakers available is the JBL Flip 5. It offers excellent sound quality and is portable and small. The speaker not charging is one of the most frequent difficulties consumers experience, nevertheless, just like with any electronic item. If you’re dealing with this problem and wondering how to fix it, you’ve come to the right place. In this article, we’ll explore some simple solutions to help you troubleshoot and resolve the issue.
Check the Charging Cable The USB cable that comes with the speaker might occasionally be damaged. Your speaker won’t be adequately charged by a subpar USB charging cord. To determine if the issue is with the cable, it is best to test a different or new cable. Take a USB cord from a friend or inquire about a speaker charging cable at an electronics repair shop. If the speaker begins to charge with the new cable, the USB charging cable needs to be changed because it is at fault. In order to prevent experiencing the same issue in a few weeks, it is recommended to replace it with an original cable rather than a third-party one. It wasn’t the cable’s fault if the speaker won’t charge even with a fresh cable, therefore keep the new USB charger for the next step.
Check the Charging Port The JBL Flip 5 speaker’s front panel houses the charging port. There is no protection or door over the charging port to keep out dust. It’s likely that the JBL speaker’s charging connector contains dirt if you used it outside. The speaker won’t charge if there is dirt or dust within the charging port, which prevents the charger from connecting with the speaker. Check for dirt by using a flashlight. Use the flashlight to shine directly into the port to check for debris. Remove any dirt from the interior if there is any. Use a small, soft toothbrush or a toothpick to get rid of the filth. When cleaning the port, you should exercise caution because it is easily damaged. Even if you can’t see any dirt with the flashlight, you should still try to clean it. It’s likely that there is filth within that you cannot see. Try charging the speaker after cleaning the charging port.
Check The Wall Charger Your JBL Flip 5 may not be charging even though the USB cable is working properly, or perhaps both the wall charger and the USB cable are to blame. To see whether this resolves the issue, try a fresh USB cable and wall charger. You ought to select a new wall charger that has the same output power as the old one. It is not advised to choose one with a lower voltage because your speaker won’t charge sufficiently at that rate. The 20W RMS power-rated JBL Flip 5 comes with a 5V/3A wall charger requirement. If the speaker charges using a fresh USB cable and wall charger, the problem is with the wall charger, which needs to be changed. If not, proceed to the following action.
Reset The JBL Flip 5
A software issue could prevent your JBL Flip 5 from charging. A JBL speaker needs to be hard reset in order to solve the majority of software issues. The speaker’s settings will be erased and the hard reset will return the device to its original state.
Turn off your speaker: Press and hold the power button until the speaker turns off.
Press and hold the Bluetooth and Volume Up buttons: While the speaker is turned off, press and hold the Bluetooth button and the Volume Up button at the same time.
Wait for the reset to complete: Keep holding the buttons until the LEDs on the front of the speaker flash. This may take up to 10 seconds.
Turn on your speaker: Once the LEDs stop flashing, release the buttons and turn on the speaker by pressing the power button.
Reconnect to Bluetooth: If you were previously connected to a device via Bluetooth, you’ll need to reconnect your speaker to that device. If restarting your speaker doesn’t fix the issue, there can be a more serious issue that needs additional investigation. But maybe this quick reset will help you resolve the JBL Flip 5 charging problem.
Dry The Wet Charging Port Although the JBL Flip 5 is IPX7 waterproof, the charging connector is still susceptible to being wet. The speaker won’t charge if the charging port is damp; instead, you must first dry it. You can use a hairdryer to dry a damp charging port, just make sure to use the hairdryer at low temperatures. The speaker could be harmed by excessive heat. Use a hairdryer to dry the speaker for about 5 minutes, and then wait at least 24 hours before attempting to charge it.
Different Wall Outlet It’s time to replace the wall outlet if you’ve already changed the USB cable and the wall charger. You run the risk of having a damaged wall outlet when charging your speaker. So, test various charging outlets to be sure.
2 notes
·
View notes
Text
Price: [price_with_discount] (as of [price_update_date] - Details) [ad_1] International Universal All in One Worldwide Travel Adapter Wall Charger AC Power Adapter Charger with Dual USB Charging Ports for USA Eu Uk AUS Plug Adapter Product introduction: This Travel Adapter is suitable for use with most 2-pole plugs. It is the safest way to plug in your portable, non-grounded devices around the world. It can be applied in a range of devices, including: MP3 players, digital cameras,mobile phones, GPS, PDAs, travel speakers, etc Rated power: 110V~/650W, 220V~/1300W. Power output: 100-240VAC~50-60HZ 6A Max. CANNOT convert voltage, Only apply to the use of small power electric appliances when traveling, such as mobile phone, digital products, computer with low power of small household appliances.The travel adapter does not work with high power appliances such as hair straightener, flat iron, hair curler, hair dryer, steam iron, hot water heater, coffee maker, etc. Embox international travel adapter is compatible with more than 150 Countries US/EU Embox Travel Adapter International All in one is compatible with more than 150 Countries US/EU/UK/AU plugs. Our international travel adapter is a must have travel essentials if you travel to multiple countries or use international devices often. U/UK/AU plugs. Our travel adapter is a must have travel essentials if you travel to multiple countries or use international devices often Safe & Reliable: Embox universal adapter is designed with built-In safety shutters protect users from the direct touch of the live parts on the socket outlet. This plug adapter has surge protection to guard your valuable devices from the voltage spikes. It is a lightweight universal socket you can carry in your hand bags or sling bags. Multiple Devices Compatibility: This Embox us to India converter plug is the safest way to plug in your portable, non-grounded devices around the world. It can be applied in a range of devices, including: MP3 players, digital cameras, mobile phones, GPS, PDAs, travel speakers, etc. Our universal adapter travel is one of the much needed travelling accessories you will need while travelling abroad. Also compatible with most of the brands like Apple iPhone x 8 8 plus 7 7s 6 6s 5s 4s, Sony, Blackberry, HTC, Lenovo, LG, ZTE, Huawei, and so on. Dual USB ports. Ideal for iPhone, iPad, Samsung Tab, iPod, Smartphones, 5V Tablets, Bluetooth Speakers & Headset. World Wide Connectivity: Embox plug adapter is commonly used as us to India converter plug, UK to India adapter plug. Our adapter plug socket can be used as europe travel adapter or also as australia to india plug converter depending on a user's need. Embox international adapter has power rating 6A max. 100-240Vac (660W max. at 110Vac. 1380W max. at 230Vac) This Charger Adapter Plug Converts the Power Outlet Only, It Does Not Convert Electrical Output Current and Voltage. Whereas best used as multi charger, multi usb charger. [ad_2]
0 notes
Text
🌟 Discover Smart Lifestyle Essentials: 5 Innovative Products You Can’t Miss! 🌟

In today’s fast-paced world, having the right gadgets can make all the difference in simplifying tasks and enhancing convenience. Here, we bring you five innovative products available exclusively at Xpressouq.com that combine functionality, style, and cutting-edge technology, making them must-haves for your home, office, or travel needs. 🛍️✨
1. 🖨️ Portable Bluetooth Mini Printer — Inkless Printing Redefined

Say goodbye to traditional printers and hello to the future of printing with the Portable Bluetooth Mini Printer. 🖋️ Designed with advanced thermal printing technology, this innovative device eliminates the need for ink cartridges, offering efficient and high-quality printing for photos, text, labels, and sketches. Its lightweight and portable design makes it perfect for on-the-go use, whether you’re capturing memories or printing creative projects. With Bluetooth connectivity, printing from your smartphone or tablet has never been easier. 📲
🔑 Key Features:
Inkless printing with thermal technology
Wireless Bluetooth connectivity
Prints photos, text, labels, and sketches
Lightweight and portable
Energy-efficient and eco-friendly
🛒 Shop Now
2. ☕ Green Lion Portable Coffee Maker Kettle — Brew Anywhere, Anytime

For coffee lovers on the go, the Green Lion Portable Coffee Maker Kettle is a game-changer. 🌍 This compact, stainless-steel marvel combines a coffee grinder and filter in one device, allowing you to enjoy freshly brewed coffee wherever you are. Powered by a 1600mAh battery with USB-C charging, it delivers up to 12–15 grinds per charge. Its durable construction ensures longevity, while its 250ml capacity is perfect for personal use at home, the office, or while traveling. 🧳
🔑 Product Features:
Integrated coffee grinder and filter
250ml cup capacity
USB-C charging and 1600mAh battery
Durable ABS plastic and stainless steel construction
Easy to clean and maintain
🛒 Shop Now
3. 🔌 Green Lion 7-in-1 Power Socket — Charge Multiple Devices with Ease
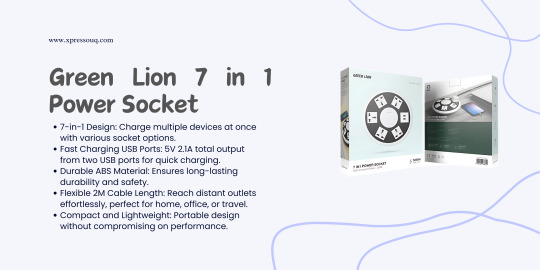
Simplify your charging needs with the Green Lion 7-in-1 Power Socket, a versatile power solution designed for modern lifestyles. 💻📱 This compact device allows you to charge multiple gadgets simultaneously, with two fast-charging USB ports delivering a total output of 5V 2.1A. Its 2-meter cable length ensures flexibility, while the durable ABS material provides safety and long-lasting use. Ideal for home, office, or travel, this power socket is a true lifesaver for anyone with multiple devices. 🔋
🔑 Key Features:
7-in-1 design for simultaneous device charging
Fast-charging USB ports (5V 2.1A total output)
Durable ABS construction
Flexible 2-meter cable for added convenience
Compact and portable
🛒 Shop Now
4. 💧 Porodo Lifestyle Instant Hot Water Dispenser — Convenience Meets Style

Upgrade your kitchen with the Porodo Lifestyle Instant Hot Water Dispenser, featuring a powerful 2200W heating element that delivers hot water instantly. 🍵☕ With four temperature settings, this dispenser ensures the perfect water temperature for tea, coffee, or instant meals. Its anti-dust surface keeps maintenance simple, while the subtle ambient lighting adds a stylish touch to your kitchen or office. The generous 3.4L capacity makes it perfect for busy households or workplaces. 🏡
🔑 Key Features:
Instant hot water with 2200W heating
Four customizable temperature settings
Anti-dust surface for easy cleaning
3.4L capacity for daily use
Subtle ambient lighting for added elegance
🛒 Shop Now
5. ⌚ Green Lion 2G Kids Smart Watch Series 5 — GPS, SOS Alerts, HD Camera

Give your kids the gift of safety and fun with the Green Lion 2G Kids Smart Watch Series 5! 🎮📱 This smartwatch is packed with features like GPS tracking, SOS alerts, a built-in HD camera, and two-way calling for easy communication. With a 400mAh battery offering up to 5 days of standby time, it’s perfect for young adventurers.
Available in Blue & Purple Display: 1.44-inch bright screen
🔑 Key Features:
GPS Tracking: Accurate location monitoring (AGPS & LBS).
SOS Alerts: Instant notifications in emergencies.
HD Camera: Capture moments with ease.
Battery Life: Long-lasting 400mAh battery.
Two-Way Calling: Stay connected anytime.
Micro SIM Slot: Supports Micro SIM cards.
🛒 Shop now
Contact Us:
Email: [email protected]
Phone: +974 77247289
Website: www.xpressouq.com
Social Links
Instagram
Facebook
Twitter
Related Links
The Best Online Shopping Tips
Customer Stories: How Xpressouq Products Changed My Life
How to Maintain Your Electronic Devices: A Comprehensive Guide
The Best Security Options to Protect Your Home and Loved Ones 🏡🔒
Upgrade Your Home Entertainment With These Must Have Devices
#ecommerce#electronics#business#coffee machine#water dispenser#smart watch#watch#printer#mini printer#socket#7 in one socket
0 notes
Photo
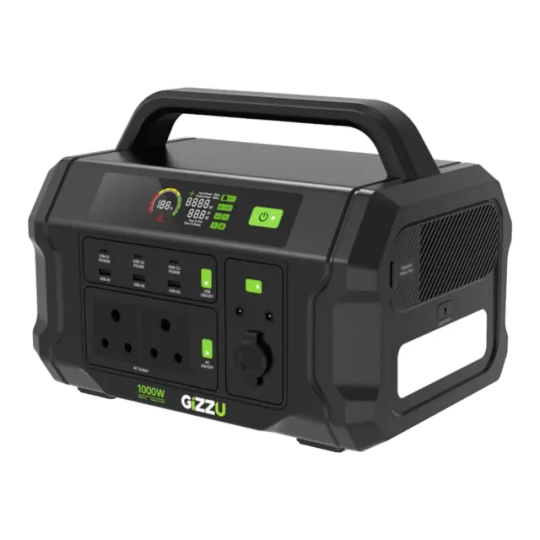
GIZZU Challenger Pro 1120Wh/1000w UPS Fast Charge LifePO4 The Gizzu Challenger Pro 1120Wh UPS Power Station is the ultimate on-the-go power supply in a compact design. This portable power station is ideal for emergency needs, power outages, camping trips, or whatever else electricity is needed as it allows you to power up small appliances. Thanks to the 230V South African plug, and two DC ports, you can power your internet router, lightbulbs, and other small electronics and appliances with ease. With two USB ports including one USB 3.0 Quick Charge port and a PD port, you can keep your phone, tablet, notebook, and camera charged. This rechargeable battery-powered model features a robust design, built-in LED flashlight and has two methods of charging, including solar power charging and traditional wall charging. When using a third-party solar panel, the voltage range needs to be between 14V – 22V with a maximum amperage of 3A. Get off the grid and enjoy the great outdoors while keeping essential gear and mobile devices powered. Thanks to the 11 outlets, including two South African plugs, you can power lights, smartphones, cameras, and other small electronics with ease. You can recharge the Challenger Pro during your outdoor adventure, simply hook the product up to your car or solar panel. It’s durable and robust, but light enough to take with you. Power essential household devices like your router, notebook, and monitors during loadshedding or power outages, Along with Pure Sine Wave technology, which is better suited to powering sensitive electronics, the Challenger Pro also features UPS functionality. This means that the Challenger Pro seamlessly switches over to battery power during loadshedding or a power outage, resulting in zero downtime for your connected essential devices. Frequent power outages leaving you with fewer hours in the day to recharge your power solution products? No problem – recharge the Challenger Pro from 0% to 100% in under 2 hours. Note: The maximum concurrent rated output for this device is 1000W. Please double-check the watt requirement of the appliance you want to power before connecting it to your Gizzu Power Station. FEATURES: 1120Wh Lithium-Iron Phosphate (LiFePO4) batteries Ideal to keep electronic appliances powered during loadshedding or a power outage Great for keeping essential gear powered during outdoor adventures Recharge the battery from 0% to 100% in under 2 hours Features 11 outlets – 230V South African 3-pin plugs, PD ports, USB ports, and car socket port Multiple input charging options – draw power from your car, solar panel, or from wall sockets Battery Management System proactively monitors and preserves battery life Robust design and built-in LED flashlight for convenience Intelligent safety features like over-charge, over-discharge, and short circuit protection SPECIFICATIONS: Internal Battery Type: Lithium Iron Phosphate (LiFePO4) Battery Capacity: 1120Wh, 22.4V 50Ah Inverter: Pure Sine Wave UPS Switching Time: 10ms AC Output: 2x 230V/50Hz 1000W Rated DC Outputs: 1x Type-C 100W PD Port (5V/3A, 9V/3A, 12V/3A, 15V/3A, 20V/5A) 2x Type-C 30W PD Ports (5V/3A, 9V/3A, 12V/2.5A, 15V/2A, 20V/1.5A) 1x USB QC3.0 Port (5V/3A, 9V/2A, 12V/1.5A, 5V/4.5A, 4.5V/5A) 2x USB 2.0 Ports (5V/2.4A) 1x Car Socket Port (12V/10A) 2x DC5521 Ports (12V/10A) Battery Management System: Yes Lifespan: 2000 Charging Cycles Charging Times: AC Input: 230V/50Hz 800W Max (1.8hrs), DC Input: 11V-50V 300W Max (6-7hrs) Product Dimensions: 38 x 26 x 29 cm Product Weight: 14000g ESTIMATED RECHARGES: Smart Phone (3500mAh): 75 Tablet (7000mAh): 37 Portable Speaker (7500mAh): 35 Action Camera (1250mAh): 211 Estimated Runtime: Laptop (50W): 17hrs Microwave (800W): 1.1hrs Washing Machine (400W): 2.2hrs 42″ LED TV (100W): 8.9hrs PROTECTION FEATURES: Short-Circuit & Over-Current Protection Over-Voltage & Under-Voltage Protection Over-Load & Temperature Protection WHAT’S IN THE BOX: Gizzu Challenger Pro 1120Wh UPS Power Station x1 AC Charging Cable x1 Car Charging Cable x1 User Manual x1
0 notes
Link
0 notes
Text
DIY Smart Home Energy Monitor with ESP32 and Home Assistant
Introduction
Managing energy consumption is a great way to reduce electricity costs and contribute to environmental sustainability. With the help of IoT, you can monitor energy usage in real-time, right from your smartphone. In this guide, we’ll build a Smart Home Energy Monitor using an ESP32 microcontroller, current and voltage sensors (like the ACS712 or SCT-013), and the MQTT protocol for data transmission. This data will be accessible on a mobile app via Home Assistant, allowing you to keep track of energy usage and optimize it effectively.
Project Overview
Objectives
Monitor power consumption in real-time for home appliances.
Display energy usage on a mobile app using MQTT and Home Assistant.
Analyze data over time to make informed decisions about energy usage.
Key Components
ESP32 (or ESP8266) microcontroller: For reading sensor data and connecting to Wi-Fi.
Current Sensor (SCT-013 or ACS712): For measuring current drawn by appliances.
Voltage Sensor: Optional, but adds more accuracy if you want to measure precise power usage.
MQTT Protocol: To send data to Home Assistant for real-time monitoring.
Home Assistant: A home automation platform to display and analyze data.
Part 1: Setting Up the Components
1. ESP32 or ESP8266 Microcontroller
Choose either the ESP32 or ESP8266 microcontroller. The ESP32 has more features and is preferred, but either will work.
Connect the ESP32 to your computer using a USB cable to program it.
2. Current Sensor (SCT-013 or ACS712)
SCT-013 is a non-invasive sensor that clamps around a wire to measure the AC current flowing through it.
ACS712 is a current sensor that can measure both AC and DC current but requires direct connection to the wire, so exercise caution with high voltage.
Wiring for SCT-013
Connect the SCT-013 sensor’s output to an analog input pin on the ESP32.
If you’re using SCT-013 with ESP8266, you’ll need an analog-to-digital converter (ADC) module since the ESP8266 has only one analog input pin with limited resolution.
Wiring for ACS712
Connect the VCC pin to the 3.3V or 5V pin on the ESP32.
Connect the OUT pin to an analog input pin on the ESP32.
Connect the GND pin to the ground (GND) on the ESP32.
3. Voltage Sensor (Optional)
A voltage sensor can be added to measure the actual voltage if you want to calculate power more accurately.
Connect the sensor’s VCC to the 3.3V on ESP32, GND to ground, and OUT to an analog input.
Part 2: Coding the ESP32 for Data Acquisition and Transmission
1. Install the Required Libraries
Make sure you have the following libraries installed in your Arduino IDE:
ESP32 or ESP8266 board support (depending on your microcontroller)
PubSubClient library for MQTT communication
WiFi library for connecting to your Wi-Fi network
2. Set Up the Code
Here’s the code to:
Read values from the current sensor.
Calculate power consumption (voltage x current if you have a voltage sensor, or assume constant voltage).
Publish data to an MQTT broker.
#include <WiFi.h> #include <PubSubClient.h>
// Wi-Fi and MQTT Broker Settings const char* ssid = "YOUR_SSID"; const char* password = "YOUR_PASSWORD"; const char* mqtt_server = "YOUR_MQTT_BROKER_IP";
// MQTT topics const char* topicPower = "home/energy_monitor/power";
WiFiClient espClient; PubSubClient client(espClient);
// Sensor parameters const int sensorPin = 34; // Analog pin for sensor (ESP32) const float voltageCalibration = 230.0; // Voltage in volts (modify as per your region) const float sensorCalibration = 0.185; // Calibration constant for ACS712 sensor
void setup() { Serial.begin(115200); setup_wifi(); client.setServer(mqtt_server, 1883); }
void setup_wifi() { delay(10); Serial.println("Connecting to WiFi..."); WiFi.begin(ssid, password); while (WiFi.status() != WL_CONNECTED) { delay(500);
Serial.print("."); } Serial.println("Connected to WiFi."); }
void reconnect() { while (!client.connected()) { Serial.print("Connecting to MQTT..."); if (client.connect("ESP32Client")) { Serial.println("Connected."); } else { delay(5000); } } }
void loop() { if (!client.connected()) { reconnect(); } client.loop();
// Read sensor data int rawValue = analogRead(sensorPin); float current = rawValue * sensorCalibration; // Adjust based on sensor
// Calculate power float power = voltageCalibration * current; // Simple power calculation (P=VI)
// Publish data to MQTT String powerStr = String(power); client.publish(topicPower, powerStr.c_str()); Serial.print("Power: "); Serial.println(power); delay(2000); // Send data every 2 seconds }
3. Upload Code
Connect your ESP32 to your computer.
Select the correct board and port in the Arduino IDE.
Upload the code to the ESP32.
Part 3: Setting Up Home Assistant and MQTT Broker
1. Set Up MQTT Broker
If you don’t have an MQTT broker, you can use Mosquitto on your local network or use an online MQTT service like HiveMQ.
Install Mosquitto on a Raspberry Pi or a computer running Home Assistant.
Configure Mosquitto by setting a username and password for secure access.
2. Configure Home Assistant
In Home Assistant, you’ll add the MQTT integration to receive data from the ESP32.
Go to Settings > Integrations and search for MQTT.
Enter your MQTT broker details and save the configuration.
3. Add a Sensor in Home Assistant
In your Home Assistant configuration file (configuration.yaml), add the following entry to display power data:sensor: - platform: mqtt name: "Home Power Consumption" state_topic: "home/energy_monitor/power" unit_of_measurement: "W" value_template: "{{ value | float }}"
Restart Home Assistant to apply changes.
You should now see a Home Power Consumption sensor in your Home Assistant dashboard.
Part 4: Testing and Using the Energy Monitor
Power on your ESP32 and ensure it’s connected to Wi-Fi.
Open Home Assistant, where you should see the real-time data of power consumption.
Monitor the data over time and optimize energy usage based on the data.
Conclusion
With this DIY Smart Home Energy Monitor, you can track power usage across various appliances in your home. This project introduces core IoT concepts such as data acquisition, MQTT communication, and integration with Home Assistant. You can further expand this setup by adding more sensors or even automating appliances based on usage patterns.
#Tech4bizsolutions #SmartHome #EnergyMonitoring #ESP32Projects #HomeAssistant #IoTProjects #DIYElectronics #MQTTProtocol #SmartHomeAutomation #PowerConsumption #EnergyEfficiency #ESP8266Projects #IoTDevelopment #HomeAutomationIdeas #TechDIY #SustainableLiving
0 notes
Text
The EcoFlow Power Hat is a solar-paneled hat that protects you from the sun while charging your devices on the go. Designed for hiking, fishing, gardening, and more. It features a foldable design for easy carrying and an IP65 waterproof rating. Equipped with a 360-degree solar panel brim, it includes both USB-A and USB-C ports, allowing you to charge up to two devices simultaneously. The EcoFlow Power Hat offers UV protection with a UPF rating of 50+, weighs just 13 oz, and has a maximum charging output of 5V/2.4A. It retails for $129 and is available in two sizes. Learn more at ecoflow.com
0 notes
Text
Portable Air Cooler Fan Humidifier with LED Water Tank: Your Solution for Personal Cooling and Comfort

With rising temperatures, especially in summer, having a quick and convenient way to cool down becomes essential. The Portable Air Cooler Fan Humidifier with LED Water Tank offers a practical solution for individuals seeking relief from the heat in smaller spaces. This innovative gadget combines the functions of a fan and a humidifier to provide a refreshing, comfortable environment wherever you go.
Key Features of the Portable Air Cooler Fan Humidifier
1. Combined Cooling and Humidifying Action
Unlike traditional fans that simply circulate air, this portable air cooler actively cools the air and adds moisture, making it ideal for dry and hot environments. By drawing in warm air and passing it over a water reservoir, this device emits a cooler, moistened breeze, which is particularly beneficial in climates where dryness exacerbates discomfort.
2. Convenient Portability
The compact and lightweight design makes this cooler highly portable, fitting comfortably on desks, bedside tables, or countertops. Whether you’re working, relaxing, or sleeping, the device can be easily placed nearby for a cooling effect. Perfect for use at home, in the office, or even outdoors with a portable power source, it’s designed for on-the-go cooling whenever and wherever you need it.
3. 600 ml Water Tank for Long-Lasting Comfort
With a water tank capacity of around 600 ml, this cooler offers up to 12 hours of continuous cooling and humidifying on a single fill, reducing the need for frequent refills. This feature is particularly convenient for nighttime use, as it can last throughout sleep hours without interruption. Additionally, it ensures that the air around you remains humidified, preventing the dryness associated with prolonged fan use.
4. Ambient LED Lighting
The integrated LED lighting not only adds a visual appeal but also serves as ambient light for the space. It’s a perfect feature for those who enjoy a soft glow in the background, which can add to a calming atmosphere. This lighting feature makes the device not only functional but also a decorative piece for your room.
5. USB Powered for Easy Compatibility
This device runs on USB Type C power, compatible with standard 5V, 2A power adapters, making it incredibly versatile. You can plug it into a laptop, power bank, or a wall adapter, allowing you to take it just about anywhere. This feature makes it ideal for home use as well as travel or outdoor events.
Ideal Use Cases and Considerations
While this portable air cooler is highly effective in small spaces and for personal use, it’s essential to understand its scope:
Best for Personal Use
This cooler is designed for close-range cooling. It works optimally when placed nearby, like on a desk or bedside table, and may not effectively cool larger rooms.
Easy Maintenance
To prevent potential leaks, it’s recommended to keep the device upright and avoid overfilling the tank. Using clean water is essential to maintain the device and ensure it operates effectively.
0 notes
Link
0 notes
Video
youtube
Dual USB-C Output Portable Solar Panel Power Bank – Your Ultimate Outdoo...
Embark on your outdoor adventures with confidence and convenience with our Dual USB-C Output Portable Solar Panel Power Bank 20000mAh. This innovative power bank is designed to keep you connected and powered up, no matter where your explorations take you. Let's delve into the exceptional features that make this power bank a must-have for outdoor enthusiasts like yourself.
Crafted from durable ABS+TPU material and powered by a high-capacity 20000mAh Li-polymer cell, this power bank is built to withstand the demands of outdoor use while providing reliable power for your devices. While it doesn't support Display, it features LED lighting for added functionality and convenience.
Equipped with a 5V/300mA mono crystalline silicon solar panel, this power bank harnesses the power of the sun to keep your devices charged even in remote locations. The integration of fast charging, lightning, and waterproof features makes this power bank the perfect companion for outdoor enthusiasts who value efficiency and durability.
Featuring dual USB-C outputs and multiple charging interfaces, including USB, Micro-USB, and USB/DC, this power bank offers versatile charging options for a variety of devices, including mobile phones, tablets, and cameras. Its compact dimensions and sleek design make it easy to carry and use during your outdoor excursions.
Keywords like #TechInnovation, #Flashlight, and #BatterySaver perfectly encapsulate the essence of this dual USB-C output portable solar panel power bank. Stay juiced up, charge on the go, and power up your devices with our powerful and versatile power bank. Elevate your outdoor experiences, stay connected everywhere, and make the most of your adventures with this essential tech accessory by your side.
Experience the convenience and power of our Dual USB-C Output Portable Solar Panel Power Bank 20000mAh, designed to enhance your outdoor adventures and keep you connected on the go. With its innovative features, durable design, and efficient charging capabilities, this power bank is the ultimate companion for outdoor enthusiasts seeking a reliable and versatile charging solution. Stay powered up, stay connected, and embrace the freedom of exploring the great outdoors with our essential tech gadget. Follow us at https://user185638.psce.pw/6v9ax7 if you’re interested!
#youtube#Power bank 20000mah Samsung#Power bank 5 below#Power banks best brands#Power banks cheap#Power banks for android phones#Power banks with usb-c output#Power banks for sale#Power banks 8000mah#Power banks brands#Power banks for iPads#Power bank RoHs#Power banks with pass through charging#Power banks with built in cables#Power bank 15000mah#Power banks solar#Power banks sale#Power banks usb-c#Power bank 5v#Power bank 6000mah#Power banks bulk#Power bank generator#Power banks in checked luggage#Power banks in flight#Power banks Samsung#Power bank 10000
2 notes
·
View notes
Text
Top 3 Heated Vests: DOACE Leads the Pack
Heated vests have become essential for staying warm in cold weather. They provide comfort and warmth, making them perfect for outdoor activities or simply braving the winter chill. Among the top choices, three heated vests stand out for their performance and features. Leading the pack is the DOACE heated vest, renowned for its innovative design and superior heating capabilities. With advanced technology and user-friendly features, the DOACE vest ensures you stay cozy and comfortable, no matter how low the temperature drops.
Detailed Review of DOACE Heated Vest

Unique Features of the Heated Vest
8 Heating Zones
The DOACE Heated Vest stands out with its innovative design featuring 8 heating zones. These zones cover critical areas such as the back, belly, shoulders, and waist. This comprehensive coverage ensures that you stay warm in all the right places. Unlike traditional vests with fewer heating areas, the DOACE vest uses high-quality carbon nanofiber heating elements. These elements provide rapid and efficient warmth, making it a superior choice for those cold winter days.
Smart Controller
You will appreciate the smart controller integrated into the DOACE vest. This 4-in-1 controller allows you to operate the shoulder, waist, and belly heating zones separately. You can choose from three heating levels, ranging from 113°F to 150°F. This flexibility lets you customize your warmth based on your specific needs, ensuring comfort throughout the day. Adjusting the heat settings is straightforward, giving you control over your comfort level.
Safety Features
Safety remains a top priority with the DOACE heated vest. It includes a built-in thermal protection module that automatically shuts off the heating if it overheats. This feature provides peace of mind, allowing you to focus on your activities without worrying about safety. The vest works with a common 5V/2A or above power bank, and it features a battery inner pocket for convenience. A single charge can provide up to 8 hours of continuous warmth, perfect for long outdoor activities.
Practical Design Elements
The practical design of the DOACE heated vest enhances its functionality. Made from lightweight, breathable material, it offers superior warmth without compromising comfort. The vest is machine washable, ensuring it remains clean and fresh after use. Deep pockets provide secure storage, and a smooth SBS zipper allows for easy wear. Available in multiple sizes and colors, this vest caters to various preferences and styles.
Benefits of the DOACE Heated Vest
Comfort and Warmth
The DOACE heated vest excels in providing comfort and warmth. Its lightweight material ensures you stay cozy without feeling bulky. The vest's design allows for unrestricted movement, making it ideal for outdoor activities like cycling and hiking. Whether you're working outdoors or simply braving the winter chill, this vest keeps you warm and comfortable.
Energy Efficiency
Energy efficiency is another significant benefit of the DOACE heated vest. The high-quality carbon nanofiber heating elements ensure rapid and efficient warmth. With the ability to adjust the heating levels, you can optimize energy use based on your needs. This feature not only conserves energy but also extends the battery life, allowing for longer use.
Versatility in Use
Versatility defines the DOACE heated vest. Its design suits various activities, from outdoor sports to everyday wear. The vest's USB port allows you to charge your devices while staying warm, adding to its practicality. Whether you're engaging in winter sports or running errands, this vest adapts to your lifestyle, providing warmth and convenience.
Comparison with Other Heated Vests

Overview of Heated Vest 2
Key Features
Heated Vest 2 offers a practical solution for those seeking warmth during cold weather. It features three heating zones, strategically placed to cover essential areas like the back and chest. The vest uses a simple control system, allowing you to adjust the heat settings with ease. Its lightweight design ensures comfort without adding bulk, making it suitable for various outdoor activities.
Pros and Cons
Pros:
Lightweight and comfortable for extended wear.
Easy-to-use control system.
Affordable price point.
Cons:
Limited heating zones compared to other models.
Shorter battery life, requiring frequent recharges.
Basic design with fewer customization options.
Overview of Heated Vest 3
Key Features
Heated Vest 3 stands out with its four heating zones, providing warmth to the back, chest, and neck areas. It incorporates a user-friendly interface, allowing you to switch between different heat levels. The vest's durable material ensures longevity, making it a reliable choice for winter sports enthusiasts.
Pros and Cons
Pros:
Durable construction for long-term use.
Multiple heat settings for personalized comfort.
Suitable for intense outdoor activities.
Cons:
Heavier than other models, which may restrict movement.
Higher price point, making it less accessible for budget-conscious buyers.
Limited color and size options.
Advantages of DOACE Over Others
Feature Superiority
The DOACE Heated Vest surpasses its competitors with its eight heating zones, offering comprehensive coverage that ensures warmth in all critical areas. Unlike other vests with only three or four zones, DOACE provides superior heat distribution. The smart controller allows you to customize your warmth, giving you the flexibility to adjust the heat according to your needs. This feature sets DOACE apart, making it a top choice for those who prioritize comfort and efficiency.
User Feedback
Users consistently praise the DOACE Heated Vest for its exceptional performance. Many highlight the vest's ability to maintain warmth even in extreme cold conditions. The safety features, such as the automatic shut-off, receive positive feedback for providing peace of mind. Customers appreciate the vest's versatility, noting its suitability for both outdoor adventures and everyday use. With its combination of innovative features and positive user experiences, the DOACE Heated Vest emerges as a leader in the heated vest market.
The DOACE Heated Vest stands out as the top choice for winter warmth. Its innovative features, like the eight heating zones and smart controller, ensure you stay cozy in any cold condition. Users rave about its performance, with one saying,
"I used the vest a few times when camping in the mountain … And it is warm!"
Consider adding the DOACE vest to your winter gear. It offers unmatched comfort and efficiency. Don't miss out on staying warm this winter—explore purchasing options today and experience the difference for yourself!
1 note
·
View note