#when I used to crochet more I'd made a little doll pattern
Explore tagged Tumblr posts
Note
Hey! This might be a weird ask, but do you know anywhere that has Cambrian sewing patterns? I’ve been trying to track down a wiwaxia or anomalocaris, but no joy. Thanks in advance!
Hey! Not a weird ask at all, and I swear I've seen one for an anomalocaris before but I can't remember where?? I'll take a look and see what I can find, and hopefully someone will see this that has a link to a pattern Edit: So good news bad news, I did find the anomalocaris plush I was thinking of, but the designer has not shared the pattern. Good news is it looks really simple to design a pattern for a simplified version of it? I'd just need to handstitch on the curved front...not legs and use the same technique I use to make spider legs without having to sew each leg individually (topstitching, but maybe also pleating) Can you reblog this with some reference photos of anomalocaris? anomalocarises? I do not know enough about them to be able to distinguish which ones are good references
#ask away!#jenni-with-an-i#I am not much of a dinosaurs person#and like. I know there's a good chance neither of those are dinosaurs#but I do not know the correct term for them if they are not dinosaurs so idk how to word that sentence?#so please put the correct word in that sentence in place of dinosaurs if you know it#but anyway: I am not much of a dinosaurs person but I like pretty much every kind of creature I learn about#and I am delighted at the thought of getting to learn about these ones while I search for patterns! :D#editing tags to add: it might be a little weird that I am so excited to make a pattern for this creature I know nothing about#but it is so shaped! it is SO so shaped#and super distinctive things like this are FUN to make patterns of#because you can play a little more with proportions and stylization and still have it be recognizable#when I used to crochet more I'd made a little doll pattern#and I used it to make a few characters but then when I was trying to use it to make some characters#I ran into what I called the 'guy in a t shirt and jeans' problem#which is that at a tiny scale if the character is just a dude wearing a t shirt and jeans it's very very difficult to make them#be distinctively them as a tiny plushie instead of a number of other dudes in shirts and jeans#no such problem with the anomolocaris!
9 notes
·
View notes
Text
Something I'm noticing in crochet is that I'm (so far) excited by trying new things, messing around with patterns, personalizing stuff, substituting willy nilly, making up my own designs as I go even if that means redoing work.
Because like, once you know how to make a ball, a rectangle, blobs, and a tube, and you know how to make them bigger or smaller, you can make almost anything, right? Not to say you can make it WELL but you can just throw stuff together and see what looks good.
Whereas crochet patterns seem to be made for people who want to get the exact same result as the photo no matter what. Less of a baking approach and more like 3D printing.
Hence all the emphasis on saying the exact brand and shade of yarn used, how to measure your own personal stitching to compare to the original and adjust accordingly, etc.
Edit - I've only kind of recently realized this when specifically finding out if it's ok to sell designs based on other people's patterns because I wondered how much you can/have to change them before it becomes a different pattern entirely. The guidance is just "sell it but not large scale" (what does that mean if crochet can't be factory-made and if this isn't really legally enforcable?) and give credit to the pattern. Which makes sense.
It also feels kind of like html coding. I understand keeping the notes in the code because they're not obtrusive. But if I decided to sell a like, crocheted french trobone, would I really still need to give pattern credit to the doll whose button design I used for the keys, the bell dress pattern I used for the horn, the snake pattern I modified for the body, etc etc? I'm genuinely not sure. And this is all hypothetical obviously. I just like to know where the lines are because autism or whatever.
Edit 2- I know this is important for clothes, but that's not what I'm making. And if it were, I'd still rather know how to alter the pattern on the fly to be what I need... not the same if you're making clothes for other people though, I know that :P
I'm also a little on my high horse (excited and proud of myself lol) for watching a list of crochet tips that most people don't know, and one was literally just a ladder stitch but not even named as such 😂 Or a guide on what to do with leftover yarn, with explicit instructions for turning wool wefts into a dryer ball and nothing else, with no mention of what needle felting even is.
I'm still a beginner by far but it helps me feel like I'm ahead of the class just because I know the basics of how some other textile crafts and other art media work.
7 notes
·
View notes
Note
Hey there!!
I was wondering if you could help me out a little bit! I already saw that you don't sell your crochet patterns, so I won't ask about that, but I was wondering if you had any tips or tricks for making dolls like the large Alex and Henry you made!
I'm a senior in college and I have a thesis project that I have to make. I'm considering making a crochet stop-motion animation for it!
Do you have any methods or tutorials you follow in order to make them so poseable and detailed? I noticed in the WIP photos that they have a wire skeleton! I'm also super impressed by the clothing and hair!
If you don't have any tips or anything, that's alright! I understand! I just thought I'd ask! 🙂
Hi! Of course, I'm going to try to explain everything to the best of my abilities ☺️ If you have more doubts afterwards, you can message me anytime you want!
I can't really point you to any tutorials because at this point I just do my own thing and in the case of Alex and Henry I designed the body pattern taking into consideration that the clothes will be independent pieces. Most patterns that I've seen directly crochet the body as if it is wearing the clothes, like, for example if you want your doll to wear a red sweater, the torso and arms are crocheted in red. I think that's easier and the results are nice as well. My chibi amigurumis are crocheted like that, they have less mobility because they're really small, but that same technique in a bigger amigurumi will give you both the mobility and the advantage of not having to crochet so many pieces.
Now some tips for the mobility:
— A wire skeleton, as you've mentioned! It's not a perfect solution because sometimes the wire isn't strong enough to keep weird poses, but it helps! This video tutorial is in Spanish, but it's really visual and it shows how to add a wire skeleton. Honestly it was the best video that I saw back in the day, when I was looking for tutorials for this same thing.
— You can use pipe cleaners instead of wire as well, although they're weaker.
— Don't stuff the arms.
— Not too much stuffing on the legs/waist so there's enough room when you pose the amigurumi. Just a little bit less, enough for the piece to be firm but have mobility. If your legs are thin, don't stuff them, like with the arms.
— Now, another perk to crocheting the body as if it was already clothed is that it helps with mobility too. More layers of clothing means the movement will be more hindered.
— Crochet the head as an independent piece. I'll put on a couple of pics so it's easier to understand, but basically what you need to do is, once you've reached your desired width for the neck, keep crocheting rounds with the exact same amount of stitches until you have a tube. When finished, make sure to stuff it very tightly (or put pipe cleaners inside) and close it. After that, to crochet the head, start by creating a similar tube, so the neck tube fits inside the head tube. Once you've got the size you need for your tube it's only a matter of crocheting the rest of the head as you would normally.
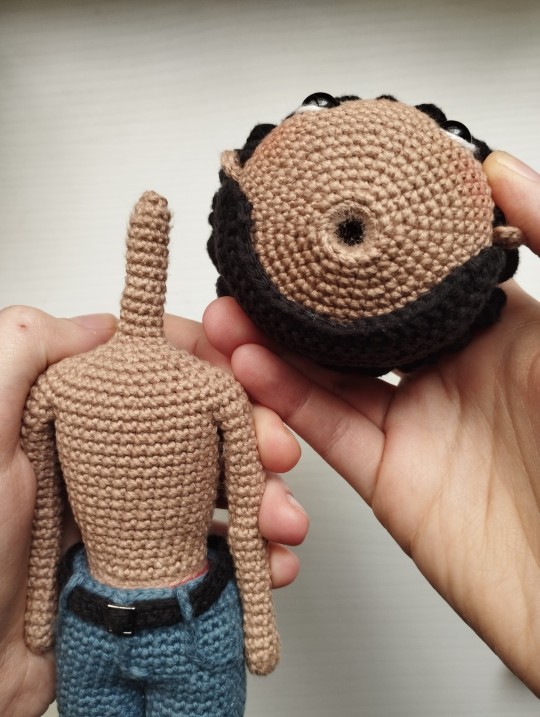
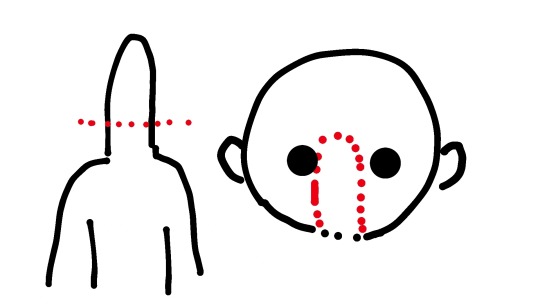
(I'm deeply sorry for that awful, awful drawing, I just thought it would help illustrate my point better but I'm not especially good at drawing on my phone)
— Use pins and skewers (like the ones for food). You can edit them out afterwards and that's probably the best tip because an amigurumi is a plushie and its mobility is never going to be really great 😅

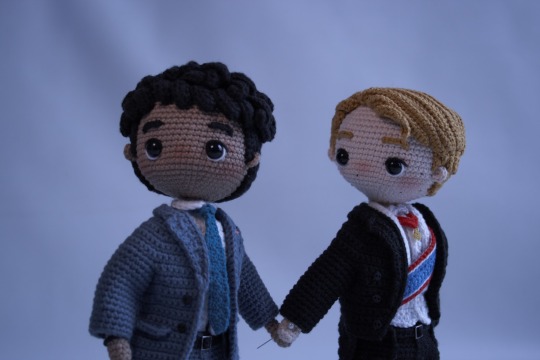
These photos are unedited, that's why they're so dark but ANYWAYS, see the skewers on their backs in the first photo? And the pin keeping their hands together in the second? Think of them as aids for your purpose. Alex and Henry can stand on their own if you manage to find the perfect balance but oooof it IS frustrating. The amount of times I've managed to pose one and just then the other falls flat on his little face... AWFUL.
And for the clothes... it depends a bit on what you're crocheting I guess????? Although I highly recommend to not be like me and get obsessed with making everything in a single piece, sometimes it works better when the details are crocheted apart and then sewn or glued to the main piece. Like for example, for the jackets, the body is one piece and the neck is a different one, I just sewn them together with a row of single crochets.
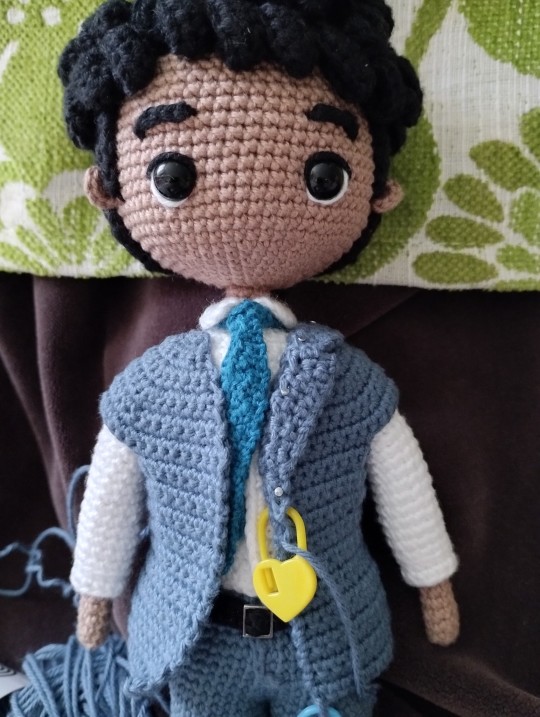

Also most of the time the easier way to do something is the best way. Since crochet have certain limitations, it's important to keep in mind that sometimes it's better to simplify. This depends on the size of the amigurumi and the size of the piece, but yep, as one of my uni professors used to say: parsimoooooooony (or follow the Ockham's razor).
Another thing!!! Learn some basic embroidery techniques and how to do surface slip stitches, they can go a long way to make a piece seem more detailed! And use other materials like felt too!
I can't think of anything else right now. I tried to be as clear as I could but it's kinda hard to explain all of this when English is not your first language 😅 Anyway, I hope you find these tips interesting and you can always ask me again anytime!
11 notes
·
View notes
Text
Why do I create characters?
Lately, there's been a couple of times that have gotten me asking myself why I do these sort of things. Today, I watched a movie (Grease, 1978) and got really invested on it, but why? Why do we watch movies or read books? What's so important about fiction? After all, it's all just made out of lies, right?
We humans have something called imagination. It goes beyond reality, and is able to create concepts, beings, or, gee, even universes that would never EVER take place in the world we live in. Hell, if we want, we can imagine a whole new world with new people and make them interact with each other. Isn't that cool? It's practically what happens when we make stories. In a way, we're basically playing with dolls inside our heads.
Imagination gives us the power to create. We can either use it for something useful, as would be designing the crochet pattern for a hat or a scarf, or for something that won't make our life any easier nor give us something material to work on. Creating a story falls in the second category, yet a lot of times is much more exciting. But why?
I think sometimes it kind of serves as a way to make reality less boring. If there's something you want but it's impossible for you to have, you can make it real inside of a fictional world. Perhaps you find the idea of going on adventures to defeat a dragon very appealing and fun, but you can't do that in real life, so you create characters that can bring to an unreal life your fantasy of going on adventures and having fun in a world very far away from the one we live in.
Sometimes, it might also be because we want to understand the world we live in better, if that makes sense? I'd say some of my stories fall here.
Something I've noticed throughout the years is that my characters always tend to have a little bit of me. There was a time where I was at my lowest point and everything that I felt, I put it into Henry. Sure, he's not a direct reflection of me and pretty much his entire life is made up, but I put that into him and I made him deal with stuff much more complicated than what I was dealing with. Even with what I put on his shoulders, he still lived, and if Henry had been able to live twenty four full years with poisonous vines around his neck (not literally), then so could I. Similarly, I made Ethan deal with anxiety the same way that I did before I got my diagnosis, although in this case, the one that got through it is me, so Ethan can too.
By creating stories, you can also create something that would be impossible in real life. You don't have to be limited by morals or logic. In your stories, everything that will or won't happen can only be decided by you, which gives you the opportunity to play outside the limits of reality.
Your characters can also reflect something you really want to happen. Raydel and Melanie (characters of mine), for example, have got a kind of friendship that I would love to have. Friendship can be really pretty. The concept of a bond that may sound even magical seems so beautiful to me, so I gave it to them.
Of course, these are only some of the reasons why somebody might want to create their own stories or characters, but these are not always the case. Some people may want to create a story just because, to have some fun, and that's perfectly fine too! Go nuts, it's your mind!
Fiction is not the same as real life. It's practically a lie, but that doesn't mean it's useless. We could say that fiction is, in a way, its own reality. It's not our lives and sometimes it's not even related to us, but it still exists inside its own little bubble in our minds, and even if it doesn't have a direct impact in real life, it still has a way of bringing emotions out of people, and may sometimes even help understand certain situations.
Those who create stories may feel proud of what they've created and a lot of times may build up emotions towards their creations. One may feel hate towards a character that damages another character towards which they feel affection, for example. Sure, the characters aren't real, but the emotions we feel when creating and playing with them are.
Those who read, watch, or generally consume stories that others have created may see some similarities between certain characters and themselves or associate things they have lived with situations the characters are being put through. Fiction can be kind of a parallel to reality sometimes.
Heck, fiction can be a lot of things and outside of what it may seem at first, it can actually be really useful. Isn't that beautiful?
I apologize if some things don't make sense; it's 1AM and I'm tired, but I really wanted to make this reflection.
Anyway, bye!
8 notes
·
View notes
Note
Hi ! I saw your Aether doll, and I was just wondering what's your process for the hair and the clothes? A friend's birthday is coming up (very) soon, and they really like Aether, so I'd love to know how to make this kind of stuff. I think you're really talented! :)
Hi! Thank you for your kind words :)
My process is largely on a ‘trial and error’ basis, but I’ve done my best to make a guide for you (using Aether as an example, since you mentioned him specifically). Unfortunately right now all of my stuff is in storage due to unstable living conditions, so I hope you’ll forgive me for only being able to offer pre-existing photos and hand-drawn diagrams. When I get access to my stuff again, I might do a step-by-step process for hair (for Lumine, since she’s my current WIP) but that could be quite a while yet.
Stuck under a read more because this is gonna get long lol
I’ll start with clothes because I always leave hair til last.
The first thing I do is hoard as many references as I possibly can, from as many different angles as possible. These are the one I used for Aether (made myself because I couldn’t find any online that met my needs), though I did also sometimes log into my game and rotate him in the character menu haha
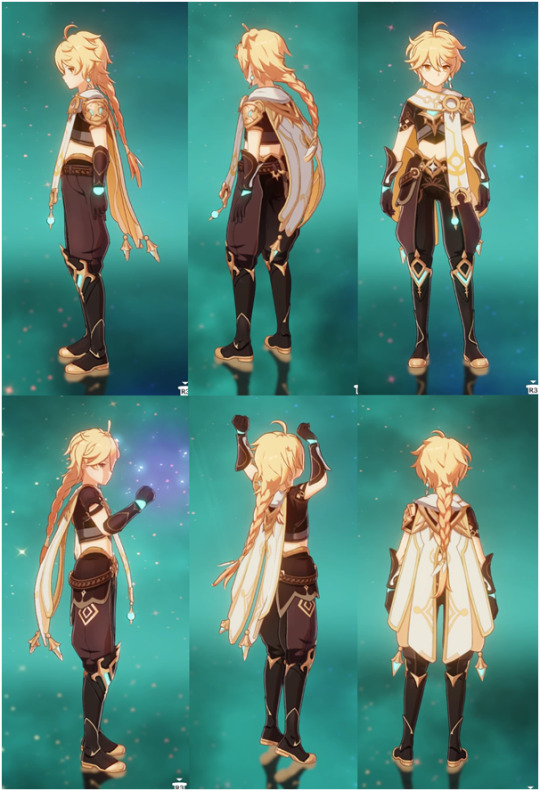
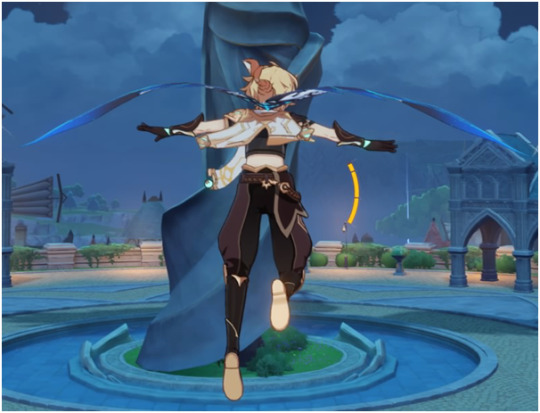
From here, the next step is to start dissecting the layers. Work from the base up, and break it down specifically into what you would make as a single piece, rather than say the shirt base AND the sleeves AND the decal. If that makes sense.
I don’t normally draw diagrams or anything like I will be for this, but if that helps you visualise it by all means do!
(I also tend to go really ham on the details because I’m a perfectionist, but please don’t torture yourself unless you really want to. Making things a little more simplistic is perfectly fine and valid.)
I won’t do the whole thing or I’ll reach image limit but here’s an example of how you might break it down:
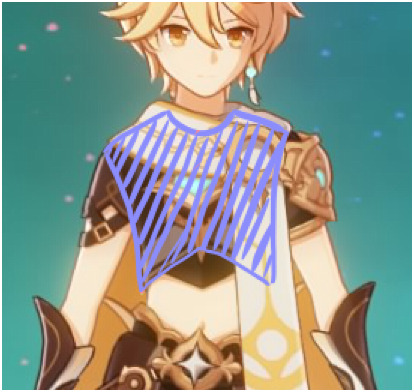
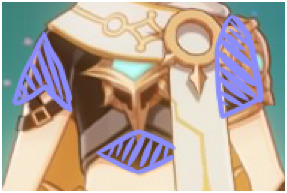

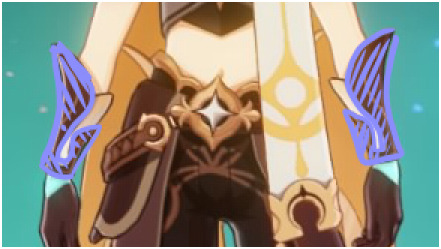
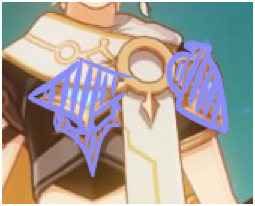

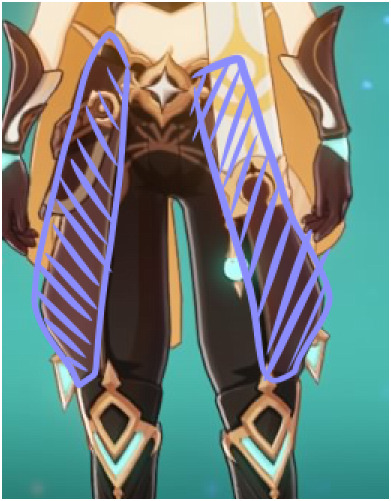
The more you simplify it, the easier time you’re going to have.
The next step for me, after I raid my cupboard and the local craft store for the right colours, is to work out which pieces of the clothing I’m going to incorporate into the doll’s base body and which will be separate.
For Aether, for example, the ‘hand’ part of his gloves are the actual doll’s hands, but the bit that flares up his arm isn’t. The boots are part of his actual legs up until the part where it flares up over the top of his pants, which I made as a separate piece. The seat of his pants are the bottom half of his base body, but the pant legs themselves are add-ons. Does that make sense?
Next, make your base body! If you’d like to use my pattern, you can find it in my pinned post :)
Once you’ve got the base doll, I start adding layers of clothing. I always use a smaller hook size for the clothes than I do for the base body. In my case I like 2.5mm (and a teeny tiny 1.25mm for fine details and thin layers – but we’ll get to that later). I normally start with the pants.
My normal method of doing pants is this:
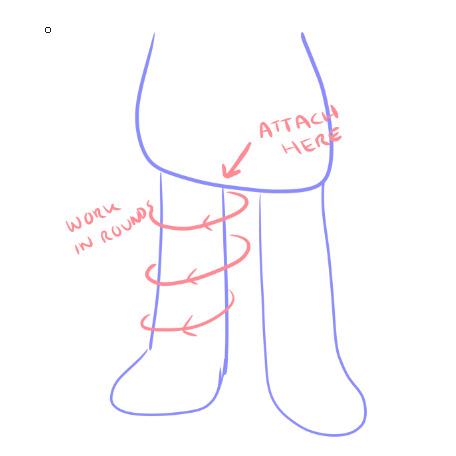
Essentially, I crochet directly into the base body in a circle around the base of the leg (so I am not chaining, but actually single crocheting through random stitches on the base in a loose circle shape), and then work in rounds until I reach the length I want.
Because Aether’s pants are puffy at the bottom and have two colours (*shakes fist at hoyo designers*), though, the process ends up being a little different.
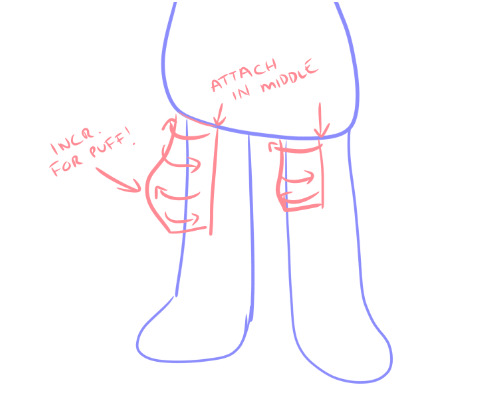
I made his pants in two pieces: the outer side and the inner side. So instead of rounds, it ends up being rows. To get that nice puff, just do some standard increases in the right spot and make sure to decrease on the lower rows to taper it back in.
Once you have both pieces, you can just sew the two halves together.
The flare of the boot over the top of the pants is exactly the same process. Attach and single crochet directly onto the leg from the top of the boot, working up towards the waist.

For trickier shapes like the gloves, it’s sort of just familiarising yourself with what kinds of effects different stitches do and allowing yourself to get it wrong about a dozen times before it actually works lol
If you break down the gloves properly, you end up with a shape similar to this:
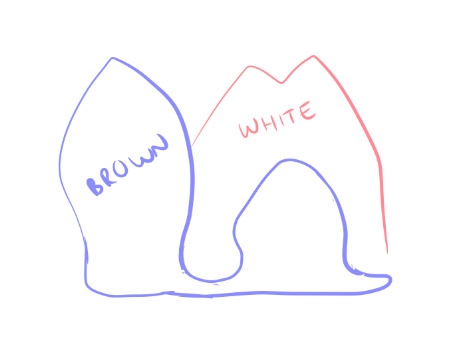
(this is not great i am so sorry – I am realising once again my reference was awful for the gloves)
But you can kind of see how it’s largely bulb shapes for the brown part, which is easy to do with increases and decreases. The white part I made separately and attached afterwards. Yes it was a huge, tedious pain in the ass.
For finer details, like his jewellery and, like, the shoulder armour, etc etc, I use the smallest hook I can tolerate. Please do not attempt this unless you lowkey hate yourself because it is torture.
So when you look at yarn, you can see that it has a bunch of smaller strands wound together, right?
You gotta split em.
Like this.

(image borrowed from http://illuminatecrochet.blogspot.com/2015/03/what-is-ply.html)
And then. You are going to use that tiny ass hook. And crochet those individual strands. It sucks. It breaks constantly. It makes you want to commit a crime. But damn if it doesn’t look good.
On a similar note, don’t be afraid to use the 2.5mm/whatever hook you use for clothes with less than the full ply of the skein you’re using. For Aether’s cape, I did the outer facing white part with only 2 of the strands in my 8ply yarn, and the inside orangey part with the 1.25mm and one strand. It’s still a little fatter than I’d like but it’s better than doing the whole thing in single strand torture mode lol
I’ll wrap up clothing here but if you want some help with anything specific just let me know!
On to hair!
For hair, I use felt square sheets that are like $1 each. Except for Aether because he has to have a Very Special Hair Colour that my craft store doesn’t stock so his cost me $7 :/
It’s a similar kind of deal for hair as it is for clothes. Break down the shapes and start from the bottom up.
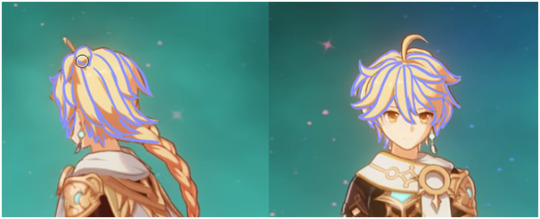
(This is not a good look for him rip)
Layers are your friend! As are sewing pins! For real, do not glue anything down until you’ve got the whole thing pinned down because once you glue you’re in for a bad time if you need to fix something.
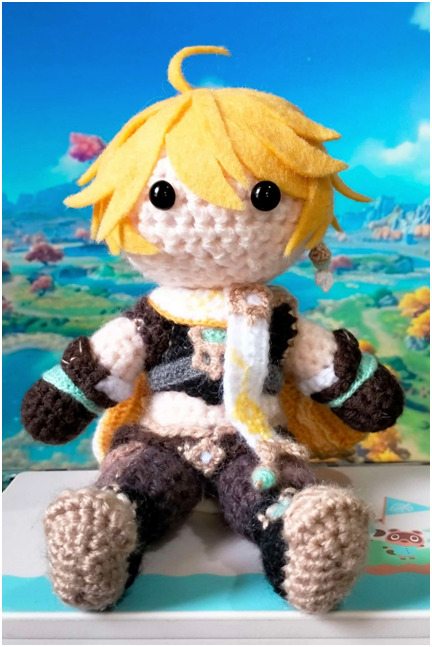

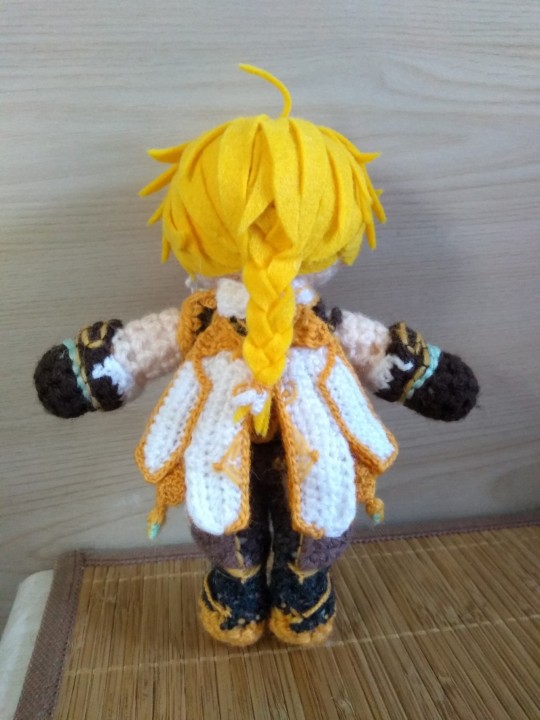
I’ve made two Aethers (one as a custom gift commission, one for myself) and they’re both a little different from each other, but this should help give you an idea of how I translated it to felt. I like to simplify if I can, purely because larger pieces tend to look a bit neater and less chaotic than a bunch of smaller ones.
For his braid, I found the easiest way to do it was to just cut three really long straight pieces, braid em, and then trim the end to the length I needed.
My absolute biggest #1 tip for hair:
If it looks bad but you haven’t finished, do not stop and restart.
It will always looks stupid as hell in the early stages. Don’t make a judgement call on whether or not it looks right until you’ve at least got the whole front part/fringe area fully pinned in place. Trust me.
I think that’s probably about all I have the energy for right at this second, but again if you have any questions or want help on anything specific, my inbox/DMs are always open – and that goes for anyone reading this! I’m always happy to help :)
3 notes
·
View notes
Text
#I READ THE BIT ABOUT PULLING THE WHOLE YARN THRU A BIG LOOP AND JUST WENT ??????? IN MY HEAD.#thank you#i have too many projects rn but...i so desperately want to knit this#can you make a video of eberything lol ill buy the pattern and tip you...jkjk#ive never done a shawl and ive never done lace and ive never done beading and i KNOW this would be the worst project to learn those things#walk before you run right#but AAAAA look at it#knitting help via @rslashknitting
Oh goodness, that would be...a loooot of video. It's definitely an advanced lace pattern, but if you're looking to make it:
Make sure you are comfortable with reading a lace knitting chart. Although to be fair, this pattern does have both charts (very clear, easy to read ones! Each individual leaf is given a different background color so you can kind of track if you're knitting in the right place) and written instructions, so if you can't read lace charts you could theoretically still do this pattern. I think being able to look at the chart and say "Oh this K2tog is supposed to be the edge of the green leaf, not the middle of the orange one, so I have missed some stitches somewhere" etc. is very, very helpful. (For anyone who wants to learn to knit from a chart, Knitty has some good tutorials.)
Beading is optional - I was planning to do beads on this but then, doing the gauge swatch yarn calculations I wasn't sure if I even had enough yarn for as large a shawl as I want (I have since ordered more. Here's hoping it's the same dye lot when it gets here.) so I finally decided not to try to calculate beads when the number of beads I'd need is a bit unclear and I just started knitting it without them. It takes a LOT of beads though, 5 for each leaf, and you can see from the pictures it's a LOT of leaves.
I would definitely recommend a smaller, less complex lace project before tackling this shawl, just to get the hang of how lace is built. Hm, let's see what I can recommend from patterns I have used before...
I think these socks were my first attempt at lace - pretty simple, just decreases and YOs.
Old Shale/Feather and Fan is always a great first lace pattern!
All the way back to my old LJ for a pattern I wrote up for a zigzag-lace kerchief...or this one with just some simple lace eyelets.
A baby hat (or doll hat :-D) with a lacy brim
A beret with a little lace motif (and this one, unlike the others above, does have a lace chart if you need practice with charted patterns!)
Spring Forward is a slightly more detailed than the above projects sock pattern.
Embossed leaves is not a free pattern - but it might be helpful to try patterns for leaf lace? I've found that familiarity with how lace stitches can make a leaf shape, in general, has been useful to me in figuring out the Mallorn stitch patterns.
Another leaf lace pattern on Duet, which can be worn as a hat or cowl!
Or for something simpler than a lacy sock or hat, this Leaf Lace Washcloth is not a pattern I've tried but it is a good basic leaf lace stitch pattern given both in written instructions and in a chart.
As for beading, I'm not finding many simpler beaded projects in my past knits to recommend - I guess by the time I started adding beads I was already comfortable with pretty complex lace and cables and whatnot. However, if you want to add beads, I recommend using 6/0 seed beads and a size .8mm crochet hook, which is what I used on the Kinross Avenue Wrap.
Oooh, also - the Raupen Wrap pattern has several video tutorials with it that includes one for knitting with beads! (It also features some more advanced lace, with gathered stitches and a butterfly stitch...) The tutorial playlist is here. And actually, the designer's Youtube channel has a ton of technique videos so you might find other things there to help with lace and/or beading!
I hope that's all helpful! I suspect the Mallorn Shawl would be pretty frustrating for a new lace knitter - but even so, it's all essentially just made up of yarn-overs and decreases (and weird "bind off in the middle of the row" techniques as per my video, of course...). It takes a lot of concentration to get it all set up but once you get through the first round or two of leaves, the pattern feels less random and it's very satisfying!
Since yesterday's knit and tea photos I have knit...ah...1 whole row (I'm blaming it on Helm's Deep. Those epic battles take forever and Cerphedis finished them yesterday, sooooo :-D). So in lieu of what would basically be identical photos to yesterday's, have a video of the special stitch that threw me off in the gauge swatch due to my failure to read the instructions thoroughly! In this pattern, the tip of each leaf is actually bound off so that the leaf floats there, surrounded by YO's, without a stitch from its tip feeding into the next leaf at all. This is done by slipping two stitches from the right side of the leaf, knitting together the next two from the left edge of the leaf, slipping the right-edge stitches over that stitch and off the needle, (thus decreasing 4 stitches to 1), and then enlarging the remaining loop to pull the whole yarn ball through it in order to bind it off. Then you just go on and knit the next stitch as if this leaf's stitches were never there. :-D For those who've been following my Mallorn Shawl progress and thinking of knitting one - hopefully this demo video will help you avoid my gauge swatch mistakes!
(Oh, and today's tea was sadly out of view in this video closeup, but it was my all time favorite Adagio tea: Blackberry Sage Oolong!)
51 notes
·
View notes
Text
So apparently he didn't use a pattern at all!! :O But I will try to make something concise enough to follow here
• Helpful links
Here's some stuff that might help this process go a little smoother if you learn how to do it beforehand!
How to sew a back stitch
How to crochet hair on dolls
Ironing down a seam (Pressing flat is recommended)
Anchoring your thread knots
• Body
Sewing a running stitch
How to sew the head and body together
So for the body you'll need to make this little shape:

It's about 5 inches long and 3½ inches wide (with seam allowance). You'll need about a square foot of two (or more) kinds of fabric of your choice for the body, and you'll want to flip the piece to trace the mirrored pieces. Basically you need two pieces facing this way and two mirrored pieces to sew together. Take two pieces at a time and sew them down the middle (think of them like double doors) and then do the same with the other two pieces. Iron down the seam (safely and with supervision if you need it!) so that it doesn't pucker. Then sew all around the body, leaving a hole at the top to stuff it. Cotton fabric is recommended because apparently when my partner went to iron the seam down, some of the polyester fabric got stuck to the iron lmao
• Head
For the head you can use a three-sided or four-sided sphere (partner used a three so I've included it here. Sorry it's so huge lol).

Make three of these out of a different fabric (I'd say maybe no more than 3 or so inches with seam allowance for each piece). If your fabric is thin, you can make 6 pieces to double it up. Sew it up along all the edges except for the points at one end so you can stuff the head. Once you've stuffed the head, if the body is weighted, you can sew it up.
• Ruffles
The ruffles are just inch-wide ribbon oddly enough! All you have to do is make a running stitch along 3 pieces of ribbon about 6 to 7 inches long, and then pull gently to cinch the ribbon. You can use a back stitch to secure the ends. Don't sew them onto the body just yet, though!
• Pompoms
For the nose and hands you can use these!

You literally only need three but they don't ever come in 3 packs or similar lmao. You can also just use two for the hands and draw the face on, it's up to you :3
To attach them to the body after it's sewn up, stick your needle with thread through the center of the pompom and secure it to the arm at the end. After the pompoms are on, you can attach two of the three ribbons to the arms.
• Details
Before you stuff the body, if you want to put buttons and bells on, now might be a good time to do so, or you can leave them off entirely. These parts are totally up to you, which is why I kinda left this for last. You can crochet a wig cap to put on top of the head after it's secured to the body, then make yarn hair, or you can leave your little clown bald lol
I've heard some people just use a feather or two and then put a little party hat on top, that is also an option!
If you want to make horns, they're a quarter circle you just sew together and then stuff. (It's a literal quadrant lmao)
Annnnd I think that's it!! I hope this made sense!! If you need any help, send me an ask or a message and I can try to troubleshoot once I'm not too busy, but I hope this works for y'all :3
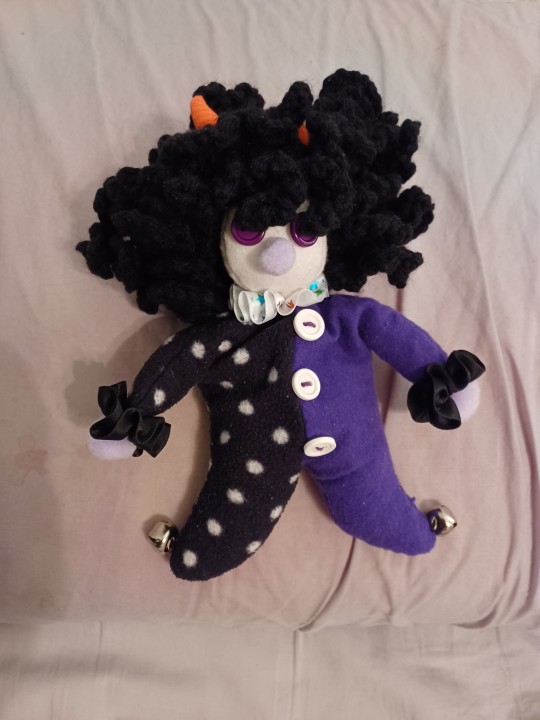
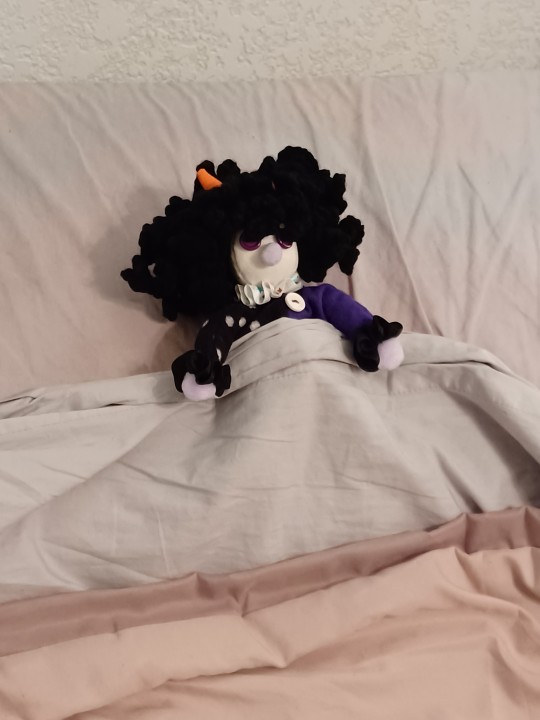
Look at this little baby my partner made for me by hand. He was a birthday gift and his name is Little Gamzee. He is a 1.1 pounds and he is filled with aquarium gravel. I'm losing my mind.
58 notes
·
View notes