#wet look stone sealer
Explore tagged Tumblr posts
Visit Tumblr Blog
Explore Tumblr blogs with no restrictions, modern design and the best experience.
Last Seen Tumblr Blogs


Fun Fact
130K people were victims of a chain letter scam that affected Tumblr in May 2011.
Video
youtube
Seaford, NY 11783 - #stonecreationsoflongisland #paversealing #longisland
#youtube#stone creations of long island#paver sealing#long island#power washing#semi gloss paver sealer#wet look paver sealer#masonry#patios#driveways#pools
2 notes
·
View notes
Text
Long Island Paver Sealing
Cleaning and sealing concrete or brick pavers sounds like a pretty easy thing to do. The truth is that it is an involved process and without the proper training, tools and materials it is very easy to screw up. Sealing pavers and stone is not a do it yourself project. It is extremely time consuming and detail orientated. Having the right equipment and knowing what to look for is extremely important. Sometimes a soft touch is needed and other times you must break out the heavy equipment.
CLEANING AND SEALING IS NOT A ONE DAY JOB
Sealing your concrete or brick pavers is a wise investment and when installed right can give you years of enjoyment and protection. Concrete and brick pavers have become very popular for outdoor hardscapes, driveways, patios, sidewalks and outdoor kitchens. Pavers are simply small pre-cast blocks of colored concrete that are assembled in various patterns. Although pavers are very hard and durable, they are also extremely porous. This makes them very vulnerable to oil stains, spills and moisture related problems such as efflorescence. The sand between and below the pavers is also a weak point. It can easily wash away with heavy rain and will also quickly start to grow weeds soon after construction. Both can cause serious structural problems for your pavers. Sealing your pavers can address all these issues, as well as enhance and restore the colors to your pavers. We at Stone Creations of Long Island have sealers that leave a completely natural appearance, and paver sealers that beautifully enhance the colors and leave a rich wet look. Sealing not only protects the paver itself, but also the sand between the pavers. As the sealer soaks deep into the sand joint, it hardens and locks the sand into a solid mass that cannot wash away or grow weeds...Call for a free consultation: http://www.stonecreationsoflongisland.net Paul Saladino Deer Park, N.Y 11729 Office-(631) 678-6896 Mobile-(631) 678-2710
#stone creations of long island#pavers&masonry#pavers#stonecreationsoflongisland#patios#cambridgepavers#swimming pool#landscapedesign#landscape lighting#outdoor lighting#suffolk county pavers#pools#www.stonecreationsoflongisland.net#outdoor kitchen#landscape design#backyard retreat#Paver Sealing#wet look pavers#semi gloss pavers#natural look pavers#stone creations LI#paul saladino
2 notes
·
View notes
Text
The Ultimate Guide to Choosing the Right Grout for Tile Floors
Author, Written by: Bledy (Installation Expert and Technical Writer)
Grout might seem like a small detail, but it plays a big role in the look, durability, and maintenance of your tile floors. The right grout can enhance your tiles, prevent damage, and make cleaning easier. But with so many options available, how do you choose the best one? Let’s break it down.
1. Types of Grout: Which One Is Best?
Different grout types serve different purposes. Choosing the wrong one can lead to cracking, staining, or moisture issues.
✔ Cement-Based Grout – The most common option, available in sanded and unsanded varieties. ✔ Epoxy Grout – Highly durable, stain-resistant, and waterproof—perfect for high-traffic or wet areas. ✔ Urethane Grout – Pre-mixed and easy to apply, offering flexibility and stain resistance.
👉 Best for kitchens and bathrooms: Epoxy or urethane grout (moisture-resistant and long-lasting). 👉 Best for large tile gaps: Sanded cement grout (provides strength and prevents shrinkage). 👉 Best for polished or delicate tiles: Unsanded grout (prevents scratching).
2. Grout Colour: Does It Matter? 🎨
Yes! The colour of your grout impacts the overall look of your floors.
✔ Matching grout (same colour as the tile) creates a seamless, blended appearance. ✔ Contrasting grout (lighter or darker than the tile) highlights patterns like subway or herringbone tiles. ✔ Neutral grout (grey, beige, or white) is a safe, timeless choice for most designs.
🚫 Avoid white grout in high-traffic areas unless you’re ready for regular cleaning!
3. Grout Width: What’s the Right Size? 📏
The width of your grout lines affects both aesthetics and maintenance.
✔ 1/16" to 1/8" (Thin Joints) – Best for small tiles, modern designs, and polished surfaces. ✔ 1/8" to 3/16" (Standard Joints) – Works well for most tile floors, offering a balance of style and durability. ✔ 3/16" and Up (Wide Joints) – Ideal for rustic, handmade, or stone tiles that need extra spacing.
4. Sealing Your Grout: Is It Necessary? 🔒
If you choose cement-based grout, sealing is essential to prevent stains and moisture absorption. Epoxy and urethane grout are already waterproof and don’t need sealing.
👉 Best grout sealer: Penetrating sealers (absorbs into the grout) for long-term protection.
5. Maintenance Tips for Long-Lasting Grout 🛠
✔ Clean grout regularly with pH-neutral cleaners to prevent buildup. ✔ Avoid harsh chemicals like bleach, which can break down grout over time. ✔ Reseal cement grout every 1–2 years to maintain stain resistance.
Final Thoughts
Choosing the right grout is just as important as choosing the tile itself. Whether you want a seamless, modern look or a bold contrast, the right type, colour, and width of grout can transform your flooring design.
Still unsure about the best grout for your tiles? Drop a comment or reach out, we’d be happy to help!
About Author:
Bledy is a flooring installation expert with over 15 years of experience. He writes easy-to-follow guides and tips to help homeowners and professionals with flooring projects.
0 notes
Text
Step-by-Step Tile Installation Process in NJ: What You Need to Know
Thinking about installing new tiles in your New Jersey home? Whether it’s your kitchen, bathroom, or living room, a well-executed tile installation can completely transform your space. But where do you start? Don’t worry—I’ve got you covered! This guide will walk you through the entire tile installation process, step by step, to ensure a flawless finish. Let's dive in!

Why Tile Installation Matters in NJ
Tiles are a top choice for NJ homeowners, and for good reason. They’re stylish, durable, and incredibly easy to maintain. Whether you’re dealing with hot summers or chilly winters, tiles provide a sturdy and moisture-resistant flooring option. Plus, they can boost your home's value, making them a smart investment. But to get the best results, you need to follow the right installation process.
Step-by-Step Tile Installation Process
Step 1: Gather Your Materials
Before starting, make sure you have all the necessary tools and materials:
Tiles (ceramic, porcelain, or natural stone)
Tile adhesive (thin-set mortar)
Tile spacers
Notched trowel
Level
Grout and grout float
Tile cutter or wet saw
Measuring tape and chalk line
Sponge and bucket of water
Step 2: Prepare the Surface
A solid foundation is key! Here’s how to prep your surface:
Ensure the surface is clean, dry, and free from debris.
If installing on concrete, check for cracks and repair them.
For wooden subfloors, use a cement backer board to create a stable base.
Make sure the floor is level; if not, apply a self-leveling compound.
Step 3: Plan Your Layout
A well-planned layout can make or break your project.
Dry-lay tiles in your desired pattern before applying adhesive.
Use a chalk line to mark guidelines to keep tiles straight.
Start from the center and work outward for a balanced look.
Step 4: Apply Tile Adhesive
Now it’s time to get sticking!
Mix the adhesive according to manufacturer instructions.
Use a notched trowel to spread a thin layer evenly.
Work in small sections to prevent the adhesive from drying out.
Step 5: Lay the Tiles
Here’s where the magic happens.
Press each tile firmly into place, twisting slightly for a secure bond.
Use spacers to maintain even gaps between tiles.
Check alignment regularly with a level.
Step 6: Cut Tiles to Fit
You’ll need to trim some tiles for edges and corners.
Use a tile cutter for straight cuts.
A wet saw is best for tougher materials like porcelain or stone.
Smooth rough edges with sandpaper or a rubbing stone.
Step 7: Let It Set
Patience is key! Allow 24 hours for the adhesive to dry completely before proceeding to grouting.
Step 8: Apply Grout
Remove tile spacers.
Spread grout using a grout float, pressing it into the joints.
Wipe off excess grout with a damp sponge.
Let it cure for at least 24 hours.
Step 9: Seal the Grout (Optional but Recommended)
Use a grout sealer to protect against stains and moisture.
Reapply sealant periodically to maintain durability.
Common Mistakes to Avoid
Many DIYers run into issues during installation. Here are some pitfalls to watch out for:
Skipping surface prep: Tiles won’t adhere well to dirty or uneven surfaces.
Using the wrong adhesive: Different tiles require different adhesives. Do your research!
Not using spacers: This leads to uneven grout lines and a messy finish.
Grouting too soon: Allow adhesive to fully dry before grouting.
Cost Considerations for Tile Installation in NJ
Tile installation costs vary based on several factors:
Material costs: Ceramic is more affordable, while natural stone can be pricey.
Labor costs: Professional installation typically ranges from $5 to $15 per square foot.
DIY savings: Doing it yourself can save money, but mistakes can be costly!
Additional expenses: Don’t forget tools, sealants, and possible repairs.
Finding the Right Tile Installation Contractor in NJ
If you prefer hiring a professional, here’s how to find the best one:
Check reviews: Look for highly-rated contractors on Google and Yelp.
Verify credentials: Ensure they are licensed and insured.
Ask for a portfolio: Experienced professionals should have photos of past work.
Get multiple quotes: Compare pricing to get the best deal.
Conclusion
tiles installation NJ can be a game-changer for your home, but it requires careful planning and execution. Whether you go the DIY route or hire a pro, following this step-by-step guide will help you achieve stunning results. Ready to start your tile project in NJ? Grab those tiles and get to work!
Precise Tile & Stone
11 E Main St, Little Falls Township, NJ 07424, United States
+19739852626
Get Direction From Google Map
1 note
·
View note
Text
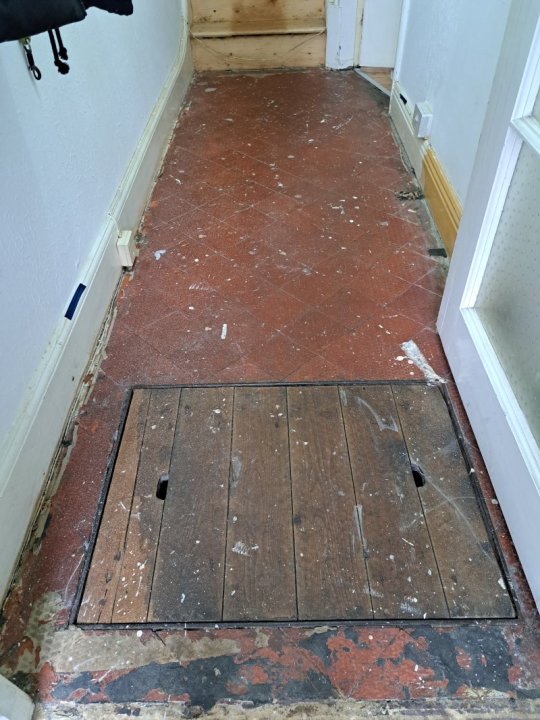
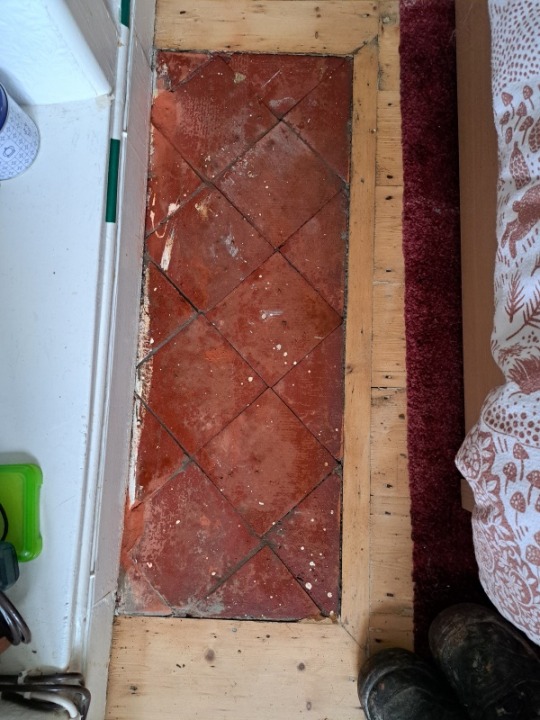
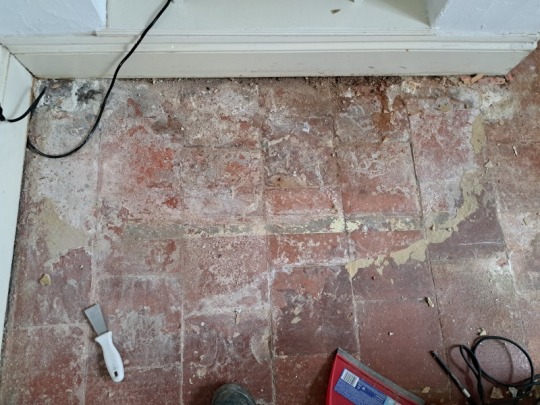
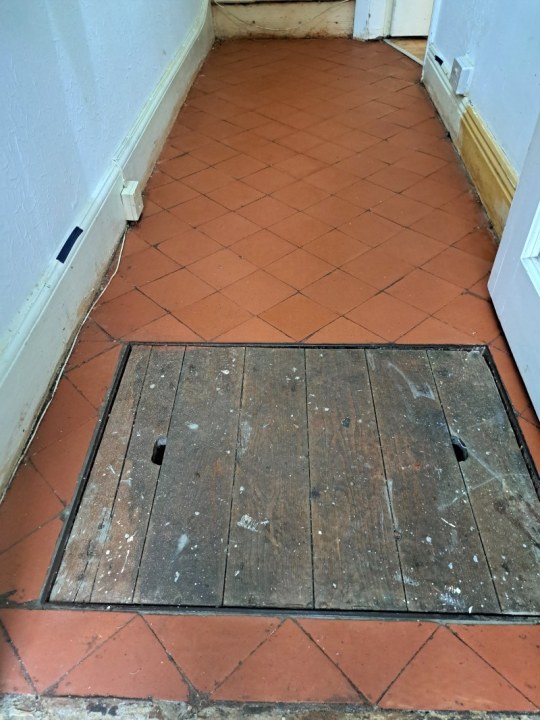
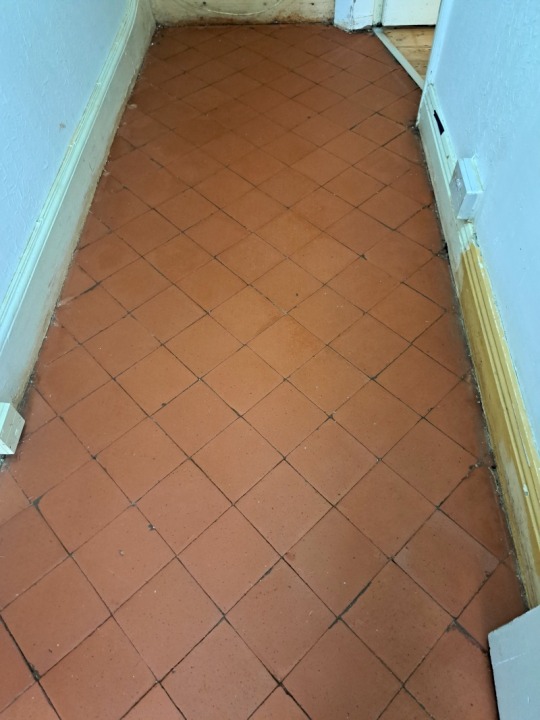
How To Renovate Neglected 200-Year-Old Quarry Tiled Flooring
Here we have a Quarry tiled floor at a property in Tiverton which Is a small village in the West Cheshire countryside with many chocolate box cottages and listed buildings. The property which was built in the 1800’s had been inherited by a young couple who had decided to renovate it and this included the old flooring.
To get a better idea of what was needed I paid them a visit to survey the floor. The Quarry tiles were very old and I suspect originally to the property, they had been badly neglected and had clearly seen a lot of wear resulting in a loss of colour. Unfortunately, it was never going to look like new again however I advised on what could be done to clean them up and put some character back into the floor.
Later that day I sent over a full quote for doing the restoration work which included an itemised list of the products needed. I heard nothing back for five months then got a phone call asking if I could help them as they had been unsuccessful completing the floor themselves. Happy to help a date was arranged to start the restoration of the tiles which had seen more activity since my last visit and now had every kind of builder’s rubbish on them.

Cleaning a 200-Year-Old Quarry Tiled Floor
The first job was to give the floor a good brush and scrape to remove as much of the plaster dust and other contaminates as possible. To do this a strong cleaning solution of Tile Doctor Pro-Clean which is a strong alkaline cleaner stripper combined with Tile Doctor Nanotech HBU. This is a heavy build up remover with nano sized particles to help dissolve and lift the stains out.
The solution was left to dwell and soak into the floor for thirty minutes which gives the products time to breakdown the dirt. Then a small section of flooring was scrubbed with a black pad fitted to a weighted buffing machine. Unfortunately, this had very little effect and clearly something more abrasive was needed to cut through the mess.
To up the ante we decided to fit the buffing machine with a 60-grit carborundum brush and run this over the floor with more water to improve lubrication. This combination did the trick and soon made light work of removing the building plaster, paint and cement from the floor. This process generated a lot of soiling which was rinsed off the floor with more water and a wet vacuum.
Next the floor was given an acid rinse using a mild dilution of Tile Doctor Grout Clean-Up, this further cleans up the tile and neutralises the pH level of the floor after the alkaline cleaning products used earlier.
Sealing a 200-Year-Old Quarry Tiled Floor
The floor was then left to dry out for two days before returning to seal with two coats of Tile Doctor X-Tra Seal to leave a wet look to the stone. This product is oil-based which soaks into the clay tile occupying its pores, this adds structure to the tile whilst preventing dirt from becoming ingrained there. X-Tra Seal is also fully breathable which is an important characteristic when select a sealer for older floors that won’t have the benefit of a damp proof membrane.

The work took three days to complete and by then end of the job the character had been restored to the floor. Naturally the tiles were never going to look perfect again but I think they suited the period cottage quite well.
Source: Quarry Tile Cleaning and Renovation Services in Tiverton Cheshire
#Quarry Tile Cleaning#Old Quarry Tiles#Period Floor#Tile Restoration#Plaster Removal#Paint Removal#Sealing Quarry Tiles#Tiverton#Cheshire#Pro-Clean#Black Pad#Nanotech HBU#Grout Clean Up#X-Tra Seal
0 notes
Text
Top Benefits of Using a Concrete Sealer Around Your Pool
When it involves preserving the beauty and sturdiness of your pool location, choosing the proper pool coating is critical. At West Asia Network, we advise polyurea coatings as the advanced preference for a sealer around your pool. This blog explores the top blessings of the usage of concrete coatings around your pool, with a special focus on why polyurea coatings are the first-class alternative available.
Unmatched Durability
One of the most substantial advantages of using an Ashford concrete sealer around your pool is the introduced sturdiness it presents. Concrete, even as strong, is porous and at risk of harm from water, chemical substances, and the freeze-thaw cycle. Applying a concrete sealer around your pool can assist guard the surface from those factors, extending its lifespan substantially. Polyurea coatings, known for their sturdy nature, provide exceptional resistance to chipping, abrasion, and chemical compounds, making them a perfect concrete sealer around your pool.
Superior Water Resistance
Water resistance is important in any pool surroundings. A concrete sealer around your pool prevents water absorption, which could lead to algae growth, staining, and in addition structural harm. Polyurea coatings create a seamless barrier that locks out moisture, making sure your pool deck remains smooth and intact. With the non-porous nature of polyurea as a cure seal hardener around your pool approach, you’ll spend much less time coping with upkeep issues associated with water damage.
Enhanced Safety Features
Safety across the pool area is non-negotiable. Slippery surfaces are not an unusual danger, however, the use of a sealer around your pool, particularly one as gifted as polyurea, can provide slip-resistant textures. This is essential for keeping youngsters and adults safe from slips and falls. Polyurea coatings can be customized with textures that provide grip even when wet, ensuring a safer pool environment.
Protection Against UV Rays
Another sizeable gain of using this cure seal densifier around your pool is protection from UV rays. Unsealed concrete can fade and degrade beneath consistent publicity to daylight. However, a polyurea-based concrete coating around your pool offers UV stability, which no longer most effectively preserves the look of your concrete but additionally prevents it from getting too hot. This manner more consolation to your naked toes at some stage on sunny days around the pool.
Aesthetic Versatility
A concrete sealer around your pool does not have to compromise the classy attraction of your space. Polyurea coatings are available in various colorations and finishes, permitting you to customize the appearance to suit your property’s outdoor decor. Whether you select a herbal stone end or a bold, colorful pattern, the usage of a concrete sealer around your pool can beautify your own home’s overall appearance.
Long-Term Cost Efficiency
Investing in an exquisite Ashford concrete sealer around your pool, like polyurea, can save you cash in the end. By defending your pool deck from premature put-on and damage, you reduce the want for expensive concrete repair and replacements. Additionally, the low maintenance necessities of polyurea coatings imply you could enjoy a pristine pool vicinity without ongoing fees.
Conclusion
At West Asia Network, we recognize the importance of the usage of a reliable Ashford concrete sealer around your pool. Polyurea coatings offer unheard-of benefits, from enhancing sturdiness and safety to ensuring your pool region remains aesthetically desirable. By deciding on polyurea as your sealer around your pool, you are choosing a solution with the intention to stand the test of time, defend your funding, and hold your pool vicinity safe and lovely for future years.
If you’re thinking about a concrete sealer around your pool, contact us today to learn more about our polyurea solutions and the way they are able to meet your precise desires. At West Asia Network, we’re right here that help you make the quality preference for your pool and your peace of mind.
0 notes
Text
Tile Maintenance Tips to Keep Your Floors Looking New"
Daily Maintenance
Sweep or vacuum daily to remove dirt and debris that can cause scratches.
Use a microfiber mop for quick dry cleaning to maintain shine.
Weekly Cleaning
Mop with a pH-neutral cleaner to avoid damaging tiles and grout.
Use fresh water regularly to prevent dirty water from settling in grout lines.
Protect High-Traffic Areas
Place mats or rugs in busy spaces like hallways and kitchens to reduce wear.
Add felt pads under furniture legs to prevent scratches.
Seal and Waterproof Periodically
Seal grout and porous tiles every 1-3 years to protect against stains and moisture.
In wet areas, ensure proper waterproofing before tile installation.
Care for Natural Stone Tiles
Use only pH-neutral cleaners designed for natural stone to avoid damage.
Reseal stone surfaces regularly to preserve their appearance and durability.
Grout Maintenance
Clean grout lines with a mix of baking soda and water or a mild grout cleaner.
Apply a silicone-based grout sealer to protect against discoloration and moisture.
Address Damage Quickly
Repair or replace chipped tiles and damaged grout promptly to prevent further issues.
Professional Assistance
Consider professional sealing and waterproofing for long-term protection, especially in wet areas.
For expert tiling services and waterproofing solutions, visit Streamline Tiling & Waterproofing Pty Ltd and let us help you keep your floors looking stunning for years to come!

0 notes
Text
If you're seeking the ideal solution to prevent your stone from becoming dull or discolored, you've come to the right place. To keep your marble and granite tiles looking like new, choose Stone Protect Gloss Finish. It provides a beautiful gloss that protects against watermarks, scuffs, and scratches while highlighting the natural color variations in quartzite, travertine, limestone, and granite.
0 notes
Text
Restore Your Floors with Professional Tile Repair Company: Polishing, Sealing, and More
Expert tile repair company can provide the cleanest and nicest floors, surfaces, and bathrooms, improving and enhancing people's quality of life. Natural stone and tiles gradually lose their lustre and beauty from frequent usage, but skilled professionals may employ polishing and resurfacing procedures to bring them back to life. Comparably, the silicone that surrounds the shower wears out with time, which might detract from its appearance. Professional silicone replacement helps to make things like new again, improving the interior appearance of the home.

Because dirt, stains, and moisture may cause discolouration and damage to tiles and grout, and tile polishing and tile sealing are services that helps one preserve the durability and beauty of tiles. By forming a protective barrier, sealing tiles avoids these problems and facilitates cleaning. Whether the tile is made of ceramic, porcelain, or natural stone, expert tile sealing services guarantee that the proper sealer is applied. To stop mould and filth from leaking into the tiles, stripping the tiles entails removing the existing seal and installing a new one.
Anti-Slip Treatment: This crucial treatment improves the safety of tiled surfaces, particularly in wet areas like kitchens, bathrooms, and foyers. With this treatment, the tiles are treated with a specially designed liquid that improves traction and lowers the possibility of slips and falls. Property owners and commercial establishments may preserve the visual attractiveness of their flooring while fostering a safer atmosphere by choosing anti-slip treatment.
Efflorescence removal is required since the deposit of salt on different types of surfaces like bricks, concrete, etc make the house look untidy. Due to excessive efflorescence the house may have leaks and hence the structural integrity of the house might be harmed.
In order to maintain tile and stone floors and surfaces in good condition, one must use the different professional services offered by tile polishing and cleaning professionals. Get a price quotation for tile services by getting in touch with the top businesses providing these services.
Source
0 notes
Text
How to Clean Kota Stone Flooring

Kota stone flooring is a popular choice for homeowners and commercial spaces alike, thanks to its durability, affordability, and natural aesthetic appeal. Originating from the Kota district in Rajasthan, India, this limestone is known for its rich color variations, ranging from subtle greens to elegant browns and grays. Kota stone's unique texture and strength make it an ideal material for both indoor and outdoor use. However, like any natural stone, it requires proper care and maintenance to retain its beauty and longevity. In this blog, we’ll guide you through the best practices for cleaning and maintaining your Kota stone flooring.
Understanding Kota Stone Flooring
Before diving into the cleaning process, it's essential to understand the nature of Kota stone. Being a natural stone, it has pores and can absorb liquids, which might lead to staining if not cleaned properly. Moreover, improper cleaning techniques can damage the stone's surface or dull its finish. Therefore, using the right methods and products is crucial to keep your Kota stone flooring looking its best.
Daily Cleaning Routine for Kota Stone Flooring
Maintaining the appearance of your Kota stone flooring requires a simple yet effective daily cleaning routine:
Sweeping: Begin by sweeping the floor with a soft-bristle broom or a microfiber dust mop. This will help remove dust, dirt, and debris that can scratch the surface over time.
Mopping: Use a damp mop to clean the floor. It's important to avoid soaking the floor with water, as excess moisture can seep into the stone’s pores, potentially leading to discoloration. A mild, pH-neutral cleaner specifically designed for natural stone is ideal. Mix the cleaner with water according to the manufacturer’s instructions and mop the floor. Ensure that the mop is only damp and not wet.
Drying: After mopping, dry the floor with a soft, clean cloth or towel. This step helps prevent water spots and streaks, keeping the stone’s surface shiny and smooth.
Dealing with Stains on Kota Stone Flooring
Despite your best efforts, stains can sometimes occur on Kota stone flooring. Here’s how to tackle different types of stains effectively:
Organic Stains: Stains from food, beverages, or other organic materials can usually be removed with a mixture of hydrogen peroxide and a few drops of ammonia. Apply the mixture to the stained area, let it sit for a few minutes, and then wipe it off with a clean cloth. Be cautious when using ammonia, as it can dull the finish if used excessively.
Oil-Based Stains: Grease, cooking oil, and other oily substances can leave stains on Kota stone. To remove these, sprinkle some baking soda on the stain to absorb the oil. After a few hours, clean the area with a soft cloth dampened with a mild dishwashing detergent mixed with warm water.
Rust Stains: Rust stains can be particularly stubborn. A commercial rust remover specifically designed for natural stone is your best bet. Follow the product instructions carefully, as using the wrong type of cleaner can damage the stone.
Periodic Deep Cleaning and Sealing
In addition to daily cleaning, your Kota stone flooring will benefit from periodic deep cleaning and sealing. This helps maintain its appearance and provides an added layer of protection against stains and wear.
Deep Cleaning: Every few months, consider deep cleaning your Kota stone flooring. You can do this by using a stone-safe cleaner and a soft brush to scrub the surface gently. Avoid using harsh chemicals or abrasive brushes, as they can damage the stone.
Sealing: Sealing Kota stone flooring is crucial, as it reduces the stone’s porosity and makes it more resistant to stains. Depending on the type of sealer used, this process should be done every 1 to 2 years. Apply the sealer evenly over the clean, dry floor and allow it to absorb before wiping off any excess.
Kota Stone Design and Maintenance Tips
Maintaining the elegance of your Kota stone design is about more than just cleaning. Here are some additional tips to keep your flooring looking its best:
Avoid Acidic Cleaners: Never use acidic or vinegar-based cleaners on Kota stone flooring. These can etch the surface and lead to dull spots.
Use Rugs and Mats: Place rugs or mats at entryways to prevent dirt and debris from being tracked onto the flooring. This also reduces wear in high-traffic areas.
Regular Inspection: Periodically inspect your Kota stone flooring for any signs of damage or wear. Addressing issues early can prevent more extensive repairs later on.
Conclusion
Kota stone flooring is a timeless choice that combines beauty with durability. By following these cleaning and maintenance tips, you can ensure that your Kota stone flooring remains in excellent condition for years to come. Whether you’re dealing with everyday dirt or stubborn stains, the key is to use the right products and techniques to protect and preserve your investment.
For more effective cleaning, maintenance, and a variety of designs, always consider professional advice when in doubt, and enjoy the natural beauty of your Kota stone flooring.
0 notes
Text
Transform Your Kitchen: A Guide to Backsplash Installation
A kitchen backsplash is more than just a protective barrier for your walls. It’s a design element that can transform your kitchen, adding color, texture, and personality. Whether you’re remodeling your entire kitchen or just looking to update its look, installing a new backsplash is a project that can make a significant impact without breaking the bank. Here's a comprehensive guide to kitchen backsplash installation.

Choosing Your Backsplash Material
The first step in your backsplash project is selecting the right material. There are numerous options available, each with its own set of benefits:
Ceramic and Porcelain Tiles: These are popular choices due to their affordability, ease of cleaning, and wide range of styles and colors.
Glass Tiles: These provide a modern, sleek look and are available in various colors and finishes. They can make a small kitchen feel larger and brighter.
Natural Stone: Materials like marble, granite, and travertine add a luxurious touch to your kitchen. However, they require more maintenance and can be more expensive.
Metal Tiles: Stainless steel, copper, and aluminum backsplashes are durable and add an industrial vibe to your kitchen.
Peel-and-Stick Tiles: These are a great option for DIY enthusiasts or renters. They’re easy to install and remove, though they may not be as durable as other materials.
Preparing Your Workspace
Before you start the installation process, you need to prepare your workspace. Clear the countertops, remove any outlet covers, and make sure the wall surface is clean, dry, and smooth. If the wall has any imperfections, sand them down or fill them in to ensure the tiles adhere properly.
Measuring and Planning
Accurate measurements are crucial for a successful backsplash installation. Measure the area you plan to cover, accounting for any outlets or windows. Plan your tile layout by dry-fitting the tiles on the countertop to see how they will look on the wall. This will help you determine the best starting point and avoid small slivers of tiles at the edges.
Cutting the Tiles
Cutting tiles to fit around outlets, windows, or edges is often the most challenging part of the installation process. Use a tile cutter or wet saw for clean, precise cuts. Measure and mark the tiles carefully before cutting to ensure they fit perfectly into your layout.
Applying Adhesive
For most tile installations, a thin-set mortar is the adhesive of choice. Apply the mortar to the wall using a notched trowel, working in small sections to prevent it from drying out before you can place the tiles. Press each tile firmly into the mortar, using spacers to maintain consistent gaps between them.
Installing the Tiles
Start installing the tiles from the bottom center of the wall and work your way outwards. This ensures that any cut tiles are at the edges, where they are less noticeable. Check your work frequently with a level to ensure the tiles are straight and even.
Grouting and Finishing
Once the tiles are set and the adhesive has dried (usually 24 hours), it’s time to apply the grout. Mix the grout according to the manufacturer’s instructions and apply it with a grout float, pressing it into the spaces between the tiles. Wipe away excess grout with a damp sponge, being careful not to remove too much from the joints. After the grout has cured, apply a grout sealer to protect it from stains and moisture.
Final Touches
Replace the outlet covers, caulk the edges where the backsplash meets the countertop and cabinets, and clean the tiles thoroughly. Step back and admire your handiwork—your Kitchen Backsplash Installation Service now has a fresh, new look!
0 notes
Text
Birmingham Expert Details the Restoration of Neglected Quarry Tiled Floors in Bournville
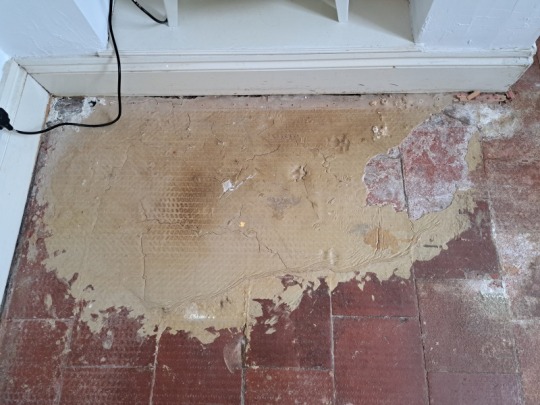
A customer had recently moved into a property in Bournville and discovered an original Quarry tiled floor in the living room, hallway and a couple of quirky tiled areas upstairs. After searching on the internet for some inspiration, they came across my previous work and got in touch. Period floors like these are very popular and so they were keen to have the Quarry tiles restored.
I went over the property to survey the floor and made notes of all the floors and problems including the removal of self-levelling screed in the living room. This is often used to level tiled floors prior to the installation of another covering such as Vinyl or Carpet. It can be difficult to remove but it can be done. Another issue that would need to be dealt with was carpet glue and paint stains which I found in the hallway.
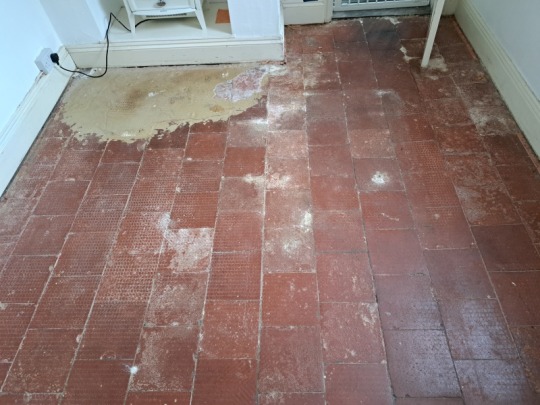
I worked out a detailed plan for the restoration work and was able to use this to create a quote for the work. Keen to have the floors restored my quote was accepted and a date set for the work to start.
Cleaning a Quarry Tiled Living Room Floor
The first day was spent removing an area of levelling screed from the living room along with a couple of repairs to the tiles. This literally has to be scrapped off the tiles by hand to remove the bulk of the screed. The whole floor was then cleaned with a strong dilution of Tile Doctor Remove & Go scrubbed in with a 120-grit carbide pad fitted to a weighted buffer machine. The resultant slurry was then extracted with a wet and dry vacuum.
The next step was to give the floor an acid rinse using Tile Doctor Grout Clean-up which is ideal for breaking down cement residues. It was let to soak into the floor for ten minutes before being scrubbed. For this the coarse 120-grit pad was switched for a finer 240-grit carbide pad. The floor was rinsed with water and extracted again to remove the slurry.
After inspecting the floor, I was pleased to see that marks imprinted onto the tiles by the previous floor covering had been removed and the tiles were looking so much cleaner. Happy with my work the tiles were left to dry off overnight with the aid of a couple of air movers.
The next day I tackled the Quarry tiled hallway which was stained with carpet glue. The started with a steamer to loosen up year’s old adhesive and bitumen along with a scraper to remove dried paint. The hallway tiles along with a couple of tiled hearths upstairs were then cleaned using the same process as the living room.
After an hour or so of drying the tiles, I applied a coat of Tile Doctor Stone Oil to all the floors and left them to dry for twenty minutes before towelling off the excess. The tiles were then left to dry off completely overnight. Stone oil is the first step in the sealing process and adds colour, texture, and generally improves the condition of the Quarry tiles after years of neglect.
Sealing a Quarry Tiled Living Room Floor
On the last day I applied a coat of Tile Doctor X-Tra Seal to all the tiles to seal them. This sealer is an impregnator that soaks into the Quarry tile, occupying its pores and thereby preventing dirt from residing there. The tiles were
This sealer will ensure that dirt remains on the surface where is can be easily cleaned away. Another benefit of the sealer is it further improves the colour of the tiles and being fully breathable it will allow moisture still in the floor to rise through and evaporate at the surface.
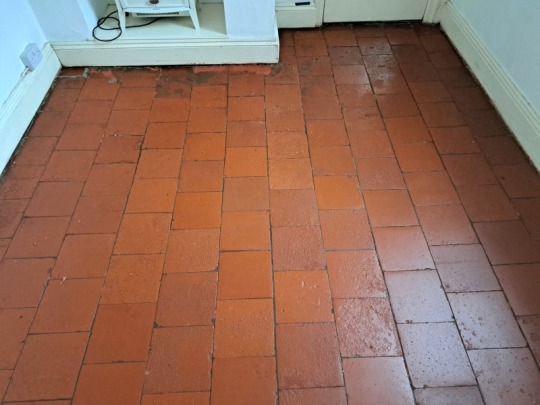
Once complete all the tiled floors looked so much cleaner and colourful, additionally the new sealer gave all the Quarry tiles a consistent appearance throughout the property.
My customer was very happy with the results and before leaving I took time to discuss aftercare cleaning and left them with a complimentary bottle of Tile Doctor pH neutral Tile Cleaner. This is a mild but effective tile cleaning product that won’t impact the sealer which can be the issue with the stronger products you find in supermarkets.
Source: Quarry Tile Floor Cleaning and Restoration Services in Bournville Birmingham
#Quarry Tile Restoration#Adhesive Removal#Paint Remove#Screed Removal#Stained Tiles#Bournville#Birmingham#Remove and Go#Grout Clean-Up#Stone Oil#X-Tra Seal#Neutral Tile Cleaner
0 notes
Text
Use of digital vitrified tiles and installation tips
The demand for the digital vitrified tiles in India has increased manifold as they are an ideal and perfect combination of quality, look, and usage. These tiles use modern digital printing methods to create designs of virtually unlimited possible combinations that imitate natural materials like marble, wood, or stone.
They are low maintenance, this means that your spaces will always be fabulous with lesser input on your side. Their unique designs which have made digital vitrified tiles the product of choice for many customers. They do not absorb stains or dirt that may easily lead to easier and quicker cleaning. This does not only save time but also guarantees that your tiles will always look new over the years.

These tiles offer an effective approach that addresses different design and functional concerns. Let us now look at the various uses of digital vitrified tiles in various places.
Kitchens: Digital vitrified tiles are the best for kitchens as they are scratch, stain, and spill resistant besides being highly durable with heavy foot traffic. The many designs ranging from the contemporary to traditional designs can help homeowners achieve their dream of a well-styled cooking area. Bathrooms: For bathrooms digital vitrified tiles provide water resistance and cleaning ease because of their use in wet areas. They are very comfortable and safe, do not retain water and odor, and are available in a variety of textures and colors to create a spa atmosphere in any bathroom. Bedrooms: Digital vitrified tiles can be installed in bedrooms where there is a desire to incorporate an element of luxury and a tile pattern or feature wall maybe created. They help in creating healthier environment as they are free from dust and other allergens. Living Rooms: Digital vitrified tiles are a plus for living rooms due to their design flexibility. These tiles can replicate the looking of materials like marble or wood and provide a luxurious feel with low maintenance. They are strong enough to last the rigors of everyday life. Offices: For offices digital vitrified tiles give a corporate look and feel. They can be easily cleaned and maintained to keep the workspace smooth and attractive to the clients. They come in many designs which can express the company’s personality. Hotels: Digital vitrified tiles are ideal for hotels due to their elegance and functionality. From the elegant lobby to the comfortable rooms, these tiles contribute to the overall atmosphere and guarantee that cleaning will not be difficult and the surfaces will be regularly refreshed.
Step-by-Step Guide to Proper Installation
Preparation: Surface Check: Make sure the surface is clean, flat, and not littered with things. Layout Planning: Use tile layout to reduce the number of cut tiles and create a visually balanced design.
Mix Adhesive: Choose a high quality tile adhesive that is appropriate for digital vitrified tiles. Make sure to follow the manufacturer’s instructions on how to mix the adhesive.
Apply Adhesive: Apply the adhesive in small areas using a notched trowel and spread it evenly. Add wrinkles in the adhesive to enhance the adhesion.
Laying Tiles: Press the tiles into the adhesive and use spacers to keep a consistent gap between the tiles. Apply pressure lightly to make sure the entire area is in contact with the adhesive.
Cutting Tiles: It is recommended to use a tile cutter or wet saw to make clean cuts and to take care that the edges are not uneven. Cut pieces should be measured to make precise cuts.
Grouting: After the adhesive has dried you need to remove spacers and to smear grout using a rubber float. Apply grout diagonally on different tiles to fill the joints and remove any excess with a damp sponge. Sealing: Once the grout has dried, then you should polish the tiles and then apply a sealer to prevent the tiles and grout from staining or taking water.
Lorenzo Vitrified is certified and we have received several industry awards for our commitment to quality. Our digital vitrified tiles have also been awarded for their quality and unique designs and this has ensured that our company maintains its position as one of the best when it comes to this kind of products. Our digital vitrified tiles are processed by the most advanced technology with the finest raw materials.
#digital vitrified tiles manufacturers#tiles#decor#digitalvitrifiedtiles#digitalvitrifiedtilesmanufacturers#digital floor tiles manufacturers#polished porcelain tiles manufacturers in india#tilesmanufacturers#home#digital floor tiles
0 notes
Text
Change the look of your space with expert Installing Tile Floors: A Complete Guide

The timeless tile flooring option is for those who want longevity, flexibility as well as visual appeal. If you're planning to renovate your house or start from scratch, installing tiles can dramatically improve the appearance and overall feel of your home. In this thorough guide, we'll go over the intricacies of flooring tile installation giving you valuable information to guarantee a smooth as well as stunning visual result.
Choosing the Right Tile:
Before beginning the process of installing tiles It is essential to choose the correct type of tile to suit your area. Take into consideration factors like the function of the space, the traffic patterns for foot, and the style you prefer. Ceramic and porcelain tiles in Tampa are popular for their strength, durability, water resistance as well as a variety of designs. Natural stones, like the marble and travertine tiles, provide the most luxurious look but need more care.
Measuring and Planning:
A precise measurement and a meticulous plan are essential to the successful installation of tile flooring. Start by determining the size of the space, taking the nooks and imperfections. Take into consideration the layout and style you wish to create to ensure a well-balanced and appealing visual outcome. The tiles should be laid dry before applying the adhesive, allowing you to see the necessary adjustments.
Subfloor Preparation:
A level and stable subfloor is crucial for the long-lasting installation of tile. Check the floor for any damage or imperfections and repair the damage. Check that the flooring is dry, clean, and free of any debris prior to moving on. If required, you can use an auto-leveling product to smooth out any irregularities, ensuring an even and solid base for the tile.
Applying Adhesive:
The selection of the correct adhesive is vital for the successful completion of your tiles flooring. The thin-set mortar can be used to install most types of tile, providing a sturdy connection and adapting to variations in the subfloor. Apply the glue evenly with the trowel with a notched edge, making sure to get complete coverage. Do the work in smaller sections to stop the adhesive from drying prior to placing the tiles.
Laying the Tiles:
After the adhesive is set It's now time to set tiles in accordance with the layout you have planned. Begin by laying them in the middle of your room and move towards the outside, keeping a constant spacing between tiles in order to make grout lines. Utilize tile spacers to guarantee the same spacing. Also, periodically examine the alignment using a straightedge. Change the spacing as needed for an exact and pleasing final result.
Cutting Tiles and Navigating Obstacles:
Installation of tiles usually involves cutting tiles in order to place them around doorways, corners, and other obstacles. Tile cutters or a wet saw are suitable for making straight cuts. Alternatively, tile nippers can be useful to cut irregular or curly shapes. Make sure to measure and mark the tiles prior to cutting them in order to avoid mistakes. In addition, make a plan of plan to limit the number of tiles cut, resulting in an appearance that is more uniform.
Grouting:
After the tiles are secured set, let the adhesive time to dry prior to moving onto the grouting phase. Pick a grout color to match your tiles and your desired style. Mix the grout as per the directions of the manufacturer. Apply the grout using a rubber float and press it into the gaps between the tiles. Please remove any remaining grout using the help of a sponge until it is fully set.
Sealing and Finishing:
Certain varieties of tiles, including natural stone, may need sealing in order to guard against the effects of the effects of moisture and staining. Let the grout cure fully before putting on the sealer as per the recommendations of the manufacturer. When you have sealed your floor with sealer, provide it with the necessary cleaning to eliminate any grout remnants that remain and give it a polished final appearance.
Spending the time and energy into an effective Tile Flooring Installation in Tampa can turn your home into an impressive and lasting design. If you follow these tips, you'll be able to not only increase the appeal of your house but also create a long-lasting and practical surface that will stand through the rigors of years. No matter if you're an expert DIY-er or are opting for an expert installation, the secret is in careful planning and meticulous attention to detail. Make your home more attractive with timeless style and elegance tiles, and create a room that exudes class and elegance.
FACEBOOK: https://www.facebook.com/wayfloorsflorida
LOCATION: https://maps.app.goo.gl/P5EsB6DeZgU8qJk4A
0 notes
Text
Stone Protect Gloss Finish is a solvent-based sealer specifically formulated for rough and riven stones. It protects surfaces while providing a wet-look finish. For more information, contact Tikko Products.
0 notes
Text
Enhancing Construction Precision: Your Go-To Supplier for Diamond Tools in Dallas

In the construction and stoneworking industries, precision is everything. Whether you're shaping granite for a luxurious countertop, coring through concrete for infrastructure, or cutting through stone for custom projects, your tools need to match the level of craftsmanship you bring to the job. That's where KLZ Diamond Tools steps in. As a trusted supplier of top-tier diamond tools in Dallas, we offer products designed to enhance efficiency, accuracy, and overall performance on the job site.
Why Diamond Tools Are Essential
Diamond tools are known for their superior hardness and durability, making them perfect for cutting, grinding, and coring through the toughest materials. Unlike standard tools, diamond-tipped or diamond-coated equipment ensures a smoother cut, reduced wear and tear, and an overall better finish. At KLZ Diamond Tools, we specialize in providing high-quality products that cater to professional needs across construction, masonry, and stonework industries.
Our Top-Selling Diamond Tools
Our selection includes an array of bridge saw blades, cutting tools, coring tools, and grinding wheels, all of which are designed to offer long-lasting performance and precision. Let’s take a closer look at our core product categories:
1. Bridge Saw Blades in Dallas
When it comes to cutting stone slabs or large-format tiles, bridge saw blades are indispensable. These blades are designed for heavy-duty applications, ensuring smooth cuts through granite, marble, and engineered stone with minimal chipping. Whether you're working in commercial or residential projects, the durability and sharpness of our bridge saw blades will significantly reduce the need for replacements, making your investment last longer.
Our selection of bridge saw blades offers excellent resistance to wear and tear, ensuring smooth operation, even in demanding environments. They are specifically engineered for precision, offering clean, accurate cuts, which is critical in stone fabrication.
2. Chemicals and Adhesives in Dallas
While blades and tools handle the cutting and shaping, no stoneworking project is complete without the proper chemicals and adhesives. At KLZ Diamond Tools, we provide premium bonding agents, sealers, and adhesives that are designed to work in tandem with our tools. Whether you’re bonding stone, marble, or granite, our high-strength adhesives ensure a flawless finish and long-lasting hold.
We also supply specialized sealers to protect stone surfaces from stains and moisture, increasing the durability and longevity of your installations. This ensures that the aesthetic and structural integrity of your stone projects remain intact for years to come.
3. Coring Tools & Accessories in Dallas
Coring tools are essential for creating precise holes in stone, concrete, and masonry. Our coring tools and accessories are crafted for superior performance, offering maximum penetration with minimal material breakage. Whether you need to create openings for plumbing, electrical installations, or structural reinforcements, our coring tools will ensure that every cut is as clean as possible.
At KLZ Diamond Tools, we offer a wide selection of coring tools designed for both wet and dry applications, giving you versatility on the job. Pair them with our durable accessories to ensure that your tools maintain their peak performance for the long term.
4. Cutting Tools & Blades in Dallas
Our range of cutting tools and blades covers various applications, from precision stone cutting to concrete sawing. We understand that different materials require different approaches, which is why we offer a comprehensive selection of blades tailored to your specific needs.
With KLZ Diamond Tools, you’ll find blades that are ideal for high-speed cutting and long-term use, ensuring consistent performance even in the toughest conditions. Our blades are engineered to reduce vibration and minimize wear, offering a smoother, faster cutting experience.
5. Shaping and Grinding Wheels in Dallas
Shaping and finishing are crucial stages in any stoneworking project. Our shaping and grinding wheels are perfect for refining edges, smoothing surfaces, and achieving the precise shape and finish your project demands. We offer wheels in various grit sizes, giving you full control over the level of smoothness or roughness required for each job.
These tools are designed for both wet and dry grinding, ensuring versatility in application. Whether you’re working with granite, marble, or other types of stone, our shaping and grinding wheels offer the high level of precision you need for professional results.
Why Choose KLZ Diamond Tools?
Choosing the right supplier is just as important as selecting the right tools. At KLZ Diamond Tools, we pride ourselves on being the go-to source for high-quality diamond tools in the Dallas area. Here's why professionals across the region trust us:
Quality You Can Rely On: Our products are crafted from the finest materials and engineered for durability, ensuring they stand up to the toughest job site conditions.
Exceptional Customer Service: We’re not just a supplier; we’re your partner in achieving success. Our knowledgeable team is available to answer any questions and help you choose the right tools for your specific needs.
Competitive Pricing: We offer premium tools at competitive prices, giving you the best value for your investment.
Local Convenience: Based in Dallas, we’re always nearby to provide the tools you need, when you need them. Our easy-to-navigate website also allows you to browse our inventory and make purchases online, ensuring a seamless shopping experience.
Conclusion
Whether you’re working on a large-scale commercial project or a residential renovation, having the right tools makes all the difference. At KLZ Diamond Tools, we’re proud to be a leading supplier of bridge saw blades, cutting tools, coring tools, chemicals, and grinding wheels in Dallas. Our products are designed to help you work smarter, not harder, by delivering consistent, reliable results on every project.
Visit our website to explore our full product range or check out our Google Business Profile for more information about our local offerings. Let us help you equip your next project with the best in diamond tools.
Visit Us: KLZ Diamond Tools
1 note
·
View note