#vertical vinyl siding
Explore tagged Tumblr posts
Visit Tumblr Blog
Explore Tumblr blogs with no restrictions, modern design and the best experience.
Last Seen Tumblr Blogs


Fun Fact
Tumblr is used by 21% of adults online aged 18-29 years.
Photo

Porch - Side Yard This is an illustration of a sizable traditional tile side porch with an addition to the roof.
#dark gray house paint#stone wainscoting#vertical vinyl siding#mixed materials#black exterior ideas#dark gray exterior#dormer windows
0 notes
Text

Vinyl Window Replacements | Energy Exteriors NW For low maintenance and longevity, Vinyl Replacement Windows are a great choice Energy Exterior NW is your GO-TO vinyl window provider! Call for a quote.
#energy exteriors nw#washington doors and windows#quality windows and doors#energy exteriors#exterior doors seattle#hardie ceiling panels#aspyre collection by james hardie#washington window and door#seattle siding contractor#wood clad vinyl windows#fiberglass sliding door#james hardie soffit panels#aluminum front doors#hardie soffit#hardie vertical siding#hardie shingles siding#aluminum clad wood windows#hardie architectural panels#hardie architectural panel#siding company seattle#french doors seattle#hardie aspyre#fiberglass sliding windows#hardie architectural collection#james hardie aspyre#hardie board porch ceiling
3 notes
·
View notes
Text
Kansas City Exterior Vinyl

Ideas for a substantial, traditional-style, split-level house with a clipped gable roof.
#white trim exterior#vinyl siding#certainteed ironmax vertical siding#vertical siding#marvin fiberglass windows#front porch
0 notes
Text

Trust Energy Exteriors NW with all your Window, Door, and Siding Replacement projects. Pick up the phone and call today!
#quality windows and doors#hardie shingles siding#hardie soffit#hardie architectural panels#aluminum clad wood windows#energy exteriors nw#washington window and door#hardie vertical siding#vinyl window company near me#window and door replacement
0 notes
Text
hc!friends to lovers


lottie matthews x fem!reader
summary: going from friends to lovers with lottie
warnings: lottie mentioned as lesbian once, pure fluff, nsfw at the bottom so MDNI there, not proofread
this was a request so i hope you enjoy it 🤞
@l0tt1emy this is me tagging youu
WHEN FRIENDS
୨୧ being friends with lottie matthews would include spend your saturday night on her huge house (more like a mansion to you) when her parents were out for work or just so busy that they wouldn't even notice you there
୨୧ you didn't know that, but she would spend the entire day thinking about you when it was a sleepover night
୨୧ sleepovers would be a casual thing for you and it was your favorite moment of the day cause lottie would turn it into a fashion show to model her new clothes for you
୨୧ speaking of it, you would constantly find yourself waiting in fitting rooms and their uncomfortable seats when lottie was trying on thousands of clothes just to buy (steal) one or two
୨୧ "do you think it looks too pink?" lottie comes out from behind the curtains to display the outfit she was trying on, featuring a fluffy pink cropped cardigan with short sleeves paired with a high-waisted, pink skirt that features vertical stripes
୨୧ "no, you look perfect," you say softly, eyes filled with affection while feeling a nervous flutter stirs in your stomach
୨୧ in parties, you would usually stick to her side and even though lottie wasn't extremely popular, people knew who she was. either because her parents had loads of money or cause, let's be honest, she fucking was stunning
୨୧ when offering to get her a drink and she would look at you with those pretty eyes and nod like "okay :)))"
୨୧ if you were part of the yellowjackets, during jackie's idea of telling the girls what you admire about them, you would DEF make her blush on purpose
୨୧ "lottie matthews..." you say lightheartedly and she's already screaming internally "you have the prettiest hair i’ve ever seen and a great fashion sense. and, yeah, you suck at french but you are so good at soccer and you have the biggest and kindest heart ever"
୨୧ and she's giggling and nervously rocking from side to side with her cheeks matching the color of her clothes
୨୧ lottie was a lonely kid and since her parents were always away, she would be taken care of by maids and housekeepers so she was easily anxious when speaking to people her age. luckyfor her, she would hide it quite well and the mean and cutesy lesbian in her would mask it greatly
୨୧ "does someone want to tell kelly kapowski to maybe worry less about prom and more about not fսcking up nationals?" lottie was mumbling in front of the mirror, fixing her bangs and makeup and you were ready to agree with anything she said
୨୧ "i know right?" but you didn't even know what kelly kapowski had said
୨୧ putting her money to good use, one of her favorite ways to show you how grateful she was for your friendship was to buy you things. not like once or twice but ALL. THE. TIME.
୨୧ books, vhs tapes of your favorite movies, vinyl, a cute dress you mentioned once, nice shoes, stuffed animals, things that reminded her of you. all you can possibly think of!!!
୨୧ "lot, you didn't have to. this must have cost a fortune!" and it's just her standing at your front door, hidden behind a huge teddy bear she bought for your birthday and a brand new walkman
୨୧ one night, when lottie's parents were home, she sneaked you in and you almost fell to your death when climbing the walls like fucking spider-man and getting to her room through the window but her perfume lingering around made everything worthy when she hugged you
୨୧ "thank you for coming, i know it's late," she lies in bed and tap the empty space beside her for you to join her. "it's okay, i was just watching a movie. i'm glad you called me"
୨୧ 'movie’ you said, but the flashback of you sleeping buried under the covers and snoring like an old guy comes to your mind...
୨୧ i feel like lottie would have a hard time opening up to people and letting them in but if they were genuine, she would trust them. but def insecure about telling you about her visits to the psychiatrist cause we all know she's just a silly girl with a few issues...
୨୧ but you were so respectful, reassuring and understanding to her that she doesn't feel ashamed or judged
୨୧ during that specific night when you were just hanging around together in her bed and talking about life, an accidental graze of her nose on yours led to an awkward moment that led to awkward giggles and an awkward and messy kiss and this was all you needed to call her your girlfriend
WHEN DATING
୨୧ even when dating, lottie would often feel insecure and ask you for help. reassuring her and telling her that there she wasn't broken and there was nothing wrong with her was something you always had to do but it didn't bother you at all. you were lottie's biggest worshiper and could spend hours just telling her how BADLY you loved her
୨୧ hear me out. lottie was a big fan of holding hands. you could be in class, watching a movie, reading together, talking with your group of friends, and even eating, but she was ALWAYS staring at you with pleading eyes and her palm facing up, extended in your direction, ready for you to hold her hand
୨୧ if you think she spoiled you too much already, you better take a seat cause that girl would show up at your place with presents all the time. "i know we agreed on saving money but i know how badly you wanted these..." you're speechless when she gives you something you really wanted
୨୧ but you can't get mad, you just thank her and kiss her adorable pout :(
୨୧ loves loves LOVES to give you small gifts as well like a pretty shell she found when going to the beach once or even her ENTIRE shell collection
୨୧ strongly believe that she would be the greatest big spoon ever and would love to cuddle you but doesn’t complain if you want to hold her
୨୧ lottie is TALL. a three would be afraid of her! im 100% convinced that she would put your stuff in a place you can't reach so you have to ask her for help. "baby, are you busy? can you get that for me?" and she's fighting demons to maintain her composure, resisting the urge to smile as she handles you the book she had just tucked away on the top shelf
୨୧ over protective lottie!!! she isn’t exactly jealous cause she trusted you a lot but is always around and keeping you in her sight. she has her arm around you all the time, drives you EVERYWHERE (makes her driver do that), and is always ready to defend you
୨୧ oh the many things that happened in the backseat that the poor driver had to ignore...
୨୧ if the crash had happened, one single mumble of yours about how hungry you were was ENOUGH for her to call nat and travis out. "lottie, there's no food. we looked everywhere!" "look harder!"
NSFW (MDNI)
୨୧ lottie spoils you with cute gifts but she’s not innocent. she would buy you the prettiest lingerie in the store just to fuck you in those 🤭
୨୧ she would adore when you face ride her. she just can’t resist to your moans and soft noises or how you feel so shy and dirty about it but just can’t stop. she loves to feel your legs around her face
୨୧ in fact, i’m a strong believer that she could just cum by hearing you moan her name. you can’t believe your eyes when you feel her nails dig into your thighs and lottie desperately closing her legs and rubbing them together, groaning into your pussy :(
୨୧ big fan of overstimulating you!!! holding your hips to keep you riding her face or her strap if she’s under you or rubbing your clit even after you made a mess on her fingers just to watch you squirm and cry for her 🤓
୨୧ i’ve mentioned this before BUT fucking you against a mirror in dressing rooms? she’s all in. even better if she’s fucking you from behind with a strap AND forcing you look at your messy and humiliating reflection in the mirror
୨୧ now when it comes to her, she loves when you suck her but keep your eyes on hers. eye contact is!!!! her fingers go crazy in your hair, pulling and holding so tight that it hurts but you don’t give a damn about it
୨୧ she wouldn't ever say no but she prefers to have her time with you instead of quickies. im a lottie hopeless romantic truther!!!
୨୧ i feel like she's not really loud when you're eating her out or fucking her, she just moans your name and lets lots of soft, weak and breathy noises and whimpers out 😵💫
364 notes
·
View notes
Text
CRP AU STUFF
their rooms :3
Characters included; Jeff the killer, Twilight (OC), Ticci toby, EJ, Ben, Sally, Brian, Tim, Missing (OC), Alex, Jay, Dale (OC), Halo (OC), Zach (OC), Nina
Jeff the killer; Upstairs, MESSY, dawg does not clean up. who needs laundry baskets when you got the floor !! Bed upper left corner (he only got a bedframe so he could shove shit under his bed), dresser besides it (covered in pill bottles and monsters), desk in bottom left corner. Lights almost always off, shitty band posters on his walls (most have tears on them) Window covered up with blackout curtains. Door is painted pink (prank done by Ben and Toby that never got painted over), Walls are painted black
he and twilight have a connecting bathroom (door on right wall for jeff, left wall for twil)
Twilight; upstairs, little messy, no where near as bad as jeffs room, its mostly just old drawings on the ground. Bed also upper left corner, has closet on left wall, large desk in upper right corner, main light almost always off, but unlike jeff she got lamps and window (on back wall). Most of the glass that used to be in the window is broke. thin flowy curtains. Beige walls (she never painted over them) multiple shelves with little trinkets and items. Floor is covered in paint/hair dye
Toby; downstairs in the proxy area (they got their own little zone so they dont gotta deal with the others + so they can get to slender's office faster) Messy, but in a its just cool decor way, brown walls, Bed is upper right corner (under his bed is used for storage), Has a big closet on the left side of his room, main light isnt used much but he has alot of lamps/smaller lights, fan always on, window on back wall with a cool patterned curtain he found, he has tons of posters and has stolen road signs just to add to his walls, a few plants (somehow alive), He has a box full of CDs and vinyls he's been meaning to display (some are on shelves but alot are still in boxes cause he is lazy) multiple small tables/ shelves to store cool shit he finds.
EJ; Downstairs, clean, dark blue painted walls, bed in upper left corner (why do all these fuckers have bed left wall), has wardrobe against right wall, no window, lights always off (broken), Has LED lights, though when on they are set to blue and only blue. One of the few people to have a tv in their room (attached to front wall), has bookshelf in room (how he read if no eyes and dark ???), has a shelf full of rocks & crystals (gifted to him by toby)
Ben; Basement, dirty, stupid child, no bed, couch, against back wall, Tv on front wall ontop of his dresser, Zelda posers (that have been drawn over to make link into Ben) all over his walls, a bunch of different consoles + their games sit ontop of his dresser aswell, main light on alot, but when off LED lights on. idk what else to say about him.
Sally; downstairs, Pink vertical stripped walls, clean-ish, Bed in upper right corner, big low table in the middle of her room (for tea partys), Window on back wall + pink patterned curtains. dresser on the end of her bed, small (whats meant to be a bookcase) used to store her tea party supplies (and a few books) Kitchen play set in the lower left of her room, Big dollhouse pressed against window, alot of stuffed animals and drawings/drawing supplies scattered in the room. Big light almost always on.
Brian/Tim/Missing (they share a room);, Downstairs in proxy area, clean, beige walls, big bed in lower right corner w/ bedside table on the left, closet is on the right wall, one of those long L shaped desks on the left wall, Missing's stupid stuff is all just stored upper left corner (hes okay with all it just being there so they dont do anything about it), window with black curtains on the back wall ,not much going on in their room tbh,
them and Jay/Alex have a connecting bathroom (door on left wall for Brim+Missing, Door on right wall for Alex and Jay)
Alex/Jay (they share a room cause there was only the one room remaining in the proxy area)(the only reason why there is a room left is cause Tim and Brian used to have diff rooms); Downstairs in the proxy area, clean-ish, beige walls, Two beds on opposite sides of the room, dressers on ends of the beds, Jays half of the room is messier, (he too busy eeping to clean), Alex surprising keeps his half clean. Theyve been meaning to buy shit to actually decorate their room but theres only 1 car, and Tim is like the only one with a vaild drivers license (everyone else is legally dead or just doesnt have one). Jay and Alex are still very iffy with eachother but L to them gotta share a room. Jay likes it dark so alex just has lamps, Window is covered with thick curtains (but not blackout)
Dale/Halo/zach ; Downstairs in the proxy area (they are not proxys, why the fuck are they here) Clean-ish, Gray walls, bed in middle of front wall, window with seating area thingy :3 (zach likes sleeping on the seating thingy), Bathroom connected on right wall, Closet on right wall, mutiple boxes full stuff related to dales special interests, desk at upper left corner
NON MANSION CRPS;
Nina; Lives in an small apartment like right outside of Slenderwoods, lives on 5th floor, messy, stuff all over, bathroom has so many bows just chilling there (+ covered in hair dye), shitty gray carpet, without her landlords permission he painted her walls purple, some fandom + band posters on her walls, has stolen some of the slender pages to hang on her walls. Bed on the middle of left wall, with her dresser on the head of the bed + a beanbag chair at the end of her bed, stickers & plushies everywhere.
Corrupt- Corrupt dimension, she just kinda sleeps wherever tf she wants so i havent made a specific bedroom for her
Jane/Mary, they live in a big, old, house, very cool gothic house, idk about their bedroom tho they just live in a coolass house
Clockwork/liu/anyone else i didnt mention- I dont fucking know i havent planned it out yet (clockwork lives in the same apartment complex as Nina, Liu lives far away from the mansion, everything else idk)
#creepypasta au#creepypasta#creepypasta oc#oc lore#jeff the killer#ticci toby#eyeless jack#ben drowned#sally williams#brian thomas#tim wright#brim#jay merrick#alex kralie#nina the killer#oc x canon
19 notes
·
View notes
Text
My favourite wallet is no longer produced (as far as I can tell), so I decided to copy its pattern and teach myself to sew it. Bonus, I get to use 🖤💜aesthetic🖤💜 colours.

The original is a rugged trifold wallet with velcro closure. The fabric appears to be high-denier nylon or polyester canvas, with a waterproof PU backing.
For my copy, I used a black 400 denier nylon pack cloth with waterproof PU backing; and a puple 400 denier water-resistant polyester canvas with a neat twill weave. I bound the wallet edges in black 3/4" (10mm) wide twill tape, and used a scrap of purple 1" (25mm) wide nylon webbing for the coin pouch pull tab. For thread, I used Glide Trilobal Polyester in "Iris".
I chose Snag-Free Velcro, which has both hooks and loops in the same tape. The loops tend to be just a smidge taller than the hooks, which means you need to press the two tapes together to get good adherence (hence reducing unwanted adherence!). This might end up being a poor choice for a wallet, as I don't typically press my wallet closed with much force, and just folding it together isn't always enough to make the Velcro stick.
On the exterior, there's a little coin pouch with velcro closure

Brand new, there's a clear vinyl ID window on the centre panel of the original wallet's exterior, but this window always breaks in my experience, so I omitted it on mine.

Inside, there are three areas for holding cards, and a bill slot behind the card slot panel.
The left and centre -thirds have two side-loading card holders each; one front and back. In the front slot, the cards are partly visible; in the back, cards are hidden. The right panel also has two card holders, these are vertical-loading; in the back slot, cards are hidden by the cards in front.

I usually keep my tappable bus card in the centre of the bill slot (the area closest to the exterior of the closed wallet), so that I can tap the entire wallet to pay my bus fare. I added an elastic to help keep the bus card in its place, but I'm not entirely sold on this feature yet.

To protect my tappable payment cards, I would usually keep them in an RFID blocking envelope in a vertical card slot panel. But since I'm sewing my own entire wallet, I decided to line the whole card slot panel with RFID blocking fabric.
I also added a little flap to keep my receipts separate from my bills.

This being my first attempt at copying the wallet, I learned a lot in the process!
When this wallet wears out, I'll sew myself another; but with some changes, for sure.
Oh! Also!
The RFID-blocking fabric passed two basic tests:
wrap my phone the fabric (try to keep the wrapping only 1 layer thick); the phone has no reception (tested by sending myself emails; having someone call me; attempting NFC tap) ✅
with a tap-enabled payment card inside, tap the closed wallet at a tap-enabled point-of-sale till during payment; payment does not work ✅
Unfortunately, the wallet also blocks my bus pass. But I'd rather it block too much than too little; I can figure out a different solution for the bus pass.
I'm quite pleased with how this turned out, and am looking forward to making one for my partner!
3 notes
·
View notes
Text

Building Dango: Part 5
While that Thang was drying I wasn't idling around. I got the ears sized out and cut out a pattern for the foam. Theyre just about over a foot in length.


I also decided to tryyyy and do the paws. Now I considered drawing a turkey on a page (tracing my hand) and just doing that.
HOWEVER!
Dango's claws are quite specific. They have serrated ends and the cutline is vertical, as opposed to the horizontally cut palm. Which means this is going to cause problems for that pattern. Therefore, I decided to chance it and tape up my fuckin hand for the pattern.


Now here's something you may overlook with taping: it's accurate to the shape. So when you cut up your pattern how you want it, trace it onto your fabric, and sew it together. It is going to be. Tight. Because the pattern is MADE to be right up against your skin!


Now here's something you may not know about making gloves:
Gloves fucking suck.
This isn't my first time making gloves, you guys watched me struggle with the Kenku gloves too (it took 5 versions.) This time going into it I knew what was up.
First up: You can't use non-stretch fabric for gloves. Because your thumb is much thicker than your wrist, and that is the stress point for a glove. If it can't stretch out to let your thumb in, you're fucked.
For Dango, I don't need these to be tight. Actually I want them to be very easy to slip in and out of on the fly.
So moving forward the pattern will be adjusted at the thumb, the wrist, and the fingers, which are just too tight right now as well. Also I machine sewed the thumb and completely fucked up the placement lmfao.

The fabrics I will be using are: - Minky (top of palm) - Rabbit fur (palm + knuckles) - PVC vinyl (claws) - Lycra (inner lining)
The vinyl is 4 way stretch- I am not worried about the vinyl. I am worried about the minky and rabbit fur, which are non stretch. The lycra I have is 2 way stretch, which I'll have to chance my luck with.
*(If you don't know the difference between 2 way and 4 way stretch, it is basically if you grab your fabric on either side and stretch it. If it can stretch west and east but not north and south, that's 2 way. If it stretches every way, that's 4 way. If it doesn't stretch at all. Well. Call that one a stiffy.)
10 notes
·
View notes
Text
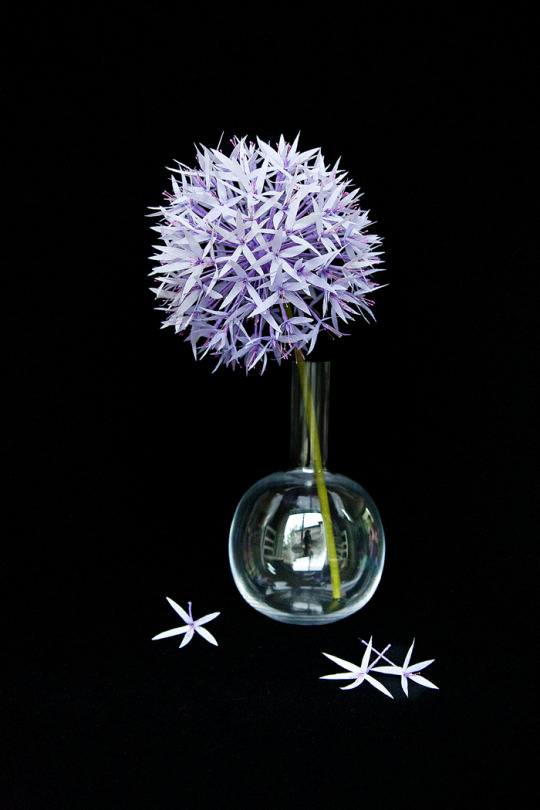
DIY Paper Allium

Project by Kate Alarcón:
Alliums have always seemed a little bit magical to me. In a garden, the long, smooth stems blend in with the other greenery, and the big globes of tiny periwinkle flowers almost seem to float in mid-air. I imagine them growing in a fairytale garden, alongside foxgloves and moon flowers.

When I set out to design a paper version, I wanted to capture that enchanted, ethereal quality. I chose a very lightweight crepe for the petals, and constructed it so that each floret radiates out from a central ball on a long wire. This design gives each petal room to stand out from its little floret, uncompressed by the florets around it. I also scaled it up to be about the size of a large cantaloupe. The end result is a big, magical globe of delicate blue flowers that is almost a bouquet in its own right.

I wanted the flower to feel free-spirited, so I cut my petals freehand, which creates little variations between florets. Once you’ve cut several sets of petals, you’ll probably find that you don’t need the template anymore, either.
This allium isn’t especially difficult to make, but producing enough florets to complete the globe is a big undertaking. I suggest making them a few at a time over a couple of weeks while watching Netflix. You can insert them into the center ball as you go — it’s the safest place for them, and it’s motivating to watch your flower fill out.
If you run out of steam before finishing, don’t despair! My assistant Emma and I noticed that a partially covered flower looks a lot like a dandelion that’s been blown and wished on. And if that doesn’t do it for you, I’ve got just one of these guys up in my shop. —Kate
Photography by Desiree Swanson
Styling assistance by Emma Swanson


Supplies
allium templates here
Aleene’s Original Tacky Glue
fine crepe in “French Violet” from Rose Mille
heavy crepe in “Eggplant” and fine crepe in “Olive Green” from Castle in the Air
18 inch lengths of 18 and 20 gauge stem wire
paper scissors
wire snips
small awl
0ptional: millinery stamens that coordinate with your paper color (Rose Mille or 32° North for similar)
0ne 1.5” polystyrene ball (I buy mine at Michaels)
one 18″ length of vinyl tubing 3/8” outer diameter, ¼” inner diameter. (Home Depot and Lowe’s both carry it in the plumbing department)
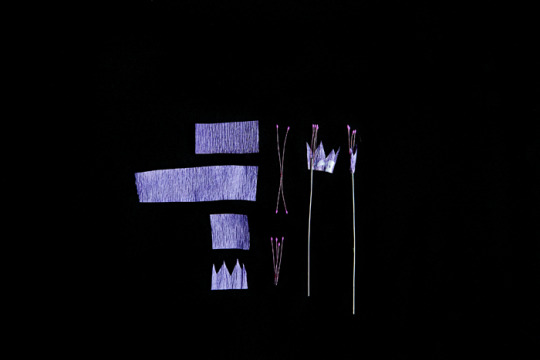
A note about crepe paper grain:
The grain of the crepe paper runs parallel to the roll or fold. Crepe paper stretches horizontally, but not vertically, so you will almost always cut petals with the grain, placing the template so that the tiny wrinkles in the paper run up and down the template, not across. Cutting with the grain means that you cut in the same direction the crinkles are running; cutting across the grain means that you cut perpendicular to these crinkles.
For the stem:
Cut a 15” length of tubing at a very sharp angle. This pointy end will be the top of your stem, and you’ll insert the point into the polystyrene ball to help anchor the stem. Cut three of the 18 gauge wires so that they’re 16” long. Insert the wires into the length of tubing to hold your stem fairly straight while you wrap it.

Cut a long ¼” wide strip of the olive fine crepe across the grain. Dot glue at 1 cm intervals along the strip. Just below the top edge of your tubing, below the sharp angle you cut, begin wrapping the strip around the tubing, holding it at about a 45-degree angle to the tubing, so that it spirals down as you wrap. For a smooth finish, hold the paper taught and slightly stretch it as you wrap.
If you need to add strips, just glue the end of one strip in place, and begin wrapping the next strip about ½” above where the previous one ends.

For the flower center:
Using template A, cut a small oval from the purple heavy crepe. Dot one side of the oval with glue, and then place it on the polystyrene ball. Stretch the oval around the ball, and hold it in place a few seconds to allow the glue to set.
On the opposite end of the polystyrene ball from the center of the oval you just applied, pierce the ball with your awl. Use your awl to widen the top of this hole by holding it at a 45-degree angle to the surface of the ball and moving it all the way around the stem hole.
Cut one template B from the purple heavy crepe. Make sure the grain runs up and down the template. (The top edge should be zigzagged.)

Dot glue all over the purple crepe, including the points. Place the polystyrene ball about 2” from the bottom of the purple crepe piece. The points and the end of the ball covered by the purple oval should face up. Wrap the crepe around the ball, stretching it so that it molds to the ball.
Press and smooth the points down against the top of the ball. If there are any slight gaps between the smoothed down points, they will be camouflaged by your purple oval, and no white should show through.

Inserting the stem:
Pull the three 18 gauge wires out about four inches from the pointy end of the wrapped tubing. Insert these wires about 1” into the hole in your polystyrene ball. Slide the pointy end of your tubing up the wires, and pierce the hole with the pointy tip. You don’t need to insert the tubing very far; it just helps to have the tip anchored in the ball.

Gather the crepe “skirt” beneath the ball tightly around the stem and scrunch it to allow the glue to set around the stem. Dot a long ¼” strip of olive fine crepe with glue and cover this purple crepe skirt by wrapping the stem beneath the bottom of the covered polystyrene ball, until you meet up with the section of the stem already wrapped in olive crepe.
Floret center:

Snip your 20 gauge wire into 3.75” lengths. Cut a 1″ tall strip of the heavy purple crepe and stretch it all the way out as shown above. Cut this strip into sections that are wider than your template C. You can use the template C to cut this little fringe piece, or just freehand a similarly sized rectangle with three or four irregular points along the top edge. Dot glue along the bottom three quarters of this little piece. If you’re using double-headed millinery stamens, fold two of these stamens in half and place them on top of the jagged purple rectangle to make a little cluster of four stamens. Place the stamens on top of the little purple piece, so that the folded point on the stamens lies slightly below the middle of the rectangle. Place your short wire on top of the stamens, so that the tip of the wire lies slightly above the middle of the rectangle.
Wrap the rest of the rectangle loosely around your wire and scrunch the bottom to set the glue.
For the petals:

Cut a 2.25” x 3.75” rectangle of French violet fine crepe. The longer edge should run across the grain. Accordion or fan fold the strip (fold over, under, over, under) so that you have five layers of paper. Use the box around template D as a guide for how widely to space the folds (about ¾”). The fold lines should run with the grain and need to line up fairly precisely.
You should have a little folded packet of fine crepe about the size of the box around template D on the template sheet. Place template D on the packet, aligning the bottom of the template with the bottom edge of the packet.
The bottom right and left edges of the template D are marked with a dotted line that indicates that this section should not be cut, but rather aligned with the fold lines on your petal packet. Leaving this section intact on both sides will ensure that you have a continuous strip of petals.
In the photo, I’ve opened up my packet of petals to show what a continuous strip will look like, but you won’t actually open your packet yet. First, gently twist the bottom of the unopened petal packet. This will create evenly spaced crinkles that will make it easier to gather the bottom of the petal strip.
Untwist and open the petal packet. Make sure that each petal is facing the same direction and that none are twisted. Lay them side by side, very close together but not overlapping, across your forefinger, and then lay down your thmb to hold them in place. Pinch the width of the bottom of the petal strip to gather it. Dot glue on this pinched section and place your floret centers so that the top of the glue line is just above the bottom of the little piece of heavy crepe you wrapped around the tip of the wire.

Loosely wrap the gathered petal strip around the stamen wire. Adjust until the petals seem evenly spaced around the wire, and then scrunch the glued section of the strip around the stem.
Cut a ¼” wide by 4” long strip of purple heavy crepe across the grain, and dot it with glue. Beginning just under the petals, wrap the wire to about half an inch from the end of the wire, leaving a section exposed to help pierce the ball.

Push the petals back so that they lie perpendicular to the floret wire.
You’ll need between 80 and 100 florets depending on how densely you pack them into your allium.
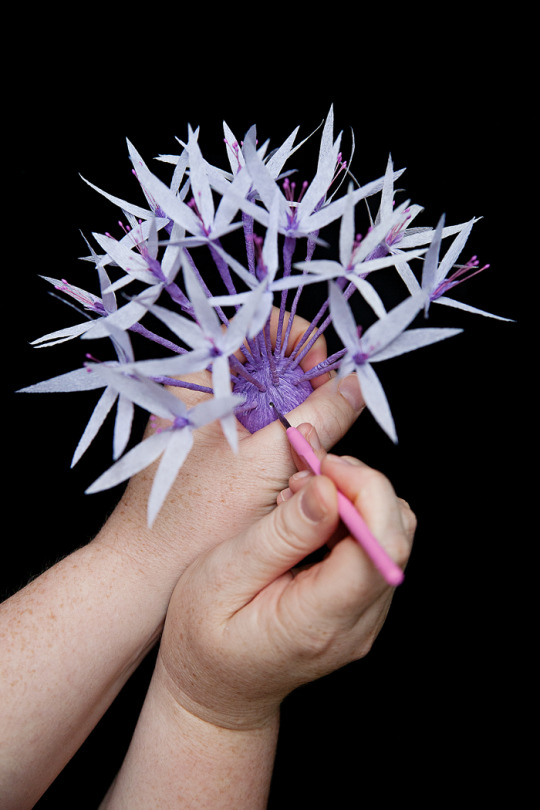
Inserting the florets:
Beginning at the very top of the flower center, use your awl to pierce a hole in the covered polystyrene ball.
For extra security, you can dip the exposed wire on the end of your floret in glue before inserting it. (I usually don’t do this because it makes it hard to reposition the florets without tearing the paper covering the ball, but if your florets are falling out of the ball, then it’s probably worth it.)
Add a little circle of florets all around this first floret, spacing your holes about 1/8” apart. I don’t worry about being too precise with my hole spacing and just eyeball it, making sure that, overall, the florets look evenly distributed. Continue working downward, adding florets around the ball toward the stem.
The trickiest part of this project is adding the final florets around the base of the ball where you’ve inserted the stem, because you can’t push against the top of the flower to hold it in place while you insert the wires in the bottom. Instead, you can hold the stem firmly to anchor the ball while you insert the last florets up around the bottom of the ball.
41 notes
·
View notes
Text


Next project (as soon as the wind dies down) - a "barn quilt" for the side of the shop. There are a number of these throughout Green Bluff, and I have always wanted one. Plus we have that big blank brown wall to work with. These 4 metal panels are vinyl coated like street signs and will attach to the metal building via a few vertical furring strips. We will also use a temporary leveling board along the bottom to keep things even and hold the weight while we work. Probably need to rent a scissor lift (it's pretty high at the peak) - should be interesting, esp. given Steve's latent fear of heights
2 notes
·
View notes
Text
My NYC Bucket List

OK. So this August will be my 8th anniversary living on the East Coast in the U.S. During that time, a lot has happened (to say the least). But it occurred to me that despite all the life changes, growing pains, and never-saw-coming absurdities that is my existence, I've managed to do some pretty cool things since I've moved to the tri-state area.
So with that revelation, a part of me felt the need to write down all the things I've done that might fall in the "tourist-y" category over the past 7.5 years. Which then led to me thinking about all of the tourist-y things I've yet to do.
And here we are.
Below is a list of 80 (so far) things I've either done or hope to do while living on the East Coast of the U.S. You'll notice that I don't have some popular things on the list like "visit the Top of the Rock" or "visit the top of the Empire State Building." That's because I don't care for heights that much, so that's not something I would ever want to do. With that said, if my NYC Bucket List inspires you and you want to add more vertical activities to your own list, I say go for it!
Before we dive in, please keep in mind that I'm an arts & culture geek and lifelong literature & history nerd. So if most of this seems boring to you, well ... I guess I'm just a really boring person.
Now without further ado ...

Walk across the Brooklyn Bridge ✅
Visit Chinatown and the Lower East Side ✅
Watch the NYC Pride parade during Pride weekend ✅
Eat at Sylvia's in Harlem
Drive across the George Washington Bridge ✅
Enjoy a show at Lincoln Center
Walk around Central Park ✅
Visit the Flatiron Building (outside or inside) ✅
Eat a slice at a pizzeria ✅
See a play during Shakespeare in the Park
Go on a walking tour of Greenwich Village ✅
Visit the Coney Island boardwalk ✅
Enjoy a stand-up show at a comedy club
Eat at a hot dog cart ✅
Hike in the woods at the New York Botanical Garden
Do a walking tour of Harlem ✅
See a movie at the Alamo Drafthouse ✅
Try an egg cream ✅
Enjoy a drag performance ✅
Visit that famous site-seeing spot in Dumbo near the Manhattan Bridge ✅
Take a tour of Grand Central Station
Enjoy a Broadway play ✅
Go to a NBA Knicks or Nets game
Eat at Sardi's
Drive across the Verrazano Bridge ✅
See an improv show at UCB (currently closed, but it's under new management so it may reopen soon) ✅
Visit the Statue of Liberty
Walk along 5th Avenue at Christmas time to see the department store windows ✅
Eat and people watch at Caffe Reggio ✅
Attend an art gallery opening ✅
See a show at Radio City Music Hall
Take the Staten Island Ferry
Be a part of a studio audience (ex: The Late Show with Stephen Colbert, the Tonight Show with Jimmy Fallon, The Daily Show, Late Night with Seth Meyers, etc.)
Go thrift shopping or vinyl records shopping in the East Village ✅
Eat at Carnegie Deli or Katz's Deli (the former is now closed though) ✅ Carnegie only
Visit the Guggenheim, the Met, the Whitney or the MoCA ✅ Guggenheim only
Attend a performance of the New York City Ballet, the American Ballet Theater, the Alvin Ailey American Dance Theater and/or the Dance Theatre of Harlem
Grab a drink at the Blue Bar at the Algonquin Hotel ✅
Visit the Bronx Zoo
Eat a black and white cookie ✅
Enjoy an Off-Broadway play ✅
Read a book in Bryant Park in the summer
Take a dance class at Steps on Broadway ✅
Watch the ice skaters at Rockefeller Center or Wollman Rink in Central Park (and go ice skating if you can) ✅ Watching only
Visit Little Italy in the Bronx
Go to a NHL Rangers or Islanders game
See a show at the Beacon Theatre ✅
Visit Tiffany's (and buy something small if you can afford it)
Enjoy High Tea at the Plaza
Attend the AfroPunk music festival ✅
Buy a book or two at the Strand ✅
Take a tour of the Apollo Theater
Ride in a NYC yellow taxi ✅
See a concert or show at Madison Square Garden ✅
Eat at Junior's after a Broadway show ✅
Attend a lecture or talk at the 92nd Street Y ✅
Visit the Nuyorican Poets Cafe
Read or write in the Rose Reading Room at the New York Public Library's main branch ✅
See a movie at the Roxy Cinema ✅
Enjoy a drink at the bar in the Hotel Chelsea
Get a playbill signed at the stage door after a play ✅
Go to a late night jazz concert at the Blue Note
Visit Washington Square Park ✅
Attend an event on the Columbia University or NYU campus ✅ Both Columbia and NYU
Grab a sweet at Magnolia Bakery
Buy a book or two at Greenlight Bookstore in Brooklyn ✅
See a concert or show at Carnegie Hall
Go to a MLB Mets or Yankees game
Have a drink at the historic Stonewall Inn ✅
Visit Prospect Park
Attend a film screening at the Tribeca Film Festival ✅
Buy a book or two at the McNally Jackson flagship store in Soho ✅
Dine at the Algonquin Hotel ✅
Go to a late night jazz concert or show at Birdland
See a play at the historic Cherry Lane Theatre
Enjoy a fancy milkshake at Black Tap
Visit the main branch of the Brooklyn Library ✅
Grab a bite or a drink at the White Horse Tavern ✅
See a burlesque show at the House of Yes
Visit the Albertine Bookstore on the Upper East Side
Take the ferry from New Jersey (Hoboken) to NYC
Visit The Morgan Library on the Upper East Side
Believe it or not, I was hoping to come up with 100 items for the list, but I've run out of things to add. If anyone has any other ideas they'd like to suggest to help me get closer to 100, I'm all ears.
You'll probably notice that I have very little on the list for the outer boroughs, so I'd be especially interested in suggestions for Queens, Staten Island, BK or BX.
Oh, and I should also mention that I'm not really interested in visiting the High Line or anything happening at the Piers. They're just not my thing.
Of course, this list is for inspiration and gratitude purposes only. It's not meant to make me or anyone feel less than. I'm simply capturing what I've done so I can look at it when I'm feeling sorry for myself in the future about how poor I am.
But it's also a lovely reminder of what else I have left to check out when money and time are on my side. ☺️

#nyc#to do list#bucket list#tri-state area#new york#new york city#tourist#travel and tourism#this is me#black bohemians#bohemian lifestyle#boho lifestyle#boho culture#downtown girl
3 notes
·
View notes
Text
Pet-Friendly Interior Design: How to Create a Stylish, Pet-Welcoming Home
How to Design a Pet-Friendly Space Without Compromising Style
Creating a home that accommodates your furry friends while maintaining a beautiful and stylish aesthetic is absolutely possible! As someone who lives between Manhattan and Rome with my beloved dog, Coco, I’ve had to find creative ways to balance functionality and style. Whether you have a playful pup, a curious cat, or a more exotic companion, thoughtful design choices can keep your space both functional and visually appealing. Here’s how to achieve the perfect balance of pet-friendly and chic.
1. Best Pet-Friendly Fabrics for a Stylish & Durable Home
Durable, stain-resistant, and easy-to-clean materials are essential when designing for pets. Opt for:
Performance fabrics like Crypton, Sunbrella, or microfiber for sofas and chairs.
Leather (real or vegan) as it resists pet hair and is easy to wipe clean.
Machine-washable slipcovers to maintain a fresh look effortlessly.
Indoor-outdoor rugs that are durable and stain-resistant while still stylish.
Living with Coco, I’ve found that a microfiber couch is a lifesaver! It repels fur and stains, and a quick vacuum makes it look brand new. In Rome, where Coco loves lounging on the terrace, I use outdoor cushions that are stylish but weather-resistant.
2. Opt for Pet-Friendly Flooring
Your floors take the most wear and tear from pets, so choose wisely:
Luxury vinyl plank (LVP) or tile – scratch-resistant, water-resistant, and available in stylish designs.
Sealed hardwood – if you love natural wood, opt for a harder species like oak, hickory, or maple and apply a protective finish.
Low-pile rugs – they’re easier to clean and less likely to trap pet hair.
In our Manhattan apartment, I’ve opted for LVP flooring—it looks like real wood but withstands Coco’s zoomies without a scratch!
3. Incorporate Designated Pet Spaces
A stylish home doesn’t mean hiding pet essentials; instead, integrate them into your design:
Built-in pet beds in nooks, under staircases, or within custom cabinetry.
Stylish pet crates that double as side tables.
Dedicated feeding stations with built-in storage for food and accessories.
Hidden litter boxes disguised in furniture or tucked in a discreet location.
Coco loves having her own cozy corner! I created a built-in dog bed under a window seat—she gets to nap in the sun while I work, and it seamlessly blends with the rest of our decor.
4. Select Pet-Safe Furniture and Accessories
Avoid furniture with sharp edges that could be hazardous to energetic pets.
Choose closed storage for delicate décor items to prevent accidental breakage.
Opt for washable throw blankets and cushions to protect furniture while adding cozy layers.
5. Go for Stylish Yet Functional Décor
Your home should feel cohesive and reflect your style while accommodating your pet’s needs:
Pet-friendly plants like spider plants, areca palms, and Boston ferns add greenery without being toxic. According to the ASPCA, some common houseplants are toxic to pets, so be sure to check before bringing them home.
Wall-mounted shelving can serve as an aesthetic focal point while giving cats vertical space to explore.
Multi-functional furniture, like an ottoman with hidden storage, keeps pet toys neatly tucked away.
6. Prioritize Easy Maintenance
To keep your home looking fresh and stylish despite pet messes:
Use washable paint finishes like satin or semi-gloss for easy cleaning.
Have a designated pet cleaning station near the entryway for quick clean-ups.
Invest in a high-quality vacuum designed for pet hair.
One of my best investments was a pet-friendly robotic vacuum—living between two cities means Coco sheds everywhere, but this keeps things under control without extra effort!
7. Keep It Cohesive
Designing a pet-friendly home doesn’t mean sacrificing your personal aesthetic. Stick to your preferred color palette and style while incorporating these functional elements. Whether you love modern minimalism, cozy farmhouse vibes, or a sleek contemporary look, there are plenty of ways to seamlessly blend pet-friendly features into your space.
Final Thoughts
You don’t have to choose between a stylish home and a pet-friendly environment. By making intentional design choices, you can create a beautiful, functional space where both you and your pets feel comfortable.
Need help designing your dream pet-friendly space? Book a free consultation today!
0 notes
Text
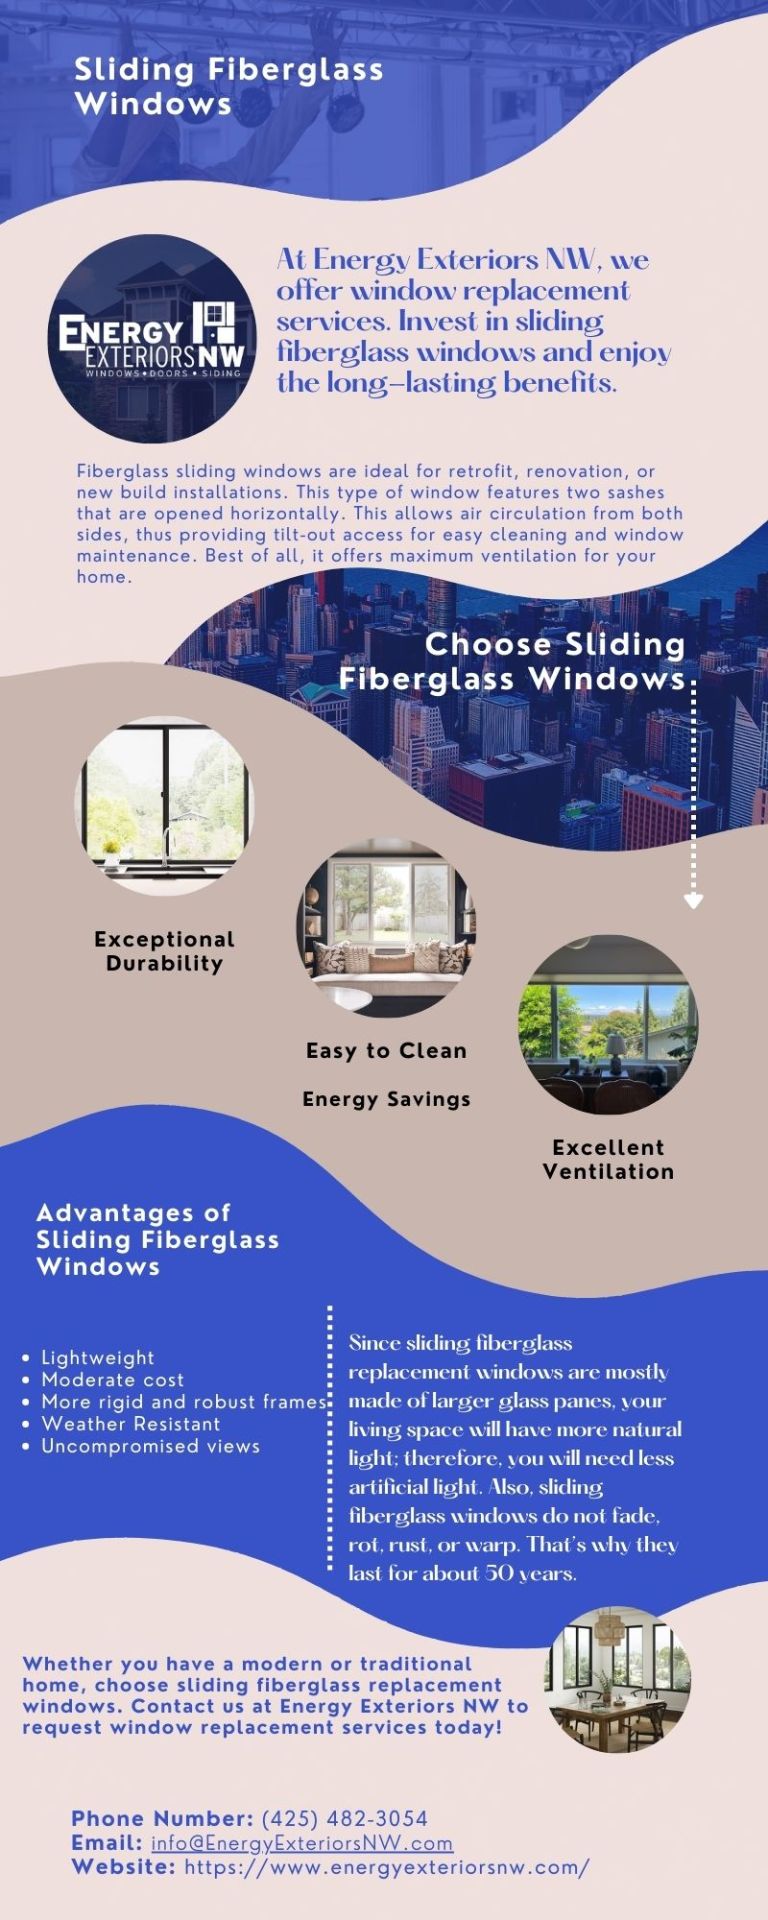
Sliding Fiberglass Windows | Energy Exteriors NW
At Energy Exterior NW, our mission is to provide the BEST Sliding Fiberglass Windows services conceivable for you as well as your residence. Call us today!
#energy exteriors nw#washington doors and windows#quality windows and doors#energy exteriors#exterior doors seattle#hardie ceiling panels#aspyre collection by james hardie#washington window and door#seattle siding contractor#wood clad vinyl windows#fiberglass sliding door#james hardie soffit panels#aluminum front doors#hardie soffit#hardie vertical siding#hardie shingles siding#aluminum clad wood windows#hardie architectural panels#panel siding#french exterior doors#siding replacement#siding repairs near me#exterior remodeling#siding contractor#replacement siding near me#siding company#exterior painting
0 notes
Text
SPC Flooring Installation: A Step-by-Step Guide for a Perfect Finish
SPC (Stone Plastic Composite) flooring has emerged as a popular choice for homeowners and businesses alike, thanks to its durability, ease of maintenance, and stylish appearance. SPC flooring installation, a type of luxury vinyl tile (LVT), features a rigid core made from a combination of stone powder and PVC, offering superior strength, water resistance, and comfort. If you're considering SPC flooring for your space, understanding the installation process is essential for achieving the best results.
In this blog, we'll walk you through the key steps involved in installing SPC flooring, ensuring a professional-looking finish.

Prepare the Subfloor
The first step in any flooring installation is to ensure that the subfloor is clean, dry, and level. SPC flooring can be installed over a variety of surfaces, including concrete, plywood, and existing vinyl floors, but it’s crucial that the subfloor is in good condition.
Clean the surface: Remove any dirt, dust, or debris using a vacuum or broom.
Check for moisture: Ensure the subfloor is dry to prevent moisture damage. If you're installing over concrete, you may want to use a moisture barrier.
Level the subfloor: Any uneven spots should be patched or sanded to create a smooth surface. Use a leveling compound if necessary.
Acclimate the SPC Flooring
Before installation, it’s essential to acclimate the SPC planks to the room temperature and humidity. This helps prevent expansion or contraction after installation. Leave the planks in the room for at least 48 hours to allow them to adjust.
Make sure the room temperature is between 65°F and 85°F (18°C and 30°C) during this time.
Plan the Layout
Carefully plan the layout of the SPC planks before you begin installation. Start by measuring the room’s dimensions and determining the best direction for the planks. Most installers recommend laying the planks parallel to the longest wall or in the direction of natural light to create a seamless look.
It’s also important to leave a small expansion gap (around 1/4 inch) between the planks and the walls. This gap will allow the material to expand and contract without causing issues.
Install the SPC Flooring
SPC flooring is designed for easy installation with a click-lock system that doesn’t require glue or nails. Here’s how to proceed:
First row: Begin in one corner of the room, placing the first plank with its groove side facing the wall. Use spacers to maintain the expansion gap along the edges.
Click the planks together: Angle the tongue of the next plank into the groove of the first one and gently press down to lock them into place. Continue this process, making sure the planks are aligned and fit snugly together.
Stagger the seams: To create a natural, appealing look, stagger the seams of the planks in each row. Avoid aligning the seams vertically or horizontally to maintain structural integrity.
Cut the last row: If necessary, use a utility knife or saw to trim the planks to fit the remaining space in the room.
Finishing Touches
Once all the planks are installed, remove the spacers and install baseboards or quarter-round molding to cover the expansion gap around the edges. This gives the floor a polished, finished look.
If you installed the flooring in a room with high foot traffic or areas prone to moisture, consider adding a protective finish for extra durability.
Maintenance and Care
SPC flooring is relatively low-maintenance, but regular cleaning can help maintain its beauty. Sweep or vacuum the floor regularly to remove dust and debris. For deeper cleaning, use a damp mop with a mild, non-abrasive cleaner. Avoid harsh chemicals or abrasive pads that could damage the surface.
Conclusion
Installing SPC flooring Dubai is a relatively simple process that can be completed by DIY enthusiasts or professionals. By following these steps, you can achieve a stunning and durable floor that enhances the beauty of your space. Whether you’re upgrading your home or outfitting a commercial space, SPC flooring offers a fantastic solution that’s both practical and stylish.
0 notes
Text

Choosing Therma-Tru fiberglass entry doors from Energy Exteriors NW offers homeowners a multitude of benefits.
#quality windows and doors#hardie shingles siding#washington window and door#energy exteriors nw#aluminum clad wood windows#hardie architectural panels#hardie vertical siding#hardie soffit#vinyl window company near me#window and door replacement
0 notes
Text
Budget-Friendly Siding Options for Kentucky Homeowners
When you're looking to enhance your home's curb appeal without breaking the bank, one of the best ways to do it is by installing new siding. Siding not only improves the look of your home but also offers protection against the elements, boosting energy efficiency. As a Kentucky homeowner, there are several affordable siding options that can make a significant difference in both the look and performance of your home. Let’s explore some of the best budget-friendly siding options available for homeowners in Kentucky.
1. Vinyl Siding
Vinyl siding is one of the most popular siding materials in the U.S. because it’s affordable, versatile, and durable. It comes in a wide range of colors and styles, including horizontal and vertical panels, and can even mimic the appearance of wood. Vinyl siding is low-maintenance, which is a huge advantage for homeowners who don’t want to spend a lot of time on upkeep. A simple wash with soap and water is often all it needs to keep it looking fresh.
The cost of vinyl siding typically ranges from $2 to $7 per square foot, depending on the style and quality. This makes it a top contender for homeowners on a budget. Additionally, vinyl siding can help improve the energy efficiency of your home, especially if you opt for insulated vinyl siding, which can reduce heating and cooling costs.
2. Fiber Cement Siding
Fiber cement siding is another affordable option that offers durability and a sleek appearance. This type of siding is made from a mixture of cement, sand, and cellulose fibers, making it resistant to moisture, insects, and rot. It can be designed to resemble wood, stucco, or masonry, allowing homeowners to achieve a high-end look without the hefty price tag.
Fiber cement siding typically costs between $5 and $10 per square foot, but the longevity and low maintenance make it a good value over time. Plus, it’s fire-resistant, making it an excellent choice for areas prone to wildfires or extreme heat, which is an added benefit for Kentucky homeowners.
3. Engineered Wood Siding
Engineered wood siding is an affordable alternative to traditional wood siding. It’s made from wood fibers that are bonded with resins, creating a material that mimics the look of real wood but is more durable and easier to maintain. Engineered wood siding is also resistant to pests, rot, and warping, making it a great option for homeowners looking for a low-maintenance material with the charm of wood.
The cost of engineered wood siding typically ranges from $3 to $8 per square foot, making it a more budget-friendly option compared to natural wood. Plus, it comes in a variety of colors and finishes, so you can customize it to match your home’s style.
4. Metal Siding
If you're looking for something with a modern look that also offers excellent protection, metal siding could be a great choice. Aluminum and steel siding are two common types of metal siding that are durable, lightweight, and resistant to fire and insects. Metal siding requires very little maintenance, and it can last for decades with proper care.
Aluminum siding typically costs between $3 and $7 per square foot, while steel siding may cost slightly more, ranging from $5 to $10 per square foot. While metal siding can be an initial investment, its longevity and low maintenance make it a good long-term option.
5. Stucco Siding
Stucco siding is an affordable option for homeowners who like the textured, Mediterranean-style look. It is made from a mixture of sand, cement, and water, which is applied to a mesh base on your home’s exterior. Stucco siding is durable and offers excellent insulation, which can help reduce your energy bills.
Stucco costs around $4 to $9 per square foot, but it’s important to note that it requires professional installation and may not be suitable for all climates. In Kentucky, where there are distinct seasons, stucco can be a good choice, but it does require regular upkeep to prevent cracking and moisture infiltration.
Choosing the Best Siding Option for Your Home
While each siding option has its benefits, choosing the best one for your home depends on your budget, aesthetic preferences, and the climate in which you live. Consider how much maintenance you’re willing to do and how long you plan to stay in your home. If you're planning on selling soon, a budget-friendly, low-maintenance option like vinyl or fiber cement can improve your home’s value without requiring a large investment.
Why Choose Humberto Maradiaga for Your Siding Installation?
When it comes to installing new siding, it’s essential to work with a professional who understands the local climate and can guide you toward the best options for your home. Humberto Maradiaga offers expert siding installation services in Louisville, KY. With years of experience in the industry, Humberto and his team ensure high-quality workmanship and a smooth installation process.
Whether you're interested in vinyl, fiber cement, engineered wood, or metal siding, Humberto Maradiaga can help you select the right material that fits your budget and style. His commitment to customer satisfaction and attention to detail makes him one of the top choices for homeowners in Louisville, KY.
With Humberto Maradiaga, you can be confident that your home will be well-protected and beautifully upgraded for years to come!
0 notes