#versatile configuration
Explore tagged Tumblr posts
Visit Tumblr Blog
Explore Tumblr blogs with no restrictions, modern design and the best experience.
Last Seen Tumblr Blogs


Fun Fact
Mobile US users spent an average of 115.8 minutes on Tumblr app monthly.
Text
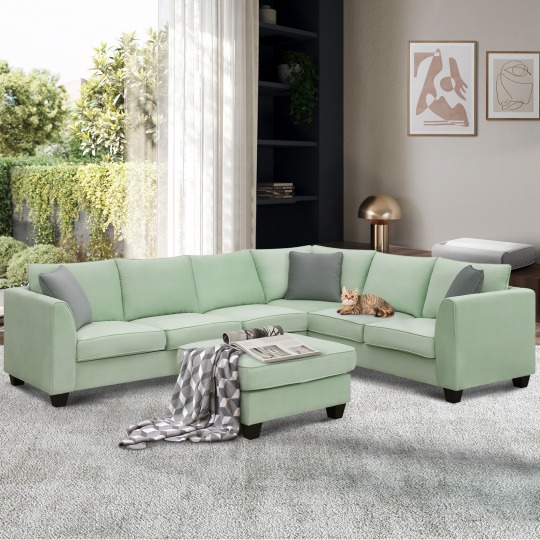
SUNVIVI OUTDOOR Patio Loveseat Review - Your Ideal Addition to Outdoor Spaces
Are you looking for a comfortable seating option for your outdoor spaces? Look no further than the SUNVIVI OUTDOOR Patio Loveseat! This 2-piece wicker outdoor sectional couch comes with removable beige cushions and is designed to provide you with a comfortable and stylish seating solution for your patio or backyard. With its durable construction and comfortable cushions, the SUNVIVI OUTDOOR Patio…

View On WordPress
#1-year warranty#beige cushions#brown color#coffee table#durable construction#easy assembly#lightweight#loveseat#outdoor furniture#outdoor sectional couch#patio furniture#product review#Sunvivi outdoor patio#versatile configuration#wicker
1 note
·
View note
Text
Ghhh i need to finish virgo vs the zodiac……….
#the ambition/versatility/patience system & just the metaphysics of the world in general#sooo cools#& the customization of how to configure the party too#AND THE WAY A LEVEL UP FULLY RESTORES LIFE#i was like halfway thru aquarius & then forgor to save & lost sooooo much progress. but man#it was good!!!#oh fuck the ice skating puzzle tho that shit did NOT work on switch#praying i saved after that actually#but yea… & the character designs rock & everyones mentalities are so fucked in such a good way#just. rlly good game
7 notes
·
View notes
Text
England's New Recruits Train Before Nations League Matches, Plus Coote Updates
The England national team is in the spotlight again as new faces join the squad to prepare for upcoming UEFA Nations League matches. With the inclusion of emerging talent alongside seasoned players, England’s roster is undergoing a promising evolution. Fans have much to look forward to as these young recruits bring renewed energy and anticipation to the team, raising hopes of clinching a strong…
#adjust#attacking threats#awareness#back four#Bellingham#between#configurations#defensive#demands#Elliott#England seamlessly#England&039;s tactics#especially#Flexibility#higher control#midfield#Midfield Flexibility#Morgan Gibbs-White’s#Nations League Matches#opponents#physical#quicker transitions#useful#versatility
0 notes
Text
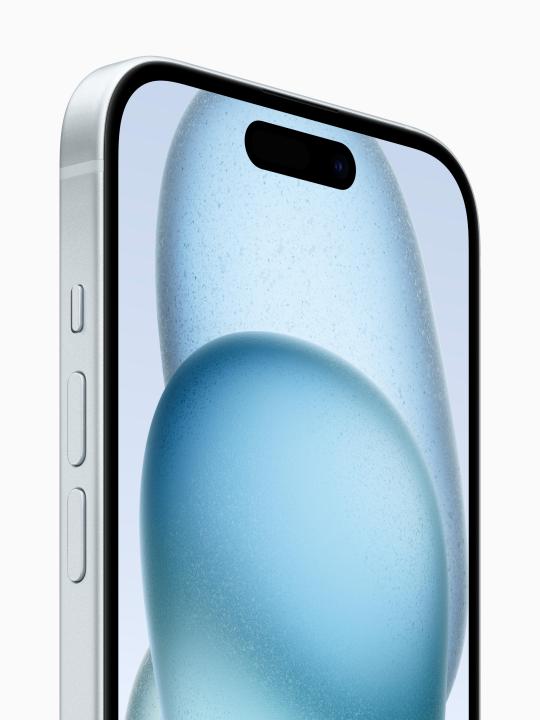
All four iPhone 16 models to feature solid-state Action Button: Report
Photo: Mute switch on iPhone 15 All four iPhone 16 models — iPhone 16, iPhone 16 Plus, iPhone 16 Pro, and iPhone 16 Pro Max — will all feature the Action button, according to a report by 9To5Mac. It is expected that the Action Button that replaced the physical mute switch from the iPhone 15 Pro and Pro Max this year will debut on the vanilla iPhone models next year. In addition to this, the…
View On WordPress
#Action button#Apple#Atlas#force sensor#functionality#innovative feature#iPhone 16 action button#iPhone 16 features#iPhone 16 launch#iPhone 16 leaks#iPhone 16 rumors#iPhone 16 series#iPhone 16 specs#iPhone 16 update#user-configurable#versatility
0 notes
Text
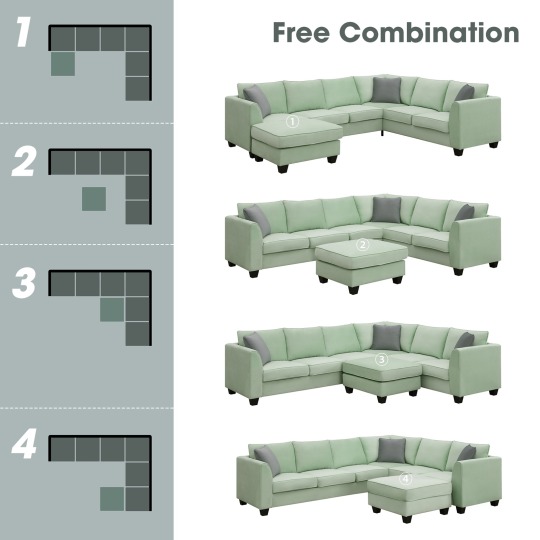
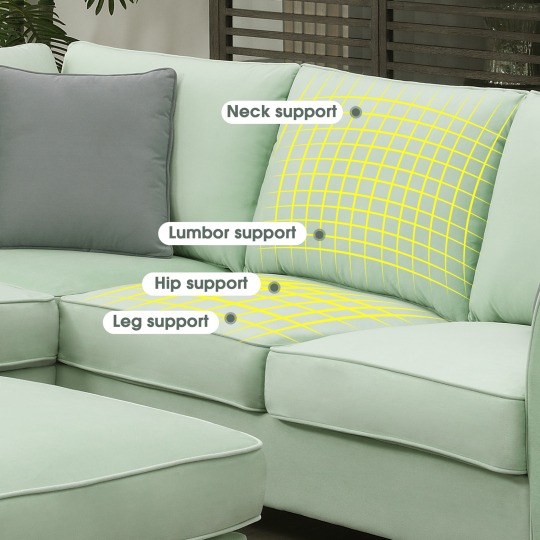
Upgrade your living room with our Modular Sectional Sofa, available in versatile colors: Black, Green, and Gray. Crafted for comfort, this L-shaped sofa features a solid wood and iron frame, 100% polyester fabric, and high-density sponge for relaxation. Configure the pieces to your liking, and chic design elements like wide track armrests and oversized cushions offer modern aesthetics. Easy assembly, strong build, and generous dimensions (112.5”W x 87.5”D x 33.5”H) ensure both style and functionality.
shopping:https://aboen.com/product/11287-inches-7-seater-modular-sofa

youtube
#combination sofa#configurable sofa#convertible sofa#couch#futon#L-shaped sofa#loveseat#modular seating#modular sectional#modular sofa#multi-piece sofa#recliner#sectional#sectional couch#settee#sofa#sofa bed#upholstered sofa#versatile sofa#Youtube
0 notes
Text
Your 12th house gifts and areas you struggle with most, according to your rising sign.
The 12th House is traditionally a desolate, dark, and isolating place. But what insights might you gain, were you to confront and explore that which you've been avoiding? Not unlike how every chart has a “natal promise”, every 12H has positive potential and negative burdens to show for itself. Here, we shall dive into that. Use Whole Sign Houses.
P.S: one configuration cannot explain everything about you as a person with a full-chart and a bunch of unique personal experiences, so if you do not relate to everything, that’s fine. ♥
— Aries Rising with Pisces in the 12H:
· Gift: Aries risings are profoundly intuitive & empathetic and this fact is oft understated. These people tend to be blessed with creativity & plenty of artistic gifts, and are incredibly inspirational to those around them. The teacher that inspires their students so profoundly they remain unforgotten even decades later, the hype man that supports their friend group’s endeavors most — these archetypes are found across the zodiac spectrum, but at an unusually high concentration among Aries risings.
· Struggle: they tend to feel overwhelmed by their unspoken emotions and have a hard time asserting personal boundaries. Aries rising natives tend to wear their hearts on their sleeves, and have a hard time keeping things in. If they *feel* something, they will make it known.
— Taurus Rising with Aries in the 12H:
· Gift: Taurus risings are blessed with incredible resiliency, & can overcome anything if they so desire. They tend to enjoy most & even be skilled at artistic pursuits that revolve around the erotic &/or grotesque. They are rarely put off by things, and are the type of people that can listen to you vent about all sorts of topics, no matter how ‘gross’ or taboo.
· Struggle: ironically, Taurus rising natives tend to simultaneously be very impatient while also being inclined to repressing and internalizing all sorts of emotions, not unlike a dormant volcano, leading to inner and outer conflict. They tend to be hot-headed and struggle letting go of matters they found hurtful.
— Gemini Rising with Taurus in the 12H:
· Gift: These people are incredibly grounded intellectually and it shines through their mental clarity and ability to communicate with precision. Though they may appear scatterbrained to others, their mind palace is incredibly well-compartmentalized. They tend to be great at artistic pursuits that call upon multiple senses at once and provide strong sensorial experiences.
· Struggle: Gemini rising natives tend to overanalyze emotions, which hinders the spontaneity and adaptative quality associated with other Gemini placements. They also tend to repress their desire for relational pleasure and connection, and have a hard time accepting that even they desire to connect with others.
— Cancer Rising with Gemini in the 12H:
· Gift: Cancer risings are capable of understanding the perspective of others with incredible ease, which grants them a versatile penmanship & communication skillset. They tend to excel at communication, writing, teaching, getting things across, as no matter how complex the topic at hand they will manage to break it down to others in a manner that is simple enough to be understood by anyone — in part explaining why they tend to be so great with kids.
· Struggle: Cancer rising natives often have a hard time reconciling rational thought with emotional intuition, leading to indecision — growing up, possibly as a defense mechanism, most Cancer risings tend to pick one end of the emotion vs reason spectrum and sticking to it, leading to unavoidable inner tension in adulthood.
— Leo Rising with Cancer in the 12H:
· Gift: not unlike Aries risings, their intuitive senses & understanding of other people’s hidden emotions are widely underestimated. Their ability to foster deep emotional connections with others & nurture those around them is second to none. They also tend to have the very rich & versatile emotional inner world that is often associated with water moons – in part explaining why they’re known for their creativity & dramatic flair.
· Struggle: Leo risings have a tendency to retreat into isolation upon feeling vulnerable. They tend to repress their feelings from the outside world, and hardly feel comfortable enough to let anyone in. In more extreme cases, there might even be a propensity towards denying certain emotions and repressing them altogether. They have a very polished facade & a strong sense of self, and consequently will hardly appreciate breaking out of character.
— Virgo Rising with Leo in the 12H:
· Gift: Virgo risings are known for telling it like it is — their authentic manner of self-expression and courage to confront anything that gets in their way is their signature brand. Though many Virgo risings tend to prefer blending in and going unnoticed, they’re in actuality extremely creative, and will hardly let other people’s narrative steer them at will.
- Struggle: a Virgo rising’s biggest critic is themselves, and oftentimes they tend to forget that their own desire to be perfect may not be shared by others, as most people value authenticity over perfection — leading to Virgo rising natives feeling rejected by those around them, as their desire to advise and help is inextricably linked to their sense of self. They tend not to realize that said advice is often unwarranted and unsought for, consequently taking everything to heart, which may result in them struggling with self-acceptance and vulnerability.
— Libra Rising with Virgo in the 12H:
· Gift: Libra risings have mastered the art of knowing that multiple things can be true at once, & their analytical minds are loaded with insight into hidden dynamics & truths. They tend to favor a practical approach to resolving emotional conflicts, which makes them seem as though they fear & avoid conflict, when in truth they had already assessed the situation and figured out the best path to returning to center.
· Struggle: Libra risings repress thought & opinion to keep the peace, & consequently feel as though their opinions matter less or not at all to those around them — which, once brought up, might come across as a point of confusion to those around them who generally value their insights immensely. They also tend to overanalyze emotions, be it their own or those of others, and thus struggle with expressing deeper feelings, or believing others to begin with, leading to inner conflict.
— Scorpio Rising with Libra in the 12H:
· Gift: Scorpio risings posess the ability to understand subconscious patterns no matter how convoluted they may be. Even at times where they struggle with understanding themselves, their emotions, desires and behavioural patterns, those of others are hardly a secret to them.
· Struggle: the 12th house is a lesson on balance & compromise for Scorpio risings. Their desire for harmony in inner conflicts is often at odds with their own subjectivity & inclination towards taking extremes in their daily lives, so they tend to struggle immensely with balance. They simultaneously obsess over & repress their hidden desires & preferences, leading to power struggles within the self. They also tend to struggle with forming connections with others, whether it’s due to failed past connections or an inherent fear of commitment or merely an extreme sense of detachment.
— Sagittarius Rising with Scorpio in the 12H:
· Gift: Sagittarius risings are known for their fearlessness and inclination towards spiritual & occult pursuits. A Sagittarius rising is never one to say no to or back down from new experiences, and have a sense of freedom that is defining to their personhood. Everyday is a potential new lesson to these people.
· Struggle: the same sense of freedom may lead to their tendency towards escapism. They tend to struggle with confronting their less superficial, deeper emotions, & may repress their anger a lot in their youth — leading to their being a lot more explosive and thrill-seeking in adulthood. Sagittarius risings are the type to prefer trying anything – even things many would advise against, just to prove a point, whether to themselves or others – as they believe they have no teacher other than life itself.
— Capricorn Rising with Sagittarius in the 12H:
· Gift: Capricorn risings are known for their philosophical perspective & optimistic outlook on challenges, which often translates to an ability to grow wiser at a faster rate than their peers. Their beliefs & values play a crucial role in their selfhood, so they tend to invest a lot of time into spiritual pursuits.
· Struggle: the flip side of their beliefs and values shaping their inner world in a way that is hard to get across to others is that they may be the type to struggle with forming connections with people who do not share the same beliefs & philosophies. They also tend to fear failure more than anything, & struggle to surrender to their own place in the grander scheme of things — these two points are inextricably linked and in order to grow past either, you as a Capricorn rising ought to address both simultaneously.
— Aquarius Rising with Capricorn in the 12H :
· Gift: Incredibly disciplined and persevering in confronting their inner fears. Overtime, they tend to develop a sense of stability and self-mastery that is second to none. While not intuitive in the stereotypical sense, they tend to have inexplicable hunches about things that hardly ever turn out to be incorrect. They tend to live well with & within chaos, sometimes at the expense of their well-being.
· Struggle: they tend to repress emotions and have a strong fear of vulnerability, which hinders their ability to form intimate connections and grow emotionally — they feel as though they have a built-in indestructible wall blocking them out & holding them back from everyone else. They may struggle with becoming responsible, or feel as though they matured too soon. Sometimes, it’s a bit of both.
— Pisces Rising with Aquarius in the 12H:
· Gift: Pisces risings are infinitely more rational than they are believed to be. They have an uncanny approach to understanding subconscious patterns, & tend to reason their way through any situation before reaching a judgement. Very insightful people who tend to be incredibly inquisitive as well, and would prod answers out of anyone if they so desire.
· Struggle: Pisces risings tend to isolate often, whether as a way to recalibrate or just out of preference. Natives of this rising sign, especially those with Air moons, often struggle with detachment and may find it hard to relate to statements implying they are inclined towards emotionality. These people often have or had a “weird kid” reputation ascribed to them by their peers that often stuck well into adulthood.
If you’d like a reading, more details can be found here!
#astrology#astro notes#astrological observations#hellenistic astrology#astro observations#astrology signs#astrology readings#zodiac#rising signs#12 houses#12h placements
3K notes
·
View notes
Text

TMP Era Theseus
Concept art for Star Trek: Online
This was a super exciting piece to work on, it was a fun challenge to 'retro-engineer' a futuristic design backwards into something befitting of an earlier style- the idea here was to match the TMP Theseus as seen in a couple of frames of the IDW comics, whilst keeping the ship customiseable with the existing version we have in-game.

The headcanon I came up with whilst I was designing is that the actual core of the ship here is just the impulse deck, aft of the saucer- to which Starfleet would 'clamp' prototype components to- ie the saucer, pylons, and engineering hull- although I like the idea that this configuration wasn't necessarily fixed, and you could attach different components however engineers required across this versatile basic spaceframe. Obviously- that can't be done in-game, and this isn't official canon, but it gave that section of the ship a very utilitarian feel that I ended up really liking for that 'experimental' vibe.
#artists on tumblr#star trek#sci fi art#concept art#science fiction#starfleet#star trek art#spaceship#star trek online#sci fi#fuck ai#i found so many images of theseus hadesgame whilst looking for reference for this
75 notes
·
View notes
Text
WALLDEC - GOLD

Enhance Your Space with Walldec: Your Destination for Acoustic and Slat Wall Panels
When it comes to transforming the aesthetics and functionality of interior spaces, wall panels play a pivotal role. In this realm, Walldec stands out as a premier destination offering a diverse range of acoustic and slat wall panels. With a commitment to quality and innovation, Walldec.co.uk caters to the needs of both residential and commercial spaces, providing solutions that elevate ambiance while offering practical benefits.
Acoustic Wall Panels:
Walldec.co.uk specializes in acoustic wall panels designed to enhance sound quality and control within various environments. Whether it's an office space requiring reduced noise levels for increased productivity or a home theater seeking optimal sound performance, Walldec's acoustic panels offer a blend of functionality and aesthetics. Crafted from high-quality materials, these panels effectively absorb sound waves, reducing reverberation and creating a more comfortable acoustic environment.
Slat Wall Panels:
For those seeking versatile and visually appealing wall solutions, Walldec.co.uk offers an impressive selection of slat wall panels. Slat walls provide a modern and customizable backdrop suitable for diverse settings, including retail stores, exhibition spaces, and residential interiors. With Walldec's slat wall panels, you can effortlessly create sleek accent walls, stylish partitions, or functional display areas. Available in various finishes and configurations, these panels offer endless design possibilities to suit your aesthetic preferences and spatial requirements.
Innovative Design and Quality Craftsmanship:
At Walldec, innovation and quality craftsmanship are at the forefront of every product offering. Their team of skilled professionals utilizes cutting-edge technology and premium materials to deliver wall panels that exceed industry standards. Whether you're looking for acoustic solutions to enhance acoustics or slat walls to add a touch of sophistication to your space, Walldec ensures that each panel is meticulously crafted to deliver exceptional performance and durability.
Elevate your interior design with Walldec's range of acoustic and slat wall panels. With a focus on innovation, quality, and versatility, Walldec.co.uk offers solutions tailored to meet the diverse needs of modern spaces. Whether you're striving to improve sound quality or enhance visual appeal, Walldec provides the perfect blend of functionality and aesthetics to transform any environment. Explore their collection today at Walldec.co.uk and redefine the ambiance of your space.
740 notes
·
View notes
Text

(Cross posted on Wattpad)
Prev - Next Chapter
They were different now, in ways that went far beyond appearances. Time had shaped them, and pain had carved deep lines into their souls.

Jinx’s hair was the first thing anyone would notice. Thick, vivid blue braids that trailed all the way to the floor, as unruly and wild as the girl herself. It was the same shade it had always been, though now tangled with streaks of soot and grime from the undercity.
Hair holds memories after all.
Her face, once-rounded cheeks had hollowed out, leaving her with a gaunt, ghostly visage. Her sunken eyes were rimmed with dark circles, speaking of sleepless nights and endless nightmares.
Through it all, Y/N still called her Bluejay. Jinx didn’t mind, she even preferred it. The nickname carried warmth, a connection to someone who saw her as more than just Jinx.
Y/N had changed too. Her face bore the same gauntness like Jinx, though hers came less from starvation and more from exhaustion. The color of her eyes had deepened, shifting into an endless voice.
The time she spent above, in the shimmering heights of Piltover, had left its mark. Her skin was tanner now, kissed by sunlight that rarely touched the depths of Zaun.
When Y/N had discovered the stolen book and the three mysterious gemstones among her scattered belongings, she hadn’t hesitated. The ancient runes in the book had shown power to protect, power to survive.
And what was a desperate girl to do when the stakes were life and death? Y/N’s answer was simple: carve the runes into her skin.
The memory was vivid. The sharp sting of the blade against her palms, the warm, sticky sensation of her own blood dripping onto the pages of the book.
With Silco’s resources, Y/N had forged something entirely her own. The three gemstones were set into sleek metallic bands, forming a trio of rings that hummed with latent power. Each ring was a masterpiece, their surfaces adorned with intricate runes that pulsed faintly with blue light.
Y/N had crafted them to be versatile, the rings linked by delicate chains that could be configured in countless ways on her fingers and even around her wrist.
She couldn’t help but feel pride in what she’d created, despite the scars it had left on her hands. The runes had worked. The blood, the pain— it had all been worth it.
Y/N remembered the first time she tested them, the rush of energy coursing through her veins as the gemstones flared to life.
Sure, everytime she used it there was a chance she would explode, but everytime she didn't, great exhaustion fell upon her. Yet for the first time, she felt like she had the means to protect her family.
Even if it cost her everything, it was a price she was willing to pay.
_____________________________________________________
Progress Day. Y/N could laugh on and on about how untrue that label felt. But for now, she’d let herself relax. The thought of the day’s festivities didn’t piss her off at all!
It didn’t piss her off that Jason, or whatever his name was, was plastered all over Piltover, smiling like some golden boy of innovation. And it didn’t sting as much as it used to that Viktor, who deserved so much more, was relegated to the shadows.
She and Viktor had exchanged a few letters, polite but distant. The connection wasn’t what it used to be, and Y/N had long accepted that it never would be again. She told herself she didn’t care, that it didn’t burn in her chest anymore.
It was stupid to dwell on feelings, she reminded herself. Emotions only got in the way, tripping up ambition. Love was a distraction. But holding onto that resolve became harder when Jinx started talking to herself again.
“What’re you looking at, Mylo?!” Jinx shouted, her voice rising in agitation. Y/N watched her quietly, then moved to sit beside her. “Just shut up!” Jinx snapped, her blue eyes narrowing, though her expression wavered as if she was unsure of her own words.
Y/N didn’t react, her white hair catching the faint light as she sat cross-legged. She met Jinx’s eyes with a softness no one else ever saw. That vulnerability made Jinx feel something rare: pride. Y/N trusted her, at least enough, to let her guard down. When Y/N reached out a hand, though, Jinx flinched.
“What.” Jinx’s voice was sharp, but it sounded more like a statement than a question.
“I heard about what happened,” Y/N said softly.
Jinx scrambled to defend herself, words tumbling out too fast. “It’s stupid, I know! I-it’s not like I still think about her! She’s just a girl with pink hair, nothing special! Sisters are stupid,” She added hastily, laughing nervously. “I-I mean, she’s not important! She’s dead!”
Her voice cracked slightly, but she pushed through it, her tone growing louder and angrier. “Now Silco thinks I’m weak! ‘Sevika will clean everything up!’ Blah, blah, blah! I’m not weak!” She curled up, pulling her knees to her chest as her gaze fell on the bombs at her side. “I’m… I’m not weak, right?”
Y/N shook her head and reached out again, her fingers gently brushing against Jinx’s braids. “You’re better at being you,” She said, her voice steady. She began undoing Jinx’s braids, her touch calm and deliberate. “You did well today.”
“You’re lying,” Jinx snapped, glaring at her, daring Y/N to contradict her.
“Have I ever lied to you, Bluejay?” Y/N asked, raising a brow as she ran her hands through Jinx’s tangled hair.
Jinx hesitated, then muttered, “No.”
“Exactly,” Y/N said, a soft smile on her lips as she started to re-braid the long blue strands. “You did good today. You took out most of the fireflies, and it was flashy. You know how much I like flashy.”
Jinx’s lips quirked up at the corners, her posture relaxing slightly. “What did you do today?” She asked, her voice quiet.
“Oh, nothing much,” Y/N replied lightly. “Had to oversee some Shimmer shipments. Made sure everything ran smoothly.”
“Tell me something interesting,” Jinx sighed, stretching her arms as she sat up straighter.
“Well,” Y/N began, her tone laced with amusement, “Some guy tried to rob a woman, but I slipped one of your bombs into his bag.”
Jinx let out a genuine laugh, her shoulders shaking. “Was it one of the new ones?”
“You bet. You told me to test it out, didn’t you?” Y/N grinned.
Jinx rocked back and forth, a smile lighting up her face. “You always kind of… Get me,” she said softly.
“We’ve known each other for years. A bird can’t fly without both of its wings,” Y/N said with a smirk as she moved from the first braid to the next.
“Is it going to take much longer, Ma?” She asked, her impatience bubbling to the surface.
“If your hair wasn’t so long, you wouldn’t be sitting here,” Y/N teased.
“Well, I don’t want it short like yours,” Jinx retorted, sticking out her tongue.
“What’s wrong with my hair?” Y/N asked, mock offense in her tone.
“It’s too fluffy. I can’t get mine to look like that,” Jinx grumbled. “Is it done yet?”
“Almost,” Y/N reassured her. “Just one more.”
Jinx fell silent for a moment, then glanced sideways at Y/N. “Hey Ma, can we go out tonight?”
“If I say no, would it stop you?” Y/N asked dryly.
Jinx shrugged. “If I say yes, will you be mad?”
“Touche.” Y/N chuckled. “But… The chain broke on one of my rings, I have to fix it tonight so I can’t go out.”
Jinx frowned, “Why? Is Silco making you go out again? Can’t he just wait? Why can’t he just make Sevika do it since she’s SOOOO great?!”
“I want to fix the rings so then I can protect you and Silco if I need to.” Y/N corrected Jinx, turning her sister's head to look at her, “Bluejay, trust me that I’d much rather want to go out with you then weld a new chain for me, but I have to.”
Jinx scrunched up her face, still displeased though knew that Y/N was telling the truth. “Alright, but next time, right?”
Y/N smiled softly, “Of course.”
_____________________________________________________
“Wanna join me? Come and play, but I might shoot you in your face. Bombs and bullets will do the trick, what we need here is a little bit of panic! Do you ever wanna catch me?”
Jinx twirled a grenade between her fingers, her blue hair swaying with every exaggerated movement. She leaned back into the worn-out chair, her eyes glittering with delight.
“I saw what you did,” Y/N said, a knowing smirk tugging at her lips as she focused on the delicate strokes of blue nail polish she was applying to Jinx’s fingers.
“How big of an explosion was it?” Y/N asked, her tone as casual as if she were asking about the weather.
Jinx let out a maniacal laugh that echoed through the dimly lit room. “Oh, it was huge!” She grinned wickedly, her eyes alight with mischief. “Silco was soooo happy when he saw what I stole. You should’ve seen his face, Ma!”
Y/N raised an eyebrow but didn’t look up from her work, though her heart warmed at Jinx calling her ‘mom’. “And what exactly did you steal this time?” She asked, switching out the blue polish for a vibrant pink. She began painting Jinx’s other hand.
“This!” Jinx exclaimed, holding up a shimmering blue orb that pulsed faintly in the dim light. The object seemed alive, radiating an eerie energy that made Y/N’s stomach twist.
Y/N froze for a moment, her white hair catching the light as she looked at the orb with widened eyes. “That’s… What is it?” She asked with a curious tilt of her head.
Jinx shrugged, her grin never faltering. “I dunno! But I stole this book thingy too.” She reached behind her and produced a book, holding it up triumphantly. “It looks a lot like that sad, boring book you’re always staring at.”
Y/N chuckled softly, her tone light despite the tension brewing inside her. “Alright now, coming for my books is a bit too harsh, don’t you think?”
Jinx waved the book around like it was a toy. “Yeah, but this one’s cooler! There’s all this magic and rune stuff going on in it. At least, that’s what the book says.” She plopped the orb and book onto the table, leaning forward with a conspiratorial grin. “Silco was soooo mad before he saw all this. I think my fireworks softened him up, don’t you think, Ma?”
“Very impressive indeed,” Y/N teased, finishing the final stroke of polish on Jinx’s nails. She held up Jinx’s hand for inspection. “Alright, Bluejay, your nails are done. Gorgeous, as always.”
Jinx examined her brightly painted nails, a wide smile spreading across her face. “Thanks! Y’know…�� She began, her tone shifting slightly, “Those rune things in the book, they kinda look like the ones on your hands.”
Y/N’s playful demeanor faltered for a fraction of a second. Her gaze flickered to her own hands, where faint scars showed faintly under the light. She flexed her fingers, her voice softer now. “You think so?”
“Yeah…” Jinx frowned, reaching for the book and flipping it open to a page covered in intricate rune illustrations. She held it up for Y/N to see. “Do you think the book you stole and the one I stole are connected? I mean, you said the runes on your hands were for protection, right?”
Y/N hesitated, her lips pressing into a thin line. “Bluejay, of course, they’re for protection. But they’re only meant to be used in emergencies. And to be honest… I don’t really know how to use them. Not yet.”
“Oh.” Jinx’s shoulders slumped slightly, but the disappointment in her face was fleeting. She brightened quickly, her grin returning. “Well, I guess we’ll just have to figure it out together, huh?”
Y/N smiled, her confidence returning. “We’re in this together, right, Bluejay?”
“Of course, Ma. Always.”
Their palms slapped together with a crisp clap, followed by their thumbs locking together to form a bird-like shape. They flapped their linked hands twice, mimicking the motion of wings, their laughter ringing out in perfect harmony.
taglist: @night-fall-moon @cyberwears @g0ul666 (If you'd like to be added tell me in the comments!!!)
#arcane#arcane x reader#x reader#fanfic#fanfiction#wattpad#cross-posted on wattpad#cross-posted#viktor x reader#wattpad fanfiction#viktor smut#silco arcane#silco#sevika#sevika arcane#jinx arcane#jinx#viktor arcane#viktor#jayce arcane#jayce
54 notes
·
View notes
Text
Proposal: Dyna-Soar/Little Joe II Suborbital Flight Test Program

Artist concept of Little Joe II/Dyna-Soar concept. (Convair)
"The X-20 Dyna-Soar program is often remembered as one of the biggest lost opportunities in the history of manned space flight. Evolving from the WS-464L Program, Dyna-Soar had great potential for use as a military space platform as well as civilian science laboratory. Unlike the earlier Mercury, Gemini and Apollo capsules that were single-use vehicles returning to earth under a parachute system, the X-20 was a winged vehicle, capable of landing on select runways, then refur- bished and utilized again.

Initial flight testing of the Dyna-Soar had the vehicle dropped from a modified B-52C, 53-0399, carrier aircraft to test atmospheric handling qualities and landing techniques. The USAF selected Ed wards AFB, CA, and White Sands Missile Range, NM, due to their natural runway surfaces. (AFTC History Office)
The initial phase of the X-20 flight test program had the vehicle dropped from high altitudes from a B-52C mothership to test atmospheric aerodynamic handing of the vehicle, as well as develop landing techniques at Edwards AFB, CA. The second phase of testing involved sending the X-20 on unmanned and manned orbital spaceflight test mis- sions powered by a Titan III rocket booster which left a large gap in the standard progression of flight testing. The Convair Division of General Dynam- ics proposed making suborbital test flights using a Little Joe II booster.

The Little Joe II was a clustered, solid-propellant rocket booster designed as unguided and controllable versions. The vehicle could accommodate one to seven, 40-inch diameter, 100,000-lb thrust, Aerojet Algol 1D solid rocket mo- tors. With minor modifications the im proved launch vehicle (IPLV) could ac commodate the more advanced 44-inch diameter Algol IIA motors.
Little Joe II had the reputation as a reliable work- horse of the early manned space program, testing Mercury and Apollo escape and recovery systems from various launch locations. The Little Joe II booster was a versatile rocket with capabilities not found on many systems of the day and could be adapted and configured for several different flight profiles.

This detailed dimensional drawing shows some of the modifications required for the Little Joe il booster in order to carry the Dyna-Soar test vehicle. In addition to the upper adapter fairing, the booster required larger aerodynamic stabilizing fins to compensate for the larger payload. (Convair)
Convair proposed making test flights of the Dyna- Soar/Little Joe II combination on an overland range between Edwards AFB, CA and the White Sands Missile Range in New Mexico. Launching from Edwards AFB provided a lakebed in case of an aborted launch . and emergency landing. Range instrumentation was already in place at both sites, keeping the range support cost to a minimum.


Two different versions of the modified Little Joe II booster
The Dyna-Soar test vehicle would be mounted atop the Little Joe II booster with a two-part transition fairing, gloved over the X-20 to minimize drag and would be jettisoned prior to separation. This variation of the Little Joe II booster required movable aerodynamic fins, larger than those used on standard Little Joe II launches.

A Boeing/USAF X-20 Dyan-Soar is boosted skyward for a suborbital test flight from Edwards AFB, CA towards White Sands Missile Range, NM, aboard a Convair Little Joe II. The larger stabilizing fins and aerodynamic fair- ing around the Dyna-Soar are noteworthy. (Convair)
Utilizing a standard Little Joe II booster, the X-20 could be propelled to a maximum speed of 10,000 fps (approximately 6,800 mph) at an altitude near 170,000 feet. With the improved Little Joe II launch vehi- cle, those figures would rise to a speed of 15,000 fps (approximately 10,200 mph) and an altitude near 200,000 feet. The entire flight covered approximately 582 nautical miles, with the booster impacting the desert floor just over halfway through the flight. The Dyna-Soar test vehicle would experience considerable aerodynamic heating during the reentry phase with the final landing on the alkali flats of the White Sands Missile Range.

The Dyna-Soar suborbital program required a minimum of five test flights: two unmanned flights utilizing the existing automatic guidance, and three manned flights. Convair projected the total price of the five-flight test program at $12.2 million, considerably less than the projected $18 million per flight for a Titan III booster (figures are in FY 1965 dollars)."
AFMC History & Museums Program HQ AFMC/HO 4225 Logistics Ave, RM S133-Wright-Patterson AFB 45433-5006-DSN: 713-1797
source
NASA ID: 63-Little Joe II-3
SDASM Archives: 86914210, 47209426
#Boeing X-20 Dyna-Soar#Boeing X-20 Dynasoar#Boeing X-20#X-20#Dynamic Soarer#Dyna-Soar#Dynasoar#X-Plane#Space Plane#Spacecraft#Little Joe II#Rocket#NASA#United States Air Force#U.S. Air Force#US Air Force#USAF#White Sands LC-36#LC-36#White Sands Missile Range#WSMR#White Sands#New Mexico#Cancelled#Cancelled Mission#Cancelled Missions#1960s#undated#my post
48 notes
·
View notes
Text

Nova (Black Hawk)
The Nova is a versatile medium OmniMech that is capable of acting as a workhorse design in most forces. In fact, the design is so well balanced that it inspired the creation of the Black Hawk-KU, an Inner Sphere design based on the Nova and named using the Inner Sphere code name for this 'Mech: Black Hawk. The Nova's debut battle was the combined assault on Kindraa Smythe-Jewel on Foster in 2872 launched by the Hell's Horses, Clan Coyote and Kindraa Payne that saw the Smythe-Jewels wiped out as a faction.
Despite the proliferation of the design into the touman of every Clan, the number of Nova OmniMechs has been steadily if slowly diminishing in the Kerensky Cluster. Designed as an early OmniMech by Clan Hell's Horses, the Nova was produced at the famous Tokasha MechWorks beginning in 2870. At the time of its introduction, the Nova was intended for use as infantry support, and was the first OmniMech designed with hardpoints allowing Elementals to easily mount and dismount the chassis, a feature which would become standard among future OmniMech designs across Clan space. However, after Tokasha was taken by Clan Ghost Bear during the Battle of Tokasha, production of the Nova ceased in the Kerensky Cluster in 2921 and while under Ghost Bear control, Tokasha MechWorks would produce just spare parts for the design. Every Clan has since acquired Nova OmniMechs as isorla. Clan Jade Falcon would restart production of the Nova on Sudeten in 3073, over 200 years after the first models left the production line.
Although the last Nova production facility in the Clan Homeworlds was retooled to create Pouncers by 3087, the very few remaining in Clan Space have gotten into the hands of Aggressor faction Mechwarriors.
Equipped with a 250 XL Model SF-2 extralight engine, the Nova has a ground speed of 86.4 km/h that allows it to keep up with most heavy and assault 'Mechs while being outpaced by most lighter 'Mechs. However, the Nova remains very maneuverable through the use of five jump jets, allowing the Nova to jump up to 150 meters. The 14 double heat sinks that the Nova mounts are barely sufficient to handle its heavy heat load of its variants. The Nova is also protected by 10 tons of armor, providing the 'Mech with 96% of its maximum armor protection.
In its Primary configuration the Nova is a devastating close combat 'Mech and battle armor killer that is capable of delivering a powerful barrage with its twelve ER medium lasers. To help it use these as effectively as possible, the Nova has added four more double heat sinks bringing the total up to 18. Even with the added double heat sinks, the Nova Prime is capable of producing almost twice as much heat as it can dissipate.
31 notes
·
View notes
Text
🎀 Attractiveness in the birth chart: Catherine Deneuve 🎀


Catherine Deneuve, a celebrated French actress and icon of her time, is known for her enduring elegance and grace. Over her long career, she has captivated audiences with her iconic roles and distinctive charm. Her presence is marked by a blend of sophistication and enigmatic allure, making her a symbol of cinematic excellence. In this article, we will explore Catherine Deneuve's charm through her natal chart.
Capricorn Rising & Saturn in Gemini
Catherine Deneuve's Capricorn Rising and Saturn retrograde in Gemini create a persona that is both authentic and thoughtfully powerful.
With Capricorn rising and an empty 1st house, she appears reserved and elegant, giving off a sense of authenticity and quiet power. Her Capricorn Rising gives her a disciplined and ambitious vibe, seen by others as quiet confidence and a steady presence.
The ruler of her chart, Saturn retrograde in Gemini, makes her communication thoughtful and deliberate. In interviews and public appearances, she is known for her measured speech and poised demeanor, which convey a sense of confidence and authority. The retrograde motion of Saturn enhances her introspective nature, causing her to reflect deeply before speaking, adding wisdom and careful consideration to her words.
7th house in Cancer
Catherine Deneuve's charm is deeply connected to her ability to form profound and inspiring relationships.
Deneuve's 7th house in Cancer tell a lot about her personal charm. This house is filled with Pluto, the North Node, the Moon, and Jupiter in Leo, showing dramatic and intense one-on-one interactions.
Pluto indicates deep, transformative relationships, while the Moon in Leo makes her warm, generous, and expressive. Jupiter in Leo boosts her magnetism, making her inspiring in personal encounters. The North Node here suggests that growing through relationships is key for her, making her charm an important part of her life path.
This configuration creates a personality that is deep and highly engaging. Catherine Deneuve connects with people on a meaningful level, showing warmth and generosity. In one-on-one interactions, talking with Catherine Deneuve feels warm and engaging. She exudes a charismatic energy that makes you feel inspired and valued, as if you're the center of her attention. Her expressive nature and emotional insights create a sense of intimacy and authenticity, leaving a lasting impression of genuine connection and warmth.
Midheaven in Scorpio & 11th House in Sagittarius
Catherine Deneuve's 11th house in Sagittarius, though empty, is ruled by Jupiter in Leo in the 7th house. This means her popularity and community relationships are influenced by her warm and charismatic interactions.
With the Scorpio Midheaven, her professional image is one of mystery and depth; she is seen as a powerful and intriguing figure in her career. The empty 10th house allows the full force of Scorpio's intense energy to shine through without any distractions, enhancing her enigmatic and captivating public persona. Her roles in psychological thrillers and complex dramas showcased her ability to embody enigmatic characters, which enhanced her reputation as a versatile and captivating actress.
Pluto's position in the 7th house means that her relationships have a significant impact on her career and public image. This placement indicates that her personal connections are often transformative and intense, affecting how she is perceived in her professional life. Her collaborations with influential directors and artists have often led to transformative roles that have shaped her cinematic legacy. Her ability to engage deeply and meaningfully with others helps her build a strong and influential reputation.
The 11th house in Sagittarius, although empty, is ruled by Jupiter in Leo, also located in the 7th house. This indicates that her popularity and connections within her community are influenced by her warm, generous, and charismatic interactions. Her involvement in charitable causes and public engagements showcases her generosity and passion, which resonates positively within her social circles.
If you’re interested in a Natal Promise report (completely unique and written by me), you can grab one on my website.
#catherine deneuve#capricorn rising#saturn retrograde#saturn in gemini#7th house in cancer#moon in leo#jupiter in leo#pluto in the 7th house#moon in the 7th house#north node in the 7th house#jupiter in the 7th house#scorpio midheaven#11th house in sagittarius#astrology#astro observations#astrology observations#astro notes#astro community#astrology notes#predictive astrology#birth chart#birth chart reading#astro content#astroblr#astrology placements#natal astrology#astrology signs
85 notes
·
View notes
Text
Inconjunct/Quincunx Signs & the Yod Configuration in a Chart
When there are planets involved, inconjunct signs essentially form a Yod. In astrology, a Yod, often called the "Finger of God," is a rare and powerful aspect pattern formed by three planets. It resembles an isosceles triangle, with two planets forming a sextile aspect (60 degrees apart) and both quincunxing (150 degrees) a third planet. The inconjunct planet becomes the apex planet of the Yod and represents the focal point of tension and adjustment in a person's life. It is where the energies of the sextile planets converge and manifest in a unique, often challenging way, pushing the individual to address specific issues or life lessons associated with that planet. The apex planet in a Yod serves as a catalyst for personal growth and can indicate a significant life purpose or area of intense focus. The Yod is associated with a sense of fated events, unique challenges, and a compelling need to address a specific purposes or lessons. It symbolizes a pivotal crossroads where individuals are called to make significant choices and spiritual growth, often requiring adjustments and redirection in their life path.
Aries: Virgo - Scorpio
In a Yod formation with Aries as the apex planet between Virgo and Scorpio, the intense energy of Aries becomes the focal point. Aries, known for its fiery and assertive nature, acts as a catalyst for the practical, analytical Virgo energy and the deep, transformative Scorpio energy. This Yod configuration propels the individual to take assertive action in addressing life's mysteries and making practical changes with great determination. It signifies a strong drive for self-discovery, personal growth, and the pursuit of a unique life purpose that requires a balance between assertiveness, practicality, and deep transformation.
Taurus: Libra - Sagittarius
In a Yod formation with Taurus as the apex planet between Libra and Sagittarius, Taurus serves as the focal point. This Yod combines Libra's quest for balance and harmony with Sagittarius' pursuit of truth and expansion. Taurus, with its practical and grounded nature, encourages the individual to find a harmonious balance between these two energies, emphasizing the importance of seeking truth and personal growth through tangible, reliable means. This Yod configuration highlights the need to harmonize relationships and values with a broader philosophical perspective, all while maintaining practicality and stability in one's pursuits.
Gemini: Scorpio - Capricorn
In a Yod formation with Gemini as the apex planet between Scorpio and Capricorn, Gemini takes center stage. This Yod blends Scorpio's intensity and transformational energy with Capricorn's ambition and practicality. Gemini, known for its versatility and communication skills, acts as the bridge between these two powerful energies. It highlights the importance of using adaptable communication and intellectual agility to navigate intense emotional transformations and career ambitions. This Yod signifies the need to balance deep, transformative changes with a practical and communicative approach to achieve one's goals and personal growth.
Cancer: Sagittarius - Aquarius
In a Yod formation with Cancer as the apex planet between Sagittarius and Aquarius, Cancer assumes a central role. This Yod merges Sagittarius' quest for knowledge and Aquarius' innovative, unconventional energy. Cancer, known for its nurturing and emotional nature, acts as the conduit between these energies. It emphasizes the importance of emotional intelligence, home, and family in navigating philosophical pursuits and innovative ideas. This Yod signifies the need to balance personal emotions, comfort, and a sense of belonging with the quest for intellectual and societal advancement, promoting personal growth through emotional intelligence and a strong sense of community.
Leo: Capricorn - Pisces
In a Yod formation with Leo as the apex planet between Capricorn and Pisces, Leo takes central stage. This Yod combines Capricorn's ambition and Pisces' dreamy, imaginative energy. Leo, known for its creative and expressive nature, acts as the bridge between these energies. It highlights the importance of self-expression, creativity, and individuality in achieving ambitious goals and nurturing spiritual pursuits. This Yod signifies the need to balance personal creativity and self-assuredness with the pursuit of dreams and aspirations, promoting personal growth through confident self-expression and pursuing spiritual or artistic passions.
Virgo: Aquarius - Aries
In a Yod formation with Virgo as the apex planet between Aquarius and Aries, Virgo takes on a leading role. This Yod combines Aquarius' innovative and Aries' assertive energy. Virgo, known for its practical and detail-oriented nature, acts as the intermediary between these energies. It emphasizes the importance of careful planning, attention to detail, and methodical execution when implementing creative and individualistic ideas. This Yod signifies the need to balance innovation and assertiveness with a pragmatic and systematic approach, promoting personal growth through methodical problem-solving and the practical application of visionary concepts.
Libra: Pisces - Taurus
In a Yod formation with Libra as the apex planet between Pisces and Taurus, Libra assumes a central role. This Yod merges Pisces' dreamy and Taurus' sensual energy. Libra, known for its sense of balance and harmony, acts as the mediator between these energies. It highlights the importance of seeking equilibrium and fairness in relationships and financial matters while navigating artistic and idealistic pursuits. This Yod signifies the need to balance the desire for security and sensuality with an appreciation for artistic and compassionate values, promoting personal growth through harmonious connections and a focus on aesthetic and ethical considerations.
Scorpio: Aries - Gemini
In a Yod formation with Scorpio as the apex planet between Aries and Gemini, Scorpio takes the lead role. This Yod blends Aries' assertive and Gemini's communicative energy. Scorpio, known for its depth and intensity, acts as the bridge between these energies. It emphasizes the importance of diving deeply into matters, using strategic communication, and transforming ideas into powerful actions. This Yod signifies the need to balance assertiveness and adaptability with a focus on profound transformation and effective communication, promoting personal growth through strategic, transformative endeavors and assertive, insightful expression.
Sagittarius: Taurus - Cancer
In a Yod formation with Sagittarius as the apex planet between Taurus and Cancer, Sagittarius energy becomes the focal point. This Yod combines Taurus' practicality and Cancer's nurturing energy. Sagittarius, known for its adventurous and philosophical nature, acts as the bridge between these energies. It emphasizes the importance of seeking personal growth through exploring new horizons, nurturing loved ones, and embracing a broad, optimistic perspective on life. This Yod signifies the need to balance practicality and emotional care with a thirst for knowledge, adventure, and philosophical understanding, promoting personal growth through a harmonious blend of grounded nurturing and intellectual exploration.
Capricorn: Gemini - Leo
In a Yod formation with Capricorn as the apex planet between Gemini and Leo, Capricorn takes the central role. This Yod merges Gemini's communicative and Leo's creative energy. Capricorn, known for its disciplined and ambitious nature, acts as the bridge between these energies. It emphasizes the importance of practical and methodical approaches to communication and creative endeavors, promoting personal growth through structured, career-oriented pursuits while balancing self-expression and communication skills.
Aquarius: Cancer - Virgo
In a Yod formation with Aquarius as the apex planet between Cancer and Virgo, Aquarius assumes the lead role. This Yod blends Cancer's nurturing and Virgo's analytical energy. Aquarius, known for its innovative and forward-thinking nature, acts as the mediator between these energies. It highlights the importance of fostering a sense of community and embracing visionary ideas while maintaining a rational, systematic approach to caring for others. This Yod signifies the need to balance emotional sensitivity and practical service with a focus on innovation and a broader societal perspective, promoting personal growth through a combination of humanitarian and analytical efforts.
Pisces: Leo - Libra
In a Yod formation with Pisces as the apex planet between Leo and Libra, Pisces plays a central role. This Yod combines Leo's expressive and Libra's harmonious energy. Pisces, known for its compassionate and dreamy nature, acts as the bridge between these energies. It emphasizes the importance of finding a balance between self-expression and harmonious relationships while nurturing empathy and artistic expression. This Yod signifies the need to balance individual creativity and partnership harmony with a focus on compassion, artistic endeavors, and spiritual growth, promoting personal development through a blend of creative expression and loving, empathetic connections.
#yod#yod aspect#inconjunct#inconjunct signs#sextile#sextile signs#astrology 101#astrology notes#astrology observations#astrology#astrologist#astrologer#sokosmic#mykosmiclife#astro observations#aries#taurus#gemini#cancer#leo#virgo#libra#scorpio#sagittarius#capricorn#aquarius#pisces
268 notes
·
View notes
Photo

Elevate Your Style Game: Mastering the Double-Breasted Suit
Despite being considered a classic from an era long gone, the double-breasted suit is making a powerful comeback in men's fashion. I've just read a fascinating article about styling these distinctive suits that feature overlapping front lapels and parallel button columns.
Did you know that the most common button configuration is 6×2, with only two buttons being functional? And here's a top styling tip - always keep those buttons fastened until you sit down, but never fasten the bottom button (it ruins the clean lines of your suit!).
For those looking to appear taller and broader-shouldered, a double-breasted suit is your secret weapon. They're surprisingly versatile too - pair with oxford shirts for casual settings or a crisp dress shirt and tie for formal occasions.
The article also advises against over-accessorising (keep it simple with just a pocket square or elegant watch) and skipping waistcoats and belts, which can spoil the silhouette.
Have you tried wearing a double-breasted suit recently? I'd love to hear your styling tips or see how you've incorporated this classic into your modern wardrobe.
Like and share if you're ready to embrace this timeless style, and drop a comment with your favourite suit configuration!
10 notes
·
View notes
Note
I've an anthro tiger character who can walk/run/etc both bipedal and quadrupedal. Within the scope of the story he also becomes an amputee - so now hes missing his entire left arm and his right leg up to the knee. I've figured out that bipedally he mostly uses a crutch. but is there anything i can do for him that'll still let him scamper around? I've not been able to find reference for animals missing limbs in a similar configuration.
alright this one was fun. mobile aids for non-human bodies can be tricky, but it's cool and important!
the first step of course is making sure you can keep a character design relatively consistent in both a bipedal and quadrupedal stance.
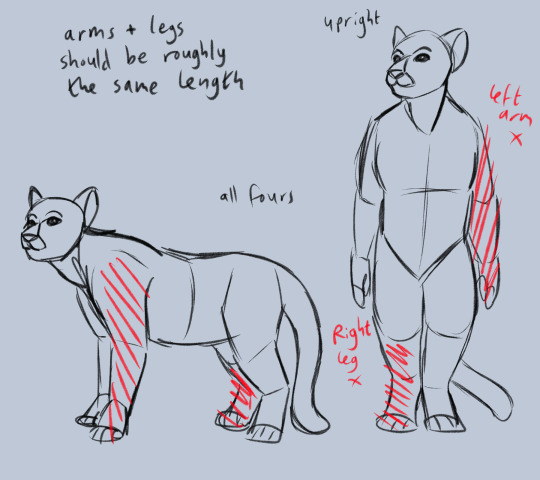
(image description: simplified sketches of a feline character standing on all fours as well as upright on two legs. their left arm and right leg have also been colored over in red to note that these limbs are missing. there is also a note on the image stating that the arms and legs should be roughly the same length. end description)
keeping the limbs similar in length is important for quadrupedal motion, if you want the spine to be kinda parallel to the ground. otherwise, you get sloped backs which are not the best for smooth motion. but the more important part of this ask is the matter of mobility aids for a character that moves between bipedal and quadrupedal motion! so let's talk about that.
for one thing, if your character is not using a leg prosthetic, they'll need two crutches when they walk upright. one crutch is helpful when you have two legs but one of them is weaker, and in that case you'd use the crutch on the strong side, actually.
I previously reblogged a post about proper cane usage, but it can apply to crutches as well! and from what I've seen, the crutches that have a forearm brace are the most popular for comfort and ease of use. your character happens to be missing an entire arm on the same side he would be using a cane or crutch if he had a leg prosthetic on. so that does make things tricky. alternatively, he could use a leg prosthetic and not bother with a cane or crutch. but! you don't have to do that. you can still give him crutches, leave his right leg without a prosthetic, and even give him a versatile prosthetic for upright and quadrupedal motion!
conveniently, cats are well documented to manage just fine with three legs, whether they are missing a back leg or a front leg! there's even at least one cat out there missing both front legs and doing fine! so, your tiger fella really only needs one prosthetic to do both kinds of locomotion, I think. here's what I've got:
telescopic/collapsible arm prosthetic-crutch-combo and a collapsible or folding forearm crutch that can be carried on a belt when not in use.
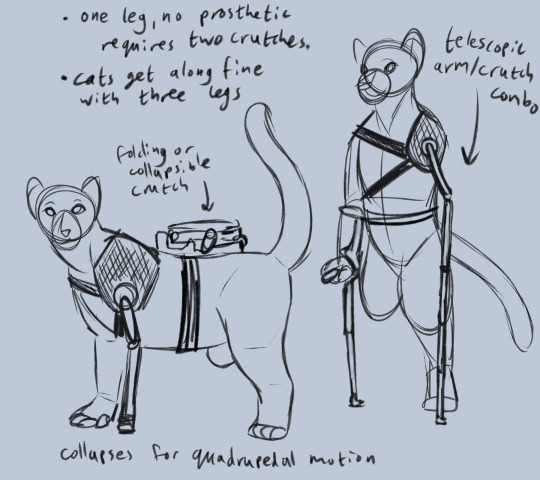
(image description: the same feline character sketched upright and on all "fours", this time with added mobility aids. the notes on this sketch say "one leg, no prosthetic, requires two crutches. cats get along fine with three legs." the mobility aids drawn on the character include a folding forearm crutch and an arm prosthetic strapped to the left shoulder that can be extended into a tall crutch for walking upright. end description.)
play around with it until you're satisfied! if you just want a leg prosthetic instead, no crutches, then I think he could use the exact same prosthetic both upright and on all "fours" without the use of an arm prosthetic.

(image description the feline character again, this time showing a simple leg prosthetic that attaches at the knee, has a small thick piece bending slightly back, and then a longer straight rod ending in a foot pad. end description.)
you'll have to adjust the exact proportions and design to better match your character, of course, but these are the options i thought could work for your idea. I hope that's helpful and gives you more ideas for how you want to draw him! good luck!
53 notes
·
View notes
Text
So, the team seem to be planning some smaller upgrades for the SF-24 coming around Spa(seems to be the goal) aimed at addressing several issues that have cropped up in the SF-24 base as well as the last 2 upgrade packages.
The key thing of note they are looking to make changes to is the ARBs (anti-roll bars) These are a part that connect the suspension components to the inboard body of the car. These are a component connected to the push/pull rods, and help with managing the forces the suspension are subjected to as well as creating the correct balance between two wheels on the same axle.
Thus this change is likely targeted at managing the instability in the current car, and is targeting an area that needs attention.
It's a small upgrade but it may make more of a difference than any others brought thus far. It will of course depend on the effectiveness of the improved part and if it does what they need. If so I would expect to see greater stability in high speeds, as well as the car being more versatile for both driver's driving styles. Stiffness or looseness caused by the ARB can lead to unwanted over or under steer depending on the setting.
As far as upgrades to address many of our frustrations go this is the one that stands out to me. It's small but I think it will make a bigger difference than any aero upgrade at this stage.
At the very least I think that this change will yield some very valuable information about the performance ceiling of the current suspension configuration.
Here is what the ARBs look like so you get an idea of the placement on the car.

Source
26 notes
·
View notes