#vegetable seeds for home garden
Explore tagged Tumblr posts
Visit Tumblr Blog
Explore Tumblr blogs with no restrictions, modern design and the best experience.
Last Seen Tumblr Blogs


Fun Fact
The “We are the 99%” Tumblr blog became the slogan for the Occupy Wall Street movement.
Text
How to Start an Urban Garden in Small Spaces: A Beginner's Guide
Urban living often means limited space, but that shouldn’t deter you from cultivating your own fresh produce. With a little creativity and planning, you can transform even the tiniest balcony or window sill into a thriving urban kitchen garden. Here’s your ultimate guide to get started.
1. Assess Your Space
Before you dive into planting, take a good look at your available space. Whether it’s a sunny windowsill, a balcony, or a small yard, understanding your space will help you choose the right plants.
Light: Most vegetables and herbs need at least 6 hours of sunlight daily. Observe how the sunlight moves across your space to identify the sunniest spots.
Size: Consider how much space you have for pots and containers. Vertical gardening with shelves or hanging planters can maximize your space.
Access: Ensure you have easy access to water and that your plants are within reach for regular maintenance.
2. Choose Your Containers
Containers are key to urban gardening. They come in various shapes, sizes, and materials, including:
Pots and Planters: Ideal for most plants. Ensure they have drainage holes to prevent waterlogging.
Raised Beds: Perfect for those with a bit more space. They can be placed on balconies or in small yards.
Vertical Gardens: Use wall-mounted planters or trellises to grow herbs and small veggies in a compact area.
Hanging Baskets: Great for trailing plants like cherry tomatoes or strawberries.
3. Select the Right Soil
Good soil is crucial for healthy plants. Urban gardeners often use potting mixes designed for containers, which offer better drainage and aeration compared to garden soil. Look for soil mixes that are rich in organic matter and nutrients.
Potting Mix: Choose a high-quality mix with good drainage properties.
Compost: Enhance soil fertility by adding compost. It enriches the soil with essential nutrients and improves its structure.

4. Pick the Right Plants
When choosing plants for your urban kitchen garden, consider the amount of sunlight your space receives and how much time you can dedicate to care.
Herbs: Basil, mint, parsley, and chives are easy to grow and perfect for small spaces. They thrive in containers and can be used in your everyday cooking.
Leafy Greens: Spinach, lettuce, and kale are great for shaded areas and can be harvested continuously.
Vegetables: Cherry tomatoes, peppers, and radishes do well in pots. Choose dwarf or compact varieties if space is limited.
Fruiting Plants: Strawberries and dwarf citrus trees are suitable for containers and can add a touch of greenery to your space.
5. Water Wisely
Consistent watering is vital for the health of your plants. Container plants often dry out faster than garden beds, so check the moisture level regularly.
Watering Schedule: Most plants need to be watered once or twice a week, but this can vary. Check the top inch of soil; if it’s dry, it’s time to water.
Drainage: Ensure your containers have drainage holes. Excess water can lead to root rot, so make sure the excess can escape.
6. Fertilize and Maintain
Plants in containers require regular feeding as nutrients are quickly depleted. Use a balanced, water-soluble fertilizer or organic options like compost or worm castings.
Fertilizing: Apply fertilizer according to the needs of your plants. Over-fertilizing can be harmful, so follow instructions on the product label.
Pruning: Regularly prune plants to encourage healthy growth and prevent overcrowding. Remove dead or yellowing leaves to improve air circulation.
7. Pest Control
Even small gardens can face pest issues. Keep an eye out for common pests such as aphids, spider mites, and whiteflies.
Natural Remedies: Use natural pest control methods like neem oil, insecticidal soap, or introduce beneficial insects such as ladybugs.
Preventive Measures: Maintain plant health by not overwatering and ensuring good air circulation to minimize pest problems.
8. Harvest and Enjoy
The best part of gardening is reaping the rewards. Harvest your produce at the peak of freshness for the best flavor and nutritional value. Most herbs can be snipped as needed, while vegetables and fruits should be picked when they reach their mature size.
Conclusion
Starting an urban kitchen garden is not only rewarding but also a great way to enhance your cooking with fresh, homegrown ingredients. By assessing your space, choosing the right containers and plants, and maintaining a proper care routine, you can create a flourishing garden even in the heart of the city. Embrace the joy of gardening and enjoy the taste of your very own urban harvest. Happy gardening!
#urban gardening tools#Kitchen Garden Fertilizers#Plant Seeds for Kitchen Garden#Gardening Tools#Vegetable seeds#vegetable seeds for home garden#fence for plants
2 notes
·
View notes
Text
Seed Sourcing Guide: An Opinion
i was listening in on a seed saving nerd zoom meeting last night when one of the best quotes ever said was said said: "the best seed 'store' is your own backyard." and the lady is totes right. downside is... you gotta source the seeds before you start saving them. with it being seed buying season, and a lady totally saying the best quote for any and all seed nerds to fuel my drive to finally sit down and write this, i have come up with:
tier list for seed sourcing websites NOT SPONSORED BTW
✨ top tier best tier ✨
ok so, i never really heard of true leaf until last year. but i have been sourcing almost all of my seeds from them since! they're not the same grow zone as me, but utah has some of the best soil in the nation so maybe that's why their seeds are the absolute best when it comes to germination. they also have a huge variety of seeds, all gorgeously designed in a quick-to-understand format (like their icons for heirloom versus hybrid, container friendly or not, etc.) their information is all legit and comprehensive as shit. my microgreen farmer friend gets all his microgreen seeds from here, too. couldn't recommend them enough!
if your looking for tomatoes specifically, then tomatofest is legit the best. they were recommended to me a few years ago by my farmer mama, and legit they are the best for any and all tomato types. if i ever need a new tomato variety, this is where i go no matter what. if they don't have it, then must not be worth growing. germination rate is always high, the plants come out great, and always fast with shipping.
i have not met a home gardener or farmer friend who doesn't have hoss in their seed library. their selection is small and their website is mid, but damn do they have the best germination rates out there along with the healthiest looking plants i ever did done see or grow. and tbh that's really what matters at the end of the day - not the germination rates, or shipping, or quantity, but rather how the vegetable or fruit plant thrives and produces. and hoss ticks off all those boxes beautifully.
😐 middle tier is mid 😐
eden brothers is mid tier only because i have attempted to germinate about 12 different seed types from them over the past 5 years and never have i ever gotten anything better than 10% germination rate. but their BULBS, their bulbs are absolutely amazing! if i need a flowering bulb to add to my cut flower garden, then this is where i source them from. never any issues with molded bulbs, and they grow true to what they say they will and how (so information is accurate). just... don't bother with the seed section.
i really truly and honestly and want to put renee's garden seeds in top tier... but i have tried over 20 different herb seeds from renee's and the herbs just never germinate. ever! the flowers, amazing. the vegetables, pretty good. selection, absolutely amazing. but the herbs, bro i don't know where they're sourcing their herbs from but it ain't happening. at least for me. maybe others more north would have better luck.
grow organic is great for supplies such as fertilizers and such, but not so much for seeds. i sourced my California softneck garlic from them and they were wonderful. i've had another farmer friend say she gets all her onion starts from them as well and her onions are phenomenal. but i've tried only 3 seed varieties from them with decent germination but didn't live long at all. if you're looking for tubers or vegetable bulbs, then totes. otherwise, be weary of the seeds even if the germination is great. (me thinks they save seeds regardless of how the plant lived, compared to saving seeds only from healthy plants.)
💀 worst tier don't bother 💀
johnny seeds used to be my go to for seeds when i was only focused on transplants. this was because they're the only one who sells in bulk, and honestly that's the only perk for them. you have to buy their seeds in bulk to get any decent germination out of them. but if you want 200 basil plants, then buying 500 basil seeds from them will be just fine. if you just want 2 basil plants, then don't even look at this website. they have one of the best seed starting soil mixes, but the shipping costs more than the soil. and they have some nice supplies. but this is a seed tier list, not a supplies tier list.
hopefully the fiasco with the purple galaxy tomato in January of 2024 has shed some light to how bad this company is, but if not then i'm including them on this list. they were pretty bad before that, but at least they live up to their name. i have sourced a few vegetables from them, but only because nobody else had them. which honestly should be a red flag. BUT c'est la vie, i bought seeds from them 3 years ago and haven't gone back. they're overpriced, germination rate is OK but considering the price tag their germination rate should be better and they're not. they try to pull themselves off as the "small guy" when they're clearly not.
https://www.burpee.com/
burpee seed company is legit the worst. they're so bad that a link to their website breaks tumblr and makes my tier list look ugly. they might lure you in with their gorgeous website, and with the huuuuge variety they have. but the website NEVER works, the varieties are almost 99% hybrids that don't grow or produce well, and the germination rate is abysmal. yes, they sell in all major and minor box stores but that's because capitalism, not because they're the best. stay. away.
🏅 honorable mention 🏅
so first off, let me say i have never bought from this website. but i have been gifted many seeds from them from several people. not sure if that's good or bad, hence the honorable mention category.
the seeds i've been gifted from 3 different farmers, and they're all winter varieties. and they've all done amazing!! i did buy some flower and herb seeds from the local hardware store, and the seeds were acceptable for germination rate. i do not blame that on the company, though, since that hardware store is so old school that they don't even have A/C inside. creaky wood floors, smells like old metal, that kind of hardware store. so not the best environment to store seeds in. but i will be buying some for this year to try out directly from their website, seeing as how if 2 year old seeds germinate pretty good and ones stored in horrible conditions are OK then fresh from the source MUST be great!
📝 let me know who i forgot and where you would rank them 📝 plz thnx luv u
maybe i'll do a tier list for even smaller seed companies, like my size seed companies?? whatchu think?? i've only tried a few so it would force me to try out some more!
#food not lawns#gardening#home garden#homegrown#gardenblr#grow food#food#homestead#homesteading#nature#suburbia farming#suburbian agriculture#suburban agriculture#suburban farm#seed saving#seed starting#seeds#tomato seeds#garden blog#garden#plants#flower garden#flowers#vegetables#growing food
44 notes
·
View notes
Text

It's easy to see why I chose these pods to mature, dry and save seed from.
They are all long, well filled out with multiple seeds and all come from the same plant. The plant itself was vigorous and prolific. These are the traits I want to keep and develop for the future.
Purple King climbing beans are one of my favourites.
#beans#garden#gardeners on tumblr#vegetables#gardening#self sufficiency#home grown#plants#organic food#climbing beans#seeds#seed saving#purple king climbing beans
15 notes
·
View notes
Text

Welcome to the world of gardening, where every seed holds the promise of fresh, crisp romaine lettuce right from your backyard! If you've ever savored a salad made with homegrown greens, you know the joy that comes from nurturing plants to life. But did you know that you can extend that joy beyond a single growing season?
In this complete guide, we’ll dive into the art of harvesting and storing romaine lettuce seeds? Whether you're a seasoned gardener looking to save your favorite varieties or a curious beginner eager to learn more about sustainable practices, this guide is designed for you. We’ll walk you through each step of the process—from recognizing when your lettuce is ready to bolt, to collecting and storing those precious seeds for future planting.
Want to Read More:
The Complete Guide to Harvesting and Storing Romaine Lettuce Seeds
#gardening#garden#gardening tips#lovegardening#gyo#gardening uk#gardenchat#organic gardening#backyard#vegetable gardening#romainelettuce#lettuce#seeds#seed#seedsaving#seedsavers#gardeningtips#gardeningtipsforbeginners#plants#vegetables#vegetablegarden#vegetablegardening#gardenerslife#gardens#flower garden#gardenblr#gardencore#gardeners on tumblr#home and garden#my garden
7 notes
·
View notes
Text

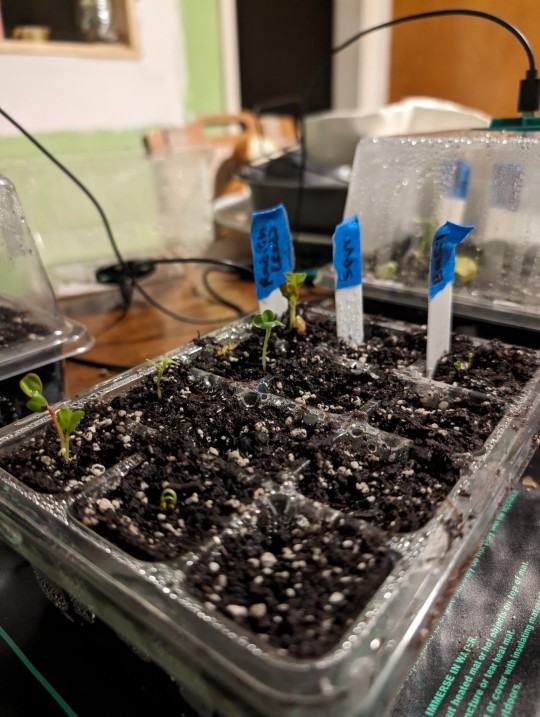
First of the lettuce seedlings are up. I put another tray of lettuce and arugula seeds in tonight. These will grow slowly under the grow light in the unheated garage, but will be sturdy enough to plant out in the cold frame in February.
I wasn't going to grow food this year but it seems ridiculous to have space and not use it to grow food. So I went through the seeds I saved last year, ordered a few fresh packages and some seed potatoes, and got a large planter nice enough to have out front without the HOA complaining. The front is where the sun is and god damn it, I intend to capture as much of that as possible this year.
3 notes
·
View notes
Text
3/5/23 - Tiny Tim’s & Moon Tomatoes coming thru as well 🍅
#indoor garden#container gardening#sustainable gardening#vegetable gardening#starting seeds#plant life#growing food#plants#plant mom#homesteading#veganuary#food not lawns#home garden#edible garden#hot peppers#grow organic
43 notes
·
View notes
Text


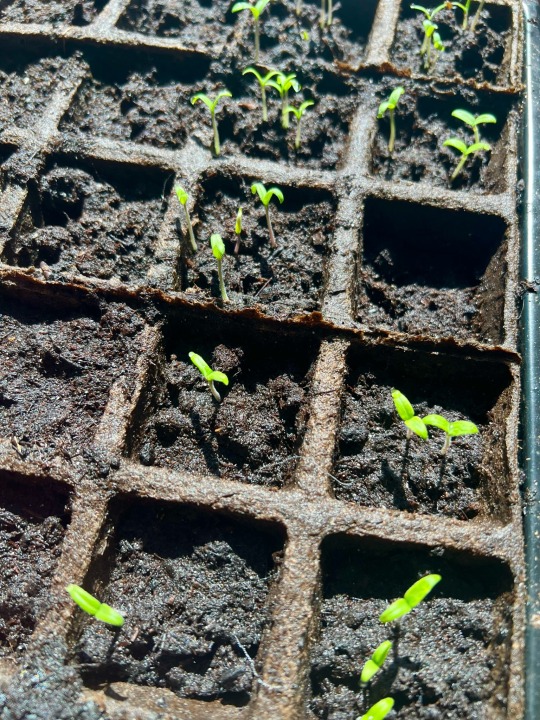
I further document how quickly my seeds are growing. The cukes are going crazy.
5 notes
·
View notes
Text
A Beginner's Guide to Growing Herbs Indoors: Tips for Thriving Indoor Herb Gardens
For those who have never grown herbs before, cultivating them indoors can be a delightful and fragrant experience. Growing an indoor herb garden is a wonderful and doable hobby, regardless of your interest in cooking or just the convenience of having fresh herbs on hand. This in-depth guide will show you how to successfully grow your very own indoor herb garden..
Choosing the Right Herbs: Start by selecting herbs that are well-suited for indoor cultivation. Popular choices include basil, mint, rosemary, thyme, and parsley. Choose herbs that share similar growing requirements to simplify maintenance.
Selecting the Right Containers: Choosing the right containers is crucial for successful indoor herb gardening. Ensure that your pots have adequate drainage holes to prevent waterlogging. Additionally, consider the size of the pots, allowing ample space for root growth.
The Perfect Potting Mix: Herbs thrive in well-draining soil. Create a suitable potting mix by combining regular potting soil with perlite or coarse sand to enhance drainage. This ensures that your herbs receive the right balance of water and air.
Providing Adequate Light: Indoor herbs require plenty of sunlight to thrive. Place your herb garden near a south-facing window where they can receive at least 6-8 hours of sunlight daily. If natural light is scarce, consider supplementing with fluorescent grow lights.
Watering Wisely: Overwatering is a common mistake in herb gardening. Allow the topsoil to dry out slightly before watering. When watering, do so thoroughly, ensuring the water reaches the roots. Always use a saucer under the pots to catch excess water and prevent water damage.
Temperature and Humidity: Most herbs prefer temperatures between 60-70°F (15-21°C). Ensure the indoor environment remains well-ventilated, as stagnant air can lead to problems like mold. Humidity levels between 40-60% are generally suitable for herb cultivation.
Fertilizing Routine: Herbs benefit from periodic feeding during the growing season. Use a balanced, water-soluble fertilizer every 4-6 weeks. Be cautious not to over-fertilize, as this can harm the plants.
Pruning and Harvesting: Regular pruning encourages bushier growth and prevents herbs from becoming leggy, or similarly, elongated or stretched. Harvest leaves in the morning when the essential oils are most concentrated. Avoid removing more than one-third of the plant at a time to ensure continued growth.
Dealing with Common Pests: Keep an eye out for common pests like aphids and spider mites. A mild solution of water and dish soap can help control these pests. Alternatively, introduce beneficial insects like ladybugs to keep your indoor garden pest-free.
In closing, embarking on the journey of growing herbs indoors is a delightful adventure for beginners. By choosing the right herbs, containers, soil, and providing the optimal growing conditions, you'll soon be enjoying the bountiful harvest of your indoor herb garden. Follow these tips, stay patient, and watch as your herbs flourish, bringing a touch of freshness to your culinary endeavors. Happy herb gardening!
#botany#garden#gardening#horticulture#how to#life hacks#planting#plants#tips and tricks#Indoor Herb Garden#Culinary Herbs#growing herbs#home gardening#container gardening#gardening tips#seeds#vegetable gardening#urban gardening#Beginner Gardening#organic herbs#Sustainable Gardening#Kitchen Herb Garden#Herb Planting#herbalism#Herb Care#Gardening Tips#indoor plants#house plants#potted plants#DIY Herb Garden
2 notes
·
View notes
Text
Starting Seeds Indoors Without Grow Lights
Finding the right window to start your seeds in is the first and most crucial step in the process. Your home naturally maintains the heat needed for seeds to germinate when given the right growing medium. The issue will be getting enough sunlight to your plants.
You will want to find a south facing window location that brings in as much sunlight as possible. Find the window area that seems like the best candidate and observe the light coming through it in the morning, throughout the day, and at night. Are there trees shading where your seedlings would sit? Does anything else impede the sunlight from hitting the plants directly. You will want to make sure your plants are soaking in that sunlight for the bulk of the day.
7 notes
·
View notes
Text

Lower your shopping bill and get a better product...Go Here
3 notes
·
View notes
Text
Easy From Seed Vegetables
The content of this blog post is from Home Garden Seed Association. It’s an excellent resource for home gardeners. They promote gardening from seed as the easy, natural and economical way to garden. Their website provides well researched and useful articles about how to garden from seed. Need inspo?
Beans, Beets, Cucumbers, Kale, Peas, Radishes, Salad Greens, Squash, Swiss Chard
Most of the vegetables typically grown in a home garden can be sown directly in the garden soil. These include salad greens of all kinds—lettuces, mizuna, arugula, spinach, and mustards—as well as beans and peas, root vegetables, summer and winter squash, and cool season cooked greens like kale and chard.
First, prepare the garden bed, loosening the soil and incorporating plenty of compost. Then, simply follow the guidelines below. In just weeks, your bountiful, delectable summer harvest will begin!
Left to right: Bean seedling, lettuce seedlings, chard seedling
Beans may be pole beans, or they may have a bush habit. In either case, wait until nighttime temps stay consistently above 50ºF to sow. For bush beans, poke seeds into the soil about an inch deep and 4 inches apart in rows that are about 1½ feet apart. Two sowings, about 3 weeks apart, will extend the harvest. For pole beans, be sure set up the trellis prior to planting time.
Beet seeds are actually clusters of seeds. Once danger of frost has passed plant them about an inch apart and ½ inch deep—and don’t be surprised if clumps of seedlings emerge. Thin them to about 2 inches apart when they are an inch or two tall, and again as the plants develop. When plants are 3 inches apart and plump enough for your purposes, you can harvest some at the baby stage, allowing others to enlarge.
Cucumbers will be set back by cold nights, so wait until nighttime temps stay above 50ºF. Sow 5 or 6 seeds, covered by an inch of soil, in a low mound, and thin to the 3 best plants as they start to develop. In a small garden, you can grow cucumbers up a trellis or fence.
Kale seeds can be sown in early spring, about 2 inches apart and ½ inch deep. Thin plants to about 12 inches apart when they are 3 to 4 inches tall, using the thinnings in salads. Begin harvesting outside leaves when plants have at least 6 sets of leaves. A second kale sowing in late summer will provide greens into the winter.
Peas, especially edible-podded peas, are a productive spring crop. They require some support, so plant seeds next to a fence or erect a structure to support them before planting. Sow seeds an inch deep and 2 to 3 inches apart in early spring. Generally, no thinning is needed.
Radish seeds can be sown in early spring, spaced 1 inch apart and covered with ½ inch of soil. Thin them early to 2 inches apart to give them room to develop. Rather than planting a big row, sow small amounts a week apart for a continuous harvest.
Salad Greens, planted thickly in wide rows, can be harvested two or even three times. Make successive small sowings until the weather turns hot for a steady supply of baby greens. Beginning in early spring, broadcast the seeds so that they fall about an inch apart and cover with ¼ inch of soil. Firm gently and keep the bed evenly moist. Harvest with scissors when they are 4 to 5 inches tall, and allow the plants to regrow.
Squash will be set back by cold nights, so wait to plant until nighttime temps stay above 50ºF. Sow 4 or 5 seeds in a low mound, covered by an inch of soil, and thin to the 2 best plants as they start to develop. Summer squash, such as zucchini or patty pan, are tender and tasty when harvested young, no larger than 6 inches. If you have the space, you can also plant summer and winter squashes in staggered rows.
Swiss Chard seeds, like beets, are clustered seeds. Sow them ½ inch deep and 2 inches apart once danger of frost has passed. Thin the seedlings when they develop two sets of leaves and add the thinnings to salads. Final spacing should be 12 to 15 inches apart.
5 notes
·
View notes
Text
Cultivating a Home Garden with Vegetable Seeds
Urban Farmer offers a wide selection of vegetable seeds for home gardens. Their range includes seeds for container-friendly vegetables, ideal for those with limited space. Some popular options include the Yellow Petite Bell Pepper, a high-yielding mini bell pepper; the Buena Mulata Pepper, a vibrant ornamental hot pepper; and the Bride Eggplant, known for its delicate taste and striking appearance.
1 note
·
View note
Text
Hello tumblr friends any recs for collecting fruit and veggie seeds? Books, videos, creators etc.
Reblog to share the knowledge!
🍓🥔🥦
#thank you much friends#gardening#home garden#fruits and vegetables#collecting#plant seeds#plants#growing#growing food#advice
0 notes
Text
Seeds of desire
Friday - visited nursery. Stuck to my list and only got what I needed. Resisted impulse purchases and avoided the discounted plants rack just to be safe. Wow, I actually did it!
Saturday - online seed company sends me an email about a $1 per packet flash seed sale.
Saturday night - realises that garden products abstinence is not my strong suit.......
#garden#gardeners on tumblr#vegetables#gardening#home grown#plants#self sufficiency#organic food#seeds
14 notes
·
View notes
Text

Starting watermelon seeds indoors offers a rewarding way to jump-start your melon-growing season and enjoy a bountiful harvest of sweet, juicy fruits. By following this complete guide, you'll be equipped with the knowledge and skills to successfully start watermelon seeds indoors!
Seedling Success: Starting Watermelon Seeds Indoors
#gyo#lovegardening#gardening uk#gardening tips#gardening#garden#gardenchat#organic gardening#vegetable gardening#backyard#home and garden#gardenblr#gardencore#gardeners on tumblr#gardens#my garden#urban gardening#vegetable garden#plants#watermellon#watermelon#growyourown#grow your own food#starting seeds#seedstarting#planting seeds#seedlings#seeds#lol#gardenersofinstagram
11 notes
·
View notes
Text

It's been hot and dry and you'd never know we live in a temperate rainforest by the weather. Fortunately we're on year four of intensive composting and tree planting, and grey water from the bath and dish rinsing gets syphoned out to the garden via a cheap bit of plastic brewer's tubing. This means the garden pretty much never dries out and everything, including the stand of douglas fir trees down the slope from the garden, is thriving.
(pictured: Purple podded peas in bloom)
#garden#vegetable garden#peas#pea flower#heritage seeds#dig for victory#composting#urban garden#urban gardening#home--farm#garden witch rambles#druid#druidry#druidlife
1 note
·
View note