#utthita parsvakonasana
Explore tagged Tumblr posts
Visit Tumblr Blog
Explore Tumblr blogs with no restrictions, modern design and the best experience.
Last Seen Tumblr Blogs


Fun Fact
There were a total of 171.5 billion posts on Tumblr in 2019.
Photo

(via Yoga At Home | 28 By Sam Wood || Curated with love by yogadaily)
#utthita parsvakonasana#inspiration#yogadaily#yoga#yogi#yogini#yoga aesthestics#yoga inspiration#fitness#health & fitness#manifest
70 notes
·
View notes
Text

Full Moon in Sagittarius
Thursday 23rd May 2024
The Full Moon in Sagittarius ignites a passion for adventure and truth-seeking. Emotions run high with a desire for freedom and exploration. Advice: Reflect on your beliefs and aspirations, letting go of what no longer serves you. Activities: Plan a trip, engage in philosophical discussions, or start a new course of study. This fiery Full Moon encourages you to broaden your horizons, embrace new experiences, and seek deeper understanding in all aspects of life.
Yoga: The Extended Side Angle Pose (Utthita Parsvakonasana) harnesses the adventurous and expansive energy of the Full Moon in Sagittarius. Stand with your feet wide apart, turn your right foot out, and bend your right knee. Extend your right hand down to the floor or a block, and stretch your left arm overhead. Feel the stretch along your side body, opening up to new perspectives and possibilities. This pose embodies Sagittarius's quest for truth and exploration.
#astrology#horoscope#witchblr#astrology forecast#witchy#witchcraft#witch#witchy things#witchy vibes#moon#full moon#sagittarius
15 notes
·
View notes
Text
"켄 요가 시퀀스"
내가 처음 요가를 시작한 해는 아마도 1999년 아니면 2000년도였던 거 같다. 반년 정도 학원을 다니며 배운 뒤 책을 참조해 최소 주 1회 이상 요가를 꾸준히 했다.
오랫동안 하타 요가 동작 위주로 스트레칭 삼아 했었고 운동을 늦게 시작했기 때문에 이미 몸이 많이 굳은 상태였지만 큰 욕심 내지 않고 꾸준히 한 결과 나름 '인간 승리'라 자평해도 되지 않을까 싶을 만큼 요가 덕을 크게 봤다. 또 국내에 아쉬탕가 및 빈야사 요가가 소개됐을 때 이로부터 영향을 많이 받았다.
40대까진 무술 수련에 도움이 되기 때문에 했다면, 쉰 살을 넘기면서는 '요가 = 생명줄'이란 걸로 인식 변화가 생기더만. 즉 지금은 "살기 위해" 요가를 한다. 예전엔 주 1회만 해도 그럭저럭 본전치기는 했고 많이 할수록 몸이 좋아졌다면, 이젠 2회 이상 꼭 해줘야 관절이 굳지 않는 걸 실감하고 있다.
이 대목에서 쫌 재밌는 현상은, 평소 스트레칭을 안 해 몸이 굳어 있을수록 찌뿌둥 불쾌한 기분을 자각 못하는 거 같다. 나 역시 원래는 안 됐다가 꾸준한 노력 끝에 성공해 느낌을 체험하고 나서야 비로소 공감하는 경우가 있었으니까. 역으로 잘 되던 게 나이 먹고 안 될 거 같은 조짐이 보이면 답답하다.
내가 하고 있는 요가 순서를 70세까지 (살아있다면) 무리 없이 하는 걸 목표로 정했다. 시간이 흐르다 보면 순서를 까먹거나 수정하는 일이 종종 일어나기 때문에 훗날 점검용으로 이 시점에 한 번 정리해 놓은 것.
▪ 태양 예배(Surya namaskara) 1st 동작 순서는 내가 매우 좋아하는 아쉬탕가 태양 예배와 동일하나 흐름은 태극권. 보통 다운독(Down Dog)에서 5번 호흡하는 걸 합해도 1분 정도 소요되지만, 태극권 특유의 관절 수축 및 이완을 관찰하느라 5분 정도 걸리는 듯.
▪ 태양 예배 2nd 차이점은 업독 & 다운독을 천천히 여러 번 반복한다. 그리고 두 손 모아 머리 위로 들어 올린 동작에서 바로 삼각 자세로 이어지도록.
▪ 삼각 자세(Trikonasana) ▪ 비튼 삼각 자세 (Parivrtta Trikonasana) & ▪ 다리 벌려 숙이기(Prasarita Padottanasana) & ▪ 뒷깍지 끼고 숙이기
▪ 한 쪽 다리 올리기(Utthita Hasta Padangusthasana)
▪ 상체 숙이기(Padangusthasana) ▪ 한 다리 올린 채 상체 숙이기(Ardha Baddha Padmottanasana)
▪ 태양 예배 3rd 다운독에서 스플릿(Spilt) 자세를 취한 뒤 영��자세로 이어지도록.
▪ 영웅자세 A(Virabhadrasana A) & ▪ 영웅자세 B(Virabhadrasana B) & ▪ 확장된 옆 기울기(Utthita Parsvakonasana) ▪ 다리를 앞뒤로 벌리고 상체 숙이기 : 무술 도장해서 했던 것
▪ 힌두 푸시업 (Hindu Push Up) : 무술 도장해서 했던 것
▪ 뱀 자세 (Bhujangasana) & 변형 ▪ 엎드린 악어 뒤집기(Makarasana) ▪ 메뚜기 자세(Salabhasana) ▪ 활 자세(Dhanurasana)
▪ 고양이 자세(Vidalasana) & 변형 ▪ 플랭크 ▪ 돌고래 자세(Ardha Pincha Mayurasana)
▪ 무릎 꿇고 앉기 ▪ 무릎 꿇은 채로 초승달 자세 (Parsva Chandrasana)
▪ 고관절 스트레칭 : 무술 도장해서 했던 것
▪ 한쪽 무릎 세워 상체 비틀기(Marichyasana) ▪ 한쪽 무릎 세워 반대로 비틀기
▪ 다리 뻗고 앉기(Dandasana) ▪ 강하게 앞으로 숙이기(Paschimottanasana)
▪ 다리 벌리고 옆 기울기(Parivrtta Janu Sirsasana) ▪ 박쥐 자세(Histapadasana) ▪ 거북이 자세(Kurmasana)
▪ 골반펴기(Baddha Konasana) ▪ 한 무릎씩 땅에 닿기 : 무술 도장해서 했던 것
▪ 연꽃자세(Padmasana) & 우디야나 반다(Uddiyana Bandha)
▪ 필라테스 오픈 렉(Open Leg) & 나바아사나(Navasana) ▪ 필라테스 공 굴리기(Rolling Like a Ball)
▪ 쟁기 자세(Halasana) ▪ 어깨로 서기(Sarvangasana)
▪ 누워 엉덩이 들어올리기(Setu Bandhasana) ▪ 물고기 자세(Matsyasana) ▪ 아치 자세(Urdhva Dhanurasana)
▪ 거꾸로 서기(Sirsasana) ▪ 전갈 자세(Vrschikasana)
▪ 뒤척이기 송장 자세(Savasana) 대체용으로 펠덴크라이스에서 갖고 온 것.
2 notes
·
View notes
Photo
Bound Extended Side Angle – Baddha Utthita Parsvakonasana

8K notes
·
View notes
Text
Extended Side Angle Pose (Utthita Parsvakonasana)
What is Extended Side Angle Pose?Extended side angle pose, or utthita parsvakonasana in Sanskrit, is a standing pose that’s often sequenced in between warrior poses. From warrior two, the yogi leans their torso toward their bent leg and reaches their arm in line with the torso. The pose provides a deep stretch to the groin and hamstrings.InstructionsBegin in warrior two with the right leg…

View On WordPress
0 notes
Text

2 notes
·
View notes
Photo

Utthita Parsvakonasana, also known as the Extended Side Angle Pose is a standing side stretching asana in modern yoga. This is an invigorating asana that stretches and extends your body from the heels to the head.
0 notes
Photo

(via The best affordable yoga retreats in Europe | CN Traveller || Curated with love by yogadaily)
#utthita parsvakonasana#yoga#yogadaily#yogi#yogini#yoga inspiration#manifestation#manifesting#fitness#health & fitness#yoga aesthetics#yoga aesthetic#Aesthetic
33 notes
·
View notes
Text

Mars in Gemini
Saturday 20th July 2024
Energy becomes versatile and scattered as Mars enters Gemini. This is a time for dynamic thinking and multitasking. Advice: Embrace curiosity and engage in stimulating conversations. Activities: Start a new hobby, read diverse topics, or join a debate group. Harness the energetic duality to fuel your ambitions..
For Mars entering Gemini, the Extended Side Angle Pose (Utthita Parsvakonasana) invigorates the body and stimulates the mind. Stand with legs wide, bend one knee, and extend the opposite arm overhead. Reach the bent knee’s elbow to the thigh, stretching the side body. Breathe deeply, embracing the dynamic energy and mental clarity of Gemini.
#horoscope#astrology#astrology forecast#witchblr#witchcraft#witchy#witchy things#witch#witchy vibes#mars#gemini
2 notes
·
View notes
Text
10 Badass Yoga Poses for Beginners
Yoga is a great method, and also you are mosting likely to obtain a world of gain from it. Where do you begin? Just what are the very first points you should know? If you're a beginner, you could intend to find out ways to do a complete Sunlight Salutation, or you might be questioning what a Sunlight Salutation goes to all.
It's important for those that are simply starting to comprehend proper alignment. Practicing standing poses will certainly aid with this. They assist you to develop a foundation, enhance the legs and also arms, as well as acquaint you with correct foot, knee, and body alignment.
Here are 10 novice standing poses to get you started.
Mountain pose (Tadasana)
Mountain position helps you to feel grounded and teaches you the best ways to engage all 4 edges of the feet, which is necessary for every pose you will practice.

Step by step:
1) Stand with your feet together on top of your floor covering. Press down with the huge toe mound of each foot.
2) Now ground down via the internal side of your heel. You will certainly feel your legs transform somewhat inward.
3) Continue grounding those two corners of your feet. Then begin to erode with the little toe mound of your foot and also the outer edge of your heel, also. Now that all 4 edges of the feet are engaged, you need to feel the inner turning of your legs even out.
4) Tuck your tailbone internal, so the resting bones are not sticking out, as well as lengthen the spine.
5) Check your ribs making certain they are not jutting external. Roll your shoulders back and down the spine.
6) Turn your hands to face ahead. Relax your face muscle mass and degree your chin with the floor.
7) Breathe deeply below, feel on your own rooting down while growing tall.
Upward Salute (Urdhva Hastasana)

Upward Salute is typically exercised as component of a circulation sequence. This pose soothes stress and anxiety, enhances digestion, as well as stretches the abdomen, side body, and also shoulders.
Step by step:
1) When you behave and also grounded in Tadasana, reach your arms out and up-- you're currently in Upward Salute!
2) Press your hands and fingers together over your head, as well as draw your shoulders down far from your ears.
4) Gaze up towards your hands. Focus on lengthening the spine by pushing down via the tailbone and also reaching up through the hands.
5) Stay right here for a couple of deep breaths as well as delight in the side-body stretch. To release, lower your hands down to your heart as well as return to Tadasana.
Tree Pose (Vrksasana)
Once you discover to ground on your own in Tadasana, you could begin to have fun with balance. Tree position is a one-legged stance that rapidly reveals where your balance requires job. This is a fantastic newbie yoga pose due to the fact that there are a number of variations, which permit the pose to expand with your practice.
Step by step:
1) Stand in Tadasana.
2) Gradually move your body weight to your left foot, and also position your practical your hips.
3) Begin to lift your best foot. If your balance is unstable, rest your toes on the flooring and also place your right heel over your left ankle. If you feel comfortable right here, place the bottom of your best foot on the within your left shin or relocate approximately your internal upper leg. You could remain to move your ideal foot up your leg, getting as close to the pelvis as you can.
4) To boost the challenge, bring your hands with each other in anjali mudra, before your heart. You may likewise elevate your arms above your head, connecting as well as up like the branches of a tree.
5) Continue to lengthen your spinal column while grounding down with the left foot. After that gradually bring your right foot down and also repeat on the various other side.
Caution: Never put your foot on your knee. Laterally stress on the knee can harm the joint.
Warrior 2 (Virabhadrasana II)
What happened to Warrior 1? Do not fret, it's coming. Warrior 1 is really a somewhat a lot more advanced posture due to your hip positioning. Warrior 2 will certainly help you start developing leg as well as arm strength. This is likewise a terrific posture to practice proper knee and ankle alignment.

Step by step:
1) Start in Downward-Facing Dog.
2) Raise your best boost behind you, entering a three-legged Downward-Facing Dog.
3) Step your best foot forward in between your hands. If you're simply beginning and also your foot doesn't get to, that's normal. Beginning exercising the activity so you could get utilized to it.
4) Ground your left foot down so it's parallel to the back side of your mat.
5) With the front knee bent at a 90-degree angle, cartwheel your arms and also torso up to come into a standing position.
6) Make certain your upper body and also pelvis are encountering the left side of your mat, not onward. Reach your arms out at shoulder level.
7) Turn your look ahead and look over your right hand. Make sure the trunk of your body is aligned over your hips, do not angle your torso forward.
8) Beware of your right knee. Can you see your huge toe? If not, your knee is pitching also much to the left, so change accordingly. You are working toward keeping your knee at a 90-degree angle with the flooring. If you're not there, it's okay! Simply see to it your knee hasn't moved on past your ankle.
9) Keep here for a couple of rounds of breath, after that repeat on the opposite side.
Warrior 1 (Virabhadrasana I)
While Warrior 1 doesn't require to be practiced right away, it is a core pose in lots of yoga series. This position educates you to really ground down with your back leg. It also aids to boost your knee and ankle joint alignment, as well as your hip flexibility.

Step by step:
1) Begin in Downward-Facing Dog.
2) Raise your ideal boost behind you, entering into a three-legged Downward-Facing Pet dog. Tip your ideal foot ahead in between your hands, flexing the knee at a 90-degree angle.
3) Ground your left foot down so your toes are facing the top left corner of your mat. This foot position is a little various from Warrior 2, and also that's where the obstacle begins.
4) Lift your upper body up while maintaining the bend in your right knee.
5) Unlike Warrior 2, your hips and breast should be degree with the front of the area. For beginners, this could be really hard. Don't press on your own, simply begin to function toward that shape.
6) Increase your arms up overhanging, and bring your hands together.
7) Turn your gaze upward toward the hands.
8) Examine in with your right knee. If it's bent past the ankle joint, you may should take a much longer stance.
9) Hold for five breaths, and after that repeat on the various other side.
Forward Fold (Uttanasana)
This is an additional fundamental posture with modifications for various degrees of flexibility. Keep in mind, limited versatility is not a need to keep away from yoga exercise! Yoga assists you to build flexibility-- as well as Uttanasana is an excellent location to begin. This posture lengthens as well as extends the back, hamstrings, and also calves.

Step by step:
1) Stand in Tadasana as well as ground all 4 corners of your feet into the mat.
2) Reach your arms out to the sides and also fold forward, hinging from the hips instead of rounding the back to bend over.
3) Area your hands on the floor, or usage yoga blocks to bring the floor to you. Concentrate on extending your spine, as well as pressing downward.
4) Continue to ground down with all 4 edges of the feet. If you feel any stress in the rear of your knees, microbend them.
5) To produce a circulation, reach your arms bent on the sides and also come back up to base on an inhalation.
6) Unwind your hands at your sides, coming back right into Tadasana.
Half Onward Fold (Ardha Uttanasana)

In Ardha Uttanasana, your back is identical with the floor. This is more crucial to recognize later in your practice when you begin to move through poses. As a novice, merely deal with getting accustomed to the pose and extending your back.
Step by step:
1) From Uttanasana, raise your upper body upward till your back is identical to the floor.
2) Draw the shoulders away from the ears to open the upper body, and lengthen the spine.
3) Rest your practical the flooring, shins, or thighs, depending on your degree of flexibility.
4) Lengthen your neck and look slightly ahead. Engage the core.
5) Exhale and also release right into a full Onward Fold.
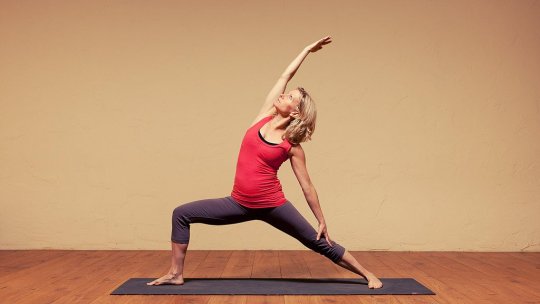
Triangle pose (Trikonasana)
Here's where you actually start moving your body with space. Trikonasana will educate you several areas of placement. It's also a wonderful posture for discovering ways to stabilize stretch and also strength.

Step by step:
1) From Warrior 2, straighten your front leg.
2) With your arms raised at shoulder elevation, begin to reach ahead with your front hand-- as if you're attempting to touch something just out of reach in front of you.
3) Bring your front hand down to the flooring, your shin, or a block, on the within your front foot. Your leading arm must be getting to towards the ceiling. ( The goal is to keep your arms in a straight line and also your side body extended, so utilize a block if essential.)
4) Weigh down via the huge toe mound of your front foot to assist preserve balance.
5) When you really feel balanced, transform your gaze up towards your top hand. Repeat on the contrary side.
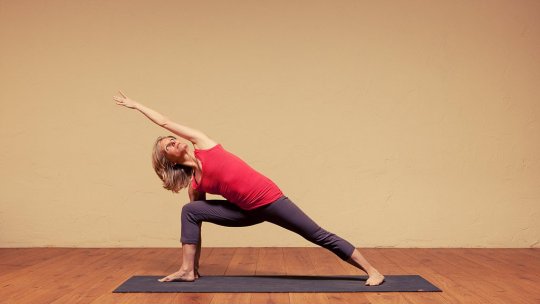
Extended Side Angle posture (Utthita Parsvakonasana)
This present blends the placement as well as stretch of Warrior 2 as well as Triangular pose. Notice how placement factors are comparable throughout lots of different positions. Extended Side Angle pose remains to aid you ground down through the back foot, stretch the side body, and maintain that knee/ankle alignment.

Step by step:
1) Begin in Warrior 2 with your ideal foot forward.
2) Relax your right forearm on your right thigh.
3) Reach over your head with your left arm, extending the left side body.
4) Usage the pressure of your right arm pushing against your right upper leg to turn the torso, turning your ribs towards the ceiling.
5) Gaze toward your top hand.
6) If you fit here, job on bringing that best hand to a block on the within of your right foot, or to the floor.
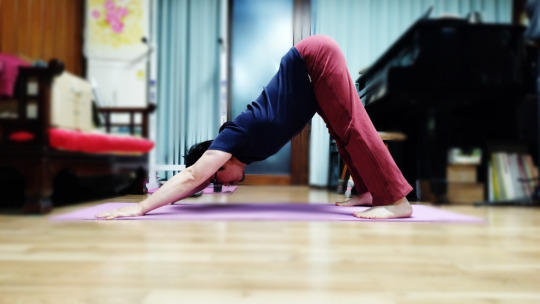
Downward-Facing Pet (Adho Mukha Svanasana)
Whether or not you practice yoga, you have actually most likely heard of Downward-Facing Pet dog. There's really a great deal to think about in this present when it comes to appropriate positioning, so it is necessary to obtain used to Downward-Facing Dog as a beginner. This basic posture extends the back of your legs as well as teaches you to stabilize weight uniformly throughout the body.

Step by step:
1) Enter into Plank posture, which numerous understand as a push-up position. Make certain your shoulders are lined up over your wrists.
2) Lift your hips upward without altering the range in between your hands and feet.
3) Ground down with the thumb and forefinger mounds of your hands, inner elbow joints facing forward.
4) Reach your heels toward the floor. If there are creases on the front of the ankle joints, slowly lift your heels higher up until they disappear.
5) Reach your hips up and back, positioning also weight in your hands as well as feet.
6) Lengthen your back, as well as set your gaze in between your knees or toward your navel.
The secret to beginning a yoga exercise practice is to begin slow. Focus on your body. Do not press on your own too hard since that will certainly cause injury. Newbie yogis should find out poses from a knowledgeable yoga exercise teacher, so they can be changed for correct placement. The information provided here are just meant as a recommendation. If your regional workshop has a novice collection, begin there!
4 notes
·
View notes
Text
Wake up happy - a morning yoga sequence
This is excellent for sweeping away tightness, opening your body and also inviting the new day with joy!
Before you begin:
Find your centre in Tadasana/ Mountain posture. Ground through the feet, kick back the face, involved your breath ...
If you intend to lengthen the sequence beginning with 3-5 rounds of your favourite sunlight salutations.
1. Higher salute to side bend/ Urdhva Hastasana

Begin in Mountain Posture. Really feel the feet then transform your palms external as well as breathe in as your raising your arms up. Your palms should encounter each other, or you can allow them lightly touch. Breathe out lower the arms back to starting position (3x). The last time lift and also open your upper body and also bring your stare up towards your hands, maintaining the rear of the neck open as well as still pressing down with the feet. Hold for a breath or two.
Next, hold your right wrist with your left hand and pull the body carefully over to the delegated stretch the right side, core solid. Look under the best arm or keep your head neutral. Breathe from ankle to wrist. Keep core solid as you show up on an out-breath and also repeat beyond. Release, lower the hands to the floor and also go back right into a Downward Confronting Pet Dog Pose.
2. Down encountering pet posture + a hip opening variation/ Adho Mukha Svanasana

In Downward Facing Dog, press the hands down, mainly the base of the index finger, thumb and also internal wrist. Take the internal shoulders back. Hug the external arms in and roll them down towards the flooring. Maintain the spine long as well as take the top of the upper legs and knees back. Take a lengthy breath or two.

Then lift your appropriate leg up behind you. When the appropriate leg raises higher after that the hip, raise the right hip as well as stack it over your left hip, flex your right knee as well as let the foot (flexed) drop throughout the body to the. Try to maintain your shoulders level. Keep for 5 breaths and delight in the hip opening and also the stretch throughout the stubborn belly. Square the hips again and tip your best foot ahead into a lunge position back knee off the floor.
3. Revolved extensive side angle position/ Parivrtta Parsvakonasana

Staying in lunge area your left hand on the flooring on the inside of the leg, weigh down through the hand and also feet and find buoyancy as you lift your right arm up in the air on an in-breath. Permit the top body to twist whilst you maintain the hips as well as reduced back steady. Really feel a lengthy line of energy relocating via the arms. Remain for 5 breaths. Bring the restore down, ground the back heel, and windmill the arms up, raising the left arm up along the front initially and let the ideal arm comply with, into Warrior II pose.
4. Warrior II position/ Virabhadrasana II

In Warrior II pose (dealing with the long side of the mat) sink your feet into the floor. Front thigh bends in the direction of parallel to the flooring. Maintain knee over ankle joint, as well as in the direction of the right little toe. While keeping knee in location press top of the left thigh back. Raise your spinal column out of the hips. Arms alongside the flooring, evaluate your right hand. Remain for 5 breaths. Inhale flip the ideal hand up as well as raise ideal arm up and also as you exhale lower right into Turned around warrior. Left hand slides down the left leg.
5. Reverse warrior pose
In Turned around warrior, stay reduced in your hips. Pull your reduced abs in as well as keep shoulders unwinded firming your shoulderblades on the back. Lift your upper body proactively to maintain room between the vertebrae as you flex back. Stare as much as your right hand. Keep for 3-5 breaths. Take a deep breath in and also on the following out-breath come back to centre, get to over the best leg and lower into Utthita Parsvakonasana.
6. Extensive side angle pose/ Utthita Parsvakonasana
In Parsvakonasana you can place your right-hand man down on the floor following to the beyond the best foot, area it on a block, or relax the elbow joint on the best top thigh (much easier variation). Left arm sweeps up and also over so the whole left side is one angled line. Revolve your heart and also look up to the ceiling. Currently move between the 2 poses: breathe in lift back up into Reversed Warrior, breathe out reduced back down right into Parsvakonasana (3x). On the third time hold Parsvakonasana for 5 breaths. After the 5 breaths bring both hands down to the floor, go back to Down dog and also repeat this series (action 2-6) on the other side!
7. Child's pose / Balasana

Lower yourself into Child's Present. Aware of heels, temple to the flooring, or relaxing your forehead on your arms or a block. Release here, temple soft, shoulders kicked back, face unwinded. Take concerning 5 breaths, really feeling the breath increase the backbody ...
To finish
Hold Seated forward fold/ Paschimottonasana for 5 breaths.
Finally, unwind in Savasana/relaxation for 6 minutes at least.
Wake up delighted with 30 Mornings of Yoga!
EkhartYoga members can follow our program 30 Early mornings with Yoga
#ashtanga yoga#iyengar yoga#prenatal yoga#types of yoga#yin yoga#yoga#yoga alliance#yoga music#yoga nidra
2 notes
·
View notes
Link
Utthita Parsvakonasana aims to stretch your spine, chest and waist and tones your legs and knees. If the Sanskrit name sounds unfamiliarwith you, let us explain its meaning.
0 notes
Link
0 notes
Text
Temple pose builds your entire lower body, it strengthens your thighs and glutes. This pose also helps in activating the base energy centers while stretching and toning the lower body.
🔸 🔸 🔸 🔸 🔸 🔸 🔸 🔸 🔸 🔸
🧘♂️ Information:👉
1️⃣ Known as:👉 Temple Pose, Mandirasana, Goddess Arms, Temple Arms Pose
2️⃣ Sanskrit name:👉 मंदिरासन
3️⃣ IAST:👉 mandirāsana
4️⃣ Pronunciation:👉 mahn-deer-AHS-anna
5️⃣ Level:👉 Beginner
6️⃣ Type:👉 Standing, Stretch, Hip Opener
7️⃣ Total time:👉 30 to 60 seconds
8️⃣ Focus:👉 Legs, spine, arms, shoulders
9️⃣ Drishti:👉 Nose (Nasagrai or Nasagre)
🔟 Chakra:👉 Muladhara Chakra, Svadhisthana Chakra
💡 Indications:👉 Stress, arthritis, sciatica, digestion, reproductive organs, fertility, diaphragm muscles
💡 Counterpose:👉 Wide legged Forward Fold Pose (Prosarita), Standing Forward Bend Pose (Uttanasana), Eagle Pose (Garudasana)
💡 Preparatory poses:👉 Reclined Bound Angle Pose (Supta Baddha Konasana), Standing Figure Four Pose (Eka Pada Utkatasana), Standing Forward Bend Pose (Uttanasana), Extended Side Angle Pose (Utthita Parsvakonasana), Garland Pose (Malasana), Chair Pose (Utkatasana), Crescent Low Lunge Pose (Anjaneyasana), Warrior I (Virbhadrasana I), Goddess Pose (Utkata Konasana)
💡 Follow-up poses:👉 Cactus Arms (Cactus Pose), Side Lunge Pose, Firefly Pose (Titibasana)
💡 Contraindications:👉 Hips, pelvis, knees, calves, hamstrings, or leg injuries, hypertension, pregnant women
🔸 🔸 🔸 🔸 🔸 🔸 🔸 🔸 🔸 🔸
#yogateacher#yogadaily#yogaeveryday#fit#yoga poses#Yoga#Fitzabout#Fitabouts#Temple Pose#temple#Temple arms#Goddess arms#Mandirasana
2 notes
·
View notes
Photo

(via Luna Yoga - Marianne Helm || Curated with love by yogadaily)
#utthita parsvakonasana#seaside#seasideyoga#yogadaily#manifesting#yoga#yogi#yogini#yoga aesthetics#yoga inspiration#yogdaily#fitness#health & fitness#manifestation#manifest
48 notes
·
View notes