#urgaffel
Explore tagged Tumblr posts
Visit Tumblr Blog
Explore Tumblr blogs with no restrictions, modern design and the best experience.
Last Seen Tumblr Blogs


Fun Fact
Hackers stole 65M passwords from Tumblr in 2013.
Photo
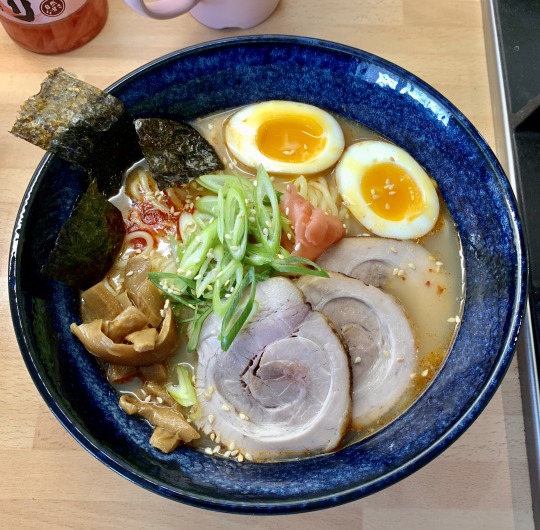
Tonkotsu Ramen
It’s easier than you think! It just takes time and a bit of planning... And bones. Lots of bones.
The complete process is quite long but you can split it up over two days if you don’t want to do it all in one go, e.g. you can make broth on day one and the pork + eggs on day two. It does mean the eggs won’t marinate over night but they’ll still be tasty. Or you can spread it over 3 days if you’re feeling patient. With that out of the way...
Tonkotsu Broth
Time: 10-12 hours, up to 24 hours.
Ingredients
2kg pork bones (cleaned trotters cut in half if you can get them are good)
1 large onion, cut in half (don’t bother peeling completely, just take whatever is loose off)
Whole bulb of garlic, cut in half (same as onion, no need to peel)
Large piece of ginger, roughly sliced
5-6 dried shiitake mushrooms
Salt to taste
Optional
2 carrots cut into large chunks
¼ bulb fennel
Process
Place bones in a large pot, cover with water and boil for 20 minutes or so.
Drain into a colander and rinse bones thoroughly. This is to get rid of blood, impurities etc. Clean the pot.
Put bones back into pot with 4L of water (or more to cover the bones) and bring to a rolling boil. Not a hard boil since that will make the broth cloudy. Skim any scum off the surface and top up with water regularly.
While the bones are boiling, heat a frying pan on medium heat and place onion and garlic with cut side down, leave until caramelised.
Option 1: leave bones on a rolling boil for 8-10 hours, add vegetables etc and boil for the final 2-3 hours. Option 2: add veg once they’re caramelized and leave to boil for 10-12 hours. Personally, I add them towards the end to get maximum pork flavour with a light extra flavouring. If you add them earlier, you obviously get a different flavour profile.
Reduce until you have about 1.5-2L of broth
Strain into a clean pot, discard bones etc.
If you’re feeling adventurous, you can leave the bones to simmer over night for maximum flavour (plus ultra), just make sure you have enough water in the pot before going to bed (or get up during the night and top it up).
Once cooled, pour into an airtight container and store in the fridge, or if you’re like me and finish this around 11pm at night, leave it to cool on the hob with the lid on and put it away the next morning.
Good video: https://youtu.be/nscTA7QxryM
Chashu Pork
Time: 2.5 - 3 hours
This is an easy dish that takes about 2.5h to make and will hopefully result in melt-in-your-mouth tender pork belly with a lovely flavour that isn’t too salty. Personally I prefer rolled up pork belly because it just looks so pretty, and I think it’s a little bit more moist compared to flat pork belly (not that flat pork belly is dry!). One thing to remember: do not discard the liquid once your pork is done. This is very important, you will need it later!
A few recipes I’ve tried (both books linked here are good btw):
https://www.justonecookbook.com/homemade-chashu/
http://adamliaw.com/recipe/ramen-school-002-three-styles-of-chashu/
Nanban – Tim Anderson https://www.goodreads.com/book/show/19186358-nanban
Japanese Soul Cooking – Tadashi Ono & Harris Salat https://www.goodreads.com/book/show/17262625-japanese-soul-cooking
The combination of which is below
Ingredients
600-750g pork belly (I prefer pork belly, other cuts would be pork neck, pork loin although loin is not fatty enough imo,). This is enough for 4 portions, use bigger piece if you need more portions
1 piece Kombu
6 Shiitake mushrooms
150ml Japanese soy sauce (or just use 250ml soy sauce instead of dark soy)
100ml Dark soy sauce (saltier than Japanese soy, also adds colour)
125ml Mirin
125ml Sake
Optional (I use these)
2-3 Spring onions
1 inch Ginger
1 Star anise
Process
Roll up pork belly and tie it up with butchers’ twine.
Boil for about 20 minutes
Remove pork from water, rinse under running water, rinse pot
Return pork to pot with kombu and mushrooms, cover with water and bring to boil
Once water is steaming, remove kombu since it will turn bitter and unpleasant if boiled
Simmer uncovered for 1 hour then add everything; soy sauce, mirin, sake, spring onion, ginger.
When done, remove the pork and leave to cool. Once cool, place in fridge over night to firm up. Don’t discard the liquid!
Strain the braising liquid into an airtight container, this will be the marinade for the eggs and can also be used to braise meat and veg for other meals.
Ajitamago
Time: 6 minutes 30 seconds for boiling, anywhere from 1 to 48 hours of marinating
Ajitamago are an essential part of ramen in my opinion. Lovely soft boiled eggs with a savoury salty sweet exterior is always a lovely accompaniment and very easy to make. You can either make a marinade ahead of time or you can use the braising liquid from the pork belly. A simple marinade recipe is below, but if you’re using the braising liquid just skip to the egg part. Using the braising liquid has the advantage of more complex flavour, plus there’s quite a lot of it so you can marinate more eggs which is always a good thing.
Simple marinade
Ingredients
225m Water
225ml Soy sauce
125ml Sake
2 cloves of Garlic
25g Ginger
1 Star anise
Process
Put all the ingredients in a pot, bring to a boil then immediately take it off the heat.
Leave to cool, transfer to airtight container.
It will last a few weeks, up to a month, in the fridge
Ajitamago ingredients
4-6 eggs
Ice bath (or just very cold water bath)
As much marinade as needed to cover the eggs
Process
Carefully pierce the bottom of the eggs (rounded part) with a pin/needle.
Bring enough water to completely cover the eggs to boil
Set a timer for 6 minutes and 30 seconds
Gently place the eggs in the water and start the timer.
Use a pair of chopsticks to gently spin the eggs for about two minutes.
Once the time is up, transfer eggs to the ice/cold water bath.
When the eggs are cool, peel under cold running water.
Place eggs in a bowl, add marinade until eggs float then place a paper towel on top to weigh the eggs down alternatively you could place them in a zip loc bag.
Leave to marinate anywhere from a couple of hours to 24 hours. If marinating for a long time, rotate them regularly.
Personally, I feel that any longer will make them too strong but it’s possible to marinate them for 48 hours.
The book Nanban has an interesting alternative which involves Lapsang Souchong for a smokier flavour.
Tare
Tare is a concentrated sauce that adds additional flavour to the broth. It can be soy based (as in shoyu ramen), miso, salt (shio ramen) and almost anything else. I tend to try different things every time I make ramen and most recently, we tried two different things:
Version 1
1tsp Nduja - spicy Italian (Calabria) spreadable salami. The idea was to use something that has a lot of flavour and spice, and doesn’t take away from the pork flavour of the broth (we spent 10+ hours getting that flavour, why would you want to dilute it?).
Version 2
0.5 - 1 tbsp Miso
1/2 tsp garlic powder
1/2 tsp chicken powder
Technically the tare is supposed to be a separate thing you put into the bowl first then add broth but it’s up to you how you want to do this. There are plenty of recipes online and in the books I’ve linked that will show you how to do it “properly” 😊
Toppings
Apart from pork belly and eggs, other toppings can be
Pickled ginger (Gari)
Pickled bamboo shoots (Menma)
Spring onion
Toasted sesame seeds
Seaweed (Nori)
La-Yu (chili-sesame oil)
There’s an almost unlimited number of combinations for toppings, the above is just what I used this time.
Assembly
Start by bringing a big pot of water to the boil and heat up the broth. While that is heating up, thinly slice the pork and any other toppings that need slicing, e.g. spring onion, seaweed etc.
Depending on how fancy you want to be, you can either heat up the pork slices in the broth or you can use a grill/frying pan/blow torch. I used a frying pan since it was easiest and you get a nice light browning on the slices.
Once the water is boiling, add noodles and cook until they are done to your liking. I prefer a little bit of a bite to them which is about 3 minutes but this varies depending on what kind of noodles you use and your preference.
Heat the bowls by adding a ladle or two of broth then pour it back into the pot.
Put a bit of tare at the bottom of the bowl, top up with broth, then noodles and finally toppings. Hopefully you now have a lovely looking bowl of tonkotsu ramen!
0 notes
Photo

Pasta with Tomato, Redpepper and Goats Cheese
A quick(ish) pasta dish that tastes great; roasted red peppers, goats cheese and chilli. What’s not to like?
Ingredients (serves 2 for sure, maybe 3)
400-500g plum tomatoes, halved
2 red peppers, de-seeded and quartered
2 cloves of garlic, minced
1 fresh red chilli, (mostly) de-seeded and sliced finly
100g Soft Goats cheese
Oregano
Handful of parsley, chopped
Olive oil
Pecorino Romana (or parmesan), finely grated
Pasta (spaghetti in the photo)
Prep
The first thing to do is to get the peppers going because they take the longest.
Heat the oven to 225C. I used grill + oven setting
De-seed and quarter the peppers. Quick de-seeding: cut off the top of the pepper, grab the seed + white flesh lump and take it out. I saved the tops, minced and put in the sauce towards the end for a bit of crunch
Place the red pepper quarters on parchment paper under the grill/in the oven and leave to char which will take about 20-25 minutes. Check them every now and then to rotate them around to get an even roast
While the peppers are roasting, get a pot of water on the hob and prep the ingredients for the sauce.
Halve the plum tomatoes
Mince garlic (I like the smash with flat of knife, julienne and mince way)
De-seed and slice the chilli
Cut the thick outer edge off the goats cheese, cut it up
Chop some parsley
Grate some pecorino
Time to check the peppers again. Once they are done you can peel the skin off and slice them into strips.
Once your pasta water is boiling, add a generous helping of salt. How much is debatable but be generous with it, add more than a pinch.
Cooking
Time to bring it all togther!
Heat a frying pan on low-meidum heat with a glug of olive oil
Add tomatoes and leave alone
Put pasta in the water, start timer (11 mins for spaghetti)
Give tomatoes a stir
Stir in garlic and chilli
Leave it alone for a few minutes, stir the pasta
Add red pepper strips (and minced pepper if using), stir
Add goats cheese
It should look a bit like this:

Add a few twists of black pepper and a large pinch of oregano, give it a stir
Give pasta a stir, check for doneness
Add a splash of pasta water to the frying pan to help make the sauce a bit more saucey
Add parsley to the pan, stir.
Give the sauce a final stir. The cheese should be melted and it should smell great by now so it’s time to
Plate up: pasta, sauce, a generous helping of grated pecorino
Enjoy!
Hot tip: the tomato sauce works as a base for all sorts of things. E.g., add a small red onion and ndujia for spicy goodness. Add some fresh basil and a shalott for a simple, super tasty tomato sauce. Using fresh plum tomatoes will almost guarantee a super tasty sauce.
0 notes
Photo

Niku Udon (serves 4)
This recipe is very easy and takes three simple stages:
Make the Dashi
Make the Udon Tsuyu
Make the Niku Udon
Stage 1 and 2 can be performed well in advance, both the Dashi and the Tsuyu will keep in the fridge for a few days.
Dashi (Makes about 1.4L/6 Cups)
Ingredients
1.8 litres (8 cups) plus 2 tablespoons water
2 6-inch pieces of kombu
40g katsuobishi (dried bonito flakes)
Method
Add 1.8L of water and the kombu to a large stockpot, steep for 30 minutes
Place the stockpot over medium heat and bring to the boil. Remove the Kombu as soon as it starts to boil.
Add the remaining 2 tbsp water, then the katsuobishi. Stir to mix.
When it comes to the boil again, decrease heat to low, simmer for 5 minutes. Remove any scum that comes to the surface.
Turn off the heat, steep for 15 minutes.
Strain the liquid through a fine sieve/muslin. If you don’t have a fine sieve or muslin a paper towel can work in a pinch.
Discard the katsuobishi.
Udon Tsuyu
Ingredients
1.4 litres (6 cups) dashi (you just made this!)
125ml mirin
125ml usukuchi soy sauce (light japanese soy sauce will do)
1 teaspoon salt
Method
Add the dashi, mirin, soy sauce and salt to a saucepan.
Bring to the boil, then set aside.
Niku Udon
Ingredients
450g beef sliced thinly and cut into bite-sized pieces
1.4 litres (6 cups) udon tsuyu (you just made this!)
Enough udon noodles for 4 (this will depend on how hungry you are!)
1 negi or spring onion, thinly sliced
Shichimi togarashi (Japanese 7 spice)
Marinade
60ml sake
50g sugar
60ml soy sauce
Method
Mix together the marinade ingredients well. Add the beef, mix with your hands and leave for ten minutes. Preheat a large, dry frying pan.
If your Udon Tsuyu has cooled, start to reheat, otherwise keep warm over a low heat.
Prepare your udon according to instructions. Drain and rinse under cold water to stop it cooking. Drain again, divide into your four bowls.
Add the beef and marinade to the preheated pan. Spread out the beef so it cooks evenly. Cook for roughly 5 minutes until most of the liquid has evaporated. Turn off the heat.
Pour the hot tsuyu over the udon. Divide the beef between the bowls, placing it on top of the noodles.
Garnish with negi, Season with the shichimi togarashi to taste.
Recipe lightly adapted from Japanese Soul Cooking: Ramen, Tonkatsu, Tempura and more from the Streets and Kitchens of Tokyo and beyond
1 note
·
View note
Photo

Punjabi style chicken curry and pilau rice
A good chicken curry is actually quite easy as long as you have roughly the right spices and a big pot. Pilau rice can be as fancy or as simple as you like! Alternatively you can eat this with chapattis (which is the “proper” way to eat it) but personally I really like using the rice to soak up the sauce.
Chicken curry
2 medium yellow onions, chopped
A bunch of cloves of garlic, 6-8?, minced
Big knob of ginger, minced
1 fresh chilli or 1 tsp chilli powder
1-2 tsp turmeric
1tbs ground cumin
2 tbs ground coriander
1 tin of chopped tomatoes (alternatively use rough equivalent of fresh)
Optional: 1 cup/250ml natural yoghurt
1kg of chicken thighs, bone in, skin off
Whole spices
5-6 cardamon pods
2-3 cm piece of cinnamon or a cinnamon stick
2-3 bay leaves
6-8 whole cloves
6-8 black peppercorns
Fresh coriander, to serve
All spice measurements are suggestions, putting in more by design or accident is never a bad thing!
Pilau rice
1 cup of basmati rice
2 cups of chicken stock
1 bay leaf
4-5 cardamon pods
a few cloves
some cumin seeds
some saffron strands for flavour and colour, soaked in a little bit of hot water (or use turmeric)
small onion, finely minced
optional: small piece of cinnamon
First the curry
Add a generous helping of oil to a big heavy pot and sizzle the whole spices for a little bit then add the onion. Sauté onion, garlic and ginger until golden then add the ground spices. Fry for another minute or two
If using fresh tomatoes, add them here with a pinch of salt and let it simmer for a while to break them down
Add chicken pieces and sauté on high heat, stirring well to lightly brown the chicken.
Add optional yoghurt here, sauté for a few minutes to dry it out
If using tinned tomatoes, add them now
Add a splash of water to make sure the chicken is mostly covered
Put the lid on and leave to simmer, stirring occasionally, for about 30-40 minutes. While this is simmering away, make the pilau rice:
Second the pilau rice
Add a splash of oil to a pot, add spices except saffron and sauté for a moment to bring out the fragrance, then add onion and sauté until golden
Pour in the rice, stir to coat it with the oil and let it fry for a moment until it turns translucent. Be careful not to burn it.
Add stock, bring to a boil and put the lid on.
Leave it alone on the lowest heat for about 15-16 minutes then take it off the heat. Leave it to rest until the chicken is done which will hopefully be in about 5-10 minutes at most.
It’s worth noting that a nice rice can be made with just some chicken stock and a bay leaf, you don’t necessarily need all the other bits (but they do make it taste nice and if you made the chicken curry you’ll probably have most of them)
Everything is done
Time to eat; a nice portion of pilau rice and/or chappatis/naans with one or two thighs per person depending on how hungry they are, sprinkle some coriander leaves over the chicken and tuck in!
Very roughly adapted from:
https://www.sanjeevkapoor.com/Recipe/Punjabi-Chicken-Curry.html
https://www.sbs.com.au/food/recipes/punjabi-chicken-curry
0 notes
Photo

Quick cucumber pickle (aka Sorta Kinda Oi Muchim)
Super quick and super simple!
Ingredients
10-15cm of a cucumber
A tablespoon of (Korean) rice vinegar
A generous helping of Gochugaru (the hotness)
A teaspoon or so of (Korean) sesame oil
Dash of garlic powder
Couple of pinches of salt
Pinch of black pepper
How to:
Slice the cucumber in half lengthwise, then on the diagonal so that you get long half ellipses.
Put it all in a bowl, add the rest of the ingredients. Give it a good mix with your hands.
Have a taste it and add more of what you feel is missing. It should be a little bit hot, not too garlicky and the sesame oil shouldn’t be over powering.
Leave to stew for at least 15-30 minutes, preferably longer.
Enjoy!
Note: This is best eaten on the day of making it. If you leave it in the fridge it will still be good the next day but the cucumber will loose its crunch.
You can use minced garlic instead of powder
Korean rice vinegar and sesame oil aren’t necessary but nice. Japanese rice vinegar and sesame oil work too, even white vinegar should work (but the flavour will of course be different).
Goes well with Bulgogi
0 notes
Photo

Marinated chicken and turmeric rice with white sauce and harissa
This is a simple dish where you marinate the chicken in lemon juice, olive oil and herbs for 30 minutes up to 4 hours, add rice, white sauce and harissa and it tastes delicious
For the chicken:
2 tablespoons lemon juice (most of a lemon)
1 tablespoon chopped fresh oregano (or dried if fresh is hard to find)
1/2 teaspoon ground coriander
3 garlic cloves, roughly chopped (about 1 1/2 tablespoons)
125ml olive oil
Sea salt and freshly ground black pepper
900g boneless, skinless chicken thighs, trimmed of excess fat (6 to 8 thighs)
For the rice:
2 tablespoons unsalted butter
1/2 teaspoon turmeric
1/4 teaspoon ground cumin
1 1/2 cups long-grain or Basmati rice
2 1/2 cups chicken broth
Sea salt and freshly ground black pepper
For the sauce:
120ml mayonnaise
120ml Greek yogurt
Sugar to taste
2 tablespoons white vinegar (or cider vinegar for milder, fruitier flavour)
1 teaspoon lemon juice
Chopped fresh parsley
Sea salt and freshly ground black pepper
To serve:
1 head iceberg lettuce, shredded
1 large tomato, cut into wedges/sliced
Harissa
Optional:
Fluffy pocketless pita bread, brushed in butter, lightly toasted, and cut into 1 × 3-inch strips
For the chicken:
1.Combine all the marinade ingredients in a blender and process, alternatively, if you don’t have fresh herbs you can finely chop or press the garlic and mix it all together in a bowl and skip the blender. Trim excess fat off the chicken thighs and place in a ziploc bag. Pour over half to 3/4ths of the marinade and massage gently to distribute the marinade evenly. Put the bag in the fridge for at least 30 minutes but no longer than 4 hours or it will go mushy. Give it a turn and a squeeze every now and then to redistribute the marinade. Reserve the remaining marinade in the fridge for later.
2. Remove the chicken from the bag and pat it dry with paper towels. Season with salt and pepper, going heavy on the pepper. Heat the oil in a 12-inch heavy-bottomed cast iron skillet over medium-high heat until it is lightly smoking. If you’re using a non-stick pan, no need to add the oil. Add the chicken pieces and cook without disturbing until they are lightly browned on the first side, about 4 minutes. Using tongs, flip the chicken. Reduce the heat to medium and cook until the chicken is cooked through and the center of each thigh registers 75°C. on an instant-read thermometer, about 6 minutes longer. Transfer the chicken to a cutting board and allow to cool for 5 minutes. You might have to do this in two or more batches depending on the size of the thighs
3. Using a chef’s knife, roughly chop the chicken into small chunks. Transfer to a medium bowl, add the remaining marinade, cover loosely with plastic, and refrigerate while you cook the rice and prepare the sauce.
For the rice:
Melt the butter over medium heat in a large Dutch oven (or heavy bottomed pot). Add the turmeric and cumin and cook until fragrant but not browned, about 1 minute. Add the rice and stir to coat. Cook, stirring frequently, until the rice is lightly toasted, about 4 minutes. Add the chicken broth. Season to taste with salt and pepper. Raise the heat to high and bring to a boil. Cover, reduce to a simmer, and cook for 15 minutes without disturbing. Remove from the heat and allow to rest until the water is completely absorbed and the rice is tender, about 15 minutes.
For the sauce:
In a small bowl, combine the mayonnaise, yogurt, sugar (go easy on the sugar), vinegar, lemon juice, parsley, and 2 teaspoons black pepper. Whisk to combine. Season to taste with salt.
To serve:
Return the entire contents of the chicken bowl (chicken, marinade, and all juices) to the skillet. Cook over medium-high heat, stirring occasionally, until heated through. To serve, divide the rice, lettuce, tomato (and toasted pita bread if you have it) evenly among four to six plates. Pile the chicken on top of the rice. Top with the white sauce and harissa. Serve immediately, passing extra sauce at the table.
Recipe taken (and slightly modified) from http://www.seriouseats.com/recipes/2011/12/serious-eats-halal-cart-style-chicken-and-rice-white-sauce-recipe.html
0 notes
Photo

Yakisoba
Fried noodles with pork, cabbage and other bits with a delicious sauce. What could be better?
Ingredients:
4 packs of yakisoba noodles. I used pre-cooked yakisoba noodles but you can use fresh (or dried) ramen or even egg noodles (although the flavour and texture will be different)
200g of thinly sliced porkbelly or alternatively, a pack of unsmoked streaky bacon cut into 5-6cm strips. Not as good as proper pork belly but better than no yakisoba!
150-200g of cabbage, sliced into strips. I used red cabbage but green or savoy are just as good. White cabbage less so.
1/2 onion, sliced thinly
Carrot, sliced thinly
Bean sprouts (I did not have bean sprouts when I made it but they are a nice addition)
Spring onion, white parts cut on the bias
125ml sake
Sesame oil
Yakisoba sauce, such as Otafuku Yakisoba sauce
Optional: garlic. I love garlic, what can I say.
Toppings:
Aonori (powdered seaweed)
Gari (pink pickled ginger), sliced thinly
Spring onion, green parts, sliced thinly
Black pepper (freshly ground)
Method:
Cook the noodles according to the instructions, rinse in cold water and leave for now
Heat some oil in a frying pan (some recipes say to heat sesame oil for frying but personally I tend to drizzle it on at the end rather than cook with it since toasted sesame oil has a low smoke point) and add the onion, garlic (if using) and pork. Fry until pork starts to turn white.
Add the cabbage and carrot and keep things moving around. Once the cabbage turns bright green (if using savoy) or starts to soften a bit (a couple of minutes at most), add the sake and yakisoba sauce and mix it all up my selecta
Add the drained noodles and mix it all up even more, stir fry until all the liquid has been absorbed, about 2 minutes or so
Dish it up and top with a swirl of yakisoba sauce (if it needs it) black pepper, aonori, green spring onion and finally a little pile of ginger (in that order for maximum pretty).
Yakisoba is really easy to make and can be done in less than 10 minutes if you cut everything up in advance. I usually have to divide everything into two bowls (two bowls of cabbage and carrot, two bowls of onion and garlic etc) because I don’t have a frying pan/wok big enough to handle it all in one go so prepping is essential :D
Recipe slightly adapted from the most excellent Japanese Soul Cooking
0 notes
Photo


Spinach, Black Bean and Chipotle Quessadillas... Sort of.
A really yummy and quick quessadilla recipe that works really well as a lunch or snack!
Ingredients:
1 can black beans (drained and rinsed)
1 Chili, chopped up
Chipotle paste (or chipotle in adobo sauce if you can get it, ~15g)
200g Emmental, grated
A generous amount of mature cheddar, grated
80-100g of chopped fresh spinach
Half a leek, about 15cm long, chopped
Flour tortillas
See first image :)
Method:
Heat some oil in a frying pan and wilt the spinach and leek (maybe add some garlic if you fancy some extra garlicky goodness and lets face it, who doesn’t?). Transfer to a bowl once done
Add black beans, a teaspoon or so of chipotle paste (or the chipotle in adobo sauce), all the cheese, the chopped chili and mix it, mix it real good (second image)
Spread a good amount of the mixture over half a tortilla. Enough to make it filing but not so much that you can’t fold it over and close it by pressing firmly along the edge. Repeat until you’ve used up all the mixture. I ended up with 4 quessadillas.
Heat up some oil in a frying pan until shimmering. Carefully add two folded tortillas and cook, swirling and moving tortillas around, until golden brown and puffy on first side, about 2 minutes. Using a flexible spatula, flip quesadillas, season with salt, and continue cooking until golden brown and puffy on second side, about 2 minutes longer.
Transfer quesadillas to a paper towel to drain, cut into triangles and serve immediately (final image)
This is really quite simple but VERY tasty. Somewhat adapted from Serious Eats excellent quessdilla recipe:
https://www.seriouseats.com/recipes/2017/02/spinach-black-bean-chipotle-quesadilla-recipe.html
Great tips on how to make excellent quesadillas:
https://www.seriouseats.com/2017/02/food-lab-great-quesadillas.html
0 notes