#toilet tank seals replacement
Text
An Understanding About The Toilet Seat Bumper Replacement
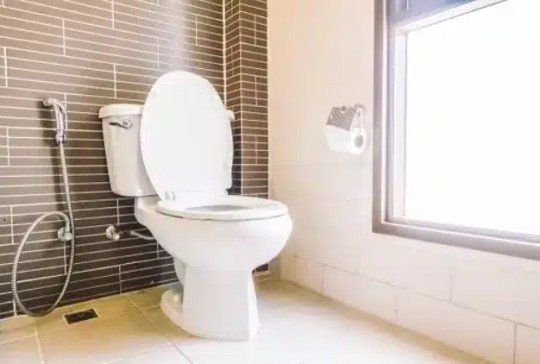
You pay attention to every little detail to keep your bathroom functional and comfortable. A toilet seat is perhaps an indispensable part of your bathroom, so replacing the bumpers on the toilet seat may not be the most interesting task to take care of your home, but it is crucial for taking care of your toilet seat. In this quick guide, you will learn why and how it might be necessary to replace such tiny yet vital parts. It is an understanding of the toilet seat bumper replacement.

Toilet seat bumpers: What are they?
The toilet seat bumpers are small rubber or plastic pads located on the underside of your toilet seat. Principally, their role is to cushion the seat when set down and to prevent it from banging or cracking against the bowl and reducing noise. They also protect the porcelain from scratches and cracks caused by the seat's movement.
Toilet seat bumpers: Reason for replacement
Over time, they will wear out or crack. They may crack, get dislodged, or lose their cushioning effect. Thus, it is necessary to replace them to keep your toilet seat in service and to prevent damage to your toilet. Still, a malfunctioning bumper can result in an uneven seat that would be very uncomfortable and unsanitary.
How to replace toilet seat bumpers?
Replacement for toilet seat bumpers can be quite easy. It requires minimal tools. First, remove the toilet seat from the bowl by unscrewing the bolts that hold it in place. Once the seat is removed, you will have a view of where the old bumpers are attached to the underside. Just peel or pry them off and attach new ones in their place. Be sure to align them properly to ensure that it would fit even. Screw the new bumpers into place. Screw the seat back to the toilet bowl once the new bumpers are in place.
Replacing toilet seat hinges
If you are replacing the bumpers because they have worn out, then it may also be of value to check the hinges. Hinges can loosen or corrode over time and thus affect the stability of your toilet seat. This entails the same or almost similar steps: removing the seat by unscrewing the old hinges and installing new ones. It works to improve stability in general and the functionality of the seat all around. This is all about the toilet seat hinge replacement.
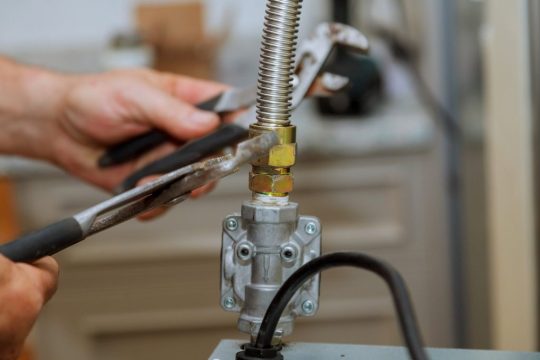
Replacement of the toilet tank seals
Don't forget about the seals for your toilet tank when you're doing your plumbing maintenance. They seal at the junction of the tank to bowl and the flush valve seal, thereby stopping leaks. These seals will deteriorate over time and may cause a running toilet or a water leak. Turn off the supply of water, drain the tank, and then remove and replace the old seals to replace them. It may be a little more involved than bumper replacement, but is equally important in preventing water damage and maintaining efficiency. As a result, toilet tank seals replacement is an easy process.
Conclusion
In summary, while replacing the toilet seat bumpers is a small task, it brings immense improvement in comfort and life longevity to your toilet. Checking the seat hinges and tank seals for replacement, if needed, will go a long way in keeping your bathroom in good condition. Avail the replacement of the toilet seat bumper from the portal Iron Horse Mechanical & Plumbing Services. The portal offers you a better service.
0 notes
Text
I’m a plumber. My father was a plumber, his father was a plumber, maybe his father was a plumber. We don’t know for sure. Grandpa was eaten by a tiger working at the zoo that one fateful afternoon, but this story isn’t about that. Where I work is a little company called Fel-Pro.
Maybe you’ve heard of Fel-Pro. You probably use their products. They’re one of the pre-eminent gasket manufacturers of the 21st century. Wherever there’s two tubes in your car that have to have a nice tight seal against each other, chances are Fel-Pro sells something to replace that seal. Are they as good as factory? Experts employed by Fel-Pro mumble and change the subject. Here’s the important thing: they have money, and some of that money goes to feed my kids by way of me fixing their office plumbing once in awhile.
Now, it’s not all roses. My plumber and custodian buddies who work in other companies, they say that people mostly stay out of their way while they’re working. Maybe once in awhile, they’ll get a Super Dad who chats a bit about power tools, or asks some basic questions about their toilet at home, or doesn’t want to take responsibility for having left a cast-iron shit in the tank and then trying to cram it through the manifold using thirty pounds of toilet paper. The usual stuff, right?
At Fel-Pro, it’s different. These motherfuckers have opinions about plumbing, as you would expect from their careers. As soon as they hear even the smallest pinhole leak, the bathroom is filled wall-to-wall with engineers, trying to figure out if it’s a gasket interface issue. Once they realize it isn’t, they start discussing ways to make it a gasket issue.
Anything that leaks is caused by inferior gasketry, even if the pipe itself has split in the middle. They could solve that by making a sort of very long, pipe-shaped grommet gasket to replace the pipe entirely. Yeah, yeah. And then a bunch of these pencil-necks start climbing over top of me to take measurements with their Mitutoyo digital calipers, and video-chat with the toilet manufacturer’s engineers just to call them rookie-level chumps. All the while, the bathroom is slowly filling with water up to our waists, the water-shutoff valve having been removed years before to prevent these eggheads from being tempted to fuck with it.
As any professional would, I started ignoring them, but it turns out that showed up on my performance review. Everyone at Fel-Pro has to be vigilant against leaks, said my boss, a dour expression on his face. He thrust a diagram on how to apply the proper torque pattern to the wax seal of a toilet.
Don’t get me started on how angry they get when they see me using hardware-store silicone bathroom caulking to solve the problem. That’s not the ideal thermal interface, they moan, and start bringing out all kinds of high-zoot polymer compounds, emblazoned with safety warnings in Chinese. Those make the room spin pretty good, and sometimes they get worryingly hot on application, but I must admit they work a treat. One engineer brought me something he stole from a tour he took of NASA and told me to seal a leaking air conditioner drain with it. Well, mission accomplished, buddy: Jim, the custodian I share an office with, had to use a plasma cutter to remove it last week.
It’s gotten so bad that I’ve started only doing plumbing repairs in the middle of the night, when the engineers are likely to be at home, berating their spouses for daring to bring Scotch tape into their home.
176 notes
·
View notes
Text
Looks like I am going to have to learn how to replace the wax seal on a toilet and also the pump in the toilet tank. At first the toilet just wanted to keep running, but now it appears to be leaking from the bottom 🙃 I can't afford to hire someone and I know I can likely do it myself. It's just a matter of actually doing it. Thank god I have 2 bathrooms at least so it isn't something I have to do RIGHT NOW. I have a friend from out of town coming this weekend.
9 notes
·
View notes
Note
Is there a non toxic way to keep mold from growing in the toilet tank? I have a pet who I try to keep out of the bathroom, but they occasionally manage to make it in and drink from the toilet, so I don't want them to get poisoned. I've thought of using vinegar but I've heard that can degrade the rubber from the plug that keeps the tank from emptying into the bowl. Any thoughts on what might help?
Truthfully, yes, Vinegar will eventually deteriorate toilet seals and rubber but so will use and age, the seals don't last forever and needing replacements every 3-5 years is not unusual for most of the toilet tank interior parts. Using a small amount of vinegar and not letting it sit for long periods is, realistically, not going to create a noticeable difference in deterioration.
However, you can also do a steam treatment on the toilet if you have the tools for it, and that's completely chemical free. Just be mindful to let the toilet cool down before filling it with cold water again or you risk cracks in the porcelain. Keep in mind whatever you do it's going to have to be recurring, with frequency determined by how quickly the mold will come back. Toilet tanks tend to be dark dank little places that mold loves, especially cuz no one really looks in them
Personally I think cats can sometimes be kind of gross. Ive caught mine drinking out of a dirty dish that's been soaking overnight(and I still let that asshole kiss me) I don't know if the occasional toilet water is a huge cause for concern, even if there is mold in the tank.
2 notes
·
View notes
Text

He's in a shitty trailer in Unova, out on a job, bitching on the phone to his Unovan connection about the accommodations-- because he has to hang out in a less-than-desirable part of town.
❝ Honestly? I'm ready to just destroy this entire house.
You think I won't climb under this bitch and loosen every single fucking pipe? You think I won't climb up into the insulation and put meat up in it to rot? You think I won't store my trash under this house until it's rancid? You think I won't flood this entire fucking master bedroom in the messiest splashiest bath ever? You think I won't offset every single fucking cinder block holding this piece of shit up so that when these torrential winds come through it shifts and wrecks the frame and eventually collapses to one side because it's already on a hill and the laws of physics would be in my favour? You think I won't release Durants into the electrical outlets? You think I won't release a shit ton of Kricketunes into the crawl space? Mother fucker, I will go find the most bed bug ridden piece of furniture to ever exist and leave it sit here in this empty house for months while you try to sell it. Like I won't pour bacon grease down every fucking drain, fill both toilet tanks with corrosive cleaners so that it smells nice but every rubber seal is being eaten away at, and put white vinegar on every metal hinge and appliance in this house to make it rust? To make every single hinge squeak horrendously and need to be replaced? I will destroy the subflooring. I will take the air vents out of the floor and piss down into them. I'll take the outlets off and shove shit into every single one of them. ❞
6 notes
·
View notes
Text
5 Common Plumbing Problems in San Jose and How to Fix Them
Plumbing problems are among the most common issues that homeowners face, and San Jose residents are no exception. Plumbing problems can range from minor inconveniences to major emergencies that require immediate attention. Knowing how to identify and fix common plumbing problems can save you time, money, and headaches in the long run. In this article, we'll discuss five common plumbing problems in San Jose and how to fix them.
Dripping Faucets
A dripping faucet is not only annoying but can also waste a significant amount of water over time. The most common cause of a dripping faucet is a worn-out washer. Replacing the washer is a relatively easy and inexpensive fix. To do so, turn off the water supply to the faucet, remove the handle, and use pliers to unscrew the packing nut. From there, remove the stem and replace the washer. Reassemble the faucet and turn the water supply back on.
Clogged Drains
Clogged drains are a common plumbing problem that can be caused by a variety of factors, including hair, grease, food particles, and mineral buildup. One of the easiest ways to fix a clogged drain is by using a plunger. Place the plunger over the drain and create a seal. Then, rapidly pump the plunger up and down several times to dislodge the blockage.
If the plunger doesn't work, try using a drain snake to remove the clog manually. Insert the snake into the drain and turn it clockwise to push it through the blockage. Once the snake has penetrated the blockage, pull it out, and dispose of any debris that may have attached to it.
Running Toilets
A running toilet can waste a significant amount of water, leading to higher water bills. The most common cause of a running toilet is a faulty flapper valve. To fix this, turn off the water supply to the toilet and remove the tank lid. Check the flapper valve and replace it if it's worn or damaged. You can also try adjusting the chain length to ensure the flapper valve seals correctly.
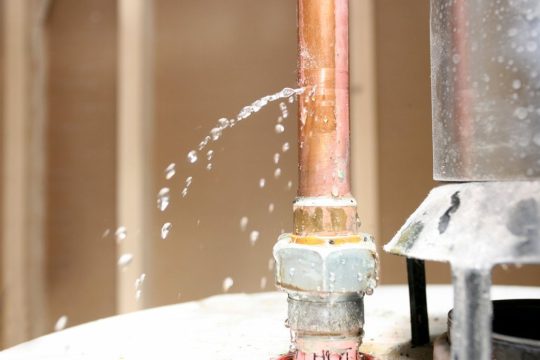
Leaking Pipes
Leaking pipes are a serious plumbing problem that requires immediate attention. Leaks can cause water damage and lead to mold growth if left untreated. The most common cause of leaking pipes is corrosion or damage to the pipe joints. If you notice a leak, turn off the water supply to the affected area and call a professional plumber to fix the problem.

Low Water Pressure
Low water pressure can be caused by a variety of factors, including mineral buildup, clogged pipes, or a faulty pressure regulator. One way to fix low water pressure is by cleaning the faucet aerator. The aerator is a small device that screws onto the end of the faucet spout. Over time, mineral buildup can clog the aerator, reducing water flow. To clean it, unscrew the aerator, remove any debris, and reattach it.
If cleaning the aerator doesn't solve the problem, you may need to call a professional plumber to diagnose the issue.
Plumbing problems can be frustrating and costly if left unaddressed. By knowing how to identify and fix common plumbing issues, you can save time, money, and headaches. However, if you encounter a serious plumbing problem, it's best to call a professional plumber to avoid causing further damage. If you need plumbing services in San Jose, Gogo Rooter Plumbing is an experienced and reliable company that can help. They offer a wide range of plumbing services, including drain cleaning, water heater repair, and sewer line replacement. Contact them today to schedule an appointment.
Gogo Rooter Plumbing
326 Phelan Ave #B, San Jose, CA 95112, United States
408-282-7026
Find US Google Map:
Also Our Social Site:
Facebook
Instagram
YouTube
Buffer
Pinterest
2 notes
·
View notes
Text
Essential Guide to Installing a New Toilet: What You Need to Know
Replacing an old, inefficient toilet with a new one is a common DIY plumbing task that many homeowners can tackle. However, installing a new toilet requires some caution—one small mistake could lead to costly damage to your home or plumbing system.
The most important tip we can offer is this: if you're unsure about what you’re doing or how a particular component works, take a moment to stop and learn. Most toilet installation mistakes can be avoided with a little research and a basic understanding of your home’s plumbing. Installing a new toilet in place of an old one is fairly straightforward, as you can reuse the existing water lines and connections. However, if you're installing a toilet in a brand-new location, it’s best to consult a plumber or do your homework in advance.
Steps for Installing a Toilet
1. Measure the Area and Prep the Space:
Before you begin, make sure the new toilet will fit in the designated space. If necessary, drill new holes for mounting.
2. Prep the Ground Pipe:
Clean out the exit pipe and remove the old wax ring. Install a new wax ring securely to prevent future leaks.
3. Position the Toilet:
Make sure the toilet is aligned correctly before placing it onto the drainpipe. Use bolts to secure the toilet to the floor.
4. Attach the Cistern (Tank):
Line up the fittings and screws correctly as you attach the cistern to the bowl.
5. Connect the Water Supply:
Depending on the toilet model, connect the water supply line to either the toilet or the cistern.
6. Seal the Base:
Apply a sealant around the base of the toilet to prevent water leaks.
7. Test the Installation:
Fill the cistern with water, turn on the water supply, and do a test flush to ensure there are no leaks or issues.
Final Thoughts
Now that you know the basic steps, installing a new toilet can be done in just a few hours. However, if you'd prefer to leave it to a professional, contact your local plumbing service. Especially when installing a toilet in a new spot, it's always a good idea to consult with a plumber to make sure the job is done right the first time.
For more information, visit - https://leyplumbingtn.com/.
1 note
·
View note
Text
Essential Plumbing Maintenance Tips for Homeowners
Proper plumbing maintenance is crucial for the efficiency and longevity of your home’s water systems. Regular upkeep can help prevent costly repairs and ensure that everything runs smoothly. Here are some essential plumbing maintenance tips every homeowner should follow.
1.Regularly Inspect Pipes:
Consistently inspecting your pipes is key to identifying potential issues before they become major problems. Look for signs of leaks, rust, or corrosion. Also, check for damp spots or discoloration on walls, ceilings, and floors, as these could indicate a hidden leak. Addressing these issues early can prevent water damage and reduce the risk of serious plumbing problems.
2.Maintain Your Water Heater:
Your water heater is essential for providing hot water in your home, so it's important to keep it well-maintained. Annually flush the tank to remove sediment buildup, which can negatively impact performance and shorten the heater’s lifespan. Also, check the temperature setting to ensure it is at a safe and efficient level, typically around 120 degrees Fahrenheit.
3.Keep Drainage Systems Clear:
Clogged drains can lead to slow water flow and potential backups. To prevent this, use a drain strainer to catch hair and debris before they enter your pipes. Avoid pouring grease, coffee grounds, or large food scraps down the sink, as these can cause blockages. Periodically, you can use a mixture of baking soda and vinegar followed by hot water to help keep your drains clear.
4. check For Leaks:
Leaks can occur in various parts of your plumbing system, including faucets, toilets, and under sinks. Regularly check for signs of leaks, such as water spots, mold growth, or a drop in water pressure. If you find a leak, repair it promptly to prevent water waste and damage. Often, replacing worn washers or seals can resolve minor leaks.
5.Insulate Exposed Pipes:
Exposed pipes, particularly those in unheated areas like basements or attics, are susceptible to freezing during colder weather. Insulate these pipes with foam sleeves or heat tape to protect them from freezing temperatures. Proper insulation can prevent burst pipes and avoid costly repairs.
6.Know How to Shut Off the Water:
In case of a plumbing emergency, knowing the location of your main water shut-off valve is essential. Familiarize yourself with how to turn off the water supply quickly to minimize damage from leaks or burst pipes.
Conclusion:
Regular plumbing maintenance is a proactive approach to avoiding major issues and extending the life of your home’s plumbing system. By inspecting pipes, maintaining your water heater, clearing drains, checking for leaks, insulating exposed pipes, and knowing how to shut off your water, you can keep your plumbing in top condition and enjoy peace of mind. Taking these steps will help you avoid costly repairs and maintain a smoothly functioning water system in your home.
1 note
·
View note
Text
The Ultimate Guide to Troubleshooting Common Household Problems
Household problems can range from minor inconveniences to significant issues that disrupt daily life. While some issues may require professional help, many can be resolved with a bit of troubleshooting and DIY effort. Understanding how to diagnose and address common household problems can save you time, money, and stress. Here’s a comprehensive guide to help you dépannage Lille and resolve some of the most frequent household issues.
1. Troubleshooting Electrical Issues
Common Problems: Flickering lights, non-working outlets, and tripping circuit breakers are typical electrical issues.
Diagnosis and Fixes:
Flickering Lights: Check if the bulb is loose or needs replacement. If flickering persists, the issue could be a loose wire or a problem with the switch. Ensure power is off before inspecting connections.
Non-Working Outlets: Use a voltage tester to determine if the outlet is receiving power. If not, check the circuit breaker or fuse box for tripped breakers or blown fuses. For persistent issues, consult an electrician.
Tripping Circuit Breakers: Frequent tripping may indicate an overloaded circuit or a short circuit. Unplug devices to see if the breaker still trips. If so, it’s best to contact a professional.
2. Troubleshooting Plumbing Problems
Common Problems: Leaky faucets, clogged drains, and running toilets are frequent plumbing issues.
Diagnosis and Fixes:
Leaky Faucets: Often caused by worn-out washers or O-rings. Turn off the water supply, disassemble the faucet, and replace the faulty parts. Reassemble and test.
Clogged Drains: Use a plunger or a drain snake to clear minor clogs. For more severe blockages, a mixture of baking soda and vinegar can help break down debris. Avoid using chemical drain cleaners, which can damage pipes.
Running Toilets: Check if the flapper valve is sealing properly. If not, replace it. Also, adjust the float mechanism if the water level in the tank is too high.
3. Troubleshooting Appliance Issues
Common Problems: Non-starting appliances, unusual noises, and poor performance are common complaints.
Diagnosis and Fixes:
Non-Starting Appliances: Ensure the appliance is plugged in and check the power source. For electrical appliances, inspect the fuse or circuit breaker. If the issue persists, the appliance may need professional repair.
Unusual Noises: Noises in appliances can indicate loose parts or mechanical issues. For example, a washing machine may have an unbalanced load, while a refrigerator may have a faulty fan. Refer to the appliance manual for specific troubleshooting steps.
Poor Performance: Clean filters and check for blockages. For example, a vacuum cleaner with reduced suction might have a clogged filter or hose.
4. Troubleshooting Heating and Cooling Systems
Common Problems: Inconsistent temperatures, strange noises, and system failures are frequent issues with HVAC systems.
Diagnosis and Fixes:
Inconsistent Temperatures: Ensure that the thermostat is set correctly and that the system is properly calibrated. Check for obstructions around vents and registers.
Strange Noises: Banging or rattling noises can indicate loose parts or debris in the system. Check and clean the system as needed. If noises persist, it may require professional attention.
System Failures: Ensure the system is receiving power and that the circuit breaker hasn’t tripped. Check the air filter and replace it if it’s dirty. If the system still doesn’t work, a technician may need to inspect it.
5. Troubleshooting General Home Issues
Common Problems: Drafty windows, mold growth, and poor indoor air quality are general home issues that can affect comfort and health.
Diagnosis and Fixes:
Drafty Windows: Check for gaps or poor insulation around windows. Use weatherstripping or caulk to seal leaks and improve energy efficiency.
Mold Growth: Address moisture issues by fixing leaks and improving ventilation. Clean mold with a solution of water and vinegar or a commercial cleaner. Ensure the area is dry to prevent mold recurrence.
Poor Indoor Air Quality: Ensure regular maintenance of HVAC filters and consider using air purifiers. Ventilate your home frequently and address sources of indoor pollution, such as smoke or chemicals.
Conclusion
Troubleshooting common household problems can empower you to handle many issues on your own, saving both time and money. By systematically diagnosing and addressing problems related to electrical systems, plumbing, appliances, HVAC, and general home maintenance, you can keep your home running smoothly and efficiently. However, don’t hesitate to seek professional help for issues that are beyond your expertise or when safety is a concern. Regular maintenance and prompt attention to minor problems can prevent larger, more costly repairs and ensure a comfortable and functional living environment.
0 notes
Text
How to Detect and Fix Common Plumbing Leaks

Introduction
A leak-free plumbing system is crucial for your home's safety and efficiency. Plumbing service leaks can lead to significant water damage, mould growth, and increased utility bills if left undetected. This guide aims to help homeowners detect and fix common plumbing leaks, providing practical tips and step-by-step instructions for maintaining a healthy plumbing service.
Understanding Plumbing Leaks
What Are Plumbing Leaks?
Plumbing leaks occur when water escapes from pipes, fixtures, or fittings. Common causes include wear and tear, corrosion, high water pressure, and poor installation. Leaks can vary in size and severity, from a dripping faucet to a burst pipe in South London. Understanding the different types of plumbing leaks is the first step in addressing them effectively.
Detecting Plumbing Leaks
Visual Inspection
Start by visually inspecting all visible pipes and fixtures. Look for water stains, damp spots, and mould growth on walls, ceilings, and floors. Check under sinks, around toilets, and near appliances for any signs of leaks.
Water Meter Test
The water meter test is a simple yet effective method to detect hidden leaks. Turn off all water-using appliances and fixtures in your home. Note the reading on your water meter, wait an hour without using any water, and then recheck the meter. If the reading has changed, you likely leak.
Listening for Leaks
Sometimes, leaks can be identified by sound. Listen for dripping or hissing noises near pipes, faucets, and appliances. Quiet areas like basements and crawl spaces are good places to start.
Water Bill Monitoring
Unexplained spikes in your water bill can indicate a hidden leak. Compare your current bill with previous months' bills. A significant increase without any change in water usage suggests a leak.
Common Areas for Plumbing Leaks
Kitchen
Under-Sink Leaks: Check for water stains and dampness under the kitchen sink. Loose connections or worn-out pipes often cause leaks here.
Dishwasher Leaks: Inspect the area around your dishwasher for pooled water or water damage. Ensure the hose connections are secure and check for any hose cracks.
Bathroom
Faucet Leaks: A dripping faucet is usually due to worn-out washers or O-rings. These leaks are common and easy to fix.
Showerhead Leaks: Look for water dripping from the showerhead when not used. A faulty seal or mineral buildup can cause it.
Toilet Leaks: Check for water around the toilet base or listen for continuous running water. A leaking toilet tank can waste a significant amount of water.
Basement and Crawl Spaces
Pipe Leaks: Inspect exposed pipes for moisture, rust, or corrosion. Even minor leaks can cause substantial damage over time.
Foundation Leaks: Water seeping through the foundation can indicate a plumbing issue. Look for damp spots or mould growth on basement walls.
Fixing Common Plumbing Leaks
Tools and Materials Needed
Before starting any repairs, gather essential plumbing tools and materials such as pipe wrenches, pliers, Teflon tape, pipe clamps, epoxy putty, washers, and replacement parts.
Faucet Leaks
Step-by-Step Guide: Turn off the water supply to the faucet. Disassemble the faucet using the appropriate tools, remove the old washer or O-ring, and replace it with a new one. Reassemble the faucet and turn the water supply back on to check for leaks.
Types of Faucets: Different faucets, such as compression, cartridge, ball, and ceramic disk, have specific repair techniques. Ensure you follow the proper method for your faucet type.
Pipe Leaks
Temporary Fixes: For a quick fix, use pipe clamps or epoxy putty to stop the leak temporarily. These solutions can buy you time until a permanent repair is possible.
Permanent Solutions: If the pipe is damaged, you may need to replace a section. Cut out the damaged part using a pipe cutter, fit a new piece of pipe, and secure it with appropriate fittings.
Toilet Leaks
Fixing a Leaking Toilet Tank: If your toilet tank leaks, it's often due to a faulty flapper or fill valve. Turn off the water supply, drain the tank, and replace the defective parts.
Replacing Faulty Parts: Ensure you have the correct replacement parts before starting the repair. Follow the manufacturer's instructions for installation.
Showerhead Leaks
Cleaning and Sealing: Remove the showerhead and soak it in vinegar to dissolve mineral deposits. Clean the threads and apply Teflon tape before reattaching it.
Replacing Washers and O-rings: If cleaning doesn't fix the leak, replace the washers or O-rings inside the showerhead.
Preventing Future Leaks
Regular Maintenance Tips
Routine inspections and maintenance can prevent leaks. Check your plumbing system regularly, tighten loose connections, and replace worn-out parts promptly.
Upgrading Fixtures
Consider upgrading to high-quality, modern plumbing fixtures. Newer fixtures are more efficient and less prone to leaks, saving you money in the long run.
Proper Usage and Care
Adopt best practices for using your plumbing system. Avoid over-tightening faucets, don't use excessive force when turning handles, and be mindful of what you flush down the toilet.
Conclusion
Maintaining a leak-free plumbing system is essential for your home's safety and efficiency. Regularly inspecting your plumbing, promptly fixing leaks, and following preventative measures can avoid costly water damage and ensure a healthy plumbing system. For persistent issues or significant repairs, always consult a professional plumber.
FAQs:
1. How do I know if my leak is severe enough to call a professional?
Answer: If you cannot locate the leak, if it's causing significant damage, or if temporary fixes aren't effective, it's best to call a professional plumber. Persistent leaks, leaks in hard-to-reach areas, or those involving significant pipes typically require expert intervention.
2. Can small leaks cause significant damage?
Answer: Yes, even small leaks can lead to substantial water damage, mould growth, and increased utility bills over time. A dripping faucet, for example, can waste hundreds of gallons of water annually, leading to higher costs and potential structural damage.
3. How often should I inspect my plumbing for leaks?
Answer: You should inspect your plumbing system at least twice a year. Regular maintenance and inspections can catch leaks early and prevent major issues, ensuring your plumbing system remains in good condition.
4. What are the most common causes of plumbing leaks?
Answer: Common causes of plumbing leaks include wear and tear, corrosion, high water pressure, and improper installation. External factors such as freezing temperatures and tree roots can also contribute to leaks in outdoor plumbing systems.
5. What tools and materials do I need to fix common plumbing leaks?
Answer: Basic plumbing tools and materials for common repairs include pipe wrenches, pliers, Teflon tape, pipe clamps, epoxy putty, washers, and replacement parts. Having these on hand can help you address minor leaks quickly and effectively.
6. How can I perform a water meter test to detect hidden leaks?
Answer: To perform a water meter test, turn off all water-using appliances and fixtures in your home. Note the reading on your water meter, wait an hour without using any water, and then recheck the meter. If the reading has changed, you likely have a hidden leak.
7. Are there any temporary fixes for pipe leaks?
Answer: Yes, temporary fixes for pipe leaks include using pipe clamps or epoxy putty. These solutions can stop the leak temporarily until a permanent repair is possible. However, addressing the underlying issue immediately is essential to prevent further damage.
8. How can I prevent future plumbing leaks?
Answer: Preventing future leaks involves regular maintenance, upgrading to high-quality fixtures, and adopting proper usage practices. Routine inspections, tightening loose connections, and promptly replacing worn-out parts can help maintain a leak-free plumbing system.
9. Can I fix a leaking faucet or call a professional?
Answer: Homeowners with basic plumbing knowledge and tools can fix many faucet leaks. Replacing worn-out washers or O-rings is a common repair. However, it's alwayou need clarification to consult a professional plumber. if you're unsure or uncomfortable with the process
#plumbing#bathroom repairs#bathroom fitters london#emergency plumber#24 hour emergency plumber london#plumber#boiler and central heating installation#plumbing services#emergency plumber croydon#bathroom refurbishment london
0 notes
Text
Preparing Your Plumbing for Winter
As winter approaches, it's essential to ensure that your plumbing system is ready to handle the cold temperatures. Proper preparation can prevent costly damages and ensure that you have reliable access to hot water throughout the season. Here are some key steps to prepare your plumbing for winter:
Check for Leaks
Inspect all your plumbing fixtures and pipes for leaks before winter sets in. Even small leaks can lead to bigger problems when temperatures drop. Check under sinks, around toilets, and in basements. If you find any leaks, it’s crucial to have them repaired promptly to avoid further damage.
Service Your Water Heater
Your water heater works harder during the winter months to provide hot water. Ensure it’s in optimal condition by scheduling a maintenance check. This includes flushing the tank to remove sediment buildup, which can improve efficiency and extend the life of your water heater. If your water heater is over ten years old, consider replacing it with a newer, more energy-efficient model.
Outdoor Faucets and Hoses
Disconnect and drain all outdoor hoses, and shut off the water supply to exterior faucets. Leaving water in outdoor pipes can cause them to freeze and burst. Drain the water from these pipes and store your hoses indoors to prevent any freezing damage.
Clear Gutters and Downspouts
Clogged gutters and downspouts can cause water overflow, which can freeze and cause damage to your home's foundation and plumbing system. Clean out any leaves, debris, and other blockages to ensure proper drainage. Installing gutter guards can also help prevent future clogs.
Know Your Main Shut-Off Valve
In case of a plumbing emergency, knowing the location of your main shut-off valve is crucial. Ensure that everyone in your household knows where it is and how to turn it off. This can help minimize damage if a pipe bursts or a major leak occurs. Additionally, it's essential to have the contact information for emergency plumbers in Canberra on hand, as they can provide immediate assistance in resolving urgent plumbing issues.
Seal Cracks and Openings
Seal any cracks or openings in your home’s foundation and walls to prevent cold air from coming into contact with your pipes. This can help maintain a consistent temperature and reduce the risk of freezing pipes.
Professional Inspection
Consider having a professional plumbing inspection before winter. At J&J Plumbing Services, our experienced plumbers can identify potential issues and provide solutions to ensure your plumbing system is winter-ready. From insulation recommendations to leak repairs, we’ve got you covered.
By following these steps, you can protect your plumbing system from the harsh winter weather and avoid unexpected repairs. At J&J Plumbing Services, we are committed to helping you maintain a safe and efficient plumbing system all year round. Contact us today for all your plumbing maintenance needs, including hot water installation in Canberra, and ensure your home is prepared for winter.
0 notes
Text
Essential Tools for Toilet Tank Seals Replacement in Iredell, TX
Iredell, Texas, toilet tank seal replacement? The necessary instruments for a seamless and successful replacement are listed by Iron Horse Mechanical & Plumbing Services, Inc. Our knowledgeable suggestions for the appropriate tools and methods will guarantee a good seal and stop leaks. Read More :- https://www.plumbtexas.net/near/iredell-tx/
0 notes
Text
The Impact of a Poorly Functioning Flush Kit on Your Home’s Plumbing
A toilet flush kit is an essential component of your bathroom’s plumbing system, ensuring efficient waste disposal and maintaining hygiene. However, a malfunctioning flush kit can lead to a cascade of plumbing issues that, if not addressed promptly, can result in costly repairs and significant inconvenience.
Understanding the impact of a poorly functioning flush kit on your home's plumbing is crucial for preventing these problems and ensuring a smoothly running household.
Constant Running Water
One of the most common signs of a malfunctioning flush kit is a toilet that constantly runs. This issue often stems from a worn-out flapper or a misaligned float, causing the toilet to continuously refill. Not only does this waste a significant amount of water, but it also increases your water bill. Over time, the constant flow of water can wear down the internal components of your toilet and place additional strain on your plumbing system.
Leaks and Water Damage
A faulty flush kit can also lead to leaks. If the seal between the tank and the bowl is compromised, water can seep out, causing damage to your bathroom floor and subfloor. This moisture can promote mold growth, leading to health issues and expensive remediation work. Furthermore, leaks can extend to other areas of your plumbing system, creating hidden damage that might require extensive repairs.

Poor Flushing Performance
When a flush kit is not working correctly, it can result in poor flushing performance. You might notice that your toilet fails to clear waste efficiently, requiring multiple flushes. This inefficiency can lead to clogs and blockages in your sewer line. Over time, these blockages can cause backups, leading to unsanitary conditions and potential damage to your home’s plumbing infrastructure.
Increased Pressure on Plumbing
A malfunctioning flush kit can create increased pressure on your plumbing system. For instance, if your toilet continually refills, it can cause fluctuations in water pressure throughout your home. These fluctuations can stress your pipes and fixtures, potentially leading to leaks and burst pipes. Addressing a failing flush kit promptly can help maintain stable water pressure and prevent additional plumbing issues.
Costly Repairs and Replacements
Ignoring issues with your toilet flush kit can result in costly repairs. A minor problem, such as a running toilet, can escalate into significant plumbing issues that require professional intervention. In severe cases, prolonged neglect might necessitate replacing entire sections of your plumbing system. The costs associated with these repairs and replacements far exceed the expense of replacing a simple flush kit.
Handyman Pro Services offers expert Toilet Flush Kit Replacement services to keep your bathroom running smoothly. Our skilled technicians ensure quick and reliable replacements, preventing leaks, running toilets, and costly repairs.
0 notes
Text
Details to Know about Small Plumbing Repairs

Plumbing issues can be a real headache. Small leaks, dripping faucets, and clogged drains are common problems in many households. These small plumbing repairs can save you a lot of trouble and money if addressed promptly. This guide will help you understand some of the most common small plumbing repairs and how to handle them.
Dripping Faucets:
Dripping faucets are not just annoying; they can waste a lot of water over time. These small plumbing repairs are usually straightforward. Most often, a worn-out washer or O-ring is the culprit.
Turn Off the Water Supply: Before starting any repair, turn off the water supply to the faucet.
Disassemble the Faucet: Use a wrench to remove the handle. Be careful not to damage the parts.
Replace the Washer: Take out the old washer and replace it with a new one. Ensure it fits perfectly.
Reassemble the Faucet: Put the faucet back together and turn on the water supply. The dripping should stop.
Running Toilet:
A running toilet can significantly increase your water bill. Small plumbing repairs usually involve the flapper valve or the fill valve.
Inspect the Flapper Valve: Open the toilet tank and check the flapper valve. If it's worn out or damaged, replace it.
Adjust the Fill Valve: If the water level is too high or too low, adjust the fill valve. You might need to replace it if it's not functioning correctly.
Check the Float: Ensure the float is in the right position. If it's too high or low, adjust it accordingly.
Clogged Drains:
Clogged drains are common in kitchens and bathrooms. Small plumbing repairs can usually be done with a plunger or a drain snake.
Use a Plunger: Place the plunger over the drain and push down firmly. Pull up quickly to create suction. Repeat until the clog is cleared.
Try a Drain Snake: If the plunger doesn't work, use a drain snake. Insert it into the drain and turn the handle to break up the clog.
Use a Chemical Drain Cleaner: If the clog persists, use a chemical drain cleaner as a last resort. Follow the instructions on the product carefully.
Leaky Pipes:
Leaky pipes can cause water damage and mold growth. Small plumbing repairs might require some basic tools and materials.
Identify the Leak: Locate the source of the leak. This could be a crack or a loose joint.
Turn Off the Water Supply: Before starting the repair, turn off the water supply to the affected area.
Patch the Leak: Use a pipe patch kit to seal the leak. You can also use epoxy putty for small cracks.
Tighten Loose Joints: If the leak is at a joint, tighten it with a wrench. Use plumber's tape to ensure a tight seal.
Low Water Pressure:
Low water pressure can be frustrating. Small plumbing repairs often involve cleaning aerators or checking for leaks.
Clean the Aerator: Remove the aerator from the faucet and clean it. Mineral deposits can build up and restrict water flow.
Check for Leaks: Inspect your pipes for any leaks. Even small leaks can reduce water pressure.
Examine the Pressure Regulator: If you have a pressure regulator, ensure it's working correctly. You might need to adjust or replace it.
Garbage Disposal Issues:
Garbage disposals can get jammed or clogged. Small plumbing repairs usually involve resetting the disposal or removing the clog.
Reset the Disposal: Most disposals have a reset button. Press it to see if it fixes the issue.
Clear the Jam: Use a wrench to manually turn the disposal and clear the jam. Never put your hand inside the disposal.
Clean the Disposal: Use ice cubes and lemon peels to clean the disposal and remove any unpleasant odors.
Water Heater Problems:
Water heaters can develop issues over time. Small plumbing repairs might require checking the thermostat or flushing the tank.
Check the Thermostat: Ensure the thermostat is set to the correct temperature. Adjust if necessary.
Flush the Tank: Sediment can build up in the tank and reduce efficiency. Drain the tank and flush it to remove sediment.
Inspect the Pressure Relief Valve: Ensure the pressure relief valve is working correctly. Replace it if it's leaking or damaged.
Handling small plumbing repairs can save you time and money. Understanding how to address these common issues is crucial for maintaining your home's plumbing system. Always remember to turn off the water supply before starting any repair. If you're unsure or uncomfortable with a repair, don't hesitate to call a professional plumber.
0 notes
Text
Vent
I'm gonna fucking scream.
So all I needed to replace in my toilet was the flap inside the tank. That's it. Then my grandpa wouldn't let me just do that. He wanted to replace the whole entire internal works, because HE didn't like how long it took for the toilet to refill. (He doesn't use it, it's a toilet in my room that only I use.)
So we finally did all that today, I deep cleaned everything, and fucking killed my back and he wouldn't let me do anything besides clean. (Hilarious, really.)
Toilet works fine, but I'm suffering the humidity in my room because I'm currently (was) trying to keep a clean air room because I'm super allergic to the wildfire smoke. Had my air purifier on blast since I cleaned it.
So I'm just about to go get in the shower and uh oh. Carpet around my toilet is soaked. (Carpeted bathroom, sue me, I love it, except in this instance.)
The entire fucking downstairs is flooded in the room no one uses. So I have to kill my back even deader to move a bunch of shit and find out where the water is dripping (storage/junk room, ofc). And obviously it couldn't just drip inside the wall, it's dripping from the middle of the fucking ceiling. I have cups set up, it's that bad. (I didn't notice because I had flip flops on until I just decided to go shower!)
Grandpa takes apart and reassembles the entire tank while I'm doing damage control downstairs and put the old rubber seal back in at my request, and when I get back up he wants to refill the tank. Well, guess what, it's leaking from a new spot now, AND the rubber gasket seal again. He tightens the new spot and insists to leave the water open until tomorrow 'to see if it leaks more' WELL GUESS WHAT I WON'T BE ABLE TO FUCKING TELL BECAUSE THE FLOOR IS SOAKED AND I DON'T WANT TO DEAL WITH AN ENTIRE NEW TANK OF WATER ALL OVER THE FUCKING FLOOR AND DOWNSTAIRS. So I shut that shit off again and he rage quit.
I'm so fucking mad bro. All I needed to replace was a new flap. Nothing to do with the water. If he'd have just let me do that, we wouldn't be in the fucking gallons of water mess that's gonna make me and our dog suffer tomorrow because the window has to be left open until the entire downstairs and my bathroom dry. Pure summer heat and wildfire smoke.
I'm fucking panicking rn man. I'm so fucking allergic to the smoke. I'm never gonna get my room aired out again by the time it dries. I normally have a fucking humidity problem because of the new roof we got in 2020 not letting heat out. I'm losing my fucking mind rn.
All I needed was one fucking flap.
And my grandpa couldn't care less about water damage lmao. He just laughed it off and said there's nothing he can do.
God, I don't know what I'm gonna fucking do. I'm literally panicking. I don't want to sleep in wildfire smoke. I have allergies and enough other health problems. It's already been a fight to keep the doors closed during the day here. I have no control over the 24/7 open windows in my grandpa's room across from mine, blowing wildfire smoke into my room from there, too.
God, I still have to fucking shower, too. I can't just fucking knock myself out with pills rn. And this is so petty, but I have to use my mom's toilet now, and it's way too tall for me and angled in a way that's extremely painful to sit on, and to put it very bluntly I flat out cannot physically shit in a toilet shaped like this.
I'm in so much fucking pain, too. I haven't fucking recovered from my back injury that went out on May 26. It's still painful to stand or walk. And yesterday I did a whole bunch of stuff that really aggravated it out of necessity. And now the toilet this morning. And then the toilet and furniture downstairs this night. I'll be lucky if I can even get out of bed tomorrow, and I have TWO APPOINTMENTS AND ERRANDS, SINCE IT'S THE ONLY DAY MY MOM WILL BE HERE WITH A CAR. I FUCKING HATE EVERHTHING SO MUCH. I REALLY THOUGHT I WAS GONNA HAVE A CHILL NIGHT AND NOT HAVE TO WORRY ABOUT THE FUCKING TOILET ANY MORE.
APPARENTLY THAT WAS TOO MUCH TO FUCKING ASK. NEXT TIME I HAVE TO REPAIR SOMETHING, LESSON LEARNED, DON'T INFORM THE LANDLORD (GRANDPA).
I'm so fucking miserable right now, man. I literally fucking scrubbed my shower for the 3rd or 4th time this week because my OCD has been getting bad again and I literally went all fucking out used up the last of my pumice to get the toilet tank dust sediment stain off, like fuck man, if I'd have known I was gonna suffer more tonight, I would've just left it and saved my back the trouble.
I don't even want to shower, and if I only had therapy tomorrow, I wouldn't, but I HAVE to see the chiropractor, but again, this is gonna end up being about my back and not my jaw like it's supposed to be. And now therapy is gonna be about the fucking toilet and not my other issues.
Sad thing is, I can't just sit in the shower. It's not clean enough for me, because I was cleaning with vinegar earlier, not bleach, since I can't open the windows. Well, now the windows are open, but I can't physically clean it AGAIN. Need to save whatever long-forgotten memory of a spoon is left for if there's another emergency.
Can't even fucking take panic attack meds, because it's in the same class as one of the sleeping meds I NEED to take. So. Lol. Wish me luck trying to calm down.
0 notes
Text
How Can You Find And Fix Plumbing Problems In A Rental Property?
Plumbing issues in rental properties can be a big headache for both tenants and landlords. If not fixed quickly, they can lead to expensive repairs. This guide from OP Plumbing Hub will help you spot common plumbing problems, understand why they happen, and learn how to fix them.

Common Plumbing Problems in Rental Properties
Rental properties often face several plumbing issues because many different people live in them over time. Here are some of the most common problems:
Leaky Faucets and Pipes: These are very common. Even small leaks can waste a lot of water and increase water bills.
Clogged Drains and Toilets: Blockages in sinks, showers, and toilets can cause water to back up and create unsanitary conditions.
Low Water Pressure: This can be due to blockages, pipe corrosion, or problems with the water supply.
Running Toilets: A toilet that keeps running after being flushed can waste a lot of water.
Water Heater Problems: Issues with water heaters can affect the supply of hot water, making daily tasks difficult.
How to Spot Plumbing Problems
Finding plumbing problems early can save you a lot of trouble and money. Here’s how you can identify potential issues:
Do Regular Inspections
Regular checks are essential to keep the plumbing system in good shape. Schedule routine inspections to find any visible signs of damage. Look for:
Water Stains: Check for water stains on ceilings, walls, and floors. These can indicate leaks.
Mold and Mildew: Mold and mildew usually mean there’s a moisture problem, often caused by a leak.
Water Pressure: Test the water pressure in all faucets and showers. Low pressure could indicate a blockage or leak.
Listen for Unusual Sounds
Plumbing problems often produce strange sounds. Listen for:
Dripping: Even if you can’t see a leak, you might hear water dripping.
Gurgling: A gurgling sound from drains can indicate a blockage.
Running Water: If you hear water running when no taps are open, there might be a leak somewhere in the system.
Check the Water Meter
The water meter can help you detect leaks. Turn off all faucets and appliances that use water, then check the meter. If the meter keeps moving, there might be a leak.
How to Fix Common Plumbing Problems
Once you've found a plumbing issue, it’s important to fix it quickly. Here’s how to handle common problems:
Fixing Leaky Faucets and Pipes
Dripping faucets and leaking pipes can waste a significant amount of water. Here’s how to fix them:
Replace Washers: Often, a worn-out washer causes a leaky faucet. Replacing the washer can usually solve the problem.
Seal Leaks: For minor pipe leaks, use a pipe sealant or plumber's tape. For bad leaks, you might have to swap out the broken part of the pipe.
Unclogging Drains and Toilets
Clogged drains and toilets are common but can be fixed with the right tools:
Plunger: A plunger uses suction to clear blockages.
Drain Snake: For stubborn clogs, a drain snake can reach deeper into pipes to remove blockages.
Chemical Cleaners: Use chemical drain cleaners as a last resort since they can damage pipes if used too often.
Fixing Low Water Pressure
Low water pressure can be frustrating. Here’s how to fix it:
Clean Aerators: Mineral deposits can build up in faucet aerators and showerheads, reducing water pressure. Clean these parts regularly.
Look for Leaks: Water pressure can drop if there are leaks in the plumbing system. Inspect the system and repair any leaks.
Replace Old Pipes: Sometimes, old and corroded pipes need to be replaced to restore proper water pressure.
Repairing Running Toilets
A continuously running toilet can use up a significant amount of water. Here’s how to fix it:
Check the Flapper: The flapper might not be sealing properly, allowing water to continuously flow into the bowl. Replace it if it’s worn out.
Adjust the Float: Adjusting the float helps regulate how much water stays in the tank. Adjust it to ensure the water stops at the appropriate level.
Inspect the Fill Valve: If the fill valve is faulty, it may need to be replaced to stop the toilet from running.
Fixing Water Heater Problems
Water heater issues can be complex and might need professional help. Here are a few issues that commonly arise and their corresponding solutions:
No hot water: Make sure to check if the pilot light is on (for gas heaters) or if the circuit breaker is tripped (for electric heaters). If these are working, the thermostat or heating element might need replacing.
Leaking Water Heater: A leaking water heater often needs replacement. Get advice from a qualified plumber to evaluate the situation.
Sediment Build-Up: Sediment can build up in the water heater tank over time, reducing efficiency. Flushing the tank regularly can help maintain performance.
When to Call a Professional Plumber
While many plumbing issues can be fixed with DIY methods, some problems require professional help. Here are times when it's best to bring in a plumber:
Major Leaks: Significant leaks can cause extensive water damage and should be handled by a professional.
Sewer Line Issues: Problems with the sewer line can be complex and need specialized equipment to diagnose and repair.
Persistent Problems: If a plumbing issue persists despite your efforts, it’s best to seek professional help to prevent further damage.
Preventing Plumbing Problems
Preventing plumbing problems is better than fixing them. Here are some preventive measures:
Regular Maintenance: Schedule regular maintenance checks with a professional plumber to identify and fix potential issues before they become major problems.
Educate Tenants: Inform tenants about proper use of plumbing fixtures and appliances to avoid misuse and damage.
Install Water Softeners: Hard water can cause mineral build-up in pipes and fixtures. Installing a water softener can help reduce this risk.
Upgrade Fixtures: Consider upgrading old plumbing fixtures and appliances to modern ones that are less prone to issues.
Conclusion
Maintaining the plumbing system in a rental property is crucial for ensuring tenant satisfaction and avoiding costly repairs. By understanding common plumbing problems, conducting regular inspections, and taking prompt action to fix issues, you can keep your rental property’s plumbing system in excellent condition. Remember, preventive maintenance and timely professional help are key to managing plumbing problems effectively. For more expert advice and services, visit OP Plumbing Hub.
#house maintenance#construction#plumbers near me#plumbingservices#plumbing#plumbers in my area#plumbing problems#plumbing piping shop drawing services
0 notes
Last Seen Blogs

sharkfoodstore
Hehe yay!!!!

hipstabiatch
Welcome in my world

bat-karaibica-soul-train-blog
Karaibica Soul Train(KST)

landlordrecords
Landlord Records

digitalfeelingchart
Feelingchart