#thingaverse
Explore tagged Tumblr posts
Visit Tumblr Blog
Explore Tumblr blogs with no restrictions, modern design and the best experience.
Last Seen Tumblr Blogs


Fun Fact
When “GIF” was named word of the year in 2012, Oxford Dictionaries U.S.A. credited Tumblr for pushing the word.
Text

My collection of Danger Days blasters. Top one is EVA foam made a decade ago, the middle one is a file I found on thingaverse, it's a scan from one of the official props. The third one is fresh off my printer from some files I bought on Etsy. The seller called this the whole grail of props and I have to agree. The details he put into the file are so fucking good. Expect a spam of all 4 of the boys blasters and a few BL.ind ones in my future and don't be surprised by seeing an OC or two pop up here or there.
#me#cosplay#party posion cosplay#party poison#mcr#mcr fanart#mcr fandom#mcarmy#the fabulous lives of the dangerous killjoys#danger days#killjoys#killjoys make some noise
8 notes
·
View notes
Note
(Portal opens, dumps the hydrobot down, closes)
Ope, there it goes again. OH LOOKIT DAT! ITS...uh...i think its bumblebee. I think you're taller than our bee honestly. Oh well, hi dere friend, names Riptide! Sorry bout the sudden appearance. Seems a weird portal keeps teleportin me across the...univer...multiv...thingaverse thingie. I keep going to places and i dont know why. But this place looks pretty cute! Wats up?

Of course Bumblebee looked over seeing the portal, and muttered a soft. "Ah, here we go again, some crazy shenanigan stuff about to happen." It seemed like the yellow bot was used to it here. But of course upon seeing the blue hydrobot drop down, he looked over them, poking him a bit to see if he was ok. "You ok buddy?" The small bot asked, getting a smile from him when he saw he was. "Ok, good I'm glad you didn't get scrapped there. But it's nice to meet ya Riptide, don't worry, we've been getting a lot of multiverse visitors ourselves."
The Autobot smiled a bit, shaking his helm. "But the fact I'm finally taller then another Bee? That's so cool! Finally I'm not the shortest heh! But this place is nice, hope ya like it in Detroit for a while! But ah nothing much other then stopping the occasional baddie and all, you probably know how it is if you ever fought Decepticons or troublemakers before." The smaller said with a shrug of his own.
#❤️bumblebee speaks❤️#((Lol hes just))#((Im used to this I guess))#((But hello friend XD))#css-stupid-boatman
4 notes
·
View notes
Text
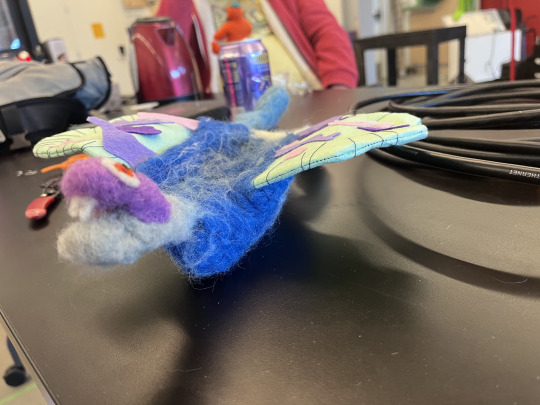
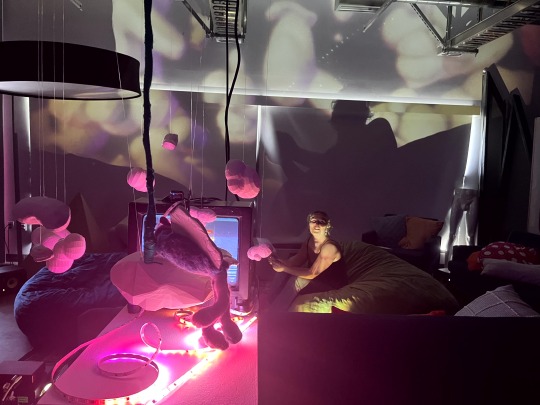
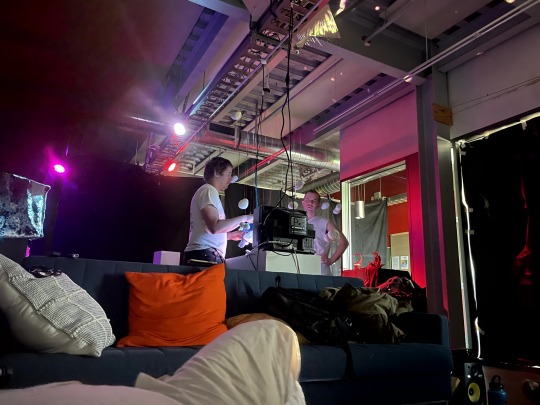
Open Studios interactive project
UCSC DANM grad school winter 2023 - week 9-10
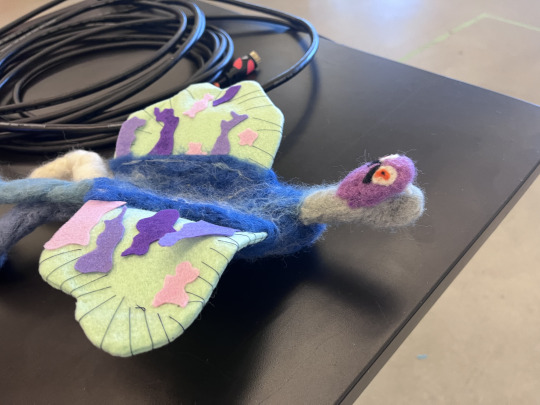
The final prompt for my interactive art class involved a skill share. From one other student I learned how to use a RFID reader with a raspberry pi. From the other I learned how to do needle felting. We each created small figures out of felt and decided to put them in a space together, with different zones that they could interact with. Here’s the felt figure I created.

youtube
This was also the first time I ever sewed anything! I sewed the wings.
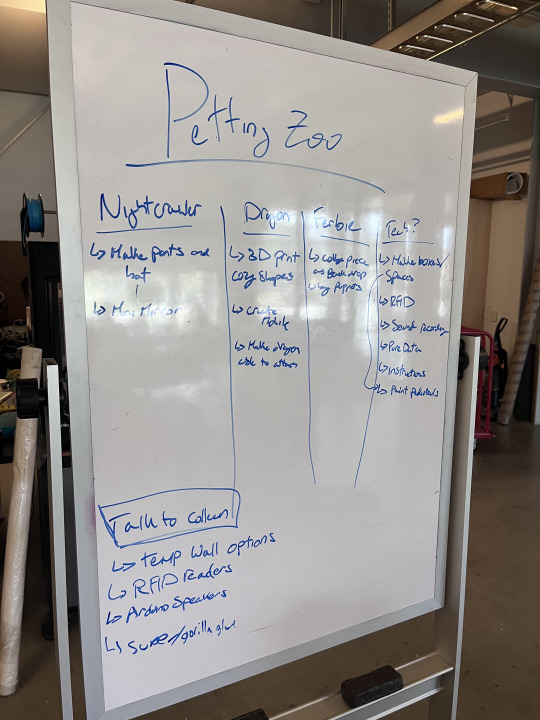
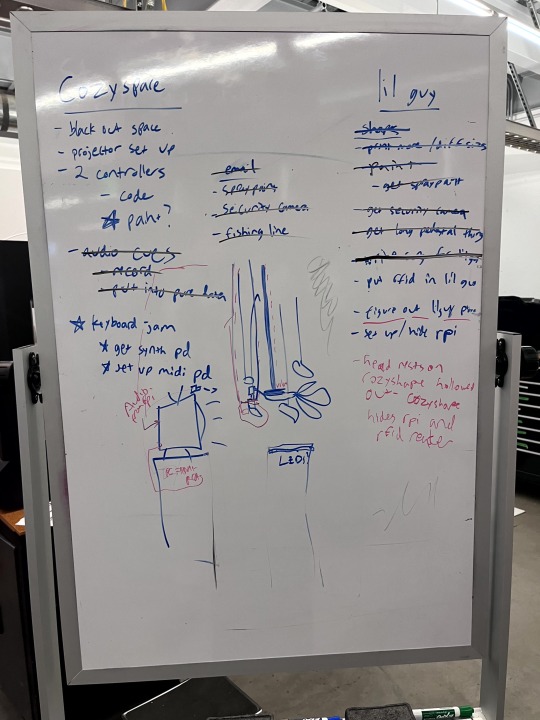
Here’s the brainstorming board the three of us put together to create a weird version of a petting zoo:
We planned on showing it off at the art department’s open studio (despite the fact that we’re not part of the art department). While we were able to show stuff at the open studios, other projects ended up taking priority and this didn’t come to fruition the way that we had originally planned.
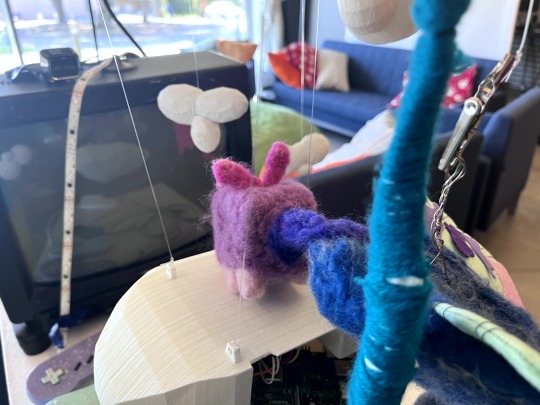
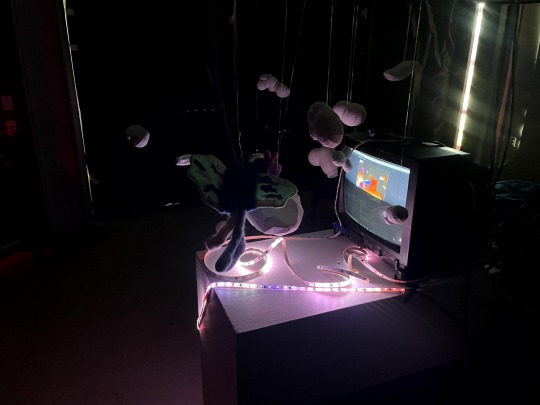
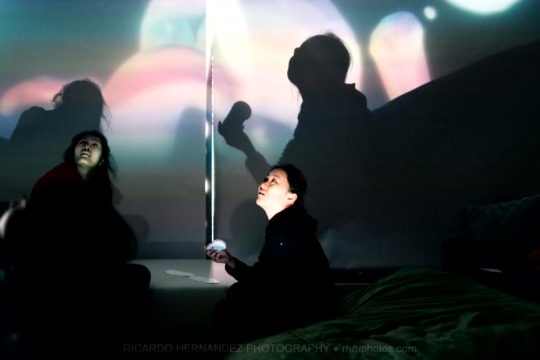
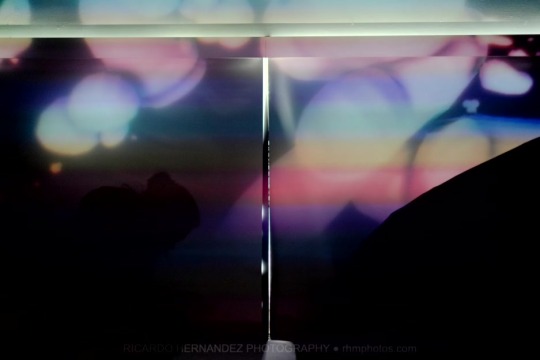
I wanted to make a reference to Nam June Paik’s TV buddhas, but I wanted to make it softer and kind of silly. I crafted a cute TV out of felt and replaced the dragon’s head.
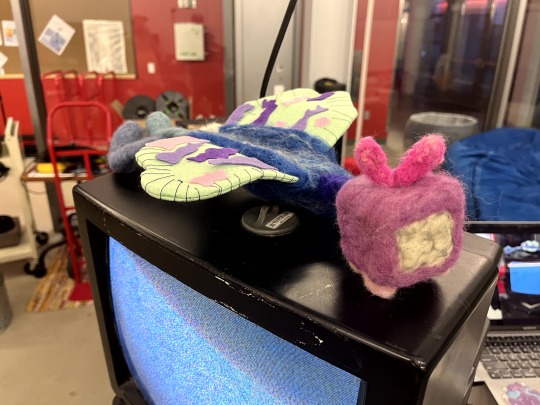
I intended on having the dragon (now a TV dragon) watch himself on a TV while it streamed to Twitch. I wanted to install COZYSPACE as well, near where this was. When you place the TV dragon in the right place, I wanted a little bit of music to play. This idea got a little out of hand, but I managed to set everything up that I planned, and it worked fine.
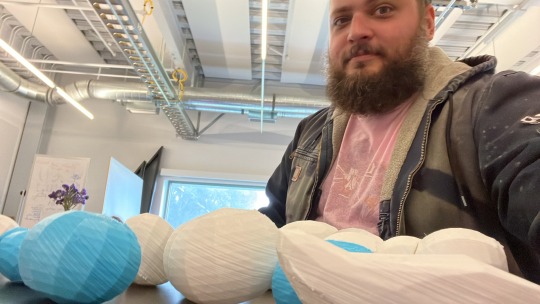
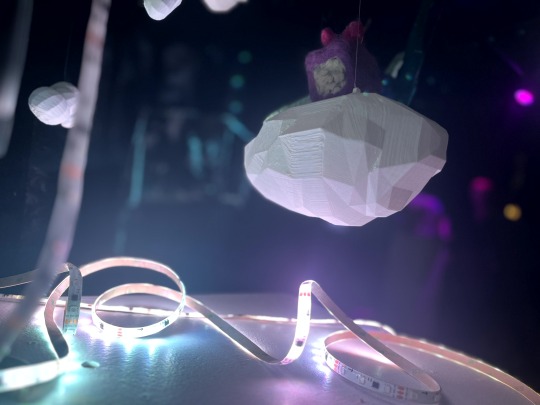
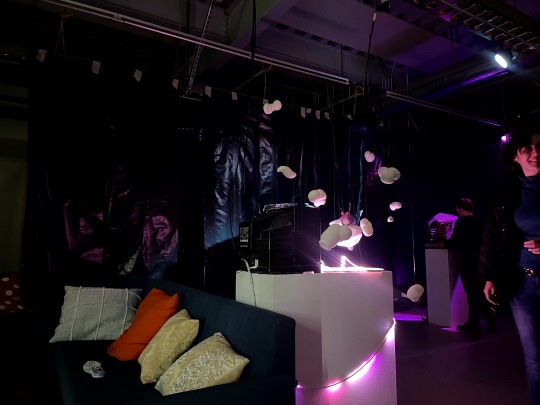
I began 3D printing the shapes in COZYSPACE at various sizes with the intention of hanging them near the TV and the dragon.
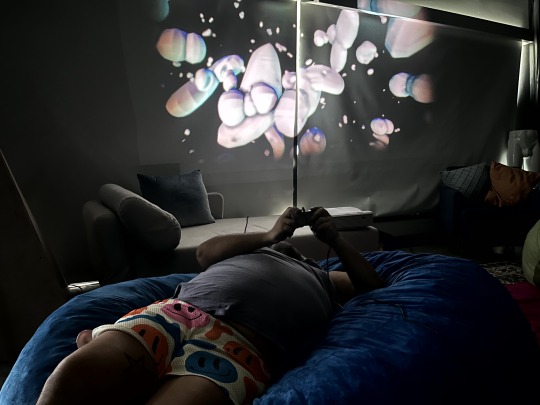
I also wanted to have the controllers for COZYSPACE be closer to my original vision of regular Super Nintendo controllers, but wireless. I got a pair and began painting them to make them cuter.
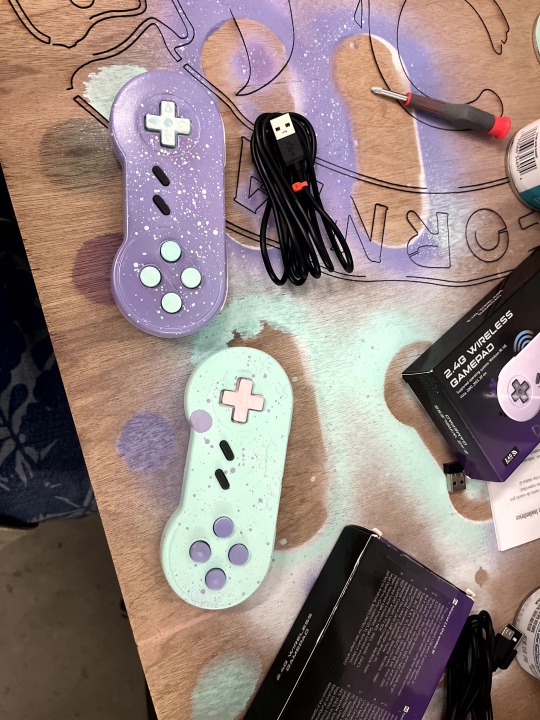
I used regular spraypaint from the hardware store, using the splatter technique I learned from making stuff for BEARPAD. I chose a purple and teal color scheme with pastel accents, as COZYSPACE was originally intended to chill me out personally, and I like that early 90s party cup/taco bell aesthetic. The spray paint took a long time to cure - the controllers were still a little sticky for up to a week after I painted them.
I rigged a raspberry pi and RFID reader to activate when placing a chip on it, combining a couple tutorials online to get it to also play music using the pygame library. I have only minimal python coding experience and it took a bit longer than I anticipated. I was amused that people recommended playing .ogg files for audio, as I haven’t really heard of those being used in over 15 years. I wrote a piece of music really quickly to play when the TV dragon rests on the cozy spot. I made a synth sound, threw a bunch of effects on it, and improvised in g flat major pentatonic using my computer keyboard in ableton.
https://on.soundcloud.com/7ALpC
Patrick designed a new shape that would look good alongside the shapes in COZYSPACE, but was large enough to hold a raspberry pi and an RFID reader. We grabbed a raspberry pi case design from thingaverse and dropped it into Blender to make sure we had the size right, built a chamber for it, then he built a shape out around the chamber. Here’s some pics of it hanging in action.
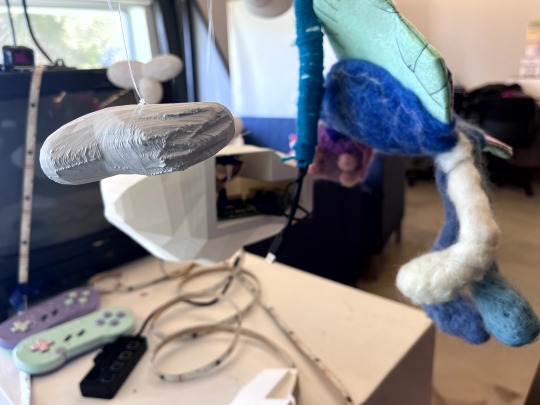
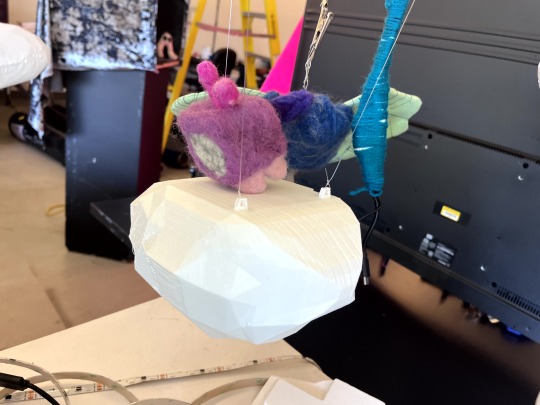
I tried it out streaming on twitch, but it immediately brought up concerns of privacy, so I ditched it and left it on the OBS screen, as though he was about to start streaming on twitch. I felted the RFID sensor inside of the bottom of his head so that his head would activate the sensor. I threaded a wire through him and attached an alligator clip to fishing line from above, so that people could attach it to that and have him rest on the cozy shape, watching himself on the TV. The sensor range was very small, however, making it a little finicky and not the experience I had hoped.
Here’s my todo/sketch board I used for a lot of the install:
I added the LED strips late in the install. There are kits you can buy for ambient lighting that sits behind a flatscreen TV. You plug in your HDMI cable and it takes the video signal and translates some of the colors to the LED strips. I know there are ways to make them with raspberry pis or with arduinos, but i was running out of time and wanted the effect of the colors in the COZYSPACE also changing the color of the 3D printed shapes, so I bought the kit from amazon. It plugged in and worked well enough right away for my purposes. I draped the LEDs a little haphazardly around the install in a way that I thought looked good for my purposes.


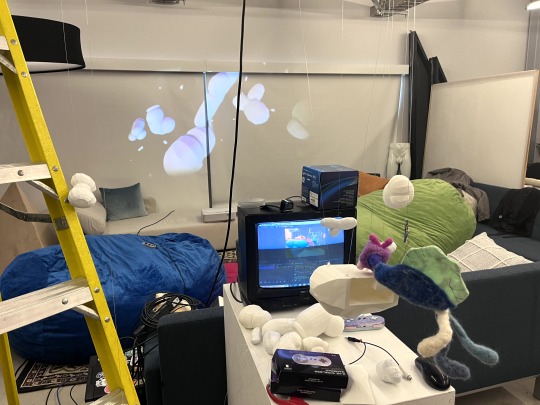

Setting up took MUCH longer than I had anticipated. I spent about 2 and a half days of work just blacking out the space, setting everything up, and hanging the cozy shapes.

I was a little worried I wouldn’t have enough time for everything to get done, but I ended up setting up everything I wanted. I left programming the controllers for last because I didn’t want to spend more time in Unity after not using it for so long. I found a way to address the joystick buttons directly in the code rather than using Unity’s input manager, which was a relief.
I also made some tweaks to the sound of cozyspace. Each of the 4 channels is playing a sub bass frequency that is slightly out of sync with the others, giving the sensation of something moving around in space around people in the center of the installation. I made the frequencies closer, which made the movement feel much much slower. I also made the looping track twice as long, adding some slight movement to the tracks, and reset everything to G flat major.
The actual open studios was a very educational experience, hah. I learned that people need to be told when you can touch the art. I assumed (incorrectly) that bean bags and video game controllers would be enough, but I had to invite people to interact with it. In the future I’ll have signage with my name and info about the work, even for an open studios.
https://youtube.com/shorts/PYVX6z-7OGc
https://youtu.be/XffYEqUQ8qc
https://youtu.be/y0zdaRWFfSc


0 notes
Text
HEY so i know a bunch of ppl
wanted me to sell or upload the battery door connector so here it on Thingiverse and its free to download if you have a 3d printer
https://www.thingiverse.com/thing:3388020
#oddbody furby#safe furby#furby#thingaverse#custom#handsome ryan#i know its not very exciting#please download and like my make#sorry about my bad upload schedule#3d printer#birth of a god
69 notes
·
View notes
Photo

Link is finished my friends . #cr10 #creality #crealityender3 #zelda #link #dekale #thingaverse #breathofthewild#breathofthewildfanart https://www.instagram.com/p/Bxi9dFonrV8/?igshid=j2sossortbg9
1 note
·
View note
Photo

It occurred to me that I never got around to sharing the mods I made to my Nerf Hammershot blaster. I found the print files at Thingiverse.com. I first upgraded the cylinder to hold seven darts. Next, I added the simple barrel, which is completely about aesthetics. It has no practical purpose but it looks cool. I printed both using PLA+, which is fine as long as I never leave it in the sun. PLA+ is easy to work with but PETG is stronger and has a higher tolerance to heat. PETG has been a pain to work with, it is like working with chewing gum. In the future, I'd like to add some LED effects as soon as I can figure out where to stick the electronics and batteries. #nerf #hammershot #pla #pla+ #petg #3dprinting #ender3pro #thingaverse https://www.instagram.com/p/CJZ46CDDhHq/?igshid=1l1d1fzo6oz3e
0 notes
Photo

Made Saiges Baseball Stand with 3d Solutech filament #3dprinting #hictop #3dsolutech #thingaverse (at Fort Worth, Texas)
2 notes
·
View notes
Text

✨💎𝐍𝐞𝐞𝐝𝐥𝐞 𝐦𝐢𝐧𝐝𝐞𝐫 𝐬𝐡𝐨𝐩 𝐮𝐩𝐝𝐚𝐭𝐞 𝐚𝐧𝐝 𝐰𝐨𝐮𝐥𝐝 𝐋𝐎𝐕𝐄 𝐟𝐨𝐥𝐥𝐨𝐰𝐞𝐫 𝐟𝐞𝐞𝐝𝐛𝐚𝐜𝐤!💎✨
A while back, I asked the other spouse of the house to use his 3D printer to make me these, after finding an STL file on thingaverse for magnets. told him to adjust the size so I could make THE MOST AWESOME NEEDLEMINDERS ON THE GAMING PLANET! Or, at least I think so.
Well, prototypes were made (many failures, trust me) and he finally perfected a method that I am happy with. WAS going to list them, but then, him and I moved offices, he left the guest bedroom and took my office, and I moved next door to the other 2/3 of the basement. That was the playroom so, my kid moved upstairs.
Anyway, point is. the 3D printer was out of commission for a while...so, I didn't want to list them until he got them back up. Because (and I doubt it) what if I sold out and couldn't make more!
Well, printer is back up! Which means, I can start making more of these (I only have currently, ONE good one...because even the ones in the pictures have defects)
Those will be B lots, sold at discount, obviously.
So, feedback! So, to those that love the LOZ series, what are your thoughts on these being sold in my shop as needle minders? Would the need be great enough? To sell individually, or as a pack (2? 3? 4?) Tumblr said so when I brought up the idea a couple months ago. If they sold well, I could branch out into red, blue, purple, gold, silver...and sell individually or as a pack
Like I ask for all my other physical needle minders, I always ask for feedback so I don't get discouraged when they list in my shop and then sit around for months with no sale.
Thanks, folks!
.
.
.
.
.
#NeedleMinder #NeedleMinders #CrossStitch #CrossStitching #Embroidery #xstitch #xstitching #Etsy #LegendOfZelda #LegendOfZeldaBreathOfTheWild #LegendOfZeldaBOTW #LegendOFZeldaArt #SturdyNerdyStitchery #NeedleMinderObsession #3DPrintig #NerdCrafts #GeekCrafts #Geek #geeky #nerd #Nerdy #Gamer #Gaming #GeekLife #GeekArt #Nerdlife #GamingLife #GamerLife #HeyListen #Link
#cross stitch#legend of zelda#breath of the wild#cross stitching#embroidery#needleminder#needle minder#etsy#crafting#etsy store#legend of Zelda art#3D printing#3D printer#sturdy nerdy stitchery#geek#nerd#geek life#nerd life#gamer life
35 notes
·
View notes
Text
IM STARTING AN EDWARD COSPLAY!
This is going to be my first cosplay and because I hate myself I’m going to make just about every thing myself, and I’m going to start with his arm.
So I’m going to 3D print all of the main parts and then stick them onto an arm length satin glove sleeve thing and put wires were there are exposed joints, I know you could do it with EVA foam but I don’t have any experience with it as well as any of the various tools that are usually needed. But I do have access to a 3D printer
I’m going to use this 3D file I found off thingaverse https://www.thingiverse.com/thing:2819729 more specifically I’m going to use the broken up part files that someone separated from it in the comments of it.
I have already done a test print with it for sizing, I put the files in makerbot at 105% but it ended up too small so I’m just going to use those parts as practice for how I’m going to attach the pieces and paint them


It was too small at 105% so I used that size as reference in the software and went with 125% I couldn’t fit the top half of the top of the arm part on the built plate now that the pieces are bigger but I did manage to fit the top of the hand and all of the finger pieces as well as the two main forearm pieces, GAHH it took around an hour to put all the files of the separate finger pieces into makerbot and then sort through, resize, and organize everything onto the build plate and this is just the first one built plate I’ve finished setting up. I still haven’t organized all of the bigger pieces and the really tiny ones, mostly like the bolts, onto their own built plate thingys to print later.

I’m hoping it’ll print right since some of the finger pieces are pretty small and a lot of the pieces are close together, also just to add to it all I had to replace the filament in the printer (this time the filament is purple :P) because there wasn’t enough left for this print and the last time I had checked it the filament tangled itself because I put it in wrong. It should be fine now but I won’t be able to check it till tomorrow and the print itself I already started earlier today but it won’t finish till like Friday and after tomorrow I won’t be able to check it till Tuesday. I HAVEN’T EVEN STARTED TO PUT IT TOGETHER YET BUT NOW I UNDERSTAND WHY ITS SO EXPENSIVE TO BUY A COSPLAY AUTOMAIL ARM ON ETSY
I won’t be able to start figuring out what I want to do with the painting till later this week because I don’t have access to my painting stuff as of right now and I’m also probably going to have to get more paint, I’m not 100 percent sure. I’ll post an update on the printing tomorrow after I check on it!!!
#I am an unholy amount of excited for this#I have so many ideas for the whole cosplay and cannot wait to try them out#for example there is a place near we’re I live that sells hand made leather bound journals that are the perfect size#to make one like edwards#I was thinking of putting the list of ingredients to make a human in it as well as some transmutation circles#and then I want to try and weather the pages by burning the edges and the wiping it with a damp tea bag for yellowing#OOooOo and then I’m going to try and sew an extra pocket into his jacket coat thing when I make it specifically for said journal#any who#edward elric#fullmetal alchemist#fma#cosplay#fmab#automail#3d printing#edward elric cosplay#Edward cosplay progress#long post
2 notes
·
View notes
Photo

Been leaning a great deal into 3D printing recently, since I have fully moved out of my previous garage woodworking space,
An old machinery knob stripped at work, and I used a combination of Thingaverse files and custom SolidWorks modeling to design and print an improved and more stylish knob.
2 notes
·
View notes
Text

I have designed a 1998 furby face plate and got it 3D printed for a boy who didn’t have one. The face plate will be on Thingaverse soon.
18 notes
·
View notes
Text
Downloading any model from thingaverse to print is like. You would download a 1:15 scale realistic toilet.
#you wouldnt download a roman dodecahedron#you wouldnt download a scalemodel of the mystery shack#last time i was at the school printer there was someone printing a papyrus from gurine oart by part for like a full week#fun times#talk
1 note
·
View note
Text
Respool3d 100mm filament refill holder with integrated hub
Respool3d 100mm filament refill holder with integrated hub
Source: http://www.thingiverse.com – Saturday, May 09, 2020 This is my remix of the reSpool3d minimalist holder by spool3d_canada. My filament holder is old school with conical idlers and works better with small size spool holes. The original reSpool3d part was nice, but I needed to make adapters to use it, so I decided I'd respin the spool with a hub and smaller hole. I measured the part w…
View On WordPress
#100mm#3D objects#3D printing#digital design#fabrication#filament#Holder#hub#Integrated#Laser#laser cutter#physical objects#rapid prototyping#Refill#reprap#Respool3d#thingaverse#things#thingyverse
0 notes
Photo

3D printed dragon bowl #thingaverse (at Grand Valley State University)
0 notes
Photo

Link is primed and ready for the best part paint . #cr10 #creality #crealityender3 #zelda #link #dekale #thingaverse #breathofthewild https://www.instagram.com/barely_making_1t/p/BwpnJ3YhZz0/?utm_source=ig_tumblr_share&igshid=fb5bivggrncd
0 notes
Photo

Rough clean up because I have to get driving back to college but gosh I'm pretty happy with it! If you want the file it's on thingaverse :D #anime #art #artistsoninstagram #3dprinting #blender3d #blender #ainzooalgown #commissionme #skeleton #spookyscaryskeletons https://www.instagram.com/p/BsjVJtEDdvi/?utm_source=ig_tumblr_share&igshid=eivwscz968ge
#anime#art#artistsoninstagram#3dprinting#blender3d#blender#ainzooalgown#commissionme#skeleton#spookyscaryskeletons
1 note
·
View note