#these days every new edit I make has different sharpening settings lol
Explore tagged Tumblr posts
Photo





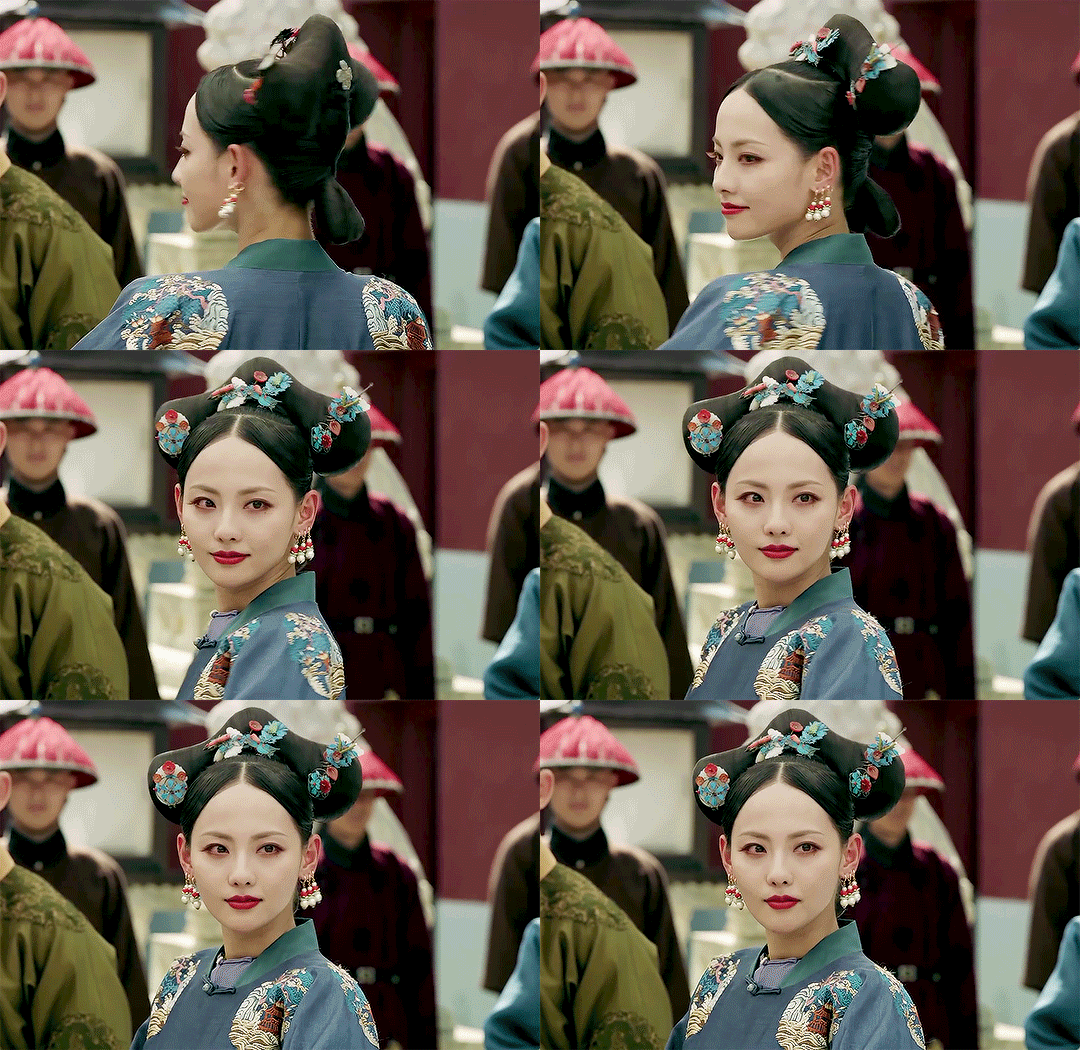

ZHANG JIANI as CHENBI in THE STORY OF YANXI PALACE (2018)
dr. Hui Kaidong, Wen Deguang.
requested by @stephanie9955
#the story of yanxi palace#cdrama#asiandramanet#chineseartistsinc#perioddramaedit#perioddramasource#onlyperioddramas#weloveperioddrama#gifshistorical#cdramagifs#cdramanet#periodedit#延禧攻略#zhang jiani#张嘉倪#*mine#*the story of yanxi palace#these days every new edit I make has different sharpening settings lol#hope you like this!#chenbi is kinda girlboss material#I dunno taking revenge on the guy who kidnapped you by implicating him and his family in attemped regicide is kinda cool
141 notes
·
View notes
Text
🌻 a gif tutorial by: me! 🌻
i know there are so so many WONDERFUL tutorials out there, but i can’t say no to a very kind anon so!!! here we go. hopefully this is helpful for someone out there! if anyone doesn’t do well with picture tutorials and would find it more helpful for me to do a video, i would also be happy to try that too!!
this is definitely not the fastest way to do it, i’m sure, just the way i’ve always done it and i’m bad at learning new things so ldkjfoiw also i’m using photoshop cc 2021 (tho this method should work for any version of photoshop i think) and i use video frames to layers to gif just as an fyi
step 1: get whatever media you’re giffing! i use torrents and direct downloads. that’s how i’ve always giffed, i’ve never tried capping so i can’t help with that. sorry!
step 2: make clips of the scenes your fc is in! i have a folder dedicated to the character the fc is playing and keep all my clips in there. when i do movies, i typically only do about 12 clips at a time because it just feels less overwhelming for me. when i do a show, i only clip one episode at a time for the same reason. i use quicktime to clip, but i know some people use VLC and i’m sure there are other options out there to try, too! again, this is just what i’ve always used so i’m comfortable with it and know how it works.
when i clip, i try to start the clip a few seconds before the scene my subject is in and a few seconds after just to make sure i’m getting every single frame.
step 3: import video frames to layers! so once you have photoshop open, go to file > import > import video frames to layers
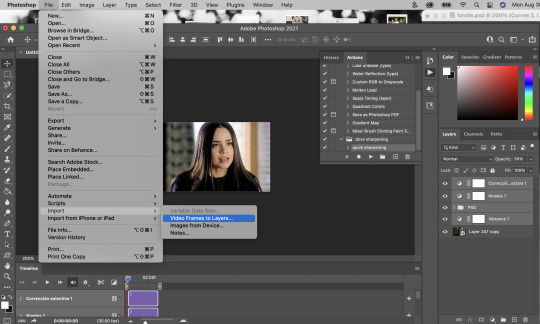
then go to your folder where you have all your clips saved and choose the one you want. i took this one out of my trash because the rest of the gifs i have to do in this episode are in the dark and that was gonna be too annoying to me lkdjfkslofw so i’m just re-making one i already did a few days ago. i’m giffing sofia carson and you can see that my clip starts on someone else’s face so i can make sure i have every frame of hers!
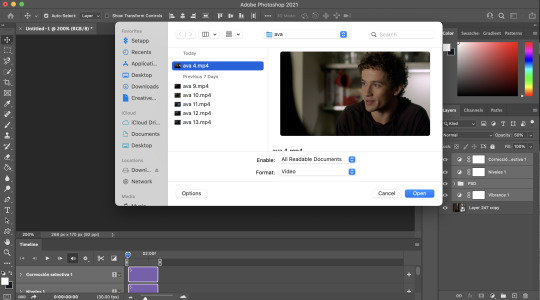
step 4: select the range for your gif! just like with clipping, i try to get a few frames before and a few frames after of the fc i’m working on so that i don’t miss anything. if you aren’t interested in giffing them in every single second (which is totally fine, i know a lot of people prefer not to!) then you don’t need to be as concerned with it

because i’m using a direct download, i’m not going to limit my frames to every 2. it’ll be really fast and choppy. if you screen recorded, i would suggest limited to every 2 frames and then going through and deleting each duplicate frame (when i giffed via screen recording, i found that every 6 frames or so was a duplicate). this will make sure your gif is smooth and exactly the same as one made from a direct download. it IS time consuming though, so i recommend doing a direct download/torrent if possible! if you ever need help finding downloads or need something torrented and converted for you, please feel free to message me and i’ll be happy to help!!
step 5: delete the frames you don’t need! this is the time to delete any extra frames at the beginning, end, and any duplicates
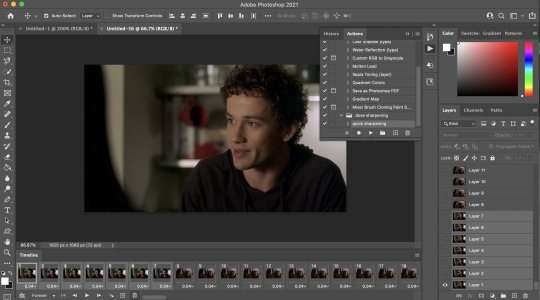
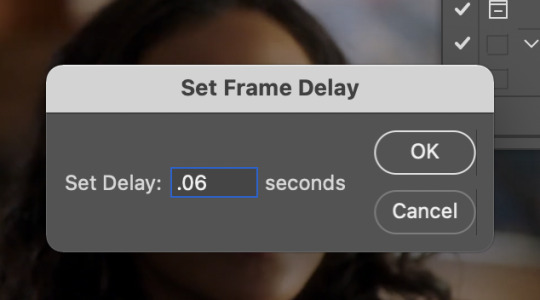
step 6: set your speed! you can do this later if you want, but i like to do it as soon as all my extra frames are deleted. my personal preference is typically .06 seconds for most of my gifs. if they’re on the shorter side (under 35 frames), i’ll do .07-.09. i know some people have very strong feelings on gif speed lskdfjpwe i do not. it’s all about what feels best for you! .06 is where i feel my gifs feel the best, but there are plenty of beautiful gifs that are slower or faster!
step 7: crop it! as you can see above, i set my W x H ratio to 268px x 170px. this is a size i really like, but you can make yours smaller or larger. i do suggest using the W x H ratio setting to set it to your specific pixel measurements because it cuts out having to resize after cropping.
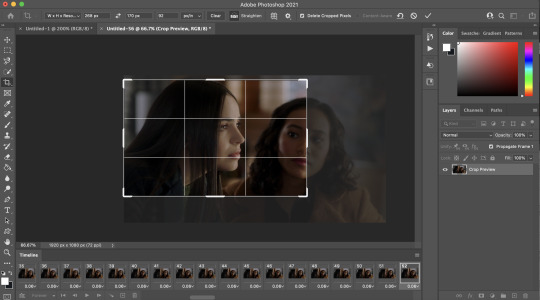
also, i have a few hundred frames in this one particular gif that i’m going to cut down in the next step. however, i know that she remains pretty much in the same place throughout the frames which is why i’m cropping them all at once. if it’s a gif where you get a few hundred frames that you’re going to turn into multiple gifs and the person moves around a lot, definitely only crop one gif at a time!
step 8: delete the frames you aren’t using! everyone has a different way of deciding how many frames their gifs are. for me, if they’re talking, i actually go and watch the segment i’m giffing to see what they’re saying, read their lips as i go through each frame, and crop it there. it’s a little more time consuming i guess but i feel like it gives me the best results. totally optional, though! if the person is NOT talking, then i typically just try to make it between 60-80ish frames and base it on facial expressions or body language. sometimes it’s more, sometimes it’s less! again just comes down to what your preference is.
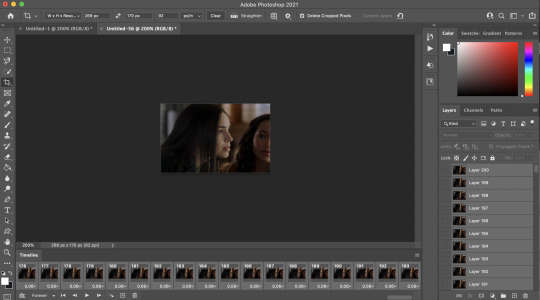
step 9: convert to timeline! basically just press that lil highlighted button down there next to the “forever” and convert to timeline. pretty self explanatory

step 10: sharpening! this is where i use my sharpening action which is linked right here. i’ve been using it for a while now and i really love it! i’ve tried other sharpening actions since i made it and they just don’t make me as happy as this one lol
hit play on your action:
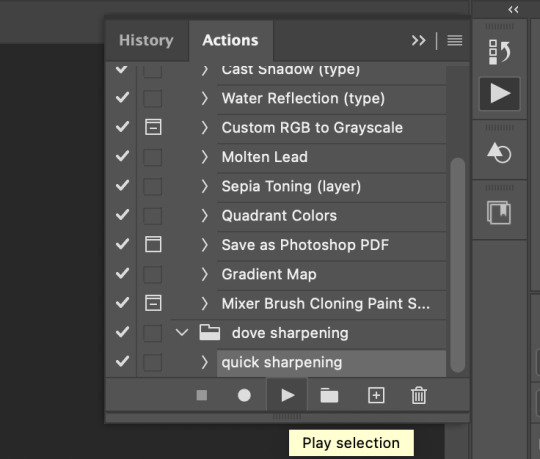
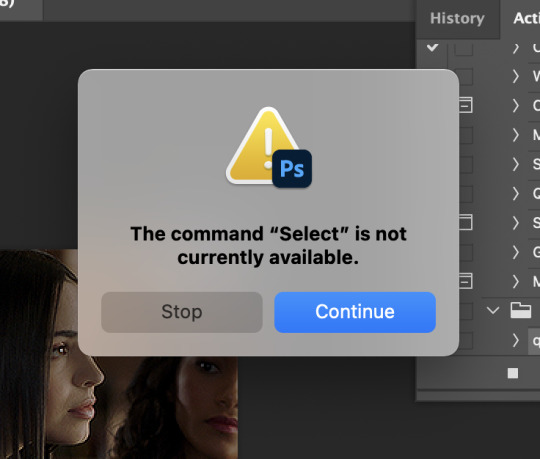
for my action, i get this popup twice and just hit “continue” and it keeps going through the steps with no problem
step 11: COLORING!!! get your psd and slap it on! i have different one base psd that i use for almost everything and will edit it to fit whatever scene/show/movie i’m working on. i’ll also save different versions of it based on the media i’m giffing. for example, the lighting on liv & maddie is SUUUUUPER different from the writing on pll: the perfectionists. so i have a “liv” psd and a “loralie” (name of my char that i use sofia for, idk why i named the first psd after liv and not my char but whatever ldkfjsoi) psd. same base, same layers, just different levels. i also will often combine psds! i’ll put my base down and then add layers from other psds or create new ones to fit whatever scene i have going!
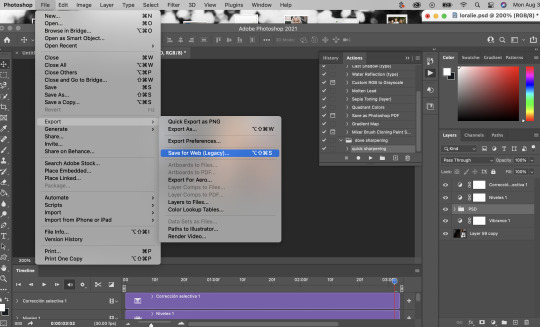
step 12: save your gif! go to file > export > save for web (legacy)...
people use different settings for saving their gifs, too. these are my personal settings. i really like them and feel they work for my gifs. feel free to copy them or play around with your own settings! just make sure it’s always on the 256 colors
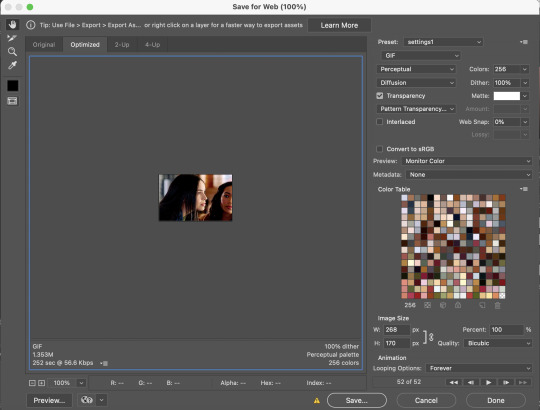
step 13 (optional): preview! i like to hit the preview button just to make sure i like my gif before i save it. if i don’t like it (coloring looks off, too fast/too slow, feels like it cuts off in a weird place) i’ll hit cancel and undo everything until i’m back to wherever i need to fix it.
step 14: save your gif, yay!! YOU DID IT!!!! save that beautiful gif and feel so proud of yourself!!

step 15 (optional): if you’re making multiple gifs from the segment you imported, go back and cntrl/cmmnd + z everything until you’re back to having allllll the frames again. delete the frames of the gif you just made (in this case, it would be 52) and start again from step 8!
i hope this made sense and was helpful for anyone! please let me know if there’s anything you need clarification on!!
36 notes
·
View notes
Photo
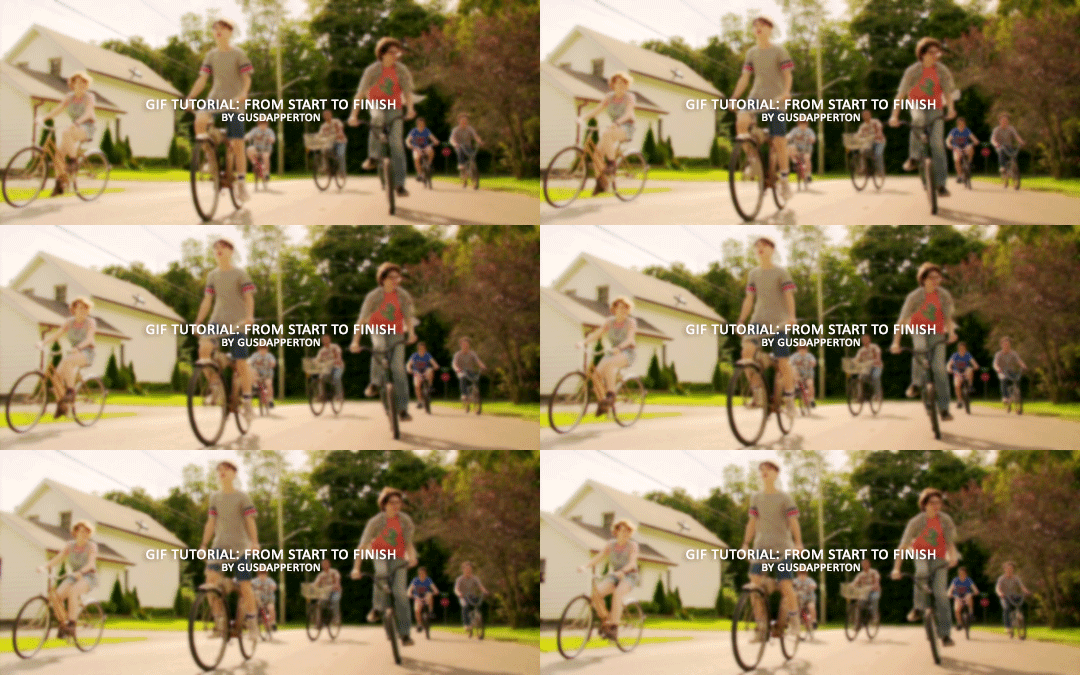
Recently someone asked if I would do a gif making tutorial, so here I am! I’m going to make this as in depth as I can, but if you have remaining questions or problems, feel free to send me them and I will try to help you to the best of my abilities.
Disclaimer: There are many ways to make a gif, but this is the method I’ve been using for years. This tutorial is very long and may make the process seem tedious, but I assure you, once you get the hang of making gifs you could do it in just under a few minutes!
This tutorial includes:
links to all of the sites and programs I use
lots of rambling (w/ pictures)
a short masterlist of my favorite photoshop sources at the end
Links:
Adobe Photoshop CC 2017
PotPlayer (64 bit)
uTorrent
4K Video Download
Photoshop, PotPlayer and uTorrent are the three programs you MUST have for this tutorial. The 4K Downloader is for YouTube/Instagram, which there are other sites you can use for that, but I prefer 4K to make sure I’m getting the best quality I can get. Best part, they’re all free :)
Torrent sites:
PirateBay
yts.lT (favorite)
Nyaa (anime)
These aren’t the only sites that offer torrents (nor are they the only ones I use). When you download torrents, try to be careful; if you think it’s sketchy, go ahead and try to find another. It’s not as scary as it seems, just be aware of what you’re clicking. Some are total duds but I usually have a pretty smooth time finding what I need unless it’s something unpopular or obscure. Whatever site you’re on, try to use the latest links (past hour/day/week) if it’s for a new movie or ongoing show. Also, if there’s the option, download magnet.
PirateBay gives me an ongoing issue with their links, so I try to avoid getting torrents from there if I think I can find it elsewhere. YTS is my favorite site for movies; they’re trustworthy and I’ve never had an issue :)
HD/1080p torrents often start popping up when the BluRay comes out, so don’t depend on any site to have it the day something premieres. Usually you’ll have to wait a few weeks/months. Until then it’ll just be CAMs which no one likes!
For this tutorial I’m going to be making a gif from IT: Chapter Two (link- click 1080p.WEB). Once you’ve gotten your torrent, open up uTorrent. It’ll ask you where you want your download stored, which I always just choose my Downloads folder.

It’s normal for it to take a while. It doesn’t take all day, but 40 min-2 hrs is usually what I have to wait. My laptop is pretty slow, RIP.
After it says it’s downloaded, you’ll have the .mp4 sitting in your Downloads folder (or whatever destination you chose, but Downloads is the default).
Before you close uTorrent, press the torrent file and then delete it (trash can icon above) so you can delete it from your Downloads folder. Otherwise, your computer will tell you the torrent is still open in the program and won’t let you. You won’t need it after you’ve gotten the .mp4.
So now we have the movie! Go ahead and open it up in PotPlayer. Right click > Open file(s) and select the movie. It will start playing automatically.
Note: You need to make folders for the frames to be held in. Its been so long since I’ve set up PotPlayer, I can’t remember if the program made the capture folder that’s in Desktop or if I did... if not, go ahead and make sure you have designated folders. (If you’re making 4 gifs, you need 4 separate folders, and so on.)
Go to the scene you’d like to gif. The scene I chose in this movie is one of the end scenes of the young Losers Club on their bikes (2hr43min).
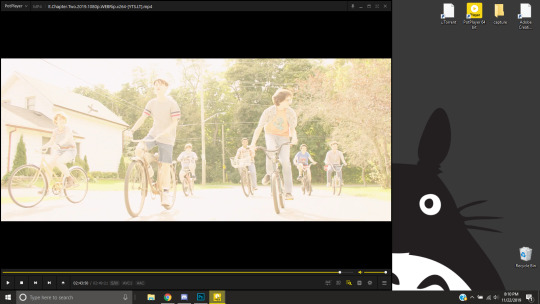
Slide the edge of the program in to minimize the screen a little for the next step.
Now, right click > Video > Video Capture > Capture Consecutive Images
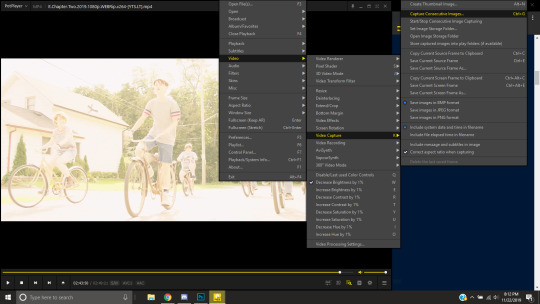
This will pop up:
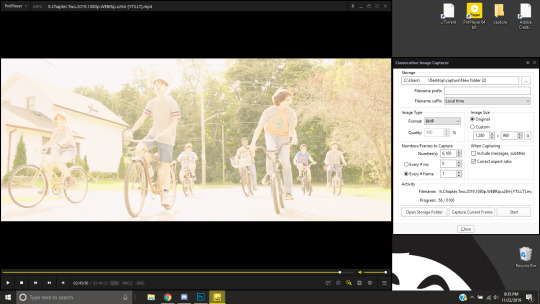
Here is a closer look at the settings:
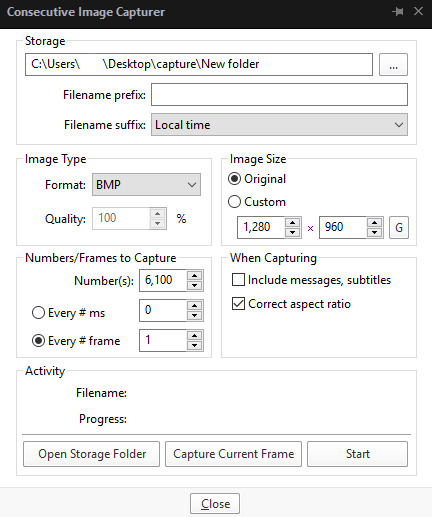
The key things to look at are the Image Type, Image Size, and Numbers/Frame to capture. And of course, make sure you have the right destination chosen in the Storage box because that’s where your frames are going to be. PNG and BMP are the best quality for the type of image. Always choose the original size of the frames. And, make sure you’re saving every frame (Every # frame must be kept at 1).
Make sure to start a few seconds before where you actually want to make a gif. Sometimes (every time lol) the start will lag and you won’t get every single frame you want or thought you were getting. In my case, the screen is fading from white, so I’m going to capture a few frames where the white can still be seen before the full color appears. This way I know I’m getting the most frames I can, and I don’t have to redo it later when I think my gif is too short because I’m missing frames.
While the movie is still paused, press Start in the smaller window, then press Play on your movie. Keep your mouse over the Pause button and end it when you’ve gotten all the frames you wanted. Then, Stop back in the small window.
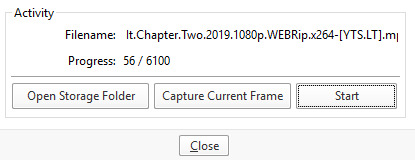
I’ve saved 56 frames to my folder.
The size of the gif you want to make dictates how many frames you’ll be using. Remember the file size needs to be under 3MB. Recently Tumblr increased that size to 8MB, but the quality of the gif will drop drastically, so I ignore it now. (Although, it probably won’t look too different if it’s at like 3.1MB and barely goes over that limit.
540px wide- ~30 frames and under. Because these gifs are so wide, naturally, they’re already going to be a large file.
268px wide- ~50 frames
177px- ~70 & up
These numbers aren’t concrete, though. The taller and/or more contrasting colors in a gif, the bigger the file will be. The shorter and less contrast in colors, the smaller, and more likely you will be able to fit more frames into your gif. These are just what I find to be the case most of the time.
For the gif I’m making now, I’m going to keep it at 30 frames, so I know I’ll be deleting ~26 out of the 56 I saved to that folder.
Tip: I rarely make big changes to the coloring of my gif if I really like the way it looks. If my gif exceeds 3MB, I’d rather delete frames. IMO, nice coloring comes before fitting in as many frames as I can.
Moving on, now that we have the frames we want, go ahead and open up Photoshop. Go to File > Scripts > Load Files into Stack. The drop down that says ‘Files’ I change to ‘Folder’ and simply select wherever your frames are held. For me, they’re here:
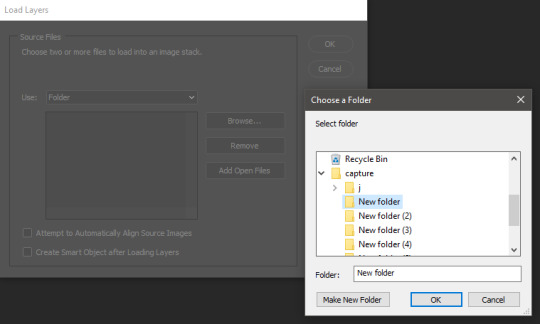
Press OK, let them all load up, then you’ll press OK again in that grey window.
It takes a minute for all of the frames to load up in photoshop. The more you have, the longer it’ll take. Again, my laptop is slow as hell, so maybe it will be really fast for you.
When they’re done loading, go to Window > Animation.
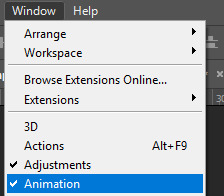
Then, inside the Animation tab, make sure you have Create Frame Animation selected:

Then once you’ve pressed it Create Frame Animation, your first frame will appear. But we need them all, so look over to that four bar icon to the right of the tab and press Make Frames From Layers.
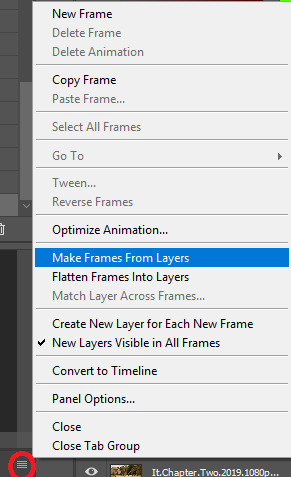
They’ll load all at once, but the gif is backwards. To fix that, simply go back to the same four bar icon and click Reverse Frames.
I’m going to go ahead and delete the frames I don’t want. For me, the beginning frames are unusable because there’s that white fade out in the start of the scene I chose. I’m going to delete those, then go ahead and delete any frame that comes after frame 30.
Here’s where I’m at now:
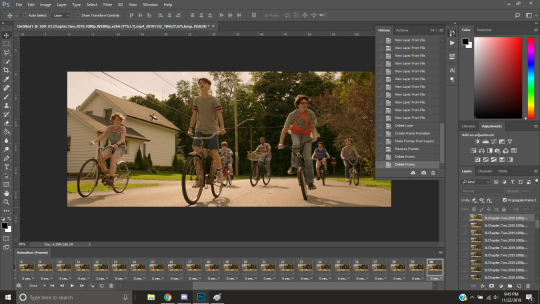
Now to resize it. I like the dimensions it currently has, so I’m not going to use the crop tool at the moment. But once you’ve cropped it to where you like, go to Image > Image Size and a new window will pop up. The widest a gif should be is 540px. How tall it is is up to you. Since I’m keeping the dimensions currently, my gif will resize to 540x225.
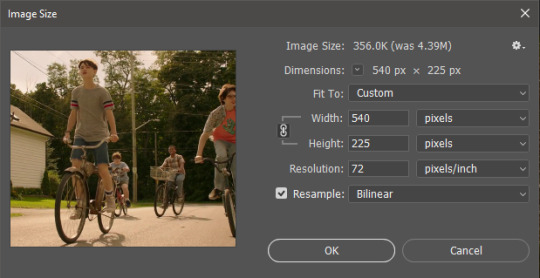
It’s VERY important to note, where it says ‘Resample:’ you need to have Bilinear selected. This effects the borders of your gif. Also, don’t make the mistake of resizing it in centimeters instead of pixels.
Now that it’s resized, you need to set the the frame delay. I choose either .05, .06, or .07. Anything outside of that looks to fast/slow to me (but I know a lot of people who like the way .03 or .04 look. It’s all preference.)
To select all of your frames at once, select the first frame, hold shift, then select your last frame. Then press where it says ‘0 sec.’ > Other > type in however fast you’d like your gif to be. I’m going to use .06. Double check every frame says .06, otherwise it’ll stay at 0 and be way too fast.
Now, again, click that four bar icon and select Convert to Timeline. The Animation tab looks like this now:

For now, look at our Layers Tab, so we can delete every frame that doesn’t show an eye icon next to it (as you can see, my first 5 frames):
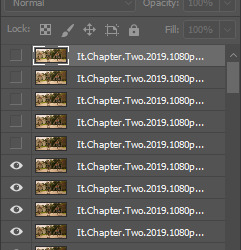
With all of the excess frames gone, select all of the frames you have left (hold shift again) and then right click > Convert to Smart Object
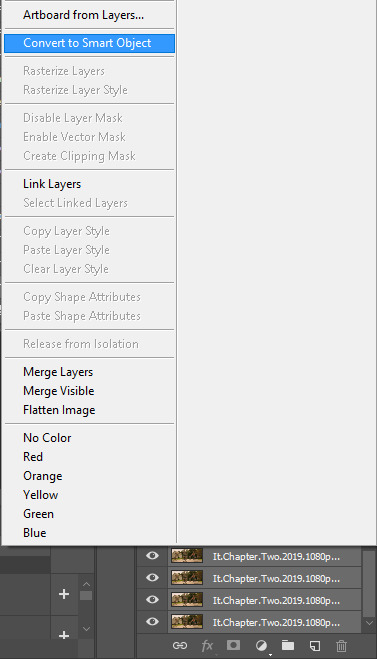
Now, we see this left:
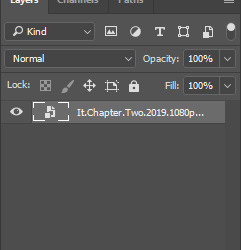

And, technically we’re done with the very basics of making a gif. But you definitely should sharpen and color it for it to look ‘nice’ and aesthetic. I’m going to color my gif now. Personally, I rarely use psds. It takes way too long for me to look through millions of psds, so I make coloring my own for each gif I make. I have two of my own psds, if you’d like to use either of those.
PSD01- this is a super basic psd I use to make any gif look brighter and more vibrant. There are more details in the post on how I use it.
PSD02- I included this psd within another tutorial for how I do color edits.
Both of these are my base psds, but if anyone wants me to do a separate tutorial for how I color gifs on a regular basis, I’ll gladly make one of those too!
Once you’re happy with how the colors look, it’s time to sharpen. Select your gif layer and go up to Filter > Sharpen > Unsharp Mask.
Here are my settings:
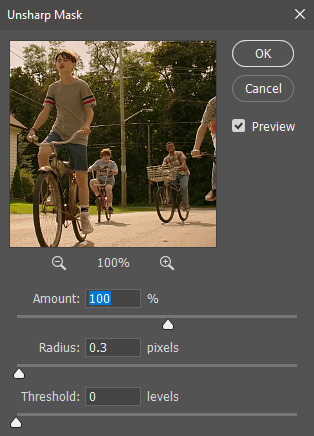
(Amount: 100%, Radius: 0.3px, Threshold: 0 levels)
Now sharpened and colored, here is my final result ready to post:
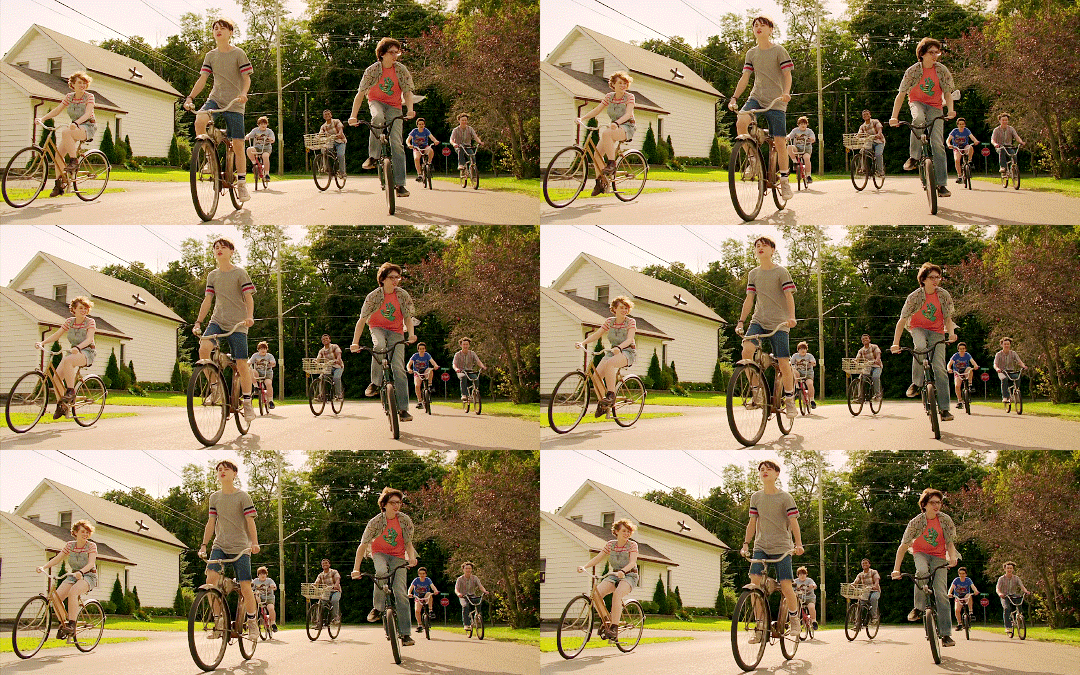
If you’re wondering, this gif is 2.42MB, so I could still make it brighter/more vibrant if I wanted to!
To save, go to File > Export > Save for Web.
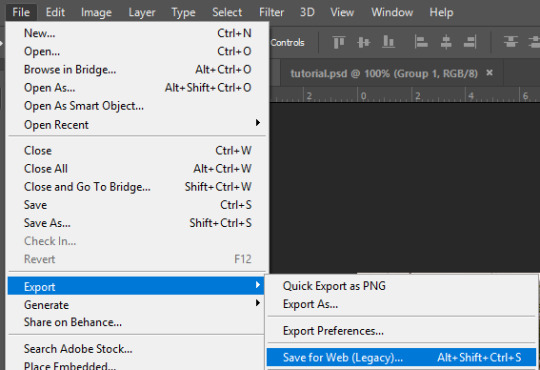
A new window will pop up. There are more settings that you should check to make sure your gif looks as nice as possible, but they’re also up to preference and can range from creator. This is what I prefer:
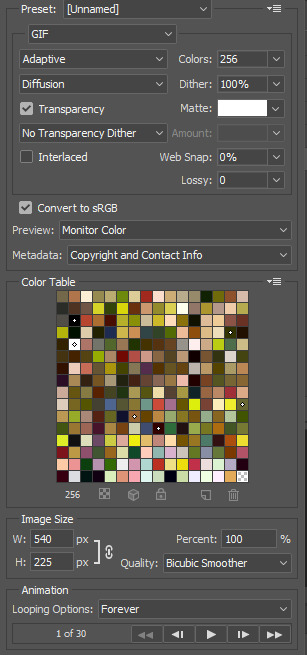
Diffusion is good for bright and/or colorful gifs, but if the gif is dark, I’ll change it to Noise to see if I like that better. Also, always double check you have the loop set to forever, otherwise your gif will only loop once.
And you’re all done!
Here is a short masterlist of resources I recommend checking out and use often:
allscallie (DeviantArt)
Their psds are beautiful, especially if you’re into making moodboards. Everything is very aesthetic!
sttoneds (DeviantArt)
More psds, especially if you’re into gifsets/photosets that are color focused.
BEAPANDA (DeviantArt)
Literally everything they publish is gold. From brushes, textures, psds, renders; they have it all. Their packs are extremely well made, too. I highly recommend bookmarking them. (The renders and brushes look beautiful when you use them in your headers!)
allresources (Tumblr)
There are so many photoshop resource blogs here on tumblr, so to make it easy on you, theirs is the one I recommend the most! The tutorials and resources she makes herself are really great too.
Thank you for reading, and good luck +.゚(*´∀`)b゚+.゚イィ
143 notes
·
View notes
Note
1, 5, 9, 13, 29, 21, 26, 32, 33, 42, 49
sorry it's a lot hgskdk
omg no tysm, i am [gib] over all of these!!
What are your top 3 favorite sets you’ve made?
yennefer week day 2 yennefer & jaskier + nicknames hisirdoux casperan + verbal incantations
5. What is your favorite movie/TV show to gif?
Most of my stuff has been with either The Witcher or Wizards, but i think I actually really like giffing music videos/documentaries? The lighting is so much easier to work with than it is on many tv shows, and while Wizards was pretty easy to work with in a lot of ways, I think I like working with live action footage more because it makes coloring/blending feel a lot more seamless.
9. What/who inspired you to start making gifs?
At this point, I honestly don't even know?? I was making little gifs as soon as I had proper access to Photoshop on my own device, but I think it was just a natural evolution out of the graphics I would make on Instagram in middle/high school. The biggest inspiration was probably all the graphics/gifs coming out of the Kingdom Hearts fandom though.
13. Where or from whom did you learn how to gif?
Basically everything I've learned came from googling tutorials and finding links on tumblr. I think a few aspects of learning how the timeline worked came from making animations & cinemographs in my graphics class, but if I ever wanted to learn a specific technique or was having an issue with my exporting, I just kinda googled things and dug around until I found what I was looking for.
21. PSDs or original coloring for each gif?
oh I have to make the coloring from scratch every time skjskdhfkdsf; I don't think I even have a generic, catch-all base PSD I use. Only if I'm making a set with similarly lit scenes will I make a base PSD for other gifs, but rarely will I ever use it for a different set.
26. How many un posted sets are in your drafts right now?
None actually 😶 I actually only use my drafts to test out how gifs will look and move on the dashboard + how the gifs will look lined up together; I think the only time I finished a set and didn't immediately post it was when I had done work for a fandom event and was waiting to post on a specific date.
29. Have you ever posted a set, realized you made a mistake later but it was already too late?
omg I don't think so, but I did delete my initial post of a set that I uploaded during the whole tag debacle of early 2022 (the yennskier nicknames one actually, lol), but I had already linked it in a few places, so it had already started to be reblogged and now I just can't see any interactions on it in my feed 😔
32. What is your favorite tool/adjustment layer in Photoshop?
Selective color my beloved omg. Though lately I've been doing a bit more similar color adjustment stuff with the Hue/Saturation layer, and have been figuring out how Channel Mixer works, so those are getting up there. Also can never go wrong with a black + color gradient map sdfdsfds
33. Do you like to/can you make edits and graphics too or only gifs?
I used to do edits/graphics on Instagram, and I probably still could do it to some degree? But I've been gif-focused for awhile now, and I actually used to use free online editing websites like Ribbet and PicMonkey for my old edits because I couldn't get access to Photoshop, so I feel like I would need to recalibrate in a way sdsdfsdfds.
42. How is your gif folder organized? Is it organized at all?
It always starts organized whenever I venture into a new fandom. Then I make a ton of other things, and ton of test PSDs and test gifs and whatnot, and now everything is in at least 5 different folders. Tbh this is just a really good reminder for me to start clearing out things I no longer need and to fix up my folders a bit lmaooo
49. How much would you say you’ve improved since you first started giffing?
So much omg??? And like, I'm definitely extremely critical of my stuff, and honestly have so many crying fits over being unable to get the sharpening/speed/coloring of a gif working well in its final state. But I think about the first gif I ever made, just a simple cut from a show with no tweaking whatsoever, to the kind of things I'm able to make now and am just so 🥺❤ And I was proud of a lot of the things I made in the last year, but now that I've recently been able to get a handle on a lot of the issues I've been having, I feel like what I make accurately reflects my ability atm, and I'm genuinely having fun with giffing again 💗
#tysm for the asks!!#going through my tags and finding edits i completely forgot i made and just feeling so !!!!!#i need to gif toa again and get back to giffing the witcher#i'd love to gif more things but i need to get an external hardrive sdfsdfds#asks#editing#long post#frostyviking
0 notes
Photo

WHO is Santi and WHERE is his face?
i am LIVING for your warm & colorful posts right now!! your editing is so amazing and it brightens my day everytime i see a new post of yours *.*
THANK YOU!!!! <3 i am so happy/relieved to be using warm colors once more, i feel like myself again. don’t get me wrong, i do like evoking different moods, but sometimes (a lot of the time, especially with santi) too much is too much. today’s posts were HOPEfully my last emo edits..............for now
LOL I actually made a comment about Fiona naming a cat/dog (once Pets comes out) Rodrigo. I'll go back underground now haha (still a great story, cant wait to read more) -Runaway NONY
OH I DIDN’T EVEN SEE THAT wtf. either tumblr ate it or i accidentally scrolled past it i’m sorry. i always enjoy seeing messages from anons who return to my inbox! but lmAO that’s a good idea. i actually met the most perfect dog today and now i know the breed and name of dog santi needs immediately
Hii! If you dont mind me askin, how do you edit your darker screenshots? I always end up making them too light or too dark to see a thing :( Thank you!
hmmm idk what to tell you about making them too light or too dark, because that’s a very specific thing that really depends on the picture. BUT i know that the dodge tool is my bff for brightening up dark pictures while still retaining some of the darker elements you want in them (aversely, the burn tool will help darken parts), messing with the exposure can also really help, coloring can also help too, selective color is my bff especially with blue shadows and orangey skin...this is kind of a broad answer, i’m sorry, but if you needed help with something specific, let me know!
I remember you answered an ask and said you drew tears when you edit right? Is there a reason you don't use CC tears?
i answered this like two weeks ago but i can’t find it so whateveR i’ve used cc tears a few times but there’s only like three of those in existence and my characters have cried a LOT. i feel like it would be kinda weird if they had the same tears every time. also there are just some variations that i like to customize myself by drawing, like sometimes they’ll be full on sobbing, sometimes just one single tear...it just depends on the situation, that’s why i draw ‘em.
Santi is my favorite Harvest Moon character.
idk shit about harvest moon so idk how to respond to this :[ here’s a small picture of michael cera with a cactus

Would you recommend buying a macbook for playing sims?
if a macbook is what you already have, then yeah, i’d say it suffices without many problems. if you’re specifically going out and buying a computer with the knowledge that you’ll be playing sims on it, then mmmmmm i’d probably say no...but it also depends on if you’re like gonna get REALLY into storytelling and cc n shit or if it’s just casual gameplay with a mods folder that’s like 5 gb or less...if it’s the latter i think it should also be fine. but yeah it just depends on what kind of gaming you’re planning on doing.
How can I read your story from the beginning? Is there a link or something? I keep seeing it on my feet and it looks so great!
thank you! there’s a button at the top of my page that says “story directory” but if you’re on mobile you can just go here or copy this link: http://femmesim.tumblr.com/tagged/story/chrono
I've talked to u like once before and I'm to shy to talk to u again... Why am I like fish?
This**
we are all like fish if you really think about it lmao but really just reach out my dude! if we talked once then y’know you already broke the ice so just go for it!! i am here and ready to talk about all the things under the sun
Do you use Topaz Clean?
yep
hi hello so maybe I am just a blind bean but may I ask how in god's name do you get your images to be so crisp? I have everything set up, but it seems as if when I do my thing in Photoshop, everything turns out lookin like a blobfish. I'm not sure if you use another person's topaz settings or if you have your own. Thank you so much if you do respond bc I was too much of a wuss to message you *cries in Spanish*
OMG well it’s mostly just resizing, smart sharpening, and most importantly topaz clean (see above) that makes them so crisp. i also use the sharpen tool on sims’ faces, and the smudge tool when something is particularly pixelated or whatever. everything i do is listed in here! UR NOT A WUSS *hugs you in spanish*
youre my inspiration to be a better writer. I know i'm good and giving characters depth and backgrounds and coming up with a rough story idea. but i rush things and i'm not great at putting it into a good story so ya. My story on simblr started out as casual gameplay but i wanted it to be more and i'm trying to get better @ everything
OMG ;_________; it sounds like you are a good writer already, and it’s awesome that you recognize your strengths while also acknowledging that you need to work on some things as well. i try to do the same and i think that’s what keeps me level headed. it sounds like you just need to dedicate some time to planning, that way you start to realize all the nuances of your story that come together to flesh out that initial rough idea. you seem to have a positive attitude, so that’s great!! you’re already getting better and better, i know it <3
now Santi's song is Post Malone - Congratulations
OMF LMAO u sent this when santi finally got to mexico and it’s fitting

sos i was listening to the song fight song by rachel platten when i saw the photoset of santi making it to mexico and now i can't stop ugly crying please make it stop
omG i see it TAKE BACK UR LIFE SANTI U GOT THIS
This is so random but like, can I just say that you're so amazing like?? Why?? You're so sweet and funny and I love you very much ok
AKJSKJDFKJS THANK YOU THIS IS SO NICEEEE ;-; i try but a lot of the time i feel like a sarcastic asshole lmao thank u for thinking otherwise <3
Am I the only one who's like... really mad about pets being NPCs? I just feel like being able to control them was the best part. I don't really feel like the EP is worth it without them. Like, don't get me wrong, I understand that the team worked really hard on it, but I feel like they didn't do it as well as they could have.
hmm i’m kind of meh on that front because like on one hand i did like controlling pets and the novelty of the fact that you could just see their different interactions firsthand, but ultimately i think i’m okay with not controlling them because it makes it more realistic for me and honestly they’re probably more likely to take care of themselves a little bit more if they’re automated, because i’m just thinking about ts3 pets and how i literally had to make them go pee outside otherwise they’d pee in the house...even if they were well trained and stuff lmao. plus there might be a cheat or mod that lets you control them, like there was in ts2? so don’t lose hope yet.
hey your blog is AWESOME, i read through your stories in a day and am obsessed (kind of in love with gianni) ❤ what are some of your favorite ts4 blogs? i'm trying to find more awesome blogs to read through during my miserable journey of trying to get the game to work on my computer lol
heyo here’s some! thank you btw, and i hope your miserable journey ends soon :{
(I really need to get this off my chest) ok so my aunt is currently in a critical condition after having a kidney failure and she's in desperate need for a new one and I'm the only one in my family that's a match (so far) but I'm not allowed to donate bc I myself have severe health issues affecting my day to day life that would make it extremely dangerous for me to remove a kidney. I'm so fucking frustrated you don't understand like I just want to cry most of the time
first off i’m so sorry that this is even happening to you ;__; and you’re an amazing person for being willing to help out your aunt like that, so just know it isn’t your fault that you’re unable to. don’t guilt yourself for it okay? is there any other possible donor at all? i wanna know how this situation ends up. i really hope your aunt will be okay. just stay close to your family for support and don’t blame yourself.
how did you get photoshop for free? I'm trying to find a link that won't give me a virus, but I had no luck yet
the pirate bay is ur friend
Ok I gotta rant. GoT does NOT deserve the hype/amazing ratings. Like, sure the cinematography is pretty great and they have ok actors but the freaking script is so mediocre I actually think I could write a better one. Me. A 16 y/o tiny child. There are so much better shows out there! Hell, even Supernatural has a better script than GoT
whenever ppl agree with me about how much GoT sucks i grow stronger and stronger even the actors are iffy at this point. watching daenerys act is painful, jon snow is wooden as hell, it’s just bad. ur 16 yr old self has more potential than these writers tbh. it’s just completely mediocre; it started out as something great because it followed the same layered storytelling pattern as the books, but it’s diverged from that completely because the writers got too caught up in the hype. and you’re right, it doesn’t deserve that hype! omfdkjsgkj i’ve never watched supernatural but i haven’t heard good things. that’s a low bar
29 notes
·
View notes
Text
QUICK TUTORIAL: lineart gifs & watercolours
i’ve received a few asks about how i made this gifset, so here’s a quick guide! i’m skipping right to the interesting parts, so you need to have basic knowledge of how to use photoshop to make gifs or you’re not going to get much out of this tutorial. the basic idea is very simple but the process can be extremely frustrating, as usual. proceed at your own risk.
things you’ll find behind the cut:
how i get from this:
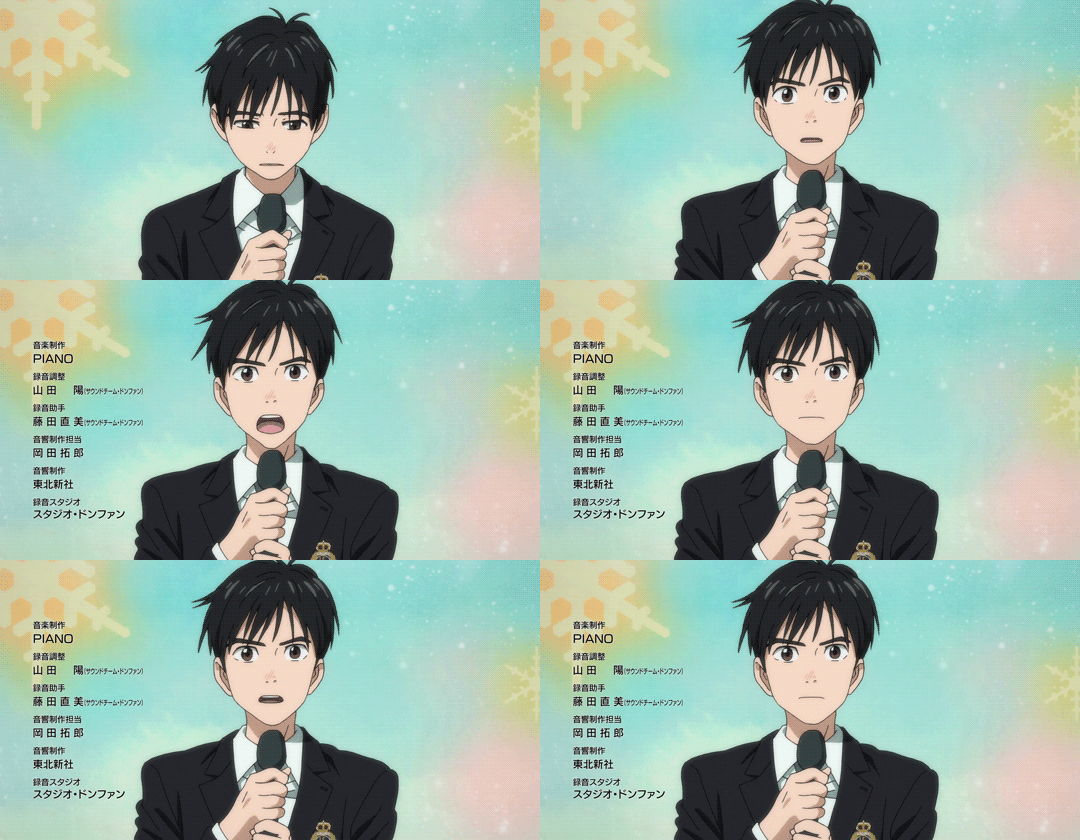
to this:

and to this:

still with me? great! let’s begin!
i use photoshop cc in this tutorial! all features should be available in other versions too, but they might be called something else. in that case please consult google.
YOU WANT YOUR GIF TO HAVE AS FEW FRAMES AS POSSIBLE! get them ready and do your basic thing ie resize, remove excess frames and set the framerate. next, flatten the frames into layers and download this action (19 frames at most) or do the following manually:
duplicate your first layer
set the copy to divide
add gaussian blur (approximately radius 0.6px) to the copy
use smart sharpen on the original layer. play around with the setting until the lines look clear and smooth (my settings: amount 300%, radius 0.3px, reduce noise 10%, remove gaussian blur)
check that the blurred layer is on top of the sharpened one
merge layers
repeat with every single layer :))))
now your gif should look something like this:
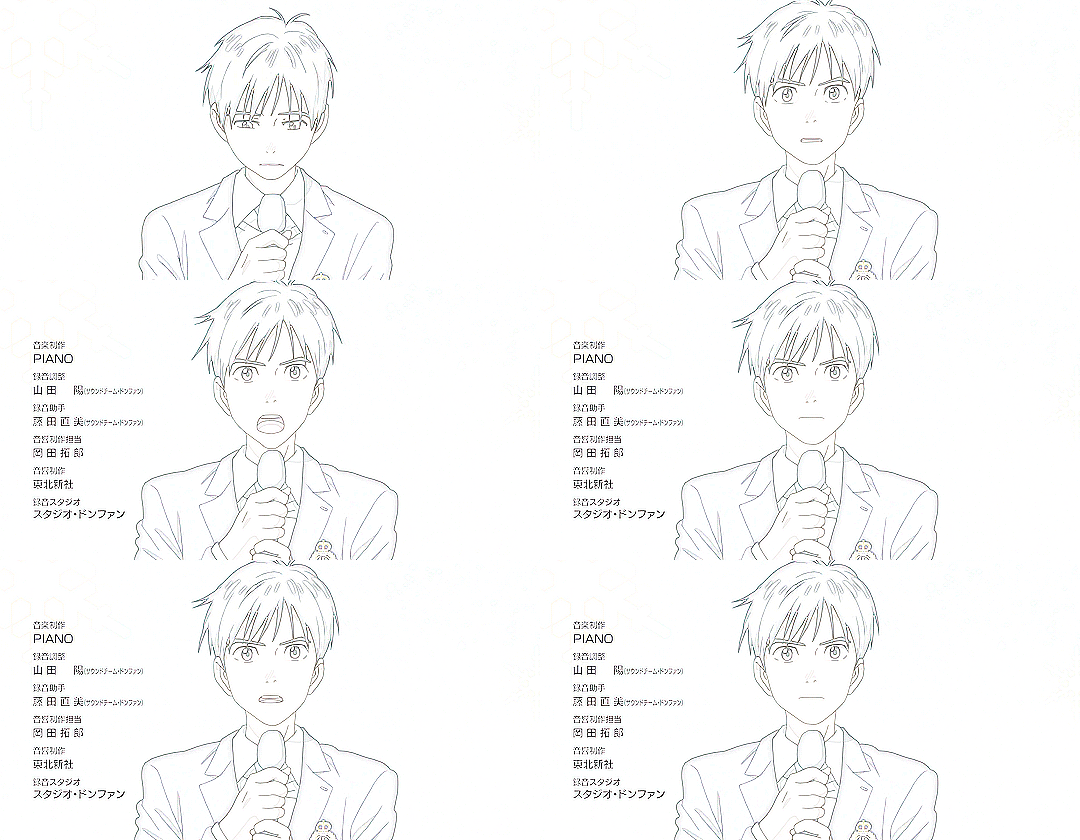
as you can see, if you wanted you could just paint over the parts where the background is still visible, add some colour or overlays and tadaaah, a perfectly fine gif! but we don’t want that today. we want to make our lives hell.
NEXT, WE’LL DO SOME MASKING AND GET RID OF THE BACKGROUND. i use the quick selection tool because it’s quick (lol), i’m lazy and these kind of gifs have nice and clear lines so it works like a dream!

make sure you’ve selected everything, it can be difficult to tell what’s part of the background and what’s the selection as you can see.
all done? next you’ll need to click mask and select. i invert the selection at this point, so the following settings only work with that! i forgot to put it in the pic but in addition to these setting, i usually have the output set to “layer mask” so that saves me a few clicks. when you’re happy with what you’re seeing, click ok and go though any bits that didn’t mask properly by hand.
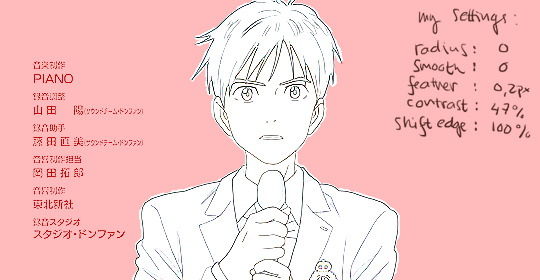
can you guess what the next step is? yeah. now do the same to all your layers...
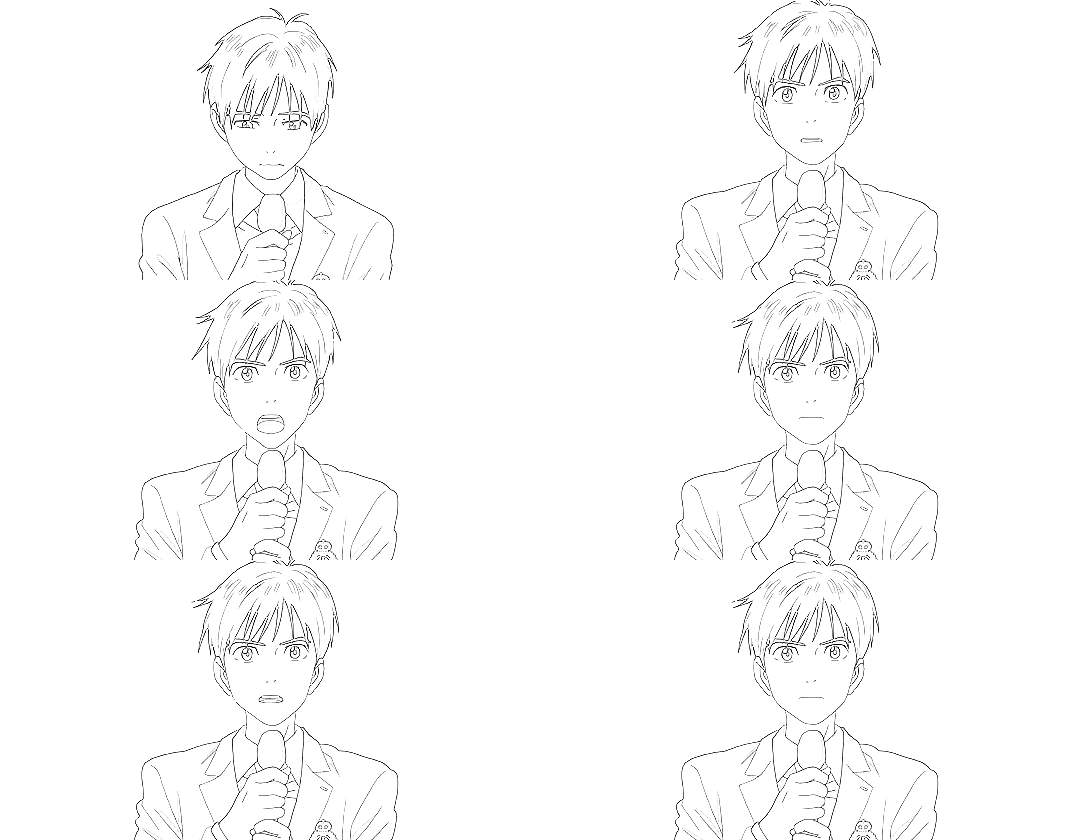
... and you’ll end up with something like this!
you probably can’t notice much difference, because it doesn’t show up properly on my blog, but the background is transparent! i’ve also added two adjustment layers to clean up the lines a bit:
black & white
levels (my settings: shadow 60, midtone 1.00, highlight 230)
//EDIT: naturally, the settings i used for the tutorial don’t work for all scenes but in my experience they’re a pretty good place to start from! also, if the scene has a very busy background i usually mask it before resizing and applying the lineart effect to make sure it looks as good as possible (and it also gives you the option to use the same frames in other projects without having to do it all over again)! in those cases the blurred layer leaves a fuzzy border around the image when you merge the layers, so you need to select the sharpened layer’s pixels before merging and mask the resulting layer with the selection. oh and i usually convert the layers for the first frame into smart objects before sharpening or blurring so i can easily adjust the settings to be optimal for the scene.
again, you could stop here, walk away with a nice transparent lineart gif and call it a day.
no? then we’ll start adding the watercolour.
this is, of course, all done manually as well, frame by frame. don’t blame me, i told you this was going to be frustrating.
add a white layer to act as a background, and adjust the output levels of the levels layer you just added a few minutes ago! my setting are: shadow 0, highlight 238
THE NEXT STEP IS TO START PAINTING
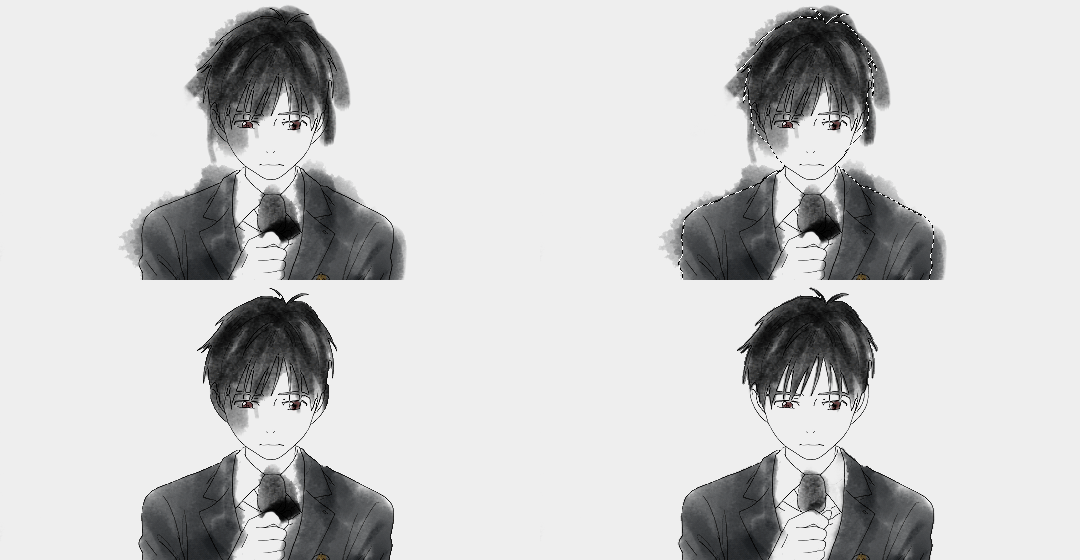
the gif should give you the basic idea of what to do from here on. basically, it’s something like this:
create a new layer on top of everything, pick a brush, add colour to appropriate spots, don’t mind if you can’t stay inside the lines. it’s actually better if you don’t! i usually have the colouring layers set to linear burn.
check what frame you have selected! you want to find the corresponding lineart layer, right click it and pick select pixels.
create a mask for your coloring layer from that selection. now the outline should be rather nice and smooth, and all you need to do is mask the inner parts using either a selection tool or do it manually. in this case i prefer the latter.
if your gif doesn’t have much movement, you can get away with duplicating the colouring layer for the next frame instead of painting everything from scratch! just duplicate the layer, delete the old mask, move the layer a bit if needed and add the mask from the next lineart layer.
repeat these steps until you run out of frames.
keep or delete the white layer you’ve used as a background.

before you even notice, you have a super pretty lineart gif painted in watercolour style, ready to be posted on tumblr or edited more!
i edited mine a bit more and ended up with this baby! i kind of lied in the beginning, since i’m not telling you how i turned it into this lmao oops. basically i just added the bg image and a few gradients on top of everything? super easy!
//EDIT: i can’t not tell you guys i feel so guilty lmao. okay, we’re starting from the bottom up!
changed the white background colour to #e6e6e6
a picture of flowers on top of it, color burn 60%
levels adjustment: shadow 60, midtone 1.00, highlight 230 and output adjustments are shadow 0, highlight 220
linear gradient fill layer, 90angle, colours #f3bfa5 and #fbeebc set mode to soft light 100% jump to between the lineart adjustment layers and colourings
color fill layer in #f3bfa5, set mode to soft light 100% jump on top of everything
vibrance adjustment layer, +100 vibrance and +31 saturation
gradient map adjustment layer, colours #f3bfa5 and fbccbc set mode to overlay 30%
duplicate the adj layer you just made, chance mode to color burn look at your beautiful gif and cry tears of joy

and that’s about it! i hope this cleared up the process a little!
thank you for checking out my tutorial! if you have any more questions, my ask box is always open ♥
oh and feel free to tag me if you post something made with this tutorial! i’d love to see your creations! i track #nikiforoov so just tag your post with that :)
#yuri!!! on ice#chaoticresources#photoshop#fyyoi#yuuri katsuki#tutorial#my edits#please let me know if there are some clear errors#in my defense it's 5am here rn and i should've been asleep ages ago#but noooope#here i am#what can i say i really love playing around with photoshop lmao
2K notes
·
View notes