#the wig is from epic cosplay which is my favorite place to get wigs and for the tattoo I made it with temporary tattoo paper
Explore tagged Tumblr posts
Text


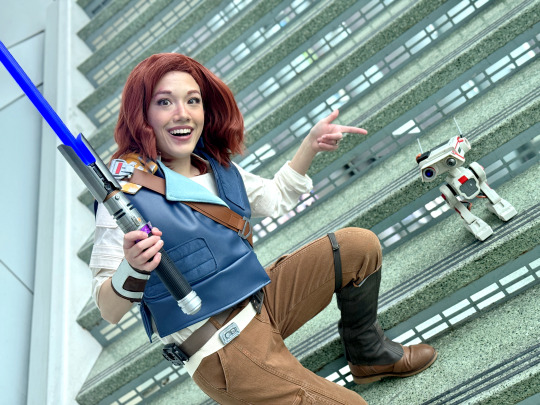
Thank you so much everyone for your kind words on my Cal Kestis cosplay!!! It was a blast to wear around the con, and I can't wait to wear it again!
My mom graciously was the one who made my cosplay, and she did an amazing job!!! She is a very talented seamstress, and I def need to learn how to sew from her haha BD-1 I got from Galaxy's Edge at Disneyland, and my lightsaber I got from Disneyland as well.
#cosplay#cal kestis#star wars#star wars cosplay#jedi survivor#the shoulder armor thing is made of EVA foam and the belt buckles are actually made of shrinky dinks!#the wig is from epic cosplay which is my favorite place to get wigs and for the tattoo I made it with temporary tattoo paper#the pants tho are from amazon haha but they worked perfectly and were super comfy since technically they're more cargo pants#the scar makeup i did was literally from a short tutorial on youtube i found#you basically use 2 shades of pink lip liners and then one red one and keep blending them on top of each other to create the scar illusion
77 notes
·
View notes
Text
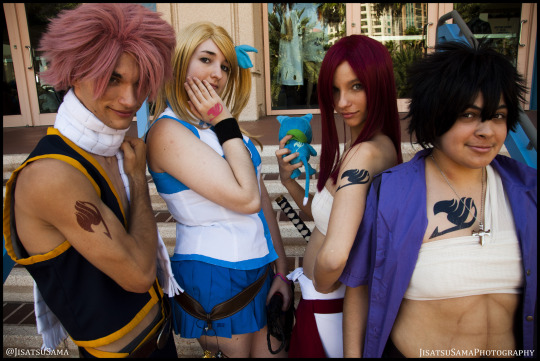
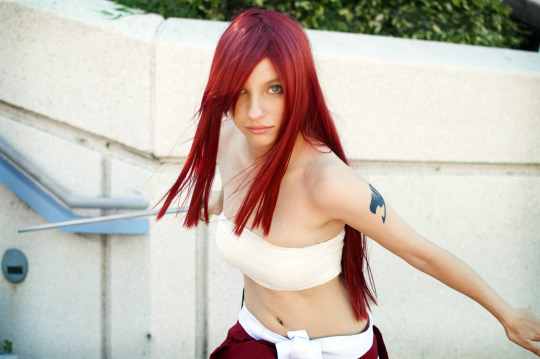
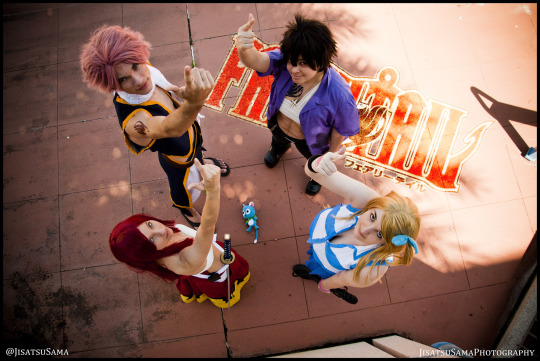
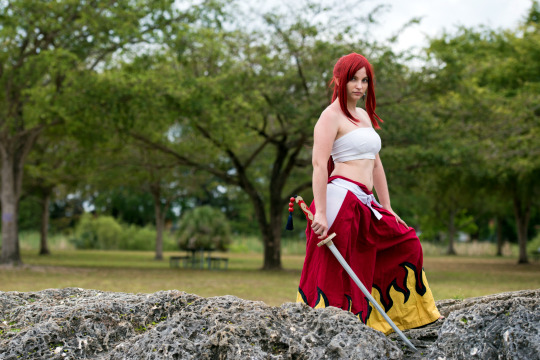
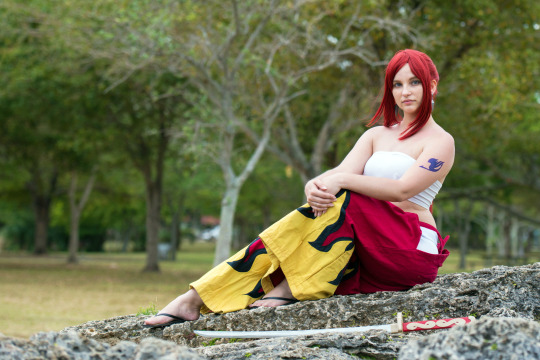
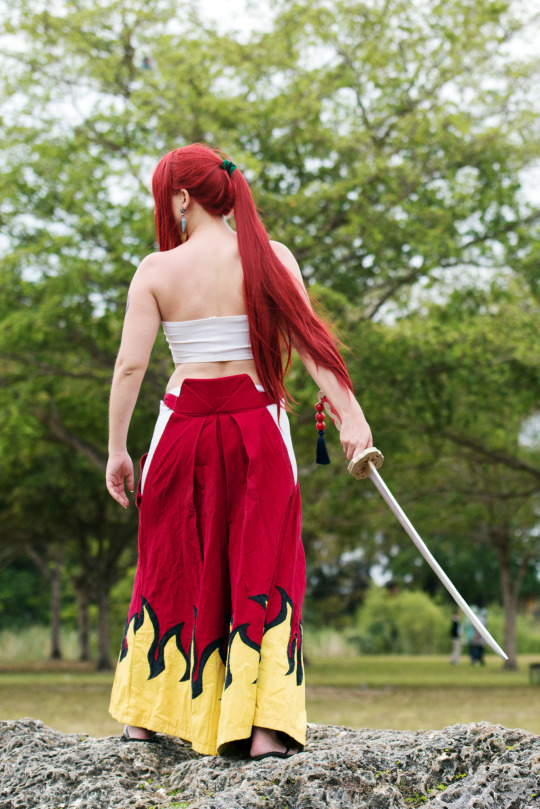
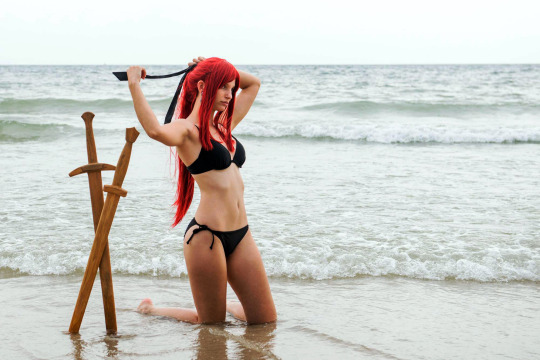
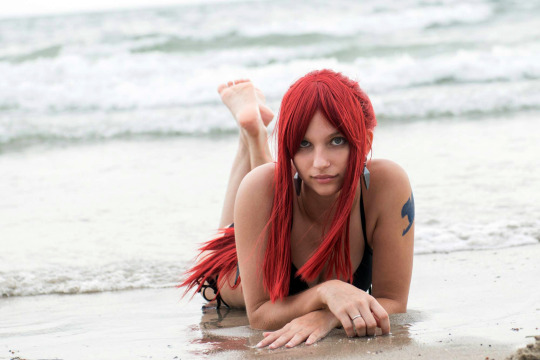
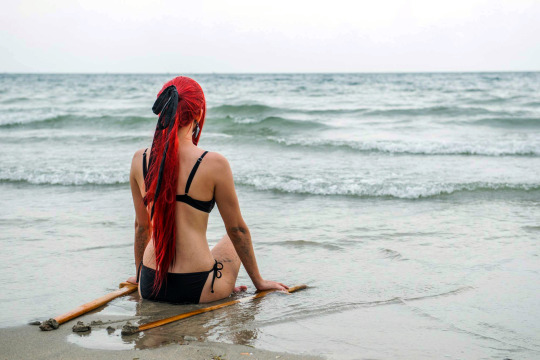
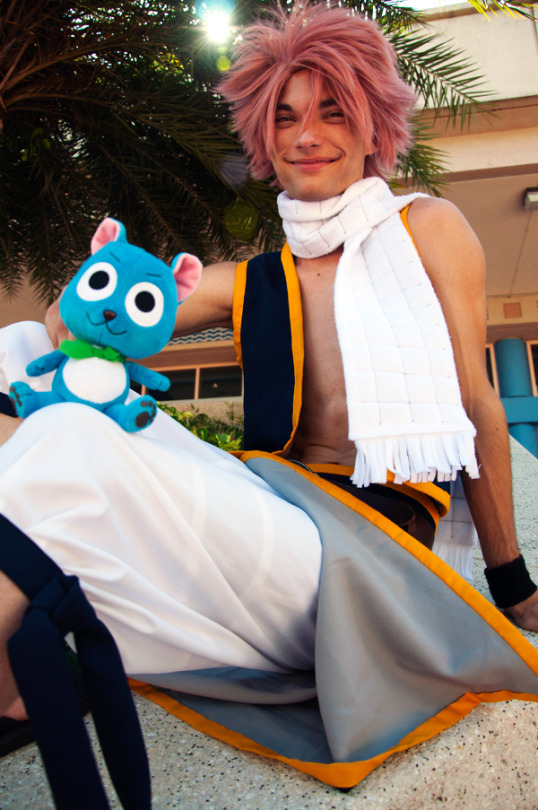
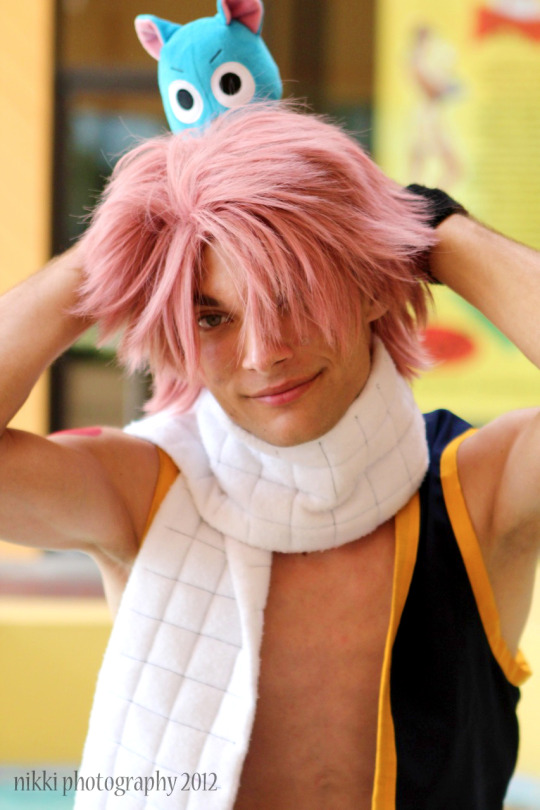
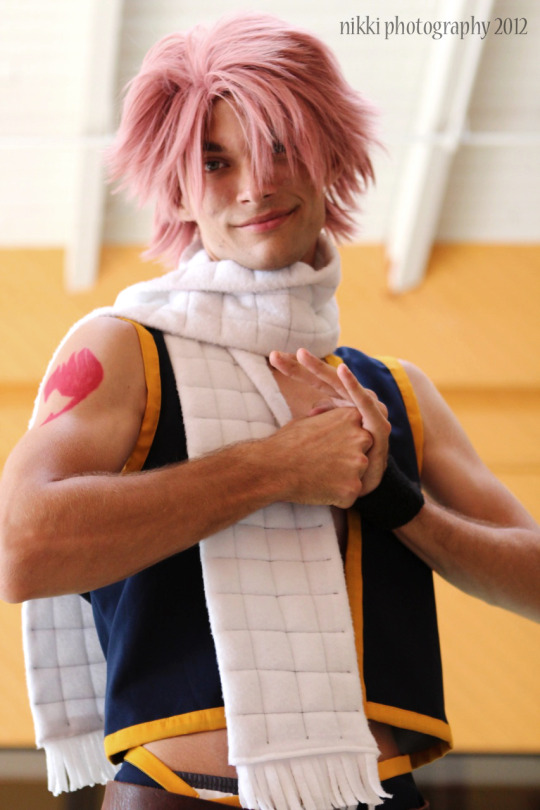
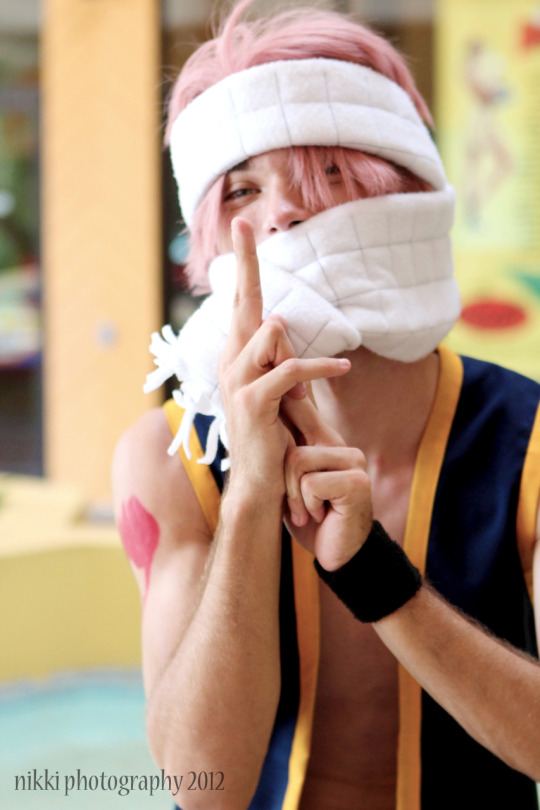
No. 17 - 2012
Character: Erza Scarlet (Armorless ver.) Series: Fairy Tail by Mashima Hiro
Cosplayer Credits: - Natsu : My brother - Gray : Jaiden - Lucy : Kirky
Photog Credits: - Axel - David Ho - Nikki Smith Photography
==========
This is genuinely one of my absolute favorite costumes, and one of the ones I'm still so proud of today!
Like Shiki, I decided to make this particular version of Erza's because I saw an opportunity to make something I'd always wanted to make: a hakama! Does she actually wear a hakama? Not really, but who cares?!
==========
My wig is from Epic Cosplay Wigs. The top is two parts. The first was made from white spandex and is essentially a tube top. I then cover it with drug-store gauze that sticks to itself once it's in place. The bottom, which you can't really see, is made from the same white spandex as the top. I made a pattern from a pair of tights I already had only it goes down to just before my knees.
The hakama is made from red denim-like cotton. I used Folkwear pattern 151, Hakama and Kataginu. I used appliqué (HeatnBond Lite) for the flames at the bottom; the fabrics were similar to the red. For my back board, I fused some spare red to a few pieces of 16th of an inch-thick piece of interfacing. It is washable this way but still stiff as a board and bendable like professional hakama.
I originally wanted to do the tattoo with Hollywood Ink Henna pens and a stencil, but when we got to the convention Friday, we saw they had temporary tattoos in all of the colors we needed and we figured that'd be easier and faster. Plus, most of us were wearing things the next day that would've shown the guildmark so we didn't want them to clash. I later bought actual temp tattoo pens from Stargazers.
I made Benizakura to go with this costume in 2017. It is made of 1/4 plywood for the core blade and hilt. The tsuba (guard) is made of 3/4 plywood that I sanded down to about 5/16 of an inch. I also sanded the hilt pieces from 1/4 to about 1/8 so the hilt came to 1/2 an inch. I used thin foam to finish the designs: the over-layer on the tsuba, the swirls on the hilt, and the pummel. Lastly, the tassel is made out of actual tassel, three wooden craft beads painted red, and screw in loop painted gold. The tassel was beaded and then, after strung through the loop, glue into the top bead.
And speaking of late add-ons... I also didn't have the time to make her earrings but I did eventually, so look out for them in some of these shots. They are made out of a half-inch square acrylic rod that I sanded down using a grinder wheel. A friend carefully drilled a small hole for the wire that I twisted, covered with a bead, and attached to a clamp earring, since I don't have pierced ears. Everything was spray painted to match.
Now my brother's costume was also a lot of fun to make. Aside from his height, he really does have a lot in common with Natsu, so it was a lot of fun to be these two. We got the wig from Fantasy Sheep on eBay; came pre-styled.
The scarf was made out of white fleece. Essentially, I made a pillowcase-like piece, inserted a thin layer of polyfoam, sewed the fringes between the "pillowcase"'s sides as it was shut, and sewed the different sections with black thread. I'm very proud of it because it bulges up and sections off like the references.
I used dark navy blue broadcloth for the front fabric and I insisted it should be reversable as per the Tenroujima Arc, I used grey broadcloth as the lining fabric. The trim is gold poly-cotton. I modified a simple shirt pattern I already had as the vest was not very complicated. We actually bought both the belt buckle and interchangeable belt from PiercingPros on Amazon.
Same fabric and idea as the vest, for the "skirt." I measured his waist, marking the middle, and then halving that measurement to add to it to get the bottom measurement, lining up the middles. (In case that was confusing, here's a formula: W = waist measurement; B = Bottom measurement; W + (W/2) = B) It connects at the top, under the belt with hook-n-eye clasps.
I modified the pants pattern from Kouma. I used white broadcloth held up with an elastic waistband. The calf ties are extra navy broadcloth fashioned like trim after bunching the ends of the pants and have hook and eye clasps on the inside seam. The knots are made separately and then sewn into place They were actually made by my friend Kirky.
==========
Erza: Cost: $60 Time: 16 hrs
Natsu: Cost: $60 Time: 10 hrs
==========
This costume has won the following award: - Best Anime Group @ Tate's NOT at ComicCon in 2012
#erza scarlet cosplay#fairy tail cosplay#anime cosplay#handmade cosplay#cosplay with a prop#natsu dragneel cosplay#for my brother#award winning cosplay
2 notes
·
View notes
Note
prompt: Aaron getting hyped for Purim (the holiday where we all cosplay)
(heck yeah! Purim is actually what started my idea of having Aaron be a LARPer :P)
Aaron fiddled with the long, blonde wig, finger combing the stray strands back into place. He still wasn't sold on whether or not he'd be reprising his Link costume, or tweaking it to a Legolas. But Bex had been dropping hints all month that her costume was going to be epic, teasing with pictures of shopping bags from charm shops and even a ridiculously large package from their favorite faux weapons fabricator. Mom banned the biggest props in the house, but that wouldn't stop his sister from getting something ridiculous like a Buster Sword or a mecha armor get up to just tease him with. His love of costuming had been well and truly nurtured as a kid and his rivalry with his youngest sister was one their favorite ways to bond.
He set the wig on the dresser and poked his head in the bathroom.
"You almost ready in here?" he asked Chris, breathing deep of the soap-scented steam that wafted out. His mate picked the best scents. The citrusy yuzu hair cream was one of his favorites. He'd burrow down with her later tonight, chin nestled over her shoulder, and the scent would blossom. He couldn't help his grin.
Chris blew him a kiss, knowing it would send ripples through the scent-scape.
"You know if you come in here we'll just end up distracted," she warned.
"I know, I know." He came in anyways, taking a towel and drying her back. "I'm just really excited to take you to Trixis. You've never been to an illusionist shop like this."
"Well no," she teased, "seeing as I've never been to an illusionist."
"Which still baffles me. I don't understand how someone can go their whole life without ever playing with a disguise charm. Especially knowing Mel--didn't she ever need to cover up hickeys or anything?"
Chris gave a low hum and turned around to place a kiss on the bend of his neck. "Are you saying I can give you one now and we can pick something up to cover it before going home for the holiday."
Aaron growled a happy answer, then stepped away. "No, bad baby pup. Down girl. We have to focus."
Chris took the towel with a laugh and began to dry he legs. "Fine, fine. Let's to your charm shop and build some costumes to rival Bex's."
As if summoned, a chime sounded from Aaron's phone. He sighed, but it wasn't an unhappy sound.
"Let's see what she's not actually showing me this time."
The text was a picture of a picture, from a photo album almost older than Bex. The whole family was lined up, Mom in a blue gingham dress, baby Bex in a little basket with a big black bow on her bald baby head. Dad was in a flannel shirt with straw sticking out of it, David in a big cardboard box spray painted silver and his metallic snow bibber. And in front, Aaron crouched with a mane made of brushed yarn and black whiskers painted on his nose in his Tigger footie pajamas. He smiled at the memory, knowing how David had fussed at him that the Cowardly Lion did not have tiger stripes. Aaron had insisted they were Tigger stripes, so what did it matter, and David had hit him with his inflatable hammer "ax". That had actually started the "no weaponry props" rule, and Aaron wondered if that was why Bex had sent it to him?
Is this a hint? he texted back.
Maybe ;)
Aaron grinned to himself and hit save attachment. He couldn't wait to get to Trixis.
7 notes
·
View notes
Text
Cosplayer Of The Month June 2017 | Chaotic Good Cosplay
New Post has been published on http://ges-sa.com/cosplayer-of-the-month-june-2017-chaotic-good-cosplay/
Cosplayer Of The Month June 2017 | Chaotic Good Cosplay
[vc_row][vc_column width=”1/2″][vc_single_image image=”25694″ img_size=”large” alignment=”right” style=”vc_box_circle”][/vc_column][/vc_row][vc_row][vc_column][vc_gallery type=”image_grid” images=”25693,25692,25691,25688,25686″][vc_column_text]Welcome to this wintery edition of Cosplayer Of The Month! The chilly season is definitely upon us now and we experienced it first hand during GeekFest 2017 right?? This is also where we got to know this month’s featured Cosplayer – Bronwyn from Chaotic Good Cosplay. She walked away with some of the awards from the GES Cosplay Contest and we wanted to get to know her a bit more and find out how she goes about crafting those amazing outfits….[/vc_column_text][vc_column_text]Hi Bronwyn! Tell us a bit more about the person behind the cosplay persona?
Hi! I’m an electrical engineer by trade. I love making things and absorbing inspiration from everywhere!
How and when did you get started in Cosplay and why do you enjoy it?
I first started being interested in cosplay at Geekfest 2016 while watching the skits. I threw on a few things from my cupboard for ICON 2016 then there was no looking back! I did my first proper cosplay at rAge 2016 and immediately wanted to start the next 100 projects! The most alluring thing about cosplay for me is being able to take a whole bunch of crafts and hobbies that I enjoy and create one masterpiece from them! It’s really awesome to have a hobby which teaches you so many new skills
Do you have any hobbies or interests outside of cosplaying? If yes, please tell us more about it
Plenty! With crafts I always have at least three projects going at a time! I knit my own jerseys, I love embroidering, painting and sewing, not to mention cooking and baking! I’m also a super big fan of many series and anime as well as a gamer. Whenever I have the time I also enjoy dancing, running and hiking.
We all know that cosplay has been become a very expensive hobby these days, do you have hints or tips for other cosplayers as far as cutting down expenses etc are concerned?
Plan ahead. You can save a lot by only having to buy from a supplier every few months. I always buy at least two/three items from a supplier at a time to make shipping/petrol costs worth it. Buying in bulk also gives you the opportunity to negotiate the price with the seller at many places. Also shop around. China mall is your friend!
What is the one thing that you try and avoid when making a new costume?
Leaving everything to the last minute! My work becomes sloppy when I am rushing and also then it isn’t fun anymore, it becomes more a chore than a hobby. Also if you are up the whole night before a convention you probably aren’t going to enjoy yourself as much
Every Cosplayer has a favourite part of creating a costume or something they are really good at, what is yours?
This is going to sound extremely silly but the planning of the costume. I treat each costume as a puzzle and think of different ways of tackling the problem before I actually start making anything. I get excited about all the different methods I could use. Planning is invaluable because it saves a lot of money if you know exactly how to approach the costume before you start and removes a lot of anxiety from the actual making of the costume. And having a backup plan is always a good idea!
Tell us about your most epic fail ever, whilst crafting a cosplay costume
Maya from Borderlands that I made for rAge 2016! I had never made armour before and messed it up completely so I remade it the day before and then needed to attach it to my leotard somehow. So at midnight I was slapping on contact glue where the velcro was going to go, using myself as a model not knowing that contact glue can give you chemical burns! Then at the con itself whenever I sat down my armour folded in on itself and created a nasty crease. And if things couldn’t get worse the side popped open and I had to ask a stranger in the bathroom to pin me back together. Fail! Haha! I learnt a lot from that experience though
Which character do you consider to be your Holy Grail of cosplays?
Erza Scarlet’s Heaven’s Wheel armour! I mean have you seen it? It’s amazing!
Which international con would you really love to go to and why?
All of them!!!! I think DragonCon is freshest in my mind at the moment though. They really had some amazing panels and some epic cosplays this year! So much FOMO!
Congrats on winning all those awards at GeekFest 2017! Can you tell us a bit more about your Nico Yazawa from Love Live cosplay?
Absolutely! I chose Nico because we (Triple Threat Cosplay) did a skit as Bibi from Love Live! We decided on the animal costumes because they are so cute and fitted the theme of the dance. My entire costume is made of black and white fur with a wave pattern rippling through it. I spent a lot of time making sure that everything was perfectly aligned, fitted and hemmed properly but my big magic trick was that the entire thing is pattern matched!. Yup, even the flaps of the pockets. It was my first time attempting this technique so I was really chuffed with the results. I also made my own pom-poms out of the scraps and styled the wig myself. Those pigtails were hard to get to be that bouncy but it was absolutely worth it!
South Africa’s convention scene has been growing leaps and bounds over the last couple of years. Do you have any tips for the other cosplayers as to how to stay comfortable throughout the day?
Think about how you are going to get into and out of a costume and how you are going to transport it. You don’t want to have to leave half of your costume behind because it didn’t fit in the car! Make sure you can sit down, eat and drink in your costume (as well as use the loo by yourself!). Do your research! See how other cosplayers have done the same character before and find out why because it may just save your bacon! Lastly bring a change of clothes just in case as well as eye drops and a LOT of water.[/vc_column_text][vc_single_image image=”25685″ img_size=”large” alignment=”center” onclick=”img_link_large”][/vc_column][/vc_row][vc_row css=”.vc_custom_1445504261410border-top-width: 3px !important;border-top-color: #aa71e2 !important;border-top-style: solid !important;”][vc_column width=”1/2″][vc_column_text]
COSPLAYER BIO
Real name Bronwyn Scott Cosplay name Chaotic Good Cosplay Age 24 Current home town Johannesburg
[/vc_column_text][/vc_column][vc_column width=”1/2″][vc_column_text]
FIND CHAOTIC GOOD COSPLAY ON SOCIAL MEDIA
Facebook Chaotic Good Cosplay Instagram @chaoticgoodcosplay WorldCosplay.net Chaotic Good Cosplay
[/vc_column_text][/vc_column][/vc_row][vc_row][vc_column width=”1/2″][vc_column_text]
COSPLAYER ROULETTE
My favorite anime/manga from this list Naruto / Dragon Ball Z / Sailor Moon / Fullmetal Alchemist / Fairy Tail is
Fairy Tail
Why do you like this particular title?
Because it always motivates me to push myself and the feels are so real!
My favorite platform to watch or experience my favorite titles is – Movies / TV / Series / Books / Comics
TV Series
Complete the sentence: I want to run after them and tell them that …… the cake is a lie![/vc_column_text][/vc_column][vc_column width=”1/2″][vc_single_image image=”25687″ img_size=”large”][/vc_column][/vc_row][vc_row][vc_column][vc_gallery type=”image_grid” images=”25690,25689″ img_size=”medium” title=”Bronwyn’s GeekFest Cosplay Contest 2017 Winning Entry”][vc_column_text]
Pictures were supplied to GES-SA by the featured Cosplayer. We do not own these pictures so if you do, and you would like to us to add the credit please drop us a mail to [email protected]
[/vc_column_text][/vc_column][/vc_row]
0 notes
Text
Thank you guys for your nice comments and words!


Thank you so much everyone for your kind words on my Cal Kestis cosplay!!! It was a blast to wear around the con, and I can't wait to wear it again!
My mom graciously was the one who made my cosplay, and she did an amazing job!!! She is a very talented seamstress, and I def need to learn how to sew from her haha BD-1 I got from Galaxy's Edge at Disneyland, and my lightsaber I got from Disneyland as well.
#cosplay#cal kestis#star wars#star wars cosplay#jedi survivor#the shoulder armor thing is made of EVA foam and the belt buckles are actually made of shrinky dinks!#the wig is from epic cosplay which is my favorite place to get wigs and for the tattoo I made it with temporary tattoo paper#the pants tho are from amazon haha but they worked perfectly and were super comfy since technically they're more cargo pants#the scar makeup i did was literally from a short tutorial on youtube i found#you basically use 2 shades of pink lip liners and then one red one and keep blending them on top of each other to create the scar illusion
77 notes
·
View notes