#the second i exported this to a png i closed photoshop without saving so we could all be free of what i had created
Explore tagged Tumblr posts
Text

has this been done yet
#dungeons and daddies#dungeons and dads#dungeons & daddies#d&dads#anthony burch#the second i exported this to a png i closed photoshop without saving so we could all be free of what i had created#also i know this is a week after the ep came out#this concept has been bouncing around the inside of my head like the idle dvd logo
73 notes
·
View notes
Photo
mobile header tutorial
hello! I’m here to share how to create a header similar to these that i’ve done in the past. here are the tools i’m using:
photoshop cc 2018 (from @birdysources)
some picture of hoseok probably from either twitter or weverse i don’t remember lol
i included pictures and tried to make it VERY beginner friendly, but please, send me an ask or dm if i’m unclear at any point. it’s 2:38 am as i’m making this tutorial and i just downed my cold brew so i’m sorry if it’s messy
1: open your picture in photoshop (here’s the picture of hobi if u wanna follow along)

2: find the quick selection tool
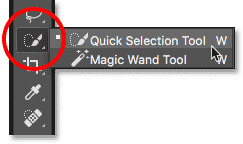
you’ll find it in the left sidebar, fourth from the top. i’ll often use this and the tool above it (polygonal lasso tool) depending on the photo. the quick selection tool is faster but more tedious, in my opinion, but hoseok was easy enough to cut out just using the quick select. use both! whatever u are comfortable with.
here are my settings for the tool:
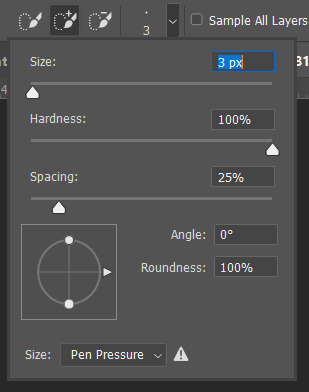
i almost always keep it at 3px. unless the image is huge, then i’ll go up to 5px, but never really above that.
3: trace over your subject(s) (aka hobi) by dragging the tool along the edges, until you’re happy with the accuracy:

4: find Select and Mask (directly above the image):

and here are the settings i’m using:
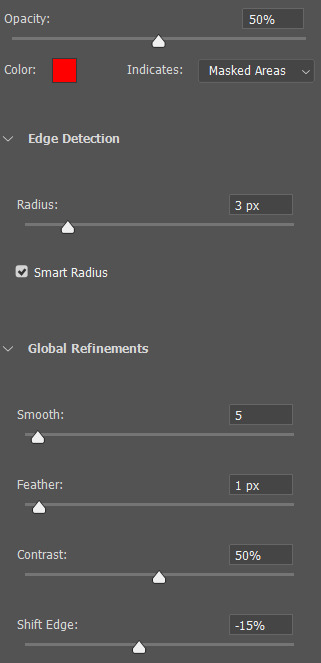
then press ‘Ok’ !
5: Select Inverse (right click inside subject)
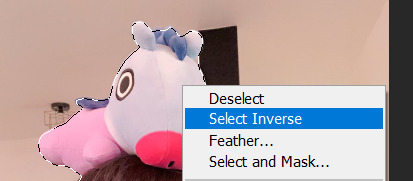
now we’re going to press ‘backspace’ on your keyboard, and the background will be gone~
make sure your file isn’t locked! it should be labeled ‘Layer 0′ and not ‘Background’ (if it’s locked, just double click it and press ‘Ok’ on the window that pops up)
after pressing backspace to delete the background, it should look like this:

then deselect it all. now is the time to look closer at your newly made render and see if there’s any cleaning up to do. i’m good to go, so i’m gonna continue on with making my header.
tip: drag the subject (hobi) with the move tool (very top tool on your left sidebar) to the center so he’s in the very middle. it should click to the center (you’ll see the pink line)

it’s not necessary for the tutorial but if you plan on saving this render as a .png and dispersing the renders you make-- it’s just cleaner looking to have them centered!
6: File > New

i always use 800 x 430 for mobile headers. for gifs, i size it down to 650 x 349.
7: resize and drag hobi into the new canvas (Image > Image Resize)

for single subjects like this i usually resize them to ~300 to ~400. whatever you think looks best tbh
now drag the file from its place up top:
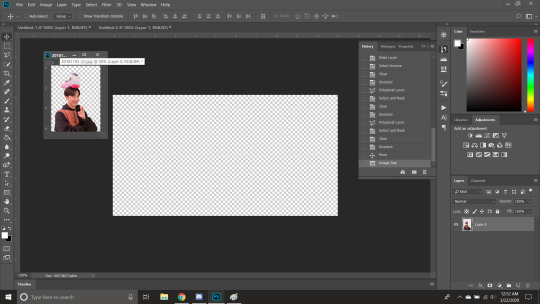
then the file from where it’s labeled ‘Layer 0′

8: now hobi is inside the canvas where the actual header is going to be made~ you can get rid of the render, or save it as a .png, whatever u plan on doing w it
i’m gonna center my hobi for the header i plan on making! from this point it’s just gonna be coloring, sharpening, etc. if you’re interested in using any textures like flowers or bring in other renders of objects, DeviantArt is a great place to search for texture packs. @beapanda on DeviantArt makes beautiful resources (kpop and non kpop related) be sure to credit them or whoever u save ur textures from!
for this header i’m not going to be using any outside resources, i just want my hobi to be the focus~
for the background, i’m gonna use a gradient from this site (this pack is 200 images. phew)
i’m using no. 200 from that pack.
9: optional- i’m gonna make some extra layers and start coloring hobi using clipping masks.
make a new layer > right click the new layer and find ‘create clippink mask’ > set the layer to either color, overlay, or multiply (whatever you think looks best and does what u are trying to achieve)
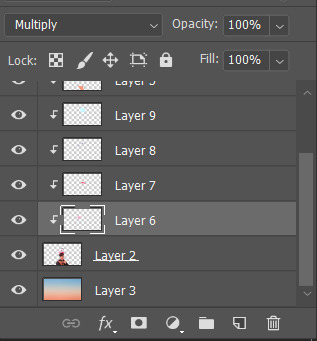
here i’ve just make layers to color things like his hair, his hoodie, and baby mang
here’s with vs without:


and when you’re done, go ahead and right click your primary layer (subject layer) and click ‘merge clipping mask’.
10: coloring~
find a psd you like or being to color the header yourself. for this header i’m gonna be using a homemade psd. i’m not gonna go into detail bc there are sooo many places to find psds on tumblr and deviantart. just like you brought hobi into the header canvas, drag your psd there, and that’s how u apply a psd.
when u are happy with the coloring, right click the bottom layer and flatten the image.
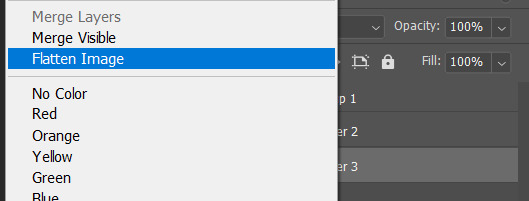
11: topaz clean + unmask sharpen
topaz clean is an addition u have to manually add to your photoshop program. u can google how to do it, but if anyone’s struggling i can show u how i did if i remember (but i’m pretty sure i do)
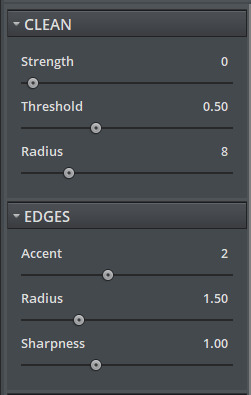
topaz settings:
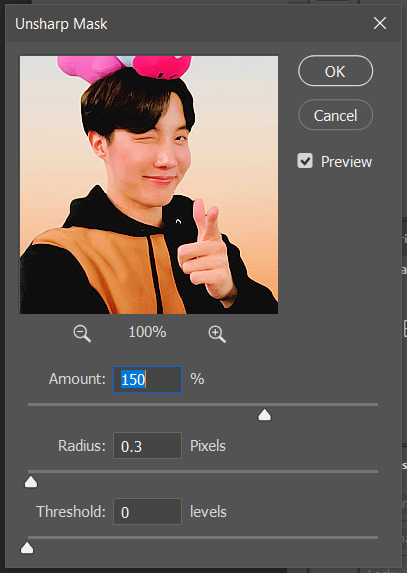
unsharp mask settings (go to filter > sharpen > unsharp mask):
honestly, topaz is completely unnecessary, but i like the way it looks so i’m gonna go with it anyway. sharpening the header alone will still give you a great outcome
12: final step, header border time~
over on my film/tv blog @gusdapperton i’ve made a header template pack (click here if u just wanna use my premade borders) but for this tutorial i’m gonna show u how i actually made those (minus the cloud one, i was just fucking around lol) (it’s so simple)
>>> if u DO just save one of the borders i made in that pack, resize it so the width is at 800 and drag it to your header canvas. set the layer to ‘screen’ and bang there u go!
BUT with that method u can’t change the color from white. so if u want a border with any other color, keep following the tutorial >>>
go to view > rulers and select that to show the rulers (duh)
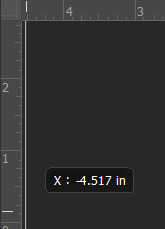
click from inside the ruler (light grey) and drag out your guides. here are where i’m placing mine:
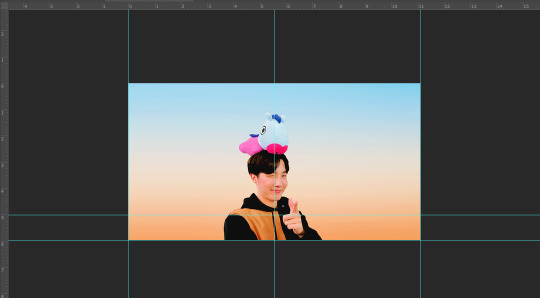
they should ‘snap’ right into place, but if they don’t, make sure u go to view > snap and that’ll fix it. u will know what i mean once u try it lol
select the curvature pen tool (right click the pen tool to show more tool options):
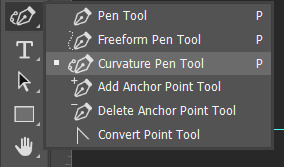
and begin to place your dots. thanks to the guides, these dots will also snap into place
here are mine:

(i eyeballed the two in the middle, it doesn’t need to look perfect tbh)
this next step is sorta stupid but i haven’t found a better way to do it yet lol
to close the shape just make sure to closely follow the direction of the dot you last placed, then go around to make your way back to the first... it looks silly but like this:

just play around with the shape and the tool... u will get the hang of it lol
now look up ^ and press Selection

then ‘Ok’ in the next window. then boom~ there’s your selection for the border we’re about to make.
make a new layer then select the rectangular marquee tool (second from the top on the left sidebar) and either drag with your mouse or use the arrow keys to move the selection we just made. here is where i’m placing mine:
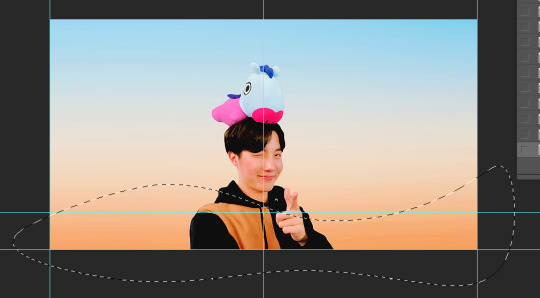
then select your paint bucket tool (if you can’t find it, right click the gradient tool and it’ll be one of the sub tools, like i showed u with the pen tool)
make a new layer, then fill it in (i’m using white)
you can stop there, but to make that line like i did in my border template pack, press the down arrow on your keyboard and go down 5-10 pixels, press backspace, go down the same amount of pixels, and re-fill that area.

now unselect. there’s the border~
now go to view > clear guides to get rid of those. u don’t need em anymore :) i’m also going to move the border we’ve just made down to the bottom of the canvas since we don’t need that big gap there.
>>> tip, don’t fill in the white directly on the layer if you wanna change the color. create a new layer on top of the border layer, right click > create clipping mask > fill the layer with the color u want for the background. example:

it saves the integrity of the shape. if you color fill right over the white, look closely and you’ll see it looks sort of pixelated and not as clean or smooth. it’s subtle but noticeable enough to me where it bothers me.
since this color i chose is kinda vibrant and clashes, i’m gonna help it out some. go back to the quick select tool and select everything inside your border layer. make a new layer, fill the layer with black (any color will do, it doesn’t matter) and set the fill to 0%. double click that new layer, and a new screen will pop up. go to drop shadow, find the settings you like, and boom. here’s what i did and what it’ll look like:
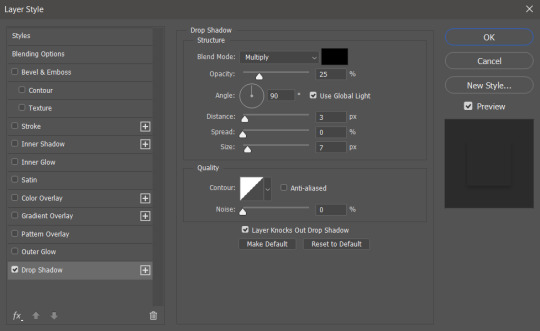
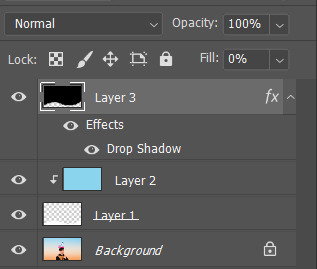
now u are finished~ i didn’t do this but u can skip sharpening the header earlier in the tutorial and reflatten the image again to sharpen it at this point instead but, yknow, i didn’t do that lol
here’s the final product (save by going to file > export > save for web)

preview of how it looks on mobile:
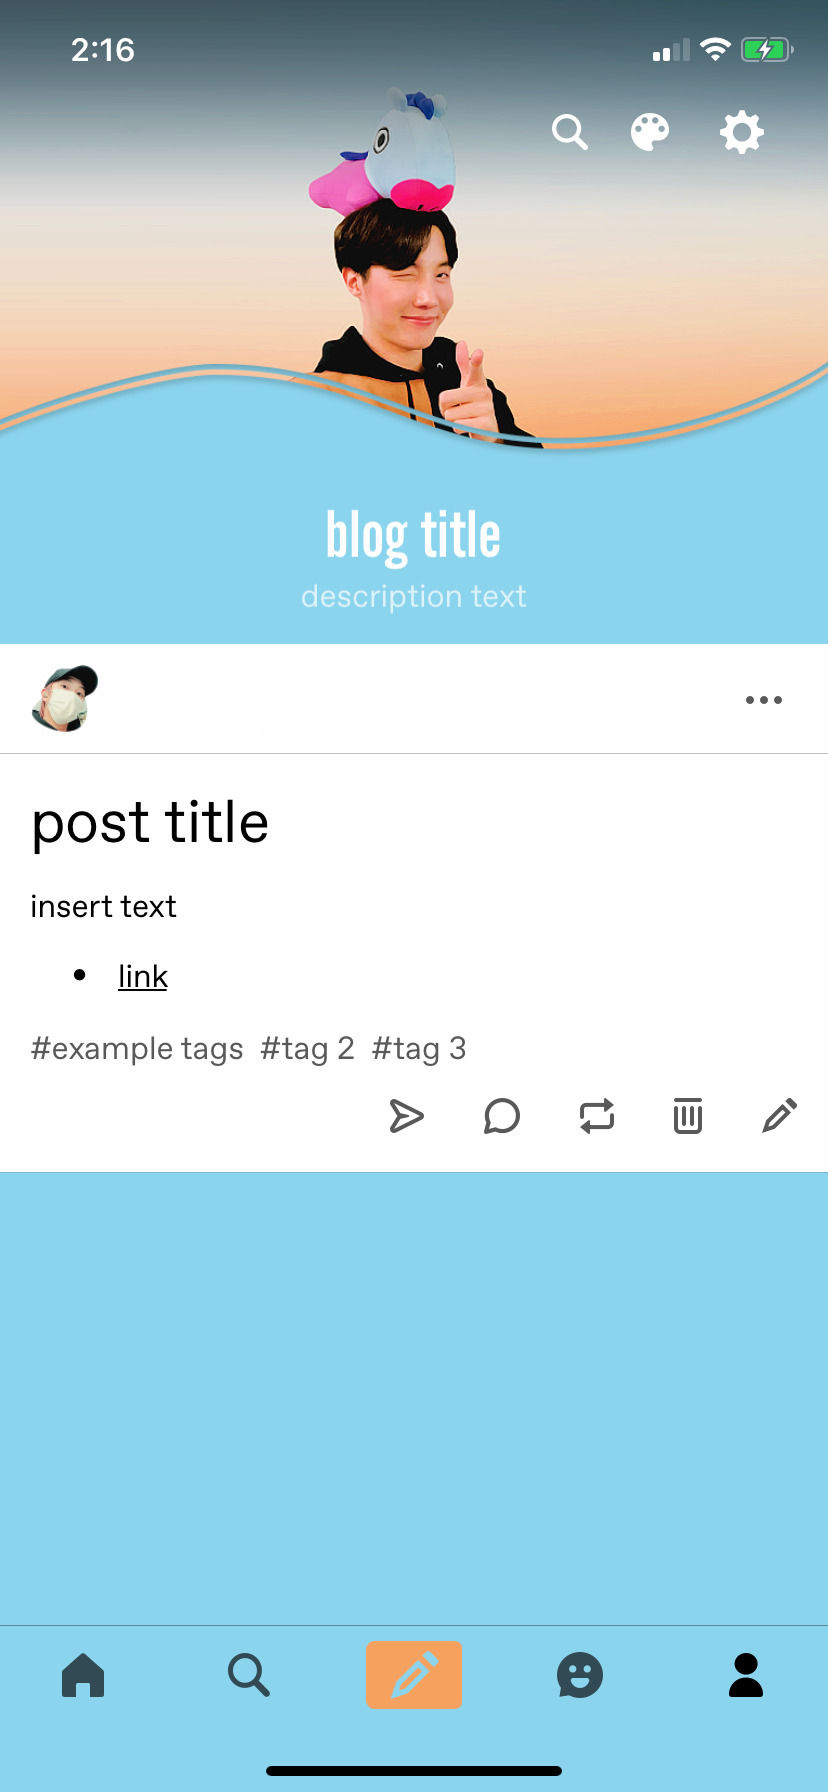
background: 8bd4ed
the end~ please send me an ask or dm if you haven any further questions, i will try my hardest to help <3
#photoshop tutorial#header tutorial#allresources#completeresources#mine:tutorial#i probably fucked up somewhere but it's bed time so i will find out in the morning hehe
149 notes
·
View notes
Text
2.5D zDepth Animations Tutorial
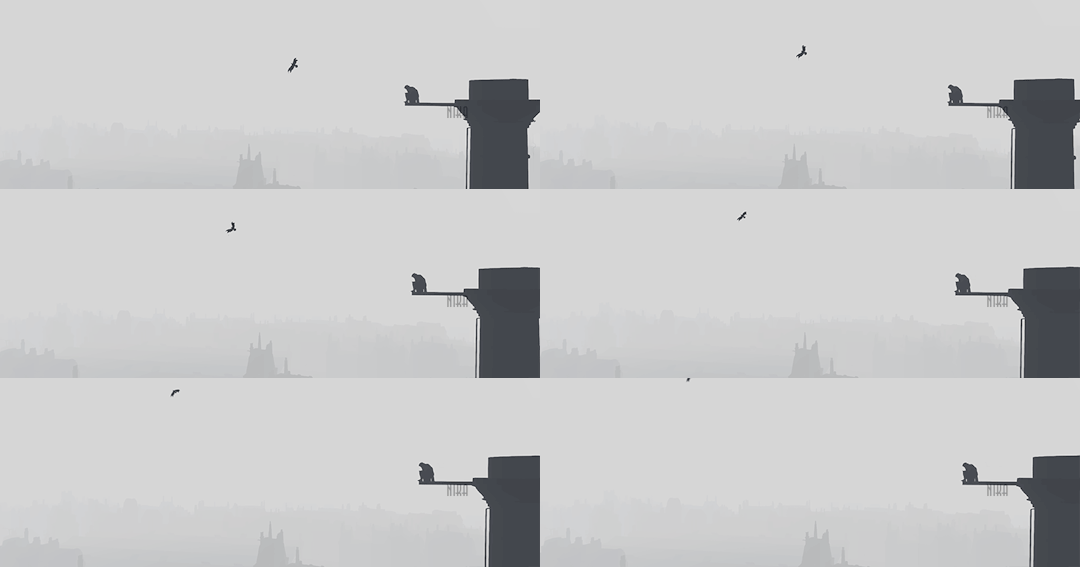
Due to the popularity of this post, I decided to write a simple tutorial for whoever wants to try the same thing with their favorite game. This method will work with every title that supports ReShade and Depth Buffer (and pretty much every static image you want to animate).
What is ReShade?
It’s more or less a mod that alters the original graphics, adding in more effects (like lens flare), different tones and fixing bad looking edges.
What is the 2.5D/Parallax effect?
2.5D is a method used by many editors to animate a completely still picture, from simple sceneries to characters. This creates a sort of 3D depth on your pictures, used a few times by many professionals to bring famous paintings and advertisements to life.
Note: This tutorial is mostly about scenery animation faking a camera movement and adding in a 3D space between layers. For the Parallax animation on characters I’ll write a separate guide.
What you need:
��� The game (duh) (in this case I’ll use Assassin’s Creed Syndicate as example) • ReShade (I find myself more comfortable with a previous version, because I somehow cannot achieve the same results with ReShade 3+ at the moment. This should easily work with the latest version too, but for any problem or if you want to follow the guide better, grab ReShade 2.0.4f from here) • An editing program like Adobe Photoshop, anything that allows you to separate parts on layers and fill empty areas. • Adobe After Effects
A basic editing knowledge is required, along with a good understanding regarding Adobe programs in general. If you make graphics and gifs you’re already a step ahead, but you actually don’t need to be familiar with AE to do the animation.
The tutorial will include four parts:
1) In-game screenshot w/ Depth activated 2) Editing/preparation for AE 3) Compositing 4) Animating
Part 1: In-game Screenshot with Depth Buffer
1) If you are using ReShade 3+ you can follow this tutorial regarding its installation, otherwise copy the ReShade folder, ReShade.fx and ReShade64.dll (or ReShade32.dll if the game is 32bit) into the main game path (where the exe is, so to speak), then rename ReShade64/32.dll as dxgi.dll.
2) With ReShade 2 go to ReShade directory > Presets > Default and drag Shaders_by_CeeJay.cfg into Notepad, then scroll down to the very last line where you see a shader called DisplayDepth. Next to #define USE_DisplayDepth change the value from 0 to 1. With ReShade 3 press Shift+F2 and look for the same name, if you properly downloaded it along with the other shaders of choice it will most likely be already activated. It is highly recommended to set a hotkey for this effect so that you can easily turn it on and off in game (for example, #define Depth_ToggleKey VK_F12).
3) Open Pipeline.cfg and look for the line #include EFFECT(CeeJay, DisplayDepth). Select it, cut it away and then paste it to the very top before any other shader listed. This will allow you to obtain smooth shapes instead of jagged edges (you should also play around with AA options, specifically SMAA and/or FXAA, both included in CeeJay.cfg). Sadly I’m not sure how the setup works in ReShade 3+.
4) Now that your options are properly set you can start the game. Find an area you like and want to shoot, then press F12 (or any other key you chose for it). If the game has a photo mode or custom made free camera tools, you should totally use those for the best results. You can check this post for a few listed titles and all their respective links.

ReShade allows you to automatically store your screenshots directly into the game’s folder by simply pressing the print screen key. This is how the scene looks normally, without UI and with the free camera activated.
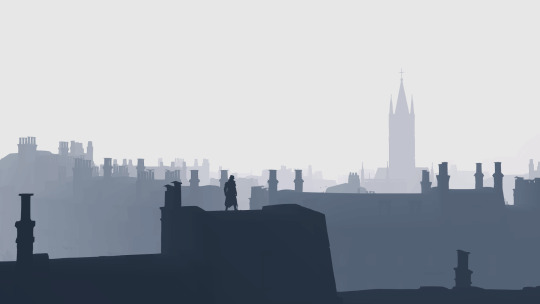
This is what happens when you turn DepthBuffer on.
Note: If all you get with Depth is a fully white or black screen, chances are you need to “reset” by simply entering the fullscreen mode (and switch back to borderless/windowed if that is what you usually like playing with). ReShade usually reloads whenever you apply a modification to the settings, but if even after this the effect doesn’t show up it probably means the game has no DepthBuffer support (or there is some incompatibility somewhere, which may be related to other shaders).
Part 2: Editing
1) Grab your depth screenshot and open it with your editing program of choice, I use Photoshop. In order to animate this, you have to create different layers (renaming them for an easier use in AE, but that is up to you) being sure each hole is covered, or else the empty part will definitely show up in your animation.
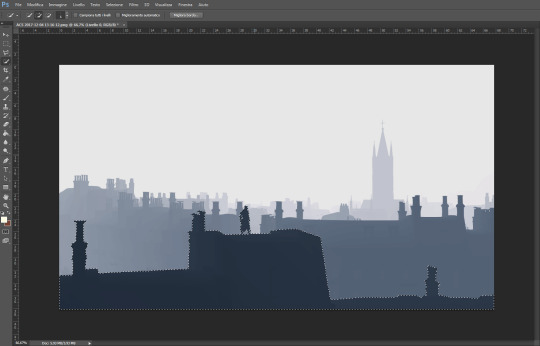
2) Make a selection around the areas you want to separate, I’m starting with what is close to the “camera”. Try to be as precise as possible to keep most of the details, especially around the character. Once you’re satisfied with your selection press CTRL+X to cut it out and then paste it into the same position, a new layer for it will be automatically created.
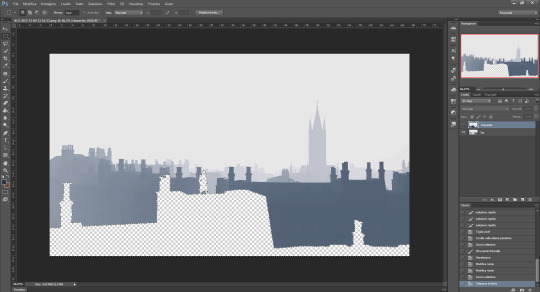
3) If you hide the layer you’ve just made, you will obviously notice an empty shape on the background right where you cut it. The easiest way to fill that properly is by selecting the layer (CTRL+LMB on it), inverting selection and going to Modify > Fill > Content-Aware.
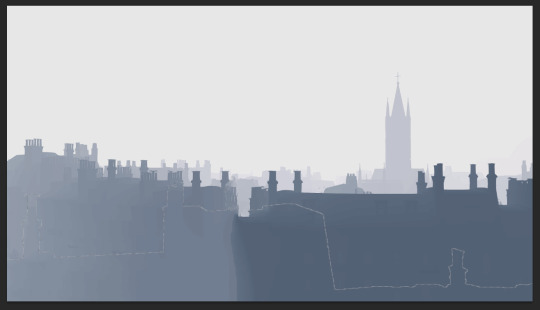
As you can see the empty area has been filled completely, but a few fixes are required. You can use the clone stamp tool or the healing brush, in this case I choose the latter because it makes the process quicker.

It can be a bit tedious in some places... especially if there are a lot of buildings or trees, depending on your scene. Photoshop covered the outline using the existing content to generate the missing parts as I dragged the brush over it, but you may want to use the clone tool as well and even draw here and there where the brush failed.
Repeat the process for all the other layers you want to separate and then rename everything to know what you’re gonna edit in AE (again, this is optional). You can also make the back layer bigger to hide imperfections behind the other layers, which won’t be too visible while animating. Further edits will be done in AE later anyway.
Part 3: Compositing
1) Save the PSD file and load Afer Effects. I’m currently using the CC 2015 one, but even if you have an older version this method will work without problems.
Go to File > Import > File and select your PSD.

Be sure the importer is set on Composition and Editable Layer Styles is checked, this is essential if you want to work on each layer.
2) Double-click on the left to preview the PSD and convert every single layer into 3D. To do so simply check the third square on the right, under the cube icon:

Now we need to add a Camera. Go to Layer > New > Camera and leave the options untouched (the default configuration should be okay for this).
3) Right under your preview you should see a button called Active Camera. Switch to Custom View 1 to move the layers and create depth between them.
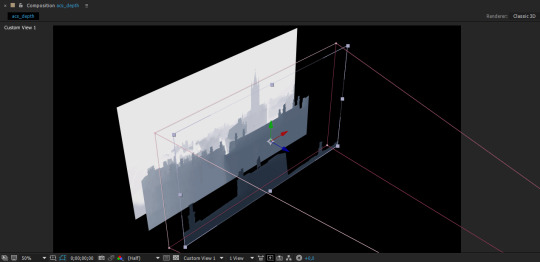
All you have to do is select each layer in the lower panel and move it using the blue arrow (z direction) to push it backward or forward. Use the order you’ve got as reference for the best result, then change the view to Active Camera again when you’re done.
4) Now that you have changed the original positions you need to fix their size to fit the composition. Select all layers at once, press S and activate the little watch icon that appears followed by the effect name (Scale). You will see three values then; place your mouse over the 100,0% one and drag it to the right or left in order to resize the layer(s). Use the directional arrows to also move them up or down eventually.
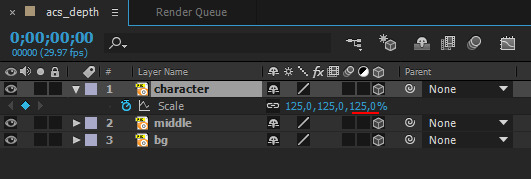
The stopwatch is absolutely fundamental, because it tells where to place each frame in the timeline. Whenever you apply an effect or any modification you need to be sure it’s recorded at the very start, this way it will affect the entire sequence and you won’t risk to only see it taking action in a few frames later instead.
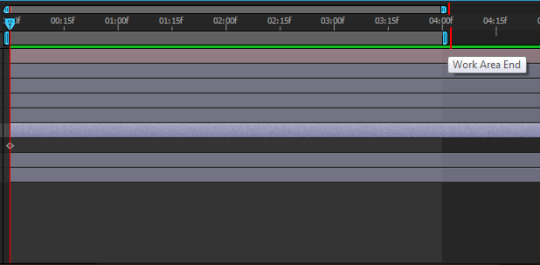
5) You can move the upper bars in your timeline to change the final time. A few seconds for this kind of animations will suffice, I always set it around 4s.
Part 4: Animating
1) Now we can finally animate, woo!!
It is highly recommended to make all the planes bigger than the composition, so that you can move them around without risking to get empty spaces. In this case we want to fake a camera movement with a sort of 3D perspective, like the gifs I’ve posted in that photoset.
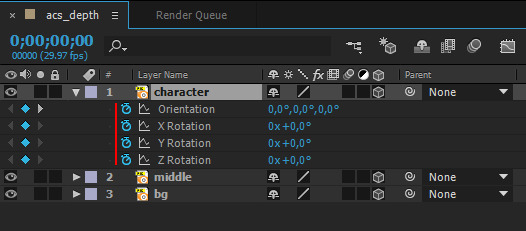
Let’s start from the first layer. Click on it and press P (position) to store the current location on the first frame, then move the time indicator at the end of your sequence. I want the main layer to slide horizontally, thus I will move the red arrow on X axes.

As soon as your first animation is stored, another frame will be generated at the end of the timeline. After Effects automatically creates all the frames between the first and the last one, if you are happy with it select the second layer and do the same, then the third and repeat. You can also use the R (rotation) key to add more realism. Remember to ALWAYS check the stopwatch on frame 1 before doing anything else.
You can preview the animation with space bar, the rendering times change according to the amount of virtual memory installed on your PC.
For a nice camera shake you can follow this tutorial.
2) Once you’re happy with your animation you’re ready to export it. You can pick a simple video option, but that usually requires a second rendering in Sony Vegas or any other program for video editing to fix the bad-looking fps drop. I suggest you to export in frames instead, especially if you plan to make gifs. Go to Composition > Add to Render Queue, a new panel will appear on the bottom. Click on Lossless and pick PNG Sequence next to Format, then on Not yet specified (output to) and select a destination on your computer. Press Render, wait and it’s done! Again, the rendering times will highly depend on your RAM and composition size. The bigger, the slower; if you play in 4k you should reduce the screenshot size to a common 1920x1080 at least, even smaller after that for the final gif (tumblr has a 3MB limit).
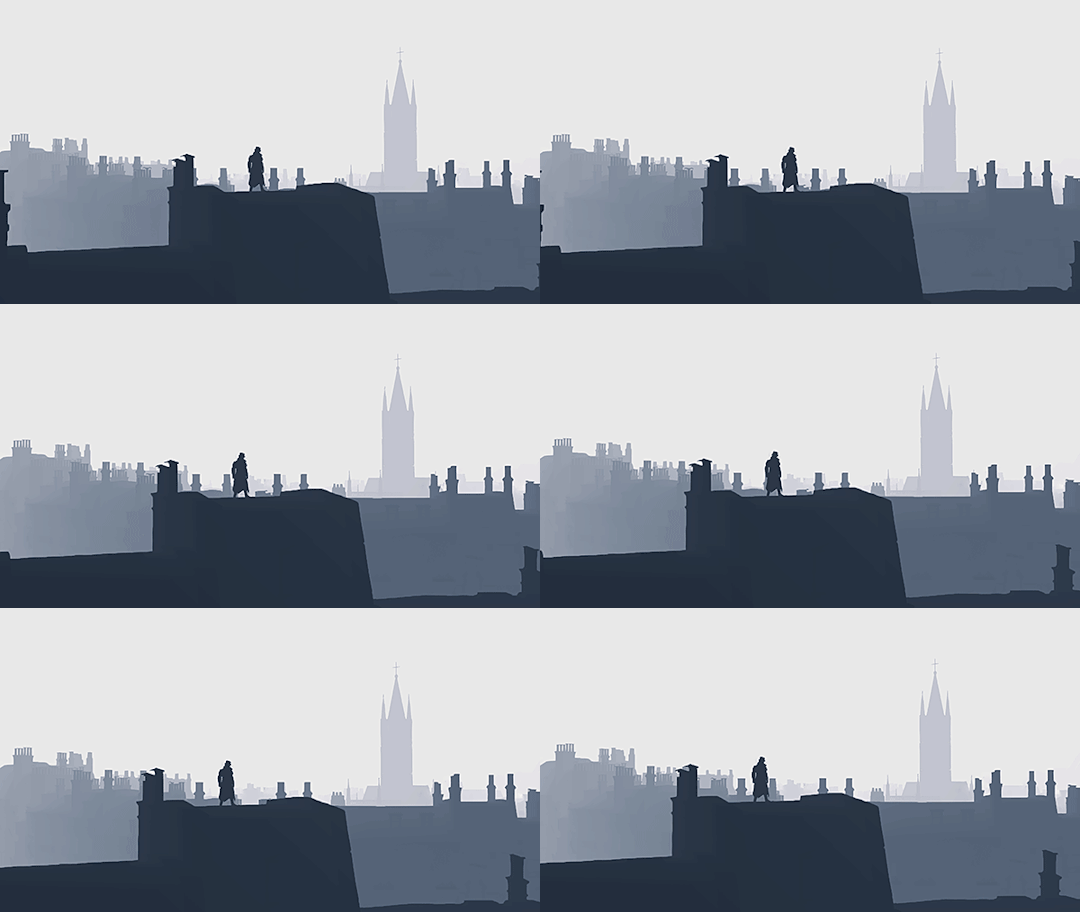
Result:
Questions? Send me a note!
#my graphics#ac syndicate#assassin's creed syndicate#assassin's creed#jacob frye#tutorial#depth buffer#zdepth#after effects#animation#guide#graphics#camera shake#reshade#2.5d#2.5d animation#parallax animation#parallax effect
30 notes
·
View notes