#the colours are a bit darker in person but idk how to capture that with photos
Explore tagged Tumblr posts
Visit Tumblr Blog
Explore Tumblr blogs with no restrictions, modern design and the best experience.
Last Seen Tumblr Blogs


Fun Fact
Tumblr has 16.74 million mobile monthly users in the US.
Text
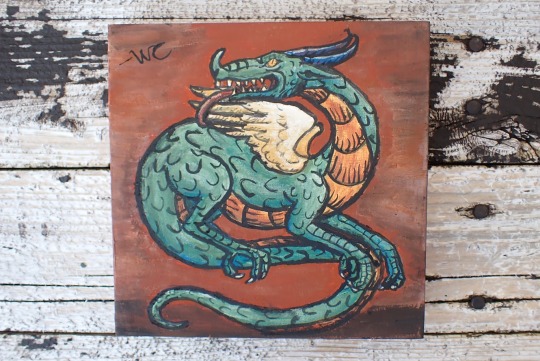
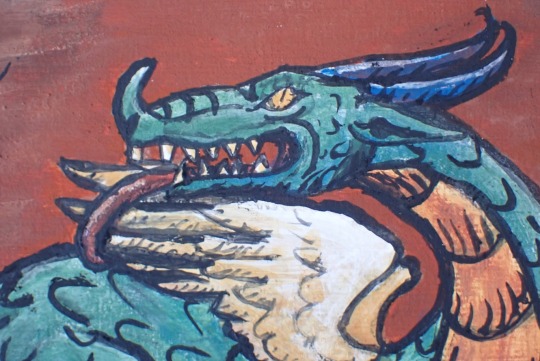
Another egg tempera experiment. This time a dragon on a pine wood panel. 6x6 inches
#egg tempera#painting#my art#dragon#the colours are a bit darker in person but idk how to capture that with photos#I want to learn to paint in person rather than just digital
10 notes
·
View notes
Text
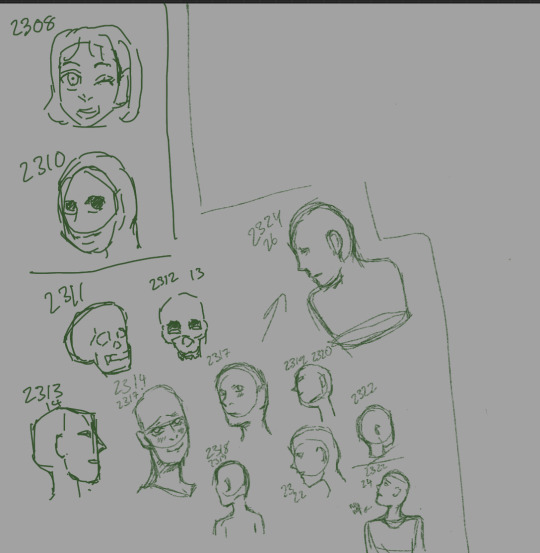
COLOURRR TIMEEEE
like lol I did genuinely have a diff plan today which was to DRAW DRAW DRAWW character stuff!!! plus have some figure prac dibble in. since this morning n afternoon, I’ve been watching some videos. faces n clothes. and honestly didn’t help that much but the clothes one I think I got more better understanding…? And what I need to study I guess.
but ahahah while I did want to draw I didn’t feel urge to get pen and draw until… I came across this beautiful colour sky thingy on yt background for a song and wow it suddenly got me wanting to do colour studying!!!! so I got my pen and cracked to it.
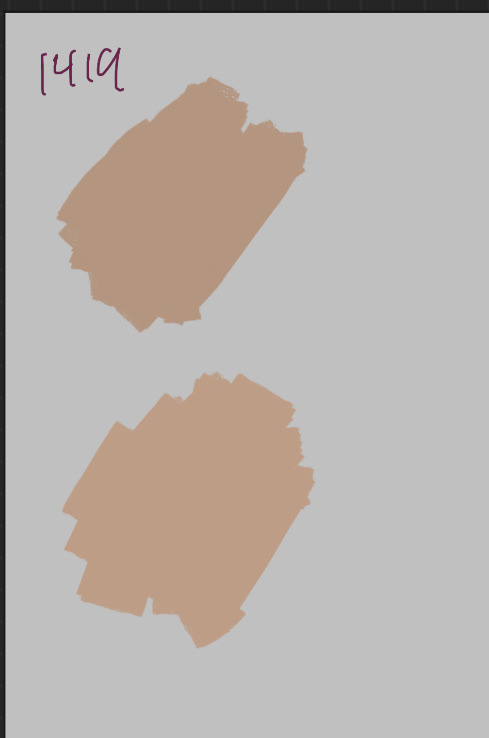
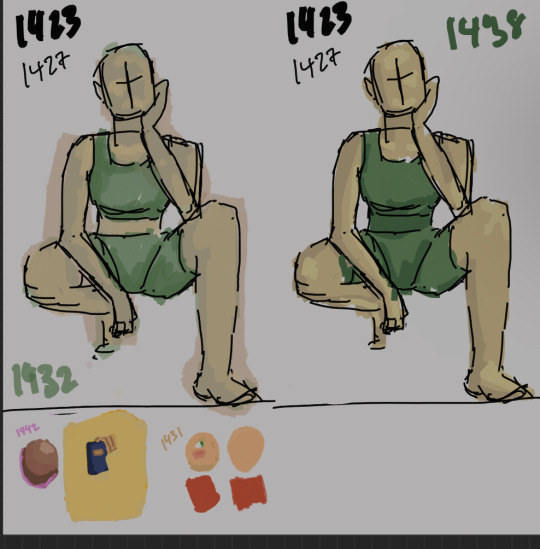
— one thing I wanted to focus on is the ability to just pick colour and feel for the right one which I think…(?) I’m getting. still very weak on that especially that yellow one down there. not satisfied since I wasn’t able to get the overall genera colour scheme awww.
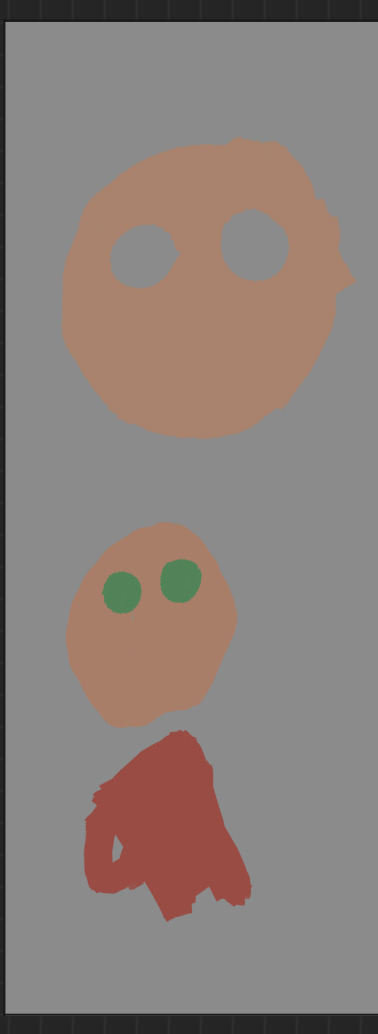
—like initially just wanted to see how diff colour picks would be easier or not against diff value backgrounds….
—for the person colour drawing I wanted to capture their overall skin colour and I think I went too overright with the Oliver. since they had more lighter skin. but at least my second attempt is better than the first which I think turned out overalll muddy because I used a green undertone but wasn’tttt entirely sure of how to use it.
— I do like how the blockage for the darker skin sphere turned out. I remembered these videos I watched a whileee ago and the more saturated colour picks and it def helped…!
— I stopped for a bit since I felt like this was starting to become aimless and I think would be better if I did a full colour for a character and then figure out my weakpoints to study on… also this was god since I was able to get in some figure study ^^ and something I realised/well more like reinforced is the drawing the legs….. and just understanding how it more less connects from the body. also ahahah I feel like it’s better if I start to work on studying the feet at one point….
— also I started to think that I want to do more comic focused today as well. it would be really good in realising what stuff I’m missing in gaps and just the prac down. I’m havin some problem in head just finalising vague ideas so I think it’s best to get something down… also do have some urge to just draw on paper today… also I really want to draw this character on motorcycle!!!’ it’s something I’ve never done so I know it won’t turn out amazibgggg and shit but. well. it’s best to try right!!!!! and ahhhh I really just wanna draw characters interacting man….. so many to-do…. piority is really that comic stuff since I can have character interactions and general comic prac which is what I need!!!!!! 15.07
ahahah… yeah I did say all of that. but I didn’t do it<3 :’
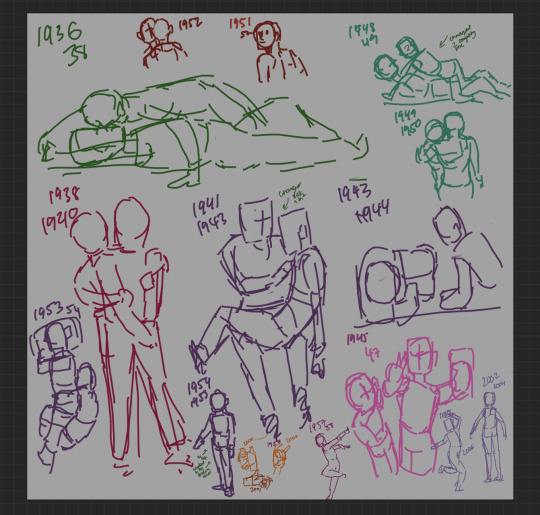
— honestly wasn’t feeling it but I felt like doing some figure pracs anyways so I just got to doing it. I wanted to focus on character interactions and lolll immediately came across this hard one… lying pose…. I honestly wasn’t feeling it so lol I put low effort into most of these… but I do think it was good and lil fun now realising doing more varied poses… also ahahah I do like the multi coloured look… I realised I still had the green from the colouring session before on when I went to do the figure prac and wanted to see how it would be like to do in all these diff colours and it looks fun to look at. but as per usual, I do like/prefer more brighter pink dark blues and black to draw in… purple when I’m in mood.
—I included hand studies and oh boy those are hard :’ ahaha…. like wtf is this under me…. Idk what I was trying lmaoooooo.

—also remembered to include some lil twisting bodies pracs since I remember I suckedddd at that yesterday ahahah. and I think I got it(?) a lil bit…. like the way the shoulder one one side is almost not seen and like doing that paper thing helped at first to see the twist…
—and well since I completed to fill the page I wasn’t really feeling doing another page but also didn’t want to stop drawing… and well remember how I said I wanted to do comic? Well I thought… what if I worked on stuff I already have…? And what do you know! That way worked! The roommate one… I didn’t actually start anything for it lmao but drawing some idea I had for poses anyways… so I just got straight into it. And uhhhh not bad. Actually quite proud of that first panel…. I did have some idea of them being outside and I don’t think I like how I filled the background since I wanted them to be more outside so something to change. also I’ve been looking closer at mangas I’ve been reading and they do tend to have panels with characters smaller and I wanted to try that. and I realised that it’s best to have a script since while I had vague idea of what I wanted in this scene it’s. kind of hard to think of the sequence just like that. but honestly cba to write out the script for this comic today LMAO so yeahhhhh
—but I did want to continue drawing and did have some urge to draw some srda and I did have this some kind of idea in my head for her pose but ehhhhhh lol when I put it to paper lmaooo it def felt so….?!?! like what was even the plan for the pose… nothing about it made sense?? why would she be doing that???? also wow I really suck at drawing the face I realise. it bothered me a lot lmaooo . like pls why does she look like that 😭😭😭
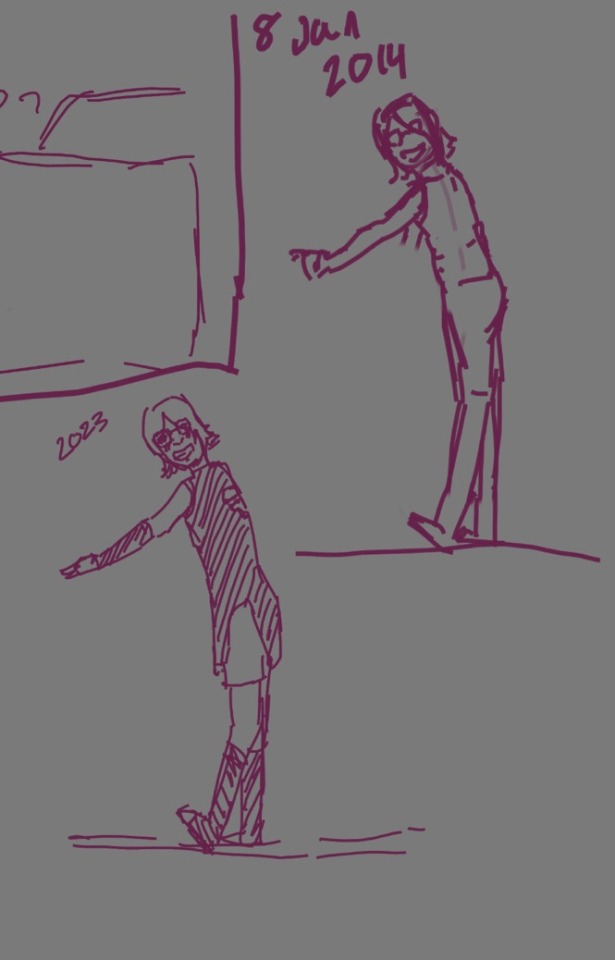
— I honestly didn’t think that I’d be doing other drawings and plus the prev one took all the drawing want to draw at all from me lmaooo. but ehhhh i got back to picking up my pen since i was back in my bed anyways… and this time i wanted to focus on faces… but i def did feel like this was super aimless… and just doing whatever and trying to get some faces in diff angles and i think the problem is that my understandings of faces structure is terrible…like i knowww the gist and general of the stuff. but well it’s more the jaw I guess and idk what it is i feel like im not completely understanding it like how im understanding and now the figure better…. so i guess its time to watch some videos and just also general videos of people drawing faces…. I feel like that would help I guess…. Also man it did feel super sad since how terrible my faces is…. I think it’s cuz I always prided myself on doing good faces and well, I know that now my “eye” has gotten better i wasn’t really that good at faces. maybe yeah for straight ones but ahh… still…. It’s kind of sad…..
#art journey#8th jan#still want to draw that motorcycle idea…#also was super satisfying to look at my colouring stuff when I came back to drawing after hours#like yeah it wasn’t good but wow it’s just nice to look at some colouring… I like that I did it….#also lmaooo I really didn’t do any clothings prac today but whateverrrr#I have been getting more aaare of clothings and when I look at images I try and study them#so I have been sorta getting prac for that#it’s kind of the same for comic stuff#when I read mangas I try to be more aware of the panels and stuff#same for poses#so in a way I’m always pracs/studying#if not. physically yet#January
1 note
·
View note
Note
📝 first, congrats on the 15k you deserve all the love and appreciation. Second, idk if you’re still taking these but a tutorial on those lovely double exposure gifs, I’m obsessed with them 💜
thank you so much! i’ve been meaning to a double exposure/blending tutorial for a while so i’m going to try my best at explaining, let’s get this party started.
i use photoshop cs5 for this and you need a general understanding of the basic tools. i’m going to be walking you through a set i’m currently working on to ultimately create a double exposure gif such as this:

step one: create your base gif
as always before you can start any gifset, you need to pick what scenes you want. i often pick several different moments and experiment with what works best, some scenes will just perfectly meld together while others will be trickier.
you want to firstly select a ‘base gif’, this is the gif that you’re going to layer your other scenes onto. it’s helpful to have a gif where you can identify a darker area where scenes might be able to be blended onto. silhouettes, side-profiles and shots where you can see a portion of the body are an ideal place to start, but you can use any scene where there is a darker area in contrast to the rest.
for example, i picked this shot as my ‘base’:

in this shot, there are darker areas which standout, her body particularly below the shoulders but also in her hair. this provides a great ‘base’ for holding other scenes.
i’m going to colour my base gif in the way i usually would (i'm not going to go into details here, but if you want to know how i colour my gifs i have a tutorial here) but making an effort to ensure the blacks are thoroughly darkened (you can do this by adding a selective colours > black layer) and i’m done with my base gif:

step two: create your overlaying gif
next, you want to create your overlaying gif. personally i try to avoid using very light scenes as these can take a lot more work to blend in. if this is your first time blending i’d definitely recommend using a scene with a neutral backdrop, or even more ideally a dark backdrop, as this will just more seamlessly work with your base gif.
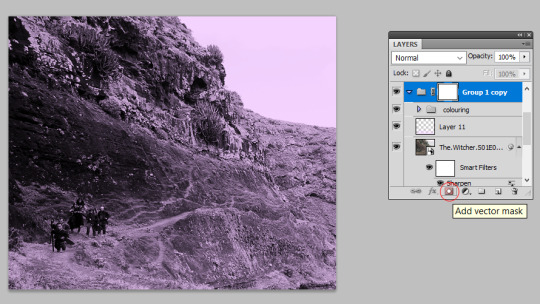
so, i’ve picked my first overlay scene as the mountain pathway, this will add a bit of texture to my gif and is fairly ‘neutral’ so should blend in well. i’m going to size and colour this as a separate gif with the same purple tones, then create a new folder (see red circle in screenshot) and drag my entire gif into it:

then i’m going to add a vector mask, to do this make sure you’ve selected the group and press this button highlighted in the screenshot:
step three: blending your gifs
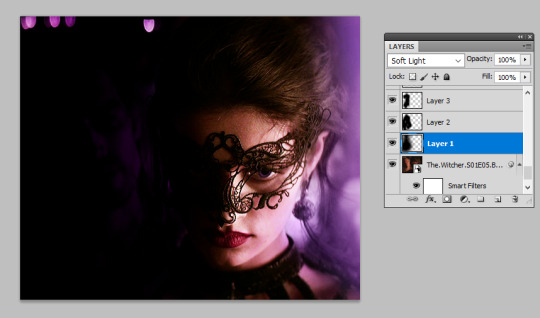
now you’re ready to blend! from here, you want to just drag and drop your overlaying gif folder on top of the base gif, then set your overlaying gif folder to ‘screen’ or ‘lighten’ (i usually use screen, but sometimes lighten depending on the scenes - see what looks best!). it now looks like this:

the obvious issue here is that the overlay has taken over her face. so, we’re going to select that vector mask we added to the ‘overlaying gif’ folder, grab a black paint brush, and just brush over her face. this will remove the overlay from that area.
i use quite a large soft brush for this (around 200px), the larger you use the ‘smoother’ the transition you’ll get. the smaller the brush the harsher your transition will be. this is the part that takes practice, but the beauty of using a vector mask is that you can grab the eraser tool and erase any of the paint strokes you’ve just done to bring the overlay back. by the end my canvas and layer mask look like this:

from this we can see i’ve blocked out the overlay from the ‘top’ of the gif and concentrated it so it just spreads over her shoulders. this captures the overlay in the space i outlined on the base gif as my ‘blending space’ earlier. i’ve also blacked out the overlay on the right hand side as i want to put another gif in this space. at this point the gif is looking like this:

i think my ‘top tip’ with blending is to leave little details to make the transition between the two gifs more natural. for example, you can see there are still patches of the mountain moving up her neck. i could black these out so the mountain scene is just confined to her body, but in leaving it there is creates more of a transition. these little background details of the scene you’re overlaying can really add to the overall texture of your base gif, and for that reason don’t get too hung up on the ‘details’ of making sure your gif is limited to an exact space.
optional step four: adding more overlay gifs
for this gif i also added the dragon on the right hand side. you don’t have to be limited to overlaying two scenes and in fact, sometimes a nice idea is to use a more ‘landscape’ shot to add texture to your blended gif. to add more, i repeated step two to colour the shot i wanted, dragged this in its own folder on top of all my other blended gifs and set it to screen again:

i repeated the same steps in step three to black out the background, particularly concentrating in removing the line that we can see where the shot finishes. because in this shot the dragon’s head is actually partially cut off by the top, i was very careful with positioning this overlay and used a smaller black brush above the head. this positioning allowed it to look as if the overlay was giving way to yennefer’s face, rather than the shot cutting it off:
and that’s it, i’m done with my gif! this was a nice straightforward blend, but some scenes may not work as easily, which is where we turn to...
step five: using a black paint layer to create overlay space
sometimes your gif doesn’t have an easily blend-able space. maybe the character is wearing something patterned, or the area just isn’t dark enough. for example in this gif, i’ve done all the above sets but the overlay scene doesn’t stand out very well because the armour pattern gets in the way:
but we can fix this quite simply with our black paintbrush. i go back to my ‘base’ gif and under all the colouring create a new layer and with a large soft paintbrush, paint over the armour. i then set this layer to ‘soft light’. then i create another new layer and using a more medium-sized paintbrush, paint exactly behind where the figures are moving. this layer adds black behind the figures so they stand out more clearly, while the soft light layer aids the transition as it darkens the whole area. now we have this:

this has made the overlay a lot more visible. you can use this technique to pretty much darken any layer. i always try and darken the section i want using ‘soft light’ layers as this creates a smoother transition than you’d achieve by just jumping in with your normal black paintbrush layer, but remember you can use multiple layers to reach the effect you want.
this can be taken to the next step to literally blacken out one side of a gif (and it may be useful if you want to do more side-by-side blending scenes), starting with your normal base gif coloured (admittedly mess-ily):

to completely darkening the right-hand side of it using a few black paintbrushed soft light layers:

and overlaying another gif into this darkened patch:

i’ve even used this technique for light scenes with success, it just might take a bit more practice and you’re better off starting with scenes that naturally have a darker background if you are a blending beginner.
the end!
and that’s a wrap. i hope this made sense, as always i’m very aware that just because i know what i’m talking about doesn’t mean anyone else does, so please if you have further questions do ask. happy blending! :)
#obliquar#tutorial#gif tutorial#blending tutorial#ps help#completeresources#itsphotoshop#fyeahps#*15k#i know a lot of people have asked me about this so i really hope it helps#it's about time i updated my now 5 years old blending tutorial#1k
1K notes
·
View notes