#thank goodness for my 4-year warranty on the other stuff
Explore tagged Tumblr posts
Visit Tumblr Blog
Explore Tumblr blogs with no restrictions, modern design and the best experience.
Last Seen Tumblr Blogs


Fun Fact
Tumblr was named as a finalist in Lead411’s New York City Hot 125 in Aug 2010.
Text
Sorry for being a bit MIA these last days. Had a issue with my driver, but also just discovered that the 13th and 14th gen of Intel cpu's can suffer from a degrading problem over time! Well I wasn't sure mine was effected.. But I took no chances and got a brand new replacement with the latest bios update.
If you have a 13th or 14th gen intel cpu, update your Bios asap! It could suffer from a degrading issue or else over time. Intel has released a patch in August to prevent that. But existing damage cannot be helped.
More info here!
#like wtf man#also got 2 new ram sticks cuz that guy thought they could have been afflicted too somehow....#mistress blabbling#thank goodness for my 4-year warranty on the other stuff#saves me €500 on a new intel cpu#or just like me try to get a replacement and be sure#even if you think there is nothing wrong with your cpu you really should update your bios!
10 notes
·
View notes
Text
Hello World!
Hello all! My name is Jeric Gutierrez and I am broke. I am also a college student. I am also also have a part time job, so life is kind of hectic right now. Between balancing essays and greeting customers, I often find it hard to find time to budget for personal care activities such as laundry, cleaning, and of course cooking. However, with this food blog, I can show you that not only can you find the time to cook and cook on a budget, but you can also cook more than just your simple pancakes and bacon.
Recently, I had just moved out of my parents’ home, so adjusting to the adult life is daunting, and while I did cook meals every now and then when I was living with my parents, it feels like a completely different beast having to rely on yourself for sustenance. The beauty of this food blog is not only to discover cheap, quick, and tasty meals but also to act as my first foray into adulting. Throughout this food blog, you will see the beginnings of me growing up, and there may be some missteps along the road. Whether that be burned recipes or missed steps in said recipes, we will all learn together.
I am also interested in diving into the backgrounds of these dishes. Being Filipino, I am really interested in Filipino dishes, and I take this blog as an opportunity to not only cook Filipino dishes but to also learn some history behind my culture. And of course, these recipes will not be exclusive to Filipino dishes, so this will not only be an excursion into my culture but into a wide array of various cultures.
I hope you enjoy my food blog. This should be a fun and educational experience for both of us!
*Edit
It comes to mind that I should leave some general tips in this introduction, so...
General tips!
You are going to see a lot of recipes that I serve over rice. One thing I always recommend if you are going to be cooking rice even once a month is to invest in a rice cooker! Get outta here with that stovetop rice stuff! It’s so easy with a rice cooker. Just pour rice into your rice pot, wash your rice, fill the pot with water on a 1:1 rice to water ratio (i.e. 1 cup of water = 1 cup of rice), and place in the rice cooker to cook. Easy! And for those who think it would be too expensive for you since you don’t eat rice that often, I bought my rice cooker from Target for $20. Even if you only eat rice once a month, it is WORTH IT!
Speaking about rice: WASH YOUR RICE! It removes the starch from the rice. It’s the same reason you wash potatoes before making french fries. It just tastes better!
Costco Tips!
I have actually worked membership at Costco, and throughout this blog I will constantly recommend buying from Costco, so here’s a breakdown of the different memberships Costco offers and which one would be right for you
Gold Star Membership
Costco’s Basic membership
$60/year
Enough to get you in and out of the store
Executive Membership
$120/year
Receive 2% rebate check at the end of your term. The check is based on how much you spend in store and online. This 2% reward also includes vacations booked through Costco Travel!
Various discounts on services offered through Costco
So I get constantly get asked which is the better membership to get, and I always answer it depends. For starters, the baseline spending you want to be doing as an Executive member is about $250/month or $3000/year. That would be enough for a $60 check, essentially breaking even with the gold star. If you’re spending more than that, UPGRADE TO THE EXECUTIVE as you will be getting a cheaper membership in the long run. Also, this next policy varies from store to store, so it would be wise to ask the membership clerk whether or not they will honor it. At both my previous and current stores, we have a policy set in place where if your rebate check is less than what you paid for in upgrade fees, Costco will reimburse you on the money you lost. So say you pay the extra $60 to upgrade from a gold star account but you only received a $50 check. Take that check to the membership desk and they will reimburse you $10. From there you are more than free to downgrade for your next term. If your warehouse does honor this policy, I always recommend first time members sign up for Executive since it’s impossible to lose money on this venture. If your check is less than $60, we reimburse you. If it’s more, then you pay less for your membership.
Oftentimes members want to try out the Gold Star membership first to see how their spending habits track before upgrading, and I always recommend against this. You don’t know how many times I’ve checked an account only to see that if they had been Executive members in the first place, they would have already had a check worth $90. So to reiterate, if your warehouse has the reimbursement policy mentioned above, START OUT AT EXECUTIVE! You won’t lose out on potential rewards that way and we’ll reimburse you if your check does not cover the upgrade fee.
In my experience, families of 4 or more typically benefit from the Executive membership. Also consider any large purchases you are planning on making in the near future. If you are buying a TV, for instance, it’s always worth considering upgrading before said purchase.
Some other things to note about the memberships, you aren’t locked in to one membership once you sign up. You are always free to upgrade or downgrade anywhere within your term. Also the Costco Anywhere Visa Card is a great additional card to sign up for if you are good with credit cards. You get 4% on gas at any gas stations that accept Visa Credit Cards, an extra 2% on Costco purchases, 3% on travel booked through Costco Travel and on restaurants, and 1% on everything else. For the gas alone, I recommend this to most people because that gets me at least $3 a month just from using the card. That may not sound like a lot until you realize that that's over half of a Goldstar membership at the end of the year. All from paying for gas. Plus you get an extended warranty (an extra 2 years on top of whatever warranty is offered) on your Costco purchases. There also aren't any annual fees with this card.
So to recap, if you spend over $250 a month, invest in the Executive. If you are good with credit cards, get the visa card. Ask if your warehouse honors that reimbursement policy. If they do, get the Executive. Your wallet will thank you.
2 notes
·
View notes
Text
First Lines Meme
List the first lines of your last 20 stories (if you have less than 20, just list them all). See if there are any patterns. Choose your favorite opening line. Then tag 10 of your favorite authors!
Thank you so much @emiliaf25 for tagging me!!! I've seen a lot of fun writing tag games going around, but I haven't been tagged in any before now. This is probably due to the fact that while I write a lot, I don't publish most of my stories so like no one knows lol. I tried to put these in chronological order from newest to oldest, but they're not perfect, as I do not keep accurate time of when I write things (and probably should). Anyway, here are mine:
1. Blasting heavy metal so I can't think
"Heavy Metal": Detroit: Become Human (This one is in the form of a poem, so that's why it's a bit weird.)
2. Markus's head popped out of the last bedroom.
"Family": Detroit: Become Human (I still have to finish this one and publish it so I can't provide a link... yet)
3. I know I'm not enough.
"Enough": Detroit: Become Human (listen this is one of the angsty ones I never published so uhhhh)
4. CHRIS: Hank! Connor! What are you two doing here?
Unnamed: Detroit: Become Human (This one is formatted as a script soooo... yeah. It's also another one I am working on and have not and probably won't publish)
5. Crowley stood by the side of the road, his arms tightly coiled around his waist.
"Alone": Good Omens (aaaaand another really angsty one I never published, I have problems)
6. "What's wrong, angel?"
"It Started in 1957": Good Omens (currently not finished and has not been worked on for over half a year... probably should get on that at some point)
7. Every dystopian novel ever has some random teenage girl save the world. Unfortunately for the world, I don't think I can do that.
This was just an original story I started back in January that I wrote like a page of and never finished because I had way too many wips. Figured I'd put it in here anyway though
8. Finally, after 17 years of work, I had made it to the most prestigious school humanity had ever created.
This is another original story, however one that I have actually worked on for more than a page lol
9. RENATA: Oh, shit. This can't be good.
Function (Free Will): original. I have been working on this story for nearly 2 years now, and I'm still nowhere even close to done. It's formatted like a script and also has the same type of rpg choice-based storytelling as Detroit: Become Human. Add to that the fact that this story is meant to critique our current political and social society, systems, and structure and touches on a variety of incredibly heavy topics, and you have the recipe for writing a story that feels like it just. Never. Ends.
10. Demons aren't supposed to feel love.
"I Love You Too": Good Omens (I wrote this one a whiiiillleeee ago, as to why it's down here on the list. I only published it a few days ago, though, a little after I first saw you tagged me in this. So thanks for finally motivating me to do it lol)
11. "You obey or he's dead."
"Exit": Detroit: Become Human
12. "Come closer. Don't be scared."
"First Kiss - The Traci's - DBH Rare Pairs Week": Detroit: Become Human
13. If I broke that shotglass, I bet it could hurt me.
"Help": Detroit: Become Human (Essentially, I published this one on Tumblr and then proceeded to take it down later the same day. It was another angsty one.)
14. "Shut up, dipshit."
"Expectations: Shut Up, Dipshit": Detroit: Become Human (This one was actually from a zine I took part in that fell apart before anything could really happen. I never finished it, so I probably won't publish it, but I guess if I finished it I could. Will that happen, however? I doubt it.)
15. "You're back."
"Hannor Week: Living Deviant Prologue Compilation": Detroit: Become Human (*sighs* Now we're getting into the old stuff. Hang on, for I have no idea what atrocities lie ahead. Or behind?)
16. System Instability. Deviancy Detected. Contact Cyberlife for a inexpensive replacement, only $2000 with your warranty!
"Living Deviant": Detroit: Become Human (I wrote this story years ago and as a result it is so cringeworthy and has so many grammar mistakes I hate to even link it so I'm not going to lol)
17. "I'm just so glad we're alive, personally."
"Who I Thought I Was": Detroit: Become Human (Surprisingly, this one isn't actually too bad. I mean, it's definitely not good, but I don't facepalm and curl up into a ball when reading it, so that has to be a good sign.)
18. I heard a gunshot from around the corner.
"Dbh Revolution Week ~ November 13 ~ Connor, Hank, and Sumo": Detroit: Become Human
19. RK900 visibly shook as he looked into the mirror.
"Scarred": Detroit: Become Human (Another one that I never published, surprise, surprise. Given how old this one is and subsequently how bad and also utterly angsty it is, I don't think I'll be publishing it unless I, like, rewrite the whole thing, so.)
20. LAUREN: 8:51, hmm? I've already been here for 11 minutes, and no one else has shown up.
"Choices": a horrible original romantic comedy I wrote as a script 5 years ago. Tbh the idea wasn't even that bad, it was the execution of it that just... really sucked. So it's a good thing we're stopping here, as if I went any farther back in my writing history, I think I might just cringe myself to death.
---
Woo, thank god we're done with that! XD In all seriousness though, this was quite a bit of fun and got me to revisit pieces I hadn't seen in years. Thank you again for the tag!!! :DDDD
Now for which one is my favorite... there are some that are definitely good, and others that are definitely bad. I like numbers 2 (cute opening line for a fluffy fic), 5 (wordplay with "coiled" and Crowley being a snake), 7 (twisting of an expected trope), 8 (brings in scifi element and introduces the character's personality while hooking the reader in), 9 (set up for the tone of the rest of the chapter and immediately introduces tension), 11 (same as previous), and 12 (also attention-grabbing), so we'll just let those make up for whatever atrocities 16 (horrible imitation of corporate writing), 20 (just plain boring), and the attempt of 18 (I had the right idea of it being a hook, the execution however was horrific) were. I start a lot of my pieces with dialogue, or at least I used to. I became aware of that within the past year and tried to work on introducing stories in other ways, which I think I've done a pretty good job on. If I had to pick a favorite, I'd probably go with 7. I just really like the subversion of expectations that you get right away from it. It announces the trope loud and clear, but plays with it instead of following it.
While I'd love to tag lots of other writers, I unfortunately don't know many at all (listen I would love to read more fics but also tiiimmmeee). I'll just tag @konami-code-ao3 for now. However, if you see this and want to hop in, feel free!
4 notes
·
View notes
Text
Fake Out (Sam Winchester x reader)
Celebrity: Sam Winchester (Played by Jared Padalecki)
TV Show: Supernatural
Spoilers: None
Summary: You've had a problem with another student on campus that won't seem to leave you alone. When Sam finds out about your situation, he offers a way to get him off your chest. It's just for the time being though, right? You guys are still just friends, right? What happens after all this is over?
Warnings: Some angsty stuff later in the chapters, fluff in the form of best friends, and fake dating later in the chapters as well.
A/N: So...this is another update, after being gone for 84 years. When you lose your job and finish school work early every day, there isn’t much left to do, so yes, I am back. I was originally planning on using a picture of season one Sam, but I couldn’t find one that fit best with what I was picturing. So, I decided to use another where he looks a little bit older instead. Hope you don’t mind.

"Thanks again for helping me study Sam. There has to be some way I can pay you back.” You speak, rubbing your eyes for the umpteenth time. "It's no problem. You have most of the information down. Sometimes it's just easier to hear it from someone other than the teacher." He shrugs, shutting his notebook. You get up and start collecting your numerous flashcards and putting your books away. "I don't know. I haven't had a problem with Mr. Van since this semester started now all of a sudden, I can barely understand a word of what he's saying in class. It’s like he’s speaking another language." You close your notebook that was filled to the brim with highlighters and a rainbow of different colored notes in pen and put it in your bag. The two of you throw your bags on your shoulder and begin walking out of the little cafe. Your phone vibrates for another time that evening. Pulling it out of your pocket, the screen lights up the texts you have yet to respond to.
Brent
I'll see you tomorrow. Don't run off to class without me. Thu 4:30 PM
Brent
You like coffee, right? Thu 6:25 PM
You were annoyed. Brent had been texting you since class let out, which was at 2 in the afternoon. It was now 6 in the evening. Why in the hell was he always bothering you? Sure, you said hello to him a few times if you saw him around, but you did that to everyone. If you said anything to him then you initiated a conversation and he won't leave. If you don't say anything he will start a conversation himself and never leave. This is a literal lose-lose scenario. Oh god, what if he found your apartment? You don't even notice you've stopped walking until Sam snaps you out of it. "Are uh, are you okay? You zoned out for a bit."
A loud sigh leaves your mouth and you stumble. "I-, it-, it's complicated." His eyes go soft as you two begin to walk again. “What’s on your mind?” You're silent for a moment, wondering how you plan to word everything. "If someone asks you out, and you politely say no, what do you do afterward if they still won't leave you alone? Hypothetically, of course." He raises his brow and asks "Well, that depends." You guys get to Sam's car and he opens the door for you. You thank him and he gets in after making sure you are fully seated. He lets the engine roar to life before driving off and answering you. "I would say you can talk to a campus adviser, but I don't know how much help that will do. If you're alone most of the time then try to find a couple of your friends to walk you to and from your classes, if that isn't too much trouble. Or, since he asked you out, just tell him you have a boyfriend. That should make him leave you alone. Hypothetically speaking of course. Although, part of me wants to think that you aren't being hypothetical about any of this, are you?"
You stay silent and suddenly the music in the background wasn't loud enough. Every bone in your body wanted to just jump out of the moving car and run away from this problem. "It's alright. I won't make you talk about it if you don't want to." Part of your brain wanted Sam to know and you were glad you at least mentioned it. He was your best friend and it didn't feel right to lie to him. The other part of your brain didn't want him to worry and resented the fact that you said anything at all. Sam already knew your answer, even without you telling him. He had managed to see two messages that Brent texted you while you were studying for tomorrow's test. No wonder you needed advice on how to handle the guy, he just wouldn't take no for an answer.
The youngest Winchester made it to your apartment just as the sun looked like it was going to start setting soon. The two of you got out of the car and as you looked up saw purples, blues, and oranges all tangled in dance within the sky. To say it was beautiful would be an understatement. Sam left his bag in the car and walked you to your door. Even though it was only a few feet from the car, he always insisted to make sure you got in safely. As you pulled out your key to the building you turned to face him. "Thank you again for helping me study. I think I'm going to start using the flashcard trick you taught me more often." He grinned and nodded his head approvingly. "I figured you would. That seemed easier than whatever it was you were doing before." After readjusting the bag on your still sore shoulders, you unlock the building to your dorm. Right before you take a step in, Sam calls you back. Turning around, he reminds you.
"You know I'm always here for you, right? I know you've been stressing a lot lately, and I'd be lying if I didn't say I wasn't worried. I just wanted you to know that I'm always available if you need me, okay?" A smile appears on your tired face, and you wrap your arms around the male's much, much bigger frame. "I'd be lying if I said that you worrying doesn’t keep me sane. I appreciate it. I do. But, don't forget to take care of yourself, too. That means stop wearing clothes for two and a half days straight." You pull away and give him a funky face before you both burst out laughing. Sam was one of those students that became so focused on his classes, that was all he ever paid attention to. Which led to him lacking in proper hygiene among other things. Lucky for him, you could step in to remind him whenever he seemed to be slipping up. A bird ringtone erupts from your phone and you playfully roll your eyes. Quickly looking at the text and then putting the phone away, you tell Sam. "That's Andy. They're getting a little impatient, so I gotta go." He nods understanding and gives you one more hug before heading towards his car.
"Hey, are we still going to the drive-thru tomorrow?" He opens his car door and nods. "You know I wouldn't miss it for the World. The original Texas Chainsaw Massacre starts at nine, and then A Nightmare on Elm Street starts sometime around ten-thirty." You nod and point to him. "You buy the tickets, and I'll pay for the snacks." Sam smiles again and as he gets in his car, he rolls the window down to say one last thing to you. "Pick you up at eight, that way we can find a decent spot?" "Sounds like a plan. Now get outta here, I gotta get ready for work." You both wave and he drives off as you enter your dorm building.
__
Not in the mood for the stairs, you take the elevator straight to your floor. There was a pretty good amount of students going up and down the hallway. Either rushing to get to class from work, students in other programs hauling around sports equipment or cameras, or other things, or students like you rushing to get to work from class. You managed to make it into your room without any trouble, and as you take your school shoes off, you hear your roommate, Andy leaves the bathroom. "So, how was the date with Sam?" They ask with toothpaste foaming out of each side of their mouth. Shaking your head, go over to your bed, and drop your bag.
"It wasn't a date. I have a test tomorrow and Mr. Van is hell-bent on making sure that I fail this semester. Sam offered to help me study on Monday, and we've been going over notes every day since." Grabbing your uniform you quickly change into it and switch places with Andy in the bathroom. "So that's where you've been running off to after class. At least he's cuter than Brent." An annoyed groan left your lips as you finished washing up. "Please don't bring him up again. I am so tired of hearing about that boy." Andy laughs and grabs both your working bags from the hook they're on. "I swear he follows you around like a lost puppy. Didn't you tell him that you weren't interested?" You spray yourself with deodorant and walk out of the bathroom to quickly put your shoes on when Cameron, the second of your three roommates bursts through the door.
"Have you guys seen my laptop?! I had it earlier this week but I haven't seen it since." She runs to her room and starts throwing everything off her bed to look. Andy sets your work bags on the counter. "I thought you were working at the gym today, why do you need your laptop?" The nearly hyperventilating redhead walks out of her room to look through the couch as you head into your room to get her laptop. “I am. Tom was working on the computer that everyone uses to clock in and out of work when it went "pop." He unplugged it and tried to cut it back on again, but then it started smoking and he doesn't know what to do. I told him that the capacitor exploded and that he has to check the motherboard, but he just thinks cutting it off and on again will prevent a computer from smoking."
Andy points out, "It could also be an electric surge from the power supply. You should have a warranty on those computers though. Call the company that he bought them from and see what they say." You walked back in with her laptop in her travel bag. "You messed up on one of the lines of code and put a nine instead of a six. I fixed the other problem you had, too." Cameron smiles ear to ear and takes the bag from your hands. Tossing it over her shoulder, she quickly gives the two of you hugs. "You two are lifesavers, honestly. We have our team meeting today and with all the computers out, Tom asked if I could bring mine since our place is closer than most." Andy checks her phone and tosses your work bag. "It’ll be our own lives we have to save if we’re late for work. We gotta go." After grabbing your keys, the three of you speed walk out of the apartment.
You three take the elevator down to the entrance and towards your respective cars. Cameron gets into her grey 2014 Honda CR-V, while you and Andy carpool in her black 2016 Ford Escape. You two leave first, having the farthest drive, and wave at your roommate as you exit the parking lot. The drive is mostly silent until your phone buzzes in your bag. You pull it out and read the message.
Sam
I think we might have mixed up pencil pouches. Pretty sure the cover of mine doesn't have Bob Ross with sunglasses on. Want me to stop by your job and drop it off? Or would John get upset again? Thu 6:55 PM
You laugh as Andy pulls into the parking lot of your job. Cutting the car off, you both get out. Quickly making it into the smoothie shop, the two of you clock in and grab your hats before relieving Michael and Steve at the front counter. You pull your phone out and send Sam a text back before more customers come in.
You
Sorry, Sam. I didn't even check to see if I grabbed anything of yours. I had to change for work and then help Cameron find her laptop. When I tell you I just barely made it in on time... That was a one-time thing with John lol, but don't worry about it though. We'll see each other tomorrow. Thanks anyway. Thu 7:00 PM
Tucking your phone back into your pocket, Andy gives you a nudge. "So when is he going to pop the question?" Giving her a confused look, she points to your pocketed phone. "When is Sam going to ask you out?" "Never going to happen." You take orders down and get the customer’s payment before heading to the back to make their drinks. Having every recipe on the menu memorized by heart, you already know what exactly to grab for theirs.
Andy makes her way to the blender next to yours and makes her own set of orders. "I mean seriously, you two would be absolutely adorable together. Think about it, the two of you are practically inseparable at the hip as it is anyway. If Sam doesn't shoot his shot now, someone else might." After pouring the newly blended smoothies into their respective cups and capping them, you turn to your friend.
"Look, I appreciate you trying to get me out there, but I don't know if I'm ready for a relationship right now. Even if I was, I don't think Sam is into me like that. He doesn't have the best home life, and right now, all he needs is a friend. That's where I come in. We're friends, that's it." Andy snickers as you walk back to the front and call the names out on the order.
As much as you liked him, there was no way on God's green Earth, would the two of you get together, right?
A/N: Hope you like this first chapter! There will definitely be more ahead. Requests are open as well if you want a story of your own.
#supernatural#sam winchester#sam winchester x reader#x reader#writing#story writing#supernatural au#college au#supernatural college au#college sam winchester#jared paladecki
30 notes
·
View notes
Text
30-something here. And this is frightening for a few reasons.
Much of the back-end architecture will soon be more difficult to maintain, as those with the expertise retire or when the one guy volunteering to update a niche corner of some minute software function that holds up 1/4 of the computer world dies.
While products are made to be “easier to use” now, which has made them more accessible, they aren’t made to last, contributing to tech pollution / e-waste. Many consumers don’t know how to upgrade or repair their own tech…if they are upgradeable.
Which brings me to my next point.
I bought a new low end laptop recently. Not chrome book, but actual Windows PC laptop. I haven’t had a personal computer for a while and with a lot of expectation to “return to the office” because COVID’s over, right? *heavy eye roll*, I wanted something cheap and portable. I found a deal because a lot of low end laptops are being discounted because school children aren’t remote now. I was actually looking for refurbished but found what I wanted cheaper new, sadly.
Finding one that I knew would run the software I needed or that wouldn’t be bogged down just with Windows? A challenge. You’ve got to know what RAM, HDD vs eMMC vs SSD, cores, age of processors, and all those specs mean.
Finding one that wasn’t Windows in “S mode,” a bullshit mode that locks you into the Windows app / store for ALL software (where they take a cut of each purchase)? Even more challenging.
When I booted it up…I imagine most people just click yes through things because why not, just want to get right to it, right?
The amount of privileges I had to decline because of targeted data collection, for ad preferences and other nefarious reasons; the number of easy-to-miss “no thanks” options to decline enrollment in bloatware; the number of things that wanted me to launch the free trial, where they could automatically enroll me into a monthly PAID subscription and could report failure to add a credit card to pay for it to credit agencies (!); many of these presented as the “recommended” or default option… ASTOUNDING.
And then I still had to go into system settings and turn off additional data tracking that they didn’t even present during set-up, along with bloatware bullshit programs they wanted to always run at start-up. Because I knew where to go and find that stuff. Don’t even get me starting on fucking Cortana.
Technology has gotten bad. Even 10 years ago, it was a couple simple agreements not to pirate, using software at your own risk, etc. and that was it.
Now? Waiving rights, arbitration, hidden terms that could leave you owing money if you don’t uninstall it, data collection to link accounts and literally track every move / your exact location / your usage, attempts to personalize ads through your specific searches, inability to block cookies unless you download a Google app!?, four pop ups for every website, as the default?
It is scary how much tech that was designed to increase productivity and make life easier has become yet another way for corporations to track us, sell to us, and sell their data on us, even potentially incriminating us.
Oh, and heaven forbid you know what you’re doing and try to upgrade or repair your equipment yourself. Warranty voiding? Should be illegal, may be illegal in some areas, but they still tell you it’ll void your warranty. Good luck finding the parts. Using non-OEM parts will void the warranty too…by design.
I did not survive Windows Vista era to deal with this bullshit.
Me: oh yeah, if you think school photography is hard now, try imagining doing this with film.
The new girl: what's film?
Me: ... film. Like... film that goes in a film camera.
New girl: what's that mean?
Me: ... before cameras were digital.
New girl: how did you do it before digital?
Me:... with film? I haven't had enough coffee for this conversation
114K notes
·
View notes
Text
Top Reviews and Complaints about Safelite AutoGlass
I am a trucker (18 wheeler). I have tried 2 Safelite windshields and both got traveling cracks (DOT FAIL!) from a ding that, on a properly laminated windshield would have just been a nickel-sized ding. Safelite truck windshields are junk. I don't know what sort of laminate (if any) they have from their foreign-made garbage, but I will only use OEM or OEM quality henceforth.
My windshield was hit by several rocks from the back of someone's truck on the freeway. I ended up with 5 tiny chips in my windshield. Took my car to Safelite to fill the tiny chips. When I got my car back there was an eight inch crack across my windshield. I should it to them right away. They said that can happen when it is filled. Let me give you a quote to replace the windshield. I said, "Why should I have to pay?" I then called the main number who told me that can happen. Let me give you $50.00 off the cost of the replacement. I am going elsewhere that charges less.
We value your privacy. Unsubscribe easily.
Are you this business? Learn more about ConsumerAffairs for Brands
R of Blairsville, GA
Verified Reviewer
Original review: Dec. 12, 2018
I needed my back car window replaced. I called Safelite on a Sunday, and they had me scheduled for two days later. I live in a rural area, but they came to my house at the time they promised, and Randy did an awesome job replacing the glass. They worked with my insurance. Very friendly too. They’ve made a customer for life.
Carol of Berlin, NJ
Verified Reviewer
Original review: Dec. 8, 2018
I made appointment after listening to rep. on phone saying Safelite best and fastest way to get replacement auto glass. I know it's hard to find glass for order cars. Was told I would have replaced today. Took off from work. Tech called 2 hours before appt to say shop they ordered from never got glass? Formatted texts telling me they are sorry. To have a nice day? Maybe in by Monday and installed Tuesday? Why not be sure before setting appt? Disappointed! They had to know availability after or before setting my appt. It's 24 degrees out. Shrink wrap won't prevent damage. Make sure you get confirmation of availability! I didn't and now stuck!
Marilyn of Clarksville, TN
Verified Reviewer
Original review: Dec. 6, 2018
My window was down and would not come up. They found out why that was and told me what was needed. They covered my window with plastic until it could be repaired. These guys never turned me away. Thank You. Safelite for having such wonderful staff.
How do I know I can trust these reviews about Safelite AutoGlass?
1,325,477 reviews on ConsumerAffairs are verified.
We require contact information to ensure our reviewers are real.
We use intelligent software that helps us maintain the integrity of reviews.
Our moderators read all reviews to verify quality and helpfulness.
For more information about reviews on ConsumerAffairs.com please visit our FAQ.
Richard of Cortland, NY
Verified Reviewer
Original review: Dec. 3, 2018
After reading many of the comments on this board, I was seriously concerned with having this company do my windshield replacement. My car has a lot of electronic stuff that is controlled by the material in the windshield. I was afraid some of this would no longer work after the replacement. My insurance company uses Safelite and I told them my concerns and they assured me that if there were any problems they would take care of it. Anyway, everything was done quickly and efficiently and everything works! The experience was excellent for us.
Mark of Philadelphia, PA
Verified Reviewer
Original review: Nov. 24, 2018
Read the reviews on their site and decided: What could go wrong and then scheduled my appointment at my home... The installer removed my old windshield and all trims wipers etc. Then told he could not install the new one due to there being some rust looking dirt around perimeter of the rim (my truck is 20 years old and in very good condition)... After checking it for myself and concluding it was sound and not actual rust, the installer still declined to put it in and left me high and dry with no windshield at all... I should've listened to my gut after reading some of the other negative reviews. Fool me once shame on them. Fool me twice shame on me.
Scott of Kenosha, WI
Verified Reviewer
Original review: Nov. 24, 2018
USAA uses Safelite Glass for auto glass repairs and refers me here. Have had issues in the past too. Couple years ago, took multiple calls to schedule appt then they never showed up or cancelled at the last minute - not sure which. Rescheduling was a major hassle again. This past time, we had 9AM appt this morning for windshield replacement. Because of all the past problems, called yesterday to ask if windshield was in - said was on backorder and was scheduled to come in December 8th - 2 weeks away. Asked if they would call me when it comes in - "oh yes sir - we'll call you". Saved myself a trip going in this morning when there is no windshield to install because they never called to let me know.
John of Horicon, WI
Verified Reviewer
Original review: Nov. 24, 2018
I can't say how disappointed I am again with these idiots. My truck was broken into and I made specific plans with the dispatcher and again the technician did read the notes. I was out of country and had to have the spare key from my truck driven down to airport hotel where the window was broken. Oh did mention it was winter and it's snowing by a friend and his number was also given to Safelite. They are great at one thing - screwing up the entire replacement. I'm not going to use them ever again in fact I would rather have my eyeballs poked out with a rusty fork than have to go through the incompetence again.
William of Half Moon Bay, CA
Verified Reviewer
Original review: Nov. 17, 2018
Replaced windshield in my wife’s car, then had to come back to fix the poor job. Tried to get them to come to my house (25 minutes) to replace my car’s windshield. Refused to come despite ad that says they will do mobile repair at my choice. Can’t believe in their service or quality of repair.
Sara of Melvin, MI
Verified Reviewer
Original review: Nov. 15, 2018
My insurance company (Liberty Mutual) sent Safelite to my house to repair a stone chip the size of half a pea. There were two tiny cracks on either side of the chip and I needed it fixed before it cracked. The guy came out and "fixed" it. About 10 minutes after he left I got in my car and saw no difference, and there was a noticeable divot in the windshield that wasn't even filled flush. I called them and they assured me it was fixed and would NOT crack. I said it is not fixed and WILL crack. She again assured me it wouldn't and though "it may not look fixed it is, and won't crack".
Well, like I said, 11 days later it cracked across my entire windshield and now I have to pay to put in a completely new one. They told me it's a known risk that repairs DON'T WORK and by signing their form I was well aware of that. DO NOT USE SAFELITE. If you do, DO NOT SIGN THEIR FORM, IT RELEASES THEM FROM FAULT when they send a hack out and he doesn't know how to do a chip repair.
View more
Gianna of Buffalo, NY
Verified Reviewer
Original review: Nov. 15, 2018
Safelite already replaced two windshields on the same vehicle and this morning I noticed my windshield was cracked again. This will be the third windshield I've had to have replaced by Safelite. During previous installments, they did not replace the rearview mirror which is attached to the windhield, properly. They did not use adequate adhesive and it fell off while driving. During installation, the tech used vice grips on the antennae which stripped the paint. I believe Safelite takes advantage of insurance companies who offer glass coverage, and inconveniences their customers with shabby work and inferior products.
Richard of Monroe, MI
Verified Reviewer
Original review: Nov. 9, 2018
I ordered 2 windshields for my classic cars. 1971 Chevelle and 1982 Camero. Scheduled an appointment with them, the day before the installation scheduled they called and said I would have to bring the Chevelle to their shop. I have no plates on the car so I said I would have to bring it later. But I would like the Camero done on schedule the next day between 8 and 12. Called them at 12 they said they canceled the appointment so after taking off work and waiting 4 hr. They said they were sorry. I scheduled replacement with Floral City Glass in Monroe MI great job, less expensive and done on schedule.
Kenneth of Houston, TX
Verified Reviewer
Original review: Nov. 5, 2018
Just had great experience having our 2016 Jeep Wranglers windshield replaced at my home in Houston. The technician's name is Anthony. He contacted me to say he could arrive much earlier than expected (huge plus because had 5 hr window which I hate)... Not only did he arrive within exact time he stated, but my jeep was rather dirty since it’s been raining so much in Houston and he took ample time properly wiping all the windows... which had me stunned seeing this?!
Nowadays (especially young staff) technicians rush thru jobs doing it very half-assed! Anthony took his time paying attention to details and afterwards explained exactly what he’d done, plus reviewed the warranty in layman terms. I’d say including fair pricing, I couldn’t imagine receiving better service with a genuine attractive smile than I received earlier today... Thanks again to my technician. As in the field you guys are who we customers see as THE COMPANY>> irregardless how big or small the vendors may be...
View more
Ric of Harrison, AR
Verified Reviewer
Original review: Nov. 4, 2018
Having a cracked windshield on 2004 Cadillac Seville, called Safelite to replace. Installer came to home, installed windshield. No problem. 2 weeks later, at 70 mph on Freeway, windshield rubber molding ripped out, slammed up to roof, destroyed sunroof deflector & roof paint. Installer did NOT replace the molding which IS PART OF THE INSTALL PROCESS! Reinstalled a new glass by a body shop who did it right. Beware of this outfit using amateurs to install product!
Marc of Hernando, MS
Verified Reviewer
Original review: Nov. 3, 2018
Technician arrived on Time. Started to work but did not have the Proper Tools to Remove my Windshield, So we waited for another Technician to show up... 50 minutes to drive 12 miles??? What the H?? He brought the "TOOL" we needed and job was finished 35 minutes later. Before my technician put my windshield on I noticed my headliner hanging down in front of my passenger visor. I asked him about it and he quickly replied "That was already there." I KNOW IT WAS NOT AS I HAD JUST CLEANED MY INTERIOR!!! Now I'm going to have to buy spray on glue and fix it myself. Safelite Customer Service has a Horrible Reputation in Satisfying their customers. My repair cost me $100.00 more than anyone else.
Jeff of Otsego, MI
Verified Reviewer
Original review: Oct. 31, 2018
Had appointment. My man called me. Was late then got here and told me he couldn't touch my truck. I have a very nice F150 with a painted to match visor over the windshield with the yellow lights. So I wasted half my day for nothing. Thank you AAA for sending them to me n ed very again first place I called said, "No problem. They're coming tomorrow."
Mike of Elk Grove Village, IL
Verified Reviewer
Original review: Oct. 25, 2018
Safelite damaged my vehicle, and made me go through a 6 long week ordeal. 1. They sent an incompetent technician to work my Mercedes. 2. He scratched the car, dropped a couple of screws in the engine area and best of all didn't even install the glass properly. He had audacity of asking for 5 stars on his survey. 3. Then a manager comes in saying he'll fix everything. He did not. He was good at coming up with excuses. He was good at making me feel stupid and dumb. He outright lied about installing new wind strip when it was clearly visible that is was same old weathered strip. Please be aware! Find a company that knows how to 1) respect customers and 2) do the job.
Susan of Orrville, OH
Verified Reviewer
Original review: Oct. 24, 2018
My technician showed up without proper equipment, said he'd be back within an hour & left. Tech came back 90 min later. I was working & couldn’t keep an eye on him. (They advertise peace of mind, right?) Technician installed the windshield & left without contacting me. Hours later I get off work & to my car for the 1st time & see ripples in the black strip along the top of my windshield. Technician left my keys turned on, therefore my car needed jumped before I could leave work. They send out a second tech the following day, who says the ripples are "normal" and applies more glue & tape.
I called corporate to resolve the issue, very disgusted with this company. Management is very rude, not taking responsibility for any wrong, stating the Tech has been with the company for 2 yrs, etc. No offer to compensate for the inconvenience or having to jump my car before I could go home after their Tech killed my battery. Safelite is a joke. Don't waste your time, you're better off taking a day off work & having your windshield replaced by true professionals.
View more
Linda of Mequon, WI
Verified Reviewer
Original review: Oct. 22, 2018
They gave me a window 8-5. Driver called at 3 and said he'd be here by 4. I called 4:30 and they said he was running late. Talked to mgr twice. Now sipped to come by 6! Wasted a whole day waiting. 10 hours total wait if they get here ever. Don't recommend this company in any way. Useless customer service. They just don’t give a damn.
Stacey of Minneapolis, MN
Verified Reviewer
Original review: Oct. 22, 2018
The first mobile appointment I had was canceled because it was misting out and they don't work in the rain. The second appoint was cancel, without my knowledge. The guy showed up, told me he couldn't replace since it was in a busy street and I stood in the middle of the street with him for 5 minutes and only one car passed us by. I think moved my car to a parking lot and he said he could take it from there. He did nothing other than cancel my appointment (without telling me) and just left. I text him multiple times and no response. When I asked why he didn't fix it like he said he was going to he told me I had been rescheduled. I asked to when and where and he didn't respond. Unprofessional! Wasted my time and his! And wasted company resources.
Pall of Edmond, OK
Verified Reviewer
Original review: Oct. 18, 2018
Safelite technician attempted to fix a 1/2" chip in my windshield, but while doing so applied too much pressure causing the chip to crack 18" across. He then handed me a $350 quote for a new windshield. After complaining, the corporate office offered me a $50 discount on the new windshield. Lolololol! How is this company in business???
Kimberly of Albuquerque, NM
Verified Reviewer
Original review: Oct. 15, 2018
I had my windshield replaced with Safelite then I got a stress crack. They came out to look at it. The tech said it was a stress crack then all of a sudden he says it was a rock. Sent a picture to his manager and the manager says six rocks at my windshield when no rock hit my windshield whatsoever. Now they are refusing to replace the windshield which is under a lifetime warranty. This place is terrible. Do not do business with them. They lie and scam. It’s one of the worst businesses out there.
Heather of Pierpont, OH
Verified Reviewer
Original review: Oct. 15, 2018
I have a cracked windshield and had set up an appointment two weeks ago. I checked my messages, emails and even the invoice page messages for any issues daily. Day came for them to arrive. I took vacation hours to stay home and wait for them. Only message I had received was one from "Gary" that stated he would be by around 12pm-5pm, and that he would text when he was arriving.
I waited all day and checked my messages every half an hour. Not a single message about being on his way or having issues finding my place. In the end I gave up after 5 pm and decide to leave the house to get something to eat. As I am driving I get the message that my appointment was canceled. No reason, no anything. This was 15-20mins after 5 pm.
I am now upset and call the customer "care", I get a woman saying she has no idea why and that she will email the guy but that is all she can do besides set up a new appointment. I can't spend ALL MY VACATION TIME WAITING FOR AN APPOINTMENT THEY CAN CANCEL 15 MINS AFTER ITS LATEST TIME! It is utterly ridiculous and the lack of actual caring for the customer is appalling. I refuse to make a new appointment and am gladly willing to take my business elsewhere. I would send screenshots of my messages if it let me do so here. I'd advise to not trust this company.
View more
Cecelia of Peoria, AZ
Verified Reviewer
Original review: Oct. 10, 2018
Cross country trip, bad hail storm in Colorado Springs, called ins. asap. Sent to Safelite Customer Service. Three different operators unhelpful; unsympathetic, would not schedule for 5 days; no attempt to find a way to help travelers. Asked for shop on the way to Kansas, still would not schedule for a week. Fortunately local Denver shop was sympathetic and obliging. Forget 800; go in to actual store.
Brian of Baton Rouge, LA
Verified Reviewer
Original review: Oct. 8, 2018
Rachael out of Baton Rouge, LA was very nice and did a great job on fixing our chip on our windshield. Only took 20 mins. I would come Back to Safelite for our future repairs on our windshield and approved our insurance. They worked very nice together!!
Jason of Clovis, CA
Verified Reviewer
Original review: Oct. 6, 2018
Safelite rep, Jeff, arrived at my residence, immediately requested that I move the car to his liking and proceeded to walk around the vehicle, to include photographing the outside and inside of the vehicle. Upon questioning his intent, of roaming around and photographing the interior, Jeff responded in a rude manner and was insufficient in his reasoning. Jeff was asked to leave and Safelite was contacted. Having utilized Safelite in the past and referring several clients this correspondence was disturbing. A company dependent on its customer service should hire better communicators or provide better training. The convenience of their service does not outweigh personal respect.
Jon of Brunswick, OH
Verified Reviewer
Original review: Oct. 6, 2018
I took a day off of work to wait at home and the technician never showed or contacted me. I had to call Safelite to find out that he didn't even know about the appointment that I made two weeks prior. The customer service reps, local and national, didn't seem to care.
Kathy of Newport, NC
Verified Reviewer
Original review: Oct. 5, 2018
Safelite came out to fix 2 windshield spots. In the commercial it looks great, however that's not what we got. The spots are still there, still look the same with something like clear nail polish over them and charge is $189. Disappointed and you can't even tell anything was done. One is pencil eraser size and other is smaller.
Joe of Osseo, MN
Verified Reviewer
Original review: Oct. 2, 2018
Was going on my 3rd Safelite windshield this year and they don't stand behind their product. 2 windshields were about a month old when the first one got a crack from a rock that flew up, the other cracked on its own. I called immediately, took pictures, and the representative that scheduled the appointment and mentioned that I wouldn't have to pay because it was only a month old. I get to the appointment which was just a waste of time because they refused to replace it saying that it was a not a stress crack, which it appears to be. I just left and I won't be using Safelite anymore. I will be going to small claims court to see if I can get my money back for this defective windshield. No one should have to pay full price for the 3rd windshield within 90 days of each other. Just sad that big companies can act like this.
1 note
·
View note
Text
The 2021 Volkswagen ID 4 hits the EV sweet spot
New Post has been published on https://appradab.com/the-2021-volkswagen-id-4-hits-the-ev-sweet-spot/
The 2021 Volkswagen ID 4 hits the EV sweet spot

The good EVs are finally here, and that’s something worth getting excited about. All those electrified models that manufacturers have been teasing us with for years are hitting dealer lots. Now, anyone wanting to finally ditch internal combustion has a series of real, and really compelling, choices.
Volkswagen was among the leading-edge EV providers here in the US, releasing the excellent, if expensive and short-ranged, E-Golf back in 2012. The new ID 4 is that car’s successor, riding on the new MQB platform and designed from the ground up to be all-electric. Where the E-Golf was fundamentally compromised by its internally combusted heritage, the ID 4 shows just how good a pure EV can be.
Like
Excellent, smooth drive
Calm and quiet
Refreshing interior
Don’t Like
Frumpy styling
No one-pedal regen
That dedicated platform means Volkswagen engineers can stuff 82 kilowatt-hours’ worth of battery into the ID 4, though interestingly only 77 kWh of those are actually usable. This extra headroom means the car can intelligently manage charge cycles across a broader number of cells, which should lead to greater life and more predictable range. Regardless, you’re covered by an eight-year, 100,000-mile warranty on the pack itself.
Those cells power either one or two electric motors. Initial versions of the car, like the First Edition model pictured here, make do with 201 horsepower through the rear wheels. In the future, an all-wheel-drive model will bump that up to 302 hp. Torque on the RWD flavor is 228 pound-feet. That’s plenty healthy and, given it’s an EV, readily available. On the deceleration side, while there are two regen modes to select from here, neither is close to what I’d consider a one-pedal mode. That’s a disappointment for sure.
As to the all-important range, VW’s EPA figure is 250 miles. In my testing, which included a mix of city, rural and highway driving at temperatures generally in the 50 to 70 degrees Fahrenheit range, I netted… 250 miles. Yes, 250 exactly.
I feel compelled to point out that this was with me treating the ID 4 like a normal car. I toggled the heat and the air-con when I wanted, and made liberal use of both heated seats and steering wheel, even the massage feature. While I did generally leave the car in Eco mode, I wasn’t gentle with the throttle, and yet I easily met the EPA rating. Drive a little more frugally and I’m sure you can beat it.
That said, there’s little reason to drive aggressively. While the ID 4 does have that fun EV throttle response, zipping you off the line and through traffic gaps, this is not a quick car. That fact is particularly evident at highway speeds, where the ID 4 cruises without issue but doesn’t exactly leap forward when prodded.
It does look a little frumpy.
Tim Stevens/Roadshow
No worries. To get the most out of the ID 4 I recommend you take a deep breath, settle back in your seat, set the adaptive cruise to a reasonable speed and just relax. The car is even smart enough to vary the follow distance depending on your chosen driving mode, staying a little farther back in Eco mode to ensure it won’t need to speed up and slow down so frequently.
The handling is similarly relaxed, but the ride quality is good. Impressive, that, considering the 20-inch wheels and tires outfitted on this First Edition. And, while you’d of course expect an EV to be quiet, VW engineers clearly spent a lot of time isolating any hint of road and wind noise. The driver’s seat is a serene place.
That’s helped by the stark white interior highlights on this First Edition version. While the materials themselves are a little harsh in places, the overall look has a distinctively concept-car vibe, which I appreciate greatly. I also love the shifter, mounted high on the gauge cluster like the one in the BMW i3. Just tilt it in the direction you want to go — or click the P button when you’re done with the going.

I love the vibe of the interior.
Tim Stevens/Roadshow
That gauge cluster is petite, but is at least present, and plenty big enough to give you all the relevant information about speed, range and navigation prompts. The gauge cluster will even display navigation prompts from Android Auto or Apple CarPlay. That’s key because I have a feeling you won’t want to rely much on the baked-in nav.
The infotainment experience in the ID 4 is clean and simple, showing some serious iOS influence with a home button on the left that you’ll need to hit to jump between various sections. It makes for an easy way to get from, say, media to navigation, but it does mean reaching for that home button a lot.
And waiting a lot, too. When I got my first drive of the ID 4 last year I was disappointed at how sluggish the software was. The optimist in me hoped that things would be optimized before the car shipped. The realist in me now sees no such optimizations have been made. Sliding and swiping is often met with extended, painful delays. If that weren’t enough, the voice recognition system is rudimentary at best. Like I said, stick to Android Auto or Apple CarPlay, both of which are supported, wirelessly at that.
Pretty functional, too.
Tim Stevens/Roadshow
It should come as no surprise that most of the car’s controls rely on capacitive touch. Even the slider for the sun shade to cover the big, bright panoramic roof is touch-sensitive. Side window controls are still physical, thank goodness, but there’s an element of touch here, too. Instead of the driver having four switches, one per window, there are only two. To control the rear windows you have to touch a tiny little “rear” indicator. Good luck doing that without taking your eyes off the road.
That panoramic roof provides good headroom, front and rear. Those in the back will find their seats slightly elevated, giving a clear, commanding view of the world around. A pair of USB-C connectors back there will keep the kids from complaining about their own batteries, while there’s a wireless charging cubby with more USB ports for phones up front.
Everybody is protected by a comprehensive active safety suite, featuring niceties like automatic emergency braking with pedestrian detection, blind-spot monitoring, rear-traffic alert and even road sign detection. All that’s included on even the base ID 4.
To control the rear windows you have to touch a tiny little “rear” indicator. Good luck doing that without taking your eyes off the road.
That base edition, called Pro, starts at $41,190 including a $1,195 destination charge. The First Edition you see here is no longer available, meaning your only options are the Pro or the $45,690 Pro S, which adds many of the features you see here, including the panoramic roof, massaging power seats and an upgrade to a 12-inch navigation screen. Another $1,500 brings you up to the Gradient trim, layering on those 20-inch wheels and some other visual flair. The eventual AWD upgrade will be a further $3,680 and, other than floor mats and the usual spate of accessories, there really aren’t any extra boxes to tick.
How does that compare with other EVs on the market today? The closest Tesla is the Model Y, which starts at $52,190 including a $1,200 destination fee. For that you get more range, 326 miles per the EPA, and quicker performance, too. But the ID 4’s interior is miles better and, well, I’ll let you figure out whether you have more Tesla or VW service centers nearby. There’s also the not-insignificant $7,500 federal rebate, applicable to the VW but not the Tesla, which means the ID 4 could come in at over $10,000 cheaper.

Not quite flawless, but hard to find a flaw just the same.
Tim Stevens/Roadshow
The new Chevrolet Bolt EUV is another EV that many will be cross-shopping, and for good reason. It builds on the well-proven Bolt platform, giving a little more room and some fresh styling. No EPA-rated range just yet, but GM’s engineers say to expect around 250 miles. An FWD Premier Bolt EUV has an MSRP of $43,925 including a $995 destination charge. That puts it right within spitting distance of the ID 4.
So, the ID 4 is competitively priced and nice to drive, with enough range to vanquish anxiety and a fresh interior that made me smile. What didn’t make me smile? I have to admit I never really fell for the thing. After the gonzo ID Buggy concept and the amazing charm of the ID Buzz, the ID 4 feels more than a little plain.
But you know what? That’s OK. Not every EV needs to make a statement, and this one exudes quiet confidence. The Volkswagen ID 4 is better than a good car, it’s a great one — it just won World Car of the Year honors— and surely a sign of even better EVs to come from VW.
0 notes
Text
10 Best Japanese Knife Block Set - Your perfect equipment for any kitchen task

Description: Looking for something special for your kitchens? You should go for Best Japanese Knife Block Set that made with ultra hardened steel with built-in sharpening block that definitely must buy. This post will provide you their product reviews, features, and buying guide.
Best Japanese Knife Block Set overview:
If you are a serious cook that loves to make delicious recipes and searching for best hand weapon in the form of a cooking knife or something that comes to your budget? Then you should go for The Best Japanese Knife Block Set that comes helpful for any household needs. There is a reason why Japanese Knives are so much popular because of their exceptional performance and deliver excellent execution slicing, dicing, and doing other things. The most fascinating about Japanese knives is that they work for both beginners and professionals thanks to their super sharp thin, and lightweight blades that make preparing food so much easy and enjoyable. A Japanese Knife brings beautiful and detailed design and produces cuts, unlike anything you ever have seen before. They typically are delicate and thin and not prone to breaking that easily.
What exactly is the Best Japanese Knife Block Set?
A Japanese knife set is something that works best and compatible with expert and home cooks. They can work for almost any long times, and their blade won't get dull or rusted. Let us take an example, you need are expecting guests, and you need to prepare dinner in twenty minutes. With that in mind, you need a heavy-duty knife to see that offer brilliant edge retention and a traditional slicer? Unlike western-style knives, the Japanese Knives come with double edge and super sharp cutting that almost produces clean cuts. Looking for (Top Best Knife for Cutting Knife) 10 Best Japanese Knife Block Set you can pick under your budget: If you tend to work with a lot of food preparation and cook multiple meals each day, then you should consider investing in the Best Japanese Knife Block Set that will stay sharp and last for a long time. With these at your side, you can chop veggies, cut, and slice meats so quickly that a novice will be able to do it. They are flexible, thinner, and have pointer tip than flat blades. Here are the fantastic Japanese knife sets that can suit any cooking style and kitchen you will appreciate eventually.
1) Global G-79589AU block knife set:
Versatile, precisely balanced, and perfect control The Global 79589AU block knife is a well-known brand for making high quality, authentic Japanese knives. This one comes with an entry point that allows users to wield it according to their needs in every way possible.

View On Amazon It is a beautiful addition that features a wooden style handle and a blade that forged with a triple layer stainless steel. The central core of this knife set is that uses hard VG-10 steel to help retain the sharpness better over time. The outer layer of this knife uses softer stainless steel that allows for easy sharpening and maintenance. Thanks to the HRC on the hardness scale, the slices look more clean and bright. If you have never used a knife before, especially a Japanese one, then this will amaze you for preparing vegetables fruits and meats with ease. This one is an ideal choice for chefs with all skill levels where no other Knife could come close to its agility and reliable grip. Key features: Forged with a single piece of stainless steel Offer incredible durability, performance, and strength Lightweight and long-lasting edge Ergonomic handle with a dimple pattern secure grip Give comfort and control Seamless design Made in Japan Comes with a lifetime warranty Users score: 4.8/5 Personal opinion: If you are ready to try out your first Japanese knife set suits your wallet, and then this one is perfect for you. It is made with state of the art design and delivers high density and increased precision.
2) GINSU Gourmet CHIKARA series 19 piece Japanese steel knife set:
Rust resistance, incredibly sharp edge, and expertly crafted It is a knife set you don't need but deserve. It has everything you can expect from the Japanese brand. The knife set comes with an elegant look and high carbon AUS steel that will provide you assistance anytime and anywhere.

View On Amazon It made with a state of the art nitrogen cooling process, and masterfully knives wield with extra precision and resist dulling and corrosion as well. All thanks to the sturdy and lightweight construction. You will be surprised to see that the knife set carefully crafted with a single sheet and ice-tempered steel to utilize a narrower blade width with more agility at the same time. GINSU Gourmet designed for superb maneuverability and satin-finished customized handle that genuinely shows how Japanese things work. Overall if you want a blend between Japanese and western style, then this will suffice for all your kitchen requirements perfectly. Key features: Made with premium Japanese stainless steel With this knife set, you can approach any recipe with more confidence Forged with a razor-sharp blade Low maintenance High-quality cutting edge Hand wash safe User-friendly grip Expertly balanced with both power and control Comes with a lifetime warranty Users score: 4.1/5 Bottom line: The GINSU CHIKARA Japanese knife block set perfect offer balance of beauty, power, and functions that will deliver stunning performance for both small and big meals. Get your hands on this set and enjoy cooking with the Japanese tradition.
3) ANOLON 46322 sure-grip Japanese stainless steel knife set:
Cutlery wooden block, silicon grip, and full bolster elegant blades The ANOLON 46322 knife block set is an essential kitchen equipment that works with art from an aesthetic standpoint also delivers a high level of performance the way you want it.

View On Amazon They may seem a little pricey, but all the knives come in different shapes, sizes, and unique features you can't resist but to buy it. All the blades made with stainless steel layered with impressive steel of VG-12, and result in you get a well balanced, lightweight, and high-end knives you will enjoy preparing food and meals. The classic D shaped handle made ebony wood that is widely known for its long durability. The block set also includes some empty slots that you can use for other home cooking needs and change according to the kitchen's demand. It crafted with stunning super steel that makes an excellent choice for any chef who is looking for a traditional Japanese design. Thanks to the tempered bolster and fourteen-degree blade edge, it will reduce wrist fatigue while you effortlessly slice the array of ingredients. In addition to the power core, the knife supported with seven layers of high carbon steel that you will find very best to use expertly without worrying about the sharpening time after time. Key features: This knife block set is also known as Gourmet kitchen knives made with top quality Exceptional durability Stone finished knife blade with beautiful taper-ground edges Outstanding cutting experience for beginners Handles made with silicon grip for giving comfortable, reliable handhold Full bolsters and steel end caps give a knife a balance Comes with long time warranty Users score: 4.4/5 My point of view: ANOLON 46322 knife block set came with a traditional design and equipped with a high carbon blade steel. It can lower the fatigue on your hand and wrist while you cut anything thanks to the flexibility. Do not wait until the stock cleared purchase, and thank me later.
4) 7 pieces of Japanese AUS-10 DAMASCUS stainless steel knife block set:
Ultra-premium handles, extreme performance, and excellent refinement If you are someone who has a great interest in finding Best Japanese Knife Block Set, then you must look into this perfect cutting edge and superior performance knife set that crafted with high-quality materials.

View On Amazon It is a kitchen leader when it comes to an artistic expression of the design and advanced manufacturing. The DAMASCUS knife block set coated with high-end stain-resistant and hand-polished visual pattern that makes it one of a kind kitchen tool you can simply overlook. The super steel core comes with an ultra-high carbon level that takes the sharpness to a whole new level thanks to unlimited long edge retention technology. The knives can easily ensure extreme heat and moisture for many years to come, and you can effortlessly cut, mince, slice, or chop whatever you want. This one is the most versatile and essential tool for cooks that love Japanese stuff and want to use it for a long time. Moreover, you will get to see a curved blade that smoothly works back and forth with an extended tip for quick chopping. The hammered texture in knives will eliminate the friction and prevent food from sticking on the blade. Key features: The knife set comes with all blades that compliment your kitchen needs Crafted with premium Japanese layer steel for excellent cutting Extraordinary performance with 70 layers of high carbon steel Liquid nitrogen tempered to ensure a long-lasting performance Rust and stain resistant 13-degree razor edge per side with mirror polished Effortlessly slice all kinds of meats Classic black ultra-premium handle with strong rivets Comes with a lifetime warranty Users score: 4.7/5 Personal thought: This Japanese knife set makes an ideal choice for culinary needs. You can gift this knife set to your mothers, wives, and lovers who takes kitchen cooking seriously so you can make their life easier and comfortable. Looking for (Best Chef Knife Under $150)
5) DALSTRONG Shogun series knife block set:
Super steel core, ultimate performance, and precise cryogenic structure With the DALSTRONG Shogun series knife block set, you are putting a lion in your hands. It is that much good and amazing.

View On Amazon The knife set is crafted with the highest quality materials and makes any kitchen a powerhouse thanks to the artistic statement and artistry. The Shogun blade is certainly precisions forged and made with an ultra single piece of a Japanese carbon layer for long term usage. You will be happy to know that it accompanies crystalline structure, flexibility, and hardness, unlike anything you've experienced in cutting with a knife. The exquisite hammered finish is a beautiful statement that serves to reduce the drag and minimize stuck-on food. The hand polishing inevitably reveals how magnificent visual pattern looks with more carbon and sharpness on it. The knife set is handmade, and thanks to it, you will get a precise 14 degree on per side, making it the most balanced knives ever. Key features: The knife set is culinary perfection Made with woodwork and outstanding blade design Crafted with cutting edge breakthrough technology Unrivaled performance with superb robustness Ultra-sharp vacuum heat Engineered for perfection with G-10 military handle Hand polished for superior control Comes with a lifetime warranty Users score: 4.6/5 Personal belief: For everyday use, this Japanese knife set is arguably best in every way with resilient construction and agile performance that you can get at a very affordable price.
6) ENSO knife set VG-10 hammered stainless steel block set:
Adaptable, full tang handle, and impeccable control The ENSO knife set square blade is a notable brand for making high caliber, real Japanese knives.

View On Amazon This one accompanies a section point that permits clients to employ it as per their requirements inside and out. It is an excellent expansion that includes a wooden style handle and an edge that fashioned with triple-layer hardened steel. The primary center of this blade set is that it utilizes hard VG-10 steel to help hold the sharpness better after some time. The external layer of this blade utilizes gentler treated steel that takes into consideration a simple honing and upkeep. The HRC on the hardness scale, the cuts look all the more perfect and precise. You have never utilized a blade, particularly a Japanese one at that point this will astonish you for getting ready vegetables leafy foods easily. This one is a perfect decision for cooks with all ability levels where no other Knife could approach its skill and secure hold. Key features: Forged with a solitary bit of steel Offer astounding sturdiness, execution, and quality Lightweight and enduring edge Ergonomic handle with a dimple design secure hold Give solace and control Seamless structure Made with Japanese state of the art technology Comes with a lifetime guarantee Users score: 4.3/5 Honest opinion: the GINSU Gourmet CHIKARA Japanese blade set ideal offer parity of excellence, force, and capacities that will convey shocking execution for both little and huge suppers. Get your hands on this set and appreciate cooking with Japanese customs you will adore.
8) LA-COTE 5 piece chef knives Japanese stainless steel block set:
Beautifully designed, metal rims and high-end craftsmanship The LA-COTE 5 piece knife block set is the first kitchen gear that works with the quality from a stylish point of view additionally conveys an elevated level of execution how you need it.

View On Amazon They may appear to be a tad bit of expensive. However, all the blades come in various shapes, sizes, and new highlights you can't resist yet to get it. All the edges made with tempered steel layered with high steel of VG-15, and result in you get an even, lightweight, and excellent quality blades you will appreciate getting ready nourishment and dinners. The exemplary V molded handle made coal-black wood that is generally known for its long sturdiness. The square set likewise incorporates some unfilled openings that you can use for other home cooking needs and change as indicated by the kitchen's interest. It created with dazzling super steel that settles on an incredible decision for any gourmet specialist who is searching for a conventional Japanese plan. The tempered reinforce and twenty-degree cutting edge it will decrease wrist weariness while you quickly cut the variety of fixings. Notwithstanding the force center, the blade bolstered with seven layers of high carbon steel that you will discover absolute best to utilize expertly without stressing over the honing on numerous occasions. Key features: This blade works as a utility, bread cutting, slicing, and paring knife Exceptional sturdiness Stone completed module sharp edge with beautiful decrease ground edges Outstanding cutting experience for tenderfoots Handles made with silicon grasp for giving agreeable, trustworthy handhold Full reinforces, and steel end tops give the blade a parity Comes with long time warranty Users score: 4.5/5 My perspective: The LA-COTE 5 piece knife block set accompanied a conventional sturdiness and outfitted with high carbon sharp edge steel. It can bring down the weakness on your hands and wrist while you slice anything because of the adaptability. Try not to hold up until stock is cleared, buy and express your authentic mastering cooking arts with this one.
9) MARCO Almond KYA28 14 pieces Japanese knife block set:
Ultra-premium handles, extraordinary execution, and self-sharpening You are somebody who has extraordinary enthusiasm for finding Best Japanese Knife Block Set. Then you should investigate this ideal forefront and predominant execution blade set that made with top-notch materials with zero issues.

View On Amazon The MARCO Almond KYA28 knife set coveted with top of the line recolor safe and hand cleaned visual example that makes it an exceptional kitchen device you can mostly disregard. The super steel center accompanies ultra-high carbon level that takes the sharpness to unheard-of level gratitude to boundless long edge maintenance innovation. The blades can survive without much of a stretch guarantee extraordinary warmth and dampness for a long time to come, and you can easily cut, mince, cut, or hack anything you desire. This one is the most flexible and fundamental apparatus for cooks that affection Japanese stuff and need to use for quite a while. Additionally, you will find a good pace bent sharp edge that efficiently works to and fro with an expanded tip for fast slashing. It is a kitchen head with regards to a creative articulation of structure and propelled production. The pounded surface in blades will dispense with the contact and keep nourishment from staying on the cutting edge. Key features: The blade set accompanies all edges that praise your kitchen needs Premium professional knives Crafted with premium Japanese layer steel for superb cutting Extraordinary execution with 70 layers of high carbon steel Liquid nitrogen tempered guarantee a durable execution Rust and stain safe 18-degree razor edge per side with reflect cleaned Effortlessly cut a wide range of meats Classic dark ultra-premium handle with solid bolts Comes with 100% satisfaction and a lifetime guarantee Users score: 4.6/5 My idea: This Japanese blade set settles on a perfect decision for culinary necessities. As you begin using, you will get plenty of benefits from it as it will give you superior quality over any other knife sets. So don't miss it and pick it up now.
10) KYUKO 5 pieces knife block set:
Superior steel, extreme execution, and ruthlessly sharp The KYUKO 5 pieces knife block set you are placing much reliable equipment in your grip. It is that much acceptable and stunning that will work for you anytime, anyplace, anywhere.

View On Amazon The blade set is made with the most significant materials and makes any kitchen a powerhouse because of the imaginative explanation and crafting. The KYUKO cutting edge is surely precisions produced and made with an ultra single bit of Japanese carbon layer for prolonged haul utilization. You will be glad to realize that it goes with crystalline structure, adaptability, and hardness dissimilar to anything you've encountered in cutting with a blade. The flawless pounded finish is a great explanation that serves to diminish the drag and limit stuck on nourishment. The hand cleaning uncovers how great visual example looks with more carbon and sharpness on it. The blade set is high quality and a charm to it. You will get an exact 18 degree on per side, making it the most adjusted blade ever. There is also a unique thing about using the knife that allows you to be more creative in chopping for preparing meals. Key features: The blade set is culinary flawlessness Made with woodwork and extraordinary cutting edge Durable handle with cobalt added Crafted with front line leap forward innovation Unrivaled execution with high power Ultra-sharp vacuum heat Engineered for flawlessness with military handle Hand cleaned for predominant control Comes with a lifetime warranty Users score: 4.4/5 Personal opinion: The time has come to be your cook, for regular utilize this Japanese blade set is best all-around with all-round development and spry execution that you can get at an entirely reasonable cost.
Best Japanese Knife Block Set Buying Guide
How to choose the Best Japanese Knife Block set in 2020? There are many numbers of factors you need to keep in mind while choosing Japanese knife sets. Depending on your skill levels, you want something that can easily suit your budget and how many pieces you want. It is a fact that Japanese Knives made with super high carbon steel, and this gives them a more sharp edge and harder to work. However, if they are not maintained or not used properly, they can be prone to chipping. The knives require regular sharpening and maintenance. They are blades specially designed for professional and expert cooks, and with stainless steel alloy, it can be much easier to wield and use. Here are some factors you need to checkout including, 1) Blade style: There are two types of blade styles that come in Japanese knife sets. One is a single angle, and the second is double bevel blades. The single blade bevels are traditional style and made for only professional chefs. They give you detailed cuts with clean results. But if you are not a professional and only want to use for domestic needs then double bevel comes in a western-style that is much easier to use. 2) Type of knife: Each blade style has its different variations, like some knives are only specific for carving and butchering. Two types of knives are meant for general use only. Like GYUTO and SANTOKU, they can use for vegetables, meat, and fruits. As a beginner, you can start with either one of them and then move on to the professional ones. 3) Tang type: Tang is essential in any blade because it attached with handle, and full tang only means the knife can run through with full length without compromising the quality. 4) Handle type: A Japanese knife comes in a more traditional Japanese handle or western handle. The handle of the west is heavy in the grip but also very hasped and secured. The western handles also feel quite sturdier and can be suitable for a brute force cutting, where traditional Japanese stems are very cylindrical made of wood and are lighter. This handle can feel awkward if you have not used them before, but they can provide you more control and delicate touch once you get used to them. Overall the choice of handle type is a matter of personal preference, so choose what you might see fit in your grip. Conclusion: These are some interesting facts about Best Japanese Knife Block Set if you want to feel the freshness in every bite of a meal then consider any of the products mentioned above, as they are great for any type of cutting. Read the full article
0 notes
Text
The Tools (And Tricks) You Need To Install An Ikea Kitchen Yourself
Many of you have asked for tips and tricks to make installing an Ikea kitchen go more smoothly and look (and function) the best it possibly can. And the good news is that after installing three of them in a little over a year and a half (!!!), we have learned A TON about how to make things a little easier and help you end up with a better result. So settle in, I’ve got twenty tools & tips that can make all the difference.

First off, we like Ikea cabinets and have personally installed them in five rooms: our laundry room & bonus room at home, our beach house kitchen, and now these two duplex kitchens. We have lived with the ones in our home for nearly five years and they’re great. Not a single issue. They are smartly made, very durable, and they have a great 25-year warranty and a great price tag (often thousands cheaper than other options). They also come with many thoughtful features like soft close drawers that come standard and tons of customization options. So yeah, some Ikea furniture is known for feeling a little cheap and wobbly, but that has not been our experience with their cabinets AT ALL.
Ok, but back to the point of this post – tips and tools to make your Ikea cabinet install easier. Some of the tools I’m listing here are absolutely necessary and some are optional (they’ll just make the process easier, faster, and less frustrating). And as you read through this list, I think you’ll also get a pretty good sense of the steps (and curveballs) involved too, which I hope will help as well.

I’ll include a short bulleted list of everything at the end of the post too, that way you can use it as a tool checklist. But let’s just get right into it.

1. Your Itemized Receipt/Order
Before you build anything, you’ll want to take time to inventory and organize all of your boxes. We had over 200 boxes (!!!) delivered for our two duplex kitchens, so it helped to sort everything into piles beforehand.

We personally like to sort boxes by item (Sektion boxes over here, Maximera drawers over there, all of our cabinet fronts somewhere else, etc.) but you may find it helpful to sort yours by cabinet instead (ex: the box, drawer, hinges, and front for one cabinet all together in one pile – this is how Ikea breaks them up your order form). Either way you do it, this sorting process will help you identify any missing pieces and also make it faster once you start building.
2. Power driver (with Philips head)

This combo gets a lot of use in this install (especially the power driver/drill) – but they’re needed first to construct your cabinet boxes (Sektion pieces). We love constructing the boxes first because you quickly get to see the shape of your kitchen come to life.

And even though Ikea is known for their allen wrenches, you don’t use them AT ALL during a typical kitchen installation! So don’t worry about having lots of specialty drill bits. You just need a normal Phillips head to screw these puppies together.
3. Hammer
You’ll also need a hammer handy to nail the MDF backings onto the cabinet backs. It may also be useful if you need to tap any anchors into your drywall when it comes time to hang your cabinets.
4. Magnetic Drill Bit Holder
Having one of these on your drill can save you a lot of frustration while building your cabinets and drawers. You can buy one separately for about $2 or it often comes included in drill/driver sets like ours. It’ll magnetize your drill bits, meaning many of the screws that Ikea provides will stick to your drill handsfree (thanks to the magic of magnets). We found this VERY helpful when trying to screw into small spots that were too tight for our fingertips (we couldn’t reach in and hold the screw steady, so having a magnetized drill bit that held it for us was key).

5. Measuring Tape
The next several tools are needed for attaching your cabinets to the wall. Whether you’re doing upper or lower cabinets, Ikea’s system uses a metal track (called the Sektion suspension rail) that you attach to your wall and then the cabinet boxes hang from these. The rail system is extremely handy because if you make sure the rail is level, your cabinets all hang from that and are guaranteed to be level! I know, it’s GREAT. The only time I don’t use their rail is when I don’t have a wall behind my cabinets, like if you’re doing an island. In that case I’ve built my own bases from 2×4″s, but more on that later.
For now, just know the measuring tape will be useful in determining exactly where in your kitchen you’re placing your cabinets – both side-to-side on each wall, and how high the rails need to be hung (Ikea provides guides for this in their instructions). You will probably want to have your kitchen plan/schematic from Ikea handy too.

6. Dremel Or Hacksaw
Once you know where each run of cabinets is going, you’ll need to cut your metal suspension rails to size. The rails are sold in 7 foot lengths, but if you only have 4 feet of cabinetry in one area – you only want 4 feet of rail.
You can cut these by hand with a hacksaw, but we find it much faster to use our Dremel Multi-Max with a metal cutting blade.

I typically mark my cut on a piece of painters tape and cut across the open top of one of our cabinet boxes (with a piece of cardboard to protect the cabinet underneath).
7. Stud Finder
You want to screw the rail into at least a few studs in your wall for maximum hold. So it’s smart to use a stud finder to locate and mark the studs that fall within the area you’re hanging the rail – that way you can be sure to go into them and get a nice firm hold. Since studs are typically 1.5″ thick, I like to mark the full width that my stud finder indicates, since you may not know exactly where the holes on the Sektion rail will line up.

8. Medium-Size Level
Once I know where my studs are, I hold my cut-to-size metal rail and, with a medium sized level (like this 24″ level) held against it, I mark the top line of my rail AND where the holes line up with my studs. I suggest amedium sized level for this just because they’re easier to wrangle during this step.

I also mark a few additional holes where I’ll use screws paired with anchors. I believe Ikea suggests at least having a screw every 12″ inches – but for short sections like this, I like to make sure I hit at least 2 studs and then have a screw at either end of the rail that goes into an anchor.
9. Heavy Duty Screws & Anchors
After some trial and error, we found that we like using these GRK Fastener Cabinet Screws to secure our rails into studs. They’re easy to drive, they hold really tight, and they include the star-head bit you need for them. We have tried other, cheaper “cabinet screws” and the heads kept breaking off. It was MADDENING.

We also like to have some anchors on hand too, like these E-Z Ancor packs that come with screws, for those additional support screws that we add.
10. Long Level
One of the biggest challenges we’ve found in this process is getting things level. Just because you’ve hung your rail level on the wall doesn’t prevent things like slopes in your floor or bows in your wall from chucking some additional curveballs in your direction. So your best defenses are a lot of patience and a nice long level, like this 4ft level we bought specifically for this task (after learning that it’s a lot harder to use a smaller level to solve these issues).

Your medium sized level will help with the process as well (especially in checking that each individual cabinet is level front-to-back) but you’ll want something bigger to check longer spans of cabinets. You could purchase an even longer level if you wanted, but they can start to get pricey, so we found a 4 foot long level to be sufficient, especially for checking across the gaps that you’ll leave for appliances like a 30″ stove or a standard 24″ dishwasher.
11. Shims
A lot of level issues can be corrected by twisting the adjustable plastic feet that come with your base cabinets, or by adjusting the placement of your metal rail. But if you’re dealing with bows in your wall (which you can find by placing your long level against it) you’ll want to have some wood shims on hand to place behind the metal rail. In these old houses, we had to use quite a few in a couple of places!
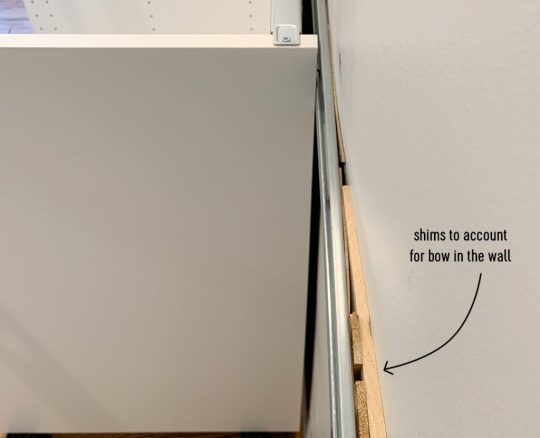
12. Jigsaw
When it comes time to install your sink base cabinet, you’ll need to make some holes for your plumbing. For smaller pipes like your water supply lines, you can just drill holes using a large drill bit (we used the 3/4″ bit in this set). But for things like your large drain pipe, you’ll either need to buy a larger hole bit or break out a jigsaw. Even though we don’t get the cleanest cut with it, the jigsaw gives us a little more wiggle room when placing the cabinet (since the drain pipe isn’t flexible like the supply lines) and we can also use it for other cuts like for exposing the outlets along the wall (the one below powers the garbage disposal under the sink).

Just be sure to make careful measurements before you cut. We usually put a layer of painters tape around the area we’re cutting. It allows us to mark our cut without marking the cabinet, plus the tape helps keep the white finish from cracking off. Either way, this stuff will all be hidden under the sink so it doesn’t have to look perfect.
13. Clamps
As you start to get your cabinets in place and leveled, you’ll want to secure any adjacent cabinets together. Ikea provides screws for doing this, but you’ll want to use some clamps (we like these 6″ bar clamps) to hold the cabinets tightly together before you begin screwing.
We didn’t get a picture of that process, but the clamps come in handy A LOT as an extra set of hands – like when we were installing this bracket for the exhaust hoods that we hung over the stoves.

14. Circular Saw and/or Table Saw
In addition to screwing cabinets together, you may find yourself attaching cover panels or filler pieces at some point. Cover panels go on exposed ends of cabinets (so you can’t see the metal rail they hang on) or, in our case, we used some large cover panels to create a box around the fridges at the duplex. So you’ll need some sort of larger saw to make long, straight cuts. Our cover panels were a bit too wide, so I used a circular saw to shave a few inches off one side.

I didn’t use a table saw for that panel because running an 8 foot tall panel that’s this wide across my table saw would’ve been tough. But for smaller pieces (like filler pieces that are only about 3 feet long) a table saw is often easier, especially if you’re only shaving off a little bit. But if that’s too pricey and you’ve got a steady hand, you can get by with the circular saw.
15. 2 x 4″ Boards
Every time we’ve installed an Ikea kitchen we’ve needed some 2×4″s at some point. At the beach house we used them to make some bases for the island cabinets.

Basically, they were just some boxes we made almost the same size as each cabinet (slightly narrower to account for the toekicks) that we secured to the floor using pocket holes. To drill the pocket holes, you can use something like a…
16. Kreg Jig
Now, a Kreg Jig isn’t absolutely necessary here, but I’ve had one for around nine years now so I’m accustomed to breaking it out for tasks like this. So while I’m a big fan of having one in your arsenal, I understand that you’ve just bought a new kitchen so tacking on another $99 tool to your budget isn’t always practical.
I did use it again for the duplexes to make more 2×4″s into boxes (this time for mounting the above-fridge cabinet away from the wall, so it sat closer to the front of the fridge).

The boxes acted as an extension of the wall. The top one was for mounting the metal rail, and the bottom one gave the base of the cabinet a spot to rest so it didn’t tip back wildly. They also gave us a way to mount that large cover panel to box in the fridge.

I guess I should add in here that a step ladder is also useful, so let’s officially put that on the list.
17. Manual Screwdriver
Once your cabinets and panels are hung, leveled, and secured to each other, the next part of the process is to add your doors and drawers. The instructions here are pretty self-explanatory and the main tool you need is a power driver to screw everything together. Our main word of warning is to pay close attention to screw placements when you’re assembling drawers! Depending on where each drawer goes in the stack (top, middle, or bottom) there are sliiiiight differences in the instructions. So while we find it most efficient to do multiple drawers at once, we still pay close attention – especially for the first few.

Ok, back to the manual screw drivers. One big part of installing doors and drawers is tweaking and adjusting them for even and level spacing. For this you’ll want to a regular ol‘ manual Philips head screwdriver. It can be kind of tedious and frustrating, but it’s worth taking your time with it. This video shows it in a bit more detail.

You also will want a flathead screwdriver for twisting the little piece of plastic that locks each cabinet onto the metal rail, which comes up earlier in the process.
18. Miter Saw
Tasks like cutting your 2×4″s or even your filler pieces will be made easier and faster by having a miter saw on hand (we own this miter saw). You’ll also find that it’s helpful when it’s time to cut and install your toekicks. Ikea’s sells toekicks to match your cabinet fronts and they clip on to the plastic feet you will have attached to the bottom of your base cabinets.

In our beach house kitchen we installed quarter round in front of the Ikea baseboards to help disguise some floor level issues, as well as using quarter round around the island where we built our own base (we used standard wood baseboard trim instead of the Ikea toekicks around the island). Meanwhile, we just used the Ikea toekicks in the duplex kitchens and the floors were more level (and we think the wood and blue cabinets were more forgiving than white ones) so we didn’t need to add quarter round and it looks great.

19. Nail Gun
In addition to using a nail gun to attach additional molding like quarter round if you’re adding that (again, the Ikea baseboards just snap on so you won’t need it for that) I also find a nail gun comes in handy sometimes for attaching small filler pieces. Especially in cases where they’re too thin to take a screw.
20. Others Tools
Real quick, here are some other items you may want to have on hand. Some I’ve mentioned or shown already, but haven’t officially listed:
Pen or pencil
Painters tape
Step ladder
Utility knife or scissors (for opening boxes faster!)
Crowbar (if you need to remove any baseboard or molding)
Broom, dustpan, and/or vacuum with a hose (we have this one)

Your Ikea Kitchen Installation Tool Checklist
As promised, here’s all of the items in one place so you can make sure you have everything you need on hand. I’ve organized it a bit differently than above, just to put like items together. You may have special circumstances for your project that require more, less, or other tools – but I’ve found this to be a pretty comprehensive set:
Your itemized receipt / order
Hammer
Manual screwdrivers
Crowbar
Measuring tape
Pen or pencil
Painters tape
Step ladder
Power driver
Drill bit set with magnetic bit holder & 3/4″ bit for plumbing holes
Dremel or Hacksaw
Stud finder
Medium level (24″)
Large level (48″)
Wood shims
Cabinet screws (roughly 4 per cabinet)
Screws with anchors (roughly 2 per cabinet)
Jigsaw
Circular saw and/or table saw
Miter saw
Utility knife or scissors
Nail gun
Clamps
2×4″s (optional)
Kreg Jig (optional)
Broom, dustpan, and/or vacuum with hose
Good luck and happy installing!
P.S. For other posts we’ve written about installing Ikea cabinets, here’s one about installing our laundry room cabinets 5 years ago, and another one about using Ikea cabinets to make a wall of built-ins for our bonus room.
*This post contains affiliate links*
The post The Tools (And Tricks) You Need To Install An Ikea Kitchen Yourself appeared first on Young House Love.
The Tools (And Tricks) You Need To Install An Ikea Kitchen Yourself published first on https://novaformmattressreview.tumblr.com/
0 notes
Photo

The Tools (And Tricks) You Need To Install An Ikea Kitchen Yourself https://ift.tt/2EWSK2p
Many of you have asked for tips and tricks to make installing an Ikea kitchen go more smoothly and look (and function) the best it possibly can. And the good news is that after installing three of them in a little over a year and a half (!!!), we have learned A TON about how to make things a little easier and help you end up with a better result. So settle in, I’ve got twenty tools & tips that can make all the difference.

First off, we like Ikea cabinets and have personally installed them in five rooms: our laundry room & bonus room at home, our beach house kitchen, and now these two duplex kitchens. We have lived with the ones in our home for nearly five years and they’re great. Not a single issue. They are smartly made, very durable, and they have a great 25-year warranty and a great price tag (often thousands cheaper than other options). They also come with many thoughtful features like soft close drawers that come standard and tons of customization options. So yeah, some Ikea furniture is known for feeling a little cheap and wobbly, but that has not been our experience with their cabinets AT ALL.
Ok, but back to the point of this post – tips and tools to make your Ikea cabinet install easier. Some of the tools I’m listing here are absolutely necessary and some are optional (they’ll just make the process easier, faster, and less frustrating). And as you read through this list, I think you’ll also get a pretty good sense of the steps (and curveballs) involved too, which I hope will help as well.

I’ll include a short bulleted list of everything at the end of the post too, that way you can use it as a tool checklist. But let’s just get right into it.

1. Your Itemized Receipt/Order
Before you build anything, you’ll want to take time to inventory and organize all of your boxes. We had over 200 boxes (!!!) delivered for our two duplex kitchens, so it helped to sort everything into piles beforehand.

We personally like to sort boxes by item (Sektion boxes over here, Maximera drawers over there, all of our cabinet fronts somewhere else, etc.) but you may find it helpful to sort yours by cabinet instead (ex: the box, drawer, hinges, and front for one cabinet all together in one pile – this is how Ikea breaks them up your order form). Either way you do it, this sorting process will help you identify any missing pieces and also make it faster once you start building.
2. Power driver (with Philips head)

This combo gets a lot of use in this install (especially the power driver/drill) – but they’re needed first to construct your cabinet boxes (Sektion pieces). We love constructing the boxes first because you quickly get to see the shape of your kitchen come to life.

And even though Ikea is known for their allen wrenches, you don’t use them AT ALL during a typical kitchen installation! So don’t worry about having lots of specialty drill bits. You just need a normal Phillips head to screw these puppies together.
3. Hammer
You’ll also need a hammer handy to nail the MDF backings onto the cabinet backs. It may also be useful if you need to tap any anchors into your drywall when it comes time to hang your cabinets.
4. Magnetic Drill Bit Holder
Having one of these on your drill can save you a lot of frustration while building your cabinets and drawers. You can buy one separately for about $2 or it often comes included in drill/driver sets like ours. It’ll magnetize your drill bits, meaning many of the screws that Ikea provides will stick to your drill handsfree (thanks to the magic of magnets). We found this VERY helpful when trying to screw into small spots that were too tight for our fingertips (we couldn’t reach in and hold the screw steady, so having a magnetized drill bit that held it for us was key).

5. Measuring Tape
The next several tools are needed for attaching your cabinets to the wall. Whether you’re doing upper or lower cabinets, Ikea’s system uses a metal track (called the Sektion suspension rail) that you attach to your wall and then the cabinet boxes hang from these. The rail system is extremely handy because if you make sure the rail is level, your cabinets all hang from that and are guaranteed to be level! I know, it’s GREAT. The only time I don’t use their rail is when I don’t have a wall behind my cabinets, like if you’re doing an island. In that case I’ve built my own bases from 2×4″s, but more on that later.
For now, just know the measuring tape will be useful in determining exactly where in your kitchen you’re placing your cabinets – both side-to-side on each wall, and how high the rails need to be hung (Ikea provides guides for this in their instructions). You will probably want to have your kitchen plan/schematic from Ikea handy too.

6. Dremel Or Hacksaw
Once you know where each run of cabinets is going, you’ll need to cut your metal suspension rails to size. The rails are sold in 7 foot lengths, but if you only have 4 feet of cabinetry in one area – you only want 4 feet of rail.
You can cut these by hand with a hacksaw, but we find it much faster to use our Dremel Multi-Max with a metal cutting blade.

I typically mark my cut on a piece of painters tape and cut across the open top of one of our cabinet boxes (with a piece of cardboard to protect the cabinet underneath).
7. Stud Finder
You want to screw the rail into at least a few studs in your wall for maximum hold. So it’s smart to use a stud finder to locate and mark the studs that fall within the area you’re hanging the rail – that way you can be sure to go into them and get a nice firm hold. Since studs are typically 1.5″ thick, I like to mark the full width that my stud finder indicates, since you may not know exactly where the holes on the Sektion rail will line up.

8. Medium-Size Level
Once I know where my studs are, I hold my cut-to-size metal rail and, with a medium sized level (like this 24″ level) held against it, I mark the top line of my rail AND where the holes line up with my studs. I suggest amedium sized level for this just because they’re easier to wrangle during this step.

I also mark a few additional holes where I’ll use screws paired with anchors. I believe Ikea suggests at least having a screw every 12″ inches – but for short sections like this, I like to make sure I hit at least 2 studs and then have a screw at either end of the rail that goes into an anchor.
9. Heavy Duty Screws & Anchors
After some trial and error, we found that we like using these GRK Fastener Cabinet Screws to secure our rails into studs. They’re easy to drive, they hold really tight, and they include the star-head bit you need for them. We have tried other, cheaper “cabinet screws” and the heads kept breaking off. It was MADDENING.

We also like to have some anchors on hand too, like these E-Z Ancor packs that come with screws, for those additional support screws that we add.
10. Long Level
One of the biggest challenges we’ve found in this process is getting things level. Just because you’ve hung your rail level on the wall doesn’t prevent things like slopes in your floor or bows in your wall from chucking some additional curveballs in your direction. So your best defenses are a lot of patience and a nice long level, like this 4ft level we bought specifically for this task (after learning that it’s a lot harder to use a smaller level to solve these issues).
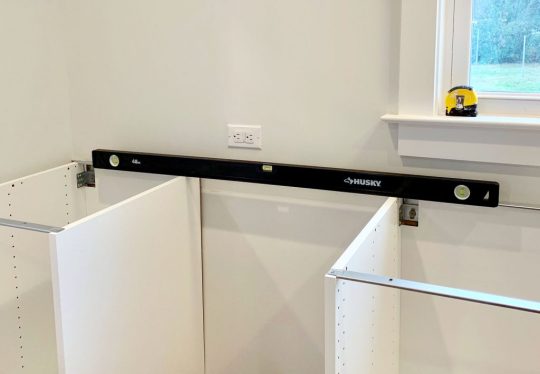
Your medium sized level will help with the process as well (especially in checking that each individual cabinet is level front-to-back) but you’ll want something bigger to check longer spans of cabinets. You could purchase an even longer level if you wanted, but they can start to get pricey, so we found a 4 foot long level to be sufficient, especially for checking across the gaps that you’ll leave for appliances like a 30″ stove or a standard 24″ dishwasher.
11. Shims
A lot of level issues can be corrected by twisting the adjustable plastic feet that come with your base cabinets, or by adjusting the placement of your metal rail. But if you’re dealing with bows in your wall (which you can find by placing your long level against it) you’ll want to have some wood shims on hand to place behind the metal rail. In these old houses, we had to use quite a few in a couple of places!

12. Jigsaw
When it comes time to install your sink base cabinet, you’ll need to make some holes for your plumbing. For smaller pipes like your water supply lines, you can just drill holes using a large drill bit (we used the 3/4″ bit in this set). But for things like your large drain pipe, you’ll either need to buy a larger hole bit or break out a jigsaw. Even though we don’t get the cleanest cut with it, the jigsaw gives us a little more wiggle room when placing the cabinet (since the drain pipe isn’t flexible like the supply lines) and we can also use it for other cuts like for exposing the outlets along the wall (the one below powers the garbage disposal under the sink).

Just be sure to make careful measurements before you cut. We usually put a layer of painters tape around the area we’re cutting. It allows us to mark our cut without marking the cabinet, plus the tape helps keep the white finish from cracking off. Either way, this stuff will all be hidden under the sink so it doesn’t have to look perfect.
13. Clamps
As you start to get your cabinets in place and leveled, you’ll want to secure any adjacent cabinets together. Ikea provides screws for doing this, but you’ll want to use some clamps (we like these 6″ bar clamps) to hold the cabinets tightly together before you begin screwing.
We didn’t get a picture of that process, but the clamps come in handy A LOT as an extra set of hands – like when we were installing this bracket for the exhaust hoods that we hung over the stoves.
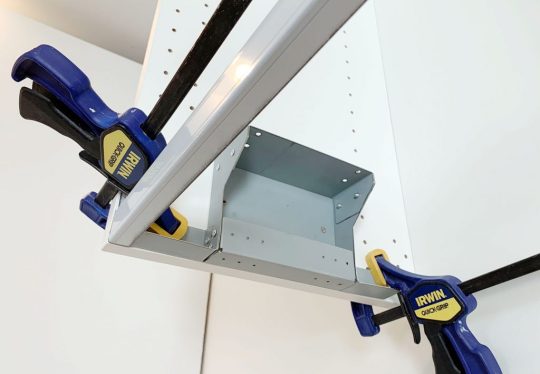
14. Circular Saw and/or Table Saw
In addition to screwing cabinets together, you may find yourself attaching cover panels or filler pieces at some point. Cover panels go on exposed ends of cabinets (so you can’t see the metal rail they hang on) or, in our case, we used some large cover panels to create a box around the fridges at the duplex. So you’ll need some sort of larger saw to make long, straight cuts. Our cover panels were a bit too wide, so I used a circular saw to shave a few inches off one side.

I didn’t use a table saw for that panel because running an 8 foot tall panel that’s this wide across my table saw would’ve been tough. But for smaller pieces (like filler pieces that are only about 3 feet long) a table saw is often easier, especially if you’re only shaving off a little bit. But if that’s too pricey and you’ve got a steady hand, you can get by with the circular saw.
15. 2 x 4″ Boards
Every time we’ve installed an Ikea kitchen we’ve needed some 2×4″s at some point. At the beach house we used them to make some bases for the island cabinets.

Basically, they were just some boxes we made almost the same size as each cabinet (slightly narrower to account for the toekicks) that we secured to the floor using pocket holes. To drill the pocket holes, you can use something like a…
16. Kreg Jig
Now, a Kreg Jig isn’t absolutely necessary here, but I’ve had one for around nine years now so I’m accustomed to breaking it out for tasks like this. So while I’m a big fan of having one in your arsenal, I understand that you’ve just bought a new kitchen so tacking on another $99 tool to your budget isn’t always practical.
I did use it again for the duplexes to make more 2×4″s into boxes (this time for mounting the above-fridge cabinet away from the wall, so it sat closer to the front of the fridge).

The boxes acted as an extension of the wall. The top one was for mounting the metal rail, and the bottom one gave the base of the cabinet a spot to rest so it didn’t tip back wildly. They also gave us a way to mount that large cover panel to box in the fridge.
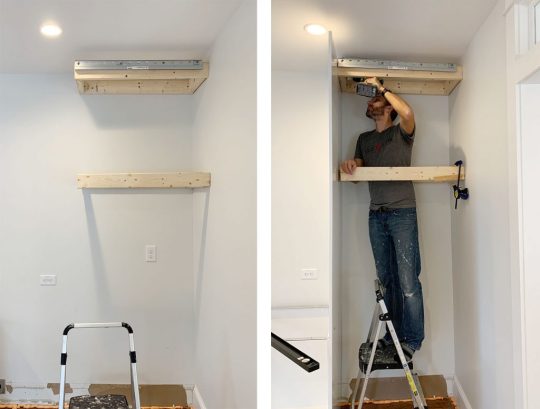
I guess I should add in here that a step ladder is also useful, so let’s officially put that on the list.
17. Manual Screwdriver
Once your cabinets and panels are hung, leveled, and secured to each other, the next part of the process is to add your doors and drawers. The instructions here are pretty self-explanatory and the main tool you need is a power driver to screw everything together. Our main word of warning is to pay close attention to screw placements when you’re assembling drawers! Depending on where each drawer goes in the stack (top, middle, or bottom) there are sliiiiight differences in the instructions. So while we find it most efficient to do multiple drawers at once, we still pay close attention – especially for the first few.
Ok, back to the manual screw drivers. One big part of installing doors and drawers is tweaking and adjusting them for even and level spacing. For this you’ll want to a regular ol‘ manual Philips head screwdriver. It can be kind of tedious and frustrating, but it’s worth taking your time with it. This video shows it in a bit more detail.
You also will want a flathead screwdriver for twisting the little piece of plastic that locks each cabinet onto the metal rail, which comes up earlier in the process.
18. Miter Saw
Tasks like cutting your 2×4″s or even your filler pieces will be made easier and faster by having a miter saw on hand (we own this miter saw). You’ll also find that it’s helpful when it’s time to cut and install your toekicks. Ikea’s sells toekicks to match your cabinet fronts and they clip on to the plastic feet you will have attached to the bottom of your base cabinets.

In our beach house kitchen we installed quarter round in front of the Ikea baseboards to help disguise some floor level issues, as well as using quarter round around the island where we built our own base (we used standard wood baseboard trim instead of the Ikea toekicks around the island). Meanwhile, we just used the Ikea toekicks in the duplex kitchens and the floors were more level (and we think the wood and blue cabinets were more forgiving than white ones) so we didn’t need to add quarter round and it looks great.

19. Nail Gun
In addition to using a nail gun to attach additional molding like quarter round if you’re adding that (again, the Ikea baseboards just snap on so you won’t need it for that) I also find a nail gun comes in handy sometimes for attaching small filler pieces. Especially in cases where they’re too thin to take a screw.
20. Others Tools
Real quick, here are some other items you may want to have on hand. Some I’ve mentioned or shown already, but haven’t officially listed:
Pen or pencil
Painters tape
Step ladder
Utility knife or scissors (for opening boxes faster!)
Crowbar (if you need to remove any baseboard or molding)
Broom, dustpan, and/or vacuum with a hose (we have this one)

Your Ikea Kitchen Installation Tool Checklist
As promised, here’s all of the items in one place so you can make sure you have everything you need on hand. I’ve organized it a bit differently than above, just to put like items together. You may have special circumstances for your project that require more, less, or other tools – but I’ve found this to be a pretty comprehensive set:
Your itemized receipt / order
Hammer
Manual screwdrivers
Crowbar
Measuring tape
Pen or pencil
Painters tape
Step ladder
Power driver
Drill bit set with magnetic bit holder & 3/4″ bit for plumbing holes
Dremel or Hacksaw
Stud finder
Medium level (24″)
Large level (48″)
Wood shims
Cabinet screws (roughly 4 per cabinet)
Screws with anchors (roughly 2 per cabinet)
Jigsaw
Circular saw and/or table saw
Miter saw
Utility knife or scissors
Nail gun
Clamps
2×4″s (optional)
Kreg Jig (optional)
Broom, dustpan, and/or vacuum with hose
Good luck and happy installing!
P.S. For other posts we’ve written about installing Ikea cabinets, here’s one about installing our laundry room cabinets 5 years ago, and another one about using Ikea cabinets to make a wall of built-ins for our bonus room.
*This post contains affiliate links*
The post The Tools (And Tricks) You Need To Install An Ikea Kitchen Yourself appeared first on Young House Love.


0 notes
Text
The Tools (And Tricks) You Need To Install An Ikea Kitchen Yourself
Many of you have asked for tips and tricks to make installing an Ikea kitchen go more smoothly and look (and function) the best it possibly can. And the good news is that after installing three of them in a little over a year and a half (!!!), we have learned A TON about how to make things a little easier and help you end up with a better result. So settle in, I’ve got twenty tools & tips that can make all the difference.

First off, we like Ikea cabinets and have personally installed them in five rooms: our laundry room & bonus room at home, our beach house kitchen, and now these two duplex kitchens. We have lived with the ones in our home for nearly five years and they’re great. Not a single issue. They are smartly made, very durable, and they have a great 25-year warranty and a great price tag (often thousands cheaper than other options). They also come with many thoughtful features like soft close drawers that come standard and tons of customization options. So yeah, some Ikea furniture is known for feeling a little cheap and wobbly, but that has not been our experience with their cabinets AT ALL.
Ok, but back to the point of this post – tips and tools to make your Ikea cabinet install easier. Some of the tools I’m listing here are absolutely necessary and some are optional (they’ll just make the process easier, faster, and less frustrating). And as you read through this list, I think you’ll also get a pretty good sense of the steps (and curveballs) involved too, which I hope will help as well.

I’ll include a short bulleted list of everything at the end of the post too, that way you can use it as a tool checklist. But let’s just get right into it.

1. Your Itemized Receipt/Order
Before you build anything, you’ll want to take time to inventory and organize all of your boxes. We had over 200 boxes (!!!) delivered for our two duplex kitchens, so it helped to sort everything into piles beforehand.

We personally like to sort boxes by item (Sektion boxes over here, Maximera drawers over there, all of our cabinet fronts somewhere else, etc.) but you may find it helpful to sort yours by cabinet instead (ex: the box, drawer, hinges, and front for one cabinet all together in one pile – this is how Ikea breaks them up your order form). Either way you do it, this sorting process will help you identify any missing pieces and also make it faster once you start building.
2. Power driver (with Philips head)

This combo gets a lot of use in this install (especially the power driver/drill) – but they’re needed first to construct your cabinet boxes (Sektion pieces). We love constructing the boxes first because you quickly get to see the shape of your kitchen come to life.

And even though Ikea is known for their allen wrenches, you don’t use them AT ALL during a typical kitchen installation! So don’t worry about having lots of specialty drill bits. You just need a normal Phillips head to screw these puppies together.
3. Hammer
You’ll also need a hammer handy to nail the MDF backings onto the cabinet backs. It may also be useful if you need to tap any anchors into your drywall when it comes time to hang your cabinets.
4. Magnetic Drill Bit Holder
Having one of these on your drill can save you a lot of frustration while building your cabinets and drawers. You can buy one separately for about $2 or it often comes included in drill/driver sets like ours. It’ll magnetize your drill bits, meaning many of the screws that Ikea provides will stick to your drill handsfree (thanks to the magic of magnets). We found this VERY helpful when trying to screw into small spots that were too tight for our fingertips (we couldn’t reach in and hold the screw steady, so having a magnetized drill bit that held it for us was key).

5. Measuring Tape
The next several tools are needed for attaching your cabinets to the wall. Whether you’re doing upper or lower cabinets, Ikea’s system uses a metal track (called the Sektion suspension rail) that you attach to your wall and then the cabinet boxes hang from these. The rail system is extremely handy because if you make sure the rail is level, your cabinets all hang from that and are guaranteed to be level! I know, it’s GREAT. The only time I don’t use their rail is when I don’t have a wall behind my cabinets, like if you’re doing an island. In that case I’ve built my own bases from 2×4″s, but more on that later.
For now, just know the measuring tape will be useful in determining exactly where in your kitchen you’re placing your cabinets – both side-to-side on each wall, and how high the rails need to be hung (Ikea provides guides for this in their instructions). You will probably want to have your kitchen plan/schematic from Ikea handy too.
6. Dremel Or Hacksaw
Once you know where each run of cabinets is going, you’ll need to cut your metal suspension rails to size. The rails are sold in 7 foot lengths, but if you only have 4 feet of cabinetry in one area – you only want 4 feet of rail.
You can cut these by hand with a hacksaw, but we find it much faster to use our Dremel Multi-Max with a metal cutting blade.
I typically mark my cut on a piece of painters tape and cut across the open top of one of our cabinet boxes (with a piece of cardboard to protect the cabinet underneath).
7. Stud Finder
You want to screw the rail into at least a few studs in your wall for maximum hold. So it’s smart to use a stud finder to locate and mark the studs that fall within the area you’re hanging the rail – that way you can be sure to go into them and get a nice firm hold. Since studs are typically 1.5″ thick, I like to mark the full width that my stud finder indicates, since you may not know exactly where the holes on the Sektion rail will line up.

8. Medium-Size Level
Once I know where my studs are, I hold my cut-to-size metal rail and, with a medium sized level (like this 24″ level) held against it, I mark the top line of my rail AND where the holes line up with my studs. I suggest amedium sized level for this just because they’re easier to wrangle during this step.

I also mark a few additional holes where I’ll use screws paired with anchors. I believe Ikea suggests at least having a screw every 12″ inches – but for short sections like this, I like to make sure I hit at least 2 studs and then have a screw at either end of the rail that goes into an anchor.
9. Heavy Duty Screws & Anchors
After some trial and error, we found that we like using these GRK Fastener Cabinet Screws to secure our rails into studs. They’re easy to drive, they hold really tight, and they include the star-head bit you need for them. We have tried other, cheaper “cabinet screws” and the heads kept breaking off. It was MADDENING.

We also like to have some anchors on hand too, like these E-Z Ancor packs that come with screws, for those additional support screws that we add.
10. Long Level
One of the biggest challenges we’ve found in this process is getting things level. Just because you’ve hung your rail level on the wall doesn’t prevent things like slopes in your floor or bows in your wall from chucking some additional curveballs in your direction. So your best defenses are a lot of patience and a nice long level, like this 4ft level we bought specifically for this task (after learning that it’s a lot harder to use a smaller level to solve these issues).

Your medium sized level will help with the process as well (especially in checking that each individual cabinet is level front-to-back) but you’ll want something bigger to check longer spans of cabinets. You could purchase an even longer level if you wanted, but they can start to get pricey, so we found a 4 foot long level to be sufficient, especially for checking across the gaps that you’ll leave for appliances like a 30″ stove or a standard 24″ dishwasher.
11. Shims
A lot of level issues can be corrected by twisting the adjustable plastic feet that come with your base cabinets, or by adjusting the placement of your metal rail. But if you’re dealing with bows in your wall (which you can find by placing your long level against it) you’ll want to have some wood shims on hand to place behind the metal rail. In these old houses, we had to use quite a few in a couple of places!

12. Jigsaw
When it comes time to install your sink base cabinet, you’ll need to make some holes for your plumbing. For smaller pipes like your water supply lines, you can just drill holes using a large drill bit (we used the 3/4″ bit in this set). But for things like your large drain pipe, you’ll either need to buy a larger hole bit or break out a jigsaw. Even though we don’t get the cleanest cut with it, the jigsaw gives us a little more wiggle room when placing the cabinet (since the drain pipe isn’t flexible like the supply lines) and we can also use it for other cuts like for exposing the outlets along the wall (the one below powers the garbage disposal under the sink).

Just be sure to make careful measurements before you cut. We usually put a layer of painters tape around the area we’re cutting. It allows us to mark our cut without marking the cabinet, plus the tape helps keep the white finish from cracking off. Either way, this stuff will all be hidden under the sink so it doesn’t have to look perfect.
13. Clamps
As you start to get your cabinets in place and leveled, you’ll want to secure any adjacent cabinets together. Ikea provides screws for doing this, but you’ll want to use some clamps (we like these 6″ bar clamps) to hold the cabinets tightly together before you begin screwing.
We didn’t get a picture of that process, but the clamps come in handy A LOT as an extra set of hands – like when we were installing this bracket for the exhaust hoods that we hung over the stoves.

14. Circular Saw and/or Table Saw
In addition to screwing cabinets together, you may find yourself attaching cover panels or filler pieces at some point. Cover panels go on exposed ends of cabinets (so you can’t see the metal rail they hang on) or, in our case, we used some large cover panels to create a box around the fridges at the duplex. So you’ll need some sort of larger saw to make long, straight cuts. Our cover panels were a bit too wide, so I used a circular saw to shave a few inches off one side.

I didn’t use a table saw for that panel because running an 8 foot tall panel that’s this wide across my table saw would’ve been tough. But for smaller pieces (like filler pieces that are only about 3 feet long) a table saw is often easier, especially if you’re only shaving off a little bit. But if that’s too pricey and you’ve got a steady hand, you can get by with the circular saw.
15. 2 x 4″ Boards
Every time we’ve installed an Ikea kitchen we’ve needed some 2×4″s at some point. At the beach house we used them to make some bases for the island cabinets.

Basically, they were just some boxes we made almost the same size as each cabinet (slightly narrower to account for the toekicks) that we secured to the floor using pocket holes. To drill the pocket holes, you can use something like a…
16. Kreg Jig
Now, a Kreg Jig isn’t absolutely necessary here, but I’ve had one for around nine years now so I’m accustomed to breaking it out for tasks like this. So while I’m a big fan of having one in your arsenal, I understand that you’ve just bought a new kitchen so tacking on another $99 tool to your budget isn’t always practical.
I did use it again for the duplexes to make more 2×4″s into boxes (this time for mounting the above-fridge cabinet away from the wall, so it sat closer to the front of the fridge).

The boxes acted as an extension of the wall. The top one was for mounting the metal rail, and the bottom one gave the base of the cabinet a spot to rest so it didn’t tip back wildly. They also gave us a way to mount that large cover panel to box in the fridge.

I guess I should add in here that a step ladder is also useful, so let’s officially put that on the list.
17. Manual Screwdriver
Once your cabinets and panels are hung, leveled, and secured to each other, the next part of the process is to add your doors and drawers. The instructions here are pretty self-explanatory and the main tool you need is a power driver to screw everything together. Our main word of warning is to pay close attention to screw placements when you’re assembling drawers! Depending on where each drawer goes in the stack (top, middle, or bottom) there are sliiiiight differences in the instructions. So while we find it most efficient to do multiple drawers at once, we still pay close attention – especially for the first few.

Ok, back to the manual screw drivers. One big part of installing doors and drawers is tweaking and adjusting them for even and level spacing. For this you’ll want to a regular ol‘ manual Philips head screwdriver. It can be kind of tedious and frustrating, but it’s worth taking your time with it. This video shows it in a bit more detail.

You also will want a flathead screwdriver for twisting the little piece of plastic that locks each cabinet onto the metal rail, which comes up earlier in the process.
18. Miter Saw
Tasks like cutting your 2×4″s or even your filler pieces will be made easier and faster by having a miter saw on hand (we own this miter saw). You’ll also find that it’s helpful when it’s time to cut and install your toekicks. Ikea’s sells toekicks to match your cabinet fronts and they clip on to the plastic feet you will have attached to the bottom of your base cabinets.

In our beach house kitchen we installed quarter round in front of the Ikea baseboards to help disguise some floor level issues, as well as using quarter round around the island where we built our own base (we used standard wood baseboard trim instead of the Ikea toekicks around the island). Meanwhile, we just used the Ikea toekicks in the duplex kitchens and the floors were more level (and we think the wood and blue cabinets were more forgiving than white ones) so we didn’t need to add quarter round and it looks great.

19. Nail Gun
In addition to using a nail gun to attach additional molding like quarter round if you’re adding that (again, the Ikea baseboards just snap on so you won’t need it for that) I also find a nail gun comes in handy sometimes for attaching small filler pieces. Especially in cases where they’re too thin to take a screw.
20. Others Tools
Real quick, here are some other items you may want to have on hand. Some I’ve mentioned or shown already, but haven’t officially listed:
Pen or pencil
Painters tape
Step ladder
Utility knife or scissors (for opening boxes faster!)
Crowbar (if you need to remove any baseboard or molding)
Broom, dustpan, and/or vacuum with a hose (we have this one)

Your Ikea Kitchen Installation Tool Checklist
As promised, here’s all of the items in one place so you can make sure you have everything you need on hand. I’ve organized it a bit differently than above, just to put like items together. You may have special circumstances for your project that require more, less, or other tools – but I’ve found this to be a pretty comprehensive set:
Your itemized receipt / order
Hammer
Manual screwdrivers
Crowbar
Measuring tape
Pen or pencil
Painters tape
Step ladder
Power driver
Drill bit set with magnetic bit holder & 3/4″ bit for plumbing holes
Dremel or Hacksaw
Stud finder
Medium level (24″)
Large level (48″)
Wood shims
Cabinet screws (roughly 4 per cabinet)
Screws with anchors (roughly 2 per cabinet)
Jigsaw
Circular saw and/or table saw
Miter saw
Utility knife or scissors
Nail gun
Clamps
2×4″s (optional)
Kreg Jig (optional)
Broom, dustpan, and/or vacuum with hose
Good luck and happy installing!
P.S. For other posts we’ve written about installing Ikea cabinets, here’s one about installing our laundry room cabinets 5 years ago, and another one about using Ikea cabinets to make a wall of built-ins for our bonus room.
*This post contains affiliate links*
The post The Tools (And Tricks) You Need To Install An Ikea Kitchen Yourself appeared first on Young House Love.
0 notes
Text
The Tools (And Tricks) You Need To Install An Ikea Kitchen Yourself
Many of you have asked for tips and tricks to make installing an Ikea kitchen go more smoothly and look (and function) the best it possibly can. And the good news is that after installing three of them in a little over a year and a half (!!!), we have learned A TON about how to make things a little easier and help you end up with a better result. So settle in, I’ve got twenty tools & tips that can make all the difference.

First off, we like Ikea cabinets and have personally installed them in five rooms: our laundry room & bonus room at home, our beach house kitchen, and now these two duplex kitchens. We have lived with the ones in our home for nearly five years and they’re great. Not a single issue. They are smartly made, very durable, and they have a great 25-year warranty and a great price tag (often thousands cheaper than other options). They also come with many thoughtful features like soft close drawers that come standard and tons of customization options. So yeah, some Ikea furniture is known for feeling a little cheap and wobbly, but that has not been our experience with their cabinets AT ALL.
Ok, but back to the point of this post – tips and tools to make your Ikea cabinet install easier. Some of the tools I’m listing here are absolutely necessary and some are optional (they’ll just make the process easier, faster, and less frustrating). And as you read through this list, I think you’ll also get a pretty good sense of the steps (and curveballs) involved too, which I hope will help as well.
I’ll include a short bulleted list of everything at the end of the post too, that way you can use it as a tool checklist. But let’s just get right into it.

1. Your Itemized Receipt/Order
Before you build anything, you’ll want to take time to inventory and organize all of your boxes. We had over 200 boxes (!!!) delivered for our two duplex kitchens, so it helped to sort everything into piles beforehand.

We personally like to sort boxes by item (Sektion boxes over here, Maximera drawers over there, all of our cabinet fronts somewhere else, etc.) but you may find it helpful to sort yours by cabinet instead (ex: the box, drawer, hinges, and front for one cabinet all together in one pile – this is how Ikea breaks them up your order form). Either way you do it, this sorting process will help you identify any missing pieces and also make it faster once you start building.
2. Power driver (with Philips head)

This combo gets a lot of use in this install (especially the power driver/drill) – but they’re needed first to construct your cabinet boxes (Sektion pieces). We love constructing the boxes first because you quickly get to see the shape of your kitchen come to life.
And even though Ikea is known for their allen wrenches, you don’t use them AT ALL during a typical kitchen installation! So don’t worry about having lots of specialty drill bits. You just need a normal Phillips head to screw these puppies together.
3. Hammer
You’ll also need a hammer handy to nail the MDF backings onto the cabinet backs. It may also be useful if you need to tap any anchors into your drywall when it comes time to hang your cabinets.
4. Magnetic Drill Bit Holder
Having one of these on your drill can save you a lot of frustration while building your cabinets and drawers. You can buy one separately for about $2 or it often comes included in drill/driver sets like ours. It’ll magnetize your drill bits, meaning many of the screws that Ikea provides will stick to your drill handsfree (thanks to the magic of magnets). We found this VERY helpful when trying to screw into small spots that were too tight for our fingertips (we couldn’t reach in and hold the screw steady, so having a magnetized drill bit that held it for us was key).

5. Measuring Tape
The next several tools are needed for attaching your cabinets to the wall. Whether you’re doing upper or lower cabinets, Ikea’s system uses a metal track (called the Sektion suspension rail) that you attach to your wall and then the cabinet boxes hang from these. The rail system is extremely handy because if you make sure the rail is level, your cabinets all hang from that and are guaranteed to be level! I know, it’s GREAT. The only time I don’t use their rail is when I don’t have a wall behind my cabinets, like if you’re doing an island. In that case I’ve built my own bases from 2×4″s, but more on that later.
For now, just know the measuring tape will be useful in determining exactly where in your kitchen you’re placing your cabinets – both side-to-side on each wall, and how high the rails need to be hung (Ikea provides guides for this in their instructions). You will probably want to have your kitchen plan/schematic from Ikea handy too.

6. Dremel Or Hacksaw
Once you know where each run of cabinets is going, you’ll need to cut your metal suspension rails to size. The rails are sold in 7 foot lengths, but if you only have 4 feet of cabinetry in one area – you only want 4 feet of rail.
You can cut these by hand with a hacksaw, but we find it much faster to use our Dremel Multi-Max with a metal cutting blade.

I typically mark my cut on a piece of painters tape and cut across the open top of one of our cabinet boxes (with a piece of cardboard to protect the cabinet underneath).
7. Stud Finder
You want to screw the rail into at least a few studs in your wall for maximum hold. So it’s smart to use a stud finder to locate and mark the studs that fall within the area you’re hanging the rail – that way you can be sure to go into them and get a nice firm hold. Since studs are typically 1.5″ thick, I like to mark the full width that my stud finder indicates, since you may not know exactly where the holes on the Sektion rail will line up.

8. Medium-Size Level
Once I know where my studs are, I hold my cut-to-size metal rail and, with a medium sized level (like this 24″ level) held against it, I mark the top line of my rail AND where the holes line up with my studs. I suggest amedium sized level for this just because they’re easier to wrangle during this step.

I also mark a few additional holes where I’ll use screws paired with anchors. I believe Ikea suggests at least having a screw every 12″ inches – but for short sections like this, I like to make sure I hit at least 2 studs and then have a screw at either end of the rail that goes into an anchor.
9. Heavy Duty Screws & Anchors
After some trial and error, we found that we like using these GRK Fastener Cabinet Screws to secure our rails into studs. They’re easy to drive, they hold really tight, and they include the star-head bit you need for them. We have tried other, cheaper “cabinet screws” and the heads kept breaking off. It was MADDENING.
We also like to have some anchors on hand too, like these E-Z Ancor packs that come with screws, for those additional support screws that we add.
10. Long Level
One of the biggest challenges we’ve found in this process is getting things level. Just because you’ve hung your rail level on the wall doesn’t prevent things like slopes in your floor or bows in your wall from chucking some additional curveballs in your direction. So your best defenses are a lot of patience and a nice long level, like this 4ft level we bought specifically for this task (after learning that it’s a lot harder to use a smaller level to solve these issues).

Your medium sized level will help with the process as well (especially in checking that each individual cabinet is level front-to-back) but you’ll want something bigger to check longer spans of cabinets. You could purchase an even longer level if you wanted, but they can start to get pricey, so we found a 4 foot long level to be sufficient, especially for checking across the gaps that you’ll leave for appliances like a 30″ stove or a standard 24″ dishwasher.
11. Shims
A lot of level issues can be corrected by twisting the adjustable plastic feet that come with your base cabinets, or by adjusting the placement of your metal rail. But if you’re dealing with bows in your wall (which you can find by placing your long level against it) you’ll want to have some wood shims on hand to place behind the metal rail. In these old houses, we had to use quite a few in a couple of places!

12. Jigsaw
When it comes time to install your sink base cabinet, you’ll need to make some holes for your plumbing. For smaller pipes like your water supply lines, you can just drill holes using a large drill bit (we used the 3/4″ bit in this set). But for things like your large drain pipe, you’ll either need to buy a larger hole bit or break out a jigsaw. Even though we don’t get the cleanest cut with it, the jigsaw gives us a little more wiggle room when placing the cabinet (since the drain pipe isn’t flexible like the supply lines) and we can also use it for other cuts like for exposing the outlets along the wall (the one below powers the garbage disposal under the sink).

Just be sure to make careful measurements before you cut. We usually put a layer of painters tape around the area we’re cutting. It allows us to mark our cut without marking the cabinet, plus the tape helps keep the white finish from cracking off. Either way, this stuff will all be hidden under the sink so it doesn’t have to look perfect.
13. Clamps
As you start to get your cabinets in place and leveled, you’ll want to secure any adjacent cabinets together. Ikea provides screws for doing this, but you’ll want to use some clamps (we like these 6″ bar clamps) to hold the cabinets tightly together before you begin screwing.
We didn’t get a picture of that process, but the clamps come in handy A LOT as an extra set of hands – like when we were installing this bracket for the exhaust hoods that we hung over the stoves.

14. Circular Saw and/or Table Saw
In addition to screwing cabinets together, you may find yourself attaching cover panels or filler pieces at some point. Cover panels go on exposed ends of cabinets (so you can’t see the metal rail they hang on) or, in our case, we used some large cover panels to create a box around the fridges at the duplex. So you’ll need some sort of larger saw to make long, straight cuts. Our cover panels were a bit too wide, so I used a circular saw to shave a few inches off one side.
I didn’t use a table saw for that panel because running an 8 foot tall panel that’s this wide across my table saw would’ve been tough. But for smaller pieces (like filler pieces that are only about 3 feet long) a table saw is often easier, especially if you’re only shaving off a little bit. But if that’s too pricey and you’ve got a steady hand, you can get by with the circular saw.
15. 2 x 4″ Boards
Every time we’ve installed an Ikea kitchen we’ve needed some 2×4″s at some point. At the beach house we used them to make some bases for the island cabinets.

Basically, they were just some boxes we made almost the same size as each cabinet (slightly narrower to account for the toekicks) that we secured to the floor using pocket holes. To drill the pocket holes, you can use something like a…
16. Kreg Jig
Now, a Kreg Jig isn’t absolutely necessary here, but I’ve had one for around nine years now so I’m accustomed to breaking it out for tasks like this. So while I’m a big fan of having one in your arsenal, I understand that you’ve just bought a new kitchen so tacking on another $99 tool to your budget isn’t always practical.
I did use it again for the duplexes to make more 2×4″s into boxes (this time for mounting the above-fridge cabinet away from the wall, so it sat closer to the front of the fridge).
The boxes acted as an extension of the wall. The top one was for mounting the metal rail, and the bottom one gave the base of the cabinet a spot to rest so it didn’t tip back wildly. They also gave us a way to mount that large cover panel to box in the fridge.

I guess I should add in here that a step ladder is also useful, so let’s officially put that on the list.
17. Manual Screwdriver
Once your cabinets and panels are hung, leveled, and secured to each other, the next part of the process is to add your doors and drawers. The instructions here are pretty self-explanatory and the main tool you need is a power driver to screw everything together. Our main word of warning is to pay close attention to screw placements when you’re assembling drawers! Depending on where each drawer goes in the stack (top, middle, or bottom) there are sliiiiight differences in the instructions. So while we find it most efficient to do multiple drawers at once, we still pay close attention – especially for the first few.

Ok, back to the manual screw drivers. One big part of installing doors and drawers is tweaking and adjusting them for even and level spacing. For this you’ll want to a regular ol‘ manual Philips head screwdriver. It can be kind of tedious and frustrating, but it’s worth taking your time with it. This video shows it in a bit more detail.

You also will want a flathead screwdriver for twisting the little piece of plastic that locks each cabinet onto the metal rail, which comes up earlier in the process.
18. Miter Saw
Tasks like cutting your 2×4″s or even your filler pieces will be made easier and faster by having a miter saw on hand (we own this miter saw). You’ll also find that it’s helpful when it’s time to cut and install your toekicks. Ikea’s sells toekicks to match your cabinet fronts and they clip on to the plastic feet you will have attached to the bottom of your base cabinets.
In our beach house kitchen we installed quarter round in front of the Ikea baseboards to help disguise some floor level issues, as well as using quarter round around the island where we built our own base (we used standard wood baseboard trim instead of the Ikea toekicks around the island). Meanwhile, we just used the Ikea toekicks in the duplex kitchens and the floors were more level (and we think the wood and blue cabinets were more forgiving than white ones) so we didn’t need to add quarter round and it looks great.

19. Nail Gun
In addition to using a nail gun to attach additional molding like quarter round if you’re adding that (again, the Ikea baseboards just snap on so you won’t need it for that) I also find a nail gun comes in handy sometimes for attaching small filler pieces. Especially in cases where they’re too thin to take a screw.
20. Others Tools
Real quick, here are some other items you may want to have on hand. Some I’ve mentioned or shown already, but haven’t officially listed:
Pen or pencil
Painters tape
Step ladder
Utility knife or scissors (for opening boxes faster!)
Crowbar (if you need to remove any baseboard or molding)
Broom, dustpan, and/or vacuum with a hose (we have this one)

Your Ikea Kitchen Installation Tool Checklist
As promised, here’s all of the items in one place so you can make sure you have everything you need on hand. I’ve organized it a bit differently than above, just to put like items together. You may have special circumstances for your project that require more, less, or other tools – but I’ve found this to be a pretty comprehensive set:
Your itemized receipt / order
Hammer
Manual screwdrivers
Crowbar
Measuring tape
Pen or pencil
Painters tape
Step ladder
Power driver
Drill bit set with magnetic bit holder & 3/4″ bit for plumbing holes
Dremel or Hacksaw
Stud finder
Medium level (24″)
Large level (48″)
Wood shims
Cabinet screws (roughly 4 per cabinet)
Screws with anchors (roughly 2 per cabinet)
Jigsaw
Circular saw and/or table saw
Miter saw
Utility knife or scissors
Nail gun
Clamps
2×4″s (optional)
Kreg Jig (optional)
Broom, dustpan, and/or vacuum with hose
Good luck and happy installing!
P.S. For other posts we’ve written about installing Ikea cabinets, here’s one about installing our laundry room cabinets 5 years ago, and another one about using Ikea cabinets to make a wall of built-ins for our bonus room.
*This post contains affiliate links*
The post The Tools (And Tricks) You Need To Install An Ikea Kitchen Yourself appeared first on Young House Love.


The Tools (And Tricks) You Need To Install An Ikea Kitchen Yourself published first on https://landscapingmates.blogspot.com
0 notes
Text
Alice’s Tips For Calling Tech Support

As a sidenote I have never seen this gif before and it is delightful.
Hello everyone! Here are some tips on making your experience calling tech support less stressful for all parties! My resume for this comes from working in several call centers with different types of customer bases, my father doing the same, and questioning my fellow call center employees about their experiences. Spread this post! Make people’s lives easier! You may think some of these are obvious but they are not to everyone.
1. Be Prepared
- If you are calling about a device it should have some sort of serial number, please have this ready. If you have called in before you should have a ticket number, this is also useful to have. My coworkers and I have a specific look of frustration for when someone says “Oh let me grab that for you.”. Usually we also have a narrow list of things we can find you with! I have worked for both computer manufacturing companies and cell phone service companies, and neither can search by your first and last name, or rather, they can but it’s pointless. Your name will bring up dozens with the same name or slight variants. Specific is best.
2. Have A Basic Grasp of The Phonetic Alphabet
- Cell phone audio quality can be terribad, add background noise in and I am going to have trouble understanding you. Many serial numbers for products have letters mixed in (alpha numeric), giving these to me phonetically will cut down on your frustration and mine. I’ll also ask for your email phonetically as well! That’s Alpha Bravo Charlie by the way, not A as in Alpha, B as in Bravo. Other words work as well of course, U as in United, A as in Apple, and C as in Cat are pretty common. X for Xmas is pretty funny though.
3. Before You Try and Bond With Me
- I understand some people are very friendly, extroverted and naturally curious when talking to strangers. I am happy for you. Really. But please be aware for a lot of call center employees their are harshly judged on the time of their calls, as in that could make or break what schedule they can get, raises, or even keeping their job. So before you launch into how you spent one semester at a college I don’t care about in my state, keep that in mind. Also, you are not clever, nor unique for asking about your tech support person’s accent.
4. My Name Doesn’t Matter To You.
- Alright, so to be honest, this is probably just me. So my real name is slightly odd in it’s pronunciation. It’s not spelled the way it sounds, an there are a dozen ways to spell it. Nightmare growing up. Most people who try and repeat my name back to me get it wrong and you know I rarely correct them. Because this is customer service and it doesn’t matter. You can’t call back and ask for me personally, with any luck I’ll fix your ____ so I never have to talk to you again, and spending two minutes guiding you through my name and hearing you exclaim the same things everyone else does serves no purpose. So when people go “Did you say your name was ____?” I agree. They could call me anything that’s not a curse word and I would agree with “Sure”. A customer thought my name was a beer brand once and I agreed. Just don’t bother.
5. Don’t Be Using The Broken Thing
- This primarily applies to cell phones. Oh, and cars I guess. Don’t call me on your broken cell phone please, and if you do be prepared with a notebook for me to give you instructions without us.
6. Be Aware Of Your Warranty
- If you buy a computer from Best Buy (etc) it will usually come with a very limited one year manufacturers warranty. Again, very limited. You can often call and upgrade it. I suggest calling pretty quickly to find out what that warranty covers. Your Basic warranties like that are also usually hardware based, software is more of a fancy warranty thing or the other manufacturer, such as Adobe, Microsoft, etc. Sometimes your Cell Phone Service Company (Sprint, AT&T, Cricket, Verizon, etc) will send you to the manufacturer such as Samsung or Apple. At the end of the day those companies only provide/are liable for service of your phone.
7. Being A Bully Is Often Fruitless.
- At the Cell Phone Service Company I worked for people constantly demanded credit on their bill, or free stuff. Some of them yelled, some of them cursed, some of them said really mean things like how do you sleep at night (very well, thank you), or even threats. Some of them made people cry to get what they wanted. When you do this, or when you ask for a supervisor, this is what we call an escalation. I was promoted and I was basically paid to take these, to get abused. So none of that phased me, and if you went above me I would find a Manager who I knew would say no (because some of them did say yes out of laziness). You know what will often work in getting you compensation of some sort? Facts. Keep a record. My computer Blue Screened on these dates this month or I had 20 dropped calls on these dates because those things are often (though not always) verifiable. I can take those to a manger and often get you something. Again. Not always.
Lastly....
8. Ask If You’re In The Right Department
- There are often dozens of departments for different things in big companies. Before you give a ten minute explanation about what is going on ask if you are talking to the right person!
- I have questions about my recent healthcare claim, am I in the right place?
- I need tech support for my internet, rather than my home security, am I in the right place?
- I need help with my desktop, am I in the right place?
Don’t assume the Automated System did you right buddy. Also, when you do get to the right place, ask if they have a direct number for next time!
Thank you for reading, have a good one!
11 notes
·
View notes
Text
Life Update #4
It occurs to me that I haven’t really updated about what’s been going on with me since last time SO
Uh, well, I have a new car now. It’s nice, and it’s got a good warranty on it so I don’t have to worry about repairs and stuff for long, long time.
Unfortunately I’ve now got ridiculous car payments and a hike in insurance that’s happening when I’ve also had a lot of hours cut at my job. So money has been. Rough. Been looking for a second job, have had two or three near-hits but something has always happened to just push me out of it. So that’s stressful.
BUT on the bright side, other than still being stressed, I’m doing a lot better mentally and am on my way to feeling better physically. Went to a doctor for the first time in like... 8 years almost(I haven’t had insurance until recently. Thanks Obama! Thanks WA!) and have started to address some issues I’ve had for years and were making me feel way more crap than I realized.
Like, there’s still some issues I gotta get sorted, but being on the WAY to it feels a lot better. And already I feel much less lethargic and tense. I’m hoping to get some mental health taken care of once I’ve worked some of the physical stuff out but, you know. Baby steps.
So yeah, currently just taking things one day at a time and hoping for the best! I’m at least SLIGHTLY less of a wreck than I have been so that’s somethin!
Kase out
14 notes
·
View notes
Text
The Tools (And Tricks) You Need To Install An Ikea Kitchen Yourself
Many of you have asked for tips and tricks to make installing an Ikea kitchen go more smoothly and look (and function) the best it possibly can. And the good news is that after installing three of them in a little over a year and a half (!!!), we have learned A TON about how to make things a little easier and help you end up with a better result. So settle in, I’ve got twenty tools & tips that can make all the difference.

First off, we like Ikea cabinets and have personally installed them in five rooms: our laundry room & bonus room at home, our beach house kitchen, and now these two duplex kitchens. We have lived with the ones in our home for nearly five years and they’re great. Not a single issue. They are smartly made, very durable, and they have a great 25-year warranty and a great price tag (often thousands cheaper than other options). They also come with many thoughtful features like soft close drawers that come standard and tons of customization options. So yeah, some Ikea furniture is known for feeling a little cheap and wobbly, but that has not been our experience with their cabinets AT ALL.
Ok, but back to the point of this post – tips and tools to make your Ikea cabinet install easier. Some of the tools I’m listing here are absolutely necessary and some are optional (they’ll just make the process easier, faster, and less frustrating). And as you read through this list, I think you’ll also get a pretty good sense of the steps (and curveballs) involved too, which I hope will help as well.

I’ll include a short bulleted list of everything at the end of the post too, that way you can use it as a tool checklist. But let’s just get right into it.

1. Your Itemized Receipt/Order
Before you build anything, you’ll want to take time to inventory and organize all of your boxes. We had over 200 boxes (!!!) delivered for our two duplex kitchens, so it helped to sort everything into piles beforehand.
We personally like to sort boxes by item (Sektion boxes over here, Maximera drawers over there, all of our cabinet fronts somewhere else, etc.) but you may find it helpful to sort yours by cabinet instead (ex: the box, drawer, hinges, and front for one cabinet all together in one pile – this is how Ikea breaks them up your order form). Either way you do it, this sorting process will help you identify any missing pieces and also make it faster once you start building.
2. Power driver (with Philips head)
This combo gets a lot of use in this install (especially the power driver/drill) – but they’re needed first to construct your cabinet boxes (Sektion pieces). We love constructing the boxes first because you quickly get to see the shape of your kitchen come to life.

And even though Ikea is known for their allen wrenches, you don’t use them AT ALL during a typical kitchen installation! So don’t worry about having lots of specialty drill bits. You just need a normal Phillips head to screw these puppies together.
3. Hammer
You’ll also need a hammer handy to nail the MDF backings onto the cabinet backs. It may also be useful if you need to tap any anchors into your drywall when it comes time to hang your cabinets.
4. Magnetic Drill Bit Holder
Having one of these on your drill can save you a lot of frustration while building your cabinets and drawers. You can buy one separately for about $2 or it often comes included in drill/driver sets like ours. It’ll magnetize your drill bits, meaning many of the screws that Ikea provides will stick to your drill handsfree (thanks to the magic of magnets). We found this VERY helpful when trying to screw into small spots that were too tight for our fingertips (we couldn’t reach in and hold the screw steady, so having a magnetized drill bit that held it for us was key).
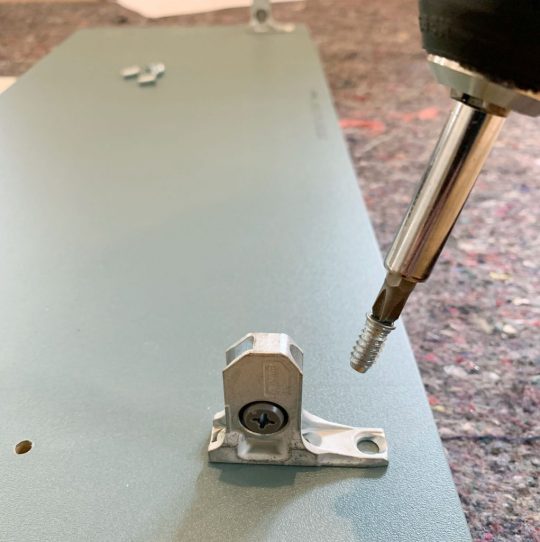
5. Measuring Tape
The next several tools are needed for attaching your cabinets to the wall. Whether you’re doing upper or lower cabinets, Ikea’s system uses a metal track (called the Sektion suspension rail) that you attach to your wall and then the cabinet boxes hang from these. The rail system is extremely handy because if you make sure the rail is level, your cabinets all hang from that and are guaranteed to be level! I know, it’s GREAT. The only time I don’t use their rail is when I don’t have a wall behind my cabinets, like if you’re doing an island. In that case I’ve built my own bases from 2×4″s, but more on that later.
For now, just know the measuring tape will be useful in determining exactly where in your kitchen you’re placing your cabinets – both side-to-side on each wall, and how high the rails need to be hung (Ikea provides guides for this in their instructions). You will probably want to have your kitchen plan/schematic from Ikea handy too.

6. Dremel Or Hacksaw
Once you know where each run of cabinets is going, you’ll need to cut your metal suspension rails to size. The rails are sold in 7 foot lengths, but if you only have 4 feet of cabinetry in one area – you only want 4 feet of rail.
You can cut these by hand with a hacksaw, but we find it much faster to use our Dremel Multi-Max with a metal cutting blade.

I typically mark my cut on a piece of painters tape and cut across the open top of one of our cabinet boxes (with a piece of cardboard to protect the cabinet underneath).
7. Stud Finder
You want to screw the rail into at least a few studs in your wall for maximum hold. So it’s smart to use a stud finder to locate and mark the studs that fall within the area you’re hanging the rail – that way you can be sure to go into them and get a nice firm hold. Since studs are typically 1.5″ thick, I like to mark the full width that my stud finder indicates, since you may not know exactly where the holes on the Sektion rail will line up.
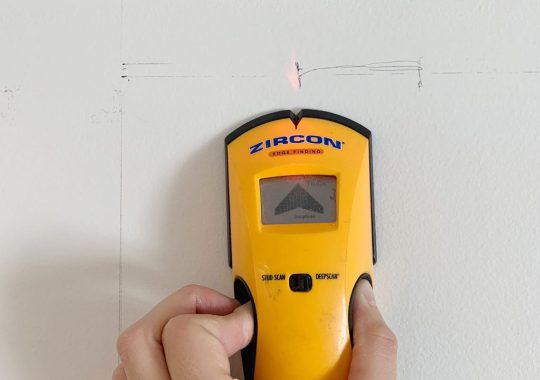
8. Medium-Size Level
Once I know where my studs are, I hold my cut-to-size metal rail and, with a medium sized level (like this 24″ level) held against it, I mark the top line of my rail AND where the holes line up with my studs. I suggest amedium sized level for this just because they’re easier to wrangle during this step.
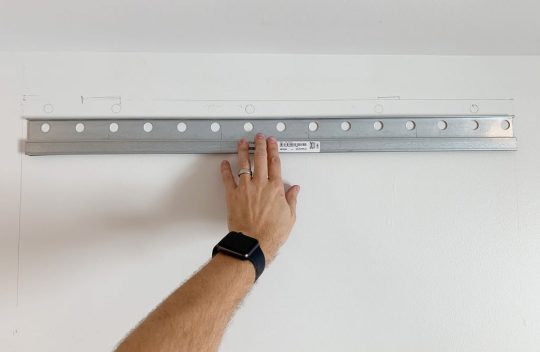
I also mark a few additional holes where I’ll use screws paired with anchors. I believe Ikea suggests at least having a screw every 12″ inches – but for short sections like this, I like to make sure I hit at least 2 studs and then have a screw at either end of the rail that goes into an anchor.
9. Heavy Duty Screws & Anchors
After some trial and error, we found that we like using these GRK Fastener Cabinet Screws to secure our rails into studs. They’re easy to drive, they hold really tight, and they include the star-head bit you need for them. We have tried other, cheaper “cabinet screws” and the heads kept breaking off. It was MADDENING.

We also like to have some anchors on hand too, like these E-Z Ancor packs that come with screws, for those additional support screws that we add.
10. Long Level
One of the biggest challenges we’ve found in this process is getting things level. Just because you’ve hung your rail level on the wall doesn’t prevent things like slopes in your floor or bows in your wall from chucking some additional curveballs in your direction. So your best defenses are a lot of patience and a nice long level, like this 4ft level we bought specifically for this task (after learning that it’s a lot harder to use a smaller level to solve these issues).

Your medium sized level will help with the process as well (especially in checking that each individual cabinet is level front-to-back) but you’ll want something bigger to check longer spans of cabinets. You could purchase an even longer level if you wanted, but they can start to get pricey, so we found a 4 foot long level to be sufficient, especially for checking across the gaps that you’ll leave for appliances like a 30″ stove or a standard 24″ dishwasher.
11. Shims
A lot of level issues can be corrected by twisting the adjustable plastic feet that come with your base cabinets, or by adjusting the placement of your metal rail. But if you’re dealing with bows in your wall (which you can find by placing your long level against it) you’ll want to have some wood shims on hand to place behind the metal rail. In these old houses, we had to use quite a few in a couple of places!

12. Jigsaw
When it comes time to install your sink base cabinet, you’ll need to make some holes for your plumbing. For smaller pipes like your water supply lines, you can just drill holes using a large drill bit (we used the 3/4″ bit in this set). But for things like your large drain pipe, you’ll either need to buy a larger hole bit or break out a jigsaw. Even though we don’t get the cleanest cut with it, the jigsaw gives us a little more wiggle room when placing the cabinet (since the drain pipe isn’t flexible like the supply lines) and we can also use it for other cuts like for exposing the outlets along the wall (the one below powers the garbage disposal under the sink).

Just be sure to make careful measurements before you cut. We usually put a layer of painters tape around the area we’re cutting. It allows us to mark our cut without marking the cabinet, plus the tape helps keep the white finish from cracking off. Either way, this stuff will all be hidden under the sink so it doesn’t have to look perfect.
13. Clamps
As you start to get your cabinets in place and leveled, you’ll want to secure any adjacent cabinets together. Ikea provides screws for doing this, but you’ll want to use some clamps (we like these 6″ bar clamps) to hold the cabinets tightly together before you begin screwing.
We didn’t get a picture of that process, but the clamps come in handy A LOT as an extra set of hands – like when we were installing this bracket for the exhaust hoods that we hung over the stoves.

14. Circular Saw and/or Table Saw
In addition to screwing cabinets together, you may find yourself attaching cover panels or filler pieces at some point. Cover panels go on exposed ends of cabinets (so you can’t see the metal rail they hang on) or, in our case, we used some large cover panels to create a box around the fridges at the duplex. So you’ll need some sort of larger saw to make long, straight cuts. Our cover panels were a bit too wide, so I used a circular saw to shave a few inches off one side.

I didn’t use a table saw for that panel because running an 8 foot tall panel that’s this wide across my table saw would’ve been tough. But for smaller pieces (like filler pieces that are only about 3 feet long) a table saw is often easier, especially if you’re only shaving off a little bit. But if that’s too pricey and you’ve got a steady hand, you can get by with the circular saw.
15. 2 x 4″ Boards
Every time we’ve installed an Ikea kitchen we’ve needed some 2×4″s at some point. At the beach house we used them to make some bases for the island cabinets.
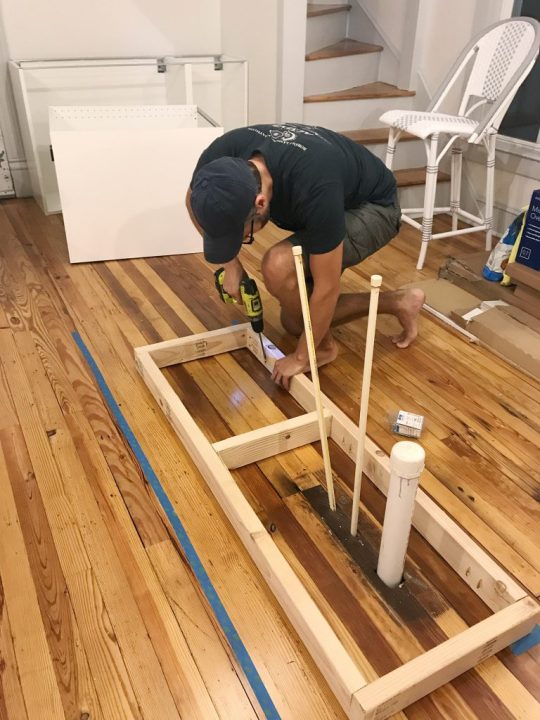
Basically, they were just some boxes we made almost the same size as each cabinet (slightly narrower to account for the toekicks) that we secured to the floor using pocket holes. To drill the pocket holes, you can use something like a…
16. Kreg Jig
Now, a Kreg Jig isn’t absolutely necessary here, but I’ve had one for around nine years now so I’m accustomed to breaking it out for tasks like this. So while I’m a big fan of having one in your arsenal, I understand that you’ve just bought a new kitchen so tacking on another $99 tool to your budget isn’t always practical.
I did use it again for the duplexes to make more 2×4″s into boxes (this time for mounting the above-fridge cabinet away from the wall, so it sat closer to the front of the fridge).

The boxes acted as an extension of the wall. The top one was for mounting the metal rail, and the bottom one gave the base of the cabinet a spot to rest so it didn’t tip back wildly. They also gave us a way to mount that large cover panel to box in the fridge.

I guess I should add in here that a step ladder is also useful, so let’s officially put that on the list.
17. Manual Screwdriver
Once your cabinets and panels are hung, leveled, and secured to each other, the next part of the process is to add your doors and drawers. The instructions here are pretty self-explanatory and the main tool you need is a power driver to screw everything together. Our main word of warning is to pay close attention to screw placements when you’re assembling drawers! Depending on where each drawer goes in the stack (top, middle, or bottom) there are sliiiiight differences in the instructions. So while we find it most efficient to do multiple drawers at once, we still pay close attention – especially for the first few.

Ok, back to the manual screw drivers. One big part of installing doors and drawers is tweaking and adjusting them for even and level spacing. For this you’ll want to use a regular ol‘ manual Philips head screwdriver. It can be kind of tedious and frustrating, but it’s worth taking your time with it. This video shows it in a bit more detail.

You also will want a flathead screwdriver for twisting the little piece of plastic that locks each cabinet onto the metal rail, which comes up earlier in the process.
18. Miter Saw
Tasks like cutting your 2×4″s or even your filler pieces will be made easier and faster by having a miter saw on hand (we own this miter saw). You’ll also find that it’s helpful when it’s time to cut and install your toekicks. Ikea’s sells toekicks to match your cabinet fronts and they clip on to the plastic feet you will have attached to the bottom of your base cabinets.

In our beach house kitchen we installed quarter round in front of the Ikea baseboards to help disguise some floor level issues, as well as using quarter round around the island where we built our own base (we used standard wood baseboard trim instead of the Ikea toekicks around the island). Meanwhile, we just used the Ikea toekicks in the duplex kitchens and the floors were more level (and we think the wood and blue cabinets were more forgiving than white ones) so we didn’t need to add quarter round and it looks great.
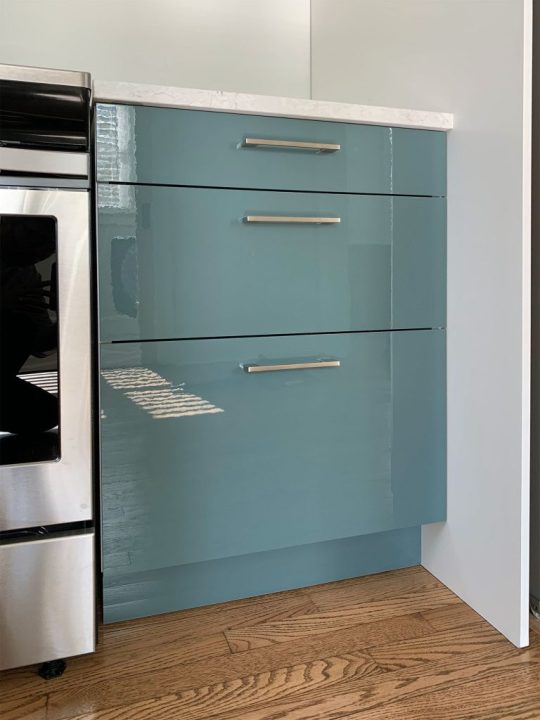
19. Nail Gun
In addition to using a nail gun to attach additional molding like quarter round if you’re adding that (again, the Ikea baseboards just snap on so you won’t need it for that) I also find a nail gun comes in handy sometimes for attaching small filler pieces. Especially in cases where they’re too thin to take a screw.
20. Others Tools
Real quick, here are some other items you may want to have on hand. Some I’ve mentioned or shown already, but haven’t officially listed:
Pen or pencil
Painters tape
Step ladder
Utility knife or scissors (for opening boxes faster!)
Crowbar (if you need to remove any baseboard or molding)
Broom, dustpan, and/or vacuum with a hose (we have this one)
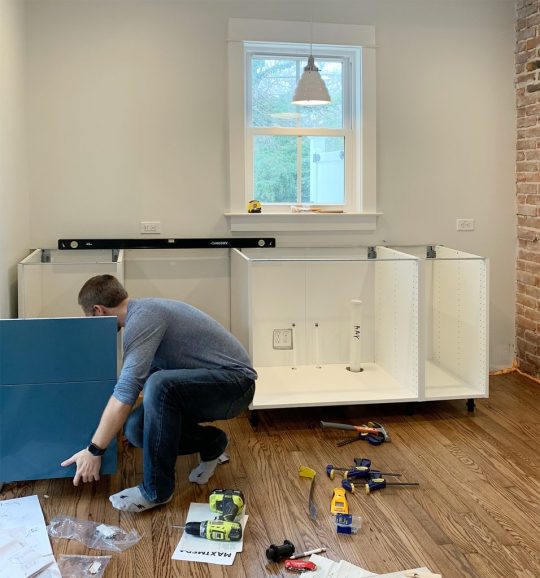
Your Ikea Kitchen Installation Tool Checklist
As promised, here’s all of the items in one place so you can make sure you have everything you need on hand. I’ve organized it a bit differently than above, just to put like items together. You may have special circumstances for your project that require more, less, or other tools – but I’ve found this to be a pretty comprehensive set:
Your itemized receipt / order
Hammer
Manual screwdrivers
Crowbar
Measuring tape
Pen or pencil
Painters tape
Step ladder
Power driver
Drill bit set with magnetic bit holder & 3/4″ bit for plumbing holes
Dremel or Hacksaw
Stud finder
Medium level (24″)
Large level (48″)
Wood shims
Cabinet screws (roughly 4 per cabinet)
Screws with anchors (roughly 2 per cabinet)
Jigsaw
Circular saw and/or table saw
Miter saw
Utility knife or scissors
Nail gun
Clamps
2×4″s (optional)
Kreg Jig (optional)
Broom, dustpan, and/or vacuum with hose
Good luck and happy installing!
P.S. For other posts we’ve written about installing Ikea cabinets, here’s one about installing our laundry room cabinets 5 years ago, and another one about using Ikea cabinets to make a wall of built-ins for our bonus room.
*This post contains affiliate links*
The post The Tools (And Tricks) You Need To Install An Ikea Kitchen Yourself appeared first on Young House Love.
The Tools (And Tricks) You Need To Install An Ikea Kitchen Yourself published first on https://bakerskitchenslimited.tumblr.com/
0 notes
Video
youtube
IFB 30 L Convection Microwave Oven (30BRC2, Black)https://amzn.to/3i5L0xi #Solo_Microwave #Grill_Microwave #Convection_Microwave https://amzn.to/3i5L0xi - IFB 30 L Convection Microwave Oven (30BRC2, Black) One of the item was damaged completely.....Product was okay but the base(glass) inside the oven was damaged Best Microwave...easy to use.... Very less sound... Unlike other microwaves....9 built-in menus are great.... With additional Rotisserie Convection for tandoors... Overall a very good Product Nice product. Packing was nice.Only roller ring is broken. Thank you ifb I saw a lot of convection microwaves. But this is one of the best convection microwave with this price this combind convention and microwave . And big trust with IFB value for money easy To use i think some part is missing (measuring mug) Excellent Product. I like this product. best one... timely delivered, provided a starter kit, ifb executive came for explaining all the features Excellent got for Rs 8791.00 including cash back which could not have been possible in market or on any site. Thanks to AMAZON. Excellent demo & installation by IFB and within 24 hrs. This is a multi purpose product maximum used for all generall action at home from pizza , cake to rice any thing will prepared with 1 or 2 easy steps very happy happy Am happy with this product 🥰 All in one and best value for money Very good best value product Demo baki hai... Nice product. Demo was given by company person. Amazon delivery was good. The product is good The product is great. Looks excellent. IFB is trusted brand.The plastic accessories given with the product are not upto the mark. All the grilling accessories are great. 30 ltr one is large enough for family of 5.Works great, timely delivered. Happy with Amazons service. I have been waiting to buy this oven for a long time. Happy to own it now. Its a great looking product with lot of menu options. I bought 2 year extended warranty too have peace of mind. Cheers n peace. I bought it on sale. The product is quite good. IFB makes nice microwave. Few of my known are using kitchen products of IFB. After their reviews, I bought it. Cons1.efficient2.power saving3.durable4. Good for large family(4-5person)5. Reliable what company saysPronsNot as such till now ...mrp can be little bit less. This is the best microwave oven by IFB. First of all I want to say whenever you order something online always check the seller rating as I always choose CLOUDTAIL the best seller on Amazon because the main thing of online purchasing is receiving our item in perfect condition. I ordered it from the seller cloudtail thats why I got my microwave oven in perfect condition. As like always Packaging was superb. Fast delivery. Now come to the microwave, It has 30L Capacity so it is suitable for large families as well. It has convection feature so it can be used for baking along with grilling, reheating, defrosting and cooking. It has touch Key Pad (Membrane) control so it is sensitive to touch and easy to clean. It has child lock as well for safety purpose. Nice look, easy to use, perfectly fine. It has auto-cook menu options available so it is so good for beginners as well But one thing which i really dont like thats why I am reducing one star is the given utensils.Brand provides very bad quality utensils with this product. They are so inferior as we can not use them on microwave. So please dont even try to use them on it. Rest all features are simple, easy to handle Overall I can say this microwave oven is a perfect choice. It is too good. Fully satisfied. SuperbStainless steelLow sound Mast The product is good but the accessories are looking cheap as the grill plate has some rust stains and the plastic utensils are looking as if they are used having scratches here and there. I would suggest to go for an offline product rather to buy these stuff online. Great product by ifb good quality genuine product very good condition and clocking is also good. Good product at cheap cost. Very useful for kitchen This review is written after a month of using this product.Happy with the product its packaging and delivery.Its useful in cooking and reheating food.Baking cakes, cookies and pizzas.Grilling/tandoor can also be done.I have prepared each of the above mentioned items and satisfied with its performance.Along with the product I also got some microwavable freebies (plastic) that includes a measuring jar, two bowls with lid, papad stand and idli maker but... by Shopping Reviews
0 notes