#switched up my gshade preset also
Explore tagged Tumblr posts
Visit Tumblr Blog
Explore Tumblr blogs with no restrictions, modern design and the best experience.
Last Seen Tumblr Blogs


Fun Fact
When “GIF” was named word of the year in 2012, Oxford Dictionaries U.S.A. credited Tumblr for pushing the word.
Text

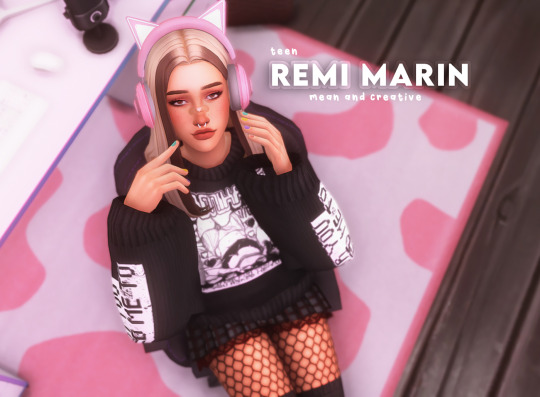
That Girl - Trait
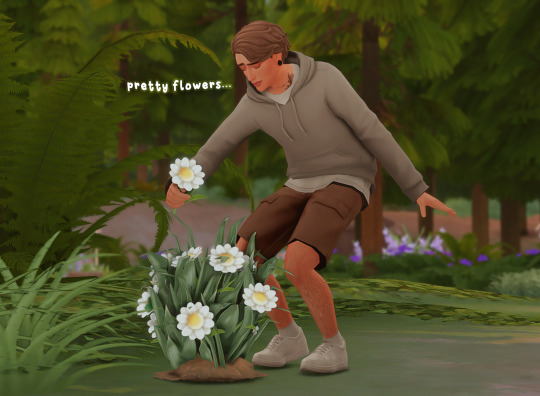
While prepping for my next lp I had a random thought about trying to make my own custom trait for miah ready for my lp when she's at highschool and then graduating onto university, so here we are
Model used is baby miah as a teen, she's doing some shopping after school 🥲🤍
Photo is taken with my new gshade preset that I recently made, I'll be using this preset only for this specific lp as I fancy a change from the light creamy one I normally use
Anyway...
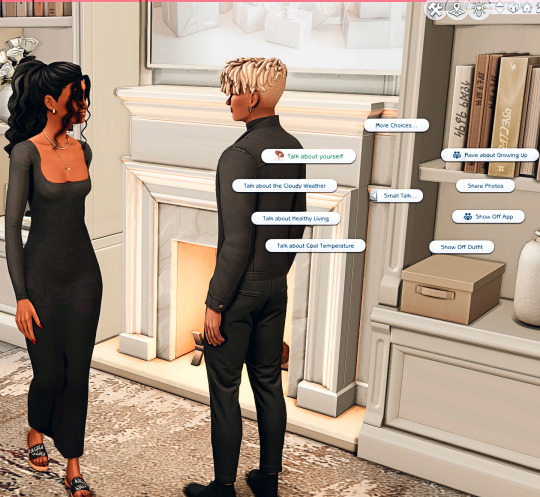
Introducing the " That Girl Trait "... You are that girl. Every other sim wants to be just like you. You're that girl that gets up at five a.m., meditates, drinks smoothies, has showers every day, journals, eats only healthy food, goes to the gym every day and is successful in many ways
Comes with two interactions, talk about yourself and discuss latest fashion trends. Both of which can be found in the friendly category under small talk
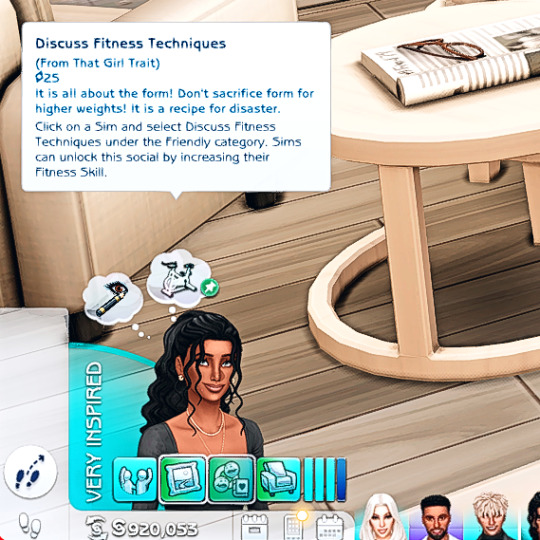
There is a total of seven wants that I have also added, wants to take selfie, make a new friend, clean anything, discuss fitness techniques, use social networking, go for a jog and discuss cuisine. You need to have wants and fears turned on for these to show up ( game settings )
I personally love having wants and fears switched on as it adds a little extra gameplay as you end up doing things you wouldn't usually
I'll be bringing more traits and custom interactions out in the new year, and possibly even a career 🤍
Available for free over on my patreon page here
Photos below of what is included


#ts#thesims#ts4#the sims 4#ts4 custom content#the sims custom content#the sims 4 mods#my cc collections#ts4 cc
1K notes
·
View notes
Text
Some tips for The Sims 3 Buy/Build
Install LazyDuchess’ Smooth Patch to alleviate lag, esp in Buy/Build and CAS.
Keep your CC merged and organized, esp your patterns, this will also alleviate a lotta lag across all modes.
When building on community lots, or any lot rlly, avoid going to the edit world menu, and just put testingcheats enabled into the cheat window, then shift+click the ground of the lot to enter Buy/Build mode. This makes leaving it to save a lot easier, with less “preparing” screens to possibly get hung up in.
Lower your settings, you don’t need any adjacent lots loaded, and you certainly don’t need super water on either. You can always switch these back on when you’re done.
While you’re at it, remove your HQ mod, and turn off your Reshade/Gshade preset, or at least turn off your depth shaders. I only ever turn on my depth shaders when I’m taking screenshots for better fps while playing. The DoF shader esp requires a lotta resources your game could be using to simulate all those 78 townie sims instead.
Save as… vs Save, I Save as… at least every third save. It’s also just good habit to keep backups.
When using the CASt tool, set down everything you plan to CASt first, then switch to a category like the wall tool to avoid eventual lag and drag when using it a lot. Love yourself. You don’t have to suffer using CASt tool in an overpopulated category like misc deco.
Utilize the clone option through testing cheats to duplicate already CASted objects, it’ll keep your design just like the dropper tool, but it’s a lot less time consuming, I promise.
Don’t be afraid to use the swatch save tool for objects you use often, esp community lot objects, as it helps to keep your aesthetic consistent. I also keep all of my favorite streetlamps, benches, and public trash bins etc in a convenient custom collection folder to speed up the process of doing multiple lots in one sitting. These handy tools are there, use them.
The issue with custom counters. They mess up sometimes, if you can’t recolor it suddenly, here’s how to fix that. Now if you can’t place down a cupboard suddenly, even though nothing’s in the way, and you’ve got moveobjects on activated, try putting it on the wall a tile over, and then try adding it to your desired spot again. Lastly if you set down counters or cupboards at a corner, and it messes up the textures, but you can still recolor it, you could do what the video I linked above does, or you could simply pull out the CASt tool, and switch it back to any of its original swatches and click the check, then feel free to recolor it as you want.
Railings will also do the “can’t recolor” trick too, but this is a simple fix, just delete it, and replace it, and you’re good.
“Oh no, I switched between buy and build mode, and now my catalogue won’t load, and I can’t click on anything at all!” Don’t panic, hit F2 and/or F3 on your keyboard, these are shortcuts for switching between them, and if you’re lucky it’ll load properly again. Should you get the bug where you load a category and it’s somehow empty, don’t fret, just click on a different category and this should fix it. Then if you get the bug where all the objects you put down disappear suddenly, sorry your game is haunted. Call an exorcist, or just reload, they might reappear if you do.
Tbh, if you run into any kind of major bugs, it’s likely a sign to either save immediately or just restart your game. These only ever show up when you’ve been at it a while ( at least for me ), therefore starting fresh wouldn’t hurt. Probably also wouldn’t hurt to check whether you might’ve installed something the game didn’t agree with by running Dashboard, or put it through the ol’ Save Cleaner.
Honorable Mention: Keep an eye on the texture sizes and poly counts of objects. I know it’s tempting to build these ultra hyperrealistic lots with clutter at every inch, but unless you’re just doing it for screenshots, or for your story, or using it very sparingly, it is not by any means recommended purely for gameplay. This is just the truth when it comes to any Sims game. You don’t want lag, or max memory crashes, or save errors? The Sims 3 is a 32bit game, that’s almost old enough to drive, be easy on it.
478 notes
·
View notes
Note
what's up with GShade what kind of drama could a Shader have
to the best of my memory: the lead developer of gshade started to get very controlling and arrogant about their software and how people used it. one common annoyance was that when there was an update released, the software would very intrusively bug you about updating right then and there and it was a headache to have to constantly manually remove the notice from your screen. i believe the crux of the drama was that a young modder took it upon themselves to mod and release a version of Gshade, or just some kind of additional software, that bypassed the annoying update notifications. and when the lead gshade dev found this out they sneakily implemented new code into gshade that would force shutdown someone’s computer if gshade detected that they were using this mod.
after the initial wave of controversy their reputation basically tanked overnight once people found this out. understandably so, as this was in very literal terms implementing hidden malware into the software. a bunch of shader preset creators started working on adapting their presets for reshade immediately after. i know i personally switched over to reshade immediately myself. it was such an easily avoidable mess haha.
also if i’ve gotten any of these details incorrect please feel free to correct me or elaborate in the replies, it’s been a while since i’ve looked into this drama and i’m literally just recounting it off the dome :)
326 notes
·
View notes
Text
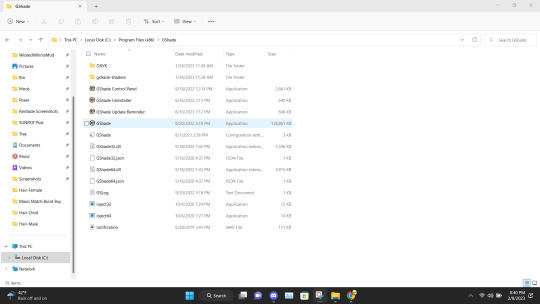
The Sims 4: GShade (Helpful Tip)
You do NOT have to completely uninstall GShade to get the dx11 option. I would like the community to stop working harder than they actually need to lol
IMPORTANT:
(1) If this does not work, THEN you will have to clean uninstall gshade from your system. I'd suggest to screenshot your in-game settings, if you have messed around with anything outside of the preset, and then wipe all gshade files from your system before you reinstall.
(2) You should save backup copies of your presets. They do not take up a lot of disk space. Also, convert any reshade presets to be properly tuned for gshade through the control panel's 'Tools' option. It helps with performance.

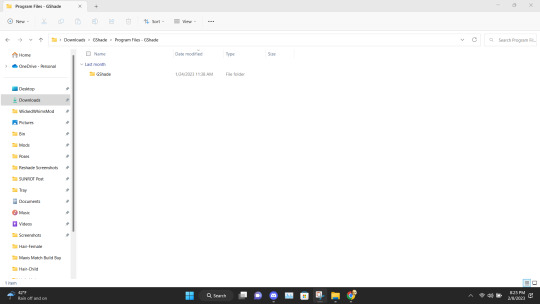
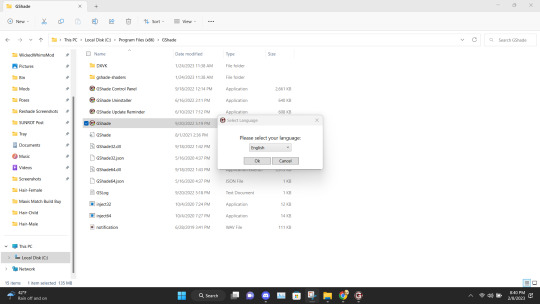
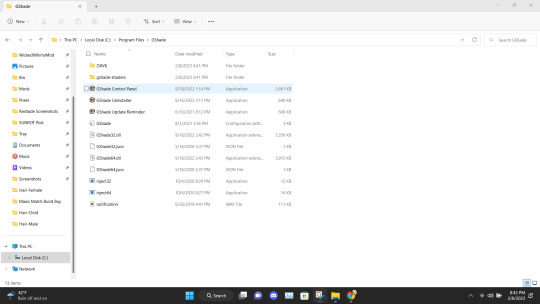
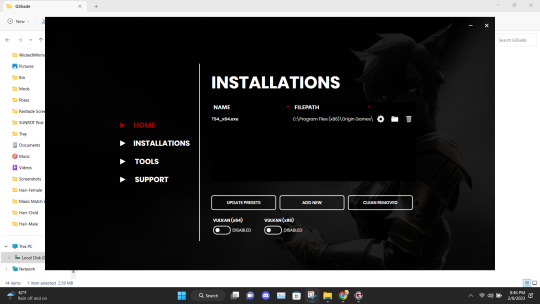
Open Gshade Control Panel
Click 'Installs'
Find TS4
Click the trash bin icon
Confirm
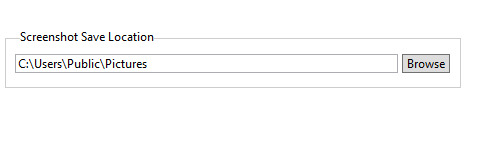
Click 'Add' and choose your paths for both the reinstallation and your screenshots. (Note -- the screenshot path can be changed at any time through the in game settings)
dx11 should now be available
[Note: This was done by me as I had just updated my game to the most recent patch, released September 18th.]


Does your system NOT support Dx11 or you simply cannot be bothered to put in the work?
There is an in-game option to switch it back to dx9

Stuck on an infinite load screen after upgrading?
You may have to batch fix your cc through Sims4Studio. This personally happened to me and the batch fixing solved it.
WARNING: BACK UP YOUR FILES. Do NOT batch fix your ENTIRE folder. Only do buildbuy and CAS. If you have a lot of CC, It will take HOURS.
Still not working out?
Go back to using dx9. I personally, backed up my entire sims 4 folder to my secondary drive before I even patched my game for dx11.
63 notes
·
View notes
Text
hello friends! 🌷
recently i got an ask on how i edit my instagram screenshots and here in gemville, all you have to do is ask and you shall receive my child
fun stuff under the cut!
this guide will be divided into two parts: how i take & edit my gameplay screenshots and how i edit my simstagram posts

before we get into the actual tutorial, here are a list of things that i use to help me take better screenies :)
gshade
i'm using an older version of gshade because - thanks to my procrastination - i never updated the version before everything went to shit.
2. presets!
i switch around between presets a lot lmao but for the most part, i use ellcrze's gshade preset for my family dynamics save, sunset n vinyl for my globetrotter save & sim download pictures and a modified boho dreams for my tjol legacy save (first post coming up soon!) sometimes i use lithium for cas pics too :p click here for a somewhat detailed explanation lol
3. tab mode camera mod
this camera mod is a godsend and makes taking screenshots soooooo much easier! 😌 i highly recommend getting this mod!!!

i think i mentioned this before in an ask - i edit my screenshots in photoshop before posting them on tumblr :D i don't really do much, just running a few actions and cropping my screenies. gshade does most of the work for me lol
this tutorial by @buglaur is insanelyyyy helpful omg i based my entire editing process on her tutorial, except for the colouring part because i'm lazy hehe
here's an example of my screenshots before and after editing (cropping the screenshot and running some actions)! there’s not much difference because as i said earlier, gshade will basically carry your entire editing process 💀

sometimes i put text in my pics like these screenies below :) i mainly use these two fonts - winkle and lemon milk :D
and that's about it for part one! now it's time for

here's what you neeeeeed
1. photoshop
i'm using a 🏴☠️ version of photoshop that i got from a somewhat sketchy website but it runs great so i'm not complaining 💀
2. instagram post template and instagram story template
a HUGEEEE thank you to @windslar for sharing the instagram story template link 😭 she is such an inspiration to me 💛
3. the actual instagram app
this is how i add text and emojis to my simstagram posts lol
disclaimer: i am NOT a photoshop expert. there's probably an easier way to do what i'm about to show you, but this works for me and i don't really mind the steps hehe
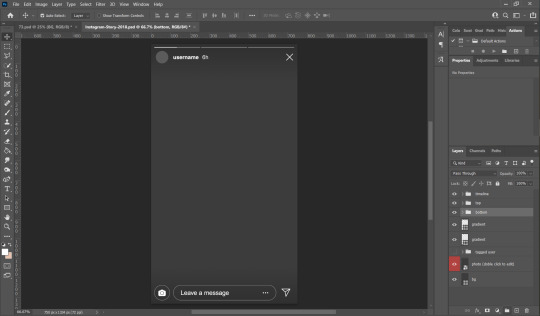
first things first, you're gonna want to open the psd files on photoshop and it'll look like this, depending on which file you opened
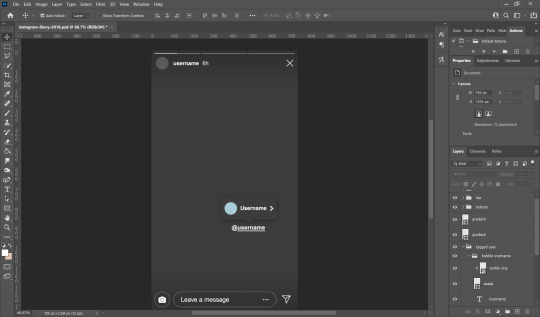
i usually just hide the layers that i don't need so in this case i'll hide the tagged users layer from the story psd and the bg layer from the post psd.
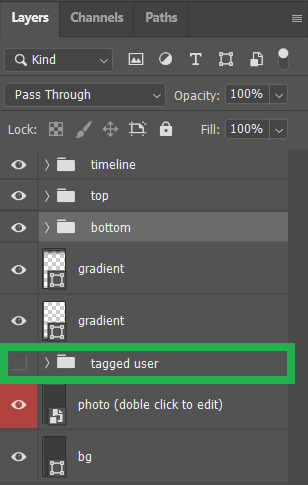

these are the layers that i hide but you can also leave them on if you want hehe totally up to you my dude. then you'll end up with something like the pics below

now we move on to the profile pictures! so what i do is i click these layers (shown below) and go 'file > place embedded > selected picture'

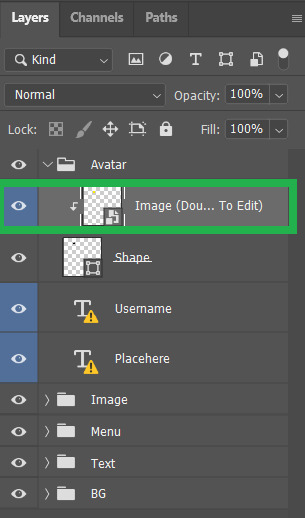
once you do that, you'll end up with something like this (below)! use 'ctrl + t' to resize your picture to fit into where the profile picture would go.


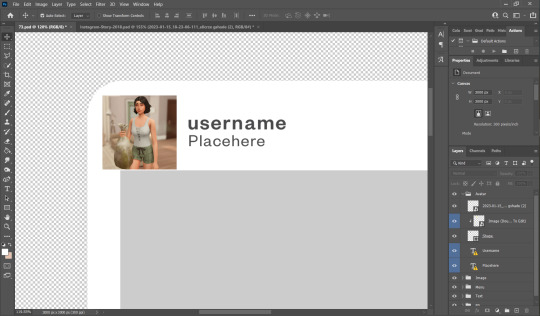
right click on the layer of your selected picture and click 'create clipping mask'. then you can hit 'ctrl + d' to adjust the picture to your liking!
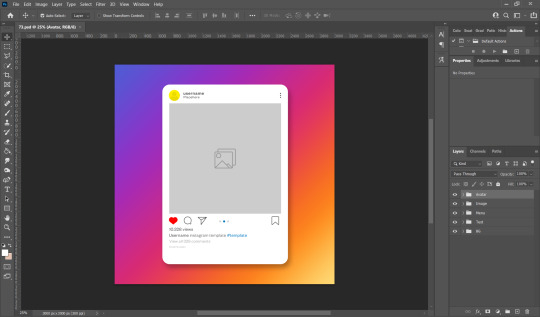
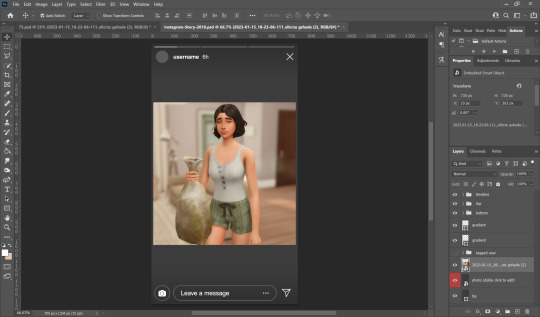
now for the actual pictures for the posts. click on these layers (shown below) and go 'file > place embedded > your selected picture'


now all you have to do is 'ctrl + t' to resize your pictures, right click on the layer of the selected picture and click 'create clipping mask' then 'ctrl + t' again to adjust the pics!
after this whole process, i'll export my pics to my family dynamics folder on my desktop and queue it up on tumblr! :D sometimes my simstagram story posts have text and emojis like these ones below

all i did was upload the pics to google drive, download it to my phone, add text/emoji on the actual instagram app then saving the story to my phone... a lot of work but i don't really mind <3
aaannnnddd that's it!!!! i can't believe i made this guide 😭 hopefully this helps :D english isn't my first language so apologies for any grammar/spelling mistakes i've made in this post 🙈 feel free to ask any questions and i'll try my best to reply to you asap!!
207 notes
·
View notes
Text
SIMS RELATED PROJECTS/UPDATES
My spring break is coming up in a week and holy crap do I have plans on plans on plans, especially since my summer is gonna be full of school + internship + HOPEFULLY friggin' graduating with a BA in Psychology so that I can start applying to grad schools.
Read more iffin' you'd like! It's long! Here's a picture of my golden retriever napping on her brother's food bowl to entice/entertain you:

god she is so precious i would literally kill for her
GOAL 1: MASTER GSHADE/ReSHADE
I know that some people are sticklers for this but my thing is that I had no gee-dee clue what I was doing with ReShade, whereas Gshade just kinda clicked and worked for me? That said I have a bunch of resources for learning ReShade so I might end up moving back to it at some point.
My main issue is figuring out the order of all the different effects. It obviously matters, I'm sure people smarter than me have tried to use presets only to be like "why tf does this look absolutely nothing like the baller screenshots this one cool Simblr has?" Annnd it turns out it's order + remembering to turn off certain graphic settings. Also photoshop, but that's gonna take a lot longer for me to figure out lol.
Like I'd been struggling to figure out why @gunthermunch's gorgeous Lithium preset wasn't looking as sexy as it did before annnnd it's because I forgot to turn Edge Smoothing off when switching to it. Jesus wept at how dippy I am sometimes.
Eventually, what I would like to do is maybe make my own preset at some point? I would be kind enough to show the effect order too if I did so. But this requires so, so much more shader knowledge than I currently have.
FUN FACT: My first ever degree was in art, I even went to a very fancy and private art school (School of the Art Institute of Chicago if you're curious)- I dropped out after one semester because uhhh that shit is expensive. Ended up finishing my degree at a much cheaper location in MN. That said, my art was 100% analog and 2D, and it turns out it did not translate super well into trying my hand at graphic art.
It's funny because I've been gifted really neat stuff for graphic art (like a really nice Wacom tablet and Adobe subscriptions), like people just expected my mixed-media ass would know what to do with it. NOPE! But yeah, Sims is sort of my excuse to try my hand at this stuff again, especially since I have a bit more energy now that my soul is not regularly being drained out of my body by customer service and tech support jobs.
GOAL 2: GET CRACKIN' ON ANOTHER DOOR
This one is hard because I am only on Gen 2 of the Orsons and it's sort of hard to justify starting up another story while that one is less than 1/5 of the way done.
THAT SAID, I don't plan on posting Another Door until I have a decent chunk of it done. Since it's not a casual gameplay story nor a legacy challenge, I plan on editing the bajeez out of the screenshots for it, really honing in on the aesthetic. I want it to look and feel very different from my random legacy challenge.
Fortunately, this story has been fucking up my sleep schedule for *months* now and I have a lot of the writing for it done. The hard part is translating that into the Sims, making sure I get the right poses and stuff, maybe even learning how to make some super easy CC (like, posters and stuff), and stuff related to GOAL 1 above.
What I'm saying is that it's going to take a bit. But I'm super serious about sharing it because it's my obsession and honestly the first time a story of my own design has possessed me in literal years.
Also, I want to make sure I have a significant backlog of the Orsons before I start seriously simming for it, because I don't want to screw over my favorite little pixel babies. This legacy challenge is going to be the one, I have done so much to keep my save files to keep it safe from harm (ask me how many backups I have of the save files. JK don't, the number is frankly silly).
GOAL 3: START YET ANOTHER MASSIVE CC PURGE
Y'all, my CC folder for this game is honestly an embarrassment. I go so hard on CC shopping because this community is stupid-talented and I like giving my pixel babies nice things and cool looks. When I'm bored and not quite in the mood for gameplay, I just like making neat-looking sims that I do absolutely nothing with because I love fucking around in CAS.
I have built my own PCs since I was 17 years old, and when I first built COMPUTERMACHINE (current rig) back in the autumn of 2018, it was with the goal that it would run Sims 4 flawlessly no matter what I did to it. It's got ridiculous amounts of RAM, I religiously update parts for it. And to be fair, even with the current 6,907,907,890 TB of CC I have atm it runs better than Sims 3 ever had with a measly 50 GB of CC.
But for me, it comes down to finding all the stuff I wanna use. Making myself get rid of the stuff I don't wanna use. Straight up yeeting the CC that I thought was going to look incredible that uh, didn't deliver.
I do CAS CC purges about once a year but have literally never done it for Build & Buy stuff, because OMG some of this shit I've had since 2014. Like when Sims 4 first came out. YIKES. My CAS CC obsession is notable but it's honestly nothing compared to my Build & Buy. Even before For Rent made building lots slow af, my PC was starting to take a solid minute to switch to different buy categories.
It would take a long af time so I want to make sure I have a bunch of content in the queue before I do it. It's gonna be a whole ass thing and be so, so boring to do. So I'm putting it off for when I have a ton of time to do it. Like, oh, my entire Spring Break?
GOAL 4: MAKE A FRIGGIN' RESOURCES LIST ALREADY
This would obviously need to wait until after GOAL 3 is completed, but I wanna make sure the awesome creators whose stuff I use get credit, and that people know where they can grab neat stuff. It would include not only CC but mods, Gshade/ReShade presets, and maybe even lots and sims I've downloaded from the gallery?
(Since I am super anti-paywall and very unapologetic and rude about it, I will also share where one could perhaps get some of these CCs without paying some dip a Trenta Starbucks Unicorn Frappucino amount of $$$)
It's ambitious as hell because *gestures vaguely at GOAL 3* but it would make things like doing WCIF asks and lookbooks so much easier.
Somewhat relatedly, I wanna make a navigation post, especially once Another Door starts getting posted. That story is gonna be a bit huge with multiple arcs that take place over the course of like, 14 years. Plus once the Orsons get to the 4th+ generation, it would be easier to track things down.
IN CONCLUSION...
I have been having so much fun sharing my silly little Sim adventures on Tumblr, so much more than I ever thought I would! You all have been so great to me, and all of this stuff is sort of a way for me to repay that. Ever since I stopped being able to be artistically creative ever since a really nasty depressive spell in 2017, Sims has been my #1 artistic outlet. And having people who are even somewhat entertained by my pixels is incredibly motivating.
Basically, if you read all of this, DAMN would you have been a rad livejournal follower of mine circa 2007. On the seriousness, however, thank you all so much for being rad and encouraging and sweet. I promise to do you all, if not proud, then at the very least not disappointed.
Time to hit the bong and take some pictures of Lou and Tatertot before taking my IRL doggos on a walk~
#sort of an announcement#future plans#sims 4 gameplay#tales from the irl#i love the sims community so much#promises i plan to deliver on (eventually)#playing with photoshop again#talking 'bout doing another cc purge again#posts so long you'll unfollow me (i will not blame you)#tl;dr: folks i'm gonna be doing some stuff#anyways... *bong rips*
22 notes
·
View notes
Note
So I was using gshade for a while , but I seen your preset blonde and immediately switched to reshade and my game is running 10x more faster tbh .
I see you didn’t switch over to gshade like the rest of us why ?
And did reshade work better for you too or you didn’t want to switch over to save the hassle just curious ☺️
Is it really? I’ve always heard that gshade was easier on your computer, but every time I try to use it, it resets my settings. it’s soooo annoying. it also takes so long to load up when I first open the game, unless I’m in performance mode, which I don’t want to be in😭
You can actually convert your reshade presets to gshade inside the gshade application! (Just in case you ever decide to switch back for some reason lol)
13 notes
·
View notes
Text
A little blog update 📝
I have updated my blog theme to the one that supports NPF. It looks pretty similar to the one I had before, but tbh I already miss my old one. And I actually don't see any differences in how posts appear on both themes 🤷♀️
I read the post about NPF (I can't find the one I read, so can't link it, sorry). And they say that they will start to nuke legacy editor on May 15, but it won't happen on one day for everybody. They said they hope to switch everyone to new editor by June 15 (if I'm not mistaken). For now I can still use legacy editor 🥳
I've also updated my donwloads page. It's already not up to date though, so it's better to look though the tag.
And I switched my queue to two posts per day for now. Because lately I'm not actually playing, but fiddling around with gshade presets to find the one that will suit my current gameplay.
20 notes
·
View notes
Note
how do you get your game to look so pretty! your most recent photos are gorgeous
Thank you nonny, I use reshade 5.8.0 (switched back to reshade after the whole gshade kerfuffle) and have been using it ok since.
I am not going to pretend to be an expert of any kind when it comes to reshade/gshade, in fact there are way too many more experienced simblrs out there who know their way around shaders, whereas I mostly select random shaders that I think look nice and keep them. It's really a tedious process of trial-and-error plus occasional troubleshooting when the shaders don't work as intended.
There's this great spreadsheet of reshade-related tutorials (I assume would also work for gshade) compiled by the marvellous @pictureamoebae which could be accessed here, I've come up with my settings by learning and experimenting, so keep on playing around with the shaders and you'll have gorgeous pictures in no time, too!
Good luck :)


With and without my current preset:


My current preset's shaders:

Click here for full size: [x]
11 notes
·
View notes
Text


From GShade to ReShade:
For those who want to switch to ReShade after the incident but are worried about loosing all of your GShade presets, can use these helpful links to ease your transition (especially if you've already switched).
ReShade 2023: How I Fixed ALL My GShade Presets!
by Lady Sweet Tart
Includes helpful information on how to get mxao to work properly on reshade for ts4 and also includes a link to popular AO's used in most Gshade presets.
Switching to Reshade from GShade for those having trouble, 2023 Reshade Installing
by CarbySlippers
This is an extremely helpful post containing steps/information on how to uninstall GShade and transition over to Reshade from Gshade while being able to continue to use your Gshade Presets.
(they also include a backup of Gshades shaders/textures if you didn't back it up from yours. Also don't use the script to uninstall Gshade linked there, as they tell you to use it at your own risk and I wouldn't trust it. Uninstalling it manually by following the steps does the trick.)
IpsuShade's Github
by Ipsusu
Is a very cool Reshade/Gshade preset, and also includes helpful information in their troubleshooting section near the bottom that may be helpful if you are having a problem with something in Reshade after switching.
(You can ignore everything else bellow as this is mainly for my Gshade Presets)
My Updated Gshade presets:
For my Gshade presets I've fixed Once In a Fairytale and Belladonna's Vengeance, seperating their different varieties into different ini's and saved the rest in Reshade. I've also included a read me .txt file with the links from above with and listed all of the shaders/textures you need for my presets to work.
(Orange Blossom will look off since the MultiLut didn't wan't to work with it, though you can try to get it to work with the original that wasn't saved in Reshade if you want here.)
[sfs] <- download
(I won't be supporting/revisiting them anymore but feel free to tweak them and reupload the ini's)
15 notes
·
View notes
Note
🏵️,🪷 !!!
🏵️ - I love your sim style
🪷 - I love your editing style/aesthetics
Thank you guys!!! 😭💗 you make me blush. but ok let me say something about each.
I'm not sure what my sim style could be defined as since I have a different perspective viewing my own sims, but I notice I tend towards smaller eyes and bigger nose and lips. I love using custom presets and blush that goes across the nose and cheeks. Lately, I've been trying to switch it up by using bigger eyes and more cartoony lashes, but I always wind up going back to kijiko's lol. What I love about others sims styles is seeing how differently they make sims, especially if its based on a character from another medium (like a different video game), its so fun to see how different people tackle something like that. I also really love unique sims styles like the ones with giant eyes or bobble heads etc. It's so fun and unique!
Ok, for editing. Ill be honest but gshade does much of the work as well as photoshop actions. Recently I started using srwe a bit and damn the quality is 😲 amazing. As for aesthetic I'm not sure what mine is. But a couple of my favorites are 1) soft pink pastel city vibes 2) warm outdoor country bumpkin ass 3) occult weirdos with too much red oh god tone it down in photoshop everyone is red/orange. And im glad yall enjoy at least one of those options 🤣
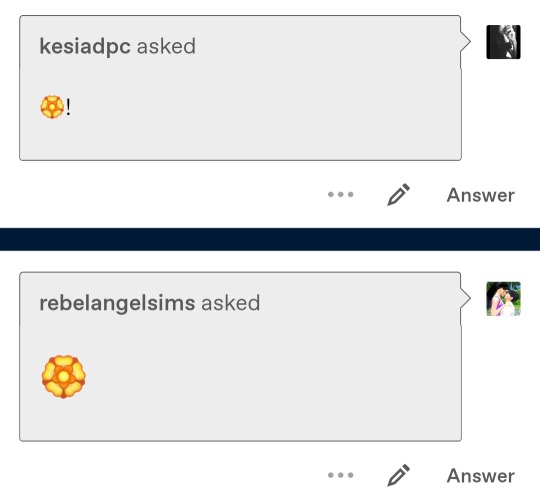
@kesiadpc @rebelangelsims
5 notes
·
View notes
Text
Gshade and horses, oh my!
Well... I finally gave up on Reshade, which I could never get to work the way I wanted to, and switched to Gshade-- now I have ALL the presets!!! It's so lovely. My upcoming screenshots will be somewhat experimental though as I try to figure out what preset(s) I like best. Suggestions for Gshade presets welcome as I'm trying all the things now that THEY'RE WORKIINNGGG!!
Also, I bought the horse pack and immediately came up with an excuse to incorporate horses into the story. HORSES YESSSSS LET'S RIDE!!
There will be a short pause on story posts for the next day or two as I finish updating my mods/etc., though I'm nearly finished. :)
3 notes
·
View notes
Text
Mine did the same thing on the patch before this. I tried updating gshade, I tried redownloading the shaders, I switched from gshade to reshade and back to gshade. Nothing was working. I ended up removing every single trace of gshade and reshade from my computer, did a game repair (and also launched the game to get fresh files), and then did a clean fresh install of gshade, and then it FINALLY worked. And then I was so worried about messing it up that I fully just rebuilt my personal preset from scratch.
I have never had as many issues with a shader as i do with relight I SWEAR. Ever since I updated my game I can't use it, I get the 'failed to compile' message. Gshade does have a new update, I wonder if updating would fix it. I don't want to have to reinstall it this shader confuses me... you'd think I would remember at this point since I've done it so many times but nah
And now I feel like I can't take CAS pics without it, I literally love it as a shader so much. I wish I wasn't always having issues with it 😫 if anyone has any advice on what to do I'd appreciate it. Won't be OK fully until I get it working again bc it's bothering me
17 notes
·
View notes
Text
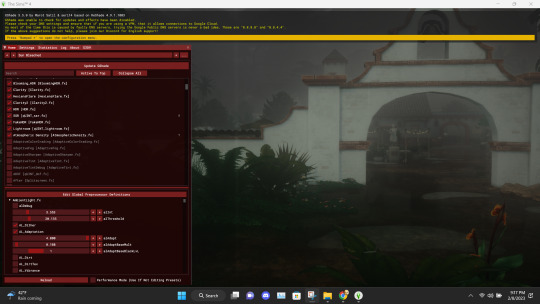
GSHADE 3.5.0 Cracked Tutorial Feb.2023
‼️Update:3/2023‼️ Due to gshade somehow being online again! You can still install the program with this tutorial but to avoid the update to version 4.2 notification keeping you from proceeding-Download the program from mediafire and then turn your pc to airplane mode and continue the process below! Note that when you turn your internet back on that your going to get the notification still ignore it. That what I’m doing.
Alright with the recent events regarding the development team of GShade figuratively going under and the current version of this program available being far from perfect. It would be lovely to back to a version of GShade that doesn't have malware, the changes that disabled the depth of field effects, and the removal of some older shaders. So here's a tutorial on how to install 3.5.0 of GShade. It's the version that we as a collective switched to all those months back, when GShade popped off in the community. Also the version I used to take this picture and got from @toskasimz who sent me the files. She's the reason why I have my pretty pictures back. It took a long time to get my preset to look like this and the modern versions of Gshade and Reshade don't have the shaders for this anymore. The suggested skill level for this is basic knowledge of how to install Reshade/Gshade and knowledge of where to find the game Bin file and Program Files on your pc.
Note: This version is before the code that shut down your PC, if you manipulated the code of the program, was introduced. Use at your own risk. I personally have no issue with using it. I'm using my laptop I do school work on and I have no money to buy a new one so that's my assessment on how safe it is.
To start download this media fire file. It's a Rar file. Unzip it.
In the unzipped version of this file, you should have a folder that's highlighted below called GShade.
Inside that file are two folders. Program Files-G-Shade and TS4 Bin Folder. These folder names correspond with where the contents of these will go on your pc.
Alright inside the folders you should have the following content in the Program Files-G-Shade
Inside the TS4 Bin Folder, you should have the following contents inside it.
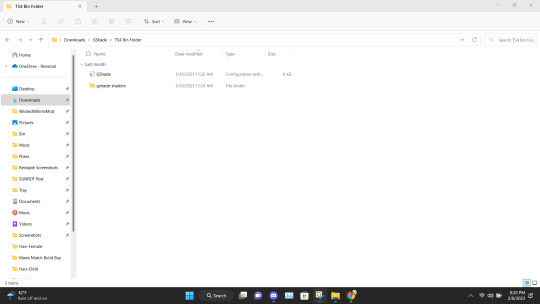
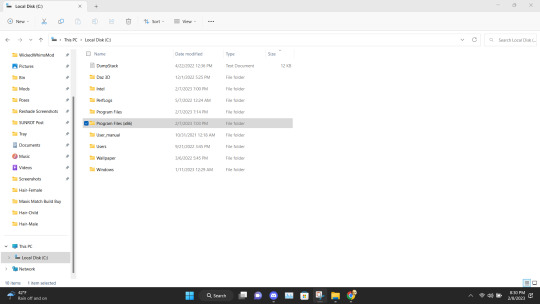
Place the GShade folder from the Program Files-G-Shade into your computer's Program(x86) file. This may have a different name based on your computer.
Next Place the contents of the TS4 Bin Folder which should be the G-Shade configuration file and the folder of GShade-Shaders into your Bin folder. (note I have gshade installed already so you won't have the extra files before installation.)
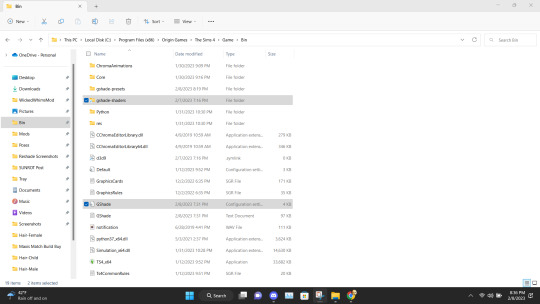
Now go back to the Program(x86) file on your PC and go into the G-shade folder.
Double Click to run the program.
This is where you gonna need to pull your Reshade/Gshade knowledge. You just install the program as normal to the game. I will say I don't know if this will work with other games.
Alright, this is what you should be left with after installing G-Shade. Everything transferred to the Program Files with the exception of this folder. Leave it be and go to the Program Files file on your pc.
Once in the Program Files folder double click the GShade Control Panel.
You should get the following screen Go to the Installations tab. Delete this file path. This is a very important step. It's not gonna work if you don't reinstall the program. Delete it and click Add New.
Install the program as viewed above. Click Next and set up your screenshot folder.
Click No on viewing the guild. You should have a control panel on your desktop. You can go in a convert you reshade presets if needed.
Alright if everything was done correctly open your game. It'll take a moment to load and when it does you greeted with the following screen on start-up.
Ignore the yellow text on the top. It says that your effects are disabled because it's not online. It works I could be misinterpreting what "effect" means but my shader work so I'm not complaining.
And there you go. Installed, and works perfectly. Don't update it. I don't know what it'll do. I have not tried. I will upload an edited version of my preset later this week or tonight. I have to tweak the color of the fog and make a decent post. Enjoy! I am open to helping under this post and in dms!
#if something you download thats for cosmetic reasons can shut down your PC that's not a normal function the program is free and basically#reshade it one of the same developers#gshade#sims 4#gshade help#ts4#simblr#tutorials
2K notes
·
View notes
Text
INSTALLING GSHADE FOR THE SIMS 3//
This tutorial only covers where to get it, and how to install it for The Sims 3 specifically, and add presets to the presets folder.
So to begin, download the GSHADE installer here. I use Windows, so I downloaded that one.
Then go to wherever you downloaded it to, and click/run GShade.Latest.Installer.

Select your language, then in the License Agreement screen, hit I Agree.
Then, in the Choose Target Executable Location window, click on Browse, then navigate to your install folder.

Mine was installed with Origin onto my "F" drive, so I navigated to SSD(F:) > Program Files (x86) > The Sims 3 > Game > Bin. This path will be different for everyone, especially if you got your game off of Steam, or by other means.

In here, you need to find The Sims 3 icon that has the biggest file size, for mine, it's TS3, so I chose that.
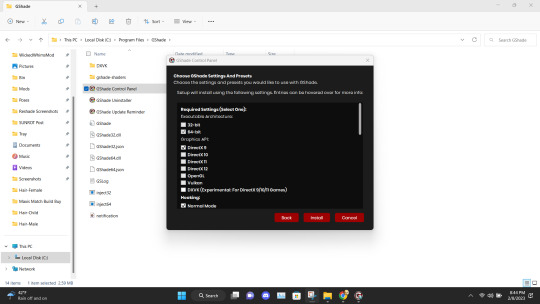
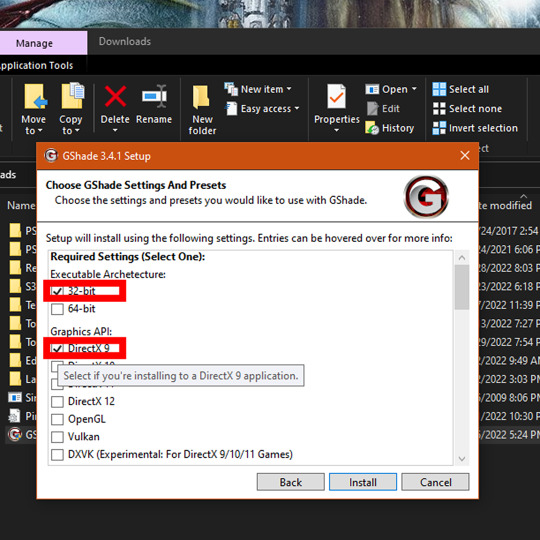
On the Choose GShade Settings And Presets screen, tick the 32-bit box, and the DirectX 9 box.
Then under Hooking, I just ticked Normal Mode.
Scroll down some more and you'll get to the optional settings, so if you're trying to convert Reshade presets to GShade, you might wanna look into that more, I don't really have any I want to convert, so I suggest you look up a more detailed tutorial on that or check out the GPosers site for more info on how exactly that all works.
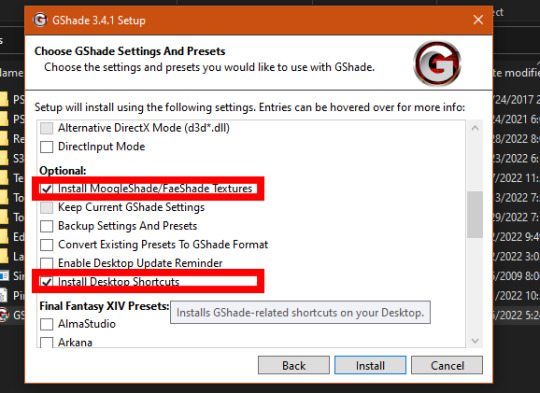
So for a fresh install we'll just stick with these boxes, but mainly the last one because it adds an icon to your desktop for an app that makes installing GShade binaries into your other games a lot easier, and also uninstalling them as well.
Under Final Fantasy XIV Presets you can tick any and all you want, they're presets created by Final Fantasy XIV players that are preloaded and ready to use if you wish.
When done, click Install.
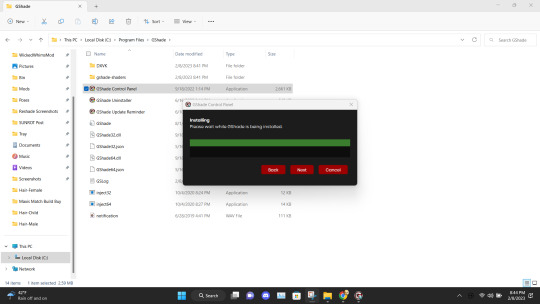
Then wait until the green progress bar is full, and the Next button is no longer grayed out, then click that.
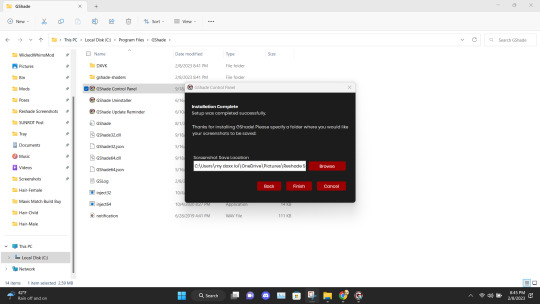
In the Installation Complete window, it'll give you an option to change the save location of any screenshots you take using GShade, similar to Reshade, feel free to change it, but if you're fine with what's already in the box, just click Finish.
Now to install any presets you've downloaded, like my Pines preset, it's as simple as moving the config file you downloaded to your Program Files (x86) > The Sims 3 > Game > Bin > gshade-presets folder, so in other words, it'll be in the same folder as those icons you navigated to earlier.
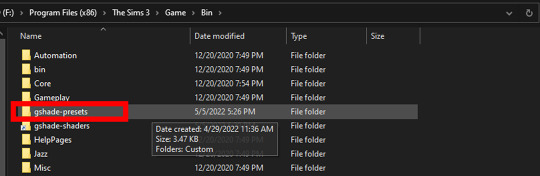
Open the gshade-presets folder, and throw the preset in there, and you're good to go.
When you launch The Sims 3, a little window will pop up at the top telling you, you were successful.

Follow its instructions to continue onto the the UI screen.
GShade looks and works exactly like Reshade, so if you're familiar with Reshade 3, 4 or 5, you shouldn't have any issue working the rest out from here, and if you're not familiar with them, there are tons of tutorials on how to use the UI, switch presets, and create your own presets, and use the shaders. Even if it's a tutorial for The Sims 4, it will work the same for The Sims 3, it all works about the same in every game, that's the magic of Reshade/GShade.
Happy Simming!
545 notes
·
View notes
Note
hii would you be kind enough to share how you edit your gameplay posts? :) also stupid question… what did you mean by keyboard shortcuts? is it like Ctrl C & Ctrl V thing??? or am I just dumb
ok so long post but here is how i edit! With visuals, some of my settings, and other tips
This may seem like a really long process at first glance but the shortcuts really cut down half the time.
I edit in rows of my screenshots, typically grouping them by post or multiple small posts.

The first thing I do is crop. My crop ratios for my posts are 7:5 for landscape and 4:4.5 for portraits.
The next thing I do is run topaz clean. I could set up a keyboard shortcut for topaz clean but I'd have to pick my preset anyways. Now for the rest of the photos I have open, I can use my most recent filter with Ctrl+Alt+F, instead of opening topaz clean and the preset every time. It will automatically use the last topaz clean preset instead.
Here are my topaz clean settings. Shout-out to the other simblrs' topaz clean settings I stared at to understand and find a starting point of what I should use for sims screenshots (mostly @sojutrait <3)
Next is my adjustment layers. I typically use brightness, exposure, and saturation. There isn't a set formula for it but here's my general method. I don't use shortcuts for adjustment layers because I'll being selecting my settings in the same space anyways.
if the screenshot isn't that bright from the get-go I'll use brightness first. If it is well lit, I will only use exposure.
I use exposure rather than brightness to brighten images and to improve highlights, add a glow-y effect, add vibrancy, and also add a little saturation.
It's pretty easy for me to tell what is too much but I suggest picking how much you want and doing a little less. The amount varies a lot per image (+0.11-0.67)
I only use a little saturation (+1-8) since I already get a lot from my gshade. Or I just don't use it
If a screenshot starts off too saturated I'll adjust the curve or lower the contrast a tiny bit instead of lowering saturation.
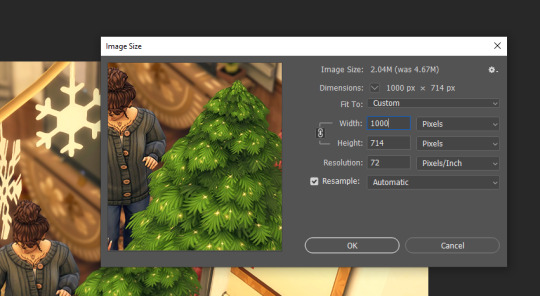
Then I resize the image to 1000px using the shortcut Ctrl+Alt+I. I don't resize the portrait crops because they are already at about 900px from the crop anyways. The purpose of resizing is so tumblr does not slightly blur the preview images as it does with pictures of a large size. You don't need to click on the field for width it will automatically select it. Just enter your amount and press enter.
If I am adding in a speech bubble, psd, notif, etc. I will do it AFTER I resize. Placing it on the smaller image will keep it sharper. I like to put my psds and such underneath my adjustment layers but if they are too overexposed I'll put them at the top and make a clipping layer (left click on the layer for the drop-down) for the overlay to match the brightness of the image.
Next part is important for my process. Before I move on to the next image in the row I will make sure I select the background layer (it makes sense later)
I don't save the image at this point!
I repeat the process for the rest of the images that I've opened and then I go back to the first image.

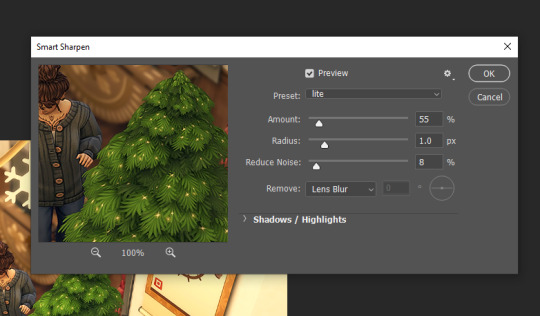
This time I use the smart sharpen filter. Here's my presets settings. I won't use smart sharpen on zoomed out exterior shots sometimes because it makes it a little crunchy. I made sure I selected the background layer before so the smart sharpen goes on the actual image and not any of the adjustment/overlay layers.
Then I save as with Ctrl+Alt+S. I'll talk about saving more further down and why I don't use quicksave.
So now I can just quickly go through every image opened using Ctrl+Alt+F (filter) and then Ctrl+Alt+S (save as). The reason I do it this way is so I can use the recent filter shortcut instead of switching back and forth between filters for every image. Again you could make a shortcut for your filters, but you will then have the filter's settings open every time. It also gives me a chance to take another look at the edits and see if there is anything I want to change after seeing it again.
After that I'll choose close all, select a new row of images, and repeat the process.
Other info
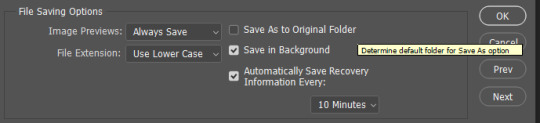
Why save as and not quick save? If you don't know, you can assign a keyboard shortcut to quick export as png. I don't use this because it doesn't follow the "save as to original folder" setting being toggled off. So you'll have to select the folder you want to save to everytime.
So I toggle off the "save as to original folder" and use the save as shortcut. After your first save to the folder you want, it will remember the folder you just saved to and that you saved as a png. Then you can just quickly press enter twice through the save as and png format option prompts. The original folder setting is in file handling (where to find file handling is under the next question)
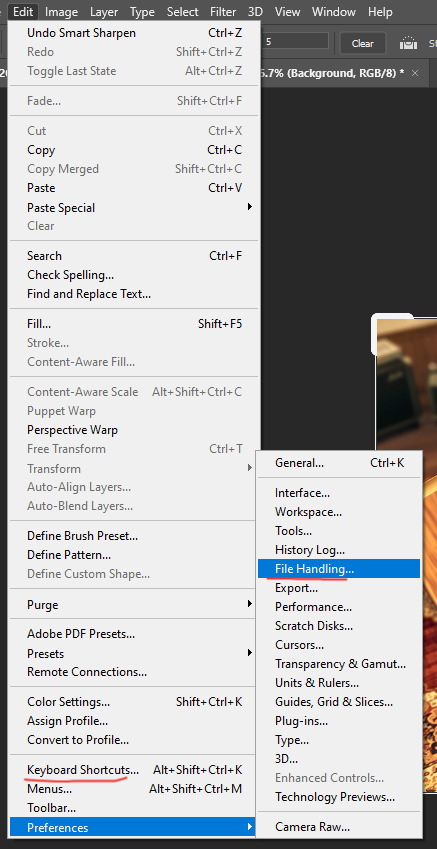
Making a keyboard shortcut? You can view all shortcuts by menu and insert your own shortcuts for ones that don't have one or for preference. Just make sure you don't overwrite another shortcut you care about. You can also just see the shortcuts displayed in the drop-down menus next to the option.
please leave any questions in my ask box and not in the replies!
78 notes
·
View notes