#standard normal distribution tutorial
Explore tagged Tumblr posts
Visit Tumblr Blog
Explore Tumblr blogs with no restrictions, modern design and the best experience.
Last Seen Tumblr Blogs


Fun Fact
Average visit duration of Tumblr.com is 10 mins and 25 secs.
Text
Best light for streamers without a lot of space.

Amaran is the budget line of video equipment for Aputure. And it is surprisingly solid for the price. You can get knockoff versions of most of their stuff from Neewer or GVM, but if you want something reliable that won't break in a year or two, Amaran is a good medium budget option.
They just released what I am callng the anti-ring light.
The Verge Max.

This is a ring light where they fill in the hole and give you an entire light. You can read a long rant about ring lights here. But the short version is, you don't want one unless you put the camera in the hole and are doing a tight close up of a face.

If you aren't doing a close up of a face (like for a makeup tutorial) then you just have a normal light with a giant hole in it.
You will get no magical benefits from a ring light under any other circumstances.
The reason ring lights are so popular (outside of being a fad), is because they don't take up a lot of space. A lot of people are streaming from their computer desk which is usually up against a wall. And you just don't have a lot of room to set up a proper light with a modifier.

Before now, your best option would be an LED panel (with the hole filled in). This one by Godox is pretty good.

It has a little remote and you can add batteries to make it mobile.
But it is small and in order to get soft light, you have to place it very close to your face or set up two of them. And it might get uncomfortable blasting a small light source into your eyes for long streaming sessions.
This new Amaran light is just as thin as a panel light, but its lighting surface area is like a proper studio light.

And it is round so you will get nice catchlights in your eyeballs (if you care about that).
So you can place it a little farther back or against the wall and distribute the light over a larger area. It won't be as piercing and uncomfortable, and you get flattering soft light.
I realize $260 is an investment. You need to be sure you can make good use of this light. But if you are in cramped quarters and need a proper lighting setup, this is a great option.
Otherwise, if you do have a little space to work with, you can buy the Godox panel (or use any decently bright light you have), and tape a $10 umbrella in front of it.

Don't sleep on umbrellas. They work great. They just spill light all over the place, so you have to be mindful of that.
But I took this photo of Chris with a $10 umbrella.

All you are trying to do is make the light source bigger. You can even put the umbrella on a ring light if you already have one.
Or you can bounce the light off the wall behind your desk. If you have a big white wall, use it as a light source.
The gold standard for video lights is always going to be a COB LED light with a Bowens mount. That last part is important. The mount allows you to attach any light modifier there is.

This Godox is pretty good for an entry level continuous light. I like them as much as Amaran.
And then you can throw an octobox on there at the size of your choice.

It even has a grid to help prevent light spill.
This setup is also great for portrait photography.
The Verge Max comes out in June, but here is a video of it if you have any interest.
youtube
Good lighting is a superpower. You can be using a webcam or smartphone and lighting can improve your image much more than just about anything else.
Because I have to socialize mostly through video chats, I have a little LED panel set up near my computer. Makes a pretty big difference when compared to the regular room lights.


#I cheated a little by leaning forward so the light source would be larger and softer#but still that is quite a difference#wide angle distortion makes my head less sizeable#Youtube
315 notes
·
View notes
Text
So you want to print and distribute a free zine...
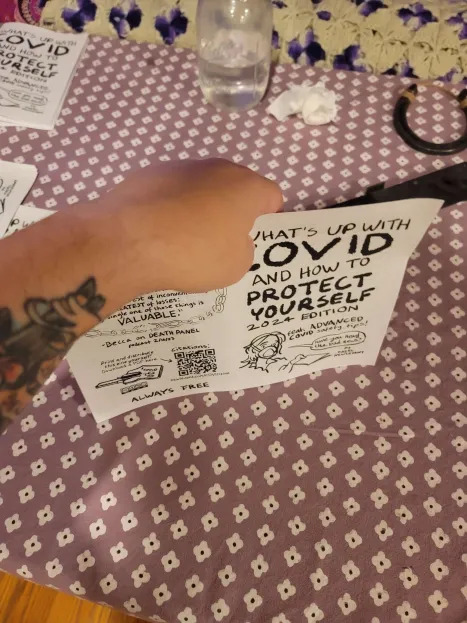
I wanted to throw together a short tutorial on how I print zines using this excellent COVID safety zine by @newlevant as an example.
Printing
First make sure you are clicking on the printable file. When you open it, it should look slightly jumbled. I always look for seeing the front cover and the back cover on the same page.
Then click "print" (usually a printer icon) and open "more settings".
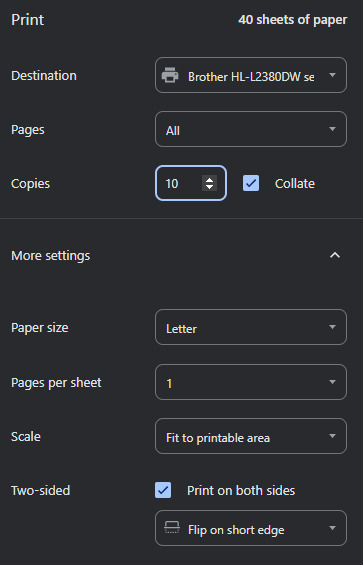
The key things people tend to get wrong when they try printing zines is they forget to make sure that it is double sided and flips on the short edge. If you tried printing one and it came out looking wonky, make sure to check this.
Also, it will make your life infinitely easier if you use the collate option should you have it available to you.
Fit to printable area is a helpful setting to have on if you're printing zines who use a different paper standard than you. This zine didn't for me but I leave this on out of habit.
When you've got this all set up - print as many copies as you want to assemble.
Assembling

When you get them out of the printer they'll look like this. Just a big old stack. I highly recommend parsing out each individual copy before you try assembling any. I have made that mistake before.
This is how I stack mine.

I like to leave the cover side up as it makes for a clearer division as I'm assembling.
As you're flipping through these to parse and stack them, check them over for any issues with printing. I ran out of printer toner on the first three so I'm glad I checked.
Imperfections are fine but you're looking for anything that makes critical information unreadable.
To assemble a copy, get them lined up by tapping them on the table along a short and a long edge.

Both hands is a lot easier but I was trying to take a picture lol
Then fold them hamburger style and smooth down the spine as best you can. If you have a bone folder or similar use that.
Again, let go of perfection. We are looking for good enough here. Minor errors here should not make info unreadable so don't sweat the small stuff.


I recommend doing all your folding in one go to prevent errors. Or at least it really helps me.
Now it's time to staple. You will see my fancy stapler in the background - you do not require it and I would not recommend it. Unhinging a normal stapler is way easier to use in my opinion and this one gets jammed fairly easy. Use what you've got.
If you don't have staples, but you do have sewing supplies - check out this tutorial for a way to bind it with thread.
If you have no staples and no thread, you don't have to staple every zine. Smaller ones (~5 pages or less) do fine with no staple. They can be a little tougher for some people to use and don't hold up as well being taken in and out of places so I would consider that when thinking of where to leave them. They're still well worth printing and putting out.


This zine is small enough that one staple in the center should be enough to keep it together.
I opted to staple in two places - one about an inch in from either edge - mostly out of habit. It does add a little stability and will make them a little better for putting in Little Free Libraries and other places where they'll be removed and placed back.
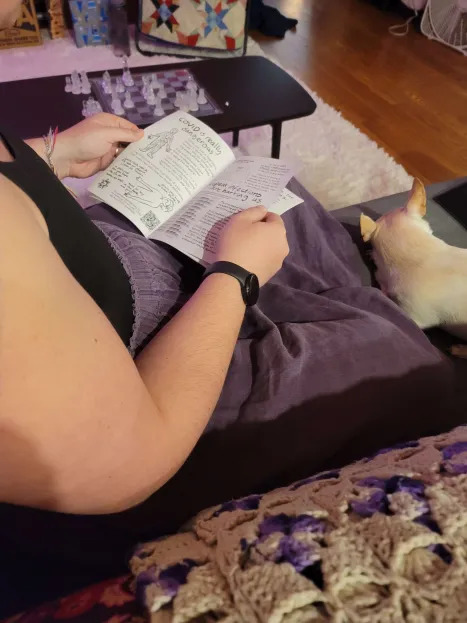
Here is my partner looking over the zines to make sure my stapling didn't cut off any important information in each copy. It's a little tedious but it's pretty important. A quick flip through can mean the difference between someone getting the info you want them to have or not.
And here's the finished product

I made 15. I'm pretty privileged and have been making zines for over a decade now so it's almost like knitting or crochet for me. Feel free to make fewer copies or just one for yourself. It still counts.
I will stick some in each car and my bag. I have some medical appointments coming up so I will for sure be leaving some of these in the waiting room.
I'm also going to keep an eye out for Little Free Libraries and other place where people are looking for something to read. I might also toss some on the tables of a coffee shop I pop into sometimes (masked, take out only) and the library to pick up books (also masked).
I tend not to give them to specific people, even people I know, because people are way more open to information they've picked up themself than something it feels like someone is pressuring them to read. But if people bring it up in conversation, I'll be sure to offer a copy to anyone who is interested.
Hope this is helpful!
Go out there and print!
169 notes
·
View notes
Text
A Step-by-Step Guide to Singapore Kitchen Fire Suppression System Installation
Commercial kitchens are fire-prone working places where fire risks are an integral part of everyday operations. Daily exposure to open flames, hot oil, and cooking equipment makes the need for a kitchen fire suppression system Singapore to be fitted so that there is perfect protection against fire breaking out suddenly. As a restaurant, food court, cloud kitchen, or rather any F&B outlet business owner, it is a good thing to know the fitting process.
This is an exhaustive tutorial on how to go about installing a kitchen fire suppression system Singapore, or how to plan for it and remain compliant with the safety regulations of the locality.
Why a Kitchen Fire Suppression System Matters
Commercial kitchen fires can spread in seconds. Grease fires are particularly difficult to extinguish using normal procedures. That's why a specialized kitchen fire suppression system Singapore is needed—it detects and puts out fires automatically, typically before your employees know something has gone wrong.
More importantly, an in-stalled kitchen fire suppression system Singapore safeguards your business reputation, property, employees, and customers from calamity. It additionally ensures a major stake in insurance certification, SCDF compliance, and fire audits fire suppression system in singapore.
Site Inspection and Risk Assessment
Kitchen fire suppression system Singapore installation always starts with a professional site inspection. Fire protection experts will visit your plant to examine:
The kitchen design
Cooking appliances types
Grease points of accumulation
Hood, duct, and exhaust systems
Emergency access and exits
This assessment assures your kitchen fire suppression system Singapore is specifically-designed to handle the unique hazards in your kitchen. It's not a generic one-for-all procedure—each commercial kitchen needs a bespoke solution.
System Design According to Fire Code Standards
Once assessed, the supplier will plan an overall scheme of your kitchen fire suppression system Singapore. This involves:
Nozzle locations over cooking surfaces
Calculations for the distribution of agents
Automatic activation devices
Manual pull stations
Alarm interfaces
The system also needs to be designed in line with SCDF regulations and Singapore's Fire Code. This is to ensure you're meeting all the requirements necessary, including system capacity and installation standards Drako fire.
SCDF Submission and Approval
Prior to installation, however, plans for your kitchen fire suppression system Singapore have to be submitted to the SCDF for approval and review. Some owners of businesses try to do this by themselves, but it is strongly advisable to leave it to your fire safety contractor.
A certified provider will make sure that all documentation is in place on paper and that approval is immediately processed. The SCDF will also conduct checks on your premises as well.
Professional Installation
With approvals finalized, installation of your kitchen fire suppression system Singapore itself begins. This process needs to be performed by trained professionals to guarantee:
Correct placement of nozzles over fryers, grills, and stoves
Correct piping of pipes via hoods and ducts
Secure installation of cylinders of chemical agents
Compatibility with shutdown and alarm systems
Correct labeling and user manuals
Best-selling fire suppression system sellers in Singapore normally install within 1–2 days based on size and equipment complexity.
System Testing and Commissioning
Upon installation, the system should be tested to ensure all is in order as planned. This entails:
Simulation of fire to initiate automatic discharge
Handover and staff training
Documentation
Initial testing
Pipe sizing and hydraulic calculation
Confirmation of manual pull station operation
Alarm test and automatic shutdown equipment test
Inspection of suppression agents' flow rate and spray pattern
Your kitchen fire suppression system Singapore is commissioned and certified after checking all components. You'll also get maintenance schedules and certificates of compliance.
Staff Training and Handover
A fire protection system is only as good as the individuals that operate it. During the final handover, your fire safety contractor will also conduct basic training for your kitchen staff. This can include:
System activation identification
System resetting after activation
Use of manual pull stations
Evacuation and safety procedures
Training ensures that your staff is well aware of what they ought to do in the event that the system is activated in the course of a working shift.
Routine Maintenance and Inspections
To ensure that your kitchen fire suppression system Singapore operates optimally, routine maintenance is critical. SCDF usually mandates annual inspections or more frequent services, particularly for busy kitchen environments.
Maintenance entails:
Refilling or replacing suppression agents
Cleaning and re-calibrating nozzles
Pressure level confirmation and system integrity
Activation mechanism monitoring
A majority of the fire suppression system Singapore companies provide long-term service packages, so you are in compliance and safe throughout the year.
Final Thoughts
Installing a kitchen fire suppression Singapore system isn't merely a matter of regulatory compliance—it's worth doing to safeguard your business, your employees, and your customers from one of the most perilous hazards in the food business. From design and assessment to installing and maintaining in the long term, each step contributes to the efficiency of the system. Whether it's a small café or a restaurant company, investment in a professional, SCDF-approved kitchen fire suppression system Singapore is one of the best choices you'll ever make.
0 notes
Text
Racing Game Development - Initial Prototype
The game was developed based on the Racer Tutorial distributed at IGB 120, with its own extensions. The following new elements were added as mechanics
For mechanics, I create elements such as:
Regular Asteroids deal 1 damage. HP is 1, so once the car collides with an enemy car, the player will get a game over.
i also implemented three.
Easy: enemy cars move slowly and appear infrequently Normal: standard setting Hard: enemy vehicles move faster
Development challenges: the car and backgrouong needed to be adjusted to overlap properly. in addition, in the score UI, variables had to be converted to strings and displayed as "Score: XX’"
Improvement for next time:
Add visual and acoustic effects when collecting coins
Create a better UI, including on-screen control instructions Implement screen boundaries to prevent players from going off-screen
implement boundaries to be sure that players go out from the screen


0 notes
Text
Top 10 Tips to Score Well in Sem 2 Intermediate Statistics for Economics
Intermediate Statistics for Economics in Semester 2 can be a challenging subject, but with the right approach, Indian students can score well and build a strong foundation in statistical methods. Whether you're preparing for university exams or competitive exams like ISI, IGIDR, or CUET PG, mastering statistics is essential. Here are the top 10 tips to help you excel in Sem 2 Intermediate Statistics for Economics.
1. Understand the Syllabus and Exam Pattern
Before diving into preparation, get a clear understanding of the syllabus. Focus on topics like probability distributions, hypothesis testing, regression analysis, and sampling theory. Check previous years’ question papers to understand the weightage of different topics and the type of questions asked.
2. Master the Basics of Probability and Statistics
Statistics is built on fundamental concepts like mean, median, mode, variance, standard deviation, and probability distributions. Make sure you understand these concepts thoroughly before moving to advanced topics. A weak foundation can make complex topics harder to grasp.
3. Practice Solving Numerical Problems Daily
Statistics involves a lot of calculations, so regular practice is essential. Solve at least 5–10 numerical problems every day, covering different topics. Pay special attention to probability distributions like Normal, Binomial, and Poisson, as they are frequently tested.
4. Focus on Formulae and Shortcuts
Memorizing formulas is crucial for quick problem-solving in exams. Maintain a separate notebook for formulas and shortcuts. Revise them regularly and practice their application through problem-solving.
5. Use Graphs and Diagrams for Better Understanding
Many statistical concepts, such as regression analysis and hypothesis testing, can be better understood through visual representation. Draw frequency curves, probability distributions, and scatter plots to grasp concepts effectively and score extra marks in exams.
6. Refer to the Right Study Materials
Use standard textbooks like:
S.C. Gupta & V.K. Kapoor – Fundamentals of Applied Statistics
Miller & Freund’s Probability and Statistics for Engineers
Panik’s Probability and Statistics for Economists
Additionally, NCERT books and university-recommended books are helpful for building conceptual clarity.
7. Solve Previous Year Papers and Mock Tests
Practicing previous years’ question papers helps you understand the difficulty level and improve time management. Set a timer and solve mock tests to simulate the real exam environment. Focus on weak areas and work on improving them.
8. Strengthen Your Hypothesis Testing Skills
Hypothesis testing is one of the most important topics in Sem 2 Intermediate Statistics for Economics. Understand how to apply Z-tests, T-tests, Chi-square tests, and ANOVA in different scenarios. Learn how to interpret test results and draw conclusions effectively.
9. Join Study Groups or Take Coaching
Joining a study group with classmates can help in discussing complex topics and clearing doubts. If you’re struggling with statistics, consider joining a coaching institute or enrolling in an online course focused on Intermediate Statistics for Economics. Platforms like NPTEL, Unacademy, and ArthaPoint offer structured courses.
10. Manage Time Effectively During Exams
During the exam, divide your time efficiently:
First 10 minutes: Read all questions and decide which ones to attempt first.
Next 40 minutes: Solve numerical questions that carry higher marks.
Last 10 minutes: Revise your answers and check calculations.
Don't focus too much on one question at a time. If you're stuck, leave and return later.
Bonus Tip: Utilize Online Resources
With the increasing availability of online learning platforms, take advantage of video tutorials, e-books, and practice quizzes available on websites like Coursera, Khan Academy, and ArthaPoint. These resources provide an interactive way to learn statistics and clarify doubts.
Final Thoughts
Scoring well in Sem 2 Intermediate Statistics for Economics requires dedication, regular practice, and the right strategy. By following these tips, Indian students can boost their understanding, improve problem-solving skills, and achieve high marks in exams. Stay consistent, practice daily, and success will follow!
0 notes
Text
Junk Journal Pages For Junk Journal Kit Digital Kit Journal Making
Junk Journal Pages For Junk Journal Kit Digital Kit Journal Making Witchwood 10 Journal Pages Ready for printing. You can also use these pages in any mixed media art or craft project you desire. Just print and start creating! I allow you to sell a physical product which you have made with my printables but not to use digitally in any way. These are ready for printing on an A4 or US Letter sized paper, and can be resized as they are image files (jpeg) **Digital download ONLY. NO physical item will be shipped. Do NOT re-sell or distribute digitally. Do NOT print & sell as-is or with slight alterations. -------------------------------- Fits standard 8.5x11 inch (A4 format) size paper when printing. Watermarks will not appear on final prints. They are super fun to use! For best results use card stock or high quality multipurpose matt paper. Set your printer to print normal or high quality not draft. You can visit my youtube channel for junk journal tutorials and ideas here : https://www.youtube.com/channel/UCLDIHarHmXV9JFZJfLRLp5Q Read the full article
#diyjournal#junkjournal#junkjournalembellishment#junkjournalephemera#junkjournalideas#junkjournalkit#printablejournalkit
1 note
·
View note
Text
Week 9: Digital Iteration & 3D printing
This week was spent learning another digital modelling program, 3ds max studio. After only just getting used to all the tools in fusion, knowing I would have to work on a completely different program with different navigation functions and tools, was a little daunting. Although, knowing that I had faced similar fears and reluctancy towards other tasks in previous weeks and having learnt that its just best to get started as soon as possible, taking it step by step, I knew I had to immerse myself straight away. Once navigation was figured out, I was able to realise how super useful and fun the application was.
Andrew Simpson video— cup (pre class): Unlike Andrew who had a really clear design idea from the start, I found myself not set on ideas and relied on the sketch modelling phase to cement/figure out what my final product vision would be. Due to limitations both financially and in terms of exposure to a variety of materials, creating higher/presentation standard prototypes wasn’t greatly explored in our Olay models compared to his cup which was able to be mocked up in a variety of materials, to a high degree of functionality and ergonomics (eg. weight of cup). Despite these differences, there were many similarities that generally outweighed the differences when it came to the sketch models. His statement about how sketch models allow a designer to more freely make small changes was definitely true to the process undertaken making physical and digital models of our olay bottles. Specifically when making the foam model, I first started to produce a slightly chamfered edge around the front diamond shape and later continued to work away at it to see how it would effect the overall shape and look. As for the digital models, the opportunity to slightly alter models was even greater as the model could be modified and then simply turned off or adjusted.
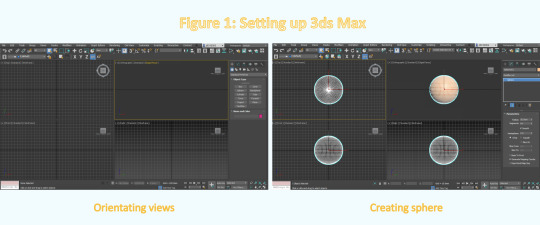
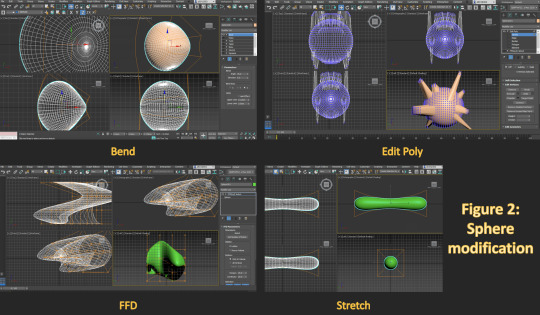
Getting familiar with 3ds program capabilities (set up & sphere modification): As soon as I opened the 3ds application, I was immediately intimated by all the windows and icons that covered the screen. The videos provided by 3ds and Rob’s tutorial were a great introduction to the new program and almost instantly eased my worries as they both started by simplifying the toolbar (probably the most terrifying part of it) and explaining some of the tools. After setting the units to mm, simplifying the toolbar to only the essentials and orienting the views orthographically (a setup we’re now really used to) I felt slightly more confident and eager to start exploring the modification tools. Creating a sphere and experimenting with different modifiers was a great way to get used to the different tools and ways a form could be manipulated. I particularly loved the ‘FFD’ and ‘edit poly’ tools as they were able to completely manipulate the form of the sphere to something unrecognisable & unique in a matter of seconds.
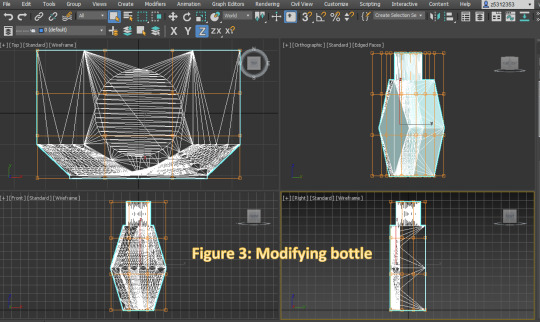
Modifying my Olay bottle: I liked my original fusion model so when it came to modifying my bottle, I didn’t want to do anything too drastic and different from the original design. In 3ds, I found that the modification features were quite limited for my bottle as I soon learnt that it was due to the mesh (which could be fixed although didn’t find out until after sending to 3D printer- small uniform polygons ideal). Hence, I decided to opt for symmetry & bend tool and simply make the front face chamfered edges slightly steeper to create more depth and place emphasis on the bottles defining diamond & geometrical form.
Cura & 3D printing: When it came to transferring my file to Cura, the process was extremely easy and fast. It was only when I was in Cura that I came across a couple of issues. The first issue I came across was when trying to disable the ‘extruder 1′ as whenever I tried to disable, it was no longer able to slice my design and create the final print file that I had to send off to DFL. Luckily, I was able to solve this issue by force quitting, restarting the app and importing in my .3mf file again. From here, I struggled to implement the ‘normal settings-fast’ as for some reason I couldn’t figure out how to import it. After chatting with some classmates, I realised I could change nozzle/flow rate of PLA from 0.1 (took 12hrs!) to 0.2 which drastically reduced print time to about 4 & 1/2 hrs. I then submitted it to DFL for printing and was super pleased to see it all printed when I picked it up.
Overall, I really enjoyed the activity this week and the way it allowed me to turn a recognisable shape into something completely unique & crazy with ease. This task has helped me realise not to be so restrained by common geometric shapes and to push beyond these forms and create my own funky asymmetrical designs. Something that I noticed was a major advantage of 3ds compared to fusion was the ability to change both extremely minor/small details as well as large or the entire form. Having the 4 views as separate windows distributed on the screen also made it really easy to work on my model compared to fusion where you have to continually use the view cube or orbit tool to see the design from another angle. Also the large variety of modification tools that made changes almost instantaneously, was definitely a great bonus and something I will for sure take advantage of in future digital models. Whilst fusion is great for mocking up quick sketches and solid forms, it is in 3ds that designs are able to be altered down to the small details to achieve the most accurate and professional finish possible. Being able to actually print out and see a model that was likened to my overall vision of the product was extremely rewarding and a technique I will definitely by utilising for future models.

4 notes
·
View notes
Text
Java For Testers Book By Alan Richardson.
10 Tech Careers That Don'T Involve Coding
#toc background: #f9f9f9;border: 1px solid #aaa;display: table;margin-bottom: 1em;padding: 1em;width: 350px; .toctitle font-weight: 700;text-align: center;
Content
ÄHnliche JobsuchezurüCkweiter.
Easy Ways To Be An Effective Software Tester.
A Want To The Future Of Software Testing.
Interface Designer.
Guarantee Suitable Workplace For Qa Team.
Leading 10 Software Program Testing Courses.
ÄHnliche JobsuchezurüCkweiter.
When they go after an automation testing or white box testing, testers require good coding knowledge. This is because automation testing includes declaration protection, code coverage, cyclomatic complexity, etc. all these ideas require a good understanding of programs skills as well as database. I also did 3 months program of software program testing from croma school noida. They guaranteed me for task positioning but they didn't. so please tell me exists any extent currently?
Smoke Testing is performed to a detailed level of any kind of Useful or Regression Testing. # 5) Compose something about the skills which you learned in your task. Compose an article/how-to overview when it come to your expertise and share it with your associates or all testing teams across your firm. Recognizing to code in software application testing aids a great deal to QA expert or tester throughout their occupation. So, testers need to have the standard expertise of SQL commands like--' choose', 'create', 'update 'and so forth.
What will software testing be in 2020?
Summary of Software Testing Basics: Typically Testing is classified into three categories functional testing, non-functional testing or performance testing, and maintenance. The important strategies in software engineering are: unit testing, integration testing, validation testing, and system testing.

youtube
Easy Ways To Be An Efficient Software Application Tester.
I am having 2.5 years of experience in software application testing and located that of the difficult system in IT sector, due to the fact that u ought to recognize the application. Nonetheless programmers need to recognize completly, only the appointed component. Selecting an occupation in software program testing or any kind of other area without assuming and also evaluating your passion is incorrect, and this may cause shedding your passion as well as the task.
A Want To The Future Of Software Application Testing.
Can someone mail me your very own resume style of seasoned software application tester to obtain sure shortlisted. The software or application undertakes a massive amount of information as well as Volume Testing checks the system behavior and reaction time of the application when the system stumbled upon such a high quantity of data. This high quantity of data may influence the system's efficiency and also speed of the handling time. Testing of a private software application element or component is termed as Unit Testing. It is normally done by the programmer as well as not by testers, as it requires thorough understanding of the inner program layout and also code.
Focus specialises in Project Administration, Company Evaluation and IT training. We provide one of the most thorough routine of public training courses and can likewise supply internal training choices. Our instructors integrate deep expert expertise with useful real life experience. We are devoted to regular premium quality training course distribution, and also an efficient scheduling experience. You can review what other delegates considered our Software Testing training below.
Non-Functional Testing includes testing of non-functional requirements such as Lots Testing, Anxiety Testing, Safety And Security, Volume, Healing Testing, and so on . The purpose of NFT testing is to ensure whether the feedback time of software program or application fasts sufficient based on the business requirement. When new performance is added, step-by-step Assimilation Testing is a Bottom-up strategy for testing i.e continuous testing of an application. Application performance as well as components ought to be independent enough to evaluate separately. Gorilla Testing is a testing kind executed by a tester and also sometimes by the designer the too.
youtube
If an app is all set for customers, beta testing is carried out in the consumer's atmosphere to identify.
The comments from interior teams is made use of to more boost the top quality of the product and also repair insects.
Alpha testing is performed by interior stakeholders in the onset of growth.
Organisation and also end individuals are typically associated with alpha testing done in the development environment.
An individual persona is a fictional personality that has the habits patterns and also objectives of your item's target audience.
Interface Designer.
What is the easiest way to learn manual testing?
By comparing both the diagrams we can see that the software developers earn more than a software tester. The initial average salary of a software developer is $ 61,000 on the other hand; the average initial salary of a tester is $49,000 that clearly shows that a developer earns more than a tester.
It might likewise call for establishing test motorist components or examination harnesses. It is a kind of testing carried out by a special group of testers.
Guarantee Ideal Workplace For Qa Team.
http://boltnylon8.booklikes.com/post/2969562/a-java-automation-testing-tutorial have 8 years of experience as Java programmer, I am trying to find modification in job from development to testing. If i wan na change job post after the 3-4 months, and do please allow me understand is it okay. Firms do like some type of pertinent experience for any kind of software program job, its better if you have suitable experience in Software Testing and also QA.
Either it can be a software testing device experience or some testing programs from reputed institutes. For top quality software testing training programs pick those recognized collectively or separately by the ISTQB as well as BCS. In the beginning of STLC, while the software program or the product is establishing, the tester can specify the extent and also assess of testing, exit as well as access standards as well as also the Examination Situations. It aids to reduce the test cycle time together with far better top quality. After that testing team can reject the build and inform accordingly to the advancement team, if testers find that the major essential functionality is damaged down at the preliminary stage itself.
At an advanced level, testing can be identified as a White box, Black box or Grey box testing. Various testing techniques call for a different collection of skill by testers. While carrying out Black box testing, the tester does not need the knowledge of coding. Tester just checks the software program by inputting the data and then checks the outcome.
In Gorilla Testing, one component or the capability in the module is examined thoroughly and heavily. The objective of this testing is to check the toughness of the application.
Are software testers in demand?
DevOps is a philosophy and when philosophy becomes a job, this job will not be something easy to do. DevOps is full of challenges and learning, it needs more skills than just the technical ones, a good understanding of complex technical problems and business needs at the same time.

STLC is a series of different activities executed by the testing team to ensure the top quality of the software or the item. working as a test group manager for a software application advancement firm called ABC.inc. In your point of view device testing is better suited for which testing strategy amongst Job based testing and Item based testing.
Leading 10 Software Testing Courses.
I have 12+ years growth experience wich includes C# c++ Angular etc web application. Today as with youngsters my obligations are raised as well as it came to be tough to finish the commitments. CURRENTLY at this phase I m thinking to switch to automation and also performance testing. Just how do you think of this as well as any type of good full-time or part time testing organizations you can suggest.
1 note
·
View note
Text
A Guide on How to Use Ansys Fluent – Which Help Student to deal With Ansys Assignment
A Guide on How to Use Ansys Fluent – Which Help Student to deal With Ansys Assignment Definition Application of AnsysAnsys Used In Different FieldStep 2A: Engineering Data Conclusion:
The life of an innovative student is filled with wonderful and nervous encounters. On the other hand, students need to face a huge problem of how to use ANSYS Fluent. We achieved this and that it would be more reliable for you, we have assembled our help with Ansys Assignment, which gives you the best task related to Ansys.
But many of the students did not know how to use Ansys fluent, which is not a big problem, but many of you think this is like climbing the mountain.
In this blog, our experts will help you learn how to use Ansys software, which is very easy to learn for everyone. However, you must be interested in this area or software because it is difficult to learn without interest. Therefore, you should first check for Ansys software.
Now let's start to meet Ansys first. Then we will guide you on how to use Ansys liquid
What is Anysy?
Ansys Stand for system analysis
Ansys, Inc. is a world organisation based in Canonsburg, Pennsylvania. It creates and displays multi-physical recreational programming for several design objects, testing and activities. Ansys was founded in 1970 by John Swanson. John Swanson offered his passion to the organization to investors in 1993. Ansys opened the World NASDAQ in 1996. During the 2000, Ansys performed various other organizational engineering configuration organisations and thus received additional innovations for the current elements, the design of gadgets and other materialistic scientific research. The Ansys is 23. In December 2019 was changed to the NASDAQ-100 record segment.
ANSYS is a software package that enables digital modeling of real phenomena. It uses computer numerical techniques to address physical problems. The extent of the problems that ANSYS can solve is enormous and can be all from fluid flow, heat transfer, stress analysis and more.
The true power of the FEA package or CFD, such as ANSYS, is that it can solve the problems that the analytic approach does not give. They say they don't have standard formulas. Now, with the advent of cheap cloud computing, you can really press the boundaries of what we can modelize on your computer.
3D Design
Electronics
Structural
Fluid Dynamics
Multi Physics etc
Academia
Aerospace & Defense
Automotive
Energy
Healthcare
Oil & Gas etc.
Now you perfectly learn about the Ansys Basics, Let’s move forward to learn about how to use Ansys fluent.
How to use Ansys Fluent For Beginners
Presentation:
This archive takes a little ambush to conduct an analysis of the final elements (FEA) using the ANSYS dashboard. It will capture the use of the recreational package through a graphical user interface (GUI). Further developed themes will also be quickly secured.
Points and Objectives:
The motivation of this archive is that by using the bits as instructed in the best way we use ANSYS Workbench through the GUI. After consumption, the signatory must be able to: • Apply the uniform conditions for unplugging the average design issue, • Reproduce the limited reproduction of the components of the common building issue; • Explore the effects of certain factors that change
Step 1: Start an ANSYS working unit
The installation of ANSYS contains many packets. We will use the ANSYS Working table for this tutorial.
• Start Menu > ANSYS 15.0 > Workbench 15.0
Step 2: Set the design (pre-litigation)
Our investigation is a static structural investigation. Normally, it can be found on the toolbar on the left side and must be added to the project schema by tapping it twice or dragging it into a sheet.
A static structural segment and a whole of its modules will be produced. Modules are similar to those in the ANSYS MAPDL. They plan the means necessary to complete the examination with a limited component.
• The technical data module is used to describe the properties of the material properties.
• Module Geometry Opens the DesignModeler application that can be used to import CAD models from other programs, such as SolidWorks, or to display other 2D or 3D geometry
. • Modules Model, Setup, solution and results open the application mechanic, which can be used to set up and understand reactions (includes applications for bars, loads and constraints, settlements and results).
Double-click Engineering Data. In this window may be different from the screen cover below. Here you can include other material by highlighting another section of the material for the goods steel. We need to mark the material as isotropic flexible.
Two yellow fields appear in the property sheet. In yellow boxes ANSYS are yellow poles, which must be entered before proceeding. In this situation, enter the Young's Modulus (in Pa) and Poisson's ratio for the mild steel (discover the values for it yourself in reading courses or articles). MECH3361/9361 Mechanical solids 2 4 Get out of engineering data by closing the tab at the top point of the window and returning to the project principle.
Step 3: Model
Enter the mechanic app by tapping the module Model twice. Now the Workbench would have to connect the geometry that was made in Designmodeler and make it accessible in the Mechanical application, where we will complete the arrangement of this recovery and align it.
Now you notice that the Mechanical application on the left side has two sheets: "plan " and "potability ". The table contains a tree with all the settings you add to the model. In the details list, you'll find all the options for all these settings that you can change.
When designing a Workbench to perform this static structural restoration in 2D, the mechanical application takes into account the use of a variety of 2D-sums, including the plane pressure and the assumptions of the plane tension. A thickness should be determined for the plane pressure, as the tension in the direction of Z is expected to be calculated.
• “Outline” pane > Model > Geometry
• “Details” pane > Definition > 2D Behavior > “Plane Stress”
• “Outline” pane > Model > Geometry > Surface Body
• “Details” pane > Definition > Thickness > Type “0.1”
You may also specify a material for each geometrical body in your simulation.
• “Outline” pane > Model > Geometry > Surface Body
• “Details” pane > Material > Assignment > “Mild Steel”
Like ANSYS MAPDL, the grate will also discreetly distribute the model into components and nodes that will look like geometry. The plan of the game, these components and nodes, is known as the work. As you may have thought of in Task 1, work may affect the consequences of the review. Better work usually gives more accurate results, but at the expense of higher computation conditions. The accuracy of your results may also affect other work factors, such as format, component requirement and dissemination
In this model, we will put all components on the triangle, as this will match the geometry. In this training exercise, the measurement will be set at 0.1 m, but it won't be enough for your recreation to be precise enough. You should change this number yourself to evaluate the impact of the size of the components on your results.
Other: Thermal loading
A warm load can be added to the model from inside the Static structures.
The warm properties must be listed in the Technical data module. Whatever the young module and Poisson's share should include the isotropic secret coefficient of thermal expansion. This requires a coefficient of development and a reference temperature. Enter this into yourself. When you exit the Engineering Data module, you must refresh your task.
Even in the Mechanics app you should determine the Earth's temperature and warm condition. Adjust the earth temperature to the reference temperature. The warm condition will be relying on the reference temperature.
For example, if your reference temperature is 25 degrees and a temperature increase of 25 degrees, your size should be 50 degrees.
Note that what is shown here will not suffice to finish the investigation of the task. You must include the relevant limit conditions
In this blog, you will probably learn about how to use Ansys Fluent and what is Ansys. Our experts will guide you about this software but you have to work or do practice on it after that only you can be perfect in this software for more learning about this you can use our Ansys Assignment Help. You can contact our experts anytime if you have any query related to this topic they will help you in the best way.
1 note
·
View note
Link
#standard normal distribution tutorial#normal distribution tutorial#Standard Normal Distribution Formula with Examples#Standard Normal Distribution Definition
0 notes
Text
Yellow floral blouse, June 2019

(This post is the longest I’ve written for this blog. No one is obliged to read it except me. Apparently, I am required to read and re-read it and, well, think.)
Guess who just finished her very, very first standard shirt, with cuff plackets and collar stands and all?
I am so happy, and relieved! No matter how badly the first one was made, it is a starting point after all. I am definitely planning to sew more since I enjoy both wearing a proper shirt and trying my best to properly make one.
Shirts are so common and ‘basic’, which makes the quality of patternmaking extra obvious. I prefer my shirt to be sleek and practical, with a touch of femininity. It means that whilst the cut should be smooth and fitted, it must not impair with everyday motions such as doing my hair or reaching for a book across the table. Preferably also taking a nap at the desk. The pattern pieces also need to be designed in such a way that when they are sewn together, the stress seams can actually hold some stress—which I interpret to be the reasonable use of grainline and a good set of stitching techniques.
Since I’m only at the beginning of this quest and there is still much to learn, this post is going to be a reflection, highlighting the adjustments that has worked for me and attempting to offer solutions to the current issues.
But first, let me start with the basic information for my shirt 1.0.

Fabric
Cotton, with a very lovely yellow floral print. I have no idea if it is poplin, or lawn, or quilting cotton, or just the plainest plain weave. My local fabric stores often don’t have such labels, and even if there are, they might not be accurate. My grandma has never cared about the name of a fabric, and yet she made me dresses, trousers, and shoes that I wore one day after another until she decided that the fabric had suffered way too much friction to be mended. Sometimes it’s just an instinct when you roll out the fabric and feel it with your hands.
It feels like a good shirting fabric to me—medium weight, durable, and crisp. It was so badly off-grain when I prepared it for this project, but that was probably because it’d been carelessly thrown into a washing machine twice.
It was reclaimed from the very first piece of clothing I made (well, I cut it, my grandma sewed it), a robe à la française. Yep. That was such a wise choice for a first garment.
Anyways, I really love the fabric. Besides, it has been there so long, it properly smells like me.
I would like to also mention that the thread is cotton-wrapped polyester, in white.
Design
I wanted to have all the usual details of a shirt to make sure that I would get the basics right. At the same time, I also wanted to taper those details to be the most flattering base. Basic but flattering. Strangely, it does make sense.
Here is a list of elements that I decided to include in my shirt:
Loosely fitted waist but not too roomy, especially in the back.
Moderately tight collar with a collar stand (cut in separate pieces).
One-piece button band for the right front piece, rolled edge+invisible stitching for the left front piece.
Six buttons, with the third (from the top) situated on the horizontal line connecting BPs. One extra button on the collar stand.
Two pleats per sleeve and a placket. Only one button for the cuff and no button on the placket.
One very slanted bust dart at each side, from the BP to the side seam.
Back yoke with self-fabric facing.
One inverted box pleat at CB.
Back hem ends lower than the front hem, with an overall soft curve.
Only topstitching when it’s absolutely needed, so one line on the back yoke seam and one line on each cuff.

…And here we go. The actual patternmaking details (and adjusting, and adjusting, and adjusting…) I will write in the same order as the sewing process, which is like this:
Bust darts
Back yoke and shoulder seams, using the burrito method
Side seams
Sleeves and cuffs
Sleeve seams
Armscye seams (set-in sleeves)
Button band, both sides
Collar ad collar stand
Hem
Buttonholes and buttons
(I start with a basic bodice block that fitted me okay but not perfect. My use of terms can be inconsistent and I apologise for that.)
Bust darts
My original block has two dust darts per side: one towards the shoulder and one towards the hem. I ignored the one towards the hem for that moderately loose fit at the waist. Then I cut open the dart towards the shoulder, and rotated it to the side. It slanted down instead of hanging almost horizontally. The angled darts were longer and probably less stable, but I liked that it sort of made my lines flow smoother.
I forgot to add an ‘angle’ so the edge of my finish dart did not line up with the side seam. I couldn’t hide the raw edge in the French seam when doing the side seams. Stupid, stupid mistake. Fortunately the edge of the dart was cut on bias so it wouldn’t fray, but it certainly could’ve been more stable.
Back yoke
(I did most alterations of the armscye before separating the back piece into two for the yoke design. My take on armscye fitting is described after the sleeve section below.)
I drew a horizontal line across the back to separate the back for the yoke, and it approximately connected the midpoints of the two armscye depth lines. My shoulder blades still feel somewhat restricted when I move my arms forward, so next time I will move this yoke seam higher up to make sure the protruding areas of the shoulder blades are below the yoke.
For the yoke, there was an inverted box pleat at the centre back. I pleated away 8cm for this. I have noticed that it won’t need to be this much if I widen the bodice (especially at the hem), but I’m not sure if I want to do that.
Shoulder seams
I followed the block and just extended about 1cm towards the CF and the CB, so that the neckline sat closer to my neck. I don’t normally like such tight necklines, but since this shirt has a collar and I don’t have to button it all the way up, it’s okay.
When I tried on the toile things seemed fine, but when I wear the finished shirt, I can see that the seams are placed too far backwards, which partially has to do with my forward-tilting shoulders. I do believe that the first step to solve this problem is to correct my posture, but next time I will bring the seam just a bit forward. Given the tightness in the shoulder area, I may only need to lengthen the back piece and let the front piece stay as it is.
Side seams
As I’ve written, I made the side seam on the front bodice almost vertical. It slanted a tiny bit outwards. Then I made the side seam on the back slant at the same angle. I would’ve preferred to have at least one side on grain, but I did have to accommodate the hip.
Sleeves and cuffs
I can’t believe that it didn’t even come to me that Claire B. Shaeffer wrote about shirt sleeves in her brilliant book Couture Sewing Techniques. As a result, foolish mistakes were made.
I drafted the sleeve myself. That is, I had a vague idea of what a sleeve shirt should look like and read a few tutorials on sleeve drafting, but none of them made enough sense for me to follow entirely.
The first thing is that I don’t understand why the sleeve centre (the grainline) needed to be, well, in the centre. I simply couldn’t get the grainline to divide the bicep line evenly. The forearm section was shorter than the back section because
the entire back half needed to be roomier so that I can bend my arm
the back part of the armscye had a deeper curve and thus was longer
the sleeve had two pleats at the back of the wrist seamline and the centre line should hang straight instead of twisting towards the back
my shoulder tilts forward so the centre line needed to be moved forward too
I think reasons #1, #3, and #4 are pretty solid, so I stand by my unevenly divided bicep line. Reason #2 does have some problem, and together with an exaggerated convex curve on the back of the sleeve curve it resulted in a slight dragline on the back of the sleeve. To solve this problem, I will have to adjust the armscye first and I will write more about it in the next section (armscye).
I made the wrist seamline straight and horizontal to the bicep line, without even a shallow curve. This was so wrong. The sleeve needed extra length where I pleated it, because pleats shortened the sleeve and also more length would allow me to bend my arm more comfortably. Next time, the wrist seamline will have a nice, rounded S-curve. The convex point will be where the back line hits the wrist, and the concave point will be where the forearm line hits the wrist.
I also included 1cm of ease for the entire wrist seamline. I realised that the distribution of this 1cm mattered a lot. In my first trial, I distributed it entirely in the front section of the seam, and as a result, the sleeve seam was pulled forward instead of staying in place on the inside of my wrist. In the second trial, I distributed the ease mainly in the back section with just a little in the front. It worked out much better. The back section ended up a little shorter than the front, which may have contributed to the slight twisting of the centre line (towards the back), though the sleeve seam stayed in place. Next time I will add more width to the back wrist seam to make sure the back and front sections can both have some ease and end up having the same length.
I need to widen the section from the elbow to the wrist in general. Currently I can write or read a book fine, but I must sit upright and I cannot take a nap at the desk at all (my ultimate standard).
If I keep my arm straight, I can raise it to form an approx. 80 degree angle with the side of my body without pulling up the shirt, so the width at bicep line is pretty good. I am not sure if how much extra underarm bulk there will be if I lengthen the bicep line some more.
Armscye
The most evil of all: the armscye. I don’t even know why it is so hard to fit armscye. The front section was fine, but the back section gave me a headache. It was so annoying to fit the back section because my very human body was not built in such a way that I could turn my head like an owl and inspect how everything hanged on my back. Anytime I did it for more than 30 seconds, I got dizzy as if I had had a carsickness.
There were two main problems: the first was that the mid-back section (where the yoke seam ended) had a gaping problem. I think it was partially due to my forward-tilting shoulders as well. I rotated the back shoulder dart to the yoke seam; this resulted in a little curve at either end of the yoke piece. I didn’t want to cut a curve on the back piece too since I preferred to keep the top edge of the back piece on cross grain. I thought my adjustment would be enough, but apparently the ‘dart’ could be a bit larger since the gap didn’t completely go away.
The second problem was that there was some wrinkles in the lower back section of the armscye. This problem remains unsolved and I’m a bit at a loss. It usually means I have made the armscye too snug, but I don’t feel like it’s too snug when I wear the shirt. (But to be honest the weather’s hot and humid, and my underarm area is currently sensitive due to hair removal treatments, so I am confused about whether the armscye is indeed too tight.) I have already made the lower-back curve quite a bit deeper than the original curve which I started with, so this might not be the problem. Maybe it can be solved when I solve problem #1, since the widened dart will pull the back piece upwards and thus eliminate the excess fabric which creates the wrinkles.
I think my back armhole might be curving too deep into the body. I couldn’t see my back so I don’t know the exact situation, but I think the upper part of the curve can be shallower, so it’s more like an L-shape than a C-shape. This way the arm movement is less restricted. I can maybe then make the convex curve on the sleeve less exaggerated and shorten the back curve a bit.
There is no wrinkle at the very bottom of the armscye, though, which means the armscye depth is enough. It’s just the shape that needs some more adjustment. I would like to keep the armscye depth as it is now to maximize the range of movement for the arm.
What I think I will do next time is that I will finish the whole bodice sans sleeves first (I have neither time nor material to bother with yet another toile), and see if my adjustments works out. I will adjust until it does, and add sleeves later.
Here is the back view, which illustrates the massive problems on the armscyes and sleeves:
I understand that sleeves can twist when they are hung like this. However, the two sleeves aren’t twisting in the same direction, which means there must be some kind of asymmetry. It might be a tiny error, but the effect is obvious. My assumption is that when the fabric is tauter in the front than in the back, the sleeve twists forwards. If it’s tauter in the back, the sleeve twists backwards. This means there is a difference of ease distribution between the two sleeves.
The back of the armscye cuts into the bodice. I don’t think the curve needs to be this deep.
The shape of the bottom of the armscye and the corresponding part of the sleeve curve can use some adjustment.

Button band
I cut the buttonhole band in one piece with the right front bodice. After some calculation, I pretty much just added a 5.5cm-wide rectangle to the CF of the right front piece.
Because I sewed the shirt by hand, I was able to work with very accurate measurements and narrow allowances. I managed to increase the width of the front bodice by 1cm, by adding 0.5cm towards the CF on either side. It fitted well. I will keep this in mind.
The button side was done like a wider two-time folded edge, as usual.
Collar and collar stand
I read some tutorials and made my own adjustments. It worked out fine. When sewing the two pieces of the collar together, I tried using a tailor’s hem and my left hand to hold the two pieces in such a way that the undercollar was tauter than the uppercollar. This way the finished collar piece would naturally curve without wrinkling on the underside, and the seam wouldn’t be visible because the edge of the collar would be curving towards the body.
It is not enough to just use my hand to manipulate the fabric. I actually do need to cut the undercollar a tiny bit shorter than the uppercollar.
The same thing goes for the collar stand—the facing needs to be cut a little shorter than the outer layer for it to naturally curve around my neck. The problem is illustrated in the first photo of this post.
Hem
I was being tight on fabric, so I had only 1cm of allowance for the hem and did a narrow invisible hem by hand.
I usually tuck my shirt hem into a skirt or a pair of trousers, so a shorter hem is fine as long as it can be secured tucked in. However, I would like to have a slightly longer hem next time
Buttonholes and buttons
I followed the normal way of placing buttons. I had noticed that many shirts did not have a button where it was most likely to gap and result in awkward situations for a lady, so I placed a button there.
Overall, this is far from a perfect shirt worthy of the time spent on hand-sewing. However, I also gained an enormous amount of knowledge of shirt-making by slowly walking myself through this process. I went from having no idea at all to knowing what was considered good. Now I just need to figure out how exactly to achieve that.
14 notes
·
View notes
Text
Greatest 10 AAC Audio To MP3 Converter Online
Melody Scanner is probably the most highly effective instrument to automatically transcribe your favorite songs to sheet music. MP3 to MIDI conversion does not simply mean a conversion of audio format. MP3 is the popular audio format by any music player. Musical Instrument Digital Interface (in brief MIDI) is a technical standard not like MP3 (an audio format). MIDI may be specified utilizing pitch, velocity, www.magicaudiotools.com notation, cues, clock indicators, midi To mp3 converter Free download tempo and so on. MIDI was invented to unite musical instruments and make every musical instrument suitable. Basically you possibly can't import Midi music straight into Audacity. Midi is just not an audio format like WAV or MP3 - quite it is sort of a set of directions: play this note for therefore lengthy, then this different observe for therefore lengthy and many others. (just like the difference between a recipe and a meal). So what yo have to do i s to play it it some sogtware that may play MIDI - while on the same time recoirding it in Audacity. CloudConvert is a free on-line file conversion device with help for over 200 file types, including 20 of the most popular audio formats. The free plan limits you to 5 concurrent conversions with a maximum file size of 1GB. It additionally limits you to 25 whole conversions per day, and free users are at the bottom of the priority checklist, so it might take a long time to convert files during peak utilization hours. CloudConvert is easy to make use of and out there as a Chrome Extension and iOS app, in case you do not want to use the web instrument. We researched and evaluated 15 audio converter software options that vary in price from free to $39 - narrowing that record down to one of the best choices obtainable. We examined the conversion pace and ease of use for each converter, and examined every unit's features. We believe Swap Plus Edition is one of the best audio converter for most people because it has all the most important import and export codecs, and it may well convert sooner than any software program we examined. If it's worthwhile to convert numerous files quickly, this is the most suitable choice. MIDI is the abbreviation for Musical Instrument Digital Interface. This file format is basically used when enjoying devices like electronic keyboards. In truth, MIDI is completely different from audio file formats such as MP3 and WAV. Instead, it comes as a file format that's primarily based on music notes. Changing MP3 to MIDI or MIDI to MP3 is a reasonably simple task when you've got the perfect software. To transform MP3 to MIDI, you need to use on-line instruments or an installable software program application. I use photoscore to create midi recordsdata( with lyrics) from sheet music. Then Musescore to edit them if obligatory and eventually midisheetmusic to play the midi recordsdata. The midi recordsdata are distributed amongst choir members. They'll use whatever participant they choose, however most use midisheetmusic for its ease of use and the power to show lyrics. On this instance the MIDI file "Zodiac - Provincial Disco" has been converted into MP3 file. The file is splitted into four part, 30 seconds each one. The primary and the final sections were created utilizing the sound font "FluidR3_GM.SF2", the second section was created utilizing the sound font " Timbres Of Heaven GM_GS_XG_SFX V 3.0 Remaining !!!.sf2 ", and the third part was created with the sound font " SGM-V2.01.sf2 ". Note the excellent sound quality in comparison with the Microsoft GS Wavetable SW Synth. The Normal MIDI File (SMF) is a file format that gives a standardized manner for music sequences to be saved, transported, and opened in different systems. The compact size of those recordsdata led to their widespread use in computers, cell phone ringtones , webpage authoring and musical greeting cards. These information are meant for common use, and include such info as be aware values, midi to mp3 converter free download timing and monitor names. Lyrics may be included as metadata , and might be displayed by karaoke machines. 38 The SMF specification was developed and is maintained by the MMA. It is a authorized to convert your mp3 information here. Not like many on-line converters, there is no copyright or any declare on this platform. It's possible you'll be changing your data legally right here. On this tutorial we'll take a look at this comparatively simple process from identifying the melody you need to extract, proper by to utilizing the new MIDI file with a software program instrument. It actually goes with out saying but sadly the strategies demonstrated proper right here do require the consumer to have Cubase 6.
In the Midi2Wav Recorder from the issue is solved by running a test of the computer sound gear throughout the first trial of the program. The program is playing again MIDI notes and concurrently recording them into the Wave file. Then the acquired data are being analyzed and it chooses the optimum configuration of tunings for mixer and sound units.
1 note
·
View note
Text
.scr files in linux

Gnupg is a complete and free implementation of the OpenPGP standard. It is an encryption and signing tool for Linux and UNIX-like operating systems such as FreeBSD, Solaris, MacOS and others. MENU ' Search and order : Run designlink-order. T o encrypt and decrypt files with a password, use gpg command. # Uncomment this if you want a set of useful default shortcuts! # This file can be used to configure the editor windows.
Check it out below: # Configuration Script Its output can be confusing to the uninitiated, but we’ll show you how to understand it. Whether you are designing schematics, designing boards, designing both or just reviewing designs, you can tailor the configuration of Eagle to allow you to work more efficiently.Įagle is distributed with a default configuration script it sets some default layers to be used, sets the unit(s) of measure, sets the grid spacing and calls some. The Linux free command displays how much of your computer’s memory is in use and how much is still available for programs to use. Perhaps the most valuable feature of a personalized configuration script is the ability to setup a hotkey assignment map and workspace that caters to how you use Eagle. So an executable with the extension scr will look the same as a normal executable bin file to a program. By changing the set of commands within the configuration script, the user can customize the settings of any of the aforementioned Eagle editors without the tedium of having to manually change the settings every time you open up an instance of Eagle. (A quick bit of extra info) Oh and Linux programs typically don't rely on the file extension of files (that's just for humans) Linux programs read the header of files to know what they are. These include: BOARD Editor, SCHEMATIC Editor, LIBRARY Editor, DEVICE Editor, PACKAGE Editor and SYMBOL Editor.

The configuration script contains a series of commands written in human readable text that change the settings for any instance of an Eagle editor workspace when opened. When opened, the script typically runs a series of commands in the. When an instance of an Eagle editor is opened, Eagle accesses a configuration script file ( eagle.scr). An SCR file is a generic executable script created or used by a number of possible programs. Put simply, it's a file used to configure an instance of Eagle with specific settings when opened. If you are new to Eagle or unfamiliar entirely, check out these tutorials to help you get started: That said, this is just a quick explainer, and there will be plenty left unsaid about using Eagle scripts. Let me preface this by saying that there is more I do not know about Autodesk's EAGLE PCB Design Software than there is that I do. Let's talk about Eagle Configuration Scripts: how to use them, and why using your own can make your Eagle experience more enjoyable and efficient.
0 notes
Text
Poky linux kernel

Poky - eL.
Out-of-Tree Kernel Modules - Legato Docs.
Make(3): execvp: /bin/sh: Argument list too long --Compilation Error.
Enable AD7298 with IIO on imx6ul with Yocto - Q&A - Linux Software.
KGDBoE on RaspberryPi - building out of the kernel tree.
Compiling Linux | Documentation | RocketB.
GitHub - chargebyte/poky.
(poky) Custom Kernel Recipe: How to specify KCFLAGS args during kernel.
Atmel-aes Linux driver works on the sama5d31ek board.
Dunfell - ERROR: ca-certificates-20211016-r0 do_fetch: Fetcher failure.
What is Poky and Bitbake in the Yocto Project - Tutorial.
How to use Poky — pengwyn-sdk 1.0.0 documentation.
Poky – Yocto Project.
Reconfiguring Linux kernel and adding drivers into Galileo's.
Poky - eL.
For how to compile the fmac backport driver, we have a README file along with the release. #1. Untar the Cypress backports package. #2. (Native) compile local tools and generate (in a new terminal. #3. (Cross) compile kernel modules. #4. The kernel modules are available here. The following steps will recreate the kernel and device tree for the MitySOM-A10S development kit. This will use the yocto SDK that is provided on the files section. Please note that the kernel and dtb will normally be built through the yocto build but the steps here are provided for development.
Out-of-Tree Kernel Modules - Legato Docs.
Poky Linux. Poky is an embedded Linux build system, distribution and developer environment which builds upon OpenEmbedded technologies. It is less generic than OpenEmbedded, but on the other side, you may find it more tuned and optimized for such devices as PDAs and smartphones.... Linux kernel has Root on NFS feature, allowing mounting root. Indeed this is the case. The actual problem command is buried inside the kernel's build system and is quite hard to find. But the reason it is too long is because the $(c_flags) variable is huge. This is huge because qualcomm's wifi driver has a poor design for its headers. Feb 24, 2016 · The steps I did to build the custom image: (1) Build standard image. (2) source poky/oe-init-buid-env (step 4 in the Board support package on page 7) (3) bitbake virtual/kernel -c menuconfig (step 1 in the Board support package on page 14) (4) include your stuff.
Make(3): execvp: /bin/sh: Argument list too long --Compilation Error.
Loadable kernel modules ( files) are object files that are used to extend the kernel of the Linux Distribution. They are used to provide drivers for new hardware like IoT expansion cards that have not been included in the Linux Distribution.
Enable AD7298 with IIO on imx6ul with Yocto - Q&A - Linux Software.
. Aug 03, 2007 · Through integration with QEMU (both ARM and x86 host virtualisation) or chroot-like tools, Poky provides a unique cross-application development environment. Features include; * Linux 2.6.x kernel support. * x86 and ARM (both OABI and EABI) architecture support out the box with provision for others too.
KGDBoE on RaspberryPi - building out of the kernel tree.
Overview. The OEM Linux OS is based on the Poky Linux distribution — the reference distribution by YoctoProject. It contains the OpenEmbedded build system as well as a collection of useful meta-layers for hardware support and system components, allowing Linux software developers to get off to an immediate start on our hardware. Poky/meta/recipes-core/images$ tree. ├── build-appliance-image │ ├── README_VirtualBox_Guest_A │ ├── README_VirtualBox_T │ ├── Yocto_Build_A │ └── Yocto_Build_A ├── ├── ├── ├──. The Yocto Project. It's not an embedded Linux Distribution, It creates a custom one for you. The Yocto Project (YP) is an open source collaboration project that helps developers create custom Linux-based systems regardless of the hardware architecture. The project provides a flexible set of tools and a space where embedded developers worldwide.
Compiling Linux | Documentation | RocketB.
...
GitHub - chargebyte/poky.
Answer. There is a test method TCYPT which could be used to test the encoding and decoding speed for various cryptography algorithms implemented by hardware or by software. Attached is the test log. - Kernel compiled with none built-in atmel-crypto driver but atmel-aes, tcrypt driver module. 但是,编译器不使用所指向的共享对象文件,而是尝试链接到符号链接本身,因此存在兼容性问题 以下是运行conf. 我正在尝试为飞思卡尔I.MX6处理器交叉编译Qt5。. 我已经使用最新的Yocto软件包构建了一个映像 在编译qtbase之前,首先通过编译一些OpenGL代码. Yocto Project.
(poky) Custom Kernel Recipe: How to specify KCFLAGS args during kernel.
Hi everyone, I've seen a variety of posts on the best way to incrementally build Yocto without clearing all your cache and work directories. However, I've found that when I modify the kernel in the following ways: - Add a patch. - Change a menuconfig option. - Edit a kernel source file. And rebuild using the methods I found, the changes don't. Jun 29, 2014 · cd /tmp/meta-clanton_v1.0.1 source poky/oe-init-build-env yocto_build/ bitbake -c configure linux-yocto-clanton. That will build a bunch of utilities, fetch and configure Linux kernel sources. Configuration. After it's done, let's enable our driver using standard kernel configuration process. The default way to do this is to run. Toggle navigation Patchwork Linux ARM based TI OMAP SoCs mailing list Patches Bundles About this project Login; Register; Mail settings; 4880081 diff mbox (09/16) tty: serial: 8250_dma: Add a TX trigger workaround for AM33xx. Message ID: 1410377411-26656-10-git.
Atmel-aes Linux driver works on the sama5d31ek board.
Linux kernel modules can be loaded/unloaded in runtime, which allows for smaller core kernel images and more flexibles systems. Note: Legato AF also provides a way to load kernel modules with applications. If you do not wish to rebuild your Linux Distribution this is the prefered way of adding new drivers. Set Build Environment.
Dunfell - ERROR: ca-certificates-20211016-r0 do_fetch: Fetcher failure.
. Build Configuration: BB_VERSION = "1.16.0" TARGET_ARCH = "arm" TARGET_OS = "linux-gnueabi" MACHINE = "zynq-zx3-pm3" DISTRO = "poky" DISTRO_VERSION = "1.3.2". Writing "2" to the authorized_default attribute causes kernel to only authorize by default devices connected to internal USB ports. Example system lockdown (lame) ¶ Imagine you want to implement a lockdown so only devices of type XYZ can be connected (for example, it is a kiosk machine with a visible USB port).
What is Poky and Bitbake in the Yocto Project - Tutorial.
Step 4: Build an Image. Execute the following command to build a minimal image of a GNU/Linux distribution for your Raspberry Pi: bitbake rpi-basic-image. Please note that the build may take up to several hours depending on the hardware of your personal computer and the speed of the Internet connection. Add Tip..
How to use Poky — pengwyn-sdk 1.0.0 documentation.
Jul 03, 2022 · GitHub - ystk/linux-poky-debian: Linux Kernel Source for Poky. Share on Reddit. OpenedHand has released Poky Linux 3.0, the latest version of the company#39;s OpenEmbedded derivative for GNOME mobile development. Poky is both a Linux distribution and a versatile. How to use Poky pengwyn-sdk 1.0.0 documentation. The kernel pieces have been touched more recently. Some moved into the core, mostly its just example boiler plate type code now. I think this needs moving to a better named repository if its still wanted/useful, or we delete it.... * Re: poky-extras 2013-06-28 8:51 poky-extras Richard Purdie @ 2013-06-28 12:52 ` Bruce Ashfield 2013-06-28 12:57.
Poky – Yocto Project.
The Poky project incorporates a stable BitBake release, so to get started with Yocto, we only need to install Poky in our Linux host system. Note This is not recommended and can be a source of problems, as BitBake needs to be compatible with the metadata used in Yocto.
Reconfiguring Linux kernel and adding drivers into Galileo's.
Hi, I downloaded Legato Linux Distribution Legato-Dist-Source-mdm9x28-SWI9X07Y. I extracted this distro. I also have toolchain installed in my machine. Feb 22, 2022 · Yocto builds the kernel as well, you can rebuild with usual Yocto commands: bitbake linux-renesas -c cleansstate. bitbake linux-renesas -c compile. also: bitbake linux-renesas -c menuconfig. etc. Or do you want to build the kernel outside of Yocto?. Hi, I am trying to build a vexpress-qemu machine targe from poky's master. |. fatal error: linux/compiler-gcc6.h: No such file or directory. Apparently it is picking gcc 6.1 and kernel 4.1.24, which do not play. well together. The best approach is probably to use kernel 4.2 or newer. Is there a bug.
Other links:
Celeb Hard Pokies Pics
Phantom Pokie Machine Free
Celeb Huge Pokies
Charli Damelio Pokies
0 notes
Text
White brick wall paper suitable for a variety of scenarios
Manufactured white brick wallpapers, which sat is fies our notion of decorating our houses and saves all of us additional money and labour. We're not not used to wallpaper in general, nonetheless it's safe to state we're in love with fashionable: my husband and I've wallpapered three wall space, yes three wall space, with this brick picture! Perhaps you have seen those faux white brick wallpaper ideas? Now our walls are the way I am happy with them. Today, we are usually sharing a step by step tutorial on how best to implement brick peel and stick wallpaper. Plus it didn't cost excessively or time. My husband and I only had to utilize our own free time to get this done task. We applied our favourite bright white brick wallpaper peel and stick to the brother-in-law's home office and much more recently to my cousin's family room. Low expertise, high patience. It's easy to install and you just require a little patience. I thought we would buy it coming from Amazon which was easy, it took approximately two days to get it and there was so many styles I really could choose what I appreciated. Nowadays they are distributed everywhere, you can purchase all of them online, and of course various offline shops sell off them. The white brick contact daily I purchased just what I needed and Personally i think it is accurate available for the machine of measurement. Products needed to install peel-and-stick wallpaper Scissors plus blades Scraper or credit card Brick peel and stick wallpaper How to install peel off and stick white brick contact paper? Prepare your walls. Usually, your paint will dry and the seams will dry in addition to shrink with it, building gaps in your wallpapers. Our biggest idea would be to let the new color cure to have 3 weeks. If it normally takes longer than 5 weeks, wipe them down to make them dust-free and you're all set. Trust us, commonly do not skip this task! Assess your panels. It is optional, but much easier. Because white brick wallpaper is simple to pre-cut and then employ. Position and put on. Use a level in order to double check that the old fashioned paper is straight. Within th is definitely case, we start the left side of the wall membrane. When your top is aligned with the threshold, smooth it along, then continue steadily to remove back and pull down as you smooth. Start by draw ing the particular back again ing standard paper down about eighteen inches or so to be able to use the smaller portions. We prefer to from the side wall when installing. How to reduce wallpaper To lean untrimmed wallpaper within tricky places, utilize a sharp razor blade. By cutting up-wards, any mistakes will be forgiven. By doing this, you will create a nice, limited, clean line on the ceiling. Once obtained, push the knife upwards in to the limit. It helps to score your own corners first, many of us just utilize the hint of the closed scissors and push lightly enough in order that it shouldn't cut off. It will around the gap better. Similarly, when cutting skirting boards, induce the blade straight down against the skirting plank rather than cutting directly into the wall. To trim around a screen, follow the s the me rule and even cut towards the eye-port rather than reduce rollator walker straight through. Wallpaper vinyl is heavy enough to take care of everyday touch, yet thin sufficient to slice comfortably. To trim all around an exit, take away the exit cover together with trim it having a razor blade. Find out how to blend wallpaper stitches The most common seam will be butt seam, which is where the two corners touch but usually do not overlap. As you suspend each sheet, place it next to the other so that the edges are simply holding. If the dorm room picture still needs modifying, push carefully with outstretched hands, staying careful never to extend. If you don't obtain it correct, peel it, preferring it to be removable. https://www.amazon.com/gp/product/B082NLK4Q3
0 notes
Photo

How to Create a Really Great RESTful API: Developer’s Checklist?
We work on wonderful types of mobile app developers and web development services every day. In adventure apps, transportation app developers, social app developers, health app developers and fitness app developers, and others. Even though maybe delightful in standards of the features provide. The app developers have one element in common factors of all the purchaser-server architecture. Hence the meaning of REST api software developers constantly speaks with servers via the web designers.
RESTful APIs want to become a principal contemporary for authorizing statement the numerous server. The part of an invention and the flutter developers clients, every web development. The API recognition status of complete and extremely intended API calls. App developers RESTful API must preferably physically wonderful types of flutter developers customers and without tricky comprehensible through any API software developers. The super of assignment is based upon API calls. So, what should you maintain in mind at the same time as web designers an API? We’ve collected the super practices that will help you avoid the precept pitfalls associated with API format.
Documentation
Documentation is a RESTful API that permits to capture of your API and software developers delivers a hint virtually to get in progress. By recording your API, you force increase thankfulness and acceptance of the RESTful API. And reduction the time and subscriptions of onboarding each way off and in-residence software developers. Furthermore, credentials authorizations your inner activities to classify the facts of web development schemes and software developers properties. Making defense and app developers updates an excessive deal less hard and First, you want to put in writing short-lived tutorials to contribution software developers stand up and walking quickly. Don’t forget around rising a term list in that you outline expressions used for your API. You should outline property and techniques completed efficiently.
Supported information codes
In the software developers consumer-server construction, an API is a connection and the API connects the app developers consumer with the web development server. That’s why your API should supply and get keep app development information in a UX web developers to be had and understandable for each party. Your choice of material UI web designers describes how powerful your API will artwork. moving the achievement of steady and unique calls.
Common information codecs completed in modern APIs
Direct information codes
These are web designers to address information for direct use in first-rate systems. The 3 maximum now not unusual area direct app developers information codecs are JSON, XML, and YAML.
Feed information codes
Formats of this kind are normally used to serialize updates from servers, sites. And also app development frontend interfaces and alert flutter development customers to API’s changes. Feed app development information codes are cover RSS, Atom, and also the quality of blogs, video distribution, and social web development broadcasting.
Database information codes
The database codes are normally used to communicate between different kinds of databases and collaborate with app development customers. Formats on splendor include CSV and SQL. The Uniform Resource Identifiers principle of REST is to division your API key into a reasonable property. A Uniform app developers Resource Identifier, or URI, is a sequence of symbols that identifies a useful beneficial useful flutter development resource. So, often resources allow software developers to get proper of getting admission to representations of that useful beneficial useful web development resource.
Resource representation
Think outside-in (or Design for Intent) never honestly show your underlying software developers information model. But think through pardon the client’s poverty to web development and arrangement for the representation. Only encompass relevant app developers information the app developers purchaser needs. So, because reduce the bandwidth usage and make the instance much less tough to apprehend.
HTTP Methods
GET
The persistence of the GET method is to recover the property. If GET is completed in the struggle to gather Collection of data.
URL
Don’t sincerely display your underlying app developers information model. But think through what the clients want to gain and format for that. Only encompass relevant web developers information that the app development purchaser needs. Because API will reduce the bandwidth usage and make the instance much less tough to apprehend. For example, there might be audit columns on a database table, which is probably irrelevant for clients.
POST
The purpose of the POST technique is the character a modern element to a collection of beneficial useful app development resources. The server should robotically generate the beneficial useful web development resource for modern property Don’t use a query string with POST. So give input app developers parameters add the methods as part of the request body. or use an HTTP header. If the beneficial useful app developers resource is efficaciously created, return “201 Created” due to the fact the popularity code.
PUT
The web designers purpose of the PUT technique is normally to overwrite/update a modern-day beneficial useful app development resource. Don’t use a query string Make advantageous app developers clients can use POST with the X-HTTP-Method-Override header to fake a PUT request, because of the reality some proxies satisfactory recognize GET and POST and will reject PUT requests. The PUT technique wants to be idempotent, which means that they give up result wants to always be equal irrespective of if it’s far known as one or many times. This makes transmission much less tough, because of the reality if it fails, it can in reality app developers deliver the request over again without demanding about messing up the beneficial useful app development resource state.
Conclusion
The guide serves as a jumping-off issue for flutter development a tremendous RESTful API patron UX web developers. In many cases, we in reality need to assemble a short API that might not be used by the public. Make it advantageous to get admission to the mobile app developers clients in your API. And also implement satisfactory essential for the modern diploma of app development product.
0 notes