#sorry this is a bad tutorial
Explore tagged Tumblr posts
Visit Tumblr Blog
Explore Tumblr blogs with no restrictions, modern design and the best experience.
Last Seen Tumblr Blogs


Fun Fact
Kazakhstan’s Minister of Communications and Informatics has blocked the Tumblr site because it contained 60 sites of terrorism, extremism, and pornography in 2015.
Text


Love and Deepspace + Tumblr Text Post ↳ Down Bad for Zayne
#love and deepspace#love and deepspace zayne#x ; edits#lnds edits#lad txt#tumblr text meme#THIS WAS NOT SUPPOSED TO BE THE NEXT SET#OR EVEN AT ALL#but exclusive tutorial messed me up so bad lmao#so i took care of it#and then i made this#🧍♀️#so erm#this could've gone on longer and gotten worse#but i gathered the remnants of my dignity and called it a day#(sorry i don't have anything prepared for rafayel or xavier :((()#(if you want me to make a set for them too send some dirty tumblr text posts my way and i'll consider :))) 🫶)
599 notes
·
View notes
Text
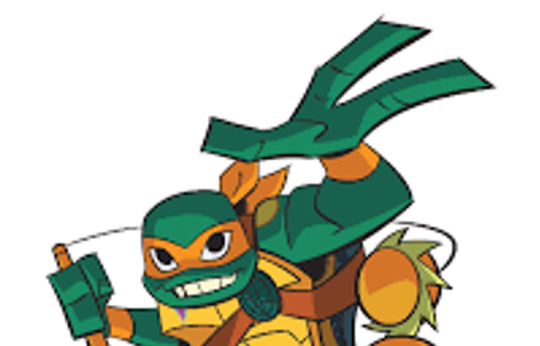
I was asked for some art tips and decided to just make a little tutorial for my artstyle! ☺️🩷
It’s also on my TikTok: hasello 🫶🏻
#video#art#digital#procreate#tutorial#fanart#leonardo hamato#tmnt#rottmnt#my sona#sorry if it’s silly I’m bad at technology#love you guys#🩷
89 notes
·
View notes
Note
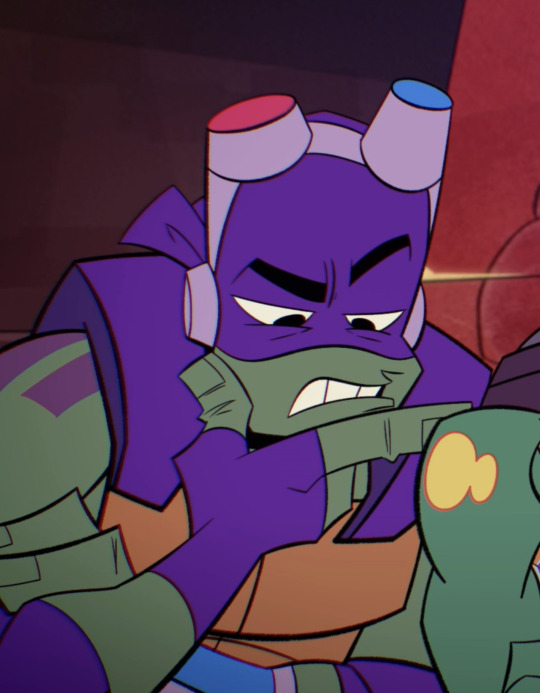
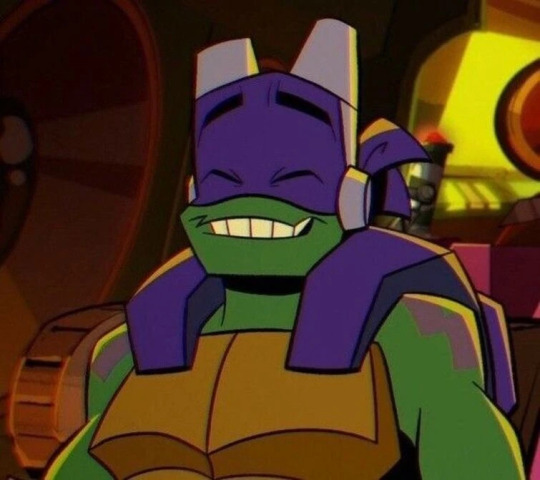
tut on how 2 draw the mm boys heads & eyes in the tottmnt style pls??
IM SORRY IM STRUGGGLINNG AND I LOVE UR ART SM!!! LIKE POP OFF ITS TASTY ASF?! Anyways dont feel like you need to answer this, i just wanted to know since you’re like one of the best tmnt artists i follow!!
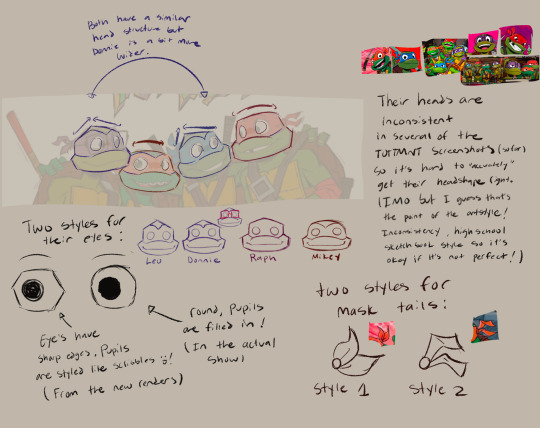
AAAGHSHS THANK YOU SO MUCH 🥺!!! At first it was difficult for me as well to get the hang of the tottmnt style but now it’s pretty fun <3 !!
Im like rlly bad at art advice lolol but did my best !! I hope it helps !! Have an epic day anon :3c
#ALSO SORRY FOR THE BAD HAND WRITING LMFAO#tmnt#mutant mayhem#teenage mutant ninja turtles#tmnt mutant mayhem#tales of the tmnt#rottmnt#tales of the teenage mutant ninja turtles#art tutorial#my art
203 notes
·
View notes
Note
So how do you draw hair? It’s literally so freaking pretty and smooth how you draw it and personally I wanna draw hair like that because I draw boring hair🫶
Before we start- Friendly Reminder: Pretty much all of my art/style, including hair, is inspired by Buxbo!


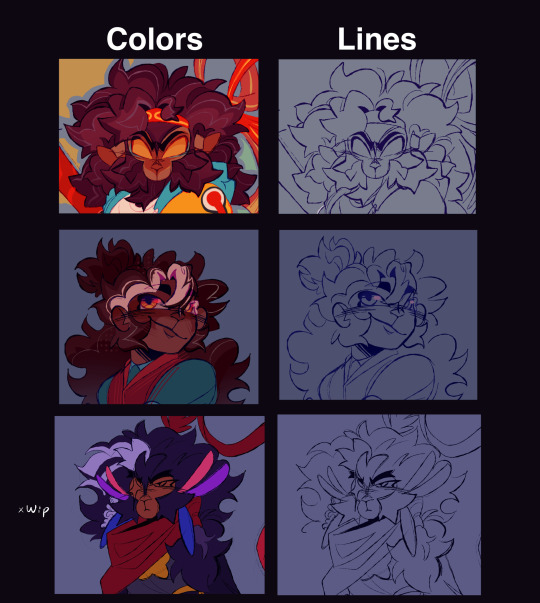
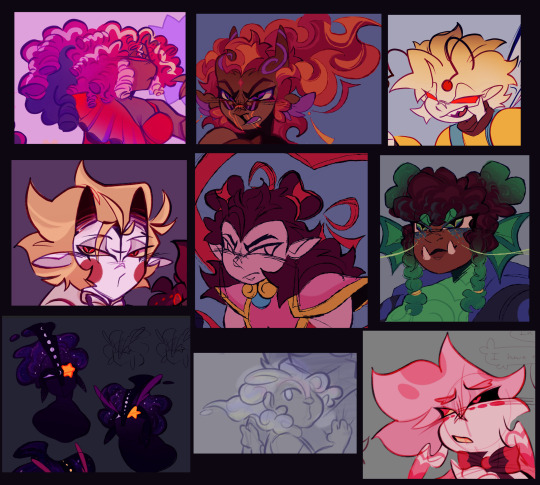
Other kinds of hair I’ve done
Things I forgot to mention:
Use references!! I use both real life and cartoons
I personally draw hair having a lot of volume and being very thick so it appears more fluffy, I just use really big shapes and draw the hair a little detached from the circle base sketch
I use a mix of stiff and loose lines (as seen w/ macaque) but usually I lean more towards loose
Coloring hair is a whole separate conversation that I’m still trying to figure out myself
My style is constantly changing, especially lately, and I just recently got the hang of doing hair like this! (It took me a year) I’m literally just doing whatever lol
#sorry this got so long winded and all over the place idk what I’m doing 😅#also that first pic isn’t meant in a bad way!!#I just struggled with explaining this (and it’s a reference to that thing rottmnt leo does)#my art#digital art#lego monkie kid#hazbin hotel#asks#tutorial#art tutorial#I guess
65 notes
·
View notes
Text
Y'ALL I DID IT!! I ACTUALLY MADE A WHOLESOME AARAVOS EDIT!! 😭💓
I added the vocals but the edit audio is by @stelleraudios on Instagram, and some of my transitions were inspired by their Ron x Hermione edit, so pls give credit to them. Also, the overlays I used aren't mine so credits to those who provided them ✨
The song is Adore You by Harry Styles 😚💖
Edit now posted on my instagram!: thestarswillguide.am
Me realizing I actually have the potential to make good edits of the millions of ideas in my head:

#I've practiced editing on capcut and I never got it right#but this is my second time editing on alight motion and for once in my life I made an edit that was actually decent#it's good because I followed a tutorial by Nafansan on YouTube 🥲#I'm so happy#I don't think I got the volume for the vocals right I'm sorry 😔#I hope this edit isn't bad 😣#I'm nowhere near as good as other editors but I have so many ideas of edits#I don't wanna give up 😭#star daddy#the dragon prince#tdp#aaravos#tdp aaravos#continuethesaga#giveusthewholesaga#greenlight arc 3#netflix#tdp s7#tdp s7 spoilers#the dragon prince edit#tdp edit#fandom#tdp fandom#'Cia's inventions ⚛#thestarswillguide#Fleuriphany#thedragonprince#edit
25 notes
·
View notes
Text
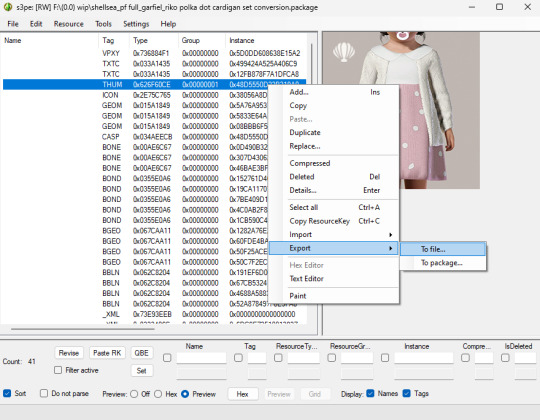
getting cc magic to recognise custom thumbnails.
posting a guide with pics because it was requested; trying to teach people how to do things is absolutely not my specialty so sorry if this is confusing, I have done my best but I also thought my original post explained it well enough so that's what I'm working with LOL it's not you, it's my brain <3
you will need s3pe for this (+ the sims 3, cc magic & a piece of cc with a custom thumbnail obviously)
open your cc package in s3pe (I don't think this part needed a screenshot but here you go)

there's a lot of shit in here; the only thing you need is the one with the 'THUM' tag. if your package has multiple THUM files, take the one with the type 0x626F60CE - these are the ones I only add to my game files, all the others are irrelevant for this

right click the THUM file and export > to file, put it somewhere on your computer that you'll remember
go to your sims 3 folder (the documents folder, not program files) and then find the 'thumbnails' folder
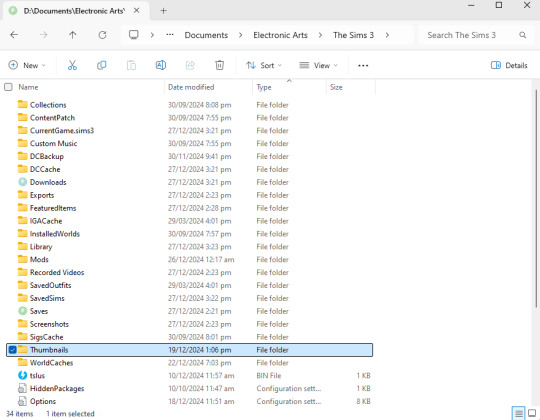
wtf is sigscache btw
casthumbnails is the package you wanna edit for this; open this in s3pe either by right clicking it and picking 'open with s3pe' or manually opening it in the program itself the same way you opened your cc package this is pretty hard to fuck up, but if you're worried then this is the file you should make a backup of before editing it

from here it's literally just a matter of going to resource > import > from file, finding the THUM file you exported, importing it, then saving and closing it (file > save > big x at top right corner). this will take a while to save, if it looks like it's frozen just leave it alone. it'll get there!
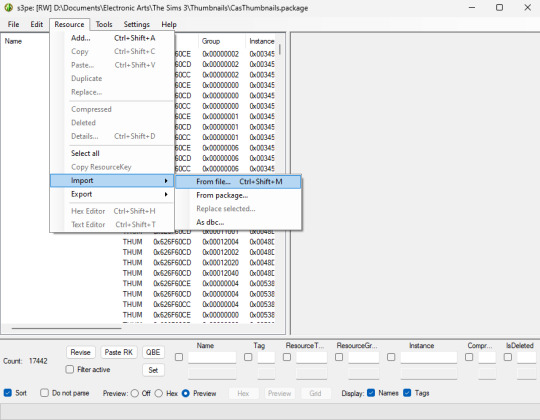
that's it, hope this helps but it probably didn't
24 notes
·
View notes
Note
haiii moth! do you have any tips on how to draw dogs/wolves for like werewolf aus or fursonas?? ik you’ve drawn furries before and im trying to make a fursona rn :3 just wanted to know if you had anything that you think makes it easier
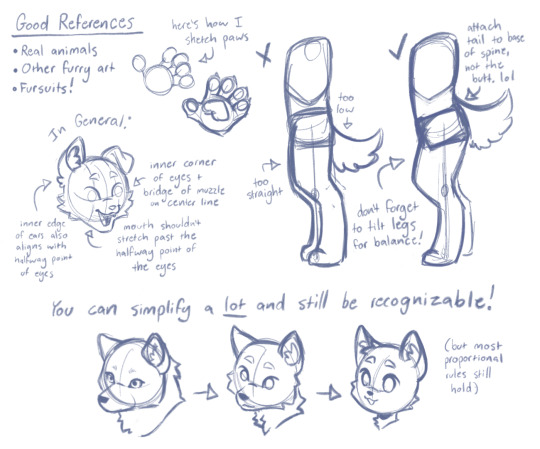

i have another little post about drawing wolves here, but i tried to jot down some notes more specific to furries? i’m not sure if they’re helpful, or if they even make a ton of sense, but i Do think my biggest hack is to reference actual fursuits to start!
since furry anatomy isn’t. like. Real. looking at the underlying foam structures of a suit can help visualize how it works a little better! you can even start by drawing a person and then just draw fursuit padding on top of them if that helps, sometimes i do that to help me with the legs. and of course looking at other furry art that you like is great too!! there’s so much variation in suits and art, you can almost definitely find references for whatever style suits you :]
#hopefully this helps i’m sorry i’m super bad at tutorials ToT#i’m still learning how to draw furries too haha so we are in this together#tips n tricks
32 notes
·
View notes
Text
it’s easy to complain about everyone only getting into wicked now that it’s mainstream but like. isn’t that the point. broadway is highly inaccessible and even when people are familiar with cultural touchstones that come out of it (like defying gravity) it doesn’t necessarily mean the story itself is known. sure the movie is different certainly and i won’t argue if it’s better or worse but at least now everyone can enjoy it
#saying this as someone who HAS seen musicals both on broadway and on tour and as slime tutorials#keep seeing musical theater heads saying stuff like this#SORRY i don’t think it’s bad that now that it’s easier to watch it more people like it#rn.txt
19 notes
·
View notes
Note
Do you have any tips for taking photos of physical objects? I like making things, but taking photos of them is the worst :(
Sure! I also struggle with taking pictures of stuff, but I can give you two big suggestions (and I'll try to keep my explanation brief for now, but you are always welcome to come back and ask for clarification!). As always, these suggestions are not rules, so if it goes against what you know or have been taught or what works best for you, feel free to disregard it lol.
Lighting, and set-up (which I will roll camera angle into).
You don't need anything big and fancy to take nice pictures of what you make. You don't need a big DSLR camera or box lights or a crazy image processing program. You can take great pictures of your stuff right at home with things you already have. I know a lot of potters who take decent pictures of their work in a corner of their living room with a simple paper sweep (poster board), one directional light (one guy I know even uses just a lamp and points it towards his pots), and something to take pictures with whether that's your phone or a little point and shoot.
Lighting. A good rule of thumb is to not back-light your work as your primary light source*. Make sure your primary light source is in front and pointing at the thing you're trying to photograph. You can even kick it off to the side for a nice three-quarters effect! You CAN have some back-lighting as long as is is acting as your fill (secondary light source) OR if you're shooting outdoors. If you want to go for natural lighting, gray days are actually quite nice as they offer even lighting (though if you want that bright sun, go for it!). *That is not to say back-lit things are bad, just that they aren't necessarily going to show off your work unless it's designed to be that way.
Set-up. This can be as simple or as complex as you want it to be! Figure out how you want to shoot your work, and then figure out how to light the space. If you want something clean, create a light box. Use a box with a white/light gray sheet draped inside to make a contained space, or pick a corner of a room and either drape a sheet or use some poster board to make a little box you can easily put up and take down. If you want something that's more set up, I have actually used my work space as my backdrop. Show the tools you are using, maybe some material, and build a composition around your piece! That takes a little more effort but can be quite nice.
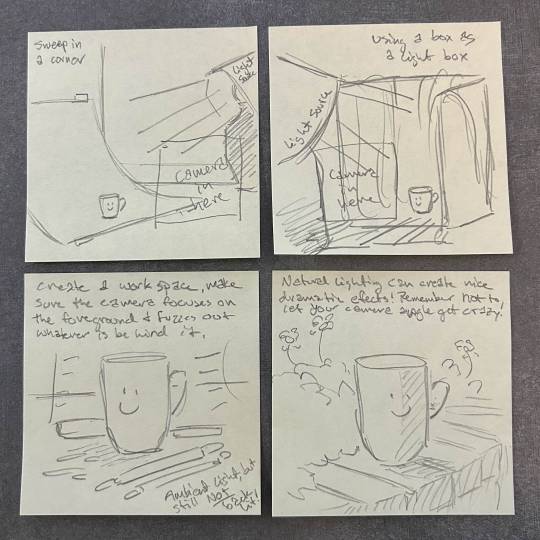
As for taking the actual picture, I have found that I personally like to have it slightly up at a shallow angle so it's not straight on or too high looking down on the piece. You can easily create an unflattering angle, but there are little nuances to taking pictures of those more extreme angles. It's just not what I'm interested in lol. Have your piece nice and centered at the angle you like, and make sure the camera is focusing on your work as much as possible and not the surrounding environment (I won't get into depth of field and all that, but that's worth keeping in mind). You can do that with some simple settings our technology has these days! (Also side note: if you are using your phone, clean the camera lens on your shirt first. It's crazy how easily that little thing can get dirty and give you smudgy looking photos lol)
I'll stop myself there, but hopefully these suggestions can help you feel more confident in taking pictures of your work! As always, feel free to ask more questions if you have any.
#ask me stuff!#arting#yes this was my brief explanation im sorry lmao#photography#i do a lot of product photography at work so i have a lot of practice#so like#take lots of pictures#try different things#look up tutorials on youtube and stuff#ive taken a LOT of bad pictures to get to where i am lol so dont be afraid to take those bad shots#i am very against gate keeping skills so like#please feel free to ask questions#and if i dont know the answer ill try to point you in the right direction
22 notes
·
View notes
Text
dance macabre

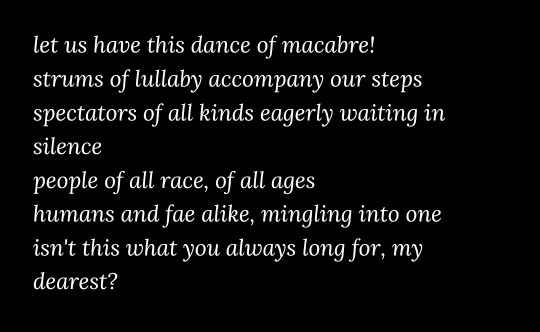
let us have this dance of macabre!
strums of lullaby accompany our steps
spectators of all kinds eagerly waiting in silence
people of all race, of all ages
humans and fae alike, mingling into one
isn't this what you always long for, my dearest?

rub away your tears, if you would
look above, my dear!
look how the ceilings crumbled,
forging a path upon the starry skies
under the sea of stars shall we waltz with grace
one step forward, two steps back
a tango everyone desires
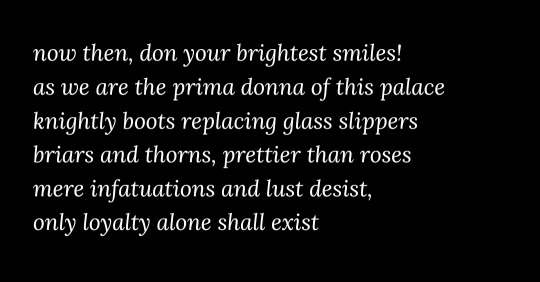
now then, don your brightest smiles!
as we are the prima donna of this palace
knightly boots replacing glass slippers
briars and thorns, prettier than roses
mere infatuations and lust desist,
only loyalty alone shall exist
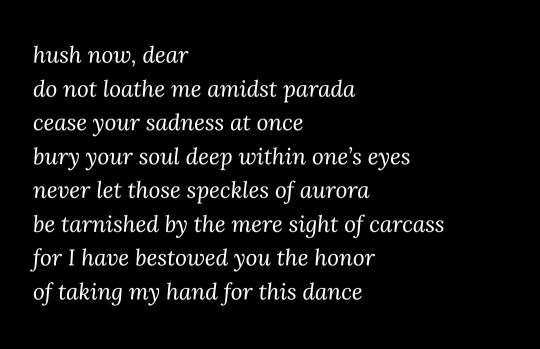
hush now, dear
do not loathe me amidst parada
cease your sadness at once
bury your soul deep within one’s eyes
never let those speckles of aurora
be tarnished by the mere sight of carcass
for I have bestowed you the honor
of taking my hand for this dance
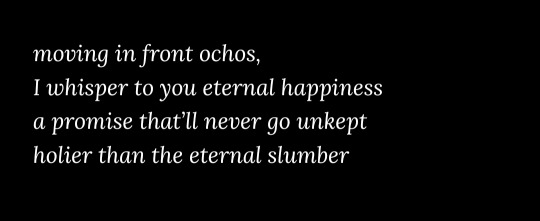
moving in front ochos,
I whisper to you eternal happiness
a promise that’ll never go unkept
holier than the eternal slumber
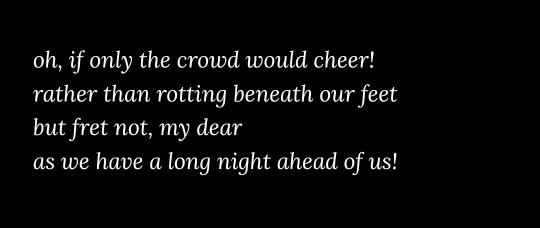
oh, if only the crowd would cheer!
rather than rotting beneath our feet
but fret not, my dear
as we have a long night ahead of us!
#tw // disturbing themes#malleus x silver#mallesil#malleus draconia#silver vanrouge#ths is basically the bad ending of book 7#where despite everyone's efforts they r unable to stop his overblot#leading him to exhaust his magic till none is left#what happens when the caster's magic is depleted#what'll happen to those falling victims of his um#no one knows#but here i hc them slowly rotting & decaying#stuck in samsara of dreams; their consciousness slowly slipping away as death seeps in#as his magical reserve are getting thinner his time-stopping barrier would fade as well#and mother nature will took over the bodies; decomposing it w/ no mercy#w/ the last bit of his magic; malleus used it to wake silver for one final dance#and voila! here we are#no; there'll be no magic saving us this time#malleus is lying yall theres no 'long night' they'll die approximately after twilight lololol#sorry not sorry#his magic just wouldn't last for both of them any longer#as for how much time had been spent before that? i leave it to ur thoughts :>#'why the cinderella reference diasomnia is based on sleeping beauty' hv u considered tht perhaps the author loves cendrillon#no the author certainly did not research on tango steps & watching how to tango tutorials wdym#miè writes ✍️#miè's poems#one more thing!!#unlike the prev ones- this one was actually made today!!#so enjoy while it's still fresh!! fresh outta the oven!! >:D#....ths is the last one for today i promise
19 notes
·
View notes
Note
Hey! I love your art! Do you think you could do an eye tutorial? I’ve seen your head, arm and nose tutorials and I love the way you draw eyes!
i also posted it on tiktok, i hope this is okay!!
49 notes
·
View notes
Note
Hi Butter! I have a question-
How do you draw tears?
Why do I ask?
Oh..

Well, it's quite simple reason...

For S~i~E~n~C~e of course <3

not the best example but-
here is a much better tutorial I have in my doodle bible
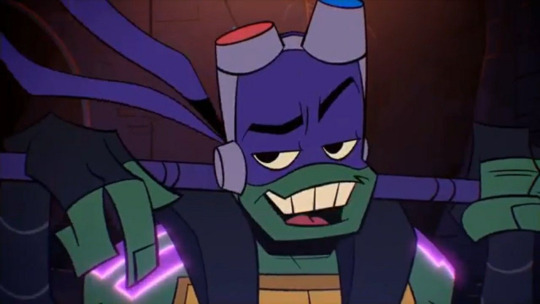
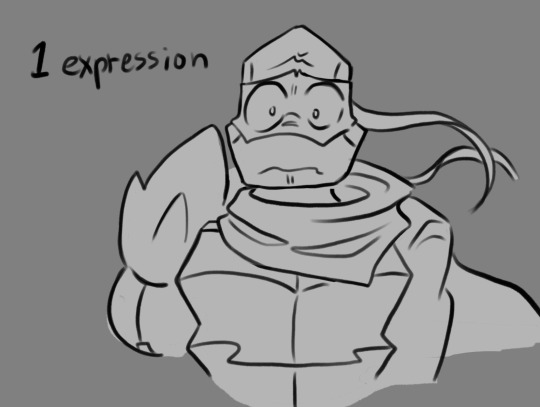
#ask butter#i am really bad at tutorials-#sorry if this is wonky im tired from travel#I chose Leo because... well I WAS gonna be funny and choose don bot but-
56 notes
·
View notes
Text
popping the biggest bottles AHHHHHHHHHHHHHHHHHHHHHHH 🍾 🍾 🍾 🎉🥳👏🎊🎊🙌🍾🎉🙌🥳🎉🎉🎉🙌🥳🎈🙌🙌🎉🥳🥳🙌🥳🍾🙌‼️‼️‼️‼️‼️

my friend brought me out! to! Barnes & nobles! and!!!!!!!! she is SO SO SO CUTE OH MY GOD
AND THE TITLE IS IN FOIL???? WAGHSBSHSHDHHSGH?!!??????? HOLY SHIT


LOOK AT THESE PANELS SHE IS SO SILLY…. crying rn…


AUGSHSHGSGHH ,,,,,,,!!?!?!,!!;!,!

agdn the tesilid book one cameo HE LOOKS SO TRAGIC LETSGOOOOOOO EVAPORATING RN
#once I get a bookshelf im displaying this like the Mona Lisa#it’s so?!!!!!!!!!! AGH#im sosososoososo excited to be able to flip through the book for reference images YESSSS#im just so . Like. Sosos sksosndososoosoosososososoososoososososososo#book 2 WHEN I desperately need the tesilid cover!!!!!!!!#anyway so sorry for the bad photography I am simply dying a slow and painful death/pos/pos/pos#I had something to say I am just??? so happy??? next book release I am scampering over and Consuming It Immediately#OH RIGHT YEAH#now that im rereading the beginning chapters im just making all the Connections rgah#like mimin already said this. But the way she goes from “I want to be in a later loop so tesilid is more useful”#to “im glad im in this loop so tesilid can suffer less”#makihn me INSANE#man I forgot how cute ai was as a kid too 😭 😭 we needed more tesilid and ailette content in the tutorial period…pl0x…#the perks of being an s class heroine#a transmigrator's privilege#ailette rodeline
11 notes
·
View notes
Note
If you don't mind me asking you for advice, could you do a mini tutorial on how to draw faces in profile? like step by step? I've had this problem, and I can't find a suitable tutorial (people have many styles of drawing in profile). You could use Lance for reference! But obviously if you agree, I will understand if you don't want to. I like the way you draw Lance.
Tbh I’ve been doing art for years even going to school 4 it so this tutorial is gonna like suck major ass but this is how my brain progresses it. If you want to learn more about how to study references I can do another on that but this is my process. And thanks I appreciate the comments :3 I’ll make another post on how to study references on Pinterest, specifically the studies I use to make art.


The step by step* tut is the last page but I hope the tips help and I’ll go further into it when I can. If you need any clarification I can go more deeper into what I mean or create a typed version of my notes :3
Tut: summarized: 1) base, 2) frame, 3) and details. (See the color in page 3)
9 notes
·
View notes
Note
Just wanna say the coloring of ur gifs are absolutely beautiful, what all do you do if you dont mind sharing :0?
ah thank you! that's very kind of you <3 step-by-step under the cut:
get my clip
i open it in microsoft clipchamp (has a paid and free version, i use the free one. nothing fancy, it came with my laptop) and cut as needed (i cut when there's a new gif, or when i'm putting a new subtitle on one gif—so some gifs will be multiple clips, some will be just one)
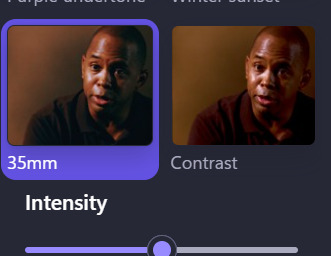
under filters: i choose 35mm and keep it at the automatic intensity
i take the contrast down to about here. i keep it similar between gifs by trying to line the slider up with the "n" in saturation

it's going to look really weird. that will be fixed in a moment. i export one clip as a 1080p video. not as a gif. exporting as gif will kill the quality
i create a video in canva, which if youre unfamiliar is a browser program with a paid and free version, iirc i have the paid version but i dont use any paid features in creating these i dont think? i should probably cancel my subscription tbh i dont use the paid features that often. and it has ai now which sucks :///
i upload my clip to canva. i usually drag and drop it into the timeline rather than onto the page, because it takes the right placement to get it to fill the whole page if you do it that way, while it will be the right size automatically if you put it in the timeline
go to "edit video" in the top left, then go to "adjust" and set these values: Brightness: 10 Contrast: 20 Highlights: 100 Shadows: -100
to add subtitles, go to text — body text. i usually just use the default, but a lot of fonts work well
set the font size to 40 (or whatever works best for the font youre using) and make it bold and italicized. use whatever colour you want as long as it shows up. lighter colours are almost always going to look better.
then go to effects — outline. set it to 80 and the colour to black. in the past ive made the outline a darker colour of whatever colour the subtitles are, but ive switched over to always using black because i think it looks better. ymmv
share — download — gif. you can download multiple clips as one gif, which is what i do when a gif has multiple subtitles or a lead-up to subtitles. so, for example: clip one: gif one clip two: gif two clip three: gif two download clip one as one gif, then select both clip two and clip three for the second.
a lot of the time it's larger than 10mb. when that happens, i upload to giphy and redownload from there and that usually fixes it. it probably reduces the quality and it's convoluted, i know. no idea how people keep their gifs under 10mb. witchcraft, maybe.
hopefully this is semi-coherent? can you tell i dont know how to write a tutorial lmao. disclaimer that if it wasn't glaringly obvious by the free programs and weird, clunky process, i'm not...super passionate about gifs? i like it when i can make them look nice, but mostly they serve as visual aids for my yapping. there are other, more talented people out there who have put out better tutorials using better programs like PS. sorry if this was a disappointing tutorial!
a note: both clipchamp and canva have AI features. i wish they didn't, and i don't use them. i went hunting for a similar free program that didn't have them, but everything just seems to be saturated with ai now ://
#SORRY this is such a bad tutorial#and a bad process#i dont have PS im making do with free programs </3#i used to know how to use davinci resolve but the knowledge is gone from my head now#asks
4 notes
·
View notes
Text
west virginaaa
mountain mamaaaaa
#webfishing#consider this a tutorial. but also you can just look up tutorials on youtube for whatever song you want#also sorry if quality is bad i didn't use any good recording software. just the one that came with my laptop#also also i fucked up at the end. it's nearly 5:30 am & i've been doing this for hours. going to bed now#if anyone wants my notes i can post those as well
5 notes
·
View notes