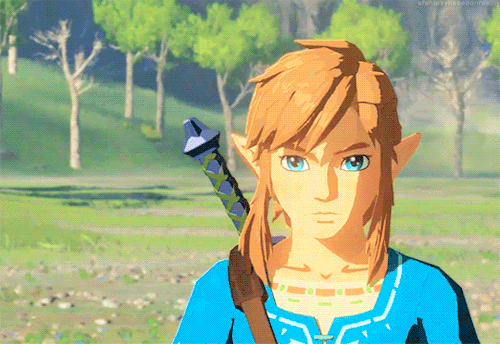
#some of them might look a bit pixelated because I scale them down after drawing and posting them
Text
Phew, I just finished the last of the sky asks, and that was quite a lot! Thanks to everyone who sent their sky kids, it was a ton of fun seeing all your interesting designs. To all those who sent their sky kids after I closed my inbox, no worries! I won’t be deleting your asks, I’ll be doing them sometime in the future :)
! If you sent your sky kid before June 10th but havent had your sky kid drawn, please dm me about it. Thank you<3
(Collection of all the drawings under the cut!)
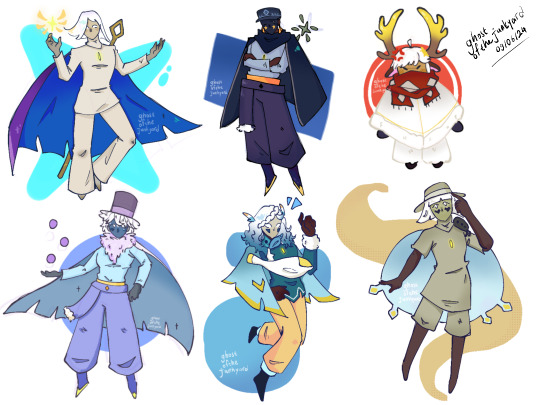


#sky cotl ocs#sky kids#sky children of the light#that sky game#sky fanart#sky kid oc#sky ocs#some of them might look a bit pixelated because I scale them down after drawing and posting them#I might open my ask box again in the future so stay tuned for that
27 notes
·
View notes
Text
Guidelines for Anybody Who would like to Start out a Clothes Brand name
youtube
how to start a clothing brand
In this article are a few strategies to any person all set to or considering about launching their own individual clothes line.
Idea # 1. Don't Rush
What I signify by that is choose your time when it comes to the start of your respective line. There may be a great deal of levels of competition to choose from these days, establishing some social media marketing web pages using a t-shirt coming shortly is not really likely to cut it. Have you ever ever received excited about a Fb site with twelve likes and "a clean new apparel brand coming soon"in the about me part? Me neither.
Tip # two. If you cannot style and design, then shell out someone that can.
A lot of street don start-ups launch their model with just their title inside a script font, screen printed over a black t-shirt. Now I am all for supporting a manufacturer, however, you want to no less than put some thought and creativity into your apparel, usually individuals will see that you'll be much like the rest of the clothing brands that have started off and failed. If you can't draw or style and design, pay someone who can. You happen to be gonna want stable types if you prefer to stand out and it will not have to be expensive. An awesome web-site for style and design do the job is called Designcrowd. This website makes it possible for you to put up your style and design brief, set your spending plan, then wait around for designers from everywhere in the entire world to write-up their entry and also you can opt for the best one particular.
Tip # 3 Really don't rip-off other folks!
Just about every brand wishes to be as productive as Obey, Stussy and Hype, but blatantly copying their strategies, style and ripping off their designs will not be planning to get you there. In reality, It really is much more likely to have a negative result simply because these models are very well known, highly regarded as well as their hundreds of fans will know that your outfits models usually are not primary.
Suggestion # four Imagine outside the box.
You've got most likely heard this stating right before and although it is much easier stated then done, a great method to start off will be to do a good bit of exploration to collect your own personal ideas. Check with you which kind of clothes do I would like to create? What are my favorite brand names? What do I appreciate in life? When you finally know the solutions to these thoughts then you can start to study brand names, jot down tips, choose photographs and doodle to actually make an image with the style of street don things you would like your brand to be manufacturing. But make sure you never dismiss idea selection 3 whilst doing your investigation!
Idea # five Analysis your product or service.
Given that you have got a handful of layouts or concepts that you would love to see printed on the t-shirt, it can be time for you to look into what organization you may use to supply your blanks. There are many companies which make blank outfits ready for printing so this component might be a little bit overwhelming, but choosing your funds and who your focus on industry is will seriously assist to slender down the choice.
Gildan and Fruit on the loom are at the most affordable end of the scale however they are likely to possess a boxier in shape and you're not likely to seek out a lot of reputable apparel brand names printing on them.
Tultex and Anvil print a great high quality tee for a fair selling price if you prefer a high-quality come to feel but your spending plan will never extend to high-priced blanks.
And on the greater finish are American Attire and Alternate Attire. Although these might be highly-priced, the quality is phenomenal and so they also have a range of colours and items which will make your model stand out through the rest.
Tip # 6 Don't lower corners.
If you want being taken severely being a brand name, creation will be the 1 position you need to do not need to rush or slice corners.
Firstly, choose a good printing business. It'll cost you a great deal extra time, cash and energy inside the prolonged run should you commit to print having a man in his bedroom who prints your layouts wonky and gets chocolate stains on the t-shirts when he's printing them.
You will find numerous respected firms by typing in "Screen printers" in Google, and don't forget to shop all over. Octomuffin and Woven Inc are rated highly during the United kingdom.
Secondly, think about your brand name graphic. Would you like to generally be thought of being a experienced brand? In the event you do, then your going to want custom neck labels, swing tags and some neat packaging. This doesn't ought to be high-priced, but little touches like that will possess a long lasting impact on the client.
Lastly, don't print a lot of. Any time you initially release a structure, you'll have no clue how it will provide, so it truly is most effective to purchase a lesser quantity at the beginning to test the h2o. Really don't fret about promoting out swiftly, it's going to make your manufacturer appear common when you do so you can constantly just re-order far more.
Idea # seven Website, and pics.
You don't require a massive finances for making a good looking and practical web-site, there are so many e-commerce platforms readily available now which supply fantastic looking web sites for any minimal regular monthly price tag. Significant cartel, retail store envy, volusion and shopify are only the tip of your iceberg in terms of these.
As soon as you have selected your world wide web platform, get a domain. Domains are so affordable in recent times apparel manufacturers haven't any justification to not buy one particular, and it helps make you glimpse much a lot more professional whenever you arrive to start.
Now you are ready to upload your items and pictures. It's important to help make absolutely sure you can get some specialist searching pictures taken of your respective items and not types which look like they may have been taken on a three mega pixel mobile phone digital camera. Your shots tend to be the only way your consumers can connect with your merchandise over the web, should the pics are little, blurry or don't demonstrate adequate of the items depth, you happen to be possible not to receive a sale.
Idea # eight And now we wait.
After you to start with launch, the joy might be a bit as well a lot and you happen to be likely being expecting huge things inside of within a shorter duration of time. Try to remain grounded, things take time, a lot of time, so don't get disheartened if you have not offered out inside your initial thirty day period and just retain likely. It truly is also an excellent idea to test and acquire feed-back from family and friends to view should the merchandise are literally nearly as good when you think they may be.
And that's it, I really hope your observed this article appealing and hopefully a little practical, as I discussed before I'm not an expert while in the avenue have on market, but individuals are just a few of the points I've learnt along just how.
References
Clothing
https://en.wikipedia.org/wiki/Clothing
1 note
·
View note
Text
This... is the 8-Bit Techo.

There have been a bunch of bad 8-Bit Neopets, but I think that this one just might be the worst. Does JumpStart think that the design is supposed to be bad? That 8-Bit pets are meant to be inherently low-quality? Or do they just have people who aren’t artists scaling down pictures from character sheets and drawing rough outlines over them?
For reference, this is what a Techo is SUPPOSED to look like:

I can see what they were going for, but the execution on some of it is just bewildering. Notably, the head and the feet.

My first thought on seeing the 8-Bit Techo, after “god is that an ugly outfit” and “why are its eyes pointing in opposite directions?” was wondering why they’d given it orange nostrils. When I looked at a Techo for a reference when drawing my own version, I realized... those were supposed to be the orange spots on its face. What a bizarre way to depict that.
They’ve also exaggerated the... let’s call them cheek bones, and while this would normally be fine, the way it’s done here just makes the face look really, really weird. They also gave it a creepy little smile similar to the Nimmo, which... I dunno, it just doesn’t work, the mouth should stretch across the entire face.

The feet are somehow even worse. I mean, like I said, I see what they were going for here... you can kinda make out the outline of the three toes. It legitimately looks like they shrunk down some Techo artwork until it was forty pixels tall and they could barely make out any details, and just traced over that.
Anyway, I’m not here to complain about bad artwork, I’m here to make myself feel superior improve upon it.

As you can see, my version is slightly (six pixels) taller, because Techos have tall torsos and short legs. I could match the original’s height while preserving the long torso if I wanted to, but JS seems to have chosen a completely arbitrary height, so why can’t I? The feet aren’t perfect, and never will be at this size and color depth, but at least they no longer look like chewed up bubblegum.
I’ve also taken the liberty to put it in the traditional UC Techo “hands-would-be-on-hips-but-long-torso” pose, and restored the squiggly tail, which JS decided to change for no discernible reason.
I’m still not a huge fan of that outfit, though, so here are a couple of alternatives: an 8-bit (NES) color palette, and something that works a bit better with the blue.

JumpStart, if you’re reading this, there are plenty of artists out there who can do great pixel art for VERY reasonable rates. Hell, I’d be willing to take whatever you paid me, even if it was nothing, if it meant we could avoid things like wall-eyed Techos with Cheeto nostrils and Grinch feet.
8 notes
·
View notes
Text
Final Evaluation

This was a weird project for me as there's a lot of places I think I did well and also a lot of places that I think I could've defiantly improved on with more time. for almost every aspect of the project there's places I think I did well and others where I didn’t.

The part of the project that I'm proud of is the dialouge system. I wanted to try and bring some kind of world building and cool characters to an arcade game and that was the original starting point for my idea for this project. Technically I think I did well getting worker as I managed to set up a semi randomized system where it picked from a chain of 5 different conversations always ending in a boss. Although I'm proud of the system if I had more time to work on it or had to do it again I’d try and make it more randomized, as although I wrote 50 different conversations with between 2 and 6 sentences each the randomization was limited as all the conversations came in sets of 5 and the dialouge manager picked from one of the 8 sets of 5 meaning really there was only 8 different possible outcomes(the last 2 were reserved for if the player beat 7 of the bosses in one run) each time dialouge was randomized. I would change it so for each room it picks from one of a larger list of conversations that were entirely separate from each other which would reduce the amount of repetition in the dialouge and probably work better for this style of a game. Another reason I decided that I would’ve rather done it that way is because I rushed writing it and it resulted in things being confusing and not making sense unless you know what I wanted for the story which obviously only I did. I would've been easier and quicker to write if every line was random and didn’t link to others and also would've been better for this kind of game.

One aspect that I think I could've defiently improved on was the art. I wanted to game to have a somewhat visually similar look to hades but because of time I just went with pixel art as it was what I felt the most comfortable working in with 2D art and it was much quicker. The character designs I think came out pretty well considering my lack of any kind of art skills. There was one problem that as caused by the art though and that was the fact I’d drawn them as if they were in a side scroller and that made it difficult to know how to draw the rest of the game since it was top down. After a few attempts I ended up with something I was content with but I still think it defiently could’ve been improved on, for my next project I defiently to start the project with a visual style in mind so that its easier to make everything look as if its part of one world and not disjointed or just overall bad looking.

One aspect I think I did pretty well on without many issues was game feel. while I feel like the feel of the dodge could've been improved a bit I’m very proud of how shooting the enemies turned out. I spent a lot of time on this making sure I had the right sound effects and adding particle effects to hitting and killing enemies to make everything feel more impactful and just fun. I think the gun flashing animation I added to firing also helped a bit with game feel. Initially I wasn’t sure about adding camera shake and time dilatation to hitting enemies as I though the camera shake might be disorienting if too strong and the time dilatation might make the game sluggish if not well tuned but after trying them and tweaking them for a bit I think they might’ve been one of the best things I added to my project.

One other thing that I’m proud of, mostly from a design point of a view than a code one is the addition of scaling difficulty. It was easy enough to set up and it helps the game keep an endless Arcady feel and also balances out the upgrades. With this system the game can go on forever like an arcade game while still letting the player build up power. The scaling difficulty obviously makes enemies have more health and damage meaning the player will have to keep getting damage and health upgrades but also doesn’t ruin the overpowered feeling as things like fire rate and speed aren’t affected by the scaling difficulty.
I’m not entirely sure on how I think this project turned out. There’s a lot of parts of it that I'm proud of but also a lot of parts that I would’ve changed or re done entirely. I also think I strayed too far from an arcade style game in terms of how I added the dialouge.
For my next project I’m gonna try and come up with a more consistent, probably simple art style so that I can spend most of time on making cool polished mechanics while not having the game look ugly and unfinished.
0 notes
Text
Idea - Second character
I had the idea of a power-up which turns the player into a different character - a rat. Although I might not actually add it, I still wanted to design it and see what I could come up with. First step - designing:
Photoshop - animations
To animate something in Photoshop, find the 'Window' tab and go to 'Timeline', this will then show a menu at the bottom of the window. By clicking the icon with 3 squares in the bottom left corner (circled in red), you can turn the timeline into a frame animation which is better suited for my needs.

To create a new frame, click the + box. This will place a duplicate of the selected frame after itself. In order for frames to look different, it's not as easy as just drawing on that same image - you have to create separate layers for different frames. This is why it can be easier to have things like legs, ears, eyes and tails all in separate layers so you can adjust them accordingly.
Once you have all of your frames designed and finished, you will have to change the visibility of some layers for each frame. This is because if you have a, for example, eyebrow up-and-down animation of 3 frames, you wouldn't want all three layers to be visible the whole time because that would make a really thick eyebrow instead of a moving one. The duration of a frame can also be changed by clicking the downwards arrow on the frame.
Walk
All four of the rat's legs move forwards and backwards throughout this motion to make it look realistic. I used the frame where the legs are in the middle twice, so the cycle goes Middle > Foot back > Middle > Foot forward. I also made the rat's rail appear to wriggle around as it moves, and the body bobs up and down with it.

Idle
For the idle animation, I used the middle frame from the walk cycle as a starting point. I also took into consideration how a rat moves/positions itself. A rat will stand very still, and often sniffle - to replicate the sniffling motion in my animation, I made the nose move 1 pixel inwards and outwards. During the sniffling, I also made the rat's eyes squint by removing the eye for a split second.
A rat's ears can sometimes twitch a little bit, so I added this by making the ear appear to shrink/curl up. To do this, I just moved the ear layer down by one pixel.
I also added some longer delays of up to two seconds between these different actions, otherwise the rat would look like it's having a fit.


Jump
I had to do some more research for this and I discovered that rats will stick their legs out whenever they jump. They also can jump very quickly, but that's something I'd have to make in unreal (increasing acceleration). For the jump animation in Photoshop, I made the legs go flat against the body so they would seem more open. I also lifted up the body to make it appear more streamlined to match its fast acceleration. The tail also takes the same shape. The delays were set to a mere 0.05 seconds because I wanted this animation to happen very quickly.


Death
I wanted to take the same approach as my main character for the death animation - it folds up and disappears, leaving behind a sad face. I also added a halo of cheese surrounding the rat's face.


Testing character possession in unreal
To actually get the character to change in my game, I went into the power-up's blueprint. I started by casting to the character on an overlap, and set the power-up to be invisible for the duration of its effect. Also I set this to only run once because it's a power-up.
To actually change the character, I used a 'Spawn actor from class' node. On the class pin in this node I changed the class to the new character (in this case Char2). The pin below this is a transform variable, a transform variable contains location, rotation, AND scale. By right clicking on this pin and selecting 'Split Construct Pin', I could individually input each of these values. I used the actor's location and rotation, and left the scale value to 1 as both characters have the same default scale.
This only spawns in the new character, to actually swap to it a 'Possess' node is needed. This will attach a given controller to a specified pawn. I used 'Get Player Controller' as the target for this possession and the return value of the 'SpawnActor' node for the pawn reference.
Now that the player is controlling the other character, the old character should become invisible otherwise there will just be two different characters on the screen.

After a certain amount of time I want the character to be reverted back to the original. I used a DestroyActor node targeted to Char2 to get rid of the second character. I then repossessed the original character by using another Possess node and setting the 'In Pawn' pin to the side scroller character. A 'Set Actor Hidden In Game' node will then make the original character visible again and finally the power-up gets destroyed.

1 note
·
View note
Text
20020: Questions and answers
The world of 20020 is a very strange one, and people are right to have questions. Jon answers some of them here.
I don’t know if I’ve ever had more fun working on a project than I did with 20020. It was a long time in the making, as was this website, Secret Base. We intend this to be a place where we tell stories, whether they happened last night, a hundred years ago, 18,000 years from now, or some nightmarish video game realm that exists outside of time. In that sense, 20020 doesn’t define this place. Secret Base is the place where something like 20020 can actually live. I don’t want to get too overdramatic; Secret Base is a website where me and a bunch of of other jerks make shit we hope you’ll like. It’s a place I love nonetheless.
I started planning 20020 about three years ago, and I wanted to make sure I wasn’t just writing a sequel to 17776 for its own sake. This time I wanted to piece together a single, cohesive story, rather than a series of loose vignettes. I also wanted to explore certain themes more specifically. What happens to the concept of time if time becomes infinite? What defines a “good game,” and can it be laid out completely by accident? Who are Americans – specifically, these Americans, us? What the Hell is this place, and what was it? What would we do with ourselves if we actually got everything we wanted?
I tried to make something bigger and better than 17776, rather than just bolting on another installment. Personally, I feel like I did, but ultimately, those of you who have read it can be the judge of that. At any rate, thank you so much for reading. I know it was a big ask of you – not only is it roughly as long as a book, it’s a mashup of two things that typically don’t go together. A lot of you came in with zero interest in American football, and a lot of you came in without any particular inclination to read a work of science fiction where humankind never explored space because it was too boring.
A couple of people deserve an extra-special thanks here. Graham MacAree edited the piece from start to finish, and help me close as many logical loopholes as we could, picking out every time a player broke a rule, or one rule was inconsistent with another rule. Throughout the whole process, Graham was totally bought in, and was always in favor of making it more weird over less weird.
Meanwhile, Frank Bi engineered the entire thing so it could actually exist on the Internet. I’m still amazed that some of these pages weigh upwards of 50 megabytes, and yet they scroll completely smoothly without glitching out and slowing down. Frank also built an app on the back end that allowed us to easily format things like dialogue.
Anyway. Earlier this week, I solicited any questions you might have had about 20020 – why I made it, how I made it, how the game works, or literally anything else about it. I received a few hundred of those, and while I couldn’t get to all of them, I’ve answered as many as I could. Thanks so much for sending them in.
* * *
I haven’t read it yet - is it good?
– Anonymous
yeah
20020 feels a lot lighter than 17776. Why did you decide to go with that tone?
– hali
It’s interesting to me that it struck that tone with you, and I’m actually glad it did, because at some points the story actually felt slightly darker to me than 17776 did. I had a couple of priorities this time around.
The first was to continue to avoid what I hopefully avoided in 17776, which was writing some kind of morality play. I am tired of reading stories and watching shows that are trying to teach me some kind of lesson. I’m a grown adult! You’re a television, I don’t want to learn concepts like “right and wrong” from you! Fuck off, loser!
Instead, I mean 17776 and 20020 as open-ended explorations of themes and concepts. It’s so great to see people walk away from them with different ideas. Some people see this post-scarcity eternal playpen as Heaven, some see it as a completely nightmarish existence, and some see it as a sometimes-promising, sometimes-unsettling in-between. Far be it from me to call it one way or the other.
when designing The Bowl Game, how bogged down did you get in rules/technicalities? a game of this scale seems so hard to effectively govern, and many readers seemed to get stuck on rules technicalities that didn’t affect the plot much. i guess a better way to phrase this question is: did you develop the rules of the game first and then write a plot around them, or did the rules emerge naturally as you wrote?
– Victoria (@dirtbagqueer)
This was by far the toughest part of the whole thing. The field itself actually inspired the entire story.
Early in 2018, a few months after finishing 17776, I had a little bit of time in between major projects, and that’s when I started drawing up the fields. The geometry and weird aesthetic of it fascinated me. At the same time, I had absolutely no fucking idea what to do with it. I wanted it to make some sort of sense somehow. I wanted to design actual good, solid gameplay within it, but I just could not figure out how to do it. Over the course of two years, I would occasionally open it up and stare at it, practically begging for some kind of solution to present itself.
It never did, and my stupid ass finally got the point: this thing is a tribute to chaotic, senseless institutions. It’s a monument of the absolute nonsense that spews forth from ostensibly rational architecture. Like, imagine the most grating, insulting, senseless corporate drivel you’ve ever heard. To me, this that in the form of a football field.
It all clicked from there. Who would come up with such a bewildering and obnoxious thing? Obviously, Juice would. He’s amused by the literal interpretations of things and he delights in inanity and chaos. I needed Ten to hibernate, because she loves well-considered, intelligent gameplay, and she would have shot him down at every opportunity.
From there, I just wrote the rules in accordance with what I felt would be the most interesting story. After looking at San Diego State’s sad little field, I realized I wanted them to star in the A-plot, and I’ll admit to writing some of the rules in service of their story.
Chapter 4’s Georgia Quarterback is introduced to us by screaming into a phone for a pizza that never gets to him. It’s the funniest thing I’ve read in a long time and I have to know, was there something or some things that inspired it?
– @Kay_N_B
That guy’s ripped straight out of real life. I used to work at a call center doing tech support for an Internet service provider. Legend has it that if you simply yell REPRESENTATIVE or SUPERVISOR to an automated system enough times, it will get you off hold and talking to someone more quickly. This was definitely not true, but it didn’t stop people from trying.
On one occasion, I picked up the phone to a woman yelling SUPERVISOR! SUPERVISOR! SUPERVISOR! SUPERVISOR! over and over and over. She was yelling it so loud that she couldn’t hear me. Or, more likely, she was just holding the receiver to her mouth without actually holding the speaker to her ear. At any rate, I just could not get through to her. After about two minutes of that, I hung up. Sometimes I wonder how much longer she sat there yelling like that.
Is Lori from the Illinois chess chapter the same Lori who talked to the Durabos in the Koy Detmer chapter in 17776?
– Ale
She is! Not for any particular reason, other than that I liked the idea of bringing someone back. She’s named after my fourth-grade teacher and ninth-grade science teacher.
Why do trains still run on diesel fuel and how does this not affect the climate/environment?
– Vince
In this universe, humans have learned how to perfectly synthesize fossil fuels that are environmentally harmless. (That’s why I was fine with Nick just carelessly pouring gallons of diesel fuel on the ground while he was fueling the train.) In my optimistic view of the real-life future, I’m sure we’ll opt to solar power or some other environmentally benign solution, but these peoples’ insistence on fossil fuels reflects what does and doesn’t change about you if you live for thousands of years. If there are no coming generations to prod you along and find solutions of their own, how much would we really be compelled to change?
That’s a foundational theory of this story, however right or wrong: change happens generationally far more than it does internally. Once we grow up, the cake’s baked. With no generations to come, there are no more agents of change, and we’re the same old slobs. I’m going to want to smell gasoline when I mow the lawn.
What would happen if a team relocated its stadium? Or repainted the field within their existing stadium at a slight angle?
– Dave
Another fundamental theme of this story is that humanity, or at least America, is very, very preservationist. Architecturally, very little has changed, because there’s a sense that if things change, they’ll never truly get back what they once had. Whether or not that’s healthy is entirely up for debate.
Someone in the 20020 thread (apologies, can’t find the comment and don’t remember who it was!) had the idea of one school building an apparatus underneath their field that would allow it to rotate. This would be both fascinating and an absolute nightmare to calculate/write, but I loved that.
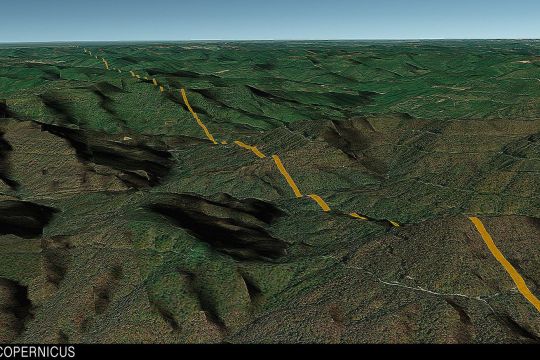
How did you create the animations and videos and such with Google Earth?
– @xyleb_
Google Earth allows you to import image overlays and slap them over the terrain. It took me a long time to figure out how to get 111 image files to stretch all across the country without the frame rate slowing to like three frames per second. In the end, it was a matter of making the field image files just about as small as possible (20x1 pixels) and stretching them from coast to coast. Given that Google Earth was never intended to do anything like this, I’m kind of stunned by how well it worked.
How do you choose the names for the players? Are they based off people you know or do you just make up names you think sound cool?
– Arp1033
When it comes to naming characters, my biggest screwup was naming the Georgia Tech quarterback Connor O’Malley. Conner is a very, very college football quarterback name, so I just bullshitted a last name that I thought would fit. Not only is Connor O’Malley an actual public figure, he’s actually a guy I’m a fan of and have been aware of for some time, and yet I somehow never connected those dots until a reader pointed it out.
I tried to give lot of consideration to the naming of characters. Since I prioritized representation, I did want to signal that certain characters were Black, or Hispanic, or Asian. Sometimes this was because I felt it was essential to their character, and sometimes it was just for the sake of representation.
In a couple of circumstances, such as the UAB Steamroller poster in which I named literally 125 characters, I partially relied on name generators. Even with those, you have to be careful. At first, I used one that allowed you to generate names that are traditionally women’s names, or more typically Black names, or Asian names. So I was like, all right, give me 50 women’s names, and it returned a bunch of names like Heather and Sally and et cetera. Yes, of course there are Black women named Sally and Asian women named Heather, but if they all have such names, that doesn’t feel entirely representative. So I requested 20 typically Black women’s names, and like six of them were Keisha. All right, cool, thanks! In that case and a few others, I just ditched name generators entirely and took first names from people I’ve known personally.
If I recall correctly, in the 17776 q+a, you talked about Nines identity a little bit and how you wanted to include an NB character in your stories. In this story, is Nine using they/them pronouns a decision they have made to identify as NB?
– Anonymous
Yep, Nine is non-binary. In 17776, Nine was non-binary simply by virtue of only having been conscious for a few days and not even having the time to examine or consider it. But now it’s been a while, and they actively identify as NB.
do you plan on bringing back any other space probes, like hubble in ‘76?
– scotty
Yes! I’ll spill the beans on that now. Hubble was originally going to appear in 20020, but there was just too much other stuff to get to. He’ll be seen in 20021.
how do you manage to find the “non-dull” part of each of the stories you write? like how do you find the newspaper clippings, names, etc?
– Carter Briggs (@carter1137)
Before I started writing, I spent two whole months just scrolling across every single field. If I hit a town, a lake, a mountain, or even a road with a weird name, I’d stop and search the newspaper archives to see if I could find anything interesting. This was definitely a test of Nancy’s sentiment in 17776 that you can’t walk ten feet in American without running into a story.
Technically speaking, it turns out that this is more or less true, but the vast majority of these stories are UNBELIEVABLY FUCKING BORING. As far as a lot of town are concerned, if anything interesting ever happened there, it sure as Hell didn’t make the papers. I’d say a good 10 percent of old newspapers are just, “Mrs. Hubbard took a trip here to visit her sons.” Just a 19th-century proto-Facebook check-in app. But one time out of a hundred, I’d find out about the James gang’s forgotten stash, or the Stannard Rock Lighthouse, or the escapes of Eugene Jennings, and it was all worth it.
I feel really, really gratified by those. I’m not so sure anyone has explored American history the way I did – by literally drawing lines across it and following those lines. It’s a very silly, stupid way to do it, but if I hadn’t, I wouldn’t have found some of these things that would otherwise have been lost to history.
What do the probe’s voices sound like over the phone? Synthesized? Uncannily human? Like a Siri kind of thing?
– Anonymous
They sound human, yeah. How exactly they sound, I can’t say, but I can kinda hear Juice. Despite being French, I hear him as a fast-talking, hyper-charismatic, high-energy Southern dude, like some guys I grew up around. Think some weird amalgamation that’s reminiscent of Matthew McConaughey and Chris Tucker.
what is the answer to nines postscript(what happens when a ball is on a intersection)
– Anonymous
So when a ball is on Field A, and it crosses Field B at an intersection, the scoreboard doesn’t change. It still belongs to Field A, and only transfers to Field B if the player makes a turn.
What do video games look like in the year 20020? Do they still make new games or do they just kind of permanently update the old ones, like an MMO or something?
– Ben
This is not necessarily canon, and is just my real-world feeling on the matter seeping out: the real frontiers in gaming aren’t about graphics or technical ability or anything like that, they’re about creativity and art. Like, Breath of the Wild? That plays at 720p on my Switch, and while it’s artistically breathtaking, I think that strictly from a technical perspective, it could have been made 10 or 15 years ago. And yet it’s probably the greatest video game ever made.
Was there always an intention to do multiple parts (17776, 20020, 20021), or did that evolve as you wrote? What does the idea generation stage look like for a story as massive and out there as this one?
– @stxnmxn
When I finished 17776, I knew I wanted to write a sequel at some point, but didn’t always imagine it in two parts. As recently as this summer, I’d planned on writing it all at once before Graham and I decided to break it up. I’d just found too much stuff to condense it into one thing.
Did you have fun writing it?
– benfrosh
yeah
ballground & ballplay — how did you think to link them to this story? were you looking for them? when did you make the connection to the fields?
– @heysihui
That was an unbelievable coincidence! Clemson’s field just ran across both of them. I knew for sure I wanted to talk some about indigenous peoples, and I’ve long been fascinated with the seemingly far-flung concept of replacing war with sports. It was just the perfect opportunity.
I loved how in 20020 there are so many smaller stories being retold, some of which even affect the larger story. Of all the places big and small visited over the course of 20020, which location had your favorite historical event? I think mine was the 1910 Emory Gap runaway train.
– @jj_jjjjj_jjjjjj
The story of Eugene Jennings takes it for me. I was so profoundly touched by the story of a guy who had an incredible gift for escaping. He wasn’t an evil person, he was just born into a world he wasn’t compatible with. I think lots and lots of people like him have lived and died, and I hope we don’t forget them. You can barely find anything about Jennings on the Internet; his story could only be found in old newspapers. I’m honored I got to tell his story. I sure as Hell won’t ever forget him.
first of all, thanks for making an explicitly lgbt couple, one where the romance is directly shown, part of your main cast for 20020. did you really give much thought to it, or was it a decision that felt natural?
– jijo, @optikalcrow
Part of the reason I wrote 17776 in the first place was to take football, which I view to be this spectacular, fascinating thing, and imagine a world where it’s opened up to every single type of person. A long while back, a friend and I were talking about football. He’s gay, and he supposed that while football seemed like the sort of thing he’d like, he never got into it growing up because he “never got the invite.”
So I did that as a means of sending an invite. More generally, I really liked the idea of making a gay couple the main characters because I almost never see that anywhere, and if I do, it’s probably a story about them being gay.
As I did last time, I wanted to represent people completely matter-of-factly. I don’t delve into the experience of being gay, because I don’t have valuable perspective to offer there, but I did want to establish Nick and Manny as fleshed-out, imperfect, warts-and-all human beings. Sometimes they argue, sometimes they make a bad call, sometimes they say stupid things, and sometimes they’re unsure of themselves, just like everybody else.
who is your favorite character to write for?
– @mwuffie
It was a lot of fun writing Nick and Manny’s pointless arguments. Mimi was great too, since she was inspired by a few people who are very close to me. But Bryce, the new Troy recruit from Chapter 10, might be my favorite.
I grew up around so many guys exactly like Bryce. A young guy who’s not sad, really, just mopey. He’s an asshole in a mostly benign way. He seems to want to do nothing but just sit in a parking lot smoking menthols and leaning against his Nissan, and mumble something about wanting to challenge someone to a street race but never, ever actually doing it. He doesn’t seem to actually like or dislike or want anything. You have absolutely no clue what makes him tick or what ever motivates him to do anything, or whether he likes you. He’s just kinda there, but you get the sense that he’s perfectly content. He fucking rules.
I also enjoyed hate-writing Chess Guy. I never bothered to give him a name because he didn’t deserve one. When Graham first read that chapter, the first thing he told me was, “I fucking hate chess guy.” Mission accomplished.
juice mentions in ch 7 that he worked with indigenous tribes to get permission for fields/players to cross native land (which, of course, all of america is native land). some tribes said no — are these tribal lands OOB and/or handled in the rules?
– lily b.
Yep, for the indigenous peoples who did not grant permission, those portions of the field are out of bounds. Some also have special conditions – for instance, a limit on how many players can be on the field at the same time. These changes aren’t reflected visually on the map for two reasons: first, I couldn’t quite figure out how to do it from a technical sense, and second, I didn’t think it was particularly important or appropriate for me to guess which tribes would and wouldn’t grant permission.
Why hasn’t technology really developed that much? Besides the nanobots, there really isn’t anything else. They still watch/follow games through normal tv’s/radios. Just wondering how boring this must be for anyone not involved in the football games.
– permian triassic extinction event
I think old people just like what they like and don’t need much more, and these are the oldest people in history. Just like folks from decades ago were perfectly fine with their three TV channels and crossword puzzle, I think we’d be okay with an eternity of, I don’t know, online gaming.
Not to be a downer but at times I felt almost guilty about this future with nothing left that needs to be done while we live in this society that’s a total hell-hole for so many. Did you have any feelings like that while writing? Is there a message here linking our harsh reality with the immortal 20020 world that went over my head?
– Anonymous
These times are full of struggle and defeat. The thing I want most and believe in most for this country and this world are things I might never get to see for myself. But god damn it, I will imagine them. It’s practice for the real thing. I believe that one day we’ll actually have the world we want, and we’d better have a plan when that day comes. What are we gonna do with it?
Is it pronounced 20020 or 20020
– Mylograms
20020, yeah.
Any other questions? Graham and I will be hanging out in the comments sections for a while, so feel free to yell at us down there.
1 note
·
View note
Text
Learn Log #3 - GUI
This week I studied various elements of Graphical User Interfaces (GUI) including text, logos, buttons and cursors. For practice, I made a mock-up of a fantasy RPG menu which turned out alright. Apologies for the late post. I was a bit busy this past week. Hopefully this doesn’t cause a delay in next week’s post but we’ll have to wait and see!
Text and Font
To practice my font making skills, this week, I tried to make readable fonts in the smallest sizing possible. My reasoning behind this is letters might be read in large passages of text, so a smaller size will likely be required – especially for small menu spaces such as inventories.

Above was my first attempt which used 3x4 pixel letters. While many of the characters were recognisable, a good number were not. The ‘M’ and ‘W’ were utterly unreadable, and some of the characters were difficult to read, like ‘S’ and ‘X’. I decided to move up to a 4x5 size.
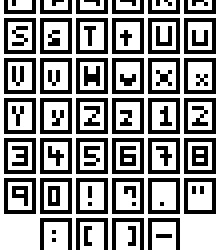
With this slightly larger size, I attempted to make both uppercase and lower case letters, most of which worked pretty well. While most characters such as the ‘S’, ‘E’, ‘3’, ‘Z’ and so forth benefited from the extra pixel in the Y-axis – characters were still needed an extra pixel along the X-axis. Characters such as ‘M’ and ‘W’ were still basically unreadable, and characters such as ‘T’ and ‘I’ were difficult to align along the even number of pixels. To fix this, I moved up to 5x5.
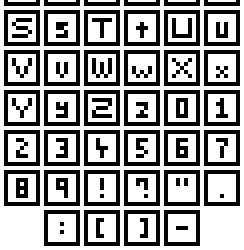
Finally! I have successful ‘M’s and ‘W’s! From this test, I really think that there are a few principals for creating nice fonts. 1) If you know or unsure about if the letters ‘M’ and ‘W’ are involved then make the canvas size for each letter at least 5 pixels wide. The same can go for characters like ‘S’ with regards to height. 2) Make the canvas size an odd number along the X-axis to better align specific letters.
With this last font set, I was also able to size the canvas for different types of characters differently. Capital letters occupied the full 5x5 canvas, lowercase letters occupied a 3x4 canvas (except for the ‘M’ and ‘W’ which had to be 5x4), and numbers and symbols filled a 3x5 canvas. I did this so readers could better distinguish between uppercase and lowercase letters, and similar characters like ‘O’ and ‘0’. I’ll have to see what it’s like an actual game later, but I think it’ll be a pretty useful trick.
I do think I will be able to make larger fonts than this and size them down in the Unity engine. Even if this is the case, I think this worked pretty well as practice within tricky boundaries.
Logos
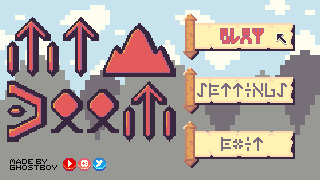
I think logos and titles are pretty crucial to a game. They plaster the cover and main menu of the screen, and I’m sure we can all think of a few memorable logos we’ve seen in games. So, now that I’d practised making text I wanted to make a banner logo for my Itch.io page. The first thing I did was a little sketching on paper before converting it to a small pixel art concept, as shown below.
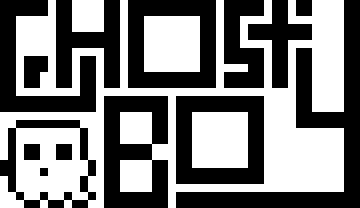
The recommended banner size for Itchi.io is about 900px wide. I was not going to start here, so I decided to do my rough draft at 45x26 and detail it as I scale up. I made this draft by implementing the concepts I really wanted first and building around that. I knew I wanted to include the ‘S’ wrapped around the ‘T’, so I started there and worked my way through the logo. I also wanted to include a little ghost, so I left a space for it in the bottom left corner. Next, I wanted to add some detail and hollow out the letters, so they were white with a black outline. This is useful as it means the letters are both white and black, allowing the logo to be read on dark and light backgrounds.
To add the detail, I scaled up the previous logo by 400%. This allowed me to round out the edges and create a nice ‘blocky-but-smooth’ look. I also adjusted the ‘G’, ‘T’ and ‘S’. The original ‘S’ and ‘T’ combo made the ‘S’ seem a little bit strange, but this new version was a lot better. With the hollowed out ‘G’ I made it seem like it was beneath the ‘H’ which I thought was a nice effect. I left one of the ends of the ‘Y’ very blocky to make it seem like it had been interrupted by the T. At this point the logo was 180x104, so I scaled it up by 500% to reach 900x520 before adding more detail.

If someone were to ask me, ‘Hey, should I make a 900x520 pixel art logo dealing round edges and circles?’ I would slap them. In fact, I’ve slapped myself because I did precisely this, and it took ages. At smaller sizes, circles can easily be adjusted, viewed, or manipulated to trick the viewer into thinking they are looking at a round edge. When you need to make 4 circles, the largest being 220x220 this becomes insanely difficult. Looking back on this issue I definitely should have used anti-aliasing - I completely forgot about it if I’m honest. The ‘O’s didn’t even come out looking that great. They look quite boxy – definitely should have used anti-aliasing. I have regrets.
Luckily the other letters turned out much better. I did adjust the ‘Y’ also as previously the logo read ‘Ghosty Boy’ rather than ‘Ghost Boy’. This did make the canvas 840x520, but I don’t think it’ll be a noticeable change. I’m pretty happy with it, especially after all the time it took. I may revisit the logo at another time (especially to fix up those ‘O’s).
Above is the final logo, I added the pattern used in my profile picture (slightly desaturated to make it easy on the eyes) to the insides of the letters and called it a day (or 3 days. I hate the letter ‘O’).
Buttons
So, we’ve got our game’s font and title, what we need now are some buttons for interacting with the menus. To practice making button sprites, I decided to make link buttons for social media sites. I started by making the designs of the buttons, as shown below.

I started with small, white 9x9 designs of each social media sites’ logo on a background of their associated colour. I wanted the buttons to be small (to be put on the sidebar of a website) and completely circular. The Itch.io logo could not fit onto the small size, so I made a rough-looking videogame controller instead.
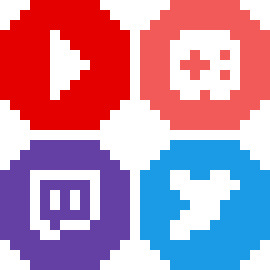
I then expanded these designs into a larger 13x13 circle which I would later turn into the button. Not much happened in this step but this.
And the buttons were done! I shifted the logos of each button upwards before adding a shadow and highlight line on the bottom. Buttons require some sense of depth or separation from the background to show that they can be interacted with. This is really all that’s needed, but more detail can be added to make the button look more appealing.

I added a shadow around the back of the buttons to emphasise the edges of the buttons, separating them from background. I then added some more detail to the highlight to make the button seem shiny and draw attention to it. By alternating between highlights and normal tones, the button appears metallic. Finally, I changed the white logos to a light yellow so the white didn’t seem too bright.
Overall, I’m pretty happy with how the buttons look. The colours on the Itch.io button are a bit desaturated which conflicts with the metallic look. This is due to the colours of the actual logo being quite desaturated. If I were to return to it, I would change it to be pink or orange to capture a similar colour but make the button as bright and eye-catching as the others.
Cursors
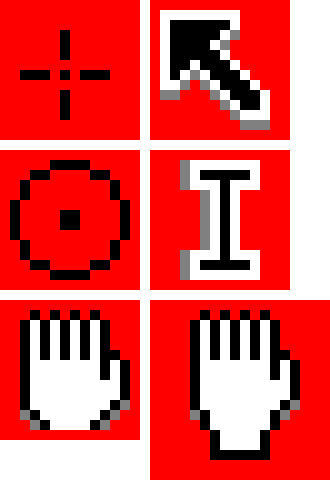
There’s not much to talk about in regards to cursors. The default cursors of PCs and Macs are pretty good, however, adding a custom cursor image to a game makes it look really cool I think – even if it’s just a simple adjustment. I tried my hand at making some cursors. The circular points make fitting cursors for shoot games as they’re reminiscent of a gun scope. The hand cursor is a little tricky to do in a small space and might not be worth it as cursors need to be small. Like I said regarding text - if Unity has an option to scale down cursors that will make things much easier. These are some simple ones, but I’m sure there could be more eccentric designs even within these cursor shapes.
Assessment
So, for this week’s learning assessment, I wanted to make a mock-up fantasy RPG menu based on the items I made last week. This was definitely not a lazy excuse to use the same colour palette and 100% a sincere artistic decision.
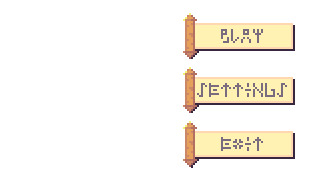
The first thing I started with was the buttons. It is crucial a menu’s buttons are clear and easy to read so they should dictate the size and presentation of the rest of the screen. I really liked the scroll item from last week, so I decided to make the buttons scrolls. This made the addition of depth more complicated, but I think I did an alright job by adding a shadow bottom right of the scroll.
For the text on the buttons, I wanted to delve into the fantasy aspect and use rune-like letters. I had to tread a fine line between clarity and the desired aesthetic of the letters which took a lot of trial and error, but I think I got there in the end.
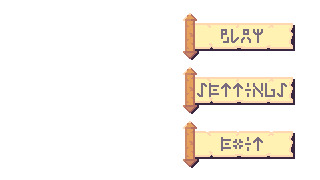
I then scaled up the buttons to add some further detail to the scroll and the runes. I thought the plain white background looked pretty bland so I decided to make a background.
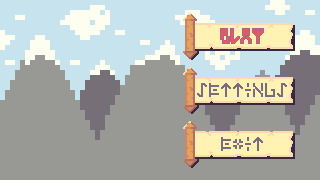
I made a mountain range as a background for the menu and changed the text of the ‘PLAY’ button to an outlined red. I kept the background quite simple as this week’s topic was interfaces, and I was concerned that a detailed background might distract from the interface elements. I turned the ‘PLAY’ red because I wanted to give the impression that the option was being selected. I had ample empty space to the left of the screen, so I decided to create a logo for the game to fill that space.
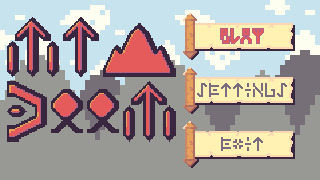
[photo]
After some more trial and error with different rune letters, I created this logo giving this fake game the title ‘Mt Doom’, inspired by the mountain range background. The rigid rune style really gave the title a more menacing feeling which was good. The ‘O’s used looked a bit weird as I had trouble turning them into a rigid rune style. I increased the size of the logo to add more detail and popped it into the menu screen.
The extra detail made the runes look a bit nicer. The ‘O’s were still off but did fit the rest of the font a little better after adjustment. My biggest concern was how out of place the whole logo looked. This was quite clearly because of the pure white colour used for the letters. I could change this to the white within the colour palette; however, this colour was used in the background, so I decided to match the selected button and use the colour red for the logo.
The red made the logo really pop while fitting in with the rest of the piece. Additionally, some light shading on each of the letters made letters stand out even more. I also moved the black outline of the text slightly to the right to make it feel more like a shadow rather than just an outline. Unfortunately, I didn’t feel like the logo had a grand enough presence for its purpose and menace to shine through. To fix this up, I digitally resized the logo by approximately 133.33%. Now, digital resizing really works well for stuff like 200%, 500%, 1000% and so on because it just adds pixels. However, a resize of 150% means you are resizing the image by 1 and a half-pixel which is not possible. This creates jagged, messy lines – but I decided to give it a shot because why not?
To my surprise, the sizing was perfect, and the messy lines actually worked somewhat with the aesthetic. The shading did get messed up a bit, and if I were to do this again I would go back and adjust the shading, but overall I actually think it improved the piece. Finally, I decided to add a cursor, a watermark and social media buttons into the piece, as shown below.
This watermark and the social media buttons do look a bit out of place in the piece, but I think that works in their favour. It draws attention to them and makes it clear that these are not part of the game or menu. This is particularly useful as those social media sites will open an external tab so showing they’re not part an internal part of the game is important.
Looking back on this piece, I do wish the background had more detail. Initially, I didn’t add it so the interface was clear and this may have worked. Still, the fact the background is very simple makes it aesthetically different and distracting. Also, while the scrolls were a nice concept, they could be designed to have more depth and a better select state. Overall, what I took from this practice is that this design process of ‘Buttons to Background to Logo’ is quite useful, but I do need to make adjustments as I go through each stage in the process.
Conclusion
That concludes week 3 of learning pixel art. In week 4, I will be diving into environments starting with grass, trees, bushes and some other features of nature. I’m really excited to build pixel art environments, and I think I’ll enjoy it more than this week as I got a bit sick of making letters over and over again.
My learning and this blog post wouldn’t have been made possible without these fantastic resources. Go check them out if you wanna learn some stuff about pixel art!
Creating A Pixel Art Font by TutsByKai
How to Make a Pixel Logo by TutsByKai
Pixel Art 101: Buttons by Pixel Pete
How to Animate a Button by TutsByKai
How to Make Pixel Art Cursors by TutsByKai
0 notes
Text
Breath of the Wild review
On the Wii U, I had The Wind Waker and Twilight Princess in their HD remastered forms....and barely touched. This is reoccurring issue with me and remasters, even with games I love. No matter how much I loved them the first time, there are some games I won't touch again and it was mainly due to the beginning stages. I dreaded going though Ordon Village again and knowing I'd have to put up with those tutorials again to get to the parts of Twilight Princess i did enjoy. So once Link wakes up Breath of the Wild, gets his clothes and Sheikah Slate and I got to run around with my meager abilities and items, I knew that this game was gonna be a classic. Yes, that's all it took.
Now, there have been many many reviews that extolled the excellence of Breath of the Wild, much better written reviews when it came out, possibly on the verge of hyperbolic. So allow me to add to it. And yes, not only is this the best game of 2017, It very well could be one of the greatest of all time. While those reviews have mentioned Witcher 3, Skyrim, Arkham Asylum and other open world games as direct influences (Nintendo said as much as well), this game inspired feelings in me I haven't felt since Xenoblade Chronicles. And like Xenoblade Chronicles, Breath of the Wild succeeded due to not just the high amount of gameplay but also by eliminating a lot of wonky, reductive elements.
There's no invisible barriers that prevents the player from going where they want to go, once you get off the Great Plateau after getting the runes in the Shrines, the player has everything the need to explore this amazing version of Hyrule. And the exploration was felt lacking in previous Zeldas. You knew that special icon or crack in the ground required the player to retrieve the item from a dungeon. Now, you just have to go there and a lot of it just jumps out at the player. This time around, Hyrule itself is a dungeon with so many puzzles that tempt to player to stop moving and just fiddle around for a bit. The world is littered with seemingly out of place shapes and it draws the player in a way that doesn't feel contrived or blatant. And even if a trail isn't apparent or there's no natural way to enter a place, the climbing mechanic breaks all of it. Climbing itself becomes its own minigame because its governed by a stamina wheel and the weather system, which does allow the player to be challenged by where they can climb but it doesn't allow the player to break the game by going everywhere. And speaking of challenge, get ready to eat humble pie with the simplest combat system but toughest enemies ever.
This Hyrule wasn't afraid to hand the player its ass over and over. And the lack of tutorials and locked rooms that teach you to fight means you're not stuck in this one place until you get it right. If you die, you come back and try again or move onto somewhere else to do something that won't kill you. When I tried to put off the story as much as I possibly can, I ended up discovering Shrines (in a minute, not yet), Koroks, rupees, side quests, food. Until I became bored and started the Zora quest line, which delighted because I got to climb up a waterfall with ice blocks and led to the real menace of Hyrule: Lynels. This is when previous Zelda game would put you in this room and turn this into a boss battle to see if the player has gotten any good. Not this time, it didn't care that I didn't have enough hearts, or my shields were too weak, or my weapons were brittle. So I just turn around from the high point and glided to somewhere else instead. While players will have to fight to actually survive, Breath of the Wild let the experience teach the players.
And mainly, those Shrines is how you get experience points. The Shrines are dotted the map, some not even trying to hide, some taking maddening puzzle solving, others rewarding the player for figuring out all the clues. Not only is this how the game facilitates fast travel, it also scratches that dungeon crawling itch for a bit, but only by being a puzzle shrine or a combat shrine. It lacks the incredible intertwining of previous Zelda dungeons but the light content and brain stretching use of items makes up for it. Especially since the player is always rewarded with a great item. Unless its a weapon...
Okay, in the early goings, weapon durability can be a bummer. Weapons break too common and by the time you get used to one, its gone. That's not the worst part of it. The problem comes when good weapons do start becoming more readily available but not you're out of slots because you don't wanna waste your Royal Broadswords on some basic ass Bokoblins because you know a Lynel needs that work more. However, you deal with it because all the puzzle solving and wander lusting led to Korok seeds to expand the inventory, so now by the time you wanna start wrecking things, you're actually equipped to do so this time around.
I also believe that the durability allows the player to actually replay certain areas. While other games use powerful enemies as gates to keep the player away for a few hours, that doesn't feel like it this time around. The map allows players to actually keep tabs on where they may want to go but don't feel like dying to do so. Place that stamp down, go somewhere else and come back to it when the player truly feels ready. I remember Miyamoto talking about how they wanted Zelda games to be able to replay certain areas for a reason. And now they didn't have to force the player to do a bunch of fetch quests or pixel hunts to come back to an area they already beaten. This makes Hyrule feel more livelier this time around because no matter how much time you spent in one area, you can come back to it and discover something hiding under your nose this whole time but you couldn't see it just yet. Or it has a dope sword you really needed but didn't have room for.
But one thing to make room for: food! There was something so hypnotic about resource gathering and cooking, in a way that surpasses Final Fantasy XV's photo-realistic dishes. The abundance of materials, which not only kills the tedium that might have killed lesser games, allows players to actual feel free to consume and experiment with everything they've gathered. In the beginning, basic meals are cooked to give your health a chance withstand raiding an enemy camp. By the time you're in the 100 hour mark, players are hunting to create complex dishes that give them dope buffs to make a play session a more pleasant.
One pleasant thing this go around is the story. For all the flack Nintendo gets for its approach to stories, it only gets it because they're not telling it through the usual cinema envy of other games. This is a deconstruction of Link and being the chosen one. Link isn't just gonna be handed all the tools needed to succeed just because he was chosen. Same goes for Zelda, who seems heartbroken that she has to be the reincarnation of a goddess. And thanks to the Memories questline, you get to see those cutscenes but they aren't automatically triggered because you did a thing. You earn those previous moments beforehand that showed Link and Zelda not truly feeling going along with what destiny wants to do because it worked 100 years ago...which was probably Nintendo's feelings developing this game.
For years, Eiji Aonuma talked about breaking the conventions and in the gameplay and story, that feeling comes across well with Divine Beast Champions, especially who they just fall doing what they were told to do. This is truly about how Zelda's dev team felt about coming together to give the same results, only for it to fail before it even began and the task fell to new people to do what's necessary to defeat Ganon through new means. It's deeply personal and the emotion maturely understated. Link and Zelda develop as legit characters through their struggles and heartbreak and it gives the story an emotional richness not seen since Ocarina/Majora. Link (and the player) truly earns the right to be called a hero, not because he was chosen but because he endured and grew.
I haven't even mentioned how beautiful this game is. Forget your need for 6 billion polygons per sec to animate a face. The details astounding from up close and far away. Climb to the top of the mountain and you see a sprawling, diverse horizon to take your breath away or look down to see a forest or lake or camp to possibly sail down. None of it ever stops looking gorgeous. My favorite place in the game revolved around a Shrine that needed an Orb to unlock but the area you were in was completely dark. Seeing Link as a shadow, lighting torches to move around this area was utterly beautiful and proves that developers don't need to high end CGI cutscenes to make a visual impression that last forever. Speaking of lasting impressions, this is one of the best UI I've seen in a game. It conveys information and stats without completely cluttering the screen and taking away from the game world. Even when playing in handheld mode, you can stil take in a lot of visual treats of Hyrule.
And despite the impression that I'm ready to marry this game, this game isn't flawless. Weapon switch is a legit pain. Holding down one button to switch to a particular weapon isn't as intuitive as the other controls in the game. You're better off just pausing and switching items, which sorta breaks the immersion for the player. Also, as great as the Koroks and Korok puzzles are, did their have to be 900 of them. I'm all for trolling the player and subverting expectations for attempting 100% completion, but 900?!? That quickly veers between padding and repetitive. And the dragons can suck it. Only one item drop per appearance and god help you if you don’t want a scale. Again. Which leads to the upgrade system being underwhelming, due to its limited focus on armor and not weapons.
What makes me ignore these flaws: the game never forces you to do any thing mentioned before this (except the first four shrines and runes). You never have to find a Korok seed (but why the fuck wouldn't you?!?), you never have to expand your health and stamina, you don't need to cook a meal, get the Master Sword, ride a horse, shield surf, regulate your temperature, complete a shrine. The game is indifferent to your progress. But you will do any and all those things because Breath of the Wild is excellent at triggering your curiosity and intellect and rewarding it, not rewarding your patience.
Best of all, nearly everything you do fits into a mechanic the benefits the player, the quest aren't just a collection of repetitive checklists of escalating numbers nor is its badly tuned mechanics just thrown for the sake of variety. (Take that, open world games!)
This is not to say the previous Zeldas were awful. They didn't get tens and awards for nothing. You may even miss the linearity. They were great for what they are. Breath of the Wild is just better. Instead of telescoping design and handing you the fun stuff when you did the one thing it told you to do, it trusted the players this time around to make their own fun and build their own legend. Players will end up completing the same things but everyone will make their own path to completion. Breath of the Wild is worthy of the praise it has received and then some. It break ground by avoiding all the pot holes and wasted soil of previous Zeldas and open world games and brought freshnesss that hasn't been felt in years. Truly a game that lives up to the word 'Legend'
2 notes
·
View notes
Text
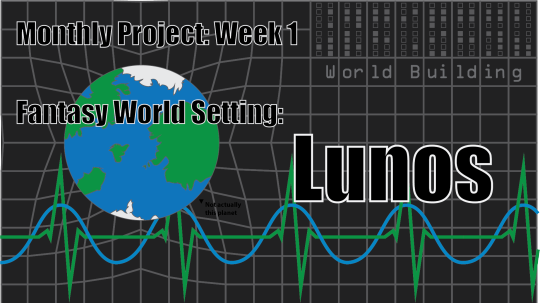
Monthly Project: January, Week 1
OH BOY HERE WE GO
I suspect at least one person who was slightly interested in my projects was thinking I’d do something vidya related since, well, that was basically my defining interest for the past.... holy fuck, it’s been a decade. hm.
Well, sorry to say, it’s not this month. It might be next month’s, but not January. January belongs to worldbuilding for me; New year, new starts, and whole new worlds to create and explore. So what did I make?
I made a world in high fantasy.
But C, just what is a “Lunos”?
So for a long time I’ve been doing worldbuilding stuff on and off in my free time, and it’s turned into a pile of ideas I’ll never be able to do justice, nor would I want to given how some of them are “babby’s first design” But what a waste of potential that would be!
I’ve also toyed around with the idea of wanting to GM a D&D campaign, but that’d be very all or nothing for me. I wouldn’t want my players to be able to look up every aspect of the campaign online, and I certainly would want them to be curious about most aspects of the world. So that means creating an entirely new setting, with lore and map included. That’s a fuckload of work, which is why I was like “fuck GMing”
But fuck “fuck GMing.” It’s a new year, and while this may or may not help me and only me, it’s a thing I can do. So let’s pick up some of that old stuff I did, and throw it into a place that can be used for a setting. Lunos is what came out of taking a crucial part of the lore that I made up for another thing that I’ll never be able to use, and putting D&D style design constraints on it.
I love design constraints. No, really; they’re a great way to get you to focus down. Let’s see where it took me:
Making the Map
So for the longest time this is what was holding me back. I have shaky hands. Very shaky hands. It’s why I can’t aim in a lot of games, and it’s also why I can’t draw. For the longest time, this prevented me from making any sort of visual aspect for things save for stuff you can directly control in vector programs like Illustrator, and some very tiny spritework which requires you to pick which details you want to shine through.
But there is a thing or two I’ve learned I can do in the past few years: I can Google, and I can generate.

I rendered some clouds in Photoshop CS5, used a filter to flatten them, and then took the shapes I liked and turned them into this. Obviously this can’t be a whole planet; this doesn’t work on a globe, but honestly I don’t need the whole planet right now, so this will do just fine.
Looking back at might notes for things I’m keeping from the lore, I need a round faultline which creates a mountain range which blocks rainfall from both sides, a few tactically advantageous places to put cities, some islands, 2 giant mountains in the middle of no where, and a few forests in sensible places in between.
I can do that.
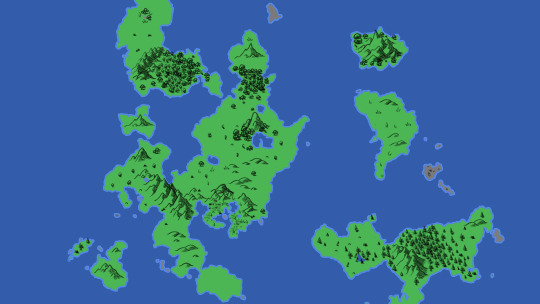
That’ll wor- wait shit, where are the deserts? Rivers?
There we go. The scale of this isn’t really clear, so there’s a lot of big empty space. Let’s put in the places that need to be there. But how do I determine the scale? Unfortunately, the tutorial I was following to help me with this wasn’t as explicit with how it would look at this resolution, so when I got the brushes I used for mountains and forests and settlements etc., it was clear to me that this map wasn’t big enough in terms of pixels to get the detail I was looking for. SO what this means is I need to put major cities, towns, and landmarks in, and then later if I actually do end up using this map, I have to go into finer detail and redraw portions from it with some more added in, as well as better populate it with smaller towns and interesting things. This is fine, but it lacks any really objective standard for scale. But I do have something up my sleeve, but first let’s add in those important places.

By the way kids; never be stingy with your layers. I had to redo large portions of this like 3 times before I got something I liked because of it.
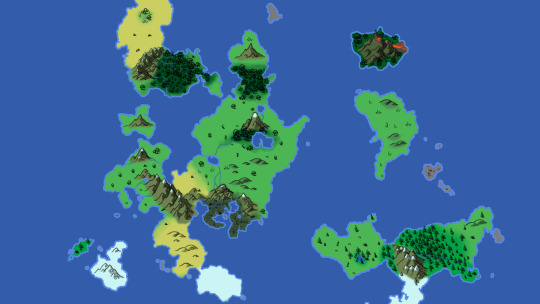
But there we go. And there’s a line you can use for scale. But how did I get that scale? Well in my notes, there is an event for this city and this port town to be 1 day’s travel away due to an annual festival that parades down the road to this city’s front gate.

Yeah, It really doesn’t scale well; I’ll definitely have to redraw on a better scale if I go about using it. But then again, I’m sure I’m not the first.
Regardless, now we have a visual reference for a distance that needs to be traveled in a day’s worth of doing so. That’s ~ 30 miles, and from there we can draw and expand that line.
Now we have ourselves a fault-line which curves from the North Wast where it separates a desert and forest, goes down South, then around East before curving down again. It’s not an accurate line to normal physics I’m sure, but it’s good enough for my needs. This portion of the planet is pretty far south, so lower portions are cold, leading to a different style of forest to the East on that island there than the one up north. That desert is of course just a desert due to lack of rainfall, which is collected further north by that semicircle of mountains there, creating that swamp.
As for the anomalies on the map: the oasis in the northern desert is an artificial one since this is a fantasy world and terra-forming isn’t out of the question when it comes to powerful wizards and sorcerers, and you can’t have an area that big with a potential trade route without a stopping point.
That Volcanic island is similarly not entirely natural, though the reason for that volcano emerging there is a bit more wobbly; haven’t quite fleshed that out as much yet, but I have a few ideas. Sure, I might have some stuff that is fleshed out, but not all of it; This hasn’t hit public eye, and it’s my world so as long as I’m consistent with my reasons when I do make them it could be whatever I want. It is a fantasy setting, after all.
If you’re curious what tutorial I used, it’s this one. Give it a shot yourself if you’re interested!
So what’s for next week now that you have a map?
Lore for starters. There’s a bunch there already, but a lot of my older and even newer stuff stems from a single design idea, and Lunos is included. Just to tease a little bit, while this is a campaign setting for D&D and therefore has all the typical races and plane-related stuff, it has it’s own history independent of all that. In fact, Lunos is actually this lush and active because of an apocalyptic event; it was actually barren, Mars-like, and rather simple before that. This mythical setting stuff is the result of a terrible accident which led to the radical changes that made it “high fantasy”, which most of it’s residents aren’t aware of, and those who are are trying to square the conflicting history of its past with its modern-day appearance and gods.
At the very minimum, I need to go more into depth about 8 gods, several lesser deities, and an entirely new race in the D&D 5e format. There’s still quite a lot of work to be done, and the order’s very specific:
I need to explain the idea behind Lunos, then explain its history, then explain its ideologies before I can even flesh out some of the gods, so that’ll be next week.
Depending on how that goes, I might get started on fleshing out new, actual homebrew content for a campaign that could be run in the setting.
But yeah, that’s for next week; thoughts? Too convoluted already? Map looks weird in places? This whole thing is silly?
What do you think so far?
1 note
·
View note
Text
How to Simplify SVG Code Using Basic Shapes
There are different ways to work with icons, but the best solution always includes SVG, whether it’s implemented inline or linked up as an image file. That’s because they’re “drawn” in code, making them flexible, adaptable, and scalable in any context.
But when working with SVG, there’s always the chance that they contain a lot of unnecessary code. In some cases, the code for an inline SVG can be long that it makes a document longer to scroll, uncomfortable to work with, and, yes, a little bit heavier than it needs to be.
We can work around this reusing chunks of code with the <use> element or apply native variables to manage our SVG styles from one place. Or, if we’re working in a server-side environment, we can always sprinkle in a little PHP (or the like) to extract the contents of the SVG file instead of dropping it straight in.
That’s all fine, but wouldn’t be great if we could solve this at the file level instead of resorting to code-based approaches? I want to focus on a different perspective: how to make the same figures with less code using basic shapes. This way, we get the benefits of smaller, controllable, and semantic icons in our projects without sacrificing quality or visual changes. I’ll go through different examples that explore the code of commonly used icons and how we can redraw them using some of the easiest SVG shapes we can make.
Here are the icons we’ll be working on:
Let’s look at the basic shapes we can use to make these that keep the code small and simple.
Psssst! Here is a longer list of simple icons I created on holasvg.com! After this article, you’ll know how to modify them and make them your own.
Simplifying a close icon with the <line> element
This is the code for the “close” or “cross” icon that was downloaded from flaticon.com and built by pixel-perfect:
CodePen Embed Fallback
In this example, everything is happening inside the <path> with lots of commands and parameters in the data attribute (d). What this SVG is doing is tracing the shape from its borders.
A quick demonstration using mavo.io
If you are familiar with Illustrator, this is the equivalent of drawing two separate lines, converting them to shape, then combining both with the pathfinder to create one compound shape.
The <path> element allows us to draw complex shapes, but in this case, we can create the same figure with two lines, while keeping the same appearance:
<svg xmlns="http://www.w3.org/2000/svg" viewBox="0 0 50 50" width="50" height="50" overflow="visible" stroke="black" stroke-width="10" stroke-linecap="round"> <line x1="0" y1="0" x2="50" y2="50" /> <line x1="50" y1="0" x2="0" y2="50" /> </svg>
We started by defining a viewBox that goes from 0,0 to 50,50. You can choose whatever dimensions you prefer; the SVG will always scale nicely to any width and height you define. To make things easier, in this case, I also defined an inline width and height of 50 units, which avoids extra calculations in the drawing.
To use the <line> element, we declare the coordinates of the line’s first point and the coordinates of its last point. In this specific case, we started from x=0 y=0 and ended at x=50 y=50.
Here’s how that looks in code:
<line x1="0" y1="0" x2="50" y2="50" />
The second line will start from x=50 y=0 and end at x=0 y=50:
<line x1="50" y1="0" x2="0" y2="50" />
An SVG stroke doesn’t have a color by default — that’s why we added the black value on the stroke attribute. We also gave the stroke-width attribute a width of 10 units and the stroke-linecap a round value to replicate those rounded corners of the original design. These attributes were added directly to the <svg> tag so both lines will inherit them.
<svg ... stroke="black" stroke-width="10" stroke-linecap="round" ...>
Now that the stroke is 10 units bigger that its default size of 1 unit, the line might get cropped by the viewBox. We can either move the points 10 units inside the viewBox or add overflow=visible to the styles.
The values that are equal to 0 can be removed, as 0 is the default. That means the two lines end up with two very small lines of code:
<line x2="50" y2="50" /> <line x1="50" y2="50" />
Just by changing a <path> to a <line>, not only did we make a smaller SVG file, but a more semantic and controllable chunk of code that makes any future maintenance much easier. And the visual result is exactly the same as the original.
CodePen Embed Fallback
Same cross, different code.
Simplifying a clock icon with the <circle> and <path> elements
I took this example of a clock icon created by barracuda from The Noun Project:
CodePen Embed Fallback
This shape was also drawn with a <path>, but we also have a lot of namespaces and XML instructions related to the software used and the license of the file that we can delete without affecting the SVG. Can you tell what illustration editor was used to create the icon?
Let’s recreate this one from scratch using a circle and a path with simpler commands. Again, we need to start with a viewBox, this time from 0,0 to 100,100, and with a width and height matching those units.
<svg xmlns="http://www.w3.org/2000/svg" viewBox="0 0 100 100" width="100" height="100" fill="none" stroke="black" stroke-width="10" stroke-linecap="round" stroke-linejoin="round"> <circle cx="50" cy="50" r="40"/> <path d="M50 25V50 H75" /> </svg>
We keep the same styles as the previous icon inside the <svg> tag. fill is black by default, so we need to explicitly give it a none value to remove it. Otherwise, the circle will have have a solid black fill, obscuring the other shapes.
To draw the <circle> we need to indicate a center point from where the radius will sit. We can achieve that with cx (center x) and cy (center y). Then r (radius) will declare how big our circle will be. In this example, the radius is slightly smaller than the viewBox, so it doesn’t get cropped when the stroke is 10 units wide.
What’s up with all those letters? Check out Chris Coyier’s illustrated guide for a primer on the SVG syntax.
We can use a <path> for the clock hands because it has some very useful and simple commands to draw. Inside the d (data) we must start with the M (move to) command followed by the coordinates from where we’ll start drawing which, in this example, is 50,25 (near the top-center of the circle).
After the V (vertical) command, we only need one value as we can only move up or down with a negative or positive number. A positive number will go down. The same for H (horizontal) followed by a positive number, 75, that will draw toward the right. All commands are uppercase, so the numbers we choose will be points in the grid. If we decided to use lowercase (relative commands) the numbers will be the amount of units that we move in one direction and not an absolute point in the coordinate system.
CodePen Embed Fallback
Same clock, different code.
Simplifying an envelope icon with the <rect> and <polyline> elements
I drew the envelope icon in Illustrator without expanding the original shapes. Here’s the code that came from the export:
CodePen Embed Fallback
Illustrator offers some SVG options to export the graphic. I chose “Style Elements” in the “CSS Properties” dropdown so I can have a <style> tag that contains classes that I might want to move to a CSS file. But there are different ways to apply the styles in SVG, of course.
We already have basic shapes in this code! I unselected the “Shape to paths” option in Illustrator which helped a lot there. We can optimize this further with SVGOMG to remove the comments, XML instructions, and unnecessary data, like empty elements. From there, we can manually remove other extras, if we need to.
We already have something a little more concise:
<svg version="1.1" id="Layer_1" xmlns="http://www.w3.org/2000/svg" x="0" y="0" viewBox="0 0 310 190" xml:space="preserve"> <style>.st0{fill:none;stroke:#000;stroke-width:10;stroke-linecap:round;stroke-linejoin:round;stroke-miterlimit:10} </style><rect x="5" y="5" class="st0" width="300" height="180"/> <polyline class="st0" points="5 5 155 110 305 5"/> </svg>
We can remove even more stuff without affecting the visual appearance of the envelope, including:
version="1.1" (this has been deprecated since SVG 2)
id="Layer_1" (this has no meaning or use)
x="0" (this is a default value)
y="0" (this is a default value)
xml:space="preserve" (this has been deprecated since SVG 2)
<svg xmlns="http://www.w3.org/2000/svg" x="0" y="0" viewBox="0 0 310 190"> <style>.st0{fill:none;stroke:#000;stroke-width:10;stroke-linecap:round;stroke-linejoin:round;stroke-miterlimit:10} </style> <rect x="5" y="5" class="st0" width="300" height="180"/> <polyline class="st0" points="5 5 155 110 305 5"/> </svg>
We can move the CSS styles to a separate stylesheet if we really want to get really aggressive.
<rect> needs a starting point from where we’ll extend a width and a height, so let’s use x="5" and y="5" which is our top-left point. From there, we will create a rectangle that is 300 units wide with a height of 180 units. Just like the clock icon, we’ll use 5,5 as the starting point because we have a 10-unit stroke that will get cropped if the coordinates were located at 0,0.
<polyline> is similar to <line>, but with an infinite amount of points that we define, like pairs of coordinates, one after the other, inside the points attribute, where the first number in the pair will represent x and the second will be y. It’s easier to read the sequence with commas, but those can be replaced with whitespace without having an impact on the result.
CodePen Embed Fallback
Same envelope, different code.
Bonus shapes!
I didn’t include examples of icons that can be simplified with <polygon> and <ellipse> shapes, but here is a quick way to use them.
<polygon> is the same as <polyline>, only this element will always define a closed shape. Here’s an example that comes straight from MDN:
CodePen Embed Fallback
Remember the circle we drew earlier for the clock icon? Replace the r (radius) with rx and ry. Now you have two different values for radius. Here’s another example from MDN:
CodePen Embed Fallback
Wrapping up
We covered a lot here in a short amount of time! While we used examples to demonstrates the process of optimizing SVGs, here’s what I hope you walk away with from this post:
Remember that compression starts with how the SVG is drawn in illustration software.
Use available tools, like SVOMG, to compress SVG.
Remove unnecessary metadata by hand, if necessary.
Replace complex paths with basic shapes.
<use> is a great way to “inline” SVG as well as for establishing your own library of reusable icons.
How many icons can be created by combining these basic shapes?
I’m working my list on holasvg.com/icons, I’ll be constantly uploading more icons and features here, and now you know how to easily modified them just by changing a few numbers. Go ahead and make them yours!
The post How to Simplify SVG Code Using Basic Shapes appeared first on CSS-Tricks.
You can support CSS-Tricks by being an MVP Supporter.
How to Simplify SVG Code Using Basic Shapes published first on https://deskbysnafu.tumblr.com/
0 notes
Text
Guidelines for Anybody Who would like to Start out a Clothes Brand name
youtube
how to start a clothing brand
In this article are a few strategies to any person all set to or considering about launching their own individual clothes line.
Idea # 1. Don’t Rush
What I signify by that is choose your time when it comes to the start of your respective line. There may be a great deal of levels of competition to choose from these days, establishing some social media marketing web pages using a t-shirt coming shortly is not really likely to cut it. Have you ever ever received excited about a Fb site with twelve likes and “a clean new apparel brand coming soon"in the about me part? Me neither.
Tip # two. If you cannot style and design, then shell out someone that can.
A lot of street don start-ups launch their model with just their title inside a script font, screen printed over a black t-shirt. Now I am all for supporting a manufacturer, however, you want to no less than put some thought and creativity into your apparel, usually individuals will see that you’ll be much like the rest of the clothing brands that have started off and failed. If you can’t draw or style and design, pay someone who can. You happen to be gonna want stable types if you prefer to stand out and it will not have to be expensive. An awesome web-site for style and design do the job is called Designcrowd. This website makes it possible for you to put up your style and design brief, set your spending plan, then wait around for designers from everywhere in the entire world to write-up their entry and also you can opt for the best one particular.
Tip # 3 Really don’t rip-off other folks!
Just about every brand wishes to be as productive as Obey, Stussy and Hype, but blatantly copying their strategies, style and ripping off their designs will not be planning to get you there. In reality, It really is much more likely to have a negative result simply because these models are very well known, highly regarded as well as their hundreds of fans will know that your outfits models usually are not primary.
Suggestion # four Imagine outside the box.
You’ve got most likely heard this stating right before and although it is much easier stated then done, a great method to start off will be to do a good bit of exploration to collect your own personal ideas. Check with you which kind of clothes do I would like to create? What are my favorite brand names? What do I appreciate in life? When you finally know the solutions to these thoughts then you can start to study brand names, jot down tips, choose photographs and doodle to actually make an image with the style of street don things you would like your brand to be manufacturing. But make sure you never dismiss idea selection 3 whilst doing your investigation!
Idea # five Analysis your product or service.
Given that you have got a handful of layouts or concepts that you would love to see printed on the t-shirt, it can be time for you to look into what organization you may use to supply your blanks. There are many companies which make blank outfits ready for printing so this component might be a little bit overwhelming, but choosing your funds and who your focus on industry is will seriously assist to slender down the choice.
Gildan and Fruit on the loom are at the most affordable end of the scale however they are likely to possess a boxier in shape and you’re not likely to seek out a lot of reputable apparel brand names printing on them.
Tultex and Anvil print a great high quality tee for a fair selling price if you prefer a high-quality come to feel but your spending plan will never extend to high-priced blanks.
And on the greater finish are American Attire and Alternate Attire. Although these might be highly-priced, the quality is phenomenal and so they also have a range of colours and items which will make your model stand out through the rest.
Tip # 6 Don’t lower corners.
If you want being taken severely being a brand name, creation will be the 1 position you need to do not need to rush or slice corners.
Firstly, choose a good printing business. It’ll cost you a great deal extra time, cash and energy inside the prolonged run should you commit to print having a man in his bedroom who prints your layouts wonky and gets chocolate stains on the t-shirts when he’s printing them.
You will find numerous respected firms by typing in "Screen printers” in Google, and don’t forget to shop all over. Octomuffin and Woven Inc are rated highly during the United kingdom.
Secondly, think about your brand name graphic. Would you like to generally be thought of being a experienced brand? In the event you do, then your going to want custom neck labels, swing tags and some neat packaging. This doesn’t ought to be high-priced, but little touches like that will possess a long lasting impact on the client.
Lastly, don’t print a lot of. Any time you initially release a structure, you’ll have no clue how it will provide, so it truly is most effective to purchase a lesser quantity at the beginning to test the h2o. Really don’t fret about promoting out swiftly, it’s going to make your manufacturer appear common when you do so you can constantly just re-order far more.
Idea # seven Website, and pics.
You don’t require a massive finances for making a good looking and practical web-site, there are so many e-commerce platforms readily available now which supply fantastic looking web sites for any minimal regular monthly price tag. Significant cartel, retail store envy, volusion and shopify are only the tip of your iceberg in terms of these.
As soon as you have selected your world wide web platform, get a domain. Domains are so affordable in recent times apparel manufacturers haven’t any justification to not buy one particular, and it helps make you glimpse much a lot more professional whenever you arrive to start.
Now you are ready to upload your items and pictures. It’s important to help make absolutely sure you can get some specialist searching pictures taken of your respective items and not types which look like they may have been taken on a three mega pixel mobile phone digital camera. Your shots tend to be the only way your consumers can connect with your merchandise over the web, should the pics are little, blurry or don’t demonstrate adequate of the items depth, you happen to be possible not to receive a sale.
Idea # eight And now we wait.
After you to start with launch, the joy might be a bit as well a lot and you happen to be likely being expecting huge things inside of within a shorter duration of time. Try to remain grounded, things take time, a lot of time, so don’t get disheartened if you have not offered out inside your initial thirty day period and just retain likely. It truly is also an excellent idea to test and acquire feed-back from family and friends to view should the merchandise are literally nearly as good when you think they may be.
And that’s it, I really hope your observed this article appealing and hopefully a little practical, as I discussed before I’m not an expert while in the avenue have on market, but individuals are just a few of the points I’ve learnt along just how.
References
Clothing
https://en.wikipedia.org/wiki/Clothing
0 notes
Text
Key Web Development Concepts for Marketers
When I work with my marketing team, I know we have the same goal: to provide the users of our site with the best experience possible. Though as a developer I won’t typically be tasked with creating content, there are some key metrics and concepts that I keep in mind when developing that will help both the marketing team and me achieve our goals. Here are some fundamental concepts web developers focus on when building web pages, and what they mean for you as a marketer.
First Meaningful Paint and Time to Interactive
First Meaningful Paint and Time to Interactive are particularly useful metrics in determining the performance of your web page. Essentially, the shorter these times, the faster your users can access and engage with the content on your page. Though your web team does a lot of work to ensure these that the First Meaningful Paint and the Time to Interactive occur as quickly as possible—by using CDNs, modularizing code so only what is needed loads, minifying CSS and JavaScript—there are considerations the marketer can make when working with designers or designing their content that effects these metrics.
Let’s go a bit more in-depth.
The First Meaningful Paint (FMP) is the first time that your web browser renders content on the page that is useful to the end user. Let’s say you have a website all about different types of ducks and on your homepage, you want to feature a “Duck of the Month” as the homepage hero, or rather, main content above the fold. The FMP is the point at which the user can first see the image of your “Duck of the Month” as well as any headline or text attached to the image.
Time to Interactive (TTI) is closely related to the FMP and will come after the FMP. Using the previous example, let’s say our “Duck of the Month” hero also has the ability to play the quack of the duck when clicked on, and you can swipe from left to right for more images. TTI is the time it takes for these features to become available on the page for the user to use, or when the page or app becomes useful.
So, as a marketer, what can you do to help ensure that the time to reach the FMP and TTI is as short as possible? Lots of things!
Ensure Your Best Content is Always Above the Fold
Though this may seem like a no-brainer, it helps exponentially if any content OR interactivity you want from the site is above the fold. Essentially, developers can leverage techniques like “lazy loading,” to ensure that code/images/features are only loaded once a user does an action that would necessitate the code/images/features, such as scrolling down the page or clicking on a button. To ensure you get your fastest FMP and TTI times, you want to put your most valuable content and features front and center.
Driving Off the Page Isn’t Best Practice
The beautiful thing about Web 2.0 is that we can get assets from other sources at the touch of a button, or er…click of a mouse. But loading too many external assets, or relying on too many styles, fonts, and images that need to be loaded from other places can slow your page down. Try instead to use in-house assets or give the files you need to your devs to cut down on load times.
Use Images Optimized for the Web, and Proper for Your Situation
Essentially, it boils down to this: JPEGs are good for smaller images and times when you don’t need your images to be pixel perfect. For example, they make good thumbnail images, background images (depending), icons, etc. PNGs are good to use when you need absolutely pixel-perfect images and are better for pictures of people, larger images on your site, images with text attached etc. Furthermore, many image modification applications, like Photoshop, usually have an option for optimizing images for the web. Since loading assets can take up the bulk of loading time for your page, you want to make sure you are cutting down file size wherever possible, and that usually means using JPEGs wherever won’t affect your user experience.
Bounce Rates and Exit Rates
Bounce and exit rates are key marketing metrics for your site, as they tell you essentially how users are interacting with your pages, how quickly they leave, and where in your conversion funnel they opt out. Your dev team can use these metrics too as a way to see if there are particular issues with the site.
For instance, high bounce rates could be indicative of long loading times. When we talk about how quickly the page should load, we’re talking about a page loading at a maximum of two seconds, and a goal of under half a second. So, pages that take longer than that to load are likely to see users abandon the site before the page even loads, increasing your bounce rates.
Exit rates might be more indicative of a problem with the functionality of a page, or a page layout, later on in your conversion funnel. For instance, a user gets all the way down to some of your awesome gated content, and when they go to submit the form to get access to that sweet, sweet content, if the form times out, or doesn’t submit, or takes a long time to submit, they will leave frustrated.
Since these metrics are typically used by your marketing team, GA or SEO specialist, you might want to draw attention to these particular metrics to your dev team so they can take a look at how to make those particular pages better. They might see something that looks okay on the surface but could subtly affect user experience. Or they might notice that this particular functionality looks fine and shiny on Google Chrome but is a nightmare on Safari! Either way, don’t be afraid to bring these metrics up and have your team investigate.
Responsiveness:
Your front end developers know that responsive design is a must. As a marketer, this is probably also one of your biggest concerns. We want to be able to reach out and engage with our users anywhere, anytime, and on any device. The implementation of responsive design is often placed on the shoulders of the front end developer, but they can’t do it alone. Often times, what looks good on a desktop or what functions well on a laptop, aren’t going to be what looks and works well on someone’s phone or tablet.
Ensure Your Designs Are “Mobile First”
This is more of an instruction for whoever is designing the layouts for your web page, but you can consider this too when making content. Essentially, any designs for mobile device sizes need to be in place before the designs for tablet and desktop can be considered.
The reasons for this are fairly simple:
There is less space on a smaller screen.
A touchscreen has different functionality from a mouse
Frequently, phones may not be connected to Wi-Fi, so your FMP and TTI times become even more important.
Make sure you have all your mobile designs and needs considered first, and then work from there. By considering the mobile use case first, we free ourselves up to add to the desktop experience instead of limiting that same experience for mobile devices. It allows us to create more and constrain less when making the website.
Scaling Content
Some of your content is bound to not scale to mobile well. Look at this image of the cast of LOST:
Even here, it is a bit too small. Primarily, you can tell it’s the cast of LOST because the image is large enough that some of the faces and people are recognizable. This is great for your desktop or laptop, where the average viewport size is around 1000 to 1400 pixels wide.
Let’s shrink this bad boy down to mobile size though, shall we?
Oh boy. Look at it now. Can’t really tell what it is at all, except a bunch of people standing around under a moon. Could be for anything, Twilight, Vampire Diaries, Harry Potter (that one guy looks like Hagrid doesn’t he?) Phone widths range between 320-pixel viewports for smaller devices and 400 – 475 for the larger devices. That’s not a lot of width when you consider some of the assets we use in our content.
Now, I know you might say “well, there is explanatory text for the image.” This doesn’t help all too much since images should help clarify the purpose of your site and, in doing so, be self-evident. When you need one element, text, image, video, sound bite, whatever, to explain—not enhance—another element on your site, that is no good. So, when thinking responsively, consider how you might have to change your assets and content to ensure the best experience over multiple device sizes, even going so far as to have different assets for mobile and desktop experiences if absolutely necessary.
To Conclude
As a marketer, you know how to best engage with your customers and your development team knows how to best create a platform for that content to reach them. By ensuring you are using the correct types of assets, and thinking responsively, you can help enable your web team to cut down on loading times and get your users engaged more quickly. You also can help them to find places to improve your site by sharing the metrics that matter to you. When you and your dev team work together to make either large scale or incremental changes to your website, you ensure that users visiting your site have the best and most engaging experience possible.
Are there any tactics you’ll be taking back to your marketing team to help you work with web dev in a more cohesive way? I’d love to keep the discussion going in the comments!
The post Key Web Development Concepts for Marketers appeared first on Marketo Marketing Blog - Best Practices and Thought Leadership.
from http://feedproxy.google.com/~r/modernb2bmarketing/~3/mBBNLtSE43E/key-web-development-concepts-marketers.html
0 notes
Text
Key Web Development Concepts for Marketers
When I work with my marketing team, I know we have the same goal: to provide the users of our site with the best experience possible. Though as a developer I won’t typically be tasked with creating content, there are some key metrics and concepts that I keep in mind when developing that will help both the marketing team and me achieve our goals. Here are some fundamental concepts web developers focus on when building web pages, and what they mean for you as a marketer.
First Meaningful Paint and Time to Interactive
First Meaningful Paint and Time to Interactive are particularly useful metrics in determining the performance of your web page. Essentially, the shorter these times, the faster your users can access and engage with the content on your page. Though your web team does a lot of work to ensure these that the First Meaningful Paint and the Time to Interactive occur as quickly as possible—by using CDNs, modularizing code so only what is needed loads, minifying CSS and JavaScript—there are considerations the marketer can make when working with designers or designing their content that effects these metrics.
Let’s go a bit more in-depth.
The First Meaningful Paint (FMP) is the first time that your web browser renders content on the page that is useful to the end user. Let’s say you have a website all about different types of ducks and on your homepage, you want to feature a “Duck of the Month” as the homepage hero, or rather, main content above the fold. The FMP is the point at which the user can first see the image of your “Duck of the Month” as well as any headline or text attached to the image.
Time to Interactive (TTI) is closely related to the FMP and will come after the FMP. Using the previous example, let’s say our “Duck of the Month” hero also has the ability to play the quack of the duck when clicked on, and you can swipe from left to right for more images. TTI is the time it takes for these features to become available on the page for the user to use, or when the page or app becomes useful.
So, as a marketer, what can you do to help ensure that the time to reach the FMP and TTI is as short as possible? Lots of things!
Ensure Your Best Content is Always Above the Fold
Though this may seem like a no-brainer, it helps exponentially if any content OR interactivity you want from the site is above the fold. Essentially, developers can leverage techniques like “lazy loading,” to ensure that code/images/features are only loaded once a user does an action that would necessitate the code/images/features, such as scrolling down the page or clicking on a button. To ensure you get your fastest FMP and TTI times, you want to put your most valuable content and features front and center.
Driving Off the Page Isn’t Best Practice
The beautiful thing about Web 2.0 is that we can get assets from other sources at the touch of a button, or er…click of a mouse. But loading too many external assets, or relying on too many styles, fonts, and images that need to be loaded from other places can slow your page down. Try instead to use in-house assets or give the files you need to your devs to cut down on load times.
Use Images Optimized for the Web, and Proper for Your Situation
Essentially, it boils down to this: JPEGs are good for smaller images and times when you don’t need your images to be pixel perfect. For example, they make good thumbnail images, background images (depending), icons, etc. PNGs are good to use when you need absolutely pixel-perfect images and are better for pictures of people, larger images on your site, images with text attached etc. Furthermore, many image modification applications, like Photoshop, usually have an option for optimizing images for the web. Since loading assets can take up the bulk of loading time for your page, you want to make sure you are cutting down file size wherever possible, and that usually means using JPEGs wherever won’t affect your user experience.
Bounce Rates and Exit Rates
Bounce and exit rates are key marketing metrics for your site, as they tell you essentially how users are interacting with your pages, how quickly they leave, and where in your conversion funnel they opt out. Your dev team can use these metrics too as a way to see if there are particular issues with the site.
For instance, high bounce rates could be indicative of long loading times. When we talk about how quickly the page should load, we’re talking about a page loading at a maximum of two seconds, and a goal of under half a second. So, pages that take longer than that to load are likely to see users abandon the site before the page even loads, increasing your bounce rates.
Exit rates might be more indicative of a problem with the functionality of a page, or a page layout, later on in your conversion funnel. For instance, a user gets all the way down to some of your awesome gated content, and when they go to submit the form to get access to that sweet, sweet content, if the form times out, or doesn’t submit, or takes a long time to submit, they will leave frustrated.
Since these metrics are typically used by your marketing team, GA or SEO specialist, you might want to draw attention to these particular metrics to your dev team so they can take a look at how to make those particular pages better. They might see something that looks okay on the surface but could subtly affect user experience. Or they might notice that this particular functionality looks fine and shiny on Google Chrome but is a nightmare on Safari! Either way, don’t be afraid to bring these metrics up and have your team investigate.
Responsiveness:
Your front end developers know that responsive design is a must. As a marketer, this is probably also one of your biggest concerns. We want to be able to reach out and engage with our users anywhere, anytime, and on any device. The implementation of responsive design is often placed on the shoulders of the front end developer, but they can’t do it alone. Often times, what looks good on a desktop or what functions well on a laptop, aren’t going to be what looks and works well on someone’s phone or tablet.
Ensure Your Designs Are “Mobile First”
This is more of an instruction for whoever is designing the layouts for your web page, but you can consider this too when making content. Essentially, any designs for mobile device sizes need to be in place before the designs for tablet and desktop can be considered.
The reasons for this are fairly simple:
There is less space on a smaller screen.
A touchscreen has different functionality from a mouse
Frequently, phones may not be connected to Wi-Fi, so your FMP and TTI times become even more important.
Make sure you have all your mobile designs and needs to be considered first, and then work from there. By considering the mobile use case first, we free ourselves up to add to the desktop experience instead of limiting that same experience for mobile devices. It allows us to create more and constrain less when making the website.
Scaling Content
Some of your content is bound to not scale to mobile well. Look at this image of the cast of LOST:
Even here, it is a bit too small. Primarily, you can tell it’s the cast of LOST because the image is large enough that some of the faces and people are recognizable. This is great for your desktop or laptop, where the average viewport size is around 1000 to 1400 pixels wide.
Let’s shrink this bad boy down to mobile size though, shall we?
Oh boy. Look at it now. Can’t really tell what it is at all, except a bunch of people standing around under a moon. Could be for anything, Twilight, Vampire Diaries, Harry Potter (that one guy looks like Hagrid doesn’t he?) Phone widths range between 320-pixel viewports for smaller devices and 400 – 475 for the larger devices. That’s not a lot of width when you consider some of the assets we use in our content.
Now, I know you might say “well, there is explanatory text for the image.” This doesn’t help all too much since images should help clarify the purpose of your site and, in doing so, be self-evident. When you need one element, text, image, video, sound bite, whatever, to explain—not enhance—another element on your site, that is no good. So, when thinking responsively, consider how you might have to change your assets and content to ensure the best experience over multiple device sizes, even going so far as to have different assets for mobile and desktop experiences if absolutely necessary.
To Conclude
As a marketer, you know how to best engage with your customers and your development team knows how to best create a platform for that content to reach them. By ensuring you are using the correct types of assets, and thinking responsively, you can help enable your web team to cut down on loading times and get your users engaged more quickly. You also can help them to find places to improve your site by sharing the metrics that matter to you. When you and your dev team work together to make either large scale or incremental changes to your website, you ensure that users visiting your site have the best and most engaging experience possible.
Are there any tactics you’ll be taking back to your marketing team to help you work with web dev in a more cohesive way? I’d love to keep the discussion going in the comments!
The post Key Web Development Concepts for Marketers appeared first on Marketo Marketing Blog - Best Practices and Thought Leadership.
from RSSMix.com Mix ID 8217493 https://blog.marketo.com/2018/05/key-web-development-concepts-marketers.html
0 notes
Text
Key Web Development Concepts for Marketers
When I work with my marketing team, I know we have the same goal: to provide the users of our site with the best experience possible. Though as a developer I won’t typically be tasked with creating content, there are some key metrics and concepts that I keep in mind when developing that will help both the marketing team and me achieve our goals. Here are some fundamental concepts web developers focus on when building web pages, and what they mean for you as a marketer.
First Meaningful Paint and Time to Interactive
First Meaningful Paint and Time to Interactive are particularly useful metrics in determining the performance of your web page. Essentially, the shorter these times, the faster your users can access and engage with the content on your page. Though your web team does a lot of work to ensure these that the First Meaningful Paint and the Time to Interactive occur as quickly as possible—by using CDNs, modularizing code so only what is needed loads, minifying CSS and JavaScript—there are considerations the marketer can make when working with designers or designing their content that effects these metrics.
Let’s go a bit more in-depth.
The First Meaningful Paint (FMP) is the first time that your web browser renders content on the page that is useful to the end user. Let’s say you have a website all about different types of ducks and on your homepage, you want to feature a “Duck of the Month” as the homepage hero, or rather, main content above the fold. The FMP is the point at which the user can first see the image of your “Duck of the Month” as well as any headline or text attached to the image.
Time to Interactive (TTI) is closely related to the FMP and will come after the FMP. Using the previous example, let’s say our “Duck of the Month” hero also has the ability to play the quack of the duck when clicked on, and you can swipe from left to right for more images. TTI is the time it takes for these features to become available on the page for the user to use, or when the page or app becomes useful.
So, as a marketer, what can you do to help ensure that the time to reach the FMP and TTI is as short as possible? Lots of things!
Ensure Your Best Content is Always Above the Fold
Though this may seem like a no-brainer, it helps exponentially if any content OR interactivity you want from the site is above the fold. Essentially, developers can leverage techniques like “lazy loading,” to ensure that code/images/features are only loaded once a user does an action that would necessitate the code/images/features, such as scrolling down the page or clicking on a button. To ensure you get your fastest FMP and TTI times, you want to put your most valuable content and features front and center.
Driving Off the Page Isn’t Best Practice
The beautiful thing about Web 2.0 is that we can get assets from other sources at the touch of a button, or er…click of a mouse. But loading too many external assets, or relying on too many styles, fonts, and images that need to be loaded from other places can slow your page down. Try instead to use in-house assets or give the files you need to your devs to cut down on load times.
Use Images Optimized for the Web, and Proper for Your Situation
Essentially, it boils down to this: JPEGs are good for smaller images and times when you don’t need your images to be pixel perfect. For example, they make good thumbnail images, background images (depending), icons, etc. PNGs are good to use when you need absolutely pixel-perfect images and are better for pictures of people, larger images on your site, images with text attached etc. Furthermore, many image modification applications, like Photoshop, usually have an option for optimizing images for the web. Since loading assets can take up the bulk of loading time for your page, you want to make sure you are cutting down file size wherever possible, and that usually means using JPEGs wherever won’t affect your user experience.
Bounce Rates and Exit Rates
Bounce and exit rates are key marketing metrics for your site, as they tell you essentially how users are interacting with your pages, how quickly they leave, and where in your conversion funnel they opt out. Your dev team can use these metrics too as a way to see if there are particular issues with the site.
For instance, high bounce rates could be indicative of long loading times. When we talk about how quickly the page should load, we’re talking about a page loading at a maximum of two seconds, and a goal of under half a second. So, pages that take longer than that to load are likely to see users abandon the site before the page even loads, increasing your bounce rates.
Exit rates might be more indicative of a problem with the functionality of a page, or a page layout, later on in your conversion funnel. For instance, a user gets all the way down to some of your awesome gated content, and when they go to submit the form to get access to that sweet, sweet content, if the form times out, or doesn’t submit, or takes a long time to submit, they will leave frustrated.
Since these metrics are typically used by your marketing team, GA or SEO specialist, you might want to draw attention to these particular metrics to your dev team so they can take a look at how to make those particular pages better. They might see something that looks okay on the surface but could subtly affect user experience. Or they might notice that this particular functionality looks fine and shiny on Google Chrome but is a nightmare on Safari! Either way, don’t be afraid to bring these metrics up and have your team investigate.
Responsiveness:
Your front end developers know that responsive design is a must. As a marketer, this is probably also one of your biggest concerns. We want to be able to reach out and engage with our users anywhere, anytime, and on any device. The implementation of responsive design is often placed on the shoulders of the front end developer, but they can’t do it alone. Often times, what looks good on a desktop or what functions well on a laptop, aren’t going to be what looks and works well on someone’s phone or tablet.
Ensure Your Designs Are “Mobile First”
This is more of an instruction for whoever is designing the layouts for your web page, but you can consider this too when making content. Essentially, any designs for mobile device sizes need to be in place before the designs for tablet and desktop can be considered.
The reasons for this are fairly simple:
There is less space on a smaller screen.
A touchscreen has different functionality from a mouse
Frequently, phones may not be connected to Wi-Fi, so your FMP and TTI times become even more important.
Make sure you have all your mobile designs and needs to be considered first, and then work from there. By considering the mobile use case first, we free ourselves up to add to the desktop experience instead of limiting that same experience for mobile devices. It allows us to create more and constrain less when making the website.
Scaling Content
Some of your content is bound to not scale to mobile well. Look at this image of the cast of LOST:
Even here, it is a bit too small. Primarily, you can tell it’s the cast of LOST because the image is large enough that some of the faces and people are recognizable. This is great for your desktop or laptop, where the average viewport size is around 1000 to 1400 pixels wide.
Let’s shrink this bad boy down to mobile size though, shall we?
Oh boy. Look at it now. Can’t really tell what it is at all, except a bunch of people standing around under a moon. Could be for anything, Twilight, Vampire Diaries, Harry Potter (that one guy looks like Hagrid doesn’t he?) Phone widths range between 320-pixel viewports for smaller devices and 400 – 475 for the larger devices. That’s not a lot of width when you consider some of the assets we use in our content.
Now, I know you might say “well, there is explanatory text for the image.” This doesn’t help all too much since images should help clarify the purpose of your site and, in doing so, be self-evident. When you need one element, text, image, video, sound bite, whatever, to explain—not enhance—another element on your site, that is no good. So, when thinking responsively, consider how you might have to change your assets and content to ensure the best experience over multiple device sizes, even going so far as to have different assets for mobile and desktop experiences if absolutely necessary.
To Conclude
As a marketer, you know how to best engage with your customers and your development team knows how to best create a platform for that content to reach them. By ensuring you are using the correct types of assets, and thinking responsively, you can help enable your web team to cut down on loading times and get your users engaged more quickly. You also can help them to find places to improve your site by sharing the metrics that matter to you. When you and your dev team work together to make either large scale or incremental changes to your website, you ensure that users visiting your site have the best and most engaging experience possible.
Are there any tactics you’ll be taking back to your marketing team to help you work with web dev in a more cohesive way? I’d love to keep the discussion going in the comments!
The post Key Web Development Concepts for Marketers appeared first on Marketo Marketing Blog - Best Practices and Thought Leadership.
from https://blog.marketo.com/2018/05/key-web-development-concepts-marketers.html
0 notes
Last Seen Blogs

djniloy-blog
NiLoY

mydogsandcats
My Dogs & Cats

zorrorandom
I don't speak English =v

t95keiko-blog
daftar situs cabang judi togel online bersama depo

bancah5org1
BancaH5 - Cổng Bắn Cá Đổi Thưởng 2023