#so now I once again have a little button in my work-issued photoshop that cleans up my little squid drawings
Text
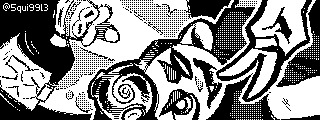

hi I'm back on my bs* so here are some ingame drawings from the early days of the game
*(splatoon hyperfixation)
#splatoon#splatoon 3#splatoon big man#octoling#pixel art#1 bit#I'm not as good at it as I was at the height of my splat2 phase but maybe I'll get back into it with practice#back in the splat2 days I had a photoshop action downloaded that cleaned up the social media versions that the switch turns these into#removing the border and un-blurring them#I lost that but found out that it's really easy to do myself#so now I once again have a little button in my work-issued photoshop that cleans up my little squid drawings
13 notes
·
View notes
Text
Photoshop Skills
This module has been an ongoing journey of learning, especially when it comes to Photoshop. Along with all the other Creative Cloud apps, Photoshop is a valuable and versatile tool; once you get the hang of it, the world's your oyster! There are innumerable possibilities as to what can be accomplished and created.
A skill I learned which I used on my original moodboard was how to create a custom path/shape. This moodboard features two symmetrical archways standing side by side, and to incorporate these better into the piece I decided to add some shapes to create a flash of light into each. This brightened up the page, created some smooth, flowing lines, and also framed the models on the moodboard.
To start out, I used the rectangle tool and drew a rectangle.
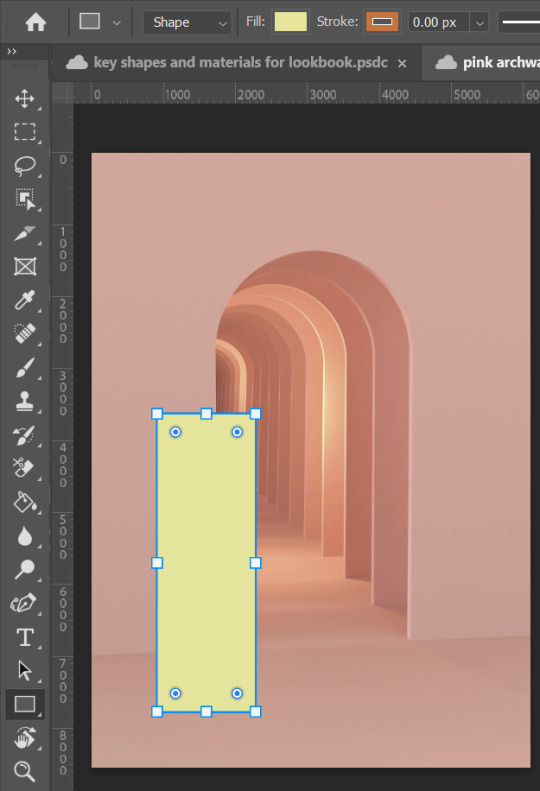
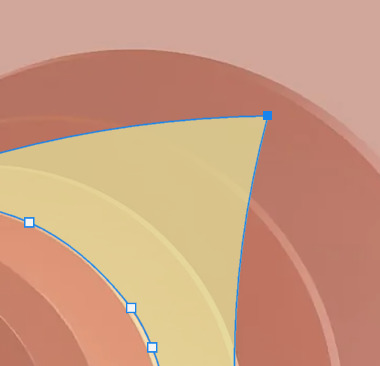
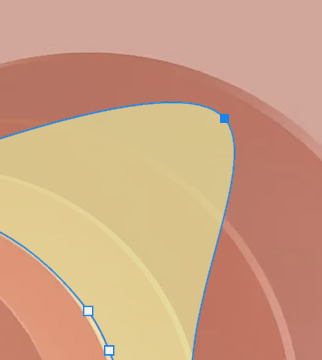
Then, clicking "P" on the keyboard takes you to the curvature pen tool. This tool lets you create, delete and move anchor points on a shape, shown below.
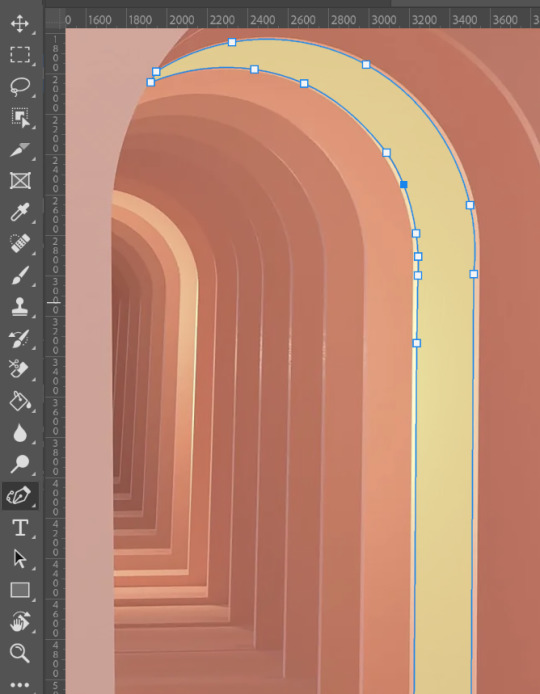
Each anchor point can be changed depending on whether you want to create sharp corners and straight lines, or smooth curves. Double-clicking on any anchor point will change the line at that point to either make it curved or straight. Below, the left hand side image shows what an anchor point looks like when it is pointy. the right hand side shows the same anchor point when it is double-clicked:
When I was happy with the shape, all that was left to do was make some minor tweaks to it, e.g. experimenting with the fill colour, opacity, and fx tools so it best fit the page. Finally, I duplicated the layer and flipped it horizontally in order to obtain a mirror image. I used this on the other archway, as I thought symmetry would be important on the moodboard to maintain balance.
The second skill, which is undoubtedly one of the key foundation skills of Photoshop, is cutting stuff out. Depending on what you're trying to cut out, there are different methods. If you want to simply crop an image into a square/rectangle, you can use the rectangular marquee tool.
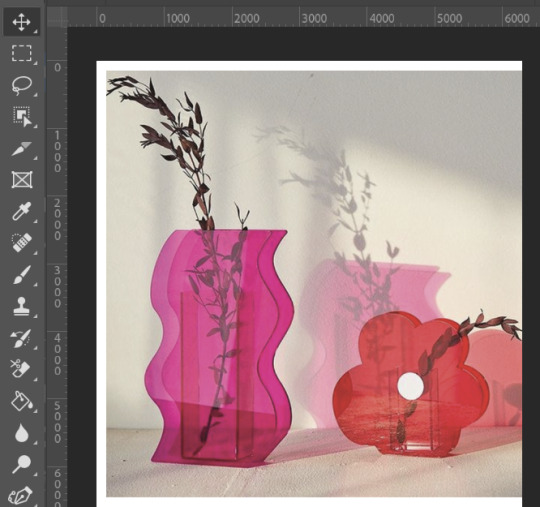
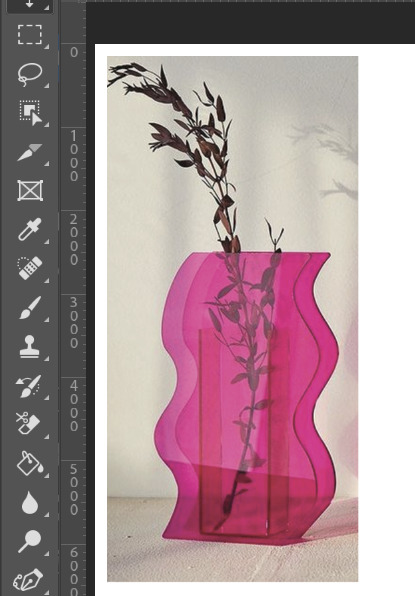
Let's say I have to crop the below image so only the pink vase is visible:
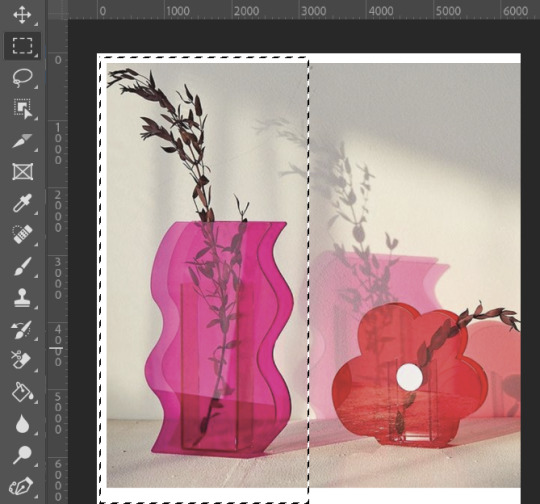
Firstly, go to the rectangular marquee tool, then drag a rectangle showing what part of the photo you would like to be visible:
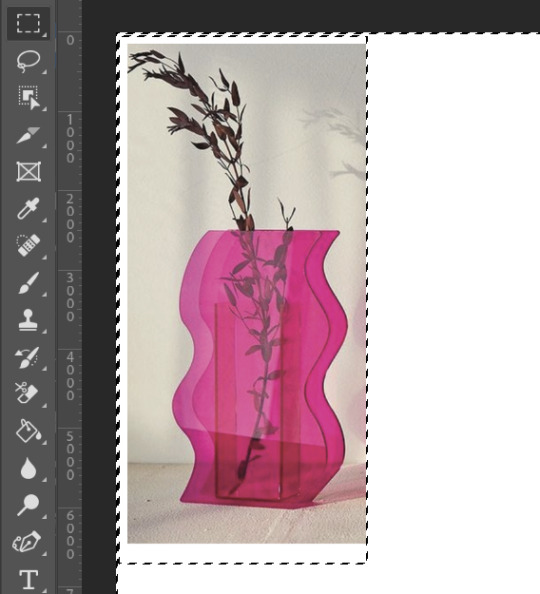
Pressing Ctrl-Shift-i inverses the selection, so anything outside of the rectangle selection you made will now be selected:

Press backspace to delete these areas, then Ctrl-D to deselect, which removes the marching ants from around the image.
Then again, if I find yourself needing to crop something which is a more complex shape, I can use the "Select and Mask" method.
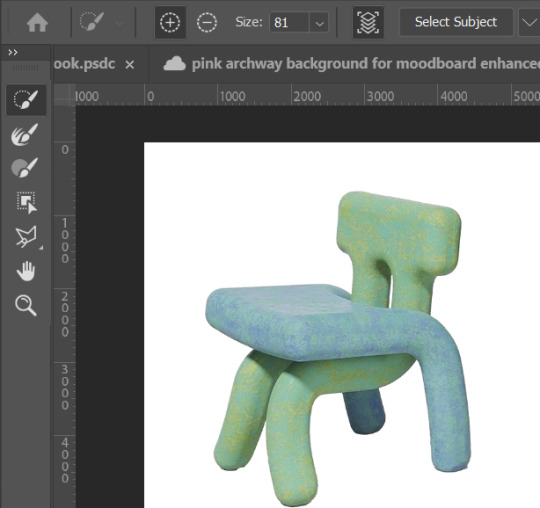
Here is a picture of one of muddycap's chairs (below):
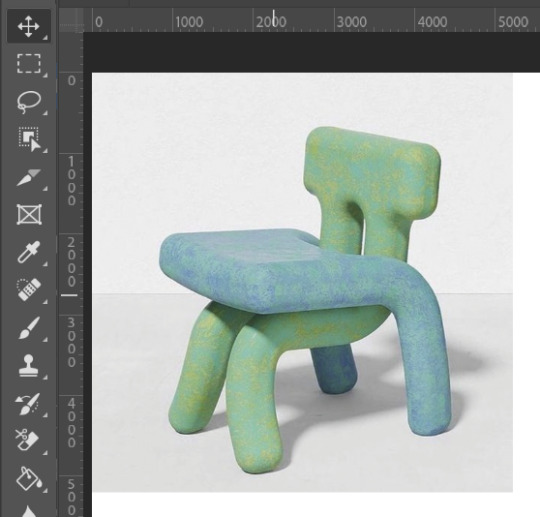
To cut out the chair and remove the white background from the image, first i will go to the "Select" drop down menu and then choose "Select and Mask", or alternatively I could press Alt+Ctrl+R as a quick shortcut.
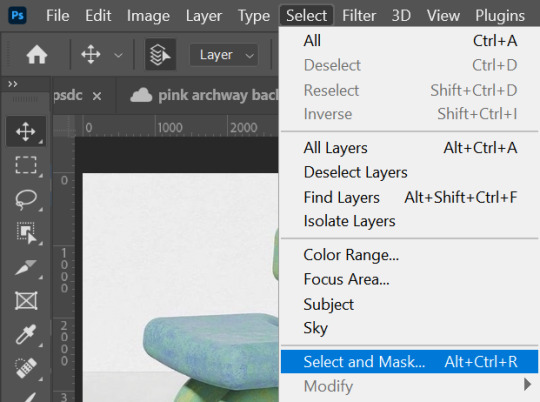
At this point, a "select subject" button with a drop down menu button beside it has appeared. It's important that you select the "Cloud" option in this drop down menu to get the most accurate and detailed results.

Simply click the button "Select Subject" and the Cloud processes the image, deciding which parts of it need to be removed.
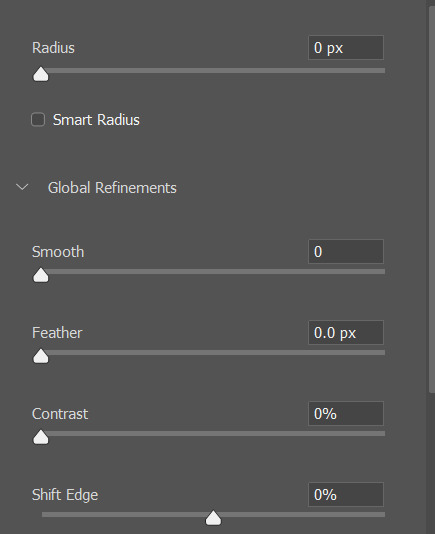
Lastly, I usually check over the selection before I click "OK" and go over any missed bits with the brush tool. There are sliders on the right such as "smooth", "radius" and "feathering" which i find to be useful when editing photos. The "radius" one is particularly useful when the edges of your item have a weird glow or are a different colour, and this tool works effectively at eliminating these issues.
Shown below is the finished image, ready to be put onto a moodboard or collage.
Cutting images out is one thing in Photoshop which can either make or break your piece; if shapes are cut out precisely and correctly, your Photoshop creation will have clean and crisp leading lines, resulting in a higher quality finish to your work. It's all about the individual little details, which come together and set the tone for the final piece.
0 notes
Text
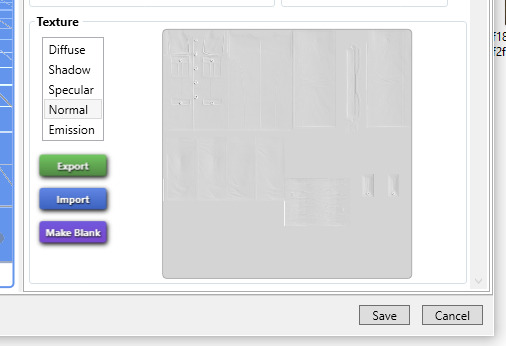
Making Normal Channels in GIMP (with njob)
Hello everyone! I was explaining how to do this in the Sims of History discord server and realized how much of this process I learned through trial and error. There isn’t really a good step-by-step tutorial about how to do this in GIMP, only in Photoshop (at least no text-based tutorials). While I use both Photoshop and GIMP for various things, I prefer to make my normal channels in GIMP. This tutorial will walk you through the process and hopefully demystify normal channels in GIMP.
Normal channels (bump maps) add additional depth beyond your mesh, which is useful for things like folds, painted on pockets, and buttons.
This tutorial is particularly for how to make Create-a-Sim items, not objects, but a lot of steps should be transferable.
You will need (all free programs):
GIMP
njob
Sims4Studio and/or CAS Tools

First, open your diffuse texture in GIMP. I often try to use the light/base texture rather than one I have colored already, but if you have already colored it and didn’t save a base, don’t worry, it doesn’t make much of a difference. Don’t use an image which has a pattern applied to it, as that will create a bump on the pattern and appear like applique or something along those lines (unless that is your goal).
I recommend doing this step after you have tested your diffuse texture image and mesh (if applicable) in the game. If you have any last minute changes to either of these, you will probably need to re-do your normal from scratch.
If your image is in layers for recoloring, or not, choose to flatten the image. Transparency isn’t helpful in making normal channels, so get rid of it so you won’t have to worry about it later.
Once you have flattened it, the background usually turns either black or white. It doesn’t really matter which one, it won’t make much of a difference in njob.
Now, select the crop tool. You can see the current dimensions of the image in the “aspect ratio” box. For a CAS items, the original will be 1024:2048, which is 1 x 2. We will need to crop the image into a 1 x 1, or perfect square.
To have your normal channel as high quality as possible, you should use 1024:1024. This will work for clothing items like full body outfits, tops, bottoms, gloves, socks, and tights (basically anything mapped in this bottom portion of the UV map). For all of these items, you must use a square and cannot crop it to be smaller. For shoes, this means a very large blank area.
For accessory items like jewelry and hats, the cropping is different. For instance, a hat would be 512:256. If you are unsure of the dimensions to use, export the normal channel on the maxis item and copy its dimensions. The following instructions will assume you are making a clothing item and not an accessory item.
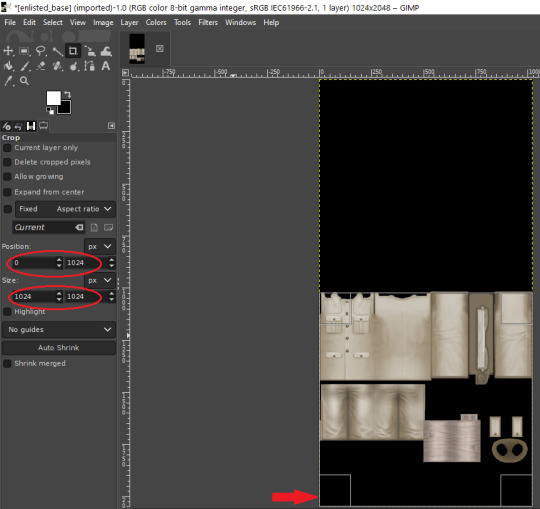
Click anywhere on the image while you have the crop tool active, then adjust your dimensions in the box to the left. You can manually type it in or drag the box and follow the size in the box as you drag.
The box should be perfectly aligned with the bottom and have no space below. If you have space below, just drag it as far to the bottom as you can. GIMP will stop you from dragging it outside of your current dimensions. If a little is sticking out at the top, that is okay. Nothing can be mapped outside of the 1024:1024 dimensions, so it is probably just bleed over or space filler that you are cropping off.
Press “Enter” on your keyboard to complete the crop.

Optional Step: If you desire, you may want to decrease the brightness and increase the contrast on your image so there will be more for njob to pick up. If you already have a lot of contrast, you may not need to do this.
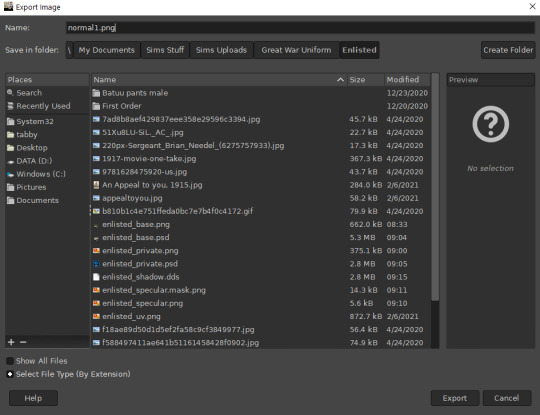
Next, export your image as a PNG or BMP. Be sure to not overwrite your original diffuse texture.
You can now close GIMP, though you will need to open it again later.
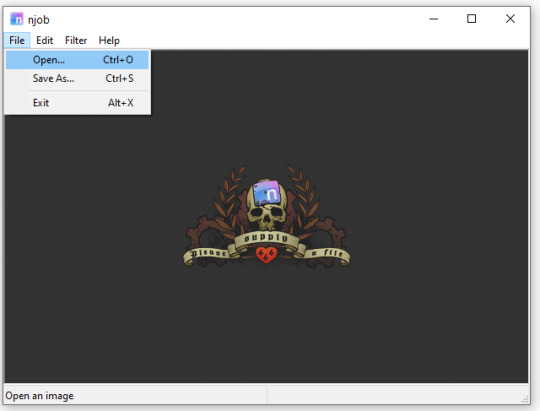
Open njob, then your saved, cropped image.
Maximize your screen so you can see what you’re doing.

Go to Filter > Diffusemap > Heightmap and select that option.
The screen will pause to load for a bit before opening up a new box.

Your image will convert to black and white and may look a bit strange. The first step is to change your “Course Detail” setting to the lowest (or close to the lowest) setting and your “Fine Detail” to the highest setting. I generally play around with the “Mid Detail” and “Scale” until I get what I want. Try to have what you want to be visible stand out, while folds should be soft and fuzzy but still somewhat distinguishable.
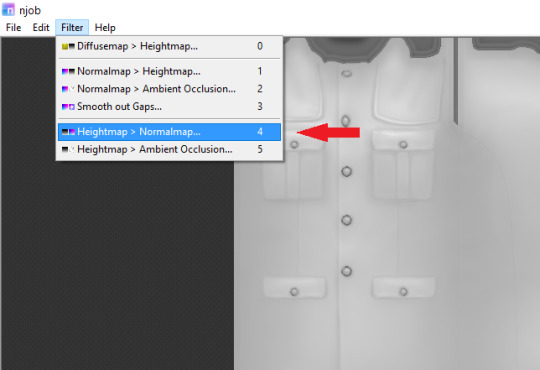
Once you have what you need, click OK and go to Filter > Heightmap > Normalmap

There are two settings, “Scale” and “Blur Radius.” Neither of them have “ideal” settings, so you will need to adjust as you need. “Scale” controls the depth of the contrast and “Blur Radius” impacts the softness of the image. If your edges are too harsh, your normal map may look odd in game.
You will probably also have lines in areas in no texture. This is normal, and I will go over how to remove those later.
Once you are satisfied with how things look, save the image as a bitmap.
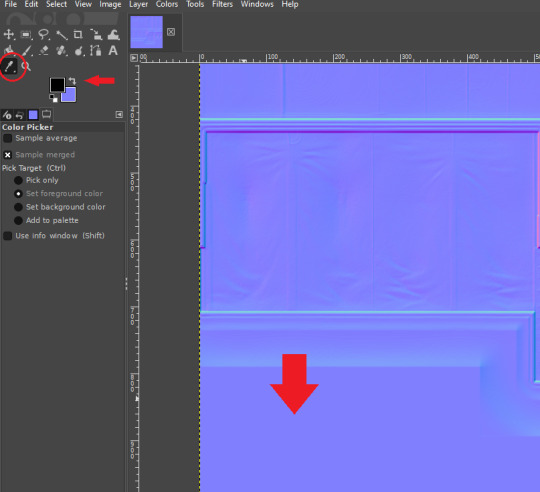
Now, open your bitmap image in GIMP. It is time to clean up the image and get rid of the artifacts. Unfortunately, unlike a specular, a normal map doesn’t have a mask to prevent bleed over onto skin or other textures. The unused areas need to be a midrange, solid grey. It is easier to edit at this step before you create your transparency.
Select a midrange blue color from one of the blank areas with your color selector and make it your background color by using the arrow button between the foreground and background colors.
Select the areas that should be blank and delete them, which will replace the lines with a solid blue color. This would be areas around the neck, wrists and ankles, and also places like the filler beneath skirts and tops that doesn’t need texturing. Be sure to select the odd lines around the image, which are usually a bright teal or hot pink color. Those can be very visible.
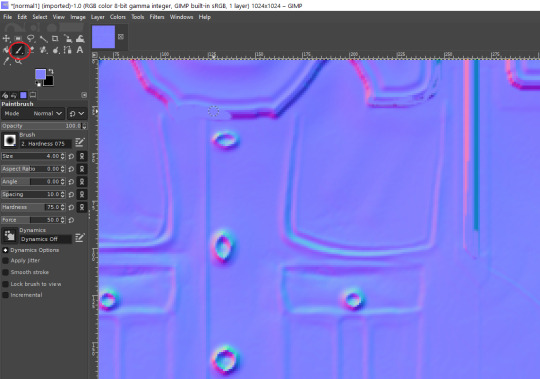
Sometimes, you may need to take your paintbrush and clean up the artifacts if they are in curved or very small areas. If anything looks too sharp, you can also use the smudge brush to smooth it out (very lightly). But don’t move anything around too much.
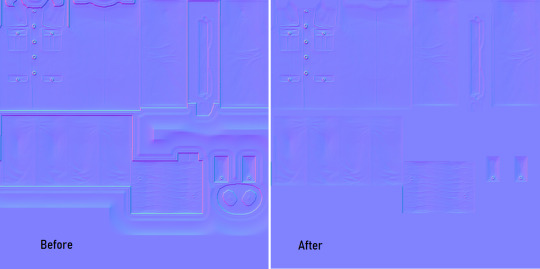
Once you have cleaned up your image, export it again as a bitmap. This is just so you can go back to it if you make a mistake later or need to modify it. Usually I save it as a new image, but you can overwrite the old one if you are feeling confident.
I have to point out that sometimes you can get away with not cleaning the artifacts from your image. But I have had too many issues with it in the past to skip this step.
Now it is time to make the normal map. Finally!

In the layers area, right click on your single layer and add an alpha channel to it. There is also a small button at the bottom you can use to add an alpha channel. You will need this transparency for the next step.
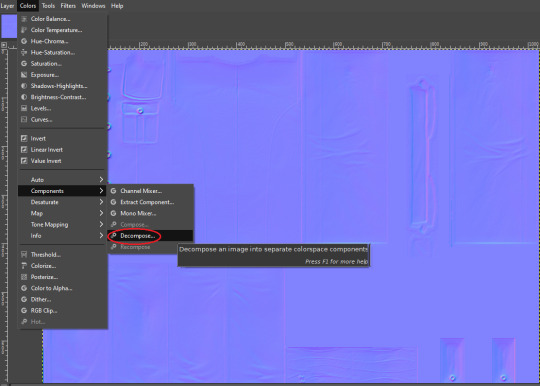
Next, go to Colors > Components > Decompose.

A small box will open up. Change your color model from RGB to RGBA to enable the alpha channel as a separate channel (layer).

Now, a new image will open that is your bitmap but greyscale. You will see four layers on the side called red, green, blue and alpha.
Select the red layer and click CTRL + A on your keyboard to select the entire layer. Then, click CTRL + C to copy the layer. (If you don’t have a keyboard, you can do “Select all” and “Copy” but this takes longer).
Now, go to your layer named alpha and press CTRL + V (paste) and CTRL + H (to anchor the layer). Now, you have replaced the alpha channel with the red channel.
Next, go to the green layer and select and copy it. Paste and anchor it into the red and blue layers, just as you did before with the red layer and alpha layer.

Your image won’t look too much different right now, it will just look like the green alpha channel rather than the visible red alpha channel when you opened it. Go back to the top bar and choose Colors > Components > Recompose. This will alter your original image, so the one you have open in layers will stay open. Go back up to the top and select the original image to go back to it, or close your layered image.

Now, your image should have changed from mostly blue to a transparent, mid-range gray with only a few elements visible. This is how it is supposed to look. If you don’t have transparency or it looks very different, then you probably messed up somewhere. Generally, I find it easier to go back to the original cleaned up bitmap (that you saved for future use) and start from scratch rather than trying to figure out where I messed up. That is usually faster.
Next, export your single-layer image as a PNG or DDS file (your preference). You will need a DDS plugin to save DDS files.
Open your item in Sims4Studio and import your new image file in the normal texture category. You will see a small preview in the box, which will probably show more details than you were able to see in GIMP. If it looks correct, save it and go to check it in game or in CASTools (which has a feature for previewing bumpmaps that can help you check for alignment problems). CASTools can be particularly useful if your computer doesn’t open the Sims quickly and you want to preview multiple bumpmaps. The only issue with CASTools is that it doesn’t really look much like it will look in game.
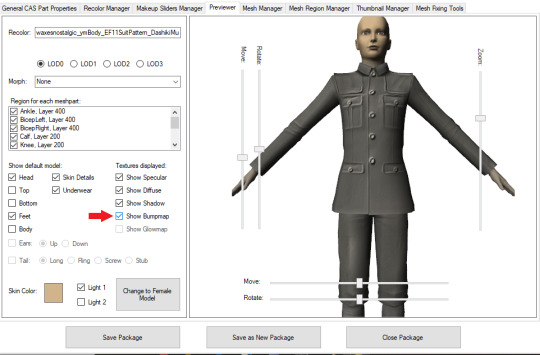
In CASTools. You have to select to see the bumpmap in the Previewer tab.
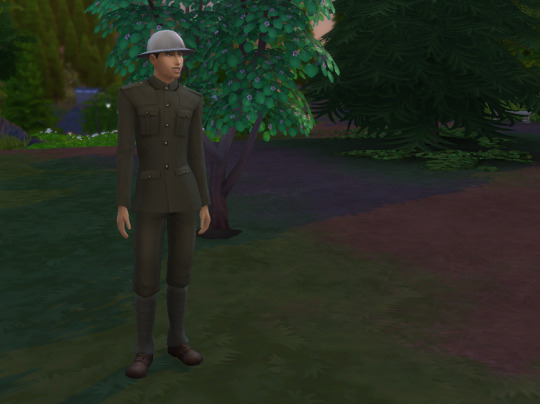
In game.
As I have only been making normal channels for a few months now, it’s possible I have missed some things, so if you know an easier or better way let me know and I can update the tutorial. I hope this is useful to you!
93 notes
·
View notes
Photo

WHO is Santi and WHERE is his face?

i am LIVING for your warm & colorful posts right now!! your editing is so amazing and it brightens my day everytime i see a new post of yours *.*
THANK YOU!!!! <3 i am so happy/relieved to be using warm colors once more, i feel like myself again. don’t get me wrong, i do like evoking different moods, but sometimes (a lot of the time, especially with santi) too much is too much. today’s posts were HOPEfully my last emo edits..............for now
LOL I actually made a comment about Fiona naming a cat/dog (once Pets comes out) Rodrigo. I'll go back underground now haha (still a great story, cant wait to read more) -Runaway NONY
OH I DIDN’T EVEN SEE THAT wtf. either tumblr ate it or i accidentally scrolled past it i’m sorry. i always enjoy seeing messages from anons who return to my inbox! but lmAO that’s a good idea. i actually met the most perfect dog today and now i know the breed and name of dog santi needs immediately
Hii! If you dont mind me askin, how do you edit your darker screenshots? I always end up making them too light or too dark to see a thing :( Thank you!
hmmm idk what to tell you about making them too light or too dark, because that’s a very specific thing that really depends on the picture. BUT i know that the dodge tool is my bff for brightening up dark pictures while still retaining some of the darker elements you want in them (aversely, the burn tool will help darken parts), messing with the exposure can also really help, coloring can also help too, selective color is my bff especially with blue shadows and orangey skin...this is kind of a broad answer, i’m sorry, but if you needed help with something specific, let me know!
I remember you answered an ask and said you drew tears when you edit right? Is there a reason you don't use CC tears?
i answered this like two weeks ago but i can’t find it so whateveR
i’ve used cc tears a few times but there’s only like three of those in existence and my characters have cried a LOT. i feel like it would be kinda weird if they had the same tears every time. also there are just some variations that i like to customize myself by drawing, like sometimes they’ll be full on sobbing, sometimes just one single tear...it just depends on the situation, that’s why i draw ‘em.
Santi is my favorite Harvest Moon character.
idk shit about harvest moon so idk how to respond to this :[ here’s a small picture of michael cera with a cactus

Would you recommend buying a macbook for playing sims?
if a macbook is what you already have, then yeah, i’d say it suffices without many problems. if you’re specifically going out and buying a computer with the knowledge that you’ll be playing sims on it, then mmmmmm i’d probably say no...but it also depends on if you’re like gonna get REALLY into storytelling and cc n shit or if it’s just casual gameplay with a mods folder that’s like 5 gb or less...if it’s the latter i think it should also be fine. but yeah it just depends on what kind of gaming you’re planning on doing.
How can I read your story from the beginning? Is there a link or something? I keep seeing it on my feet and it looks so great!
thank you! there’s a button at the top of my page that says “story directory” but if you’re on mobile you can just go here or copy this link: http://femmesim.tumblr.com/tagged/story/chrono
I've talked to u like once before and I'm to shy to talk to u again... Why am I like fish?
This**
we are all like fish if you really think about it
lmao but really just reach out my dude! if we talked once then y’know you already broke the ice so just go for it!! i am here and ready to talk about all the things under the sun
Do you use Topaz Clean?
yep
hi hello so maybe I am just a blind bean but may I ask how in god's name do you get your images to be so crisp? I have everything set up, but it seems as if when I do my thing in Photoshop, everything turns out lookin like a blobfish. I'm not sure if you use another person's topaz settings or if you have your own. Thank you so much if you do respond bc I was too much of a wuss to message you *cries in Spanish*
OMG well it’s mostly just resizing, smart sharpening, and most importantly topaz clean (see above) that makes them so crisp. i also use the sharpen tool on sims’ faces, and the smudge tool when something is particularly pixelated or whatever. everything i do is listed in here! UR NOT A WUSS *hugs you in spanish*
youre my inspiration to be a better writer. I know i'm good and giving characters depth and backgrounds and coming up with a rough story idea. but i rush things and i'm not great at putting it into a good story so ya. My story on simblr started out as casual gameplay but i wanted it to be more and i'm trying to get better @ everything
OMG ;_________; it sounds like you are a good writer already, and it’s awesome that you recognize your strengths while also acknowledging that you need to work on some things as well. i try to do the same and i think that’s what keeps me level headed. it sounds like you just need to dedicate some time to planning, that way you start to realize all the nuances of your story that come together to flesh out that initial rough idea. you seem to have a positive attitude, so that’s great!! you’re already getting better and better, i know it <3
now Santi's song is Post Malone - Congratulations
OMF LMAO u sent this when santi finally got to mexico and it’s fitting

sos i was listening to the song fight song by rachel platten when i saw the photoset of santi making it to mexico and now i can't stop ugly crying please make it stop
omG i see it
TAKE BACK UR LIFE SANTI U GOT THIS
This is so random but like, can I just say that you're so amazing like?? Why?? You're so sweet and funny and I love you very much ok
AKJSKJDFKJS THANK YOU THIS IS SO NICEEEE ;-; i try but a lot of the time i feel like a sarcastic asshole lmao thank u for thinking otherwise <3
Am I the only one who's like... really mad about pets being NPCs? I just feel like being able to control them was the best part. I don't really feel like the EP is worth it without them. Like, don't get me wrong, I understand that the team worked really hard on it, but I feel like they didn't do it as well as they could have.
hmm i’m kind of meh on that front because like on one hand i did like controlling pets and the novelty of the fact that you could just see their different interactions firsthand, but ultimately i think i’m okay with not controlling them because it makes it more realistic for me and honestly they’re probably more likely to take care of themselves a little bit more if they’re automated, because i’m just thinking about ts3 pets and how i literally had to make them go pee outside otherwise they’d pee in the house...even if they were well trained and stuff lmao. plus there might be a cheat or mod that lets you control them, like there was in ts2? so don’t lose hope yet.
hey your blog is AWESOME, i read through your stories in a day and am obsessed (kind of in love with gianni) ❤ what are some of your favorite ts4 blogs? i'm trying to find more awesome blogs to read through during my miserable journey of trying to get the game to work on my computer lol
heyo here’s some! thank you btw, and i hope your miserable journey ends soon :{
(I really need to get this off my chest) ok so my aunt is currently in a critical condition after having a kidney failure and she's in desperate need for a new one and I'm the only one in my family that's a match (so far) but I'm not allowed to donate bc I myself have severe health issues affecting my day to day life that would make it extremely dangerous for me to remove a kidney. I'm so fucking frustrated you don't understand like I just want to cry most of the time
first off i’m so sorry that this is even happening to you ;__; and you’re an amazing person for being willing to help out your aunt like that, so just know it isn’t your fault that you’re unable to. don’t guilt yourself for it okay?
is there any other possible donor at all? i wanna know how this situation ends up. i really hope your aunt will be okay. just stay close to your family for support and don’t blame yourself.
how did you get photoshop for free? I'm trying to find a link that won't give me a virus, but I had no luck yet
the pirate bay is ur friend
Ok I gotta rant. GoT does NOT deserve the hype/amazing ratings. Like, sure the cinematography is pretty great and they have ok actors but the freaking script is so mediocre I actually think I could write a better one. Me. A 16 y/o tiny child. There are so much better shows out there! Hell, even Supernatural has a better script than GoT
whenever ppl agree with me about how much GoT sucks i grow stronger and stronger
even the actors are iffy at this point. watching daenerys act is painful, jon snow is wooden as hell, it’s just bad. ur 16 yr old self has more potential than these writers tbh. it’s just completely mediocre; it started out as something great because it followed the same layered storytelling pattern as the books, but it’s diverged from that completely because the writers got too caught up in the hype. and you’re right, it doesn’t deserve that hype!
omfdkjsgkj i’ve never watched supernatural but i haven’t heard good things. that’s a low bar
29 notes
·
View notes
Text
Why your Mac is operating sluggish and what you are able to do to repair it
http://tinyurl.com/y4q3kxaa
If you happen to’ve used a Mac for an prolonged period of time, you’ve got certainly seen the spinning beachball as your system slows to a crawl. It is particularly irritating to have a Mac that is simply not performing as quick because it ought to once you’re making an attempt to get work finished. (We’re hoping that Apple’s newly-announced $6,000 Mac Pro has sufficient uncooked energy to sidestep this messy enterprise.) You can roll your eyes and be taught to take care of frequent slowdowns, or you could possibly do one thing about it. We stroll you thru the most typical apps that hog up system assets, how to determine which apps are guilty, and provide the finest suggestions for maintaining a Mac operating as clean as doable. Your browser is (seemingly) the largest perpetrator Nearly any app can hog your Mac’s processing energy and reminiscence, inflicting sluggish efficiency because of this. Nonetheless, some apps are extra susceptible to bringing your system to a crawl than others. If you happen to use Google Chrome, you seemingly already know it is normally on the prime of the listing. As photographer Christopher Michel discovered, Google’s Backup and Sync app will also be a drain. No person desires a sluggish Mac. No person. Sarah Tew/CNET Picture or video modifying apps, like iMovie or Photoshop, are additionally resource-intensive. There is no actual getting round that because the computing energy required to render giant picture recordsdata or encode video recordsdata is taxing on nearly all methods. If you happen to discover that Google Chrome is simply too burdensome to your Mac, a indisputable fact that our review team has found to be the case, you may swap to a different browser like Safari or Firefox. Firefox has been working arduous on its Quantum-branded version of its browser, with the newest replace enhancing pace as much as 80% for websites like Google, Instagram or Amazon. If you happen to merely cannot surrender your browser, you could have to regulate how your workflow. As an alternative of getting 15 tabs open without delay, restrict your self to 7 and be taught to be studious in closing older tabs. As for picture and video modifying apps, you may attempt totally different apps — like GIMP — which can be constructed to run on a wider vary of methods with minimal specs, and thus use fewer assets. Be mindful, however you might sacrifice high quality for gaining just a little further efficiency out of your Mac. Now enjoying: Watch this: Apple is bringing iPad apps to your Mac 4:32 Earlier than switching up your favourite apps, you will want to determine which of them are slowing down your Mac. To try this, you will must get acquainted with Exercise Monitor. Exercise Monitor exhibits the apps slowing you down Exercise Monitor is constructed into MacOS and may be present in Functions > Utilities. Once you first open Exercise Monitor, the CPU tab will likely be chosen. You may see an inventory of apps and processes which can be operating, and each few seconds the listing will rearrange. There will likely be some acquainted names and different processes like “WindowServer” which can be more than likely unfamiliar. With a purpose to get a transparent image of what is doing what, click on on the “% CPU” dropdown to rearrange the processes by highest CPU use. After arranging the processes by the best CPU proportion, watch it for a couple of minutes with out doing something in your Mac. Your Mac is continually finishing up duties within the background, so the processes will proceed to maneuver up and down on the listing. Generally processes will even bounce over 100 p.c for a short second, earlier than going again to a decrease quantity. No matter is straining your system ought to stay close to the highest of the listing always. It is best to view Exercise Monitor over a number of minutes to look at what’s taxing your system. Screenshot by Jason Cipriani/CNET For instance, I not too long ago watched a “Google Chrome Helper” course of sit atop operating processes with 20 to 25 good of the CPU load. I wasn’t actually positive what Google Chrome Helper was, however I knew I had a number of processes by that title operating. After some analysis, I found it may very well be a Chrome extension or an open tab. It simply so occurred that I had about 40 tabs open in Chrome, and so I started closing every tab, one after the other till the useful resource hogging course of disappeared from my exercise monitor. You may have a few totally different choices of coping with rogue app or course of after you determine it. You’ll be able to both troubleshoot like I did, closing every tab, window or app till you work it out, or you may spotlight the method in Exercise Monitor and click on on the cease signal button with an “X” in it. You may see a immediate asking if you wish to stop or pressure stop the method. Begin with Give up, and if that does not cut back the CPU workload, then click on on the identical button and choose Drive Give up. Even when your Mac is model new, you will nonetheless run into apps and packages that may sluggish it down every so often. Sarah Tew/CNET Again to the fundamentals There are going to be occasions once you open Exercise Monitor and discover “kernel_task” or “launchd” and even “WindowServer” utilizing up all of your Mac’s assets. These processes are fairly imprecise and don’t have any direct strategy to hyperlink them to a particular app that is operating in your Mac. In these situations, it is a good suggestion to return to the plain troubleshooting suggestions that we are able to all overlook at occasions. They might very nicely make a distinction. Give up all open apps. Do not simply shut the home windows, however right-click on the app icon within the dock and choose “Give up.” Reboot your Mac fully. As an alternative of choosing Restart from the Apple menu, choose Shut Down and provides your Mac a couple of minutes to fully flip off — then flip it again on. If you happen to discover a particular app all the time slows down your system, alter your workflow to make use of that app with out anything open in your system, after which Give up the app as quickly as you are finished. There are different points that may sluggish your Mac’s efficiency. Stuff like random login gadgets, operating out of arduous drive area, or previous apps you now not use can influence efficiency. It is a good suggestion to be taught five tips to help you speed up your Mac, and in addition addressing common Mac issues and how to fix them. Source link
0 notes
Last Seen Blogs
milk-and-cherryjuice
The heart is like guitar strings

uber-bitch-rachel
what will bring me home?

dogma85
DOGMA85

lemoncrushh
lemoncrushh
oregonwanderlust3
OregonWanderLust3