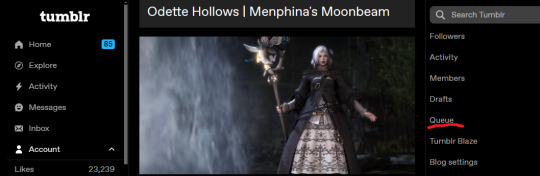
#so i can see the date that i queued specific posts in the queue screen right
Explore tagged Tumblr posts
Visit Tumblr Blog
Explore Tumblr blogs with no restrictions, modern design and the best experience.
Last Seen Tumblr Blogs


Fun Fact
1,644 Tumblr posts in 1 second.
Text

#one piece#sanji#black leg sanji#everysanji#punk hazard#ch674#ft. nami#ft. usopp#so i can see the date that i queued specific posts in the queue screen right#the posts that are posting when i'm making this post (try saying that five times fast)#were queued before the season started which is just wild to me#exactly a month ago actually#i'm trying to keep up ~200 posts in the queue and i refill it once a week
13 notes
·
View notes
Text
hello i'm back. with some??? tips??? you can reblog on a whim! if you come across your own post on the dashboard, you can just reblog it again! Or you can toss it in the queue, or schedule it! you can also go into your archive and find your posts and reblog that way! if you're worried about 'spamming' then feel free to make a tag that people can block! i use 'SRB' which stands for self reblog. many people use this tag or one similar or one all their own. if you don't want to think about it at all, i highly recommend scheduling your post for a few days/hours/weeks/months out from when you first post it. this shuffles the post into your queue (if you use one) for whatever time and date you pick. you can just pick wildly, you can math it out, whatever makes you comfy and ends with your work being put back on the dashboard. also, if you don't know what the Queue or Scheduled Posts are here is a quick break down:
Some quick explanations from the Tumblr Help Desk:
Queued posts help keep your blog active by staggering posts over a period of hours or days.
Scheduling a post sends it to your queue with a specific publishing time instead of following your regular queue posting program.
(If you're using xkit I assume you know how to queue and schedule posts, so this is for the folks who don't!)
Whenever you make a post for tumblr dot com, you get a big blue button that says Post! But it also has a drop down menu! (Oooh, drop down menus!) See below:
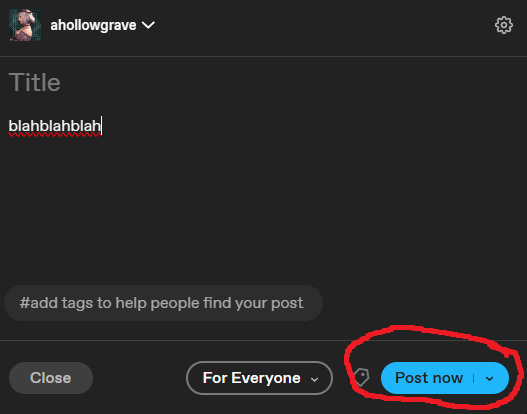
In this menu we have the following:
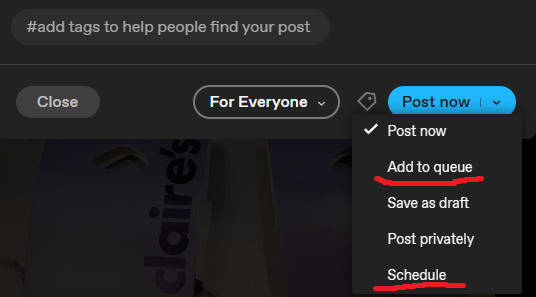
In this case, we are focusing on "Add to Queue" and "Schedule." Please note that this menu is the same when you are reblogging as well! If you hit "add to queue" the post will automatically enter your queue (more on this later) but if you hit Schedule it will give you a pop up where you can pick the date and time you want a post to... post. Or reblog, in this case!

I just kind of scroll randomly on both of these menus and let it go. Once a post is Scheduled it can be found in your queue! If you already have a queue set up, the schedule post will be put between posts for the date/time you selected -- regardless of your queue rules. And you're done! You don't have to think about reblogging it yourself! In a few hours/days/weeks/months you will SRB your own post and put it back on the dashboard! And we get to see it again! Or maybe even for the first time!! A win for everyone!!!!!!!!!!!!
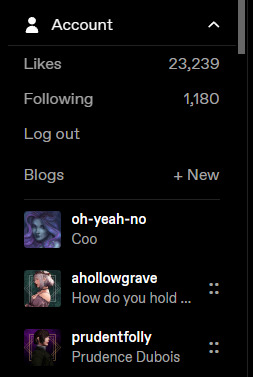
But Pigeon, you cry, how do I get to the queue!? No fear, my friend! The queue is but a few button clicks away. On the left hand side of the desktop you'll find these buttons! We want to click Account. This will unfold all your blogs, or just show your blog if you somehow only have one:
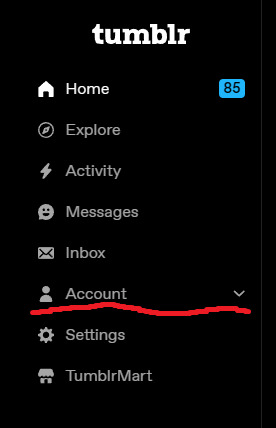
(Don't look at my following don't worry about it I'm fine)
Now. Your queue is set up individually for each blog! So, click the blog that you want. This will bring you to a screen like this:
I'm sure we're familiar with this screen! This is how you access your follower count, your drafts, and of course your queue. Click on queue and it will bring you to a screen that should look something like this in the middle:

Up top are our queue rules! As you can see, my queue is set to post 10 queue'd posts a day between the hours of 11am and 11pm US Central Time! (You probably see me post a lot more, this is because I have a lot of free time (sometimes) during the work day! So I am reblogging on top of the queue. Not always! But often!) These rules only apply to posts you have queue'd! But, again, this is where you Scheduled posts will show up! For example, as you can see the next post in my queue will post on Friday at 3:21 PM Central time. If I scheduled a post for Friday at 3:25 pm I would find that immediately after this post. I am not a technical writer by any means but if you didn't know how to use these features before I hope you know now! Not everyone uses the queue, in fact I think most people don't. But I love it! I mostly use mine to reblog my own stuff, for aesthetic posts, but I also toss in other people's writing and screenshots and other content all the time! I, personally, love when a post of mine gets reblogged weeks later because it was sitting in someone's queue. It's always a little bursts of notes on a screenshot or writing that I loved and it often leads to me reblogging my own stuff!! I don't want to tell anyone what to do or how to use tumblr dot come. This is a social media site and you should be having fun here! But tumblr is one of the last social media sites that does not have an algorithm to run users dashboards. It does have algorithm type things that are opt-out, and many veteran users have, so it is important to 1. Reblog things you like! No one sees your likes unless they have that feature turned on or your likes are public and they're snooping. Likes are nice and I've never scoffed at seeing one and I'm sure no one else has! But Reblogs are what get a post under more eyes, you know?
2. REBLOG YOUR OWN WORK! You can determine how often and what you reblog of your own work!!! Did you post at a 'weird' time!? Reblog it! Did it not do as 'well' as you would have liked? Reblog it! Are you just super proud of the work you did? RE! BLOG! IT!
Anyway. This is so long, but I love you and your work and I'm so glad you shared it!
hey come here
reblog your own work. reblog it as much as you want. the dashboard is chronological (mostly) so you gotta put it back out there!! ok bye
#ooc#ok it's real long under that readmore just fyi#(for me)#(that's what she said)#but the point is I LOVE YOU and you should REBLOG YOUR OWN WORK
208 notes
·
View notes
Note
20, 24, 31, 42, 46, 47 :)
thank you for sending these Katie!
20: Mac or PC?
PC! i pretty much take any opportunity i can to shit talk apple products. i’m an android and pc bitch forever. i have an ipad, so i know the differences between the interfaces and apple is just so much less customizable. i need my freedom! the only downside to not having a mac is that i can’t screen record with kmplayer.
24: 480p 720p 1080p? What is the minimum quality you’ll gif from?
720p is the lowest i will go usually. it’s just super frustrating and not even worth it to use video that’s less than that bc the gifs will be ugly and grainy and do that weird fuzzy wall thing. i have files of that’s so raven that i really wish i could gif, but they’re like 480p and i just can’t put myself through that.
31: Do you schedule/queue posts or do you post right after you’re done?
always queue!!! i will NEVER post a set immediately unless i genuinely hate it and don’t want it to be seen, or if it’s time-sensitive like a request. i always schedule my stuff for at least the next day, but sometimes months in advance (for when i go back to school/work and need to keep my blog active). i also generally schedule stuff to post between 1pm and 4pm PST bc i read that that’s supposedly when this site is the most active. keep an eye out bc sometimes i will tag my long-queued posts with stuff like “this post has been queued since (date) so hello future!”
42: How is your gif folder organized? Is it organized at all?
my folder is just organized by the name of the show/movie for the most part. my gif psd folder isn’t organized at all, though, i just keep it alphabetical. and i never delete anything bc i tend to go back to certain gif files to see how i did specific colorings or effects.
46: Ever gotten a really sweet compliment over a set?
so literally every time emma (@oliviasrodrigo) reblogs any of my sets i CRY bc she’s so sweet and kind and makes me feel so appreciated! i get so excited for her to see my gifsets bc she always leaves nice comments. i don’t deserve her!
also colleen (@summercohen) is super sweet as well, and i specifically remember when i posted my very first barry gifset, she reblogged it multiple times and said so many kind words!
47: Any advice for novice gif makers/people who want to start making gifs?
so i included a “random tips” section in my gif resources masterpost, but i think the most meaningful advice i gave there was to follow and uplift other gif makers. every bit of positivity you put out comes right back to you. when you make an effort to support other people, they will want to support you. and that’s what makes this whole experience so fun.
questions for gifmakers!!!
#anyway emma makes me feel so valid#i cant believe she invented being supportive#answered asks#amandaseyfried
5 notes
·
View notes
Text
Cursed Child Tickets...
I keep reading posts across Social Media of people complaining how they still cannot secure tickets to see Harry Potter and the Cursed Child. Now, I have seen it six times so far and have tickets to see it three more times and I have never had an issue trying to get my hands on them. So I figured I would share my knowledge and experience of attending West End Theatre to hopefully help more of you get tickets.
To be honest, to me, most of this is common sense. Then again, the bulk of the audiences attending are brand new to theatre and the West End, so when they hear the words “SOLD OUT”, it doesn't occur to them that there are other ways to buy tickets.
However, I need to make this clear now, under no circumstances should you ever buy tickets from a resale site, especially if they are being sold for above face value. People have been turned away from the theatre when trying to attend with these sorts of tickets. It isn't worth the hassle and at the end of the day, you will be the one out of pocket. You are NOT protected if you buy tickets this way.
Anyway, keep reading to find out the best ways to secure tickets.
Option 1: General Ticket Release:
Now this is the most obvious route to go, but probably the most frustrating. Thousands of tickets across several months going on sale at the same time with thousands of people queuing online to buy them.
However, if you are flexible with your dates and the amount you are willing to spend, there is a good chance you will secure tickets.
Be willing to buy for weekday performances over weekend ones.
Always join the Nimax queue. ATG are only given a small allocation to sell and they always sell out within the hour, two at most.
And the less tickets you want to buy the better. The moment you want to buy three or more tickets and you have been waiting hours to get to buy them, the less chance you have of securing tickets for your entire party.
That being said, if you are willing to, go by yourself, then you are definitely likely to get a ticket during a general ticket release.
Use this option if you have to plan in advance to be able to attend.
Option 2: Friday Forty:
This is the weekly lottery for Forty Seats per Show for £40. Each of these seats are in some best places to sit in the theatre. Front Row of the Stalls being one of them.
I cannot give you any tips to guarantee you will win as it is a lottery, therefore you can only hope you will be lucky.
However, having won the Friday Forty back in March, I can tell you when it is likely you will win.
As you know, we have a little walking wizard on our screen when they begin to allow people through onto booking. If your little wizard does not move, you will not win. If your wizard continues to walk, you have a chance. It is as simple as that.
All I can say is keep your fingers crossed and keep trying, hopefully one week it will be you who wins!
Option 3: Via the Website:
If you are in a position to book from anything from a month to a few hours in advance and have the money to pay for seats up to Premium, then this is the option for you.
It is a common occurrence for all theatre shows to hold back a number of seats, outside of lottery/rush tickets, for specific guests (celebs basically). If these are not sold, they will appear on the website, along with return tickets, for the public to buy.
They can appear up to a month before the performance, though checking daily doesn't hurt.
However, it should be noted that these tickets are generally premium seats, or seats for either £65 or £70 per part. They do from time to time get cheaper seats, but it is a case of checking at the right time.
I have done this three times now. First, it was on the first Monday of the month and late release/return tickets had just gone up for the month. Second time, I was browsing as I had some additional money and was lucky to find a £140 seat for four days later. Third time, was this morning in fact (12/5/17). I had, again, found myself with additional money and went to check what they had. Amazingly I was able to get better seats for cast change for both parts, despite there not having been any available just days before.
Option 4: Via the Box Office:
Now, there are two ways to approach this. You either walk in and hope there is something within the next month or you join the returns queue.
I have never done the returns queue. I do know, though, there is no guarantee and you could potentially be waiting till just minutes before the performance begins for either part. Be prepared to pay for higher cost seats as well.
The other option is to walk in and just see what they have. I have done this twice now. First time was the end of Jan when the website refused to allow me to book two tickets. I walked out with two tickets for three days later. The second time I was asking for cast change and nabbed one seat for Part Two, which my best friend is now using.
It is possible to book up to a month or two in advance with this option, but again it depends on what has been released or returns that have been made.
It is my belief that not all returns and late release tickets find their way onto the website. It sometimes may be better to just turn up to find out. However, please note you must attend the box office in person, you cannot phone and book, unless it is access seats you need.
This is the option I advise people to use when they ask me.
Option 5: From Social Media Sites:
I am including this because the second time I saw the show, this was how I brought my tickets. I also know many fans have found themselves with additional tickets for cast change and have offered them out on social media.
It is always best to check as many people don't want to muck about doing returns with the theatre, especially if they have left it too late to do so. It is fine to do this as these will always be offered at face value.
However, if you need to collect the tickets from the box office, the person who originally brought the tickets must contact the point of sale to arrange for the names to be changed on the tickets. The sooner the better as well as we found it was problematic changing them just days before, though it was done and we able to collect our tickets.
These are the safest and best ways to buy tickets. In all honesty, it really isn't a secret either. I am not, nor is any other fan who has been multiple times, a genius at buying tickets. We are all positions to attend regularly due to money and our location to London. We are, perhaps, just a little more persistent than other fans.
I hope this helps those who are still trying to get tickets or even for those who wish to go again. If anyone else has advice for buying tickets, let me know and I will add it to this post.
For now, though, GOOD LUCK!!
12 notes
·
View notes
Text
Here’s What to Expect with the New Agorapulse
The current version of Agorapulse was released in November 2013.
As you can imagine with a 4-year-old SaaS product in a fast moving industry, the backend needed a revamp to help us move faster. The user interface was in need for a serious makeover.
At just four years old, our product for social media management was aging — and it was time to make big changes.
We started this process in the summer of 2016 with the backend. This part was done and released in February 2017. You didn’t see any change but these changes streamlined our code so much that we now can deliver new, innovative features twice as fast as before.
Since March, we’ve worked our butts off to implement the new design and the new front end. Every single pixel of the app has been rethought, re-engineered, and recoded with a new framework. Needless to say, that this was a heck of a task for our tech team.
During this neverending 12-month process, we have not served you as well as we’d like in terms of stuff you can see on the front end. Because all our energy was on this new release, you didn’t see much in the way of new features or improvements.
But this long development tunnel is now over and we’ll be releasing the new Agorapulse at the end of this month. If you don’t know, you can access the beta here: http://ift.tt/2iq6fQ1
To help you better understand what to expect, I’ve made a list of all the major new features and improvements.
Wanna see?
1. A New Inbox
1.1 A new design and workflow
We’ve redesigned the inbox to make it easier to scan. Reviewed items will now disappear in real time from the “to review” filter to give you more clarity.
1.2 New filters for more granularity
The filters offered in our inbox now offer a lot more options: see all the messages reviewed by a specific team member or those assigned to a specific team member. It’s another way to check on your team’s work with ease.
1.3 Saved replies
You can now create “saved replies” or canned responses for each of your social profiles and save a TON of time when using the same responses over and over again. This a long-awaited feature that we’re thrilled to finally deliver.
1.4 Better emoji picker
Many of you have complained about the behavior of our emoji picker. It’s been improved big time. Not only the emojis are bigger now, but you can also search for the ones you need!
1.5 Translation feature
Don’t you love when fans and followers engage with you? But when they speak a language you don’t, things get a little tricky. With our new “translate” feature, you can see their message in your own language in one click. Pretty convenient!
1.6 “Always On” user profile
Whenever you’re looking at a tweet, a comment or a private message, you’ll now see the full profile of its author on the right. Knowing who you’re dealing with is a real plus. But there’s more to it than just seeing their name, photo, and bio. You can also tag them and see relevant tag to quickly gauge how important they are to your business. You can also favorite them to retrieve their info in a pinch.
Last but certainly not least, you can expand their profile and see all their past interactions with you. This is a huge time saver for teams using the same dashboard for social media marketing or customer support.
1.7 Real time team activity visibility
It will definitely be a game changer for large teams. On each social profile, you can now see who else is currently connected at the same time as you (top right of the screen), but more importantly, you can see who is viewing what and who is currently responding to what!
No more stepping on each other’s toes.
2. New Reports
2.1 New stats and design
If you liked our reports, you should love the new ones. They are offer more data, show the evolution of each metric over time and, in my opinion, look sleeker. Here’s what I mean by sleek.
2.2 Content report
You now have access to a separate content report for Facebook, Twitter, and Instagram. See all your posts for the selected period and sort them by any metric you want. Need to see your post with the most engagement? Click on engagement and you’re done. We’ll provide the ability to export this in .csv very soon.
2.3 New PowerPoint design
Our PowerPoint reports have also been revamped. They now contain all the metrics and graphs you see on the web version. They also look great on Keynote (if you’re a Mac addict) and Google Slides. We’re planning to let you upload your own logo automatically very soon too.
3. New Publishing Engine
3.1 “Always on” previews
Our preview feature was really cool, but it was hard to find.
They are now always visible and easily accessible. Need to know how your post will look like on each social network? You’re all set!
3.2 In context editing/customization
Our preview feature also offered the possibility to customize your post for each of your social networks. Another super helpful feature we released before any other vendor out there. It was great but a bit hidden.
You can now edit your preview in context, for each of your networks. Just click on the text start editing. What you’ll see is what you’ll get on each network. You can even add mentions on Facebook and Twitter with ease.
3.3 Check your content calendar before hitting “publish”
One of the main goals of with this new release is to give you greater control and clarity over your social media management.
We designed our dashboard to instantly show you:
what’s left to review in your inbox
the exact preview of your post before posting them, and
exactly when your post will be published and how that fits with your existing content calendar!
If you repeat your content or add additional scheduled slots, you will visually see when each post will go out. You’ll find it convenient to make sure you’re posting each one at the best possible time.
3.4 Ability to repeat scheduled content
This option will allow you to repeat a post a certain number of time and set a specific time gap between each post. It’s ideal for:
promoting an event taking place at a specific date and repeating it a set number of time
announcing a repeating event taking place on the same day and time every week or every month
wishing Happy Birthday to one of your followers by repeating it every 12 months!
3.5 Ability to create multiple scheduled slots at once
If the repeat option doesn’t give you the flexibility you need, try our option to manually add multiple scheduled slots. Add as many additional days and times to your initial scheduled slot.
3.6 A brand new queue system (with advanced evergreen content requeuing)
If you prefer to use a content queue when posting, we’ve also revamped entirely this part of our publishing feature.
The first addition is the ability to add your post to the next available queue slots (if your content is time sensitive, for example). Fear not: we still offer the option of putting content at the last slot of your queue.
The knock on using a queue is that often, you don’t know when queued items will publish and seen by the masses. We too found that annoying so we did something about it.
With the schedule feature, we give you clarity by displaying your content calendar. Here you’ll see exactly your queued post will be published.
Last but not least, you can now requeue your post a specific number of times. You can also go full automaton and set a piece of content indefinitely. If you choose the latter, you can set an expiration date to make sure you won’t be posting outdated content months from today. (A great way to avoid a social media fail.)
As with the repeat or reschedule options, you can set these requeuing options social profile by social profile. You want to queue once on your Facebook page, three times on LinkedIn, and unlimited times on Twitter? Go for it.
3.7 Easy content tagging and content tagging reports
You can tag your content as you publish it — great feature to measure the performance of your content by topic or campaign.
Thanks to this tagging option, we will show you a report comparing the performance in reach and engagement for each of your topics.
Great to A/B test various topics or to track the performance of campaigns you’re running and report on them, don’t you think?
3.8 Ability to assign content for approval
If you create content as a team and have a specific workflow, you’re going to love this feature. Let’s say you create the first draft of the post, then need your designer to add a visual to it, then need a an editor to proofread or “OK” every post.
Simply create your posts, set the day and time (or add to the queue) and then assign them to your designer. Once your designer has added the visuals (he’ll get a notification for each post assigned to her), she can then assign them to the editor who will, in turn, proofread and approve the content to be published.
Probably the simplest and most efficient way to match any content publishing workflow.
3.9 Ability to duplicate already published content (or failed or scheduled/queued)
Failed posts happen. Whether you had API issues, problems with your content (video size, image format), duplicate content by accident or just a bug on our side (rare), you had no way to get back on track and that was frustating.
Well, can now retrieve a failed-to-launch post in 1 click!
You can also duplicate any content in one click, queued, scheduled or already published.
4. Redesigned Team Management
Our team management feature was good but not great. We knew it as we were using it too!
We’ve revamped it entirely. We made it super easy to invite new team members but also existing team members to a newly added social profile. Large teams and agencies are going to LOVE this improvement.
The way we display your team has also been improved big time. You now see it by team member (and not by social profile) which makes understanding responsibilities much easier. It’s also easier to remove a team member.
5. What’s Coming Next?
As I mentioned earlier, our new technology framework will allow us to move much faster and deliver the features and improvements that you deserve. Here are the features you can expect shortly after this initial launch:
YouTube comment management
Multiple photo uploads
Facebook reviews management
New and improved mobile app
Exporting post performance report in .csv
Initiate private messages from Facebook comments or tweets
.csv bulk upload for posts
Associate content categories to queue slots for more flexibility in your queueing strategy
And here are the features and improvements we are committed to release in the next 6 to 8 months:
Deeper Instagram metrics (demographics, impressions, reach)
Facebook groups management
Unified (multiple profile) reports
Unified content calendar
Unified inbox
Facebook personal profile publishing
Instagram video publishing
Thank you for your continuous support and I hope this new release and everything that will come right after will really make your job easier and more fun.
To your success!
The post Here’s What to Expect with the New Agorapulse appeared first on Agorapulse.
Here’s What to Expect with the New Agorapulse posted first on http://ift.tt/2qbaJ0t
0 notes
Photo

New Post has been published on http://www.lifehacker.guru/how-to-use-pocket-casts-to-wrangle-your-horrible-podcast-addiction/
How to Use Pocket Casts To Wrangle Your Horrible Podcast Addiction
Podcasts have become one of the best forms of entertainment around, but it’s tough keeping track of the ones you like, ditching episodes you’re not interested in, or even managing what you want to hear. Pocket Casts is one of the best apps for helping you organize your podcasts, but you’ll need to experiment with it a bit to get it to work for you.
While Pocket Casts is available for Android ($3.99) and iOS ($3.99), many of these tips transfer over to other podcast apps as well, you’ll need to hunt down settings in different places.
Save Space by Setting Your Podcasts to Stream or Download
Pocket Casts is good about giving you a variety of options to manage your storage. On a basic level, this means you can set podcasts to download or stream them. Beyond that, you can also set Pocket Casts to automatically delete old podcasts, only download certain recent episodes, or skip downloading some podcasts altogether. If you have a phone that seems constantly full, this level of control is useful.
To control the storage usage for an individual podcast, tap any podcast title in Pocket Casts, then the three dots icon in the right corner, then tap Podcast Settings. Here, you can change storage behavior for this podcast. You can chose to stream or download new episodes by default. You can also set how many episodes Pocket Casts keeps around by tapping the Auto Cleanup button. You can also set it hold the newest episode, the last two, the last three, and so on. This way, Pocket Casts deletes old episodes regardless of whether you listen to them. Speaking of which, you should also enable Delete Episodes After Playing so Pocket Casts deletes everything as you listen. Android users can also change the storage location so all podcasts download to the SD card instead of local storage.
If you prefer, you can set up all of these options on a universal level under Settings > Storage & Data Use.
Skip Long Intros by Setting Start Times
While you’re in the podcast setting screen, it’s also worth setting up the Start From time. If you listen to podcasts with long intros, you can set Pocket Casts to skip the intro at a set interval of time. This obviously varies from podcast to podcast so it requires a little experimentation, but once you settle on a time, enter it on the Start From form.
Customize Your Fast Forward and Rewind Times
Pocket Casts lets you choose how much time the fast forward and rewind buttons go. Head to Settings > Playback and you’ll see an option to customize these. This is great to skip over ads, but the rewind button is helpful if you tend to zone out or get distracted by something.
Use the Up Next Feature for On-the-Fly Queuing
Pocket Casts uses the same “Up Next” queuing system as music services like Apple Music and Spotify. Your Up Next queue is essentially the default playlist and it’s useful for eclectic shows where you skip some episodes, like Planet Money or Stuff You Should Know. You have three main ways to add an episode to the queue:
From the episode list screen, swipe left on the bottom “currently playing” overlay, and you’ll get the option to bulk select episodes to add to your queue.
Long press the episode title from the new releases screen and select “Add to Up Next.”
Tap the playlist icon from an individual episode page.
You can always access and reorder you queue by tapping the currently playing episode then swiping left.
Use Filters to Automatically Sort Podcast Episodes
If you’re like me, then you subscribe to way more podcasts then you could ever listen to. You also probably cherry pick which episodes of those podcasts you actually listen to. Pocket Casts has a filters system to help you manage these. You can create smart episode filters based on download status, play state, audio/video, release date, and favorite podcasts.
From the main Pocket Casts menu, tap Create Episode Filter to set your parameters. Personally, I have three different filtered playlists. One is a collection of my “must listen” podcasts. For that one, I made an episode filter that includes unplayed episodes from a handful of podcasts released in the last month. I also have a filter that includes every episode from any podcast I’ve ever starred that works as a sort of “best of” from episodes I’ve listened to.
Finally, I use a weird hacked together system to cram different multi-part episodes into their own playlist. I use this for shows like Dan Carlin’s Hardcore History or You Must Remember This that have topics that span multiple episodes. My filter includes: all play states, all statuses, any release date, one podcast, only starred episodes, and sort from oldest to newest. I then go through and star the individual episodes in that series I want to listen to. It’s a little convoluted, but it’s the best way I’ve found to keep track of multi-part podcasts.
Change Playback Speed, Trim Silence, or Use Volume Boost
Pocket Casts has three episode-specific settings worth a look: playback speed, trim silence, and volume boost. These can help improve your general listening experience, though the options to adjust them is in an odd place.
Tap an episode of a podcast to play it. Tap the circular button in the bottom left corner. Here, you can change the playback speed if a podcast is too fast or too slow for you. You can also turn on the “Trim Silence” feature, where Pocket Casts automatically fast forwards through silence if the podcast has dead air for some reason. Finally, you can turn on Volume Boost, which cranks up the volume on quiet podcasts without altering your device volume. Trim Silence and Volume Boost are only available for downloaded episodes.
Use the Web Player to Access Your Podcasts on Your Desktop
For $9, you can get access to the Pocket Casts web player. The web player syncs your podcast playback from your mobile device to the web app, which is great if you bounce between a computer and your smartphone throughout the day. The web player doesn’t have all the features as the mobile apps, but it does the job.
I also suggest using the Pocketcaster Chrome app, which turns the web player into a Chrome app. This is neat enough on its own if you happen to accidentally close tabs like I do, but more importantly, it allows you to use your keyboard’s media keys to pause and play episodes.
Keeping track of all those casted pods is a job in itself, but once Pocket Casts is set up, it does a lot of the work for you. Now it’s about finding the time to actually listen to them all.
©
0 notes