#so i can do the sketches in the art program i normally use (the tablet one)
Explore tagged Tumblr posts
Note
queen of ai art <3


I genuinely have no idea what the fuck is in the tap water right now considering these all came in the last ten days from what I suppose are different people considering I blocked the first two… either that or it is one very persistent person or the collective actions of what I assume is probably the world’s most depressing groupchat. Incest anon, come back, I miss you on hindsight.
I don't normally answer mean-spirited questions but these pissed me off recently because of the nature of the accusations. So, let’s get into a long, illustrated lesson including a WIP gallery as to why you shouldn’t rely on “gotcha” AI logic and/or be a little twat, with tips on manual digital scaling, presented in classic Balls style.
Now, the vast majority of my art is traditional, many are quick ‘challenge’ sketches—they are drawn or painted on paper. With many of them, there are progress shots. Sometimes multiple, including fucking gemwork. Sometimes I do silly sketches. I have also been quite open that I’m really focusing on exploring varying styles of portraiture at the moment after an artistic background in watercolour landscapes. A number of you follow my traditional art blog where said landscapes were posted, and you know they’re banging.
Now, I’ve posted *checks notes* like five digital pieces last year from the time I owned a tablet (after which all my work has been trad due to being indefinitely parted from said tablet), and none of them are what you’d call professional quality, considering most of my work is traditional/realist and I am still not very good at stylised or digital drawing. I’ll choose my “best”/most detailed one for the purposes of this impromptu demonstration using the files I do have on me at the moment.
Due to my background in traditional art 👆🏻I always and without fail do my initial sketching by hand, because I find it difficult to get perspective and proportions correct digitally, because I learnt various pencil angling tricks etc… so anything I have drawn digitally that includes people/buildings, I’d do a sketch on paper and scan it, and do the lineart from there.
Here is the sketch, the sketch cleaned up into lineart, shaded values, and a portion of the colour-blocking stage, where I checked to make sure the major colours don’t clash at the borders, thanks to Thingol’s bright orange outfit from hell.

I assume what has been done here is that you or whatever program you’re using has picked up on the below little noisy bits, threads and spirals and decided they’re AI. Let me introduce you to the magic of textural overlays, aka texture stamps/brushes, which I get so impatient with that it becomes quite obvious they’re on there… which works in my favour right now lmao.
Here is me sliding the opacity on and off sections, so you can see what exactly is going on (pillar with marbled effect, thingol skin texture, elrond jacket texture, elrond's remarkable forehead, and the marbled archway):

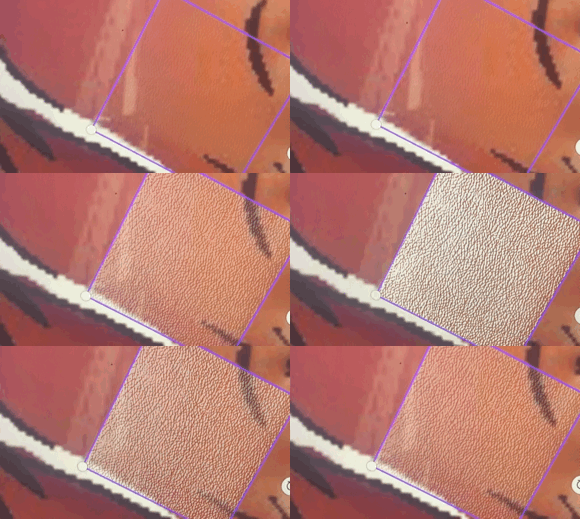

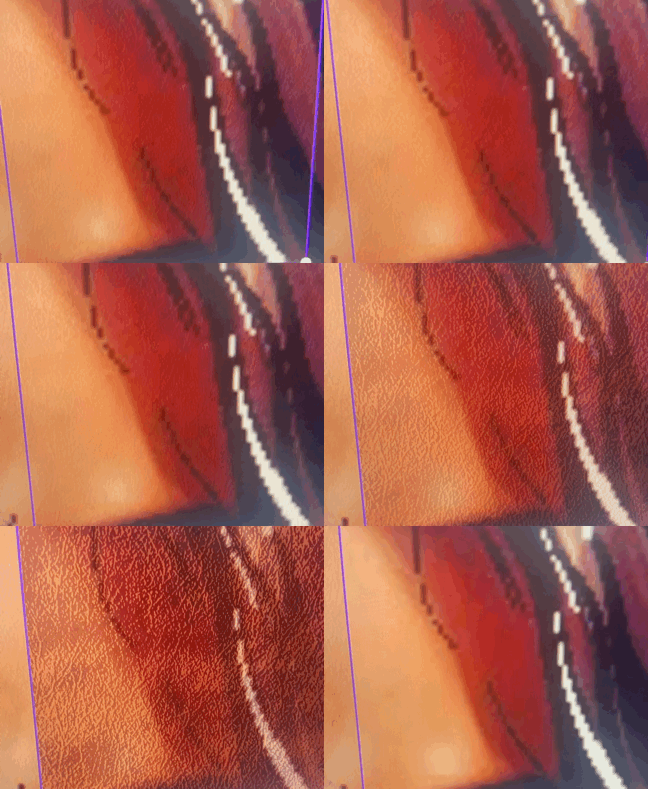

These aren’t overlaid by my mystery robot sex toy, they are done by hand and there’s around 20-30 different ones in any given piece, some of them (eg skin texture or leaves) are repeated 10-15 times. Using texture brushes or stamps is not a cardinal sin, they are literally sold on this website by the artists who make them. Here is a clip of me just selecting them all in one go, if you’d like that proven for your face eyes as well.
I have no excuses for overblending my colours or leaving sections choppy, I’m just lazy to do painterly detail on stylised digital pieces, and usually just stop after a couple rounds of blending. But if laziness was a crime then most nation-states in this world would not have a functioning government.
Now, the final two stages—because the base for these images are usually scans or photos of my sketches and thus not exactly at the best of resolutions, I upscale in Lightroom. Amusingly, image upscaling is actually normally done by AI either built into Photoshop or plugins—this isn’t exactly generative AI, it’s more an algorithm that breaks down your existing photo and “reconstructs” it at a higher resolution. Hence, many upscaled images are flagged as AI regardless of the manner of upscaling.
I am too stingy to purchase Photoshop, the above plugins can/do use your art to train generative AI even if it doesn’t use it for your image, and I have Lightroom Classic already—upscaling is relatively easy to do here and does not train AI. Here’s a walkthrough:
Open Image > Denoise > Play with Slider > Save as TIFF > Open TIFF > Develop Module > Enhance > Save DNG. Then, work on DNG image re: adding noise/brightness/contrast whatever.
Just a note that the ‘Super Resolution’ feature does actually use (algorithmic, not generative) AI so don’t click on that, just do the normal Enhance. This will increase your image size and resolution without sacrificing detail. However, the file itself would be fucking enormous by this point so you can either compress it yourself or use Canva or whatever.
If you don’t mean those and instead mean these fucking things, jesus fucking christ they’re free graphic design templates with free Illustrator vectors, get a fucking grip, ten days in a charity comms job and you can make these in your sleep while moving the mouse with your pussy.
Here is a collage of some of my other digital works at various stages as well, including pencil/pen sketches, to help you sleep at night:

Please remember that I stopped posting digital art except one charcoal+digital work after I was parted from my tablet in December. If I was really iBalls, I would have continued churning them out surely 😇

Writing
I am not going to even take this seriously because there is clearly no way to explain the concept of writing something in advance to people who clearly type out and immediately send every half-dusted thought the moment it farts itself into their brain.
However, if you are actually sitting in your home in the year 2025, when there is almost definitely litter in your neighbourhood that needs picking and dogs on the Rover app that go unwalked, feeding my fucking writing into whatever fucking AI detector you have that is, in turn, training whatever fucking AI generator it is linked to, simply because of whatever robot you have created in your brain that somehow knows very niche facts about the lifestyle, dialect, speech patterns, culture and politics of a frankly irrelevant town in 1970s Kerala, I genuinely do not wish you a single moment of joy in your life
I have already or will soon be privating some of my artwork considering there are people cheerfully sat there feeding my work to Musk’s field of cows in order to get yourself a good old gotcha against some random Elrondfucker on the Internet — I’m obviously not going to do that to my writing at the moment but please stop letting your actions be driven by your asshole instead of your brain.
As for this one, I initially thought of not being so cocky in my response but considering I either get a version of this like once a month or some fucker goes to another person’s blog to ask them if I’m not tired of people kissing my ass, let me tell you something:
I am not whatever hockey-playing girlboss it was that was a bitch to you in high school and you are now afraid is intruding into your fandom space. She must have sucked I am certain. I am very sorry you had to deal with her. But I am not her. She is not me. I can assure you of this. If you must know, I was a netball girl. In fact, I was netball team captain. If it actually was me, I sincerely apologise for accidentally on purpose fouling you in 2014 because I wanted to win the intra-school friendly and I promise I won’t ever do it again.
And just in general, let me please remind you that I did not curate this audience through purposeful posting of art and literature and tasteful selfies, I did it via the 'Lindircident' post, aka accidentally holding my asshole wide open for the light to shine through two weeks after I made this account and remaining in the same doubled-up position for the six months since.
Tschüss! 🖕
51 notes
·
View notes
Note
Your blog, fics and headcanons always cheer me up! Your art is so neat too. Ive been lurking around here for a bit when I feel like I need my crops watered. Question, can I get headcannon of mallek x reader where the reader is an artist? somehow was able to accept commissions while on Alternia? I feel like the vibe of them just silently drawing and him coding in the background is super cute. What do you think?
AUGRHGAA TYYY!!!! I'm glad you like the art, writing, and headcanons! I've also definitely had the thoughts of Mallek being with an s/o who works a lot on computers for digital art stuff, mainly cause it sounds peaceful af.
Okay, so! Artist is a pretty loose term that could apply to a lot of things, but you specify them drawing here, so I'll go over Mallek x reader, both of them being either a traditional artist or a digital artist.
Traditional Artist:
🎨Starting with the traditional artist! Dunno if any of you consider yourselves to be fairly clean but either way if you were to stay over at his hive a lot and for convenience's sake, leave some of your art stuff at his place..it only adds to the chaos that his hive, "damn girl you live like this?" Idk! I just imagine all sorts of physical stuff traditional artist's use. Different types of paint and paintbrushes, charcoal, watercolors, colored pencils, paper, canvases, etc. Your art stuff adds a whole other thing to look at in his hive and honestly? He's here for it. He thinks art is cool. I mean..he can do tattoos, so of course he'd have some appreciation for a s/o who does artsy stuff. He also like those moments where he finds you just covered in your art supplies. Charcoal all over your arms and even smudged on your face for when you couldn't fight a itch and scratched at it, your hands and fingers smudged with paint or oil pastels...he just finds it incredibly charming.
🎨Oh also on the subject of paint uhh. May or may not be something you're comfortable with using considering that paint on Alternia is made from the blood of trolls. Depends whether or not you can get over that and just pretend it isn't to cope lmao. If you can just. Don't ask Amisia and Chahut about how getting the supplies for your paint went!
🎨Mallek would find it incredibly relaxing to listen to while he's fucking around with his husktops and many monitors. Normally he's one to either sit in quiet with nothing to play or maybe he'll have his playlist quietly playing whatever music or other things to listen to while he works on projects or contact people. Not to say it isn't still quiet while you both do your own things, but that's just the thing. It's quiet, not silent. Mallek finds he works the best when he knows that there's life going on around him. The sounds of his hands rapidly typing on his keyboard, the whirring of his husktop, sometimes you can hear him speak to someone that he's calling. You just further add on with your sounds of living, the sound of pencil sketching onto paper or canvas, the louder or softer sounds of you using oil pastels or charcoal, papers being moved, the adjusting of a canvas. It's all very comfortable to you both.
🎨You're each other's background sounds.
Digital Artist:
🖋️Being a digital artist is also so cool to Mallek, why wouldn't it be? It's tech shit! He can also help you try and traverse the different Alternian art programs. It's pretty new to him too since all he usually uses is the Alternian equivalent to Microsoft paint..and it's not super serious, just doodles, sketches, and shitposts stuff to destress. You got yourself a husktop, Amisia was jumping at the chance to help you look for digital art supplies (such as a tablet and stuff), and Mallek helped you get a hold of art programs for you to try out and decide what you like to use as your primary programs.
🖋️They're pretty much the same as Earth art programs in terms of it's functions. Though of course their interfaces can be different from program to program. Not everything works as it does on Earth? Certain shortcuts or tool locations are moved around or changed but it's pretty easy to figure out if you're experienced in digital art. And if you're stuck or can't figure something out your cool tech savvy matesprit can help you out. Mallek has his moments where he takes a break from what he's working on briefly to watch you draw...he always has to stifle a laugh when he sees you're absolutely struggling over there to do line art, having to undo do your stroke like 50 times before you get it. Like the previous one? He thinks it's cute and charming.
🖋️While you don't add a lot of new things to look at it in his hive, as you're working with more tech, it's still just as nice to listen to in the background he thinks. He can hear your fingers type out messages to friends or clients you're working with, the sound of your pen stroking against the tablet face, your mouse clicking here and then. There may not be as many sounds, but he finds it just as comforting, he likes to listen to the life around him after all.
Commissions:
As for the commission portion, thought it would be fun to get into this separately after talking about the respective art types! Being commissioned as an alien on the planet is certainly. Interesting. Which can be taken positively or otherwise.
Being an alien is your selling point to a lot of trolls online. It's where you got a huge chunk of your followers! Sure, they're very split on genuinely believing you are a real alien and those who think this is some kind of roleplay account or something but follow out of interest. Your commissions gather more interest from those who want a drawing from an alien! Real or not. Lots of odd are fun interactions.
For a traditional artist you could go the route of just, scanning your picture and posting it onto your socials and tag the trolls (or post it to the troll client privately). If you offer a shipement of the physical original drawing Mallek can help you out with getting a drone to drop it off for you so you don't have to go on a wild goose chase to find the troll client in this great wide troll world.
41 notes
·
View notes
Note
You might have gotten this one before but what art program do you use? I have a cheap one that doesn't work so good so I was wondering if you had any recommendations
I really like your art and I hope to make something that looks as cool as yours someday! Keep up the great work!
Hello! Thank you for the ask! I actually haven’t had anyone ask this question yet, so no worries.
I’m not sure if you’re using an art tablet or computer, because I have somewhat of an idea that those use different art programs better suited for them. I use an iPad to make my drawings, and my main art program is Procreate. However, Procreate is notably a very solid painting-based application, so depending on your art style as well, the wide set of tools provided by this program may or may not be easier to use. I lack the skills to paint, so the art you see on my page are created using the sketch and pencil tools. Some people might say Procreate is only for the professionals and “real” “serious” artists, but never let anyone put the idea that only the best can pick up a paintbrush. Additionally, there are also a lot of videos on YouTube that could give more professional advice on how to adapt to the art program. The primary drawback is that it costs…money, and is limited to the iOS bloodline.
An art program I would actually recommend is Ibis Paint X, which should run fine both on android and iOS devices. Ibis was my secondary art program [or more accurately, the second art program I started using after MediBang], and it has more options for individuals who prefer line-based “anime” creations, although I have definitely seen more than nutty creations that go beyond the expectations of normality from the app. It’s so convenient to use that people without a digital drawing pen can still draw undisturbed with their fingers alone. The main drawback, if I’m not mistaken, is that most tools require you to watch an advertisement before being able to use it, since it is a free application. It also has a wide variety of filters and not just layer effects you could apply to your works. ^^
Well, all these recommendations may be null since at the end of the day I’m not sure if they are compatible with your current device, so I apologise if what I essentially said was all a nothing burger. You should also go with whatever application you’re most comfortable using with regardless of your experience with art <- important
Thank you for the kind words as well 🙏 Keep drawing and you’ll soon develop your own beloved unique works and style!
6 notes
·
View notes
Text
I'm gonna shout into the void again because I went for my stupid mental health walk and I drank some stupid water and my brain feels organized enough to try and get the swirling mass of thoughts out of it so maybe I can be normal again. All this rambling is pertaining to my Hoist Up the Thing animatic that I've been working on.
I'm really trying to put into words what exactly the struggle here is, and I think it's a combination of a couple of different things coming together to make me have a bad time. Specifically, making me have a bad time trying to finish the Hoist Up the Thing animatic that I wanted to have done like 2 weeks ago. Full transparency, I haven't hardly touched it in that time. It is about halfway completed, and I am really struggling with it.
Part of it is hardware and software troubles. I'm using an my ipad which was old when I bought it almost 5 years ago. I was drawing it in a program called Toonsquid, an animation program that is very rudimentary and clean, but doesn't have the drawing tools I like. I would be better off if I just did in on my PC, and I do have a drawing tablet, but it isn't one of the display ones and I have tried for years to get myself comfortable with that stupid thing but I physically cannot bring myself to try and animate with it when drawing feels that clunky (believe me I tried that was the plan for how I was gonna make this thing in the first place)
Another thing is that the time limit and the poll to pick the song and the general notion of me wanting people in the fandom to know I was making it is making me feel even worse for not having it done. I did it that way to try and keep myself motivated, but when life slowed me down and got in the way (I had my friends wedding like a week and a half ago, among other things) it just started to feel like I was letting people down? Like I know logically that very few people online even are aware of my existence, but it still feels like I am failing those few who do, because I was really committed to making this.
This is kind of a combination of the software issues and the mental ones, but I also just do not like how it looks right now. At all. I sketched it out very loosely on one layer, with intent to clean it up later. Problem is, it looks too clean, and the art style is so simple it barely looks like I made it at all. The motion is what I want, but the actual art itself makes me very unhappy. I decided to finally look up some guides on how other people make animatics, and a lot of them said to draw the frames in a separate program then import them into an editor to compile everything. This is an entirely different process than what I was used to, because at this point I have made several full-length animatics entirely within Toonsquid, drawing and editing in all, and I have almost no experience with actual editing software. So I feel very stuck. I don't want to make a final product that I myself hate (and honestly I wonder if I even could push myself to finish it in the current style it is in), but I also feel like the absolute mess my brain has been in because of all the stuff mentioned above plus outside life stress has left me with a lot of negative associations with this particular project, making it hard to work on no matter what. It doesn't help that the primary path I see forward with this project is to completely redo it, trying some form of a new process to make it feel better.
In short, I have no idea what to do. Since I started learning how to make animatics, I have been craving a method of doing them that feels better, that works with my brain in a way that will make the process more comfortable. Like I love making them, I love making things move, I love watching back through them after I am done with them. It fills me with so much pride and joy to see it but the actual process feels more unpleasant than it needs to be.
I've recently gotten myself a job (finally, that was another thing stressing me out massively) and after a bit of time saving i plan to buy myself a display tablet. I hope to do it as soon as possible, because I have wanted one for years and I think being able to use the more robust programs on my PC in a way that isn't agonizing will do wonders for me, but that'll be a minimum of a few months away. I just feel very lost and demotivated, and I feel really bad not only because I was telling people I was making this thing and I feel like I've done them a disservice, but also because I really wanted this project to be a sort of gift to the whole cast. I plan to make more fanart, obviously (even some more animatics, hopefully) but this show means so much to me that I wanted to do something big and elaborate and fun as a way to say thank you.
I don't know if this was at all comprehensible, I hope it was at least a little bit. I don't know if I got it all out of my system, but I hope this can clear my head enough that I can at least work on something today. If you read all of this, I appreciate your time and attention that was definitely not necessary to give. If you did read this through, and managed to understand any of it, any words of advice you might have would be appreciated but I very much understand if there is none to give.
I don't have anyone in my life who makes art, much less anyone who knows the first thing about animation. So I have absolutely nobody to talk to about this stuff, hence the screaming into the tumblr void.
#rolling with difficulty#rant post#rwd blue#i am only including rwd tags so that people in the fandom who know about this project can find out why it isn't done yet#i know no one is mad at me#or honestly probably even cares very much#but my brain has convinced me i have failed an entire fandom bc anxiety is lovely condition
0 notes
Text
I was going to say something, but I'm so tired, I don't quite remember what.
I think I was going to whine about how much I wanted that dumpster fire lamp from Tumblr, but fine, if I can't have it, I'll just throw it on my tottering pile of ideas that I have that I'll probably never get around to.
I really need to figure out how to.......... something with my sketchbook. Like, this probably isn't normal, but when I'm working digitally, since I can turn layers off, I will often work like three or more projects in the same document. It's kind of vaguely a little bit like having sections in a sketchbook, or if my sketchbook was in a binder, maybe shoving similar projects into one page protector.
But then of course, shit gets even more lost and buried than it would in a sketchbook, because instead of happening to flip past it while hunting for another project or a blank page, I have to remember the project with my brain, or be willfully hunting through my digital art program files.
On the other hand, the cool thing about working digitally is, I can make copies, change colors, erase and completely redraw. If I print out sketchbook "pages", sure, I can print out my studies or mood board or whatever, maybe that's a page or two, and I can print out any tentative patterns, in the case of beadwork. I can print out sketches and linework, but when do I hit print?
I guess that's the real question. When do I hit print? And then, where do I put my work? In a binder? I guess in a binder, I could use sheet protectors, and then maybe gather up any progress? Like, going from a sketch, when I'm drawing, to linework, to color. Or inspiration for a project, an original pattern when it's ready to bead up, and then any alterations when I've beaded it?
The thing I like about sketchbooks is, they're organic. You don't really curate a sketchbook. Cutting and pasting things into a sketchbook on purpose........ feels disingenuous? My logical brain knows that a sketchbook is whatever the hell I say it is, but my gut says this is not how to make a digital sketchbook a little more analogue.
But if that's not how..... then how??
Myself, personally, if I ever end up pursuing this, a) it'll be during a depression, b) I want to do it in a spiral bind notebook. Sketchbooks tend to have nice paper that will hold up to the weight of any added media, like more paper, and I can just tear out any blank pages as the sketchbook begins to bloat.
Another idea would be, I could PoD it. This really only works for collections that I've managed to get a good bit of pieces in. I wouldn't really want to do this for a book that wouldn't have a decent enough number of pages.
Maybe trying to make my digital sketchbook more analogue and accessible to my old-school brain is a dumb idea. But really, I can't describe for you the number of ideas I've had, scrawled into my tablet and they're just gone, poof! Buried fifty documents back, never to be seen again.
Whatever. I'm going to continue weaving Eeyore. Honestly, really, I should finish the neon triangles box..... Maybe I get more pizza. I'm just about food fatigued on pizza. Burjer? But if burjer, than chimkn nugg.........I vaguely want Jimmy John's......
0 notes
Text
i had this idea that has turned out SO well and im obsessed now
#beeep#THE IDEA IS. use tablet (normal. phonelike. has genshin#et cetewa) as a DRAWING tablet#because. my drawing tablet is very very very old and the pen needs to stay plugged in to work and even without any of those issues#i still find it easier to draw when im seeing my hand#ANYWAY#it worked and now i can access rebelle on my tablet hee hee hoo hoo#the only issue is that it loses power faster than the link to the computer charges it#so i have to be patient and let it charge -_-#but like i am so psyched for my cool idea that probably everyone else has had#and maybe im late to the party BUT IM AT THE PARTY NOW AND IT ROCKS#i think. i might actually *se m*ney to get the full app#because the trial expires in 3 days.... and its so good#rolls around#so i can do the sketches in the art program i normally use (the tablet one)#which is workable? but i like rebelle better#watercolors go brr
2 notes
·
View notes
Note
Hi! I adore your art, it’s so beautiful, and was wondering how you draw heads/face shapes? No pressure to answer by the way. I just tend to struggle with getting the face shapes to look normal and was wondering how you start at least- again you don’t have to answer!
hi, thank you so much!! i use a pretty stylistic approach to faces (and my sketches are veeery rough lol) but it does have a base in knowing what structure is underneath the skin, so anatomy fundamentals will aaaalways help (and references if you're struggling with a pose). but with that said, i used Warriors as a guide for this and hopefully this answers your questions! everything under the cut.
Step 1
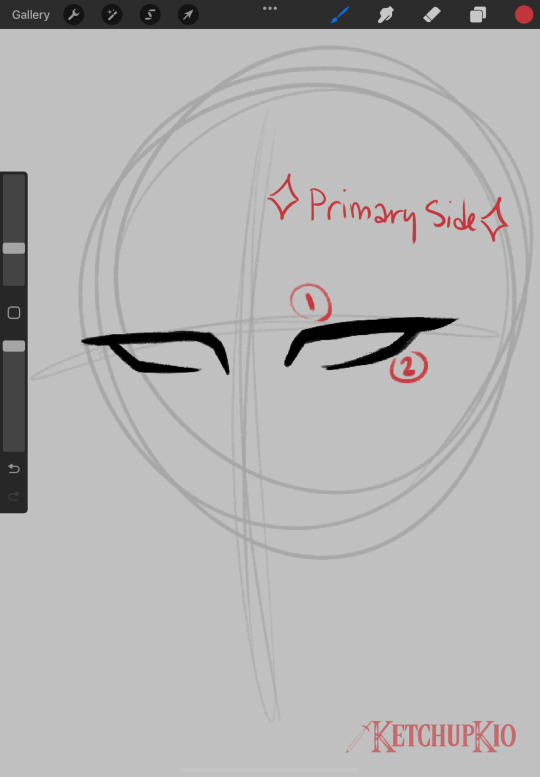
i start with a circle and the standard cross shape guidelines for the face on a layer with much lower opacity. the top of the circle is irrelevant and will get shaved down/refined later when i'm ready to do the hair, but i like having the full circle when i'm starting my sketch bc it just makes me feel better. if I'm trying to block out a full pose i'll usually sketch the jawline too, but i didn't this time. (note that if you're newer to drawing and not used to knowing where the face shapes go, you can use more lines! no shame in that, whatever works for you)
keeping in mind which side of the character's face will be more towards the viewer (primary side), i draw the basic shape of the eye first-- upper then lower lash line. repeat on the other side and adjust as needed by flipping your canvas, though i usually wait till later when i have more features on it to do the first flip and something looks wonky. i did a pretty decent job this time lol.
i usually use pretty short strokes when i draw because i use an ipad and i don't like to rest my hand on the screen. this was different when i used sai, i had a lot more continuous strokes then and rested my hand on the tablet, but the change in medium/program got me to do things differently. with smooth pens you're going to want to use longer strokes usually, but with fuzzier/textured pens i find you can get away with shorter pen strokes and just erasing.
Step 2
i add the irises and nose, then draw the beginning of the eyebrows and then go towards the outside of the face, indicated by the arrow. primary side first usually. the eyebrow closest to the nose should either touch or could hypothetically have a line touching the bridge. the length of the eyebrows is up to you, but usually natural eyebrows extend a little past the outer corner of the eye, so it just depends on your character. here i sketched the jawline too on the guideline layer. feel free to adjust proportions as needed.
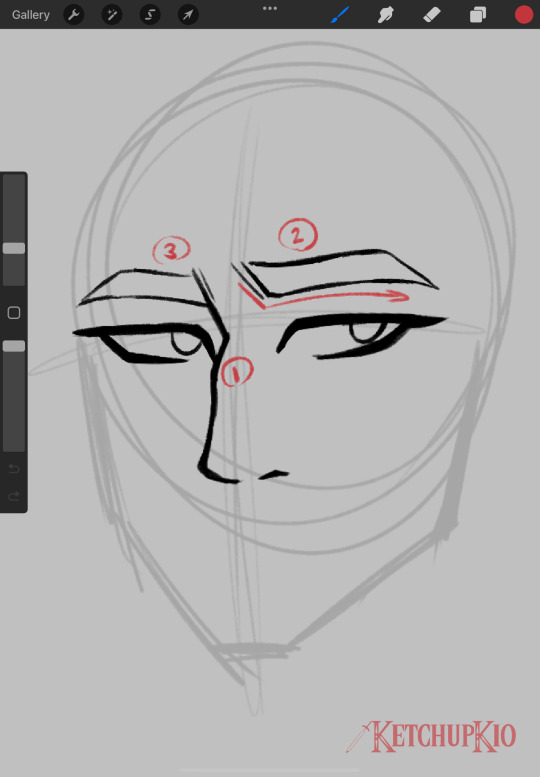
Step 3
jawline! all my jawlines start with the same shapes, they just vary from sharper to rounder depending on the character. Wars has a slimmer, angular face with a strong jaw and chin, so his lines are usually pretty sharp and square. sometimes i put the jaw/neck/shoulders on a separate layer than the facial features, but it just depends. here they're on the same layer.
starting from the primary side, i draw one line down, then another line down on the secondary side. then i connect them to meet the chin, which should always fall in the middle of your face's centerline (or where you've put the centerline in your mind's eye bc my guidelines don't always stay accurate). i usually fiddle with the jaw a bit with the transform tools to make sure it's where i want it to be.
i've also added eyelid creases (the top, curved line is the approximate ridge for the eye socket, i just like doing that) but i'm not fussy about when i do that, i just did it here :shrug: imo eyelid creases help the viewer more clearly see the structure of the face and where things are supposed to be, but that's just the way i do it. and it's also to fill space lol
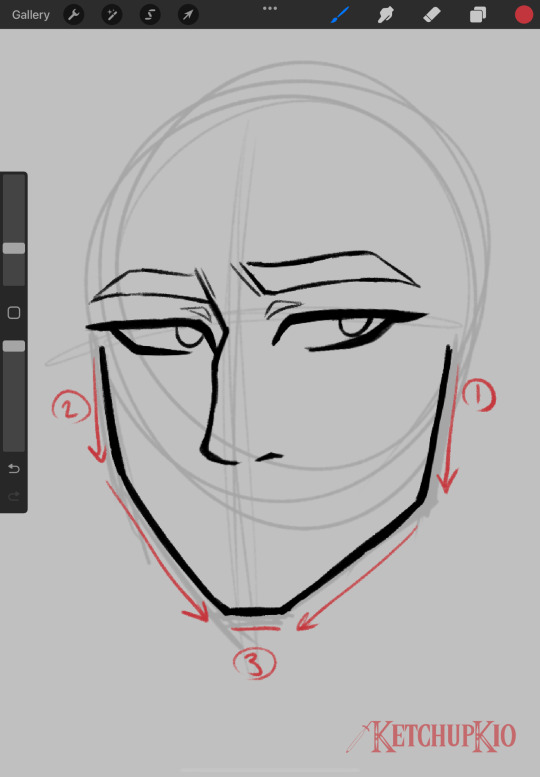
Step 4
mouth and ear(s)! i wait until after the jawline to draw the mouth just so i know how much room i have for the expression. if you're drawing a smile or something and you want it to be lopsided, the higher side should be your primary side, just trust me. when drawing the ears (or just singular ear in this case bc i wasn't feeling drawing a second one) i usually do SOOO MUCH warping and resizing. on a real person's face, the top of the ear lines up w the tail of the eyebrow and the bottom lines up w the tip of the nose. usually with my style, it ends up being the corner of the eye and the nose, but it's just depending on what looks right. poor wars' bad ear is on the primary side so he does not get the full long hylian ear. i cannot draw upturned hylian ears to save my gotdamn life.
i've also gone ahead and drawn the neck and a little bit of the trapezius muscle. y'all i BEG of you to look up how the neck muscles, tendons, and bones work bc they are so important, i think i reblogged a post about it a little while ago? or i at least saw one. everything is connected and all of the lines lead down to the divot of the collarbone. the back line of the neck should never be before the corner of the jaw and the tendon should lead up to that corner. very very very important. also the collarbones should point to the start of the deltoid muscles and that's important for posing, but i didn't draw that much for this. neck width varies depending on your character's build, so someone skinny would have a thinner neck than a chubby or muscular person.
i added the nose and cheekbone lines i always do in this step. i think they look nice and fill space well, and they can help indicate the angle/curve of the cheekbone when the face is more tilted. just my thing i've done forever tho! sometimes i wait until after i've done the hair to draw them so i know they can be seen (and i ended up moving them for this drawing bc i didn't wait vnkdsnl)
in preparation for the hair, i added a guide for the hairline and refined the shape of the skull to where i actually want it to be
MAKE SURE TO FLIP YOUR CANVAS TO MAKE SURE EVERYTHING LOOKS RIGHT!
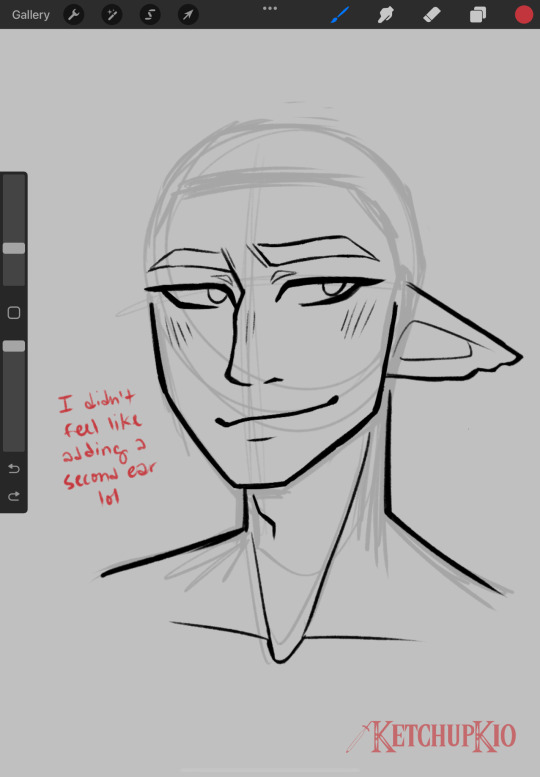
Step 5
hair! it's always on a separate layer for me, and that has to do with how i color too. i do the little floofy thing at the swirl of the hair first, at the back of the part, then i start the first line for the swoopy side of the hair (line 2), then the other side. i guess you could call it the major side (side w the most hair) and minor side (side w the least hair).
i usually use a lot of lines to indicate hair direction, but it just depends on your style. i'd recommend identifying the major shapes of your character's hairstyle and replicating those whenever you draw that person. so for wars, it's the big bump where his part starts on the major side, the top of the hair usually stays flat, and it waves out to the side. on the minor side his hair is shorter and flips out and there are waves and stuff in the back. what i didn't draw in this step that's an identifying feature is his sideburns, which curve inward, but that's next. warp tool is a godsend for hair.
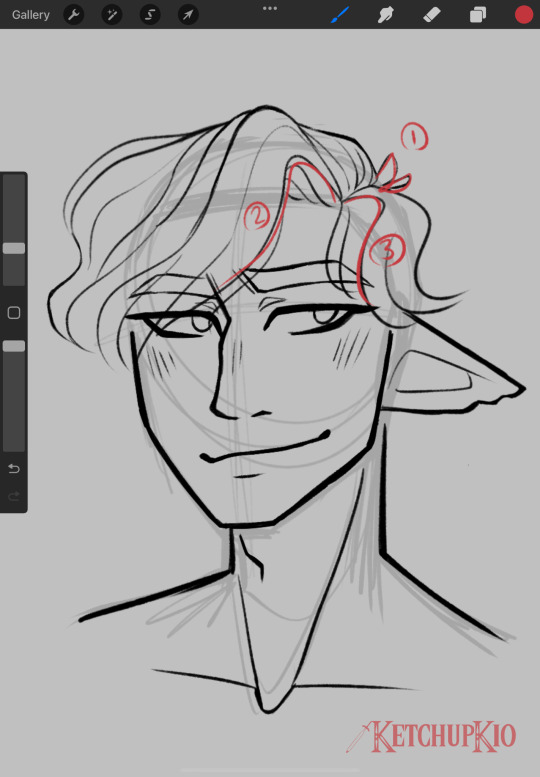
Step 6
finish the hair! refining shapes, floofies, the back, you name it. it's all about filling in space and making sure the weight is right before you start erasing lines underneath it. i lower the opacity of the face line layer to make sure there's no weird/stray lines.
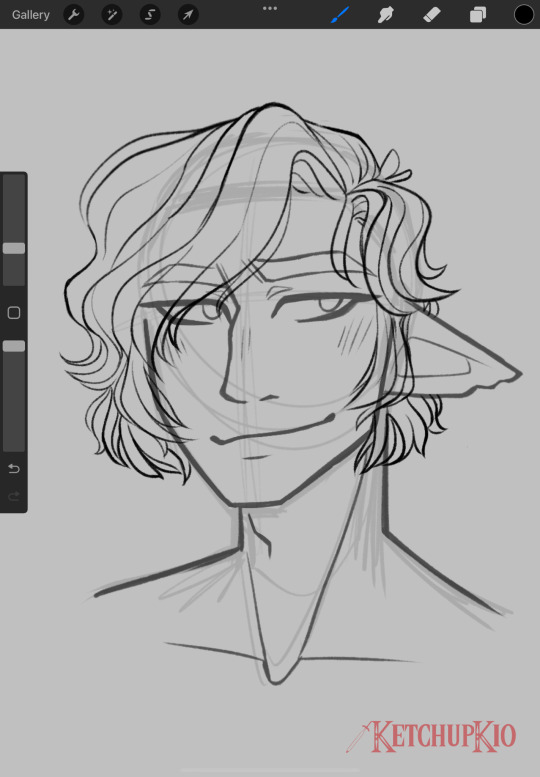
Step 7
add finishing details, erase lines, and you're done! at least with the lineart bit lol. if i know it's just going to be lines, i add scars here, but if i'm gonna color it, i leave scars and other face markings for the coloring stage. and that's it!
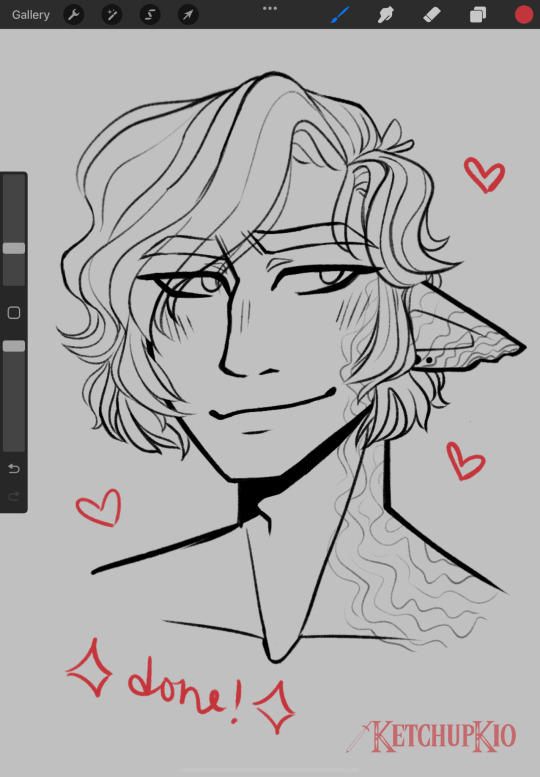
i hope this was informative lol. thank you anon for asking, i had fun doing this!
43 notes
·
View notes
Note
do you have any advice for digital artist who is just getting started with digital? i have a cheap tablet (wacom) and i use photoshop. thank you!<3 sorry for bad english
ok first of all your english is really good, dont apologize <3 second of all yeah i can give some advice! keep in mind that i am not a professional by any means, im just a 20 y/o who's mostly self taught. took a couple of classes in high school but honestly they didnt teach me much beyond what i already knew unfortunately. still, self taught is something, and clearly my art is decent enough that people enjoy it and are coming to me for advice, so! here's a list of advice i can think of.
stop using photoshop. this might be a bold one to start out with, but don't use photoshop for drawing, man. i know how to use photoshop REALLY well, i'm like taught in it. and that program is ASS even at editing photos, much less drawing. it's outdated and overpriced and really needs to stop being an industry standard. it's one thing if that's the program you've been using for years and you're comfortable with it, but if you're just starting out? ditch that shit. i personally use both sai2 and clip studio paint, but both of those are paid programs. not that i paid for them, but yknow. if you don't want to pirate or pay, some good free programs include krita and sketchbook pro ! also most programs come with a free trial you can test out.
the deform tool is ABSOLUTELY your friend, especially in the sketching phase. the face looks a little off? adjust it a bit instead of redrawing it. make it look perfect. leg not in the proper place? grab it and move it! just keep in mind that you should generally do this before you line/paint/etc. it's best to make these adjustments to the sketch, because oftentimes deforming something will reduce the quality of it. this depends on both the program and the amount of adjustment being done, but as just a general rule best to get this out of the way early on.
flip your canvas. a lot. this will REALLY help you. say you're drawing a guy standing up straight, and you're like huh, this looks kinda weird, but i can't tell why. it just looks super off for some reason. flip the canvas, and i can promise you that that drawing will be leaning all sorts of ways that will be immediately obvious to you once you're looking at it from that angle. make it look good from that angle too and it'll look WAY better from the normal angle.
on the same note, rotate your canvas! it'll really help you out just like rotating a piece of paper when you're drawing traditionally. a lot of people seem to just... not want to do this for some reason? but it's really a big help.
using references isn't just okay, it's something you should ABSOLUTELY be doing. idk why people online used to constantly cry about how using references is cheating, but it's not. using references is a great aid and will drastically improve your art.
use clipping masks !! say, you want to put some sparkles on your character, but you only want them on the character, not the background. instead of tediously going around the character and erasing the leftover sparkles from your brush, you can just make the layer of sparkles a clipping mask above your character layer, and that's it. no cleanup necessary, it'll only be on your character. this is a HUGE help.
experiment with shit!!!! play with brush settings, layer effects, textures, anything. get to know your program, and use everything you have at your disposal. nothing worse than finding out about a feature and thinking 'awh man i wish i knew about this three year earlier' but you just never found it because you never bothered clicking on that button.
i don't have much else at the moment, but if yall have any specific questions go ahead and hit me with em i guess
16 notes
·
View notes
Note
In these apparently trying times of "lack of content" I was wondering if we could get a glimpse behind the tablet and see how you write! Could you talk about your process and how you keep track of things and parse out your story? Do you storyboard or write rigorous notes? Is it all in your head? I am super curious about your system.
Oh yikes I’m about to disappoint a lot of people.
Okay, here’s the thing - I cannot physically keep notes because I get distracted and forget to write things down. I’ve tried keeping notebooks for WD!Steven stuff and I have come to accept that it’s only for show. I barely use it. I cannot use my memory on the effort of writing notes - I’d much rather use that energy to remember things in my head.
I brute-force everything through my mind palace. My mind... house... mindshack.
My process is simple:
Step 1) THINK
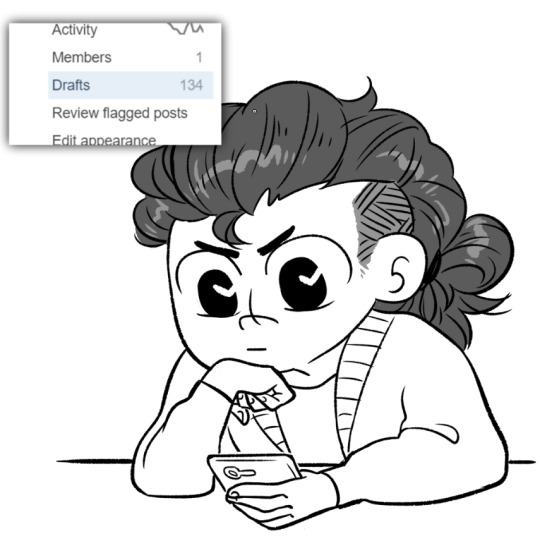
I constantly get asks that I feel might be good for the comics. I’ve made posts on this before but the main way I decide if I’ll use an ask is:
Is the ask addressed explicitly to Steven (or another character?)
Is the ask not giving away any fourth-wall-breaking information?
Is the ask actually ASKING Steven an open-ended question or TELLING Steven to do something?
If the ask is too vague (”so what do u like”) or gives away too much (“Steven don’t u think ur actually half-human? If Rose had a baby it would be half gem half human. Wouldn’t that be the same as u? You should ask Rose about a gem named Spinel I bet she would freak out!!!!!”) or if the ask is just pushing for Steven to do something instead of asking (”go to the moon base!”) then I almost always ignore it.
Step 2) Storyboard!
After choosing a question, I’ll sit and… stare at my desk/the wall/twitter without seeing it and instead storyboard the entire comic in my head. Sometimes this happens in a matter of minutes. Sometimes I’ll work it over in my mind’s eye for days before I like it. This includes the dialogue.

Yes, I do this while driving. I have an hour drive to work. No, I have never been in an accident. My autopilot works really well. I guess. Probably. I often have no memory of the actual drive itself but the comic gets written.
Step 3) Sketch!
Afterwards I go into my drawing program (MediBang Paint) and sketch out each individual panel on a layer. Sometimes the sketches are detailed. Sometimes they are just sloppy action lines to remind me what I’m going for.

I script in my head WHILE I’m drawing the sketches. I try out different lines as I go through each panel and see what fits the most. This sketching process takes about 3-5 minutes per panel.
Step 4) Lineart!
After I’ve sketched at least 50% of the comic, I go back in and start doing lineart. I will do this mindlessly - it is only at this point that I allow myself to listen to a podcast, or music, or have a YouTube video running while I draw. (I cannot sketch/storyboard/script with any sort of noise on. Has to be dead silent.)
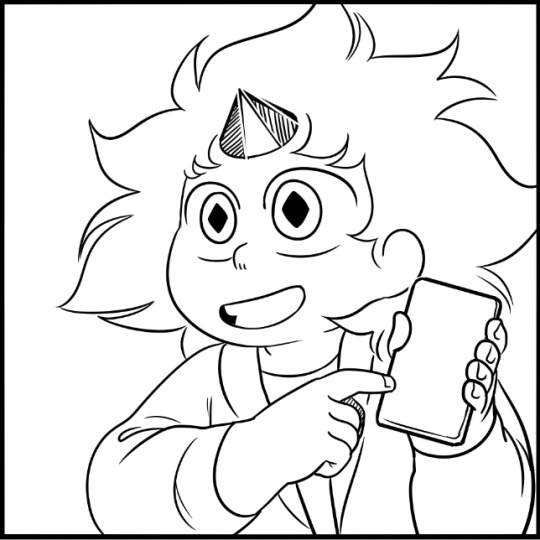
The initial lineart process takes about 10 minutes per panel if the panel is simple like the one above. If I go through the process of adding necessary details, patterns, or have to create phone background detail, or draw a background in general, then it will obviously take longer.
If I do color comics, it takes 3 times as long which is why I hate coloring.
For the Lapis arc I also added tones. It was not as annoying as coloring, but it still took me twice as long as an average panel because there was so much layering to be done between the water/lapis’ wings/backgrounds. It was not fun.
Step 5) Dialogue
After I finish the lines for ALL the panels, or at least 50%, I start going back in and finally adding dialogue and details. I do the dialogue all at once because it allows me to view the flow more naturally. I end up reading and re-reading the panels several times to make sure there are no repeating words and that it flows more or less like a normal conversation would.
This takes about… eh… an hour or so for an average 20-panel comic?
The bulk of my editing is done at this stage. I will go back through and re-read the finished comic several times and try to weed out weird details or typos.
If I find none, I post it to Patreon, because it’s a guarantee that I will find 3 more immediately afterwards. That’s how posting art to social media works. Also, many of my Patreon patrons are usually kind enough to point out any typos I’ve missed. (MediBang doesn’t have a spellcheck so don’t judge me too harshly…)
And that’s….. it. I post to Patreon, make any last-minute fixes if I have to, and then queue everything to tapas and tumblr.
And then I immediately begin to worry about the next comic. Because… that’s how it works.
I understand it’s not exactly a professional process. That’s because I’m not a professional! I’m self-taught, and this comic is meant to be for fun, not for profit. If I make a Season-finale comic or a season-start comic, I typically go through the same steps, except I add thumbnailing to the mix (drawing tiny copies of the pages on post-it notes to see how many pages I can fix it to.)
Hope that was… educational? I don’t know. Either way…

1K notes
·
View notes
Note
Hi, I hope your day is going well :)
I'm about to experiment digital art for the first time, and I'm a little nervous... do u have any tips (maybe about the art program ecc.)?
And where should I start as a beginner?
Hello dear🌟
Thank you, and congratulations on the new experience and I hope you find it thrilling! I'm not a tech savy or hardly know enough to use the full capacity of what those programs offer. But I can tell you few things about it, specially based on my practice coming from a traditional background.
But first, talking about art software; there's alot. Depending on what device you're using for a start. My main mane is Sai paint tool 2, and Clip Studio Paint, both PC windows solo and both are not free, so I recommend MediaBang. Its the closet professional free software out there I think. Can be used on all systems, windows android and iOS, if I'm not mistaken. So if you got a pc and android phone, you can easily draw on both with a drawing tablet that works on pc and android! (I only tried it recently tho so I can't tell its a smooth working method)
I was going to recommend you FireAlpaca too as it stood as a replacement for Sai for years but now I downloaded to test and it turned out to be another 'simpler'... mediaBang 8l
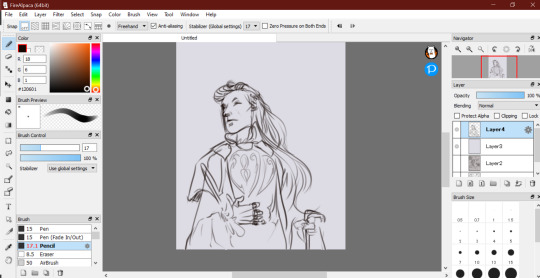
I think its a very simple nice way to get you started, its not cluttered and you can find labels easily, now I spent some time on it. It has wonder stabiliser, actually the best on any other software I used. I know it can be a help to get your strokes more clean but there will be ways the debate of not over using them so you wouldn't relay too much on them, which I think its valid, but we are dealing with computers here that has to process everything we move in a certain way, and if your normal strokes on it looks much awful on screen than what you normally do on paper, than some stability tweaking is much better than continuing frustration. (But that's just me side tracking)
The easiest steps into making digital art with any app would be:
Finding a favourite Brush. You can almost use one brush throughout the whole drawing process by minding the size and the density of the brush and really keep tweakingit to your liking. But of course, it can be much neater, and easier, to use a brush for each purpose. Using a hard ege brush like ink to draw lines or sharp edges. Using a soft brush to add shade or color or blend, you can use an airbrush. For blending colors, you can always use watercolour brush, smudge, or blur.
Using layers. One of the best things about digital art is the ability to use layers. You can use as many or few as you like. The starter layer can be the sketch, you lower the opacity and add a new layer on top to ink or define the sketch, when you done you can hide the lower layer by clicking the eye icon and you got yourself a squeaky clean mess, heh. You can also using the blending mode with layers. Let's say you want to add light to your painting, you add a new layer and set ilthe blending to "Add". Then choosing light orange color you draw the sun beam or light up few areas as you like. You can experiment with all of the blending modes as each create a different results and helps tie picture together.
Using Filter. It can help you adjust the picture to the desired hue, saturation and contrast. There's all kind of ways to fiddle with these, you can always Google them to have more understanding of what you're doing. If not, do what the rest of us surely do; slide those bars mad till everything looks pretty, hehe
This is just me nitpicking, but I love to erase with my favourite brush instead of using the eraser, cuz then you keep the pictures harmonious with brush strokes even when you erase something it wouldn't stand out too much in the picture and doesn't introduce unwanted contrast within the drawing's lines, if I'm making any sense. Anyway, you can do that simply by clicking on the transparent square near the colors.
The things the software vary the most on is textures and endless ways to editing the pic, and of course, how smooth the program works with brush strokes and editing them and huge files of canvas. But it all will come in time and you can learn about them easily to find what suits you the best by experimenting on them!
Here's links to more random art tips if any could help:
Art-ing attitude +Simple colour theory
Expressions and posing
Blur and blend
I hope this is of help in any way and I haven't confused you more x'
Wish you all the best, and cheering you on🙌🔥
250 notes
·
View notes
Text
Disabled, broke/no income, offering commissioned drawings
Sorry to keep posting about this. This is related to previous posts I made but I didn’t want to reblog them to add this because they’re already long.
Currently, I have less than $30 in my bank account and no income as I’m unemployed and haven’t yet been able to receive unemployment or disability benefits. I had a job interview yesterday (it felt more like pre-interview screening but w/e) but I don’t know if I’ll get the job yet, and if I do get the job $30 still probably won’t be enough to last until my first paycheck.
If you’re willing, you can donate to my paypal.me, but I am willing to offer commissioned drawings/sketches starting at $15. I’m not going to detail it too much because this isn’t an “official” commissions post, I just need some money. You can see examples in this blog’s art tag and my gallery website. It’ll probably be traditional (I need to fix my tablet drivers, hopefully I can soon) and for the starting price of $15 it probably won’t be a detailed full-color drawing. It’d be something like this dragon sketch or these character drawings (warning for mild body horror in the second link). You can buy one for more than $15 if you want which would probably get you more color/detail but please discuss that with me. If it is traditional, I may also be willing to send the original to you for a little extra (10% of the drawing, to a max of $5, plus cost of packaging and postage if applicable). If I’m able to do digital I don’t think I could add project files because the drawing program I normally use is very old so almost no one else uses it now, but if you have a suggestion for another drawing program that might be helpful.
It’ll be a queue, with five “slots” to start out with, technically other people can get in queue but if I draw their commissions I’ll wait until after I finish the first five. If you want a commissioned drawing, please let me know that before you send the money. Discussing the drawing would also be best before then. Probably best to reach me by emailing [email protected], but after you first contact me we can stay in touch by Discord or Telegram if you’d prefer either of those. If you’ve sent the money and I haven’t finished the drawing yet, you can request a refund, but depending on how far I am in drawing it I might only partially refund it.
If you can’t commission or donate that’s fine, sharing or reblogging this is also appreciated. Thank you very much for reading!
215 notes
·
View notes
Note
what are your biggest tips for beginner artists? or best learning resources?
based on my own experiences, watching speedpaints was always a fun way to figure out some methods for drawing in my early days. it was fun to watch the different ways people sketched and colored and rendered and seeing it be made right in front of me made it seem much more possible for me to create something like that as well
there’s a lot of lovely art youtube channels for some free education as well. jazza (formerly draw with jazza) is a classic, he has plenty of drawing tutorials, plenty of which i made use of. a more “advanced” i guess channel would be proko. they have playlists for how to figure draw and do gestures, and a whole playlist for anatomy of the human body for artists, which works pretty well for me personally, but it is very anatomical. if all those individual muscle terms are a bit too confusing, i cant guarantee itll help you, but it definitely helped me, just how my brain works. also they’re kinda funny sometimes. like the pelvis video where they slam dunked a baby doll into a cgi skeletons pelvis. but they also have plenty of other videos about like. character design and a bunch of other stuff i havent gotten around to but yeah check em out. that’s just two channels, but they’re a good jumping off point into other channels and artists you can learn from.
so that’s like, general education of how to draw, and when it comes down to making the art itself, here’s my number one rule for beginners:
TEST YOUR SUPPLIES BEFORE STARTING AN ACTUAL DRAWING.
that means make sure your liner pens wont smudge when you color over them with marker or paint (made that mistake myself and i got sad) make sure your paper is good for whatever media you’re using (i.e. maybe dont do wet media on paper made for dry media), be wary of bleeding, see how long it takes any wet-ish media to dry (that includes pens and markers)
that also means test out the brushes in your drawing program, mess around with layer modes and selection tools, figure out what shortcuts do what, and if you’re using a drawing tablet of some kind for the first time, do a good amount of practice drawings to get a feel for it, especially if it doesnt have its own screen. (digital art is less stressful in that regard cuz of the undo button so yeah, just a little note there)
in terms of what supplies to actually get, uhhhh idk much about traditional art. im not well versed in that field
digital art though? firealpaca is free and a good start for beginners. not only does it have a lot of good functions for normal drawing, but you can also make simple animations with it. it has an onion skin mode and a website where you can convert the layers into frames and make it a gif but you can also do that part on other sites, but yeah its p neat.
another free option for animation is blender but i have yet to figure out how to use it, so yeah. there’s tutorials online tho, you can do both 2d and 3d animation, and even blend (heh) them.
but yeah, that’s my advice. and if you do digital art, SAVE OFTEN.
53 notes
·
View notes
Note
hi! i am a ridiculously huge fan of you art. just want to ask about your creative process and what advice you’d give to those trying to find an art style or start out digitally? any tips really on creating digital art! (and lastly, your most recent artwork of the handler blows my goddamn mind, the colours, the style, everything, it’s perfect)
hello! thank u so much thats so sweet! ill answer in parts!
creative process:
i think most times i think some shit up and i save an unhealthy amount of reference pictures, and based on that i try to figure out a cool/harmonious composition. i think the most important part in my process is mapping out the basic shapes / silhouettes, cuz its a “quick” way of knowing if yr design will work, like if it’s visually engaging. it’s gotta work from the silhouette stage. then i pretty much just fill in the details (face, lineart, clothes, BGs, etc).
art style:
art style comes on its own tbh. developing an art style has more to do with experimenting with stylistic and aesthetic choices so dont be afraid to try out different styles and tecnhiques! i cant stress this enough though, style is not as important as hard drawing skills like anatomy, lighting and color theory. id say start with the “boring” stuff and work your way from there! it will make your art exponentially better. master those pillars and then go crazy, go stupid.
digital art tips (ill do my best):
theres’ a lot of hardware out there, ive only ever used Wacom and theyre really good! the simplest wacom tablet is guaranteed to do the trick and last for YEARS on end
try to not break/lose your tablet pen. theyre expensive
if you can, try out different software! tbh i only use photoshop cuz im a pussy and Clip studio scares me BUT please try different programs
WEAR GLASSES. even if you dont regularly need them, get you a pair of screen glasses cuz vision deteriorates quickly (been there done that), protect yr eyes
experiment with layers and blending modes! its really fun and you can achieve some crazy stuff by using them, dont b scared of em (i was)
if your software offers tools like 3D models, or some other stuff that will make drawing easier, USE THEM. it’s not cheating, and it will save you a lot of time and frustration
if your computer can take it, work in 600 dpi resolution at least (just learned this the hard way recently)
when doing personal work draw stuff you ENJOY drawing, pick things you can look at for 6+ hours without getting sick of it
try to practice on the tablet as often as possible, do it regularly, not only to keep growing/improving, but especially to maintain the progress youve made
draw things that scare you. most times its just a mental barrier, youll be fine even if you think its shit the first time. just keep going
progress is not lineal. sometimes youll like the result, sometimes you won’t and that normal and healthy. be prepared for that
when analyzing/critiquing your own work, pretend it’s somebody else’s. youll be more honest with yourself and less destructive
KILL YOUR DARLINGS, dont get attached to drawings. if you dont like something / a sketch is not working, it’s better to ditch it and start over
dont be too hard on yourself, and have fun!!
this ended up being really long! i hope it helps! <3
34 notes
·
View notes
Note
yo just curious because i just got an art tablet and i think your art is really cool,, do you have any tips for a beginner or like what brush settings to use or anything . idk if its normal but i feel like such a dummy trying to use it -_-
honestly i started drawing digitally when i was twelve like eight years ago so i dont really remember what the transition was like but id honestly recommend experimenting a lot whether youre making full pieces or just doodling; some techniques working with traditional transfer over to digital but a lot dont so figuring that out is helpful. drawing on a tablet and looking at a screen takes getting used to but practicings the only thing thats gonna get you used to it so do a lot as well. there’s also not one way to do art besides just “lines with color” and “fully rendered painting” so study peoples techniques, i did lineart for sooo many years before realizing that it limited the flow of my drawings so now all i do is clean up my sketches and use that as lineart and i highly recommend trying that if youre not happy with your lines
lineart definitely doesn't work the same and its sooo important to use big, long strokes to get a good look whether its a sketchy style or not. just drawing circles and drawing two dots and then connecting them will get your wrist used to lining too, look up inking exercises to make your lines look better. i really recommend a textured brush for lines to start out because it doesn’t need to be super clean looking. people say “brush settings dont matter its just skill” but it can make or break the look of a piece, look up “brush settings+ art program” on yt and google and pick out some you like and try them. but also brushes arent everything and you can make art look good w any brush! theyre there to assist your art and make it more polished but the form is what really matters
look up tutorials! you dont have to copy them directly but even learning one thing from them can help you in the long run
use the bucket tool for coloring it saves soo much time. and try and learn tools in your program bc theyre there to make your life easier
remember youre learning a completely different medium with tons of its own techniques that can produce to many unique styles so dont be discouraged starting out, rn is just an awkward stage but as long as you experiment youll be able to find a method that works for you. gl!
#Anonymous#long post#feelfree to ask anything specific as well im not an expert but im happy to help <3
2 notes
·
View notes
Note
Hi, I think it's no secret that I love your art, both digital and "physical" (?). I was wondering if you could tell me what art program you're using for your digital art. I've recently bought a tablet and I'm sort of taking my first steps with digital art at the moment. Also, do you have any tips for beginners? And what did you use to animate that Jared art? I works greatly appreciate any tips you can give.
Awww thank you my most excellent friend. 😄 You’re awesome!🌟🙌🏼 I don’t often get art asks and I’m happy to chat! 👍🏻😄
But, Disclaimer! I’m a beginner at digital art too! I brought my first tablet just over a year ago and have been learning as I go. So don’t use me as an expert 😋 but I’m happy to share my experience.👍🏻😄
I have a secondhand wacom tablet and stylus (the type where you draw on the pad and look at a separate monitor. I think the drawing tablets with built-in screens (or an iPad etc) are much easier to use, but I don’t have very much money so I use what I have 🤷🏻♂️😊) - and I draw and paint in photoshop CS6. (another secondhand copy because the subscriptions for that are expensive too! 😅) But if you want a free program to get started on I found SketchBook pretty intuitive to use and I have heard good things about Krita.
My top tip (after practice on stuff you love doing, so that you have fun!🤷🏻♂️😄) is that it does take time to get used to drawing in one place and looking in another. even drawing on an iPad is different. it’s a very different feel from traditional art. you need to use different speeds and pressures to get clean line work - and I’m still working on that! 😄 so don’t be discouraged if you suddenly see a drop in how cleanly you draw. Just keep practicing until it feels natural. Or do what I do and zoom in and go slow and keep your hand on the Back button 😁
And my next tip is to use layers. The more the better. Then you can draw on top of what is already there but if you make a mistake you don’t have to start over because everything before that is safe on a lower layer. So the background is it’s own layer. sketch on another layer. Do line art over it on a clean layer. Add block colour on another layer. Add shade on another, and highlights on yet another etc. so if you make a mistake in any one place your whole picture isn’t ruined. And later you can change the background easily or turn off the sketch once you don’t need it. Etc. (The Back button IS excellent for mistakes. But some programs only go back a limited number of times so layers are much easier if it takes a while to realise that something isn’t right.) l know because I make a lot of mistakes! 🤷🏻♂️😁 but everything is a learning experience. 👍🏻👍🏻👍🏻
Next: Save copies of your work and then don’t be afraid to try random stuff. Use strange brushes. Weird colours. Add some blurring or smudges. Click on a tool that you don’t know what it does. You can always back up or if the worst happens go back to the last saved version. 👍🏻
And to finish by answering your question about how I animate: Layers is how I make my animations too! 😁. I painted Jared as normal then on top on a clean layer I painted over his eye and moved the irises a little. Then over that on another layer I moved it a little bit more. And so on. you can turn the layers on and off in order like moving a flick book. This works well if most of the animation is static because you only have to re-draw the bits that move, the rest will just show through the layers. So I saved jpegs of each step that had a new layer. then put the 6 jpegs together in a gif maker app. (I’m fairly sure there is a way to make photoshop make the gif for me but I haven’t found that yet.😄🤷🏻♂️) I have no idea if that’s how people usually animate - but that’s the way that I did it and I’m quite pleased with how it turned out. 😊
I hope this was helpful, and if you have any questions I always happy to share my process 😄 but like I said: please remember that I’m learning too, so there might be easier ways to do things and better advice out there. But for now we can all learn together 👍🏻😄
7 notes
·
View notes
Note
Hope 2020 is off to a good start for you! I was wondering if, providing you find the time, you'd give us a behind the scenes look into your creative process? I know via previous asks what tablet and program you use, but your art is so unique, I'd love to know more about what goes into it. Do you sketch first? Do you use references (e.g. for poses)? What brushes you use to get that traditionally drawn look in most of your art? The step by step process from sketch to colored art? I really love it!
hello! you too💖 thank you so much! there’s nothing really that special that i do, but i can try and give you an insight!
i tend to sketch first on a normal sketchbook, i use mechanical pencil. sometimes, i go through a pencil phase again but it doesn’t last long lmao. i use references a lot! i do tend to draw from my head too but i find that using references helps the drawing look more natural and accurate! and you can adapt whatever pose you’re using to the vibe you want. my pinterest is at rosyumie and my inspo tumblr is at ilhxyz. there’s a ton of albums there for characters but i use it often. i tend to search for whatever i’m looking especific too.
as for my process, as i said i sketch first. at my home, our printer has less settings so i just use x1200 res, jpeg and greyscale. at uni, i do 300dpi, jpeg, high quality. afterwards, you could use photoshop (or even csp probably has these settings) but i use pixlr to adjust the levels of darkness and brightness. i find that i don’t need this as much when i scan stuff at uni but at home is very necessary. the main reason i use it is because it makes the size of the photo smaller, like a scanned picture can be like 5MB and sai hates big files like those so i have to make them smaller. i tried switching to ps but it only made the file larger and i didn’t wanna fuss too much so i just stick to what i know. also, sai doesn’t give you much room to edit photos and i need it for the lineart to be crisper.
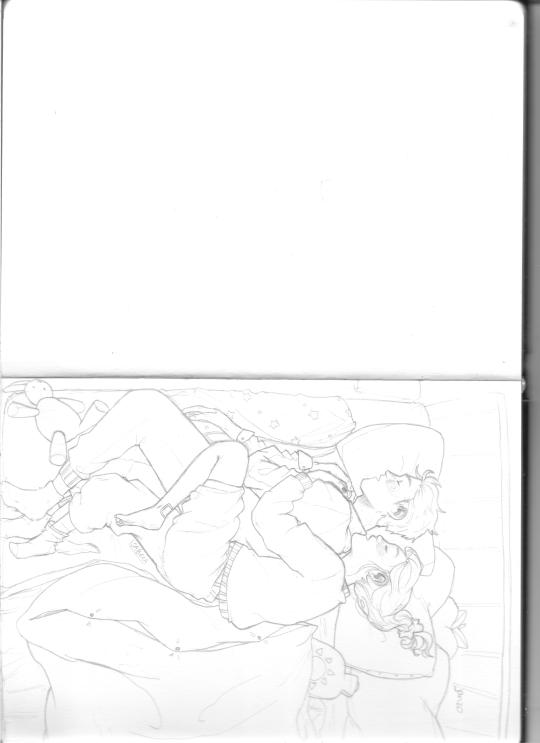
this is the straight out of the scanner. which looks pretty good because i took the time with the lineart haha
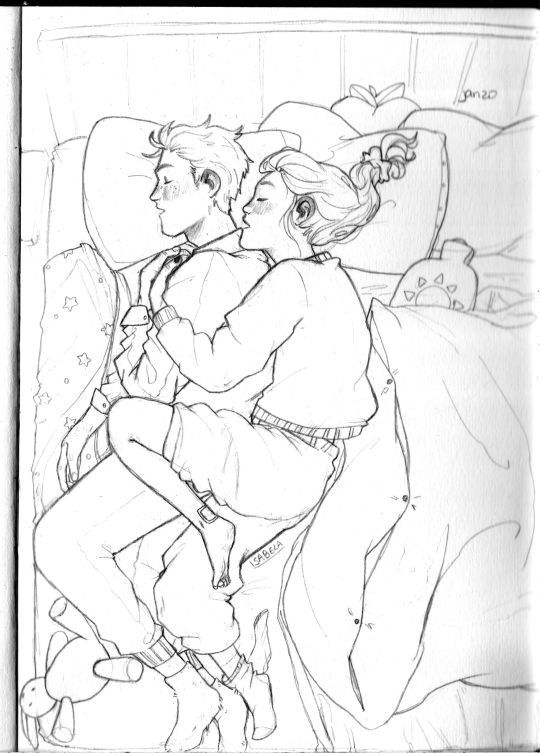
this is what it looks like after i edit the levels. this way makes it easier for me to clean stuff up (even tho there’s that smudge on the right. when this happens i lighten the image enough to match and do lineart on top). i clean the images by erasing.
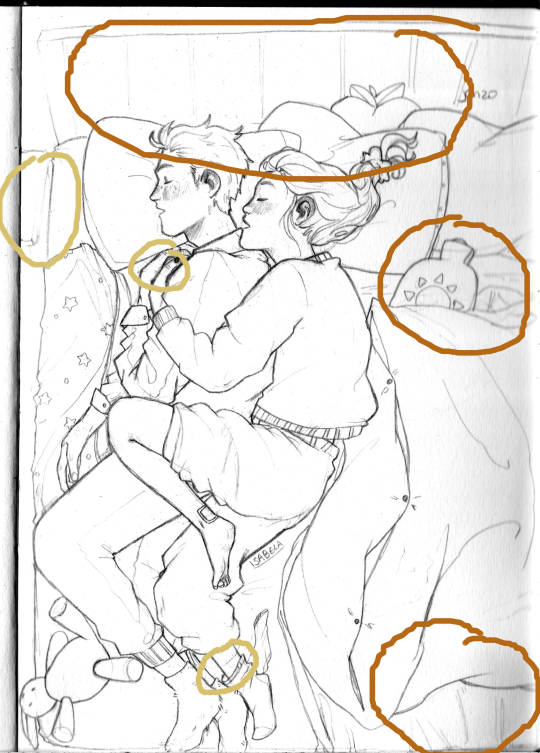
with this brown orange highlight i had to lighten and redo the lineart. with the greeny-yellow ones i erased to look neater (the leg/hands) and at the top i erased that completely and did new lineart. with this piece, i knew sunday’s head was something i had to adjust because it’s bit too big for her body and in comparison to beckett’s that looks a bit small. i also topped up the lineart on her ponytail. cleaning stuff is what takes me a while to do.
when all of the lineart is clean and done, because i erased a lot of the image, i add a white layer on top of the sketch, make it multiply and transfer down the layer so it’ll fill in those erased bits.
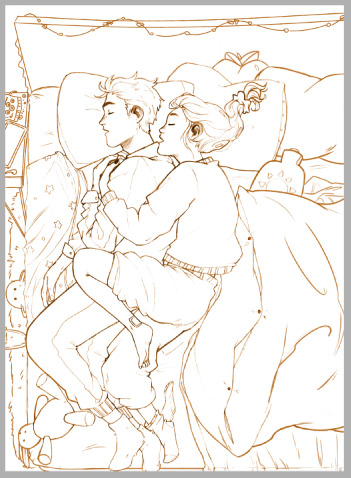
to add a color to the lineart i use the overlay layer with the color i want and then transfer it down. i move on to flats!
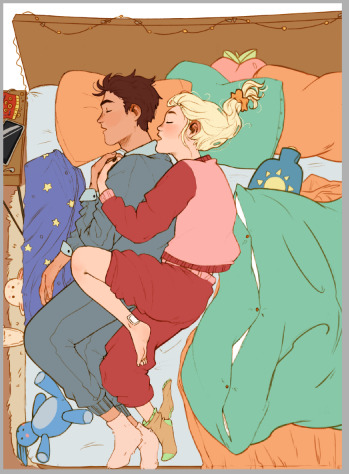
i have beck’s and sunday’s color palette saved now because of the triplets. afterwards it’s just a bunch of multiply layers and overlays and luminosity! i guess i could go on on another post since this is massive already! (if you want of course)
as for brushes, i use the normal default pen tool to color flats. i think i might have added texture to it actually.
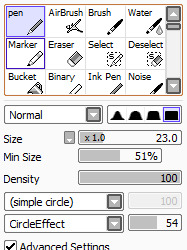
for lineart i use this pencil one.
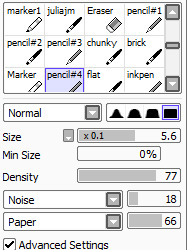
i use the default marker tool for blush, blending if i need to. it was the main brush i used for the queen of cordonia drawing i did (to blend).
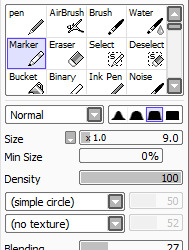
and last but not least, the water tool. used to blend shadows and blush and highlights.
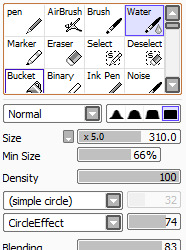
i have many other brushes but these are basically all i need and use 95% of the time. i hope this helps!
39 notes
·
View notes