#shrink tube cut to length machine
Text

Right sizing shrink film for more savings.
Using a generous amount of shrink-wrapping film might seem harmless or even the right thing to do. Better to overestimate, than underestimate when it comes to sizing, right? Wrong! Over time, you may experience shrinking profits as your materials costs increase. In fact, it is better to simply get it right the first time.
Nailing down your shrink film measurements is easier than you might think. Finding the proper film width and length will depend on what type of film you are using. You will need to know a few facts and measurements before calculating your shrink film dimensions. In this article, all measurements are in inches.
-Orientation/flow through shrink tunnel (This will inform which side is your product length vs your width).
-Type of machine (this will dictate what type of film you need).
-Production/Conveyor Speed.
-Product dimensions (always round up to the nearest inch).
-Width: parallel to the cut-off or cross seal.
-Length: parallel to the fold of the film, in cases of centerfold film.
-Height: In cases of products with uneven surfaces, the height should be considered from the bottom to the highest point of the package.
The most common forms of shrink wrap film are tubing, centerfold film, and shrink wrap bags. Conveniently, there is a formula to calculate the proper measurements for each kind.
Centerfold: Combine the height and the width of the item, then add 2-3 inches of wiggle room. (3 for larger items only). The formula for this is H+W+2.
Tubing: Tubular shrink film is typically only used for oblong objects. To determine the width of your shrink film tube, multiply the circumference of your object by 1.15, then divide your total by 2. In other words, (CIR×1.15)÷2. As for the length of your shrink wrap tube, simply add 2-3 inches to the length of the object.
Shrink Bag: For most applications, bags are the most beginner-friendly solution to shrink wrapping. They are already sealed on 3 of the 4 sides, which makes packaging your item simpler. To find the right width for your shrink bag, follow this formula: (CIR×1.13)÷2. As with our previous examples, the length of your shrink bag should be the length of your object, plus 2-3 inches.
Every application is different and finding the right size film can be even more difficult when your item is an irregular shape. When in doubt, ask an expert: 813 242 6995 or [email protected]
#pricing news#quickpakinc#resin pricing#quick pak inc#free pallet wrapper#stretch film pricing#coreless film#youtube#free machine#stretch film#shrink film size#right size shrink film
0 notes
Text
Automatic Cutter For Heat Shrink Tubing
Automatic Cutter For Heat Shrink Tubing
This model 100 automatic cutter for heat shrink tubing is a fully automatic shrink tube cut to length machine driven by stepper motor, designed for cutting heat shrink tube,soft tube,sleeve, ribbon cable,foil, paper and other thin and soft materials, set cutting length and quantity, auto feeding, working and stop.
Feature:
1. High speed: It can cut 100~120 cut per minute. (50mm long)2.…

View On WordPress
#automatic cutter for heat shrink tubing#automatic foil cutter#automatic tubing cutter#corrugated tube cutting machine#heat shrink tube cutter#shrink tube cut to length machine#strip cutters#tubing cutter for pvc tubing#velcro cutter
0 notes
Text
Pleated Skater Skirt (with suspenders)
Materials--
-3.5-4 yards medium weight fabric
-4 slide buckle adjusters
-1 zipper
-1 button set
-black thread
-regular and zipper foot
-iron
-dressmaker’s pins
-tape measure
-fabric pen or chalk
OPTIONAL: two small squares of fusible interfacing, to stabilize the buttonholes

[ID: notes for the skirt, including an overview or materials, and a key for the measurements for each piece.]
One, Prep. Always start by preshrinking fabric in the wash. This is also a good time to see how much shrinkage you’ll have to deal with regarding this fabric, so you know for the future whether you’ll be able to regularly wash and dry it or not. If you’re not sure how the fabric is going to dry and you’re worried about a lot of shrinkage, just cut off a small, palm-sized square, and dry only that. It’ll give you a good idea of how much the fabric will shrink before you shrink, you know, the whole thing.
While this is washing, it’s usually a good time to clear yourself a space to work. You’ll need a decent amount of floor space for this project initially while making the pleats, so keep that in mind when setting up a workspace. I usually try to work near outlets, because ironing is very important while sewing. Trust me; I didn’t think it was and would often bypass it, and that wound up leaving so many otherwise lovely projects a little off.
>Note: while waiting for the fabric to wash, I turned two of my slide adjusters into makeshift “D rings” because I didn’t have any lying around, and these are basically the same thing. (Also I still have like 40 slide adjusters laying about.) To do this, just take a butter knife and carefully pop off the middle bit of the adjuster. It took me five minutes, though I did keep getting distracted by an episode of Drawfee and my cat. This step is also technically unnecessary -- you can just hide the slide bit when you sew it to the lower strap -- but I don’t like the very faint jingling noise, so I removed it. It also looks just a bit cleaner upon close inspection, but if anyone is looking that closely at the hardware on your skirt, you may have other problems.
Two, Skirt. Take and decide measurements. My skirt is almost a mini-skirt when accounting for my body, so including the waistband, it’s 16 1/2 inches. Subtracting a 1 1/2in waistband, and then adding 3/4 inch of seam allowance (for the bottom hem and to attach the waistband), the length of the “♥A” measurement is 15 3/4in. “♥B” will be my waist measurement, 29in, x3, and then +2. In all, the length of my Skirt Piece will be 15 3/4in x 89in. It may seem like a lot of fabric now, but the pleats will be flat once ironed and sewn in place.
When you’re first starting sewing, numbers can be very vague and not mean much tangibly. A length that would be a miniskirt on me would not necessarily be a miniskirt on you. In these situations, it’s best to look at clothes you already own, and measure a final length from those. When cutting, remember that if you’re not sure, be safe and just cut a little more. You can always take away from the bottom hem later down the road, if needed.
Three, Waistband. The “♣A” measurement is however wide you want your final waistband to be, x2, + seam allowance. I typically include, in all, 1/2in of seam allowance for waistbands, because I sew two 1/4in seams into them. My “♣A” will be 3 1/2in, in all. My “♣B” will be my entire waist measurement, +2 inches. For me, this will be roughly 31in.
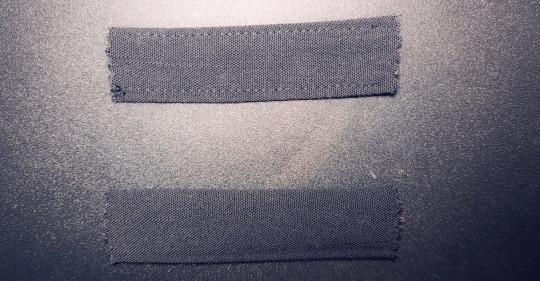
Four, Straps. Your straps, for 1in slide adjusters, will be 2 3/4in on 1/4in seam allowance. You will have to turn these inside out, and you want the final width of these straps to be just wider than the adjusters themselves to keep them in place. You’ll need the main strap, which will go through the slides to adjust the length to your comfort, and two much shorter straps, that will go through the D Rings. You can either cut two very long straps, and then trim the ends for your Δ-Strap pieces, or you can cut two “♦” pieces and two “Δ” pieces. The length of your “♦” pieces will be 50in (each!) when all is done, though. I like to have straps at a length where the metal of the slides are visible around my chest/shoulders, because I think it’s pretty, though this can be adjusted to be shorter if you’d prefer they only be visible from the back. All of these pieces will have an A measurement of 2 3/4 inches, while the “ΔB” will be 3in, to result in 1 1/2in loops. (You can make these shorter if you’d prefer, though I’d go no smaller than 1in loops, for both aesthetic and ease of assembly reasons.)
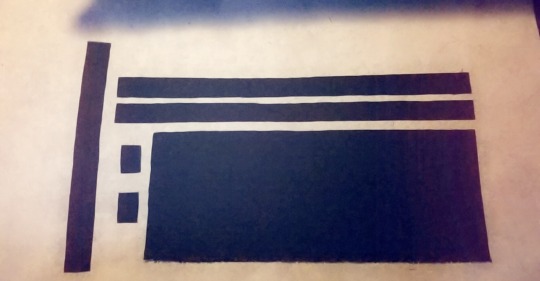
[ID: a picture of the six skirt pieces laid out together.]
Five, Hemming. Once your fabric has all been cut and sorted, lay your Skirt Piece out somewhere, completely flat. Before proceeding with anything else, take a minute to hem the BOTTOM of your skirt. You will regret it if you wait until you’ve pleated it. I like to do rolled hems for outside hems; take the fabric, fold it up 1/4in, and iron it in place. Then, fold it another 1/4 inch in and pin it in place. Secure with a straight stitch. This is time-consuming now, but makes sewing the seam much easier at the end.
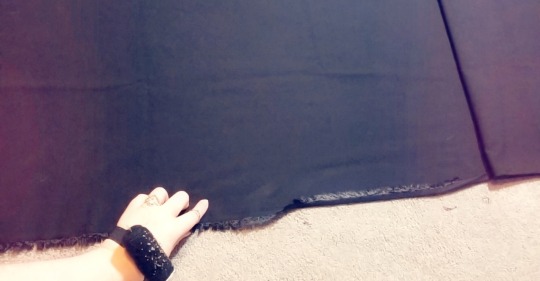
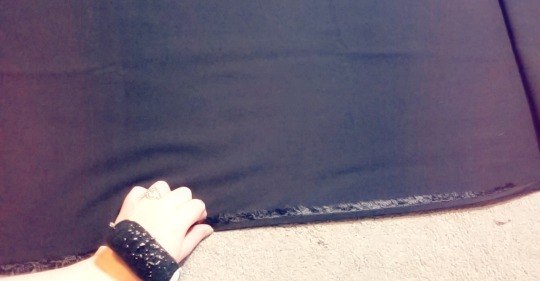

[ID: three pictures showering the process of a rolled hem. In the last picture, I’m giving a lil thumbs up.]
Six, Pleats. Starting at one end of your skirt -- I started at the right sight of my fabric, right side facing up, and I think this was a mistake, so start at your LEFT -- use your tape measure to measure one inch in, and mark it with some kind of pen, chalk, or marker. This flap will later home half of your zipper. (Note! I’ve used permanent marker on fabric before, and so long as it’s set into the fabric, it won’t bleed, and it won’t be visible on the final product.)
After that, mark every 3 inches, until you run out of fabric. Then, starting at the beginning, you will take your first mark and fold it over the second, to meet the third. The second mark will be the hinge of the fold. Think of it as the spine of a book, with the first and third marks being your pages. Repeat this until your entire skirt as been pleated. At this point, it should be the same length as your waistband. If you’re unsure of your pleats, you can do them all, and double-check your measurements, or you can iron and pin as you go. Whatever is best for you, but DO make sure to iron the pleats down flat, and THEN pin them in place. (You only need one pin per pleat, running parallel to the outer edge of the pleat.) I promise, this makes the sewing part MUCH easier!
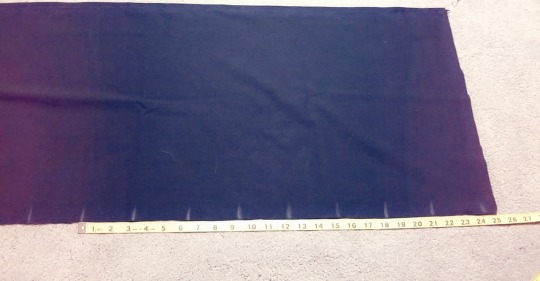
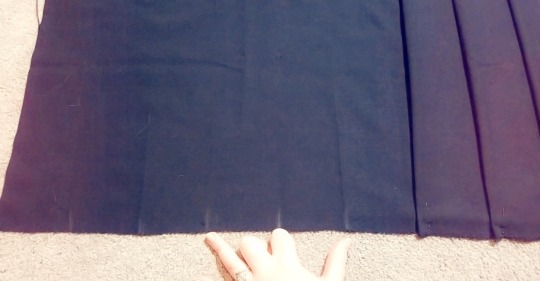

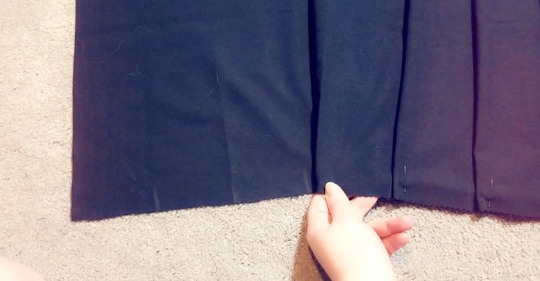
[ID: four pictures showing the process of making pleats. The first shows the measurements next to a tape measure, the second shows me indicating the three parts of the pleat, the third and forth showing the process of folding the pleat over.]
Seven, Pleats continued. With the pleats facing TOWARD you, sew the top hem at 1/4in seam allowance. You’ll want to make sure the “hinges” of the pleats are going through your machine before the open ends. Then, sew each of the pleats down. You only need to go about 1-3 inches down per pleat, depending on how “structured” you’d like them, but it makes the final result look much neater either way. I tend to go down a bit further, as I have a lot of hip, and don’t want to add unnecessary bulk there.
>NOTE: You can also sew the pleats in place, THEN iron them, though I find it easier to iron and pin and THEN sew the hem. Sometimes I wind up doing an extra bit of ironing afterwards, but it’s usually unnecessary.
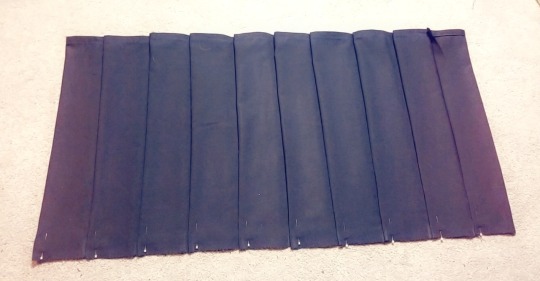
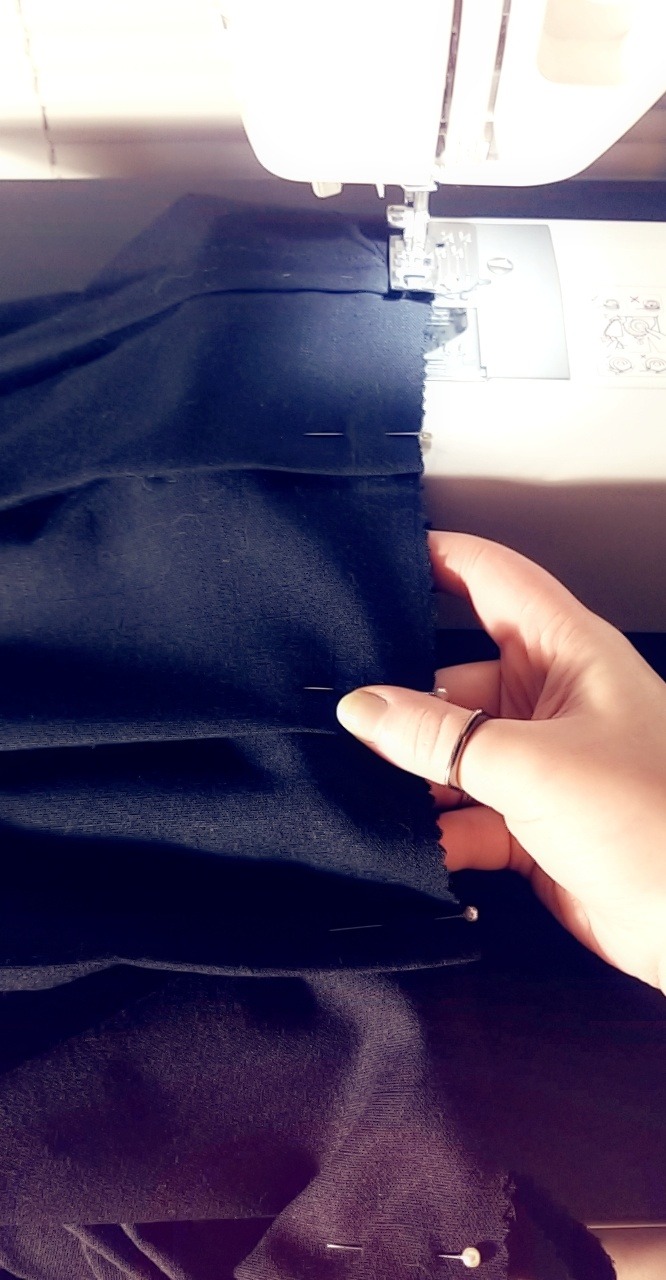
[ID: the skirt with all the pleats pinned in place, then the pleats being sewn down.]
Eight, Waistband continued. If your fabric has a wrong side, fold the waistband piece in half right sides together, and sew down the entire length at 1/4in seam allowance. Turn the tube inside out. (If you have a turner, this step is much easier, though you can do it just fine without one.) Iron the tube flat, and then attach your waistband to your skirt at 1/4in seam allowance. You can just go over the first line of stitching you made to seal the top hem of your skirt.
Nine, Zipper (AKA, fuck this). When I talked to my grandmother about how to attach zippers, she told me to hand-baste them first. For so long, I, as the foolhardy lionheart ingenue ignoring the advice of her wise mentors and elders would have, didn’t listen, and I so deeply regret this. What you’re going to do, young Knight of Yore™, is listen to me, because someone really should heed this sweet old woman’s advice. So here’s what we’ll do:
First, you will bring the outside seams of your skirt together, right sides touching. Pin them in place as far up as you’d like. Note that wherever you stop, this IS where the bottom of your zipper will be. I recommend leaving about 7 inches for zipper length, but that’s because I have quite a bit of thigh and butt to contend with. If you’re less worried about those things, you can get away with anywhere from 4-6 just fine, though I always prefer seven anyways. I’ve found it as a comfort spot for me when dressing.
Next, you’ll make a seam as normal up to where you’ve marked on 1/4-1/2in seam allowance, whichever you accounted for when cutting. Make sure to fully backstitch at the top and bottom of this hem. Next, laying your fabric flat, you’ll press this seam open. You’ll also press the remaining seam allowance on the fabric up to either side, so it’s perfectly flat. If you’re looking at the skirt from the outside, these two seams should be neatly folded, concealing the raw edges inside the garment. Once this is done, arrange your zipper over the fabric, and take care to pin it in place. At this point, you can handle the rest of the attachment one of two ways.
One, you’ll now hand-baste the zipper into place. I always thought this wasn’t a necessary extra step, but pins are hazards when sewing, and hand-basting is invisible and much safer. If you think you’ve done too many stitches when basting the zipper into place, you probably haven’t; if you think you’ve done enough, you certainly haven’t. Your zipper doesn’t need to be securely attached at this point, but it shouldn’t be shifting. Make sure the corners are in the proper place, and neither the zipper OR fabric have bunched at all. Now, you’ll be able to attach the zipper using your machine. Just follow the guidelines of the zipperfoot, arranging the seam on either the right or left side as needed, and attach. When you get to the bottom of the zipper, do be sure to turn your fabric and finish your stitches by going across the bottom of your zipper. If you’re using a zipper with plastic teeth, this WILL NOT ruin or damage your machine/needle, but you MUST take care. Use the hand crank to carefully go over the teeth; do not sew over it normally. This is a necessary step, as it will make your new zipper stop.
Two, you simply hand-sew the zipper in. I like to use backstitches when hand-sewing anything that needs to be sturdy. The process is much the same, but you need to pay slightly more attention that your stitches are not only secure, but straight, too. You’ll still have to make a new zipper stop, but this is functionally the same as above: just wrap the thread around the bottom of the teeth a few time to keep them securely together.
Both of these processes have pros and cons, but both will result in a very neat and securely attached zipper. Sewing is like cooking: do whatever you want, and as long as you like it and no one dies, no one is allowed to complain.
Nine-point-five, Button. You can technically do this Whenever at this point, but I recommend doing it now; you’re probably going to want to try the skirt on soon (for both necessary construction reasons, but also to just be proud of your progress). To figure out where the button will need to be, put your skirt on, and mark on the center of your waistband where you’d like the closure to be. Then, take whatever press button set you got, and following the instructions on it, attach your button to the fabric that will cover your zipper. If you don’t want a visible button detail, you can also just use press studs and sew them inside at the top edges.
If you think your garment is going to get a lot of wear and you’re worried for the durability of your fabric, cut out two tiny pieces of fusible interfacing, and attach them (as the package directs!) to the INSIDE of your garment over where your buttons will be. This will give it just a tiny bit of extra strength around the button, and won’t be visible from the outside of the assembled garment.
[Unfortunately, I did not take pictures of any of this.]
Ten, Straps. You’re going to assemble the straps much the way you assembled the waistband; fold each piece in half lengthwise, either pin or iron it in place, sew with a straight stitch at 1/4in seam allowance. Once they’re finished, turn them, and iron them flat. Here, you could either leave the straps as is, or make them look very clean by sewing two top-stitches down the length of either side, about 1/4in from the edges. It keeps your straps very flat, and gives them an extra little ~finished~ look.

[ID: one of the long straps laid out, and then a closeup of the two small straps. On the bottom is the turned strap that’s only been ironed; on top is the strap once the extra stitching has been added.]
At this point, you’ll want to try the skirt on if you haven’t already, and ask a friend (or your mom) to help you mark out where you want your straps to sit on both the front and back of the skirt.
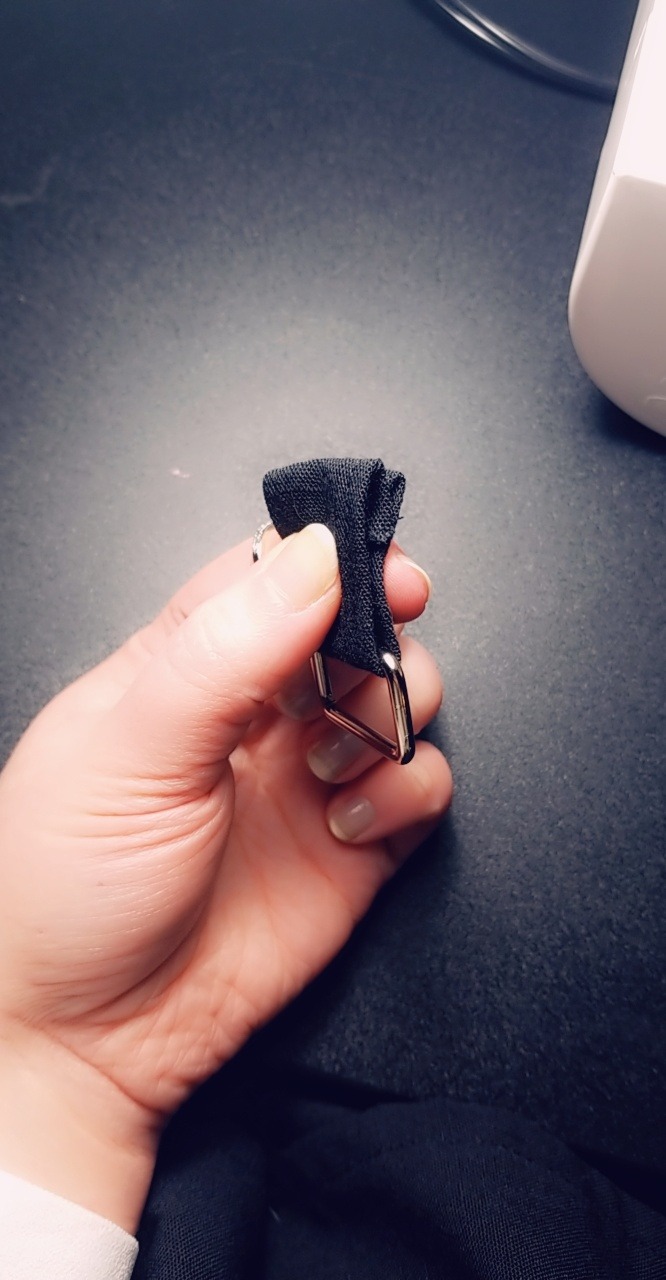
Now, you’re ready to attach the hardware. First, loop one end of one of one ♦ through the adjuster’s center piece. Make sure to give yourself enough slack to tuck the raw end up, and then sew this as close to the adjuster piece as you can comfortably get.


[ID: pictures showing the strap being threaded through the adjuster.]
Then, take the remaining length of fabric and thread it through one of the D Rings, BEFORE looping it through the rest of the adjuster.

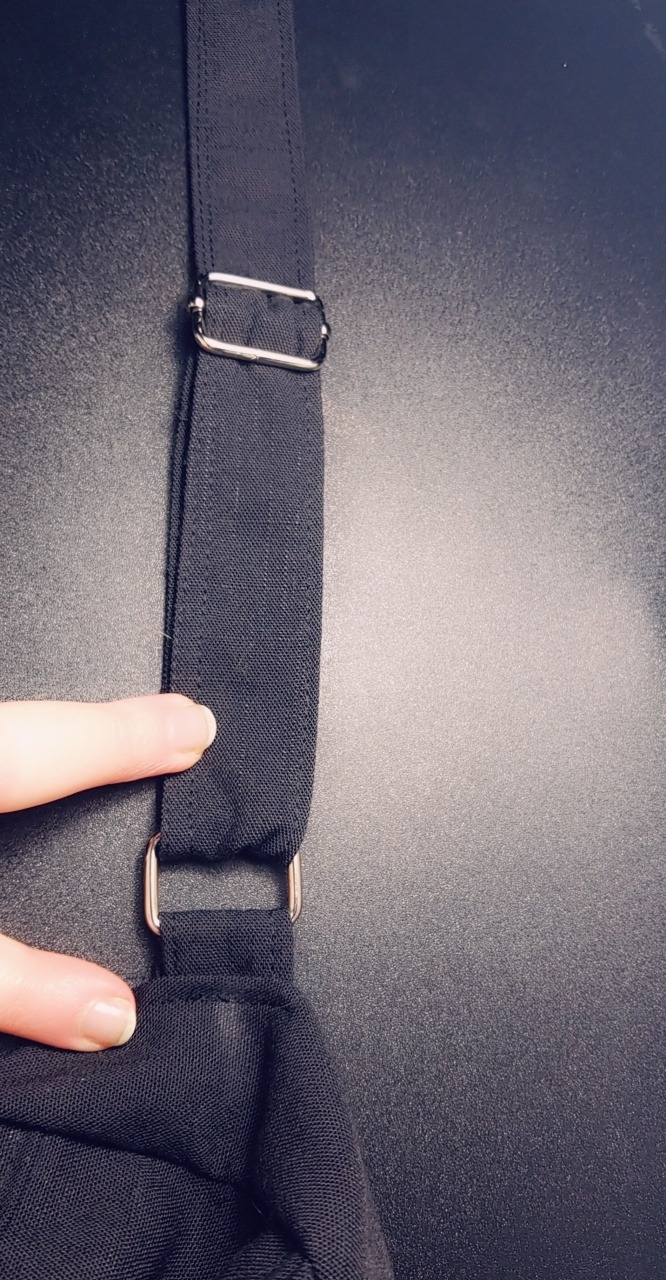
Take the Δ straps, and loop each one through the other end of the D Rings.

Fold the raw ends up so they’re hidden, and use a straight stitch to attach them where marked on the back of the skirt, as close to parallel to the top of the waistband as possible. You can also attach them a bit lower, stitching a box over the straps for extra security, but I don’t think it’s necessary, seeing as they’re not functional suspenders. Repeat with the remaining end of your suspenders on the front of the skirt. [You can see pictures of this above; I decided to attach the triangle straps first, but it really doesn’t matter what order you do it in!]
Eleven. Technically, you’re done! You have a fully assembled and CUTE AF skirt!
But since we live for Aesthetics here, let’s embroider something on. The great thing is, you can put anything you want, anywhere! Tiny daisies along the bottom hem, a large rose at the hip, ivy going up the hem-- whatever you want! Just be sure that once the design is on, you lay the skirt out again and iron it flat. And then you’re done! Go into the world and look adorable as hell!
2 notes
·
View notes
Text
Advantages of Weft Knit Fabric
Weft knit fabric is produced by knitting loops or threads on circular knitting machines, such as the jersey machine. These knitting machines use one set of needles to produce the loops of the fabric. These fabrics are used for sweaters, t-shirts, and other garments. While woven, weft knit fabric is not as strong as woven fabrics, so they are often not preferred for tailored garments
Weft knit fabric can be made of a variety of yarns. The first yarn 82 may make up 15% to 60% of the fabric's weight. The second yarn 84 can make up 40% to 85% of the fabric's weight. A third, elastic yarn may make up the remaining 8% of the fabric. It has a wide range of applications. Weft knit fabric is a good choice for sports apparel.
Weft knit fabric is stretchy and elastic. When folded, it springs back into shape. On the other hand, woven fabric will easily wrinkle when rolled up. Moreover, weft knit fabric is cheaper than woven fabrics. Weft knit fabrics come in flat and tube forms. While flat knits feature round blobs of glue or starch along the lengthwise edges, the cut edge frays across the width of the fabric.
Weft knit fabric is a type of fabric made of loops. A weft knit fabric has two sets of needle beds that form a circular fabric. They differ in length and width. In some cases, weft fabric will have additional yarns in addition to the two shown in the single jersey construction. Weft knit fabric is a versatile fabric. It can be used for clothing, upholstery, and even for curtains.
Weft knit fabric is the best choice for many purposes. It's comfortable and stretchy, and it's also cost-efficient. However, it can also shrink easily, unravel easily when cut, and has a tendency to curl at the edges. In contrast, double knit fabric has a much more stable structure and does not unravel or curl at the edges. It's a versatile type of fabric, and can be made from various materials, including wool, polyester, and cotton.
The weft knitting process involves two sets of needle beds that form a fabric. Weft knit fabric 80 consists of two predominantly cotton yarns. The first yarn 82 is a double jersey, while the second yarn is a cotton-poly blend. The two yarns are fed into the knitting machine alternately. The two yarns make up the first course of the weft knit fabric. Each course is called a "course".
Weft knit fabric is a common type of knit fabric. It has several advantages over woven fabrics. For one, it is easier to manufacture, while woven fabrics require more work. And they are more durable. The two types of yarn are the same. They are both made of cotton and can be shaped into any shape. Besides being easier to produce, weft knit fabric is also cheaper than woven.
The weft knit fabric is elastic and stretchable. It is also warm and comfortable. It is also cheap and is a great choice for garments. Compared to warp-knitted fabrics, it is more durable, and can withstand a wide range of temperatures. They can be used for many purposes, including socks, hats, and even lingerie. This type of fabric is also a good choice for home textiles.
Weft knit fabric is a type of horizontally knit fabric. Weft Knit Fabric is made from one piece of yarn and is the most popular type of weft knit fabric. It can be created manually or by knitting machines. Weft knit fabric is easier to create than warp knit fabric. It is a versatile material that can be used for a variety of applications. The texture and color of the fabrics is a great advantage.
1 note
·
View note
Text
“Vintage” sewing
So, I’m partially writing this down because it’s handy for people actually doing this stuff, and also because, from a writing point of view, you can use the practice of working on things to apply to your writing.
So one thing I sew a fair amount of is skirts and button front blouses. I can do a short sleeved button front blouse in about 2 and a half yards of average quilting cotton (2.3 meters). If the fabric is a full 48″ inches wide (101 cm,) you can get by with only 2 yards, but sleeves are surprisingly fabric hungry. My body size is larger and pretty curvy, so if you’re not that, you’ll obviously need less fabric.
So, let’s say you want to make something like that. What did I use?
I used Simplicity 1493 since it had a review saying the size range included a ton of ease (so an XL, for example, could handle a 60″ hip (152 cm)). There’s no darts for shaping, but I simply traced the size for my hips and added a dart a bit under the armhole. If you do this, the dart should end before your actual fullest part of your chest to avoid a very pointy figure (this also hides any errors you make in adding a dart since it’ll be hidden by your side.)
The pattern’s discontinued, but it was an entire dollar when I picked it up. What I wanted was something with a basic shape, a yoke, an affordable price, and a size range that would fit me. When I sewed it, I noticed that the collar stand was too short by about an inch and a half, and, like the reviews, the sleeves were long. The pattern seemed bad at explaining the button band, and I added a third stripe down the front so I could simply fold the button band three times (encasing the raw edge.) The final thing I changed was to even off the hem since I had no need for the extra flap in the back if I just cut the shirt at a proper length (it took two shirts to get my base pattern evened off, since the yoke makes it hard to guess the lengths.) I completely ignored the button placement suggestions, for reasons that I’ll explain later.
Why do you want a yoke? First of all, this enables you to encase seams easily if you don’t want to cut extra seam allowances for French seams. (This pattern, as written, has entirely encased seams save for the side seams and the armholes.) Secondly, it’ll help your shoulders not have an itchy seam. Finally, aesthetically, a yoke tends to control blousing and puffiness in the back due to having a smaller area over your shoulder blades. Since this style of unisex shirt tends to be a tent like tube (if you don’t add darts,) having that yoke improves the tailored feel of things.
Button placement is something I consistently see people discussing on the internet, and none of the younger people sewing seem to use the method my mother loves. Basically, put on your shirt (side seams done, sleeves on, etc, but you don’t need it hemmed.) Place a pin over the bit of you that sticks out the most. That’s where you need a button. You’ve got some leeway up and down a bit, but if there’s a button where there’s the most of you, the shirt will be smooth and in place on that spot. Space the rest of the buttons as evenly as you can up and down from that point.
(You can use this same trick for slim skirts if you find that your hips or belly makes your button band a little uneven. It might work better to pin the skirt in the approximate line it’d fall and then mark the point for the button.)
Process wise, let’s talk about time. Washing the fabric takes about forty minutes for me, including drying. (You want to do this, especially if you’re using discount flannel, linen, or very cheap fabric. One well known fabric company has discount flannel that shrinks about 10%. I have a very cute winter flannel shirt with cardinals that’s a wee bit tighter than I like due to that.) I find that it takes about an hour to cut out a shirt (less for multiple since you’re already set up to go,) unless I’m very confident with what I’m doing (there’s tailor tacks needed for the dart and the gathering for the yoke.) Sewing, (with pressing,) is about 2 hours to get up to the point where you do buttons and hemming, but I prefer to let the shirt hang a while prior to doing that. There’s a chance that due to your body shape / preferred fit that your side seams will have an angle to them. This bias fabric will stretch, so letting the shirt hang a day will help it not continue to stretch, potentially making a wobbly hem or an uneven one. Buttonholes by machine don’t take that long, but the process of setting up, testing your button hole, sewing the button hole, cutting it open, and repeating will add an hour for final finishing. Add in more if you’re doing hand done buttonholes.
Aesthetically, you could swap out the smaller bits of fabric for other fabrics. So, for example, you could use a colorful fabric for the inside of your yoke or collar stand. If you wanted to go full Edwardian, you could pintuck / pleat / mess with lace on mirror image sides of your fabric, and cut out your fronts as a single layer to make a very fancy outfit. A popular option is to cut striped yokes on the bias to make chevrons when you sew them together, and so on.
But - there you go. Vintage looking shirt that’d cover decades (while not being totally historically accurate,) at the cost of just tweaking a pattern a bit around drafting silliness.
1 note
·
View note
Text
Handy machine cuts heat shrink tubing to length
Solder joints on PCBs don’t usually require extra protection, but loose wires are a different story. Because they can move around and touch each other or the enclosure, you need to protect the bare wire from shorts. Most people use either electrical tape or heat shrink tubing for the job. But cutting heat shrink tubing to length can be a time-consuming process if you have many wires to protect. That’s why Mr Innovative used an Arduino to build this handy machine that cuts heat shrink tubing automatically.
Mr Innovative built similar machines in the past, including one that feeds four different wire spools and cuts them to desired lengths. This machine is similar, but works with a single spool of heat shrink tubing. The user inserts one end of the tubing into the machine, sets the length via a touchscreen interface, and the machine takes care of the rest. It will continue to snip off sections of tubing, all of the same length, until it runs out of heat shrink to work with.
An Arduino Nano board controls the machine through a custom PCB that contains two A4988 stepper motor drivers. A NEMA 17 stepper motors drives a wheel that feeds the heat shrink tubing. A high-torque stepper motor in a servo motor package actuates a linkage that pushes the cutting blade. The display is a Nextion NX3224K028 2.8″ resistive touchscreen with a resolution of 320×240, which has a custom interface programmed by Mr Innovative. The machine’s frame is a combination of wood, aluminum extrusion, and 3D-printed parts.
youtube
The post Handy machine cuts heat shrink tubing to length appeared first on Arduino Blog.
Handy machine cuts heat shrink tubing to length was originally published on PlanetArduino
0 notes
Text
A Guide to Bonding Polyethylene With Hot Melt Adhesives
From kitchenware to our vehicles, plastic products have permeated every aspect of our lives and are integral to our day-to-day activities. Plastics can be divided into two main groups: thermoplastics and thermosets. Thermoplastics, like Polyethylene, soften easily when heated. Thermosets do not. Manufacturers must be able to efficiently and permanently join plastic components into complete assemblies, such as in vehicles, and that means using hot melt glue adhesives.
Advantages of Adhesive Bonding
Adhesives have several advantages over other types of bonding, like welding, or even using screws or nails.
Adhesives distribute the weight between two substrates more evenly, reducing stress on joints.
Adhesives are invisible, which means you get a nice, clean seamless line where the materials join.
Adhesives form a seal, as well as a bond, which protects the joint from corrosion.
Other hot melt adhesives can join irregularly shaped surfaces, quickly and easily bonding the substrates.
Assembly line operations are much easier, as there is less need for customization in the bonding process.
History of Hot Melt Adhesives
Archeologists have found evidence of humans using adhesives over 6000 years ago. The Ancient Egyptians used a form of glue to seal the wooden caskets of the pharaohs. However, modern adhesive technology did not begin to evolve until about 100 years ago.
A scientist invented thermoplastic glue, today is known as hot melt, in 1940. The scientists wanted something that would seal cereal boxes and stop them from popping open before getting to the consumer.
Manufacturers, particularly packing companies, first began the widespread use of hot melt in the 1960s. Eventually, hot melt technology led to the invention of hot melt glue sticks, spray-on bulk hot melt products and various formulations targeting specific bonding for plastics.
What Are Hot Melt Adhesives?
Traditional hot melts are thermoplastic resins. The resins are heated and applied to the substrates. Once it cools, the glue forms a strong bond that holds well under all types of conditions.
Although manufacturers produce a variety of hot melt glue tapes, depending on the usage, the most popular and best-performing hot melt varieties are ethyl vinyl acetate (EVA), polyamide, polyolefin and reactive urethane.
Hot melts have a thermoplastic polymer base that remains solid at room temperatures. Heating and applying them in liquid form make them well-suited for industrial applications. You can apply them by hand, using an industrial spray gun, by rolling or by extruding.
Applications of Hot Melt Adhesives
Polyamide hot melt adhesive products have an extensive range of applications in a variety of industries, such as:
Packaging
Printing
Bookbinding
Taxidermy
Textiles, including applique bonding
Shoe manufacturing
Wood processing
Automotive, including interior and exterior finishing work like cushioning, headlights, taillights and wheel covers
Electronics manufacturing
Hot Melt Additives
Hot melt adhesives do not contain water or solvent. The adhesive sets when it loses heat, which is why the bond forms literally within seconds after applying.
The polymers in the adhesives provide strength and flexibility.
Resins provide immediate tack needed for adhesive action. Wax in the adhesive thins it making it easy to apply.
Antioxidants help protect the adhesive from losing its bonding ability even at elevated temperatures.
Tackifiers boost bonding strength.
Waxes alter the surface properties and reduce the viscosity.
Fillers, like tackifiers, also increase bond strength, as well as increasing the melting point and viscosity.
Important Factors That Influence Hot Melt and Adhesion
Since hot melt for heat shrink adhesives lose heat while setting, you need to be careful about the temperature control. The adhesive material should be in liquid or molten form for wetting substrates and is sufficiently hot to bond the materials together. Insufficient heat can lead to the failure of the bond.
It is important when using heat shrink tubing to proceed with caution and observe basic safety measures to avoid accidents or injuries. Here’s how to use heat shrink tubing:
Begin by choosing the right size tubing with the correct shrink ratio. It should comfortably cover the wire or components before it has been shrunk into place to ensure a tight fit afterwards. Remember that it will be across both its breadth and its length.
If the components to be covered could change size after application, ensure that the tubing has sufficient expandability by comparing its diameter when shrunk (called the ‘recovered’ diameter) with its size before shrinking (called the ‘expanded’ diameter). Check the recommended heating temperature for the tube to avoid uneven application or melts.
Cut a suitable length of tubing using standard scissors and lay or slide this over the target components. It’s now time to heat the shrink wrap. This can be done with a handheld heat gun or a heat shrink oven. The latter are specialist appliances for more precise and advanced heat applications.
If you use a gun, move the heat back and forth across the tubing and avoid staying in one place to minimize the risk of burns. Continue until the wrap has been tightly secured.
A wire harness is typically designed to simplify the manufacture of a larger component, and is designed based on the geometric and electrical requirements of the equipment it is to be installed in.
Wire harness inserting machine is commonly used in the electronics industry, the automotive industry, in the manufacture of construction machinery and industrial equipment, as well as in the manufacture of white goods such as washing machines and dryers, refrigerators, and other household appliances.
The wire harness tension machine simplifies the building of these larger components by integrating the wiring into a single unit, or several units, for “drop-in” installation. By binding the many wires, cables, and subassemblies into a harness, the OEM or installer only has one component to install. In addition, a wire harness allows the completed assembly to be better secured against the effects of abrasion and vibration, and by constricting the wires into a non-flexing bundle, usage of space is optimized.
0 notes
Text
Do you know this about the fiberglass sleeve?
The Features and Benefits of Fiberglass SleevesFiberglass sleeves serve as an easy, affordable alternative to heat-shrink tubing. Fiberglass solutions are engineered to fit comfortably over wire and cable without requiring initial shrinking to size through the use of heat. Fiberglass sleeving offers a range of unique benefits, including its ability to be resin-saturated or heavyweight braided, meaning it will not burn, melt, or become brittle. It’s also cut-through and abrasion-resistant, but can be easily cut with scissors, making it easy to install.
There’s minimal dusting when fiberglass sleeves are cut and handled, and they easily resist gasoline and engine chemicals. Fiberglass sleeving is also resistant to extremely high temperatures; therefore, it’s commonly used as thermal protection for items such as wires, cables, and hoses that are continuously subjected to harsh environments, such as those found in engine manifolds and exhaust systems.
Extremely tough and durable, fiberglass sleeving is able to maintain its structure under extreme vibration, abrasion, mechanical stress, and temperature variations. It's used in a variety of applications to deflect or retain heat in conditions reaching 1,200 °F.
Fiberglass Sleeving Customization OptionsFiberglass sleeving offers endless customization options. It can be supplied as heated-treated fiberglass, vinyl-coated fiberglass, modified acrylic-coated fiberglass, silicone rubber-coated fiberglass, thin-wall fiberglass, expandable monofilament, and heat-treated and saturated fiberglass.
Fiberglass sleeving usually comes in muted colors, such as black, white, clear, and natural, a tan hue. It’s typically braided, expandable braided, or knitted, and has usually undergone a heat treating procedure. Sleeving from 0.024 inch to 2.5 inch in diameter is available to meet various sizing needs. And since material is spooled, requests of nearly any length can be easily accommodated.
Fiberglass sleeving can be customized for a wide range of industries and environments, including restaurants, retail stores, hospitals, machining, aerospace, transportation, heavy equipment, iron and steel, and wastewater. Specific uses include motor insulation, generator and appliance leads, welding equipment, alternator and starter applications, thermal insulation on oxygen sensors, heating elements, lighting fixtures, robotics, and ignitor and component leads.
0 notes
Photo

First of all, what are the operating steps of the hose crimping machine? 1. Use a ruler to measure the length of the hose sample. Measure the data of the metal joint with a caliper and observe the inner diameter of the hose sample. Prepare the required hoses and joints. Use Zaozhuang Make Machinery Co., Ltd. pipe cutter to cut the required length of the hose and clean the inner hole of the hose. 2. Use a peeling machine to peel off the outer rubber of the hose, and then insert the hose into the metal joint sleeve. The outer rubber of the hose must be peeled off. Insert the straight core of the metal connector into the hose to the bottom. Measure whether the hose is the same length as the hose sample. Use non-taper shrink tube machine to process the hose. Adjust the specified data through the positioner according to the hose to be crimped. 3. To start crimping the hose, you can use the manual crimp button or the foot pedal to crimp the button. After the hose is crimped in place, the locator sounds an alarm, and then press the mold opening button. After crimping, use a caliper to measure the crimping data and probe it with a probe. The hose can reach the specified withholding data. After the withholding is completed, stop the machine and cut off the power supply. Zaozhuang Make Machinery Co., Ltd. has a complete range of pipe crimping machines. Electric pipe crimping machines and manual pipe crimping machines can meet the needs of customers in different places with high flexibility! Currently the hot selling models are MM-F32, MM-20D,MM-F20 https://www.instagram.com/p/CMVw8VWHab8/?igshid=lkxhyjlel50o
0 notes
Text
How to choose shrink wrap tubing
PVC shrink tubing is a continuous roll of lay-flat PVC shrink tubing. The circumference of the tubing can be found by multiplying the width by two. PVC is short of Poly Vinyl Chloride, one of the most common forms of shrink wrap. When the tubing is cut into pre-cut sleeves, they are often referred to as shrink sleeves. Shrink tubing is an excellent option for wrapping long cylindrical products. The two open ends of tubing can be sealed or left open.
PVC Shrink tubing is a perfect option when wrapping products of the same circumference, but differing lengths. Shrink wrap tubing can, at times, be used in place of shrink wrap bags. We carry 100 gauge shrink tubing, a flexible and durable shrink wrap tubing good for a variety of products in almost any industry.
*Cost advantage- Instead of buying multiple sizes of shrink wrap bags, PVC shrink wrap tubing can be used. The user only needs to adjust the length per the product to fit accordingly. PVC shrink tubing is less expensive than Polyolefin shrink tubing but is just as durable. We offer shrink wrap tubing at 2.3 cents per ft. for 4 inch widths, up to 28 inches in length for 30 cents per ft. for PVC shrink tubing. Shrink wrap tubing rolls come in 250 to 1500 ft. length; cost is determined by roll width and length.

*Protection- shrink tubing can loosely slide around products to prepare for shrinking. Once the heat is applied to the tubing, it will tightly conform to the products securing them in place. The PVC shrink tubing shrinks up to 40% in all directions. The product is kept secure from dust, moisture, and tampering. Multiple items bundled together in PVC shrink tubing will stay together during transport. Beauty care products, among other products, can be grouped with PVC shrink tubing, so the products do not jostle loose in transport.
*Shrinking & Sealing- PVC shrink tubing can be used with I-bar or L-bar sealers. From sealing electrical wires, candles, or mason jars, shrink wrap tubing is an ideal packaging solution to consider. Since our shrink tubing is made of Polyvinyl Chloride (PVC), it is not recommended for consumable products, and should only be used as secondary packaging.

The market today has begun to use shrink wrap tubing in PC molding. To tidy up computer interiors, and create a more aesthetic finish, colored shrink wrap tubing is used to code wires and connections. PVC shrink tubing does release small amounts of odor when sealing products, so proper ventilation is necessary.

How To Measure For PVC Shrink Tubing?
Shrink Wrap Tubing- Measure the circumference of the objects widest point, multiply by 1.1, and divide by two.
Circumference x 1.1 ÷ 2
Example- If an object had a circumference of 10, the equation would be: 10×1.1=11 then divide by 2, 1÷2=5.5 inches. Round up to the next largest size if the exact size is not available.
Click on the link for a full blog post on how to measure for shrink wrap tubing with illustrations.
How To Use Heat Shrink Tubing?
Shrink wrap tubing is a preferred packaging option for many companies. Whether using high-speed machinery or handheld manual machines, the basic process is the same. The product is inserted into the tubing, the tubing is sealed and cut, and then heat is applied. Some companies prefer to leave the tubing ends open without making a seal. See the videos below to view how to use shrink wrap tubing each way.
0 notes
Photo

How to Measure Shrink Film for your Product.
Using a generous amount of shrink film might seem harmless or even the right thing to do. Better to overestimate, than underestimate when it comes to sizing, right? Wrong! Over time, you may experience shrinking profits as your materials costs increase. In fact, it is better to simply get it right the first time.
Nailing down your shrink film measurements is easier than you might think. Finding the proper film width and length will depend on what type of film you are using. You will need to know a few facts and measurements before calculating your shrink film dimensions. In this article, all measurements are in inches.
Orientation / flow through shrink tunnel (This will inform which side is your product length vs your width).
Type of machine (this will dictate what type of film you need).
Production / Conveyor Speed.
Product dimensions (always round up to the nearest inch).
Width: parallel to the cut-off or cross seal.
Length: parallel to the fold of the film, in cases of centerfold film.
Height: In cases of products with uneven surfaces, the height should be considered from the bottom to the highest point of the package.
The most common forms of shrink wrap film are tubing, centerfold film, and shrink wrap bags. Conveniently, there is a formula to calculate the proper measurements for each kind.
Centerfold: Combine the height and the width of the item, then add 2-3 inches of wiggle room. (3 for larger items only). The formula for this is H+W+2.
Tubing: Tubular shrink film is typically only used for oblong objects. To determine the width of your shrink film tube, multiply the circumference of your object by 1.15, then divide your total by 2. In other words, (CIR×1.15) ÷2. As for the length of your shrink wrap tube, simply add 2-3 inches to the length of the object.
Shrink Bag: For most applications, bags are the most beginner-friendly solution to shrink wrapping. They are already sealed on 3 of the 4 sides, which makes packaging your item simpler. To find the right width for your shrink bag, follow this formula: (CIR×1.13) ÷2. As with our previous examples, the length of your shrink bag should be the length of your object, plus 2-3 inches.
Every application is different and finding the right size film can be even more difficult when your item is an irregular shape. When in doubt, ask an expert. Every service tech at Quick Pak Inc is trained in shrink wrapping procedure.
Any questions on shrink packaging call us at 813 242 6995 or email us at [email protected]
0 notes
Text
Fully Automatic PVC Soft Tube Latex Tubing Yellow Wax Tube Teflon Tube Silicone Rubber Tube Cutting Machine
Fully Automatic PVC Soft Tube Latex Tubing Yellow Wax Tube Teflon Tube Silicone Rubber Tube Cutting Machine
This model 100 automatic heat shrinkable tube cutting machine is a fully automatic shrink tube cut to length machine driven by stepper motor, designed for cutting heat shrink tube,soft tube,sleeve, ribbon cable,foil, paper and other thin and soft materials, set cutting length and quantity, auto feeding, working and stop.
Product NameFully Automatic Heat Shrink Tube Cutting MachineModel…
View On WordPress
#auto cutter#heat shrink tube cutter#heat shrinkable tubing cutter#roll to sheet cutting machine#silicone rubber tube cutter#strip cutting machine#tubing cutter
0 notes
Text
Raitool™ DC 24V 96W Mini Lathe Beads Saw Machine Set Woodworking DIY Beads Polishing Cutting Drill

https://sensoq.com/product/raitool-dc-24v-96w-mini-lathe-beads-saw-machine-set-woodworking-diy-beads-polishing-cutting-drill/
Specification: Brand:Raitool Color: Silver Power: 96W Material: Stainless Steel Voltage: DC 24V-36 V Chuck Clamping Range: 0.6-6mm Speed: 0-3000 revolutions per minute Seven speed control power supply. The Oretical Maximum Clamping Length: 100mm The Theory of Maximum Turning Diameter: 10 mm Size: 30.7cm x 6.7cm x 6.7cm/12.1” x 2.6” Feature: -Transparent organic glass dust cover, with strong convection hole for cooling. -With full wire joints heat shrink tube wrapped. -With large torque ball bearing motor. -With pure steel structure drill chuck. -Small volume, but with high precision, low-noise. -Perfect designed for home DIY enthusiasts. Package Include: 1 x Buddha Beads Lathe 1 x Standard power supply 6 x Carving Knife 1 x Hexagon Fixed Pins with 1.5MM,2MM,2.5MM Sensoq.com
Read More >>>
https://sensoq.com/product/raitool-dc-24v-96w-mini-lathe-beads-saw-machine-set-woodworking-diy-beads-polishing-cutting-drill/
0 notes
Text
Raitool™ 80W DC 24V Mini Lathe Beads Machine Woodworking DIY Lathe Standard Set
https://dkwana.com/product/raitool-80w-dc-24v-mini-lathe-beads-machine-woodworking-diy-lathe-standard-set/
Raitool™ 80W DC 24V Mini Lathe Beads Machine Woodworking DIY Lathe Standard Set
Description: 80W Mini Lathe Beads Machine Woodwork DIY Lathe Standard Set with Power DC 24V The small woodworking lathe simulates and simplifies operating principle of the large lathes. It extensively uses high-strength aluminum alloy materials and is suitable for DIY friends. Specification: Brand Raitool™ Material Aluminum Alloy and Acrylic Size 355*87*70mm Power 80W Voltage DC 24V Chuck clamping range 0.6-6mm Speed 4000-8000 r / min, 7 grade speed Theoretical maximum clamping length 180mm The theory of maximum turning diameter 70 mm Adapter biggest saw blade diameter 50 mm Features: -With aluminum alloy thick plate. -With full wire joints heat shrink tube wrapped. -With large torque ball bearing motor. -With pure steel structure drill chuck. -Small volume, but with high precision, low-noise. -Ideal designed for home DIY enthusiasts. -Transparent organic glass dust cover, with strong convection hole for cooling. -Suitable for drilling, cutting, polishing walnut, buddha beads, bodhi, jade and etc. -The saw blade also helps to cut small wood, plastic, and thin material etc. -Solid aluminum alloy base and transparent acrylic plate dust cover, with good shock absorption. -This mini polishing saw lathe machine is an ideal gift for DIY woodworking makers. Note: This set is without the acrylic covers, hope your kindly understanding:) Thank you. Package Included: 1X Graver 1X Buddha beads lathe 1X Standard power supply 1X Operation instruction 2X Hexagon wrenches More Details: 1.If the user does not have lathe base experience,when use should follow: low speed, slowly, cautiously and other security operations. 2.The speed can be adjusted in 4000-8000R, cut wood should not exceed 4000. 3.Drill chuck axis, the axis of the wood, the tailstock center axis of the drill should be in a straight line, or need to adjust the nut. 4. When using a knife, locking the bottom of screw, location should be away from timber 1-1.5cm. 5.If you do not really understand the operation, it is best to consult a professional person.
Read More
https://dkwana.com/product/raitool-80w-dc-24v-mini-lathe-beads-machine-woodworking-diy-lathe-standard-set/
0 notes
Text
Know How You Can Buy High Quality Fiber Optic Polishing Machines at Easy Rates
Splicing cables is an assignment of an expert. One has to be really skilled and green to address this assignment well. There are two kinds of splicing procedures. While fusion splice is the primary recognized kind, mechanical splicing stands second. Each of these procedures has its particular functions and capabilities.
Importance of Fiber Optical Cables
These are cables which can be normally utilized in our everyday existence. One of the most common components of their use is for the purpose of excessive-velocity and extraordinary wired communication.
When it comes to fusion splicing, it's far a bond of more than one cables, or optical fiber, which are joined together by permanent wielding. In order to do away with them, you require a splice cleaver to make certain there are fewer issues, no mirrored image and no light loss. Making poor splice can cause damage of the fiber, which include melting of wires that can lead to in addition problems.

How to Use a Splicing Machine?
To start splicing a cable, you need to prepare specific Fiber Optic Polishing Machines inside the first vicinity. To do so, it's far essential to strip all forms of tubes and coatings, as well as jackets of the cables in order to make sure that simplest the bare fiber is left for your use. It could be very essential to easy the filling material and gel completely the usage of a proper gel cleanser. While you're cleaning the fiber, make certain it is achieved well in order that there are no issues in the destiny. An easy surroundings is the maximum crucial requirement for proper connectivity.
To begin splicing, you need to cleave the optical fiber. To try this, you require a great cleaver for excellent splice. The fibers may be aligned manually or mechanically, as you wish - commonly, it depends at the sort of device used. Thereafter, an electrical arc will start melting the fibers collectively to create a permanent wielding wished for each the ends of the fibers.
In addition, you can additionally use warmth shrink tubing for defensive the fiber. It can keep your Fiber Optic Machine Supplies sage from all elements, which might lead to breakage.

Laser cutting gadget can development at the non-woven side ,and not using a deformation, marking system will no longer stiff, steady and accurate length, no flash, preferred length, small mistakes (± 0.1mm), the impact is smooth, excessive frequency, and the sense of blunt knife reducing stress is little. Any complex form can be reduce; excessive efficiency, low value, pc layout pix, you may reduce any shape and any of a diffusion of sizes of lace. The combination of laser and pc technology, computer layout, laser engraving can output at any time carving facet layout merchandise.
For More Info:- Nanometer Technologies Inc
0 notes
Text
Npabne interpretation of Shijiazhuang pipe bending machine manufacturing
Npabne interpretation of Shijiazhuang pipe bending machine manufacturing company: the company has established a complete and responsive after-sales service support team and a continuous market information collection, feedback and disposal mechanism. Its main purpose is to provide users with high-quality, cheap and reliable products, and to form the connotation of enterprise progress, continuous development and expansion with personality, character and integrity. Replace the sealing ring in the spare parts bag.
The pipe shrinking machine is a hydraulic fully active pipe end processing machine which is under normal condition to stop expanding and shrinking the pipe end face, and is controlled by an integrated touch-screen display screen. Changing the mold can stop expanding, shrinking, bulging, upsetting and other pipe ends of the pipe fitting, and can accept the manual, inching or active processing shape machine from the oil tank, bed, sliding according to the user's needs Block, main oil cylinder, mould core rod (selection), limit oil cylinder, pressing oil cylinder, clamping mould and axial positioning oil cylinder, axial positioning angle iron and other first parts are composed.
Pipe necking is a forming process to reduce the end curvature of the tube blank. The tube blank enters into the deformation area under the influence of the axial force, and the plastic deformation of the shrinkage cavity with the tangential contraction occurs in the deformation area, and then enters into the unchanging area, and finally forms the reduced end curvature.
The tube expanding is a kind of forming process to enlarge the curvature of the end of the tube blank. The expanding shape can be conical and cylindrical. The tube blank enters into the deformation area under the influence of the axial force. With the rapid development of industry, there are few products that need manual operation. In general, most of this situation is because it can adjust the product specificationsGrid, which can be applied to a wide range of products, is not that a processing machine product can only process and produce one product, but can produce and adjust the specification data of the machine unrestricted to produce products of other specifications, or process products of other specifications Make speed; stack type hydraulic control one-way valve is set on the pressing <a href="http://www.metmac.com/double-drive-plasma-cutting-machine.html">double drive plasma cutting machine</a> oil cylinder circuit to ensure that the die is not loose during clamping; stack type two-way throttle valve is set on the circuit of displacement oil cylinder, limit oil cylinder and axial positioning oil cylinder to adjust the two-way moving speed of the above-mentioned oil cylinder. The shift oil cylinder and the limit oil cylinder use the conversion station together, so that the station conversion is convenient and ensures the processing amount of pipe fittings. In order to make our pipe bender more attractive, the key is to make our products more different from other pipe benders in many aspects. Only in this way can we impress those picky users in the fierce market competition of pipe bender
the pipe shrinking machine is widely used in the processing of pipe fittings, automobile oil pipes, air pipes, water pipes, <a href="http://www.metmac.com/complete-your-workshop.html">shop now</a> air conditioning pipes and other connecting parts Forming is a fancy mechanical tool for tube end forming and processing. The processing shape includes: convex, concave joint, long flat, square, extension inclined, V-shaped, tooth opening elbow, flat elbow, etc. according to the products sold, forming a forming mold. When the pipe bender is working, the heating phenomenon of the hydraulic system sometimes occurs. The internal reason is that the system design is unreasonable, such as the unreasonable matching between components, the thin pipeline channel, the multi bend radius, the small oil tank volume is not enough, etc.;
through mechanical transmission, the beltThe rotating steel tube is heated by flame at one end of the steel tube. When it reaches a certain temperature, the rocker arm rotating device is the core part of the pipe bender. Its function is to bend the heated pipe into a radius that meets the specified requirements, with the function of bending, rotating and reducing the diameter.
The head of the heated steel pipe shall be stopped with the forming die and bent to the required shape. The mold should separate the non-ferrous metal pipe from the steel pipe according to the specification.
Note: the tube shrinking machine of Chen unit is fixed on a base with support seat, heating ring and die closing frame. The base is connected with chassis track and can stop the connection according to the required length. As for the application field of the pipe bender, we have introduced a lot before, but we will not explain it one by one here. If you want to know the pipe bending process of the hydraulic pipe bender and the full-automatic pipe bender, please check our technical article, which contains the detailed technical article of the pipe bending process description.
Use method
: weld a land with channel steel, and remove the motor, reducer and clamp head at Meizhou end (for pipe clamp, it can be replaced by lathe chuck). At the other end, install and dismantle the support seat (which can be turned over), and fix a heating ring (8-10 nozzles, which are welded on a copper pipe ring by gas welding with the aid of the emergency nozzle) on the outer end of the support seat. The outside is a movable closing frame, on which an alloy die is installed and disassembled. Back and forth bending is a pipe fitting with two bending angles (generally °).
Usage: fix the pipe on the pipe shrinking machine, turn over the heater (ring). When the temperature reaches, the alloy die is pushed, and the pipe head shape meets the requirements. The whole process is about 15 minutes. Therefore, CNC technology has become an advanced systemOne of the core technologies in manufacturing technology.
Problems and troubleshooting
1. The impact bar of manual hydraulic pipe bender is unable to be pushed out, so it cannot be bent. a) First, check whether the steel ball in the switch can be dropped. Second, tighten the switch (19) clockwise.
b) Check whether the hydraulic oil in the oil tank (18) is full, and fill it up.
c) Loosen the (7) bolt on the oil filler.
d) Exchange the YX polyurethane sealing ring in the plunger pump (4).
The pipe bender is strictly a kind of consumable and sold goods. In the process of use, if it is properly maintained, it will greatly improve the sawing efficiency, save materials and materials, and prevent the appearance of various problems. Especially, it is very important to clean up the waste after sawing!
e) The method for removing the air in the oil tank is as described in Article 6, paragraph 7 above.
2. The column cold pump is empty or the oil cannot be drawn out.
The elbow arm is connected with the main shaft of the bending machine, the bending die shaft can be changed, the clamping die can move up and down, the die conditioning is simple and reasonable, part of the strength of the machine equipment is added, and it is simple, then use the three-way servo and system
A) to remove the air in the oil tank, the method is as described in the preceding Article 7 and 6.
b) There is less oil in the tank, so it should be filled up.
The development of stainless steel pipe bender was slow before the implementation of market economy. Firstly, the electronic industry was backward at that time, and the consumption of stainless steel pipe bender was all state-owned
C) the oil number did not meet the requirements, so the N15 machine oil was exchanged.
d) There is garbage in the oil filter, please clean itWash. The oil filter can be removed with a large spanner. Use gasoline to wash up the rubbish on the copper wire net.
*High speed feeding, microcomputer control, LCD display, when active and manual control, it can advance feeding or retreat, and can be manually cut Knife, suitable for all kinds of copper platinum, aluminum platinum, nickel sheet, PVC pipe, heat shrinkable sleeve, braided pipe, yellow wax pipe, clothing zipper, wire arrangement line, isolation line, etc.
3. Lift the handle (6) of manual hydraulic pipe bender, and gradually lift the handle (pump).
Extend all the inductive rods of the manual hydraulic pipe bender, or when there is pressure on the plunger pump while the pipe is being bent, tap the end of the handle (2) on the handle base with a flange.
4. The large and small plunger pumps leak oil during operation.
0 notes
Last Seen Blogs