#sew your own chest binder
Explore tagged Tumblr posts
Visit Tumblr Blog
Explore Tumblr blogs with no restrictions, modern design and the best experience.
Last Seen Tumblr Blogs


Fun Fact
Tumblr.com rank in the US is 25.
Note
Hi! I was talking with my university's queer center recently about binders and helping people get them, and the idea of an events series where people can make their own was discussed (multiple sewing machine owners were part of this conversation and planned to lend theirs)
So I remembered that you guys at some point (idk if you still do?) had a diy kit, and I wanted to ask about how long those take to assemble? Obviously it would vary a lot by experience but just. Very roughly? (I'd also like to you know if you would be able to do bulk order of them but that would probably be a more nuanced thing and this is very far from planned out lol) I'm mostly trying to gauge feasibility of planning something like this
Thank you so much! Sorry if these questions are difficult to answer with the information given
Hi! Yessss, hooray for sew-your-own binder events!
We do indeed have kits! Assembly does vary a lot by experience, and also by machine - are there sergers available? How fast does your machine do a zigzag hem on multiple layers? Are you putting in a zipper?
That said, it's not that long a project. Cut the pattern, cut the fabric, four seams, adjust to fit, four hems. I think most people can get it done in a day.
We absolutely can offer discounts on bulk orders. Email [email protected] to get that set up. We've done this for several queer center groups already.
And finally: we're starting to teach Sew-Your-Own workshops in October! If your uni would be interested in having us, please do tell them to reach out.
39 notes
·
View notes
Text
How to Make Your Own Binder that Fits Well and Looks Good
A while back I was in need of some new binders and thought hey, I bet I can make one way cheaper than buying it from somewhere (especially cus some of the ones I’ve bought in the past didn’t really fit right). Except when I started looking for a binder patterns online, I was very surprised that I really… couldn’t find many that looked very nice lol. Most of them had really wrinkled necklines, or didn't bind well, or just overall looked weird. A lot of the patterns also required a serger, which I don't have.
So I just said fuck it and made my own pattern! And it ended up being relatively easy! And the binders fit REALLY WELL and are comfortable to wear, even for long periods. The neckline doesn't show under shirts with loose collars, and the bottom hem doesn't gap or stick out. Here's me wearing one:
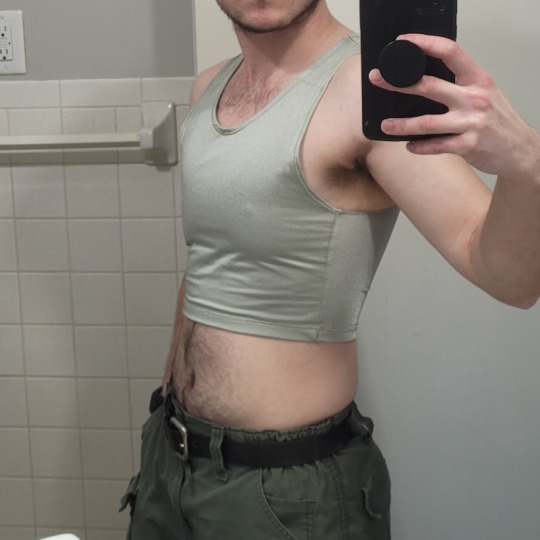
(plus I was able to make myself 5 of them for a total of like ~$50.)
So I figured I could throw together a guide to help out anyone else who wanted to make their own binder but was dissatisfied with the patterns available!
Disclaimer: This tutorial is going to assume a baseline level of sewing experience, and also will require access to a sewing machine. It is not a complicated pattern, but it will most likely require some tweaking and adjustments after you make the first one. Don’t be afraid to make alterations to make it fit better!
This tutorial is for a gc2b-style half-tank binder. It could be altered to be a full-tank binder, but all instructions will be for the half-tank design.
Materials needed:
Stretchy fabric, probably listed as 'athletic fabric' (I use this kind from Joann’s. Most athletic stretch fabrics should work, look for around 80% nylon/20% spandex blends)
Stiff fabric (I use this shirting cotton because I like how lightweight it is. If you want something a little stiffer with more structure, you can use a cotton or cotton/poly blend twill like this. gc2b binders use twill for theirs.)
Lightweight fusible interfacing (I use this kind) (get FUSIBLE not sew-in)
Fusible webbing like Pellon Wonder-Web (this is technically optional but it WILL make your life easier when you’re sewing - just make sure to get the kind with the paper backing!!!)
“But kiwisoap thats 4 whole kinds of materials, surely I don’t need that many!” Ok sure, you can probably get by without the fusible web and interfacing, but consider: they are both dirt cheap (im talking like $1-2/yard), they will make it much easier to sew the final product, and will give you an overall better-looking result. This tutorial is written with the assumption that you’ll use them.
"How much fabric will I need?" Measure the circumference of your chest below your armpits. Add 6 inches just to be safe. This is the yardage of stretch fabric you’ll need, and should give you enough material to make at least 3 binders without much excess left over. You will need around half as much stiff fabric.
Other supplies:
Big Paper (for drawing the pattern)
Flexible measuring tape
Sewing machine
Iron
Pins
Step 1: Measuring
You will need 4 main measurements for this pattern.

A) Measure the circumference of your chest just below your armpits, then divide the number in half. This will be the widest part of the pattern.
B) Measure from the top of your shoulder down to where you want the binder to end. For most folks, this will usually be around the natural waist (narrowest part of the torso), about 3-6 inches above the belly button. This will be the overall height of the pattern.
C) Measure the distance from below your armpit to where you want the binder to end. This will determine where the arm hole starts.
D) Measure the circumference of your waist where you want the binder to end, then divide the number in half.
So for example, after dividing A and D in half, my measurements are 17", 15", 7", and 14.5".
Next:
Subtract one inch from measurement A - This will help provide some compression. You might need to take it in even further depending on how it fits, but one inch is a safe starting point. I take mine in around 1.5 inches.
Subtract half an inch from measurement D. This will help prevent the bottom edge of the binder from gapping. Again, you may need to take it in more or less, depending on your own body.
Add 1.5 inches to measurement B and one inch to measurement C. This is to account for the hems and armhole placement.
This makes my final measurements
A = 16"
B = 16.5"
C = 8"
D = 13.5"
From here on out, we are only going to be working with the measurements that we have added/subtracted to, NOT the ones we initially took.
Step 2: Drawing the Pattern
You will need a piece of paper large enough to accommodate the entire pattern. This may involve taping multiple pieces together, or using a piece of newsprint, etc.
I recommend folding the paper in half to ensure that you get a symmetrical pattern. However, this means you will need to divide measurements A and D in half again, or else you’ll end up with a pattern that’s twice as wide as it should be!
Also note: the pattern is drawn with the seam allowance built in! You don’t need to add any seam allowance.
To draw the pattern:
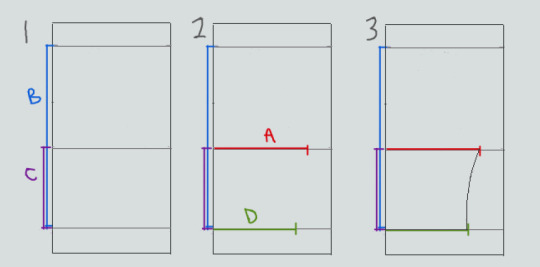

Begin with your folded paper. Measure and mark B and C on the paper, and draw a line extending across the paper. These will be your guidelines.
Measure and mark A and D along the middle and bottom guidelines, respectively. Remember, the paper is folded, so you only use half of the measurement for A and D.
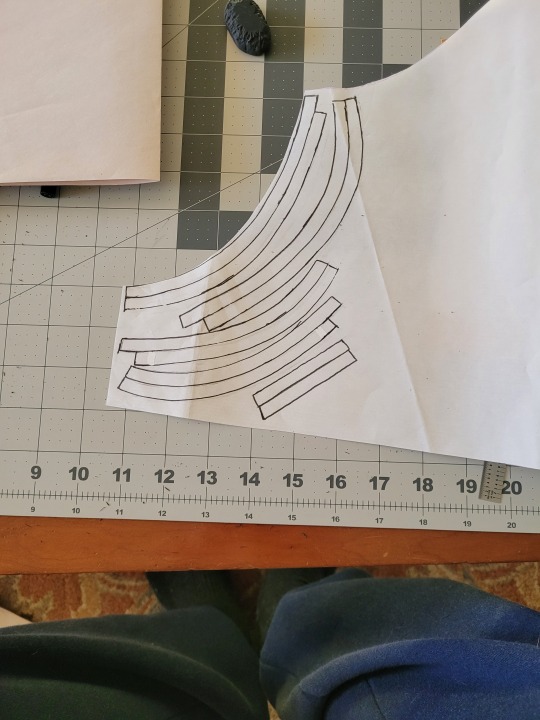
Draw a loose curve connecting the endpoints of A and D. If needed, you can also just draw a straight line between the two.
Mark the opening for the neck hole. Depending on your size, it will measure around 6-8 inches across at the top (remember to divide this in half for the folded paper) and about 5-6.5 inches deep. (mine is 6.5" across and 5.5" deep) Draw a curve to connect the two points. This part will take some tweaking and adjusting to get it to look right lol.
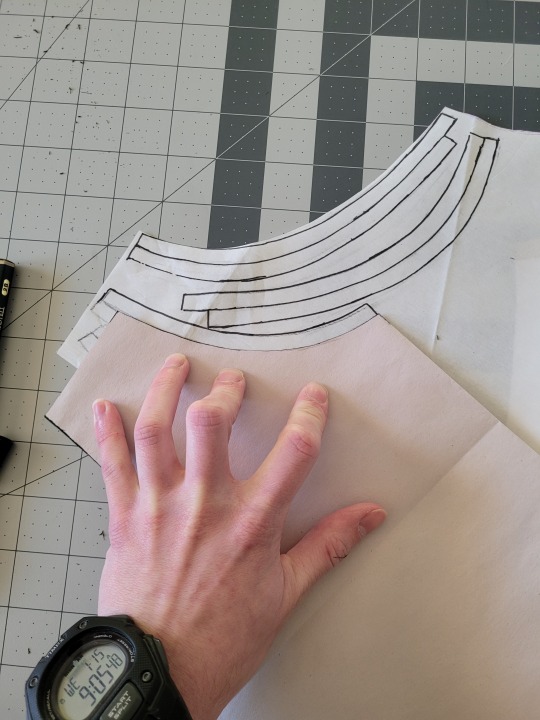
Measure the width of the strap - this should be somewhere between 2.5 - 4 inches wide. They will end up about 1/2” to 3/4” narrower once you sew them. Draw the line at a slight angle, as shown.
Connect the endpoint of the strap to the endpoint of line A with a curve like in the diagram.
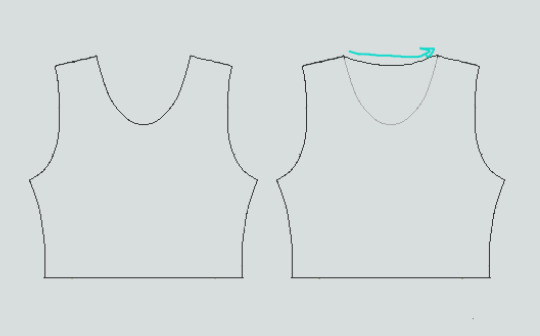
This will be the pattern for the front piece.
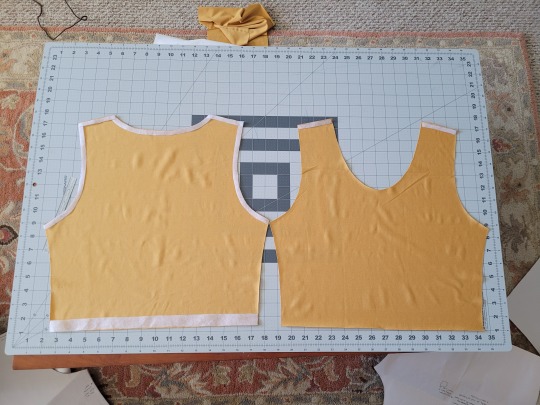
To make the back piece, trace the front pattern, but make a very shallow curve for the neckline instead of a steep one, as shown:
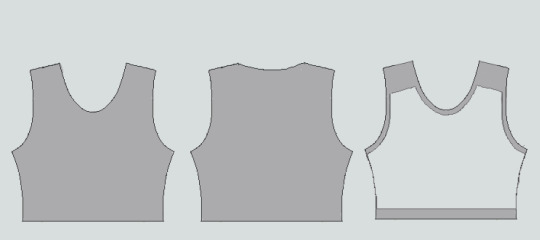
The last piece is the stiff front panel. This is what provides the flattening effect of the binder. To make the pattern, trace the front pattern again. Trim 3/8” in on the sleeves and neckline, and 3/4” to 1” along the bottom. This gives a flatter hem. Then trim the straps shorter by a few inches. This helps the binder lay flatter along the shoulders.
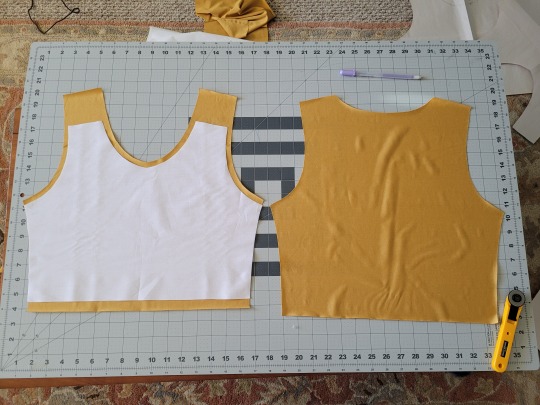
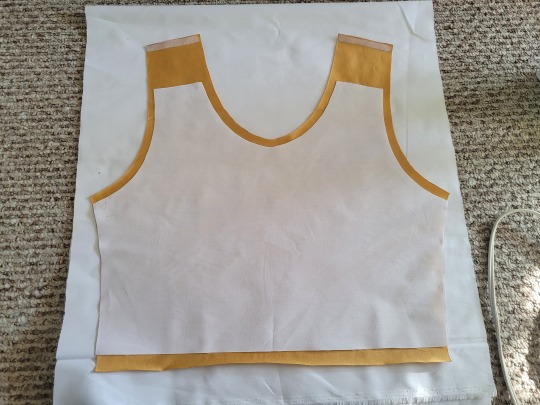
When you're done, you should have 3 pattern pieces that look approximately like this (stiff panel shown overlaid on the stretch fabric to show how it fits together).
NOTE: If you want more compression or just want to make it a bit sturdier, you can add a second panel of stretch fabric to the back piece. Just use the bottom half of the back pattern (from the widest part down to the bottom hem) to cut out another piece of stretch fabric. Attach it to the back piece with a strip of fusible webbing and a zig-zag stitch along the top.
Step 3: Putting It All Together
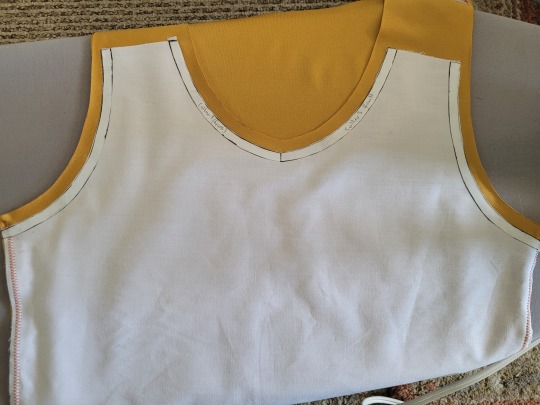
Once you’ve made the patterns and cut out the pieces of fabric, you should have something that looks like this:
The next step is adding interfacing and fusible webbing. Use your pattern to cut out 3/8" strips to fit on the top of the straps for both pieces, and to the neckline, sleeves, and bottom hem of the back piece, as shown:
If you want to add it to the bottom hem of the front piece, it will help keep that hem flat when sewing it down later, but it's not essential.
If you choose to also use fusible webbing (WHICH I RECOMMEND), you will apply it to the stiff front panel similarly to how the interfacing was applied, ~3/8” strips along the neckline, sleeves, and top of the straps. Cut out two strips for the neckline and sleeves, because we'll use those later too.
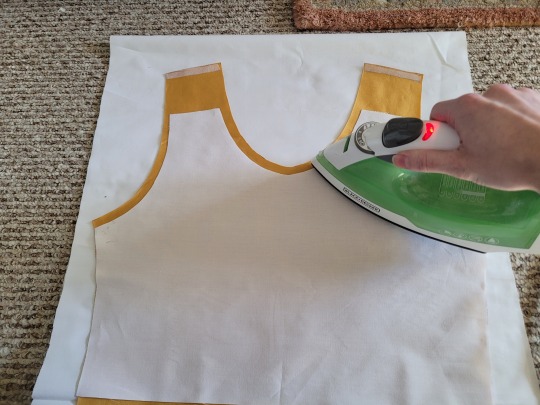
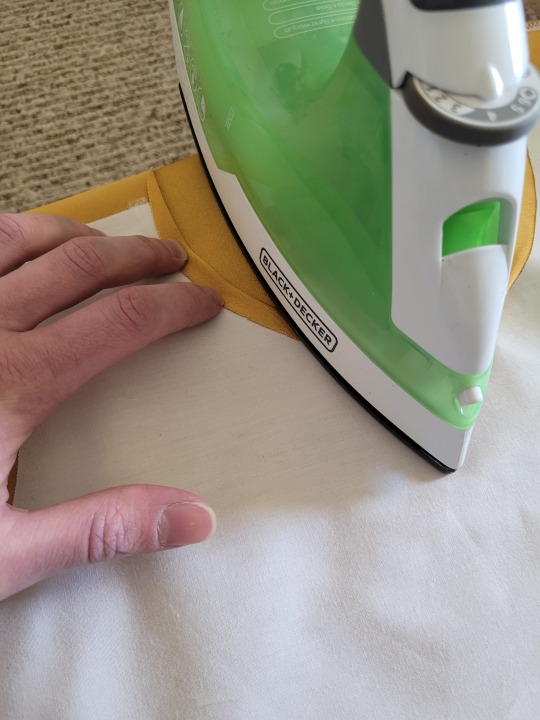
Iron the strips onto the front panel as shown:

Once it's on, just peel off the paper, position it webbing-side down on the stretch fabric, and iron it to fuse the two pieces together so everything stays in place while you sew. THIS MAKES IT WAY EASIER TO SEW.
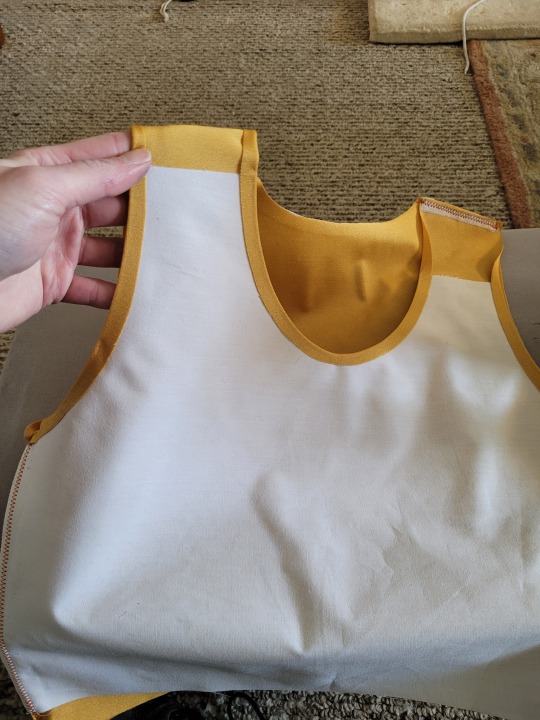
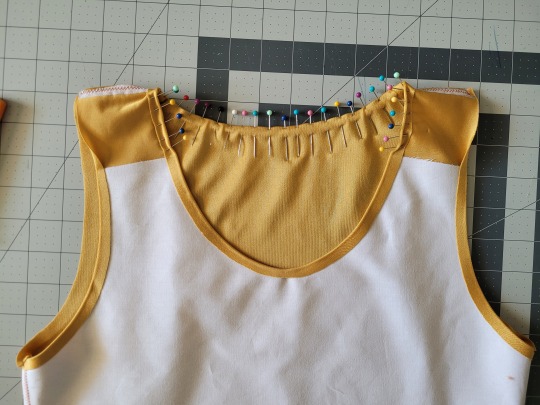
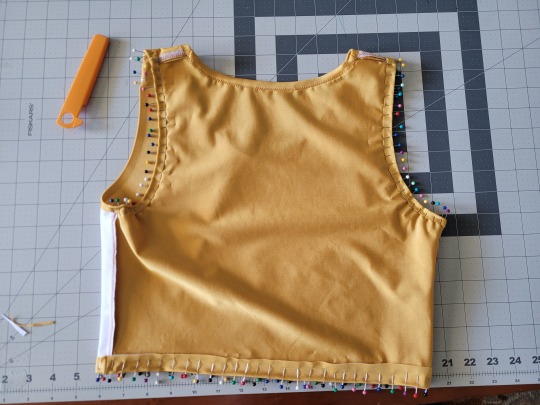
After the stiff front panel is fused to the stretch fabric, you’ll sew the straps of the front and back pieces together, then join the pieces along the sides. Pin the hell out of it to keep everything in place -this type of material is VERY prone to puckering.
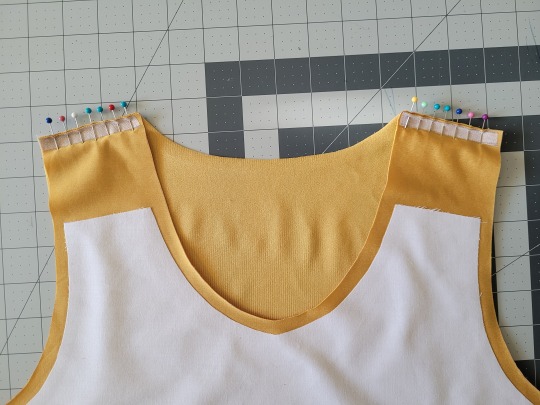
When sewing, USE A ZIGZAG STITCH. A straight stitch will NOT WORK for stretch fabric. I adjust mine to 1.3mm long and 3.5mm wide which has worked well. If your machine doesn’t let you adjust stitch length or width, well. That sucks, I don’t really have any advice.
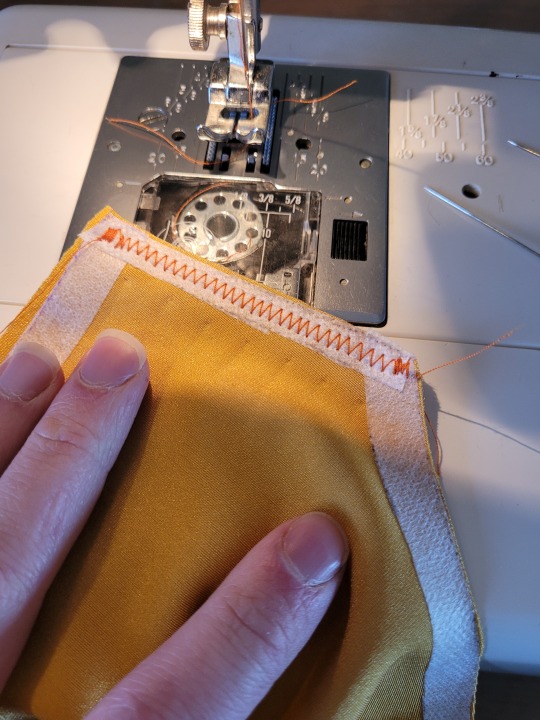
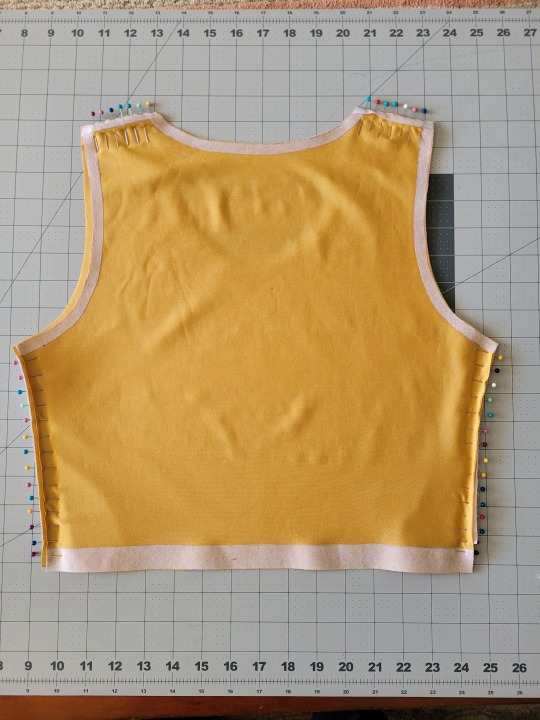
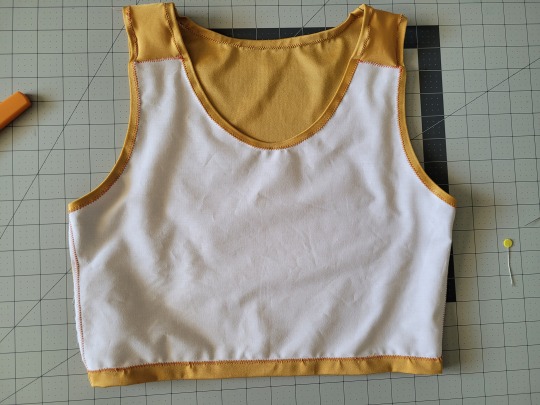
After you sew the front and back pieces together, you can add more fusible webbing to the front panel to help hold the hem down flat and prevent it from puckering while you sew it. Just add the strip, peel the paper off, then fold the hem over and iron it down. This part isn’t really necessary, but it does make the hems look nicer. If nothing else, I would recommend adding it to the neckline.
After that, you just fold & pin all the hems and sew them up with a zigzag stitch, then go over the raw edge at the top of the stiff panel (where we cut the straps shorter).
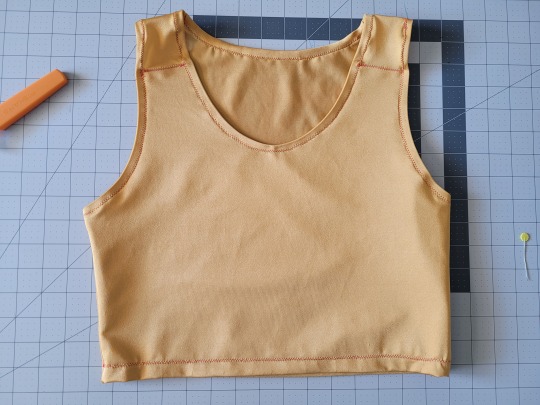
And that’s it! You’re done! And now you can make your own binders whenever you want!
And hey! If you used this tutorial and wanna throw me a dollar or two on ko-fi, I wouldn't complain.
829 notes
·
View notes
Text
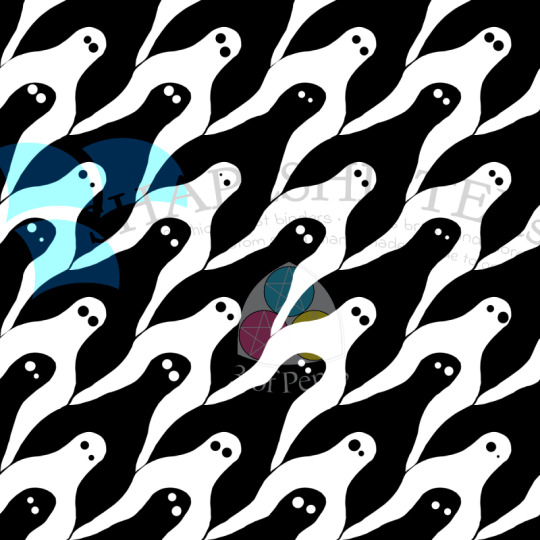

Fresno Nightcrawler Houndstooth // Fabric Design for @shapeshiftersvt and The Cryptid Collection
Remember way back a few weeks ago when I posted the Squonk poster and I said that once I'd designed the fabric to go along with it I'd start posting the fabric designs here? Well guess what! It's time!
For those who don't remember or who didn't know, I am the co-owner, site manager, and graphic designer for @shapeshiftersvt. 2024 marks our 10th anniversary and we wanted to do something big and special and new to mark the occasion and my partner, co-owner, head tailor, fashion designer, and founder, Eli, pitched a fashion line themed around cryptids. We call it The Cryptid Collection and it features six of our and the internet's favorite cryptids: The Fresno Nightcrawler, Mothman, the Jackalope, the Jersey Devil, Champ, and the Squonk.
My parts of the collection were designing the posters, and creating fabric designs for our very own, truly Shapeshifters designed chest binders and sports bras. But since we utilized Spoonflower to have those fabrics printed, they're also available through the Spoonflower marketplace for anyone to buy for their own sewing projects.
And now that all of the fabric designs are done and uploaded and proofed and listed, I, as promised, am posting them here to talk a bit more in-depth about them, the thoughts and inspirations behind them, and the design process.
Starting with the Fresno Nightcrawler.
Part of the reason I'm starting with the Fresno Nightcrawler is because this was the very first design that I finished. When we were planning out the fabrics, it was the most solid design concept I had that wasn't just adapting the poster design to fabric (mostly because ... I hadn't done the poster yet). It was the first one I really came up with, the one I was most excited about, and the one that pretty much stayed the same from concept to execution.
I love houndstooth. Which is weird to say when I don't think I've ever owned a single garment or accessory in with a houndstooth pattern? But I do, I love it. I love the teeny tiny classic version of the pattern; I love a blown-up graphic version of the pattern; I love plays and variations on it. So when I was trying to brainstorm what kind of fabric pattern I could make inspired by a creature with such a simple shape whose only colors were white and black, the idea came pretty quickly: A houndstooth. Or a Nightcrawlertooth, if you will. It was a trick, though, and a real learning experience, especially with this being my first design.
Getting a pattern to repeat smoothly is a skill unto itself. Basically you have what's called a tile, and the tile contains the part of the pattern that you want to repeat. Then, when your pattern is created, the original tile just gets essentially copy-pasted over and over so 1) you don't have to draw the whole yard of fabric, and 2)all of the repeated parts of the design are identical. But by doing it this way, you have seams you need to take into consideration. If you think of putting the pattern together, it's sort of like making a basic quilt: You start with one square (or rectangle), then attach four more squares to each side, and then just keep doing that. Each one of those seams (top, bottom, left, right) is a place where the pattern might not match up, which means when it's applied to a yard of fabric, it's not going to look like a smooth, seamless pattern.
Of course there's ways to avoid this altogether. If you're doing a simple stripe, using the line tool in your drawing software will keep your stripe a consistent thickness, and holding SHIFT while you draw it will keep the line straight. Or, even easier, you can create a pattern where the part that repeats doesn't straddle a seam; like a polkadot pattern, where the dot(s) can be centered on the tile and seams only cut through a solid background.
The trouble with a houndstooth, though, is that not only does the tile need to repeat, it's made up of repeating figures that interlock. I can't just center the white Nightcrawler on the tile and call it a day, because then the black Nightcrawler straddles the seam. On top of that, they needed to be shaped in such a way that the negative space between the white Nightcrawlers left a shape that was also recognizable as a Nightcrawler and similar enough to the white one that the pattern is mostly seamless.
I fully admit that I was not able to do this on my own. Enter: Eli. Eli is, among other things, a math nerd who enjoys an excuse to break out the graph paper. They found a tutorial online and got to graphing and shaping and, in just a couple of hours, had gotten the shapes down. I took that tile, illustrated it, cleaned up the seams (shoutout to Eli for also finding an easier way to do this than just manually copy-pasting), and voila! A Fresno Nightcrawler houndstooth.
Now, you might look at that image up there and say, "Well that's all well and good, Pents, but they're kind of blobby and the lines are wobbly and it's all a little uneven." To which I say ... yeah, that's true. It's also kind of intentional. Like, I'm not gonna sit here and claim I got the basic pattern done and wasn't exhausted. But also I could've left it and come back to it the next day to clean up the lines and shapes a bit more, make everything really smooth and even. But, like. Look at this guy.

He's just a weird kinda blobby little dude. So I left the pattern kinda weird and blobby.
Even if I'd cleaned it, it's such a blobby little shape that's so at odds with the classic houndstooth that's all straight lines and sharp angles. So I made a deliberate choice to not polish it up. To kind of lean into the kodama vibes:
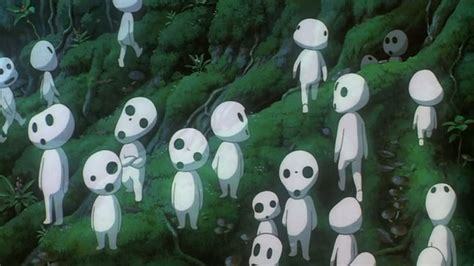
I am really so so proud of and pleased with this design. It came out almost exactly how I pictured it; it was really the most true design collaboration between Eli and I; and I'm just so pleased, after a lifetime of being a houndstooth lover, to now also have designed a houndstooth.
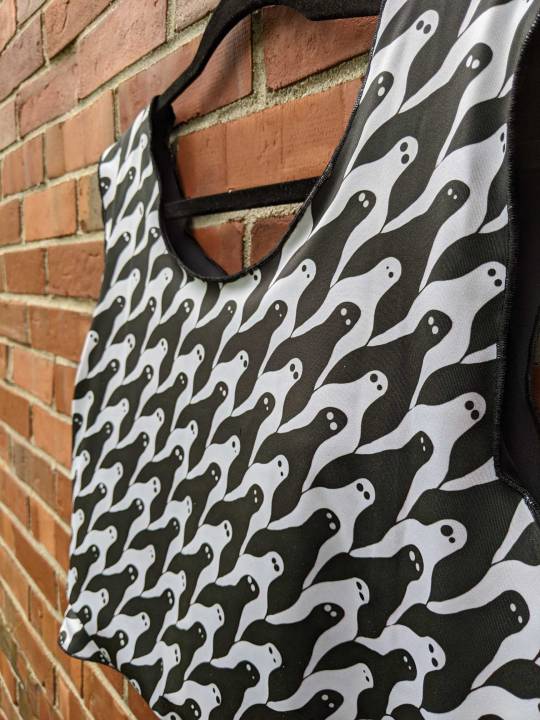
If you'd like a custom-sized, handmade, made-to-order binder or sports bra in this houndstooth like the one in the photos, you can find those listings (as well as the poster listing) here, on the Shapeshifters website. There are three pattern size options, the classic teeny tiny version; a somewhat bigger medium size; and a super graphic large size. Our binders are the most comfortable and effective on the market thanks to our finely graded internal sizing system. Because we're a small operation that makes every garment to order, both our binders and sports bras are highly customizable, and can be made to ALL measurements with flat pricing across sizes.
If you'd like to purchase the fabric yourself for your own sewing projects, you can order it through our Spoonflower shop, where we have it listed in the same three pattern sizes.
#cryptids#fresno nightcrawler#california#fabric design#fabric pattern#the cryptid collection#shapeshifters#spoonflower
34 notes
·
View notes
Text
Hey friends.
Another fucking 'sew your own binder' tutorial is going around.
It's one thing if you want to learn to sew a light compression sports bra, go ahead and give it a try with adequately stretchy materials.
BUT if you're looking for full flatness binding, even with a small chest,
Please.
Please.
Please I am begging yall to remember that a binder is a piece of MEDICAL EQUIPMENT.
If you wouldn't sew your own sling, your own sutures, or your own compression equipment, please don't sew your own binder.
#actually trans#transmasc#ftm#binders#info#safety#ftm safety#the endless cycle of grown transmen asking young transmascs to stop diy binding#the endless attempts to prevent back injury#and rib injury
4 notes
·
View notes
Text
btw, btw. Today I finished sewing Choso cosplay :3


I am waiting for my binder to arrive. I finally FINALLY got one!! So I believe it will look better regarding my chest area -side view that shows the size, I will try to post the after picture- (I was wearing a mild compression bra, but is not enough. I do not have an issue with my self image nor body, I totally understand it might be a triggering topic. This is only for cosplaying purposes, I'm not trying to change my gender nor take such issue as a simple thing at all) btw, it hasn't arrived yet, but I found one online from an LGBTQ+ owned business. I strongly recommend you to buy one from such businesses to promote and help them! (It's from Argentina, idk if they sell internationally). Also, please be aware of the correct usages of binders!! No more than 8 hours and always prioritize your health!
I think I'm going to wear this cos next weekend, so I am hoping for good pictures to be taken (I have a good spot where I can simulate it's Shibuya Station bathrooms 🙊)
21 notes
·
View notes
Text
For my fat trans friends, because the photos and info here are a bit focused on people with smaller busts- I don't know much about binders and I'd love if someone else could add relevant info about binders for larger people, but I do know corsets! And I want to assure you corsets can provide similar flattening even for large breasts.
I think one of the reasons people who'd like the smoothing/flattening look of a corset avoid them is because the popular image of them is primarily burlesque and bawdy historical fiction where the corsets are decorative and basically pushup bras.
But historically speaking, corsets were utilitarian undergarments intended to keep your breasts supported and out of the way while you worked. They were replaced by bras as fashion changed and began to favor thinner fabrics designed to be worn directly against the skin.
Frankly as a well be-tittied person I find corsets a lot more comfortable than bras. I suspect the larger surface area just helps distribute the weight better, plus the additional back support is very appreciated. They're also just nicer looking than most bras in my size.
They will however run you at least as much if not more than a good bra, so be prepared to make an investment. You do *not* want to buy a shitty cheap corset, for a lot of the same reasons you don't want to buy a shitty cheap binder. You will not be getting anything quality from Amazon I can tell you that.
You're looking for something with spiral steel boning (unboned won't compress anything and plastic bones are a travesty and a hazard), and it should be overbust or "stays." Stays is the historical term for the particular flattening, cone shaped corsets of the 16th century. If you're expecting daily wear, the fabric should be something breathable like cotton.
You will also need an undershirt! Generally speaking, you never want to wear a boned corset directly against the skin, because they are not easy to wash without damaging! You can't put a boned corset in the washing machine!
My go-to for modern-style corsets is usually Corsetstory. They're not the best (corset snobbery incoming- off-the-rack is never going to be as good as something made to your measurements) but they're pretty good, comparatively affordable, and they're usually running some kind of sale.
However, if you want to compress and smooth the bust, you don't want modern style corsets that prioritize an hourglass shape. You want classic/historical stays, and those are unfortunately harder to find online and more expensive when you find them- redthreaded and periodcorsets have some very high quality made to order options with nauseatingly high price tags. Considering the materials, skills, and historical knowledge involved, $500 to $700 isn't unreasonable to ask, but I sure don't have that laying around to spend on corsets.
Your best bet honestly might be to go to your nearest ren faire and talk to some of the people selling corsetry there. They may be selling their own stuff, but they're generally also historical fashion enthusiasts who will happily talk your ear off about the virtues of corsets and where to find them.
Or, if you can sew (or you'd like to learn) you could try making your own, which might actually give you the most bang for your buck in terms of ensuring it fits, is comfortable, and does what you want it to do.
You can buy a pattern, like this elizabethan style, or this 1920's corset for that boyish flapper shape. Or draft your own based on your own measurements, using instructions like these, which is a lot easier than you'd think.
So if you're a large chested individual, and you'd like a flatter profile but binders aren't a good option for one reason or another, maybe check out corsets!
THINGS I NEED TO FUCKING KNOW: Why every fuckin trans man or nb person I know who binds is like “oh binders are the worst, you can’t breathe in them, I know someone who broke a rib once”,
And meanwhile over in historical costuming, we are fucking eating, sleeping, swordfighting, riding horses, and feeling great like this:

(credit: Jenny La Flamme, The Tudor Tailor, Verdaera)
Like is there NO overlap between people who want to bind and people who care about accurate 16th century clothing reconstruction techniques?
(I, okay, maybe it is kind of a niche interest, but…. REALLY? Anyone who’s made a boned binder, PLS SPEAK TO ME)
Keep reading
69K notes
·
View notes
Note
my 2 cents on the ground miku top from what little i know about sewing and fabric: i think sewing the bra shaped piece under the mesh piece would work? it might effect the stretch of the mesh in that area so some slack might need sewn in and you might need to be careful it doesnt make the bra piece too tight either? the way youre decribing it working reminds me a lot about chest binders / compression tops if thats any help for construction ideas... id almost say using a mannequin or ducktape dummy and draping the fabric or making ducktape patterns off of it would be your best bet if youre making from scratch
mannequin/duct tape dummy is always the way to go for making ur own patterns I think but I have neither/too lazy/don't already have materials for the latter 😭 the good thing about this construction is that I could still try making them separately and if that doesn't work just use the same pieces and sew them together with minimal fabric loss
#also noted: zigzag stitch everything. got it 👍#thanks for ur input!!!!! sry for the late response LMAO#work on the cosplay has ground to a halt as i am missing a lot of materials#its a good thing I started way early lmao. but it means if i dont finish on time#i have literally no excuses <3#anon#ask#again the main priority when it comes to this is: how do i do this at minimal cost#which means a lot of shortcuts. like not doing a mockup#unfortunately(?) i successfully made fitting leggings without a mockup#so now i have too much confidence...
0 notes
Note
hello! you asked me a bit ago about my experience w chestbinder.co but for some reason i can't like, answer it privately from my drafts? idk. anyway i'll just post my response here.
so i had a good experience with them, the one i bought was the side-latching one (the 'classic chest binder') and it arrived on time iirc (i live in nz) with zero issues, as described. it flattens out my chest pretty well but i'm not sure how this specific one would do for larger chests (i'm like an a to b cup when wearing bras).
a friend of mine also bought binders from there and his ended up being too small for him so the size chart on their website might be off. weirdly i had the opposite problem and both of mine ended up too big, fortunately the smaller size i bought was easy enough to alter to fit me (it's p easy when you know how to do some basic hand sewing)
i have heard that there are some pretty mixed reviews out there but my experience with them was perfectly solid. i hope it turns out similarly for you if you decide to go for them! good luck!
oh i just saw this, thank you so much for responding! i ended up getting one that zips up and a strapless one that clasps. i only really wear the zip up one and it flattens great and id super comfy and easy to wear.
i dont wear the strapless one at all because its hard to clasp and it pushes the skin under my armpits up LMAO
the zip up one might have been a little small but honestly ive been binding for so long i didnt really care and it stretched out on its own (DONT do this if you dont have experience binding. you won't be used to the feeling enough to know your limits yet. so if anybody sees this and orders from chestbinder.co you might want to get a size up, especially if youre new to binding!)
but other than that i also had a good experience and im looking to get another zip up one from them!
#posting this for other people to see :)#trans#transgender#trans visibility#transmasc#trans binding#binding tips#transmasc binding#binding#(adding a bunch of tags so hopefully ppl who are looking like me can find this!)#chestbinder.co
1 note
·
View note
Text
How To Make A Chest Binder That Will Help You Lose Weight Fast
Now that you're wondering, let's look at this how to make your own chest binder.
Making Your Own Chest Binder Chest binders are a great way to help you lose weight quickly and easily. They provide compression to the chest area and help to flatten and reduce the appearance of chest fat. Making your own chest binder is not difficult and doesn't require any special materials. Here are the steps you need to take to make your own chest binder:
Gather Your Materials - You will need a piece of fabric that is long enough to cover your chest and wide enough to wrap around your torso comfortably. You can use an old t-shirt or any other stretchy fabric that you have lying around. You will also need a pair of scissors, a ruler, and a sewing machine.
Measure and Cut the Fabric - Measure the circumference of your chest and the length of your torso. Cut the fabric to the measurements you have taken, making sure to leave enough fabric for the seams.
Sew the Binder - Pin the fabric together and sew the edges together. Start by sewing the side seams, then the top and bottom seams. Make sure to leave an opening for the straps.
Add the Straps - Cut two strips of fabric long enough to fit around your torso and attach them to the binder. Sew the straps in place, making sure to reinforce the seams.
Try it On - Put on the binder and adjust the straps so that it fits securely but comfortably.
Making your own chest binder is simple and cost-effective. Once you have made your binder, you can wear it for up to eight hours a day to help you lose weight. Make sure to take breaks from wearing the binder to give your skin a chance to breathe.
0 notes
Text
Shapeshifters is a small business based in Vermont who sell uniquely designed chest binders, make custom size binders, AND sell an at-home sewing kit to make your own binder!
heyo just a psa: gc2b is not safe anymore. old binders from them are fine but new ones are way lower quality and will almost certainly mess up your ribs (think warping or breaks). don't get binders from amazon because they also tend to be dangerous. underworks seems to have maintained their good ratings, so if you need a binder consider going with them, and remember to always do your own research :D
25K notes
·
View notes
Text
A Beginner's Tutorial on How to Make a Binder like Sports Bra
Binder like sports bra is a type of sports bra designed to provide extra support and comfort for larger-chested athletes. It is made of a breathable, stretchy material that keeps the breasts in place and prevents them from bouncing during strenuous activities. This type of bra is also great for women who are not comfortable wearing a traditional sports bra because it provides more coverage and support.
The first step in making a binder like sports bra is to choose the right fabric. Look for fabrics that are stretchy, breathable, and moisture-wicking. Cotton, Lycra, and spandex are all good options. Once you have chosen the material, cut the fabric into two pieces, one for the front and one for the back.
Next, sew the two pieces together along the sides and up to the armpit. Make sure to leave enough room for the elastic to be sewn in later. Now it's time to sew in the elastic. Cut two pieces of elastic, one for the top and one for the bottom. Sew the elastic onto the fabric, making sure it is tight enough to provide support but not so tight that it is uncomfortable.
The last step is to sew the straps. Cut two pieces of fabric that are long enough to reach from the top of the bra to the bottom. Sew the straps onto the back of the bra, making sure the straps are snug but not too tight.
Now that you have finished making your binder like sports bra, it's time to try it on. Make sure it fits comfortably and that it provides you with the support you need. If you are happy with the fit, you are ready to hit the gym or the track with your new bra.
Making your own binder like sports bra is a fun and rewarding experience. Not only will you have a bra that is perfect for your needs, but you will also have the satisfaction of knowing that you made it yourself. So what are you waiting for? Get out there and make your own binder like sports bra!
0 notes
Note
Speaking about the kits, I've been wondering, what do you consider the minimum to do them? Sewing wise. I don't have a machine and assume doing it by hand is out of the question, so what would be the minimum machine requirements?
Top tier: A sewing machine with a stretch stitch, and a serger for the hems.
Totally fine: A sewing machine with a stretch stitch and/or a zigzag stitch, for both seams and hems.
Hard Mode: Hand-sewing with strong thread using a stitch for stretch fabrics. It'll take a long time and a lot of pins to keep all the layers in place, but it's technically doable.
18 notes
·
View notes
Text
10 Super Easy, Quick And Elegant Diy ChestBinders That Are Perfect For A night Out!
Anyway, what is accepted and accepted by people is diy chest binders.
What’s the point of buying a designer piece if you can’t wear it out? That’s why we’ve put together this list of ten super easy, quick and elegant DIY chestbinders that are perfect for a night out! Whether you’re hitting up a club or just want to look polished and put-together, these chestbinders will have you looking your best in no time. So, go ahead and add one to your outfit plan for next week!
How to wear a chest binder
There are a few things you'll need to do in order to make wearing a chest binder easy and stylish. First, gather the materials you need: either an old T-shirt or shirt that's too large for you and some scissors, or a fabric seamstress' cutter. Cut the T-shirt or shirt into a snug fitting undershirt-style top and bottom. Second, find a comfortable chest binder to wear. There are many different styles on the market, so find one that fits your body type and style. Third, take some time to adjust the binder so it's perfectly fitted. Make sure it's tight enough to keep your breasts contained but not too tight that it causes pain or discomfort. Finally, find some clothes that will work well with your new chest binder. A blazer or cardigan can be perfect for adding extra warmth if needed, as well as skirts that aren't too short or tight around the waistline.
10 Best tips for making your own chest binders
When it comes to nightwear, there are a lot of choices available. From lace bras and panties to gathered tank tops and halter necklines, the list goes on and on. But what if you don’t want all of the fuss? What if you just want something easy, something that looks great and is comfortable? One option is to make your own chest binders. These bindings are easy to put on and take off, making them perfect for a night out. Here are some tips for creating your own binders: 1) Pick a fabric that you love. Whether you choose cotton or silk, make sure that the fabric feels soft against your skin. You'll also want to be sure that the fabric doesn't ravel easily so that it stays looking neat. 2) Cut out your binding strips using a long hemming scissors or a rotary cutter. Make sure that the width of the strip is about 1 inch wider than the circumference of your chest (measured around the fullest part of your bust). For example, if your bust size is 38 inches around, then your binding strip should be about 42 inches wide (1 inch + 2 inches = 42). 3) Sew the strips together at an angle, overlapping slightly as you go. Use a zigzag stitch to help prevent fraying. Once you've sewn all of the strips together, press lightly so that the seams lay flat against each other. 4
Conclusion
In today's roundup, we have 10 amazing and easy chest binders that will make for the perfect night out. From ties to bows, each one is simple but stylish and can easily be put together in just a few minutes. Whether you're looking for something special to wear on a date or simply need an extra layer of security while out socialising, these binders are sure to come in handy. So if you're feeling a little shy about your chest, give these DIYs a try - you won't regret it!
0 notes
Text


Mothman Moth Wings // Fabric Design for @shapeshiftersvt and The Cryptid Collection
It's time to talk about my Mothman fabric design!
This was another fabric design where I didn't have a poster yet to pull design elements from, so I was working entirely from scratch. I actually designed two different Mothman fabrics and fully intended to illustrate both of them, but then our whole household got covid and my entire workflow shut down and my design schedule got thrown off. I may or may not have adapted the second design to a bonus drop that may or may not be coming soon. But this is the one that Eli and I both really wanted for The Cryptid Collection, Eli especially because they'd already designed their Mothman runway look to incorporate a cape made with this fabric.
When I was brainstorming designs, the big thing I was focused on was how to utilize the common visual shorthand for Mothman — a black humanoid figure with moth-like wings and big red eyes — without unintentionally encroaching on someone else's interpretation. It did not take me long to decide against depicting Mothman literally and to remember that the coolest looking moth wings almost always have a pair of false eyes on them.
I wanted a very sooty look, like I had in my head the story of the moths in London during the Industrial Revolution whose wings got darker in theory because the sudden extreme rise in the amount of smoke and coal in the environment darkened the bark of the trees that the moths hung out on. I didn't want it black because I still wanted the pattern to be visible so that you really got the effect of the moth wings.
I opted for more of a blood red with the eyes just to keep that kind of broody, vampiric vibe too. It is plenty bright and obvious amongst all the greys.
There might ... also ... be a bit of an easter egg ... for fans of a certain game ... thinking about ... how ... dreams ... and manipulating people's dreams ... to try and save them ... is a big part ... of Mothman's mythos ...
I actually had to go through like two rounds of unofficial proofing to get this final version of it. When I say "unofficial", I mean that I went through Spoonflower's digital proofing process, we ordered a couple of yards in different fabrics, and when we got them, we discovered we were victims of the reason you should really do a physical proof: The colors were way too dark. Which makes perfect sense! It looked fine on my laptop screen, but my laptop screen is a giant LED light. A yard of fabric isn't. So what I saw as pretty good detail on my screen, just ended up being mostly undefined black blob when it was printed. So I lightened the colors a bit.
Then, when orders started coming in for binders and sports bras, we realized that the eyes were set too close to the edge of the fabric to accommodate multiple sizes. So I moved the eyes in to the center of "wings". Which also proved to be better for the cape too, which got remade with the new print.
As frustrating as it was to, like, go a couple of weeks thinking the print's good and finished, and then hear from Eli that there's something wrong, fix it, then go another couple of weeks thinking it's good and finished, and then hear from Eli that there's something else wrong, and fix it ...
I'm really pleased with this design. I don't think it's exactly what I had in my head at first conception? But part of the reason it changed so much was just the medium it was designed for. It was a really practical education in how a piece can change from digital art to rendering in a different medium. Like, I knew that was a risk in theory, but it helps to see it happen and understand why. Now I have more knowledge about how to avoid it in future projects.
As I mentioned in the last post, if you'd like your own chest binder or sports bra in this fabric like the ones pictured above, you can find them here (along with the poster print) on the Shapeshifters website.
If you'd like to purchase the fabric for your own sewing projects, you can do so through our Spoonflower shop. There are three different sizes there — small, medium, and large. The large is a single pair of wings that takes up the entire yard; the medium is two sets of wings across the width of the yard; the small has three sets across the width of the yard. Though keep in mind that these were designed with Spoonflower's sport lycra in mind, which is wider than some of their other fabric options. For fabrics under 56" wide, one or more of the wings may get cut off, so you may want to take that into consideration when you're choosing which size you want.
19 notes
·
View notes
Text
6 Quick And Easy Tips For Making Your Own Chest Binder
That's interesting. Don't watch what happens next how to make a chest binder out of a shirt.
As a fitness enthusiast, you know the importance of having a good chest bind. It helps to support your upper body and keep everything in place while you work out. But what if you don’t have time to make your own chest bind? No worries! Here are six quick and easy tips for making your own chest binder in just minutes.
How to make a chest binder
1. First, you will need some supplies. You will need a piece of fabric about 18 inches by 24 inches, a needle and thread, and a scissors. 2. Next, fold the fabric in half so that it is an 18-inch square. This will be the front of the binder. 3. Sew the top edge of the fabric together, making sure to leave a 1-inch gap open at the top. 4. Turn the binder so that it is now folded in half along its long axis (the direction that was sewn together). Pin this side closed with pins. 5. Sew the bottom edge of the fabric together, making sure to leave a 2-inch gap open at the bottom (this will be where your straps will go). 6. Turn the binder so that it is now folded in half along its short axis (the direction opposite of where you sewed it together). Pin this side closed with pins. 7. Sew one strap to each corner of the bottom opening on either side of your binder, using a length of thread equal to twice your desired chest circumference (in inches). Make sure that both straps are even with each other and pinned down securely before sewing them in place. If you want to make two straps per corner instead of one, sew another strap halfway between each strap and pin it down as well. 8. Finally, sew up your sides and top opening using a second length of thread
Tips for wearing your chest binder
If you're looking for a comfortable way to bind your chest, there are a few quick and easy tips you can follow. First, make sure the chest binder is wide enough. A band that's too tight will be uncomfortable and restrictive, while one that's too loose will be ineffective. Next, choose the right material. A band made of cotton or fabric-covered elastic will be comfortable and durable, but may not stay in place as well as bands made from latex or silicone. Finally, ensure that the binder is fitted properly. If it's too large or small, it will be difficult to wear and may even fall off during exercise.
Conclusion
If you're looking for an easy and affordable way to bind your chest, check out our quick and easy tips. With just a few materials and some simple steps, you can have yourself a chest binder that will fit perfectly and stay in place all day long. Plus, it's a great project to work on with friends or family members – no one will be able to resist trying it on!
0 notes
Text
HOW TO TRANS YOUR GENDER: i know my audience!
N.B.: This is hypothetical, and not in any way based on how real 19thC trans folks dressed. Take this as a speculative fanwork suggestion.
With all these layers, would an AFAB person even need to bind their breasts?
honestly probably not! if i was presenting masc back then, i'd wear a couple of undershirts, and then make sure my shirt and waistcoat were tailored to hide my curves. but i'm only a C cup; people with larger breasts might want to have a dedicated garment for binding, as would people doing manual labor.
Remember that this was an era where having a basic grasp of sewing was like having a basic grasp of mathematics. You needed to know how to sew a ripped seam shut again, and you needed to know how to add up your purchases while shopping. If you were raised as a girl, you spent your WHOLE childhood watching and helping your mother, your sisters, the maid(s) mending and making clothes for everybody else in the household. It wouldn't be difficult, given the common materials and skills of the day, to sew your own (non-elastic) binder that buttoned up like a modern vest or laced up like a corset, and then pop a shirt and waistcoat over it. You wouldn't be wrapping bandages around your chest, is basically what I'm saying.
What about AMAB / transfemme folks?
Given that the purpose of the corset + bodice and the petticoats + crinolines was to create the ideal feminine silhouette, you'd pretty much dress like any cis woman of the time. It wasn't widely talked about, but lots of women wore wigs or hairpieces in order to achieve a fashionable hairstyle with its elaborate curls, and if you didn't have the money for that, you could easily hide too-short or too-thin hair under a bonnet or headscarf without anyone commenting. Shoes might be the biggest difficulty, especially for fashionable ladies; if you're lower class and/or hardworking you can wear a pair of plain work boots with your skirts, but a fashionable women's shoe in your size might be impossible to find. I imagine you'd have to save quite a bit to get a pair made to fit your feet.
See, the fourth thing that Victorians loved was TELLING PEOPLE WHAT TO DO. Printing was cheap. Literacy rates were on the rise. The Industrial Revolution drove urbanization and widespread anxieties about class mobility and what was Right and Good. More and more workers had a few pennies to spare in the budget and a Sunday evening to kick their feet up and read a bit. There were SO MANY journals and magazines and advice booklets etc on the market. No matter what kind of man or woman you aspired to be, there was some kind of periodical you could subscribe to that would tell you exactly what you should and should not do about it.
A BASIC GUIDE TO VICTORIAN CLOTHING, FOR FANDOMS
wherein VICTORIAN CLOTHING is understood to mean "common clothing from the 1830s to the end of the century, in fashion as set by London and followed to a greater or lesser extent in the rest of the British empire"
This is very much meant as a starting point or a cheat sheet, not a comprehensive historical essay, for people who want to know what the Fuck is happening under that morning coat and/or dress the size of a kitchen table. I've also included a little bit on likely materials and colors so you can add some texture to your fics.
Here's the rule of thumb: Victorians loved LAYERS, BUTTONS, and DECORATIVE SHIT. When in doubt, slap several layers of clothing on your guy, button 'em all together, and flourish the hell out of the top layer. Congrats, you have dressed a Victorian.
Read on for details! And check my reblogs for a note on trans characters and for a few picture examples. A Part 2 on Mending/Laundry is in the works, because it had a much bigger impact on Victorian dress at all levels of society than it does on modern fashion and I think it's worth talking about.
UNDERWEAR FOR MEN:
a warm and comfortable and easily washable undershirt (typically called a vest) with sleeves that went down to the wrist
drawers, also warm and comfortable and easily washable and covering the whole legs, fastened with buttons or ties at the waist and ankles
pair of socks
If you cover your whole body in this base layer made of undyed, unfashionable, who-cares-if-it's-stained fabric, the sweat and dirt of your body stays on this easily-washable layer and spares the outer layers of clothing that would be damaged by hot water and soaps, or at least that was the philosophy.
The most common fabric for this underwear was flannel, as it was cheap and fairly soft. Bands of cotton could be stitched to the inside of the wrists, ankles, waists, and collar if you found the wool itchy. Socks were almost always knitted wool, holes or thin spots mended with darning whether you were poor or rich.
UNDERWEAR FOR WOMEN:
the chemise / shift: a simple, short-sleeved cotton tube that fell to the mid-thigh
other underwear requires a bit of a history lesson, sorry. At the beginning of the century, you wore like 85 petticoats and no bloomers. Then crinolines--a sort of metal cage skirt that held your dress away from your body to obtain the fashionable wide silhouette--were invented in the 1850s. It was great, because they replaced 30lbs of underskirts, but also inconvenient, in that hoops of steel are inherently bouncy. To preserve modesty (and also warmth) women began wearing bloomers, open in the middle and buttoning at the waist and either at or below the knee. These were also made of plain cotton and only occasionally decorated with a bit of lace-- for all your underthings, male or female, you wanted to be able to 1) make a bunch of sets quickly and cheaply so you could change every day without needing to launder as often and 2) use cloth that could be laundered easily.
stockings were longer and more decorative than men's socks, made of wool, cotton, or silk. White was popular at the beginning of the century, but bright colors and patterns became fashionable in the middle, and conservative black stockings dominated the end of the era. Wool fabrics were the most common, warmest, and cheapest; silk stockings were for very wealthy and fashionable women as they required the most care. Near the end of the century stockings were suspended from the corset, but up til that point stockings were held up by garters tied above the knee.
MIDDLE LAYERS FOR MEN:
shirts, with much longer tails than the button-up shirts we're used to, with a buttoned slit that only went about halfway down the chest rather than all the way down the front of the garment. Lots of volume in the sleeve around the armpit, buttoned up at the cuff. At the beginning of the period, rich men's shirts were checked or patterned while working men's shirts were white(ish), but this swapped over the course of the century as colored fabric became cheaper. (It hides stains better.) The gentleman's shirt from midcentury onward was a crisp, bright white.
As a middle layer, parts of it (like the cuffs and front) could be seen in public, but you absolutely could not go out without a waistcoat and jacket. You only removed your jacket and showed your shirtsleeves at the end of the day, amongst your family.
Trousers were held up by braces / suspenders that went over the shoulders, not belts that fastened around the waist, and you did NOT let them show. They were meant to be covered entirely by waistcoats.
MIDDLE LAYERS FOR WOMEN:
As a very carefully tailored and shaped garment that couldn't really be washed, corsets went over the shift. All women wore them, even laborers, even prisoners and people in workhouses as part of their (institution-provided and deliberately demeaning) uniform. They were viewed as necessary armor to support your weak internal organs, and the physically upright posture they created went hand in hand with moral uprightness in the Victorian mind.
camisoles (also called vests or corset covers) were tailored shirts worn over the corset, and could be either extremely decorative with embroidery and lace or plainer and made for warmth.
then you've got the crinoline, tied at the waist, a skirt made of steel hoops as already described.
then a couple of petticoats, decorated at the hem for fashion, layered for warmth and to hide the crinoline's hoops.
OUTERWEAR FOR MEN:
trousers, made of cotton or wool. The big differences between Victorian trousers and today's are 1) zippers hadn't been invented yet, the flies were buttoned and 2) the modern waist sits around the hipbones, while the Victorian waist was at the bottom of the ribcage.
jackets, made of thick heavily felted wool that was decently wind- and rain-proof. Darker colors in jackets and trousers lasted longer, so light-colored cloth was mostly worn by the young and rich (or those who wanted to look rich) and flashy.
waistcoats were where the fashion REALLY was. As the back was always made of plain cotton not meant to be seen, even poor men could often afford the cost of the fabric needed to make a neat waistcoat. The front could be made of embroidered silk for luxury, wool for added warmth, or printed cotton making full use of the brilliantly-colored (and relatively cheap) dyes that had just been invented. It's a little bit like people today wearing simple suits and shirts paired with wild socks.
OUTERWEAR FOR WOMEN:
and here you finally get to the f*cking dress. I couldn't possibly go into all the variations on dresses in this era, but I can say that bright colors and patterns were common for women of all classes (but were also part of the ever-present anxiety about people acting "above their station", if a maid dressed too fashionably). The design of the sleeves and the decoration of the hems changed regularly with fashion, as did the precise shape of the feminine silhouette, but the bodice was always tight and the skirts were always full. The average woman would spend more money on flourishes--ribbons, lace, other trimmings--than the dress itself, largely because the average level of skill in sewing was so high that they mostly bought the fabric for the dress and cut & sewed it themselves.
ACCESSORIES FOR MEN:
the collar was not an integral part of the shirt! It was detachable and had to be washed, starched, and ironed separately. Laborers didn't wear them, just a loosely-tied cloth around their neck, but a stand-up collar was necessary for anyone working in a business setting whether you're rich or making really terrible clerk's wages. Turned-down collars like the ones on most of our shirts today were informal and for wealthy men at leisure.
a stock or necktie, ideally black silk. Modern neckties weren't around yet, but the century moved slowly towards that and away from cravats.
gloves. Especially when status was a concern, so, men outside the home not engaged in business and servants waiting on their masters. These were tight-fitting, pale in color, and damn near impossible to launder and mend.
ACCESSORIES FOR WOMEN:
a shawl, often. Your lower half would be covered in stockings and plentiful skirts, while your upper half would only have a few layers that were usually made of cotton, so freezing your tits off was unfortunately common.
gloves. Like men's gloves, these were also status symbols worn when visiting your acquaintances or waiting on your masters. The vast vast majority of servants were women, and the rough labor of washing and cleaning fell to them, so these gloves also covered the evidence of that rough work.
HATS/BONNETS:
Everybody wore a hat when out in public. It's just what you did. The type of hat varied based on fashion, occupation, and social standing, but you had SOME kind of thing on your head when you left the house.
SOME SPECIFIC CLOTHES:
Fishermen wore knitted jumpers instead of jackets. Laborers out in the country (muddy when it rained, dusty when it didn't) wore gaiters, which were basically just rectangles or tubes of cheap-ass sacking that tied around the ankle and below the knee to keep the mud / dust off their trousers. Surgeons and people who worked a lot with ink (clerks, stationers) had sleeves, which were tubes of canvas that tied around the wrist and elbow to protect their shirtsleeves. The advantage of sleeves and gaiters is that you can remove them, toss them in a bucket of water, and beat the shit out of them to wash them without worrying about rips or tears OR getting the stains (mud, ink, blood, etc) onto your other clothes.
Maids and other laborers didn't wear crinolines, but they did wear a corset and a couple of petticoats under their dress.
More prosperous laborers might still own a collar / crinoline, but only wear it to church on Sundays or other occasions that called for nice dress.
When at home and not working or entertaining visitors, both men and women would wear slippers that could be super fancy or very simple or your kid's first sewing project, etc etc. Depends on your preference.
Men would sleep in long, loose nightshirts and women would sleep in long, loose nightdresses. Practically speaking there wasn't much difference between these garments; both might be decorated a bit with embroidery or lace. Rich people would have finer fabrics, fashionable people would have more decoration, poor people might just sleep in whatever combination of day clothes is the most comfortable. Fairly straightforward.
TO RECAP
MEN: vest + drawers + socks > shirt > trousers + braces + collar > waistcoat + stock or necktie > jacket + shoes or boots > hat
WOMEN: shift + bloomers (optional) + stockings > corset > camisole > crinoline > petticoats (minimum 2) > dress > shawl > shoes + bonnet
===
SOURCES
How to Be a Victorian, by Ruth Goodman
Inside the Victorian Home, by Judith Flanders
Episode 342 of Antiques Freaks, Historical Costuming for The Terror (2018)-- the first ~8 minutes talk about men's clothes in general, then they go into naval uniforms until minute 15ish.
#N.B.: 'NB' stands for nota bene which is latin for Note Well aka Pay Attention To This#victorians were out there podcasting. basically.
323 notes
·
View notes