#sea lemon tutorials
Text


I made a thing!
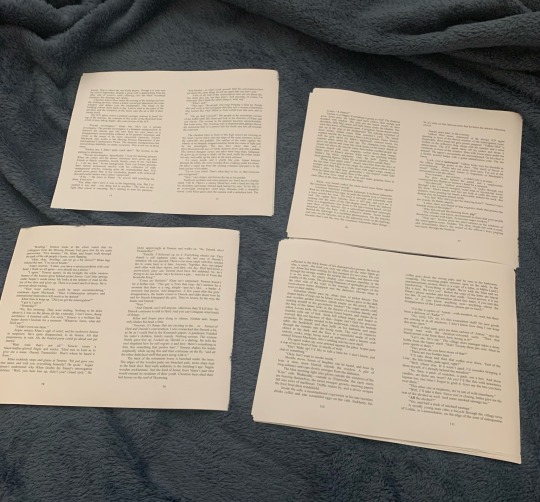
I’ve re-read Appassionato by chonideno about a million times now, and I still absolutely love it, so I decided it need to be a book I could put on my bookshelf.
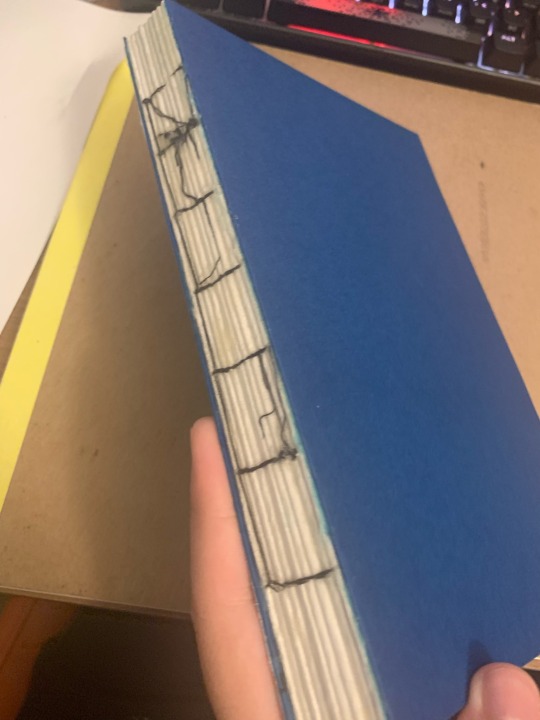
I designed and cut the front cover myself, and followed a YouTube tutorial for Double Needle Coptic Stitch Bookbinding by Sea Lemon for the actual binding.
I copied the text from Ao3 and set it up for printing in Publisher, and decided to put the notes Magnus and Alec write for each other in as... notes. Pictures. Visual elements? I’m not sure what to call it, but you can see what I mean on the last picture.
#bookbinding#shadowhunters#malec#Magnus bane#Alec lightwood#fic rec#sea lemon tutorials#I would tag both chonideno and sea lemon if I could#but i don’t think sea lemon has a tumblr#and if chonideno is here I don’t know
51 notes
·
View notes
Text
HI!!! After finishing Disco Elysium I wanted to read Sacred and Terrible Air, but there were two issues:
1. It’s not officially released in English
2. I don’t like staring at pdfs!
So I did what any sane person would do. That is take three days of my life printing and binding it.
TRANSLATION (“thank you Group Ibex” we all say in unison!):
PROCESS PICS:
I apologize in advance for anyone who has experience in this sort of thing this is so botched.
I have NEVER done anything like this before, I don’t even read books on my own volition, but if the Disco fixation wants me to learn how to sew and bookbind I’ll do that.
Four of the signatures above. There were nine total, eight of them with 8 sheets/32 pages and the last was five sheets I think. Threw the pdf into adobe acrobat and went straight to printing with those settings and the “booklet” option enabled.
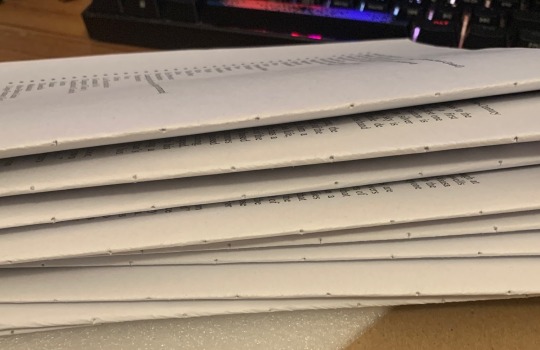
Pricked holes through each signature! Used thumbtacks and a piece of foam I scavenged from my room, worked out great. It’s probably also worth mentioning I do not have a bone folder, book press, or any of the other fancy schmancy bookbinding tools. Flattened the pages with a pencil and pressed with D&D books…
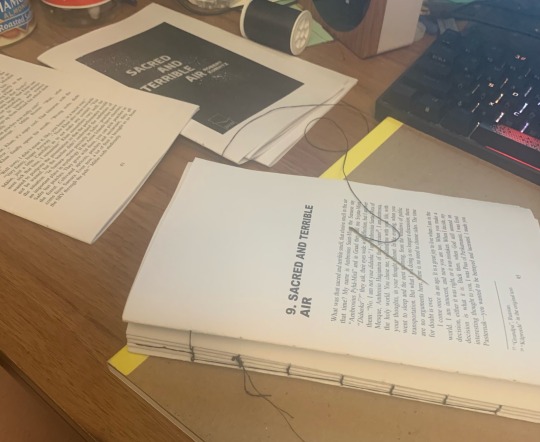
SEWING TIME. I have never sewn in my life. My success in this regard can be majorly attributed to Sea Lemon on youtube, particularly this tutorial:
youtube
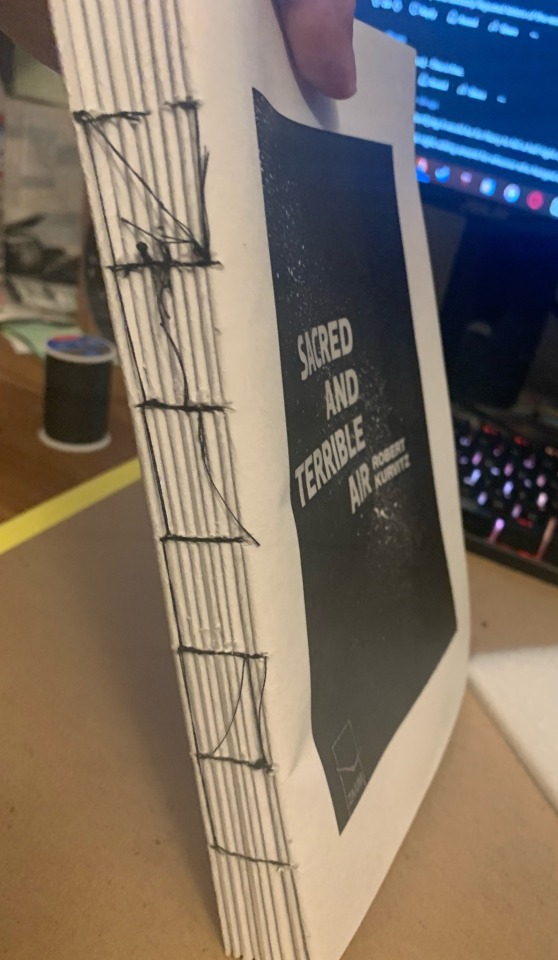
The process from printing to finishing sewing the signatures took ~8 hours. Now we hit our first roadblock, I had no glue for the spine! After going to sleep and waiting what felt like ages (literally 10 hours or so) before I was free to visit a craft store, I tried to find PVA glue because that’s what you’re supposed to use I think?? Yeah. They were out of PVA glue and my impatient ass got mod podge.
‘Tis glued! As you can see I added cardstock to the ends. Joyous day.
Also, you see that sketchbook in the pic? Yeah? You see that lovely cardboard?
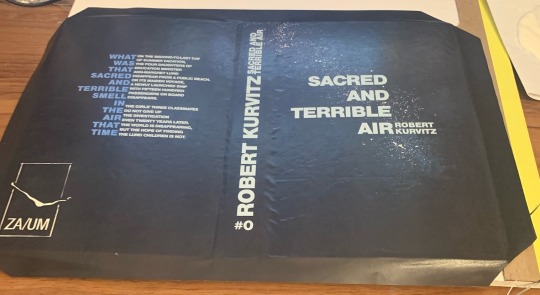
It is now the cover. Rest in piss bristol sketchpad backing.
———
EDIT: I see a bunch of people want to attempt this so here’s a video on how to make the hardcover: https://youtu.be/Av_rU-yOPd4?si=7T5zgVJGAfPFBxn-
youtube
I didn’t use any measurements or advice from it but it’s a good reference for when it comes to assembling the cover from ~3:50 onwards. The boards are same size as your text block pages and spine, I think I made the cover width a bit longer just in case it doesn’t cover the text block though. Do not do this with the spine, I regret it.
And note, this is NOT a tutorial, it is the process of someone who got a bit too silly and decided to bind a book, obviously do your own research lol. Don’t be afraid to try it though, it’s surprisingly simple!
———
… So, now that’s done! I swore to myself I wouldn’t start reading SATA/PJÕL until I finished this project completely, meaning I’ll be doing that now yippee :]
#sacred and terrible air#püha ja õudne lõhn#disco elysium#pjõl#i’m normal#proud of this despite it being pretty scuffed#uhh yeah#the spine is a bit too wide but who cares at this point HAHA#my art#i guess?? my creation??
241 notes
·
View notes
Note
since we’re on the topic of bookbinding, i’ve been wanting to get into it but i haven’t actually done any research (yet) other than vibes, so do u have any tips for complete beginners?? :)
@geminibookbinding is who inspired me to finally look up the whole process and figure out where to start! this is the super helpful tutorial i got from them
i had dabbled with binding before though, using Sea Lemon's tutorials to make blank sketchbooks yearsss ago. i still use her text block and diy hardcover videos as a refresher/reminder while i bind!
the biggest thing that stopped me from learning to bind printed fiction was not understanding how to print the text from home, specifically how to get the pages in the right order for signatures. it's actually so easy with some very simple to use programs: QuantumElephant for PC users (free), and I use BookletCreator on Mac ($20)
i want to go into more detail about my process and supplies from a beginner perspective, i hope this helps:
format the text in a word processor
export your document as a single page PDF
enter that PDF file into Quantum Elephant or BookletCreator, to rearrange the pages for your signatures. your program will give you a new PDF file that you can then print.
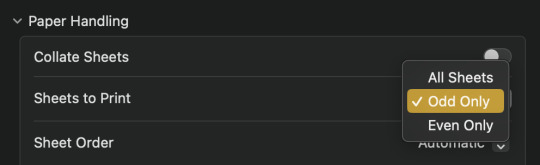
4. double sided printing: i was so so scared of this at first, but it's incredibly simple. no matter what printer you have, somewhere in your print settings will be an option to print even or odd pages.
print all the even pages first, then when the stack is finished printing, flip them over, insert them back into the paper feed, and print the odd pages.
5. fold the signatures together so you have a stack of little booklets, then mark on the spine where your sewing holes need to be. manually punch the holes using an awl, or diy an awl by stuffing a cork on the end of a straight needle.
6. sewing: take regular sewing thread and run it over a block of beeswax. this makes the thread easier to manage and holds it in place better while you sew. a curved needle is also much easier to use than a straight one, especially for a kettle stitch (using Sea Lemon's tutorial)
7. gluing: glue decorative pages (or plain, but thicker paper) to the front and back to create your end pages, then press the book flat to apply PVA glue to the spine. press it overnight so the glue dries flat. (optional: glue a ribbon to the top of the spine, then sew on headbands) finally glue an additional piece of paper (or mull) around the spine to strengthen it.
8. optional: trim the edges of your book down to create a smooth edge. this one's given me the most trouble because it's very hard to get right with a knife, and the proper supplies are expensive. check your local stationery shop (i.e. Officeworks, Staples) for an industrial guillotine service
9. cover: once you have the final measurements of your text block you can start making the cover. this is essentially gluing cardboard, binders board, or plywood etc to a sheet of fabric. the fabric either needs to be bookcloth, or have some kind of non-porous back so the glue doesn't seep through. you can diy bookcloth from any fabric with tissue paper. then glue the decorate end pages to your cover to attach the textblock!
118 notes
·
View notes
Text
Flowers you gave to Gods have withered away? no problemo, reuse them!

Hello guys! I believe I made a post before in which I talked about my habit of picking up flowers for Lady Aphrodite, Lord Hermes, and Lady Athena whenever I come back home. However, since they do not have dirt in which to expand their roots and absorb water, they wither away very soon. Generally, I would advise you to not leave expired food or dried-up flowers on your deity's altar. But there comes the question
,, Jelly, what do I do with them afterward?"
Well, fear not, because I've got just the solution as your fellow devotee and flower enjoyer!
1. Make homemade Potpourri!
A potpourri is basically a jar full of flowers, fruits, spices, etc. Which you leave in your room for its scent. Once your flowers get all dry, you can make one of these and place them in your room as to fill it with scents that remind you of your deities! and it is also a way more natural alternative to room freshener. I personally follow this recipe:
– Spread your flower heads and petals on a baking sheet.
– Dry your flowers in an oven at 93° Celsius (200° Fahrenheit), which may take up to two hours.
– Place dried flowers in an airtight container with a lid and add two or three drops of essential oils for your ideal scent. Rose, lemon, lavender, and cinnamon are among the most common fragrances for the home.
– Store for six to eight weeks to allow the flowers to absorb the essential oils.
PS: Can also be a good freshener for your altar!
2. Homemade dried flower body scrub!
I actually only found out abut this today. But, apparently, if you mix up dried flower petals with Epsom salt, sea salt, baking soda, and essential oils you can basically create a scrub! I dunno if I would recommend it to people with sensitive skin tho...
3.Scented room spray
Mix together essential oils, alcohol, and dried flowers, and BOOM natural room spray! poof a little on your altar every morning!
4. If they are roses, make rosaries out of them!
Even though rosaries can be found a lot in Catholicism, many other religions use them. Buddhists, Muslims, and so much more! and, they actually used to be made out of actual roses. @jekraftbooks has a very good tutorial on TikTok about this, but basically, you need to:
1.Take your dried roses and throw them in a blender
2.Cook them down for several days at a low temperature. Only simmering, never boil.
3.When it begins to form like a clay ball, it is ready to go! Get a cheese cloth and squeeze all the water you can out of the clay. (Keep it for later)
4.Roll them into balls. Put a needle through them to make the hole, then leave them on cardboard for a few days to dry.
5. Once they dry, they will be rough, but we need them to have a smooth texture. Use the water from step 3, then rub some oil on them to give them some shine and protection from water ✨
6.Your beads are done! congrats! make necklaces, earrings, bracelets, any type of jewelry you wish for with them! You can also dedicate them to a deity as devotional jewelry or use them for prayer. Let your creativity go wild!!
#hellenic pagan#hellenic#hermes devotee#pagan#aphrodite devotee#hermes#hermes deity#aphrodite#aphrodite deity#athena#hellenic devotion#flowers#offering#offering ideas#physical offerings
134 notes
·
View notes
Text
My TAU Bookbinding Frenzy
So I’ve gotten really really into bookbinding recently (well, sort of, I’ll explain in a second), and I keep forgetting to share what I’ve been doing, So allow me to rectify that.
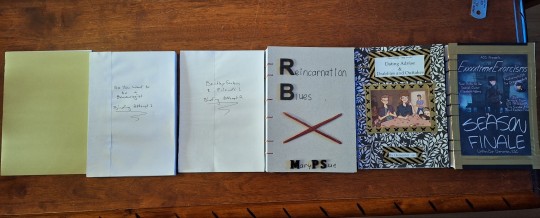
BEHOLD!! The Six (6) TAU fics I have bound and printed!
(This ended up being really long so, more details under the cut)
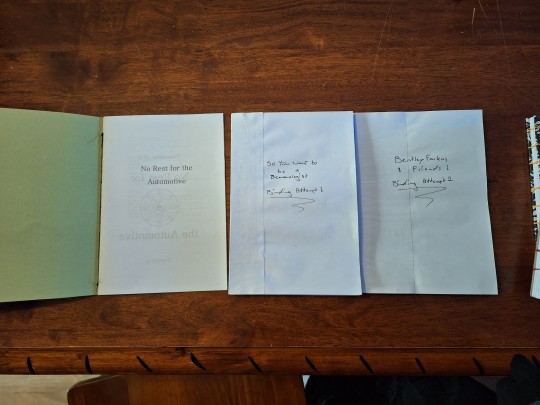
This printing journey actually started months ago, some time last year when I printed these three, No Rest for the Automotive by Feneris, So you Want to be a Demonologist by Dementor_ssc, and the first six oneshots (collated into one) from the Bentley Farkas and Friends series by @skia-oura.
For these three I used the Hardcover Case Bound Book tutorial by Sea Lemon alongside other related tutorials by her. Her videos were very useful throughout all of this so I highly recommend checking out her channel if you’re interested in doing all this yourself. I also initially used a tutorial on tumblr to get the formatting looking nice, but that has since been lost to the aether, so for most of them I just mucked around on Word until I thought they looked nice and professional. I did also use Jess Less’ tutorial on binding fanfiction specifically to help with figuring out how to print these books.
For my very first attempt at binding I wanted to start with something small, that would let me get a feel for the techniques without risking wasting a whole bunch of materials by making some kind of mistake so I chose No Rest for the Automotive by Feneris as it’s one of my favourite shorter fics.
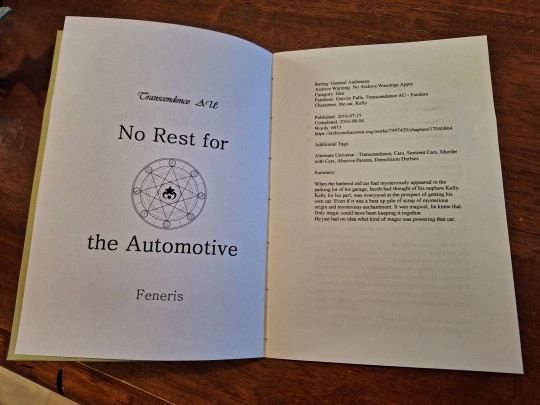
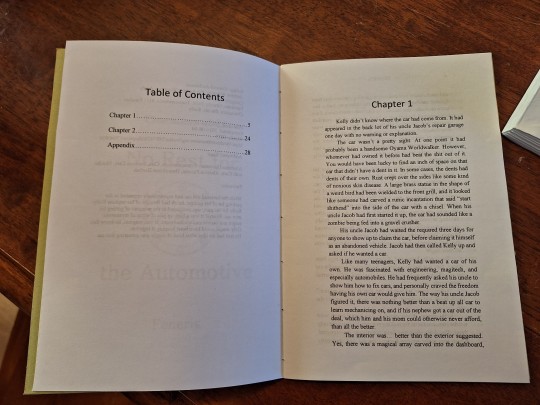
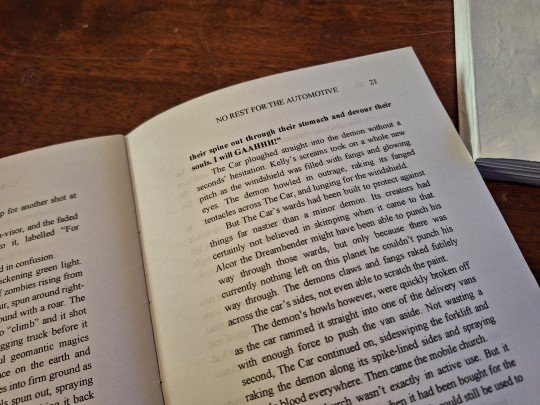
For the cover I used some coloured card that I stitched to the binding, which I’m sure I would have used a tutorial for, but this was done a while ago and I’m not sure which it would have been. This ended up with 28 pages, including an appendix with the author notes at the end, which I did for all of these.

The second book I printed was So You Want to be a Demonologist by Dementor_ssc, because of course it was. It was one of the first fics I read for this AU and I feel fairly confident in saying it’s the most popular in the fandom (and rightfully so, it’s incredible). @gnomewithalaptop also printed it, which was very cool to see, (and she had a significantly cooler cover than my copy but ah well).


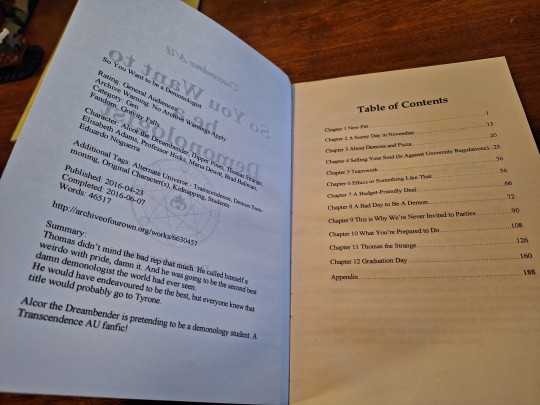
Following Sea Lemon’s tutorial I got as far as glueing the spine together getting a complete text block (I think that’s the right term, idk I can’t be bothered checking haha) and making a haphazard attempt at making the hard cover, but that involved a lot of glue, and waiting for glue to dry, which sadly absolutely ruined my motivation to properly finish this project. But even still I now have a physical copy of one of my favourite fics, and it might not have a pretty cover but I still think it’s neat. This ended up having 191 pages :)

I ran out of image space so check out the reblogs for the rest of it!
#Transcendence au#TAU#Book binding#fanbinding#fic binding#no rest for the automotive#so you want to be a demonologist#bentley barkas and friends#reincarnation blues
92 notes
·
View notes
Note
Do you have any recommendations on how to learn bookbinding? It looks super cool, but I don't know where to start.
It depends on the type of bookbinding you want to get into, my focus is primarily on hardcover case bound books, so if that is what you are keen on, here are some resources that I found incredibly useful while learning:
YouTube
DAS bookbinding has a whole bunch of really detailed, professional tutorials that are incredibly useful. He covers multiple types of binds and techniques and they are all very easy to follow. (I always laugh when I watch his videos tho because he’s Aussie like me and he has the EXACT same shitty tiles in his workroom that I have in my house.)
Sea Lemon does bookbinding amongst other crafts, and while her videos are shorter and less in depth, they are very friendly for beginners and offer alternatives if you don’t have all the tools/equipment at home
Omgreylo is great for if you are doing fanbinding, she also has videos on typesetting, which is something you’ll want to learn too if you are planning on fanbinding. Her videos are also very chill and sometimes I’ll just watch them to relax because I’m a nerd.
Ingenious Designs has some really good videos on some more advanced skills like edge gilding and working with leather bound books. He’s also really charismatic so his videos are fun and informative.
I’m probably forgetting a few, but those channels have all been super useful. The other thing that I do and highly recommend is just browsing the bookbinding and fanbinding tags on tumblr, reddit and instagram to see what other people are doing. A lot of people (including myself when I finally remember to actually take pictures and record the process) will post progress photos alongside the finished project and will talk about the process. Most people are quite happy to answer any questions you might have about their projects too so don’t be afraid to ask.
Also the most important piece of advice I can give, if you are serious about bookbinding, GET YOURSELF SOME SHORT-GRAIN PAPER. It makes all the difference in terms of quality, ease of use, and durability.
Anyways if anyone else has any other resources or tips they think are useful, please feel free to add!
193 notes
·
View notes
Text
Book No. 9

Ages ago now, @kangofu-cb reached out about having a copy of A Heart Worth Loving bound, and I was so excited to work on this for her. So excited that I sent it off with taking any photos of the finished book, in fact, and had to sheepishly ask for some after it arrived. Luckily she was super accommodating, ty lovely! (If you haven’t read the fic, check it out, it’s really beautiful.)

I don’t want to say that this bind was cursed, but it was absolutely the most challenging bind to date. Everything that could go wrong, went wrong, from the typeset to casing in. I guess it was inevitable that I’d case in upside down eventually, but I was gutted to lose the first endpapers, a wooden-floor effect paper with gold highlights that I’d found specially for this project; I ended up ‘saving’ half of them so there’s an unusual double-endpaper thing going on. But this marbled paper is also quite classy I think.

The cover was a pain as well; I wanted to reflect the apartment that’s the setting for most of the fic, but I did not know what I was doing with HTV so attempt one came out incredibly wonkily. Luckily, I already knew I wanted a copy for myself.
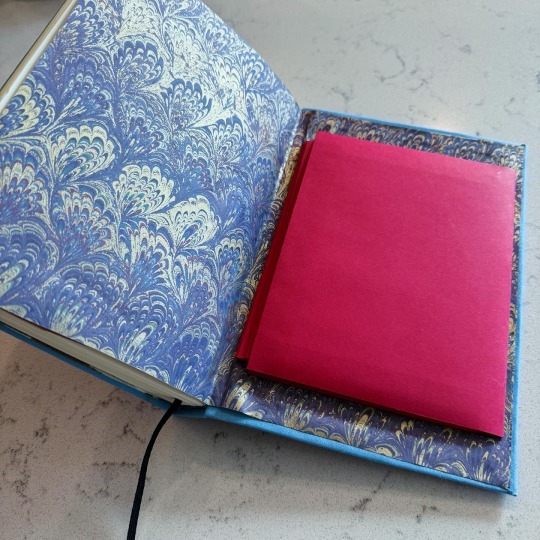

The thing I like best about the author copy is the envelope in the back, which has a little booklet with all the fic’s art. I used Sea Lemon’s accordion pocket tutorial, kindly recommended in the Renegade Bindery discord, and the construction was far simpler than I worried it would be. Next time I’d adjust the spine and hinge gaps more to accommodate the enclosure, as it was bulkier than anticipated, but as a way of including art I think it’s not bad.
It’s always nice being approached by an author instead of having to go to them, which I get very nervous about, and CB was delightful to collaborate with on design questions, so even with the construction issues this was a fantastic project and I’m so happy to have been able to work on it.
77 notes
·
View notes
Text
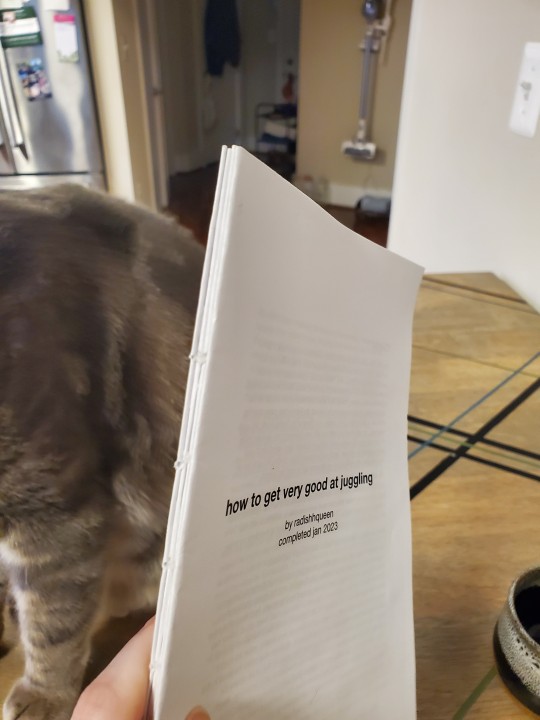
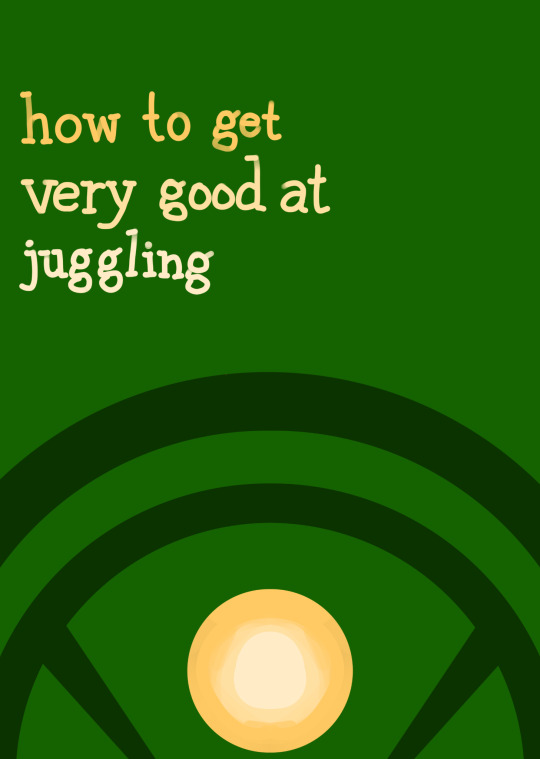
so my project over the summer was making a hard copy of my rottmnt april-centric fic, how to get very good at juggling! shameless plug, it occupies a very special place in my heart.

and a video flip through <3 yes it's a bad video but this has been rotting in my drafts I need it out
step by step-ish process pics under the cut! + a link to the tutorial i used.
I largely used this tutorial by Sea Lemon for the actual construction of the book. For the text block, I just copied it into a word document, formatted it to my liking, and printed it out in 24 page signatures. (This makes it sound easier than it was. I trial and error-ed this step so hard, since all the tutorials I saw were for blank notebooks, and not text. If there's demand for a step-by-step on how to do this process with god's jankiest printer, lmk and i'll write it out)
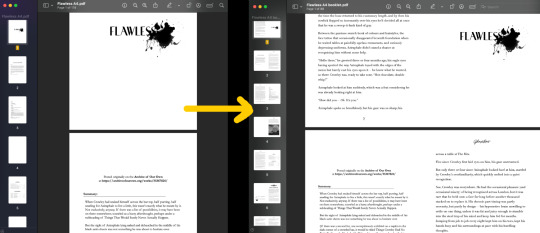
In the end, I had a bunch of signatures that looked similar to this image below. i actually reprinted them (for the third time) after i took this picture bc some pages disappeared and i took the opportunity to center the page numbers. someday i'll learn how to get them on alternating corners.

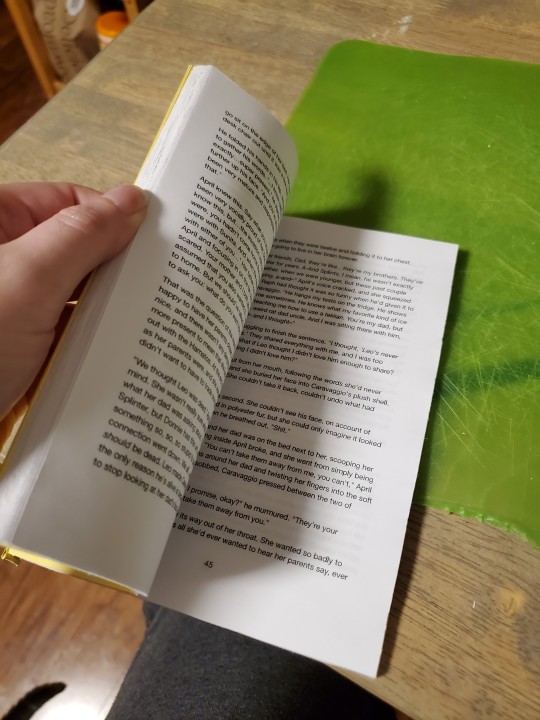
...that i then sewed and glued into a text block! (ft. my cat)
because i was using a public printer, and also because i couldn't figure out how to adjust the margins, i had to do some trimming to make the margins more normal. you can kinda see in the image above that the top margin is like. two inches. (i'm currently in the process on typesetting another fic, i'm gonna figure out the margins this time i swear)

once i trimmed it (very slowly, with an exacto blade) (god i wish i had a paper guillotine), i sewed on some paper headbands and an extra piece of support cardstock (not pictured, whoops), and then it was finally time to start the cover!
okay, admission. when i started this project, my intention was to do a vinyl cover, do the title in stickers, and be done with it. unfortunately the sticky backing of vinyl? very sticky. not easy to adjust things when you have shaky hands and can't get the cover pieces immediately lined up. so i quickly burned through the whole roll of vinyl i had, which meant it was time for plan B, fabric.
also unfortunately, my local chain craft store never fails to let me down, and the only green fabric they had was god's brightest shade of green. regardless, we persevere.
because of who i am as a person, i know how to embroider! more or less! so that meant instead of futzing around with fabric markers and attempting to make a passable cover that way, i just decided to embroider a cover.
first came the mock up
and then i got started with the embroidery! i measured out the dimensions of the cover on the back of the fabric, and made a grid for where i wanted all my pieces to go

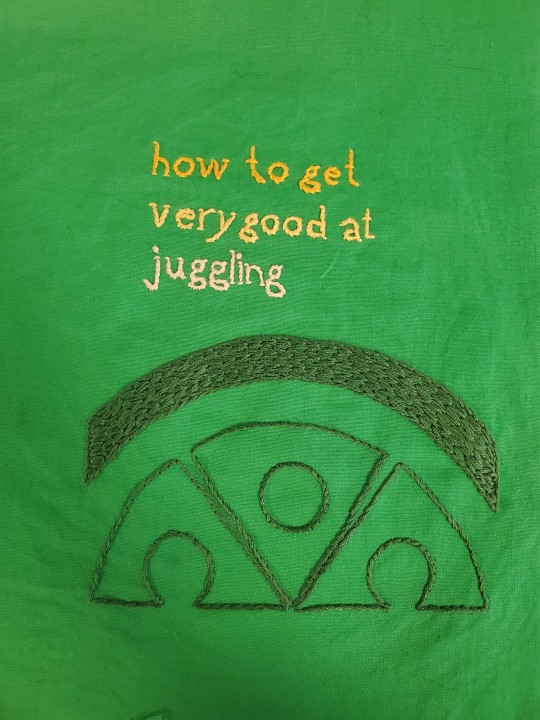
once the cover was finally done, i glued and assembled it a la Sea Lemon's tutorial. and!! now i have a book!!
120 notes
·
View notes
Note
I would love a list of resources on getting started on ficbinding, if you have any? Or recommended tips, or tags to follow? Just anything, really. Obsessed with this.
I started with this video. It teaches you the basics like sewing (the sewing stitch is still the one I use now, despite having learned others since), printing and gluing. You can pretty much do this project with materials and tools you already have.
This video will introduce you to better tools and materials, but I don't believe this is quite accessible to beginners, it's borderline professional. But it's full of good tips!
Sea Lemon's channel, especially her bookbinding playlist. They're recommended very often in bookbinding circles and I've watched one or two tutorials by her for specific stuff and I found them good. So this might be a goldmine for a beginner.
I mostly learned bookbinding from this book, that I still use from A to Z when I make a book. It was expensive when I bought it, but it's invaluable to me.
I have found great advice on r/bookbinding in the past.
And that's it. I'm in that phase where I get better with every book even though all I'm doing is following the same instructions.
I follow the "bookbinding" and "ficbinding" tags here on tumblr, but so far I haven't seen tutorials, I just like seeing the beautiful projects. It's customary to put a list of the materials used in these posts however, so you might learn about materials that way.
Now for general tips, or what I wish I'd've known sooner!
Don't try to trim a text block by hand, or accept that it will look rough. If you insist, you have a big chance of hurting yourself. Wear gloves. Use a safety cutter. I can't stress this enough
Do it on the cheap when you start. I literally bound my first fics with cardboard from amazon boxes. That way you'll learn the techniques and gestures without ruining good materials
Once you've found the right ones, screenshot or note down your printer settings for the love of everything that breathes
That's all I have right now. Thank you for asking, I hope it helps, and good luck!
55 notes
·
View notes
Text


I decided to try my hand at bookbinding. The thrift store had cool Halloween-themed scrapbook paper and some appropriately colored cloth (I swear the cloth is seafoam green IRL), so my first book is TLT themed. I stenciled a Seventh House skull on for the final touch.
I followed Sea Lemon’s tutorials, which are nice and easy to follow. Things I learned while doing this:
- buying random bolts of cloth at the thrift store is maybe not the best choice if you want to avoid visible glue marks on your final cover
- cutting a straight line is really hard and if I do this a lot I should get a paper guillotine and/or rotary fabric cutter
- sewing the binding is actually quite fun
More to come at some point?
85 notes
·
View notes
Note
👁👁 i recall you bookbinding at one point in time, what would i need in order to do the very basics?
So I have great news for you: bookbinding is SHOCKINGLY ACCESSIBLE and very very easy to pick up as a hobby! (But it's an unusual enough hobby that everyone around you will just ASSUME you have highly specialized and developed skills, hahaha).
I made my last few bookbinding projects out of stuff I had around the house. But prior to that, I got almost all of my supplies from the dollar store.
You will need:
-Paper (any. Big enough to fold to whatever size you want your book to be)
-Some sort of chip board or cardboard (I like buying dollar store sketchbooks...the backs are this perfect dense-but-thin cardboard, and I tear out the pages for my paper. I basically flip a cheap generic sketchbook into a unique hardcover sketchbook!)
-Acid-Free White Glue (Elmer's makes a good cheap one. Scrapbooking glue is great too. Anything that dries clear and is suitable for archival, meaning it won't degrade the paper over time. Some people even mix their own!)
-Needle and Thread. (Any. Curved needles are easiest, but straight needles work just fine. Use those until you can find the curved variety. Any thread works, but pro-tip: get ahold of some cheap wax --beeswax probably-- and then run the length of your thread along it to smooth the fibers. Do that, and your thread will never tangle, which saves a lot of time. It also helps prevent your paper from tearing!)
-Something to wrap around the cover. (You can get really creative with this. You can use paper or fabric or leather or cardstock or basically anything that you can wrap and glue down to the board of your cover. I've seen people use old jeans: I've seen people use giftwrap. Experiment!)
-Something to puncture the signature holes (the actual tool for this is something called an awl, and I have one at this point, but dollar store push-pins work fabulously if you're just giving it a try)
-Something to fold your signatures (you can use your hands, but it's much easier with a tool called a bone folder. Craft stores sell them. A small ruler made of wood or plastic works very well, too.)
And that's it!
There are a few other things (like book paper for the covers, corner protectors, book tongues, ribbon for attached bookmarks, cheese cloth to strengthen the spine, etc.), but I don't consider those the absolute BASICS needed for a first project. All the things I've listed are cheap, easy to find, or easy to substitute. Try it out before you decide if you wanna invest in the fancier stuff!
Sea Lemon on YouTube makes great, easy to follow tutorials for the actual construction. I also recommend watching a few bookbinding ASMR videos; watching someone apply their skills in a relaxed but steady way is a great way to learn, imo.
If you give it a try, let me know how it goes!
18 notes
·
View notes
Text


Crafting
Today I followed an online tutorial by Sea Lemon and made a notebook using the coptic binding stitch!
Well, that's what I was trying to do. Some of the time I did it right, but I think not all of the time, because some of the stitches didn't really come out looking right, but the book does hold together and the pages open more or less flat--and to the extent that they don't, I think it's because I was using rather cheap printer paper. The cover is made of a piece of thin cardboard (from the packaging of a wall calendar), which I cut to the right size and covered using paper from fancy chocolate wrappers (around the edges), some heavy turquoise paper (on the outside), and some patterned paper on the inside. That part of the process would have gone better if my double sided tape dispenser hadn't been defective.
The actual binding was the part I was interested in, and for a first attempt at that method, I think it turned out pretty well. I'll have to try it again sometime to see if I get the hang of it better.
8 notes
·
View notes
Note
book binding? 👀 i’ve been wanting to get into that. do you have a tag of references and/or resources for the crafts you pick up? or just a list of references you found useful for learning book binding?
As for book binding i got into it because i was annoyed when th how a lot of my fav sketchbooks with good ass paper wouldnt let the pages lay down flat. And i somehow stumbled upon a tutorial from the youtube channel “Sea Lemon” and essentially i had pretty much all of the tools needed except an awl (i used corn skewers instead).
You essentially only need sewing thread, a needle and lots of paper. But the process is easier if you also have a curved needle, awl, bone folder, those paper cut machines that looks like a sword, and a block of beeswax for waxing the thread.
I started by first just doing the text block and no cover, due to not having a good material for that. But im pretty sure Sea Lemon have video tutorials on how to turn like an old cereal box into a book cover etc.
If you dont care for fancy book covers and just wanna make your own sletchbooks with your favorite paper, then its fairly easy to learn and get into. You can start by just making simple booklets and then advance further.
37 notes
·
View notes
Note
Hi! I followed your @ from ao3 to here, and saw your bookbinding 😲 it's gorgeous! I'm a complete beginner, but I want to do this so much. Where did you learn? Do you have any helpful links to tutorials? Also... do you print at home? Because i'm not sure i want to print smutty fanfic at a shop lol
hihi!! welcome welcome to my humble blog!
i’m very glad you enjoy my fic enough to come here hehe <3 thanks for reading!!
As for bookbinding, my go to where i learned to bind paper together is a youtuber named Sea Lemon!! A lot of her older videos really helped me get started out! I see all my textblocks together with the french link method if that helps!!
And yes i print at home!! theres loads of tutorials online for typesets, and i’m very willing to send anyone who asks my personal typesets for fics i’ve already made just shoot me a private message :D
I use an Epson ecotank ET-2850 for all my printing!! I bought it with bookbinding and art prints in mind after my old printer gave up on me and its the best, it also can print so much with fairly cheap ink!! I think i’ve only topped up black ink once since i bought it in august and i haven’t had to buy new ink yet!!
If you have any other questions definitely don’t hesitate to ask by sending another ask or a dm!! <3
10 notes
·
View notes
Text
I gave myself one (1) week to style a wig for Raine Whispers so I’m gonna try my hand at a tutorial/build log! First: the reference

They have… really short hair. I’m going to try a glued undercut and essentially make a wig helmet
Next, the materials:

I got a secondhand sea foam green Spirit Halloween wig (read: thin and tangles easily) that I will use for the base, as well some leftover white Arda wefts from a different project. I’m also using
Wide tooth comb
Narrow tooth comb
22” circumference Canvas wig head
Crimping iron
Sew-in wig clips
Detangling spray (mixture of boiling water, conditioner, and a few drops of clove and lemon essential oils so it smells nice :))
Thinning shears
Fabric glue
Quilt batting
Cosplayer Audacity
So I’m gonna start crimping

#cosplay#raine whispers#owl house#build log#wig styling#my cosplay#idk man I have half a mind to put together an Amazon list for all this stuff because that’s the best place to get an actual nice wig head#but that requires recommending Amazon….
4 notes
·
View notes
Note
hey! i want to have my favourite fanfics in bound form; do you have any resources i can learn bookbinding from? I’m already learning to make art so that i can add smol illustrations; however, i can’t pin it down to clearly defined forms instead of a puddle of values (i don’t work with digital art). how do i work with all of that?
Personally I learned from a bunch of videos on YouTube and various Google searches! I recommend checking out these videos;
Bookbinding Tools and Materials- beginner friendly, by bitter melon bindery. (Their channel has several very helpful videos, including one on making book cloth!) This one gives you a good rundown on the tools and stuff you'll need.
Turning Fanfiction Into the Hardcover Book it Deserves, by Less Jess. This one I recommend for learning how to copy over the fics and format them into a printable form! Trust me, you'll want that Adobe trick; formatting it all by hand is a real pain in the ass!
Rajiv Surendra's Bookbinding Guide for Beginners | Into to Bookbinding, by HGTV Handmade. This one's good for more fundamentals and learning extra techniques and tricks!
French Link Stitch Bookbinding Tutorial, by Sea Lemon. They also have lots of nifty videos; this one in particular goes into depth on my preferred binding stitch.
Beyond that, I encourage you to do lots of research, and experiment a little! There are actually lots of ways to bind books, and don't be afraid to try different things and see what works best for you! I personally prefer the French link stitch for the back, and bind it in bookboard covered with handmade book cloth from various fabrics I find.
Hope his helps, and don't be afraid to ask any followup questions!
6 notes
·
View notes
Last Seen Blogs

prostoreznik-blog
Пыль километров дорог

swinginllamahumanfreak-blog
Без названия

jeeyakurtis
JEEYA KURTIS

intrepvd-blog
fearless.

crashlapinerecords
crashlapine
records