#screenfetch
Explore tagged Tumblr posts
Visit Tumblr Blog
Explore Tumblr blogs with no restrictions, modern design and the best experience.
Last Seen Tumblr Blogs


Fun Fact
There were a total of 171.5 billion posts on Tumblr in 2019.
Text
screenfetch but there's a 1/6 chance it automatically uploads your geolocation info to reddit
biggest data breach in the history of Linux: what if neofetch displayed your password next to your username. You just know people would still compulsively post screenshots
68 notes
·
View notes
Note
YOU KNOW WHAT?! FUCK THIS! I'M GONNA MAKE YOU RUN SCREENFETCH WHETHER YOU LIKE IT OR NOT!
*installs ShrineOS on you and runs screenfetch*
ERROR: UNABLE TO INSTALL
1 note
·
View note
Photo

2 notes
·
View notes
Photo

Debian 9.2 on Thinkpad X60
7 notes
·
View notes
Text
Como adicionar vários fusos horários no Ubuntu
Se você tem familiares ou colegas em outro país ou mora em um país com vários fusos horários, é importante acompanhar a diferença de horário. Afinal, você não quer incomodar alguém ligando às quatro da manhã.
Alguns usuários do Linux também mantêm uma aba no horário UTC, porque a grande maioria dos servidores usa o UTC.
Situações como essas podem ser gerenciadas melhor se você tiver vários…
View On WordPress
0 notes
Link
Info di sistema su shell con screenfetch, ma non per windows
1 note
·
View note
Text
Neofetch: Logotipo e información del sistema.

Neofetch: Logotipo e información del sistema. Neoftech es una herramienta en línea de comandos que nos imprime en pantalla el logotipo e información del sistema. Su uso y configuración es sencillo a la vez que aporta una mejora visual a la clásica barra parpadeante de la consola / terminal. Neoftech es similar a ScreenFetch o Linux_Logo, pero mucho más personalizable, ademas viene con algunas características adicionales realmente buenas. Algunas de sus principales características: es muy rápido, imprime una imagen a todo color (el logotipo de tu distribución en ASCII o cualquier imagen que tu selecciones), permite definir el qué y dónde se imprimirá la información del sistema, etc.... Como norma general no viene en casi ninguna distribución linux (exceptuando algunos Arch Linux), pero su instalación desde repositorios de terceros si es posible. Vemos como instalar la aplicación.
Neofetch: Logotipo e información del sistema
Instalar Neofetch en... Debian: Debes seleccionar tu versión de Debian y modificar la siguiente linea (en el ejemplo Buster), bionic, buster, jessie, oldstable, sid, squezze, stable, strech, testing, unstable, wheezy y xenial. echo "deb http://dl.bintray.com/dawidd6/neofetch buster main" | sudo tee -a /etc/apt/sources.list curl -L "https://bintray.com/user/downloadSubjectPublicKey?username=bintray" -o Release-neofetch.key && sudo apt-key add Release-neofetch.key && rm Release-neofetch.key sudo apt-get update sudo apt-get install neofetch Ubuntu, Linux Mint y derivados: sudo add-apt-repository ppa:dawidd0811/neofetch sudo apt-get update sudo apt-get install neofetch CentOS, Fedora, Rhel y derivados: La aplicación esta en los repositorios que pertenecen a "dnf", así que debemos instalar el propio dnf. sudo yum -y instalar DNF sudo DNF -y instalar DNF-plugins-core sudo DNF -y Copr permitir Konimex / neofetch sudo DNF -y instalar neofetch Arch Linux y derivados: packer -S neofetch packer -S neofetch-git OR yaourt -S neofetch yaourt -S neofetch-git Una vez instalada la aplicación la puedes ejecutar con el siguiente comando: neofetch En la imagen principal del articulo podemos ver como aparece en CentOS, también ponemos unas imágenes de ejemplo sobre la visualización en Linux Mint y Debian. De todas formas... más abajo vemos como realizar modificaciones en la configuración de Neofetch.

Neofetch en Linux Mint 18.3 Sylvia

Neofetch en Debian 10.Buster Configurar Neofetch Al ejecutar por primera vez Neofetch, se genera automáticamente (en tu usuario) el archivo de configuración predeterminado. Es muy intuitivo y sencillo de configurar. nano /home/tu-usuario/.config/neofetch/config.conf Aparece en pantalla algo similar a... # See this wiki page for more info: # https://github.com/dylanaraps/neofetch/wiki/Customizing-Info print_info() { info title info underline info "OS" distro info "Host" model info "Kernel" kernel info "Uptime" uptime info "Packages" packages info "Shell" shell info "Resolution" resolution info "DE" de info "WM" wm info "WM Theme" wm_theme info "Theme" theme info "Icons" icons info "Terminal" term info "Terminal Font" term_font info "CPU" cpu info "GPU" gpu info "Memory" memory # info "GPU Driver" gpu_driver # Linux/macOS only # info "CPU Usage" cpu_usage # info "Disk" disk # info "Battery" battery # info "Font" font # info "Song" song # ] && prin "Music Player" "$player" # info "Local IP" local_ip # info "Public IP" public_ip # info "Users" users # info "Locale" locale # This only works on glibc systems. info cols } # Kernel # Shorten the output of the kernel function. # # Default: 'on' .............................. etc... Puedes editar el archivo según tus necesidades, para ver todas las opciones y su configuración ejecuta lo siguiente: neofetch --help También puedes lanzar el modo "test", para ver todas las funciones habilitadas. neofetch --test Para habilitar el logotipo de la distribución en modo ART ASCII, ejecutamos... neofetch --ascii Como hemos podido comprobar estamos ante una herramienta altamente configurable, haz buen uso de ella. Espero que este articulo sea de utilidad, puedes colaborar con nosotros con una donación (paypal), o con el simple gesto de compartir los manuales en tu sitio web, blog, foro o redes sociales. Read the full article
#ARTASCII#ASCII#ConfigurarNeofetch#consola#distribucionlinux#dnf#InstalarNeofetch#lineadecomandos#Linux_Logo#Logotipoeinformación#Neoftech#ScreenFetch#sistema#terminal
0 notes
Photo

Manjaro + GNOME Personalização feita por: @diegolivs Gostaria de colaborar também? Envie o print do seu desktop no direct ou no e-mail: [email protected] #manjaro #GNOME #rollingrelease #arch #desktop #GNOMECommunity #theme #archlinux #linuxuser #instatech #icons #userfriendly #gtk #opensource #BR #manjarocommunity #screenfetch https://www.instagram.com/p/BwjYOyKhbVb/?utm_source=ig_tumblr_share&igshid=hdwlthltyl3l
#manjaro#gnome#rollingrelease#arch#desktop#gnomecommunity#theme#archlinux#linuxuser#instatech#icons#userfriendly#gtk#opensource#br#manjarocommunity#screenfetch
0 notes
Photo

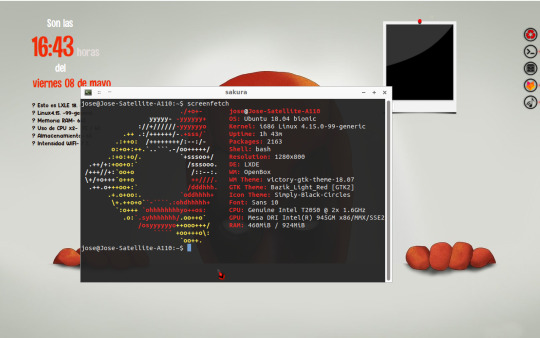
Finalmente, LXLE se queda en mi portátil Toshiba Satellite A110.
Este escritorio se titula “asómate a la ventana”.
Como se puede ver en el “screenfetch”, sus recursos son bastante limitados, pero esta distro aún va fluida, ello junto al hecho de que la puedo customizar a fondo tal como se puede ver, me ha hecho decicirme por dejarla.
* Antes de esta decisión probé “helium”, “antiX” (estas dos MUY COMPLICADAS para configurar una mera conexión WiFi), MX Linux, zorinOS 15.2 Lite (pesadas, el sistema se colgaba solo con abrir Firefox), Sparky (no me acabó de convencer, espartana e imposible eliminar focos y sombras tras ventanas), SliTaZ (nunca llegó a instalarse, de hecho ni en modo “live” pude ver cómo iba, supuestamente es muy liviana) y Manjaro XFCE (resultó que no tiene soporte ya, así que descartada casi de antemano, pero tuve curiosidad por ver cómo es una rolling directamente basada en Arch).
2 notes
·
View notes
Photo

Distribution: Archlinux.Terminal: Termte (config).LinuxerOS Telegram Group: https://t.me/linuxeros_es.Archlinux Telegram Group: https://t.me/ArchlinuxLatinoamerica.
#archlinux#arch linux#i3#i3wm#terminal#linux#termite#screenfetch#telegram group#telegram linux#telegram linuxeros#archlinux telegram#telegram archlinux#screenshots#screenshot linux#i3blocks#i3blocks customize
0 notes
Text
Top things to do after installing Xubuntu 17.10
Top things to do after installing #Xubuntu 17.10
Ubuntu 17.10 was released on 19th of October 2017. And I thought of giving it a try. So I downloaded Ubuntu’s XFCE spin. i.e. Xubuntu 17.10 and installed it in Virtual Box.
So here are the top things I did after Installing Xubuntu 17.10 in Virtual Box.
Type/ paste following commands in termianal.
1. Configure Root Password:
sudo passwd root
2. Software Repository settings: Change Mirror
Click on…
View On WordPress
#build-essential#debian#dmenu#dmenu ubuntu#gnu/linux#guest additions#linux#linux firewall#opensource#power management#remove applications linux#screenfetch#ssh#ssh server#system information#system update#top things to do after installing ubuntu 17.10#top things to do after installing xubuntu 17.10#ubuntu 17.10#ubuntu drivers#ufw#uninstall applications debian#vim#virtualbox#xubuntu 17.10
0 notes
Photo

Linux Mint fetch #terminal #linux #linuxmint #screenfetch #lm #gnulinux #mint #games #gaming #homebrew #code #gui #specs #status #bored #root #rooted #bash #gtk #mate
#linux#terminal#code#screenfetch#mint#specs#gnulinux#games#rooted#bash#homebrew#gtk#gui#bored#linuxmint#gaming#mate#lm#status#root
1 note
·
View note
Photo

Arch Linux on Thinkpad X201
3 notes
·
View notes
Photo

CrunchBang++
Je kiffe bien ma machine.
Je suis passé par #ubuntu comme beaucoup, puis #kubuntu pendant quelques années.
Puis son interface m'a gavé, un blogueur me conseils alors de trouver plus léger, et au détour d'un post clamant de "CrunchBang is not dead", je découvre "CrunchBang++" .
Et c'est le coup de foudre. C'est une Debian avec comme gestionnaire de fenêtre #OpenBox , équipé de Tint2 pour gérer les bureau, et #conky à la base pour monitorer le système.
Je vais donc prendre à bras le corps la modification des fichiers de conf en xml , ajouter les openlogo que l'on voit.
Le fond d'écran est également de moi, réalisé avec #blender .
Ajouter d'autres sources afin de transformer ma CrunchBang++ en Kali.
Et voilà!!!
Bon il faut que je mette la procdure au propre...
0 notes
Photo

Decided to finally do my own system screenshot, the OS is ubuntu though not Kali. I need to find my live drive and get it back! I need a more creative host name. Overall, I like my set up:)
1 note
·
View note