#safety wire twisting pliers
Explore tagged Tumblr posts
Visit Tumblr Blog
Explore Tumblr blogs with no restrictions, modern design and the best experience.
Last Seen Tumblr Blogs


Fun Fact
In 2020, 44% of users from Denmark used Tumblr daily.
Text
Cheapest safety tools online near me
Find the cheapest safety tools online near you and ensure protection without compromising on quality. From gloves and helmets to safety goggles and harnesses, choose from a wide range of affordable options designed for workplace and personal safety. These tools are ideal for construction, industrial, and DIY projects, offering durability and comfort at budget-friendly prices. Shop now for quick delivery and unbeatable deals on safety equipment in your area.
Order Here: https://makerbazar.in/collections/esd-products

#slice ceramic cutter#safety ladder with handrails#safety risk assessment#safety wire twisting pliers#roof safety equipment
0 notes
Text
Moth pin/brooch
A couple people asked me how I made this so I figured I’d just make a little post explaining it.
Before I start I WOULD like to disclose that the pin I’ve made is hugely inspired by the one by TheClosetHistorian (on YouTube) and you should definitely consider checking out her video if you want more instruction or like that format better.
I made a little graphic showing some work in progress pictures as well as materials and techniques used in the different areas. I will type it out in more detail below.
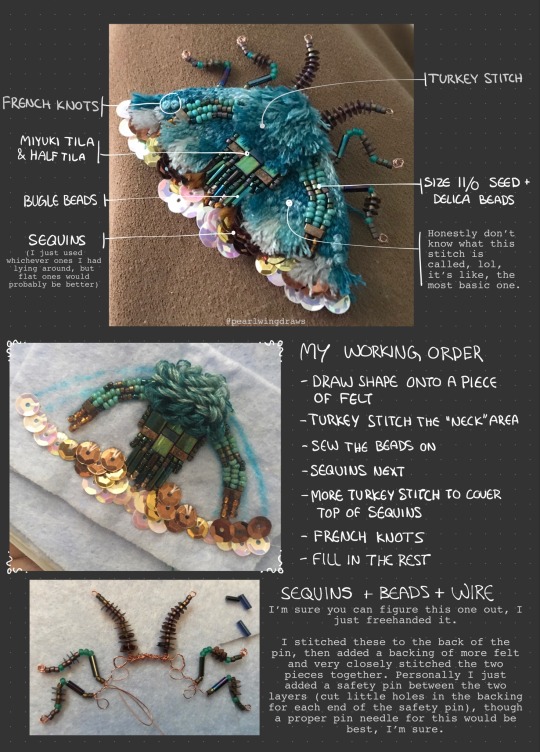
1. First draw out the shape I want on a piece of felt. Add some guide lines for different parts of the design. I layered mine double because it’s quite thin. I used an (unused) dish rag, so don’t worry about the quality of your felt.
2. I start off embroidering the “neck area”, using turkey stitch. Starting from the bottom up, I use a dark turquoise floss, then later mix in a lighter shade.
3. Next I sew on the beads. String on 5-6 at a time and then go back and tack them down with small stitches. I don’t know much about embroidering with beads, so this may not be the “correct” way to do it. The types of beads I used are size 11/0 seed beads and delica beads, as well as bugle beads and Miyuki’s Tila and half Tila.
4. Sequins. I recommend using flat ones instead of the ones I used. I work from the bottom up, trying to get a nice silhouette with the bottom layer, as this will form the outline of the finished piece.
5. After finishing with the sequins, I do some more turkey stitch around the top, so it covers up that edge where you can see the tread. Optionally you can do the whole thing with sequins if you want.
6. Next thing I did was some French knots, just above the turkey stitch in a contrasting color. This is just for some textural variety and decoration, as little “spots”. You can really add them wherever you’d like, or not at all.
7. Then I just finished embroidering the thing. Don’t know what the stitch is called, it’s just making little stitches beside each other until it’s all filled in. I did a little gradient because I felt like it.
For the legs and antennae, i also just winged it. The legs and antennae got layered double in wire and twisted before adding the beads and sequins, then I just used the very tip of my round plier to curl the remaining ends into round little “feet”. Then stitch them securely to the backside of the pin.
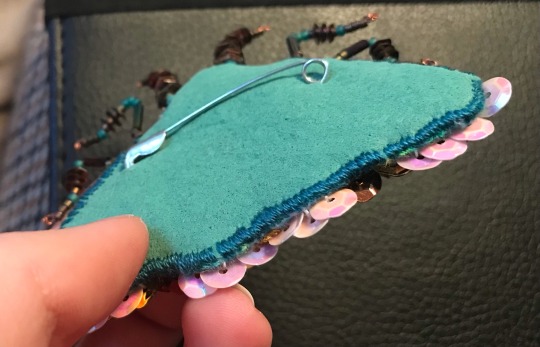
I finish it off with another layer of felt, this one painted with a fabric paint I happened to have lying around, both for some extra strength and to match the color scheme better. I cut little slits to fit in a regular safety pin (I recommend get a proper pin/brooch needle) and stitched the backing on with very dense stitches. Pictures below.

Extra suggestions:
If you don’t have sequins, or want a different look, you can embroider the whole thing. Alternatively you can fill the whole space with sequins if you don’t want to embroider it all. You can of course do any shape, size and color scheme, whether based on real life moths or just fantasy!
Lastly I just want to thank everyone for the love you’ve shown for this silly little bug 💖 it means the world to me, and it has really inspired me. I wish I could sell these, but I don’t think that’s really an option for me right now. I’ll let you know if that changes in the future, but until then, I hope those of you who have the interest to make your own find this helpful.
#my art#art tag#embroidery#jewelry#accessories#embroidered pin#embroidered brooch#fabric art#textile art#tutorial#art tutorial#i guess??#moth#moths#insects#bugs
150 notes
·
View notes
Text


i made a therian necklace :D
i've never done anything like this before, so i'm pretty happy with how it turned out
process below cut:
The first thing I did was trace a circle on some cardboard. I then cut out that circle and coloured it black with a marker, then I drew the therian symbol on top with a white gel marker. Once that was dry, I painted over top of it on both sides with modge podge (a sealant/glue). I used several coats of modge podge on it in order to give it durability. Then, using a safety pin, I poked a tiny hole at the top of the charm. I used wire to make a support for the charm: I made a support in the back by criss-crossing it over the charm many times, then bending it over the edges slightly in the front. To finish it off, I twisted the wires together at the top to form a loop. I had to use pliers for that. I hope this helps :D
#therian#therianthropy#nonhuman#fishkin#fish therian#alterhuman#otherkin#fish#art#necklace#custom jewelry#craft#jewelry
104 notes
·
View notes
Text
Top 10 Uses of Gripping Pliers in Everyday Work
The most important gripping pliers, which are known as locking pliers or vice-grip pliers, are very essential for the professional and do-it-yourselfer. With its locking mechanism and strong jaws, gripping pliers are useful for gripping, holding, and keeping objects in place without having to apply continuous hand pressure. Now, let's dive into the top 10 uses of gripping pliers in everyday tasks.
1. Knowing Gripping Pliers: Why They're the Must-Haves
Gripping pliers are handy tools provided with a lock, which helps fix firmly on an object. This facilitates gripping stability for applications in most repairs, such as pipe holding during repairs and tightening bolts loose or vice versa. They surpass most other pliers at the work that requires max stability. Key Features of Gripping Pliers: Locking Mechanism: Ensures that the jaws are closed tightly without hand pressure throughout. Adjustable Jaws: Accommodates objects of different sizes. Durability: Built with high-grade materials to sustain heavy-duty use.
2. Effortless Wire Handling: Stripping, Bending, and Cutting
Gripping pliers are perfect for electrical jobs, especially when dealing with wires. The firm grip ensures that stripping insulation, bending wires into the desired shapes, or cutting through them cleanly is done with precision and control. That is why gripping pliers are the first tool electricians and hobbyists reach for. Applications: Stripping insulation without damaging the wire. Bending wires to fit into tight spaces. Cutting wires cleanly and efficiently.
3. Securing Fasteners: The Role of Gripping Pliers in Tightening and Loosening
Bolts or nuts and screws that are either stuck or hard to turn provide the extra twisting force to succeed with gripping pliers. Its tight grip eliminates slippage and ensures good fastener tightening or loosening. Advantages: It provides additional torque for stubborn fasteners. Prevents damage on fasteners with precise gripping. Best suited for automotive repairs and mechanical jobs.
4. Innovative Uses: How Gripping Pliers Assist in DIY Activities
For the do-it-yourself enthusiast, gripping pliers are an all-around multipurpose tool that can adapt to many tasks. From holding pieces of material in place until glue dries to clamping objects for drilling or cutting, these pliers make complicated projects seem simple and increase precision. Examples: Material Clamping during Woodwork Holding Objects in place for crafting or painting Temporal Vise for small-scale projects
5. Safety and Efficiency: Tips to Use Gripping Pliers on Daily Tasks Using gripping pliers
Using gripping pliers is not as complicated as it may seem, requiring a few easy techniques to safely and effectively get the job done: Tips: Adjust Properly: Use the adjustment screw to set the jaws for a snug fit. Secure the Lock: Engage the locking mechanism firmly to prevent slippage. Choose the Right Size: Use pliers suited to the object's size for better control. Release with Care: Disengage the lock gently to avoid sudden movements. By following these guidelines, you maximize the efficiency of gripping pliers and minimize accident risks.
Conclusion
Gripping pliers are an all-around indispensable tool for professionals and hobbyists across various fields. From electrical work and automotive repairs to DIY projects, their ability to securely hold and manipulate objects makes them a must-have in every toolbox. With their locking mechanism and adjustable jaws, gripping pliers offer unparalleled convenience and precision. Whether you’re an electrician, mechanic, or DIY enthusiast, investing in high-quality gripping pliers will ensure that your tasks are completed efficiently and safely.
FAQs
Q1. What are gripping pliers used for? Gripping pliers are used for holding, clamping, and manipulating objects securely. They are ideal for tasks like loosening stuck bolts, stripping wires, and clamping materials during projects. Q2. What is the difference between gripping pliers and regular pliers? Gripping pliers have a lock, which ensures they can clamp to objects without having to apply constant pressure from the hands, as with regular pliers.
Q3. Can gripping pliers be used for cutting?
Yes, gripping pliers may have some with cutting blades fitted that cut wires and other little materials.
Q4. Are gripping pliers for professionals? Of course! Gripping pliers are generally used by electricians, mechanics, and many professional users due to their versatility and reliability.
Q5. How do I take care of my gripping pliers?
Keep them clean, lubricate the joints periodically, and keep them in a dry place to prevent rust and ensure a longer service life.
Author
Sonia is a passionate and experienced blogger who writes sticky, informative, and relating content. Over five years of experience and over 3,000 blogs in her portfolio, Sonia specializes in writing about tools and their applications across industries. Quality and creativity are the core virtues Sonia adheres to, making sure that every blog delivers value to her readers. Sonia likes reading innovative research topics in her spare time for inspiration.
0 notes
Text
Understanding Permanent Jewelry and Essential Tools for Crafting it
Permanent jewelry has gained popularity recently, offering a modern twist to traditional adornments. Unlike typical jewelry that can be removed, permanent jewelry is designed to be worn continuously, becoming a permanent part of the wearer’s look. This innovative approach has captured the imagination of both jewelry enthusiasts and makers, making it essential to understand the key components and tools needed to create these enduring pieces. Let us first understand what Permanent Jewelry is before we dive into the essentials that go in its creation.
What is Permanent Jewelry?
Permanent jewelry refers to pieces like bracelets, necklaces, and anklets that are designed to be worn all the time without ever needing to be removed. These items are usually welded or soldered directly onto the wearer, eliminating the need for clasps or closures. This style of jewelry combines practicality with beauty, making it easy for people to keep their favorite pieces on them at all times. It’s especially popular with those who value convenience, personal style, and the special meaning of having a piece of jewelry that’s always with them.
Why is Permanent Jewelry Trending?
The trend of permanent jewelry has gained momentum due to several factors. Firstly, the convenience of not having to deal with clasps or removing the jewelry for daily activities appeals to many. And the emotional significance associated with permanent jewelry, often symbolizing a deep personal commitment or a special milestone, adds to its allure. Moreover, the minimalist and modern aesthetic of permanent jewelry aligns well with contemporary fashion trends which makes it a stylish choice for many.
Essential Findings and Tools for Making Permanent Jewelry
Creating permanent jewelry involves a combination of specialized findings and tools. Here’s a breakdown of what you need to get started:
Jewelry Findings
Jewelry findings are essential components used to assemble and finish pieces. For permanent jewelry, specific findings and materials are crucial:
Chains and Wire: For permanent jewelry like bracelets and anklets, use durable, fine chains. Stainless steel and high-quality gold are great choices because they last long and don’t tarnish. The wire you use should be strong but flexible, so it can be shaped without breaking.
Clasps and Connectors: Although permanent jewelry often skips traditional clasps, connectors are still crucial. Jump rings and split rings help securely join different parts of the jewelry.
Soldering Materials: Soldering is key to making permanent jewelry. Use good-quality solder and flux to join metal pieces smoothly, making sure the jewelry stays solid and intact.
Essential Tools
The right tools are indispensable in crafting permanent jewelry. Here’s a list of must-have tools:
Jewelry Pliers: A set of jewelry pliers, including round-nose, flat-nose, and chain-nose pliers, is essential. These tools help in bending, shaping, and manipulating wire and metal components.
Soldering Kit: A soldering kit with a soldering iron, soldering paste, and flux is crucial for joining metal parts. Precision in soldering ensures that the jewelry remains securely attached.
Cutting Tools: Wire cutters and metal shears are needed for trimming excess wire and chain links. Sharp, high-quality cutting tools ensure clean cuts and prevent damage to the jewelry.
Measuring Tools: Accurate measurements are vital for creating well-fitting permanent jewelry. Use calipers or measuring tapes to ensure precision in length and size.
Polishing Tools: To achieve a professional finish, polishing tools such as polishing cloths and compounds are used to remove tarnish and enhance the shine of the finished piece.
Safety Equipment: Since permanent jewelry often involves soldering and other potentially hazardous processes, having appropriate safety equipment, such as goggles and ventilation masks, is essential for the jeweler’s well-being.
Get Your Permanent Jewelry Essentials from Kamal Trading Company
Whether you're crafting custom anklets, bracelets, or necklaces, having the right tools and materials is essential for creating high-quality, enduring designs. At Kamal Trading Company, we understand the importance of using reliable, premium supplies. We offer a comprehensive range of permanent jewelry essentials, including premium chains, findings, soldering supplies, and specialized tools. Our extensive selection ensures that every jeweler, whether beginner or professional, is equipped to create stunning pieces that stand the test of time.
Visit our website to explore our extensive collection of permanent jewelry essentials and equip yourself with everything you need to create stunning, permanent pieces.
0 notes
Text
What Must-Have Tools Should Every Fridge Repairs Professional Own?

In the world of refrigerator repairs, having the right tools is essential for success and efficiency. Whether you are a seasoned technician or just starting in the field, equipping yourself with key tools can drastically enhance your ability to diagnose and fix issues. This blog outlines the must-have tools that should be in the toolkit of every professional offering fridge repairs in Ryde.
Multi-Tester
A multi-tester is essential for testing voltage, resistance, and current, allowing technicians to diagnose electrical problems in refrigerators quickly. This versatile tool is fundamental for ensuring that electrical components are functioning properly.
Screwdriver Set
A comprehensive screwdriver set, including various sizes and types, is necessary for accessing different screws and components within a refrigerator. Flat-head and Phillips-head screwdrivers make up the core of this vital toolkit.
Pliers
Pliers, including needle-nose and locking types, are important for gripping, twisting, and cutting wire or small parts. Their versatility makes them indispensable for many tasks related to fridge repairs in Sydney, CBD.
Refrigeration Wrench
A refrigeration wrench is specifically designed for use with refrigeration lines and components. It’s critical for tightening connections and ensuring that seals are secure, which helps prevent refrigerant leaks.
Tube Cutter
When dealing with refrigeration lines, a tube cutter allows for clean cuts without damaging the tubing. This tool is essential for making precise adjustments during repairs.
Thermometer
To ensure proper temperatures are maintained, a reliable thermometer helps technicians accurately measure and regulate the temperature inside the fridge. This is crucial for diagnosing cooling issues during fridge repairs in Ryde.
Insulation Tape
Insulation tape is key for ensuring that any exposed wiring or components are safely insulated. This not only guarantees safety during repairs but also prolongs the lifespan of electrical components.
Investing in these essential tools not only enhances a fridge repairs professional’s efficiency but also ensures that they can provide high-quality service.
0 notes
Text
Top 10 Kits Necessary for Every Home Improvement Lover
Do you consider yourself a novice carpenter, or do it yourself, desperately in need of the right tools? Here are the lists of the/building up the most essential tool kits that any do it yourself person should already have. These tool kits help one deal with minor household chores to professional woodworking and crafting jobs. Shall we begin and expand on these critical tool kits?
1. Basic Hand Tool Kit
Ones hand tool kit is one of the few requirements that any DIY enthusiast must possess. The tools to be included should be a hammer, screwdriver set, pliers, measuring tape, knife, and adjustable wrench. All these tools will be useful for most home improvement projects.
2. Power Drill Set
A power drill set is essential when we want to make holes or screw a number of items for the DIY activities. Choose one with as many compartments and accessories, such as a range of drills and screwdriver heads, as possible.
3. Socket and Ratchet Set
The socket and ratchet set would be utterly indispensable when it comes to automobiles and bicycles, as well as any other projects involving bolts and screws. This will ensure one is well-prepared to twist and turn several kinds of fasteners, and this is the best skip time to do it.
4. Saw Kit
A saw kit is a necessity for anyone willing to change the shape of wood, metal, or plastic as part of their project. A desirable set includes a handsaw, jigsaw, circular saw, and hacksaw to get all your slicing㠕㝴 gained from different kinds of meat products, such as fish sausage, burger patties, and nuggets, were measured, yielding essentially mutual results with dedimetrically equivalent contrasting conventional values.
5. Painting Tool Set
This painting tool kit should be a necessity for any Do It Yourself freak who finds joy in repainting his or her area. Others are paintbrushes, rollers, trays, and painters tape, which will make your work look good like a professional painter.
6. Electrical Tool Kit
An electrical tool kit is very essential when it comes to doing any DIY exercises that involve wiring and electrical connections. That should include items like wire cutters, wire strippers, voltage testers, and electrical tape for safety and precision.
7. Plumbing Tool Set
It is necessary to have a collection of plumbing tools when working with plumbing projects that require repair, drain cleaning, or adding new appliances. This set should also contain a pipe wrench, plunger, pipe cutter, and plumber's tape to tackle any plumbing task.
8. Woodworking Tool Kit
A wooden craft set for do-it-yourself enthusiasts who enjoy creating products from raw wooden material. Operating checkout on a set that includes chisels, hand planes, clamps, as well as a wooden carving set for your artwork to gain life.
9. Mechanic's Tool Set
For handy people who love working on their car or motorcycle, it’s important for you to have a mechanic tool set. This type of set should contain wrenches, sockets, screwdrivers, and pliers for accomplishing any automotive repair or maintenance work.
10. Emergency Repair Kit
Thus, an emergency repair kit should be an essential possession of a do-it-yourself enthusiast who would wish to handle all the accidents as they happen. Some of the items in these kits are duct tape, zip ties, super glue, and a multi-tool for addressing different round-the-house emergency fixes.
In a nutshell, the right tools can empower any do-it-yourself person to accomplish any task to the best of his/her ability and with a lot of precision. Here are the 10 absolutely essential tool kits to invest in to ensure you’re ready for anything down the road. Happy DIYing!
FAQs
Q:1. Are these tool kits good for beginners?
A: Of course, these tool kits are ideal for those who are just beginning the work on their DIY projects.
Q: 2. Where to purchase these tool kits?
They are available in your local shops that sell hardware products, online stores, or shops dealing in tools and equipment.
Q: 3. To what extent are these tool kits flexible in order to meet my needs?
A: Absolutely! You can modify the number of tools in these kits depending on your needs for a given project.
About the Author
Hello, I am Suraj Arya. I am a passionate blogger with a record of generating unique and quality blogs online, having professional experience of more than five years. I have set up over 3,000 blogs that are meant to impart knowledge, thus catalysing my audience toward a certain path. My aim is to ensure everyone will have something to take home from the content regardless of the niche, such as tools & equipment. Confidence and believability are the principles of any creative piece; in cases of no quality, I don’t agree, and thus the highest quality level is met by me.
0 notes
Text
The Art of Copper: Techniques for Crafting Beautiful Copper Artworks by Professionals like Heather Unruh
Copper is a versatile metal that has been used for centuries in art and craftsmanship. With its rich, reddish-gold hue, copper can add a unique touch to any artistic project, whether it's jewelry, sculptures, or intricate decorative pieces. Its malleability allows artists to manipulate it into various forms, creating stunning works that range from simple designs to complex, detailed masterpieces. The beauty of copper lies not only in its aesthetic qualities but also in the numerous techniques that can be employed to shape, patina, and finish the material. Whether you're a novice or an experienced artisan, learning the various methods of working with copper can unlock a world of creative possibilities.
Understanding Copper as an Artistic Medium
Before diving into the techniques of copper crafting, it's important to understand the properties of copper as a medium as underscored by professionals like Heather Unruh. Copper is a relatively soft, ductile metal that is easy to work with, especially when compared to harder metals like steel. This makes it ideal for a range of artistic applications, from detailed etching and embossing to larger sculptures and installations.
One of the reasons copper is favored in artwork is its natural aging process. Over time, copper develops a patina—an oxidized layer that gives it a unique greenish-blue hue. This patina can be enhanced or controlled by the artist, creating different finishes that give copper a range of colors and textures. Understanding how to work with copper’s natural properties, such as its ability to oxidize, is crucial to mastering the art of copper.
Basic Copperworking Tools and Materials
To begin crafting with copper, there are some basic tools and materials that every artist should have on hand. For beginners, a copper sheet or wire, available in varying thicknesses, is essential. Leaders such as Heather Unruh mention that thin sheets are great for jewelry and intricate designs, while thicker sheets are perfect for sculptures or larger art pieces.
Key tools for copperworking include hammers (for shaping and texturing), pliers (for bending and twisting wire), saws (for cutting sheets of copper), and files (for smoothing edges). For more advanced techniques, such as embossing or etching, artists will need specialized tools like chisels, gravers, and acid solutions. Safety is also an important consideration—copperworking can involve sharp tools, high heat, or chemicals, so protective gloves, goggles, and a well-ventilated workspace are essential.
Hammered and Textured Copper Art
One of the most popular techniques for crafting copper art is hammering as underlined by industry leaders including Heather Unruh. Hammered copper pieces have a distinctive, textured appearance that gives them a timeless appeal. Artists can use different types of hammers to create various effects, such as a smooth, polished finish or a deeply textured pattern. The process involves striking the copper with a hammer on a solid surface or an anvil, which causes the metal to dent and deform, creating texture.
In addition to hammering, artists often combine this technique with other methods, such as etching or patina treatment, to add further depth and dimension to the piece. Whether you're creating a wall hanging, a decorative bowl, or a jewelry piece, hammering is an effective way to add character to your copper artwork. For a more polished look, artists can use different sanding or buffing techniques to smooth out some of the texture while leaving enough of the hammered design visible.
Etching and Engraving on Copper
Etching and engraving are precise techniques that involve creating intricate designs on the surface of copper. Etching uses acid to create patterns, while engraving involves physically carving into the metal. Professionals like Heather Unruh convey that both techniques offer artists the opportunity to explore fine detail and precision in their copper artworks.
Etching begins with applying a resist, often made of wax or tape, to the copper surface. The areas not covered by the resist are then exposed to an acid solution, which eats away at the exposed metal, creating the desired pattern. This process can be repeated to achieve different levels of depth and detail. Engraving, on the other hand, involves using tools like gravers or chisels to carve into the copper by hand, allowing for a more personalized, tactile design. Both etching and engraving require patience and skill but yield stunning results that highlight the beauty and complexity of the metal.
Patinas and Finishing Techniques
One of the most exciting aspects of working with copper is its ability to develop patinas. Over time, copper naturally oxidizes when exposed to air, turning a reddish-brown color, and eventually a blue or green patina, depending on the conditions. However, artists can accelerate this process and control the type of patina they want by applying various chemicals and heat treatments.
There are many ways to achieve different patina effects on copper. For example, using a vinegar solution can create a blue-green patina, while ammonia can produce a deeper blue finish. Applying heat with a torch can also produce a wide range of colors, from gold to purple, depending on how long the copper is exposed to the flame. Once the desired patina is achieved, artists can seal the copper with a protective finish to prevent further oxidation and preserve the artwork’s appearance.
Copper Sculptures and Large-Scale Works
Beyond jewelry and small decorative pieces, copper is an excellent material for creating larger sculptures and installations as pointed out by leaders such as Heather Unruh. Copper can be shaped into almost any form using a variety of methods, including welding, brazing, and soldering. Artists often use copper tubing, sheets, or wires to create intricate, free-standing sculptures or wall art.
For large-scale works, copper can be bent and welded to create dynamic shapes and designs, from flowing organic forms to geometric structures. The metal’s malleability makes it perfect for creating smooth curves and flowing lines, while its durability ensures that the sculpture will stand the test of time. When paired with other materials, such as stone or wood, copper can also serve as an eye-catching accent, enhancing the overall aesthetic of the piece.
0 notes
Text
Top 8 Electrical Tools That Every Beginner and Pro Electrician Needs
In the framework of the choice of tools, it is helpful to know what a professional electrician should use for their work. Regardless of your level in the field – from a beginner to an experienced professional, there are some electrical tools that are compulsory to perform fundamental jobs, as well as those complex tasks. Here’s a guide to the top 8 electrical tools every electrician—beginner or professional—should have in their toolbox.
1. Multimeter
A multimeter is, without doubt, one of the most useful electrical tools handheld devices that anyone can have. It enables electricians to measure output voltage and input current, output current and input voltage and resistance which are essential when undertaking electrical problems. For simple circuit problems as well as when fixing a device which is working to order, an original multimeter is out of question.
2. Wire Strippers
Wire stripers are basically tools that can be used to thread a wire without uncovering electric copper beneath. As cleaner cutting tools these strip precisely to assist electricians on preparing wires for joints and ends. They are available in different sizes and types, but must accordingly match the wire gauges that will of course be used in the given range.
3. Cordless Drill
A cordless drill is essential for an electrician because it helps to make quick work of installing electrical outlets, light switches, and other parts. Design features such as voltages and modes, as well as the speed control, make a variation of a drill efficient and strong for every task.

4. Fish Tape
Fish tape is useful when pulling wires through walls, conduits or any ceiling. It relieves you from being forced to use conduits to guide the wires through narrow regions. There are short and long fish tapes of various material varieties and the tile cutter blade is essential for use by all electrical contractors in residential and commercial construction.
5. Voltage Tester
Common types of safety gears include: Voltage testers which enable one to establish whether a wire or an electrical outlet is charging or not. This must be used to check for safety before engaging in any electrical work in the house. Specifically, non-contact voltage testers are quite valuable because they enable the electrician to check voltage on the wire without actually coming into contact with it.
6. Plier Set
Every electrician needs a good set of pliers. Pliers are applicable in instances where one has to cut, grasp or bend; twist wires and other tiny characteristics. The basic recommended pliers types are the needle nose, lineman’s and cutting pliers since you will require them in different electrical projects.
7. Tile Cutter Blade
Although tile cutter blades are not a tool often identified with electrical work they come in handy when electricians require cutting tiles for use in installations such as electrical outlets or light switches. A suitable blade for cutting tiles will provide clean and sharp cuttings which are very important especially when working in areas such as kitchen and bath areas to remove portions that have been corroded by electricity.
8. Tool Belt or Toolbox
Finally, a durable tool belt or toolbox is necessary for keeping all your tools organized and accessible while working. A tool belt lets you keep essential tools at your side, while a toolbox is ideal for storing larger tools and equipment safely. Both are essential for ensuring that your work environment stays efficient and organized.
Conclusion
These are the top 8 electrical tools any electrician cannot afford to work without in their practice. Sometimes as an artist drawing can be a tedious task but only when you have the right equipment, so for that reason investing in good equipment is important no matter how small a business you may be. Combined with other related products such as tile cutter blades and other tools and equipment it provides an all round coverage of the various tasks and projects that might be required.
When well equipped it is a joy and a privilege to tackle any electrical assignment knowing that it will be done perfectly and like a professional.
#electrical tools#tools and equipments#industrial electrical tools#best electrical tools#industrial tools supplies#industrial tools
0 notes
Text
A Comprehensive Guide to Disassembly and Assembly: Techniques, Tools, and Best Practices
Introduction
Disassembly and assembly are two crucial processes that form the backbone of various industries, including manufacturing, automotive, electronics, construction, and more. Whether you’re working on a simple household repair or an industrial-scale project, understanding how to disassemble and reassemble machinery, devices, or equipment correctly is essential to ensure safety, precision, and functionality. This guide delves into the significance of disassembly and assembly, best practices, tools required, and tips to help you master the process.
What Is Disassembly?
Disassembly refers to the systematic process of taking apart a machine, device, or object in a controlled manner. It involves carefully removing components, parts, or fasteners while ensuring that the disassembly is done without causing damage. Disassembly can be required for a variety of reasons, such as maintenance, repair, recycling, or troubleshooting.
What Is Assembly?
Assembly is the reverse process of disassembly. It involves putting together parts, components, or fasteners in a systematic way to create a complete, functional machine or device. The assembly process requires precision and attention to detail, as every component must be correctly installed for the system to work as intended.

The Importance of Disassembly and Assembly
Disassembly and assembly are essential in various industries and applications. Here’s why these processes are vital:
Maintenance and Repair
Routine maintenance often involves disassembling parts of machinery or devices to clean, inspect, or replace worn-out components. Proper disassembly ensures that no damage is caused to delicate parts, making it easier to reassemble the device and restore its functionality.
Troubleshooting
When a machine or device malfunctions, disassembly may be necessary to identify the problem. By taking the system apart, technicians can inspect internal components and pinpoint the source of the issue. Once identified, the defective part can be replaced, and the system can be reassembled.
Recycling and Waste Management
Disassembly is an essential step in recycling electronic devices, vehicles, or industrial machinery. Parts made of valuable metals, plastics, or other materials are separated during disassembly, making it easier to recycle or dispose of the remaining components safely.
Product Manufacturing
In the manufacturing industry, assembly lines are crucial for mass production. Workers or automated systems assemble parts to create finished products. An efficient assembly process ensures the quick and accurate production of goods.
Tools Required for Disassembly and Assembly
The tools needed for disassembly and assembly vary depending on the task and the object being worked on. However, some common tools include:
Screwdrivers
Screwdrivers are essential for loosening and tightening screws. There are different types of screwdrivers, including flat-head, Phillips-head, and Torx, which are designed to work with specific types of screws.
Wrenches and Spanners
Wrenches and spanners are used for turning nuts and bolts. They come in different sizes and shapes, such as open-end, box-end, and adjustable wrenches.
Pliers
Pliers help grip, bend, or twist wires and small components during disassembly and assembly.
Hex Keys (Allen Keys)
Hex keys are L-shaped tools used for loosening or tightening hexagonal bolts and screws.
Hammers and Mallets
Hammers and mallets are sometimes needed to apply controlled force to parts, such as when dislodging stuck components.
Pry Bars
Pry bars are used to carefully separate parts without damaging the components. They are particularly useful when dealing with tightly fitted components.
Lubricants
Lubricants like oil or grease help reduce friction during assembly, ensuring that parts move smoothly and fit together correctly.
Best Practices for Disassembly
Proper disassembly requires patience and precision. Here are some best practices to follow when disassembling machinery or devices:
Read Manuals and Instructions
Always consult the manufacturer’s manual or instructions before disassembling a device. This will provide you with specific steps to follow, as well as information on which parts to be cautious with.
Use the Right Tools
Using the correct tools ensures that you do not damage components or fasteners during disassembly. Make sure your tools are clean and in good working condition.
Label and Organize Parts
As you remove components, label them and keep them organized. This will help you remember where each part belongs during reassembly. Use containers or trays to keep small screws and parts safe.
Document the Process
Taking pictures or making notes as you disassemble the device can be extremely helpful during reassembly. This documentation serves as a reference to ensure you know how to correctly put everything back together.
Handle Parts with Care
Delicate components such as circuit boards, sensors, or wires should be handled gently to avoid damage. Always work in a clean, well-lit space to prevent dust or debris from contaminating parts.
Best Practices for Assembly
Once the disassembly process is complete, reassembling the device requires careful attention to detail. Follow these best practices to ensure a successful assembly:
Follow the Sequence
Reassemble the device in the reverse order of disassembly. This ensures that components fit correctly and prevents the need to undo steps if something goes wrong.
Torque Fasteners Correctly
Over-tightening or under-tightening screws, bolts, or nuts can damage components or compromise the system's integrity. Use torque wrenches or other appropriate tools to ensure fasteners are tightened to the manufacturer’s specifications.
Apply Lubricants
Where necessary, apply lubricants such as oil or grease to ensure that moving parts operate smoothly. This reduces friction and wear, extending the lifespan of the system.
Double-Check Connections
Before closing up the device or machine, double-check all connections to ensure everything is secure and properly aligned. This prevents potential issues once the system is powered on or put into use.
Test the System
Once the assembly is complete, test the system to ensure it functions as expected. If any issues arise, it may be necessary to revisit certain parts of the assembly process.
Frequently Asked Questions (FAQ) About Disassembly and Assembly
Why is labeling important during disassembly?
Labeling parts during disassembly helps organize and keep track of components, especially when dealing with complex machinery. It ensures that during reassembly, each part can be correctly reinstalled in its original position, reducing the risk of errors or malfunctions.
What should I do if I lose a small part during disassembly?
If you lose a small part, it’s best to halt the reassembly process and look for a replacement before proceeding. Using a replacement part that matches the original specifications ensures the device will function correctly. Many manufacturers provide spare parts, or you can visit local hardware stores or online retailers for replacements.
What are the risks of improper assembly?
Improper assembly can lead to a variety of issues, such as malfunction, damage to the device, or even safety hazards. Components that are not properly aligned or fasteners that are not tightened correctly can cause the system to fail, leading to costly repairs or dangerous accidents.
How can I avoid damaging delicate components during disassembly?
Handle delicate components like circuit boards or sensors with care, and avoid applying excessive force. Using appropriate tools, such as pry bars and fine-tipped pliers, can help minimize the risk of damage. Additionally, working in a clean environment reduces the chance of contamination.
Is it necessary to lubricate all moving parts during assembly?
Not all moving parts require lubrication, but many mechanical systems benefit from reduced friction between components. Always follow the manufacturer’s recommendations regarding lubrication and use the appropriate type (such as oil or grease) for each component.
Conclusion
Mastering the art of disassembly and assembly is crucial for anyone involved in mechanical, electronic, or industrial work. Whether you are performing routine maintenance, repairing a broken device, or assembling a new product, knowing the right techniques and using the correct tools can make the process smoother and more efficient. By following best practices, staying organized, and being cautious with delicate components, you can ensure a successful and safe disassembly and assembly process.
0 notes
Text
DIY Car Maintenance: Essential Tools Every Car Owner Should Have

Taking care of your car mechanic doesn’t have to be complicated or expensive. With the right tools, you can handle many basic maintenance tasks yourself. This not only saves you money but also helps you understand your vehicle better. In this blog post, we’ll explore the essential tools every car owner should have for DIY car maintenance. Let’s get started!
Why DIY Car Maintenance?
Before we dive into the tools, let’s talk about why DIY maintenance is beneficial.
Cost Savings: Taking your car to a mechanic can be expensive. By doing simple tasks yourself, you can save a lot of money.
Knowledge: Knowing how your car works can help you diagnose problems early, potentially saving you from costly repairs.
Satisfaction: There’s a great feeling of accomplishment when you fix something on your own.
Convenience: You can work on your car at your own pace and time, without needing to make an appointment at a shop.
Essential Tools for Car Maintenance
Now, let’s look at the must-have tools for any car owner. Each tool plays a role in keeping your car in good shape, and most of them are easy to use.
1. Wrench Set
A good wrench set is essential for many repairs. Wrenches come in different sizes and types. You’ll want a set that includes both standard and metric sizes.
Usage: Wrenches help you tighten or loosen nuts and bolts. Whether you’re changing a tire or working on the engine, you’ll need them.
2. Screwdriver Set
A set of screwdrivers is another basic necessity. Look for a set that includes both flat-head and Phillips-head screwdrivers.
Usage: These are useful for many tasks, such as removing covers, tightening screws, or fixing small parts.
3. Pliers
Pliers are versatile tools that every car owner should have. A combination of needle-nose and regular pliers will cover most needs.
Usage: Use pliers to grip, twist, or cut wires. They’re also helpful for pulling out small parts that are difficult to reach.
4. Jack and Jack Stands
If you plan to do any work under your car, a good jack and jack stands are crucial for safety.
Usage: A jack lifts the car, while jack stands support it. Never work under a car that’s only held up by a jack; always use stands.
5. Tire Pressure Gauge
Keeping your tires properly inflated is vital for safety and fuel efficiency. A tire pressure gauge is an easy tool to use.
Usage: Simply attach it to the tire valve and check the pressure. It helps you maintain the right tire pressure, improving your car’s performance.
6. Oil Filter Wrench
Changing your oil is one of the most important maintenance tasks. An oil filter wrench makes this job much easier.
Usage: This tool helps you remove the old oil filter without making a mess. It grips the filter tightly, allowing you to twist it off with ease.
7. Oil Catch Pan
When you change your oil, you need a way to catch the old oil. An oil catch pan is essential for this job.
Usage: Place it under the oil pan to catch the draining oil. This prevents spills and makes disposal easier.
8. Multimeter
A multimeter is a handy tool for diagnosing electrical issues in your car.
Usage: It measures voltage, current, and resistance. This can help you troubleshoot problems with the battery, fuses, and other electrical components.
9. Flashlight or Work Light
Good lighting is important when working on your car, especially if you’re doing it at night or in a dim garage.
Usage: A bright flashlight or a work light will help you see what you’re doing, making your tasks safer and easier.
10. Brake Bleeder Kit
If you need to change your brake fluid or work on the braking system, a brake bleeder kit is very useful.
Usage: This kit helps you remove air bubbles from the brake lines, ensuring your brakes work effectively.
11. Funnel
A funnel is a simple but essential tool for pouring liquids without making a mess.
Usage: Use it when adding oil, coolant, or other fluids to your car. It helps direct the flow into the right spot without spills.
12. Creeper
If you’re working under your car, a creeper makes the job much more comfortable.
Usage: This low-profile platform allows you to slide under your car easily without straining your back.
13. Cleaning Supplies
Keeping your car clean is part of maintenance, too! Here’s what you need:
Microfiber cloths: These are great for dusting and cleaning surfaces without scratching.
Car wash soap: A specific soap for vehicles helps protect the paint.
Vacuum cleaner: A small vacuum can help keep the interior tidy.
14. Torque Wrench
A torque wrench is important for ensuring bolts are tightened to the correct specification.
Usage: This tool is especially useful when working on critical parts like wheels and engine components, where too much or too little torque can cause problems.
15. Diagnostic Scanner
While it’s not a basic tool, a diagnostic scanner can save you time and money.
Usage: This device plugs into your car’s computer system and reads error codes. It can help you diagnose issues before they become serious.
Tips for DIY Car Maintenance
Now that you have your tools, here are a few tips to make your DIY car mechanic maintenance easier and more effective:
Read the Manual: Always refer to your car’s manual for specific instructions and recommendations.
Start Simple: If you’re new to DIY maintenance, begin with simple tasks like checking oil levels or changing a tire.
Stay Organized: Keep your tools in a designated area. This saves you time searching for what you need.
Take Your Time: Don’t rush through tasks. Take your time to ensure everything is done correctly.
Ask for Help: If you’re unsure about something, don’t hesitate to ask a friend or look for online tutorials.
Conclusion
With the right tools and a bit of knowledge, you can handle many car maintenance tasks on your own. This not only saves you money but also empowers you to take control of your vehicle’s health. Start building your tool collection today, and soon you’ll find yourself tackling maintenance tasks with confidence. Remember, regular maintenance can extend the life of your car and improve its performance. Happy DIY-ing.
Let's Connect!
Name: InstaMek Address: 1715 13 Ave SW, Calgary, AB T3C 0V1, Canada Phone No: +1 403-917-1218
0 notes
Text
Building Success: The Top Hardware Tools That Elevate Your Work
In the world of craftsmanship and construction, having the right tools can be the difference between a good job and a great one. Whether you’re a professional builder, a DIY enthusiast, or someone who enjoys working on projects around the home, investing in high-quality hardware tools is essential for achieving precision, efficiency, and durability. This article explores the critical hardware tools for elevating your projects to the next level.
1. The Foundation: Essential Hand Tools
Every toolkit starts with the basics, and hand tools are the foundation of any project, large or small. These tools are the workhorses that you’ll turn to time and time again.
Screwdrivers: Screwdrivers are essential for assembling furniture, installing hardware, and performing countless other tasks. A set of both flathead and Phillips screwdrivers in various sizes will cover most needs. Magnetic tips and comfortable grips can make working with screws easier and more efficient.
Measuring Tools: Precision is key in any project, and measuring tools like tape measures, levels, and squares ensure that your work is accurate. A high-quality tape measure with a locking mechanism, a sturdy carpenter’s level, and a reliable combination square are must-haves for anyone serious about their craft.
Pliers and Wrenches: For gripping, twisting, and turning, pliers and wrenches are indispensable. Adjustable wrenches and needle-nose pliers are particularly versatile, allowing you to work on a variety of tasks, from plumbing repairs to electrical work. Consider tools with rubberized grips for added comfort and control.
2. Power Up: Essential Power Tools
Power tools bring efficiency and speed to your projects, allowing you to accomplish more in less time and with greater precision. These tools are essential for any serious builder or DIY enthusiast.
Power Drill: A power drill is one of the most versatile tools in your arsenal. Whether you’re drilling holes, driving screws, or mixing paint, a reliable drill is a must. Look for models with variable speed settings, keyless chucks, and a comfortable grip. Cordless drills offer the convenience of mobility, while corded drills provide continuous power for more demanding tasks.
Circular Saw: For cutting wood, metal, or plastic, a circular saw is indispensable. This power tool allows you to make precise cuts quickly and efficiently. Features to look for include adjustable depth settings, a comfortable handle, and a guide for straight cuts. Consider a cordless model for greater flexibility on the job site.
Jigsaw: A jigsaw is perfect for making curved cuts and intricate designs. Its versatility makes it ideal for projects like furniture making, flooring, and DIY crafts. Look for a model with variable speed control and a tool-less blade change system for added convenience.
Angle Grinder: An angle grinder is a powerful tool that can cut, grind, and polish a wide range of materials. It’s especially useful for metalworking, masonry, and even woodworking. Choose a grinder with adjustable guards and multiple speed settings to handle different tasks with ease.
3. Precision Matters: Specialty Tools for Advanced Projects
When your work demands precision and attention to detail, speciality tools can make all the difference. These tools are designed for specific tasks, ensuring that you can achieve professional-level results.
Wire Rope Clip: The wire rope clip is a crucial hardware component used to secure and terminate wire ropes, ensuring reliable and safe connections in various applications. Designed for easy installation, it consists of a U-bolt and a saddle, which clamp down on the rope, creating a secure loop. Ideal for lifting, rigging, and construction tasks, the wire rope clip provides strength and stability, preventing slippage and enhancing overall safety.
Router: A router is essential for tasks like creating edges, grooves, and intricate designs in wood. It’s a go-to tool for cabinet makers, woodworkers, and anyone interested in fine detailing. Look for routers with adjustable speeds, easy bit changes, and a sturdy base for stability.
Table Saw: A table saw is a cornerstone tool for any workshop, providing the ability to make precise, straight cuts in large pieces of wood. It’s ideal for cabinetry, furniture making, and framing. Features like a reliable fence system, dust collection port, and a powerful motor are important considerations when choosing a table saw.
Luser Level: For projects that require perfect alignment, a laser level is invaluable. This tool projects a straight line across your work area, ensuring that everything is level and properly aligned. Whether you’re hanging shelves, installing tile, or framing a wall, a laser level helps you achieve professional results with ease.
Impact Driver: An impact driver is a powerful tool designed for driving screws and bolts with ease, even into tough materials like concrete or dense wood. It delivers more torque than a standard drill, making it ideal for heavy-duty fastening tasks. Features to look for include a compact design, multiple speed settings, and a comfortable grip for extended use.

4. Tool Storage and Organization: Keeping Your Tools in Top Shape
Having the best tools is only part of the equation; keeping them organized and in good condition is just as important. Proper storage ensures that your tools are always ready for use and helps extend their lifespan.
Toolboxes and Tool Chests: Investing in a sturdy toolbox or tool chest is essential for keeping your tools organized and protected. Look for models with multiple compartments, durable construction, and secure locking mechanisms. Mobile tool chests with wheels and handles are particularly useful for transporting tools around a job site.
Pegboards and Shelving: In a workshop setting, pegboards and shelving systems allow you to keep tools within easy reach while maintaining an organized space. Pegboards are perfect for hanging frequently used hand tools, while shelving can store larger power tools and accessories. Customizable systems let you configure the storage to suit your needs.
Maintenance and Care: Regular maintenance is crucial for keeping your tools in top condition. This includes sharpening blades, lubricating moving parts, and cleaning off debris after use. Proper care not only extends the life of your tools but also ensures they perform at their best, project after project.
5. Investing in Quality: Why the Right Tools Matter
While it can be tempting to opt for cheaper tools, investing in high-quality hardware tools pays off in the long run. Quality tools are more durable, perform better, and provide a greater level of precision, making your work easier and more enjoyable.
Durability and Longevity: High-quality tools are built to last, often featuring better materials and construction than their cheaper counterparts. This durability means that you won’t have to replace tools as often, saving you money over time. Additionally, quality tools are less likely to fail during use, reducing the risk of accidents and ensuring consistent performance.
Enhanced Performance: Precision and performance are critical when working on any project. Quality tools are designed to perform consistently, allowing you to work faster and with greater accuracy. Whether it’s a power tool that maintains speed under load or a hand tool that fits comfortably in your hand, the right tools make your work more efficient and enjoyable.
Professional Results: If you’re aiming for professional-level results, using high-quality tools is non-negotiable. The precision and reliability of these tools ensure that your work meets the highest standards, whether you’re building a piece of furniture, renovating a home, or working on a complex DIY project. The right tools not only make the job easier but also elevate the overall quality of your work.
Conclusion:
Success in any project is built on the foundation of the right tools, and the cargo hook is no exception. By investing in high-quality hardware tools, including a reliable cargo hook, you equip yourself with the means to work more efficiently, achieve greater precision, and produce results that stand the test of time. Whether you're just starting or are a seasoned professional, having top tools like a cargo hook in your arsenal is essential for elevating your work to the next level. Don't underestimate the impact that something as simple as a cargo hook can have on the success of your project.
0 notes
Text
The Best Home Tools for Every DIY Enthusiast
Whether you might be a seasoned DIY expert or maybe beginning to tackle diy projects, having the right tools is vital. The right tools not only make your hard work easier but additionally ensure the job is done safely and efficiently. Here’s a comprehensive guide to the tool reviews and recommendations that every household needs to have.

1. Hammer A hammer can be a must-have for every home. Whether you’re hanging pictures, assembling furniture, or doing minor repairs, a good-quality hammer is indispensable. Opt for a claw hammer, which has a flat head for driving nails as well as a claw for removing them.
2. Screwdriver Set A versatile screwdriver set is crucial for various tasks around the house. Choose a set that includes both flathead and Phillips-head screwdrivers in different sizes. Magnetic tips certainly are a bonus, as they make handling small screws easier.
3. Adjustable Wrench An adjustable wrench can tackle a number of nuts and bolts, making it a versatile tool for plumbing, automotive, and general repair tasks. Choose one which has a comfortable grip and smooth adjustment.
4. Tape Measure A reliable tape measure is important for any project that requires precise measurements. A 25-foot measuring tape is usually sufficient for most household tasks, from measuring furniture spaces to cutting materials accurately.
5. Cordless Drill A cordless drill is often a powerful tool that can handle drilling holes and driving screws easily. Look for one with adjustable speed settings, an excellent battery life, plus a comfortable grip. A pair of drill bits and driver bits can make it much more versatile.
6. Level A level ensures that your work is perfectly horizontal or vertical. Whether you’re hanging shelves, mounting a TV, or installing cabinets, a level is important for a professional-looking finish. A digital level offers added precision.
7. Utility Knife A sharp utility knife is important for cutting materials like drywall, carpet, or cardboard. Choose one with a retractable blade for safety, and extra blades accessible for when the blade dulls.
8. Pliers A list of pliers is essential for gripping, twisting, bending, and cutting wire and other materials. Needle-nose pliers are particularly helpful for reaching into tight spaces, while slip-joint pliers are great for general use.
9. Stud Finder When you should hang something heavy on the wall, obtaining a stud to anchor it is essential. A stud finder can help you locate the studs behind your walls, preventing potential damage and ensuring that your backpacks are securely fastened.
10. Safety Gear Safety gear is often overlooked but is important for any home project. A basic kit should include safety glasses to safeguard your eyes, work gloves to shield your hands, and ear protection for loud tasks. A dust mask is also essential for projects that creates dust or fumes.
11. Toolbox or Tool Bag Keeping your tools organized is half the battle. A sturdy toolbox or tool bag with compartments many different tools makes sure that you can quickly find things you need when you need it. Some toolboxes even feature built-in trays for smaller stuff like screws and nails.
12. Multi-tool A multi-tool combines several tools into one compact device, so that it is perfect for quick fixes when you don’t wish to carry around the full toolkit. Look for the multi-tool which includes pliers, screwdrivers, a knife, and also other essentials.
Investing in high-quality home tools can be a smart decision that may pay off in the long run. With these essential tools with your arsenal, you’ll be well-equipped to tackle a wide range of home improvement and repair projects confidently. Whether you’re fixing a leaky faucet, assembling furniture, or hanging artwork, these tools will make your DIY endeavors easier, safer, plus more enjoyable.
0 notes
Text
How to Install T-Posts Without a Post Driver

T-posts are metal posts commonly used for fencing, and they can be driven directly into the ground. Typically, a manual post driver (pounder) is used for this, but there are other tools and methods you can use if you don’t have one. Here’s a simple guide on how to install T-posts without a post driver:
Tools and Methods:
1. Sledgehammer for Soft Ground:
Use a sledgehammer to drive small T-posts into soft ground. Be cautious as it can slip and cause injuries.
2. Closed-End Metal Pipe:
Use a heavy, closed-end metal pipe (like a cast iron pipe) as a substitute for a post driver.
Place the pipe over the T-post, lift it, and pound it down forcefully.
3. Bucket Tractor or Loader:
For many heavy-duty T-posts, use a tractor or loader with a bucket. Lift the bucket and hit the top of the T-post to drive it into the ground.
4. Dig Pilot Holes:
Dig small holes and water the ground to soften it. This makes driving T-posts easier and helps verify if the post can be driven.
5. Homemade Post Driver:
Use a heavy metal pipe with one end closed and handles welded on. Lift and drop it over the T-post to drive it in.
6. Auger or Drill:
In hard or rocky ground, use a drill or auger to create pilot holes. Insert the T-post into the holes and then drive them further with a hammer or other tool.
Tips for Easier Installation:
Moist Soil: Driving T-posts is easier in moist soil. Depth:Drive T-posts at least 1/3 of their length into the ground for stability. Spacing: Space T-posts 8 to 12 feet apart depending on the fence’s load.
Steps to Drive T-Posts:
1. Mark Underground Portion: Mark the part of the T-post that will go underground. 2. Align T-Post: Hold the T-post vertically and place the pipe or sledgehammer on top. 3. Drive T-Post: Use your chosen method to drive the T-post into the ground. For tractors or loaders, have someone hold the post while you lift and hit it with the bucket.
Attaching Difference Fences with T-posts:
Wire Fences:
Use T-post clips to attach wire fences. Wrap the clip around the post and fence wire, then twist it with pliers.
Electric Fences:
Mount T-post insulators to keep live wires from touching the metal post.
Snow Fences:
Use heavy-duty zip ties or metal wires to attach snow fences to T-posts.
Wood Fences:
Use T-post adapters to attach wood panels to the posts.
Safety Precautions:
Always wear gloves and other safety gear.
Use both hands to hold tools firmly.
Ensure you’re hitting the post from directly above to avoid slips.
Frequently Asked Questions:
How to drive T-posts in rocky ground?
Use a drill or auger to make pilot holes.
2. What is a post driver?
A heavy tool used to drive posts into the ground.
3. How to remove T-posts?
Use a T-post puller to lift the posts out of the ground.
4. How to hang a gate on a T-post?
Use T-post hinges to attach the gate securely.
By following these methods and tips, you can successfully install T-posts without a post driver, ensuring your fence is strong and secure.
Reference: https://fencefacts.com/install-t-post-without-driver/
1 note
·
View note
Text
Garage Door Repair Loudoun: A Comprehensive Guide To Fixing Common Issues And Ensuring Smooth Operation
Introduction to Garage Door Repair Welcome to our comprehensive guide to garage door repair in Loudoun! Homeowners rely on our garage doors for convenience, security, and peace of mind. However, like any mechanical system, garage doors can encounter problems that hinder their smooth operation over time.
Visit: https://nextdaygaragedoorservices.com/loudoun/
Whether it’s a noisy opener, a malfunctioning spring, or a stubbornly stuck door, dealing with these issues can be frustrating and time-consuming. But fear not! In this blog post, we will walk you through common garage door problems and provide practical tips and solutions to get your door back in tip-top shape. So grab your tools, and let’s dive into the world of garage door repair in Loudoun! Common Issues with Garage Doors
Garage doors are essential to our homes, providing security and convenience. However, like any mechanical device, they can experience issues over time. Understanding these common problems will help you troubleshoot and identify the issue quickly.
One common issue is a garage door that won’t open or close properly. Various factors, such as misaligned sensors, broken cables, or worn-out springs, can cause this. Regular maintenance and inspection can help prevent these issues from occurring.
Another problem is noisy garage doors. If your garage door makes excessive noise during operation, it could indicate worn-out rollers or hinges that need lubrication. Applying a silicone-based lubricant to the moving parts can often resolve this issue.
A frequently encountered problem is a garage door that gets stuck halfway while opening or closing. This usually indicates an issue with the tracks or rollers. Inspecting and cleaning the tracks regularly will help ensure smooth operation.
Faulty remote control functionality is also a common complaint among homeowners. If your garage door opener fails to respond to remote commands, check for dead batteries in both the remote control and the opener itself before troubleshooting further.
Weather-related damage is another concern for many homeowners. Over time, extreme temperatures and exposure to moisture can cause rusting and deterioration of various components on your garage door system.
Remember that safety should always be your top priority when dealing with any repair work involving heavy machinery like garage doors! If you are unsure how to fix an issue or feel uncomfortable doing so yourself, don’t hesitate to call a technician specializing in garage door repair in the Loudoun area!
Understanding these common issues with garage doors and taking proactive steps towards their maintenance and timely repairs ensures smooth operation! Tools and Materials Needed for Repairs
The right tools and materials are essential to repair your garage door successfully. Here are some of the critical items you’ll need:
1. Screwdriver: A good quality screwdriver is necessary for removing screws and accessing different parts of the garage door mechanism.
2. Adjustable wrench: This versatile tool will help loosen bolts and nuts that may need adjusting during repairs.
3. Pliers: Pliers can help grip and twist wires and hold small parts securely while working on them.
4. Hammer: A gentle tap with a hammer is sometimes needed to align or adjust specific garage door system components.
5. Lubricant: Keeping your garage door well-lubricated is essential for smooth operation. Choose a lubricant specifically designed for use on garage doors.
6. Replacement parts: It’s always wise to have spare parts, such as springs, rollers, cables, or hinges, that commonly wear out over time.
Remember that safety should be your top priority when attempting garage door repair. Always disconnect power sources before starting work and never attempt repairs beyond your skill level – if in doubt, it’s best to call in a technician specializing in Garage Door Repair in Loudoun.
By following this comprehensive guide and being prepared with the right tools and materials, you can effectively tackle everyday issues with your garage door and ensure its smooth operation for years to come!
0 notes
Text
How to Make Model Rocket Igniters Model rocket igniters are an essential part of any model rocket launch. They provide the spark that ignites the rocket motor, allowing the rocket to take off. Making your own model rocket igniters is a great way to save money and ensure that your rocket launches are successful. In this article, we will discuss the materials and steps needed to make your own model rocket igniters. Materials Needed The materials needed to make model rocket igniters are relatively simple and inexpensive. You will need: A spool of nichrome wire A pair of wire cutters A soldering iron A pair of pliers A length of heat shrink tubing A length of electrical tape Nichrome wire is a type of wire that is resistant to high temperatures and is commonly used in model rocket igniters. It is available in a variety of gauges and lengths, so you can choose the size that best suits your needs. Steps to Make Model Rocket Igniters Once you have gathered the necessary materials, you can begin the process of making your own model rocket igniters. The steps are as follows: Cut a length of nichrome wire that is approximately 6 inches long. Use the wire cutters to make a clean cut. Strip the insulation off of the ends of the wire using the pliers. Make sure that the ends of the wire are exposed. Twist the ends of the wire together to form a loop. Make sure that the loop is tight and secure. Wrap the loop with electrical tape to ensure that it is secure. Make sure that the tape is tight and that there are no gaps. Slide a length of heat shrink tubing over the loop. Use the soldering iron to shrink the tubing and secure it in place. Your model rocket igniter is now ready to use. Attach it to the rocket motor and you are ready to launch! Safety Considerations When making model rocket igniters, it is important to take safety precautions. Nichrome wire can get very hot when heated, so it is important to use caution when handling it. Make sure that you wear protective gloves and eye protection when working with the wire. Additionally, make sure that the area you are working in is well ventilated. Conclusion Making your own model rocket igniters is a great way to save money and ensure that your rocket launches are successful. With the right materials and a few simple steps, you can make your own model rocket igniters in no time. Just remember to take safety precautions when working with the nichrome wire and you will be ready to launch! #ModelRocketIgniters #RocketLaunches #NichromeWire #SafetyPrecautions If you have any questions or comments Please contact us on our contact page or via our Facebook page
0 notes