#s4 ea colours
Explore tagged Tumblr posts
Text

Melissa Hair
Base Game Compatible
Hat compatible
All 24 EA Swatches
2 Ombre ACCs:
Face Paint (colour slider)
Birthmark, front torso (If you are using a birthmark you can change the file's type from S4S to whatever you want)

Download (Patreon) | SimFileShare Follow Me : Tumblr | Twitter | Instagram | YouTube
Hope you like it! 💖
#the sims 4#maxis match#ts4cc#ts4#sims 4#the sims#cc#s4cc#sims#custom content#maxismatchcc#ts4cchair#thesims4#thesims4cchair#maxis match cc#sims 4 cc hair#ts4cc hair#thesims 4#thesims 4 cc#sims 4 mmcc#ts4 mmcc#sims 4 cc
3K notes
·
View notes
Text
Batuu Bonus Buildmode

When I started some star wars builds I found it very limiting only having the wide doors provided in the Batuu pack so this was really one of the first things I worked on. They are far from perfect but I feel they're good enough to share in case anyone else finds them helpful.
See below for further details, pictures and download links.
Two doors - smaller versions of the resistance and First Order blast doors. Same six swatches as the original doors. Journey to Batuu game pack is REQUIRED.
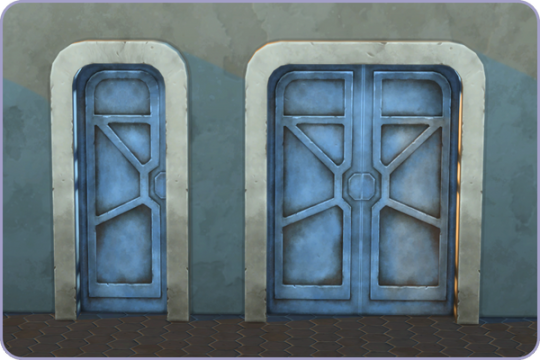
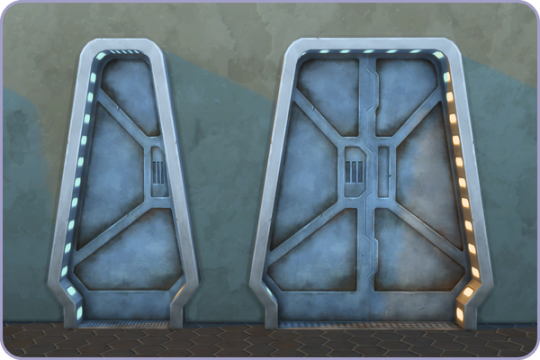
Four arches - created from the original and smaller versions of the resistance and First Order blast doors. Come in the original swatches only. Journey to Batuu game pack is REQUIRED.
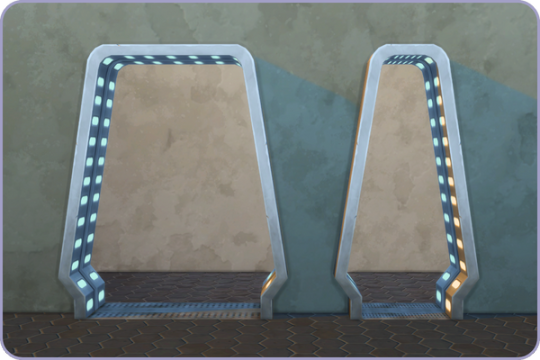
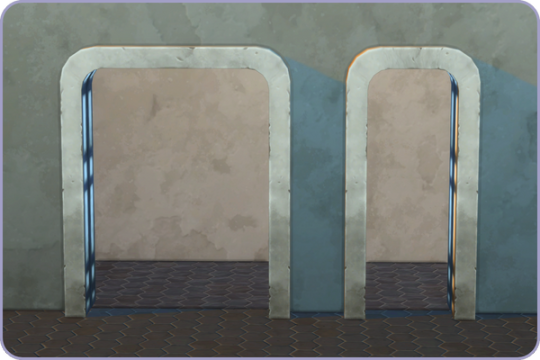
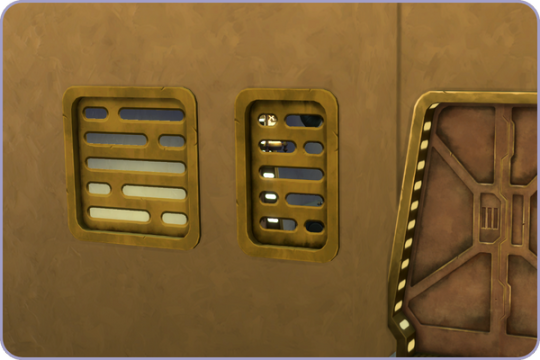
Four perforated windows - The first is a stand-alone recolour of the original square window by EA, using colours mostly taken from the EA blast doors, the other three are mesh edits of these for a wider range of sizes. Twelve swatches. Journey to Batuu game pack is REQUIRED.

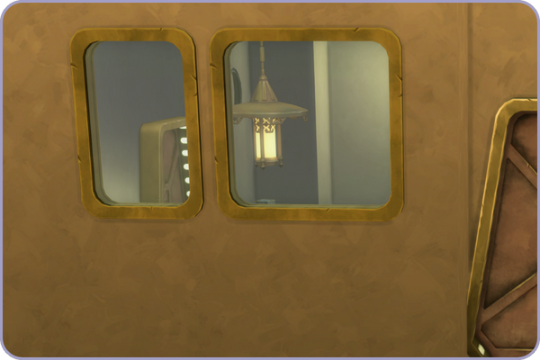
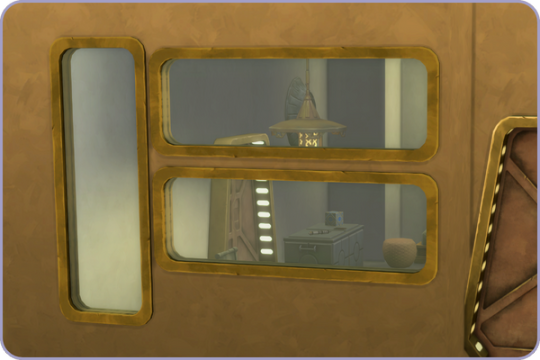
Four glazed windows - These BG glazed windows use the frames from the all metal perforated windows above so should fit in with the style of the other items. Twelve swatches. BG compatible.
Download All (Downloads ZIP file from Google Drive)
Pick and Choose (Opens Google Drive folder)
If there's any problems with any of these items or you have any constructive feedback, suggestions or questions, please just get in touch, I'm still learning every day!
Credits
All textures and meshes are edited or frankenmeshed from in-game EA assets.
CC created using Blender, Sims 4 Studio & GIMP. Preview images using Canva Pro.
Everyone on the S4S forums and the Creator Musings discord group for all the tutorials and advice/help.
#sims 4#ts4#ts4cc#sims 4 custom content#ts4 download#my cc#journey to batuu#star wars sims 4#ts4 cc#the sims 4 custom content#the sims 4 cc#sims 4 cc#ts4cyberpunk#ts4 star wars#ts4 star wars cc#ts4 simblr#ts4 scifi#ts4 bb#alwaysfreecc#free cc#sims 4 star wars cc#cc
231 notes
·
View notes
Text

Cone Hat
I'm really original with those names, aren't I? /sarcasm Anyway, I was looking through the debug objects in S4S and saw this cone and thought "What a great hat!"*. And so I did just that 'cause I have no impulse control sometimes.
*(remembering the time I put exactly this on Cassandra Goth head for a render. Ah, good times!)
What to know:
-BGC -Male & female, teen to elder -8 swatches 'cause I didn't think that cones should be any colour other than orange/red (though I added some yellow 'cause I do what I want) BUT if you use thepancake1 and MizoreYukii's Color Slider mod it is compatible, so you can have all the colours you want, you crazy kids! -Polys: 48 for all LODs 'cause I wasn't gonna decimate this already super duper low poly mesh -Disallowed for randoms -All occults (except werewolves) -Colour tagged -Ugly as fuck, but then again, it's a (slighty edited) 48 polys debug object originally, what do you expect?
---
TOU
🔸 Don’t claim as yours 🔸 Don’t re-upload 🔸 Recolours are OK (even including the mesh), just credit me and redirect to the original 🔸Obviously, if you do recolours, DO NOT PUT BEHIND A PAYWALL OF ANY KIND (no EA, no adlink, no whatever). And don't post it on Curseforge under any circumstance. 🔸 Edits are also OK, but the same rules as for recolours apply! (credit me, no paywall, no Curseforge) 🔸 Eat broccoli! 🥦 🔸 Enjoy! ❤️🧡💛💚💙💜
---
DOWNLOAD Patreon (always free) SFS
335 notes
·
View notes
Text

CK3 Western Traveller Cape Conversion
05 January 2025 edit: both tartan versions updated to work with dx11 (i.e. to show proper swatch icons instead of llamas). Please redownload!
***
It took me way much longer than it should've, but it's finally here. The first - hopefully not the last - cape from Crusader Kings 3, converted for TS4.
All ages, including infants. Unisex. Versions for younger sims take their textures from the adult version - they won't work properly without them! Hence all ages are merged together. If you unmerge for any reason, remember that you have to keep the adult version(s) (or at least press that magical 'something something embed resources' button in S4S ;)).
Comes in 3 versions, all working independently: solids or 2 versions of tartan patterns. 40 + 85 + 17 swatches. In case that's still not enough for you, you can download the .pdn texture file and make your own recolours. Just replace the colour block in the 'colour' layer with whatever you want to put there.
Only HQ-mod-compatible versions this time, because the packages are quite small anyway and I doubt 1024x2048 versions would look any acceptable. I highly recommend using the capes with the mod, especially the patterned ones!
Many thanks to Ingeli/MedievalSimTailor/Simverses for her help with slaving all those kids&co. textures to the adult ones :).
Enjoy!
DOWNLOAD (free on Patreon, no ads or EA)
265 notes
·
View notes
Text
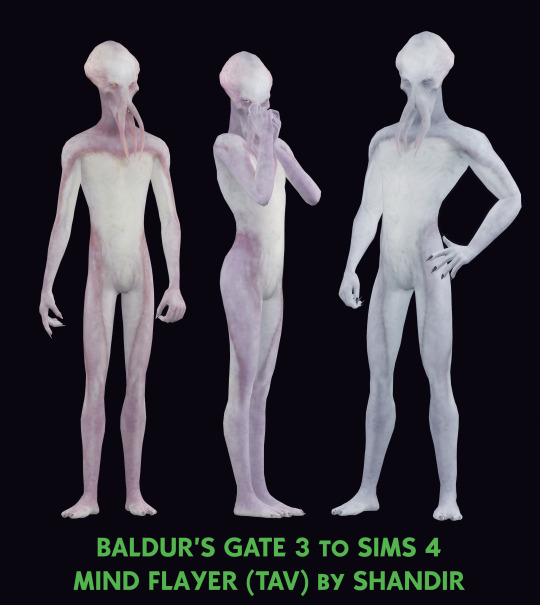
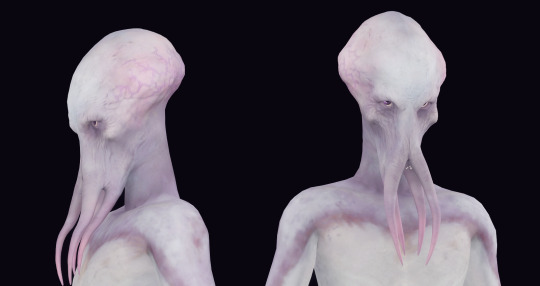
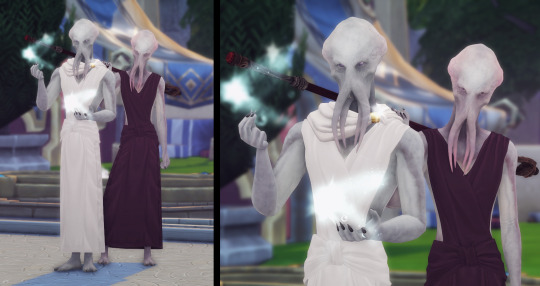


I've desperately needed my illithid Tav in S4, so you can have your own too now - it's not just some "monster shell" mesh - this head can use some EA (and custom) sliders, any eye colour you set and is fully dressable. I spent a lot of time fixing all minor seams, clipping and other stuff, it may not be perfect, but I hope you will have fun with your new braineater.
INFO: - for males on male frame; - skin (4 colours) in skin details (forehead), foot (no textures) in boots and custom body shape preset; - HQ only;
Model & texture by Larian Studios. TOU. No paysites, paywals or reuploading. You can recolour, but don't include meshes. Tag me on your screenshots if you use my cc)
DOWNLOAD HQ SFS | DOWNLOAD MEGA 7z or ZIP
#sims 4#sims 4 download#s4download#sims 4 cc#s4cc#ts4cc#sims 4 baldur's gate 3#illithid#mind flayer#sims 4 skin
1K notes
·
View notes
Text
Crystal Creations Jewelry in CAS!!

I was always annoyed that the Crystal Creations jewelry was crafting exclusive... so these recolors aim to fix that!! I'm stoked that I can actually use the darn things in my everyday simming now, but oh man did this take me like a week. I salute the cc community lmao y'all are strong!! 😅
All 12 EA sets are now complete in CAS with consistent color combos for both masc and fem sims <3 - 12 Sets (Earrings, Necklace, Bracelet, Ring) - 28 Gem Colours w/ 4 Metals (Silver, Gold, White, Black) - 1200+ Swatches!! - Male & Female Frames - Custom Thumbnails - Sortable by Crystal Creations
Credit to @nachoofthelibre for the base packages of the earrings, necklaces, and bracelets for fem sims. They were such a time saver for getting this project going :)
📌 DOWNLOAD: http://simfileshare.net/folder/239237/ 📌 !!! Pick the 'All' file OR mix and match, not both !!! No reuploading, paywalls, or other thieving please and thank you 👍
P.S. I do not claim any janky EA meshes but lmk if you find any swatch mistakes!! Gently tho I've been in S4S for too long... :')
23 notes
·
View notes
Note
Hello, sorry to bother you! I know you're answering a lot of asks on this topic but as someone whose been curious for a long time I figure I'd come to you. I've always dreamed of a purely blank world, no ugly EA decorative buildings, at the most I'd love to delete everything from the worlds we have except maybe some trees and water. How would I go about this? I'm willing to use Studio, TOOL, or any other mods if possible.
hi! you're not bothering me, and i just realised for all the yammering i've done about my save file i haven't actually made a proper tutorial yet. woops
so removing world objects is achievable two different ways
1 (The Surprisingly Easy Way):
You can go into the .world files with Sims 4 Studio, navigate to World Object Data, click on the 'Edit' button next to Lots, and click the Remove button on any objects you don't want. There are more objects to remove in World Data as well. A quick visual guide:
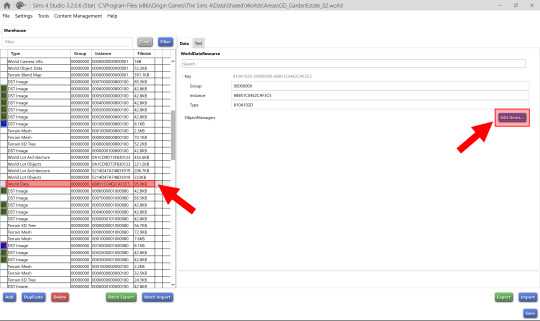
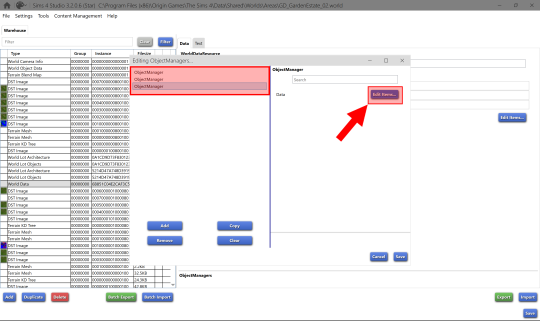
Then you just replace the .world file you edited, similar to the way you'd install a lighting mod. The upside to this way is that you can stop certain objects from spawning, like the Seasons roller rink and seasonal food stands. The downside to this approach is that if you want to use a custom lighting mod, you'd need to import the creator's files (with their permission ofc, if you plan to share your edited .world file). Also, you have to re-replace the files whenever the game patches.
2 (The Also Easy, but Incredibly Tedious Way):
You can make each debug world object invisible/un-interactable by changing the Model and Footprint resources in Object Definition to zero (S4S will auto-fill the correct number of zeroes). Here is a tutorial on this method
This is the way I've done it for my save, so people can place the files in their game once and be done with it, no updates necessary, if they don't want the optional lighting (softerhaze has very kindly allowed me to use theirs!) or terrain colour edits.
I like this way because it's persistent, but I wouldn't recommend it if you'd be bothered by the objects disappearing in other worlds. If you hide an object this way, all instances of it are hidden, not just the ones in a certain world.
if you have any questions you can send me another ask or private message!
193 notes
·
View notes
Text

Preview of one of the SSO manes from my spreadsheet post - This is the Pulled Mane courtesy of the TWH. All of the SSO manes will be split into forelocks and manes for the slots in CAP (just like EA forelocks/manes, and they should be interchangeable with them too) and will also be mirrored — So there'll be a left and right version of both the mane and the forelock for variety. & like I said before they'll be in all the EA colours, + the colours for the SSO breed they were from, + any I want to add.
Sadly, no tools fully work for rigging these models yet (we don't even have the horse rig itself!) but patience from all is definitely needed on that front. The S4S devs are working the best they can, and other creators like Cmar will be on it as soon as they're able. In the meantime, I continue to prepare!
65 notes
·
View notes
Note
Hi, I tried messaging you but wasnt able to, so i'm sending another ask.So this is what I'm trying to make.

I made theI made theI made the tie from scratch in blender and this is how it looked in s4s

But this isBut this isBut this is how it looked in game even after fixing the uv_1 and transferring weights.

I got fustrated so I decided to try and find an ea mesh for the tie. So I used part of a bow from an outfit from snowy escape. And I tried editing it in blender to connect to the shirt but I'm really struggling.

Like I tried rotating it and making it longer and I kind of messed up because there is a hole in the mesh now.

Basically I want to know if there is an easier way to do this. I hope I'm making sense.
ah your first try was fine but i think that distortion is due to vertex paint. when you have an accessory that isn't supposed to morph with the shirt, you have to paint it a diff colour

use the colour #007f00 for the tie and you can make the rest of the outfit the colour it already is (it's probably 00ff00).
it should scale better after that and won't crash into the boobs. for accessories like buttons, hair ties, brooches, etc, that's your best bet.
bring that into game and it should work. if anything, lemme dm you and we can see if we can work it out together :-D
14 notes
·
View notes
Text
get to know me! 𓍢ִ໋🌷͙֒
tagged by @mal-functioning, thank u so much my love!
i’m tagging @lazysunjade and @vampiredisk! ⋆⁺₊ ⋆
What’s your favourite Sims death?
i’m a sims 3 player thru nd thru, so the buried alive one from showtime. i just think the ghost looks so cool LOL.
Alpha CC or Maxis Match?
always been an alpha girlie, i wish i could play mm but it’s not my style.
Do you cheat your sims weight?
no!
Do you use move objects?
yeah, but i’m not much of a builder.
Favourite Mod?
i actually don’t play with mods, but i should start.
First Expansion/Game Pack/Stuff Pack?
it was showtime! my parents wouldn’t let me get late night because of the box art so i thought showtime was close enough.
Do you pronounce live mode or aLIVE or LiVing?
alive mode!
Who’s your favourite sim that you’ve made?
in terms of looks, if they have an insta/twitter then it’s because they’re one of my favourite faces i’ve made, but in terms of story it’s either yinghua or juliette.
Have you made a simself?
i’ve tried, but they never come out looking like me.
Which is your favourite EA hair colour?
most of my sims have dark hair because they’re asian, so i’ll say black?
Favourite EA hair?
i don’t use EA hairs, like, ever.
Favourite life stage?
i love the teen to young adult transition! i love being able to watch my sims grow up and figure themselves out, so it’s hard to choose. i think i have the most fun playing with teens, but when they grow up and i get to progress their lives, i also have a lot of fun playing with them as young adults, since i’m already invested.
Are you a builder or are you in it for gameplay?
gameplay for sure! i can’t build.
Are you a CC creator?
the most i’ve done is make recolours for myself.
Do you have any Simblr friends or a Sim Squad?
yea! most of my friends these days come from simsta so i can’t tag them, but @mal-functioning has been my ride or die since my sims 3 days.
Do you have any sims merch?
no, i didn’t even know that existed.
How has your “Sims Style” changed throughout your years of playing?
since joining simblr to retiring from sims 3, i think i got better at being able to represent the features i wanted to, but my style evolved especially when i started making s4 sims. i think the way i do eyes has become very distinctive.
Whats your Origin ID?
u can dm me if u really wanna know!
Who’s your favourite CC creator?
i have so much @babyetears stuff in my game it’s getting bad.
How long have you had simblr?
i think i joined 2019? but i had been lurking since 2018.
How do you edit your pictures?
i use photoshop! sometimes i’ll go into snow to add effects and stuff.
What expansion/stuff pack is your favourite?
i always have so much fun playing thru university life!
#tags#get to know me tag#mal is CRAZY for tagging me in this#and obviously i am rarely on tumblr#so they had to tell me IN A CALL that they tagged me
7 notes
·
View notes
Photo
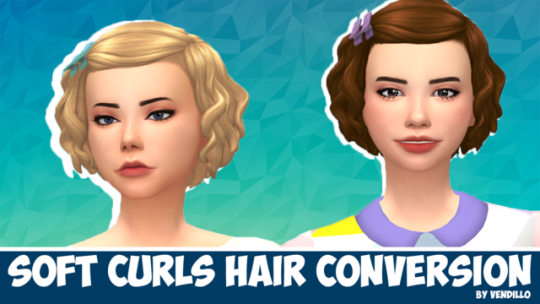

► Soft Curls hair: Toddlers stuff hair conversion for adult ► Need Toddler Stuff. ► 9 EA colors (no unnatural colors). You can recolored this hair ( do not include mesh in recolor). ► Download in my blog
#S4CC#S4HAIR#S4 FEMALE HAIR#S4MM#S4MMCC#S4 MM HAIR#S4 CC MM#S4FMM#S4FMM HAIR NEW MESH#S4 HAIR CONVERSION#S4MMHAIR CONVERSION#S4 CONVERSION#S4 EA COLOURS#CC BY VENDILLO
26 notes
·
View notes
Text
Cantina Collection

Straight from Oga's Cantina comes this cobbled together industrial set.
A bit later than planned but finally here. All items are very low poly as they are all frankenmeshed from the original bar back counters.
The textures are all composites and rearrangements of the originals, as a result they are not seamless - but we'll say it just adds to the look that they've just been made from whatever scrap metal was around!
Also as the cabinet doors all have the same rust pattern, it looks odd/repetitive on very big kitchens but works fine for small spaces.
There is only one swatch for all items except the seating, which comes in the same colours as the originals.
All items are base game compatible, except the resized bar backs which require Journey to Batuu.
See below for further details, pictures and download links.
Comfort (5 items):


Industrial Bar Stools x 2 - Low Back & No Back
Industrial Dining Chairs x 2 - Low Back & No Back (shown with original JtB high back chair)
Metal Dining Chair (shown with original JtB bar stool)
Surfaces (16 items):


Kitchen Counters & Islands


Bar Table
Dining Tables x 2


Coffee & End Tables
Console Tables x 3


Smaller Replicas of the original Cantina Barbacks x 5 - resized to match the height of regular counters NOTE: You'll need to use bb.moveobjects on to align these properly. JOURNEY TO BATUU PACK IS REQUIRED.
Industrial Shelf
Decor (2 items):
Metal Splashbacks x 2
Activities & Skills (3 items):


Oga's Bars x 2
Sabacc Game Table NOTE: BGC but JOURNEY TO BATUU is required in order to change the game type to Sabacc. Without this it will function as any other base game card table.
Download All (Downloads ZIP file from Google Drive)
Pick and Choose (Opens Google Drive folder)
If there's any problems with any of these items or you have any constructive feedback, suggestions or questions, please just get in touch, I'm still learning every day!
My TOU
Credits
All textures and meshes are edited or frankenmeshed from in-game EA assets.
@myshunosun - for their gorgeous sona dining chair which I cloned in order to have an object with the necessary transparency for the chair and bar stool - can be downloaded here.
Lizbot3000 - for their base game bar tables, which I cloned for my bar table and can be found here.
@ravasheencc - for her Crop It Like It's Hot Backdrops which I used to take some preview photos and can be downloaded here.
CC created using Blender, Sims 4 Studio & GIMP. Preview images using Canva Pro.
Everyone on the S4S forums and the Creator Musings discord group for all the tutorials and advice/help.
#always free cc#alwaysfreecc#custom content#download#journey to batuu#maxis match#my cc#sims 4#sims 4 buy mode#sims 4 cc#sims 4 custom content#sims 4 futuristic cc#sims 4 industrial#sims 4 industrial cc#sims 4 futuristic#sims 4 journey to batuu#sims 4 maxis match#sims 4 star wars#sims 4 star wars cc#star wars cc#star wars sims#star wars sims 4#the sims 4#ts4 cc#ts4#ts4 bb#ts4 buy cc#ts4 custom content#ts4 download#ts4 futuristic cc
169 notes
·
View notes
Photo
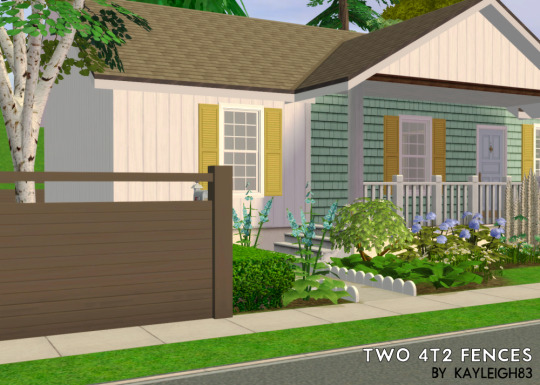
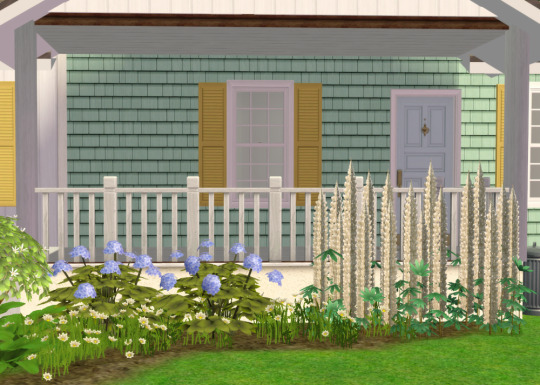

Two 4t2 fences today!
The Mega Basic Fence is from base game. I had issues finding all the textures for it, so it’s just one EA colour, my white recolour, and all but one of iCad’s woods (two looked almost identical on this fence). Total of 21 options.
Then a fence that I found somewhere in S4S from Eco Lifestyle debug. Looks basically the same as a regular fence you can find in TS4 build mode from I believe Vintage Glamour? In any case, a nice modern “privacy” fence (it’s not super tall and there is that little looky-loo window). This one comes in 6 swatches, one is EA, one is my white and selection of iCad’s.
Enjoy!
Download (SFS) | Download (MF)
( @sims4t2bb )
#ts2 maxis match#ts2 simblr#ts2#simblr#maxis match#thesims2#the sims 2#sims 2#ts2 cc#ts2cc#s2cc#s2 cc#ts2 download#4t2#4t2cc#4t2 conversion
501 notes
·
View notes
Photo
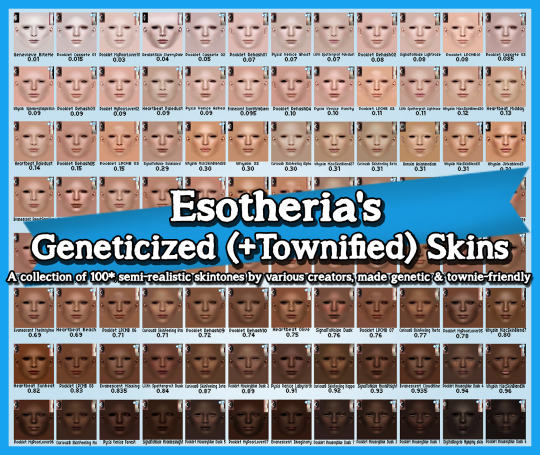
As requested by one very enthusiastic Anon, today I’m sharing the setup of geneticized + townified skins I use in my game. It contains upwards to 100 geneticized skins (it’s actually 97, but shhhh,100 sounded better), and more than one half of them are also townie-enabled, meaning that they will randomly spawn on sims generated by your game. Say goodbye to bland townies! :D
What are geneticized/townified skins?
The 4 skins in your game have a ‘genetic’ value assigned by EA. Those values are: S1 = 0.10 | S2 = 0.30 | S3 = 0.60 | S4 = 0.90. If a custom skin is ‘geneticized’, it means that it has been assigned a genetic value by the player. In other words, the custom skin now acts like the four in-game skins: it becomes part of the skin colour spectrum and can be randomly inherited by sims born in the game, as long as it falls on or between the values of the parents' skintones.
A ‘townified’ skin is, simply put, any custom skin that has been set to spawn on townies and NPCs generated by your game.
Want to learn more about geneticized and townified skins, including how to make your own? Read these handy guides by Vimpse and Rikkulidea!✨
General Notes:
First and foremost: this is a HUGE set, so I’ve included a swatch card with names and previews for all skins which tells you exactly where each skin falls on the genetic scale, what their values are, which ones of them are townified, etc. Make sure to study it carefully!
Secondly, but equally importantly: I take NO credit for any of the skins included in this set! They were made by creators far more talented than myself, a full list of whom is included in the Read Me file that accompanies this download. Please take the time to actually read the Read Me, since it also contains links to the original uploads!
For more notes, disclaimers and fair warnings, and so I don’t turn this post into a whole novel please consult the Read Me file. It’s there for a reason!
Bonus Content!
As if having a collection of 100 97 gorgeous, semi-realistic skintones wasn’t enough, I’ve also included some sweet bonus content for y’all. 😉 Namely:
*My four default skins: Because having this skin spectrum in your game wouldn’t make much sense if you don’t also use the same skin defaults as I. (*Disclaimer: none of those four default skins were actually made by me. Check out the ‘Links & Credits’ file in the ‘Default Skins’ subfolder to give the original creators some much deserved love!)
My swatch card PSD: So you can create your own elaborate skintone collage, should you choose to add to/modify my genetic setup. I don’t claim it’s perfect, but certainly better than making one from scratch!
With all this out of the way...
DOWNLOAD: Simfileshare | Mediafire | Box
683 notes
·
View notes
Photo

If you have been updating your existing hair packages by adding the new swatches on via an S4S palette, chances are they won’t work with genetics. The new swatches will take on the hair colour tag of the last hair swatch you had clicked before you applied the palette. This tutorial explains how to fix that issue.
To make your existing hairs genetics compatible with the new swatches you have two options:
Remake the package. Making a fresh clone of an EA hair will automatically give you the proper tags. I know not everyone will want to do this but if you also end up updating your meshes it might make your life easier.
Change the tag values manually for the new swatches you added, which is what this tutorial will cover.
The new colours have tags (you can technically but sims 4 studio has not updated to add them to the “categories” tab or give them an official name under the tags section in the warehouse, so at the moment they are just numbers, but the game will still recognise it. This explains why even if you add the swatches by applying the palette from an EA hair, the tags will be incorrect because s4s hasn’t given them a legit “tag”. Now that’s out of the way the tutorial can begin.
1. Open your package and navigate to the warehouse tab of sims 4 studio.

Once opened you should see a long list of all the components of your file. Scroll to the bottom. I don’t know if it is the same for everyone else but for all the packages I tried this on, the 6 new swatches were at the bottom - like so:

select the first swatch - Neutral black.

(open the image in a new tab if its too small to read)
Once clicked, scroll to the bottom of the data tab on the right. There you should find a litle submenu or whatever called tags. Click edit items.

a tab like this will pop up. Scroll to the bottom to where it says “HairColor” the colour will probably be different for everyone - like i said it depends what swatch you had selected when you applied the palette.
Select the box where it says “TagValueNumber” and type in the following, this will change depend on what swatch you are working on but these are the numbers in order:
Here are the following TagValueNumbers for the new swatches:
1 Neutral black : 2528
4 Warm brown: 2529
6 Light brown: 2530
10 neutral blonde: 2531
11 light blonde : 2532
16: white blonde: 2533
For example if we were editing the warm brown swatch, we would replace 133 with 2529. Once done, click save at the bottom right and repeat for all the new swatches. If you have any questions send me an ask. Hopefully this was helpful.
700 notes
·
View notes
Photo


Aqua Trigger Eyes Human Default Overhaul
As I mentioned a while ago, I noticed I hardly use the first version of the Aqua Trigger Human Default eyes because I guess I made them similar to the EA swatches which are mainly super saturated and don’t look natural. I especially never understood why there would be a red and a purple swatch.. So when I started remaking them I had a look at the EA Default eyes colour tags in S4S and had quite an aha moment. Swatch 5 is tagged ‘Hazel Green’ and swatches 9 and 10 are tagged ‘Hazel Blue’ (I still can’t believe I never noticed this before), the only problem is: EA for some reason didn’t make these swatches Hazel. Swatch 16 is tagged ‘Light Brown’ even though the swatch colour is grey, while swatches 17 and 18 are tagged ‘Amber’ with their swatch colours being red and purple. Why? Only EA knows. So I made Hazel what is supposed to be Hazel, made swatch 16 a light brown-grey, swatch 17 an actual amber and swatch 18 the only purple eye colour that would exist in Humans which would be an albinic eye. For each swatch I looked up examples of the respective eye colour to make sure it was natural looking and could actually occur in Humans. I’m happy with how they came out and I’m excited to use these now.
Note: If you would like to use this eye, please remove the old Aqua Trigger Default file from your mods folder and replace it with this one.
DOWNLOAD ~ Default Overhaul
07/07/2022: Updated for the Werewolves Update
~ Link to the original Aqua Trigger Eyes post ~
Wanna buy me a coffee? 🤍
1K notes
·
View notes