#runcommand
Text

Are you looking for a quick and easy way to access the Disk Management tool in Windows? In this video, we will show you two simple methods to open Disk Management in Windows. Whether you're looking to create or format partitions, manage drive letters, or troubleshoot issues with your hard drives, Disk Management is an essential tool for any Windows user.
https://youtube.com/shorts/WxBa4lDnd4U?feature=share
#WindowsTips #DiskManagement #HardDrive #Partition #CreatePartition #FormatPartition #DriveLetters #Troubleshoot #RunCommand #StartMenu #Tutorial #HowTo #algorithminc #microsoft #thealgorithm #thealgorithminc
0 notes
Text
How to access enter the gungeon console

How to access enter the gungeon console for free#
How to access enter the gungeon console how to#
You've met with a terrible fate, haven't you (Secret)Īlways be flipping. Kill 100 enemies while riding in a mine cartĬomplete the game with the Sorceress's Enchanted Gun (Secret) Kill 100 enemies by knocking them into pitsĪlways be flipping. You've met with a terrible fate, haven't you I installed the installer and launched it but the problem is i cant select etg because the file search doesnt let me write anything in it and the file search button just doesnt work and crashes the installer for 7 or 8 secs.
How to access enter the gungeon console for free#
Win a wager against the Gunsling King 5 times So i got etg on epic games for free and then wanted to try it with mods. Kill a boss after covering it with glitterĬomplete the game with the Sorceress's Enchanted GunĬonstruct the Bullet that can kill the Past Enter the Gungeon Enter The Gungeon - Advanced Gungeons & Draguns Launch Trailer The expansion featuring hundreds of new rooms, new enemies, new bosses, and more, is out now. Wait for the process to finish - the log will tell you whats happening and itll tell you when the process has finished. To install the base backend, just click Install ETGMod at the bottom. Map the first Five Chambers for the lost adventurer If youre using the Steam version, the installer should autodetect where Gungeon data is if not, you can select the executable at the top (Step 1). Mod The Gungeon Console Commands List Pc.
How to access enter the gungeon console how to#
Mod The Gungeon Console Commands Minecraft Mod The Gungeon Console Commands List How to Get Get R&G Dept How to get on this secret floor.Firstly we need to get on the 4th floor and get at least one master round(you can get them by killing a boss without taking a hit). Make Tab autocomplete to the shared beginning string, for example if you have two completions abctest and abct2est, typing in abc and pressing Tab should autocomplete to abct before displaying. Better console command backend When generating the unit/args tables before calling RunCommand, check if the string is just whitespace and ignore it. Under the hood, the installer uses MonoMod, which is powered by Mono.Cecil. Take a look at the source on GitHub, throw issues in our direction or even fork and send pull requests! Zoom r16 r24 driver for mac. Mod the Gungeon is an open-source project, by the community, for the community.
0 notes
Text
How to change costumes in enter the gungeon console

#HOW TO CHANGE COSTUMES IN ENTER THE GUNGEON CONSOLE MOD#
At the end of the day, this is a game about shooting. You’ll be like that dude with the keys in the Matrix Reloaded, except better. In this, you’ll be able to open any lock (chests, doors, Ness Monsters) without needing a key. Some of these may not be actual adjectives, but they’re still accurate.So any opportunity to gain an advantage is definitely a welcome one. In this context, smidgen translates to unfathomably, cruelly, hair-pullingly and wall-punchingly. Also if you can't type in the console, open the Ammonomicon first and then type.Ĭhances are, if you’ve played a bit of Enter the Gungeon, you’ll have noticed that it is a smidgen hard. Use the installer, open the game and start a run, then press F2 to open the console and type 'give X' where x is the item in lower caps, with underscores as spaces. If you’re not, then the tutorial introduces you to Manuel, or Manny, who teaches you the basics of the game while leading you into the more advance techniques of dodge rolling and timing, flipping tables for cover, and using items called “blanks” to dispel any enemy fire. Make Tab autocomplete to the shared beginning string, for example if you have two completions abctest and abct2est, typing in abc and pressing Tab should autocomplete to abct before displaying.
#HOW TO CHANGE COSTUMES IN ENTER THE GUNGEON CONSOLE MOD#
Mod The Gungeon Console Commands Minecraftīetter console command backend When generating the unit/args tables before calling RunCommand, check if the string is just whitespace and ignore it.
0 notes
Text
How to run apps as an administrator on Windows 10 and Windows 11
How to run apps as an administrator on Windows 10 and Windows 11
There are times both on Windows 11 and 10 you will need to prevent anyone from just installing or running any app on your system but sometimes there could be some trusted programs that will require elevated privilege or permission to work and you will really need to know how to carry out this task with appropriate permissions. You can read more on permissions by reading these: Error 0xc1510111:…

View On WordPress
#Administrator#Microsoft Windows#RunCommand#Search#Task Manager#Windows#Windows 10#Windows 11#Windows Search#Windows Server 2012#Windows Server 2016#Windows Server 2019
0 notes
Photo

Get it done already... #execute #runCOMMAND #run #runner #running #leds #nightlights #visualstimulation #nike #justdoit #tuning #enginebuilding (at Glendale, Arizona) https://www.instagram.com/p/BxspTZ-lgpI/?igshid=183xcgcfpmy9u
#execute#runcommand#run#runner#running#leds#nightlights#visualstimulation#nike#justdoit#tuning#enginebuilding
0 notes
Text
CVE-2021-26616
An OS command injection was found in SecuwaySSL, when special characters injection on execute command with runCommand arguments.
source https://cve.report/CVE-2021-26616
0 notes
Text
Executing WP CLI commands inside WP CLI command with WP_CLI::runcommand()
In this article let’s learn about how to execute another WP CLI commands.
Note: If you read some recent articles then you can skip some below steps that are related to plugin creation.
Create Empty Plugin #Create Empty Plugin
Create a new folder wordpress-examples into plugins directory /wp-content/plugins/
Create a file wordpress-examples.php and add the below code into it.
<?php /** Plugin Name: WordPress Examples */
Note: If you want to add some additional information then you can get it from gist snippet – WordPress Complete Plugin Readme File.
Now you can see our WordPress Examples plugin exists into the plugins list.
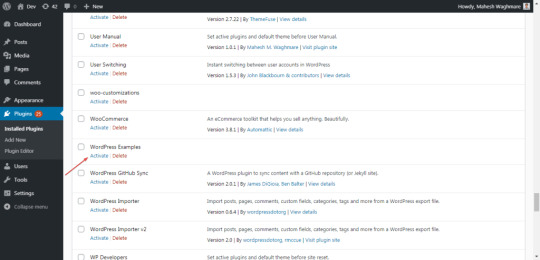
Now, Activate the WordPress Examples plugin.

Register WP CLI Command #Register WP CLI Command
Register PHP class WordPress_Examples_WP_CLI e.g.
if ( ! class_exists( 'WordPress_Examples_WP_CLI' ) && class_exists( 'WP_CLI_Command' ) ) : class WordPress_Examples_WP_CLI extends WP_CLI_Command { } endif;
Here,
We have registered a new class WordPress_Examples_WP_CLI and extend it with WP_CLI_Command.
Add Examples Command #Add Examples Command
Now let’s register the examples. E.g.
WP_CLI::add_command( 'examples', 'WordPress_Examples_WP_CLI' );
Here,
We have used the function WP_CLI::add_command() to register our examples command.
The function WP_CLI::add_command() accepts 2 parameters. The first parameter is the command name. Which is examples in our case.
And second is a callback class which is WordPress_Examples_WP_CLI.
Add execute_commands sub command #Add execute_commands sub command
public function execute_commands( $args, $assoc_args ) { WP_CLI::line( 'Hello' ); }
Here,
We have added a function execute_commands() with two parameters.
$args contain the arguments.
$assoc_args contain the associate arguments.
Testing the Command #Testing the Command
Open command prompt/terminal. Go to your WordPress setup. I have set up WordPress in D:\xampp\htdocs\dev.test
So, Execute the below commands:
cd D:\xampp\htdocs\dev.test
wp examples execute_commands
You can see the output something like below:
λ wp examples execute_commands Hello
This command just shows the string Hello.
Using WP_CLI::runcommand() #Using WP_CLI::runcommand()
Its time to execute another command in our WP CLI command with WP_CLI::runcommand().
public function execute_commands( $args, $assoc_args ) { WP_CLI::runcommand( 'cli info' ); }
Let’s execute the command wp examples execute_commands.
λ wp examples execute_commands OS: Windows NT 6.1 build 7601 (Windows 7 Ultimate Edition Service Pack 1) i586 Shell: C:\Windows\system32\cmd.exe PHP binary: D:\xampp\php\php.exe PHP version: 7.0.8 php.ini used: D:\xampp\php\php.ini WP-CLI root dir: phar://wp-cli.phar/vendor/wp-cli/wp-cli WP-CLI vendor dir: phar://wp-cli.phar/vendor WP_CLI phar path: D:\xampp\htdocs\dev.test WP-CLI packages dir: C:\Users\intel/.wp-cli/packages/ WP-CLI global config: WP-CLI project config: WP-CLI version: 2.4.0 D:\xampp\htdocs\dev.test
Here, we see the result of the WP CLI command wp cli info.
Note: When we use the function WP_CLI::runcommand() then we don’t need to pass the prefix wp. So, wp cli info should be cli info.
Experiment with Examples #Experiment with Examples
Example 1
public function execute_commands( $args, $assoc_args ) { // Execute `wp cli info` CLI command. WP_CLI::runcommand( 'cli info' ); // Execute `wp plugin list --status=active` CLI command. WP_CLI::runcommand( 'plugin list --status=active' ); }
Lets execute command wp examples execute_commands.
λ wp examples execute_commands OS: Windows NT 6.1 build 7601 (Windows 7 Ultimate Edition Service Pack 1) i586 Shell: C:\Windows\system32\cmd.exe PHP binary: D:\xampp\php\php.exe PHP version: 7.0.8 php.ini used: D:\xampp\php\php.ini WP-CLI root dir: phar://wp-cli.phar/vendor/wp-cli/wp-cli WP-CLI vendor dir: phar://wp-cli.phar/vendor WP_CLI phar path: D:\xampp\htdocs\dev.test WP-CLI packages dir: C:\Users\intel/.wp-cli/packages/ WP-CLI global config: WP-CLI project config: WP-CLI version: 2.4.0 +--------------------+--------+--------+---------+ | name | status | update | version | +--------------------+--------+--------+---------+ | wordpress-examples | active | none | | +--------------------+--------+--------+---------+
Here, we have executed two commands.
wp cli info – It displays the WP CLI information.
wp plugin list --status=active – It displays active plugins.
Example 2
public function execute_commands( $args, $assoc_args ) { WP_CLI::runcommand( 'plugin list --format=json --status=active' ); }
λ wp examples execute_commands [{"name":"wordpress-examples","status":"active","update":"none","version":""}]
Example 3
Lets, Get the result of the command in a variable to perform some operations like:
public function execute_commands( $args, $assoc_args ) { $options = array( 'return' => true, // Return 'STDOUT'; use 'all' for full object. 'parse' => 'json', // Parse captured STDOUT to JSON array. 'launch' => false, // Reuse the current process. 'exit_error' => true, // Halt script execution on error. ); $plugins = WP_CLI::runcommand( 'plugin list --format=json --status=active', $options ); foreach ($plugins as $key => $plugin) { WP_CLI::line( $plugin['name'] . ' status is ' . $plugin['status'] ); } }
λ wp examples execute_commands wordpress-examples status is active
Here, In function WP_CLI::runcommand() we have passed 2 arguments.
First is plugin list --format=json --status=active which is the WP CLI command.
And second is the $options which is the array of configuration values.
Example 4
public function execute_commands( $args, $assoc_args ) { $options = array( 'return' => true, // Return 'STDOUT'; use 'all' for full object. 'parse' => 'json', // Parse captured STDOUT to JSON array. 'launch' => false, // Reuse the current process. 'exit_error' => true, // Halt script execution on error. ); $posts = WP_CLI::runcommand( 'post list --format=json', $options ); foreach ($posts as $key => $post) { WP_CLI::line( $post['ID'] . ' | ' . $post['post_title'] ); } }
λ wp examples execute_commands 162 | Sample Post 160 | Sample Post 89 | Another Post 1 | Hello world!
Oh! Don’t forget that we learned about the class \WP_CLI\Formatter(). It displays the well-formatted data.
Let’s try to implement it in the above example.
public function execute_commands( $args, $assoc_args ) { $options = array( 'return' => true, // Return 'STDOUT'; use 'all' for full object. 'parse' => 'json', // Parse captured STDOUT to JSON array. 'launch' => false, // Reuse the current process. 'exit_error' => true, // Halt script execution on error. ); $posts = WP_CLI::runcommand( 'post list --format=json', $options ); $display_fields = array( 'ID', 'post_title', ); $formatter = new \WP_CLI\Formatter( $assoc_args, $display_fields ); $formatter->display_items( $posts ); }
Now, Execute wp examples execute_commands.
λ wp examples execute_commands +-----+--------------+ | ID | post_title | +-----+--------------+ | 162 | Sample Post | | 160 | Sample Post | | 89 | Another Post | | 1 | Hello world! | +-----+--------------+
We can see the data in the table format. To demonstrate the WP_CLI::runcommand() I have used posts example.
You can use the command wp post list to list the posts. E.g.
λ wp post list +-----+--------------+---------------+---------------------+-------------+ | ID | post_title | post_name | post_date | post_status | +-----+--------------+---------------+---------------------+-------------+ | 162 | Sample Post | sample-post-2 | 2019-11-05 02:11:16 | publish | | 160 | Sample Post | sample-post | 2019-11-05 02:10:05 | publish | | 89 | Another Post | another-post | 2019-10-15 23:32:57 | publish | | 1 | Hello world! | hello-world | 2019-10-05 08:23:44 | publish | +-----+--------------+---------------+---------------------+-------------+
Executing WP CLI commands inside WP CLI command with WP_CLI::runcommand().
Tweet
from WordPress http://bit.ly/2PpUGqE
via IFTTT
0 notes
Text
Executing WP CLI commands inside WP CLI command with WP_CLI::runcommand()

In this article let’s learn about how to execute another WP CLI commands.
Note: If you read some recent articles then you can skip some below steps that are related to plugin creation.
Create Empty Plugin
Create a new folder wordpress-examples into plugins directory /wp-content/plugins/
Create a file wordpress-examples.php and add the below code into it.
View On WordPress
0 notes
Photo

EC2のWindows Server構築でやるべきこと https://ift.tt/3362W2C
1. 概要
2. Windows Serverのインスタンス起動
— 2.1. AMIを選択してインスタンス起動
— 2.2. Cドライブのサイジング
3. Windows ServerのOS初期設定
— 3.1. Administratorのパスワード変更
— 3.2. Administrator以外のユーザー作成
— 3.3. Timezone設定、Language設定、Region設定
— 3.4. File name extensions設定
— 3.5. NTP設定(Amazon Time Sync Service)
— 3.6. Computer Name変更(*)
— 3.7. Windows Update
4. EC2 管理ツールのインストール/セットアップ
— 4.1. AWS CLI のダウンロード & インストール
— 4.2. AWS CLI のセットアップ
— 4.3. E2CConfigのダウンロード & インストール
— 4.4. CloudWatch Agent のインストール
— 4.5. CloudWatch Agent のセットアップ(*)
5. OSのネットワーク/セキュリティ関連の設定
— 5.1. リモートデスクトップ接続設定(セキュリティポリシーによる)
— 5.2. ネットワークレベル認証設定(セキュリティポリシーによる)
— 5.3. 暗号化レベルをHigh設定(セキュリティポリシーによる)
— 5.4. 暗号化TLS1.0/1.1 を無効化(セキュリティポリシーによる)
6. ADに登録(*)
7. ミドルウェアのインストール(*)
— 7.1. ミドルウェアのインストール
— 7.2. ミドルウェアのログローテーション
8. AMI を使った横展開
概要
インフラエンジニアの基本はIaaS構築から! 本記事は、EC2上に起動したWindows Server OSの構築でやるべきことをまとめた記事となります。対象はOSのベースのみであり、WebサーバーやDBなどミドルウェアの手順については含みません。
なお、本記事に完成はなく、Windows Server OSの構築で新しい発見があれば都度更新の予定です。
Windows Serverのインスタンス起動
AMIを選択してインスタンス起動
AMI を選択します。「コミュニティ AMI」を選択し、「Windows」をチェックします。
日本語OS を使用する場合、「Japanese」で検索します。
特に理由がなければ、AWSが配布するAMI(provided by Amazon)を選択します。バージョンやミドルウェアを含むなどいくつかの種類がありますので、目的に応じて選択。
以降のインスタンスの設定については、本記事では省略します。
Cドライブのサイジング
Windows Server のCドライブにはある程度の未使用領域が必要です。Cドライブをサイジングする方法は、下記ドキュメントを参照。
概要はじめに今回は、EC2 のディスク拡張についてご紹介します。対象のサーバーOSは、Windows Server 2012 R2 となります(2016以降も手順は同じです)。マイクロソフトのドキュメントを例に、IaaSの設計時に悩ましいCドライブの容量をサイジングする方法についても...
EC2(Windows) Cドライブのサイジングと拡張 | Oji-Cloud - Oji-Cloud
Windows ServerのOS初期設定
次に、Windows Server が起動した後のOS初期設定を記載します。
Administratorのパスワード変更
Administratorのパスワード変更
確認のためサインアウト/サインイン
Administrator以外のユーザー作成
Administrator以外のユーザー作成
Administratorsグループ割り当て
確認のためサインアウト/作成したユーザーにてサインイン
Timezone設定、Language設定、Region設定
タイムゾーン(Timezone)の設定
コントロール パネルの時計、言語、および地域(Control Panel\Clock, Language, and Region)
例:UTC
言語(Language)の設定
例:English(US)
Regionの設定
例:United States
File name extensions設定
ファイル名拡張子(File name extensions)の表示は有効にする。
NTP設定(Amazon Time Sync Service)
Amazon Time Sync Service(Server:169.254.169.123)を設定。
C:\Users\Administrator>w32tm /query /status Leap Indicator: 3(last minute has 61 seconds) Stratum: 0 (unspecified) Precision: -6 (15.625ms per tick) Root Delay: 0.0000000s Root Dispersion: 0.0000000s ReferenceId: 0x00000000 (unspecified) Last Successful Sync Time: unspecified Source: Local CMOS Clock Poll Interval: 9 (512s) C:\Users\Administrator>net stop w32time The Windows Time service is stopping. The Windows Time service was stopped successfully. C:\Users\Administrator>w32tm /config /syncfromflags:manual /manualpeerlist:"169.254.169.123" The command completed successfully. C:\Users\Administrator>w32tm /config /reliable:yes The command completed successfully. C:\Users\Administrator>net start w32time The Windows Time service is starting. The Windows Time service was started successfully. C:\Users\Administrator>w32tm /query /status Leap Indicator: 0(no warning) Stratum: 4 (secondary reference - syncd by (S)NTP) Precision: -6 (15.625ms per tick) Root Delay: 0.0341949s Root Dispersion: 7.7766624s ReferenceId: 0xA9FEA97B (source IP: 169.254.169.123) Last Successful Sync Time: 2/22/2019 10:53:21 AM Source: 169.254.169.123 Poll Interval: 9 (512s)
Computer Name変更(*)
Computer Name(コンピューター名)を変更する。
OSの再起動を伴うため、OS初期設定の最後に実施とする。
Windows Update
SSM(Systems Manager)からWindows Update
SSM(Systems Manager)のRun Commandより、下記コマンドを使用して、SSMのUpdateを実施。
AWS-UpdateSSMAgent
SSMが古いと、次のWindows Updateが失敗するため。
SSM(Systems Manager)のRun Commandより、下記コマンドを使用して、Windows Updateを実施。
AWS-InstallWindowsUpdates
Action: Install
Allow Reboot: True
事前に、EC2のロールにAmazonSSMFullAccessがアタッチされていることを確認する。
EC2 管理ツールのインストール/セットアップ
AWS CLI のダウンロード & インストール
以下より、AWS CLI のインストールモジュールをダウンロード。
https://s3.amazonaws.com/aws-cli/AWSCLISetup.exe
AWS CLI をインストールする。
C:\Users\niikawa>aws --version aws-cli/1.16.103 Python/3.6.0 Windows/2012ServerR2 botocore/1.12.93
AWS CLI のセットアップ
以下記事を参考に、AWS CLI をセットアップする。
Linux + aws cli のはじめ方準備今回は、Linux にaws cli をインストールして初期設定する方法をまとめます。Linux環境は、Windows 10にインストールしたWindows Subsystem for Linuxを使用します。Windows Subsystem for Linuxのインストール方法は、下記の記事を参...
やさしいaws cli のインストール方法 | Oji-Cloud - Oji-Cloud
E2CConfigのダウンロード & インストール
以下より、AWS CLI のインストールモジュールをダウンロード、インストールする。
https://s3.amazonaws.com/ec2-downloads-windows/EC2Config/EC2Install.zip
あるいは、SSM(Systems Manager)のRun Commandを使用して、インストールする。
AWS-UpdateEC2Config
CloudWatch Agent のインストール
以下より、AWS CLI のインストールモジュールをダウンロード、インストールする。
https://s3.amazonaws.com/amazoncloudwatch-agent/windows/amd64/latest/amazon-cloudwatch-agent.msi
msiexec /i amazon-cloudwatch-agent.msi
次のディレクトリが作成されたことを確認する。
C:\Program Files\Amazon\AmazonCloudWatchAgent
あるいは、SSM(Systems Manager)のRun Commandを使用して、インストールする。
AWS-ConfigureAWSPackage
Action: Install
Name: AmazonCloudWatchAgent
事前に、EC2のロールにAmazonSSMFullAccessがアタッチされていることを確認する。
次のディレクトリが作成されたことを確認する。
C:\Program Files\Amazon\AmazonCloudWatchAgent
CloudWatch Agent のセットアップ(*)
以下記事を参考に、CloudWatch Agent をセットアップする。
Windowsインスタンスの統合CloudWatch エージェント設定方法はじめに目的EC2インスタンス上のWindowsサーバーが個々に持つログを収集して、CloudWatch Logsに集約すること。CloudWatchを使って、各EC2インスタンスのカスタムメトリクスを監視すること。何が【新】か...
【最新】Windows + CloudWatch Agentによるメトリクス/ログ管理 | Oji-Cloud - Oji-Cloud
OSのネットワーク/セキュリティ関連の設定
リモートデスクトップ接続設定(セキュリティポリシーによる)
リモートデスクトップ(RDP)接続を 2セッションまで許可する設定に変更する。
ローカルグループポリシー(gpedit.msc)を起動し、コンピューターの構成を開く。
下記の項目を展開する。
管理用テンプレート → Windows コンポーネント → リモート デスクトップ サービス → リモート デスクトップ セッション ホスト → 接続
(English)Administrative Templates -> Windows Components -> Remote Desktop Services -> Remote Desktop Session Host -> Connections
下記のパラメータを無効(Disabled)に変更する。
リモート デスクトップ サービス ユーザーに対してリモート デスクトップ サービス セッションを 1 つに制限する
(English)Restrict Remote Desktop Services users to a single Remote Desktop Services Session

ネットワークレベル認証設定(セキュリティポリシーによる)
以下記事を参考に、設定する。
Windows Server セキュリティ強化: ネットワークレベル認証前提条件Windows Server のセキュリティ強化の設定を紹介します。RDP(リモートデスクトップ)を行う際の認証方法をネットワークレベル認証(NLA)に変更します。ネットワークレベル認証とは、接続元のクラ...
Windows Serverのネットワークレベル認証設定 | Oji-Cloud - Oji-Cloud
暗号化レベルをHigh設定(セキュリティポリシーによる)
以下記事を参考に、設定する。
Windows Server セキュリティ強化: 暗号化レベルのHigh設定前提条件Windows Server のセキュリティ強化の設定を紹介します。RDP(リモートデスクトップ)による接続を行う際、サーバーとクライアント間で通信されるデータは暗号化されています。しかし、盗聴時に解読...
Windows Serverの暗号化レベルをHigh設定 | Oji-Cloud - Oji-Cloud
暗号化TLS1.0/1.1 を無効化(セキュリティポリシーによる)
以下記事を参考に、設定する。
Windows Server セキュリティ強化: TLS1.0/1.1を無効化する前提条件Windows Server のセキュリティ強化の設定を紹介します。TLS(Transport Layer Security)の旧バージョンであるTLS 1.0/ TLS 1.1を無効化し、旧バージョンの脆弱性から回避します。(例:TLS 1.0 に...
Windows Serverの暗号化TLS1.0/1.1 を無効化 | Oji-Cloud - Oji-Cloud
ADに登録(*)
システムでADサービスを利用する場合は、Windows Server をADに登録する。
以下記事を参考に、ADに登録する。
Windows Server のAD登録方法前提条件AWSでは手軽にADサービスを利用することができます。本投稿では、マネージド型の Microsoft Active DirectoryにWindows Serverを登録する手順を記載します。OSのバージョンは、Windows Server 2012 R2 となります。Microsoft AD...
やさしいWindows Server をADに登録する方法 | Oji-Cloud - Oji-Cloud
ミドルウェアのインストール(*)
ミドルウェアのインストール
システムの要件に応じて、各種ミドルウェアやツールをインストールする。
例) Microsoft .NET Framework, IIS, DB, Javaなど
ミドルウェアのログローテーション
システムの要件に応じて、ミドルウェアののログローテーションや定期削除を組み込む。
概要Windows Server において、Linux のlogrotate コマンドの役割を作ります。Windowsのforfiles は、Linux のfind コマンドに近い動作をします。forfiles を使ったbatファイルを作成し、スケジューラーで定期実行させます。forfilesの使用方法構文forfiles [/c &...
Windowsのforfilesを使ったログのリネーム/削除 | Oji-Cloud - Oji-Cloud
AMI を使った横展開
これまでの構築後にAMIを取得し、別のサーバーに横展開 or スケールアウトする場合、AMIを取得する前にWindows Server をsysprep(初期化)する。
以下記事を参考に、Windows Serverをsysprepする。なお、sysprepは、EC2Config サービス、あるいはSSM(Systems Manager)のRunCommandのいずれかを使用する。
なお、横展開後にサーバーごとに変更が必要と思われる箇所を(*)にて、マークする。
Windowsにログインせず、SSM(CLI)からsysprepを投げる概要はじめに今回は、SSM(Systems Manager)を使用して、EC2上のWindows Server に対してsysprepを行う方法をご紹介します。Sysprepはsysprepコマンドを直接実行するのではなく、AWSのEC2Config サービスを利...
SSMからEC2 Windowsをsysprepする方法 | Oji-Cloud - Oji-Cloud
元記事はこちら
「EC2のWindows Server構築でやるべきこと」
November 20, 2019 at 02:00PM
0 notes
Text
Session ManagerでSCPとかSSH Portforwardもできる!
from https://qiita.com/taishin/items/25d91e1037d1bc80fb39?utm_campaign=popular_items&utm_medium=feed&utm_source=popular_items

何の話?
以前、うちのエンジニアの人たちに、EC2に接続するときはSSHやめて、セッションマネージャーすすめてみたんですが、SSHでのターミナルだけでなく、SCPでのファイルコピーとか、インスタンス内でサービス立ち上げてアクセスするためにPortforwardとか頻繁に使うってことであまりセッションマネージャーは使っていなかったんですが・・・
こんなアナウンスが。
Session Manager launches tunneling support for SSH and SCP
これはもしや!
セットアップ
https://aws.amazon.com/jp/about-aws/whats-new/2019/07/session-manager-launches-tunneling-support-for-ssh-and-scp/
クライアント側
セッションマネージャープラグイン
1.1.22.0 が必要なのでアップデートしましょう。
https://docs.aws.amazon.com/systems-manager/latest/userguide/session-manager-working-with-install-plugin.html
$ session-manager-plugin --version
1.1.23.0
SSH Config
~/.ssh/config に下記を追加します。
~/.ssh/config
# SSH over Session Manager
host i-* mi-*
ProxyCommand sh -c "aws ssm start-session --target %h --document-name AWS-StartSSHSession --parameters 'portNumber=%p'"
i-* はインスタンスIDを指定したとき、 mi-* はオンプレのサーバをSSMで管理している場合に使うIDです。
つまり、インスタンスIDに対してSSHアクセスしたときには、ssmでトンネル張って、その中をSSH接続するということですね。
EC2インスタンス側
SSMエージェント
2.3.672.0 以上が必要ですのでRunCommandでアップデートしてください。
EIP
SSM使うので不要です。
セキュリティグループ
もちろん外部からのSSHへのアクセス許可は不要です。
SSH Key
前述のとおり、セッションマネージャーのトンネル内でSSH接続するので、keyの付与は必要になります。
ない場合、SSHの鍵が違う場合はこんな感じ。
Permission denied (publickey,gssapi-keyex,gssapi-with-mic).
なので、EC2にsshdは必要ってことですね。
接続
普通にSSH
普通にSSHコマンドでインスタンスID指定して接続できました。
$ ssh ec2-user@i-xxxxxxxxxxxxxxx -i ~/.ssh/id_rsa
ast login: Wed Jul 10 03:23:25 2019 from localhost
__| __|_ )
_| ( / Amazon Linux 2 AMI
___|\___|___|
https://aws.amazon.com/amazon-linux-2/
No packages needed for security; 6 packages available
Run "sudo yum update" to apply all updates.
[ec2-user@ip-10-0-1-104 ~]$
おお!
普通にOSのユーザーで使えますね。
トンネル張ってるので、ログ的にはlocalhostから接続されていることになってます。
/var/log/secure
Jul 10 03:08:19 ip-10-0-1-104 sshd[4173]: Accepted publickey for ec2-user from 127.0.0.1 port 49148 ssh2: RSA SHA256:aHEcVcQEixW0amxNSFVjabsst2Jglm7KDbYr+Tyb3Zjko
Jul 10 03:08:19 ip-10-0-1-104 sshd[4173]: pam_unix(sshd:session): session opened for user ec2-user by (uid=0)
Jul 10 03:08:38 ip-10-0-1-104 sshd[4207]: Received disconnect from 127.0.0.1 port 49148:11: disconnected by user
Jul 10 03:08:38 ip-10-0-1-104 sshd[4207]: Disconnected from 127.0.0.1 port 49148
Jul 10 03:08:38 ip-10-0-1-104 sshd[4173]: pam_unix(sshd:session): session closed for user ec2-user
Jul 10 03:14:29 ip-10-0-1-104 sshd[4253]: Accepted publickey for ec2-user from 127.0.0.1 port 49216 ssh2: RSA SHA256:aHEcVcQEixW0amxNSFVjJyt2Jglm7KDbYr+Tyb3Zjko
Jul 10 03:14:29 ip-10-0-1-104 sshd[4253]: pam_unix(sshd:session): session opened for user ec2-user by (uid=0)
Jul 10 03:14:35 ip-10-0-1-104 sudo: ec2-user : TTY=pts/0 ; PWD=/home/ec2-user ; USER=root ; COMMAND=/bin/tail /var/log/secure
SCPしてみる
$ scp test.txt ec2-user@i-xxxxxxxxxxxxxxx:test.txt
test.txt 100% 191 11.2KB/s 00:00
$ ssh ec2-user@i-xxxxxxxxxxxxxxx ls
test.txt
おおお!
SSH PortForwardしてみる
$ ssh ec2-user@i-xxxxxxxxxxxxxxx sudo yum -y install httpd
$ ssh ec2-user@i-xxxxxxxxxxxxxxx sudo systemctl start httpd
$ ssh -fNL 8080:localhost:80 ec2-user@i-xxxxxxxxxxxxxxx
$ curl -I localhost:8080
HTTP/1.1 403 Forbidden
Date: Wed, 10 Jul 2019 03:24:08 GMT
Server: Apache/2.4.39 ()
Upgrade: h2,h2c
Connection: Upgrade
Last-Modified: Thu, 04 Apr 2019 18:08:00 GMT
Accept-Ranges: bytes
Content-Length: 3630
Content-Type: text/html; charset=UTF-8
おおおお!!!
残念ながら・・・
セッションマネージャーには出力をS3や、CloudWatch Logsに送信する機能がありますが、この接続の場合は出力されないようです。
出力はSSHになるので当然かもしれないですが・・・
まとめ
今度こそSSHするためのアクセス許可は考えなくていいことになりそう!
0 notes
Photo

Execute tarefas no Windows de forma mais rápida sem a necessidade de navegar por muitas telas.
➡️ Confira neste Post:
http://www.webmundi.com/sistema-operacional/windows/221-comandos-executar-do-windows-run-commands/
0 notes
Text
Original Post from Security Affairs
Author: Pierluigi Paganini
FireEye Mandiant discovered that the FIN7 hacking group added new tools to its cyber arsenal, including a module to target remote administration software of ATM vendor.
Security experts at FireEye Mandiant discovered that the FIN7 hacking group has added new tools to its arsenal, including a new loader and a module that hooks into the legitimate remote administration software used by the ATM maker NCR Corporation.
The group that has been active since late 2015 targeted businesses worldwide to steal payment card information. Fin7 is suspected to have hit more than 100 US companies, most of them in the restaurant, hospitality, and industries.
In August 2018, three members of the notorious cybercrime gang have been indicted and charged with 26 felony counts of conspiracy, wire fraud, computer hacking, access device fraud and aggravated identity theft.
The new loader is able to drop the malware directly in memory, it was dubbed BOOSTWRITE and allows threat actors to load several malicious codes, including the Carbanak backdoor.
Researchers also spotted a new RAT tracked as RDFSNIFFER that is dropped by the BOOSTWRITE loader.
“The first of FIN7’s new tools is BOOSTWRITE – an in-memory-only dropper that decrypts embedded payloads using an encryption key retrieved from a remote server at runtime. FIN7 has been observed making small changes to this malware family using multiple methods to avoid traditional antivirus detection, including a BOOSTWRITE sample where the dropper was signed by a valid Certificate Authority. One of the analyzed BOOSTWRITE variants contained two payloads: CARBANAK and RDFSNIFFER.” reads the Mandiant report. “While CARBANAK has been thoroughly analyzed and has been used maliciously by several financial attackers including FIN7, RDFSNIFFER is a newly-identified tool recovered by Mandiant investigators.”
BOOSTWRITE implements the DLL search order hijacking technique to load its DLLs into the target’s memory that allows it to download the initialization vector (IV) and the decryption two embedded payload DLLs.
Before decrypting the embedded PE32.DLLs payloads the loader performs sanity checks on the results, then load them into memory.
The researchers analyzed several samples of BOOSTWRITE, one of them that was uploaded to VirusTotal on October 3 was signed with a code signing certificate issued by MANGO ENTERPRISE LIMITED.
The loader was observed delivering the RDFSNIFFER DLL which allows an attacker to hijack instances of the NCR Aloha Command Center Client application and interact with victim systems via existing legitimate 2FA sessions.
RDFSNIFFER hooks the process of NCR Corporation’s RDFClient, it runs every time the legitimate software for remote administration is executed on the compromised machines.
The malicious code is designed to run man-in-the-middle attacks on connections made using RDFClient, it also allows attackers to upload, download, execute and/or delete arbitrary files.
Below the list of supported commands:
Command Name Legit Function in RDFClient RDFClient Command ID Description Upload FileMgrSendFile 107 Uploads a file to the remote system Download FileMgrGetFile 108 Retrieves a file from the remote system Execute RunCommand 3001 Executes a command on the remote system DeleteRemote FileMgrDeleteFile 3019 Deletes file on remote system DeleteLocal – – Deletes a local file
In March, the group carried out attacks delivering a previously unseen malware tracked as SQLRat that drops files and executes SQL scripts on the host. The messages sent to the victims were also dropping the backdoor DNSbot that primarily operates over DNS traffic.
In April 2018, FIN7 hackers stole credit and debit card information from millions of consumers who have purchased goods at Saks Fifth Avenue and Lord & Taylor stores.
“While these incidents have also included FIN7’s typical and long-used toolsets, such as CARBANAK and BABYMETAL, the introduction of new tools and techniques provides further evidence FIN7 is continuing to evolve in response to security enhancements.” concludes the report.
“Barring any further law enforcement actions, we expect at least a portion of the actors who comprise the FIN7 criminal organization to continue conducting campaigns.”
window._mNHandle = window._mNHandle || {}; window._mNHandle.queue = window._mNHandle.queue || []; medianet_versionId = "3121199";
try { window._mNHandle.queue.push(function () { window._mNDetails.loadTag("762221962", "300x250", "762221962"); }); } catch (error) {}
Pierluigi Paganini
(SecurityAffairs – FIN7, hacking)
The post FIN7 Hackers group is back with a new loader and a new RAT appeared first on Security Affairs.
#gallery-0-6 { margin: auto; } #gallery-0-6 .gallery-item { float: left; margin-top: 10px; text-align: center; width: 33%; } #gallery-0-6 img { border: 2px solid #cfcfcf; } #gallery-0-6 .gallery-caption { margin-left: 0; } /* see gallery_shortcode() in wp-includes/media.php */
Go to Source
Author: Pierluigi Paganini FIN7 Hackers group is back with a new loader and a new RAT Original Post from Security Affairs Author: Pierluigi Paganini FireEye Mandiant discovered that the FIN7 hacking group added new tools to its cyber arsenal, including a module to target remote administration software of ATM vendor.
0 notes
Link
I still remember the first time I had to deploy a changeset to a production server. It was at my first job roughly ten years ago, and I wasn’t usually doing operations. I had a colleague who did the deployments, but he was missing that day.
0 notes
Text
Finder Sync Extension
The macOS Finder Sync Extension allows extending the Finder’s UI to show the file synchronization status.
Apple’s documentation on the macOS FinderSyncExtension is good, but it lacks more info on communication between the MainApp and the Finder Sync Extension. In this article, one such example is shown as a possible solution for bidirectional communication between the two.
Creating the extension
Once you’ve created your macOS project, select the project in the project navigator and add the new target “Finder Sync Extension”.
Sandboxing
Depending on your project’s needs, you may want/need to disable the App Sandbox. If your project is going to use a virtual file system such as osxfuse, the App Sandbox needs to be disabled.
You’ll have to leave the App Sandbox enabled for the Finder Sync Extension though. Set ‘User Selected File’ permissions to None in the Finder Sync Extension. If you leave it to ‘Read Only’, which it is by default, the extension won’t be able to receive messages from the MainApp.
App groups
To be able to communicate with one another, the MainApp and the Finder Sync Extension must belong to the same App Group. Create an App Group in a pattern like: group.[app-bundle-id]
What the demo app demonstrates
The demo application consists of two components: FinderSyncExample and FinderSyncExtension. FinderSyncExample is what we call the ‘MainApp’.
When started, the MainApp offers a path to a demo folder which will be created when the Set button is pressed. After successful folder creation, the app shows controls for modifying file sync statuses. Beneath the controls, there is a label showing a custom message which can be sent from the Finder extension menu.
MainApp updating file statuses in the Finder
It is possible to set a status for three files: file1.txt, file2.txt and file3.txt. Select a desired status from combo-box and tap the appropriate Set button. Observe how Finder applies sync status to the relevant file.
Finder sending message to the MainApp
On the Finder window, open the SyncExtension menu and select ‘Example Menu Item’ on it. Observe how on the MainApp window message-label is updated to show a message received from the Finder.
Multiple FinderSyncExtension instances can exist simultaneously
It is possible that more than one Finder Sync Extension is running. One Finder Sync Extension can be running in a regular Finder window. The other FinderSyncExtension process can be running in an open-file or save-document dialog. In that case, MainApp has to be able to update all FinderSyncExtension instances.
Keep this in mind when designing the communication between the MainApp and the FinderSyncExtension.
Bidirectional communication
Communication between the MainApp and the FinderSyncExtension can be implemented in several ways. The concept described in this article relies on Distributed Notifications. Other options may include mach_ports, CFMessagePort or XPC.
We chose Distributed Notifications because it fits with the One-application – Multiple-extensions concept.
Both the MainApp and the FinderSyncExtension processes are able to subscribe to certain messages. Delivering and receiving messages is like using the well-known NSNotificationCenter.
Sending a message from MainApp to FinderSyncExtension
To be able to receive notifications, FinderSyncExtension registers as an observer for certain notifications:
NSString* observedObject = self.mainAppBundleID; NSDistributedNotificationCenter* center = [NSDistributedNotificationCenter defaultCenter]; [center addObserver:self selector:@selector(observingPathSet:) name:@"ObservingPathSetNotification" object:observedObject]; [center addObserver:self selector:@selector(filesStatusUpdated:) name:@"FilesStatusUpdatedNotification" object:observedObject];
The relevant code is available in the FinderCommChannel class.
For the MainApp to be able to send a message to FinderSyncExtension, use NSDistributedNotificationCenter:
NSDistributedNotificationCenter* center = [NSDistributedNotificationCenter defaultCenter]; [center postNotificationName:name object:NSBundle.mainBundle.bundleIdentifier userInfo:data deliverImmediately:YES];
More details are available in the AppCommChannel class.
AppCommChannel belongs to the MainApp target. It handles sending messages to FinderSyncExtension and receiving messages from the extension.
FinderCommChannel belongs to FinderSyncExtension target. It handles sending messages to the MainApp and receiving messages from the MainApp.
Throttling messages
In real-world apps, it can happen that an app wants to update the sync status of many files in a short time interval. For that reason, it may be a good idea to gather such updates and send them all in one notification. macOS will complain about sending too many notifications in a short interval. It can also give up on delivery of notifications in such cases.
The AppCommChannel class shows the usage of NSTimer for throttling support. A timer checks every 250ms if there are queued updates to be delivered to FinderSyncExtension.
For a clearer display, a sequence diagram showing sending messages from the MainApp to FinderSyncExtension is given bellow.
Sending messages from FinderSyncExtension to MainApp
To send a message from FinderSync to the MainApp, NSDistributedNotificationCenter is used but in slightly different way:
- (void) send:(NSString*)name data:(NSDictionary*)data { NSDistributedNotificationCenter* center = [NSDistributedNotificationCenter defaultCenter]; NSData* jsonData = [NSJSONSerialization dataWithJSONObject:data options:0 error:nil]; NSString* json = [NSString.alloc initWithData:jsonData encoding:NSUTF8StringEncoding]; [center postNotificationName:name object:json userInfo:nil deliverImmediately:YES]; }
Notice that the JSON string is sent as the object of the notification, and not in the userInfo. That is necessary for these notifications to work properly.
Restarting FinderSyncExtension on app launch
Sometimes, it may be useful to restart the extension when your MainApp is launched. To do that, execute the following code when MainApp launches (i.e. in didFinishLaunchingWithOptions method):
+ (void) restart { NSString* bundleID = NSBundle.mainBundle.bundleIdentifier; NSString* extBundleID = [NSString stringWithFormat:@"%@.FinderSyncExt", bundleID]; NSArray* apps = [NSRunningApplication runningApplicationsWithBundleIdentifier:extBundleID]; ASTEach(apps, ^(NSRunningApplication* app) { NSString* killCommand = [NSString stringWithFormat:@"kill -s 9 %d", app.processIdentifier]; system(killCommand.UTF8String); }); dispatch_after(dispatch_time(DISPATCH_TIME_NOW, (int64_t) (0.5 * NSEC_PER_SEC)), dispatch_get_main_queue(), ^{ NSString* runCommand = [NSString stringWithFormat:@"pluginkit -e use -i %@", extBundleID]; system(runCommand.UTF8String); }); }
Debugging
Debugging the FinderSyncExtension is pretty straightforward. Some options are described below.
Debugging with Xcode alone
It is possible to debug both MainApp and FinderSyncExtension simultaneously. First, start the MainApp running the Xcode target. Then, set the FinderSyncExtension scheme and run it.
Set breakpoints in desired places in the MainApp source and in the FinderSyncExtension source.
Sometimes, the FinderSyncExtension debug session may not be attached to the relevant process. In that case, it helps to relaunch the Finder: press Alt+Cmd+Escape to bring Force Quit Application dialog and then select the Finder and relaunch it.
Xcode should now attach the debug session properly to the new process.
Debugging with AppCode + Xcode
If you’re using AppCode, then you can launch the MainApp form AppCode and FinderSyncExtension from the Xcode. This way, you can see both logs and debug sessions a bit easier.
Troubleshooting
It could happen that, even though the MainApp and FinderSync processes are running, no file sync statuses are shown. It can also happen that the requestBadgeIdentifierForURL method is not being called at all.
If that happens, check if you have other FinderSyncExtensions running on your MBP (ie Dropbox, pCloud…). You can check that in System Preferences -> Extensions -> Finder.
Disable all extensions except your demo FinderSyncExtension and then see if the issue is still present.
Testing
It seems that there is not much room when it comes to testing the FinderSyncExtension. At the time of writing this post, the only way to test the extension would be to refactor the code into a framework and then have the framework tested.
Conclusion
FinderSyncExtension is a great way to show file sync statuses. Hopefully, you now have a better understanding on how to develop the extension. Solutions shown in this article are designed to be simple yet powerful enough to face real-world use cases.
Useful links
Demo project on bitbucket
Finder Sync Extension
FinderSync Class
Human Interface Guidelines
Distributed Notifications
Inter-Process Communication
JNWThrottledBlock – Simple throttling of blocks
Open source project using mach ports for bidirectional communication
Der Beitrag Finder Sync Extension erschien zuerst auf codecentric AG Blog.
Finder Sync Extension published first on https://medium.com/@koresol
0 notes
Last Seen Blogs

lenstepmed
Congenital Abnormalities | Physiology of hearing -Lenstapesmed

oldmetryman
Everything In Moderation

hikewonders
The Wonders Of Hiking

painfully-unoriginal
🧪THINGS I'VE NEVER SEEN BEFORE🧪

crisp-art
✨Ugh✨