#reset windows 10 password
Explore tagged Tumblr posts
Text
How to create a password reset disk: Reset Windows Password
In this article, I will show you How to create a password reset disk which is a specially created disk or USB flash drive that can help restore access back to your Windows system in case you forget your password. Whenever you forget your password there will be no cause for alarm so far you already created a password reset disk using a USB flash drive or a floppy disk. These are other interesting…
#disk#Microsoft Windows#Password#Reset#Windows#Windows 10#Windows 11#Windows Server#Windows Server 2012#Windows Server 2016#Windows Server 2019#Windows Server 2022
0 notes
Text
How to Bypass Windows Passwords using Kali Linux
Learn how to reset/remove forgotten passwords on any Windows computer. Using this method you can unlock any Windows device without knowing the user password and without formatting the hard disk. Read the full article:
https://fastskill.net/blog/articles/how-to-bypass-windows-passwords-using-kali-linux
1 note
·
View note
Text
Oh, Microsoft...
computer: Hey, just picked up the October update to Windows 10. Want to reboot now? me: I'm leaving for work in a little while so just reboot then shut yourself off after in a few minutes. computer: Okily. [I go away, it's doing the update.] me: [9 hours later] Computer, I'm home! computer: Hello! I have restored Panes to your Start menu! Do you like it? me: There's a reason why I turned that garbage off, dude. Undo that now. computer: Okay, great! So you're not online, you should connect to the WiFi! me: I didn't disconnect. And it's not logging in, but I know the WiFi works on my phone. computer: Avast has updated! You're online now! me: Great. I need to synch my Fitbit now. cell phone: So you need to log into Fitbit! me: I didn't log out. And my password isn't working. cell phone: Okay, so let's reset it. me: How about... what it should be. cell phone: Can't let you use that, you already used it before. me: Because that's my fucking password!! Fine, here's something new. cell phone: Great, you got 13,213 steps logged. computer: Did you know Google has gone token instead of two-factor authentication? me: JFC!
17 notes
·
View notes
Text
having fucking,,, Opinions about modern computer literacy and how technology is constantly getting more complex while also obscuring this complexity behind a thin facade of "user friendliness" that quickly collapses any time there's any issue. Like, working in retail tech support, the number of people of a variety of ages who didn't know the term "internet browser" was highly concerning, or didn't know the difference between Windows and Google Chrome, or whether or not they had a Google account. Like, these are all very important things to know, and in some rare cases people just refused to learn "all that tech stuff", but most people tried to understand when I explained it, in what little time i could spare. Everyone should know the answer to questions like "what operating system are you using?", and the fact that many people don't is a (not entirely unintentional) failure on society's part to not give people agency over their own fucking devices! Navigating the file system through explorer should be simple, not a completely foreign activity, knowing what is or isn't installed, how to remove it, etc. I will always recommend Linux over windows, there are a ton of different versions, many of which are very easy to use these days, but on some level they all require that basic understanding and comfortability with the workings of a computer that people just don't get anymore, and so I can't really blame people for hesitating when Windows is at least somewhat more familiar and requires less work to operate, even as it takes away more and more user control.
I used to just get annoyed when people came to me with basic questions, but eventually I realized its almost like owning a car. I don't know how to fix cars, and everytime mine makes a noise I'm like oh god, what's wrong?? So I pay a mechanic who has much greater knowledge than I do to fix it. Not being familiar with computers is very similar, except troubleshooting a computer doesn't require a wholeass workshop and specialized tools, and so it shouldn't be something people are charged an arm and a leg for (we charged $50 for (up to) 30 minutes of general tech support, like I'm supposed to run someone's pockets because I took 10 minutes to help them reset a password?? Because I closed the annoying popup and restarted their pc?? The fuck??). Like so many times I just, hopped on google and found an answer within minutes, and that just seemed like wizardry to people, like no using a search engine should, again, be basic stuff at this point, at least for simple stuff.
Idk where I'm going with this it just makes me so frustrated that people are essentially encouraged to not learn how to operate their devices so they can be charged for shitty tech support subscriptions and just, buy a new one when it stops working right, god I hate tech companies
#for the record most of my clients were from the elderly community near the store#and I didn't actually charge the $50 or most of the other fees as long as no one was looking#so like obviously my demographic experience is skewed#but I definitely encountered similar issues across a wide range of ages#including like middle aged business people who use their pcs for work and stuff#blegh
4 notes
·
View notes
Text
Windows 10 is a fucking disappointment
It suddenly decided my PIN code isn't available anymore so I'm trying to do a factory reset because it also account-walled everything and changing my password doesn't change it in the PC apparently EXCEPT it also account-walled the damn factory reset (that I did via the bios) and now I'm twice as stuck in this mess with no way out aside from hiring a technician, which I don't have the money for.

And if you click "forgot your password" it'll just restart the thing, it's utterly useless
TL;DR: Do not, under any circumstances, download the Windows 10 update
5 notes
·
View notes
Text
How to archive a Discord channel
I'm going to say this way ahead of time: this is going to be waaaaaaay more of an annoying process than it should be. Discord should allow exporting the channel history to server owners, without the need of doing all this. I won't blame you if you give up.
Get the DiscordChatExporter application to download the chat history
This program has two versions
one that has a graphical interface, but works on Windows only
one that has a command line interface, but works on Windows, Linux and macOS
This guide covers the first. The second one maybe next time, in another post. The second version also makes it easier to download every channel on the server.
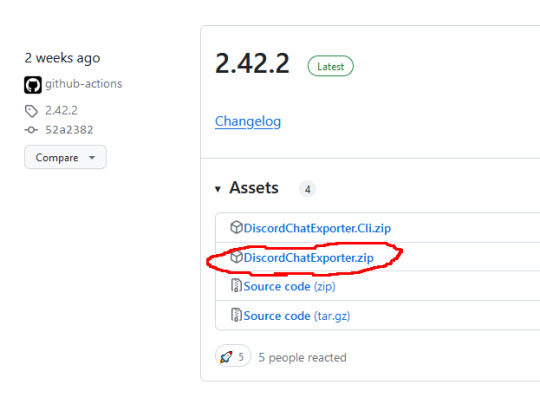
Step 1: Go to here, and download the latest version in the zip file named DiscordChatExporter.zip
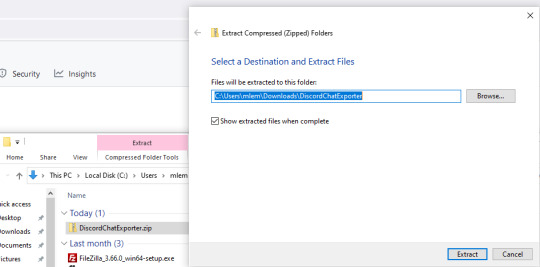
Step 2: Unpack the zip file
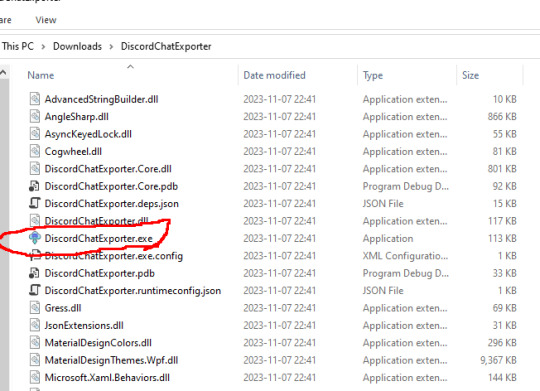
Step 3: Run DiscordChatExporter.exe
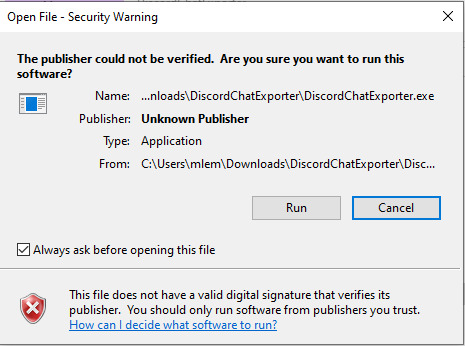
Step 4: Dismiss the scary looking warning as this will show up for any program that which developer can't afford paying $629 a year.
Step 5: Close the welcoming message and you'll see the application interface:
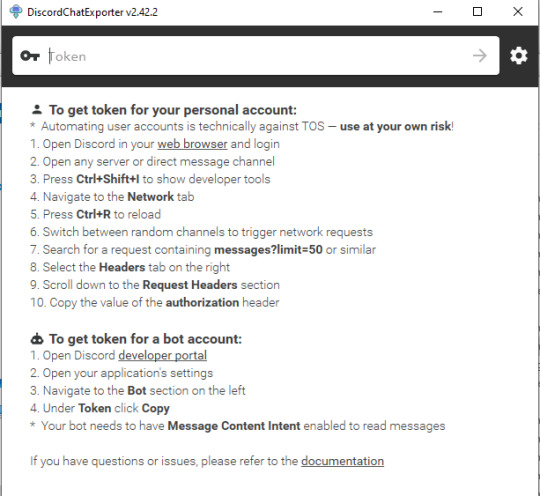
Prepare an access token. Do not share it to anyone else - treat it the same way as you treat your password.
There are two ways to do it:
Approach 1: use your own access token, will work with any channel you're able to access, including Direct Messages, but it is a violation of Discord Terms of Service, and therefore your Discord account could get banned for it. Use at your own risk.
Follow the instructions here, which are fairly detailed step-by-step instructions for Chrome, Firefox, and also the desktop app. I'm gonna expand more on approach 2 as I had to figure it out myself, and the current instructions for approach 2 are not really adequate enough. If you go with approach 1, skip down the entire section below, until the "Paste the token in the Token textbox and click the arrow button" section.
Approach 2: create a bot account, invite it to your server, and use its access token. This process assumes you have enough privileges to invite bots to the server ("Manage Server" permission), and therefore, but is also 100% okay as far as Discord's Terms of Service are concerned. It is also generally safer, as accidental leaking of the token will not risk you losing your user account.
Step 1: Go to the Discord developer portal.
Step 2: Create a new application by clicking the "New Application" button

Step 3: Name it however you want, I personally named it "mlemgrab". Agree to the scary sounding long ass terms of service.

Step 4: Go to the Bot section, scroll down to the "Privileged Gateway Intents"

Step 5: Enable the "Message Content Intent". We don't have to worry about the "if your bot is in more than 100 servers" part because our bot will never be in this many servers.
Step 6: Save changes by pressing the green button "Save Changes"

Step 7: Go to "OAuth2" followed by "URL Generator"
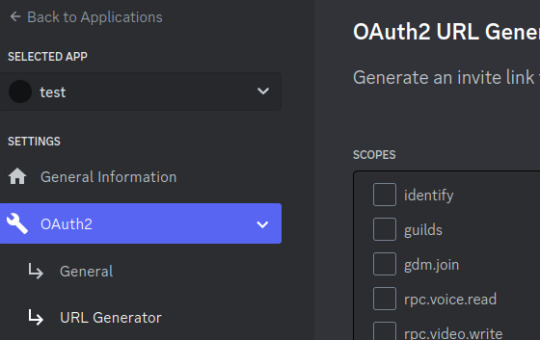
Step 8: Select the "bot" scope and then "Read Messages/View Channels" and "Read Message History" permissions

Step 9: Copy the link at the bottom and visit it:

Step 10: Press "Continue", and approve the required permissions by clicking Authorize. Once you do it, the bot account is on the server.
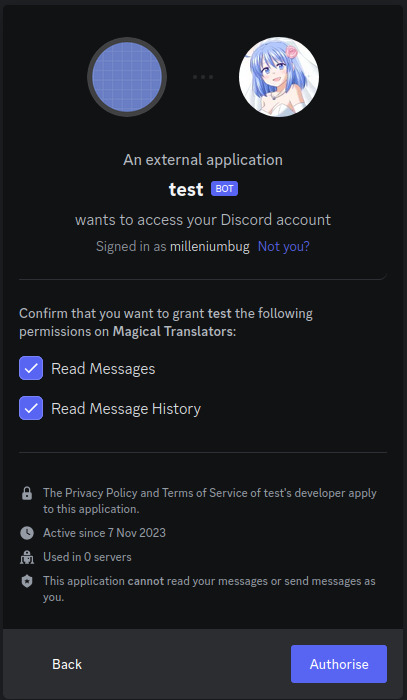
Step 11: Go to "Bot" and click the "Reset Token" button to get the token that will allow you to act (in our case, getting all the messages) using the bot user. If you lose that token, you can click reset again to get a new one.

Paste the token in the Token textbox and click the arrow button

Select the server, and then the channel you want to archive

Click the download button on the bottom right

Select where you want to save it, and the format. HTML is good for easy browsing and preview in a web browser, JSON is good for further processing (let's say someone else later writes a program for importing the conversation elsewhere).
For archivization purposes I recommend saving in both HTML and JSON.
Click "More" for more options.
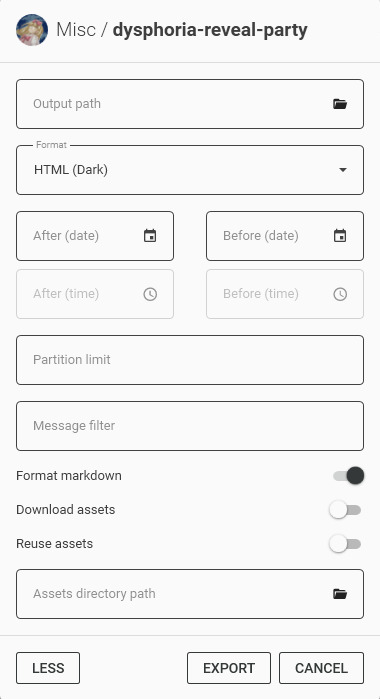
By default the program will not download any message attachments nor avatars or emotes. If you want that, select "Download assets" option. Preferably while also selecting the "Reuse assets" option and selecting a single directory for assets if you want to archive multiple channels.
You can also select the specific time range and using the partition limit - split the archive into several files each containing N messages.
Press Export. Wait. The progress bar will move very slowly.
Once it is done, you should be able to open the HTML file with your web browser.
Treat anything on Discord as media that will be lost
Do not use Discord to host your files. Do not rely on Discord to preserve your text. DO NOT RELY ON DISCORD FOR ANY KIND OF PRESERVATION OR HOSTING!!
It CAN be lost, it WILL be lost! You must consider Discord as a part of the Core Internet, controlled by one company that hosts the servers.
I thought it was impressive at first that it replaced IRC, but now I am horrified. If the company behind Discord went under today, how many friends would you lose?
How many relationships? How much writing?
You may think this won't happen, but I remember when AIM went down and along with it, entire novels worth of interaction with my oldest friend.
IT CAN HAPPEN TO YOU. IT WILL HAPPEN AGAIN. NO COMPANY IS INFALLIBLE.
Back up your files! Download anything you've saved to Discord NOW, before the API changes go into effect! And DO NOT RELY ON THEM FOR HOLDING IMPORTANT FILES!
50K notes
·
View notes
Text
Forgot Dell Laptop Password Windows 7 How to Unlock?
I forgot Windows 7 admin password for my Dell laptop and a reset disc was not created. How do I reset the password and get into my locked Dell laptop? Many people have this dilemma when using Windows 7 system. A strong and unique password is essential to protect our system, but you tend to forget Windows 7 password. What to do if we are locked out of Dell laptop Windows 7?

The following Tips will tell you how to unlock a locked Dell laptop Windows 7 without original password. All you need is to reset the forgotten admin password of Windows 7.
Tip 1: Using Windows 7 default Administrator account.
Windows 7 OS has a built-in administrator account which is created during Windows installation without password, and disable by default. You need to enable that account before losing your other admin account password. Or in this tip your built-in administrator account won’t appear in the screen.
1. Start your computer and press "F8" while the computer boots up. The Advanced Boot Options screen appears.
2. Scroll down to "Safe Mode with Command Prompt" and press "Enter." Your computer starts in Safe Mode with Command Prompt.
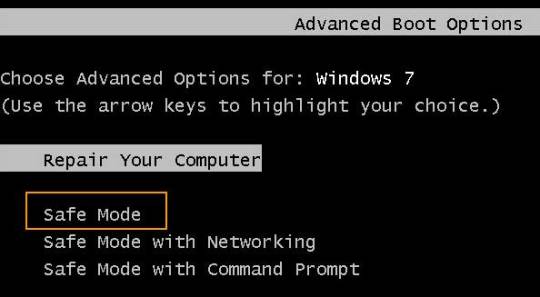
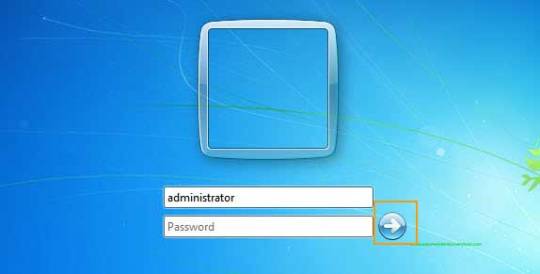
3. Select the Administrator account that appear in the screen, then enter command prompt.
4. Type: net user your username 123456 and hit enter, it will show you a message that” the command completed successfully.
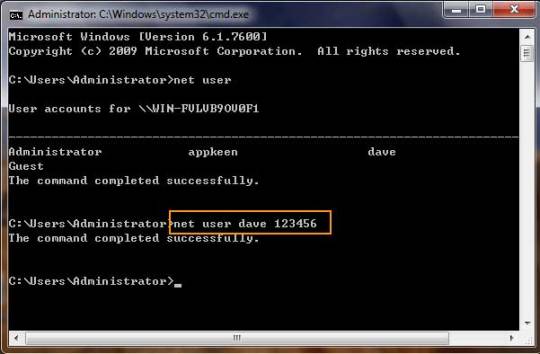
5. Restart your computer, then you can log in as dave with the password 123456. You can go to control Panel to change your account password if necessary.
Tip 2: Reset Dell Laptop Password Windows Vista Using A Free Password Reset Disk.
This is a free and easy way to hack Windows Vista without data lost. The problem with this option is that you have to create the reset disk before the password is lost. Thus if you don’t have a password reset disk, this option is not for you. Here are the steps if you have reset disk.
Step 1. Insert Win7 password reset disk to your computer.
Step 2. When you entering a wrong password for login, a hint will appear: The user name or password is incorrect. Click OK and back to the login Window. Click Reset password.

Step 3. Password reset wizard is running. On the Welcome screen, click Next.
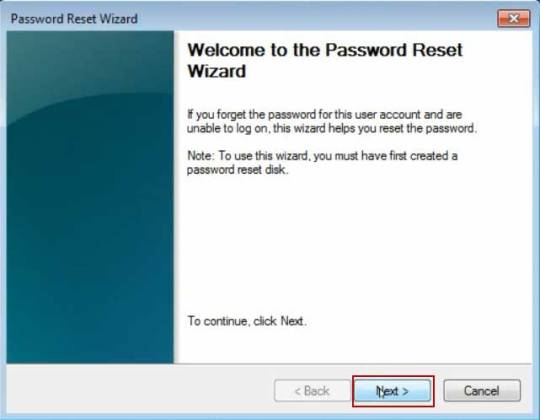
Step 4. Choose your USB flash drive in the drop-down menu and click Next.
Step 5. After the Password Reset Wizard finished reading your saved password, you need to type a new password in the Type a new password box and confirm. And then Click Next, then Finish. It is OK.
Tip 3: Use a Windows Password Recovery program to help Unlock Dell laptop Windows 7.
If you forgot an admin account password on your Dell laptop Windows 7 and there is only one admin account. It is a little troublesome.
However, we can use a handy password recovery tool, Windows Password Rescuer Advanced, to easily bypass Windows 7 admin password on your laptop without admin privileges, then you can log into your Dell laptop without password.
Here I will show you how to reset Windows 7 administrator password on a Dell laptop with USB flash drive.
It works perfectly for all Windows versions on any laptop and desktop computers. All you need is another computer which you can login with administrator account and install Windows Password Rescuer to create a Windows password recovery disk with USB flash drive.
Step 1: Log in any available computer that you can access to and allows you download. Download and install “Wimware Windows Password Rescuer program” in that computer.
Of course, it also works for Windows 10. If you want to unlock a Dell Windows 10 laptop without password, this is one of the best workable ways.
Step 2: Run and burn the program to a blank CD/DVD or USB flash drive.
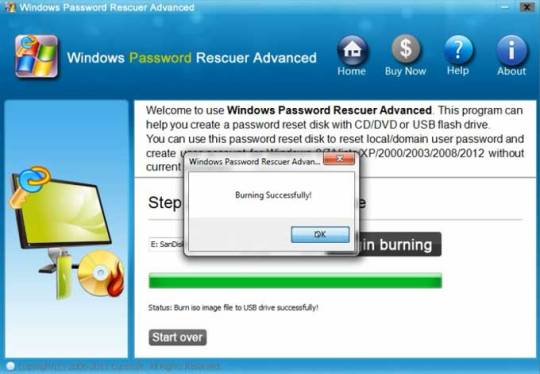
Step 3: When finish, insert the disk to your locked Computer and make your computer boot it from the disk by changing the BIOS setup, then you can follow the instruction to reset your password.
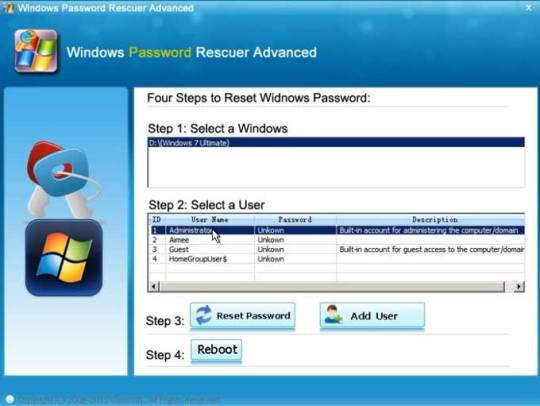
Step 4: After restart, you can log into your Dell laptop Windows 7 without password.

#Dell laptop#Windows 7#unlock dell laptop windows 7#reset password on dell laptop Windows 7#forgot dell laptop password windows 7
0 notes
Text
How to Troubleshoot Common Issues in Windows 10 Home and Pro Editions
Windows 10 is one of the most popular operating systems used by millions of users worldwide. While it is known for its stability and performance, like any other software, it can also encounter issues that may hinder its functionality. In this article, we will discuss common issues that users may face in Windows 10 Home and Pro editions and provide step-by-step troubleshooting guides to resolve them.
Issue 1: Slow Performance
One of the most common issues faced by windows 10 home users is slow performance. If your computer is taking too long to start up, launch applications, or perform tasks, it may be due to various reasons such as malware, disk errors, or outdated drivers. To troubleshoot this issue, start by checking for any malware infections using an anti-virus software. Next, run the built-in Disk Cleanup tool to remove temporary files and system files that may be consuming disk space. Additionally, update your drivers to the latest version and consider upgrading your RAM if your computer is running low on memory.
Issue 2: Wi-Fi Connectivity Problems
Wi-Fi connectivity issues are another common problem faced by Windows 10 users. If you are unable to connect to a Wi-Fi network or are experiencing frequent disconnections, try restarting your router and modem. Next, check your Wi-Fi settings to ensure that you are connected to the correct network and that your Wi-Fi adapter is enabled. If the issue persists, try resetting your TCP/IP stack by running the command "netsh int ip reset" in the Command Prompt. You can also try updating your Wi-Fi drivers to the latest version.
Issue 3: Update Errors
Windows 10 is designed to automatically download and install updates to ensure that your system remains secure and up-to-date. However, sometimes updates may fail to install, resulting in error messages. To troubleshoot update errors, start by checking the Windows Update history to identify the specific error code. Next, try running the Windows Update Troubleshooter tool, which can automatically detect and fix common issues. If the issue persists, try resetting the Windows Update components by running the command "net stop wuauserv" and "net start wuauserv" in the Command Prompt.
Issue 4: Blue Screen of Death (BSOD)
The Blue Screen of Death (BSOD) is a critical error that occurs when Windows encounters a problem that it cannot recover from. If you are experiencing frequent BSODs, try running a System File Checker (SFC) scan to identify and replace corrupted system files. Next, check for any driver updates and install the latest version. You can also try running a memory test using the built-in Windows Memory Diagnostic tool to identify any issues with your RAM.
Issue 5: Login Issues
Login issues are another common problem faced by Windows 10 users. If you are unable to log in to your account or are experiencing issues with your password, try restarting your computer in Safe Mode. Next, try running the built-in System Restore tool to restore your system to a previous point when you were able to log in successfully. If the issue persists, try resetting your password using the built-in Password Reset tool.
Issue 6: Audio Issues
Audio issues are common in Windows 10, particularly after installing updates. If you are experiencing issues with your audio, try running the built-in Audio Troubleshooter tool, which can automatically detect and fix common issues. Next, try updating your audio drivers to the latest version. You can also try disabling and re-enabling your audio device in the Device Manager.
Issue 7: Display Issues
Display issues are another common problem faced by Windows 10 users. If you are experiencing issues with your display, such as blurry text or incorrect resolution, try running the built-in Display Troubleshooter tool. Next, try updating your graphics drivers to the latest version. You can also try adjusting your display settings to ensure that they are set to the correct resolution and refresh rate.
Conclusion
Troubleshooting common issues in Windows 10 Home and Pro editions requires patience and a step-by-step approach. By following the troubleshooting guides outlined in this article, you should be able to resolve most issues and get your system up and running smoothly. Remember to always keep your system updated and run regular maintenance tasks to prevent issues from occurring in the first place. If you are still experiencing issues after trying the troubleshooting steps, consider seeking further assistance from Microsoft support or a professional technician.
0 notes
Text
Password Manager Google Rises Passkey Support to Desktop
Password Manager Google
Google Password Manager
On any device, logging into your preferred websites and applications ought to be as simple and quick as opening your phone. This is when passkeys are useful. It getting closer to a pass wordless future with these safer and more user-friendly alternatives to passwords. You can securely sign in to apps and websites using your fingerprint, face, or screen lock.
Only passkeys for Password Manager Google on Android could be saved up till now. Though you would have to use your Android handset to scan a QR code in order to use them on other devices.
Organize passkeys in Chrome
With a passkey, you may quickly and safely log in using a fingerprint, facial scan, or screen lock. Without the need for a password app, passkeys are an easy and safe method to access all of the websites and applications you care about in addition to your Google Account. To increase the security of your account, you might be required to generate or use a passkey while logging in to a website.
Recommendation: Since passkeys are based on industry standards, you can utilize them on numerous platforms.
Password manager
Further information on passkeys
Passkeys are cryptographic key pairs; this is how they differ from passwords. A website-specific key pair is used. Half of the information is stored on your device or password manager, while half is shared with the website. Instead of using a password that could be forgotten or stolen, websites and applications authenticate your access with a code that is created securely.
Passkey advantages include:
You won’t need to commit a string of characters, digits, and letters to memory.
Accounts can be accessed via facial or fingerprint recognition technologies.
Passkeys work with both websites and apps, and they are compatible with a variety of browser ecosystems and operating systems.
Passkeys are protected from hacker attempts because they are powerful enough to never be guessed or reused.
Because passkeys are linked to the app or website for which they were intended, you will never be duped into logging into a phony app or website with your passkey.
Password Manager Google passkeys are compatible with all Android applications.
Make use of passkeys
Passkeys are stored on your devices. The procedure varies depending on the operating system and might not be accessible on all of them.
Keep passkeys in Windows storage
Passkeys are available for use if you have Windows 10 or later. You need to configure Windows Hello in order to store passkeys. Passkeys are only saved to your PC because Windows Hello does not presently support synchronization or backup. Passkeys are lost if you lose your computer or reinstall the OS.
You must have Windows 11, version 22H2 or later on your PC in order to use passkey management and passkey auto-fill.
Passkeys can be kept on an Android device
Important: Your device has to be running Android 9.0 or higher and have the screen lock enabled in order to save passkeys.
Passkeys are kept in your Password Manager Google and used on your Android smartphone. Your Android devices securely sync and backup your passkeys.
Keep passkeys on an iPad or iPhone
Passkeys are available in iOS or iPadOS 16+. The iCloud Keychain syncs them with iOS, iPadOS, and macOS devices. Passkey auto-fill is not available in iOS.
Securely keep passkeys on a key
To keep your passkeys safe, you can utilize a security key.
Important: There is no backup for passkeys kept on security keys. You cannot get your passkeys back if you misplace or reset the security key.
It releasing changes today that further simplify the use of passkeys across all of your devices. Passkeys for Password Manager Google can now be saved from Windows, macOS, Linux, and Android; ChromeOS is also available for beta testing. After they are saved, they will sync automatically across all of your devices, so all you have to do to log in is scan your fingerprint.
Google releasing a new Password Manager Google PIN that will allow you to generate passkeys and access saved ones across all of your devices. This PIN provides an extra degree of protection to guarantee that your passkeys are completely encrypted and inaccessible to anybody not even Google.
You will need to know your Android device’s screen lock or your Password Manager Google PIN when you first use passkeys on a new device. You may safely retrieve your previously saved passkeys and sync fresh ones between your Android devices and PCs with these recovery factors.
For well-known websites and applications like Google, Amazon, PayPal, and WhatsApp, passkeys are already available. You may also start using Password Manager Google right now without downloading any additional apps because it is a feature that is incorporated into Chrome and Android devices.
Is Google Password Manager Safe
In general, Password Manager Google is regarded as secure. Google uses robust encryption to safeguard your credentials, and they have a security staff on hand to keep an eye out for any threats. Like any internet service, there are some risks involved.
Here are some important things to think about:
Your Google account and security are linked
Your passwords may be at risk if your Google account is hacked.
Although Google offers local encryption,
It is not activated by default. Local encryption is therefore optional. This implies that in the event of a data breach, your passwords are kept on Google’s servers and may be accessible.
No master password
Google Password Manager does not necessitate a separate master password, in contrast to certain specialized password managers. This implies that your saved passwords are directly accessible to anyone who manages to access your Google account.
To improve your safety
Turn on Google account two-factor authentication (2FA). This adds another level of protection.
Though Google Password Manager is handy, you might find that a specialized password manager is a better option for people who require high levels of security because it frequently provides more sophisticated security features.
Read more on Govindhtech.com
#Google#passwordmanager#googlepasswordmanager#passkeys#news#govindhtech#technologies#technology#technews#technologytrends
0 notes
Text
actually kind if annoyed cuz i was excited abt this laptop i got it cheap refurbished off ebay & it ran cool at first but now the space bar and enter key dont work & the start menu isnt opening..its literally windows 10.....idk wtf its doing but i cant fully reset it cuz i need the admin password but i think i Maybe fixed that?? i guess we'll see these animals are a mystery to me i feel like when im tampering with a computer im trying to poke an angel with a stick
1 note
·
View note
Text
Windows 10/11 Password Expired? Here’s how you can reset and disable it
0 notes
Text
How to Connect Cricut to Your Device via Bluetooth: Full Guide
Connecting a Cricut machine to a device is essential for working on Cricut projects. Without this connection, it is impossible to use the Cricut Design Space app. You should know how to connect Cricut to your operating system to get started. Keep reading the blog, and by the end, you will know everything about connecting.
Connecting a Cricut machine to a device can be done either via Bluetooth or a USB cable. Most users prefer Bluetooth because it is a wireless connection. With Bluetooth, you can move around within the range and work on your DIY projects without being restricted to one place. In this write-up, I will explain how to connect your Cricut machine to compatible devices using Bluetooth.
How to Connect Cricut to Windows Using Bluetooth?
You can connect your computer to a Cricut machine via Bluetooth. There are a lot of benefits to using a Cricut machine on a computer. On a computer, you can work on multiple projects in different windows at the same time. Follow these steps to learn how to connect Cricut to your Windows PC:
How to Connect Cricut to Mac With Bluetooth?
The procedure for connecting to your Cricut machine via Bluetooth on a Mac computer is almost identical. Check out the steps below to learn how to connect Cricut to a MacBook.
How to Connect Cricut to Bluetooth on Your iOS Device?
If you want to set up a Cricut machine but don’t have a computer, then you can set it up and connect it to your iPhone. Now, you can do it easily. To learn the process of how to connect Cricut to your iPhone, these are the steps:
How to Connect Cricut to Bluetooth on Android Devices?
Similarly, you can use your Android phone to work on your Cricut projects as well. You can connect your Cricut machine to your Android phone with these simple procedures:
Connecting your device to your Cricut is not enough to work on projects. After the connection, download the Cricut Design Space app. After that, you have to log in with a Cricut ID, and then your machine will be ready to make beautiful items.
Conclusion
In this blog, you learned how to connect Cricut on your computer and mobile. Connecting a device to your Cricut machine is very important. Only after the connection can you work on your designs on your device and then cut those designs with a Cricut machine. For connection, you can also use a USB cable, but most users prefer Bluetooth because of its flexibility. You can connect your machine to a computer or phone according to your convenience and start working to make beautiful crafts using Cricut machines.
FAQs
Why Is My Phone Not Connecting to Cricut Bluetooth?
If you are not able to connect your phone to a Cricut machine, then you should go on to check a few things regarding the connection. First, check whether Bluetooth is turned on or not. If it is not on, you will have to turn it on. Next, verify the distance between your machine and the phone. If the distance is more than 10-15 feet, then your device will not find the machine. To solve this problem, bring the machine and the phone closer.
How Can I Find What My Bluetooth Connecting Code for Cricut?
When you use Bluetooth to connect your device to the Cricut machine, you need a password to connect. At least in the beginning, PIN is a must. The Bluetooth connection is wireless, and a security PIN is required to prevent it from connecting to unwanted devices. Most of the time, devices have a generic PIN, which is set by default. However, people can choose their own password. If you do not know your PIN code, your device has a default PIN. Type 0000 as the PIN, and the connection will be successful.
How Can I Reset Bluetooth Cricut connection?
If you use Bluetooth to connect your Cricut machine to a device and you are facing a problem, you can reset the Bluetooth connection on the device, and the issue will go away. To reset Bluetooth, you have to go to Bluetooth settings and turn it on. Now, you have to click on the right side of the machine and click on Unconnect the device. When the machine is unconnects, search for the machine and reconnect it. The reset is now complete.
Visit: install cricut design space app
Source: https://connectcricut.com/how-to-connect-cricut-to-your-device-via-bluetooth-full-guide//setup
#www.cricut.com setup login#www.cricut.com/setup#cricut.com/setup#install cricut design space app#cricut create connect to computer#cricut setup new device#cricut new product setup#cricut.com setup mac#cricut setup maker#cricut setup create account#cricut setup explore air 2 setup#cricut setup for pc#cricut setup on computer#cricut setup#cricut design space#cricut setup log in#cricut new machine setup#cricut crafts#cricut explore air 2#cricut explore 3
0 notes
Text
can't connect l2tp vpn windows 10
🔒🌍✨ Get 3 Months FREE VPN - Secure & Private Internet Access Worldwide! Click Here ✨🌍🔒
can't connect l2tp vpn windows 10
L2TP VPN setup Windows 10
L2TP/IPsec, also known as Layer 2 Tunneling Protocol, is a popular VPN protocol that provides a secure and encrypted connection for users. Setting up an L2TP VPN on Windows 10 is a straightforward process that allows you to enhance your online privacy and security.
To begin setting up an L2TP VPN on Windows 10, you first need to access the VPN settings on your device. You can do this by navigating to the 'Settings' menu and selecting the 'Network & Internet' option. From there, click on 'VPN' and then 'Add a VPN connection.'
Next, you will need to input the required information for your L2TP VPN connection. This includes the VPN provider's name, the server name or address, the VPN type (in this case, L2TP/IPsec with pre-shared key), the pre-shared key, your username, and password.
After entering all the necessary information, you can save the VPN connection and then connect to it by clicking on 'Connect.' Windows 10 will establish a secure L2TP connection, allowing you to browse the internet anonymously and securely.
It is important to note that while L2TP/IPsec is a secure VPN protocol, it may not be as fast as other protocols such as OpenVPN. However, it is still a reliable option for users looking to protect their online activities from prying eyes.
In conclusion, setting up an L2TP VPN on Windows 10 is a simple process that can greatly enhance your online security and privacy. By following the steps outlined above, you can establish a secure connection and browse the web with peace of mind.
L2TP VPN connection issues Windows 10
Encountering L2TP VPN connection issues on Windows 10 can be frustrating, but understanding the common issues and troubleshooting steps can help resolve them swiftly.
One prevalent issue users face is difficulty establishing a connection. This may stem from incorrect VPN settings or a misconfigured firewall. Ensure that the L2TP VPN settings, including the server address, username, and password, are accurate. Additionally, check if your firewall settings permit L2TP traffic. Adjustments might be necessary to allow the VPN connection.
Another common problem involves authentication failures. If you're receiving authentication errors, double-check your credentials for accuracy. Ensure that the username and password provided are correct, and if applicable, verify that your VPN account is active and in good standing. Sometimes, resetting your VPN password can resolve authentication issues.
Interference from third-party software can also disrupt L2TP VPN connections. Certain antivirus programs, security suites, or network monitoring tools might interfere with VPN protocols. Try temporarily disabling these programs or adding exceptions for your VPN software to see if it resolves the issue.
Furthermore, outdated network drivers can cause connectivity problems. Ensure that your network adapter drivers are up to date by accessing the Device Manager and checking for driver updates. Installing the latest drivers can often improve compatibility and resolve connectivity issues.
Lastly, consider restarting your networking equipment, such as your router or modem, as well as your computer. Sometimes, a simple reboot can resolve temporary glitches and restore VPN connectivity.
By addressing these common issues methodically, users can troubleshoot and resolve L2TP VPN connection issues on Windows 10, ensuring seamless and secure access to their network resources.
Troubleshooting L2TP VPN Windows 10
L2TP (Layer 2 Tunneling Protocol) VPN provides a secure and encrypted connection for users to access a private network over the internet. However, like any technology, issues can arise when setting up and using L2TP VPN on Windows 10. Here are some troubleshooting tips to help resolve common problems:
Check VPN Server Settings: Ensure that the VPN server settings are correctly configured. Check the server address, pre-shared key, and user credentials to make sure they are accurate.
Firewall and Antivirus: Sometimes, firewall settings or antivirus programs can block VPN connections. Temporarily disable these programs and try connecting to the VPN again.
Update Network Drivers: Outdated network drivers can sometimes cause VPN connection issues. Update your network drivers to the latest version to ensure compatibility with L2TP VPN.
Restart VPN Service: Restarting the VPN service can refresh the connection and resolve any temporary issues. Press Win + R, type services.msc, find the "IKE and AuthIP IPsec Keying Modules" service, and restart it.
Protocol Compatibility: Check if your router supports L2TP VPN passthrough. If not, try switching to another protocol like OpenVPN or SSTP.
Check Ports: Ensure that UDP ports 500 and 4500 are open on your router and firewall for L2TP VPN to establish a connection successfully.
By following these troubleshooting tips, you can effectively resolve common L2TP VPN issues on Windows 10 and enjoy a secure and seamless connection to your private network. Remember to always keep your system and software updated to prevent compatibility issues and ensure a smooth VPN experience.
L2TP VPN not working Windows 10
Having trouble with your L2TP VPN on Windows 10? You're not alone. L2TP (Layer 2 Tunneling Protocol) is a popular choice for setting up VPN connections, but sometimes it can be finicky, especially on Windows 10. Here are some troubleshooting tips to get your L2TP VPN working again:
Check your credentials: Make sure you're using the correct username and password for your VPN connection. Sometimes, a simple typo can prevent you from connecting.
Verify server settings: Double-check the server address and other settings provided by your VPN provider. Even a small discrepancy can cause connection issues.
Update Windows: Ensure your Windows 10 system is up to date with the latest updates and patches. Sometimes, VPN connectivity issues can be resolved by installing system updates.
Restart your devices: Reboot your Windows 10 computer and your router or modem. This can help refresh network settings and resolve temporary glitches.
Disable firewall and antivirus: Your firewall or antivirus software may be blocking the VPN connection. Try temporarily disabling them and see if you can connect to the VPN.
Use alternative protocols: If L2TP continues to give you trouble, try connecting using a different VPN protocol such as OpenVPN or IKEv2.
Contact your VPN provider: If all else fails, reach out to your VPN provider's support team for assistance. They may have specific troubleshooting steps tailored to their service.
By following these steps, you should be able to troubleshoot and resolve any issues you're experiencing with your L2TP VPN on Windows 10. Remember, persistence pays off, and with a bit of patience, you'll likely have your VPN connection up and running smoothly again in no time.
Windows 10 L2TP VPN configuration error
When configuring a VPN (Virtual Private Network) on Windows 10 using L2TP (Layer 2 Tunneling Protocol), encountering errors can be frustrating. One common issue users face is an error during the configuration process.
The error message might vary, but it usually indicates a problem with the setup of the L2TP VPN connection. This could be due to incorrect settings, misconfiguration of network components, or issues with the VPN server itself.
To troubleshoot this error, there are several steps you can take:
Verify Settings: Double-check all the settings entered during the configuration process. Ensure that the server address, VPN type (L2TP), and authentication details are accurate.
Check Firewall Settings: Sometimes, firewalls can block L2TP VPN connections. Make sure that the necessary ports (UDP 500, UDP 4500, and ESP protocol) are open on both the client and server side.
Update Drivers: Outdated network drivers can sometimes cause connection issues. Update the network adapter drivers on your Windows 10 device to the latest version available.
Restart Services: Restarting the IPsec Policy Agent and IKE and AuthIP IPsec Keying Module services can sometimes resolve connectivity issues with L2TP VPNs.
Contact VPN Provider: If the error persists, contact your VPN service provider for assistance. They can offer further troubleshooting steps or advice specific to their service.
By following these steps, you can often resolve configuration errors with L2TP VPN connections on Windows 10. However, if the problem persists, seeking assistance from IT support professionals or your VPN provider may be necessary to pinpoint and address the underlying issue.
0 notes
Text
youtube
how to find gmail password,password with keke palmer,chelsea handler password password,wifi password hacker, wifi password hacker app,password hacking,how to hack wifi password,hack wifi password,how to hack a password, wifi hacking password,password cracking,how to hack wifi without password,wifi password,hacker, wifi password change,windows password hacking,password hash,how to crack wifi password,1password, passwords,how to connect wifi without password,password tips,password hacking kali,how to hack password, reset windows 10 password,password reset,password,forgot password,remove password on windows 10, how to reset forgotten password in windows 10,how to reset windows 10 password,reset windows 11 password, reset windows 10 password without cd or software,reset windows 10 password with cmd,windows 10 password reset, reset windows 11 password command prompt,reset windows 10 password without losing data, how to reset password on windows 10,windows 11 password,facebook password,facebook password change, how to recover facebook password,show facebook password,facebook password reset,how to see facebook password, how to change facebook password,facebook ka password kaise pata kare,facebook,i forgot my facebook password, how to find facebook password,how to reset facebook password,how to see facebook password in mobile, forgot facebook password,facebook forgot password,facebook password kaise pata kare,gmail password, change gmail password,how to change gmail password,reset gmail password,gmail password change, password,how to reset gmail password,change gmail password on android,gmail password change kaise kare, how to change password in gmail,gmail password change in mobile,forgot gmail password, gmail ka password kaise change kare,gmail ka password bhul jane par kya kare,gmail id password change, change gmail password in mobile,gmail account password change
0 notes
Text
Forgot Windows 8.1 Local Admin Password No Reset Disk How to Resolve
How to get back into your Windows 8.1 computer if you have forgotten local administrator password no reset disk, how can you reset administrator password in Windows 8.1 without reset disk?

To resolve this problem, you can firstly try Offline NT Password Editor to help reset the forgotten Windows 8.1 administrator password without reset disk. Offline NT password Editor can help clear or reset Windows local account password via CD/DVD. The following procedure will show you the detailed walkthrough.
Trick 1: Use Offline NT Password Editor to Reset Windows 8.1 Local Admin Password (Work with CD/DVD).
When you forgot Windows 8.1 administrator password and a password reset disk was not created, “Offline NT Password Editor”, a free Windows password reset disk, can help you reset forgotten Windows 8.1 local account’s password without knowing it. Free download the ISO file from the official site. Extract the downloaded file and then burn the ISO file on to a writable CD/DVD. Once burning completed, you can use the CD/DVD which is bootable to crack Windows 8.1 Local Admin password.
Step 1: Power on your locked computer and then insert the bootable CD to the CD-ROM.
Step 2: Restart the computer to boot from CD/DVD. If it still boot into Windows, you may need to change device boot order in BIOS. Learn how to boot computer from CD/DVD.
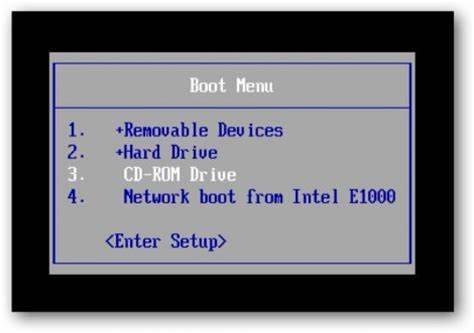
Step 3: When the computer boots from CD and loads Offline NT screen, press Enter until the “step one” appears. Type “1” and hit Enter.

Step 4: Select “Password reset”, type “1” and hit Enter.

Step 5: Select “Edit user data and passwords, type “1” and hit Enter.

Step 6: Select a user account, type “administrator” and hit Enter.

Step 7: Select “Clear user password”, type “1” and hit Enter.

Step 8: Administrator’s password is cleared. Select “Quit editing user and back to user select”, type “!” and hit Enter.

Step 9: Select “Quit”, type “q” and hit Enter.
Step 10: Write back changes, type “y” and hit Enter.
Step 11: When it asks you if try again, type “n” and hit Enter.
Step 12: Now eject your CD and then press CTRL-ALT-DEL to restart the computer.
Step 13: When Windows 8.1 welcome screen appears, click the screen to automatically sign in administrator without password.
Another simple method to reset forgotten Windows 8/8.1 local admin password is using a password recovery program, Windows Password Rescuer, which is working fine for all Windows systems including Windows 11. Here is how to use the utility to reset a local admin password on Windows 8.1/8 PC without logging in.
Trick 2: Reset Windows 8.1 Administrator Password with Windows Password Rescuer Run from USB.
If you have forgotten Windows 8.1 administrator password and need to get back into the account, you can use Windows Password Rescuer to create a bootable USB disk and then use the disk to reset Windows 8.1 local administrator password easily without losing data. It also works perfectly for Windows 11, 10, 8.1, 8, 7, Vista, XP and Windows server 2022, 2019, 2016, 2012, 2008, 2003 etc.
Equipment required: Another Windows computer, USB flash drive.
Read more detailed steps: How to reset Windows 8.1 Admin Password with USB.
Step 1: Use another computer to download Windows Password Rescuer and then install the software.
Step 2: Plug in a blank USB flash drive to the computer and launch the software. Select “USB device” on the software screen.
Step 3: Pull down the drive list and select your plugged USB flash drive. Then click “Begin Burning” to create a bootable USB under a minute.
Step 4: Once the burning process is completed, unplug the USB flash drive and then connect it to your locked computer that you want to reset Windows 8.1 password.
Step 5: Power on the locked computer and press F12 as soon as possible to open “Boot Menu”. Press arrow key to highlight USB option and press Enter to boot from USB.
Step 6: Once the locked computer boots from USB and locates Windows Password Rescuer, you can reset administrator or other local user account passwords with several clicks. Now click “Administrator” from user list.
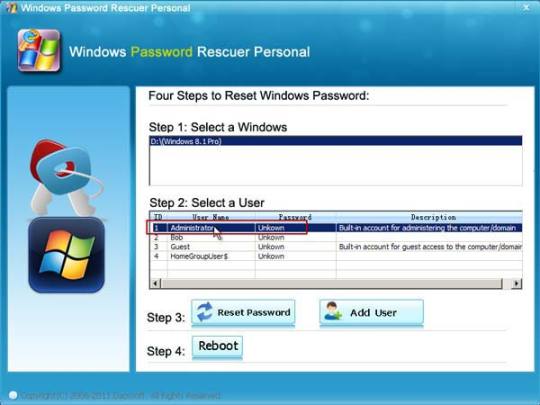
Step 7: Click “Reset Password”, when it asks you if reset administrator password to blank, click “Yes” to confirm it.
Step 8: Administrator password will be removed and shown blank in password list. It means that you will be able to sign in the account without password.
Step 9: Click “Reboot”. When it asks you to remove your USB, remove the USB from your computer and then click “Yes” to restart the computer.
Step 10: After restarting, you can log on administrator without password.

Methods in this article apply to any laptop and desktop computers such as Dell, HP, Toshiba, Acer, Lenovo, Asus etc.
0 notes
