#remember to go to your settings and enable a custom theme!
Explore tagged Tumblr posts
Note
How old does your blog have to be to see the desktop blog view thing?
You can just make it happen whenever you want!
In your browser, set it to desktop mode (available in the dropdown dots menu) and then just type in a user's name first, then tumblr.com
Example:
Fangirltothefullest.tumblr.com
If they have set up a desktop version it'll show
Users older than when mobile became a thing will have desktop versions as they are more customizable. You could even add music if you had the html code for a player.
If you wsnt one yourself, you have to enable custom themes.
Log into tumblr on your browser either on desktop or on mobile. I suggest logging in through desktop mode on your phone's web browser and opening the log in in a new tab so it stops trying to pop up the app.
Once logged in you can disable desktop mode in your browsers drop down to see things easier.
It'll probably up like this otherwise and be a formating nightmare.
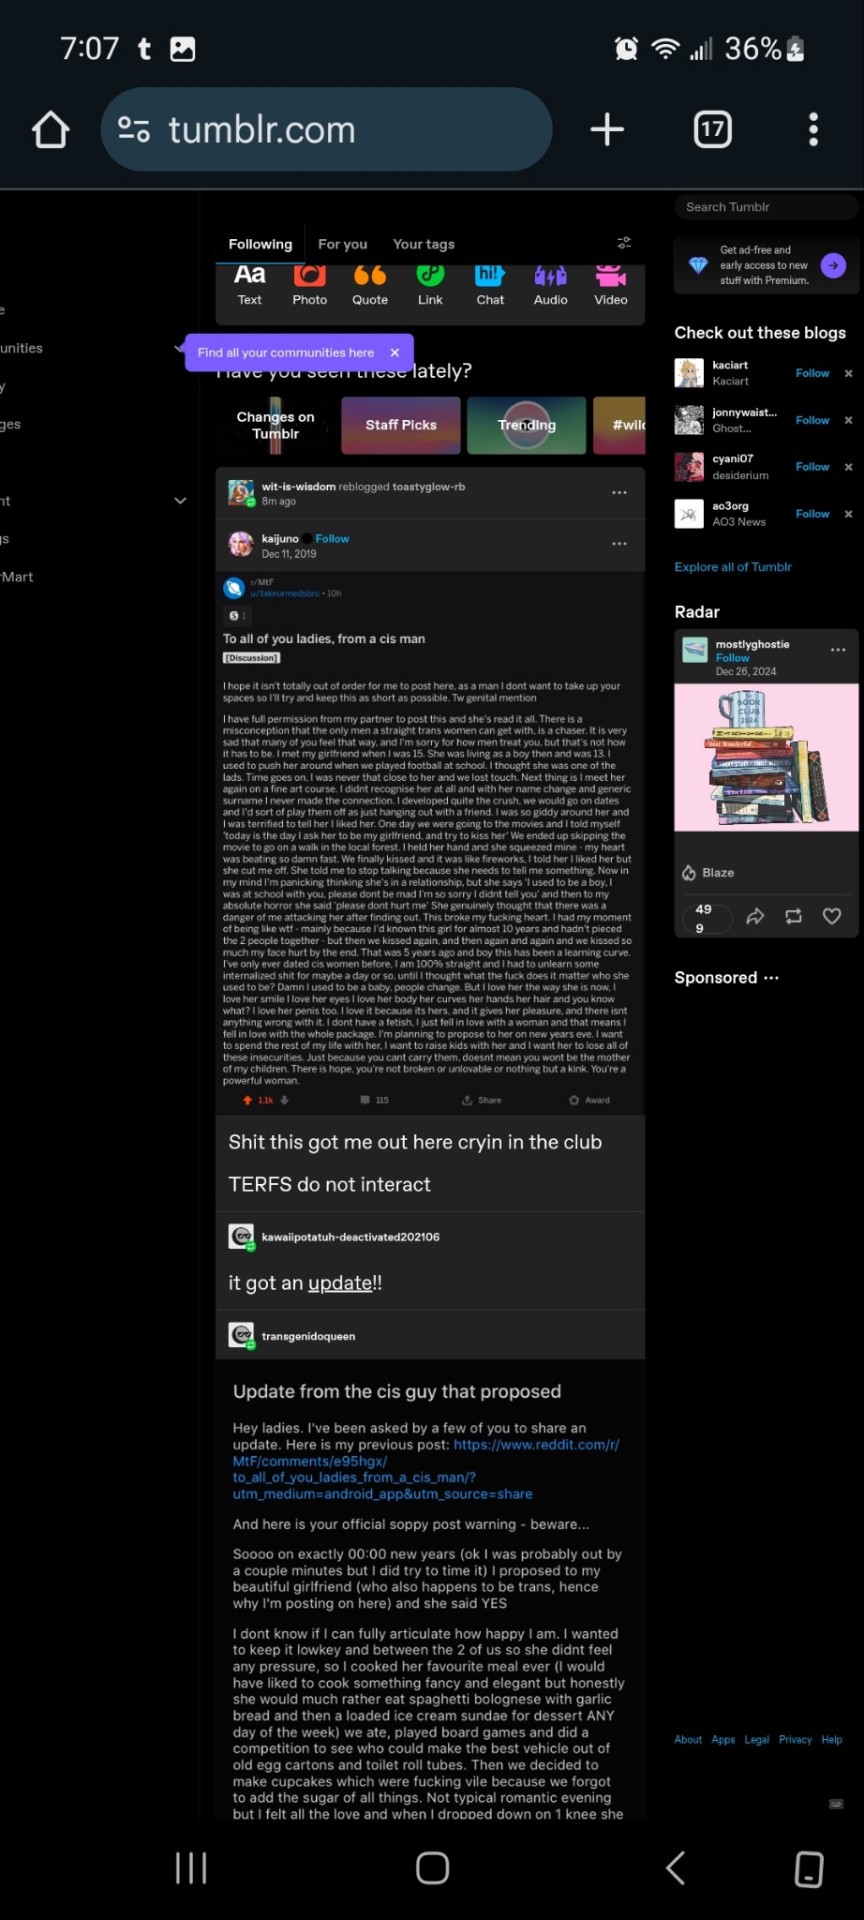
Now.... once it's OFF desktop mode,
Go to the blog you want and hit blog settings in the drop down.
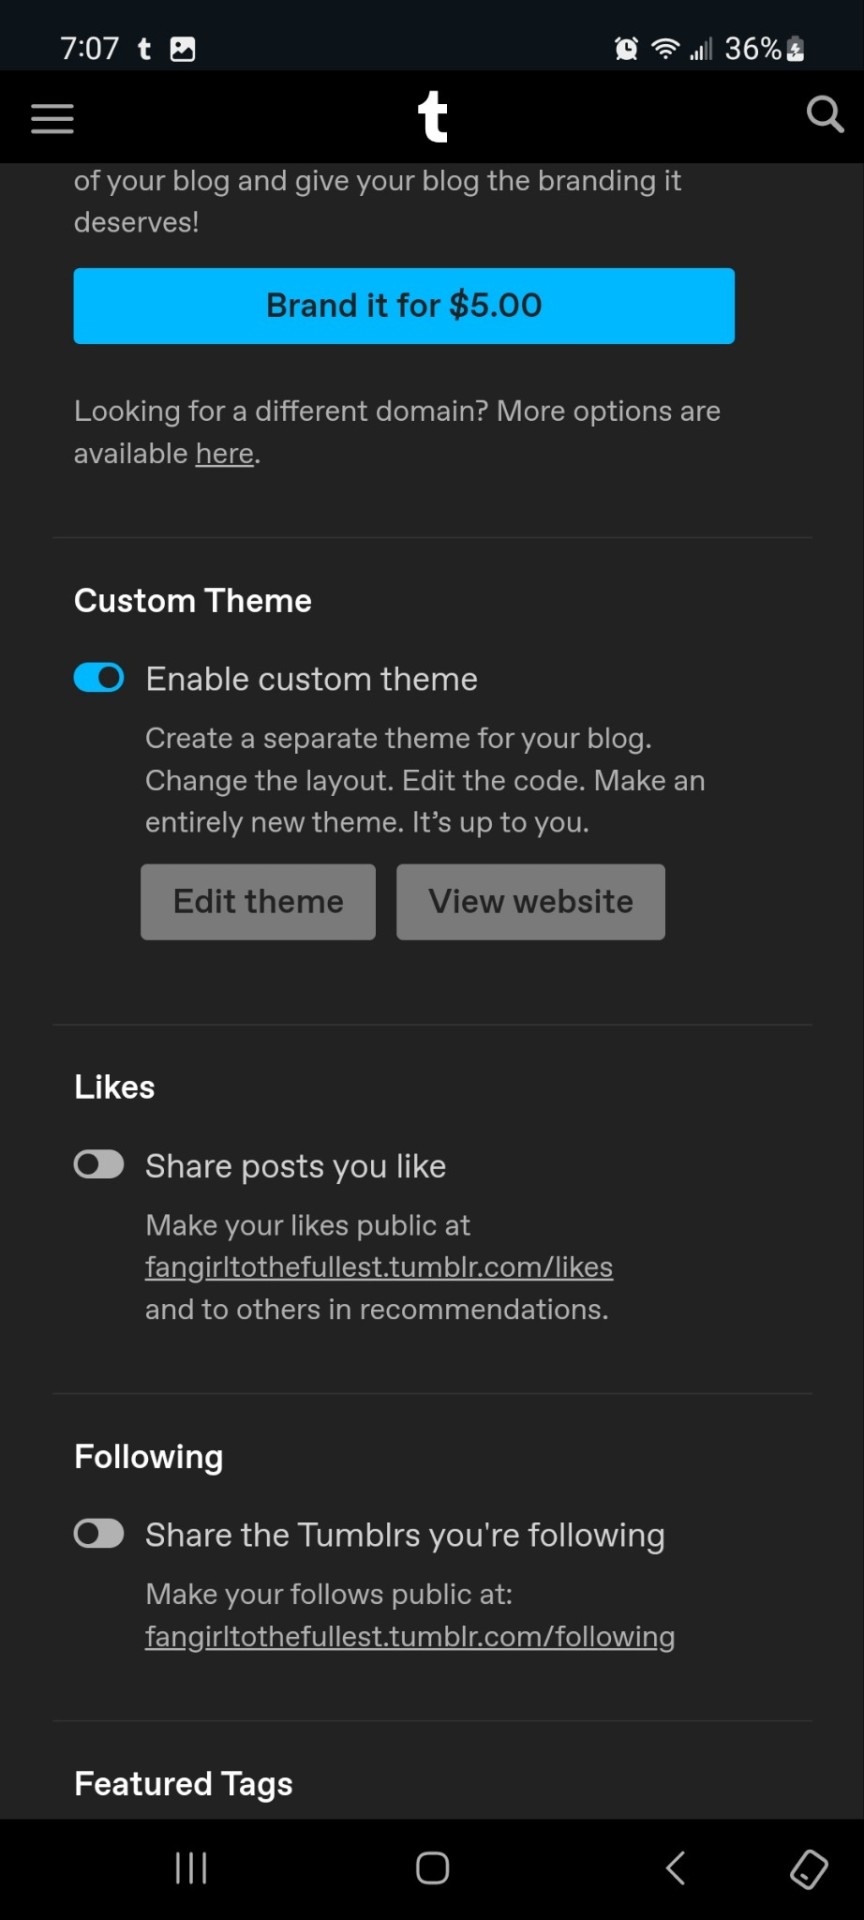
Enable the custom theme and hit the edit theme button. You'll be taken to a place that looks likethis:
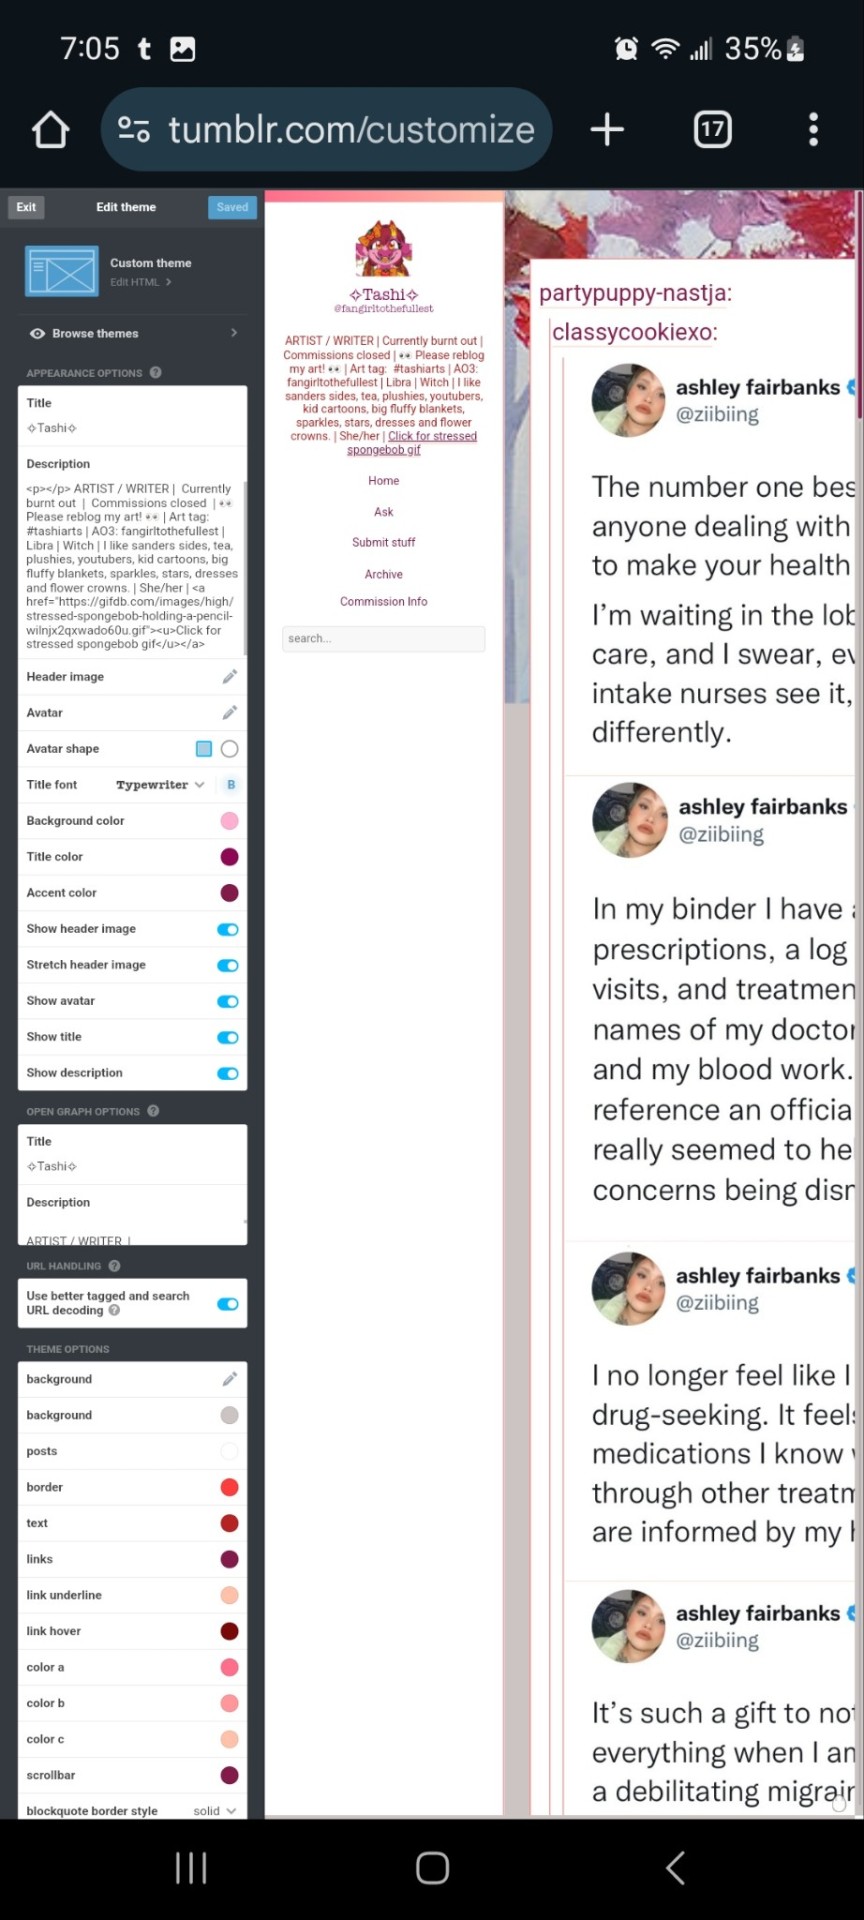
You can zoom in to hit the browse themes button:
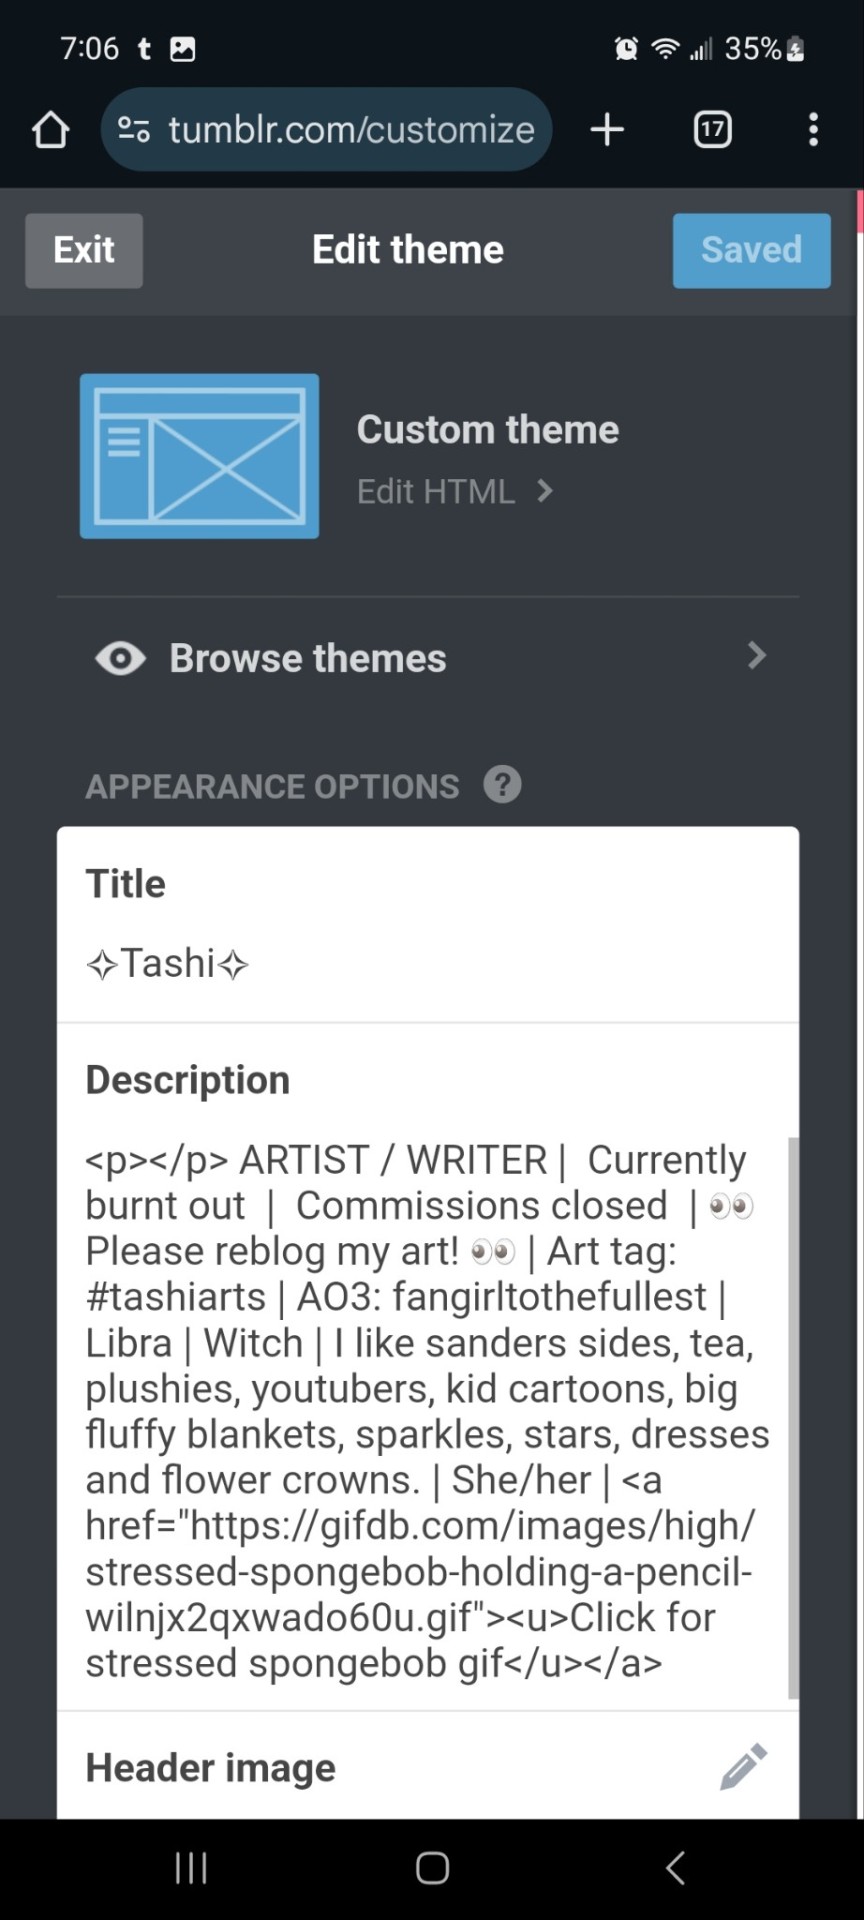
It'll bring you here:
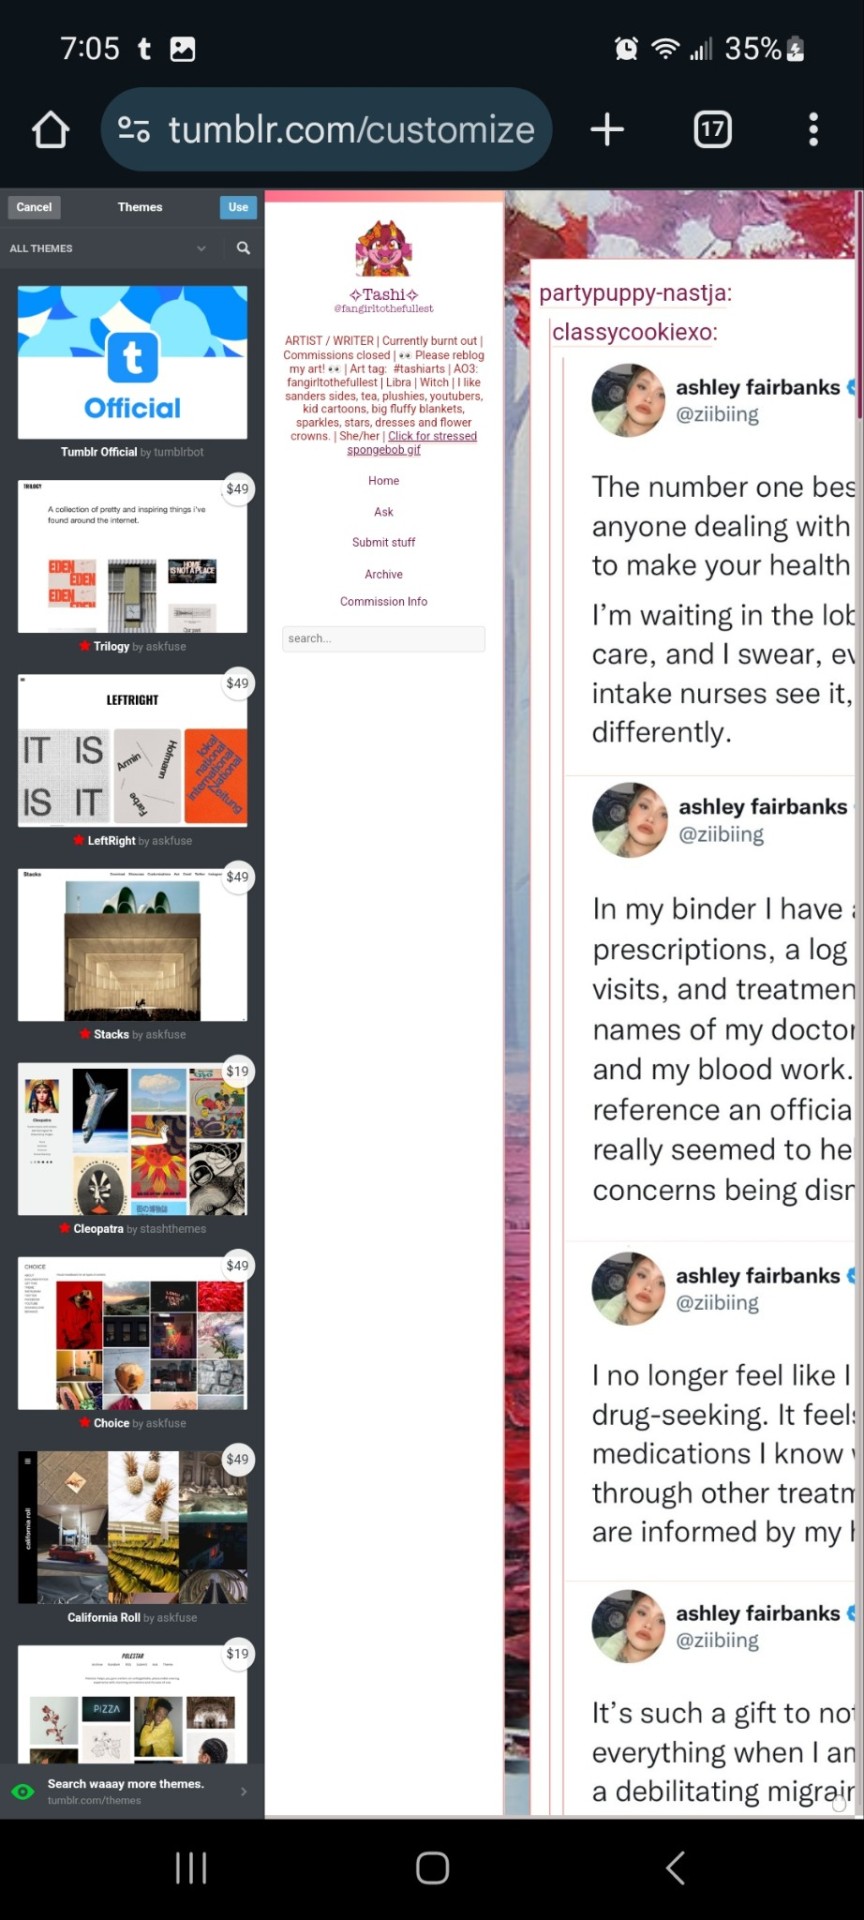
And you can choose what style you want! Hit save and you'll notice it gives you options to play around- choose a background, colour scheme. Fonts etc. Play with the html!
On a regular desktop this is easier to see so I suggest doing this on a laptop or pc.
Also fun fact you can hide secret messages in the html coding and if someone pops open the page source they'll see the surprise message in the code. XD just a fun thing if anyone wants to... say... make their own arg or send out secrets etc.
You CAN create whole pages with this feature too but they are unreliable and after this long it might be broken? So... yeah.
NOW REMEMBER: TO ACCESS THE DESKTOP PAGES YOU HAVE TO CHANGE THE LINK!
Forfeature. As a said above, my desktop link is fangirltothefullest.tumblr.com
I believe the mobile version has it as tumblr.com/fangirltothefullest.
Only people who have made a desktop version will have their blog show up if you'd like to test this festure.
Also this is how you access everyone's blog archive! Because blog archives exist!
Mine would be:
Fangirltothefullest.tumblr.com/archive and you can't open it in mobile or it'll just pop up the mobile version which doesn't exist.
You wsnt this page which let's you find the earliest things a blog has posted. So I created this blog in june 2012 lol.
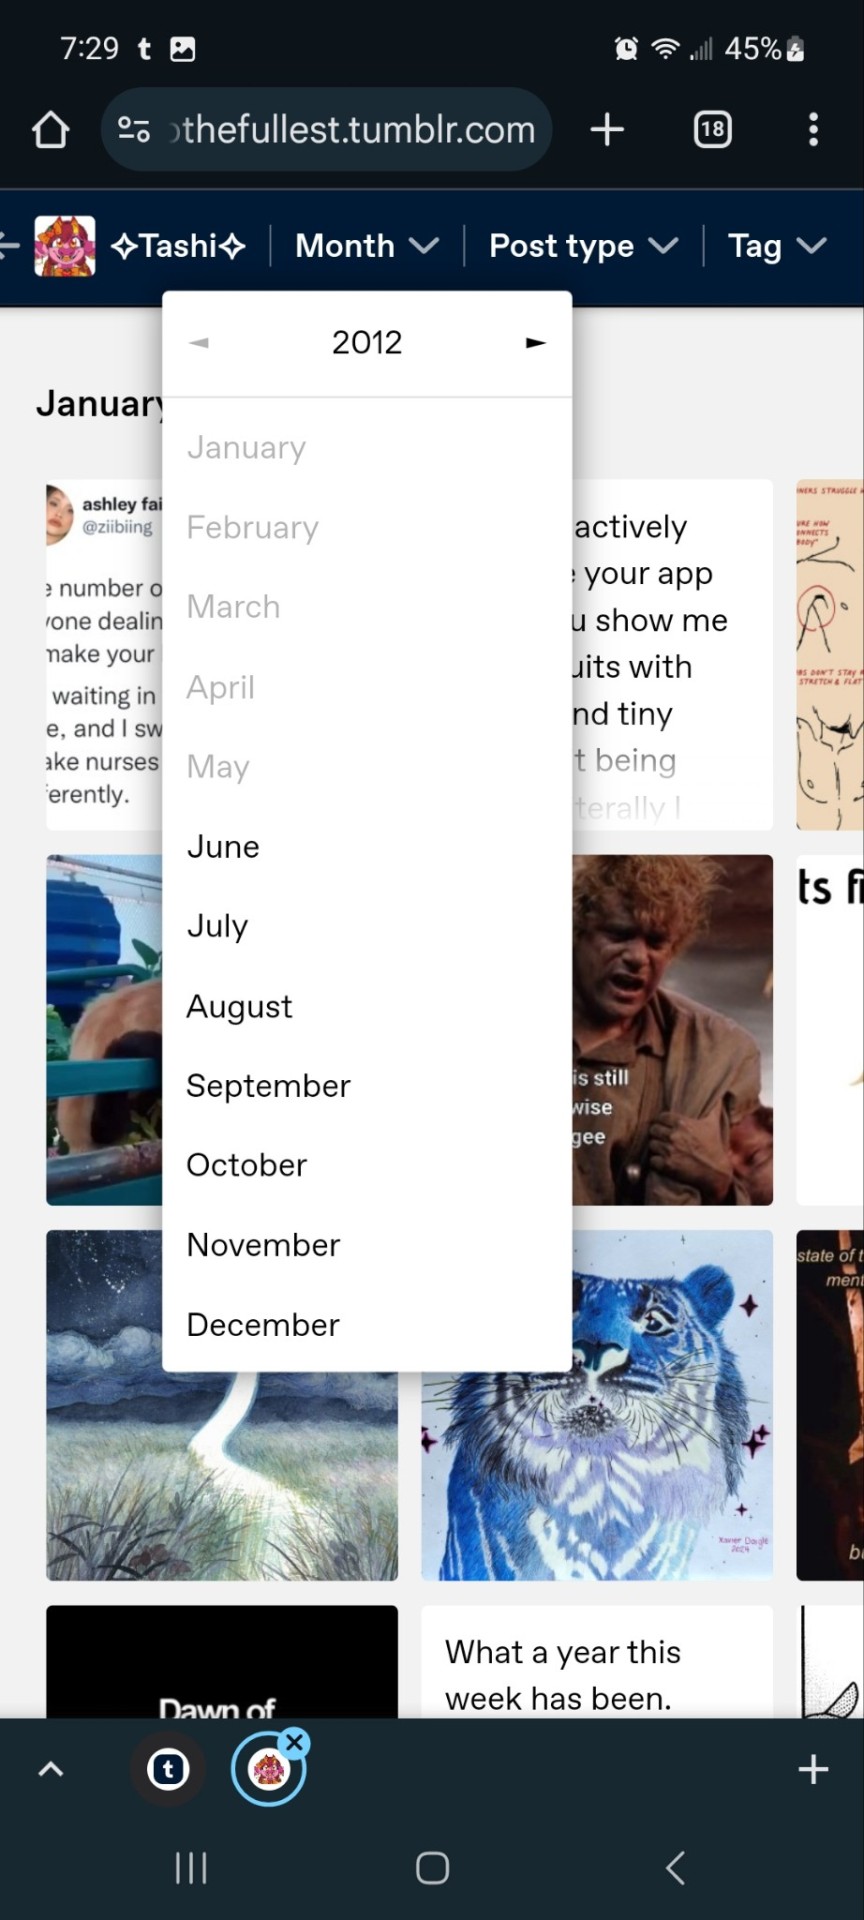
It works for tags too to show you ONLY the contents of that specific tag
Fangirltothefullest.tumblr.com/tagged/tashiarts/
And if you want a tag in order you add /chrono to the end to get it chronologically sorted from the earliest posts in the tag.
Fangirltothefullest.tumblr.com/tagged/tashiarts/chrono
I hope this helps!
NOW EVERYOE GO HAVE FUN MAKING COOL DESKTOP VERSIONS OF YOUR BLOGS!
30 notes
·
View notes
Text
im good at finding back old posts so here's some tips for finding back old posts
if tumblr search itself doesn't spit out the post you know for sure you made at some point you can try going to your search engine of choice and putting in "site:[your url].tumblr.com/post [search terms]" or "site:tumblr.com/[your url] [search terms]" this will limit the search to only show permalinked posts on your blog. it depends on how often your blog got indexed by search engines so it's not foolproof but it works pretty much always when it comes to finding back random popular posts (in which case you leave out the part specifying your own url)
when it comes to finding my own posts the blog archive view is my best fucking friend. you can only visit it when you have custom theme enabled in your blog settings but once you do it's available at [url].tumblr.com/archive. you should enable custom theme anyway because it also lets you completely customise your desktop blog theme but thats another post that others have already made. archive view shows an overview of all your posts in reverse chronological order like this

you can narrow it down to show only posts starting from a specific month, of a specific type, and with a specific tag. the tag dropdown only shows a limited number of your most used tags but you can filter for any tag you've ever used by typing [url].tumblr.com/archive/tagged/[tag] in the address bar and then further filter it by date and type, which saves a lot of time when you're looking for a post from like 2018 with a tag you use a lot

after that it's just a matter of narrowing down the search. when searching for a post with text you can scroll down until you're pretty sure the post you need has been loaded and then hit ctrl+f and type some keywords. the browser text search will only have visible highlighted text if it's in the visible preview but it will search through the whole post text and jump down to the post that has it so it can still give you a rough idea of what handful of posts to look through.
personally I often don't remember when exactly i was talking about something but do remember what else i was talking about around the same time, so in that case i use regular ol tumblr search to find a post i know is from around the same time, check the post timestamp, then go into my archive to sniff around all the posts i made around that time.
124 notes
·
View notes
Text
So I was poking around through my followers list and I noticed that there are a few of you who have no title, no profile picture, no custom site and no bio who do have enough likes to make me think you might be a real person and not a bot. If you are indeed a real person, please read this post.
If I click on you and your blog looks like this:
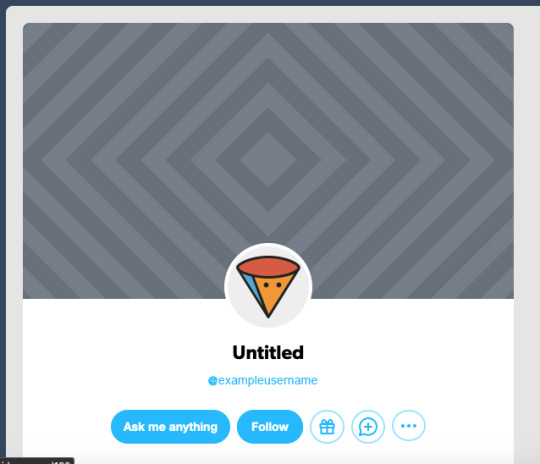
you look like a bot, yes even if you have a substantial amount of likes.
It is very easy to make yourself look human, and because I'm feeling helpful and chatty today, I'm going to show you how to do that, with screenshots. I even went on this site in safari where I don't have dashboardunfucker set up to take these screenshots, so you know I'm feeling good today.
Step 1:
In your sidebar go to "account" highlighted in blue below:

Step 2:
Select your blog in the drop down. (There are a bunch of blogs on mine because I have multiple junk side blogs.) For the purpose of this exercise I made a brand new blank one called imtotallyabot56789.
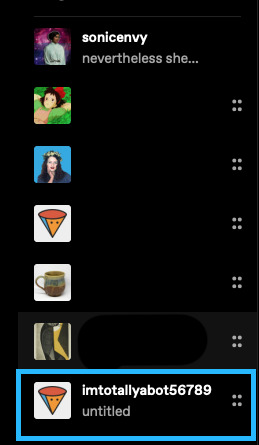
Step 3:
Go to "blog settings" in the right hand sidebar. This will take you to a new page.
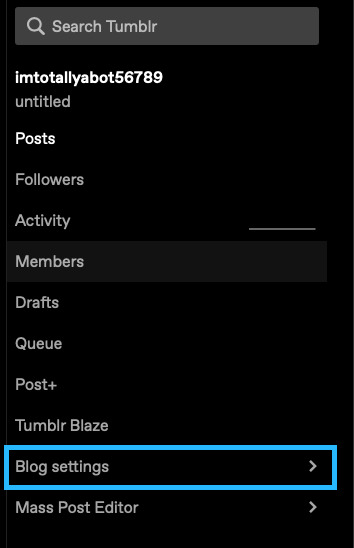
Step 4:
On that new page, select "edit appearance".
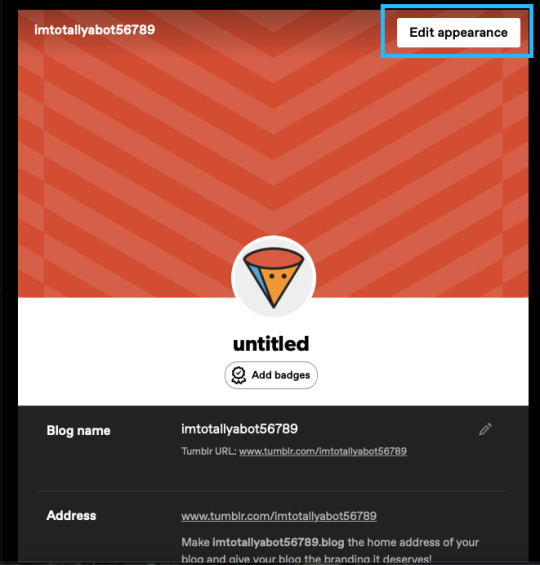
Step 5:
Get to editing! I've highlighted for you the 4 most important things you need to change to not be a bot.
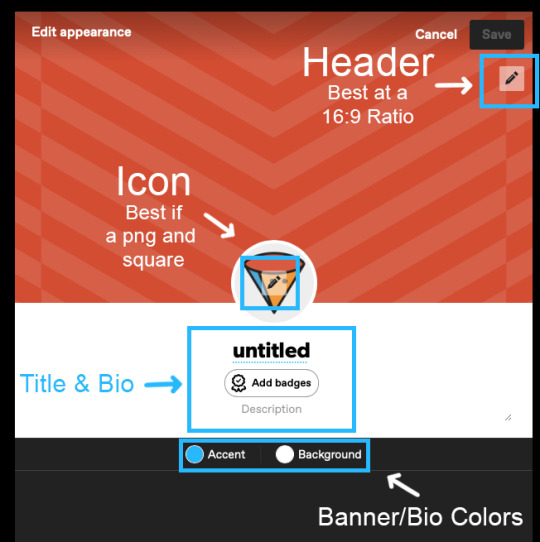
Those things are:
your icon
your header
your title & bio
you banner/bio colors
Some notes:
Your banner can be a .gif, a .png or a .jpg. It is best at a 16:9 ratio. I can't remember how big mine was, but a little bit bigger is better so that it displays decently on desktop and on mobile.
Your icon/profile picture should be a square. I think it displays at 128x128, but I don't know for sure. Use a bigger image than that though. Mine is apparently 886x886 at 72 ppi. Don't pick a photo of yourself unless there's something interesting about it (ie: you're in cosplay or something) because a regularass photo of a person looks like a bot as well. If you don't know what to pick, you can head over to picrew and use an icon generator there to create an icon. There are a lot of fun options. If you want to design your own and don't have photoshop or something like that, check out photopea which is an in browser photoshop clone. Have fun with this -- pick a character you like or a pretty image. Like whatever you want just don't stick with the default one. Use either a jpg or a png.
Your title doesn't have to be that deep. Or descriptive. A lot of people use lines from books, music, poetry, tv or movies for theirs. Mine is related to Elizabeth Warren ("Nevertheless She Persisted"). I've previously used "Death Cannot Stop True Love" and "This could be a little more sonic"
Your bio also doesn't have to be long or, like describe anything super detailed about you. The beauty of tumblr dot hell is that it is one of the more anonymous social media sites out on the internet. You could literally just put something like "Fandom Lurker". Just have something.
The banner/bio colors just change the color of the border around your header image/icon "background" and the accent color.
Step 6:
Some additional basic (optional) things to do:
Enable "Custom Theme". This gives you an actual website rather than the dumb little tumblr dot com/blog/yourblognamehere thing that you get by default. The advantages to having an actual yourblognamehere dot tumblr dot com website are numerous. I made a whole post about that with instructions on how to do that. (note that the screenshots in that post were made before the tumblr layout change that was tumblr staff copying twitter's homework). A big benefit to having your own site is that it is easier to find tagged posts on a site because the default search that tumblr has on the /blog/yourblognamehere thing is hot flaming garbage and pulls posts that don't have that tag whilst also missing ones that do. with a yourblognamehere dot tumblr dot com site you can simply go to yourblognamehere(dot)tumblr(dot)com/tagged/mycooltag and see all the tagged posts. Dooo this. you know you want to doooo this.

2. Open your ask box and turn off tumblr affiliate links. Asks can be fun. They can also be terrible. You can always turn them off later if you decide that people are being mean to you. Personally I have not had that problem in the 12 years I've been here. Maybe it's just the relative obscurity of this blog? who knows. glad for that though.
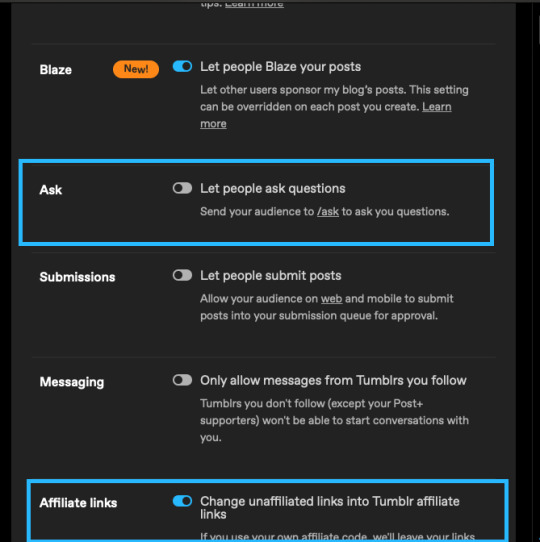
3. Add some featured tags.

This is a newer setting but I think it's fun. If you make posts (or reblog lots of posts) you can add a few tags that you use very often to this as little shortcuts for people visiting your blog.
Whew! That's all for today folks! Thanks for coming to my tumblr how to for newbies talk. I'll probably post another tumblr for newbies chat at some point.
with love and light,
💚 your local internet crazy lady slash tumblr oldtimer
Be kind to yourself and someone else today!
#tumblr#tumblr how to#how to tumblr#tumblr for new users#tumblr tips#tumblr tutorials#tumblr for newbies series#long post for ts
16 notes
·
View notes
Note
yo dunno if you've been asked this question before or not (sorry if you have) but where'd you get your tumblr theme? and are the colors customizable or at least have theme variants (like royale or maybe royale noir, but i honestly have never been able to find anything for the latter)??
Hey, I'm always open for questions like that! So, when you say theme, there are a couple different possibilities you might be referring to: either the colors of a basic tumblr blog (the small popup window you see via Tumblr directly) or the desktop site you receive automatically upon acquiring a URL. You should get everything you need for the in-site customization when you first make a tumblr blog--and I'm most familiar with this on desktop, so forgive me for not providing details on mobile--but anyway, it would be discoverable through your blog editor in the same place you go to edit your description, title, pfp, etc. As for my desktop blog, this was made using customizable HTML (hypertext markup language), or a basic programming language for websites used in tandem with CSS (cascading style sheets). There is also a section of JavaScript on my blog which is for the sparkles that follow the cursor on my page. All three of these languages can be used to make your blog virtually whatever you want, but considering the question, I'll operate on the basis that you don't know how to code. How can you get a customizable theme?
Follow these simple directions:
go to settings
select your blog on the right sidebar (should look like this but with your blogs instead of mine)

scroll until you see this setting

if not enabled, enable custom theme
click edit theme
At this point, you should see an editor much like this, but with your desktop site, which is likely going to be a generic model.

I will be proceeding in this guide assuming that you don't know HTML. To get a custom theme, select the icon on the left sidebar that says browse themes.
You will then see the sidebar change to feature Tumblr's generic theme and probably one or two paid ones. Look to the bottom of the sidebar to find this fun lil guy:

Then do me a favor and select it.
On the new page that pops up, you should be able to find hundreds and hundreds of themes made both by professionals and amateur programmers, some of them with price tags, but plenty of others totally free! To install a theme onto your blog, first find one that fits your tastes about right. Don't fret too much about colors and images, because the vast majority of themes will allow you to customize that--you just need the computer to know where to put things. Let's take a look at some of the featured selections here.
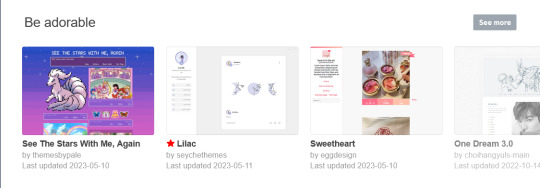
Let's say you want to try the first theme! Select it so this window pops up on your computer.

Preview and install do exactly what it says on the tin. For now, let's scroll down a little bit to check this theme's stats...

Take a look at all of this stuff to make sure that it does what you like, and make sure that you understand what you're signing up for. It's totally reversible in the sense that you can install the generic theme again at any time, but remember that whatever theme you already have WILL change when you install this. Always check for accessibility features as well! Depending on your needs, you might need to know if the programmer whose code you're borrowing has put any flashing lights or gifs in the layout before you download. Better safe than sorry.
Once you've decided on a theme, go ahead and click install.
It shouldn't take long afterwards for your blog to finish rearranging itself. Once it's finished, mosey over to your desktop site to check out how it's changed!
Most themes that you can download will include their own customization options that you can find using the same method we used earlier to open up this part of the blog editor:
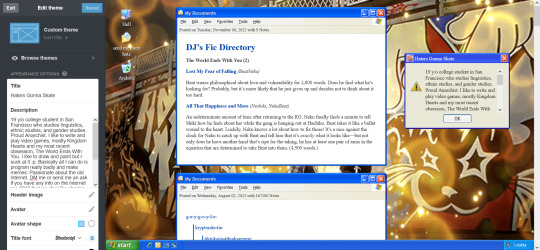
Just use the left sidebar to make any changes you might want to make to your theme in there. The theme description should've listed everything you can customize before downloading, and it'll all be right there in that menu! Most themes will let you change the color, images, backgrounds, links, music, or any other custom features to your heart's content through those controls. And if you're still unsatisfied, you can open up your blog's HTML file by clicking the edit HTML tab at the top of the left sidebar. Make sure you read some basic guides on code insertion if you do, though. It can be a little tricky to reverse garbage code if you put it in the wrong place.
Let me know if I can do anything else, anon! Good luck and happy customizing!

13 notes
·
View notes
Text
The Complete Guide to WordPress for Beginner Bloggers
The Complete Guide to WordPress for Beginner Bloggers
Using WordPress you can now begin blogging because it provides an easy platform for users. The powerful features of WordPress enable users to build their personal brand while sharing thoughts alongside starting their online business. This complete guide provides everything beginner bloggers need to know about WordPress starting from installation of WordPress through content creation and optimization. This guide will establish a foundation for running a successful blog which you can achieve by its conclusion.
What is WordPress?
With millions of websites worldwide WordPress serves as a content management system (CMS). As an open-source system users gain free access to this platform and experience high levels of customization. The platform of WordPress provides a friendly interface which suits both news users and developers who have built some website experience.
WordPress comes in two versions:
WordPress.com: With WordPress.com users receive hosted website support which includes server hosting and automatic maintenance and system updates. Users find this version simple although they get fewer customization options. WordPress.org: With the self-hosted version you need to find your own hosting provider although this setup provides total flexibility in blog customization. We will concentrate on WordPress.org for this tutorial because it is the preferred platform for most bloggers.
Step 1: Setting Up WordPress
You must install WordPress before starting your blogging journey. Here’s how:
Choose a Domain Name:
When people want to visit your blog they type in your domain name since it serves as the web address (e.g., www.yourblogname.com). Your domain name selection must connect to your niche focus and must be simple to remember while also addressing your target audience.
Here are some tips:
Maintain your domain name concise and easy to understand and brandable. Avoid using numbers or hyphens. Select terms which readers can easily memorize both written and spoken.
To buy a domain name pick one of many options including GoDaddy along with Name cheap and your web hosting provider.
2. Choose a Web Hosting Provider
A hosting provider stands as the essential requirement for WordPress installation. The web service which holds your blog files enables online visitors to access them on the Internet is called web hosting.
Some popular hosting options for WordPress include:
Bluehost: Great for beginners, with one-click WordPress installations.
SiteGround: The provider’s customers experience excellent help and they process tasks at lightning speed.
HostGator: Offers affordable hosting plans and good WordPress integration.
DreamHost: WordPress directly promotes this service because it delivers high performance alongside dependable support.
After selecting your web hosting provider you need to join a hosting membership plan. Most hosting companies feature simplified processes for WordPress setup.
3. Install WordPress
Every major hosting company provides users with a straightforward one-click solution to install WordPress. You will receive hosting login credentials through email after completing your hosting purchase. Log into your hosting dashboard after you receive your hosting account login email to begin WordPress installation.
4. The next step includes theme selection together with installation.
The selection of your blog theme controls both design elements and organizational structure. The WordPress dashboard gives you thousands of free and premium themes that let you install them without hassle.
To install a theme:
Go to your WordPress dashboard. You need to choose Appearance > Themes > Add New through your WordPress dashboard. The theme selection page allows users to view available choices and perform direct theme searches. From your dashboard follow these steps to activate the selected theme: Click Install followed by Activate to activate it.
Selecting a basic theme with clean design and mobile-responsive framework suits novice webmasters best.
0 notes
Text
Setting Up Your Shopify Store: A Step-by-Step Beginner’s Guide

Starting an online store can be a game-changer for your business, and Shopify is one of the best platforms to make it happen. Whether you're a budding entrepreneur or an experienced seller, Shopify provides an easy-to-use platform for building and managing your eCommerce store. Here’s a comprehensive step-by-step guide to help you set up your Shopify store from scratch.
Step 1: Sign Up for Shopify
Go to Shopify’s website and click on "Start Free Trial."
Enter your email address, password, and store name.
Tip: Choose a store name that reflects your brand and is easy to remember.
Complete the registration process by answering a few questions about your business.
Step 2: Configure Basic Settings
Set Your Store Location: Add your address and other relevant details to calculate shipping rates and taxes.
Select Your Currency: Go to Settings > Store Currency and choose the appropriate currency for your target audience.
Setup Taxes: Enable or configure tax settings to comply with your region’s requirements.
Step 3: Choose a Theme
Navigate to Online Store > Themes in your Shopify dashboard.
Browse through the free and premium themes available on the Shopify Theme Store.
Tip: Pick a responsive theme that works well on both desktop and mobile devices.
Click "Customize" to start tailoring the theme to your brand.
Step 4: Customize Your Store Design
Add Your Logo: Upload your brand logo for a professional look.
Choose Colors and Fonts: Align these with your brand’s identity.
Design Your Homepage: Add high-quality images, headlines, and CTAs (Call to Actions) to make it visually appealing.
Preview Your Store: Test how it looks on different devices.
Step 5: Add Products
Go to Products > Add Product in the Shopify dashboard.
Fill out product details:
Title
Description (include keywords for SEO!)
Images (use high-resolution images)
Pricing
Inventory information
Organize products into categories or collections for easier navigation.
Step 6: Set Up Payment Methods
Go to Settings > Payments.
Choose your preferred payment gateway (Shopify Payments, PayPal, Stripe, etc.).
Tip: Shopify Payments integrates seamlessly and offers competitive transaction fees.
Configure additional payment options like credit cards, digital wallets, or cash-on-delivery if applicable.
Step 7: Configure Shipping Settings
Navigate to Settings > Shipping and Delivery.
Add shipping zones and rates for domestic and international customers.
Offer shipping options like free shipping, flat rates, or real-time carrier rates.
Step 8: Set Up a Domain
Go to Settings > Domains in the Shopify dashboard.
Purchase a new domain through Shopify or connect an existing one.
Tip: A custom domain gives your store a professional look (e.g.,).
Step 9: Install Essential Apps
Visit the Shopify App Store to enhance your store’s functionality.
Popular apps to consider:
SEO Optimizer for better search visibility.
Email Marketing Apps like Klaviyo or Mailchimp.
Abandoned Cart Recovery apps.
Review Collection Apps for social proof.
Step 10: Test Your Store
Place a Test Order: Use Shopify’s test mode to simulate a purchase.
Check for:
Smooth navigation.
Proper display of product images and descriptions.
Functioning payment gateways.
Fix any issues that arise before going live.
0 notes
Text
How to Migrate Magento 1.0 to Magento 2.0?
Migrating from Magento 1.0 to Magento 2.0 is a crucial step to future-proof your eCommerce store. Magento 1 has reached its end of life, which means no security updates or technical support. By upgrading to Magento 2, you unlock advanced features, improved performance, and enhanced security. Additionally, Magento 2 offers a more modern, user-friendly interface, faster load times, and better scalability, which is vital for meeting customer expectations in today’s competitive online market. Proper planning and execution are essential to ensure a seamless transition without disrupting your business.
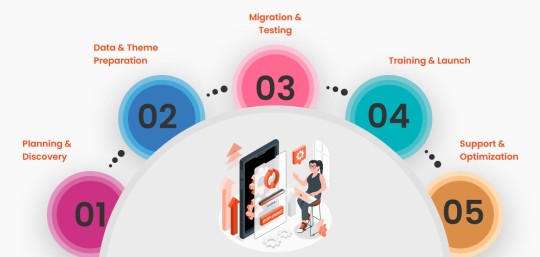
Plan and Prepare: Analyze your current Magento 1 store, including extensions, themes, and customizations. Identify essential features to replicate in Magento 2. Create a comprehensive migration plan, including timelines and resources.
Set Up Magento 2 Environment: Install Magento 2 on a compatible server. Configure your environment to match the requirements of the new platform for optimal performance.
Data Migration: Use the Magento 2 Data Migration Tool to transfer key data, such as products, customers, orders, and categories. Ensure data integrity by thoroughly testing after migration.
Migrate Extensions and Themes: Magento 1 extensions and themes are incompatible with Magento 2. Replace outdated extensions with Magento 2 versions or find suitable alternatives. Develop a new theme or customize an existing one to match your store's branding.
Test and Optimize: Test your Magento 2 store for functionality, design, and performance. Fix bugs, optimize page speed, and ensure mobile responsiveness.
Go Live: After successful testing, deploy your Magento 2 store. Regularly monitor and maintain the site for a seamless customer experience.
Once the migration process is complete, your store will benefit from a faster, more reliable platform designed to handle higher traffic and deliver a superior customer experience. With advanced SEO features, mobile responsiveness, and a streamlined checkout process, Magento 2 enables you to drive more conversions and boost sales. Remember, the key to a successful migration lies in thorough testing, ongoing maintenance, and ensuring all extensions and customizations align with your business needs. Upgrading to Magento 2 is not just a technical update but a strategic move that positions your online store for long-term growth and success in the dynamic eCommerce industry.
For more details for Magento Migration, visit: https://mageleven.com/magento-migration-services/
0 notes
Text
How to Use WordPress to Build a Scalable Business Website

Introduction
In today’s digital world, businesses need websites that grow with them. WordPress is a great platform to create a flexible, scalable site that supports your business at every stage. With the help of Custom WordPress Development Services, you can customize WordPress to meet your unique business needs and set yourself up for future growth.
1. Start with Reliable Hosting
A good website starts with the right hosting. Choosing a hosting provider that can handle growth is essential. Managed WordPress hosting is a solid choice it offers routine updates, added security, and resources that can expand as you get more visitors.
2. Pick a Business-Friendly Theme
Your website’s look and functionality come from its theme. Choose a theme that’s both professional and user-friendly, with good loading speed, mobile compatibility, and SEO features. The best themes allow customization, making it easier to match your brand’s style and offer a smooth experience for users.
3. Add Useful Plugins
Plugins let you add features to your WordPress site without coding. From SEO to security, there’s a plugin for almost every business need. But remember, too many plugins can slow your site, so choose wisely. For more tailored features, WordPress plugin development services can help you create custom plugins for your business.
Some Essential Plugins:
SEO Plugins to help people find your site.
Caching Plugins to improve load times.
Security Plugins to protect customer data.
4. Optimize for Speed and Performance
Website speed matters. It keeps visitors engaged and improves search rankings. Regularly optimize your images, use caching, and consider a content delivery network (CDN) to speed things up. Many WordPress development solutions offer services to keep your site fast and responsive, especially as your traffic grows.
5. Boost Security
As your site grows, security becomes a top priority. Regularly update plugins, enable two-factor authentication, and use security plugins to protect data. Custom security measures can be added as needed, especially if you handle sensitive customer information.
6. Plan Your Content and SEO
Quality content helps attract visitors and keeps them engaged. WordPress makes it easy to manage blog posts, share news, and update content. Partnering with WordPress website development services can also improve your SEO, making your content more visible to potential customers.
7. Consider Custom Development
At some point, you might need custom features that go beyond what standard themes and plugins offer. Custom development can add unique tools, like booking systems or custom forms, that fit your business perfectly. This ensures your site is exactly what you need and continues to grow with you.
Conclusion
WordPress is a fantastic choice for building a business website that can grow and adapt. With the right hosting, theme, plugins, and development support, you’ll have a website that meets your needs now and as you expand. Using Custom WordPress Development Services can help make your site a powerful tool for your business’s success.
0 notes
Text
From Concept to Reality: Implementing Complex UI/UX Ideas Using Elementor's Toolkit
In the ever-evolving world of web design, turning innovative UI/UX concepts into functional, visually striking websites can be a daunting task. Enter Elementor, a powerful WordPress page builder that has revolutionized the way designers and developers bring their ideas to life. With its extensive toolkit and intuitive interface, Elementor empowers creators to implement even the most complex UI/UX ideas without diving deep into code. Let's explore how you can leverage Elementor's features to transform your concepts into reality.
Understanding Elementor's Ecosystem
Before diving into implementation, it's crucial to understand the components that make up Elementor's toolkit:
Widgets: These are the building blocks of your design, ranging from basic text and image elements to complex forms and sliders.
Sections and Columns: These structural elements help organize your content and create responsive layouts.
Templates: Pre-designed layouts that can be customized to fit your needs.
Theme Builder: Allows you to design entire website structures, including headers, footers, and archive pages.
Dynamic Content: Enables you to populate your design with data from your WordPress database.
Custom CSS: For those times when you need to add that extra touch of customization.
With these tools at your disposal, let's walk through the process of implementing complex UI/UX ideas.
Conceptualization and Planning
Before opening Elementor, start with a clear concept. Sketch out your ideas, create wireframes, and define the user journey. Consider the following:
User flow and navigation
Content hierarchy
Interactive elements
Responsive design requirements
Performance considerations
Having a solid plan will make the implementation process smoother and more efficient.
Setting Up Your Canvas
Once you have your concept ready, it's time to set up your Elementor canvas:
Create a new page or post in WordPress.
Click "Edit with Elementor" to open the Elementor interface.
Choose a starting point: blank canvas or a pre-designed template.
If you're working on a complex layout, starting with a blank canvas gives you more flexibility. However, templates can be excellent time-savers if you find one that aligns with your concept.
Building the Structure
Begin by creating the overall structure of your design:
Add sections to divide your page into major areas.
Within each section, add columns to create your desired layout.
Adjust column widths and responsiveness settings to ensure your design looks great on all devices.
Remember, Elementor's drag-and-drop interface makes it easy to rearrange elements as you go, so don't worry about getting it perfect on the first try.
Implementing Core UI Elements
Now, start adding the core UI elements that make up your design:
Use basic widgets like Heading, Text Editor, and Image to add your content.
Implement more complex widgets like Icon Box, Tabs, or Accordion for interactive elements.
Customize each widget's style settings to match your design concept.
As you build, constantly preview your work to ensure it aligns with your original concept.
Enhancing with Advanced Features
To bring more complex UI/UX ideas to life, leverage Elementor's advanced features:
Motion Effects: Add parallax scrolling, animations, and hover effects to create a dynamic user experience.
Popup Builder: Create engaging popups for calls-to-action, forms, or promotional content.
Custom Positioning: Use absolute or relative positioning to create unique layouts that break the grid.
Form Builder: Design complex forms with conditional logic and multi-step processes.
Custom CSS: Add custom CSS to fine-tune your design or create unique effects not available through the standard interface.
Implementing Dynamic Content
For data-driven designs, Elementor's dynamic content feature is invaluable:
Use dynamic tags to pull in content from your WordPress database.
Create templates for repeating elements like blog posts or product listings.
Implement custom fields to add extra data to your posts or pages.
This approach ensures your design remains flexible and easily updatable.
Optimizing for Performance
Complex UI/UX designs can sometimes lead to performance issues. Use these strategies to keep your site running smoothly:
Optimize images by using the correct sizes and formats.
Leverage Elementor's built-in lazy loading features.
Use the "Load CSS asynchronously" option in Elementor's settings.
Consider using a caching plugin to further improve load times.
Ensuring Responsiveness
With mobile traffic accounting for over 50% of web visits, ensuring your complex design works well on all devices is crucial:
Use Elementor's responsive mode to preview and adjust your design for different screen sizes.
Utilize responsive controls for margin, padding, and font sizes.
Hide or show elements based on device type using advanced responsive settings.
Test thoroughly on various devices and browsers.
Adding the Finishing Touches
As you near completion, focus on the details that will elevate your design:
Implement micro-interactions using hover effects and animations.
Ensure consistency in colors, typography, and spacing.
Add custom icons or SVGs to create unique visual elements.
Implement scroll-triggered animations to guide the user's journey through the page.
Testing and Iteration
Before launching, thoroughly test your implementation:
Check for broken links or missing content.
Ensure all interactive elements work as intended.
Test loading times and optimize if necessary.
Gather feedback from team members or test users.
Don't be afraid to iterate on your design based on feedback or new ideas that arise during the implementation process.
Conclusion
Implementing complex UI/UX ideas with Elementor is a journey of creativity and problem-solving. By leveraging Elementor's powerful toolkit, you can bring even the most intricate designs to life without extensive coding knowledge. Remember, the key to success lies in careful planning, a deep understanding of Elementor's capabilities, and a willingness to experiment and iterate.
As you become more proficient with Elementor, you'll find that the line between concept and reality blurs, allowing you to push the boundaries of what's possible in web design. So, dream big, plan meticulously, and let Elementor be your brush as you paint your digital masterpiece.
Visit my Upwork project catalog : Elementor Developer
0 notes
Text
Smile On Click: Unforgettable Selfie Booth Experiences in Delhi
New Delhi, with its rich tapestry of history, culture and innovation is the perfect setting for creating unforgettable experiences. Smile On Click specializes in creating one-of-a-kind selfie booth experiences inspired by the spirit of this great city. Our list of some awesome selfie booth ideas in Delhi is assured to convert your every moment into a golden memory be it when you are planning a wedding or executing a corporate gala or throwing some rocking bash.

Taking About The Ever Vibrant Delhi:In The Heart Of An Ancient Tradition -- Heritage-Inspired Selfie Booths
Delhi's heritage-themed selfie booths are a homage to some of the architectural marvels in Delhi like the Red Fort and Qutub Minar. In getting their pictures clicked against them and innumerable backdrops that sing the splendour of these architectural symbols, studded as they are with intricate carvings and millennial hues,making a tapestry of Delhi's very many-tongued cultural identity. By adding augmented reality, tourists can communicate with all the historical figures, or take a virtual visit of the ancient streets of Delhi, turning every selfie booth encounter in Delhi a seamless mixture of past and present.
2. Bollywood Extravaganza - Lights, Camera, Selfie Action!
A Bollywood culture (Bollywood style here) is lively in all delhi which will offer you a conventional yet glamorous Selfie Booth theme. The glitzy and glamorous world of Bollywood is revealed in this booth where guests can bathe themselves in stunning lights, sequins and colourful drapes. Incorporate classic Bollywood element such as giant Sunglasses or feather boas or movie clapboards. Add different filter types digitally that looks like Bollywood movie posters or convert your selfies in magazine cover pages with famous Bollywood starts, so every click shows the feel of Bollywood larger than life.
3. STREET FOOD FIESTA - ADD SPICE TO YOUR SELFIES
And in the crowded streets of Delhi, Food and spices go hand in hand. Wind through colorful food carts, neon signs and delicious displays of tasty treats to take a selfie that celebrates this glorious food. Being a photo-blogger, I can also suggest props such as huge chaat plates, samosa hats or jalebi garland that make the selfies look fun. Add scent dispensers that waft the smells of famous Delhi street foods, making visitors feel as if they were in the Chandni Chowk! This is an incident which not just shows smiles but also captures the quintessential flavour of the Delhi lowdown food life.
4. Futuring Tech: Selfies are Here to Stay!
The capital of technology - Delhi prepares the ground for Selfie Experiences of Future. Develop a booth with the latest technology available, such as 360-degree cameras, AR mirrors, and pleasure screens. With a range of digital backdrops to choose from like cosmic galaxies, futuristic cityscapes inspired by Delhi's skyline; the guest has the freedom to select their backdrop as and when they desire. With one hand, click photo: enable gesture control or voice activated capture commands to even further simplify selfie-taking. For added fun, make it easy for Attendees to spice up selfies using digital overlays and custom hashtags or immediately share their images on social media to ensure that your event leaves as lasting a digital impression as the experience itself.
5. Green Medium Selfie in Backyard Oasis
Sustainability Innovation Facilitated in a Crowded City Like Delhi Build a selfie-booth completely in-line with the theme off recycled materials with loads of lush greens around it pots & pans props that are also biodegradable. Provide props that go along with your sustanianle theme: re-usable tote bags, bamboo sunglasses, eco-friendly messages - that guests can use to take selfies(delete mark). Remember everywhere you capture moments to snap a selfie the Delhi-way, spreading awareness of the city's effort in promoting environmental conciousness!
6. Artistic Expression: Paint Your Selfie
Delhi’s thriving art scene inspires a selfie booth that celebrates creativity and individuality. Set up a studio-like booth with easels, paint palettes, and brushes, inviting guests to create their own masterpiece selfies. Incorporate digital effects that mimic famous art styles or transform selfies into surrealistic paintings. Encourage collaboration with a communal canvas where guests can contribute to a collective artwork, fostering a sense of community and creativity. This artistic approach not only captures moments but also showcases Delhi’s vibrant artistic spirit.
7. Retro Revival: Nostalgic Selfie Booths
Delhi’s charm lies in its ability to blend the old with the new seamlessly. Tap into this nostalgic vibe with a retro-themed selfie booth that pays homage to Delhi’s vintage treasures. Deck out the booth with retro props like antique telephones, vinyl records, and vintage Bollywood posters. Offer classic photo filters that evoke the look of old polaroid or film camera snapshots. Invite guests to dress in retro attire and strike poses reminiscent of bygone eras, capturing timeless moments that celebrate Delhi’s rich cultural heritage.
Conclusion:
With Smile On Click's dedication to innovation and creativity, our selfie booth ideas in Delhi ensure that every event is a captivating celebration of Delhi's rich heritage and vibrant spirit. Whether you're seeking to evoke nostalgia with a retro-themed booth or indulge in futuristic technology, our tailored experiences promise to leave a lasting impression. Discover how Smile On Click can elevate your next event in Delhi with our unparalleled selfie booth ideas that turn ordinary gatherings into extraordinary celebrations.
#SelfieBoothIdeasDelhi#SmileOnClick#DelhiEvents#PhotoBoothFun#EventPhotography#DelhiSelfieSpots#MemoriesInDelhi
0 notes
Text

Shopify Store Launch Checklist: Essential Steps Before Going Live
Are you gearing up to launch your Shopify store and make your online business dreams a reality? Congratulations on taking this exciting step towards entrepreneurship! As you prepare to unveil your digital storefront to the world, it's crucial to ensure that everything is in place for a successful launch.
To help you navigate this important milestone, we've compiled a comprehensive checklist of essential steps to complete before going live:
Design and Branding 1. Shopify theme experts can customise your store to reflect your brand identity and create a visually appealing storefront.
2. Ensure that your logo, colours, fonts, and imagery are consistent across all pages for a cohesive brand experience.
Product Setup 1. Take help from Shopify experts to add your products to Shopify, including detailed descriptions, high-quality images, and accurate pricing.
2. Organise your products into categories or collections to make navigation easier for customers.
Shipping and Taxes 1. Configure shipping options and rates based on your location and shipping preferences.
2. Set up tax rates for your products according to your business location and tax regulations.
Payment Gateways 1. Shopify developers will help choose and integrate payment gateways that are compatible with Shopify and meet your business needs.
2. Test payment processing to ensure that transactions are secure and seamless for customers.
Legal Compliance 1. Create and publish essential legal pages, including a privacy policy, terms of service, and refund policy.
2. Ensure that your store complies with GDPR if you sell to customers in the European Union.
SEO Optimization 1. Our team of the best SEO experts in India can help optimise your website content, including product descriptions, titles, and meta tags, for relevant keywords.
2. Set up 301 redirects for any old URLs to maintain SEO rankings and prevent broken links.
Testing and Quality Assurance 1. Conduct thorough testing of your website functionality, including navigation, product pages, checkout process, and form submissions.
2. Test your website speed and performance to ensure fast loading times and a smooth user experience.
Marketing and Promotion 1. Plan and schedule marketing campaigns to generate buzz and drive traffic to your Shopify store before and after launch.
2. Set up social media accounts and create engaging content to build anticipation and attract potential customers.
Analytics and Tracking 1. Install Google Analytics or other tracking tools to monitor website traffic, user behaviour, and sales performance.
2. Set up conversion tracking to measure the effectiveness of your marketing efforts and identify areas for improvement.
Backup and Security 1. Web app developers can help implement regular backups of your Shopify store to protect against data loss or website downtime.
2. Strengthen website security measures, such as using strong passwords, enabling two-factor authentication, and installing security apps.
By following this comprehensive Shopify store launch checklist, you'll be well-prepared to go live with confidence and set your online business up for success. Remember to stay organised, pay attention to detail, and prioritise the customer experience to create a memorable and engaging shopping journey for your audience.
As a Shopify development company, Tech Wishes is committed to helping businesses build and launch successful online stores.
If you need assistance with Shopify development, customization, or optimization, contact us today to learn how we can support your e-commerce goals.
#Shopify Theme Experts#Shopify Experts#Shopify Developers#Best SEO Experts in India#Web App Developers
0 notes
Text
Demystifying the Labyrinth: A Manual for Grasping Calculations in Our Web-based Class

Handle the Basics: We’ll separate the center ideas of calculations, making sense of various kinds like arranging calculations, search calculations, and suggestion calculations. You’ll comprehend how these calculations work in the background to arrange information and convey customized encounters. Explore the Computerized Scene: By understanding calculations, you’ll be better prepared to explore the web-based world. You’ll figure out what calculations mean for your web-based entertainment takes care of, web index results pages (SERPs), and, surprisingly, the items you see publicized on the web. Pursue Informed Choices: Knowing how calculations work engages you to go with informed decisions on the web. You’ll have the option to basically assess the data you experience and comprehend how calculations could impact your way of behaving. What Our Web-based Calculation Class Offers:
Intuitive Learning: Our internet based class highlights drawing in happy, including video addresses, tests, and intelligent exercises. You’ll advance by doing and gain a reasonable comprehension of calculations. Master Educators: Our classes are driven by experienced teachers intensely for software engineering and a talent for making complex themes understood and open. Adaptable Learning: The web-based design permits you to learn at your own speed and accommodation. You can get to the course materials and complete examples on your own timetable. Advantages of Grasping Calculations:
Help Your Educated: By understanding calculations, you’ll turn out to be more well informed and certain exploring the advanced world. Decisive Reasoning Abilities: Finding out about calculations supports decisive reasoning abilities, permitting you to actually examine data more. Profession Benefits: Understanding calculations is important in different fields, including software engineering, information science, and showcasing. Prepared to Unravel the Code? Sign up for Our Web-based Calculation Class Today!
At Online Class Wizards, we accept that information is power. Our web-based calculation class enables you to comprehend the imperceptible powers molding your web-based encounters. Enlist today and set out on an excursion of revelation into the entrancing universe of calculations!
Moreover, you can consider remembering the accompanying for your calculation page:
A brief video displaying bits from the internet based calculation class. Tributes from past understudies who have taken the class. An unmistakable source of inspiration button to support enlistment. Data about the course educational program and learning results. Connections to other important assets on calculations, like articles or narratives. By giving significant data and featuring the advantages of your web-based calculation class, you can draw in likely understudies and secure yourself as a forerunner in web-based software engineering schooling.
0 notes
Text
Celebrating the Eclipse with an Eclipse Card!

SLIMLINE ECLIPSE CARD In anticipation of today's astronomical spectacle, an eclipse, I found my creativity steering towards the cosmos. The event isn't just a marvel of the skies but a muse for my latest project—an "Eclipse" technique slimline card. For this project, I dove into the soon-to-be-retired Stargazing Designer Series Paper, which proved to be the perfect backdrop for our celestial theme. The starry sky and space-themed patterns brought the vastness of the universe to the palm of my hands. The choice to use the Alphabet A La Mode Die set for cutting out "Happy Birthday" directly from this cosmic backdrop was deliberate, aiming to blend the celebration with the infinity of space. And of course, no starry night is complete without a sprinkle of sparkle, hence the addition of Rhinestone stars to mimic the gleaming cosmos. Crafting the Envelope: The First ImpressionThere are 2 paths you can take for the slimline card envelope. The traditional route with a business-sized envelope offers simplicity and convenience, but I can't resist the charm of creating a custom envelope. Matching the envelope with the card's Designer Paper, it sets the stage for what lies within, promising a journey through the stars before the card is even seen. Instructions & Video Tutorial: Guiding Through the GalaxyIf you're eager to recreate this stellar journey, detailed instructions, measurements, and a complete supply list are readily available in a free PDF in the INSTRUCTIONS section. The Stargazing Suite: A Farewell to a Galactic CompanionThe core of this project, the Stargazing Suite Collection, deserves its ode. As it prepares for retirement, I can't help but reflect on the cosmic journeys it has enabled. From crafting astronauts to rocket ships and creating paper planets, this collection has been a gateway to the galaxy. Its galactic stamps, cosmic dies, and holographic paper have not just been tools but portals to crafting our very own universes. NOTE: THE STARGAZING PAPER IS GOING ON SALE TOMORROW 40% OFF WHILE IT LASTS Don't let the adventure end here. Dive into my Stargazing SERIES section below to discover more tutorials inspired by the Stargazing Suite. As we bid farewell to this celestial collection, let’s make the most of its remaining time, crafting our tributes to the night sky. Conclusion: A Cosmic ConnectionAs we look up at the eclipse today, let’s remember the beauty and mystery of the cosmos that we can capture, even in something as simple as a handmade card. Join me in this crafting journey and let's make connections that span galaxies. Happy crafting! Tami INSTRUCTIONS INSTRUCTIONS PDF ⬇ The guide provides detailed measurements and a sequential process for crafting this card, complete with a clickable list of materials. DOWNLOAD PDF SUPPLIES I USED SUPPLIES I USED TO CREATE THIS CARD⬇ STARGAZING SERIES TUTORIALS Click the thumbnails below for more free tutorials in my series. STAMPIN' UP! CATALOGS CURRENT SPECIALS PHOTOS A birthday "eclipse" slimline card For this project, I dove into the soon-to-be-retired Stargazing Designer Series Paper, which proved to be the perfect backdrop for our celestial theme. The starry sky and space-themed patterns brought the vastness of the universe to the palm of my hands. I used the Alphabet A La Mode Die set for cutting out "Happy Birthday" directly from this cosmic backdrop. I discuss how to do this technique with Foam Adhesive above in the tutorial. I used the Slimline Card Style The Rhinestones sparkle like stars in the sky Check out more awesome-ness in my Stargazing Wow Fun fold card series Want to save these ideas for later? Pin them to your favorite Pinterest board. Have you tried these designs? I love to see your creations! Be sure to share them on #shareyourcrafts post every Saturday on my Facebook Page Read the full article
0 notes
Text
iOS 15 Jailbreak
Jailbreaking is the process of removing the restrictions imposed by Apple on iOS devices. It allows users to gain root access to the operating system, enabling them to install apps, extensions, and themes unavailable through the Apple App Store. The iOS 15 jailbreak is no different, offering users a gateway to a world of customization and enhanced control over their devices.
How to Jailbreak iOS 15
To jailbreak your device running iOS 15, you can visit https://www.instantjb.com/cydia-ios-15-1-2-3-4-5-6-7-8-9-jailbreak.html. InstantJB is a reliable source for jailbreaking iOS devices, providing a straightforward and user-friendly process. Here's a basic outline of the steps you'll need to follow:
Visit the Website: Go to InstantJB's website using the link provided.
Compatibility Check: Ensure your device is compatible with the iOS 15 jailbreak.
Download the Jailbreak Tool: Follow the instructions on the website to download the jailbreak tool.
Run the Jailbreak Process: Once downloaded, run the tool and follow the on-screen instructions to jailbreak your device.
Enjoy Customization: After the jailbreak process is complete, you can start customizing your device with various apps and tweaks.

Benefits of Jailbreaking iOS 15
Jailbreaking your iOS 15 device opens up a plethora of opportunities for customization and functionality enhancements. Some of the key benefits include:
Access to Cydia: Cydia is the app store for jailbroken devices, offering apps, tweaks, and themes that you can't find on the Apple App Store.
Customization: Change the look and feel of your device with themes and custom icons.
Improved Functionality: Install tweaks that can enhance the functionality of your device, such as better battery management or enhanced privacy settings.
Risks and Precautions
While jailbreaking can be exciting, it's essential to understand the risks involved:
Voiding Warranty: Jailbreaking may void your device's warranty.
Security Risks: Jailbreaking can expose your device to security vulnerabilities.
Potential for Bricking: If not done correctly, jailbreaking can render your device unusable.
To mitigate these risks, always back up your data before proceeding and follow the jailbreaking instructions carefully.
Conclusion
Jailbreaking iOS 15 is an excellent way for users to unlock the full potential of their devices. By following the steps outlined above and taking the necessary precautions, you can enjoy a whole new world of customization and enhanced functionality. Remember, while jailbreaking can be exciting, it's essential to proceed with caution and understand the risks involved.
0 notes
Text
About this theme
Getting started
Once you purchase and install the theme, you can customize the colors and layout!
Since this theme offers a relatively wide range of theme options to explore, I personally believe it would be helpful to provide you with a list of customization guides below.
How to add a custom link to this theme?
How do I change the blog layout?
How do I enable the latest post under the popup?
How to add the featured tags on the popup?
How to customize the colors
Please play around with the settings below for the live preview:
How to add a custom link to this theme?
You can add as many custom links as you want through Tumblr pages (click here for more information), and the process is very simple, here’s how:
Go to Customize page
Scroll down until you find ‘+Add a page’
Enable ‘Show a link to this page’
Select “Link” from the dropdown menu (for custom links) and if you want to make a custom page (for example, an ‘about’ page), just don’t change anything from the dropdown menu and leave the ‘Standard layout’
Add the URL, page title, and page body text as you wish and save
How to change the blog layout?
It’s very simple. Under the “Blog Layout” option, change the dropdown to select the layout you prefer. The options are:
Normal: This displays a single-column layout
Masonry: This presents a grid layout to showcase your posts on 2 or 3 columns.
Tabs: This layout is a unique feature of this theme. It displays tabs for each existing post on the left side and the activated posts on the right side. There is also a toggle button layout to minimize the post preview.
What is the purpose of the Blog Container dropdown theme option?
There is a distinction between having the Blog Container enabled/on and disabled/off.
This setting essentially contains the blog posts within a container, adding spacing around it. To better understand, refer to the comparison below.
Left: Contained — Right: Not Contained


How do I enable the latest post under the popup?
On the customize page, enable it by scrolling to the theme options until you find the Blog Latest Post dropdown. Change it from Hide to Show.
Once done, tag your favorite posts as #text, and they will automatically appear in the section.
It might take a moment for the posts to show up. If you don’t see any, try hard refreshing and clearing your browser cache.
You’re all set!
How to add the featured tags on the popup?
Navigate to your blog's settings (https://www.tumblr.com/settings/blog)
Scroll to the Featured Tags section
Click the pencil icon and add a tag, then click the Add button.
Once you're done, Tumblr automatically generates a list of tags on the popup!
How do I install this theme?
The theme has been uploaded on Tumblr theme garden which means you don’t have to manually copy-and-paste the code on customization panel, just go to this link and click ‘Install’ button and your blog automatically will be changed.
You said that this theme is mobile-friendly, but it shows the default theme provided by Tumblr! How do I disable it?
Easy! Just go customize, scroll down until you find ‘Advanced options’ → disable ‘Use default mobile theme’ → Save
Please remember that this theme is free to use, you are not allowed to remove the credit and claim this theme as your own! I have sacrificed my time to make this theme for free so in return just don’t touch the credit, okay? Enjoy!
0 notes