#probably my favorite SW work of all of them (including the tv shows and stuff)
Explore tagged Tumblr posts
Visit Tumblr Blog
Explore Tumblr blogs with no restrictions, modern design and the best experience.
Last Seen Tumblr Blogs


Fun Fact
In 2020, 44% of users from Denmark used Tumblr daily.
Text
Had a funny conversation last night where a person I just met and I were talking and Star Wars came up and he commented that The Last Jedi was The Worst Star Wars movie ever and I gasped and acted horrified, because it's my favorite (and the best) Star Wars movie and he was so discomfited that I had that opinion that he had to start asking me why, because he could see I was passionate about it and he couldn't fathom why I loved it, and as we talked and I told him some of the things I found so compelling about it, he admitted he agreed with the points I was making, but we never quite got to finish the conversation and I was just so hideously amused by it all the entire time and finding myself vacillating between wanting to let it go because we don't need to fight about it and wanting to lovingly troll him for it.
#personal#i have strong feelings about the last jedi and i will never apologize for it#absolutely my favorite SW movie of all of them#probably my favorite SW work of all of them (including the tv shows and stuff)#and it's one of the BEST works of the whole franchise too#but i know it's very controversial and the people who hate tlj usually hate it for reasons i find utterly stupid#i understand why they hate it ~from their perspective~ it's just that their perspective is wrong#but most of the time it greatly amuses me to piss them off with how much i love it#and my reasons for praising it are the exact reasons they hate#and ooooohhhh man do many of them not know what to do with that
2 notes
·
View notes
Note
Always love your recs and appreciate the amount of time you have to put into them on top of all your normal, insanely detailed posts! I was wondering if you had any good starting places for getting into the non-film/video game/TV side of the fandom. Like what books are good? comics? There are so many!
Hi! I’m glad you’re enjoying the fic recs! There’s a ton out there to read, so if I can help point out some gems, I’m very glad to do so!With books and comics, a lot will depend on what you’re interested in (like my favorite era is the prequels, but I’ll read anything good, because I enjoy almost everything of SW), and you can pretty much pick up anything from the last five years or so and it’ll at least not be terrible! Though, I have to admit, the comics have been phenomenal, while the books can’t quite reach the same heights for me.But my favorite places to start are usually:COMICS:
The 2015 Star Wars main comic title by Jason Aaron + the 2015 Darth Vader comic series by Kieron Gillen. They’re meant to be read concurrently (at least for the first dozen issues or so) and they really kicked off an incredible era of SW comics. The explore the time between ANH and ESB, getting into the characters’ heads and having some phenomenal moments. Vader discovering the name of the pilot that blew up the Death Star is an iconic moment for a reason.
The 2017 Darth Vader: Dark Lord of the Sith comic by Charles Soul, which is an intense and beautifully done look at the transition from Anakin Skywalker to Darth Vader in the aftermath of Revenge of the Sith and really goes hard on showing his sunken cost fallacy and how terrible his choices were that he could never admit to, that he’s absolutely a terrifying nightmare while also being entirely human and almost pitiable.
Kanan: The Last Padawan is only 12 issues, but it’s gorgeously drawn and adds so much to Kanan’s story and is great if you’re interested in seeing what the Jedi were like inside their own Temple a bit more. We get to see Caleb Dume become a Padawan, we get some stellar Depa Billaba moments, and a lot of heartbreak as we see Order 66 through Caleb’s eyes, as well as Kanan figuring out his way in the galaxy after all that.
The Age of Republic series (I think there’s 8 or 9 in total?) by Jody Houser are really great. They’re single issue stories, so don’t expect big complex plots, but the character moments in each one of them, including a lot of themes that echo from one issue to another, are absolutely stellar.
Obi-Wan & Anakin by Charles Soule, which is a stunningly beautiful comic (I HAVE NEVER SEEN A PRETTIER COMIC IN MY LIFE) and seems somewhat simple on the first read--Anakin intends to leave the Jedi Order, but goes on one last mission with Obi-Wan, then changes his mind--has a surprising amount of layers and details that you can read into it, making it one I’ve reread like three times now and I’ve loved it more each time.
The Poe Dameron comics by Charles Soule are absolutely incredible. They’re the Poe character exploration for me, the one that really set the foundation imo, as well as they capture Poe’s character and Oscar Isaac’s portrayal of him brilliantly, making him absolutely charming to read. I still think they’re the best sequels tie-in material yet, even when I love love love other stuff, too.
Shattered Empire by Greg Rucka is also a gorgeously illustrated comic and does a lot to explore what happened after the Empire fell and the aftermath and clean up/last days of the war and was just really solidly good.
BOOKS:
From a Certain Point of View by various authors is a series of short stories about the A New Hope characters that really give a lot of cool depths to them or are just funny little moments. While it can be hit-or-miss, the ones I would recommend reading are “Master & Apprentice” (Qui-Gon POV), “Time of Death” (Obi-Wan POV), “There is Another” (Yoda POV), and “An Incident Report” (Motti, and it is the funniest thing I’ve ever read) as they provide some stellar character moments.
Bloodline by Claudia Gray is probably the best book for giving you a sense of how the sequel trilogy happened/what the politics of it are, and it’s a solidly fun Leia book and I think easily Gray’s best work for Star Wars.
Star Wars Propaganda by Pablo Hidalgo is an incredible read if you don’t mind that it’s sort of a reference book and sort of a proper novel, as it’s an in-universe reference book, which tells the story of the politics of the galaxy far, far away as shown through art history and its use for propaganda. It’s an amazing overview of the bigger SW story and how one war flowed into the next and really nails how the governments’ actions (or inactions) lead to so much unrest.
I haven’t finished A New Dawn by John Jackson Miller, but I’ve heard nothing but good about this Kanan backstory (the early days of his and Hera’s first getting to really know each other/working together, as well as Kanan slowly starting to find himself and his path again, or at least think about doing so) that’s interspersed with flashbacks to his time as a Jedi Padawan.
Thrawn by Timothy Zahn is actually a really great book, it introduces the perfect character to be the Watson to Thrawn’s Holmes, where they balance each other really well, so it takes the edges off Thrawn’s more obnoxious behaviors, while also winding it all together with showing what it was like inside the Empire’s earlier days and how the characters all came to be in the places they were in Rebels.
I haven’t finished Lords of the Sith by Paul S. Kemp yet, but what I’ve read of it so far has been really good! It’s an intense one (as would be expected of a Vader-heavy book) but also it has moments of showing the Twi’lek’s pain at all that’s been heaped on them from their point of view, and some really EXTRA AS FUCK moments from Vader, so I’m enjoying it a lot.
If you’re interested in the sequels, I really loved Phasma by Delilah S. Dawson and Cobalt Squadron by Elizabeth Wein, I thought they both did amazing jobs at showing the backstories for Phasma and Rose Tico respectively, that Phasma is utterly batshit Star Wars at its best, that Cobalt Squadron really gave me a ton of Rose and Tico Sisters feelings.
79 notes
·
View notes
Text
Beach House: End Of The Year Tour!
Beach house progress, both big and small, feels like it’s happening so quickly that we hardly have time to keep up with documenting it, but I did walk through the whole house yesterday and make a big ol’ video tour… which basically catches you right up to date! So excuse this post for only having around a dozen photos (we have thousands on our phones, but they’d take us all day to upload and explain, and nobody got time for that with Christmas being less than a week away).
First let’s start at the front door. We hung a wreath (from Tar-jay) and put some battery powered LED candles with timers in the windows (so they’re auto-pilot even when we’re not there). Hallelujah, the house finally looks lived in! I mean, except for the whole it-has-no-landscaping-and-I-desperately-need-to-sand-and-stain-the-front-door thing. Also I still want to paint those white blocks behind the lanterns to match the house. Someday…
lanterns / wreath / house numbers / doormat / siding: SW Mellow Coral / ceiling: SW Breaktime / trim: SW Pure White
While things are far from finished, things are even farther from where they were this time last year. This photo is from almost exactly a year ago, and looking back is a nice reminder that wrinkly curtains and an unfinished pantry are far smaller problems to work through than THE ENTIRE SIDE OF THE HOUSE BEING TORN OFF. Here’s that whole story if you missed it (yup, we literally had to have 500 square feet removed and rebuild from scratch).
SO YEAH. It’s looking a lot better at the end of 2017 than it did at the end of 2016. And weirdly enough that picture makes me excited to get started on the duplex, because as much as I love having finished walls to decorate and finished floors to arrange furniture on, the process of planning (and dreaming about) all of the potential that’s fills the air during a big demo/rebuilding project is oddly addicting. Can’t wait to share our duplex progress as soon as we have our plans approved and all of our permits pulled! But back to the pink house, where I’m walking you guys through every room in a little video tour of sorts: If you can’t see this in a reader, click through to view it on our blog or you can view it here on YouTube.
If you can’t watch the video right now, I’d definitely recommend dropping back in and catching it when you can (a video is basically worth a million photos and I pretty much cover every crevice and explain a lot of extra stuff I couldn’t squeeze into this post).
One recent update, after months and months of debate, is that we finally pulled the trigger and painted the railing. The vertical balusters had all already been painted (SW Stone Isle), so it was just that top rail and the post at the end that were “wood.” I’ll explain why that’s in quotes in a second. It’s hard to see in this picture since that front post is getting hit with a ton of light through the open door, but we went with a deeper gray tone (SW Perpetual Gray) that’s about 3 shades darker than the trim, so it accents the post and the top rail without being too crazy and compete-y with the standout stars of the entire house (those stained glass windows).
I know what some of you are thinking. NOOOO! How could you disgrace such old beautiful wood with paint?!?! Well, this railing had been covered in a thick paint-like brown stain that showed zero grain and was sticky, roughed up, and ruined in a bunch of places (covered in paint splatters, spackle globs, and decades of other issues). After attempting to sand it down, we learned it was a darker redder wood – meaning we’d never be able to stain it to match the lovely heart pine floors. So, we reasoned that a fresh coat of paint applied nice and evenly was a heckuva lot better than its current state. And it really does look glossy and lovely in person, which makes us incredibly relieved.
The good news is that we don’t have any shortage of wood tones in this house. We have original heart pine everywhere (we stripped and clear-sealed all of the original doors that we could, brought the original floors both upstairs and downstairs back to their glory, etc). This house’s middle name could be wood. Pinkie “Wood” House. Wait that sounds bad. Forget the middle name thing.
Down in the living room, we added this cool wall-mounted bookcase, which instantly made us both say “Ahhh! It looks like an actual room people live in!” We also got to hang some cozy white curtains which need DESPERATELY to be steamed and hemmed. They’re Lenda curtains from Ikea– I just cut off the top tabs and make sure to wash them to pre-shrink them before hanging. We also have them in our home office and love how washable and easy they are. Also, my secondhand brass grasshopper (aka: Brasshopper) is a total badass and I love him more each day.
bookcase / blue pillow / curtains / rods / similar brass grasshopper
Also bought a rug from New England Loom (if you don’t follow them on Instagram you’re missing out because they have so many lovely secondhand rugs to be discovered) and the colors and patterns and antique feeling of the rug is PERFECT for a room that will be assaulted with food and sand and everything else that a rental living room has to deal with, so I have high hopes for it holding up like a champ (seeing as it is decades old already, that really does inspire confidence). That pretty blue pillow is from this Etsy shop (I love all of her pillows) and the pink one is from Target a while back. And you guys know the sofa is the Ikea Karlstad that they no longer make, which is a straight up travesty.
We also updated the light in here to this gleaming beauty from West Elm. The old light was a one-bulb fixture that we hung and immediately said “this room needs way more light.” We love the juxtaposition of this leggier modern light and the old-looking medallion (which is actually from Home Depot – shhh). And the old brick chimney that we discovered behind the wall and exposed is probably my favorite feature in the room, along with the giant windows (this room is 9′ tall, so the windows are easily over 6.5′ feet tall – that’s taller than John!). Don’t mind that TV on the floor. We found something we think will work for in there, just gotta get it out there in our next car load. #AlwaysRoadTrippingWithFurniture
rug source / chandelier / ceiling medallion /curtains / rods
The kitchen came a long way too, with the quartz island going in (it’s Pearl Jasmine by Silestone and we LOVE it so much) and a working sink. Cue the choir of angels! You can hear two ways we saved money on our quartz counters in Podcast Episode #74, which also covers why our original plan to do butcher block there didn’t work out. There are still some things missing though. Mainly, the backsplash that we’ll add after we hang the other missing element: shelves on either side of the stove under the sconces (probably two per side, not sure yet but we’ll keep you posted).
stools / quartz / butcher block / cabinets / range: secondhand refurbished / trim: SW Stone Isle / walls: SW White Heron
The back door was blue for a hot second, which some of you might have seen on Instagram, but as the room came together more John and I both realized that the same gray as the trim (SW Stone Isle) would let the pink stove do her thing and be the accent in the room that she has always been destined to become. Plus, we have a blue chippy door leading to the mudroom nearby, and one blue door + one pink stove is… enough. You know I didn’t love painting that door twice, so if I did it, it had to be done. Ha!
green vase / wood cutting board / wood stand / hanging rod / hood / kettle / sconces / pink salt & pepper
Upstairs the bedrooms are coming along with some art up on the walls, layered cozy bedding, and even headboards. HUZZAH! Still need to hang all the curtains up there (once we do that the headboard will look exactly as wide as the window because we are tricky tricksters). Stay tuned…
rug / large art / lamp / side table / striped blanket / headboard / fan
This is another view of that front bedroom, which is the largest of the four (the bunk room is teeny tiny and the middle bedroom and back bedroom are just fine but not giant). It also has that exposed brick chimney that we discovered hiding behind the wall, and next to it you’ll see my favorite craigslist find of all time that you might have already “met” on Facebook or Instagram when I shared a quick shot of it this weekend. Yes, I really did find an inlay piece of furniture on Craiglist, and yes, it’s currently selling for $2,000 on Restoration Hardware (I got it for $400!). Insert that screaming cat emoji face here. Seriously, it’s the score of a lifetime, and I’m going to share the whole story, including how I fix up a few missing inlay spots soon. So… stay tuned. Again.
And before we move on, that sconce looks crazy small above the dresser (we just hung it as a placeholder and it’s looking like a placeholder, so we’ll probably get a wider double-sconce for that spot soon). Anyway, on with the tour! Or should I say “roll the next flashback!” This is that wall a year ago. Same house. Just nekkid a year ago versus clothed now. With walls. You get what I mean.
And now, the back bedroom. Aka: our room whenever we stay there! Although the front room is the largest and has that lovely exposed brick, the back bedroom has its own master bathroom (complete with my big beautiful clawfoot tub) and it has its own stairs that lead up to it, which are surprisingly useful. We originally thought those back stairs would be more of a fun thing for kids and a cool historic detail to preserve, but we weren’t sure we’d actually use them very much but we go up and down them all the time!
rug / fan / leather stools / striped duvet cover / pocked doors: SW Riverway
One of our bigger projects this past weekend was this built-in dresser that we added to the nook behind the pocket doors that you see above. We love gaining some storage and function in that formerly blank area at the top of the back steps, and there’s more than enough room to pull out the drawers and take like five steps back before you’d fall down the steps (you know I’d be the one to bite it all the way down these steps, so we have to make sure these things we’re adding won’t curse me later).
dresser / mirror / wood top / door color: SW Riverway
John would be quick to point out it’s not complete. We ran out of nails for our nail gun, so the trim still needs to be attached, caulked, etc. But basically, a Malm from Ikea fit pretty perfectly in the space, so we made it look even more built-in by removing and reinstalling the molding around it (see below) and adding a few skinny filler pieces to each side (scraps from our kitchen install). We also popped some leftover butcher block counter from downstairs on top to tie into the pine floors and we’re also planning to add some leather pulls to it to tie in the stools at the foot of the bed (you can see them in the shot two photos up). Can’t wait to finish it up and share the final pics!
Next let’s move onto the master bathroom, which is easily my favorite room because I get to soak in that big ol’ tub after hours of DIY and it feels so freaking good every time. Except for the first time. I had sort of a false start in there (more on that in this podcast) but now the tub and I are bros and only happy things happen when I’m in there. And the kids love it too.
marble table / floor tile / accent floor tile / wall hooks / blinds / tub color: SW Riverway
I’m basically salivating while looking at this because we’re back home and our house has two bathrooms that we still have to redo and two tubs that are about 10″ deep (half of my body sticks out like an iceberg) so I’m itching to add a deeper bathtub into my life here at home.
The hall bath is still my boo too, thanks to my favorite vanity ever. The top is tiled with marble and the rounded wood drawers make it look like a furniture piece we converted to be a vanity but it came that way and WE SALUTE IT because goodness knows we have other stuff to keep us busy. Still on the list: making built-in bunk beds, building out the pantry and the mudroom, tiling the backsplash, landscaping, etc, etc. That big round silver mirror is an awesome (and recent!) HomeGoods find (the same one in brass hangs above our mantel at home) so if you’re looking for one in either color, try HomeGoods. Target also has a really similar one that’s slightly smaller and thinner in gold.
vanity / faucet / drum stool / light fixture / floor tile
And although we haven’t built the wall to wall bunkbeds in our small-but-mighty kids room yet, we did hang art. And that’s half the battle, right? (Nope, half the battle is being halfway done with the bunkbeds, but let me lie to myself for a second, ok?). That cute colorful painting is from our dear friend Lesli Devito (remember when we house crashed her wayyyy back here) and if you don’t have one of her paintings or prints I highly recommend getting one. The door also got a sign that says Mermaids Welcome and it made my whole life to hang it up (also we took a poll among a bunch of kids and basically everyone is cool with mermaid and pirates, but don’t get me started on how split the group was on dolphins).
marble table / mermaids welcome plaque / art by Lesli DeVito
So there you have it: a tour as of yesterday of the beach house (remember: watch the video! it has approximately 98% more info than some pics and captions can convey). Also, we hope you have a very happy holiday surrounded by the ones you love and delicious food and all the mermaid-related memorabilia that your heart desires. And if you have a tub where your entire body can be submerged, know that I, for one, now know what I’m missing and am deeply deeply jealous.
P.S. To see the entire process of fixing up this beach house (from floor planning and demo to tiling and tiling and tiling and getting the floors redone) here’s a full category of beach house updates for you to flip through.
*This post contains affiliate links*
The post Beach House: End Of The Year Tour! appeared first on Young House Love.
Beach House: End Of The Year Tour! published first on http://ift.tt/2qxZz2j
0 notes
Text
Beach House: End Of The Year Tour!
Beach house progress, both big and small, feels like it’s happening so quickly that we hardly have time to keep up with documenting it, but I did walk through the whole house yesterday and make a big ol’ video tour… which basically catches you right up to date! So excuse this post for only having around a dozen photos (we have thousands on our phones, but they’d take us all day to upload and explain, and nobody got time for that with Christmas being less than a week away).
First let’s start at the front door. We hung a wreath (from Tar-jay) and put some battery powered LED candles with timers in the windows (so they’re auto-pilot even when we’re not there). Hallelujah, the house finally looks lived in! I mean, except for the whole it-has-no-landscaping-and-I-desperately-need-to-sand-and-stain-the-front-door thing. Also I still want to paint those white blocks behind the lanterns to match the house. Someday…
lanterns / wreath / house numbers / doormat / siding: SW Mellow Coral / ceiling: SW Breaktime / trim: SW Pure White
While things are far from finished, things are even farther from where they were this time last year. This photo is from almost exactly a year ago, and looking back is a nice reminder that wrinkly curtains and an unfinished pantry are far smaller problems to work through than THE ENTIRE SIDE OF THE HOUSE BEING TORN OFF. Here’s that whole story if you missed it (yup, we literally had to have 500 square feet removed and rebuild from scratch).
SO YEAH. It’s looking a lot better at the end of 2017 than it did at the end of 2016. And weirdly enough that picture makes me excited to get started on the duplex, because as much as I love having finished walls to decorate and finished floors to arrange furniture on, the process of planning (and dreaming about) all of the potential that’s fills the air during a big demo/rebuilding project is oddly addicting. Can’t wait to share our duplex progress as soon as we have our plans approved and all of our permits pulled! But back to the pink house, where I’m walking you guys through every room in a little video tour of sorts: If you can’t see this in a reader, click through to view it on our blog or you can view it here on YouTube.
If you can’t watch the video right now, I’d definitely recommend dropping back in and catching it when you can (a video is basically worth a million photos and I pretty much cover every crevice and explain a lot of extra stuff I couldn’t squeeze into this post).
One recent update, after months and months of debate, is that we finally pulled the trigger and painted the railing. The vertical balusters had all already been painted (SW Stone Isle), so it was just that top rail and the post at the end that were “wood.” I’ll explain why that’s in quotes in a second. It’s hard to see in this picture since that front post is getting hit with a ton of light through the open door, but we went with a deeper gray tone (SW Perpetual Gray) that’s about 3 shades darker than the trim, so it accents the post and the top rail without being too crazy and compete-y with the standout stars of the entire house (those stained glass windows).
I know what some of you are thinking. NOOOO! How could you disgrace such old beautiful wood with paint?!?! Well, this railing had been covered in a thick paint-like brown stain that showed zero grain and was sticky, roughed up, and ruined in a bunch of places (covered in paint splatters, spackle globs, and decades of other issues). After attempting to sand it down, we learned it was a darker redder wood – meaning we’d never be able to stain it to match the lovely heart pine floors. So, we reasoned that a fresh coat of paint applied nice and evenly was a heckuva lot better than its current state. And it really does look glossy and lovely in person, which makes us incredibly relieved.
The good news is that we don’t have any shortage of wood tones in this house. We have original heart pine everywhere (we stripped and clear-sealed all of the original doors that we could, brought the original floors both upstairs and downstairs back to their glory, etc). This house’s middle name could be wood. Pinkie “Wood” House. Wait that sounds bad. Forget the middle name thing.
Down in the living room, we added this cool wall-mounted bookcase, which instantly made us both say “Ahhh! It looks like an actual room people live in!” We also got to hang some cozy white curtains which need DESPERATELY to be steamed and hemmed. They’re Lenda curtains from Ikea– I just cut off the top tabs and make sure to wash them to pre-shrink them before hanging. We also have them in our home office and love how washable and easy they are. Also, my secondhand brass grasshopper (aka: Brasshopper) is a total badass and I love him more each day.
bookcase / blue pillow / curtains / rods / similar brass grasshopper
Also bought a rug from New England Loom (if you don’t follow them on Instagram you’re missing out because they have so many lovely secondhand rugs to be discovered) and the colors and patterns and antique feeling of the rug is PERFECT for a room that will be assaulted with food and sand and everything else that a rental living room has to deal with, so I have high hopes for it holding up like a champ (seeing as it is decades old already, that really does inspire confidence). That pretty blue pillow is from this Etsy shop (I love all of her pillows) and the pink one is from Target a while back. And you guys know the sofa is the Ikea Karlstad that they no longer make, which is a straight up travesty.
We also updated the light in here to this gleaming beauty from West Elm. The old light was a one-bulb fixture that we hung and immediately said “this room needs way more light.” We love the juxtaposition of this leggier modern light and the old-looking medallion (which is actually from Home Depot – shhh). And the old brick chimney that we discovered behind the wall and exposed is probably my favorite feature in the room, along with the giant windows (this room is 9′ tall, so the windows are easily over 6.5′ feet tall – that’s taller than John!). Don’t mind that TV on the floor. We found something we think will work for in there, just gotta get it out there in our next car load. #AlwaysRoadTrippingWithFurniture
rug source / chandelier / ceiling medallion /curtains / rods
The kitchen came a long way too, with the quartz island going in (it’s Pearl Jasmine by Silestone and we LOVE it so much) and a working sink. Cue the choir of angels! You can hear two ways we saved money on our quartz counters in Podcast Episode #74, which also covers why our original plan to do butcher block there didn’t work out. There are still some things missing though. Mainly, the backsplash that we’ll add after we hang the other missing element: shelves on either side of the stove under the sconces (probably two per side, not sure yet but we’ll keep you posted).
stools / quartz / butcher block / cabinets / range: secondhand refurbished / trim: SW Stone Isle / walls: SW White Heron
The back door was blue for a hot second, which some of you might have seen on Instagram, but as the room came together more John and I both realized that the same gray as the trim (SW Stone Isle) would let the pink stove do her thing and be the accent in the room that she has always been destined to become. Plus, we have a blue chippy door leading to the mudroom nearby, and one blue door + one pink stove is… enough. You know I didn’t love painting that door twice, so if I did it, it had to be done. Ha!
green vase / wood cutting board / wood stand / hanging rod / hood / kettle / sconces / pink salt & pepper
Upstairs the bedrooms are coming along with some art up on the walls, layered cozy bedding, and even headboards. HUZZAH! Still need to hang all the curtains up there (once we do that the headboard will look exactly as wide as the window because we are tricky tricksters). Stay tuned…
rug / large art / lamp / side table / striped blanket / headboard / fan
This is another view of that front bedroom, which is the largest of the four (the bunk room is teeny tiny and the middle bedroom and back bedroom are just fine but not giant). It also has that exposed brick chimney that we discovered hiding behind the wall, and next to it you’ll see my favorite craigslist find of all time that you might have already “met” on Facebook or Instagram when I shared a quick shot of it this weekend. Yes, I really did find an inlay piece of furniture on Craiglist, and yes, it’s currently selling for $2,000 on Restoration Hardware (I got it for $400!). Insert that screaming cat emoji face here. Seriously, it’s the score of a lifetime, and I’m going to share the whole story, including how I fix up a few missing inlay spots soon. So… stay tuned. Again.
And before we move on, that sconce looks crazy small above the dresser (we just hung it as a placeholder and it’s looking like a placeholder, so we’ll probably get a wider double-sconce for that spot soon). Anyway, on with the tour! Or should I say “roll the next flashback!” This is that wall a year ago. Same house. Just nekkid a year ago versus clothed now. With walls. You get what I mean.
And now, the back bedroom. Aka: our room whenever we stay there! Although the front room is the largest and has that lovely exposed brick, the back bedroom has its own master bathroom (complete with my big beautiful clawfoot tub) and it has its own stairs that lead up to it, which are surprisingly useful. We originally thought those back stairs would be more of a fun thing for kids and a cool historic detail to preserve, but we weren’t sure we’d actually use them very much but we go up and down them all the time!
rug / fan / leather stools / striped duvet cover / pocked doors: SW Riverway
One of our bigger projects this past weekend was this built-in dresser that we added to the nook behind the pocket doors that you see above. We love gaining some storage and function in that formerly blank area at the top of the back steps, and there’s more than enough room to pull out the drawers and take like five steps back before you’d fall down the steps (you know I’d be the one to bite it all the way down these steps, so we have to make sure these things we’re adding won’t curse me later).
dresser / mirror / wood top / door color: SW Riverway
John would be quick to point out it’s not complete. We ran out of nails for our nail gun, so the trim still needs to be attached, caulked, etc. But basically, a Malm from Ikea fit pretty perfectly in the space, so we made it look even more built-in by removing and reinstalling the molding around it (see below) and adding a few skinny filler pieces to each side (scraps from our kitchen install). We also popped some leftover butcher block counter from downstairs on top to tie into the pine floors and we’re also planning to add some leather pulls to it to tie in the stools at the foot of the bed (you can see them in the shot two photos up). Can’t wait to finish it up and share the final pics!
Next let’s move onto the master bathroom, which is easily my favorite room because I get to soak in that big ol’ tub after hours of DIY and it feels so freaking good every time. Except for the first time. I had sort of a false start in there (more on that in this podcast) but now the tub and I are bros and only happy things happen when I’m in there. And the kids love it too.
marble table / floor tile / accent floor tile / wall hooks / blinds / tub color: SW Riverway
I’m basically salivating while looking at this because we’re back home and our house has two bathrooms that we still have to redo and two tubs that are about 10″ deep (half of my body sticks out like an iceberg) so I’m itching to add a deeper bathtub into my life here at home.
The hall bath is still my boo too, thanks to my favorite vanity ever. The top is tiled with marble and the rounded wood drawers make it look like a furniture piece we converted to be a vanity but it came that way and WE SALUTE IT because goodness knows we have other stuff to keep us busy. Still on the list: making built-in bunk beds, building out the pantry and the mudroom, tiling the backsplash, landscaping, etc, etc. That big round silver mirror is an awesome (and recent!) HomeGoods find (the same one in brass hangs above our mantel at home) so if you’re looking for one in either color, try HomeGoods. Target also has a really similar one that’s slightly smaller and thinner in gold.
vanity / faucet / drum stool / light fixture / floor tile
And although we haven’t built the wall to wall bunkbeds in our small-but-mighty kids room yet, we did hang art. And that’s half the battle, right? (Nope, half the battle is being halfway done with the bunkbeds, but let me lie to myself for a second, ok?). That cute colorful painting is from our dear friend Lesli Devito (remember when we house crashed her wayyyy back here) and if you don’t have one of her paintings or prints I highly recommend getting one. The door also got a sign that says Mermaids Welcome and it made my whole life to hang it up (also we took a poll among a bunch of kids and basically everyone is cool with mermaid and pirates, but don’t get me started on how split the group was on dolphins).
marble table / mermaids welcome plaque / art by Lesli DeVito
So there you have it: a tour as of yesterday of the beach house (remember: watch the video! it has approximately 98% more info than some pics and captions can convey). Also, we hope you have a very happy holiday surrounded by the ones you love and delicious food and all the mermaid-related memorabilia that your heart desires. And if you have a tub where your entire body can be submerged, know that I, for one, now know what I’m missing and am deeply deeply jealous.
P.S. To see the entire process of fixing up this beach house (from floor planning and demo to tiling and tiling and tiling and getting the floors redone) here’s a full category of beach house updates for you to flip through.
*This post contains affiliate links*
The post Beach House: End Of The Year Tour! appeared first on Young House Love.
Beach House: End Of The Year Tour! published first on http://ift.tt/2qCHnUt
0 notes
Text
Beach House: End Of The Year Tour!
Beach house progress, both big and small, feels like it’s happening so quickly that we hardly have time to keep up with documenting it, but I did walk through the whole house yesterday and make a big ol’ video tour… which basically catches you right up to date! So excuse this post for only having around a dozen photos (we have thousands on our phones, but they’d take us all day to upload and explain, and nobody got time for that with Christmas being less than a week away).
First let’s start at the front door. We hung a wreath (from Tar-jay) and put some battery powered LED candles with timers in the windows (so they’re auto-pilot even when we’re not there). Hallelujah, the house finally looks lived in! I mean, except for the whole it-has-no-landscaping-and-I-desperately-need-to-sand-and-stain-the-front-door thing. Also I still want to paint those white blocks behind the lanterns to match the house. Someday…
lanterns / wreath / house numbers / doormat / siding: SW Mellow Coral / ceiling: SW Breaktime / trim: SW Pure White
While things are far from finished, things are even farther from where they were this time last year. This photo is from almost exactly a year ago, and looking back is a nice reminder that wrinkly curtains and an unfinished pantry are far smaller problems to work through than THE ENTIRE SIDE OF THE HOUSE BEING TORN OFF. Here’s that whole story if you missed it (yup, we literally had to have 500 square feet removed and rebuild from scratch).
SO YEAH. It’s looking a lot better at the end of 2017 than it did at the end of 2016. And weirdly enough that picture makes me excited to get started on the duplex, because as much as I love having finished walls to decorate and finished floors to arrange furniture on, the process of planning (and dreaming about) all of the potential that’s fills the air during a big demo/rebuilding project is oddly addicting. Can’t wait to share our duplex progress as soon as we have our plans approved and all of our permits pulled! But back to the pink house, where I’m walking you guys through every room in a little video tour of sorts: If you can’t see this in a reader, click through to view it on our blog or you can view it here on YouTube.
If you can’t watch the video right now, I’d definitely recommend dropping back in and catching it when you can (a video is basically worth a million photos and I pretty much cover every crevice and explain a lot of extra stuff I couldn’t squeeze into this post).
One recent update, after months and months of debate, is that we finally pulled the trigger and painted the railing. The vertical balusters had all already been painted (SW Stone Isle), so it was just that top rail and the post at the end that were “wood.” I’ll explain why that’s in quotes in a second. It’s hard to see in this picture since that front post is getting hit with a ton of light through the open door, but we went with a deeper gray tone (SW Perpetual Gray) that’s about 3 shades darker than the trim, so it accents the post and the top rail without being too crazy and compete-y with the standout stars of the entire house (those stained glass windows).
I know what some of you are thinking. NOOOO! How could you disgrace such old beautiful wood with paint?!?! Well, this railing had been covered in a thick paint-like brown stain that showed zero grain and was sticky, roughed up, and ruined in a bunch of places (covered in paint splatters, spackle globs, and decades of other issues). After attempting to sand it down, we learned it was a darker redder wood – meaning we’d never be able to stain it to match the lovely heart pine floors. So, we reasoned that a fresh coat of paint applied nice and evenly was a heckuva lot better than its current state. And it really does look glossy and lovely in person, which makes us incredibly relieved.
The good news is that we don’t have any shortage of wood tones in this house. We have original heart pine everywhere (we stripped and clear-sealed all of the original doors that we could, brought the original floors both upstairs and downstairs back to their glory, etc). This house’s middle name could be wood. Pinkie “Wood” House. Wait that sounds bad. Forget the middle name thing.
Down in the living room, we added this cool wall-mounted bookcase, which instantly made us both say “Ahhh! It looks like an actual room people live in!” We also got to hang some cozy white curtains which need DESPERATELY to be steamed and hemmed. They’re Lenda curtains from Ikea– I just cut off the top tabs and make sure to wash them to pre-shrink them before hanging. We also have them in our home office and love how washable and easy they are. Also, my secondhand brass grasshopper (aka: Brasshopper) is a total badass and I love him more each day.
bookcase / blue pillow / curtains / rods / similar brass grasshopper
Also bought a rug from New England Loom (if you don’t follow them on Instagram you’re missing out because they have so many lovely secondhand rugs to be discovered) and the colors and patterns and antique feeling of the rug is PERFECT for a room that will be assaulted with food and sand and everything else that a rental living room has to deal with, so I have high hopes for it holding up like a champ (seeing as it is decades old already, that really does inspire confidence). That pretty blue pillow is from this Etsy shop (I love all of her pillows) and the pink one is from Target a while back. And you guys know the sofa is the Ikea Karlstad that they no longer make, which is a straight up travesty.
We also updated the light in here to this gleaming beauty from West Elm. The old light was a one-bulb fixture that we hung and immediately said “this room needs way more light.” We love the juxtaposition of this leggier modern light and the old-looking medallion (which is actually from Home Depot – shhh). And the old brick chimney that we discovered behind the wall and exposed is probably my favorite feature in the room, along with the giant windows (this room is 9′ tall, so the windows are easily over 6.5′ feet tall – that’s taller than John!). Don’t mind that TV on the floor. We found something we think will work for in there, just gotta get it out there in our next car load. #AlwaysRoadTrippingWithFurniture
rug source / chandelier / ceiling medallion /curtains / rods
The kitchen came a long way too, with the quartz island going in (it’s Pearl Jasmine by Silestone and we LOVE it so much) and a working sink. Cue the choir of angels! You can hear two ways we saved money on our quartz counters in Podcast Episode #74, which also covers why our original plan to do butcher block there didn’t work out. There are still some things missing though. Mainly, the backsplash that we’ll add after we hang the other missing element: shelves on either side of the stove under the sconces (probably two per side, not sure yet but we’ll keep you posted).
stools / quartz / butcher block / cabinets / range: secondhand refurbished / trim: SW Stone Isle / walls: SW White Heron
The back door was blue for a hot second, which some of you might have seen on Instagram, but as the room came together more John and I both realized that the same gray as the trim (SW Stone Isle) would let the pink stove do her thing and be the accent in the room that she has always been destined to become. Plus, we have a blue chippy door leading to the mudroom nearby, and one blue door + one pink stove is… enough. You know I didn’t love painting that door twice, so if I did it, it had to be done. Ha!
green vase / wood cutting board / wood stand / hanging rod / hood / kettle / sconces / pink salt & pepper
Upstairs the bedrooms are coming along with some art up on the walls, layered cozy bedding, and even headboards. HUZZAH! Still need to hang all the curtains up there (once we do that the headboard will look exactly as wide as the window because we are tricky tricksters). Stay tuned…
rug / large art / lamp / side table / striped blanket / headboard / fan
This is another view of that front bedroom, which is the largest of the four (the bunk room is teeny tiny and the middle bedroom and back bedroom are just fine but not giant). It also has that exposed brick chimney that we discovered hiding behind the wall, and next to it you’ll see my favorite craigslist find of all time that you might have already “met” on Facebook or Instagram when I shared a quick shot of it this weekend. Yes, I really did find an inlay piece of furniture on Craiglist, and yes, it’s currently selling for $2,000 on Restoration Hardware (I got it for $400!). Insert that screaming cat emoji face here. Seriously, it’s the score of a lifetime, and I’m going to share the whole story, including how I fix up a few missing inlay spots soon. So… stay tuned. Again.
And before we move on, that sconce looks crazy small above the dresser (we just hung it as a placeholder and it’s looking like a placeholder, so we’ll probably get a wider double-sconce for that spot soon). Anyway, on with the tour! Or should I say “roll the next flashback!” This is that wall a year ago. Same house. Just nekkid a year ago versus clothed now. With walls. You get what I mean.
And now, the back bedroom. Aka: our room whenever we stay there! Although the front room is the largest and has that lovely exposed brick, the back bedroom has its own master bathroom (complete with my big beautiful clawfoot tub) and it has its own stairs that lead up to it, which are surprisingly useful. We originally thought those back stairs would be more of a fun thing for kids and a cool historic detail to preserve, but we weren’t sure we’d actually use them very much but we go up and down them all the time!
rug / fan / leather stools / striped duvet cover / pocked doors: SW Riverway
One of our bigger projects this past weekend was this built-in dresser that we added to the nook behind the pocket doors that you see above. We love gaining some storage and function in that formerly blank area at the top of the back steps, and there’s more than enough room to pull out the drawers and take like five steps back before you’d fall down the steps (you know I’d be the one to bite it all the way down these steps, so we have to make sure these things we’re adding won’t curse me later).
dresser / mirror / wood top / door color: SW Riverway
John would be quick to point out it’s not complete. We ran out of nails for our nail gun, so the trim still needs to be attached, caulked, etc. But basically, a Malm from Ikea fit pretty perfectly in the space, so we made it look even more built-in by removing and reinstalling the molding around it (see below) and adding a few skinny filler pieces to each side (scraps from our kitchen install). We also popped some leftover butcher block counter from downstairs on top to tie into the pine floors and we’re also planning to add some leather pulls to it to tie in the stools at the foot of the bed (you can see them in the shot two photos up). Can’t wait to finish it up and share the final pics!
Next let’s move onto the master bathroom, which is easily my favorite room because I get to soak in that big ol’ tub after hours of DIY and it feels so freaking good every time. Except for the first time. I had sort of a false start in there (more on that in this podcast) but now the tub and I are bros and only happy things happen when I’m in there. And the kids love it too.
marble table / floor tile / accent floor tile / wall hooks / blinds / tub color: SW Riverway
I’m basically salivating while looking at this because we’re back home and our house has two bathrooms that we still have to redo and two tubs that are about 10″ deep (half of my body sticks out like an iceberg) so I’m itching to add a deeper bathtub into my life here at home.
The hall bath is still my boo too, thanks to my favorite vanity ever. The top is tiled with marble and the rounded wood drawers make it look like a furniture piece we converted to be a vanity but it came that way and WE SALUTE IT because goodness knows we have other stuff to keep us busy. Still on the list: making built-in bunk beds, building out the pantry and the mudroom, tiling the backsplash, landscaping, etc, etc. That big round silver mirror is an awesome (and recent!) HomeGoods find (the same one in brass hangs above our mantel at home) so if you’re looking for one in either color, try HomeGoods. Target also has a really similar one that’s slightly smaller and thinner in gold.
vanity / faucet / drum stool / light fixture / floor tile
And although we haven’t built the wall to wall bunkbeds in our small-but-mighty kids room yet, we did hang art. And that’s half the battle, right? (Nope, half the battle is being halfway done with the bunkbeds, but let me lie to myself for a second, ok?). That cute colorful painting is from our dear friend Lesli Devito (remember when we house crashed her wayyyy back here) and if you don’t have one of her paintings or prints I highly recommend getting one. The door also got a sign that says Mermaids Welcome and it made my whole life to hang it up (also we took a poll among a bunch of kids and basically everyone is cool with mermaid and pirates, but don’t get me started on how split the group was on dolphins).
marble table / mermaids welcome plaque / art by Lesli DeVito
So there you have it: a tour as of yesterday of the beach house (remember: watch the video! it has approximately 98% more info than some pics and captions can convey). Also, we hope you have a very happy holiday surrounded by the ones you love and delicious food and all the mermaid-related memorabilia that your heart desires. And if you have a tub where your entire body can be submerged, know that I, for one, now know what I’m missing and am deeply deeply jealous.
P.S. To see the entire process of fixing up this beach house (from floor planning and demo to tiling and tiling and tiling and getting the floors redone) here’s a full category of beach house updates for you to flip through.
*This post contains affiliate links*
The post Beach House: End Of The Year Tour! appeared first on Young House Love.
Beach House: End Of The Year Tour! published first on http://ift.tt/2r6hzQy
0 notes
Text
Beach House: End Of The Year Tour!
Beach house progress, both big and small, feels like it’s happening so quickly that we hardly have time to keep up with documenting it, but I did walk through the whole house yesterday and make a big ol’ video tour… which basically catches you right up to date! So excuse this post for only having around around a dozen photos (we have thousands on our phones, but they’d take us all day to upload and explain, and nobody got time for that with Christmas being less than a week away).
First let’s start at the front door. We hung a wreath (from Tar-jay) and put some battery powered LED candles with timers in the windows (so they’re auto-pilot even when we’re not there). Hallelujah, the house finally looks lived in! I mean, except for the whole it-has-no-landscaping-and-I-desperately-need-to-sand-and-stain-the-front-door thing. Also I still want to paint those white blocks behind the lanterns to match the house. Someday…
lanterns / wreath / house numbers / doormat / siding: SW Mellow Coral / ceiling: SW Breaktime / trim: SW Pure White
While things are far from finished, things are even farther from where they were this time last year. This photo is from almost exactly a year ago, and looking back is a nice reminder that wrinkly curtains and an unfinished pantry are far smaller problems to work through than THE ENTIRE SIDE OF THE HOUSE BEING TORN OFF. Here’s that whole story if you missed it (yup, we literally had to have 500 square feet removed and rebuild from scratch).
SO YEAH. It’s looking a lot better at the end of 2017 than it did at the end of 2016. And weirdly enough that picture makes me excited to get started on the duplex, because as much as I love having finished walls to decorate and finished floors to arrange furniture on, the process of planning (and dreaming about) all of the potential that’s fills the air during a big demo/rebuilding project is oddly addicting. Can’t wait to share our duplex progress as soon as we have our plans approved and all of our permits pulled! But back to the pink house, where I’m walking you guys through every room in a little video tour of sorts: If you can’t see this in a reader, click through to view it on our blog or you can view it here on YouTube.
If you can’t watch the video right now, I’d definitely recommend dropping back in and catching it when you can (a video is basically worth a million photos and I pretty much cover every crevice and explain a lot of extra stuff I couldn’t squeeze into this post).
One recent update, after months and months of debate, is that we finally pulled the trigger and painted the railing. The vertical balusters had all already been painted (SW Stone Isle), so it was just that top rail and the post at the end that were “wood.” I’ll explain why that’s in quotes in a second. It’s hard to see in this picture since that front post is getting hit with a ton of light through the open door, but we went with a deeper gray tone (SW Perpetual Gray) that’s about 3 shades darker than the trim, so it accents the post and the top rail without being too crazy and compete-y with the standout stars of the entire house (those stained glass windows).
I know what some of you are thinking. NOOOO! How could you disgrace such old beautiful wood with paint?!?! Well, this railing had been covered in a thick paint-like brown stain that showed zero grain and was sticky, roughed up, and ruined in a bunch of places (covered in paint splatters, spackle globs, and decades of other issues). After attempting to sand it down, we learned it was a darker redder wood – meaning we’d never be able to stain it to match the lovely heart pine floors. So, we reasoned that a fresh coat of paint applied nice and evenly was a heckuva lot better than its current state. And it really does look glossy and lovely in person, which makes us incredibly relieved.
The good news is that we don’t have any shortage of wood tones in this house. We have original heart pine everywhere (we stripped and clear-sealed all of the original doors that we could, brought the original floors both upstairs and downstairs back to their glory, etc). This house’s middle name could be wood. Pinkie “Wood” House. Wait that sounds bad. Forget the middle name thing.
Down in the living room, we added this cool wall-mounted bookcase, which instantly made us both say “Ahhh! It looks like an actual room people live in!” We also got to hang some cozy white curtains which need DESPERATELY to be steamed and hemmed. They’re Lenda curtains from Ikea– I just cut off the top tabs and make sure to wash them to pre-shrink them before hanging. We also have them in our home office and love how washable and easy they are. Also, my secondhand brass grasshopper (aka: Brasshopper) is a total badass and I love him more each day.
bookcase / blue pillow / curtains / rods / similar brass grasshopper
Also bought a rug from New England Loom (if you don’t follow them on Instagram you’re missing out because they have so many lovely secondhand rugs to be discovered) and the colors and patterns and antique feeling of the rug is PERFECT for a room that will be assaulted with food and sand and everything else that a rental living room has to deal with, so I have high hopes for it holding up like a champ (seeing as it is decades old already, that really does inspire confidence). That pretty blue pillow is from this Etsy shop (I love all of her pillows) and the pink one is from Target a while back. And you guys know the sofa is the Ikea Karlstad that they no longer make, which is a straight up travesty.
We also updated the light in here to this gleaming beauty from West Elm. The old light was a one-bulb fixture that we hung and immediately said “this room needs way more light.” We love the juxtaposition of this leggier modern light and the old-looking medallion (which is actually from Home Depot – shhh). And the old brick chimney that we discovered behind the wall and exposed is probably my favorite feature in the room, along with the giant windows (this room is 9′ tall, so the windows are easily over 6.5′ feet tall – that’s taller than John!). Don’t mind that TV on the floor. We found something we think will work for in there, just gotta get it out there in our next car load. #AlwaysRoadTrippingWithFurniture
rug source / chandelier / ceiling medallion /curtains / rods
The kitchen came a long way too, with the quartz island going in (it’s Pearl Jasmine by Silestone and we LOVE it so much) and a working sink. Cue the choir of angels! You can hear two ways we saved money on our quartz counters in Podcast Episode #74, which also covers why our original plan to do butcher block there didn’t work out. There are still some things missing though. Mainly, the backsplash that we’ll add after we hang the other missing element: shelves on either side of the stove under the sconces (probably two per side, not sure yet but we’ll keep you posted).
stools / quartz / butcher block / cabinets / range: secondhand refurbished / trim: SW Stone Isle / walls: SW White Heron
The back door was blue for a hot second, which some of you might have seen on Instagram, but as the room came together more John and I both realized that the same gray as the trim (SW Stone Isle) would let the pink stove do her thing and be the accent in the room that she has always been destined to become. Plus, we have a blue chippy door leading to the mudroom nearby, and one blue door + one pink stove is… enough. You know I didn’t love painting that door twice, so if I did it, it had to be done. Ha!
green vase / wood cutting board / wood stand / hanging rod / hood / kettle / sconces / pink salt & pepper
Upstairs the bedrooms are coming along with some art up on the walls, layered cozy bedding, and even headboards. HUZZAH! Still need to hang all the curtains up there (once we do that the headboard will look exactly as wide as the window because we are tricky tricksters). Stay tuned…
rug / large art / lamp / side table / striped blanket / headboard / fan
This is another view of that front bedroom, which is the largest of the four (the bunk room is teeny tiny and the middle bedroom and back bedroom are just fine but not giant). It also has that exposed brick chimney that we discovered hiding behind the wall, and next to it you’ll see my favorite craigslist find of all time that you might have already “met” on Facebook or Instagram when I shared a quick shot of it this weekend. Yes, I really did find an inlay piece of furniture on Craiglist, and yes, it’s currently selling for $2,000 on Restoration Hardware (I got it for $400!). Insert that screaming cat emoji face here. Seriously, it’s the score of a lifetime, and I’m going to share the whole story, including how I fix up a few missing inlay spots soon. So… stay tuned. Again.
And before we move on, that sconce looks crazy small above the dresser (we just hung it as a placeholder and it’s looking like a placeholder, so we’ll probably get a wider double-sconce for that spot soon). Anyway, on with the tour! Or should I say “roll the next flashback!” This is that wall a year ago. Same house. Just nekkid a year ago versus clothed now. With walls. You get what I mean.
And now, the back bedroom. Aka: our room whenever we stay there! Although the front room is the largest and has that lovely exposed brick, the back bedroom has its own master bathroom (complete with my big beautiful clawfoot tub) and it has its own stairs that lead up to it, which are surprisingly useful. We originally thought those back stairs would be more of a fun thing for kids and a cool historic detail to preserve, but we weren’t sure we’d actually use them very much but we go up and down them all the time!
rug / fan / leather stools / striped duvet cover / pocked doors: SW Riverway
One of our bigger projects this past weekend was this built-in dresser that we added to the nook behind the pocket doors that you see above. We love gaining some storage and function in that formerly blank area at the top of the back steps, and there’s more than enough room to pull out the drawers and take like five steps back before you’d fall down the steps (you know I’d be the one to bite it all the way down these steps, so we have to make sure these things we’re adding won’t curse me later).
dresser / mirror / wood top / door color: SW Riverway
John would be quick to point out it’s not complete. We ran out of nails for our nail gun, so the trim still needs to be attached, caulked, etc. But basically, a Malm from Ikea fit pretty perfectly in the space, so we made it look even more built-in by removing and reinstalling the molding around it (see below) and adding a few skinny filler pieces to each side (scraps from our kitchen install). We also popped some leftover butcher block counter from downstairs on top to tie into the pine floors and we’re also planning to add some leather pulls to it to tie in the stools at the foot of the bed (you can see them in the shot two photos up). Can’t wait to finish it up and share the final pics!
Next let’s move onto the master bathroom, which is easily my favorite room because I get to soak in that big ol’ tub after hours of DIY and it feels so freaking good every time. Except for the first time. I had sort of a false start in there (more on that in this podcast) but now the tub and I are bros and only happy things happen when I’m in there. And the kids love it too.
marble table / floor tile / accent floor tile / wall hooks / blinds / tub color: SW Riverway
I’m basically salivating while looking at this because we’re back home and our house has two bathrooms that we still have to redo and two tubs that are about 10″ deep (half of my body sticks out like an iceberg) so I’m itching to add a deeper bathtub into my life here at home.
The hall bath is still my boo too, thanks to my favorite vanity ever. The top is tiled with marble and the rounded wood drawers make it look like a furniture piece we converted to be a vanity but it came that way and WE SALUTE IT because goodness knows we have other stuff to keep us busy. Still on the list: making built-in bunk beds, building out the pantry and the mudroom, tiling the backsplash, landscaping, etc, etc. That big round silver mirror is an awesome (and recent!) HomeGoods find (the same one in brass hangs above our mantel at home) so if you’re looking for one in either color, try HomeGoods. Target also has a really similar one that’s slightly smaller and thinner in gold.
vanity / faucet / drum stool / light fixture / floor tile
And although we haven’t built the wall to wall bunkbeds in our small-but-mighty kids room yet, we did hang art. And that’s half the battle, right? (Nope, half the battle is being halfway done with the bunkbeds, but let me lie to myself for a second, ok?). That cute colorful painting is from our dear friend Lesli Devito (remember when we house crashed her wayyyy back here) and if you don’t have one of her paintings or prints I highly recommend getting one. The door also got a sign that says Mermaids Welcome and it made my whole life to hang it up (also we took a poll among a bunch of kids and basically everyone is cool with mermaid and pirates, but don’t get me started on how split the group was on dolphins).
marble table / mermaids welcome plaque / art by Lesli DeVito
So there you have it: a tour as of yesterday of the beach house (remember: watch the video! it has approximately 98% more info than some pics and captions can convey). Also, we hope you have a very happy holiday surrounded by the ones you love and delicious food and all the mermaid-related memorabilia that your heart desires. And if you have a tub where your entire body can be submerged, know that I, for one, now know what I’m missing and am deeply deeply jealous.
P.S. To see the entire process of fixing up this beach house (from floor planning and demo to tiling and tiling and tiling and getting the floors redone) here’s a full category of beach house updates for you to flip through.
*This post contains affiliate links*
The post Beach House: End Of The Year Tour! appeared first on Young House Love.
Beach House: End Of The Year Tour! published first on http://ift.tt/2uiWrIt
0 notes
Text
Beach House: End Of The Year Tour!
Beach house progress, both big and small, feels like it’s happening so quickly that we hardly have time to keep up with documenting it, but I did walk through the whole house yesterday and make a big ol’ video tour… which basically catches you right up to date! So excuse this post for only having around around a dozen photos (we have thousands on our phones, but they’d take us all day to upload and explain, and nobody got time for that with Christmas being less than a week away).
First let’s start at the front door. We hung a wreath (from Tar-jay) and put some battery powered LED candles with timers in the windows (so they’re auto-pilot even when we’re not there). Hallelujah, the house finally looks lived in! I mean, except for the whole it-has-no-landscaping-and-I-desperately-need-to-sand-and-stain-the-front-door thing. Also I still want to paint those white blocks behind the lanterns to match the house. Someday…
lanterns / wreath / house numbers / doormat / siding: SW Mellow Coral / ceiling: SW Breaktime / trim: SW Pure White
While things are far from finished, things are even farther from where they were this time last year. This photo is from almost exactly a year ago, and looking back is a nice reminder that wrinkly curtains and an unfinished pantry are far smaller problems to work through than THE ENTIRE SIDE OF THE HOUSE BEING TORN OFF. Here’s that whole story if you missed it (yup, we literally had to have 500 square feet removed and rebuild from scratch).
SO YEAH. It’s looking a lot better at the end of 2017 than it did at the end of 2016. And weirdly enough that picture makes me excited to get started on the duplex, because as much as I love having finished walls to decorate and finished floors to arrange furniture on, the process of planning (and dreaming about) all of the potential that’s fills the air during a big demo/rebuilding project is oddly addicting. Can’t wait to share our duplex progress as soon as we have our plans approved and all of our permits pulled! But back to the pink house, where I’m walking you guys through every room in a little video tour of sorts: If you can’t see this in a reader, click through to view it on our blog or you can view it here on YouTube.
If you can’t watch the video right now, I’d definitely recommend dropping back in and catching it when you can (a video is basically worth a million photos and I pretty much cover every crevice and explain a lot of extra stuff I couldn’t squeeze into this post).
One recent update, after months and months of debate, is that we finally pulled the trigger and painted the railing. The vertical balusters had all already been painted (SW Stone Isle), so it was just that top rail and the post at the end that were “wood.” I’ll explain why that’s in quotes in a second. It’s hard to see in this picture since that front post is getting hit with a ton of light through the open door, but we went with a deeper gray tone (SW Perpetual Gray) that’s about 3 shades darker than the trim, so it accents the post and the top rail without being too crazy and compete-y with the standout stars of the entire house (those stained glass windows).
I know what some of you are thinking. NOOOO! How could you disgrace such old beautiful wood with paint?!?! Well, this railing had been covered in a thick paint-like brown stain that showed zero grain and was sticky, roughed up, and ruined in a bunch of places (covered in paint splatters, spackle globs, and decades of other issues). After attempting to sand it down, we learned it was a darker redder wood – meaning we’d never be able to stain it to match the lovely heart pine floors. So, we reasoned that a fresh coat of paint applied nice and evenly was a heckuva lot better than its current state. And it really does look glossy and lovely in person, which makes us incredibly relieved.
The good news is that we don’t have any shortage of wood tones in this house. We have original heart pine everywhere (we stripped and clear-sealed all of the original doors that we could, brought the original floors both upstairs and downstairs back to their glory, etc). This house’s middle name could be wood. Pinkie “Wood” House. Wait that sounds bad. Forget the middle name thing.
Down in the living room, we added this cool wall-mounted bookcase, which instantly made us both say “Ahhh! It looks like an actual room people live in!” We also got to hang some cozy white curtains which need DESPERATELY to be steamed and hemmed. They’re Lenda curtains from Ikea– I just cut off the top tabs and make sure to wash them to pre-shrink them before hanging. We also have them in our home office and love how washable and easy they are. Also, my secondhand brass grasshopper (aka: Brasshopper) is a total badass and I love him more each day.
bookcase / blue pillow / curtains / rods / similar brass grasshopper
Also bought a rug from New England Loom (if you don’t follow them on Instagram you’re missing out because they have so many lovely secondhand rugs to be discovered) and the colors and patterns and antique feeling of the rug is PERFECT for a room that will be assaulted with food and sand and everything else that a rental living room has to deal with, so I have high hopes for it holding up like a champ (seeing as it is decades old already, that really does inspire confidence). That pretty blue pillow is from this Etsy shop (I love all of her pillows) and the pink one is from Target a while back. And you guys know the sofa is the Ikea Karlstad that they no longer make, which is a straight up travesty.
We also updated the light in here to this gleaming beauty from West Elm. The old light was a one-bulb fixture that we hung and immediately said “this room needs way more light.” We love the juxtaposition of this leggier modern light and the old-looking medallion (which is actually from Home Depot – shhh). And the old brick chimney that we discovered behind the wall and exposed is probably my favorite feature in the room, along with the giant windows (this room is 9′ tall, so the windows are easily over 6.5′ feet tall – that’s taller than John!). Don’t mind that TV on the floor. We found something we think will work for in there, just gotta get it out there in our next car load. #AlwaysRoadTrippingWithFurniture
rug source / chandelier / ceiling medallion /curtains / rods
The kitchen came a long way too, with the quartz island going in (it’s Pearl Jasmine by Silestone and we LOVE it so much) and a working sink. Cue the choir of angels! You can hear two ways we saved money on our quartz counters in Podcast Episode #74, which also covers why our original plan to do butcher block there didn’t work out. There are still some things missing though. Mainly, the backsplash that we’ll add after we hang the other missing element: shelves on either side of the stove under the sconces (probably two per side, not sure yet but we’ll keep you posted).
stools / quartz / butcher block / cabinets / range: secondhand refurbished / trim: SW Stone Isle / walls: SW White Heron
The back door was blue for a hot second, which some of you might have seen on Instagram, but as the room came together more John and I both realized that the same gray as the trim (SW Stone Isle) would let the pink stove do her thing and be the accent in the room that she has always been destined to become. Plus, we have a blue chippy door leading to the mudroom nearby, and one blue door + one pink stove is… enough. You know I didn’t love painting that door twice, so if I did it, it had to be done. Ha!
green vase / wood cutting board / wood stand / hanging rod / hood / kettle / sconces / pink salt & pepper
Upstairs the bedrooms are coming along with some art up on the walls, layered cozy bedding, and even headboards. HUZZAH! Still need to hang all the curtains up there (once we do that the headboard will look exactly as wide as the window because we are tricky tricksters). Stay tuned…
rug / large art / lamp / side table / striped blanket / headboard / fan
This is another view of that front bedroom, which is the largest of the four (the bunk room is teeny tiny and the middle bedroom and back bedroom are just fine but not giant). It also has that exposed brick chimney that we discovered hiding behind the wall, and next to it you’ll see my favorite craigslist find of all time that you might have already “met” on Facebook or Instagram when I shared a quick shot of it this weekend. Yes, I really did find an inlay piece of furniture on Craiglist, and yes, it’s currently selling for $2,000 on Restoration Hardware (I got it for $400!). Insert that screaming cat emoji face here. Seriously, it’s the score of a lifetime, and I’m going to share the whole story, including how I fix up a few missing inlay spots soon. So… stay tuned. Again.
And before we move on, that sconce looks crazy small above the dresser (we just hung it as a placeholder and it’s looking like a placeholder, so we’ll probably get a wider double-sconce for that spot soon). Anyway, on with the tour! Or should I say “roll the next flashback!” This is that wall a year ago. Same house. Just nekkid a year ago versus clothed now. With walls. You get what I mean.
And now, the back bedroom. Aka: our room whenever we stay there! Although the front room is the largest and has that lovely exposed brick, the back bedroom has its own master bathroom (complete with my big beautiful clawfoot tub) and it has its own stairs that lead up to it, which are surprisingly useful. We originally thought those back stairs would be more of a fun thing for kids and a cool historic detail to preserve, but we weren’t sure we’d actually use them very much but we go up and down them all the time!
rug / fan / leather stools / striped duvet cover / pocked doors: SW Riverway
One of our bigger projects this past weekend was this built-in dresser that we added to the nook behind the pocket doors that you see above. We love gaining some storage and function in that formerly blank area at the top of the back steps, and there’s more than enough room to pull out the drawers and take like five steps back before you’d fall down the steps (you know I’d be the one to bite it all the way down these steps, so we have to make sure these things we’re adding won’t curse me later).
dresser / mirror / wood top / door color: SW Riverway
John would be quick to point out it’s not complete. We ran out of nails for our nail gun, so the trim still needs to be attached, caulked, etc. But basically, a Malm from Ikea fit pretty perfectly in the space, so we made it look even more built-in by removing and reinstalling the molding around it (see below) and adding a few skinny filler pieces to each side (scraps from our kitchen install). We also popped some leftover butcher block counter from downstairs on top to tie into the pine floors and we’re also planning to add some leather pulls to it to tie in the stools at the foot of the bed (you can see them in the shot two photos up). Can’t wait to finish it up and share the final pics!
Next let’s move onto the master bathroom, which is easily my favorite room because I get to soak in that big ol’ tub after hours of DIY and it feels so freaking good every time. Except for the first time. I had sort of a false start in there (more on that in this podcast) but now the tub and I are bros and only happy things happen when I’m in there. And the kids love it too.
marble table / floor tile / accent floor tile / wall hooks / blinds / tub color: SW Riverway
I’m basically salivating while looking at this because we’re back home and our house has two bathrooms that we still have to redo and two tubs that are about 10″ deep (half of my body sticks out like an iceberg) so I’m itching to add a deeper bathtub into my life here at home.
The hall bath is still my boo too, thanks to my favorite vanity ever. The top is tiled with marble and the rounded wood drawers make it look like a furniture piece we converted to be a vanity but it came that way and WE SALUTE IT because goodness knows we have other stuff to keep us busy. Still on the list: making built-in bunk beds, building out the pantry and the mudroom, tiling the backsplash, landscaping, etc, etc. That big round silver mirror is an awesome (and recent!) HomeGoods find (the same one in brass hangs above our mantel at home) so if you’re looking for one in either color, try HomeGoods. Target also has a really similar one that’s slightly smaller and thinner in gold.
vanity / faucet / drum stool / light fixture / floor tile
And although we haven’t built the wall to wall bunkbeds in our small-but-mighty kids room yet, we did hang art. And that’s half the battle, right? (Nope, half the battle is being halfway done with the bunkbeds, but let me lie to myself for a second, ok?). That cute colorful painting is from our dear friend Lesli Devito (remember when we house crashed her wayyyy back here) and if you don’t have one of her paintings or prints I highly recommend getting one. The door also got a sign that says Mermaids Welcome and it made my whole life to hang it up (also we took a poll among a bunch of kids and basically everyone is cool with mermaid and pirates, but don’t get me started on how split the group was on dolphins).
marble table / mermaids welcome plaque / art by Lesli DeVito
So there you have it: a tour as of yesterday of the beach house (remember: watch the video! it has approximately 98% more info than some pics and captions can convey). Also, we hope you have a very happy holiday surrounded by the ones you love and delicious food and all the mermaid-related memorabilia that your heart desires. And if you have a tub where your entire body can be submerged, know that I, for one, now know what I’m missing and am deeply deeply jealous.
P.S. To see the entire process of fixing up this beach house (from floor planning and demo to tiling and tiling and tiling and getting the floors redone) here’s a full category of beach house updates for you to flip through.
*This post contains affiliate links*
The post Beach House: End Of The Year Tour! appeared first on Young House Love.
Beach House: End Of The Year Tour! published first on http://ift.tt/2BedaSe
0 notes
Photo
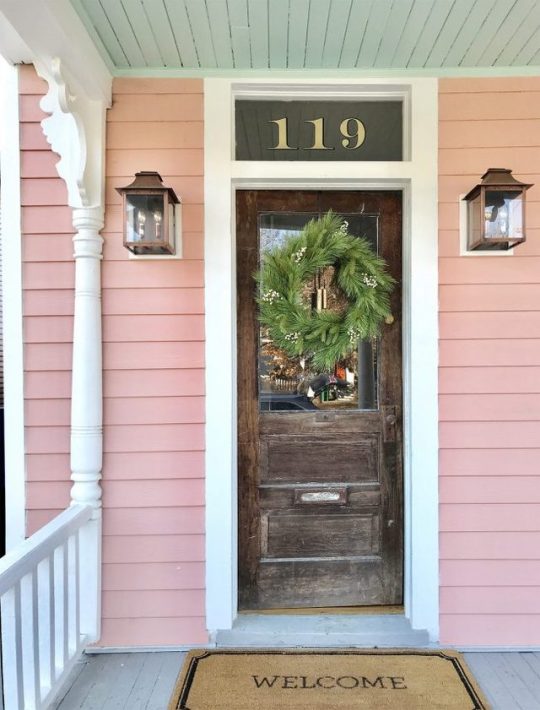
Beach House: End Of The Year Tour! http://ift.tt/2D8c9Mf
Beach house progress, both big and small, feels like it’s happening so quickly that we hardly have time to keep up with documenting it, but I did walk through the whole house yesterday and make a big ol’ video tour… which basically catches you right up to date! So excuse this post for only having around around a dozen photos (we have thousands on our phones, but they’d take us all day to upload and explain, and nobody got time for that with Christmas being less than a week away).
First let’s start at the front door. We hung a wreath (from Tar-jay) and put some battery powered LED candles with timers in the windows (so they’re auto-pilot even when we’re not there). Hallelujah, the house finally looks lived in! I mean, except for the whole it-has-no-landscaping-and-I-desperately-need-to-sand-and-stain-the-front-door thing. Also I still want to paint those white blocks behind the lanterns to match the house. Someday…
lanterns / wreath / house numbers / doormat / siding: SW Mellow Coral / ceiling: SW Breaktime / trim: SW Pure White
While things are far from finished, things are even farther from where they were this time last year. This photo is from almost exactly a year ago, and looking back is a nice reminder that wrinkly curtains and an unfinished pantry are far smaller problems to work through than THE ENTIRE SIDE OF THE HOUSE BEING TORN OFF. Here’s that whole story if you missed it (yup, we literally had to have 500 square feet removed and rebuild from scratch).
SO YEAH. It’s looking a lot better at the end of 2017 than it did at the end of 2016. And weirdly enough that picture makes me excited to get started on the duplex, because as much as I love having finished walls to decorate and finished floors to arrange furniture on, the process of planning (and dreaming about) all of the potential that’s fills the air during a big demo/rebuilding project is oddly addicting. Can’t wait to share our duplex progress as soon as we have our plans approved and all of our permits pulled! But back to the pink house, where I’m walking you guys through every room in a little video tour of sorts: If you can’t see this in a reader, click through to view it on our blog or you can view it here on YouTube.
If you can’t watch the video right now, I’d definitely recommend dropping back in and catching it when you can (a video is basically worth a million photos and I pretty much cover every crevice and explain a lot of extra stuff I couldn’t squeeze into this post).
One recent update, after months and months of debate, is that we finally pulled the trigger and painted the railing. The vertical balusters had all already been painted (SW Stone Isle), so it was just that top rail and the post at the end that were “wood.” I’ll explain why that’s in quotes in a second. It’s hard to see in this picture since that front post is getting hit with a ton of light through the open door, but we went with a deeper gray tone (SW Perpetual Gray) that’s about 3 shades darker than the trim, so it accents the post and the top rail without being too crazy and compete-y with the standout stars of the entire house (those stained glass windows).
I know what some of you are thinking. NOOOO! How could you disgrace such old beautiful wood with paint?!?! Well, this railing had been covered in a thick paint-like brown stain that showed zero grain and was sticky, roughed up, and ruined in a bunch of places (covered in paint splatters, spackle globs, and decades of other issues). After attempting to sand it down, we learned it was a darker redder wood – meaning we’d never be able to stain it to match the lovely heart pine floors. So, we reasoned that a fresh coat of paint applied nice and evenly was a heckuva lot better than its current state. And it really does look glossy and lovely in person, which makes us incredibly relieved.
The good news is that we don’t have any shortage of wood tones in this house. We have original heart pine everywhere (we stripped and clear-sealed all of the original doors that we could, brought the original floors both upstairs and downstairs back to their glory, etc). This house’s middle name could be wood. Pinkie “Wood” House. Wait that sounds bad. Forget the middle name thing.
Down in the living room, we added this cool wall-mounted bookcase, which instantly made us both say “Ahhh! It looks like an actual room people live in!” We also got to hang some cozy white curtains which need DESPERATELY to be steamed and hemmed. They’re Lenda curtains from Ikea– I just cut off the top tabs and make sure to wash them to pre-shrink them before hanging. We also have them in our home office and love how washable and easy they are. Also, my secondhand brass grasshopper (aka: Brasshopper) is a total badass and I love him more each day.
bookcase / blue pillow / curtains / rods / similar brass grasshopper
Also bought a rug from New England Loom (if you don’t follow them on Instagram you’re missing out because they have so many lovely secondhand rugs to be discovered) and the colors and patterns and antique feeling of the rug is PERFECT for a room that will be assaulted with food and sand and everything else that a rental living room has to deal with, so I have high hopes for it holding up like a champ (seeing as it is decades old already, that really does inspire confidence). That pretty blue pillow is from this Etsy shop (I love all of her pillows) and the pink one is from Target a while back. And you guys know the sofa is the Ikea Karlstad that they no longer make, which is a straight up travesty.
We also updated the light in here to this gleaming beauty from West Elm. The old light was a one-bulb fixture that we hung and immediately said “this room needs way more light.” We love the juxtaposition of this leggier modern light and the old-looking medallion (which is actually from Home Depot – shhh). And the old brick chimney that we discovered behind the wall and exposed is probably my favorite feature in the room, along with the giant windows (this room is 9′ tall, so the windows are easily over 6.5′ feet tall – that’s taller than John!). Don’t mind that TV on the floor. We found something we think will work for in there, just gotta get it out there in our next car load. #AlwaysRoadTrippingWithFurniture
rug source / chandelier / ceiling medallion /curtains / rods
The kitchen came a long way too, with the quartz island going in (it’s Pearl Jasmine by Silestone and we LOVE it so much) and a working sink. Cue the choir of angels! You can hear two ways we saved money on our quartz counters in Podcast Episode #74, which also covers why our original plan to do butcher block there didn’t work out. There are still some things missing though. Mainly, the backsplash that we’ll add after we hang the other missing element: shelves on either side of the stove under the sconces (probably two per side, not sure yet but we’ll keep you posted).
stools / quartz / butcher block / cabinets / range: secondhand refurbished / trim: SW Stone Isle / walls: SW White Heron
The back door was blue for a hot second, which some of you might have seen on Instagram, but as the room came together more John and I both realized that the same gray as the trim (SW Stone Isle) would let the pink stove do her thing and be the accent in the room that she has always been destined to become. Plus, we have a blue chippy door leading to the mudroom nearby, and one blue door + one pink stove is… enough. You know I didn’t love painting that door twice, so if I did it, it had to be done. Ha!
green vase / wood cutting board / wood stand / hanging rod / hood / kettle / sconces / pink salt & pepper
Upstairs the bedrooms are coming along with some art up on the walls, layered cozy bedding, and even headboards. HUZZAH! Still need to hang all the curtains up there (once we do that the headboard will look exactly as wide as the window because we are tricky tricksters). Stay tuned…
rug / large art / lamp / side table / striped blanket / headboard / fan
This is another view of that front bedroom, which is the largest of the four (the bunk room is teeny tiny and the middle bedroom and back bedroom are just fine but not giant). It also has that exposed brick chimney that we discovered hiding behind the wall, and next to it you’ll see my favorite craigslist find of all time that you might have already “met” on Facebook or Instagram when I shared a quick shot of it this weekend. Yes, I really did find an inlay piece of furniture on Craiglist, and yes, it’s currently selling for $2,000 on Restoration Hardware (I got it for $400!). Insert that screaming cat emoji face here. Seriously, it’s the score of a lifetime, and I’m going to share the whole story, including how I fix up a few missing inlay spots soon. So… stay tuned. Again.
And before we move on, that sconce looks crazy small above the dresser (we just hung it as a placeholder and it’s looking like a placeholder, so we’ll probably get a wider double-sconce for that spot soon). Anyway, on with the tour! Or should I say “roll the next flashback!” This is that wall a year ago. Same house. Just nekkid a year ago versus clothed now. With walls. You get what I mean.
And now, the back bedroom. Aka: our room whenever we stay there! Although the front room is the largest and has that lovely exposed brick, the back bedroom has its own master bathroom (complete with my big beautiful clawfoot tub) and it has its own stairs that lead up to it, which are surprisingly useful. We originally thought those back stairs would be more of a fun thing for kids and a cool historic detail to preserve, but we weren’t sure we’d actually use them very much but we go up and down them all the time!
rug / fan / leather stools / striped duvet cover / pocked doors: SW Riverway
One of our bigger projects this past weekend was this built-in dresser that we added to the nook behind the pocket doors that you see above. We love gaining some storage and function in that formerly blank area at the top of the back steps, and there’s more than enough room to pull out the drawers and take like five steps back before you’d fall down the steps (you know I’d be the one to bite it all the way down these steps, so we have to make sure these things we’re adding won’t curse me later).
dresser / mirror / wood top / door color: SW Riverway
John would be quick to point out it’s not complete. We ran out of nails for our nail gun, so the trim still needs to be attached, caulked, etc. But basically, a Malm from Ikea fit pretty perfectly in the space, so we made it look even more built-in by removing and reinstalling the molding around it (see below) and adding a few skinny filler pieces to each side (scraps from our kitchen install). We also popped some leftover butcher block counter from downstairs on top to tie into the pine floors and we’re also planning to add some leather pulls to it to tie in the stools at the foot of the bed (you can see them in the shot two photos up). Can’t wait to finish it up and share the final pics!
Next let’s move onto the master bathroom, which is easily my favorite room because I get to soak in that big ol’ tub after hours of DIY and it feels so freaking good every time. Except for the first time. I had sort of a false start in there (more on that in this podcast) but now the tub and I are bros and only happy things happen when I’m in there. And the kids love it too.
marble table / floor tile / accent floor tile / wall hooks / blinds / tub color: SW Riverway
I’m basically salivating while looking at this because we’re back home and our house has two bathrooms that we still have to redo and two tubs that are about 10″ deep (half of my body sticks out like an iceberg) so I’m itching to add a deeper bathtub into my life here at home.
The hall bath is still my boo too, thanks to my favorite vanity ever. The top is tiled with marble and the rounded wood drawers make it look like a furniture piece we converted to be a vanity but it came that way and WE SALUTE IT because goodness knows we have other stuff to keep us busy. Still on the list: making built-in bunk beds, building out the pantry and the mudroom, tiling the backsplash, landscaping, etc, etc. That big round silver mirror is an awesome (and recent!) HomeGoods find (the same one in brass hangs above our mantel at home) so if you’re looking for one in either color, try HomeGoods. Target also has a really similar one that’s slightly smaller and thinner in gold.
vanity / faucet / drum stool / light fixture / floor tile
And although we haven’t built the wall to wall bunkbeds in our small-but-mighty kids room yet, we did hang art. And that’s half the battle, right? (Nope, half the battle is being halfway done with the bunkbeds, but let me lie to myself for a second, ok?). That cute colorful painting is from our dear friend Lesli Devito (remember when we house crashed her wayyyy back here) and if you don’t have one of her paintings or prints I highly recommend getting one. The door also got a sign that says Mermaids Welcome and it made my whole life to hang it up (also we took a poll among a bunch of kids and basically everyone is cool with mermaid and pirates, but don’t get me started on how split the group was on dolphins).
marble table / mermaids welcome plaque / art by Lesli DeVito
So there you have it: a tour as of yesterday of the beach house (remember: watch the video! it has approximately 98% more info than some pics and captions can convey). Also, we hope you have a very happy holiday surrounded by the ones you love and delicious food and all the mermaid-related memorabilia that your heart desires. And if you have a tub where your entire body can be submerged, know that I, for one, now know what I’m missing and am deeply deeply jealous.
P.S. To see the entire process of fixing up this beach house (from floor planning and demo to tiling and tiling and tiling and getting the floors redone) here’s a full category of beach house updates for you to flip through.
*This post contains affiliate links*
The post Beach House: End Of The Year Tour! appeared first on Young House Love.
0 notes
Text
Beach House: End Of The Year Tour!
Beach house progress, both big and small, feels like it’s happening so quickly that we hardly have time to keep up with documenting it, but I did walk through the whole house yesterday and make a big ol’ video tour… which basically catches you right up to date! So excuse this post for only having around around a dozen photos (we have thousands on our phones, but they’d take us all day to upload and explain, and nobody got time for that with Christmas being less than a week away).
First let’s start at the front door. We hung a wreath (from Tar-jay) and put some battery powered LED candles with timers in the windows (so they’re auto-pilot even when we’re not there). Hallelujah, the house finally looks lived in! I mean, except for the whole it-has-no-landscaping-and-I-desperately-need-to-sand-and-stain-the-front-door thing. Also I still want to paint those white blocks behind the lanterns to match the house. Someday…
lanterns / wreath / house numbers / doormat / siding: SW Mellow Coral / ceiling: SW Breaktime / trim: SW Pure White
While things are far from finished, things are even farther from where they were this time last year. This photo is from almost exactly a year ago, and looking back is a nice reminder that wrinkly curtains and an unfinished pantry are far smaller problems to work through than THE ENTIRE SIDE OF THE HOUSE BEING TORN OFF. Here’s that whole story if you missed it (yup, we literally had to have 500 square feet removed and rebuild from scratch).
SO YEAH. It’s looking a lot better at the end of 2017 than it did at the end of 2016. And weirdly enough that picture makes me excited to get started on the duplex, because as much as I love having finished walls to decorate and finished floors to arrange furniture on, the process of planning (and dreaming about) all of the potential that’s fills the air during a big demo/rebuilding project is oddly addicting. Can’t wait to share our duplex progress as soon as we have our plans approved and all of our permits pulled! But back to the pink house, where I’m walking you guys through every room in a little video tour of sorts: If you can’t see this in a reader, click through to view it on our blog or you can view it here on YouTube.
If you can’t watch the video right now, I’d definitely recommend dropping back in and catching it when you can (a video is basically worth a million photos and I pretty much cover every crevice and explain a lot of extra stuff I couldn’t squeeze into this post).
One recent update, after months and months of debate, is that we finally pulled the trigger and painted the railing. The vertical balusters had all already been painted (SW Stone Isle), so it was just that top rail and the post at the end that were “wood.” I’ll explain why that’s in quotes in a second. It’s hard to see in this picture since that front post is getting hit with a ton of light through the open door, but we went with a deeper gray tone (SW Perpetual Gray) that’s about 3 shades darker than the trim, so it accents the post and the top rail without being too crazy and compete-y with the standout stars of the entire house (those stained glass windows).
I know what some of you are thinking. NOOOO! How could you disgrace such old beautiful wood with paint?!?! Well, this railing had been covered in a thick paint-like brown stain that showed zero grain and was sticky, roughed up, and ruined in a bunch of places (covered in paint splatters, spackle globs, and decades of other issues). After attempting to sand it down, we learned it was a darker redder wood – meaning we’d never be able to stain it to match the lovely heart pine floors. So, we reasoned that a fresh coat of paint applied nice and evenly was a heckuva lot better than its current state. And it really does look glossy and lovely in person, which makes us incredibly relieved.
The good news is that we don’t have any shortage of wood tones in this house. We have original heart pine everywhere (we stripped and clear-sealed all of the original doors that we could, brought the original floors both upstairs and downstairs back to their glory, etc). This house’s middle name could be wood. Pinkie “Wood” House. Wait that sounds bad. Forget the middle name thing.
Down in the living room, we added this cool wall-mounted bookcase, which instantly made us both say “Ahhh! It looks like an actual room people live in!” We also got to hang some cozy white curtains which need DESPERATELY to be steamed and hemmed. They’re Lenda curtains from Ikea– I just cut off the top tabs and make sure to wash them to pre-shrink them before hanging. We also have them in our home office and love how washable and easy they are. Also, my secondhand brass grasshopper (aka: Brasshopper) is a total badass and I love him more each day.
bookcase / blue pillow / curtains / rods / similar brass grasshopper
Also bought a rug from New England Loom (if you don’t follow them on Instagram you’re missing out because they have so many lovely secondhand rugs to be discovered) and the colors and patterns and antique feeling of the rug is PERFECT for a room that will be assaulted with food and sand and everything else that a rental living room has to deal with, so I have high hopes for it holding up like a champ (seeing as it is decades old already, that really does inspire confidence). That pretty blue pillow is from this Etsy shop (I love all of her pillows) and the pink one is from Target a while back. And you guys know the sofa is the Ikea Karlstad that they no longer make, which is a straight up travesty.
We also updated the light in here to this gleaming beauty from West Elm. The old light was a one-bulb fixture that we hung and immediately said “this room needs way more light.” We love the juxtaposition of this leggier modern light and the old-looking medallion (which is actually from Home Depot – shhh). And the old brick chimney that we discovered behind the wall and exposed is probably my favorite feature in the room, along with the giant windows (this room is 9′ tall, so the windows are easily over 6.5′ feet tall – that’s taller than John!). Don’t mind that TV on the floor. We found something we think will work for in there, just gotta get it out there in our next car load. #AlwaysRoadTrippingWithFurniture
rug source / chandelier / ceiling medallion /curtains / rods
The kitchen came a long way too, with the quartz island going in (it’s Pearl Jasmine by Silestone and we LOVE it so much) and a working sink. Cue the choir of angels! You can hear two ways we saved money on our quartz counters in Podcast Episode #74, which also covers why our original plan to do butcher block there didn’t work out. There are still some things missing though. Mainly, the backsplash that we’ll add after we hang the other missing element: shelves on either side of the stove under the sconces (probably two per side, not sure yet but we’ll keep you posted).
stools / quartz / butcher block / cabinets / range: secondhand refurbished / trim: SW Stone Isle / walls: SW White Heron
The back door was blue for a hot second, which some of you might have seen on Instagram, but as the room came together more John and I both realized that the same gray as the trim (SW Stone Isle) would let the pink stove do her thing and be the accent in the room that she has always been destined to become. Plus, we have a blue chippy door leading to the mudroom nearby, and one blue door + one pink stove is… enough. You know I didn’t love painting that door twice, so if I did it, it had to be done. Ha!
green vase / wood cutting board / wood stand / hanging rod / hood / kettle / sconces / pink salt & pepper
Upstairs the bedrooms are coming along with some art up on the walls, layered cozy bedding, and even headboards. HUZZAH! Still need to hang all the curtains up there (once we do that the headboard will look exactly as wide as the window because we are tricky tricksters). Stay tuned…
rug / large art / lamp / side table / striped blanket / headboard / fan
This is another view of that front bedroom, which is the largest of the four (the bunk room is teeny tiny and the middle bedroom and back bedroom are just fine but not giant). It also has that exposed brick chimney that we discovered hiding behind the wall, and next to it you’ll see my favorite craigslist find of all time that you might have already “met” on Facebook or Instagram when I shared a quick shot of it this weekend. Yes, I really did find an inlay piece of furniture on Craiglist, and yes, it’s currently selling for $2,000 on Restoration Hardware (I got it for $400!). Insert that screaming cat emoji face here. Seriously, it’s the score of a lifetime, and I’m going to share the whole story, including how I fix up a few missing inlay spots soon. So… stay tuned. Again.
And before we move on, that sconce looks crazy small above the dresser (we just hung it as a placeholder and it’s looking like a placeholder, so we’ll probably get a wider double-sconce for that spot soon). Anyway, on with the tour! Or should I say “roll the next flashback!” This is that wall a year ago. Same house. Just nekkid a year ago versus clothed now. With walls. You get what I mean.
And now, the back bedroom. Aka: our room whenever we stay there! Although the front room is the largest and has that lovely exposed brick, the back bedroom has its own master bathroom (complete with my big beautiful clawfoot tub) and it has its own stairs that lead up to it, which are surprisingly useful. We originally thought those back stairs would be more of a fun thing for kids and a cool historic detail to preserve, but we weren’t sure we’d actually use them very much but we go up and down them all the time!
rug / fan / leather stools / striped duvet cover / pocked doors: SW Riverway
One of our bigger projects this past weekend was this built-in dresser that we added to the nook behind the pocket doors that you see above. We love gaining some storage and function in that formerly blank area at the top of the back steps, and there’s more than enough room to pull out the drawers and take like five steps back before you’d fall down the steps (you know I’d be the one to bite it all the way down these steps, so we have to make sure these things we’re adding won’t curse me later).
dresser / mirror / wood top / door color: SW Riverway
John would be quick to point out it’s not complete. We ran out of nails for our nail gun, so the trim still needs to be attached, caulked, etc. But basically, a Malm from Ikea fit pretty perfectly in the space, so we made it look even more built-in by removing and reinstalling the molding around it (see below) and adding a few skinny filler pieces to each side (scraps from our kitchen install). We also popped some leftover butcher block counter from downstairs on top to tie into the pine floors and we’re also planning to add some leather pulls to it to tie in the stools at the foot of the bed (you can see them in the shot two photos up). Can’t wait to finish it up and share the final pics!
Next let’s move onto the master bathroom, which is easily my favorite room because I get to soak in that big ol’ tub after hours of DIY and it feels so freaking good every time. Except for the first time. I had sort of a false start in there (more on that in this podcast) but now the tub and I are bros and only happy things happen when I’m in there. And the kids love it too.
marble table / floor tile / accent floor tile / wall hooks / blinds / tub color: SW Riverway
I’m basically salivating while looking at this because we’re back home and our house has two bathrooms that we still have to redo and two tubs that are about 10″ deep (half of my body sticks out like an iceberg) so I’m itching to add a deeper bathtub into my life here at home.
The hall bath is still my boo too, thanks to my favorite vanity ever. The top is tiled with marble and the rounded wood drawers make it look like a furniture piece we converted to be a vanity but it came that way and WE SALUTE IT because goodness knows we have other stuff to keep us busy. Still on the list: making built-in bunk beds, building out the pantry and the mudroom, tiling the backsplash, landscaping, etc, etc. That big round silver mirror is an awesome (and recent!) HomeGoods find (the same one in brass hangs above our mantel at home) so if you’re looking for one in either color, try HomeGoods. Target also has a really similar one that’s slightly smaller and thinner in gold.
vanity / faucet / drum stool / light fixture / floor tile
And although we haven’t built the wall to wall bunkbeds in our small-but-mighty kids room yet, we did hang art. And that’s half the battle, right? (Nope, half the battle is being halfway done with the bunkbeds, but let me lie to myself for a second, ok?). That cute colorful painting is from our dear friend Lesli Devito (remember when we house crashed her wayyyy back here) and if you don’t have one of her paintings or prints I highly recommend getting one. The door also got a sign that says Mermaids Welcome and it made my whole life to hang it up (also we took a poll among a bunch of kids and basically everyone is cool with mermaid and pirates, but don’t get me started on how split the group was on dolphins).
marble table / mermaids welcome plaque / art by Lesli DeVito
So there you have it: a tour as of yesterday of the beach house (remember: watch the video! it has approximately 98% more info than some pics and captions can convey). Also, we hope you have a very happy holiday surrounded by the ones you love and delicious food and all the mermaid-related memorabilia that your heart desires. And if you have a tub where your entire body can be submerged, know that I, for one, now know what I’m missing and am deeply deeply jealous.
P.S. To see the entire process of fixing up this beach house (from floor planning and demo to tiling and tiling and tiling and getting the floors redone) here’s a full category of beach house updates for you to flip through.
*This post contains affiliate links*
The post Beach House: End Of The Year Tour! appeared first on Young House Love.
Beach House: End Of The Year Tour! published first on http://ift.tt/2hUI8pL
0 notes
Text
Beach House: End Of The Year Tour!
Beach house progress, both big and small, feels like it’s happening so quickly that we hardly have time to keep up with documenting it, but I did walk through the whole house yesterday and make a big ol’ video tour… which basically catches you right up to date! So excuse this post for only having around around a dozen photos (we have thousands on our phones, but they’d take us all day to upload and explain, and nobody got time for that with Christmas being less than a week away).
First let’s start at the front door. We hung a wreath (from Tar-jay) and put some battery powered LED candles with timers in the windows (so they’re auto-pilot even when we’re not there). Hallelujah, the house finally looks lived in! I mean, except for the whole it-has-no-landscaping-and-I-desperately-need-to-sand-and-stain-the-front-door thing. Also I still want to paint those white blocks behind the lanterns to match the house. Someday…
lanterns / wreath / house numbers / doormat / siding: SW Mellow Coral / ceiling: SW Breaktime / trim: SW Pure White
While things are far from finished, things are even farther from where they were this time last year. This photo is from almost exactly a year ago, and looking back is a nice reminder that wrinkly curtains and an unfinished pantry are far smaller problems to work through than THE ENTIRE SIDE OF THE HOUSE BEING TORN OFF. Here’s that whole story if you missed it (yup, we literally had to have 500 square feet removed and rebuild from scratch).
SO YEAH. It’s looking a lot better at the end of 2017 than it did at the end of 2016. And weirdly enough that picture makes me excited to get started on the duplex, because as much as I love having finished walls to decorate and finished floors to arrange furniture on, the process of planning (and dreaming about) all of the potential that’s fills the air during a big demo/rebuilding project is oddly addicting. Can’t wait to share our duplex progress as soon as we have our plans approved and all of our permits pulled!
But back to the pink house, where I’m walking you guys through every room in a little video tour of sorts: If you can’t see this in a reader, click through to view it on our blog or you can view it here on YouTube.
If you can’t watch the video right now, I’d definitely recommend dropping back in and catching it when you can (a video is basically worth a million photos and I pretty much cover every crevice and explain a lot of extra stuff I couldn’t squeeze into this post).
One recent update, after months and months of debate, is that we finally pulled the trigger and painted the railing. The vertical balusters had all already been painted (SW Stone Isle), so it was just that top rail and the post at the end that were “wood.” I’ll explain why that’s in quotes in a second. It’s hard to see in this picture since that front post is getting hit with a ton of light through the open door, but we went with a deeper gray tone (SW Perpetual Gray) that’s about 3 shades darker than the trim, so it accents the post and the top rail without being too crazy and compete-y with the standout stars of the entire house (those stained glass windows).
I know what some of you are thinking. NOOOO! How could you disgrace such old beautiful wood with paint?!?! Well, we love the old wood here. In fact, we stripped doors and floors to restore it! But this railing had been covered in a thick paint-like brown stain that showed zero grain and was sticky, roughed up, and ruined in a bunch of places (covered in paint splatters, spackle globs, and decades of other issues that had built up). After attempting to sand it down, we learned it was a darker redder wood – meaning we’d never be able to stain it to match the lovely heart pine floors. So, we reasoned that a fresh coat of paint applied nice and evenly was a heckuva lot better than its current state. And it really does look glossy and lovely in person, which makes us incredibly relieved.
The good news is that we don’t have any shortage of wood tones in this house. We have original heart pine everywhere (we stripped and clear-sealed all of the original doors that we could, brought the original floors both upstairs and downstairs back to their glory, etc). This house’s middle name could be wood. Pinkie “Wood” House. Wait that sounds bad. Forget the middle name thing.
Down in the living room, we added this cool wall-mounted bookcase, which instantly made us both say “Ahhh! It looks like an actual room people live in!” We also got to hang some cozy white curtains which need DESPERATELY to be steamed and hemmed. They’re Lenda curtains from Ikea– I just cut off the top tabs and make sure to wash them to pre-shrink them before hanging. We also have them in our home office and love how washable and easy they are. Also, my secondhand brass grasshopper (aka: Brasshopper) is a total badass and I love him more each day.
bookcase / blue pillow / curtains / rods / similar brass grasshopper
Also bought a rug from New England Loom (if you don’t follow them on Instagram you’re missing out because they have so many lovely secondhand rugs to be discovered) and the colors and patterns and antique feeling of the rug is PERFECT for a room that will be assaulted with food and sand and everything else that a rental living room has to deal with, so I have high hopes for it holding up like a champ (seeing as it is decades old already, that really does inspire confidence). That pretty blue pillow is from this Etsy shop (I love all of her pillows) and the pink one is from Target a while back. And you guys know the sofa is the Ikea Karlstad that they no longer make, which is a straight up travesty.
We also updated the light in here to this gleaming beauty from West Elm. The old light was a one-bulb fixture that we hung and immediately said “this room needs way more light.” We love the juxtaposition of this leggier modern light and the old-looking medallion (which is actually from Home Depot – shhh). And the old brick chimney that we discovered behind the wall and exposed is probably my favorite feature in the room, along with the giant windows (this room is 9′ tall, so the windows are easily over 6.5′ feet tall – that’s taller than John!). Don’t mind that TV on the floor. We found something we think will work for in there, just gotta get it out there in our next car load. #AlwaysRoadTrippingWithFurniture
rug source / chandelier / ceiling medallion /curtains / rods
The kitchen came a long way too, with the quartz island going in (it’s Pearl Jasmine by Silestone and we LOVE it so much) and a working sink. Cue the choir of angels! You can hear two ways we saved money on our quartz counters in Podcast Episode #74, which also covers why our original plan to do butcher block there didn’t work out. There are still some things missing though. Mainly, the backsplash that we’ll add after we hang the other missing element: shelves on either side of the stove under the sconces (probably two per side, not sure yet but we’ll keep you posted).
stools / quartz / butcher block / cabinets / range: secondhand refurbished / trim: SW Stone Isle / walls: SW White Heron
The back door was blue for a hot second, which some of you might have seen on Instagram, but as the room came together more John and I both realized that the same gray as the trim (SW Stone Isle) would let the pink stove do her thing and be the accent in the room that she has always been destined to become. Plus, we have a blue chippy door leading to the mudroom nearby, and one blue door + one pink stove is… enough. You know I didn’t love painting that door twice, so if I did it, it had to be done. Ha!
green vase / wood cutting board / wood stand / hanging rod / hood / kettle / sconces / pink salt & pepper
Upstairs the bedrooms are coming along with some art up on the walls, layered cozy bedding, and even headboards. HUZZAH! Still need to hang all the curtains up there (once we do that the headboard will look exactly as wide as the window because we are tricky tricksters). Stay tuned…
rug / large art / lamp / side table / striped blanket / headboard / fan
This is another view of that front bedroom, which is the largest of the four (the bunk room is teeny tiny and the middle bedroom and back bedroom are just fine but not giant). It also has that exposed brick chimney that we discovered hiding behind the wall, and next to it you’ll see my favorite craigslist find of all time that you might have already “met” on Facebook or Instagram when I shared a quick shot of it this weekend. Yes, I really did find an inlay piece of furniture on Craiglist, and yes, it’s currently selling for $2,000 on Restoration Hardware (I got it for $400!). Insert that screaming cat emoji face here. Seriously, it’s the score of a lifetime, and I’m going to share the whole story, including how I fix up a few missing inlay spots soon. So… stay tuned. Again.
And before we move on, that sconce looks crazy small above the dresser (we just hung it as a placeholder and it’s looking like a placeholder, so we’ll probably get a wider double-sconce for that spot soon). Anyway, on with the tour! Or should I say “roll the next flashback!”
This is that wall a year ago. Same house. Just nekkid a year ago versus clothed now. With walls. You get what I mean.
And now, the back bedroom. Aka: our room whenever we stay there! Although the front room is the largest and has that lovely exposed brick, the back bedroom has its own master bathroom (complete with my big beautiful clawfoot tub) and it has its own stairs that lead up to it, which are surprisingly useful. We originally thought those back stairs would be more of a fun thing for kids and a cool historic detail to preserve, but we weren’t sure we’d actually use them very much but we go up and down them all the time!
rug / fan / leather stools / striped duvet cover / pocked doors: SW Riverway
One of our bigger projects this past weekend was this built-in dresser that we added to the nook behind the pocket doors that you see above. We love gaining some storage and function in that formerly blank area at the top of the back steps, and there’s more than enough room to pull out the drawers and take like five steps back before you’d fall down the steps (you know I’d be the one to bite it all the way down these steps, so we have to make sure these things we’re adding won’t curse me later).
dresser / mirror / wood top / door color: SW Riverway
John would be quick to point out it’s not complete. We ran out of nails for our nail gun, so the trim still needs to be attached, caulked, etc. But basically, a Malm from Ikea fit pretty perfectly in the space, so we made it look even more built-in by removing and reinstalling the molding around it (see below) and adding a few skinny filler pieces to each side (scraps from our kitchen install). We also popped some leftover butcher block counter from downstairs on top to tie into the pine floors and we’re also planning to add some leather pulls to it to tie in the stools at the foot of the bed (you can see them in the shot two photos up). Can’t wait to finish it up and share the final pics!
Next let’s move onto the master bathroom, which is easily my favorite room because I get to soak in that big ol’ tub after hours of DIY and it feels so freaking good every time. Except for the first time. I had sort of a false start in there (more on that in this podcast) but now the tub and I are bros and only happy things happen when I’m in there. And the kids love it too.
marble table / floor tile / accent floor tile / wall hooks / blinds / tub color: SW Riverway
I’m basically salivating while looking at this because we’re back home and our house has two bathrooms that we still have to redo and two tubs that are about 10″ deep (half of my body sticks out like an iceberg) so I’m itching to add a deeper bathtub into my life here at home.
The hall bath is still my boo too, thanks to my favorite vanity ever. The top is tiled with marble and the rounded wood drawers make it look like a furniture piece we converted to be a vanity but it came that way and WE SALUTE IT because goodness knows we have other stuff to keep us busy. Still on the list: making built-in bunk beds, building out the pantry and the mudroom, tiling the backsplash, landscaping, etc, etc. That big round silver mirror is an awesome (and recent!) HomeGoods find (the same one in brass hangs above our mantel at home) so if you’re looking for one in either color, try HomeGoods. Target also has a really similar one that’s slightly smaller and thinner in gold.
vanity / faucet / drum stool / light fixture / floor tile
And although we haven’t built the wall to wall bunkbeds in our small-but-mighty kids room yet, we did hang art. And that’s half the battle, right? (Nope, half the battle is being halfway done with the bunkbeds, but let me lie to myself for a second, ok?). That cute colorful painting is from our dear friend Lesli Devito (remember when we house crashed her wayyyy back here) and if you don’t have one of her paintings or prints I highly recommend getting one. The door also got a sign that says Mermaids Welcome and it made my whole life to hang it up (also we took a poll among a bunch of kids and basically everyone is cool with mermaid and pirates, but don’t get me started on how split the group was on dolphins).
marble table / mermaids welcome plaque / art by Lesli DeVito
So there you have it: a tour as of yesterday of the beach house (remember: watch the video! it has approximately 98% more info than some pics and captions can convey). Also, we hope you have a very happy holiday surrounded by the ones you love and delicious food and all the mermaid-related memorabilia that your heart desires. And if you have a tub where your entire body can be submerged, know that I, for one, now know what I’m missing and am deeply deeply jealous.
P.S. To see the entire process of fixing up this beach house (from floor planning and demo to tiling and tiling and tiling and getting the floors redone) here’s a full category of beach house updates for you to flip through.
*This post contains affiliate links*
The post Beach House: End Of The Year Tour! appeared first on Young House Love.
0 notes
Text
Tangential Content Earns More Links and Social Shares in Boring Industries [New Research]
Posted by kerryjones
Many companies still don’t see the benefit of creating content that isn’t directly about their products or brand. But unless you have a universally interesting brand, you’ll be hard-pressed to attract much of an audience if all you do is publish brand-centric content.
Content marketing is meant to solve this dilemma. By offering genuinely useful content to your target customers, rather than selling to them, you earn their attention and over time gain their trust.
And yet, I find myself explaining the value of non-branded content all too often. I frequently hear grumblings from fellow marketers that clients and bosses refuse to stray from sales-focused content. I see companies publishing what are essentially advertorials and calling it content marketing.
In addition to turning off customers, branded content can be extremely challenging for building links or earning PR mentions. If you’ve ever done outreach for branded content, you’ve probably gotten a lot of pushback from the editors and writers you’ve pitched. Why? Most publishers bristle at content that feels like a brand endorsement pretending not to be a brand endorsement (and expect you to pay big bucks for a sponsored content or native advertising spot).
Fortunately, there’s a type of content that can earn your target customers’ attention, build high-quality links, and increase brand awareness...
Tangential content: The cure for a boring niche
At Fractl, we refer to content on a topic that’s related to (but not directly about) the brand that created it as "tangential content."
Some hypothetical examples of tangential content would be:
A pool installation company creating content about summer safety tips and barbeque recipes.
A luggage retailer publishing country-specific travel guides.
An auto insurance broker offering car maintenance advice.
While there’s a time for branded content further down the sales funnel, tangential content might be right for you if you want to:
Reach a wide audience and gain top-of-funnel awareness. Not a lot of raving fans in your “boring” brand niche? Tangential topics can get you in front of the masses.
Target a greater number of publishers during outreach to increase your link building and PR mention potential. Tangential topics work well for outreach because you can expand your pool of publishers (larger niches vs. a small niche with only a few dedicated sites).
Create more emotional content that resonates with your audience. In an analysis of more than 300 client campaigns, we found the content that received more than 200 media mentions was more likely than low-performing campaigns to have a strong emotional hook. If your brand niche doesn’t naturally tug on the heartstrings, tangential content is one way to create an emotional reaction.
Build a more diverse content library and not be limited to creating content around one topic. If you’ve maxed out on publishing content about your niche, broadening your content repertoire to tangential topics can reinvigorate your content strategy (and your motivation).
Comparison of tangential vs. on-brand content performance
In our experience at Fractl, tangential content has been highly effective for link building campaigns, especially in narrow client niches that lack broad appeal. While we’ve assumed this is true based on our observations, we now have the data to back up our assumption.
We recently categorized 835 Fractl client campaigns as either “tangential” or “on-brand,” then compared the average number of pickups (links and press mentions) and number of social shares for each group. Our hunch was right: The tangential campaigns earned 30% more media mentions and 77% more social shares on average than the brand-focused campaigns.
So what exactly does a tangential campaign look like? Below are some real examples of our client campaigns that illustrate how tangential topics can yield stellar results.
Most Hateful/Most Politically Correct Places
Client niche: Apartment listing site
Campaign topic: Which states and cities use the most prejudiced/racist language based on geo-tagged Twitter data
Results: 67,000+ social shares and 620 media pickups, including features on CNET, Slate, Business Insider, AOL, Yahoo, Mic, The Daily Beast, and Adweek
Why it worked
After a string of on-brand campaigns for this client yielded average results, we knew capitalizing on a hot-button, current issue would attract tons of attention. This topic still ties back into the client’s main objective of helping people find a home since the community and location of that home are important factors in one’s decisions. Check out the full case study of this campaign for more insights into why it was successful.
Most Instagrammed Locations
Client niche: Bus fare comparison and booking tool
Campaign topic: Points of interest where people post the most Instagram photos in North America
Results: 40,000+ social shares and more than 300 pickups, including TIME, NBC News, Business Insider, Today, Yahoo!, AOL, Fast Company, and The Daily Mail
Why it worked
Our client’s niche, bus travel, had a limited audience, so we chose a topic that was of interest to anyone who enjoys traveling, regardless of the mode of transportation they use to get there. By incorporating data from a popular social network and using an idea with a strong geographic focus, we could target a lot of different groups — the campaign appealed to travel enthusiasts, Instagram users, and regional and city news outlets (including TV stations). For more details about our thought process behind this idea, see the campaign case study.
Most Attractive NFL Players and Teams
Client niche: Sports apparel retailer
Campaign topic: Survey that rates the most attractive NFL players
Results: 45,000+ social shares and 247 media pickups, including CBS Sports, USA Today, Fox Sports, and NFL.com
Why it worked
Since diehard fans want to show off that their favorite player is the best, even if it’s just in the looks department, we were confident this lighthearted campaign would pique fan interest. But fans weren’t the only ones hitting the share button — the campaign also grabbed the attention of the featured teams and players, with many sharing on their social media profiles, which helped drive exposure.
On-brand content works best in certain verticals
Tangential content isn’t always necessary for earning top-of-funnel awareness. So, how do you know if your brand-centric topics will garner lots of interest? A few things to consider:
Is your brand topic interesting or useful to the general population?
Are there multiple publishers that specifically cover your niche? Do these publishers have large readerships?
Are you already publishing on-brand content that is achieving your goals/expectations?
We’ve seen several industry verticals perform very well using branded content. When we broke down our campaign data by vertical, we found our top performing on-brand campaign topics were technology, drugs and alcohol, and marketing.
Some examples of our successful on-brand campaign topics include:
“Growth of SaaS” for a B2B software comparison website
“Influencers on Instagram” for an influencer marketplace
“Global Drug Treatment Trends” for an addiction recovery client
“The Tech Job Network” for a tech career website
Coming up with tangential content ideas
Once you free yourself from only brainstorming brand-centric ideas, you might find it easy to dream up tangential concepts. If you need a little help, here are a few tips to get you started:
Review your buyer personas.
In order to know which tangential topics to choose, you need to understand your target audience’s interests and where your niche intersects with those interests. The best way to find this information? Buyer personas. If you don’t already have detailed buyer personas built out, Mike King’s epic Moz post from a few years ago remains the bible on personas in my opinion.
Find topics your audience cares about with Facebook Audience Insights.
Using its arsenal of user data, this Facebook ads tool gives you a peek into the interests and lifestyles of your target audience. These insights can supplement and inform your buyer personas. See the incredibly actionable post “How to Create Buyer Personas on a Budget Using Facebook Audience Insights” for more help with leveraging this tool.
Consider how trending news topics are tangential to your brand.
Pay attention to themes that keep popping up in the news and how your brand relates back to these stories (this is how the most racist/bigoted states and cities campaign I mentioned earlier in this post came to be). Also anticipate seasonal or event-based topics that are tangential to your brand. For example, a tire manufacturer may want to create content on protecting your car from flooding and storm damage during hurricane season.
Test tangential concepts on social media.
Not sure if a tangential topic will go over well? Before moving forward with a big content initiative, test it out by sharing content related to the topic on your brand’s social media accounts. Does it get a good reaction? Pro tip: spend a little bit of money promoting these as sponsored posts to ensure they get in front of your followers.
Have you had success creating content outside of your brand niche? I’d love to hear about your tangential content examples and the results you achieved, please share in the comments!
Sign up for The Moz Top 10, a semimonthly mailer updating you on the top ten hottest pieces of SEO news, tips, and rad links uncovered by the Moz team. Think of it as your exclusive digest of stuff you don't have time to hunt down but want to read!
from Blogger http://ift.tt/2yM4wef via SW Unlimited
0 notes
Text
Beach House: End Of The Year Tour!
Beach house progress, both big and small, feels like it’s happening so quickly that we hardly have time to keep up with documenting it, but I did walk through the whole house yesterday and make a big ol’ video tour… which basically catches you right up to date! So excuse this post for only having around a dozen photos (we have thousands on our phones, but they’d take us all day to upload and explain, and nobody got time for that with Christmas being less than a week away).
First let’s start at the front door. We hung a wreath (from Tar-jay) and put some battery powered LED candles with timers in the windows (so they’re auto-pilot even when we’re not there). Hallelujah, the house finally looks lived in! I mean, except for the whole it-has-no-landscaping-and-I-desperately-need-to-sand-and-stain-the-front-door thing. Also I still want to paint those white blocks behind the lanterns to match the house. Someday…
lanterns / wreath / house numbers / doormat / siding: SW Mellow Coral / ceiling: SW Breaktime / trim: SW Pure White
While things are far from finished, things are even farther from where they were this time last year. This photo is from almost exactly a year ago, and looking back is a nice reminder that wrinkly curtains and an unfinished pantry are far smaller problems to work through than THE ENTIRE SIDE OF THE HOUSE BEING TORN OFF. Here’s that whole story if you missed it (yup, we literally had to have 500 square feet removed and rebuild from scratch).
SO YEAH. It’s looking a lot better at the end of 2017 than it did at the end of 2016. And weirdly enough that picture makes me excited to get started on the duplex, because as much as I love having finished walls to decorate and finished floors to arrange furniture on, the process of planning (and dreaming about) all of the potential that’s fills the air during a big demo/rebuilding project is oddly addicting. Can’t wait to share our duplex progress as soon as we have our plans approved and all of our permits pulled! But back to the pink house, where I’m walking you guys through every room in a little video tour of sorts: If you can’t see this in a reader, click through to view it on our blog or you can view it here on YouTube.
If you can’t watch the video right now, I’d definitely recommend dropping back in and catching it when you can (a video is basically worth a million photos and I pretty much cover every crevice and explain a lot of extra stuff I couldn’t squeeze into this post).
One recent update, after months and months of debate, is that we finally pulled the trigger and painted the railing. The vertical balusters had all already been painted (SW Stone Isle), so it was just that top rail and the post at the end that were “wood.” I’ll explain why that’s in quotes in a second. It’s hard to see in this picture since that front post is getting hit with a ton of light through the open door, but we went with a deeper gray tone (SW Perpetual Gray) that’s about 3 shades darker than the trim, so it accents the post and the top rail without being too crazy and compete-y with the standout stars of the entire house (those stained glass windows).
I know what some of you are thinking. NOOOO! How could you disgrace such old beautiful wood with paint?!?! Well, this railing had been covered in a thick paint-like brown stain that showed zero grain and was sticky, roughed up, and ruined in a bunch of places (covered in paint splatters, spackle globs, and decades of other issues). After attempting to sand it down, we learned it was a darker redder wood – meaning we’d never be able to stain it to match the lovely heart pine floors. So, we reasoned that a fresh coat of paint applied nice and evenly was a heckuva lot better than its current state. And it really does look glossy and lovely in person, which makes us incredibly relieved.
The good news is that we don’t have any shortage of wood tones in this house. We have original heart pine everywhere (we stripped and clear-sealed all of the original doors that we could, brought the original floors both upstairs and downstairs back to their glory, etc). This house’s middle name could be wood. Pinkie “Wood” House. Wait that sounds bad. Forget the middle name thing.
Down in the living room, we added this cool wall-mounted bookcase, which instantly made us both say “Ahhh! It looks like an actual room people live in!” We also got to hang some cozy white curtains which need DESPERATELY to be steamed and hemmed. They’re Lenda curtains from Ikea– I just cut off the top tabs and make sure to wash them to pre-shrink them before hanging. We also have them in our home office and love how washable and easy they are. Also, my secondhand brass grasshopper (aka: Brasshopper) is a total badass and I love him more each day.
bookcase / blue pillow / curtains / rods / similar brass grasshopper
Also bought a rug from New England Loom (if you don’t follow them on Instagram you’re missing out because they have so many lovely secondhand rugs to be discovered) and the colors and patterns and antique feeling of the rug is PERFECT for a room that will be assaulted with food and sand and everything else that a rental living room has to deal with, so I have high hopes for it holding up like a champ (seeing as it is decades old already, that really does inspire confidence). That pretty blue pillow is from this Etsy shop (I love all of her pillows) and the pink one is from Target a while back. And you guys know the sofa is the Ikea Karlstad that they no longer make, which is a straight up travesty.
We also updated the light in here to this gleaming beauty from West Elm. The old light was a one-bulb fixture that we hung and immediately said “this room needs way more light.” We love the juxtaposition of this leggier modern light and the old-looking medallion (which is actually from Home Depot – shhh). And the old brick chimney that we discovered behind the wall and exposed is probably my favorite feature in the room, along with the giant windows (this room is 9′ tall, so the windows are easily over 6.5′ feet tall – that’s taller than John!). Don’t mind that TV on the floor. We found something we think will work for in there, just gotta get it out there in our next car load. #AlwaysRoadTrippingWithFurniture
rug source / chandelier / ceiling medallion /curtains / rods
The kitchen came a long way too, with the quartz island going in (it’s Pearl Jasmine by Silestone and we LOVE it so much) and a working sink. Cue the choir of angels! You can hear two ways we saved money on our quartz counters in Podcast Episode #74, which also covers why our original plan to do butcher block there didn’t work out. There are still some things missing though. Mainly, the backsplash that we’ll add after we hang the other missing element: shelves on either side of the stove under the sconces (probably two per side, not sure yet but we’ll keep you posted).
stools / quartz / butcher block / cabinets / range: secondhand refurbished / trim: SW Stone Isle / walls: SW White Heron
The back door was blue for a hot second, which some of you might have seen on Instagram, but as the room came together more John and I both realized that the same gray as the trim (SW Stone Isle) would let the pink stove do her thing and be the accent in the room that she has always been destined to become. Plus, we have a blue chippy door leading to the mudroom nearby, and one blue door + one pink stove is… enough. You know I didn’t love painting that door twice, so if I did it, it had to be done. Ha!
green vase / wood cutting board / wood stand / hanging rod / hood / kettle / sconces / pink salt & pepper
Upstairs the bedrooms are coming along with some art up on the walls, layered cozy bedding, and even headboards. HUZZAH! Still need to hang all the curtains up there (once we do that the headboard will look exactly as wide as the window because we are tricky tricksters). Stay tuned…
rug / large art / lamp / side table / striped blanket / headboard / fan
This is another view of that front bedroom, which is the largest of the four (the bunk room is teeny tiny and the middle bedroom and back bedroom are just fine but not giant). It also has that exposed brick chimney that we discovered hiding behind the wall, and next to it you’ll see my favorite craigslist find of all time that you might have already “met” on Facebook or Instagram when I shared a quick shot of it this weekend. Yes, I really did find an inlay piece of furniture on Craiglist, and yes, it’s currently selling for $2,000 on Restoration Hardware (I got it for $400!). Insert that screaming cat emoji face here. Seriously, it’s the score of a lifetime, and I’m going to share the whole story, including how I fix up a few missing inlay spots soon. So… stay tuned. Again.
And before we move on, that sconce looks crazy small above the dresser (we just hung it as a placeholder and it’s looking like a placeholder, so we’ll probably get a wider double-sconce for that spot soon). Anyway, on with the tour! Or should I say “roll the next flashback!” This is that wall a year ago. Same house. Just nekkid a year ago versus clothed now. With walls. You get what I mean.
And now, the back bedroom. Aka: our room whenever we stay there! Although the front room is the largest and has that lovely exposed brick, the back bedroom has its own master bathroom (complete with my big beautiful clawfoot tub) and it has its own stairs that lead up to it, which are surprisingly useful. We originally thought those back stairs would be more of a fun thing for kids and a cool historic detail to preserve, but we weren’t sure we’d actually use them very much but we go up and down them all the time!
rug / fan / leather stools / striped duvet cover / pocked doors: SW Riverway
One of our bigger projects this past weekend was this built-in dresser that we added to the nook behind the pocket doors that you see above. We love gaining some storage and function in that formerly blank area at the top of the back steps, and there’s more than enough room to pull out the drawers and take like five steps back before you’d fall down the steps (you know I’d be the one to bite it all the way down these steps, so we have to make sure these things we’re adding won’t curse me later).
dresser / mirror / wood top / door color: SW Riverway
John would be quick to point out it’s not complete. We ran out of nails for our nail gun, so the trim still needs to be attached, caulked, etc. But basically, a Malm from Ikea fit pretty perfectly in the space, so we made it look even more built-in by removing and reinstalling the molding around it (see below) and adding a few skinny filler pieces to each side (scraps from our kitchen install). We also popped some leftover butcher block counter from downstairs on top to tie into the pine floors and we’re also planning to add some leather pulls to it to tie in the stools at the foot of the bed (you can see them in the shot two photos up). Can’t wait to finish it up and share the final pics!
Next let’s move onto the master bathroom, which is easily my favorite room because I get to soak in that big ol’ tub after hours of DIY and it feels so freaking good every time. Except for the first time. I had sort of a false start in there (more on that in this podcast) but now the tub and I are bros and only happy things happen when I’m in there. And the kids love it too.
marble table / floor tile / accent floor tile / wall hooks / blinds / tub color: SW Riverway
I’m basically salivating while looking at this because we’re back home and our house has two bathrooms that we still have to redo and two tubs that are about 10″ deep (half of my body sticks out like an iceberg) so I’m itching to add a deeper bathtub into my life here at home.
The hall bath is still my boo too, thanks to my favorite vanity ever. The top is tiled with marble and the rounded wood drawers make it look like a furniture piece we converted to be a vanity but it came that way and WE SALUTE IT because goodness knows we have other stuff to keep us busy. Still on the list: making built-in bunk beds, building out the pantry and the mudroom, tiling the backsplash, landscaping, etc, etc. That big round silver mirror is an awesome (and recent!) HomeGoods find (the same one in brass hangs above our mantel at home) so if you’re looking for one in either color, try HomeGoods. Target also has a really similar one that’s slightly smaller and thinner in gold.
vanity / faucet / drum stool / light fixture / floor tile
And although we haven’t built the wall to wall bunkbeds in our small-but-mighty kids room yet, we did hang art. And that’s half the battle, right? (Nope, half the battle is being halfway done with the bunkbeds, but let me lie to myself for a second, ok?). That cute colorful painting is from our dear friend Lesli Devito (remember when we house crashed her wayyyy back here) and if you don’t have one of her paintings or prints I highly recommend getting one. The door also got a sign that says Mermaids Welcome and it made my whole life to hang it up (also we took a poll among a bunch of kids and basically everyone is cool with mermaid and pirates, but don’t get me started on how split the group was on dolphins).
marble table / mermaids welcome plaque / art by Lesli DeVito
So there you have it: a tour as of yesterday of the beach house (remember: watch the video! it has approximately 98% more info than some pics and captions can convey). Also, we hope you have a very happy holiday surrounded by the ones you love and delicious food and all the mermaid-related memorabilia that your heart desires. And if you have a tub where your entire body can be submerged, know that I, for one, now know what I’m missing and am deeply deeply jealous.
P.S. To see the entire process of fixing up this beach house (from floor planning and demo to tiling and tiling and tiling and getting the floors redone) here’s a full category of beach house updates for you to flip through.
*This post contains affiliate links*
The post Beach House: End Of The Year Tour! appeared first on Young House Love.
Beach House: End Of The Year Tour! published first on http://ift.tt/2qxZz2j
0 notes
Text
Beach House: End Of The Year Tour!
Beach house progress, both big and small, feels like it’s happening so quickly that we hardly have time to keep up with documenting it, but I did walk through the whole house yesterday and make a big ol’ video tour… which basically catches you right up to date! So excuse this post for only having around a dozen photos (we have thousands on our phones, but they’d take us all day to upload and explain, and nobody got time for that with Christmas being less than a week away).
First let’s start at the front door. We hung a wreath (from Tar-jay) and put some battery powered LED candles with timers in the windows (so they’re auto-pilot even when we’re not there). Hallelujah, the house finally looks lived in! I mean, except for the whole it-has-no-landscaping-and-I-desperately-need-to-sand-and-stain-the-front-door thing. Also I still want to paint those white blocks behind the lanterns to match the house. Someday…
lanterns / wreath / house numbers / doormat / siding: SW Mellow Coral / ceiling: SW Breaktime / trim: SW Pure White
While things are far from finished, things are even farther from where they were this time last year. This photo is from almost exactly a year ago, and looking back is a nice reminder that wrinkly curtains and an unfinished pantry are far smaller problems to work through than THE ENTIRE SIDE OF THE HOUSE BEING TORN OFF. Here’s that whole story if you missed it (yup, we literally had to have 500 square feet removed and rebuild from scratch).
SO YEAH. It’s looking a lot better at the end of 2017 than it did at the end of 2016. And weirdly enough that picture makes me excited to get started on the duplex, because as much as I love having finished walls to decorate and finished floors to arrange furniture on, the process of planning (and dreaming about) all of the potential that’s fills the air during a big demo/rebuilding project is oddly addicting. Can’t wait to share our duplex progress as soon as we have our plans approved and all of our permits pulled! But back to the pink house, where I’m walking you guys through every room in a little video tour of sorts: If you can’t see this in a reader, click through to view it on our blog or you can view it here on YouTube.
If you can’t watch the video right now, I’d definitely recommend dropping back in and catching it when you can (a video is basically worth a million photos and I pretty much cover every crevice and explain a lot of extra stuff I couldn’t squeeze into this post).
One recent update, after months and months of debate, is that we finally pulled the trigger and painted the railing. The vertical balusters had all already been painted (SW Stone Isle), so it was just that top rail and the post at the end that were “wood.” I’ll explain why that’s in quotes in a second. It’s hard to see in this picture since that front post is getting hit with a ton of light through the open door, but we went with a deeper gray tone (SW Perpetual Gray) that’s about 3 shades darker than the trim, so it accents the post and the top rail without being too crazy and compete-y with the standout stars of the entire house (those stained glass windows).
I know what some of you are thinking. NOOOO! How could you disgrace such old beautiful wood with paint?!?! Well, this railing had been covered in a thick paint-like brown stain that showed zero grain and was sticky, roughed up, and ruined in a bunch of places (covered in paint splatters, spackle globs, and decades of other issues). After attempting to sand it down, we learned it was a darker redder wood – meaning we’d never be able to stain it to match the lovely heart pine floors. So, we reasoned that a fresh coat of paint applied nice and evenly was a heckuva lot better than its current state. And it really does look glossy and lovely in person, which makes us incredibly relieved.
The good news is that we don’t have any shortage of wood tones in this house. We have original heart pine everywhere (we stripped and clear-sealed all of the original doors that we could, brought the original floors both upstairs and downstairs back to their glory, etc). This house’s middle name could be wood. Pinkie “Wood” House. Wait that sounds bad. Forget the middle name thing.
Down in the living room, we added this cool wall-mounted bookcase, which instantly made us both say “Ahhh! It looks like an actual room people live in!” We also got to hang some cozy white curtains which need DESPERATELY to be steamed and hemmed. They’re Lenda curtains from Ikea– I just cut off the top tabs and make sure to wash them to pre-shrink them before hanging. We also have them in our home office and love how washable and easy they are. Also, my secondhand brass grasshopper (aka: Brasshopper) is a total badass and I love him more each day.
bookcase / blue pillow / curtains / rods / similar brass grasshopper
Also bought a rug from New England Loom (if you don’t follow them on Instagram you’re missing out because they have so many lovely secondhand rugs to be discovered) and the colors and patterns and antique feeling of the rug is PERFECT for a room that will be assaulted with food and sand and everything else that a rental living room has to deal with, so I have high hopes for it holding up like a champ (seeing as it is decades old already, that really does inspire confidence). That pretty blue pillow is from this Etsy shop (I love all of her pillows) and the pink one is from Target a while back. And you guys know the sofa is the Ikea Karlstad that they no longer make, which is a straight up travesty.
We also updated the light in here to this gleaming beauty from West Elm. The old light was a one-bulb fixture that we hung and immediately said “this room needs way more light.” We love the juxtaposition of this leggier modern light and the old-looking medallion (which is actually from Home Depot – shhh). And the old brick chimney that we discovered behind the wall and exposed is probably my favorite feature in the room, along with the giant windows (this room is 9′ tall, so the windows are easily over 6.5′ feet tall – that’s taller than John!). Don’t mind that TV on the floor. We found something we think will work for in there, just gotta get it out there in our next car load. #AlwaysRoadTrippingWithFurniture
rug source / chandelier / ceiling medallion /curtains / rods
The kitchen came a long way too, with the quartz island going in (it’s Pearl Jasmine by Silestone and we LOVE it so much) and a working sink. Cue the choir of angels! You can hear two ways we saved money on our quartz counters in Podcast Episode #74, which also covers why our original plan to do butcher block there didn’t work out. There are still some things missing though. Mainly, the backsplash that we’ll add after we hang the other missing element: shelves on either side of the stove under the sconces (probably two per side, not sure yet but we’ll keep you posted).
stools / quartz / butcher block / cabinets / range: secondhand refurbished / trim: SW Stone Isle / walls: SW White Heron
The back door was blue for a hot second, which some of you might have seen on Instagram, but as the room came together more John and I both realized that the same gray as the trim (SW Stone Isle) would let the pink stove do her thing and be the accent in the room that she has always been destined to become. Plus, we have a blue chippy door leading to the mudroom nearby, and one blue door + one pink stove is… enough. You know I didn’t love painting that door twice, so if I did it, it had to be done. Ha!
green vase / wood cutting board / wood stand / hanging rod / hood / kettle / sconces / pink salt & pepper
Upstairs the bedrooms are coming along with some art up on the walls, layered cozy bedding, and even headboards. HUZZAH! Still need to hang all the curtains up there (once we do that the headboard will look exactly as wide as the window because we are tricky tricksters). Stay tuned…
rug / large art / lamp / side table / striped blanket / headboard / fan
This is another view of that front bedroom, which is the largest of the four (the bunk room is teeny tiny and the middle bedroom and back bedroom are just fine but not giant). It also has that exposed brick chimney that we discovered hiding behind the wall, and next to it you’ll see my favorite craigslist find of all time that you might have already “met” on Facebook or Instagram when I shared a quick shot of it this weekend. Yes, I really did find an inlay piece of furniture on Craiglist, and yes, it’s currently selling for $2,000 on Restoration Hardware (I got it for $400!). Insert that screaming cat emoji face here. Seriously, it’s the score of a lifetime, and I’m going to share the whole story, including how I fix up a few missing inlay spots soon. So… stay tuned. Again.
And before we move on, that sconce looks crazy small above the dresser (we just hung it as a placeholder and it’s looking like a placeholder, so we’ll probably get a wider double-sconce for that spot soon). Anyway, on with the tour! Or should I say “roll the next flashback!” This is that wall a year ago. Same house. Just nekkid a year ago versus clothed now. With walls. You get what I mean.
And now, the back bedroom. Aka: our room whenever we stay there! Although the front room is the largest and has that lovely exposed brick, the back bedroom has its own master bathroom (complete with my big beautiful clawfoot tub) and it has its own stairs that lead up to it, which are surprisingly useful. We originally thought those back stairs would be more of a fun thing for kids and a cool historic detail to preserve, but we weren’t sure we’d actually use them very much but we go up and down them all the time!
rug / fan / leather stools / striped duvet cover / pocked doors: SW Riverway
One of our bigger projects this past weekend was this built-in dresser that we added to the nook behind the pocket doors that you see above. We love gaining some storage and function in that formerly blank area at the top of the back steps, and there’s more than enough room to pull out the drawers and take like five steps back before you’d fall down the steps (you know I’d be the one to bite it all the way down these steps, so we have to make sure these things we’re adding won’t curse me later).
dresser / mirror / wood top / door color: SW Riverway
John would be quick to point out it’s not complete. We ran out of nails for our nail gun, so the trim still needs to be attached, caulked, etc. But basically, a Malm from Ikea fit pretty perfectly in the space, so we made it look even more built-in by removing and reinstalling the molding around it (see below) and adding a few skinny filler pieces to each side (scraps from our kitchen install). We also popped some leftover butcher block counter from downstairs on top to tie into the pine floors and we’re also planning to add some leather pulls to it to tie in the stools at the foot of the bed (you can see them in the shot two photos up). Can’t wait to finish it up and share the final pics!
Next let’s move onto the master bathroom, which is easily my favorite room because I get to soak in that big ol’ tub after hours of DIY and it feels so freaking good every time. Except for the first time. I had sort of a false start in there (more on that in this podcast) but now the tub and I are bros and only happy things happen when I’m in there. And the kids love it too.
marble table / floor tile / accent floor tile / wall hooks / blinds / tub color: SW Riverway
I’m basically salivating while looking at this because we’re back home and our house has two bathrooms that we still have to redo and two tubs that are about 10″ deep (half of my body sticks out like an iceberg) so I’m itching to add a deeper bathtub into my life here at home.
The hall bath is still my boo too, thanks to my favorite vanity ever. The top is tiled with marble and the rounded wood drawers make it look like a furniture piece we converted to be a vanity but it came that way and WE SALUTE IT because goodness knows we have other stuff to keep us busy. Still on the list: making built-in bunk beds, building out the pantry and the mudroom, tiling the backsplash, landscaping, etc, etc. That big round silver mirror is an awesome (and recent!) HomeGoods find (the same one in brass hangs above our mantel at home) so if you’re looking for one in either color, try HomeGoods. Target also has a really similar one that’s slightly smaller and thinner in gold.
vanity / faucet / drum stool / light fixture / floor tile
And although we haven’t built the wall to wall bunkbeds in our small-but-mighty kids room yet, we did hang art. And that’s half the battle, right? (Nope, half the battle is being halfway done with the bunkbeds, but let me lie to myself for a second, ok?). That cute colorful painting is from our dear friend Lesli Devito (remember when we house crashed her wayyyy back here) and if you don’t have one of her paintings or prints I highly recommend getting one. The door also got a sign that says Mermaids Welcome and it made my whole life to hang it up (also we took a poll among a bunch of kids and basically everyone is cool with mermaid and pirates, but don’t get me started on how split the group was on dolphins).
marble table / mermaids welcome plaque / art by Lesli DeVito
So there you have it: a tour as of yesterday of the beach house (remember: watch the video! it has approximately 98% more info than some pics and captions can convey). Also, we hope you have a very happy holiday surrounded by the ones you love and delicious food and all the mermaid-related memorabilia that your heart desires. And if you have a tub where your entire body can be submerged, know that I, for one, now know what I’m missing and am deeply deeply jealous.
P.S. To see the entire process of fixing up this beach house (from floor planning and demo to tiling and tiling and tiling and getting the floors redone) here’s a full category of beach house updates for you to flip through.
*This post contains affiliate links*
The post Beach House: End Of The Year Tour! appeared first on Young House Love.
Beach House: End Of The Year Tour! published first on http://ift.tt/2qxZz2j
0 notes