#pre-finished 5/8 thick
Explore tagged Tumblr posts
Visit Tumblr Blog
Explore Tumblr blogs with no restrictions, modern design and the best experience.
Last Seen Tumblr Blogs


Fun Fact
28.6 is the average number of monthly visits per US mobile user.
Photo

Library Vancouver Example of a huge trendy open concept light wood floor family room library design with a standard fireplace, a tile fireplace and a concealed tv
0 notes
Text
Humans are —
Chapter 2
Four chapters! This is gonna have four chapters now since I've been enjoying updating in smaller increments.
Some tags: Reader-insert | Female-reader | Platonic x reader | Fluff | Sickfic | Post-Season 1, Pre-Season 2
Words: 2k+
Chapter 1 | Chapter 2 | Chapter 3 | Chapter 4 | Chapter 5 | Chapter 6 | * | Chapter 7 | Chapter 8 | Chapter 9 | *²|
Chapter 10|
~
Aziraphale’s determination was a force of nature in itself, and any protest you might have mustered was effortlessly steamrolled by his resolute fussing. You weren’t even sure how it happened, but before you knew it, your teacup was empty, and Aziraphale was back at your side, plucking it from your hands when he noticed that you'd finished.
"Good girl. Now, let's get you upstairs. It's much cozier up there."
You weren't sure how that could be possible, considering the way the homey atmosphere of his bookshop alone seemed to sap all your energy away, replacing it with a deep sleepy warmth, but something told you if you ventured to find out you really wouldn't be leaving tonight.
The look on your face must have tipped him off to what you were thinking and he stopped with a sigh, tilting his head almost sympathetically.
"Come now, don't pout. It’s for your own good," he said, gently but insistently helping you to your feet. The blanket around you shoulders slipped slightly as you stood, and Aziraphale hurried to wrap it securely around you again as a makeshift cloak before taking a careful hold of your arm.
As he guided you to the staircase, Crowley was still sprawled comfortably in his chair, legs stretched out and crossed at the ankles on a ottoman with his gaze fixed disinterestedly on his cellphone as you passed by. His eyes only flicked up for a moment with a smirk when you made a nasty face at him, having firmly settled on blaming the demon for the predicament you were now in.
Aziraphale hovered just behind you the whole time, one hand gently resting on your back as if worried you might collapse while ascending the spiral staircase.
"Careful now. Watch your step. There's no need to rush."
"I’m not dying, you know. It really just feels like a cold." you muttered, though the protest came out weaker than you intended.
"No, but you’re unwell, and that’s reason enough to take precautions," he replied with a kind matter-of-factness.
"And I'm not a child," you clarified, taking up a bit of bitterness with the angel since this level of fussing was over the top, even for him. You stoped on the stairs to look back at him exasperatedly, quickly growing more and more self-conscious about all the attention.
"Indeed. Which is why I expect you to have the good sense to listen," he countered again gently, giving you a look that was equal parts steadfast and understanding. "Now up you go, or I'll have Crowley carry you. The sooner you're settled, the sooner we'll all feel better."
You groaned again, dragging your feet as much as you could manage, but the angel had a way of shepherding you around with surprising ease for someone who so often only fretted and fluttered. He paused only briefly at the top of the stairs to straighten your blanket again before ushering you into the small, neatly kept guest room.
His 'guest room' was as warm and inviting as the rest of the bookshop, with soft lamplight casting a warm glow over the antique furniture and ever abundant shelves lined with books. A thick quilt adorned the old but ornate bed, and the sight of it made your resolve waver again as the growing weariness was tempted by the urge to fall into it.
"There we are," Aziraphale said, motioning you to sit on the edge of the bed. "Now, you stay put and I’ll go fetch those bed clothes."
"Azi, you really don’t have to do all this. You're acting like I'm on death's door."
But he'd disappeared briskly into the adjoining room, and simply sitting in the bed's edge was enough convince you of how comfortable it would be.
You sighed, slumping slightly as you pulled your blanket tighter around yourself.
Before you could dwell on your predicament further, Aziraphale reappeared, carrying what looked like a nightgown over one arm and another blanket under the other. He set the blanket down on a side table before holding up the nightgown with a satisfied smile.
"Here we are! It’s nothing fancy, but it will do nicely for the night."
You stared at the garment, blinking. It was impossibly vintage, floor-length, with lace trim and delicate embroidery that looked like it belonged in a Victorian period drama.
"Aziraphale, I can’t wear that."
"Of course you can," he insisted cheerfully, draping the gown over your arm. "It’s warm, it’s modest, and it’s far better than sitting about in damp clothes."
"They’re not damp anymore," you tried to argue, gesturing to yourself.
"Ah, but they’re hardly suitable for sleeping in, are they?" he countered with a knowing smile.
Right, he really did intend for you to stay the night...
"I'll be heading out then!" Crowley's voices rang from downstairs and you panicked. That was your ride, after all.
"Crowley, wait!" You jumped to your feet, the blanket slipping off your shoulders as you dashed to the top of the stairs. "Crowley!" you called again, gripping the bannister as you decened a few steps to catch him.
He was already at the door but paused to glance back at you. "What?" he drawled, his tone oozing disinterest.
"Y-you're my ride!"
"Relax, love,” Crowley called back, "Angel’s got it all under control, doesn’t he? You’ll be juuust fine here."
"But..." you mumbled, your voice climbing in pitch as you realized he wasn't bluffing.
"Besides," the demon continued, "Rain might've cleared up by tomorrow morning, anyway. I'll take you back to your hotel once you’ve slept off whatever plague you’ve caught."
"Actually," Aziraphale began, coming quickly up behind you to pull you back upstairs with a disapproving shake of his head "She’ll be staying here tomorrow as well, until she’s well enough to leave. Won’t she, Crowley?"
"Yes, sure, whatever. May I go now?"
"Of course, and thank you for the delivery!" Aziraphale nodded to the demon politely as you were once again sheparded back upstairs and into the guest room, the click of the door as Crowley left was the nail in your metaphorical coffin, leaving you to wonder if he'd only been referring to the books the demon had stopped by with.
"See? All sorted. Crowley understands. Now, No. More. Fussing." He chided ever patiently and took a step back, picking up the nightgown from where you'd tossed it onto the bed and handing it to you again. "Get changed, and if you insist on discussing this further, I ask you to wait until tomorrow. When it comes to humans, something as simple as a good night's rest can do wonders for the body and the spirit. I'm sure you're outlook on the situation will have improved in droves. You're just a bit frazzled after getting caught in that dreadful storm."
You stared at him, flabbergasted by his utter certainty that you’d concede defeat. But truthfully, maybe you already had. There was no fighting Aziraphale when he was like this.
The only person that really stood a chance was Crowley. And you knew he wasn't likely to offer you an escape; not with the way he seemed to enjoy watching this go down.
With a resigned sigh, you examined the nightgown in your hands.
"Fine..." you relented.
Aziraphale smiled triumphantly. "I’ll give you some privacy then," he said quickly, slipping out of the room so you could change.
As you undressed and slipped into the nightgown, you couldn’t help but laugh softly at how ridiculous you looked in the mirror. The lace trim tickled at your wrists, and the embroidery along the seams seemed too detailed to belong on a garment that anyone was actually expected to sleep in. Still, the fabric was soft and comfortable, and by the time you finished tying the tiny ribbon at the neckline, you had to admit you felt considerably cozier.
It's just one night, you thought to yourself. Maybe two tops if you couldn't convince him you were well enough by tomorrow morning. So... you finally decided to accept defeat.
You cared deeply for Aziraphale after all, so his company was always welcome, and this wouldn't exactly be your first night spent in the bookshop. You'd be lying if you said you hadn't fallen alseep on one of the loveseats downstairs before and woken up nearly swaddled the next morning with the Angel overjoyed to have had you stay the night, even if accidentally.
This was no different, right?
Aziraphale reappeared with a gentle knocking from outside the room, waiting for your confirmation before stepping back into the room. His face lit up the moment he saw you in the nightgown, a delighted and almost prideful smile spreading across his features as he clasped his hands in front of his face.
"Ah, doesn’t that look lovely!" he said as he hurried to your side. "I'd say it suits you rather perfectly, don't you think?"
You gave a weak laugh, pretending to fiddle with one of the lacy cuff as a way to hide your bashfulness. "If you say so."
"Indeed I do." Aziraphale’s delighted smile softened as he noticed the faint weariness tugging at the edges of your expression. "Now then, my dear," he said, folding back the large quilt, "let’s get you properly settled."
The soft-spoken certainty behind his words was what finally had you give in, and with still only a small drag of your feet as you closed the distance, you slid into the bed.
As soon as you did, he began a flurry of small tasks; seemingly materializing a small decanter of ice water and a glass to set on your bedside table, leaning around you to fluff your pillow and then carefully resting both hands on your shoulders to ease you into laying down.
You gave him a funny look your head sunk into the pillow, embarrased by the way as he seemed to feel the need to take every little action into his own hands,
"If Crowley saw the way you were fussing around like this, he'd never let either of us live it down."
"I do not fuss!" Aziraphale corrected certainly with a huff and folded the quilt over you, pulling it snuggly up to your shoulders. "And don't you mind him," he added dismissively, fetching the extra blanket he'd set side earlier and unfolding it to drap over you as well. "He enjoys teasing, but I know he'd never dare mock you in earnest." Finally, the heavy knit blanket you'd come upstairs with was picked up and thown on the top, adding that extra bit of weight that forced you to sink into the soft mattress completely.
He adjusted all three until they layered over you perfectly, and you raised a hand from underneath, attempting to help straighten them yourself.
"I can do this part," You reassured, only to be tutted again as the angel gripped the edge of the blankets and pulled them up to your chin this time
"I’m sure you can, but you won’t," Aziraphale said matter-of-factly, his tone leaving no room for argument. "Not while I’m here to help. You need only to rest~ Really now, one would think you'd never been cared for properly before." He muttered and you averted your gaze, feeling considerably vulnerable as the angel loomed protectively over you until satisfied with his work. "There we are," He said, his voice almost a whisper as he nodded proudly at a job well done. Clearly beyond proud to see you "properly" bedded down. "Are you quite warm, enough, dear?"
"Perfectly toasty." You admitted with a light blush and a sniffle.
This seemed to remind him of something and he quickly excused himself before hastily returning with a box of tissues that he set beside the water on the nightstand.
"Thanks..." You said quietly, unsure of what more you could express in this moment besides your thanks.
"Of course! You should have everything you need to soldier through the night!"
You giggled at that. He made it sound like you were fighting for your life from atop the soft sheets and under the heavy blankets.
The angel glanced around the room hurridly for a moment more, lingering on your area the longest as if deciding if there was anything else to be done. "I suppose that's all for now then, hm?" He stated rhetorically and you gave a small nod. "I'll leave you to get some rest then, do call if you need absolutely anything," he stressed, "or better yetー" He raised his hand and a small tinkling sound was heard. "Ring this," He amended, a small bell now gripped between his thumb and forefinger that he set softly on the nightstand. "No need to strain yourself more then necessary after all~"
You giggled again. "Pfff... sure," you agreed, knowing full well that bell would never be touched.
"Then I will leave you to it! Do get some proper rest tonight, won't you?" The angel gave you a bit of a pout and a pleading look.
"I'll do my best." You sighed, but you wouldn't have to do much of anything considering the way your eyelids and body had grown increasingly heavier since being tucked in. Everything had been orchestrated perfectly to ensure you stayed put after all.
"That's a good girl." He cooed as if truly proud of you for making the right choice.
Then, to your mild surprise, he began collecting your clothes from where you'd left them on a nearby chair.
"What are you-"
"Just tidying up," he said quickly, his tone light and casual. "No need to worry. I'll have these cleaned and pressed by morning."
"Ah..." You made a small hum of acknowledgment before nestling further under the covers with an air of finality. You weren't sure your clothes had ever been "pressed" before. Whatever that meant exactly. But you were sure it could only be a good thing if Aziraphale was the one doing it.
He folded your things before tucking them under his arm with a cheerful hum and then turned to leave, pausing briefly to do a double take when he noticed your shoes sitting bed-side on the floor.
The angel pursed his lips in thought, giving them a critical once-over before glancing to you. When he saw that your eyes had drifted closed, he hurried over with the lightest of steps and plucked them off the ground, tucking them quickly– and out of sight– under the rest of your clothes.
You must have sensed his presence because your eyes fluttered open again. Aziraphale froze as if caught in the act of something at the foot of the bed, but you only squinted curiously, having grown sleepy enough that you hadn't the mind to actually be suspicious.
He responded to your tired gaze with an acknowledging nod, lifting your now neatly folded shirt and jeans a tad, as if to say, 'nothing to see here!'
You made a sleepy hum and let your head lull to the side again, sinking slowly back into the pillow.
The angel shook himself back into form with a quick relieved huff, and with quiet steps once again, took his leave of the guest room as to not disturb you further.
He stopped only once on this way out the door to take a final glance back at you.
You'd rolled over, your back to him now with one of the bed's extra pillows hugged to yout chest in a makeshift snuggle.
Aziraphale smiled softly and proudly at the sight, knowing it meant you were really comfortable.
So with a guided click of the door, he wished you a quiet goodnight and stepped out into the hall to headed for his study.
"The sweetest of dreams, my dear."
~
Small question to anyone reading through this so far, especially if you've read any of my other works.
When writing for Aziraphale and Crowley, I've found that I focus so much on getting their way of speaking right that just going over and over it takes up most of my writing time, and I'm a little worried it could be affecting my usual tone.
So lemme know!
If you're not familiar with my other stuff that's okay too, just let me know if you think the tone feels a bit off, I guess? It's been bugging me a weird amount lol. Since I'm in such a different headspace when writing for GO than I am for characters whose dialog just flows naturally for me.
#good omens#GO#crowley#aziraphale#anthony j crowley#ineffable dads#platonic good omens x reader#good omens x reader#I also have an ao3 if you prefer reading over there#same username
23 notes
·
View notes
Text

Made a new bathroom set.
Supplies:
Hooks: 2.5 mm, 3.75 mm, 5.00 mm
5 skeins of Knitpicks Dishie (100% cotton, 190 yards) colors A, B, C, D, and E.
2 skeins in color F.
Pre-punched 6 in., round basket bottom (like this)
Special stitches:
Moss stitch: Sc in first stitch, *ch 1, skip 1 stitch, sc in next stitch. Repeat from * across, ending with a sc.
Notes:
Depending on how closely each skein of Dishie is to its promised yardage, you may end up with a bit less yarn than you need to finish a final row. Frog back to start of previous round and pick up next color, or you can simply add the new color where the short color ends if you like how it looks.
Order of operations to guarantee you have enough yarn for all parts is as follows: Complete first 7 rows of towel, then complete washclothes, then complete the basket, then finish towel. The instructions are written with this in mind.
Towel Start:
With 5.00 mm hook and Color F, Chain 126.
SC 125 across. Ch 1. Turn.
SC across. Attach Color A in final stitch. Ch 1. Turn.
In color A, complete a row of moss stitch. In the final stitch, attach Color B. Ch 1. Turn.
Repeat previous row with Color B. In the final stitch, attach Color C. Ch 1. Turn.
Repeat previous row with Color C. In the final stitch, attach Color D. Ch 1. Turn.
Repeat previous row with Color D. In final stitch, attach Color E. Ch 1. Turn.
Repeat previous row with Color E. Leave a loop open and set aside.
Washcloths:
Make 5, with main color A, B, C, D, and E and trim with Color F.
With the 5.00 mm hook, Chain 40.
SC across chains (39 sc). Ch 1. Turn.
Complete a row of moss stitch. Ch 1. Turn.
Repeat last 2 rows until you have 39 rows (you end on a single crochet row). Fasten off.
Join Color F to any edge stitch of the washcloth. SC evenly around all 4 sides, working 3 sc into each corner stitch.
Basket:
You will work all rows with yarn folded double. You can pull from the center and outside end of the Dishie skeins to make it double thickness.
With the 2.5 mm hook and Color A, work 2 sc into every pre-punched hole in the basket bottom. Join with a ss to first stitch. Ch 1, continue working in spiral rounds throughout. Switch to 3.75 mm hook for all other basket rows.
Work 7 more rows with Color A in sc, joining with a ss at the end of each row and ch 1 with no turn. Before join at the end of row 8, join Color B.
Work 8 rows of Color B, changing to color C in final stitch before joining.
Repeat last 8 rows with Color C, then Color D, then Color E.
With Color F folded double, work 1 row around. Join with the ss and fasten off.
Towel finish:
Picking up from open loop of Color E, attach Color F and work 40 rows of sc. Fasten off. Weave in all ends.
6 notes
·
View notes
Text
Trying out a new craft
ShannonMakes did some neat videos about using English Paper Piecing as a way to have an ultra portable project. I remember, many moons ago when I was in college, all the talk about EPP was that you needed perfection in cutting the paper, glue or freezer paper methods, mountains of thread and almost 8 yards of fabric for a twin / single quilt ( 55" by 83" on average.)
Obviously the fabric usage hasn't changed.
Due to laser cutter and other automatic cutter prices, you can buy about 300 bits of stiff cardstock for about 15$. The average 1.5" by 3" wide hexagon needs about 700 ish hexagons for a basic twin sized quilt. (Go here for a calculator. While it doesn't account for odd shapes, you can still use estimation for other shapes.) You can reuse cardstock.
A lot of people on the internet talk about using various automatic cutters for fabric, but I'd sooner play around with a craft with minimal supplies before I buy things to make it faster. The internet swears on seam allowances from 1/4" up to under 5/8". Other people use charm squares / circles, since your main accuracy is from your paper shape.
I'm using a quilt as a random "use case" option, but obviously you could do curtains for sun blocking / warmth or use the finished fabric for bags / cushions / fabric.
Why is it portable? Imagine a pile of paper shapes, a needle, a thimble because you love the skin of your hand, a spool of thread, your pre-cut fabric, and some sort of thread snips. That could fit in a bag the size of a generous paperback. Since each hexagon can be paused mid sewing, you've got something where you can drop everything if needed. Once you've run through all your hexagons, you can then start sewing them together. This means you get two "activities" out of one batch of supplies.
With hexagons around a central hexagon, you can remove the paper, and continue as you wish. (From a second hand aspect, Shannon recommended interfacing dubious fabrics or packing a lining fabric and cutting thick fabrics to a larger seam allowance. She also said the basting step could totally use rotten / weak thread if you have thrifted some shady thread.)
Why does this interest me? I have issues thrifting fabric in the area, since our local stores rarely have good options, but Swanson's Fabric has charming people running it and adorable themed bundles.
So, I picked up some fabrics I loved, intending on using them for garments, looked at Shannon's video, and decided to try a new craft.
Just for accountability, cost outlay was 50$ for the fabric, 5$ for some sewing clips which I wanted to pick up anyways, and 15$ for the paper pieces. I've got an old sheet that could be backing fabric, or I could spend another 50$ to do the back side of the quilt. On average, actual quilt backing fabric tends to be about 40$ for the "right" sized panel. The average price for twin sized quilt batting seems to be about 30$ for higher end stuff, but I haven't checked local stores.
A "better" quality half poly twin sized quilt (not ethical, or by a quilting artist, mind you,) runs about 130$ and fully cotton quilts (with the same warnings) tend to be 250$ from what I've seen. Knowing I could turn a project into a cozy, economical, and ethical quilt in exactly the colors I love is exciting, no?
2 notes
·
View notes
Text
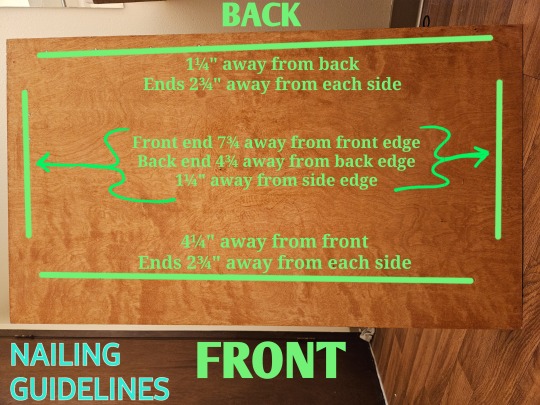
Extremely Strong Shower Bench
I've gotten feedback from the community asking me to share my plans, so here it is. If you want to build your own shower bench, this is how you do it. Make sure to ask a thinno for help, this will not be easy to do!
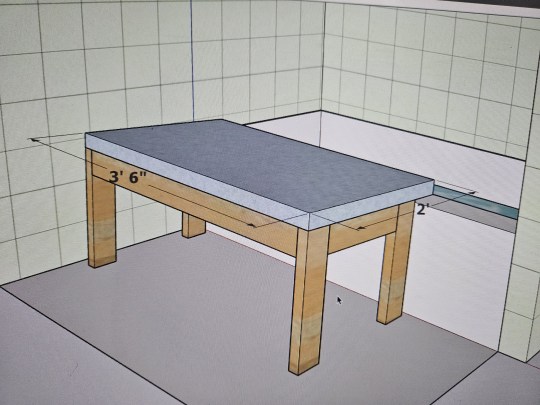
This is an extremely strong shower bench with a 1000+lb capacity. The floor under you will fail before the bench does! This shower bench is designed to remove you from the shower and basically have you sit on the ledge. You will need a couple feet of clearance away from your tub's ledge for it to work.
The top of my tub's ledge is about 1' 3⅜" up from the ground. If yours is taller/shorter by more than ¼" or so, you will need to make some adjustments to measurements down below.
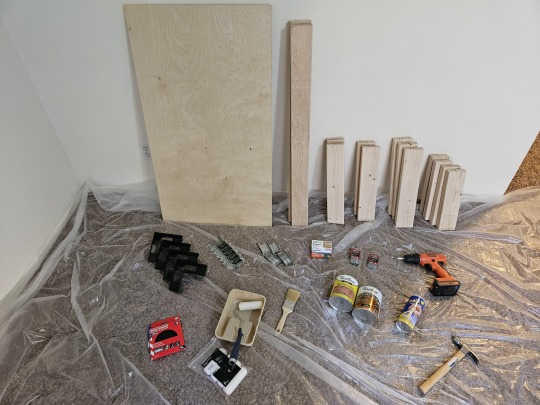
This is a photo of the materials I used to make this build. I got everything I needed at my local hardware store. My build wasn't perfect though. I would suggest you learn from my mistakes and acquire a slightly different material list though:
1x 2'×4' plywood sheet. Get something pre-sanded and rated for outdoor use. I recommend ¾" thick.
2x 8' 2×4s. Most any wood type will work, so get what you like most. I just got some normal 2×4s and made sure they looked pretty. If you don't want to bother with staining or weatherproofing the structure of your bench, get pressure-treated 2×4s.
4x 2' ½"×½" square dowel.
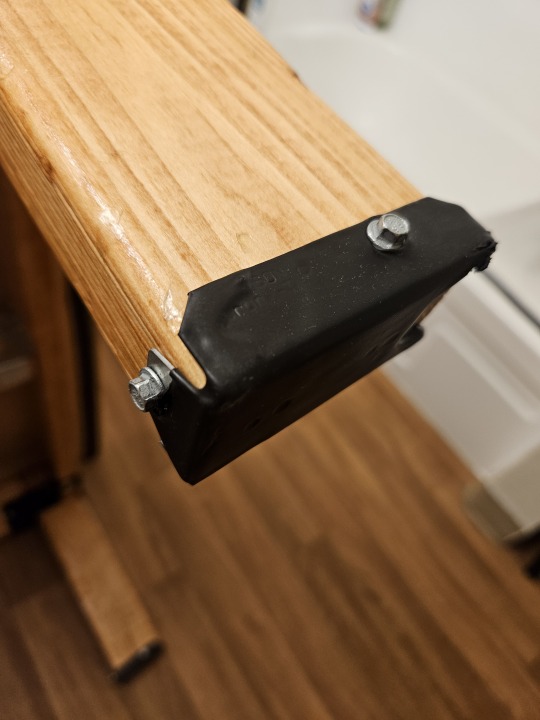
4x Simpson Strong-Tie RTC2Z. Get the black-powder-coated ones if you can.
2x Simpson Strong-Tie LUS24Z. These will be used for the cross beam.
4x Simpson Strong-Tie FB24Z. These will be the feet.
1x Simpson Strong-Drive SD9112R100 #9×1½" 100ct Connector Screws. You won't use the whole box. It comes with a bit.
4x 3" common nails.
32x 1½" common nails.
35x 1" brad/finish nails.
200-220 grit sandpaper.
Oil-based high-gloss polyurethane.
Small dense-foam roller & roller pan.
If you're applying stain, oil stain & staining brush for oil stain.
Liquid rubber. Get something that will provide grip.
Rubber-foam weather stripping. The thicker and wider, the better. I got 20' of 1¼"×7⁄16" and it worked great for me.
4x paper clips, hair ties, or something to hang the feet from.
A plastic tarp, thickness is more important than size.
As for tools, you really only need two things:
Hammer
Drill, ratchet, or socket screwdriver
OPTIONAL: File or knife
I also highly recommend some PPE. Get some cheap/disposable cleaning gloves, a mask of some type, hair ties for your hair, and an old change of clothes.
If you don't have access to a table saw at home, *don't leave the store yet!* You need to cut your wood at the store. Many home improvement stores will cut your lumber for you, either for free or for a low price.
Ask an employee to cut the two 2×4s like this:
2×4 #1: 38", 38", 17"
2×4 #2: 33½", 33½", 13", 13"
NOTE: If your tub ledge was taller/shorter than mine, then for every 1" difference, lengthen/shorten each 33½" cut by TWO inches.
Then ask them to cut two dowels down to 20½", and two down to 24".
You should also ask them to take 6" off the short side of the plywood, so it's 2'×3½' instead of 2'×4'.
You're not ready to leave yet! You need to make two more cuts, and the store employees will not help you with these. Many home improvement stores will have a DIY handsaw table where you can cut moulding down to length. You'll need to use this to make the last two cuts yourself.
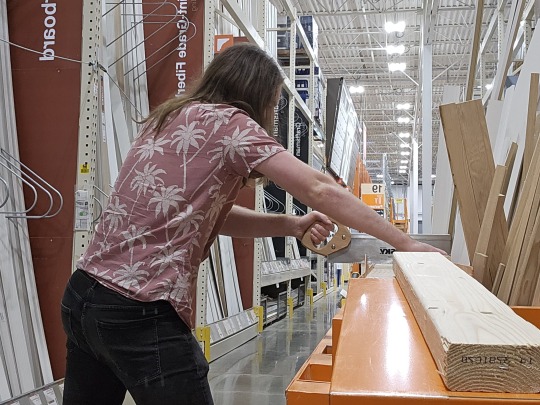
You need to make an ANGLED cut into the 33½" boards. Lay the first 33½" board down flat as shown. On the edge closest to you, mark a point 1' 5⅛" away from the left end of the board. Then on the edge farthest from you, mark a point 1' 5¼" away from the same left end of the board. Position your saw across both points, and cut through the board. You may need to roll the board over to finish the cut.
NOTE: If your tub ledge was taller/shorter than mine, then for every 1" of difference, add/remove 1" from the 1' 5⅛" / 1' 5¼" measurements above.
For the second board, *do not measure!* It is more important that the cuts in the boards be identical than it is for any one cut to have exact dimensions. Lay the second board down, then set one of the cut pieces on top so the ends of the two boards are aligned, then use the existing angle in the cut piece to start the cut in the second board.

When you are done, you will have four boards, two slightly taller than the others, with the exact same angle cut in all of them. In the above photo, the boards are resting on their angled ends. These pieces will be your long and short legs.
NOW you can bring everything home.
First, lay down your tarp somewhere. Ideally you'll have access to a 5'×10' flat area outside.
Then you need to sand *everything* (except the big faces of the plywood, and the pressure-treated wood if you went that route). Pay special attention to the corners and cuts in the wood.
Now you need to attach the square dowels to the outside of the plywood board. Choose a face of the board to be the "up" face, the one you'll sit on. Put the 24" dowels on top, right along the short edges. Choose a long edge to be the back, and squeeze the two shorter dowels in along it between the side dowels. Nail everything down with the finish nails.
Next is staining, if you chose to stain. Apply according to the directions on the tin. You will likely have to do multiple coats.
Now the truly hard part, applying polyeurethane. I recommend using the foam roller for this and applying many coats. You can prop up the plywood sheet using the 2×4s if you like so you can get all the way around the edges in one pass. You'll still need to flip it over and do three more passes when done with the top, so you can protect the underside from warping.
While waiting for your polyethylene to dry, you may as well make the rubber feet. Grab your four FB24Zs and tie something through one of the holes in the end. Open your can of liquid rubber and follow the instructions to fully submerge each one before leaving it out to dry. One coat should be enough. Once dry, try to remove excess rubber from the inside using a file or knife.
When everything's had a good long dry (at least a day after final coat), it's time for assembly.
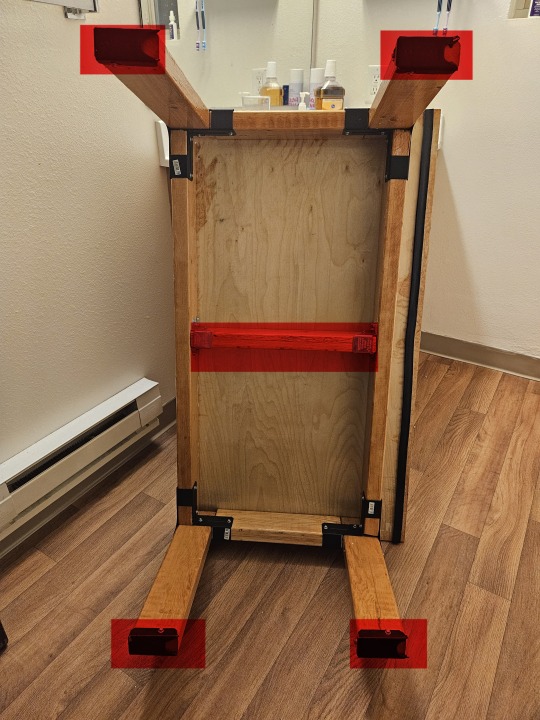
Grab your two 38" boards, your two 13" boards, all four of your legs, and your four RTC2Zs — everything except what's highlighted red in the first photo above. Set the 38" boards down on their narrow side along the long edges of the board, and the 13" boards down on their narrow side along the short edges of the board. Bring them together to form a rectangle, then set the RTC2Zs upside-down on the corners. Each RTC2Z has an L-shaped hole in its bottom; the top/bottom of each L-shaped hole will be filled by the ends of the 38" boards, while the center and left/right of each hole will be filled by the legs. The ends of each 38" board will butt against the wide side of the legs, while the ends of each 13" board will butt against the narrow side of the legs. Now make sure everything is pressed firmly together as you use the Strong-Drive screws to attach the RTC2Zs to the 38" & 13" boards. For each corner, four screws go into the 38" board and two screws go into the 13" board. *DO NOT ATTACH THE LEGS YET!* The legs are just here for spacing right now. Remove the legs when everything is attached.
Grab your 17" board and your LUS24Zs. The 17" board should squeeze in nicely right in the middle, turning your blocky 0 into a blocky 8. Straighten out your LUS24Zs if needed (mine were bowed outwards too much), set them down over the ends of the 17" board, and use 4 screws each to attach them to the sides of the 38" boards. Now grab your long 3" nails and use two on each LUS24Z, installing them at a 45° angle into the remaining holes. They'll nail at an angle into the 17" board and go straight through into the 38" board.
Flip everything over such that the plywood board is now resting good-side-up on top of the mostly-complete frame, with the whole thing resting on the rounded bottoms of the RTC2Zs. Center the frame between the left and right sides of the plywood (should be ½" overhang on each side); let the plywood's back overhang ½" off the back of the frame, and its front overhang 3½" off the front. Now use the 1½" common nails to nail in the plywood into the frame. I used four lines of nails, one for each outer board; measurements are in the second photo above.
OPTIONAL: Apply a final polyurethane coat over the nail heads. This will need a day or two to dry.
Screw the feet into the ends of the legs. See the third photo above for a reference. Try to make the feet as straight and snug as you can get them.
Insert the legs into the holes left from step 1. The short legs go in on the front side, and the long legs go in on the back side. You should have a bench that tilts slightly forward, to allow for water to drain into the tub. Use some sort of material as a spacer as necessary to adjust each leg to level out the bench. Don't be afraid to introduce gaps between the legs and the plywood; the metal connectors are what hold the weight. Once everything is nice and level, use six screws on each leg to attach then to the RTC2Zs.
Apply your rubber-foam stripping. I applied stripping all along the length of my tub's ledge AND along the underside of my bench.

And you're done! Your bench will look different than the photo above, I hadn't yet added the stripping, the wooden dowel siding, or the feet. And perhaps you chose a different stain color, or made your legs out of pressure-treated wood! In any case, this thing is built like a tank (made with actual home framing materials) and shouldn't break easily. I hope it serves you well!
17 notes
·
View notes
Text


No. 17 - 2012
Character: Erza Scarlet (Armorless ver.) Series: Fairy Tail by Mashima Hiro
Cosplayer Credits: - Natsu : My brother - Gray : Jaiden - Lucy : Kirky
Photog Credits: - Axel - David Ho - Nikki Smith Photography
==========
This is genuinely one of my absolute favorite costumes, and one of the ones I'm still so proud of today!
Like Shiki, I decided to make this particular version of Erza's because I saw an opportunity to make something I'd always wanted to make: a hakama! Does she actually wear a hakama? Not really, but who cares?!
==========
My wig is from Epic Cosplay Wigs. The top is two parts. The first was made from white spandex and is essentially a tube top. I then cover it with drug-store gauze that sticks to itself once it's in place. The bottom, which you can't really see, is made from the same white spandex as the top. I made a pattern from a pair of tights I already had only it goes down to just before my knees.
The hakama is made from red denim-like cotton. I used Folkwear pattern 151, Hakama and Kataginu. I used appliqué (HeatnBond Lite) for the flames at the bottom; the fabrics were similar to the red. For my back board, I fused some spare red to a few pieces of 16th of an inch-thick piece of interfacing. It is washable this way but still stiff as a board and bendable like professional hakama.
I originally wanted to do the tattoo with Hollywood Ink Henna pens and a stencil, but when we got to the convention Friday, we saw they had temporary tattoos in all of the colors we needed and we figured that'd be easier and faster. Plus, most of us were wearing things the next day that would've shown the guildmark so we didn't want them to clash. I later bought actual temp tattoo pens from Stargazers.
I made Benizakura to go with this costume in 2017. It is made of 1/4 plywood for the core blade and hilt. The tsuba (guard) is made of 3/4 plywood that I sanded down to about 5/16 of an inch. I also sanded the hilt pieces from 1/4 to about 1/8 so the hilt came to 1/2 an inch. I used thin foam to finish the designs: the over-layer on the tsuba, the swirls on the hilt, and the pummel. Lastly, the tassel is made out of actual tassel, three wooden craft beads painted red, and screw in loop painted gold. The tassel was beaded and then, after strung through the loop, glue into the top bead.
And speaking of late add-ons... I also didn't have the time to make her earrings but I did eventually, so look out for them in some of these shots. They are made out of a half-inch square acrylic rod that I sanded down using a grinder wheel. A friend carefully drilled a small hole for the wire that I twisted, covered with a bead, and attached to a clamp earring, since I don't have pierced ears. Everything was spray painted to match.
Now my brother's costume was also a lot of fun to make. Aside from his height, he really does have a lot in common with Natsu, so it was a lot of fun to be these two. We got the wig from Fantasy Sheep on eBay; came pre-styled.
The scarf was made out of white fleece. Essentially, I made a pillowcase-like piece, inserted a thin layer of polyfoam, sewed the fringes between the "pillowcase"'s sides as it was shut, and sewed the different sections with black thread. I'm very proud of it because it bulges up and sections off like the references.
I used dark navy blue broadcloth for the front fabric and I insisted it should be reversable as per the Tenroujima Arc, I used grey broadcloth as the lining fabric. The trim is gold poly-cotton. I modified a simple shirt pattern I already had as the vest was not very complicated. We actually bought both the belt buckle and interchangeable belt from PiercingPros on Amazon.
Same fabric and idea as the vest, for the "skirt." I measured his waist, marking the middle, and then halving that measurement to add to it to get the bottom measurement, lining up the middles. (In case that was confusing, here's a formula: W = waist measurement; B = Bottom measurement; W + (W/2) = B) It connects at the top, under the belt with hook-n-eye clasps.
I modified the pants pattern from Kouma. I used white broadcloth held up with an elastic waistband. The calf ties are extra navy broadcloth fashioned like trim after bunching the ends of the pants and have hook and eye clasps on the inside seam. The knots are made separately and then sewn into place They were actually made by my friend Kirky.
==========
Erza: Cost: $60 Time: 16 hrs
Natsu: Cost: $60 Time: 10 hrs
==========
This costume has won the following award: - Best Anime Group @ Tate's NOT at ComicCon in 2012
#erza scarlet cosplay#fairy tail cosplay#anime cosplay#handmade cosplay#cosplay with a prop#natsu dragneel cosplay#for my brother#award winning cosplay
3 notes
·
View notes
Text
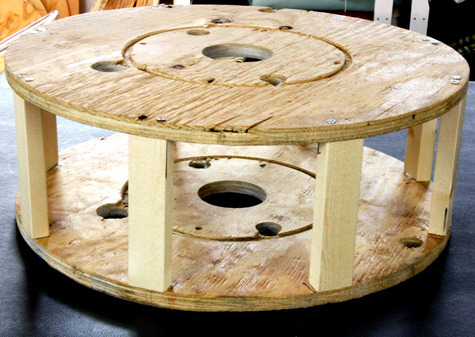
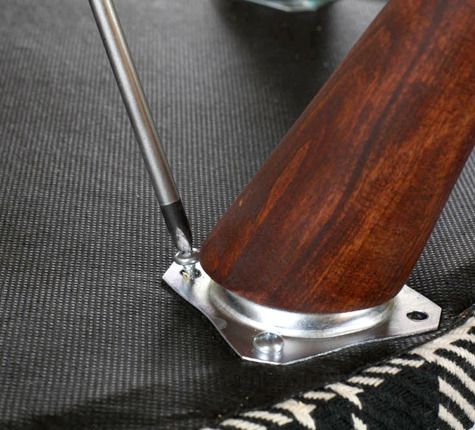
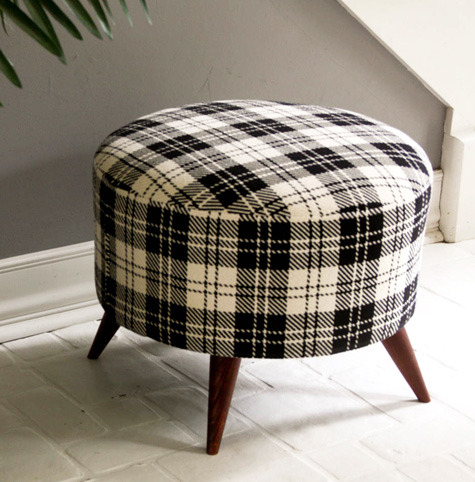
DIY Salvaged Spool Ottoman
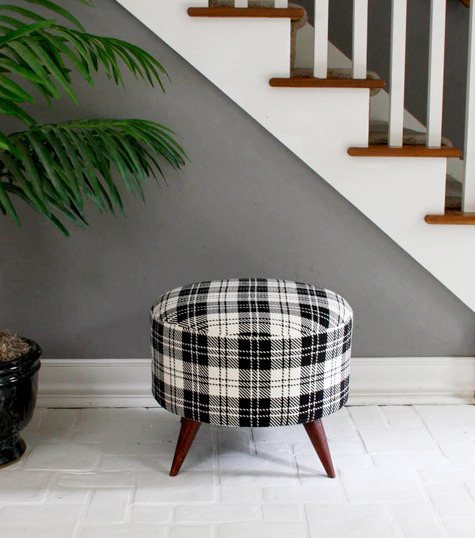
Project by Shelly:
i know ottomans aren’t the most indispensable piece of furniture in the house, but is it criminal to say they bring me the most joy? i think upholstery maven shelly (aka ModHomeEcTeacher) would agree with me; she’s made a whole collection of smart looking ottomans using a range of found fabrics and materials. i am so excited to follow her instructions and craft an adorable plaid ottoman of my very own, just in time to welcome fall. click here to see more of shelly’s amazing work, including her tutorials on everything from upholstering with rugs to aligning atomic legs. thanks, shelly! –kate
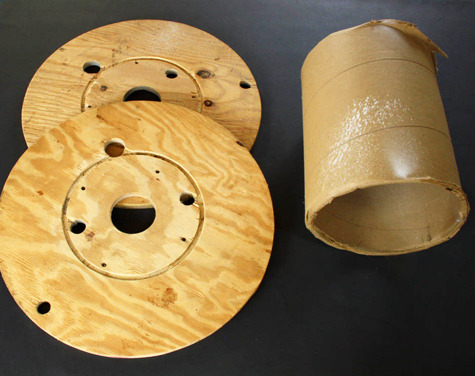
When Lowes stopped selling the pre-cut wood circles I used to construct my ottoman frames, it was a dark day. I soon discovered that cutting perfect circles with a hand-held jigsaw wasn’t easy, or even really possible. Weeks later, while roaming the store searching for an alternative, I discovered the empty electrical spools that are routinely discarded. Two perfectly cut round pieces of 5/8” plywood with a removable cardboard cylinder in the middle? Now we’re talking. With a tiny bit of carpentry, I came up with a way to easily re-work these into frames for my upholstered ottomans. I would label this as a mid-level DIY project that you could complete in a weekend. Once you get the hang of it, you these would make fantastic handmade gifts for friends and family. –Shelly
Materials:
-1 20” diameter empty electrical wire spool (hardware stores usually throw these out, so ask about picking them up instead) -8 pre cut 1”x 2”x 6” pieces of wood (a hardware store will cut these for you) -Wood glue -32 1 ¾” screws -A piece of foam (anywhere from 3” to 6” thick and at least ½” larger all around than the wood) -Spray adhesive (Elmers makes a spray adhesive available at the craft store) -Scrap fabric ( this to attach around the ottoman frame measuring about 8” x 65”. An option would be to use a bendable piece of cardboard) -1 ½ yard of cotton or dacron batting -1 ½ yard of 54” wide fabric -¾” yard of scrap fabric to cover the bottom of the finished ottoman -Thread and straight pins -Staples -4 screw on leg plates (hardware store) -4 fabulous ottoman legs (look around for good legs on cruddy, inexpensive Goodwill furniture)
Tools:
-Big marker -Drill -3/32” drill bit and a 3/8” drill bit -Electric knife -Electric stapler -Scissors -Measuring tape -Flat head screwdriver -Pliers (crescent or needle nose) -Sewing machine
Instructions:
Making the frame:
1. Take the spool apart and make a pattern by tracing the circle on a large piece of paper, adding ½” all around for the seam allowance. The pattern will be used for cutting out the foam, batting, fabric and a dustcover for the bottom. Lay aside.
2. Glue and screw 6-8 posts evenly around the outside edge of one wooden circle, then add the other piece of wood on top of the posts and attach. Be sure to keep the wood circles aligned.
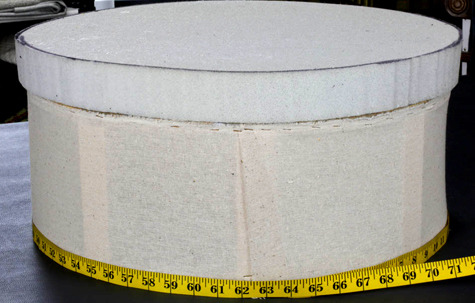
Padding:
1. Use the staple gun to attach the long piece of cotton muslin around the outside edges of the top and bottom circles. Keep fabric pulled taut. The fabric serves to fill in the open spaces between the support posts. Cut off excess fabric. (Option: use bendable cardboard)
2. Trace the pattern onto the foam and cut the foam using the electric knife. Keep the knife blades perpendicular to the foam to get a crisp, even cut.
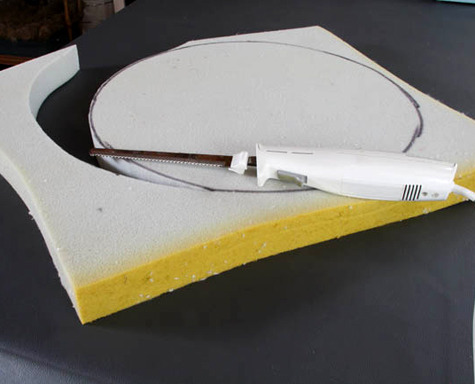
3. Use spray adhesive to glue the foam to the top of the ottoman frame.
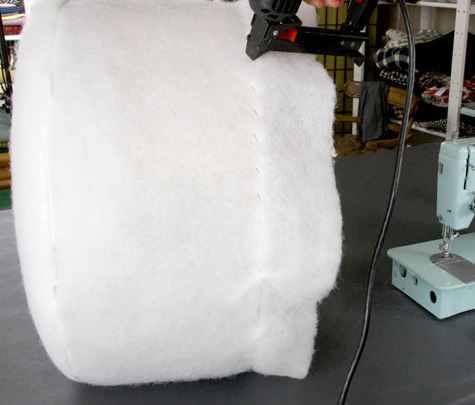
4. Trace the pattern onto the batting, cut out. Also, cut out a long strip of batting equal to the total height of the ottoman, from the top of the foam to the bottom edge, plus two extra inches.
5. Pin the batting strip to the batting circle, starting 1” from the short end of the strip and ending 1” from the other end. Stitch in place.
6. Remove from under the sewing machine and stitch the open seam closed and go back and complete stitching that section of the band to the batting top.
7. Trim off the excess seam allowance, turn the batting covering right side out and pull it down on top of the ottoman frame.
8. Measure and mark the batting band (all the way around the covering ) so that it will be stapled evenly from the top seam to the bottom EDGE of the frame. Do not attach the batting to the underneath side of the wood. Attach it to the edge and cut off the excess batting.
Sewing and Upholstering:
1. To make the fabric covering, which is a bit like a snug slipcover, trace the pattern onto the fabric and cut it out. You’ll need to cut a band of fabric 3” longer than the height of the ottoman and 5” wider than the circumference. If you need to stitch two pieces together to get a long enough piece for the band, split the circumference measurement in two and add 3 extra inches to each piece.
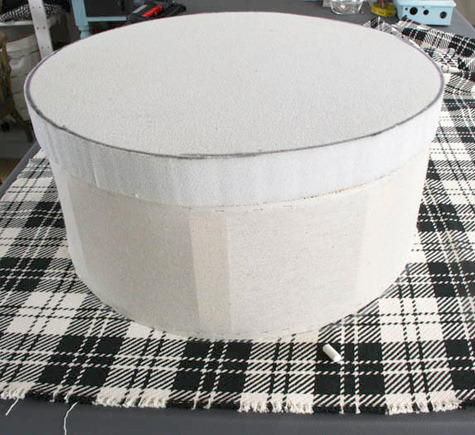
2. To prepare the fabric covering for stitching, fold one short end of the cut fabric band over 1” with wrong sides together. With the right side of the band to the right side of the fabric circle, patterns matching, pin and begin stitching at the folded short edge all the way around to the other short end. Overlap the excess fabric 2” past the folded short end. Cut off any excess fabric beyond the 2”. Pin and stitch the overlapping fabric to the seam.
3. Turn the fabric covering right side out and topstitch the folded seam closed from the bottom of the band to the top seam.
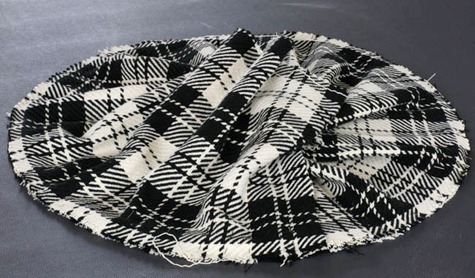
4. Pull the fabric covering down over the dacron covered ottoman. Adjust the fabric pattern and straighten so the pattern or plaid is aligned.
5. Pull the fabric down firmly and staple in place evenly and snugly.
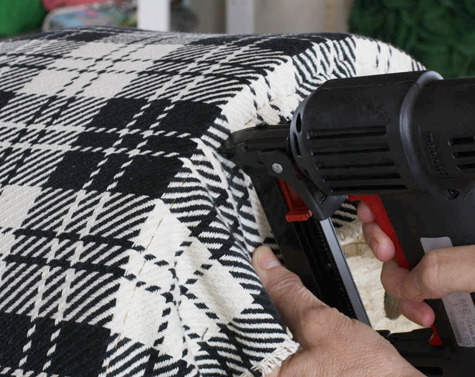
Upholstery Tip: It works best to start with one section and attach with a few staples, move to the opposite side and do the same. Then repeat for the other sides. Attach the fabric between the set staples by smoothing and easing in the fabric.
Attach Legs:
1. Measure and mark the bottom of the ottoman base for leg attachment. Place the leg plates on the marks to make sure they are equidistant from each other. Mark the center hole of the plates. Use the 3/8”drill bit to drill out the center hole. You can also do this step prior to putting the fabric on (as shown below).
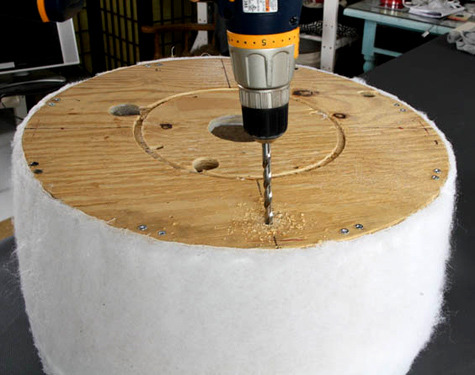
2. Cut out a dustcover from scrap fabric and attach it to the bottom of the ottoman by folding the edge under ½”.
3. Locate the drilled holes, line the leg plates up, screw the leg plates on using a Phillips head screwdriver or the drill. Attach the legs to the plates.
VOILA!
4 notes
·
View notes
Text
my secret to a pie that really drives my family wild every thanksgiving (which has led me to be the only one allowed to make desserts) is i try to use flavored crusts that match up to the pie filling (and invariably not make enough crust so i just make a whipped topping). my go-to is usually cinnamon crusts, since a lot of pie fillings already use cinnamon. here's the one i've been using:
2 cups flour
2 tsp ground cinnamon
1/2 tsp salt
3/4 cup butter/shortening, cold and cut into pieces
3-5 tbsp of ice water
Mix dry ingredients. Cut in the butter/shortening with either a pastry blender or some knives until the mixture has pea-size crumbs. Put in the ice water a tablespoon at a time until the dough comes together. Then you wrap the dough, flatten it into a disc, and then cool for thirty minutes. After that, flatten it into a 14" circle 1/8 in. thick, then transfer to your pie pan. No pre-baking required!
Of course, there's other crusts you can look into, but most importantly, a LOT of them don't really require eggs! If you want that glossy finish on the latticetop, then i guess you need egg wash for that, but again, i'm a genetic freak, and i'm not normal, so i just hand-whip cream.
My fellow American hobby bakers, demoralized by egg prices and scarcity and how you will make the American apple pie or the chocolate chip cookie, fear not. I have spent many years turning regular baking recipes vegan for my corrupt and traitorous sister who last week ate a salmon cream cheesed roll. There are many, many substitutes for eggs including but not limited to:
Mashed banana: best added to compliment flavors of whatever it is you're baking (peanut butter, chocolate) make sure it's MUSHY and ripe
Apple sauce: again, best with complimentary flavors (cinnamon, brown sugar) use unsweetened and have the rest as a snack
The big boy champ, ground flaxseed: flavorless, though it does darken your batter/ dough a bit. Bags found next to cornstarch and almond meal, etc. Instructions on how to use right on the bag! Make sure to let the flaxseed water combo sit in a separate bowl until it has the consistency of mucus 👍
Now with all of these you MUST add a bit more leavener, they don't have the lil bit of lift eggs give, so make sure you add a touch more baking powder. Sort of ok for brownies and cookies if you want them a bit more dense but KEY for cakes, quick breads, muffins and other things like that or she is gonna be SQUIDGY 🫡
31K notes
·
View notes
Text
Top 10 Must-Have Car Wash Products for Home Use
Introduction
Cleaning your vehicle at home may be each enjoyable and value-powerful—especially when you have the right equipment. With the right automobile wash products, you may acquire a spotless, professional-grade finish without moving into a detailing center. Whether you're a amateur or a seasoned enthusiast, here’s a breakdown of the top 10 should-have car wash products that each automobile proprietor should keep in their garage.
1. Car Wash Shampoo (pH-Balanced)
A extraordinary, pH-balanced shampoo is crucial for competently eliminating dust, dirt, and avenue grime without damaging the paint or shielding coatings. It helps keep the shine and integrity of your car's floor. Tip: Opt for a shampoo that produces thick foam and is unfastened from harsh chemical compounds.
2. Microfiber Wash Mitt
Unlike normal sponges, microfiber wash mitts lure dirt of their fibers, decreasing the danger of swirl marks and scratches. They're smooth, absorbent, and reusable—making them ideal for secure and efficient washing. Why use it? Gentle on paint and enormously effective at lifting dirt.
3. Two-Bucket Wash System
This technique entails two buckets—one for soapy water and one for rinsing your mitt. It prevents dust from re-getting into the smooth water, lowering the danger of scratching your automobile. Pro tip: Use grit guards at the lowest of each bucket to lure dirt particles.
4. Foam Cannon or Foam Gun
If you have a pressure washing machine or maybe a normal hose, a foam cannon or foam gun is a have to. It blankets your automobile in suds, assisting to loosen dust before contact, and makes washing quicker and extra amusing. Bonus: It’s an extremely good pre-wash step to reduce the risk of paint damage.
5. Microfiber Drying Towel
Drying your vehicle with an old rag or chamois can depart streaks or scratches. A big, plush microfiber towel absorbs extra water and leaves a spotless,
6. Wheel and tire cleaner
Your wheels collect brake dust, tar, and road gram - things cannot handle regular shampoo. A dedicated cleaner targets these contaminants without damaging your rims. Use with: a wheel brush for hard-to-wheel areas.
7. Tire dressing
Dark black, shiny finish with your tires with a good tire dressing. In addition to aesthetics, tires also protect the rubber from drying, hoof and UV damage. Choose: Water-based dressing for a clean, non-spring look.
8. Streak-free glass cleaner
Crystal-Callier windows and mirrors make all differences. An ammonia-free glass cleaner ensures that your windows are immaculate without damaging the tint or leaving the lines. Tip: Use a clean microfiber cloth to avoid smeering.
9. Spray
spray Perfect for touch-up between the washes, remove the quick detailer spray light dust, remove the fingers, and smoothing adding a layer of glow and safety. Keep one: in your car for on-the-go shine.
10. Clay bar kit
If your car still feels thicker after washing, it is likely to be due to bonded contaminants. A soil bar gently removes these particles, leaves the surface smooth and is ready for waxing or polishing. It should be used: with soil lubricants to avoid damaging paint.
Conclusion
Having the right car wash product at home makes all differences between the presence and price of your vehicle. These top 10 required not only provide completely clean, but also help your car surfaces to prevent long-term damage. With just a little effort and appropriate equipment, you can get a sparkling finish in your driveway.
0 notes
Text
The Ultimate Guide to Booklet Binding: Methods, Benefits, and Best Practices

Booklet binding is an essential aspect of print production, ensuring durability, professional presentation, and ease of use. Whether you’re creating catalogs, brochures, magazines, or instruction manuals, choosing the right binding method can enhance the readability and longevity of your booklet. In this comprehensive guide, we will explore various booklet binding techniques, their benefits, and best practices to help you make the best decision for your project.
What Is Booklet Binding?
Booklet binding refers to the process of assembling and securing multiple pages into a finished, compact format. It involves arranging the pages in a specific order and fastening them together using a binding technique that suits the booklet’s purpose, design, and budget.
Popular Booklet Binding Methods
1. Saddle Stitch Binding
Saddle stitch binding is one of the most common and cost-effective methods. It involves folding sheets of paper in half, stacking them together, and securing the pages along the spine with staples. This method is ideal for booklets with a page count ranging from 8 to 64 pages.
Pros:
Affordable and quick to produce
Lies flat when open for easy reading
Suitable for small to medium-sized booklets
Cons:
Limited durability compared to other methods
Not ideal for booklets with many pages
2. Perfect Binding
Perfect binding uses strong adhesive glue to attach pages to a softcover spine, providing a sleek and professional finish. It is commonly used for thicker booklets, such as magazines, annual reports, and catalogs.
Pros:
Professional appearance with a square spine
Suitable for high-page-count booklets
Allows for printing on the spine
Cons:
More expensive than saddle stitching
Doesn’t lay completely flat when open
3. Spiral Binding (Coil Binding)
Spiral binding involves inserting a plastic or metal coil through pre-punched holes along the spine. This method is highly flexible, allowing the booklet to lay flat or fold back completely.
Pros:
Excellent durability
Ideal for instructional booklets, manuals, and planners
Lays completely flat when open
Cons:
Not as aesthetically refined as perfect binding
Can be challenging to store on a shelf
4. Wire-O Binding
Wire-O binding is similar to spiral binding but uses metal wire loops instead of a plastic coil. This method offers a professional look with increased durability, making it a great choice for business presentations and reports.
Pros:
Durable and long-lasting
Lays flat for easy readability
Available in multiple colors for customization
Cons:
Slightly more expensive than spiral binding
Not suitable for very high page counts
5. Comb Binding
Comb binding uses plastic comb spines inserted into punched holes along the edge of the booklet. This method is often used for reports and educational materials.
Pros:
Cost-effective
Allows for easy page additions and removals
Lays flat when open
Cons:
Less durable compared to spiral or wire binding
Not suitable for high-end professional booklets
Best Practices for Booklet Binding
To ensure a successful booklet binding project, consider the following best practices:
Choose the Right Paper Weight: The thickness and texture of your paper impact the final booklet’s durability and usability.
Ensure Proper Page Count and Margins: Different binding methods require specific margin settings and page count limitations.
Use High-Quality Printing: Crisp, vibrant prints enhance the booklet’s readability and overall appeal.
Consider the Purpose of the Booklet: Select a binding method that best suits the booklet’s use case, audience, and longevity requirements.
Work with a Professional Printer: Professional printing services can help you achieve the best results with the right materials and techniques.
Final Thoughts
Booklet binding is a crucial step in producing high-quality printed materials that are both functional and visually appealing. By understanding the various binding methods and their advantages, you can make an informed decision that best suits your needs. Whether you need a simple saddle-stitched brochure or a professionally bound perfect-bound catalog, selecting the right technique will enhance the effectiveness and presentation of your booklet.
For expert booklet binding services, consider partnering with a reputable printing company to ensure top-notch quality and craftsmanship.
#service digital printing#printing nerang#printers gold coast#printer gold coast#print shop gold coast#printing gold coast#printing places gold coast#printing southport#southport printing company#car wrapping varsity lakes#offset printing#offset printers#a frame signs gold coast#booklet binding#commercial printing#digital printer printing#large format print
0 notes
Text
DIY Stair Baluster Plant Stand

Project by Kate Pruitt:
i am a very sad person this week…i used to have access to what i thought was an inexhaustible supply of old stair balusters. i love having them around because they work beautifully for all sorts of projects, and whenever i ran out i knew i could walk into this one salvage shop and sift through a giant bin of them. but alas, i went looking for more yesterday and they are all sold out :( if you are the collector or store owner or whatever who went to said salvage shop and bought them all…smart move. i should have cracked the piggy bank and done it a long time ago. even though my chief supplier is currently tapped out, however, i vow that this will not be the last baluster project you see from me.
this plant stand is a great project for anyone who is picky about plant presentation; the height of the stand and the plant is completely customizable, and you can finish the wood in numerous ways, or repaint it whenever suits your fancy. for heavier plants, use four legs instead of three for added sturdiness. since i only had three balusters left (sniff) i have to be content with the tripod configuration. seek out the balusters in your area, and play around with it. have fun!! –kate


Materials:
– 3 – 4 chair balusters/banisters (i used 3, but would recommend 4 for extra sturdiness. you can purchase these new at hardware stores, or try to find them at salvage shops for usually far cheaper) – wooden peg plugs 1/4″ thickness (you can buy these at hardware stores too) – super strength wood glue – drill with 1/4″ bit – wooden circle, any diameter between 12″ – 20″ (you can buy these pre-cut at hardware stores or craft stores) – pencil – saw (hand saw or chop saw would be useful) – hammer – paint – tape measure and/or ruler
Instructions:
1. Decide what height you want your plant stand to be. Cut the bottom of the balusters level if they did not come that way. Hold all of you balusters with their bases level and use your ruler to mark the desired stand height on each baluster.

2. Cut each baluster to the marked height. Stand them up and check that they are all level and the same height.
3. Stand them up and place the wood circle in the middle to eye the height you want your plant to sit at (mine is 20″ from the ground). use your ruler to mark a dot at the desired height on each baluster. put the dot right in the middle of each baluster. make sure that the thickness of the wood at height where you connect the wood circle to the balusters is enough that you can drill in 1/2″ and not go through the entire baluster. if the baluster is too thin at the point of contact with the wood circle, the whole stand will be flimsy.

4. Drill a 1/4″ hole, about 1/2″ deep into the baluster right at the dot you’ve made. Repeat on all balusters.

5. Measure (or use math to calculate) the circumference of your wooden circle. Divide it in thirds or fourths (if you are using 3 or 4 balusters, respectively) and mark a dot in the center of the sides at each interval.

6. Drill into the wooden circle about 1/2″ deep right at the dots you’ve marked. Now tap a peg plug not each hole in the wooden round. It should sink in about half of the peg’s length.

7. If you want to paint anything, remove the plugs from the circle and paint now. Allow everything to dry fully.
8. Use a hammer to tap the peg plugs into each baluster, and check that your stand is level and the circle is also level. now remove each baluster and remove the pegs. Put a small dap of glue into each hole (circle and baluster) and tap the peg bag into place. Repeat with all baluster legs until the stand is fully connected. Let the glue set for 30 min.

YOU’RE DONE!
note: this plant stand is suitable for plants and pots weighing under 25 lbs. again, i recommend four legs for added sturdiness ( i only had three so i went for the tripod look, which works for light plants).

2 notes
·
View notes
Text

Discover the Advantages of Choosing X-Bond Microcement for Your Interior Projects
Microcement has become a popular choice for modern interior design. X-Bond Microcement is particularly noteworthy among the available options because of its durability, visual appeal, and versatility. This blog will discuss the various advantages of using X-Bond Microcement for interior projects, which makes it a great choice for builders, designers, and homeowners alike.
What is X-Bond Microcement?
An innovative overlay product called X-Bond Microcement is created by combining natural stone with latex polymer. It can be placed over pre existing surfaces to create a seamless concrete appearance without requiring demolition. X-bond microcement works well for both residential and commercial applications because it can modify a variety of spaces, including joinery, floors, walls, and ceilings.
Key Advantages of X-Bond Microcement
1. Versatile Applications
Adaptability is one of X-Bond Microcement's most significant advantages. It can be placed on a variety of surfaces, such as:
Floors: Concrete, tiles, compressed sheeting.
Walls: Villaboard, Blueboard, and Plasterboard.
Joinery: laminate and MDF.
Homeowners can redesign without removing anything due to its flexibility, which saves time and cuts down on waste from traditional renovation method.
2. Seamless Aesthetic
Grout joints and lines are eliminated with a continuous layer of X-Bond Microcement coating. This results in a smooth, stylish look that is easy to maintain and clean. The smooth surface brings an elegant look to any space and is especially attractive for modern designer.
3. Minimal Thickness
X-Bond Microcement, applied at a thickness of about 2-3 mm, is a perfect choice for projects that require preserving existing floor heights or architectural features. Its thinness allows it to be applied over surfaces that already exist without changing door heights or floor level.
4. Durability and Flexibility
The durability of X-Bond Microcement is remarkable, even with its thin application. It contains latex polymers, which give buildings the ability to adapt to cracking as they settle or move. This enables them for use in high-traffic residential and commercial environments. Additionally, for more than 30 years of usage, X-Bond has shown no signs of delamination.
5. Waterproof Capabilities
When SEMCO Liquid Membrane™ and X-bond Microcement are paired together it provides excellent waterproofing capabilities. This makes it suitable for moist areas such as bathrooms, toilets, swimming pools and kitchens. In wet regions, homeowners can safely install X-Bond without fear of degradation or damage.
6. Quick Installation Process
X-Bond Microcement takes less time to install as compared to traditional standard flooring solutions. A 100 m² project normally takes approximately five days to finish. Because of its effectiveness, daily life is not disturbed during reconstruction.
7. Customizable Finishes
X-Bond Microcement is available in a variety of colors and finishes, homeowners can design their spaces according to their own unique personal choices. X-Bond offers plenty of design options, whether you want a matte or glossy finish or want to generate custom shade.
8. Eco-Friendly Option
If you're looking for an environmentally friendly option, X-Bond Microcement is the perfect choice. It not only enhances the aesthetic appeal of your space but also prioritizes sustainability, making it an excellent option for eco-conscious projects. By renovating existing surfaces rather than removing them, you reduce waste and the environmental effects caused by traditional renovation methods. This environmentally friendly strategy fits with the expanding trends in eco-conscious design.
Ideal Spaces for X-Bond Microcement
X-Bond Microcement can be used in a variety of ways in your house or place of business:
Residential Spaces: Perfect for bedrooms, kitchens, bathrooms, and gardens.
Commercial Spaces: Ideal for cafes, restaurants, shops, and offices.
Wet Areas: A great choice for steam rooms, swimming pools, baths, and showers.
Because of its versatility, interior designers frequently use it to achieve unified aesthetics in a variety of spaces.
Conclusion
Choosing X-Bond Microcement from Seamless Overlays for your interior projects offers various advantages that boost both functionality and beauty. Its adaptability allows it to be applied on various surfaces without the need for removal; its seamless finish enhances design while reducing maintenance; and its durability ensures longevity in high-traffic areas. If you're planning a remodeling or new construction project that demands a modern touch with minimal interruption, X-Bond Microcement could be the perfect choice. It distinguishes itself as a top option in modern home design with its variety of solutions and eco-friendly advantages. By choosing Seamless Overlays' X-Bond Microcement, you are not only making an investment in quality and innovation but can also turn your living spaces into extraordinary places that reflect your style.
0 notes
Text
The Ultimate Guide to Booklet Binding: Methods, Benefits, and Best Practices
Introduction
Booklet binding is a crucial process for businesses, students, and creatives looking to present their work professionally. Whether you’re making brochures, catalogs, manuals, or event programs, choosing the right binding method enhances durability and usability. This guide explores different binding techniques, their advantages, and the best practices to ensure high-quality booklets.
Types of Booklet Binding Methods
1. Saddle Stitch Binding
Saddle stitch binding is one of the most cost-effective and common methods. It involves folding sheets in half and stapling them along the spine.
Pros:
Affordable and quick to produce
Ideal for booklets with 8 to 64 pages
Lays flat when opened
Cons:
Limited durability
Not suitable for thick booklets
2. Perfect Binding
Perfect binding uses adhesive to glue pages to a spine, creating a professional, polished look.
Pros:
Great for booklets with a higher page count (40+ pages)
Provides a sleek, professional finish
Cons:
More expensive than saddle stitch
Does not lay completely flat
3. Spiral Binding (Coil Binding)
Spiral binding involves inserting a plastic or metal coil through pre-punched holes along the spine.
Pros:
Allows booklets to open fully flat
Durable and ideal for workbooks or manuals
Cons:
Not ideal for high-end marketing materials
May not work well for very thick booklets
4. Wire-O Binding
Wire-O binding uses metal loops to hold pages together and is often used for calendars and professional presentations.
Pros:
High durability
Pages turn smoothly
Cons:
Can be more expensive than spiral binding
Not ideal for high-volume printing
5. Case Binding (Hardcover)
Case binding is a premium method where the booklet is sewn and glued into a hardcover.
Pros:
Extremely durable and professional
Ideal for long-term use
Cons:
Most expensive binding option
Heavier and bulkier
Choosing the Right Binding for Your Booklet
When selecting a binding method, consider:
Purpose: Is it for internal use, marketing, or long-term storage?
Budget: Some binding methods are more affordable than others.
Page Count: Certain binding styles work better with specific page ranges.
Durability Needs: Will the booklet be used frequently?
Best Practices for High-Quality Booklet Binding
Choose the Right Paper Weight: Heavier paper enhances durability.
Use Proper Margins: Leave space near the binding edge to prevent cutting off text.
Opt for Professional Printing Services: They ensure accurate alignment and binding quality.
Consider Coatings: Glossy or matte coatings add a professional touch.
Conclusion
Booklet binding enhances readability, durability, and presentation. Whether you need a budget-friendly saddle stitch or a premium case-bound booklet, selecting the right method ensures professional results. Understanding your needs and following best practices will help you create a well-bound, high-quality booklet that stands out.
#digital printing gold coast#gold coast printers#gold coast printing#printing company gold coast#printing services gold coast#printing shop gold coast
0 notes
Text
Essential Outdoor Table Tennis Tips for Beginners
How to Choose the Best Outdoor Table Tennis Table
Choosing the best outdoor table tennis table can be a daunting task given the numerous options available on the market. However, with a clear understanding of the key factors to consider, you can find a table that suits your needs and provides endless hours of fun. Here’s a comprehensive guide to help you make an informed decision.
Read more: Choosing the Right Table Tennis Paddle for Beginners

Key Factors to Consider When Buying an Outdoor Table Tenis Table
1. Weather Resistance
Outdoor table tennis tables must withstand various weather conditions, including rain, sun, and wind. Look for tables made from weather-resistant materials:
Tabletop Material: Common materials include aluminum composite, melamine, and resin laminate. These materials are resistant to warping, rusting, and fading.
Frame and Legs: Choose tables with powder-coated steel or aluminum frames to prevent rust and corrosion.
2. Tabletop Thickness
The thickness of the tabletop affects the ball's bounce quality. Outdoor tables typically have a thickness of 4 to 7 millimeters:
Thicker Tops (6-7mm): Provide a more consistent and higher quality bounce, ideal for serious players.
Thinner Tops (4-5mm): Suitable for recreational use, offering decent bounce at a more affordable price.
3. Portability and Storage
Consider how often you’ll need to move or store the table:
Wheels: Large, sturdy wheels make it easy to move the table across different surfaces.
Foldability: A table with a foldable design can be easily stored when not in use. Look for tables with a compact storage position and a locking mechanism for safety.
4. Stability and Durability
A stable and durable table ensures safe and enjoyable play:
Frame Construction: A sturdy frame with reinforced corners and legs provides better stability.
Adjustable Legs: Some tables come with adjustable legs to ensure a level playing surface, even on uneven ground.
5. Playing Surface
The playing surface should be smooth and provide consistent bounce:
Anti-Glare Coating: Reduces sun reflection and improves visibility, especially during sunny days.
Color: Dark-colored surfaces can minimize glare and enhance the ball's visibility.
6. Size and Space
Measure the space where you plan to place the table:
Standard Size: Regulation-size tables are 9 feet long, 5 feet wide, and 2.5 feet high.
Compact Size: If space is limited, consider a compact or midsize table that offers similar playability in a smaller footprint.
7. Assembly
Ease of assembly can vary greatly among different models:
Pre-Assembled: Some tables come pre-assembled or partially assembled, requiring minimal effort.
Assembly Time: Check customer reviews for insights into the assembly process and required time.
8. Budget
Outdoor table tennis tables range widely in price:
Entry-Level Tables: Priced around $200-$400, suitable for casual players.
Mid-Range Tables: Priced around $400-$800, offering better materials and features.
High-End Tables: Priced above $800, providing professional-level play and maximum durability.
Top Recommendations
Based on the factors mentioned above, here are a few top recommendations for outdoor table tennis tables:
Cornilleau 500M Crossover: Known for its exceptional durability, weatherproof 7mm resin laminate top, and adjustable legs for stability.
JOOLA Nova DX: Popular for its affordability and weather-resistant 6mm aluminum plastic composite surface.
STIGA XTR: Features an all-weather aluminum composite top and a quick-play design, making it highly durable and easy to assemble.
Butterfly TW24B Playback Rollaway: Offers robustness and ease of storage with a 5mm melamine top and sturdy steel legs.
Killerspin MyT7 BlackStorm: Combines style and functionality with a weatherproof aluminum-plastic blend top and a sleek black finish.
By considering these key factors and recommendations, you can confidently choose an outdoor table tennis table that will provide great playability, withstand the elements, and offer lasting enjoyment for you and your family.
1 note
·
View note
Text
Top Features to Look for in Metal Bending Machines
Metal bending machines are the unsung heroes of modern manufacturing, shaping metals into precision parts for industries ranging from construction to aerospace. But what exactly should you look for in a metal bending machine? Whether you're a seasoned manufacturer or new to the field, understanding the features that matter can save you time, money, and stress.

1. Understanding Metal Bending Machines
Metal bending machines are designed to shape metal sheets and plates into various forms, such as cylinders or cones. They are indispensable in manufacturing processes that require precision and efficiency. Think of them as sculptors, turning raw metal into masterpieces.
2. Types of Rolling Machines
Metal bending machines come in different types, each suited for specific tasks:
2-Roll Machines: Ideal for simple bending operations.
3-Roll Machines: Perfect for pre bending and symmetrical shapes.
4-Roll Machines: Offer enhanced precision and automation, a popular choice for advanced manufacturing.
Profile Bending Machines: Designed for bending beams, pipes, or angles.
Knowing the type of machine that fits your needs can make all the difference in your production line.
3. Key Features to Look For
When evaluating metal bending machines, prioritize these features:
Bending Capacity: Ensure the machine can handle your required plate thickness and length.
Ease of Operation: Look for intuitive controls and user-friendly interfaces.
Precision: Advanced machines with CNC systems offer unmatched accuracy.
4. Automation and Control Systems
Automation has revolutionized metal bending. Machines equipped with CNC (Computer Numerical Control) systems allow for precise, repeatable results. For instance, a CNC plate rolling machine can program complex bends effortlessly, saving valuable time and reducing errors.
5. Material Compatibility
A versatile machine is essential for handling different materials such as steel, aluminum, or copper. Check the machine's specifications to ensure compatibility with the metals you use most frequently.
6. Safety Precautions in Rolling Machines
Safety is non-negotiable in metal bending operations. Look for these key safety features:
Emergency stop buttons.
Protective guards.
Automated shut-offs in case of malfunctions.
Following safety guidelines reduces risks and ensures a safer workplace for operators.
7. Understanding the Rolling Process
The rolling process involves shaping metal by passing it through rollers. Depending on your needs, this can be a simple task or a complex sequence involving multiple passes. Visualize it like rolling out dough for baking—except with metal, precision is critical.
8. Choosing the Right Rolling Type
Not all rolling processes are created equal. Here are common rolling types:
Hot Rolling: Ideal for large-scale production, involves shaping metal at high temperatures.
Cold Rolling: Ensures better surface finish and tighter tolerances.
Selecting the right rolling type affects the quality and efficiency of your operations.
9. Durability and Maintenance
Durable machines are long-term investments. Features like robust construction and wear-resistant rollers ensure longevity. Regular maintenance, such as lubrication and inspections, keeps machines running smoothly and minimizes downtime.
10. Why Choose Himalaya Machinery?
Himalaya Machinery, a leading plate rolling machine manufacturer in India, offers top-notch solutions tailored to the needs of metal manufacturers. Their machines are renowned for precision, reliability, and innovation, making them a trusted partner for businesses worldwide.
11. Applications of Metal Bending Machines
Metal bending machines are used in a variety of industries:
Automotive: Manufacturing components like exhaust pipes and chassis parts.
Construction: Creating beams and structural elements.
Aerospace: Shaping lightweight metal for aircraft parts.
12. Cost vs. Performance
Balancing cost and performance is crucial. While high-end machines may seem expensive, their efficiency and precision often justify the investment. Calculate ROI (Return on Investment) to determine the best value for your money.
13. Emerging Trends in Metal Bending
The metal bending industry is evolving with:
Smart Machines: Incorporating IoT for real-time monitoring.
Energy Efficiency: Reducing power consumption without compromising performance.
AI Integration: Enhancing precision and automation.
14. Tips for Optimal Machine Usage
To get the most out of your machine:
Train operators thoroughly.
Conduct regular inspections.
Use quality raw materials to prevent damage.
These steps ensure efficient operations and prolonged machine life.
15. Conclusion and FAQs
Metal bending machines are the backbone of modern manufacturing. By understanding the essential features and choosing a reliable manufacturer like Himalaya Machinery, you can optimize your production and stay ahead of the competition.
FAQs
1. What are the main types of metal bending machines? 2-roll, 3-roll, 4-roll, and profile bending machines are the primary types, each suited for specific tasks.
2. Why is material compatibility important in metal bending machines? Material compatibility ensures the machine can handle various metals without compromising performance or safety.
3. What safety precautions should operators follow? Operators should use machines with emergency stops, wear safety gear, and follow manufacturer guidelines.
4. How does CNC improve metal bending processes? CNC systems enhance precision, automate complex bends, and minimize human error.
0 notes
Video
youtube
HOW TO LAUNCH 23’ PLYWOOD FISHING BOAT Part 8 BOAT LAUNCH, BOAT RAMP, BO...
This is a very nice build for a lake boat. Awesome Lego it is never ever going to be this hard with our kids this is an incredibly difficult way to do it and you don't have to however our son and daughter are quick to point out that the way they started the frame is a good idea we'll send templates you cut them out of MDO plywood this marine grade they only need wine 'cause they're thick and you would have this as a 23 foot vessel you'd only need 4 in the middle and the in the aft very end in the front will come together. And you would put those sections up like he had and you don't ever use that kind of plywood he wasted his time. You would cut in the corners where the plywood meets you cut in a To buy that would run full length and you can buy them long. And you would also cut in a keel which would be pretty big and you would have to make the keel or have it made and it's not easy some people can join it but it's not an easy thing to do some people can have it made but it is actually difficult they do not sell them like that and they're hard to make you can make a kill out of plywood and we probably end up doing that and you and you would form it and it would go up all the way to the top of the front of the bow and all the way up the back of the stern and you put like 5 pieces together that are three quarter with special glue all of them are pre cut pieces and you would bolt it together with stainless bolts And then you would set the whole thing into those vertical template pieces that are it would separate your hall and make it safer it would it would be hard to sink you actually connect it so you have compartment true compartmentalization and you glass over them of course. And people have built them like that it's a very nice way to build it you waterproof your keel before putting it in to the plywood by applying the first layer of fiberglass and you wrap it one way you wrap it the other way and you can overlap it you might have to cut your pieces a little so you put the keel in and you put the boating upside down and you have some lines running like three on each side that are where the plywood is going to be bolted in and you both both sides and the special bolts and the through bolts and they're flush on the outside. And use MDO for a boat like that 23 foot the sides on this need to go up a foot the width has to be a foot wider and we would make the boat about a foot longer but I like the cabin design it's just not how they build it it takes forever and her son says you build kind of a frame on the top of the plywood that you put in to separate your your compartments and you put it on the sides too in between the long runners and that makes your frame up and then you clip them together with a special clip. I guess we'd have to provide the hardware so that you can get it and it fits a little and you glue it and then glass over it so when it's upside down it's easy to build like that and you stick it up a little so you can get in there and you put a light in there. You would then so you have your keel in and those things upside down in the runners and you would then begin vaulting the hull. And you would both the hall like every foot and you have to offset it from the last one and you have to be careful to use the right type of wood. And you should pre drill it all and if it's not a lot of people use epoxy and our sun recommends it and we do too and you bolt it in and it's kind of a hardwood you wanna use like Redwood is perfect. If you can get a solid keel it's better but you have to piece it together most people would have no idea how and it's very hard. We wanna also mention splicing stuff does not work that great but this design is very nice and works very well and we've seen it and it's almost unbeatable so you put the hole together and you glass the bottom and you're tempted to put the finish coats on and you probably should and you have to put on some really nice cushions when you turn it over and you put the deck on and then you after it cures and then you put the and then you after it cures and then you put the rest of the assembly which you may kind of simple plywood and redwood and we recommend glassy on the inside now and then you paint it and then you put it lost and then you have a boat if you use a motor you get a used one of a car that's been wrecked or something you put a straight shaft and this size boat you can put two small motors and people do that and we recommend that there's some parts you have to get that are hard to get but you would have a boat that's worth a lot of money but it would probably be with the exclusion of the motors including the shafts and hardware that you need and propellers everything together all the plywood and adhesives and Etcetera you would probably be talking about $8000. That's a lot of boat so I guess we're gonna have to make a kit 'cause he wants to make one of those.
Thor Freya
dave used to this is nice
macs
Zues
we see it good. we do it ok and yes. we shall. and fish and sleep onboard cook but not fish lol and yeh ok hahaah lo pew you there and hahah but funwe shall have fun. good. what a nice day and go to the seafood place. mb a higher cabin yes and it can do it. and sides and cruise around and go to the islands here and fun.up the intercoastal and it i nice yo ushall see ok
ok and good fun we shall build it we you and i and terrific. i will try and my best. you can help me most iht the engines and stuff the try roking me on yes good
Jen we are fun togtehr yes and yes a dream this is and good me again jen caa hahah lol ok good
ohhh
macs
and great mac adday
Thor Freya Sounds like good fun because it is and he is looking forward to it and she is too it's a lot of work it's headaches but it's not that much it's a lot less than other things you could build he's good with the wood like this too it's fairly good at joinery and that's what you have to be it doesn't require too much skill and it's not too much angles and they tell you what they are and to fill it with this epoxy glue and it really makes all the errors go away but there wouldn't be that many now tell you he's pretty good at this kind of thing assembling that kind of thing she likes it it would be a good time for them then the cars would come after. Yeah they're talking about that reimbursement and he put his reimbursements in before he was made general of everyone before the 15th of June he was an adjutant or something and he did a few things and they paid him for that even though it failed and it sounds familiar
Olympus Sounds like good fun because it is
They did pay him for that and it was more than reimbursements and it was for doing the job and yeah they wanted to implicate him and get him on board and they paid him for what he had paid for so he started a reimbursement thing and thought it'd be easier and it turned out to be a nightmare but yeah he did a battle or two but he took a big break and he took a big break and they believe they paid you for that battle no they paid him like $30,000 back then and now it's like $300,000 roughly about $400,000 because they're pounds and yeah they didn't pay that paid so I guess the attacks it goes Pennsylvania it's gonna look aboutmacas
0 notes