#ping 127.0.0.1
Explore tagged Tumblr posts
Visit Tumblr Blog
Explore Tumblr blogs with no restrictions, modern design and the best experience.
Last Seen Tumblr Blogs


Fun Fact
Kazakhstan’s Minister of Communications and Informatics has blocked the Tumblr site because it contained 60 sites of terrorism, extremism, and pornography in 2015.
Note
i would check if it's your wifi card
google how to ping your particular computer's wifi card (usually in a command prompt window you type 'ping 127.0.0.1' but double check that that's the ip you need to ping on your machine)
if it's not pinging, then it's likely either a faulty card or the card got jostled and disconnected
i hope this saves u having to replace your computer bc a wifi card is way cheaper to replace! also u can get external drives that act as a wifi card as a temporary measure (i did this to get wifi 5 on my old computer so i didn't have to upgrade and it worked great!)
Thank you for the advice but I just tried it & it pinged fine so I’m not sure that’s it 😔 idk she’s 5 years old now & she’s been having a couple hiccups recently so maybe it’s time to just buy a new one but it was so sudden. Also like literally nothing led up to this, I didn’t drop it or jostle it, I was just sitting on my couch working on my slides & any hope of even considering an internet connection just fuckin vanished lmao
2 notes
·
View notes
Text
127.0.0.1 is the loopback address, "ping 127.0.0.1" is equal to "ping @self" in layman's terms. "rm -rf" is remove recursive-forced, aka "remove, do not give me a confirmation prompt, wipe the bastard". the syntax is wrong (rm -rf should come first) but if it Did work, it would wipe the whole machine because he didn't specify what it was removing, so it would just remove everything.
also that's not how traceroute works. I'm at work so I can't go boot up a vm and show you but that's. very much not how traceroute works lmfao


4K notes
·
View notes
Text
PA03 - UDP echo server
Background Read about ping: https://en.wikipedia.org/wiki/Ping_(networking_utility) “`bash whatis ping which ping man ping ping –help ping 127.0.0.1 ping google.com “` Enjoy learning about this entertaining ping gimick: https://www.youtube.com/watch?v=JcJSW7Rprio See https://www.rfc-editor.org/rfc/rfc792 section on echo request and reply: Echo or Echo Reply Message “` 0 1 2 3 0 1 2 3 4 5 6 7 8 9…
0 notes
Text
Linux CLI 30 🐧 ping and trace route commands
New Post has been published on https://tuts.kandz.me/linux-cli-30-%f0%9f%90%a7-ping-and-trace-route-commands/
Linux CLI 30 🐧 ping and trace route commands

youtube
a - ping command ping is a network utility that tests the device if is connected on a network ping google.com → pings google.com. Press Ctrl + C to stop You can also ping localhost to check the local network ping 0 or ping 127.0.0.1 or ping localhost -6 → specifies to request an IPv6 address -4 → specifies to request an IPv4 address, default ping -s 500 -1 google.com → -s specifies the packet size and -i specifies the interval other options: -f → floods a network -c 2 → max packets 2 -w 10 → time limit to 10 b - traceroute command traceroute shows how packets travel from your computer to another computer through the network It is useful diagnosing issues with connections and routes traceroute -4 google.com → uses IPv4 to traceroute. -6 for IPv6 traceroute -m 3 google.com → use maximun 3 hops traceroute -n google.com → -n disables IP address resolution Other options: -p 2324 → specifies the port 2324 to use -q 2 → specifies 2 probes per hop, 50 → specifies the packet length to 50
0 notes
Text
127.0.0.1:62893 Meaning, Error, and Fixing Tips
In the world of computer networking, IP addresses and ports play a crucial role in facilitating communication between devices and applications. One such combination is 127.0.0.1:62893, often encountered in various networking contexts. This article explores the meaning of 127.0.0.1:62893, common errors associated with it, and practical tips for fixing those issues.
Understanding 127.0.0.1:62893
The Loopback IP Address
The IP address 127.0.0.1 is known as the loopback address. It is a special address used by a computer to refer to itself. Often termed "localhost," this address is utilized for testing and troubleshooting purposes within the local machine. It ensures that network software can communicate within the same device without needing external network access.
The Role of Port 62893
In networking, a port is an endpoint for communication. Ports are numbered from 0 to 65535, with certain ranges designated for specific uses. Port 62893 falls within the dynamic or ephemeral port range (49152-65535). These ports are temporary and used by client applications to establish outgoing connections. Port 62893 might be chosen dynamically by the operating system during a session.
Common Errors Associated with 127.0.0.1:62893
Connection Refused
Error Message: "Connection refused"
Cause: This error typically occurs when the service you are trying to connect to on port 62893 is not running or is not listening on that port.
Fix:
Verify Service Status: Ensure the service or application expected to be running on port 62893 is active.
Check Configuration: Confirm that the service is configured to listen on 127.0.0.1 and port 62893.
Restart the Service: Sometimes, simply restarting the service can resolve the issue.
Address Already in Use
Error Message: "Address already in use"
Cause: This error arises when another process is already using port 62893.
Fix:
Identify Conflicting Process: Use commands like netstat -an (Windows) or lsof -i :62893 (Linux/Mac) to identify which process is using the port.
Terminate Conflicting Process: If appropriate, terminate the process using the port with commands like taskkill (Windows) or kill (Linux/Mac).
Change Port: If terminating the process is not feasible, reconfigure your application to use a different port.
Firewall Blocking
Error Message: "Connection timed out"
Cause: A firewall may be blocking connections to port 62893.
Fix:
Check Firewall Settings: Ensure that your firewall allows traffic on port 62893.
Add Rule: If necessary, add a rule to permit inbound and outbound traffic on port 62893.
Fixing Tips for 127.0.0.1:62893 Issues
Step-by-Step Troubleshooting
Verify Localhost Accessibility:
Test connectivity by pinging localhost: ping 127.0.0.1.
Check Service Configuration:
Ensure the service is set to listen on 127.0.0.1 and port 62893.
Review configuration files for any discrepancies.
Restart Network Services:
Sometimes, network services may need a restart to resolve binding issues.
Update Software:
Ensure that all relevant software and dependencies are up-to-date to avoid compatibility issues.
Review Logs:
Check application and system logs for any error messages that provide clues about the issue.
Consult Documentation:
Refer to the documentation of the service or application for specific troubleshooting steps.
Using Diagnostic Tools
Netstat: Provides information about network connections, including listening ports.
Telnet: Allows you to test connectivity to specific ports.
Wireshark: A network protocol analyzer that can help diagnose complex networking issues.
Conclusion
The address 127.0.0.1:62893 is a critical component in local network communication, particularly for testing and development purposes. Understanding the common errors and their fixes can help maintain smooth operation and effective troubleshooting. By following the tips outlined in this article, you can resolve issues related to 127.0.0.1:62893 efficiently, ensuring robust and reliable network functionality.

0 notes
Text
Black Lives Matter
After seeing that video from which the ad revenue is donated entirely to BLM groups and bail funds, I realized there was one problem that could come up for folks.
By itself, the video is about an hour long without ads. Obviously, with ads, it’ll be longer, but there isn’t a way to calculate that since ads are variable. However, what if you want to play it over and over? Well, because of the way YouTube works, you won’t actually generate ads again unless you navigate away and back. And then I remembered some skills I picked up four years ago in a tech job.
So, below is a way you can automate the process of watching the video, letting it play, closing it, and restarting it to play again. This process continues until you close it. Even better, it will take you probably about 2 minutes to set up. Details below the break.
First Things First, here is our code. This is written in the language used by Windows Command Line. I’ve had a cumulative 3 hours of experience using a MAC laptop to navigate the web, so I am certainly not able to write anything for that, but this should work for the five most popular Windows web browsers (plus Safari).
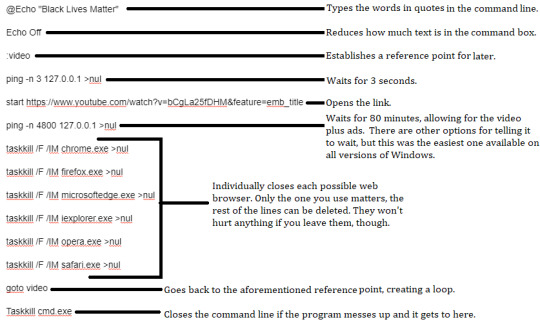
@Echo "Black Lives Matter"
Echo Off
:video
ping -n 3 127.0.0.1 >nul
start https://www.youtube.com/watch?v=bCgLa25fDHM&feature=emb_title
ping -n 4800 127.0.0.1 >nul
taskkill /F /IM chrome.exe >nul
taskkill /F /IM firefox.exe >nul
taskkill /F /IM microsoftedge.exe >nul
taskkill /F /IM iexplorer.exe >nul
taskkill /F /IM opera.exe >nul
taskkill /F /IM safari.exe >nul
goto video
Taskkill cmd.exe
All you need to do is copy and paste this in a notepad file, save it with a .bat extension, and then run that whenever you’re away. To close it, simply close the command program and it stops running. For those who need it, I am going to post screen shots and explanations. If you want, this can be the end of the post.
Now, I will explain what the lines above actually do so you know there’s nothing malicious in them.
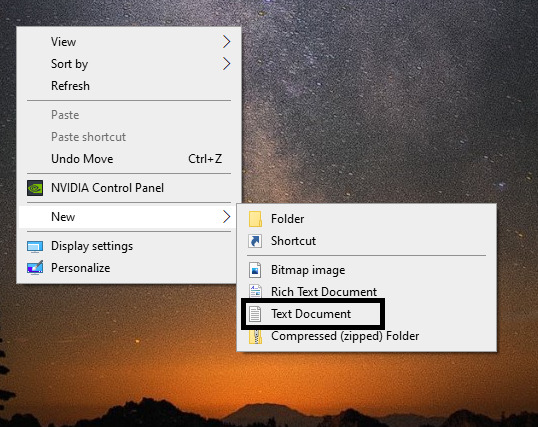
To actually create the file to run you’ll want to highlight and copy the code, open a notepad document (You can right-click on the desk top, hover over New, then click Text Document, which I’ve noted in the picture below)
Paste the text in, and save it with the extension .bat, like so

As an example, I named mine BLM2.bat but it could easily be video.bat or whatever, as long as it ends in .bat
It is VERY important that you also change what it is saving as from “Text Document (.txt)” to “All Files” otherwise it won’t let you save it as a .bat. (Side bar, a .bat is a Windows Batch File. It is basically a file type that allows you to run code in the Windows Command Line as a Batch, instead of by typing things individually.)
After that, all you have to do is double click it, and it will run. That will look like this:

Just close that Command window whenever you want it to stop. But as long as you are away, this will keep going.
If I have to make any edits, I will reblog this post with notes about it as well as make a separate post.
I recommend you open the file, then let it run while you are asleep, or away, etc.
#blm#Black Lives Matter#I have no idea what to tag this please give me suggestions#I just want to help in every way I can
58 notes
·
View notes
Text
PukiWiki構築(MacBook Air[Mid 2012])
作業内容
作業メモを作成するために、ローカルで動作するPukiWikiを準備する
参考:https://www.codingstock.jp/macos-mojave-inarll-apache-php/
参考:https://pukiwiki.osdn.jp/?PukiWiki/Install/%E3%82%A4%E3%83%B3%E3%82%B9%E3%83%88%E3%83%BC%E3%83%AB%E6%96%B9%E6%B3%95#s94ea60b
参考:https://pukiwiki.osdn.jp/dev/?BugTrack/2469
手順1:事前確認
MacOS確認
ターミナルから下記のコマンド操作を行う
$ sw_vers ProductName: Mac OS X ProductVersion: 10.15.7 BuildVersion: 19H2
Apache確認
ターミナルから下記のコマンド操作を行う
$ apachectl -v Server version: Apache/2.4.41 (Unix) Server built: Jun 5 2020 23:42:06 $ sudo apachectl restart $ sudo launchctl list | grep http 2345 0 org.apache.httpd $ sudo apachectl stop /System/Library/LaunchDaemons/org.apache.httpd.plist: Operation now in progress
PHP確認
ターミナルから下記のコマンド操作を行う
$ php -v PHP 7.3.11 (cli) (built: Jun 5 2020 23:50:40) ( NTS ) Copyright (c) 1997-2018 The PHP Group Zend Engine v3.3.11, Copyright (c) 1998-2018 Zend Technologies
ホスト名確認
ターミナルから下記のコマンド操作を行う
$ hostname taiyo-no-MacBook-Air.local $ ping -c 5 taiyo-no-MacBook-Air.local PING taiyo-no-macbook-air.local (127.0.0.1): 56 data bytes 64 bytes from 127.0.0.1: icmp_seq=0 ttl=64 time=0.085 ms 64 bytes from 127.0.0.1: icmp_seq=1 ttl=64 time=0.349 ms 64 bytes from 127.0.0.1: icmp_seq=2 ttl=64 time=0.265 ms 64 bytes from 127.0.0.1: icmp_seq=3 ttl=64 time=0.247 ms 64 bytes from 127.0.0.1: icmp_seq=4 ttl=64 time=0.240 ms --- taiyo-no-macbook-air.local ping statistics --- 5 packets transmitted, 5 packets received, 0.0% packet loss round-trip min/avg/max/stddev = 0.085/0.237/0.349/0.085 ms
手順2:Apache, PHP初期設定
/etc/php.ini作成
ターミナルから下記のコマンド操作を行う
$ sudo cp /etc/php.ini.default /etc/php.ini $ sudo chmod 644 /etc/php.ini
httpd.conf変更
ターミナルから下記のコマンド操作を行う
$ sudo cp -a /etc/apache2/httpd.conf /etc/apache2/httpd.conf.`date +%Y%m%d%H%M%S` $ sudo vim /etc/apache2/httpd.conf $ ll /etc/apache2/httpd.conf* -rw-r--r-- 1 root wheel 21554 10 7 16:36 /etc/apache2/httpd.conf -rw-r--r-- 1 root wheel 21550 8 30 2019 /etc/apache2/httpd.conf.20201007154239 -rw-r--r-- 1 root wheel 21084 7 16 2017 /etc/apache2/httpd.conf.pre-update -rw-r--r-- 1 root wheel 21084 9 30 2017 /etc/apache2/httpd.conf~previous $ diff /etc/apache2/httpd.conf.20201007154239 /etc/apache2/httpd.conf
112c112 LoadModule include_module libexec/apache2/mod_include.so 183c183 LoadModule userdir_module libexec/apache2/mod_userdir.so 185,187c185,187 LoadModule rewrite_module libexec/apache2/mod_rewrite.so > LoadModule php7_module libexec/apache2/libphp7.so > LoadModule perl_module libexec/apache2/mod_perl.so 230c230 ServerName taiyo-no-MacBook-Air.local:80 520c520 Include /private/etc/apache2/extra/httpd-userdir.conf
Apache再起動
ターミナルから下記のコマンド操作を行う
$ sudo apachectl restart $ sudo launchctl list | grep http 2523 0 org.apache.httpd
ユーザーホームのディレクトリ設定
ターミナルから下記のコマンド操作を行う
$ sudo cp -a /etc/apache2/extra/httpd-userdir.conf /etc/apache2/extra/httpd-userdir.conf.`date +%Y%m%d%H%M%S` $ sudo vim /etc/apache2/extra/httpd-userdir.conf $ ll /etc/apache2/extra/httpd-userdir.conf* -rw-r--r-- 1 root wheel 714 10 7 16:16 /etc/apache2/extra/httpd-userdir.conf -rw-r--r-- 1 root wheel 607 8 30 2019 /etc/apache2/extra/httpd-userdir.conf.20201007161117 -rw-r--r-- 1 root wheel 607 7 16 2017 /etc/apache2/extra/httpd-userdir.conf~previous $ diff /etc/apache2/extra/httpd-userdir.conf.20201007161117 /etc/apache2/extra/httpd-userdir.conf 19a20,26 > > <directory> > Options All > AllowOverride All > Require all granted > </directory> > $ cp /Library/WebServer/Documents/index.html.en ~/Sites/index.html
Apache再起動
ターミナルから下記のコマンド操作を行う
$ sudo apachectl restart $ sudo launchctl list | grep http 2682 0 org.apache.httpd $ sudo apachectl configtest Syntax OK
手順3:PukiWikiインストール
PukiWikiファイル解凍
ターミナルから下記のコマンド操作を行う
$ mkdir ~/Sites $ cd ~/Sites/ $ unzip ~/pukiwiki-1.5.3_utf8.zip Archive: pukiwiki-1.5.3_utf8.zip creating: pukiwiki-1.5.3_utf8/ creating: pukiwiki-1.5.3_utf8/lib/ inflating: pukiwiki-1.5.3_utf8/lib/config.php inflating: pukiwiki-1.5.3_utf8/lib/convert_html.php extracting: pukiwiki-1.5.3_utf8/lib/index.html inflating: pukiwiki-1.5.3_utf8/lib/auth.php inflating: pukiwiki-1.5.3_utf8/lib/pukiwiki.php [以下略] $ rm ~/pukiwiki-1.5.3_utf8.zip
PukiWikiファイル配置
ターミナルから下記のコマンド操作を行う
$ mv ~/Sites/pukiwiki-1.5.3_utf8 ~/Sites/WkWiki
PukiWikiアクセス確認
Webブラウザから"http://localhost/~taiyo/WkWiki/"にアクセスする →Wikiが表示されることを確認
手順4:PukiWiki初期設定
暗号化パスワード作成
Webブラウザから"http://localhost/~taiyo/WkWiki/?cmd=md5"にアクセスして、暗号化パスワードを作成する
pukiwiki.ini.php変更
ターミナルから下記のコマンド操作を行う
$ cd ~/Sites/WkWiki/ $ cp -a ./pukiwiki.ini.php ./pukiwiki.ini.php.`date +%Y%m%d%H%M%S` $ vim ./pukiwiki.ini.php $ ll ./pukiwiki.ini.php* -rw-r--r--@ 1 taiyo staff 21810 10 8 15:35 ./pukiwiki.ini.php -rw-r--r--@ 1 taiyo staff 21681 3 10 2020 ./pukiwiki.ini.php.20201008152435 $ diff ./pukiwiki.ini.php.20201008152435 ./pukiwiki.ini.php
122c122 $modifier = 'taiyo'; 125c125 $modifierlink = 'http://localhost/~taiyo/WkWiki/'; 192c192 $adminpass = '{x-php-sha512}暗号化パスワード';
Apache再起動
ターミナルから下記のコマンド操作を行う
$ sudo apachectl restart $ sudo launchctl list | grep http 1167 0 org.apache.httpd
トップページの凍結解除
Webブラウザから"http://localhost/~taiyo/WkWiki/"にアクセスする →「凍結解除」メニューをクリックして、パスワードを入力する →「ページの更新」ボタンをクリックする
1 note
·
View note
Photo
Cmd Hijack !!! A command/argument confusion issue with path traversal bug in Windows cmd.exe https://t.co/GlD1323xfz cmd.exe /c "ping 127.0.0.1/../../../../../../../../../../windows/system32/calc.exe" via @julianpentest https://t.co/lMSolvGS7f (via Twitter http://twitter.com/TheHackersNews/status/1270651924266745856)
3 notes
·
View notes
Text
Command Injection
OS command injection (also known as shell injection) is a web security vulnerability that allows an attacker to execute arbitrary operating system (OS) commands on the server that is running an application, and typically fully compromise the application and all its data.
Useful commands:
Linux:
whoami --- Name of current user.
uname -a --- Operating system.
ifconfig --- Network configuration.
netstat -an --- Network connections.
ps -ef --- Running processes.
Windows:
whoami --- Name of current user.
ver --- Operating system.
ipconfig /all --- Network configuration.
netstat -an --- Network connections.
tasklist --- Running processes.
Basic payloads:
Note: VC = valid_command
VC ;ls --- Execute ls after VC
VC | ls --- Sends the output of VC as input to ls
VC || ls --- Executes ls iff VC returns a nonzero exit status(error)
VC $(ls) --- Sends the output of ls as arguments to VC
VC `ls` --- Sends the output of ls as arguments to VC
VC && ls --- Execute ls after, if VC return 0
Bypass Blacklisted words:
w'h'o'am'i
w"h"o"am"I
w\ho\am\i
/\b\i\n/////s\h
Blind command injection payloads:
& ping -c 10 127.0.0.1 &
& whoami > /var/www/static/whoami.txt &
& nslookup kgji2ohoyw.web-attacker.com &
& nslookup `whoami`.kgji2ohoyw.web-attacker.com &
References:
OWASP
2 notes
·
View notes
Text
Internet explorer 8 cannot display the webpage

Subject: Internet Explorer “Cannot Display the Webpage” by Ziggy1

The winsock tells windows how to handle the internet.įrom: Ziggy1 via windows-xp-pro-l Monday, Ma7:03 PM Even if it doesn’t fix it, it never has made things worse for me. Posted by broken-pc (PC Technician) on Mar 1 at 8:26 PM html (how to use sdfix.exe, also has download link) -combofix (combofx.exe, also has download link) ity_tools/hijackthis (hijackthis analyser) -– -–įrom: To: Date: Mon, 19:24:53 -0600 Subject: RE: Internet Explorer “Cannot Display the Webpage” received worldwide-sites.aspx l.html tware.html (Online Armor) (Spybot) 3.html (Spybot tutorial). My Spec: MB – Gigabyte X58 UD4P(BIOS F7), CPU – i7 920 (overclocked to 4Ghz), Graphics – Zotac 9800GTX+ 512Mb, Memory – OCZ DDR3 1066 Gold 12Gb, Hard drive – Western Digital 1TB x 2, PSU – Hi-Power 900w, Tower – Antec 300, Monitor – 24″ LG x 2. Tell us the things you’ve tried, we might know of additional steps to solve your problem. A good idea is to have your system spec as a signature, then you don’t have to keep putting those details in. What’s your understanding of PC’s? Novice, I know a bit, expert? things like this help us to target issues more accurately.Īs an example: if you have a printer issue, give us the make and model of the printer, what driver version are you using? if you are replacing a printer what are you replacing and what are you replacing it with? have you uninstalled the drivers? give us your operating system i.e. Put the full errors messages not just part of it. Put your system specifications in the post, this is important for hardware related issues, but also to a lesser degree, software issues. A lack of detail will not get answers, it will get questions, so put as much detail as you can in the first post, this will speed up the process of diagnosis. Regards Lee -– - Ittoolbox: Here are a few tips to getting good replies to your posts. Click OK in the advanced properties window.Ĥ. Click the advanced button near the bottom of the shortcut tab and check off run as administrator. Right-click the shortcut to Notepad on your desktop and select properties.ģ. Send a shortcut to Notepad to your desktop by right-clicking Notepad in the start menu and selecting send to desktop.Ģ. Now that Notepad is open with Administrative privileges browse to (C:WindowsSystem32driversetc) in Notepad and open the hosts file.ġ. Open Notepad with Administrative privileges by clicking Start, All Programs, Accessories, and then right-click Notepad and select to open as Administrator.Ģ. Click OK in the properties window to save the changes.ġ. %SystemRoot%system32notepad.exe C:WindowsSystem32driversetchosts Right-click the shortcut to Notepad on your desktop and select properties. Send a shortcut to Notepad to your desktop by right-clicking Notepad in the start menu and selecting send to desktop. Heres how to create a shortcut on your desktop and lets you quickly and easily open your hosts file with Notepad and edit it.ġ. I sometimes frequently edit my hosts file and like a shortcut on my desktop for easy editing. Now you can edit and save the hosts file. Now that Notepad is open browse to (C:WindowsSystem32driversetc) and open the hosts file. Make sure you have an Administrator Account, most accounts are in Windows XP home environments and Open Notepad 2. I’ve found a neat way to edit hosts files quickly Once this is set up its very easy to edit or gain access to the hosts file:ġ. To find the router IP and your network card IP type: ipconfig /allĬheck your hosts file to see if anything has blocked IE. Have run a few ping tests? ie Start > Run type: Cmd in the Cmd Window (Black Screen) type: ping 127.0.0.1 you should get four replies back, you can then ping your router IP, your Network card and say you should get four replies back from each.
0 notes
Text
Docker swarm is a tool used to create a cluster of docker hosts. With docker swarm, we can create a high availability and high performance cluster where applications are distributed among the hosts. Docker swarm consists of a manager and worker nodes and operations are performed from the manager. In this guide, we are looking at how to set up Docker swarm cluster on Ubuntu 22.04|20.04. Step 1: Prepare your nodes. In my set up, I have one manager node and two worker nodes. On each host, configure hosts file to include all the other nodes. sudo vim /etc/hosts Add the following content to the file 192.168.1.10 manager.example.com manager 192.168.1.11 worker-01.example.com worker-01 192.168.1.12 worker-02.example.com worker-02 Save the file. Ensure that you can ping all the hosts from each host using hostname and not IP address. Step 2: Install Docker CE on Ubuntu 22.04|20.04 We are going to install Docker CE on the hosts. To install Docker CE on Ubuntu22.04|20.04, following the following steps: Install dependency packages with the below command sudo apt update sudo apt install apt-transport-https ca-certificates curl software-properties-common lsb-release Add docker key: curl -fsSL https://download.docker.com/linux/ubuntu/gpg | sudo gpg --dearmor -o /etc/apt/trusted.gpg.d/docker-archive-keyring.gpg Add docker repository to your hosts with the following commands: sudo add-apt-repository "deb [arch=amd64] https://download.docker.com/linux/ubuntu $(lsb_release -cs) stable" Update packages sudo apt update Ensure that you are going to install from the official Docker repo instead of default Ubuntu repo. $ apt-cache policy docker-ce docker-ce: Installed: (none) Candidate: 5:20.10.17~3-0~ubuntu-jammy Version table: 5:20.10.17~3-0~ubuntu-jammy 500 500 https://download.docker.com/linux/ubuntu jammy/stable amd64 Packages 5:20.10.16~3-0~ubuntu-jammy 500 500 https://download.docker.com/linux/ubuntu jammy/stable amd64 Packages 5:20.10.15~3-0~ubuntu-jammy 500 500 https://download.docker.com/linux/ubuntu jammy/stable amd64 Packages 5:20.10.14~3-0~ubuntu-jammy 500 500 https://download.docker.com/linux/ubuntu jammy/stable amd64 Packages 5:20.10.13~3-0~ubuntu-jammy 500 500 https://download.docker.com/linux/ubuntu jammy/stable amd64 Packages Install Docker CE on Ubuntu22.04|20.04: sudo apt install docker-ce After installing, Docker daemon should be started. Confirm the status by running the below command: $ systemctl status docker ● docker.service - Docker Application Container Engine Loaded: loaded (/lib/systemd/system/docker.service; enabled; vendor preset: enabled) Active: active (running) since Sat 2020-10-17 16:28:08 EAT; 57s ago TriggeredBy: ● docker.socket Docs: https://docs.docker.com Main PID: 2807 (dockerd) Tasks: 8 Memory: 37.5M CGroup: /system.slice/docker.service └─2807 /usr/bin/dockerd -H fd:// --containerd=/run/containerd/containerd.sock Add your user to Docker group to avoid typing sudo everytime you run docker commands. sudo usermod -aG docker $USER newgrp docker Step 3: Create Docker Swarm Cluster onUbuntu 22.04|20.04 To set up swarm cluster, we first need to initialize Docker Swarm mode on the manager node then add the worker nodes to the cluster. Get interface IP address # Get active primary interface name $ ip address 1: lo: mtu 65536 qdisc noqueue state UNKNOWN group default qlen 1000 link/loopback 00:00:00:00:00:00 brd 00:00:00:00:00:00 inet 127.0.0.1/8 scope host lo valid_lft forever preferred_lft forever inet6 ::1/128 scope host valid_lft forever preferred_lft forever 2: enp1s0: mtu 1500 qdisc fq_codel state UP group default qlen 1000 link/ether 52:54:00:13:e7:d6 brd ff:ff:ff:ff:ff:ff inet 192.168.1.10/24 brd 192.168.200.255 scope global dynamic noprefixroute enp1s0 valid_lft 3578sec preferred_lft 3578sec
inet6 fe80::bfeb:53e3:8760:78ee/64 scope link noprefixroute valid_lft forever preferred_lft forever 3: docker0: mtu 1500 qdisc noqueue state DOWN group default link/ether 02:42:e8:4e:10:c8 brd ff:ff:ff:ff:ff:ff inet 172.17.0.1/16 brd 172.17.255.255 scope global docker0 valid_lft forever preferred_lft forever For me the interface for which Docker manager will advertise on is enp1s0 INT_NAME="enp1s0" #replace accordingly HOST_IP=$(ip addr show $INT_NAME | grep "inet\b" | awk 'print $2' | cut -d/ -f1) Confirm IP address is saved correctly: $ echo $HOST_IP 192.168.1.10 Run the below command to initialize Docker swarm node on the manager. $ sudo docker swarm init --advertise-addr $HOST_IP Swarm initialized: current node (fsuaqqpihi2eabmmq8gldzhpv) is now a manager. To add a worker to this swarm, run the following command: sudo docker swarm join --token SWMTKN-1-018kvdektwa74z8fajb5c1u6jyz6qfk4ood8u4qotw7go9jj0p-cfpnh7omy86xcgoh45vau2kaj 192.168.1.10:2377 To add a manager to this swarm, run 'docker swarm join-token manager' and follow the instructions. Step 4: Join Worker Nodes to the Cluster We are now going to add the ‘worker-01‘ and worker-02 nodes to the cluster ‘manager’ using the ‘join-token’ from the cluster ‘manager’ node. Run the command printed in the init command output. $ sudo docker swarm join --token SWMTKN-1-13xo81gxpb3ttjh5e335pfrmz9fbnliikgfys7u8l4r8k4m575-2gsjwjs3y1i4kgeua2yu840hw 192.168.1.10:2377 This node joined a swarm as a worker. Check if the worker nodes are successfully added to the cluster by running the below command on the manager: $ sudo docker node ls ID HOSTNAME STATUS AVAILABILITY MANAGER STATUS ENGINE VERSION etx5xc5guzftmsqx4naqwvump worker-02 Ready Active 19.03.13 xop4jvrkywz4ldsgwqmfacssc * manager Ready Active Leader 19.03.13 bghrkp7ll1b9lb0ikv8x51gzy worker-01 Ready Active 19.03.13 Step 5: Deploy application in the Cluster Let’s create a service Nginx web server to run on default http port 80, and then expose it to the port 8080 on the host. $ sudo docker service create --name web-server --publish 8080:80 nginx:1.13-alpine pq5txw0p9c1qcjrrl2lw3mh5p overall progress: 1 out of 1 tasks 1/1: running [==================================================>] verify: Service converged Confirm the created service by running the below command: $ sudo docker service ls ID NAME MODE REPLICAS IMAGE PORTS pq5txw0p9c1q web-server replicated 1/1 nginx:1.13-alpine *:8080->80/tcp Step 6: Replicas and Scaling the service. We are going to make 3 replicas of the web-server service so that it is accessible on the manager and the two worker nodes. $ sudo docker service scale web-server=3 web-server scaled to 3 overall progress: 3 out of 3 tasks 1/3: running [==================================================>] 2/3: running [==================================================>] 3/3: running [==================================================>] verify: Service converged Confirm created service replicas $ sudo docker service ls ID NAME MODE REPLICAS IMAGE PORTS pq5txw0p9c1q web-server replicated 3/3 nginx:1.13-alpine *:8080->80/tcp Access the service from your browser using all the nodes IPs: http://192.168.1.10:8080, http://192.168.1.11:8080 and http://192.168.1.12:8080 and you should get a nginx welcome page as below: This has been a step-by-step guide on how to set up Docker Swarm on Ubuntu22.04|20.04. I believe it has been helpful.
0 notes
Text
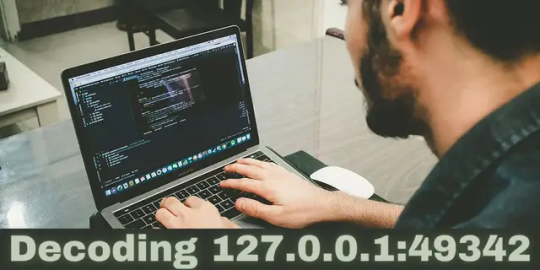
Decoding 127.0.0.1:49342
In the realm of networking and computer science, certain terms and addresses are ubiquitous, often serving as the backbone for various operations and processes. One such address is 127.0.0.1:49342, a combination that carries significant meaning in the context of networking, particularly with localhost operations. This article aims to decode the intricacies behind this address and its practical applications.
Understanding 127.0.0.1
The Loopback Address
The IP address 127.0.0.1 is known as the loopback address. It is a special address that a computer uses to point to itself. Often referred to as "localhost," it is used primarily for testing and network diagnostics. When you ping 127.0.0.1, you are essentially asking your machine to send a message to itself, verifying that the TCP/IP stack is correctly configured and operational.
Why 127.0.0.1?
The range of addresses from 127.0.0.0 to 127.255.255.255 is reserved for loopback purposes. However, 127.0.0.1 is the most commonly used address within this range. This convention ensures that there's a reliable and consistent way to refer to the local machine across different systems and applications.
The Significance of Port 49342
Ports in Networking
In networking, a port is a virtual point where network connections start and end. Ports are numbered from 0 to 65535, and each number represents a specific type of service or protocol. For instance, port 80 is typically used for HTTP traffic, while port 443 is reserved for HTTPS.
Dynamic and Ephemeral Ports
Port 49342 falls within the range of dynamic or ephemeral ports (49152-65535). These ports are temporary and are typically used for client-side communications. When a client initiates a connection to a server, it uses an ephemeral port for the duration of that session. This allows multiple applications to communicate over the network simultaneously without interference.
Practical Applications of 127.0.0.1:49342
Local Development and Testing
Developers frequently use 127.0.0.1:49342 for testing web applications and services on their local machines. By binding a web server to 127.0.0.1:49342, a developer can simulate a real-world environment without exposing the service to the external network. This is crucial for debugging and ensuring the application functions correctly before deployment.
Network Diagnostics
Network administrators and engineers use loopback addresses like 127.0.0.1 for diagnostics. Tools such as ping, traceroute, and various network monitoring software rely on loopback addresses to verify the integrity of the network stack and local machine configuration.
Security Implications
Using 127.0.0.1:49342 can also enhance security during development. Since the loopback address is not accessible from the external network, it reduces the risk of unauthorized access during the testing phase. This containment is crucial for maintaining the integrity of the development environment.
Conclusion
The address 127.0.0.1:49342 is more than just a numerical combination; it represents a fundamental concept in networking and local machine operations. Understanding its significance can greatly aid in developing, testing, and maintaining robust networked applications. Whether you are a developer debugging code or a network engineer ensuring system integrity, 127.0.0.1:49342 is a vital tool in your arsenal.
0 notes