#only using the lasso tool and fill bucket (and a bit of the gradient tool) made everything simultaneously a lot easier and a lot harder
Explore tagged Tumblr posts
Visit Tumblr Blog
Explore Tumblr blogs with no restrictions, modern design and the best experience.
Last Seen Tumblr Blogs


Fun Fact
Kazakhstan’s Minister of Communications and Informatics has blocked the Tumblr site because it contained 60 sites of terrorism, extremism, and pornography in 2015.
Text
How I Color in Photoshop
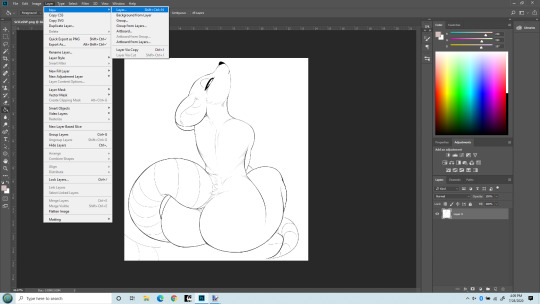
I’ve been asked before how I do coloring. I hesitate to call this a tutorial as that implies this is the RIGHT way to do it. Instead, this is just how I do it. My image is a bit risque, but I think Tumblr will be okay with it. This assumes you already have a drawing saved as some sort of file that can be opened in Photoshop. The principal is the same in about every program, but the specifics of how to do things are different. So I’m starting with this:
(BTW, if the images are too small, try right-clicking and Open In New Tab. Seems to show a bigger image.)
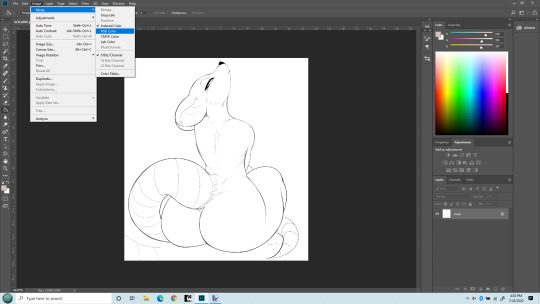
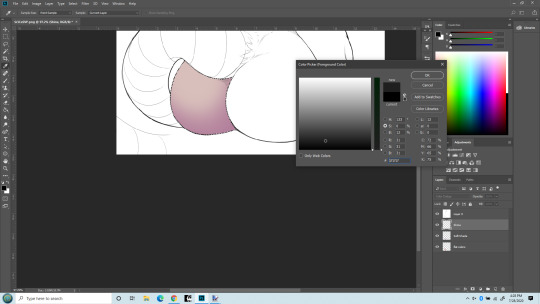
So first off, you may need to change the mode to RGB to work with it. I’ve opened the file here and am changing the mode to RGB. (Edit > Mode > RGB). Once that’s done, we can start working with adding a flat color, a soft shade and a shine layer to it. That’s what I’ll be up to here.

Next, I like to make the line layer editable, so I click the little lock icon there. By default when you do this it will name it Layer 0. That’s fine. If you’re anal you can change it to Line Layer or something.
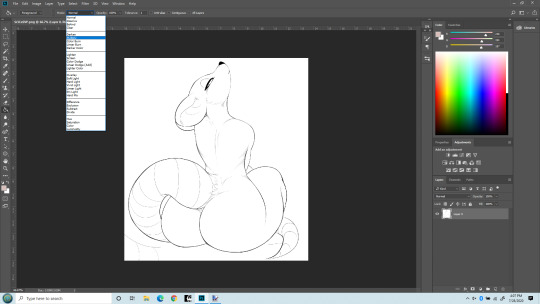
Next I’m changing the Line Layer to Multiply. This is pretty critical. You can do it from the top menu there, or there’s a place just above the layer name (where we Unlocked earlier) too. Either does the same thing. As best I understand, Multiply says to combine other layers with this layer So when we color, the white areas will be colored, the black lines won’t be.
Now I’m adding a new layer that my flat colors will “live” on. It can be a Normal layer since it’s going UNDER the line layer and nothing needs be seen underneath it.

Okay, you can see my new layer on the bottom right I named Flat Color. That’s where our actual colors will be painted. (or more accurately, PENCILED!). You can drag layers above and below each other there, and this layer needs to be under the line layer. I used to make this the Multiply layer and had the line layer underneath it. That works, but will lead to issues later on as you learn to do more layers, so best to just always keep the line layer on top and MOST other layers under it.

Last step before we get to work. I do NOT paint flat colors with a paintbrush. I use a PENCIL. Because the pencil tool is pixel-perfect. That is, there’s no soft edges on a pencil line. Each pixel is either fully colored, or it’s not at all. Even the hardest brushes still have bleed over from pixel to pixel. The size of the pencil really depends on the size of the lines in the line art, but typically I set it at about 5 pixels. That’s pretty small, but lets me get into tight places. I’ve seen others do this differently - but this isn’t about them. It’s how I do it.
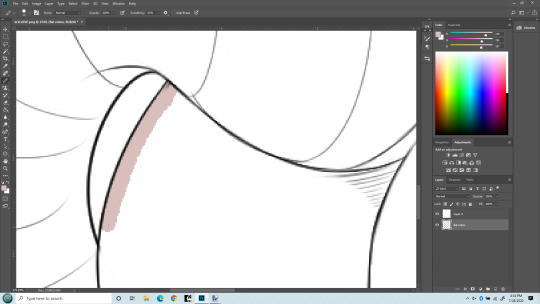
Time to zoom in and get coloring. I’ve chosen my color. Obviously this pencil is bigger than 5 pixels, but I wanted it to be clear what I’m doing. I’m drawing with my pencil right into the line itself. If I stray outside, I use the eraser (ALSO SET TO PENCIL SO IT ERASES PIXEL PERFECT) and keep the edge of the color underneath the black lines. I don’t care about the other side because Flood Fill/Paint Bucket will handle that later.
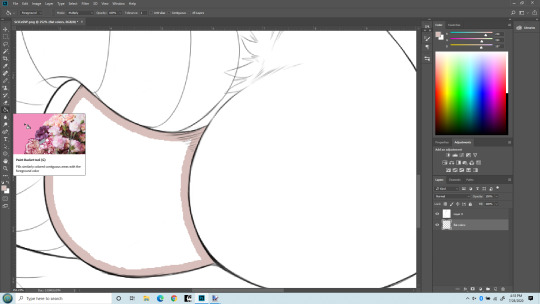
Here I’ve finished drawing the color inside her butt cheek, keeping the edge under the black lines. In practice I’d have gone on to everything that needs to be colored with the same flat color, but keeping this simple. Now I’m switching to Flood Fill/Paint bucket and am going to fill in the rest with one click. It normally will fill the entire section pixel-perfect, though sometimes around very tight angles it may miss a few. Those I fix with a pencil directly.

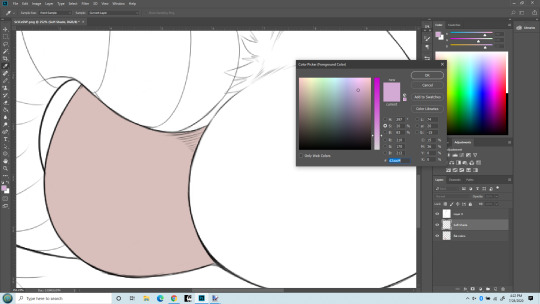
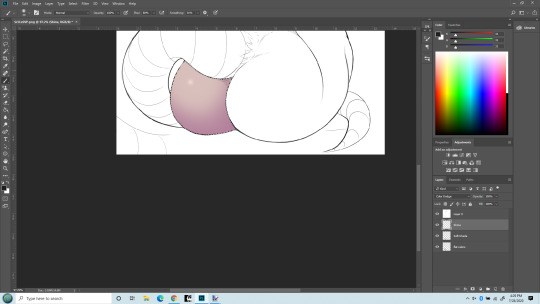
Bang! Butt cheek filled with a solid flat color. Now draw the rest of the damn owl. No, but seriously I will do this for the entire character with the various colors I want. For her I did this color for her body, a pinkish color for the tail and nose, a white and a green for the eyes. But there’s another advantage of doing this - I can select entire body parts by just selecting the Flat Color layer and use the magic wand to select everything that is that one color. Trust me, that’s a real benefit. You can get stylish later on, but having this flat layer is still awfully handy to keep FLAT. Okay. On to shading. Notice I now have a 3rd layer in between the Line and the Flat layers. It’s where I’m going to do Soft Shading. I also put it in between the line and flat layers, and I set the layer type again to MULTIPLY. Because I do want the flat colors showing through it.
Now I’m getting ready for soft shading. I almost always you a greyish-purple color for shading. For me, it just seems to work the best. I know there are more intricate things, but this is a basics lesson. Another thing, when doing Soft Shading, I use a HUGE paintbrush set to the softest possible setting. Typically the brush spans the entire size of the body part I’m painting. I also SELECT just the part I’m shading. Sometime that takes some patience with the lasso tool, sometimes you get lucky and can just use the Flat layer to select, then move back to the Soft Shade layer. The important thing is to select only the part you are going to shade. You’ll have to do it over again on the other parts. Ideally the separation between the body parts will be a nice line you can hide the transition inside of. Othewise the Smudge tool is your friend to correct small mistakes in shading.

HUGE soft round brush. I think I used about 400px here. But the important part is, you don’t even put the center of the brush inside the section you’re shading! The shading is done with the edge of the brush. Essentially you’re almost doing a gradient.

Zoomed out with a nice soft shading. I did use a similarly soft eraser to work it back a little too.
BONUS! Notice the new layer? SHINE layer! I put it above the soft shade. Really I’d probably do a hard shade layer in as well, done similarly to the soft shade in the same color but with a smaller, harder edged brush and just in limited places.
But I want to show the MAGIC of COLOR DODGE! That’s what my Shine layer is set to. Essentially if you color in black, nothing changes. If you color in a grey, it lightens the colors underneath. If you color in white, no matter the underlaying color, you get white. There are other blending types that work similarly but I just like the effect of color dodge best.
Also, note the color I’m chosing. It’s ALMOST black (which would result in no change). It takes only a very small bit of not-black to make a big difference. Going to give that cheek a highlight. First, with a soft brush at maybe 40px.
What a difference a little dot makes!!! Now that cheek’s really popping out! The type of brush used when making a highlight makes a big difference too. I do tend to overdo this, I know - but I like it! I can’t help myself! One last thing - what if I use a hard-edge brush instead of soft for the highlight?

Same size brush, but now its hard edged highlight. Really the softness (or other texture used) defines the kind of surface it’s on. The soft looks more natural, esp. on skin. The hard edge looks more like rubber/latex surface. (Neither look like rat fur, but sometimes you don’t care!)
That’s it. This is how I do stuff. Plenty of other things I could have mentioned. Reflection layer is a biggie. I like to do both soft and hard shading too. Eyes of course. Nothing makes a picture shine like good eyes. And then there’s what I truly call Highlights - a layer that goes on top of the line layer, so it can obscure even the lines. Backgrounds, which I’m not very good at but I almost always do them anyway because I like pictures that define a place and time as well as just a character. Shadows (as opposed to shading) which is frankly an art form in itself. But I’ve already put in more pictures of a rat butt than Tumblr is happy with so I’ll end it here.
5 notes
·
View notes
Text
Aesprite
Aesprite is amazing for working on pixel sprites. its affordable and easy to learn.

it has a lot of tools to help make a sprite just perfect. all the main tools can be seen at the top right (please note, i have spliced a screenshot to make all visible at once, usually the row you click on will be visible until you click off)
Selection tools
These let you select an area and this area is the only part that can be edited until told otherwise.
Rectangular marquee tool: selects a box from where you start to finish.
Elliptical marquee tool: selects a circle with the line you draw as the diameter.
lasso tool: draw a custom area that doesn't have straight lines.
Polygonal lasso tool: click and drag to draw a custom area where all sides are connected via points
Magic wand tool: selects all of the colour you pick that’s connected to it.
Drawing tools
The pencil and spray tools let you draw on your canvas.
Pencil tool: This lets you draw with your primary colour using left click and then your secondary colour using right click. it'll draw wherever your pointing and dragging while holding down click will let you draw a line. Clicking once and then holding sift before clicking again will connect the 2 points, similar to how the line tool works. You can change the size from the tool settings.
Spray tool: this will throw random pixels of the primary colour (left click) or secondary colour (right click) depending on the size and rate on the tool settings. It wont apply anything if your mouse doesn't move while holding, however, move the slightest bit and it will activate.
Eraser
the eraser tool lets you delete pixels on the selected layer and frame. you can change the size in the tool settings. If you right click over a colour that’s the exact same as your primary colour, it will replace it with your secondary colour.
colour picker
Use left (primary) or right (secondary) to replace that colour in your colour selection with the one your hovering over.
zoom tools
These let you move around the screen in different ways.
zoom tool: dragging either click will zoom in when dragging right or zoom out for left. right clicking will zoom out whereas left clicking will zoom in. alternatively, you could also use the scroll wheel.
Hand tool: Lets you pan around the screen and that's about it. This can also be done my doing middle mouse click with any tool.
editing tools
Slice tool: The slice tool lets you make a box that you draw and assign it a name. this helps keep track of what's what.
Move tool: this tool lets you move the selected layer around.
fill tools
Paint bucket tool:
Use right or left click to fill the colour you selected with the appropriate primary or secondary colour.
Gradient tool: drag on a colour to replace it with a gradient. the gradient depends on your primary and secondary colours as well as how far and what direction you drag in. you can also change the shape of the gradient in the tool settings. You can use right click when using this to swap your primary and secondary colours.
line tools
Line tool: drag from one point to another to create a straight line connecting the start and finish. This can also be done by right clicking to use the secondary colour instead.
curve tool: this tool lets you start with drawing a line by dragging, similar to the line tool, then you can curve it by clicking another location. You can do this twice per line. You can use the secondary colour by using right click. To cancel the line from being made, do the opposite click to what you started with.
set shape tools
custom shape tools
Jumble/smooth tools
0 notes
Note
A quick question: I use the program Medibang Paint to do digital art, and I'm really struggling with layers. I don't know how to use different layers for colours/lines/items of clothing etc What would you recommend?
If Medibang is anything like Photoshop, here’s a (brief and rudimentary) tutorial about how I handle my layers! I’ll be using my OC Serena:

1). Never sketch on the Background. I mean, you CAN but its easier if you don’t. Generally, you can’t erase too easily on the Background and it tends to have a bunch of components that make doing such a hassle, i.e. you can’t really move and select the sketch easily. Make a new Layer 1. You can have multiple sketch layers. There’s no wrong way! For simplicity’s sake, I’m just gonna use one.
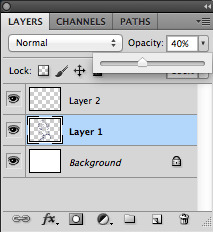

2). Lower the opacity of the sketch layer, and then make a new layer for your line art!

3). Once finished with your line art, click the eye icon to turn off the visibility of the sketch layer to help make things less cluttered on your screen.
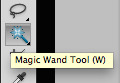
4). Using the Magic Wand Tool, select the area of the line art you want to color. We’ll start with the skin.
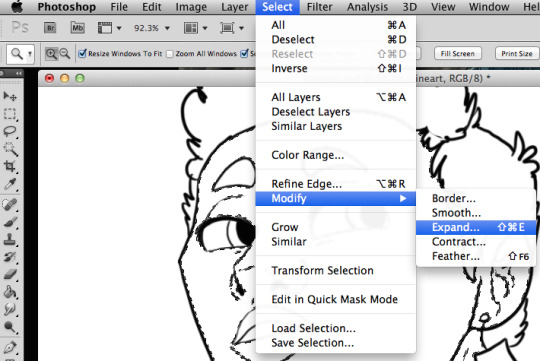
5). Select -> Modify -> Expand

6). I prefer 1-pixel expansion. It tends to get most of the areas…

7) But not all. Zoom in and select the missing pixels. Computers aren’t perfect.

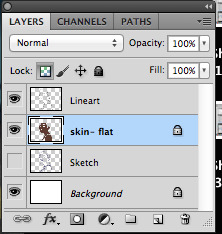
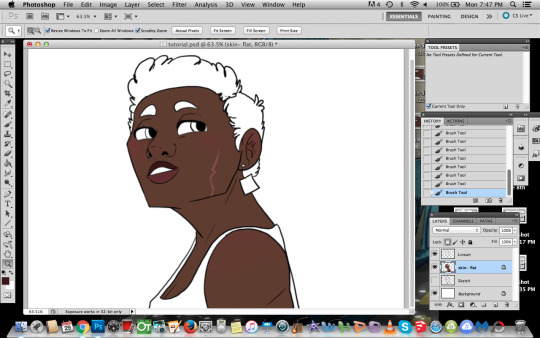
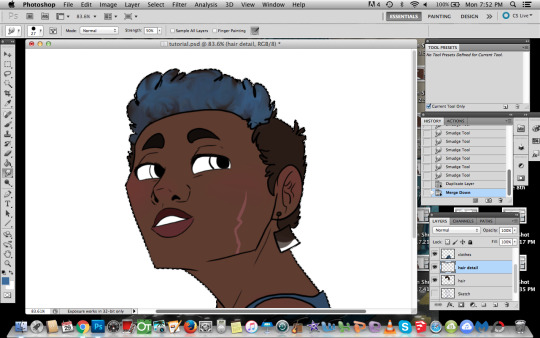
8) Make a new layer underneath the line art layer. Name it skin-flat (or whatever) and fill in the color in that layer! Even after you’ve filled in the color, there may be some uncolored spots. Be careful to check around for those.
9) To add details to a flat color, check the LOCK box (like adding blush, or scars in this case)


10) For quick-color selections, select the OUTSIDE of the line art, go to INVERSE and then color using a brush tool in a layer under SKIN-FLAT named CLOTHES.

11). HAIR TIME! Since the line art isn’t as straight, there may be some pixels that need selecting. Toggle the INVERSE selections to include any stray pixels. Underneath CLOTHES, create a new layer named HAIR. Color in with a brush tool.
12) Keep the selection on if you want to add some details to the hair. I added a new layer above HAIR called HAIR DETAILS and added Serena’s dyed colors, and mixed it to a texture using the mixer brush.

13) Beneath the SKIN-FLAT layer, create a DETAIL layer. You can use this one to fill in the eye whites, teeth color, and earrings or other needed details. [If you want to add something like eye shines, create a new layer named SHINE above the LINE ART layer, and add them. Eye shines are optional, but tend to make the eyes look more alive!]

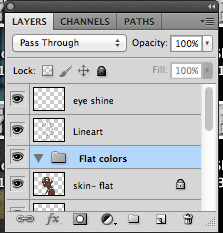
14) Organize flats. I make a folder and drag the flat color layers into the folder in their designed order, so the layers folder is less cluttered!


15) SHADOW TIME! Create a new layer above the flats and below the line art. For quick shadows, make a selection using the lasso tool and pick what color you want as a shadow color. Either fill in using the gradient tool (used here) or the fill bucket.

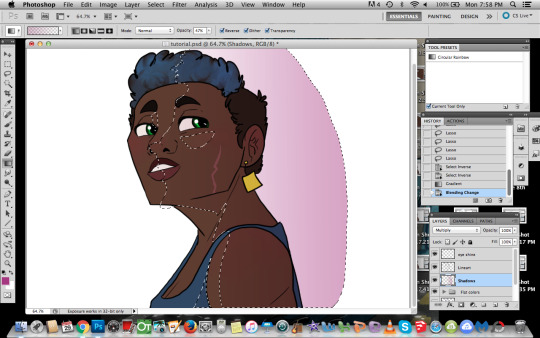
At first, it should come out like you just put pink on top of the image. But if you change the layer property to MULTIPLY, you should get a richer, darker shadow!

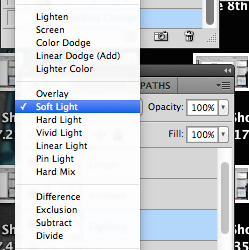
16) HIGHLIGHTS! Create a layer below the SHADOW layer. For simplicity, I’ll just use a gradient tool and a yellow color. Now, this CAN look nice as is, but I tend to make the main lighting source a bit more subtle. Change the layer property on HIGHLIGHT layer from Normal to Soft Light.
For environmental lighting, I use thinner lines on the other side of the light source, where the light could be bouncing off of the objects around Serena. I tend to favor using blue and use the strong Lighten property, with 47% opacity.
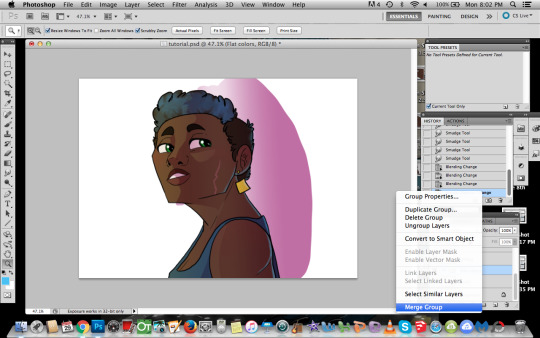
17) Now, I merge the FLATS. Right click on the folder, and click Merge Group.


18) To get rid of the outside shadows and highlight mess, go to the FLATS layer (all flat colors merged together) and select the OUTSIDE of the colors (the white-space). Use the eraser tool, and go to each layer to erase the shadows and lightings outside of Serena.

19) If you want something a little extra, LOCK the line art layer and color the line art using the brush tool.
And THERE YOU HAVE IT!
This only covers the main layers I tend to use in my drawings, but I recommend also experimenting with other layer properties as shadows / highlights etc.
Hope this helped! -Chainsxwsmile
15 notes
·
View notes