#on the plus side i set up my new ethernet cable.
Explore tagged Tumblr posts
Visit Tumblr Blog
Explore Tumblr blogs with no restrictions, modern design and the best experience.
Last Seen Tumblr Blogs


Fun Fact
Hackers stole 65M passwords from Tumblr in 2013.
Text
looks around scared. was there a promo hour.
#hi guess whos been dead at work!!!!!!!#on the plus side i set up my new ethernet cable.#so ill be less scared of lagging tf out in xiv <3#apparently my ping is good ^_^#but yeah im too drained today to do shit. abd i open first thing tomorrow.
9 notes
·
View notes
Text
Week 4.
-
Nov. 14
I woke up after 11AM.
Did some the usual before today’s exercise.
First, yesterday’s DD. 20 forward bends with EC. Pretty breezy work. Just a little dizzying, today.
Second, today’s DD. 40 leg raises with EC. Definitely tougher exercise. Still not the most fun to have to keep head held up for ab work like this. But doable.
Third, Day 19 of the YAC. 3 sets: 40″ boat pose + 40″ knee hug holds. Definitely tougher to get through fresh after those leg raises. But I’m glad I could manage.
Last, Day 19 of TEN. Ab day, counted 6-7 sets completed by the time was up. The last few sets became a willpower game due to pretty intense neck strain.
Spent more time chatting, processing videos... and processing last week. Because I fell behind on my tracking again. Oi. But I’m caught up. Again.
Got to bed in the red zone, but a few hours earlier than yesterday.
-
Nov. 15
I got up around the same time as yesterday.
Spent a few hours this morning getting some shopping and processing more stream footage. Then I went into today’s exercise.
First, today’s DD. 200 backfists with EC (100/100). This was pretty intense, but fun as always! I love punches! =w=
Second, Day 20 of the YAC. 3x40″ supermen holds, 40″ rest. Having timer in face is useful. Did take a bit of digging in to get it done. Did note tenderness in abs during this - hit ‘em pretty hard yesterday.
Last, Day 20 of TEN. Tendon strength / flexibility day. Counted 3 completed sets by the end of it. Did 2 of the sets with knees held above floor and 1 (+1 extra) with them resting on floor during the up/down dogs. Honestly, those were the least pleasant to do in the entire sequence. Overall, I do think the DD did make many of the exercises a bit hard to do. But I could get through it well enough!
Spent much of the rest of my day chatting and doing some writing.
Got to bed later than yesterday.
-
Nov. 16
I woke up around noon.
After some video processing and chatting, I did today’s exercise.
First, today’s DD. 40 get-ups with EC. Got reasonably fatiguing by the time I hit the last 10 or so reps per side.
Second, Day 21 of the YAC. 3 sets: 45″ boat pose + 45″ knee hug holds. Pretty intensive. Timer bell wigged out on me during the last set - so that was unpleasant. (Decided to wait/hope that it would stop sounding and maintain the boat. It did resolve after a bit,)
Last, Day 21 of TEN. Cardio day. Counted 9 completed set by the end of it - not too shabby as far as pace. Kinda happy the only impact exercise was some jumping jacks (still consider those a fave tho.)
Did some dishes and made today’s Hello Fresh meal. Chicken Romesco filled ravioli. I liked it reasonably well - the filling had a delightful smoky flavor. But it wasn’t an experience with enough consensus to clamor for revisit (relatively.)
Spent rest of night chatting and whatnot.
Got to bed later than yesterday.
-
Nov. 17
I think I got up around the same time as yesterday.
Spent time doing some computer maintenance and chatting, did today’s exercise.
First, today’s DD. 40 squat hops on the spot with EC. A bit winding and intense.
Second, Day 22 of the YAC. 3x45″ supermen holds, 45″ rest. Manageable.
Last, Day 22 of TEN. Leg day. Counted 5 sets completed within time, +1 extra overtime. Just about manageable work, overall.
Spent rest of day just doing more computer maintenance stuff, chatting, and whatnot.
Got to bed around the same time as yesterday.
-
Nov. 18
I think I got up around the same time as yesterday.
Spent time doing some computer maintenance and chatting, did today’s exercise. Again.
First, today’s DD. 40 plank rotations with EC. Got a bit fatigued, but doable.
Second, Day 23 of the YAC.
Last, Day 23 of TEN. Arm day. I counted 9 sets completed within time, +1 overtime. Pretty doable and challenging.
Spent rest of night chatting and whatnot.
I got to bed earlier than yesterday, but still rather late.
-
Nov. 19
I woke up after 11AM.
Spent time unpacking some deliveries that arrived today. I stapled down a new ethernet cable I ordered. Definitely took some energy to wire it. This was in prep for a new laptop I ordered.
I had intention of firing it up after installing another SSD into it... but needed a spudger to be able to get past unscrewing the case and pry it open without breaking anything. I was running on basically just coffee, so I was pretty irritated.
Ordered a kit for that. Was too tired/hungry to do much more than chatting and the usual. So I rain-checked on my exercise.
Got to bed later than yesterday.
-
Nov. 20
I woke up around noon.
After getting far too distracted and spending time updating my logs, I caught up with my exercise.
First, yesterday’s DD. 2′ uneven plank hold with EC (1′/1′). This took some digging in to accomplish. But very manageable work.
Second, today’s DD. 30 half shrimp squats with EC (15/15). Didn’t go for assist, so depth wasn’t consistent. But I was able to maintain balance and whatnot.
Second, Day 24 of the YAC. 3x45″ supermen holds, 45″ rest. Manageable. Deep breaths is helpful (even if mechanically a bit restricted by this exercise.)
Last, Day 24 of TEN. Ab day. Counted 5 sets completed here, plus a few extra exercises by the end. Honestly, the neck strain’s the only really unpleasant part to contend with. Though my quads and abs got to feeling it at the pace I was going at (did rest/pause ~20″ between sets.)
By the time I got that done and some dishes... I only really had enough energy to reconstitute some canned soup for the family tonight. I did however spend time connecting Dethklok songs to the Sides for some reason. :,D
Got to bed late, but a little earlier than yesterday.
2 notes
·
View notes
Text
the Arlo Pro 3
Hi, folks. This is Gabe at Security Baron, and Arlo isback at again bringing you some 2K action. Today, we’re checking out the Arlo Pro 3. [background music] Gabe: In today’s review of the Arlo Pro 3,we’re going to go over some pros and cons, its design, its feature set, the installation,and mobile app experience before answering some common questions and letting you knowwho we think this device is for. If you want to see the full details on theArlo Pro 3 and check out some smart home integrations, head over to securitybaron.com. Let’s kick off our review of the Arlo Pro3 going over some pros and cons, beginning with the pros, beginning with that video quality. It can record it up to 2K but even the 1080looks solid on whatever device you happen to be using.best home outdoor wireless security camera
That 2K is gorgeous, really clear and youalso get 160-degree field of view HDR. It’s just really bring in the heat. Now that extends to its night vision whereit ups the ante with having a surprisingly solid vision with just two infrared LEDs. If you add on that spotlight it gets evenbetter where you have this color night vision that makes it seem almost as if the middleof the night is as clear as day. We’re really impressed with the video qualityelement in that way. Beyond that, you have the wireless elementof the Arlo Pro 3 and the durability. That means you can place it both indoors andoutdoors. It’s weather resistant and you can handlesun, snow, sleet, rain, you name it and still work really well to make sure you’re capturingeverything that’s taking place in your home or outside of it. When it comes to cons to Arlo Pro 3, I thinkthe issue of 2K is really representative of the overall experience. We had issues getting the 2K to work initiallyand we never essentially got the 2K to work when it comes to manual recording. That was an issue that to do with the faultyhub and a mobile application that is not always the most intuitive. Overall, yes, I think that Arlo has a lotof depth, a lot of robust features that you can really dive deeply into, but it’s justnot effortless in terms of getting to them like we’ve seen with some of the other camerason the market. [music] Gabe: Now that we’ve gone over the pros andcons, let’s talk about the design on the Arlo Pro 3 in which I’m actually a really big fan. The Arlo Pro 3 is the first one that we’vegotten in the nice black, but it isn’t really glossy black. You’re definitely going to get your fingerprintson it, but just a really solid looking device, really sleek, really elegant. When it comes to mounting, it has a lot ofoptions. You can, of course, thread as in mount intothe back of the device itself, but we like this nice little magnetic mount that givesyou a lot of flexibility. You can put it in a lot of different ways,it’s just going to work for you. It’s really strong and if you don’t want tohave that on for a moment, you can take it off, you can place it simply down, somethinglike this. You’re wondering, “How do I charge this device?” Really easy to put that initial battery in,but actually once you have your battery inside and have this thing set up, you can closethis and really never open it again, because there is a magnetic mount on the bottom ofthe device. You’re thinking, “I hope I don’t have to unscreweverything each time that I want to charge it.” You don’t. Take it off the magnet, take your magneticcharger, and voila, you’re ready to go. That’s it, you charge it, give it a few hours,and you’re good for another few months. Note that you also have the Smart Hub. The Smart Hub itself has gotten a bit of anupgrade since the Arlo Pro 2. It’s also nice and sleek, it’s thinner, ithas a good look to it. It will basically blend into anyone’s homedecor, it’s in that nice white with your Arlo insignia, and you get this nice little LEDlight to know when it’s on and off. The final element I’ll talk about with yourArlo Pro 3 itself is the fact that it’s almost completely flush. You have your lens, you’ve got microphone,speaker, and you have your spotlight. This is a pretty thin spotlight that’s bringinga lot of light. It’s going to be really bright with just thislittle bit here. Overall, big fan of not only the design onthe Arlo Pro 3, but the Arlo Smart Hub. [music] Gabe: Hold on. I hope you’re enjoying today’s review of theArlo Pro 3. If you want to be kept up to date on the newestin smart home security cameras, smart home security in general, cybersecurity, bluetoothtrackers, and more, subscribe to our channel, Security Baron. We’re dropping new content weekly. Let’s get back to the video. [music] Gabe: Now that we’ve gone over the pros andcons and the design of the Arlo Pro 3, let’s talk about its feature set, beginning withthat video quality. It can capture motion events in 2K and itjust looks amazing. It’s capturing things in 2K with a 160-degreefield of view, HDR, and it’s just got a really lovely crisp and clear video quality to it. It even means that it can do that in nightvision, where we have a solid infrared LED perspective that can be enhanced by colornight vision with the spotlight that comes equipped on your Arlo Pro 3, allowing youto see things in the middle of the night in that nice vivid color perspective. This clarity with the Arlo Pro 3 extends tothe audio experience.best home outdoor wireless security camera
I was able to have really clear conversationswith people on the other side. It has a microphone and a speaker embeddedinside of it. In terms of the conversation capacity or capability,it’s really high with the Arlo Pro 3. Automated Voice: I can hear you. Sounds good. Sounds good. Gabe: When it comes to saving these audio/videoclips, you have a few different options with your Arlo Pro 3, including local storage withyour Arlo Smart Hub. You can install a SD card, up to 128 GB, whichwill allow for you to save those directly to your Smart Hub itself. Additionally, you can get the cloud storagewith your Arlo Pro 3 in an Arlo Smart Plan. Fortunately, you do get three months of theArlo Smart Plan for free whenever you buy your Arlo Pro 3. One thing to note about the Arlo Pro 3 andArlo Smart Plan is that it’s going to give you 30 days’ video history, basically anysmart plan. The real key here is you get a number of advancedfeatures as well. There are multiple offerings that can geta bit complicated. For full details, go check it out at securitybaron.com. Let’s talk about some of those advanced features,like activity zones. In addition to motion sensitivity that canbe adjusted within the app, you can also set up activity zones that will only give youa motion alert when it detects motion in those particular spaces that you’re looking for. I can build my own in the app, multiple, multipleactivity zones. What types of motion can it distinguish between? This is where that artificial intelligencecomes into play. The Arlo Pro 3 is capable of distinguishingbetween people and animals and vehicles. It even has some degree of package detection,which is pretty impressive. The Arlo Pro 3 also integrates with the twomajor smart platforms out there — Amazon and Google. I can use my voice and the linking of my Arloand Google and Amazon Virtual Assistant to watch my footage wherever I want. I can send a live stream to something likemy Google Chromecast just using my voice. Overall, the Arlo Pro 3 is really great, anice, robust and deep feature set to the home security camera game. [music] Gabe: Now that we’ve covered the feature setwith the Arlo Pro 3, let’s talk about the installation process. Here, I’ve got somewhat mixed feelings. When it comes to installing the device,
best home outdoor wireless security camera it’spretty straightforward. You’re going to have your Smart Hub done first. Plug in your Ethernet cable, plug in yourpower adapter. Once that’s up and set, you’re going to gothrough the process with your Arlo Pro 3. You’re going to be navigating it using themobile application. Make sure your battery is charged here atthe bottom. Boom. You’re done. You can probably be finished in a matter ofminutes, with adding any extra time deciding if you want to mount your magnetic mount outdoors,indoors, wherever you decide to put it. Overall, that part of the process is prettystraightforward. Where we ran into issues is when it comesto making sure you get the full capacity of your Arlo Pro 3. Remember, this is a 2K device. In order to get that 2K, you have to makesure, for one, you’re on the most recent version of the Arlo Smart Hub. We had one of those because we had the ArloUltra. However, we found out that our version wasfaulty. It took a long conversation with Arlo to finallycome to that conclusion, and then we had to get a replacement. Of course, to get the 2K recording, you haveto ensure that you have an SD card installed here at the bottom. Overall, that entire process took a littlebit longer than we think it needed to. It is a really important part of getting thefull capability out of your Arlo Pro 3. Otherwise, very straightforward, easy setupwith your Arlo Pro 3. [music] Gabe: Now that we’ve got our Arlo Pro 3 installed,let’s check out its mobile application, the Arlo app Generally speaking, people seem to have agood experience with it. It has a 4.5 in the Apple App Store and a3.8 in the Google Play Store. Let’s go ahead and check it out on my iPhone7 Plus. Here I am, checking out the Arlo Pro 3 inthe Arlo mobile application. Let’s go ahead and jump directly into thatlive stream. You note that it takes a minute to jump intothe live stream. It’s not immediate. Even now that we’re in the live stream, theredoes seem to be a delay. There’s a lag on what happens that’s a littlebit longer, I’d say about four to five seconds at times, than many of the competitors. You also note that we’re not actually streamingin 2K. This is not a 2K-enabled device, but evensometimes when I’m on 2K-capable devices, we noted that it did not actually give usthat live stream in 2K. You’ll see there are a number of icons atthe bottom. I have the speaker on the bottom left. I’ve got the microphone for two-way talk. I’ve got the ability to take a snapshot, turnon that spotlight in the far right-hand bottom corner, and then I can just record. You see here, I’m recording now, and thisis a pretty useful element. You can record that live stream. One thing we want to note as we’re recordingthis live stream, is that we have had issues with it actually recording live stream, somanual recording in 2K. It does do motion detection, things of thatnature in 2K, but in our personal experience, it would not actually do live recordings in2K no matter which device we happen to be using. Let’s go ahead and look at our event history,and just look at our history in our library. Go down to the bottom and you see here, nowwe have our manual recording that we just did. We’ve got various motion recordings in 2Kthat it was capable of doing. If you look at the top, we have a history,so I can go to the 15th, go to the 14th. I got package options. I got 18th, 19th. You can just look at a host of different thingsgoing on here. If you look at the filter in the top, youcan actually filter by the type of notification — people, vehicle, animal, package, smokealarms, motion alarms, audio — which is really useful. If we were to go to today, let’s just sayI wanted to download this 2K motion detection. I can watch it here. You can see me blowing out. [laughs] I can download the video directlyto this device. I can share it. I can send this video off to someone I’d liketo through message, or email, or shared album. It is great that you do have the ability tocontrol your recordings pretty quickly and easily. Now we can jump back out of that. Let’s go ahead and check out some of theseother elements of the Arlo Pro 3, beginning by just looking at the video settings. Of course, when you’re in the device settings,you’ll note that it has the ability to tell you how much battery life you have. It tells you which Smart Hub you’re connectedto. If you go into your motion detection setting,this actually allows you to decide how sensitive you want your cameras to be. This is one element that typically is notunder something called “device utilities” in a mobile application, so it did take usa little while, initially, to find out exactly where to find these elements of controllingour Arlo Pro 3. Low, medium, and high are your options. Let’s go check out some of our video settings. Now we have the ability to change our brightness. It’s currently at 50 percent. We could take it up to 75 percent, 100 percent. to know more best home outdoor wireless security camera
#camera#security#dsalr#us politics#covit_19#covid2019#wireless#aro#arlo3#arlo pro 3#arlo camera setup#flood#flood2020#tecno#technology#music#biar#italien#canada#coronavirus india#made in usa
1 note
·
View note
Text
Blink security camera reviews
afternoon I figured I would take a few minutes to go over a few topics really into physical security specifically surveillance or security cameras for those who don't know and those of you follow me on Facebook friends and ten members
you'll probably see a couple times a month I'll make reference to something we saw on our surveillance cameras at the house and it's kind of become a hobby of mine and I like to be able to see blink vs arlo seurity camera review what's happening at my home whether I'm there or not so there's a couple different options that I recommend if you're looking at getting a home security system as far as surveillance I will say in the beginning of this video that if you have the time and the money
you're willing to potentially mess up your house or hire somebody to do it for you a hardwired system whether it's a video cable and power cable or power over ethernet however you want to do it if you want to mount those cameras throughout your house and drive through the sheetrock and lay all those wires that is the best way to do it you're going to have a constant video you're not going to have interference you're not going to have to worry about it being saved to a cloud somewhere somebody else seeing the footage it's all going to be stored locally so that is the best way to do it I'm not in that boat to describe a new house don't want to mess up the walls so that's where these cameras come in the two cameras.
I've tried are blink and are low and had we used blink for about a month or two and then we used our low almost a year we're actually using our low right now so the the different cameras that I recommend that those are the two that we've used and those are the two I always get questions about you know should I go at blank I go in are low what are the pros and cons of each one so I figured I make this video for you and run down the list so the first thing really determines how many cameras you need most people are going to be fine with just two or three now if you want multiple angles that you want the sides of your house you want major one facing the door and one away from the door then the blink security system might be the best because for the price of two are low cameras plus the base station which is required you can buy five blink cameras plus the base station again the quality is not going to be quite as good the blink cameras are not set up to be used outdoors arlo security camera review but they can be if you're very strategic about where you place them so again if you need a lot of cameras.
you're on a budget like most people are then a blink is going to be the way to go now if you want a slightly better audio if you want something a better video and you want the addition of audio and you want something that's weatherproof then you'd want to go with our low because our low to be placed anywhere as long as you're on a place where it gets well below freezing or over 110 115 degrees then again our low is going to be fine they both support web apps or so our applications on your phone so you can download the blink app you can download the Arlo app.
54 notes
·
View notes
Text
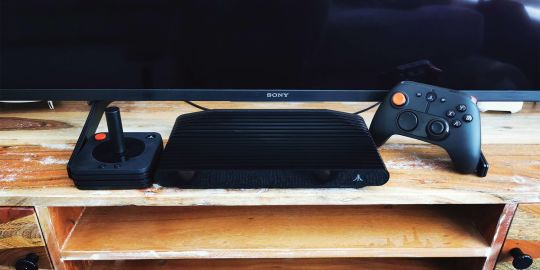
Atari VCS Review: An Incredible Nostalgia Hit With Gaming and Productivity in Equal Measure
Atari VCS
7.50 / 10
Read Reviews
Read More Reviews
Read More Reviews
Read More Reviews
Read More Reviews
Read More Reviews
Read More Reviews
Read More Reviews
Read More Reviews
Read More Reviews
Read More Reviews
Read More Reviews
Read More Reviews
Read More Reviews
Read More Reviews
Read More Reviews
Read More Reviews
Read More Reviews
Shop Now
Atari bills the 2021 iteration of its VCS as a perfectly capable mini PC and a game console in one; a computer console hybrid. The launch games work well and there are some lovely indie titles in there, and you can stay productive with Chrome's browser-based apps. In all, despite a couple of expected teething problems, the Atari VCS is a great console capable of streaming media, running games, and with a selection of apps allowing users to make use of the computer console's features.
Key Features
Console computer hybrid
Multiple controllers
Up to 4K resolution
Atari app store
Gaming and productivity
Specifications
Operating System: Atari Custom Linux OS
Storage: 32 GB flash (upgradeable M.2 SSD slot))
VR Support: Not at present
Resolution: Up to 4K
App Store: Yes
Wi-Fi: Wi-Fi 802.11 b/g/n 2.4/5GHz
Ports: HDMI 2.0, Gigabit Ethernet, 4x USB 3.1
HDR Support: No
Pros
Nice selection of launch games
Excellent for nostalgic gaming
Can connect other Bluetooth devices
Chrome browser works a charm
Great for media playback
Cons
PC Mode currently has issues
Fan can be noisy
Buy This Product
Atari VCS other
Shop
// Bottom
At last, the Atari VCS computer console has arrived. With four years in the making, you'd certainly expect the console to be more than just a heavy nostalgia trip. And it is, with one or two small caveats.
With so much hype leading up to its release (and somehow miraculously weathering the COVID storm despite electronic component shortages and logistics issues plaguing the tech industry), let's look at whether the Atari VCS lives up to expectation.
What's in the Box?
When you open the Atari VCS box, you'll find:
The Atari VCS 800 computer console
HDMI cable
Power supply unit
And that is it. You don't actually get any controllers with the device as they need to be purchased separately. Each both the Atari Modern controller and the Classic Joystick come with a micro-USB charging cable in the box.
The console retails for $299.99, while both controllers retail at $59.99 each. You can also get a bundle, with the console and both controllers, for $399.99.
What About the Atari VCS Specs?
The Atari VCS comes with specs that, as Atari says, make it "a solid mini PC". We'll come to whether the specs do indeed make it so later, but for now, here's what we're looking at:
Operating system: Atari Custom Linux OS (Debian based)
APU: AMD Raven Ridge 2 (RG1606G)
GPU: AMD Ryzen
Storage: 32GB eMMC fixed internal; internal M.2 SSD slot; unlimited external USB HD/stick; cloud (subscription required)
RAM: 8GB DDR4 RAM (upgradable)
Compatible Operating Systems: Linux, Windows, Steam OS, Chrome OS
Wireless Connections: Wi-Fi 802.11 b/g/n 2.4/5GHz, Bluetooth 4.0
Wired Connections: HDMI 2.0, Gigabit Ethernet, 4x USB 3.1
Mouse/Keyboard Support: Yes, USB or Bluetooth
4K video with HDCP 2.2 Integration: Supported
A Familiar Face
We'd forgive you for thinking you've seen the Atari VCS before. That is because Atari bases the console's appearance on the original Atari VCS, which later became the Atari 2600 in 1982.
Not familiar with the original VCS/2600? OK, let's take a tour around the device's aesthetics first.
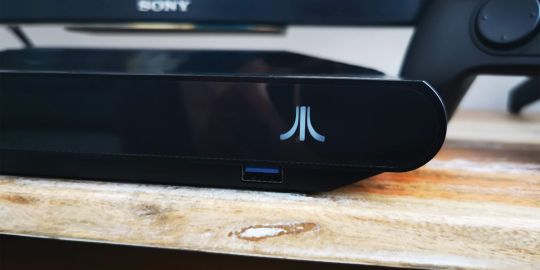
We reviewed the Onyx version. This is all black (save for the back panel), with a ridged, contoured top surface that replicates the original device. Note that the faceplate is also black, although you can also get the Black Walnut version, which features a real wood faceplate, further mimicking the first iteration of the console.
To the front of the device we have the iconic Atari Fuji logo. This lights up with a white glow when the device in operation, and pulses with the same hue when you put the VCS into standby mode.
There are also two USB ports, which you can use to connect the controllers to charge, or to insert a USB drive if you need to use the device in PC Mode.
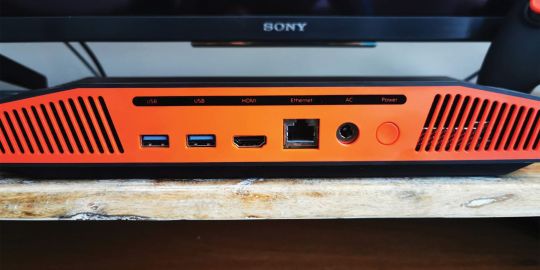
Spin the VCS round and the back comes in a recognizable Atari red. The back panel houses the power button, power input, an Ethernet port, and two further USB ports.
Anyway, now you know what the console looks like, lets see what the controllers have to say for themselves.
Atari VCS Controllers
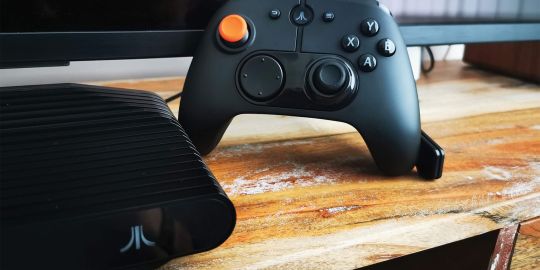
As mentioned, you can get two controllers for the VCS. One is a modern joypad style controller, while the other is a very recognizable joystick. Both are wireless, but work with a wired connection too, should you wish.
The Wireless Modern Controller will have a familiar form-factor for anyone who plays Xbox, uses a Switch Pro control pad, or the official Stadia pad.
Crafted by PowerA, the joypad's buttons have the same configuration as those mentioned above in terms of the thumbstick, action buttons, triggers, and directional buttons/pad. The center houses a home button that features the Atari Fuji logo and lights up white. Below this is a strip of LEDs that indicate remaining battery power.
PowerA also designs the joystick controller. This looks pretty much identical to the joysticks that shipped with the 2600, save for a couple of extra buttons to add functionality, such as a home button and (curiously) a trigger button around the side of the device.

Personally, I find the stick component of the joystick to be a little flimsy. However, my memories of playing with a joystick (pre-1995) involve the Powerplay Cruiser.
Retro gamers will remember this stick. Not only because of its bright colors but also because of the adjustable torque control. This was a collar at the bottom of the stick, which made it harder or easier to manipulate the directional controls.
Because of this resistance, I guess my muscle memory expects the Atari wireless joystick to behave in the same way. A little more resistance would have been nice with the wireless joystick, personally, I find it isn't firm enough when I'm using it.
Saying that, it works perfectly for some of the retro games I have been playing from my younger days (more on those later).
Simple, User-Friendly Set-Up
The first thing you need to do, when you get any console, is set it up. This is a simple process. Just hook it up to a power source, connect to a display with the included HDMI cable, and you're ready to switch it on.
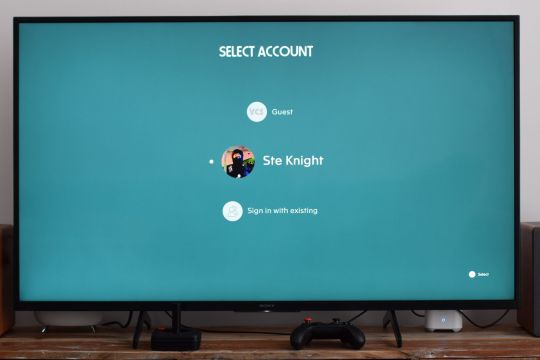
Doing so presents you with a lovely Asteroids animation, which then takes you to the sign-in page. At this stage, you'll need to connect the controller to the console, or you won't be able to input any details for account set-up. This is simply a case of holding down the home button, which puts the controller into pairing mode and connects it to the console.
Setting up your account is as easy as defining your user name and selecting a password.
Given that I received the Atari VCS prior to general release (in order to test it), for the first time in my life, I could choose Ste Knight as my user name and wasn't greeted by a "This username is unavailable" message. Sorry, SteKnight_1.
Note that you can set up different user accounts on the VCS, which is great if you want to have an account for the grown-ups and a separate one for the kids.
With the Atari VCS running and the account set up, now it is time to check out the VCS software.
An Easy to Navigate User Interface
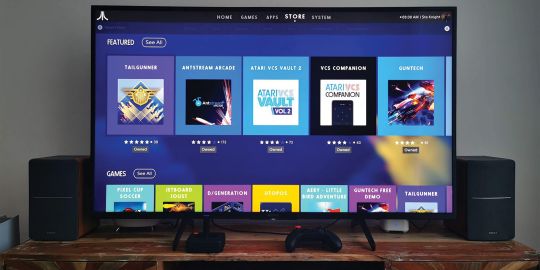
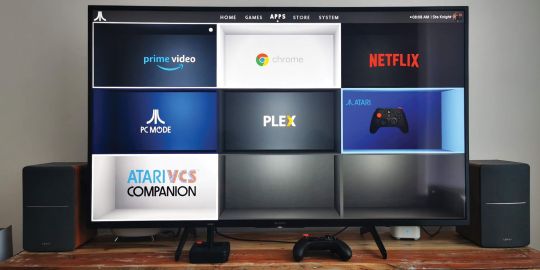
The first thing that struck me about the Atari VCS was its simple user interface (UI). This comprises several pages; Home, Games, Apps, Store, and System.
When you first see it, the Home page will be fairly unpopulated, save for Google Chrome and the Atari VCS Companion launcher. As you use the apps and games you add to the device, the home page will populate, with your most recently used app appearing first in the list.
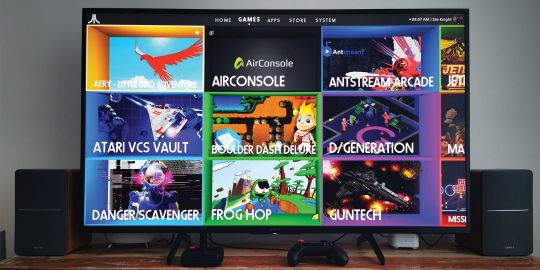
The Games page will also be unpopulated. This (obviously) fills up with titles as you add them from the Store. As you do, it presents each game in its own box, and you just select it to launch the game, as with any other console carrying digital titles.
In the Store, you'll find Featured Apps and Games, plus a section for all Games and all Apps. Selecting one will present you with a description of the game, with screenshots, and the option to buy it (along with the price).
System is where you deal with the Atari VCS settings. You'll find the following options in here:
Account: Here you can alter account settings and remove an account.
General Settings: Here you can change display settings, change your console preferences such as Sleep time, find out how the controller operates, perform System and BIOS updates, and factory reset the VCS.
Network: This is where you connect to the internet, wirelessly or via ethernet cable.
Devices: Toggling Bluetooth, checking out your connected devices, and adding new controllers. You also update your controller firmware here.
Storage: You can manage internal storage and connected storage media here.
At the top right of the screen, you'll see your avatar. Navigating to this will allow you to switch accounts and turn the console off.
With menus out of the way, let's get to the meat on the Atari VCS' bones.
Gaming on the Atari VCS
Being a nostalgia freak, I absolutely love any gaming system that lets me play games I loved growing up, like the Evercade handheld games console. With this in mind, the Atari VCS provides an excellent platform for me to get all misty-eyed over.
Including Antstream Arcade on the store is a real boon for Atari and for its retro game loving fans. I've been hammering the likes of Sensible World of Soccer, GODS, and Chaos Engine, along with many other titles from my youth. The VCS copes well with these games (as you would expect; it is significantly more advanced than the original game platforms).
The Atari VCS Store currently features a modest selection of games. These are indie titles, and you'll recognize some of them from other platforms, like Sir Lovelot, Something Ate My Alien, and Jetboard Joust.

One exciting title (currently in public beta on the VCS and Steam) is a remake of 1993 shooter Utopos. This is an arena-based game, in which contestants fly space ships around an enclosed zone, blasting each other deathmatch style. Oh yeah, and no spawn camping in this one. Brill! As it is in beta, though, you're likely to only play against AI for now.
Atari promised the VCS would create a platform for indie developers to shine, and it has so far. It just needs to grow the collection of titles available in the store. But, hey, the PS5 had few titles at launch and it still relies heavily on indie titles, so who are we to talk?
Most of these games run smoothly on the VCS. The only exception is Missile Command Recharged, which seems to hate the Wireless Classic Joystick. This doesn't work at all with the game, seemingly taking on a mind of its own and dragging the cross-hair to the bottom left of the screen, so you can't defend your base. It is pretty hard to play with the Modern Controller.
Hopefully, as the Atari VCS grows in popularity, the game store will expand to feature some bigger titles alongside its loveable indie games.
Productivity on the Atari VCS
In terms of productivity, I must start with a caveat. I couldn't test the PC Mode, as the VCS wouldn't boot the UbuntuOS drive I had created on external storage. I reached out to Atari for help with this matter, and I'm told that it will resolve the issue in the next software update. Fingers crossed because I would actually like to use the VCS as a living room PC, as Atari marketed the device.
You should also note that PC Mode also currently only works with a signed OS (when it works). So platforms like ChromeOS, Windows, and Ubuntu. I tried to boot Chromium, but this isn't a signed OS, so the VCS displayed a security warning and refused to launch it, sadly.
However, if you're having a similar issue, you do have Google Chrome pre-installed on the VCS. So you can still make use of Google's suite of browser-based applications such as Docs, Sheets, and so on. Therefore, if you need to get productive with your VCS, you still can, just not with PC Mode at the time of writing.
Browsing the web on my Sony Bravia TV, via the VCS was a pleasant experience (MUO looked particularly resplendent). I have connected a wireless keyboard and mouse to the device, which makes using it for productivity even easier.
Note that you can download an app for your smartphone or tablet called the Atari VCS Companion. This acts as a wireless keyboard and mouse, so you don't actually need any extra peripherals if you're in a pinch and need to browse the internet on your VCS. It works very well with the console and I noticed very little latency between executing a command and the VCS performing it.
TV, Movies, and Music on the Atari VCS
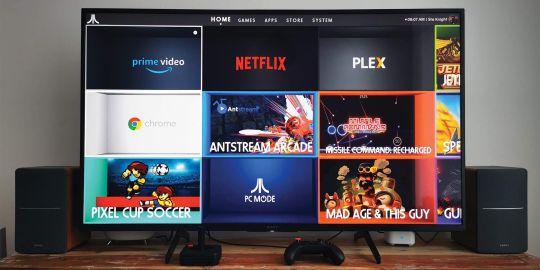
You can access a range of SVOD services on the Atari VCS. This includes the current "big three"; Disney+, Netflix, and Amazon Prime Video. You can also access further services (sadly geo-locked to the US, sorry non-US readers), including Showtime, ESPN, and Peacock, among others.
I installed Netflix and found no issue with playback, even with UHD movies and TV series'. Likewise, Amazon Prime Video works as it does on my PS5 or my Fire TV stick. So, all is well in this respect. I noticed no lagging or juddering, no buffering, and it perfectly syncs audio with video.
I also installed Plex, meaning I can access all of my owned media directly from my server upstairs and play it via the VCS (although I don't really need to, as I also have Plex on about a million other devices). However, it handles Plex really well, streaming my music collection faultlessly.
Related: Features That Make Plex the Perfect All-In-One Media Streaming Platform
So, as with games, we're all good regarding media playback.
Should You Buy the Atari VCS?
That all depends on what you want from it. If you want it so that you have a central hub to play retro and indie titles, then that is one box ticked. If you would like to use it for streaming media and accessing your owned media, there is another box ticked.
The only area that I felt a little let down on was the PC Mode. Productivity is still achievable, and don't forget, almost every device you buy now requires updates and so on as developers address bugs. The Atari VCS is no different in this respect. Hopefully, Atari will resolve the PC Mode issues with the next update.
Some might sneer at the price and compare it to the PS5 or the Xbox Series X. However, how much work can you do on those? None. Atari doesn't want to draw comparisons between the VCS and new-gen consoles, and for good reason, they're totally different things.
Once Atari sorts the above-mentioned teething issues out, I am confident that I for one will use the device not just to play myriad games, but also to write my reviews here on MUO while I'm relaxing on my sumptuous sofa, and that can't be a bad thing at all.
Atari VCS Review: An Incredible Nostalgia Hit With Gaming and Productivity in Equal Measure published first on http://droneseco.tumblr.com/
0 notes
Text
Mac Mini For Photoshop

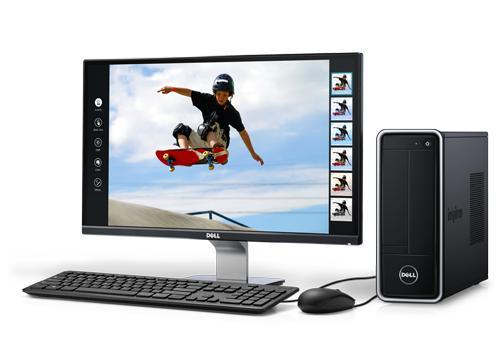
The entry-level Mac mini offers a 3.6GHz quad-core i3 processor for £799/$799 which may not fulfil the needs of the typical designer, but the £1,099/$1,099 version offers a 3.0GHz 6-core i5. Apple FINALLY updated their Mac Mini product line late in 2018 (with a minor update in March 2020), making it a pretty good option for photographers to run Lightroom and Photoshop. This buying guide provides insight into which model and what configuration options photographers should consider. The best budget Mac for photo editing is the 2019 Mac Mini for about $900 and the best budget PC is the Dell Inspiron 3670 for about $650. Add the ViewSonic VA2719-2K-SMHD 27 Inch display for about $220 and a 4TB hard drive for another $100. So you are a photographer on a tight budget in need of a computer to run Lightroom and Photoshop. Hi John - The PA272W-BK-SV 27' 16:9 IPS Monitor with SpectraViewII from NEC comes equipped with the NEC SpectraViewII color calibration tool and features enhanced color accuracy covering 99.3% of the Adobe RGB color space, 94.8% of the NTSC color space, and 146.4% of the sRGB color space. With a variety of input connectors including DisplayPort, Mini DisplayPort, HDMI, and DVI-D Dual-Link, you.
Mac Mini For Photoshop Cs6
Mac Mini For Photoshop Software
What is Final Cut Pro X like running on a new Mac mini? We take a look at the new model, its features and how well FCPX performs. It even beats an iMac Pro in one of our tests!
Before we plug the new Mac mini up, it is important to understand that this version of the unit has changed. Changed a lot.
Back in 2005, the Mac mini was designed for switchers from PCs. It didn’t come with a screen, keyboard or mouse and keeping the price down helped make the transition to Mac OS 10.3 Panther and a PowerPC processor as painless as possible.
Times and technology have changed, no need now for the DVD slot or a spinning hard disk for storage.
The switchers of today are buying MacBook Airs and MacBook Pros as their first Macs, not the mini.
So this gives Apple a chance to change and retarget the use of the Mac mini. Consequently, that’s exactly what they have done with the new range of models.
But instead of offering (To quote Steve Jobs) a ‘stripped down Mac’ they’ve actually put the logic board on steroids!

The fourth generation Mac mini now has a choice of quad and 6-core processors, up to 64GB of Ram, up to 2TB of SSD storage and the option of a 10GigE port over the standard GigE.
There are also four USB-C Thunderbolt 3 ports fed from two controllers, an HDMI port that supports 4K and two USB 3 ports. So yes, you can plug your own keyboard and mouse in without having to buy any adaptors.
Can the user upgrade the RAM in the new machine? Yes, it is possible, but it is not a case of flipping up a slot and exchanging the cards out.
You have to remove the cooling fan and then slide out the logic board. Make a mess of it and you’ll invalidate the warranty, so it is best to stick to an Apple approved centre for the upgrade. Should you want to get your spudger out and see the insides of the new Mac mini, head over to the excellent iFixit site.
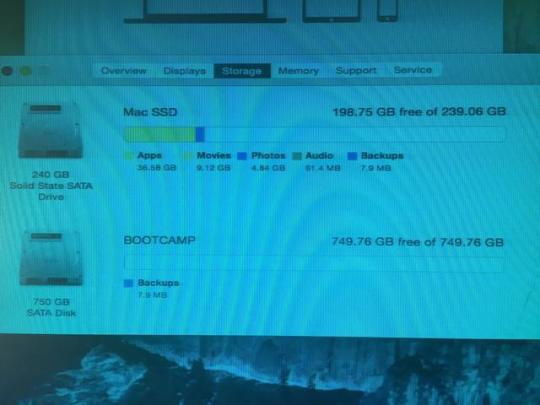
The machine on test is a 3.2GHz 6‑core 8th‑generation Intel Core i7, 32GB 2666MHz DDR4, Intel UHD Graphics 630, 1TB SSD storage and the 10 Gigabit Ethernet option.
If the colour of the Mac mini looks familiar, it is exactly the same as the iMac Pro and (after seeing them side by side) the Blackmagic external GPU. This also makes sense of the decision for Apple to sell the black keyboard and mouse and also probably hints at the new Mac Pro colour. (And possible footprint- a skyscraper sized oblong trashcan?)
Connecting it up
I’m lucky to have 2 10GigE connections on the back of my QNAP NAS. Final Cut Pro X needs fast drives to be able to build the ‘always live’ waveforms and thumbnails.
Plumbing the Mac mini into the edit system is easy and I’ve detailed how to do point to point 10Gig connection before if you haven't got a router/switch.
If you need the internet on the machine, a cheap USB to Ethernet adaptor from Amazon for $15 works as well as anything else. Run a speed test to make sure you are accessing the NAS via the higher speed route.
I powered a 4K monitor from the HDMI port; this works well and avoids any more dongles having to be bought.
After 25 years of Mac ownership, I have enough keyboards and a spare mouse to finish off the system!
Power On
The machine comes with Mojave installed and defaults to dark mode on the now silent boot. The machine is very quiet and can’t be heard over the fan of the nearby QNAP, which isn’t that loud either. This machine could easily sit on your desktop and not annoy you or your co-worker.
I read a recent review that the sound was pretty terrible out of the Mac mini. I’d disagree. It isn’t great, but it isn’t bad either. I’d say it was better than the old cylinder Mac Pro, but not in the league of the Mac notebooks. You wouldn’t want to use it as edit monitoring.
The Mac mini does have a headphone socket and I can see many editors sitting in offices with the machine on the desk and headphones on editing all day.
Although I worked the machine hard with rendering, the shell didn't get too hot. However I did feel the warm rush of air out of the back of the machine which caught me by surprise when the mini was angled away from me.
I wouldn't have it in this orientation for continuous use, ie situated under a central monitor post with cables pointing at you. Instead I suggest putting the cables and heat exhaust to the back. It will make plugging the headphones in a bit trickier, but I hate sitting in draught!
Final Cut Pro X Performance!
Let’s give it a real test and put it up against an iMac Pro!
I thought I’d dive straight in with a 4K Project and use a Library with a short minute and a half sequence with large still images, transitions, multiple title and adjustment layers.
It is in a Library that I duplicated to both machines with the media staying on the QNAP. The cache was set to both desktops respectively as the RAM in both runs at up to 3Gig speed.
Mac Mini For Photoshop Cs6
Although I didn’t time it, it felt like the thumbnails were taking a longer time to draw than I’m used to on the iMac Pro. All render files were deleted before all tests.
Unrendered, the Mac mini played the sequence back in Better Performance, but dropped frames on Better Quality. The iMac Pro played back in both settings without a problem.
Skimming seemed just as fast as the iMac Pro and it didn’t feel underpowered when navigating the timeline or browser.
The iMac is an 8 core machine with 64GB of RAM and more importantly a Radeon Pro Vega 64 GPU.
Both machines are connected to the same storage via 10GigE and renders and exports went to the respective desktops. (Ok I know it is NBase-T which supports 1Gb, 2.5Gb, 5Gb and 10Gb)
Render time Mac mini 7’03” iMac Pro 1’43”
Mac Mini For Photoshop Software
4K ProRes 422 Export Mac mini 6’45 iMac Pro 1’40”
As expected here as FCPX uses the GPU for image processing, the much lower powered Mac mini takes a lot longer.
Compressor Convert to HEVC 4K 8Bit Mac mini 54” iMac Pro 55”
Well, the Mac mini beat the iMac Pro! This is because all of the conversion is done on the CPUs.
Not really worth testing for Motion as apart from a few things like particles, Motion almost lives on the GPU.
Compressor Clusters
No, not a new breakfast cereal, but Compressor allows you to share the work out over connected machines.
I didn’t realise that the ability to set up a cluster of machines running Compressor was easy to do. Well, when I say easy my first attempt failed, but that might be down to my slightly quirky network topology with the QNAP.
To build a cluster, on the machines you want to add, open up a copy of Compressor. In the preferences, turn the option on for other computers to process batches.
Then on the host machine, make a cluster from the available machines in the list. Here you can see we have got something very wrong! We will be revisiting this topic with the issue fixed when we have more time.
Then having named your cluster (or other single machine), you can then toggle the processing destination in the dropdown menu on the bottom of the host machine's Compressor GUI.
To work properly and fast, all the machines need to be connected with 10GigE via a 10GigE switch. The costs of this networking is now a lot cheaper, Netgear and QNAP make a suitable budget switch.
There is no limit to the amount of Mac minis you can have in a cluster. You'll probably run out of switch ports first!
One note here. For distributed processing, it has to be a self contained movie that gets automatically diced and sliced and sent off to the cluster machines.
Conclusions
Not what I expected. I guess I was in the state of mind thinking that the Mac mini wasn’t a serious machine for anything other than web browsing, Plex serving or basic Photoshop.
It’s a lot more than than. It is a component in building a modular system, which is a new thought considering that Apple has been criticised over the past few years for lack of upgradability in the Mac Pro and iMac Pro.
There are two reasons for this new direction. The first are Thunderbolt 3 connections giving the option of using an external GPU and therefore factoring out the limited onboard Intel offering.
The second is the option of a 10GigE port. Being able to connect to high speed shared storage without going through an adaptor is a huge plus.
Why? Take sever centres for example. Every App on the iOS App Store has been compiled on a Mac. Rack up rows of Mac minis connected with 10GigE and you have a facility that can get apps ready quickly. No need for costly large GPUs here, all the work will be done by the CPU cores. Once set up, the Mac mini is more than happy to run in a headless mode. I've worked with a few producers like that.
This is also true of building a small Mac mini cluster to do the hard work of making all the different deliverables of an FCPX exported finished movie - while you carry on editing something else with your main machine. It would make sense for a large production or facility house to have a rack of these that everybody could access when needed.
Put five or ten of these together in a rack and you have a very fast DIT tool for making proxies and dailies on set. The Mac mini above gets its first on set DIT experience tomorrow!
I’ll leave you with a final thought.
Spec up a 6-core Mac mini with 32GB of RAM, 1TB of SSD storage and the soon to ship Blackmagic RX Vega 56 eGPU and you have a machine that’s not too far from the base model iMac Pro, wait for it... with over £1,200 left spare.
Granted, you’ll have to supply your own monitor, keyboard and mouse, but if upgradability is important to you, this could be a very clever way of getting the power with the flexibility.
Hopefully we will have an eGPU to test soon :)
Peter Wiggins is a broadcast freelance editor based in the UK although his work takes him around the world. An early adopter of FCP setting up pioneering broadcasts workflows, his weapon of choice is now Final Cut Pro X.
You can follow him on Twitter as @peterwiggins or as he runs the majority of this site, you can contact him here.
0 notes
Text
Samsung Q80T series (2020) review: High-end design, excellent picture, approachable price
New Post has been published on https://appradab.com/samsung-q80t-series-2020-review-high-end-design-excellent-picture-approachable-price/
Samsung Q80T series (2020) review: High-end design, excellent picture, approachable price

In 2020, Samsung’s TV lineup seems skewed more than ever toward higher-end models: There are three series with 8K resolution, a bunch of lifestyle models such as The Frame, The Sero and even a crazy-expensive outdoor television called The Terrace. Among relatively “normal” TVs, the Q80T stands out. It’s not cheap, but it is the least expensive Samsung QLED TV to feature full-array local dimming, which gives it an excellent picture.
Like
Excellent overall image quality
Superior styling
Wide range of sizes
Numerous features, voice options
Don’t Like
More expensive than competing TVs with similar picture quality
The Q80T’s big brother, the Q90T, also has FALD and I expect it to perform even better, but once again there’s an issue with price. In the 55- and 65-inch sizes the Q90T costs basically the same as my favorite high-end TV for 2020, the OLED-powered LG CX, and in my experience the OLED will have a better picture overall. That puts the Q80T in roughly the same price-to-performance sweet spot as the Sony X900H, the Vizio P-Series and TCL 6-Series.
I compared all four in my basement TV lab side-by-side and the Samsung Q80T was indeed excellent, but despite costing more than the other three, it didn’t put out a better picture. Instead its strength lies in design, with sleeker looks, an excellent remote and, yes, that Samsung nameplate. Like the others it’s also well-suited to pair with an Xbox Series X or PS5 thanks to variable refresh rate capability and 4K/120Hz input.
If you have your heart set on a Samsung, you want a great picture and you don’t have money to burn, the Q80T is pretty sweet. But if you’re brand-agnostic, the Vizio and TCL are both better values.
Sleekness from the stand up
When you pay a little extra for a Samsung you expect superior design, and the Q80T delivers. The most obvious upgrade is the stand: Samsung uses a central pedestal, which to my eye looks a lot sleeker than the two separate legs to either side that most new TVs employ. The base is a single slab of metal, flush against the tabletop. An angled chunk of metal and plastic supports the panel, creating a nice floaty effect.
Black with a minimal frame around the image, the Q80T also has a textured backside and a cable management system that lets you channel power and HDMI from their ports through the stand, making for a cleaner look.

David Katzmaier/CNET
Samsung’s clicker is also among my favorites, with minimal buttons and just the right feel in-hand. Channel and volume keys click up and down, Ambient mode gets its own button as does the mic for voice, and even the Netflix and Amazon app shortcut keys are nicer than on other remotes: They lack garish colors and instead just match the rest of the wand.
Ambient mode is designed to show stuff on the screen when you’re not watching TV. It’s a cool feature if you don’t like the big black rectangle of an inert TV, and can display your photos, designer art, the weather, headlines and even adjust backgrounds to match your wall.

David Katzmaier/CNET
Alexa and Google join Bixby
Samsung’s homebrew Bixby voice assistant is built into the Q80T, as you’d expect, but new for 2020 you can choose the overwhelmingly more-popular Amazon Alexa or Google Assistant instead. You can select between the three in the menus and whichever one you choose will be available when you press the mic button on the clicker.
Alternately you can set the remote’s mic to listen for the “Alexa” or “Hey, Google” wake words, allowing you to issue commands hands-free (it worked well as long as I stayed relatively close to the remote). And like most TVs you can also pair the Q80T with separate Alexa or Google speakers.

David Katzmaier/CNET
Beyond voice, Samsung’s on-screen smart TV system is excellent, with quick responses and plenty of apps, and I’d take it over LG or Vizio’s systems. I still like Roku and Android TV (found on Sony TVs) better overall, however, because they have even more apps. Just like most TVs now (including Roku), Samsung has the Apple TV app and works with Apple’s AirPlay system.
Full-fledged features and HDMI connectivity
Full-array local dimming sets the Q80T apart from cheaper Samsung TVs. This technology, which improves LCD image quality significantly in our experience, boosts black levels and contrast by making certain areas of the picture dimmer or brighter in reaction to what’s on the screen. The step-up Q90T and the company’s 8K models have more dimming zones and brighter images than the Q80T, but Samsung doesn’t say exactly how many zones each has.
Key features
Display technology LED LCD LED backlight Full array with local dimming Resolution 4K HDR compatible HDR10, HDR10+ Smart TV Tizen Remote Standard voice
Like all of Samsung QLED TVs, as well as most higher-end TVs from Vizio and TCL, the Q80T’s LCD panel is augmented by a layer of quantum dots — microscopic nanocrystals that glow a specific wavelength (i.e. color) when given energy. The effect is better brightness and color compared to non-QD-equipped TVs. The Q80T uses a true 120Hz panel, which improves the TVs’ motion performance, but as usual the “Motion Rate 240” specification is made up (note that the 49- and 50-inch sizes are 60Hz/MR 120).
The set supports high dynamic range content in the HDR10 and the HDR10 Plus formats. It lacks the Dolby Vision HDR support found on most competitors’ HDR TVs. I’ve seen no evidence that one HDR format is inherently “better” than the other, so I definitely don’t consider lack of Dolby Vision a deal-breaker on this TV — instead it’s just one more factor to consider.
Gaming features are one of the Q80T’s strong points. It’s compatible with variable refresh rate, as well as the FreeSync and G-synch VRR formats, available from devices including select PCs, the Xbox Series X and PS5, although the latter doesn’t support VRR yet. The Q80T also accepts 4K/120Hz input on HDMI 4, which is conveniently marked with a little game controller icon. The TV supports Auto Game Mode too, which lets it automatically switch to game mode to reduce input lag when it detects you’re playing a game. (Note that the 49- and 50-inch sizes lack 4K/120Hz input and VRR.)

David Katzmaier/CNET
4x HDMI inputs
2x USB ports
Ethernet (LAN) port
Optical digital audio output
RF (antenna) input
Remote (RS-232) port (EX-LINK)
This list is mostly solid, unless you happen to own a legacy device that requires analog video (component or composite) or audio. The Q80T is one of the few TVs that doesn’t at least offer one analog input, audio or video.
Picture quality comparisons

Click the image above for picture settings and HDR notes.
David Katzmaier/CNET
The Q80T is an excellent performer overall, with good local dimming and contrast, excellent brightness, color and video processing. It fell short of the black levels and brightness of some less-expensive TVs, such as the Vizio P-Series and TCL 6 series, especially with HDR material, but showed less blooming and a slightly cleaner image, earning the same score of 8 (Excellent) in this category. I preferred the Vizio and TCL overall for image quality and liked the Sony X900H a bit less, but all four occupy the same general plane.
Click the image above to see the picture settings used in the review and to read more about how this TV’s picture controls worked during calibration.
Dim lighting: I started with the excellent-looking Blu-ray of Parasite. In brighter scenes the Samsung generally matched the image quality of the others — all four were excellent overall. Differences emerged in darker scenes, for example during Park Dong-ik’s ride in the back of the car in Chapter 4. The TCL and the Vizio both showed darker, more realistic “black” in the shadows and letterbox bars, with less bleed from bright areas into dark, compared to the Sony and Samsung. The latter two were close, but the Samsung has a slight edge over the Sony. The differences weren’t drastic — all four TVs have very good black levels and contrast — but still visible side-by-side.
Here’s where I mention an unusual thing Samsung did with settings, which I liked. The Brightness control handles backlight level but there’s an additional Shadow Detail slider under Gamma (where it should be) that controls exactly that (and does a lot of the same work as a standard Brightness/black level setting). According to my measurements it does what it claims: boosts brightness at low levels (5% to 20%) as you creep up. The default “0” setting is the most accurate but cranking it up did reveal more, yes, details like the car seat cushions and floor of Parks car became more visible.
Bright lighting: These days TVs just seem to be getting brighter but the Q80T is an exception, measuring dimmer than many TVs at its level including the TCL, Vizio P and Sony, and even slightly dimmer than the Q70 from 2019. It’s still bright enough for just about any room, however, and has plenty of punch to make HDR look impactful.
Light output in nits
TV Brightest (SDR) Accurate color (SDR) Brightest (HDR) Accurate color (HDR) Hisense H9G 1,239 1,238 1,751 1,498 TCL 65R635 1,114 792 1,292 1,102 Sony XBR-65X900H 841 673 989 795 Vizio P65Q9-H1 768 629 1,305 1,084 Hisense 65R8F 717 717 770 770 Samsung QN65Q80T 664 503 1,243 672 Vizio M65Q7-H1 595 424 588 480 LG OLED65CX 377 290 690 634
Don’t let the high score in Dynamic fool you. Aside from being woefully inaccurate, it fluctuated quite a bit, starting out at over 1,200 nits but falling almost immediately to around 300. Most other TVs don’t show such dramatic fall-off, and none of the Q80T’s other modes did either.
For the Accurate measurements in SDR I used the Natural picture mode in combination with the Warm color temperature setting (the default temperature for Natural is quite blue). I prefer Vizio and TCL’s approach of a dedicated, accurate bright-room picture mode.
Unlike previous Samsung TVs I’ve tested the Q80T didn’t excel at handling ambient light. In a bright room all of the TVs in my lineup were better at reducing the brightness of reflections to preserve the fidelity of the image. The difference wasn’t massive but definitely noticeable in dark areas of program material.
Color accuracy: The Samsung’s Filmmaker Mode and Movie modes are both accurate before calibration but I prefer the former because it disables most video processing by default (see below). After calibration, as expected, it was excellent. During Parasite, colors like the green lettuce and red kimchi in the cafeteria in Chapter 4, as well as the skin tones of the family as they eat, looked natural and well-balanced. Then again so did the other displays — it was difficult to see any real color differences even side-by-side with non-HDR colors.
Video processing: As usual the Samsung aced my tests in this category, delivering true 1080p/24 film cadence with film-based sources and plenty of motion resolution (1,000 lines) with video-based sources. The TV achieved both results with a Picture Clarity setting of Custom with Blur Reduction at 10 and Judder Reduction at 0, so if I had this TV I’d “set it and forget it” right there. Note that Filmmaker Mode’s default setting is to turn Picture Clarity off, which results in less motion resolution, but you can adjust it to taste.
You can also add more smoothing or soap opera effect by increasing Judder Reduction or choosing Auto instead of Custom. Meanwhile the LED Clear Motion option makes motion even sharper with the help of black frame insertion, at the expense of flicker and a dimmer image.
Samsung continues its tradition of excellent input lag in game mode with a score just over 14 milliseconds with both 1080p and 4K HDR sources.
Uniformity: With demanding, full-field test patterns the Q80T’s screen was quite uniform, with more-even lighting from edge to edge than the Vizio, whose sides looked slightly dark, and slightly less-even lighting than the TCL. With program material I saw the same minor issue on the Vizio while the others were very similar (note that uniformity can vary from sample to sample). From off-angle the Samsung was the best LCD TV I’ve tested, maintaining color fidelity, brightness and contrast better than the others.
HDR and 4K video: With high dynamic range sources the differences between the four TVs became more apparent, and the Vizio and TCL looked slightly better than the Sony and the Samsung overall. The Q80T’s highlights appeared a bit dimmer than the others, including the Sony, while its black levels were lighter and less realistic than the TCL and Vizio, it’s contrast did beat the Sony’s.
Watching the Spears and Munsil HDR benchmark’s test montage, the ferris wheel at night (4:51) was a good example, with a slightly gray-blue cast to the sky, and less pop in the lights on the Q80T. It still looked great, with plenty of punch and contrast I expect from HDR, but next to the TCL and Vizio it didn’t convey quite the same sense of realism — although it looked better overall then the Sony.
Brighter scenes, like the closeups of flowers and insects (3:26), showed less of a difference but the Samsung still appeared very slightly dimmer than the TCL and Vizio, an impression backed up by spot measurements of my light meter. Colors were crisp and vibrant, however, and the orange of the monarch butterfly for example appeared a bit deeper and more saturated than the TCL, if not quite as powerful as the Vizio.
The Samsung and Sony had one advantage during the montage however: they were slightly cleaner than the TCL and Vizio in the first fade up from black to a bright sky. The latter two showed faint, subtle banding in the sky as the image brightened, while the two “S” TVs didn’t.
Another advantage: The Q80T was the best among the three at controlling blooming, so stray illumination wasn’t an issue even in difficult mixed bright-and-dark scenes. One major reason, I suspect, was its less-aggressive brightness compared to the more blooming-prone TCL and Vizio.
Switching over to Parasite in HDR, the Samsung’s image held up better than before thanks to its ability to control blooming and maintain black levels (at the expense of brightness). During the dark Chapter 4 car ride, for example, the Q80T’s black levels were darkest and it showed less stray illumination in the passing streetlights. On the other hand those lights and other bright spots were more brilliant on the TCL and Vizio, and both exposed more shadow detail than the Samsung — while the Sony had the best shadow detail and the worst contrast. I still ended up preferring the TCL and Vizio overall, but the Samsung was much closer.
In brighter scenes where blooming is less visible the superior light output of the other TVs shined gave them more characteristic HDR punch, particularly in highlights like the sun as TK approaches the house in Chapter 3. The Samsung still looked brilliant, saturated and impressive, but the TCL and Vizio looked just a notch more-so in my side-by-side comparison.
Geek Box
Test Result Score Black luminance (0%) 0.003 Good Peak white luminance (SDR) 664 Good Avg. gamma (10-100%) 2.22 Good Avg. grayscale error (10-100%) 0.64 Good Dark gray error (30%) 0.90 Good Bright gray error (80%) 1.37 Good Avg. color checker error 2.70 Good Avg. saturation sweeps error 2.01 Good Avg. color error 1.29 Good Red error 1.34 Good Green error 0.59 Good Blue error 1.13 Good Cyan error 1.38 Good Magenta error 1.61 Good Yellow error 1.70 Good 1080p/24 Cadence (IAL) Pass Good Motion resolution (max) 1000 Good Motion resolution (dejudder off) 1000 Good Input lag (Game mode) 20.77 Good HDR10 Black luminance (0%) 0.005 Good Peak white luminance (10% win) 1243 Good Gamut % UHDA/P3 (CIE 1976) 91.85 Average ColorMatch HDR error 5.52 Poor Avg. color checker error 2.65 Good Input lag (Game mode, 4K HDR) 20.37 Good
Samsung QN65Q80T CNET revie… by David Katzmaier
Portrait Displays Calman calibration software was used in this review.
0 notes
Text
Vizio SB36514-G6 Soundbar Review: Shockingly Affordable Dolby Atmos
New Post has been published on https://bestedevices.com/vizio-sb36514-g6-soundbar-review-shockingly-affordable-dolby-atmos.html
Vizio SB36514-G6 Soundbar Review: Shockingly Affordable Dolby Atmos
Vizio SB36514-G6 5.1.4-channel Dolby Atmos soundbar
"The Vizio SB36514-G6 is your one-way trip to delight Dolby Atmos on a budget."
Sleek design
Impressive performance from Dolby Atmos
Solid detail for the price
Chromecast Wi-Fi streaming
Several ways to customize the sound
Bass can be limp
Setup and calibration require patience
It will be hard to hide from Dolby Atmos. From 4K Blu-rays to Netflix, Amazon and Disney's new streamer, Disney +, Atmos sneaks into every format. The only real barrier is the expensive hardware that makes Atmos sing.
This is where Vizio's growing fleet of Dolby Atmos soundbars like the SB36514-G6 come in.
After Vizio thrilled the crowd with the $ 1,000 SB46514-F6, which offers 5.1.4-channel Dolby Atmos performance for hundreds less than most of its competitors, Vizio has released several follow-ups in different sizes at lower prices . The SB36514-G6 shrinks the length of the flagship bar by a full 10 inches, but retains all 5.1.4 channels, Chromecast streaming, and more for just $ 700.
Is there atmos in it?
The SB36514-G6 comes in a relatively compact L-shaped box that is reminiscent of most two- or three-channel budget bars and is much smaller than the sarcophagus boxes that I get from other all-in-one Dolby Atmos I'm used to setups.
Inside, you'll find a sleek, five-part system that features Vizio's signature silver and black (a greeting to your Raiders fans). The 36-inch soundbar (which adds to the intricate name) contains three oval drivers on the front, two passive radiators, and oval drivers towards the center.
The two satellite speakers are each equipped with two drivers, including their own high-powered drivers, to complete the ".4" height channels, which bounce the sound off the ceiling for a hemispherical immersion. The last piece of the puzzle, the aluminum-coated subwoofer, has a small but powerful 6-inch driver inside that highlights the bass.
While the satellite speakers need to be connected to the subwoofer with old-fashioned cables and mounted behind you, the system is easily one of the most inconspicuous Atmos setups I've encountered, causing guests to be amazed at how much sound can be extracted from them a compact setup. The aesthetics are more useful than sexy, but the silver-plated subwoofer is really stylistic.
The most inconspicuous Atmos setups that I've come across.
There are numerous connections on the back of the bar, including a digital optical connection, an analog 3.5 mm connection, Ethernet for the Wi-Fi connection, HDMI ARC for connecting to your TV and an HDMI input for the Connect a streaming box or other device directly. Of course there is also Bluetooth streaming, although the "casting" from Spotify or other apps using Chromecast technology from Google offers the best sound quality.
Loaded package
The SB36514-G6 offers numerous play options as well as numerous functions – especially for the price – many of which can be traced back to Vizio's Google partnership. The brand's SmartCast system uses Google Casting for Wi-Fi streaming, which also uses multi-room streaming with other Google Home speakers, as well as basic Google Assistant commands for the bar over those speakers. In other words, it pays to dive deeper into the Google ecosystem to get more for your money.
When it comes to decoding surround sound, the SB36514-G6 essentially has the entire Dolby Suite, including Dolby Atmos (of course) as well as Dolby Digital Plus and Dolby TrueHD. DTS Digital Surround and high-resolution DTS-HD Master Audio are also supported, but DTS: X, the brand's Atmos rival, is not. As with the SB46514-F6, this means that all DTS: X 3D surround tracks must be rendered virtually. On the other hand, we've seen so few DTS: X mixes outside of some 4K Blu-rays that this shouldn't be the case. For most listeners, this is not that important.
On the video side, the SB36514-G6's HDMI 2.0a input provides 4K HDR pass-through, including HDR10 and Dolby Vision.
Old School Interface (with a twist)
Those who are used to one of Vizio's sound bars – including mid-level and even entry-level bars – are very familiar with the remote-based interface used here. Essentially, the remote control's Casio-like digital screen is the interface you need to scroll through the small window from EQ and sound modes to inputs and speaker settings. There is only one column of white LEDs on the front of the bar with an on-board display.
It is a system that I have never loved, that I have got used to over the years. In addition, compared to bars like Samsung's expensive Q90R, it's easier to forgive the elementary setup when you consider Vizio's desire to deliver the best Atmos punch for your money.
You can use the remote control to change almost anything, including adjustments for height speakers – something that Vizio's previous SB46514-F6 didn't include – and center, surround, and subwoofer levels so you can effectively adapt the system to your room. Still, it's a bit more expensive than automatic calibration systems like Sennheiser's highly Falutian Ambeo bar, and due to some bass balance issues (more on that below), I had to play around a lot to include things.
An interesting aspect of Vizio's setup is how the Music, Film and Direct EQ modes work. The latter is the only way to get an unrestricted audio signal, including stereo playback for music. In addition, all subwoofer, speaker, or bass / treble settings are exclusive to the mode you are in. In the end I just used the film mode (with my own adjustments) for film and TV playback and the direct mode for music playback.
It is important that the Vizio SmartCast app offers an additional option for customizing sound and functions, with a multitude of settings in the virtual remote area. It's a great addition to the real remote and offers a modern upgrade to the outdated user interface. With the app you can also set up the SB36514-G6 in your Wi-Fi network.
configuration
Getting the SB36514-G6 up and running is easy enough, if a bit tedious, when it comes to laying these long cables for the satellite speakers. They are connected to the wireless sub, which theoretically limits the placement options in larger rooms. However, there are a lot of cables to work with and I simply placed the sub in my room in the usual layout. Just make sure you've matched the color-coded left and right inputs with the appropriate speakers. Otherwise you have to start over.
Otherwise, connecting to the TV is very easy. The supplied HDMI cable leads from the HDMI ARC connection of the bar to the corresponding ARC input on your TV. This is important if you want to get Dolby Atmos directly from your TV. You can also use the TV remote control to control the volume and power of the SB36514-G6 (although you may need to turn on CEC in your TV settings). Otherwise, the optical input is the best backup option.
The system is an absolute ace with Atmos content.
The last piece of the puzzle connected via Wi-Fi via the SmartCast app caused me (predictably) some problems. It's always difficult to connect third-party Google Home products to Wi-Fi (or is it just me?), And I had to restart the app a couple of times to make everything work. Finally, however, things clicked and I was able to use the app and stream via Spotify Connect without any problems.
performance
There's nothing like a sweet Dolby Atmos demo to knock someone off your feet, and a weekend full of house guests gave me the opportunity to do just that. When I turned on the library with specially tailored demos from two of Dolby's latest demo discs, my guests were absolutely amazed when they first learned what Atmos can do. Like drug addicts who were looking for their solution, they repeatedly asked me to load the next scene so that I could get lost again in the lush Atmos sound.
When it comes to Atmos content, the SB36514-G6 is an ace.
In the Leaf demo, the bar pulls you blindly through the trees and later turns the brochure, which breaks off the branch around you with impressive precision, while the subwoofer pulsates the heartbeat of the scene with booming pressure through the room. The Amaze demo is similarly spectacular, as the insects initially shimmer in a whisper around you, while the Rainstorm clip offers cascading showers from above and lifelike thunder that shakes your chest with crackling power. And so on.
It is this powerful subwoofer that occasionally stands in the way of an otherwise brilliant experience outside of the Atmos clips. While the submarine has the muscle, it doesn't always have the rhythm to control it. Sometimes it sounds limp and bloated when it should be tight and stiff. While this unbridled blow generally does the trick in potent action scenes like the introductory monster fight in Guardians of the Galaxy Vol. 2. 2, it gets a little hot sometimes, like an uninvited party guest who started partying too early.
This is most evident in the content of television programs, especially during musical interludes. In the thematic intros for shows like Parks and Recreation and The Office, the submarine blows up the room without warning and forces you to scurry for the remote control. In the Jessica Jones intro, the sub simply got out of sync and transforms the wonderful stand-up bass from tight and lively into a blurry, over-coated porridge. Overall, it takes a certain balance between genre and genre to keep the action hot and the more subtle scenes cool.
These problems do not occur with Samsung's high-end Atmos bars, such as the HW-K950 or the updated Q90R, which offer more details, performance and, above all, more control over the low frequencies. But these bars are also more than twice as expensive as the SB36514-G6.
Otherwise, the SB36514-G6 is very impressive and offers a solid level of detail of the front unit. The bar only occasionally sounds as bright as it looks in the upper midrange – usually when lighter blends are used. It's also relatively solid for music playback, as you can choose the right settings for most genres in direct mode, and you can just let the stereo sound spout respectable details and big volume for larger rooms.
Honestly, it's amazing that you can get this kind of swirling movie sound from a bar of this price and stature. Vizio's piecemeal system, which swaps the 36-inch bar into multiple Atmos iterations, seems to be paying off – both for Vizio and for anyone who wants to bring the sweet pulse of Atmos into their room while making it clear stay below $ 1,000.
Warranty information
Vizio grants a warranty on its soundbars one year after the date of purchase.
Our opinion
The latest 5.1.4-channel Dolby Atmos soundbar from Vizio offers an impressive wealth of Atmos riches for your dollars in a slim design and extends this exciting surround technology to almost every setup and budget.
Is there a better alternative?
Not at this price. Bass reproduction is poor, and you can get more details and balance from sound bars with similar prices that use virtual surround effects, but nothing I've encountered offers more atmospheric thrills for less money.
If you want a bit more quality, performance, and stiffness across the spectrum and have some money to play with, Vizio's $ 1,000 SB46514-F6 offers a higher quality experience, including bigger, tighter basses. Outside of Vizio, the Samsung HW-N950, still my favorite Atmos bar, is available at a bargain price compared to the original price.
Do you need further help with the purchase of a soundbar? Check out our favorite sound bars from 2019.
How long it will take?
The SB36514-G6 appears to be solidly built and is as future-proof as you would expect from a soundbar of this price and caliber. The only thing we want that isn't here is eARC, something we see in the latest top-class A / V equipment.
Should you buy it
Yes. If you're looking for exciting Dolby Atmos sound on a budget, the Vizio SB36514-G6 offers the best $ 700 you can spend.
Editor's recommendations
0 notes
Text
Is the Circle Home Plus Enough to Keep Your Family Safe Online?
Our verdict of the Circle Home Plus: A compact, lightweight internet filter that can help you to manage how your family uses the internet. Circle Home Plus is perhaps the best tech solution to screen time, but you might prefer to get your family on board before buying.910
How much time do you spend online as a family?
From streaming video on every device to kids enjoying Minecraft on their tablets and consoles, our time spent online is increasing. If you’ve decided enough is enough and it’s time to do more as a family, you can start by controlling online hours.
You’ve heard of parental control apps. Now meet a parental control router. Circle Home Plus aims to help you manage every aspect of your family’s online activity on the home network.
youtube
Manage Internet Screentime
Managing screen time is vital for a happy family life. Children addicted to digital devices are unlikely to give them up when it is time to eat, go out, take a trip somewhere without data. Having strict, immutable rules about usage is vital.
Being able to manage online screen time is a vital part of this. While standard parental control apps can monitor individual apps and games, internet access can be a bit trickier. After all, workarounds exist, in the shape of VPNs and proxies.
The Circle Home Plus is a router and app combo that pairs with your router and inspects non-encrypted traffic. The accompanying mobile app helps you to manage internet use on your home network. It’s not just for the younger members of your family either. If you have a bad habit of staying online too late, you can put an end to late-night surfing.
Time limits can be set (and if necessary, altered), and content types blocked. Specific sites can be blocked and whitelisted too.
What’s In the Box? Unboxing the Circle Home Plus
The Circle Home Plus ships in a compact box, around the same size as a smartphone box.
Inside, you’ll find the main device, a mains adapter, USB type-C power cable, and an Ethernet cable. While the Circle Home Plus features a battery, it should be kept plugged in. Portable use with a mobile hotspot (perhaps in the car) is an option, however.
The Circle Home Plus device is, regrettably, rather dull to look at. As nondescript as network hardware comes, it is at least well designed. A rubber ring on the back acts as the power button, while secreting the 1Gb Ethernet port. Keeping things tidy, the USB type-C port is in the middle of the ring.
Ultimately this is a compact white cube (3.2 x 3.2 x 3.2 inches, weighing just 1.15 pounds) that can easily be hidden behind another device. Its unremarkable appearance strangely works in favor of the Circle Home Plus.
Key Features of the Circle Home Plus
The Circle Home Plus comes with good selection of features that are almost all controlled via the mobile app.
Content Filter: four levels are available, Kid, Teen, Adult, and None. Filter levels can be further customized, ads blocked, explicit search results filtered, and YouTube restricted. Various website and app categories can also be managed.
Time Limits: individual profiles can have time limits set, with platforms and apps subject to individual limits.
Bedtime: internet access for every device with is blocked for the set period. For example, 10pm to 7am.
Off Time: enables offline time, useful for periods of homework, family group activities, etc. Can be used to encourage verbal communication!
Pause the internet: this feature lets you disable internet access for individual devices or the entire house.
Location: helps you find a family member (or the device they use).
History: displays a list of sites viewed by a profile and their future availability to the user. For example, if an inappropriate site has been visited, it can be blocked.
Usage: site and platform access are logged, giving you an idea of how much time the profile owner has spent on an activity.
Rewards: time limits can be extended, bedtime set later, and off time disabled, all via the app.
The version we reviewed comes with a one-year membership with all premium features activated. Once this expires the subscription is $10/month; or you can opt to continue using the device without the premium features. On the free plan you’re limited to only content filtering and monitoring.
Activity, access, content, and pretty much everything else is managed via a mobile app. The Circle app is available for iOS (10.0 or later) and Android (5.0 Lollipop and newer).
The Circle app is available without the Circle Home Plus and can be used to manage all the devices owned by your family. However, this requires the family devices (phones and tablets) also have the app installed.
In contrast, the Circle Home Plus sits alongside your router, removing the need for individual apps.
Pairing the Circle Home Plus With Your Router
To use the Circle Home Plus, it needs to be paired to your router. This is a straightforward process, requiring you to connect the device directly over Ethernet for the best results.
With the Ethernet cable connected and the device powered up, setup is managed via the smartphone app. This uses the QR code printed on the side of the Circle device to establish a connection over Wi-Fi.
So long as the device running the Circle app is on the same wireless network that the Circle Home Plus is connected to, it should be a straightforward process.
Set Up the Parental Controls App
Things can get a little confusing at first with the app. Setting up the Circle Home Plus means creating a management account, then a series of accounts for each device holder on the network. However, both the main account and the device accounts must be set up on the device where the Circle app is installed.
This can cause some confusion. While the accounts are clearly labeled, if you’re browsing your own profile, it isn’t hugely apparent at times. In testing, I found myself using the Pause feature to disable the entire network’s internet connection. What I thought I was doing was Pausing my own account!
Inadvertent stupidity aside, the app is straightforward to set up.
Configure the App for Child Use
Getting the most out of the Circle Home Plus means setting up a child account and associating a device. This begins by creating a new profile in the parent app and giving it a name. Setting a filter level (Kid, Teen, Adult, None) comes next, along with platform and content whitelisting/blacklisting.
“Child” devices (which may also include your partner’s) use the same app. This time, the Set up as child device option is chosen, a QR code displayed, and the device easily paired to the Circle Home Plus via the parent app.
Some permission tweaking is required in Android, mainly to prevent the app from being uninstalled. Once this is done, the device will appear on the Circle app on the parent device. Time limits can then be remotely set and enabled, and content whitelisting and blacklisting adjusted.
The child device can be remotely managed, with rewards easily assigned for good behavior. Alternatively, instant internet blocking can be enabled using the Pause function.
Is the Circle Home Plus Useful?
In theory, Circle Home Plus is the perfect solution for managing screen time and restricting inappropriate internet content.
However, if you restrict online time for your kids already via existing parental control apps (e.g. Google Family, Amazon Parent Dashboard) you might be thinking about skipping this hardware.
The usage stats are certainly useful, but with so many other great features restricted behind a $10/month subscription, you might be discouraged. After all, a smart kid could get around this stuff with a VPN, right?
Well not in this case. The Circle Home Plus software filters popular VPNs, so your kids should not be able to encrypt their connection to avoid attention. (You should, of course, have a VPN set up on your main router for all outgoing traffic.)
Avoid Pairing and Network Issues
With so many different routers in circulation, there is some risk as to whether the Circle router will successfully pair with your device. While it is difficult to list all models, the device ships with some useful troubleshooting tips.
Some smart home equipment and mesh network hardware can cause problems with setup. The easy solution is to switch such devices to “unmanaged” mode, or simply use the device in Ethernet-only mode.
Rebuild Your Family Circle
The urge to keep tabs on your family’s internet activity—especially those members under 21—might well be compelling. Naturally, there are ethical considerations surrounding this, but ultimately it depends on the decision made together by parents.
Circle is a good way to manage online time. It isn’t perfect; the pause feature doesn’t quite work as intended, set up can be slow (it was tested on a 40Mbps line), but the app is well designed and effective. Unfortunately, while the internet-connected devices can be completely controlled, offline devices can’t, which is a bit of a shortcoming for things like gaming consoles.
You might indeed appreciate the monitoring aspect of the Circle system. Data usage, a history of visited sites per device, and the ability to track a phone (person) are useful. They can certainly be part of the armory of any parenting team attempting to manage screen time.
However, you might alternatively prefer a non-technology solution, one based on discussion, agreement, and trust. But there’s no reason why both methods can’t work hand-in-hand.
Enter the Competition!
Circle Home Plus Giveaway
Read the full article: Is the Circle Home Plus Enough to Keep Your Family Safe Online?
Is the Circle Home Plus Enough to Keep Your Family Safe Online? posted first on grassroutespage.blogspot.com
0 notes
Text
Building a Photo-Editing Computer on the Cheap
Having returned to photography after a lay-off of some years, I had discovered a whole new world, where, among other things, computers had largely replaced darkrooms. It soon became apparent that my Windows 10 laptop was sadly underrated for the tasks required. I began to research alternatives.
I fairly quickly decided that while a top of the line laptop could probably do the job, there were still limitations, not least the price. Going back to a desktop tower computer configuration made more and more sense. Also, I negotiated the commandeering of a closet that was fortuitously suitable for a digital photo set up. Back into the closet — just like my darkrooms of earlier years!
Determining Desired Specs
I spent a lot of time on the Internet studying what would be the characteristics of a desirable computer. There was no question it would be a Windows 10 machine, far and away the best choice for the combination of cost and compatibility with a large number of post-processing programs. I came up with a list of desired minimum specifications:
Windows 10 Professional Operating System
Intel i7 processor, 4 cores
16 gigs of RAM
Decent Graphics Card
Terabyte of Storage
Further desirable options would be:
1. A solid-state drive (SSD) at least large enough for booting and start-up for programs. 256 gigs would serve nicely.
2. An additional 16 gigs of RAM bringing the total to 32 gigs.
And these additional options would require at the least that the computer could easily accept more RAM.
Searching for the Right Computer
I started looking for suitable computers. At first, a box that would meet my needs seemed easy to find — tower computers designed for home and office, and starting around $800 and heading north. But, these computers did not include a graphics card up to the task.
A graphics card suitable for a higher resolution monitor used for still photography and normal video would add somewhere from $130 and up. And, problematically, such a card would likely require at least 100 watts, probably more. But, careful checking of specification sheets demonstrated that the packaged computers from the big name companies had nowhere near that much reserve power.
It quickly became apparent that what I really wanted was a gaming computer. These machines featured everything I wanted: blazing speed, loads of memory and terrific graphics capability. And stiff pricing of $2,000 and up. Sigh.
I started looking at used and refurbished computers on eBay. One caught my eye: the Dell Optiplex 9010, being offered refurbished with 30-day return privilege, with Windows 10 Professional, an i7 processor running at 3.4 GHz and with 4 cores, 16 gigs of installed RAM and a 500-gigabyte new hard drive. It also included two optical drives — a read-only DVD drive and a read/write DVD drive. And the price: $260 delivered!
The seller, the Blind Center of Nevada, has an excellent eBay rating. Computers being retired are donated to them, but with the original hard drive held back and destroyed. They refurbish the computers, add a newer hard drive with Windows 10 Professional, test them and sell them for attractive prices. They were not the only vendor offering refurbished Optiplex 9010 computers but their offering seemed like the best value. (Note that there a number of refurbishers who offer the Optiplex 9010 through eBay, Amazon, Walmart, NewEgg, etc. Be sure to shop around.)
Anyhow, this was looking more and more like a viable solution. The Optiplex line has always been Dell’s front line business model, for which reliability was and is an important design criterion. Other than a burp around 2004, the product line has met reliability expectations.
The computer so offered did NOT include a keyboard or a mouse. But since I had a USB mouse and keyboard from an earlier computer that was not a problem. Also, the computer did not have a wireless interface for Wi-Fi. It did, however, include an Ethernet jack, plus 6 USB 2 and 4 USB 3 connectors. I found I could purchase on eBay a wireless USB adapter dongle for less than $7, which I ordered immediately.
The computer also did not include a card reader. After all, this computer was designed to be a serious office computer or work station, not a consumer model. Again, USB card readers from slow to fast are readily available on eBay and elsewhere from less than $10 to over $100.
I wanted a larger hard drive, but 500 gigs would serve me for quite a while. And more on that subject later in this article.
I started doing further research. One YouTube video, in particular, showed how the presenter upgraded the exact computer into a pretty decent gaming machine.
youtube
It is a major resource for this article. This video answered a lot of my questions quickly and became a major guide for my upgrading. Now convinced that I could accomplish what I wanted, I ordered the computer.
If you decide to follow closely in my footsteps, you should understand that the Dell Optiplex 9010 is available in several different configurations. The one I selected is the Dell Tower version.
If you choose to purchase a different configuration, you need to understand that it may well not be as easy to upgrade; indeed it may well be impossible.
Also, it is important to note that the 9010 family was available with a choice of Intel i3, i5 or i7 processors. The i7 is far and away the most powerful, which you will certainly want for graphics processing. Yet, surprisingly, the pricing differential is not that great. Insist on an i7.
I knew I would need to add a video graphics card and a beefed up power supply. I already knew a 450-watt Antec VP450 supply that would fit and, as specified in the above-referenced video, would cost about $37 on Amazon. And this supply would give me somewhere between 200 and 250 watts of reserve for a graphics card.
A week later, the computer arrived, well packed. The appearance was excellent — obviously not new, but clean and very acceptable. I put it on a table, attached an old VGA monitor, a keyboard and a mouse and fired it up. It booted up beautifully. I attached the wireless dongle and immediately had internet, once I was registered. I went to “Control Panel”, accessed the system page under “System and Security” and verified that the computer was what I ordered. It was.
Being well aware that this is a used computer, and with a 30-day return privilege, I was determined to rigorously test it. First, I ran the computer non-stop for three days, during which time it updated Windows 10 and also the Windows Defender virus definitions. Everything continued to operate flawlessly. Next, for three more days, I turned the computer on and let it run for an hour, then shut down, then an hour later turned it back on. I did this as convenient over a period of another three days. Again, the computer passed with flying colors.
While engaging in the run-in testing, I studied my options for a graphics card. Long story short, I ended up ordering from Amazon a Gigabyte GeForce 1050 card (GV-N1050OC-2GD) with 2 gigs of memory. The cost was $130.
While not the fastest card in the world it seemed, and later proved, to be everything I needed and more, and with a very low power draw, less than 100 watts.
It is worth noting here that there are other power supplies and other graphics cards available that will work fine in this computer. BUT! It is important that you confirm that they will fit! The length of both the power supply and the graphics card are important — there is only so much room available. (The video also covers this subject.)
Having satisfied myself that the computer was performing flawlessly, I unplugged everything, I laid it on its side, swallowed hard, grounded myself, broke the supplier’s seal and opened the computer, as per the video. I was immediately impressed with how clean the inside of the computer was. It looked like a brand new computer, not one manufactured around 2012.
Changing out the power supply proved to not be difficult. As per the video, I unplugged the cables from the original supply, then removed the 4 screws holding the supply to the computer case, and slid it forward and out. It is a good idea to make notes of where the cables were, and perhaps take a photo or two on a smartphone or camera.
Once the original supply is out, put the new supply in, replace and tighten the screws.
The new Antec VP450 supply came out of its box with many more cables than the original Dell supply. This was not a surprise, considering the Dell supply was purpose-built for the 9010, whereas the Antec supply was intended to be as universal as possible. Generally speaking, if one of the cables from the power supply will fit the power input connector for one of the 9010 components, it is safe and appropriate to use it. All connectors are keyed so that you can only plug them in one way — you can not plug one in backward. But there is one exception to this: the motherboard power connector does not exactly match the connector from the power supply!
It seems there were two different power connectors for standardized motherboards. One uses 20 pins, the other uses 24 pins. The 9010 uses 24 pins. The upgrade video does NOT explain this. The Antec supply uses a simple cure for the problem: they made the motherboard connector so that it accepts an additional mating connector adding the additional 4 pins making it work for the 9010. The additional mating connector is in the same cable bundle as the 20 pin connector does, and you will see that they can nest together and line up to offer 24 pins. If you watch the video closely you will see that the demonstrator does exactly that but without comment. The Antec manual, which must be downloaded from the Web, explains this… sort of. But you will see it when you get there and then it makes sense.
Anyhow, once I had attached power to all the connectors the original supply was hooked to, I tidied up the extra cables, tying them together with cable ties left from an earlier project. I can not tell you everything was neat, but the cables were tied off and out of the way. Then I replaced the cover, reattached the monitor, put the power cord into the new supply, turned the monitor back on, and then came the moment of truth. I pressed the power button on the computer and… nothing happened. As I began to panic, a quick thought occurred. I went to the back of the computer and pushed the rocker switch on the back of the new supply the other way, then tried the computer power button on the front again. And voila! The computer booted just fine, and I heaved a sigh of relief. All was well.
My next step was to install the video card. As the video shows, there is a blue accessory slot near the left end of the accessory slot bank. Actually, installing the card was very easy, once I had removed the two slot covers from the back, and removed the rubber foot protecting the graphics card connector pins. You have to get slightly physical to push the card down into the slot, but don’t force it! Everything should come together nicely. The Gigabyte card I had selected does not need an additional power connector as some cards do.
That done, I closed up the computer, attached my new graphics monitor, of which I’ll discuss later, and fired it up again. The computer booted, but the resolution on the monitor was terrible. I went to the Gigabyte site on the internet, and found and downloaded the correct drivers for the card for Windows 10 and installed them. I do not recall whether I had to reboot the computer after driver installation or not, but shortly everything was working properly, and with beautiful resolution and color.
That completed the first phase of the project, and as far as I am concerned it was very successful. I was now sporting a powerful computer that, though not state of the art, is not all that far behind either. Post-processing programs run beautifully on it. Windows 10 is an elegant operating system that supports everything very well. And, for what it is worth, this article is being written on the system. The best news is the price: At this point, I had $445 invested in it, excluding the monitor, but including the Wi-Fi dongle and a cheapie card reader that works fine.
I have a powerful computer that I am delighted with. What are the downsides I see? OK. Let’s face it: at the time of this writing, we are talking about a computer that is as much as 7 years old. There is no support for it. But again, any computer more than a year old likely has no significant support either. The 9010 was Dell’s front line business computer and they made many, many thousands of them.
What skill level is required to follow my path? My feeling is if you feel competent to change a light switch in your home you can manage this. You should have at least a modest understanding of your way around the Windows operating system.
Of course, the Dell 9010 is hardly the only available option for such treatment. Other front line computer makers also offered comparable systems and are worthy of consideration if the price is right. If looking at a different box, do make sure it will accept a more powerful power supply, that it will accept a graphics card, and that it either includes or can accept at least 16 gigs of RAM. I would certainly suggest you demand an i7 processor or the AMD equivalent. YouTube videos will almost certainly be available to help you if needed. Check first!
Adding a Solid State Drive
Once you have owned or used a computer with a solid state drive, you will never be happy booting a computer from anything else. A typical Windows 10 computer will boot in a fraction of a minute — not the five minutes or so that means you start the computer and then go get a cup of coffee. And, the price of solid state drives has plunged in the last year. As I write this, a quality 240 gig solid state SATA drive is going for $30.
The trick with these drives is to make them bootable. There are a number of ways to try to do this that are free. Sadly, my personal experience is that none of those methods worked for me. (My first experience of this was converting a laptop to a solid state drive.) Finally, in desperation, I spent $25 to purchase an Apricorn USB to SATA adapter from Amazon.
It showed up two days later — the adapter and the software needed — and an hour later I was smiling from ear to ear. I have since used it about 6 times making friends’ SSDs bootable and with never an error. Buy one and keep it — it will serve you for years. Just always check their website before each use to make sure you have the current software.
In purchasing an SSD you want to plan a little for it. SSDs do not last forever — every time you change the data, the bytes involved lose a tiny fraction of their life expectancy. The devices have some very clever software built in that spreads the usage out to maximize their life. Basically, if you never load the drive to more than about 60% of their capacity they will last for many years. The closer you get to 100% utilization the faster their life expectancy plummets. So, what you want to do is have your SSD be the boot drive, plus put all your operating programs on the SSD, and then all data files, pictures, etc. on a separate hard drive. The SSD becomes Drive C, the Hard drive becomes drive D.
So purchase first the SSD you desire as well as the Apricorn adapter. Load the Apricorn software on your hard drive, having checked their web site to see that it is the latest. Run the program. It will walk you through the steps needed. In perhaps half an hour, the SSD drive will be ready to go.
There are two ways you can physically mount the SSD into your 9010. The simple way, which is easily and entirely reversible, is to procure some sort of Velcro-type system. I bought a 3M substitute at Walmart for $3.
Turn off the computer and remove cables as needed. If you have the room to lay the computer on its side you don’t really need to remove most of the cables. For safety’s sake, however, you most certainly should remove or unplug the power cord. You will find the Hard Drive bay at the opposite corner of the corner from the power supply. Unplug the two cable sets — one goes to the power supply, the other to the motherboard, which is the data cable.
Squeeze the two blue handles of the hard drive caddy and lift it out, and set it aside. Now, attach the power cable and the data cable to the SSD. Put the SSD into the hard drive bay, figure out where to attach it to the wall, then apply the Velcro or substitute and thus attach it to the wall. It will probably be easier to temporarily remove the power and data cables to do this, once you have figured out the best location. If so, now replace the cables, close up the computer, re-attach cables and power up. You should be absolutely delighted with the speedy boot.
The original Hard Drive should be carefully placed in a protective bag, labeled and stored. If for any reason you have a boot failure or SSD failure, you can always put the original hard drive back into the computer and go from there.
The other method of mounting the SSD is well described in the above-referenced video, so is not covered in depth here. Suffice it to say it is the more elegant approach. But for a home user, the Velcro approach is entirely adequate and easier, cheaper, and quicker.
Adding a Large Capacity Hard Drive
As stated above, it is a very good practice to not utilize an SSD at full capacity. Plus, the storage of a lot of pictures can and will take up a lot of memory. I could have utilized the 500-gig hard drive supplied with the computer as a second drive, but for one thing, I wanted to save it as my boot-device back-up, and for another, I wanted rather more capacity. Back to eBay!
I fairly quickly found what looked to be a real bargain: a 3 terabyte SATA drive, new, for $50 post paid, from eBay advertiser GoHardDrive. Wow! I read the fine print carefully. The brand of the drive was not given, only that it was a “White label” Enterprise Drive. User comments said that the drive was made by Hitachi, a respected supplier. So what the heck is an Enterprise Drive? A little search engine research gave me answers: it is a drive intended for server farms — i.e. The Cloud. Some comments suggested that Enterprise drives are not as reliable as consumer-oriented drives, which, however, cost rather more for the same capacity.
I thought about this. I would have a back-up for the data, right? Be it on premises or in the cloud, anything you value must be backed up. That was good enough for me. I ordered the drive.
At the same time, I ordered another hard drive caddy for the 9010 from an eBay supplier, being careful to select a USA source, since I wanted the caddy quickly. And, as suggested in the video, I ordered a right-angle SATA data cable.
All arrived within a matter of days, and once in hand, I installed the new hard drive. I looked at the original hard drive, still in its caddy, to figure out how to mount the drive into the “new” caddy, which turned out to be simple once I figured it out. I unplugged the computer, placed it on its side, and removed the cover. The caddy with the new drive dropped easily into the empty drive bay. I found another power cable with the appropriate connector from the bundle of unused cables from the power supply and attached that. I followed the SATA data cable from the SSD to the motherboard and saw the rest of the SATA inputs. There was one vacant socket left. I plugged the new SATA cable into that and the opposite end into the new drive, closed up the computer, and powered it back up.
Hmmm. Windows Explorer showed no sign of the drive. Then, fortuitously, I remembered the note on the hard drive invoice: “You will need to format the drive before it can be seen on your computer.” Okay…
A brief exploration of the internet gave easy directions to do this. You are taken to “Disk Management”, where you will find the new drive is listed, then directed to partition and format the new drive. The actual process of doing so takes rather less time than researching it.
I chose to add no partitions to the drive. And, I designated it to be drive “D”.
And it was done. It was still necessary to tell a number of my programs that data was to be stored on Drive “D”. Also, I entered the “Power Management” profile and set the hard drive to switch off after 10 minutes of not being used. It is my hope that this will greatly extend the life of the drive.
And that concludes this portion of the article. Actually, I have now set up two identical computers as per above, both purchased from the same sources, one in service with a friend. While not quite state of the art, they are powerful computers that should serve well into the future. I did consider adding more RAM memory, to go from 16 gigs to 32 gigs, but I have not yet seen a situation where I believe the added Ram would have given me greater performance. If I do decide to add more RAM later, it is a simple matter to install it.
I did add one other item that has been a very nice addition: a backlit keyboard that uses real key switches. I got it from Amazon — it is an Eagletec KG010 Mechanical Keyboard, USB Wired for $40. It took a little getting used to but I love it. It is a great tool for writing.
So. Now I have a fine computer for post-processing. But what about a monitor? Of course, that is a separate story. I did the usual internet research for what constituted a good monitor for photo post-processing. After some research, I had developed a listing of suitable monitors from several different manufacturers. I took that list and checked the usual sources. I was willing to consider a used model if the provenance sounded right.
Again, long story short, I purchased a BenQ PD2700Q 27″ 1440p Designer Monitor refurbished, directly from BenQ. The monitor was listed on eBay for $236. All I can say is that if this monitor was ever out before refurbishment, I could never tell. It seems perfect in every way, not least including no apparent bad pixels. The color is beautiful and I am delighted with it — it is a very fine match for my computer. It was designed for photo editing and works beautifully for that. Today the world is moving towards 4K video and higher, with higher resolution in video monitors. But the BenQ 27″ works for me. The computer video card will indeed support higher resolution monitors but I have no present plans to update.
I hope this article will encourage others to try my path. I figure my frugality has saved me at least $1,000 which can and will be applied to new photo gear.
Please note that I have absolutely no financial connection with any of the suppliers referenced. I get no royalty or commission. Happily, and without exception, everything I ordered has performed as expected, to my pleasure. And this article was written on the computer this story is about. Cheers!
About the author: Bob Locher certainly makes no claim to being a great photographer; rather, he considers himself to not be a very good one. He is not much of a speaker either, and does not have his own YouTube Channel, nor does he do Photographic Tours. But, he has been in the photographic hardware industry most of his life, fancies himself as something of a writer, has opinions and is not afraid to express them. He loves photography, values technical quality and is indeed a pixel-peeper. The opinions expressed in this article are solely those of the author. Locher has written over 50 magazine articles as well as two books. You can find more of his work and writing on his website.
source https://petapixel.com/2019/04/08/building-a-photo-editing-computer-on-the-cheap/
0 notes
Text
Building a Photo-Editing Computer on the Cheap
Having returned to photography after a lay-off of some years, I had discovered a whole new world, where, among other things, computers had largely replaced darkrooms. It soon became apparent that my Windows 10 laptop was sadly underrated for the tasks required. I began to research alternatives.
I fairly quickly decided that while a top of the line laptop could probably do the job, there were still limitations, not least the price. Going back to a desktop tower computer configuration made more and more sense. Also, I negotiated the commandeering of a closet that was fortuitously suitable for a digital photo set up. Back into the closet — just like my darkrooms of earlier years!
Determining Desired Specs
I spent a lot of time on the Internet studying what would be the characteristics of a desirable computer. There was no question it would be a Windows 10 machine, far and away the best choice for the combination of cost and compatibility with a large number of post-processing programs. I came up with a list of desired minimum specifications:
Windows 10 Professional Operating System
Intel i7 processor, 4 cores
16 gigs of RAM
Decent Graphics Card
Terabyte of Storage
Further desirable options would be:
1. A solid-state drive (SSD) at least large enough for booting and start-up for programs. 256 gigs would serve nicely.
2. An additional 16 gigs of RAM bringing the total to 32 gigs.
And these additional options would require at the least that the computer could easily accept more RAM.
Searching for the Right Computer
I started looking for suitable computers. At first, a box that would meet my needs seemed easy to find — tower computers designed for home and office, and starting around $800 and heading north. But, these computers did not include a graphics card up to the task.
A graphics card suitable for a higher resolution monitor used for still photography and normal video would add somewhere from $130 and up. And, problematically, such a card would likely require at least 100 watts, probably more. But, careful checking of specification sheets demonstrated that the packaged computers from the big name companies had nowhere near that much reserve power.
It quickly became apparent that what I really wanted was a gaming computer. These machines featured everything I wanted: blazing speed, loads of memory and terrific graphics capability. And stiff pricing of $2,000 and up. Sigh.
I started looking at used and refurbished computers on eBay. One caught my eye: the Dell Optiplex 9010, being offered refurbished with 30-day return privilege, with Windows 10 Professional, an i7 processor running at 3.4 GHz and with 4 cores, 16 gigs of installed RAM and a 500-gigabyte new hard drive. It also included two optical drives — a read-only DVD drive and a read/write DVD drive. And the price: $260 delivered!
The seller, the Blind Center of Nevada, has an excellent eBay rating. Computers being retired are donated to them, but with the original hard drive held back and destroyed. They refurbish the computers, add a newer hard drive with Windows 10 Professional, test them and sell them for attractive prices. They were not the only vendor offering refurbished Optiplex 9010 computers but their offering seemed like the best value. (Note that there a number of refurbishers who offer the Optiplex 9010 through eBay, Amazon, Walmart, NewEgg, etc. Be sure to shop around.)
Anyhow, this was looking more and more like a viable solution. The Optiplex line has always been Dell’s front line business model, for which reliability was and is an important design criterion. Other than a burp around 2004, the product line has met reliability expectations.
The computer so offered did NOT include a keyboard or a mouse. But since I had a USB mouse and keyboard from an earlier computer that was not a problem. Also, the computer did not have a wireless interface for Wi-Fi. It did, however, include an Ethernet jack, plus 6 USB 2 and 4 USB 3 connectors. I found I could purchase on eBay a wireless USB adapter dongle for less than $7, which I ordered immediately.
The computer also did not include a card reader. After all, this computer was designed to be a serious office computer or work station, not a consumer model. Again, USB card readers from slow to fast are readily available on eBay and elsewhere from less than $10 to over $100.
I wanted a larger hard drive, but 500 gigs would serve me for quite a while. And more on that subject later in this article.
I started doing further research. One YouTube video, in particular, showed how the presenter upgraded the exact computer into a pretty decent gaming machine.
youtube
It is a major resource for this article. This video answered a lot of my questions quickly and became a major guide for my upgrading. Now convinced that I could accomplish what I wanted, I ordered the computer.
If you decide to follow closely in my footsteps, you should understand that the Dell Optiplex 9010 is available in several different configurations. The one I selected is the Dell Tower version.
If you choose to purchase a different configuration, you need to understand that it may well not be as easy to upgrade; indeed it may well be impossible.
Also, it is important to note that the 9010 family was available with a choice of Intel i3, i5 or i7 processors. The i7 is far and away the most powerful, which you will certainly want for graphics processing. Yet, surprisingly, the pricing differential is not that great. Insist on an i7.
I knew I would need to add a video graphics card and a beefed up power supply. I already knew a 450-watt Antec VP450 supply that would fit and, as specified in the above-referenced video, would cost about $37 on Amazon. And this supply would give me somewhere between 200 and 250 watts of reserve for a graphics card.
A week later, the computer arrived, well packed. The appearance was excellent — obviously not new, but clean and very acceptable. I put it on a table, attached an old VGA monitor, a keyboard and a mouse and fired it up. It booted up beautifully. I attached the wireless dongle and immediately had internet, once I was registered. I went to “Control Panel”, accessed the system page under “System and Security” and verified that the computer was what I ordered. It was.
Being well aware that this is a used computer, and with a 30-day return privilege, I was determined to rigorously test it. First, I ran the computer non-stop for three days, during which time it updated Windows 10 and also the Windows Defender virus definitions. Everything continued to operate flawlessly. Next, for three more days, I turned the computer on and let it run for an hour, then shut down, then an hour later turned it back on. I did this as convenient over a period of another three days. Again, the computer passed with flying colors.
While engaging in the run-in testing, I studied my options for a graphics card. Long story short, I ended up ordering from Amazon a Gigabyte GeForce 1050 card (GV-N1050OC-2GD) with 2 gigs of memory. The cost was $130.
While not the fastest card in the world it seemed, and later proved, to be everything I needed and more, and with a very low power draw, less than 100 watts.
It is worth noting here that there are other power supplies and other graphics cards available that will work fine in this computer. BUT! It is important that you confirm that they will fit! The length of both the power supply and the graphics card are important — there is only so much room available. (The video also covers this subject.)
Having satisfied myself that the computer was performing flawlessly, I unplugged everything, I laid it on its side, swallowed hard, grounded myself, broke the supplier’s seal and opened the computer, as per the video. I was immediately impressed with how clean the inside of the computer was. It looked like a brand new computer, not one manufactured around 2012.
Changing out the power supply proved to not be difficult. As per the video, I unplugged the cables from the original supply, then removed the 4 screws holding the supply to the computer case, and slid it forward and out. It is a good idea to make notes of where the cables were, and perhaps take a photo or two on a smartphone or camera.
Once the original supply is out, put the new supply in, replace and tighten the screws.
The new Antec VP450 supply came out of its box with many more cables than the original Dell supply. This was not a surprise, considering the Dell supply was purpose-built for the 9010, whereas the Antec supply was intended to be as universal as possible. Generally speaking, if one of the cables from the power supply will fit the power input connector for one of the 9010 components, it is safe and appropriate to use it. All connectors are keyed so that you can only plug them in one way — you can not plug one in backward. But there is one exception to this: the motherboard power connector does not exactly match the connector from the power supply!
It seems there were two different power connectors for standardized motherboards. One uses 20 pins, the other uses 24 pins. The 9010 uses 24 pins. The upgrade video does NOT explain this. The Antec supply uses a simple cure for the problem: they made the motherboard connector so that it accepts an additional mating connector adding the additional 4 pins making it work for the 9010. The additional mating connector is in the same cable bundle as the 20 pin connector does, and you will see that they can nest together and line up to offer 24 pins. If you watch the video closely you will see that the demonstrator does exactly that but without comment. The Antec manual, which must be downloaded from the Web, explains this… sort of. But you will see it when you get there and then it makes sense.
Anyhow, once I had attached power to all the connectors the original supply was hooked to, I tidied up the extra cables, tying them together with cable ties left from an earlier project. I can not tell you everything was neat, but the cables were tied off and out of the way. Then I replaced the cover, reattached the monitor, put the power cord into the new supply, turned the monitor back on, and then came the moment of truth. I pressed the power button on the computer and… nothing happened. As I began to panic, a quick thought occurred. I went to the back of the computer and pushed the rocker switch on the back of the new supply the other way, then tried the computer power button on the front again. And voila! The computer booted just fine, and I heaved a sigh of relief. All was well.
My next step was to install the video card. As the video shows, there is a blue accessory slot near the left end of the accessory slot bank. Actually, installing the card was very easy, once I had removed the two slot covers from the back, and removed the rubber foot protecting the graphics card connector pins. You have to get slightly physical to push the card down into the slot, but don’t force it! Everything should come together nicely. The Gigabyte card I had selected does not need an additional power connector as some cards do.
That done, I closed up the computer, attached my new graphics monitor, of which I’ll discuss later, and fired it up again. The computer booted, but the resolution on the monitor was terrible. I went to the Gigabyte site on the internet, and found and downloaded the correct drivers for the card for Windows 10 and installed them. I do not recall whether I had to reboot the computer after driver installation or not, but shortly everything was working properly, and with beautiful resolution and color.
That completed the first phase of the project, and as far as I am concerned it was very successful. I was now sporting a powerful computer that, though not state of the art, is not all that far behind either. Post-processing programs run beautifully on it. Windows 10 is an elegant operating system that supports everything very well. And, for what it is worth, this article is being written on the system. The best news is the price: At this point, I had $445 invested in it, excluding the monitor, but including the Wi-Fi dongle and a cheapie card reader that works fine.
I have a powerful computer that I am delighted with. What are the downsides I see? OK. Let’s face it: at the time of this writing, we are talking about a computer that is as much as 7 years old. There is no support for it. But again, any computer more than a year old likely has no significant support either. The 9010 was Dell’s front line business computer and they made many, many thousands of them.
What skill level is required to follow my path? My feeling is if you feel competent to change a light switch in your home you can manage this. You should have at least a modest understanding of your way around the Windows operating system.
Of course, the Dell 9010 is hardly the only available option for such treatment. Other front line computer makers also offered comparable systems and are worthy of consideration if the price is right. If looking at a different box, do make sure it will accept a more powerful power supply, that it will accept a graphics card, and that it either includes or can accept at least 16 gigs of RAM. I would certainly suggest you demand an i7 processor or the AMD equivalent. YouTube videos will almost certainly be available to help you if needed. Check first!
Adding a Solid State Drive
Once you have owned or used a computer with a solid state drive, you will never be happy booting a computer from anything else. A typical Windows 10 computer will boot in a fraction of a minute — not the five minutes or so that means you start the computer and then go get a cup of coffee. And, the price of solid state drives has plunged in the last year. As I write this, a quality 240 gig solid state SATA drive is going for $30.
The trick with these drives is to make them bootable. There are a number of ways to try to do this that are free. Sadly, my personal experience is that none of those methods worked for me. (My first experience of this was converting a laptop to a solid state drive.) Finally, in desperation, I spent $25 to purchase an Apricorn USB to SATA adapter from Amazon.
It showed up two days later — the adapter and the software needed — and an hour later I was smiling from ear to ear. I have since used it about 6 times making friends’ SSDs bootable and with never an error. Buy one and keep it — it will serve you for years. Just always check their website before each use to make sure you have the current software.
In purchasing an SSD you want to plan a little for it. SSDs do not last forever — every time you change the data, the bytes involved lose a tiny fraction of their life expectancy. The devices have some very clever software built in that spreads the usage out to maximize their life. Basically, if you never load the drive to more than about 60% of their capacity they will last for many years. The closer you get to 100% utilization the faster their life expectancy plummets. So, what you want to do is have your SSD be the boot drive, plus put all your operating programs on the SSD, and then all data files, pictures, etc. on a separate hard drive. The SSD becomes Drive C, the Hard drive becomes drive D.
So purchase first the SSD you desire as well as the Apricorn adapter. Load the Apricorn software on your hard drive, having checked their web site to see that it is the latest. Run the program. It will walk you through the steps needed. In perhaps half an hour, the SSD drive will be ready to go.
There are two ways you can physically mount the SSD into your 9010. The simple way, which is easily and entirely reversible, is to procure some sort of Velcro-type system. I bought a 3M substitute at Walmart for $3.
Turn off the computer and remove cables as needed. If you have the room to lay the computer on its side you don’t really need to remove most of the cables. For safety’s sake, however, you most certainly should remove or unplug the power cord. You will find the Hard Drive bay at the opposite corner of the corner from the power supply. Unplug the two cable sets — one goes to the power supply, the other to the motherboard, which is the data cable.
Squeeze the two blue handles of the hard drive caddy and lift it out, and set it aside. Now, attach the power cable and the data cable to the SSD. Put the SSD into the hard drive bay, figure out where to attach it to the wall, then apply the Velcro or substitute and thus attach it to the wall. It will probably be easier to temporarily remove the power and data cables to do this, once you have figured out the best location. If so, now replace the cables, close up the computer, re-attach cables and power up. You should be absolutely delighted with the speedy boot.
The original Hard Drive should be carefully placed in a protective bag, labeled and stored. If for any reason you have a boot failure or SSD failure, you can always put the original hard drive back into the computer and go from there.
The other method of mounting the SSD is well described in the above-referenced video, so is not covered in depth here. Suffice it to say it is the more elegant approach. But for a home user, the Velcro approach is entirely adequate and easier, cheaper, and quicker.
Adding a Large Capacity Hard Drive
As stated above, it is a very good practice to not utilize an SSD at full capacity. Plus, the storage of a lot of pictures can and will take up a lot of memory. I could have utilized the 500-gig hard drive supplied with the computer as a second drive, but for one thing, I wanted to save it as my boot-device back-up, and for another, I wanted rather more capacity. Back to eBay!
I fairly quickly found what looked to be a real bargain: a 3 terabyte SATA drive, new, for $50 post paid, from eBay advertiser GoHardDrive. Wow! I read the fine print carefully. The brand of the drive was not given, only that it was a “White label” Enterprise Drive. User comments said that the drive was made by Hitachi, a respected supplier. So what the heck is an Enterprise Drive? A little search engine research gave me answers: it is a drive intended for server farms — i.e. The Cloud. Some comments suggested that Enterprise drives are not as reliable as consumer-oriented drives, which, however, cost rather more for the same capacity.
I thought about this. I would have a back-up for the data, right? Be it on premises or in the cloud, anything you value must be backed up. That was good enough for me. I ordered the drive.
At the same time, I ordered another hard drive caddy for the 9010 from an eBay supplier, being careful to select a USA source, since I wanted the caddy quickly. And, as suggested in the video, I ordered a right-angle SATA data cable.
All arrived within a matter of days, and once in hand, I installed the new hard drive. I looked at the original hard drive, still in its caddy, to figure out how to mount the drive into the “new” caddy, which turned out to be simple once I figured it out. I unplugged the computer, placed it on its side, and removed the cover. The caddy with the new drive dropped easily into the empty drive bay. I found another power cable with the appropriate connector from the bundle of unused cables from the power supply and attached that. I followed the SATA data cable from the SSD to the motherboard and saw the rest of the SATA inputs. There was one vacant socket left. I plugged the new SATA cable into that and the opposite end into the new drive, closed up the computer, and powered it back up.
Hmmm. Windows Explorer showed no sign of the drive. Then, fortuitously, I remembered the note on the hard drive invoice: “You will need to format the drive before it can be seen on your computer.” Okay…
A brief exploration of the internet gave easy directions to do this. You are taken to “Disk Management”, where you will find the new drive is listed, then directed to partition and format the new drive. The actual process of doing so takes rather less time than researching it.
I chose to add no partitions to the drive. And, I designated it to be drive “D”.
And it was done. It was still necessary to tell a number of my programs that data was to be stored on Drive “D”. Also, I entered the “Power Management” profile and set the hard drive to switch off after 10 minutes of not being used. It is my hope that this will greatly extend the life of the drive.
And that concludes this portion of the article. Actually, I have now set up two identical computers as per above, both purchased from the same sources, one in service with a friend. While not quite state of the art, they are powerful computers that should serve well into the future. I did consider adding more RAM memory, to go from 16 gigs to 32 gigs, but I have not yet seen a situation where I believe the added Ram would have given me greater performance. If I do decide to add more RAM later, it is a simple matter to install it.
I did add one other item that has been a very nice addition: a backlit keyboard that uses real key switches. I got it from Amazon — it is an Eagletec KG010 Mechanical Keyboard, USB Wired for $40. It took a little getting used to but I love it. It is a great tool for writing.
So. Now I have a fine computer for post-processing. But what about a monitor? Of course, that is a separate story. I did the usual internet research for what constituted a good monitor for photo post-processing. After some research, I had developed a listing of suitable monitors from several different manufacturers. I took that list and checked the usual sources. I was willing to consider a used model if the provenance sounded right.
Again, long story short, I purchased a BenQ PD2700Q 27″ 1440p Designer Monitor refurbished, directly from BenQ. The monitor was listed on eBay for $236. All I can say is that if this monitor was ever out before refurbishment, I could never tell. It seems perfect in every way, not least including no apparent bad pixels. The color is beautiful and I am delighted with it — it is a very fine match for my computer. It was designed for photo editing and works beautifully for that. Today the world is moving towards 4K video and higher, with higher resolution in video monitors. But the BenQ 27″ works for me. The computer video card will indeed support higher resolution monitors but I have no present plans to update.
I hope this article will encourage others to try my path. I figure my frugality has saved me at least $1,000 which can and will be applied to new photo gear.
Please note that I have absolutely no financial connection with any of the suppliers referenced. I get no royalty or commission. Happily, and without exception, everything I ordered has performed as expected, to my pleasure. And this article was written on the computer this story is about. Cheers!
About the author: Bob Locher certainly makes no claim to being a great photographer; rather, he considers himself to not be a very good one. He is not much of a speaker either, and does not have his own YouTube Channel, nor does he do Photographic Tours. But, he has been in the photographic hardware industry most of his life, fancies himself as something of a writer, has opinions and is not afraid to express them. He loves photography, values technical quality and is indeed a pixel-peeper. The opinions expressed in this article are solely those of the author. Locher has written over 50 magazine articles as well as two books. You can find more of his work and writing on his website.
from Photography News https://petapixel.com/2019/04/08/building-a-photo-editing-computer-on-the-cheap/
0 notes
Text
The MeshForce M7 Tri-Band Router Is an Easy Way to Improve Your Wi-Fi Signal
MeshForce M7 Tri-Band Whole Home Mesh WiFi System (3 Pack)
9.00 / 10
Read Reviews
Read More Reviews
Read More Reviews
Read More Reviews
Read More Reviews
Read More Reviews


See on amazon
The MeshForce M7 tri-band router is an excellent way to improve the Wi-Fi signal throughout your whole home. With sleek components and a straightforward setup procedure, it's suitable for any house and users of all abilities.
Key Features
SSID Broadcast
Beamforming
Smart QoS
Specifications
Brand: Meshforce
Range: 6,000 square feet
Wi-Fi Bands: Tri-band AC2100
Ethernet Ports: Yes
USB Ports: None
MU-MIMO: Yes
Mesh Network Compatible: Yes
Pros
Parental controls
Guest network
Aesthetic design
WPS
Dedicated backhaul
Cons
No USB ports
Lack of indicators on the unit
Cheaper mesh systems are available
Buy This Product
MeshForce M7 Tri-Band Whole Home Mesh WiFi System (3 Pack) amazon
Shop
// Bottom var galleryThumbs1 = new Swiper('.gallery-thumbs-1', { spaceBetween: 10, slidesPerView: 10, freeMode: true, watchSlidesVisibility: true, watchSlidesProgress: true, centerInsufficientSlides: true, allowTouchMove: false, preventClicks: false, breakpoints: { 1024: { slidesPerView: 6, } }, }); // Top var galleryTop1 = new Swiper('.gallery-top-1', { spaceBetween: 10, allowTouchMove: false, loop: true, preventClicks: false, breakpoints: { 1024: { allowTouchMove: true, } }, navigation: { nextEl: '.swiper-button-next', prevEl: '.swiper-button-prev', }, thumbs: { swiper: galleryThumbs1 } });
Wi-Fi networks can be a fickle beast. You might find that you have a great signal in one part of your home, but when you move a few feet in a different direction, the performance falls off a cliff.
Many factors can cause the issue. It could be the location of your router, the location of your walls, the materials used to build your home, or simply poor-quality equipment from your ISP.
When people encounter such issues, many turn to repeaters, powerline adaptors, and other inferior solutions. These solutions are rarely worth the money; the best approach is to buy a mesh router system.
Today, we put the MeshForce M7 Tri-Band Whole Home Mesh Wi-Fi System through its paces. Keep reading to find out more.
What's in the Box?
MeshForce sent us the three-pack version of the M7. Inside the box, you'll find three of the M7 units along with three power cables, a single ethernet port to connect one of the router units to your existing hardware, a quick start guide, and a small product registration card.
If you enjoy the "unboxing experience," you're going to be disappointed. There is nothing flash about the exterior packaging, and within the box, all the nodes are packed in regular cardboard plastic wrapping.
In fairness, considering this is a tri-band mesh router with three nodes for less than $300, it's not surprising that the company has opted to save on its packaging.
Product Design
The cylindrical three units are all identical, meaning you can connect any of them to your existing ISP's modem. Each is plain white with a silver disk affixed to the top. The silver disk helps to add a touch of class to what is otherwise a very plain design.
There are ventilation holes around the bottom of each unit, and underneath you'll find the two LAN ethernet ports, a WAN/LAN ethernet port, the power connection, and a tiny device reset button.
The side of the node has a solitary LED light. When it's solid green, your Wi-Fi connection is good; when it's yellow, your connection is average; when it's red, there is no connection.
The big drawback of the design is the size of each unit. Their bulkiness surprised me when I took them out of the box, with the router having a diameter of 5.3 inches (13.4cm) and standing 4.4 inches (11.2cm) high. Their size means the MeshForce M7s are not something you can discretely tuck away on a shelf or on your TV stand; people are going to notice them.
On the plus side, each router is extremely lightweight. There's no danger of it causing injury if it's accidentally knocked off a shelf by a pet or small child.
MeshForce M7 Specs
Here are some of the headline specs you need to know about:
Processor: Dual-core 900Mhz CPU
RAM: 256MB DDR3
Standards and Protocols: IEEE802 11a/b/g/n/ac, IEEE 802.3, IEEE 802.3u, IEEE 802.3ab.
Mesh Network Standard: IEEE802.11s
Speed: 2.4GHz, 300 Mbps / 5GHz, 867Mbps
Frequency: 2.4-2.4835GHz, 5.15-5.25GHz, 5.47-5.725GHz, 5.725-5.85GHz.
Antennas: Four, all internal
Security: WPA-PSK/WPA2-PSK
Firewall: VPN (PPTP/L2TP/IPsec) passthrough, prevention of TCP/UDP flood attacks
Internet Connection: PPPoE, DHCP, static IP
Virtual Server: Port forwarding and UPnP
Modes: Router mode and bridge mode
Setting Up the MeshForce M7s
youtube
Perhaps the most significant benefit of the MeshForce M7s is the setup process—it is remarkably straightforward and means the product is the ideal mesh router system for anyone who does not consider themselves to be tech-savvy.
Sure, the Asus ZenWi-Fi AC CT8 might offer more power and some more advanced features, but it also costs more, and it is not as easy to get started.
To begin, download the MeshForce app onto your Android or iOS device. Next, connect your router's ethernet port to the WAN/LAN ethernet port on your M7 and hook up the power.
You then need to connect your phone to the M7's default network (you will find it printed on the bottom of the unit). Open the app and you will see a prompt to change the default network name and password.
To add additional nodes to your mesh network, you just need to plug them into a wall socket and the app should detect them automatically. If it doesn’t, open the app, go to Settings > Add a Mesh, and scan the QR code on the base of the unit.
Keep in mind that a unit should be within 32 feet of the next nearest node to optimize performance. You should also keep them away from fridges, microwaves, and other wireless devices.
Performance
Needless to say, setting up a mesh network and placing one of the nodes in my office made a huge difference to the Wi-Fi speed.
In the image below, you can see the speed results when connected to my old ISP router in the lounge (approximately 20 meters from the office):

And here are the results after setting up the mesh network:
Smart Phone App
Aside from using the smartphone app to perform the initial network setup, it is also the way in which you manage your Wi-Fi network remotely.
Using the app, you can set up a DHCP server, enable/disable UPnP, add port forwarding rules, enable QoS, control your parental settings, and a whole lot more.
Device Support
Although the product ships with three units in the box, you can connect up to six MeshForce M7s to your mesh network.
This is really useful if you want to get a strong Wi-Fi signal into a detached garage, guest house, or up a couple of flights of stairs and onto a roof terrace.
The mesh network itself supports up to 75 simultaneously connected devices. Unless you’re a massive tech fanatic or have an extremely large party, you are unlikely to ever hit the limit.
Tri-Band Networking
The tri-band aspect of the MeshForce M7s isn't just marketing lingo—it has a practical benefit.
By constantly assessing the traffic on each router, the system can automatically throw you onto another router in your system if one becomes too bogged down with users. In turn, this helps to optimize bandwidth and upload/download speeds to keep your network running as efficiently as possible.

Smart QoS
Smart QoS is a key feature for gamers and people who stream a lot of online videos. It will automatically reroute anything with high bandwidth usage to give you the best connection possible, and will thus help to eliminate staggering, lags, and buffering.
Guest Network
You can toggle a guest network on and off from within the smartphone app. It is ideal when you have visitors and do not want to grant them access to your main network.
Parental Controls
Like all MeshForce mesh router systems, the M7s come with a parental control feature. You can set it up via the accompanying smartphone app.
It has far fewer features like a dedicated parental control app (for example, you cannot block individual sites or apply age-specific filters), but you can pause the internet with a single button, create a user profile for everyone in your household, and create access schedules on a user-by-user basis.
Amazon Alexa Is Coming
At the time of writing, you cannot use your voice to control your mesh network via Alexa. However, MeshForce insists that the feature is close the completion and will be available to all users in the near future.
Repairability
We often like to refer to iFixit's repairability scores when assessing the viability of fixing a product. Sadly, iFixit has not reviewed the MeshForce M7s.
A quick inspection of the units reveals there are no accessible screws to get inside the device, and a search for spare parts on the web reveals that nothing is available.
If the unit does go wrong, therefore, there is little you can do other than buy a new unit. The units are available individually, so you will not need to buy another three-pack, but it is not ideal.
Should You Buy the MeshForce M7 Tri-Band Whole Home Mesh Wi-Fi System?
Not everyone is going to benefit from a mesh Wi-Fi system. If the Wi-Fi signal around your home is already strong and reliable, there is no need to spend $260 dollars on this system.
Similarly, even if you have a lot of dead spots but you live in a small house or apartment, you will not need the 6,000 square feet of coverage that the MeshForce M7 provides. You would be better advised to opt for one of MeshForce's cheaper options with a smaller range. For example, we reviewed the slightly less powerful MeshForce M3 in 2020 and found it to be excellent.
However, if you live in a large home with poor Wi-Fi coverage, you will be hard-pressed to find a better mesh Wi-Fi system at this price point. If you fall into this boat, the MeshForce M7 Tri-Band Whole Home Mesh Wi-Fi System will revolutionize the way you can use the web when at home.
The MeshForce M7 Tri-Band Router Is an Easy Way to Improve Your Wi-Fi Signal published first on http://droneseco.tumblr.com/
0 notes
Text
Lowrance HOOK2 Series Fish Finder Reviews & Tips For Choosing
In this review, we are going to show you the best Lowrance Hook2 Series unit. After that, we will also point out the difference between the Lowrance Hook and the Hook2 series later in this guide. We're going to answer some of the most frequently asked questions on the Hook2 series. With this in mind, let's get started.
Lowrance HOOK2 Series Rated Comparison Charts
Image
Product Name
Transducer Option
Size
Price
Lowrance HOOK2 4X - 4-inch Fish Finder with CHIRP Sonar
Bullet Skimmer
4.2-inch
Lowrance HOOK2 5 - 5-inch Fish Finder with TripleShot / SplitShot Transducer and US Inland Lake Maps Installed
SplitShot
TripleShot
6-inch
Lowrance HOOK2 7-inch Fish Finder with TripleShot/SplitShot Transducer and US Inland Lake Maps Installed
SplitShot
TripleShot
7-inch
Lowrance HOOK2 9-inch Fish Finder with TripleShot/SplitShot Transducer and US Inland Lake Maps Installed
SplitShot
TripleShot
9-inch
Lowrance HOOK2 12-inch Fish Finder with TripleShot/SplitShot Transducer and US Inland Lake Maps Installed
SplitShot
TripleShot
12-inch
Lowrance Hook2 Series Fish Finder Reviews
1. Lowrance HOOK2 4X - 4-inch Fish Finder with CHIRP Sonar
The 4.2 inches Lowrance Hook2 fishfinder is equipped with a lot of fantastic features to make your fishing hunt a breeze. The main function of HOOK2 is to help you spend more time fishing and less time playing with settings.
Autotuning Sonar
With the aim to create an enhanced sonar clear display and imaging, the Autotuning Sonar imaging was introduced. Housing 3lbs weight design, the Hook2 mode features an autotuning sonar to help you correct your settings automatically to the clearest underwater view.
This means you won't need to carry out any manual adjustments when setting up the transducer.
SolarMax Display
To even make this fishfinder more crisp and clear, the Lowrance Hook2 features a SolarMax display to give you an ultra-wide and clear viewing angle, which translates to the best resolution you can find around.
This means you have the full detail of underwater view without tilting your head or adjusting your body.
GPS plotter
While this unit offers a multiple sonar functions like a circular flasher, Bottom Range, Fish ID, it also houses a basic GPS plotter that looks like those of Garmin Striker device.
My little complaint is that the GPS plotter doesn't come with specified frequency or channels.
But it does offer a blank page to help you mark waypoints and save routes. The waypoints come with longitude and latitude coordinates to track the vessel's movement on the white sheets.
Tripleshot Transducer
The HOOK2 4X also did a nice job by offering a Tripleshot transducer that allows you to mark fish, track baits, identify the underwater structure and help you scan large areas.
It also offers a 3 in 1 model that allows using the PLUS SideScan, traditional high CHIRP, and DownScan imaging.
Wide-Angle CHIRP
The included Wide-Angle CHIRP sonar is an awesome feature that deserves massive. This fantastic feature does not only double your sonar coverage but also allows you to view more fish in the water column.
You will be able to cover more water in less time with this wide-angle CHIRP.
Easy-To-Use Interface
The Hook comes with Quick Access to Key Functions, which makes it one of the most intuitive fishfinders on the market.
The Function of the direct-access keypad helps to reduce the time spent working on settings, and let you keep your focus on fishing.
GPS and Mapping Options
The HOOK2 4X also features a preloaded C-MAP® US Inland mapping system to allow you to narrow your search for efficient water features.
This can be drop-offs, points, and ledges with a broad eye view.
One-Year Warranty
Due to its awesome performance, this fishfinder comes with a one-year warranty.
Drawback
While this unit looks awesome, I do have some main complaints.
First, the unit did not come with adequate instructions. Another major complaint is that it has no Downscan, Sidescan, or Structural scan. While that is true, it can't see in elevation, and the GPS unit is in minimal quality.
On top of that, the top screen has a broad color band which interferes with bottom depth - Only 2000 points allowed, so the trail ends in a matter of hours.
Also, it doesn't come with any generic map, so all you get is lines with no reference to where you are. It is also a pain to know that there's
No microSD or SD card slot
No split-view feature
No A-Scope function
No NMEA or Ethernet
And doesn’t offer Sonar Record, Rewind
I can understand this is why it is cheap. I also wonder why Lowrance chooses to make its keypad operational.
PROS
High-resolution
SolarMax display
Autotuning sonar
Double the CHIRP sonar coverage of most fishfinders
Broadband Sounder
High CHIRP
SideScan and DownScan Imaging™ sonar options
Full Chartplotter
Basic GPS navigation options
Three transducer options are available
TripleShot 3-in-1 sonar
SplitShot 2-in-1 sonar and Bullet
One year warranty
CONS
Inadequate instructions
No Downscan, Sidescan, or Structural scan
No ability to see in elevation
The GPS unit is in minimal quality
The top screen has a broad color band
No any generic map
No microSD or SD card slot
No split-view feature
No A-Scope function
No NMEA or Ethernet
And doesn’t offer Sonar Record, Rewind
2. Lowrance HOOK2 5 - 5-inch Fish Finder with TripleShot / SplitShot Transducer and US Inland Lake Maps Installed
The HOOK2 5 - 5-inch comes with the same sweet perk with the HOOK2 4X - 4. One of the remarkable differences between the Hook2 5-5 and the HOOK2 4X - 4-inch is that the former is 6 inches in size, compared to 4.2 inches size of the latter.
While that is true, it also retains the same impressive features of the previous generation. Its uniqueness comes from the ability to supply navigation features for inland fishing, and an optimal array of sonar, while eradicating unnecessary features that have no significant effect.
Sonar and Transducer
The introduction of the SplitShot transducer paves the way for a Wide-Angle High CHIRP and DownScan.
This feature lets you scan depths up to 500 ft (152 m), thanks to its Wide-Angle High CHIRP mode that can scan up to 300ft (91m) when using DownScan.
The best part is that it can maintain an efficient fish targets reading at speed up to 20-30 MPH.
Apart from that, the SplitShot transducer also integrates a temperature sensor and features 20 ft (6 m) of cable, alongside an 8-pin connector.
Downscan Overlay
The DownScan Overlay features let you use both the two sonar technologies to help you get a clear understanding of the position of the fish arches and their vegetation structure.
GPS Features
Unlike the Hook2-4x, Lowrance Hook2-5 is equipped with a standard GPS alongside the US Inland charts. The high-sensitivity internal GPS can also use the information from, EGNOS, WAAS and MSAS satellites to deliver the most accurate results possible if they are available in your area.
This GPS will calculate the speed of your vessel and show you coordinate patterns.
C-MAP Charts
With the C-MAP charts, you will get a high-detail US mapping alongside 1-foot contours for more than 3,000 lakes. Even though they don’t deliver super detail, they will show you the boundaries between land and water accurately.
You will get to use premium charts C-MAP Navionics, C-MAP Genesis and more, to give you superior detail and, contour shading, tide information, etc.
While this unit can save about 3,000 waypoints, it can still create up to 100 routes. You will be able to track plotting functions and record up to 100 tracks, within 10,000 plots per track.
SolarMax Display
This gorgeous feature offers a SolarMax Display that houses a LED backlight. This backlight offers optimal visibility even in direct sunlight.
The display angle visibility is 70°/50°/70°/70° top/bottom/left/right. The good news is that the unit has a colorful display coupled with a horizontal layout. It has a pixel matrix of 800H x 480V, which delivers a sharp and crisp imaging.
Waterproofing Features
The Lowrance HOOK2 5 - 5-inch is IPX7 waterproof, meaning it can withstand rainfall, water exposure, and snow with no problem. The design is tightly sealed without allowing water to damage the metallic parts of the unit.
It also has a microSD card slot, which is skillfully placed on the right side of the unit. This will let you upgrade the internal software, upgrade its charts database, and transfer data.
Drawback
Just like any other unit, this device also comes with its own downsides.
It has a short transducer cable that requires you to buy an extension cable.
It doesn't offer networking features, and the included transducer is not ideal for ice fishing.
And the fact it offers only one MicroSD card slot makes it a hassle to insert and remove.
PROS
The 2D Broadband Wide CHIRP Sonar is pretty spot on
DownScan sonar
Included SplitShot 2-in-1 transducer
Fast and accurate GPS
US Inland base maps included
Compatible with superior charts, such as C-MAP Genesis, C-MAP®
Color display
Adjustable backlight for superb readability
Split-screen view for three panels per view
MicroSD card reader
Easy to use Bracket mount and panel mount kit
One year warranty
CONS
Short transducer cable
No networking features included transducer is not ideal for ice fishing
One MicroSD card slot makes it difficult to insert and remove
Does not support external GPS
3. Lowrance HOOK2 7/9/12 - 7/9/12-inch Fish Finder with TripleShot/SplitShot Transducer and US Inland Lake Maps Installed
Lowrance HOOK2 7 - 7-inch Fish Finder with TripleShot Transducer and US Inland Lake Maps Installed
The Lowrance HOOK2 TripleShot & SplitShot comes as a revamped version of the Hook2 series as it offers a big and bold HOOK2 12 inch design and the 5 sizes, which are the 5, 7 to 9 and 12-inch size.
New TripleShot Transducer
The Hook2 TripleShot & SplitShot offers a new 2-in-1 skimmer transducer and also has DownScan and High CHIRP technology to give you the best fishing experience.
DownScan and Side-scan sonar allow you to see the fish arches better with the vegetation or structure viewed in DownScan crisp and bright display.
Simple Set Up
Lowrance HOOK2 9 - 9-inch Fish Finder with TripleShot Transducer and US Inland Lake Maps Installed
Just like the Elite and Hook transducers, this unit also sports a molded-in rib that lets you mount it against a trolling motor housing.
It also comes with a TrackBack feature that lets you record sonar feed, and allows you to scroll back through the sonar history to review a specific spot.
Internal GPS
Another nice feature is that the HOOK2 TripleShot fish finder flaunts an internal GPS, alongside 3,000 preloaded lake maps with 1 ft contour lines.
Fish ID 2D
I also admire the included Fish ID 2D sonar mode feature, which allows fish icons to the fish arches. Meaning, this feature interchange the sonar returns that it deduces to be fish.
Circular Flasher and A-Scope are also available.
For ice or stationary fishing, the included Circular Flasher mode assigns all the sonar information into a ring format while it displays the depth in the middle.
Also, the A-Scope comes with a vertical flasher which is displayed next to the 2D view and, shows in detail the most recent sonar beam.
GPS & Maps
Did I mention that the Hook2 also delivers a high-sensitivity internal GPS?
Its operating frequency is estimated to be about 5 Hz, meaning that it will deliver position fixes five times per second.
The device can also make use of position enhancements from EGNO, SWAAS, and MSAS satellites to let you see coordinates of any point of interest and display and calculate the speed of your boat.
More Views
TripleShot transducer gives you DownScan sonar (straight down), SideScan sonar (up to 300' to each side), and CHIRP sonar (fish arch) views.
Detailed Lake Maps
Preloaded CMAP mapping with 1-foot contours for over 3,000 lakes plus standard coverage of an additional 9,000 lakes. The trail recording functions and waypoints routes are also available here to give you the best spot to locate fish.
While this may sound great, this unit doesn't offer super detail, as we hoped for. Even with this, we discovered that it shows the boundaries between water inland accurately and also include various points of interest.
Navionics Chart
This unit is compatible with Navionics charts to have access to SonarChart Live, to create current icons and to change the tide.
It also comes with a StructureMap feature to help you SideScan images to visualize crisp and clear underwater environment. This will give you a better interpretation of your position.
Control Unit Features
The control unit is a gorgeous feature that lets you view fish in an underwater environment in a 9-inch display WVGA color LCD, sweetened by a pixel resolution of 800H x 480V.
To make this sweeter, the display also boasts a SolarMAX type coupled with an adjustable LED backlight. This will ensure you get an excellent picture even in direct sunlight.
To make it more gorgeous, the interface of this bad boy is highly intuitive, and its homepage can be customized in multiple ways.
The best part is that you can even set up a split-screen from about 4 applications per view.
Waterproof
Yes, your guess is right; the HOOK2 7/9/12 delivers a lPX7 waterproofing feature that can withstand water splashes or any incidental water exposure like rain or spillage.
Downsides
One bitter pill about this unit is that it is not touch screen enabled. You can only operate it using the keypad on the right.
Lowrance did not include an extended cable. And we also notice that the device is not networkable. It does not offer any networking features like NMEA or Ethernet.
The included transducer is not great for ice fishing and with a single Micro SD card, it will be hard to save lots of screenshots.
As we’ve mentioned above, this unit doesn’t offer the extensive range of features as the Elite Ti units, or Simrad units. Thus, it doesn’t provide NMEA support or Ethernet support, and it’s not networkable. It does have one microSD card slot, though, for chart upgrades or data transfer.
Finally, the box includes both front-dash and the classic gimbal bracket. A unit cover is not included, though.
PROS
Wide-angle High CHIRP (2D)
DownScan, and SideScan
Includes TripleShot 3-in-1 transducer
Gps is accurate and fast
Route creation function
3,000 waypoints
Features U.S. Inland maps included
SolarMAX color display
A superior backlight is adjustable excellent readability
Offers Split-screen modes
DownScan overlay
Easy to install
Sonar recording
One year warranty
CONS
No NMEA or Ethernet ports included
No unit cover
AIS is un-inserted
Lowrance HOOK vs. HOOK2
We've had a lot of people asked; what is the difference between the Lowrance Hook and Hook2? In this guide, we will show you the difference. Here is a table below to give you a quick view of the difference between the two models.
Lowrance HOOK
Lowrance HOOK2
User-friendly
Less
More
Exit-button
No
Yes
Touchscreen
Yes
No
Easy to setup
Yes
No
Connector
Turn-knob
Push-connectors
Manual ducer-selection in the menu
Yes
No
Medium CHIRP
Yes
No
Cone Angle
22 degree
42 degree
Broadband Sounder Module
No
Yes
Autotuning Sonar
No
Yes
SolarMax Display
No
Yes
Touchscreen
One significant difference between these two models is that the Hook2 does not feature a touchscreen. It has a well-planned button configuration, which makes it a lot easier and natural for you to navigate the device with less hassle.
On the other hand, the Hook features a touchscreen, which a less natural because it misses a few buttons, making them less user-friendly.
User-Friendly
Because of the easy navigation button of the Hook2, and coupled with the fact that it offers a widescreen Interface of 7” and 9”, the Hook2 offers a more friendly approach than the Hook.
Redraw-Speed
The redraw speed of the Hook has been pretty slow beforehand. But since the introduction of the Hook2, it has now boosted with faster internals compared to what you have in the Hook.
Connectors
While the Lowrance Hook comes with a turn-knob connector, the Hook2, on the other hand, sports the push-connectors.
Manual Ducer-Selection in the Menu
Unlike, what you will get in the Lowrance Hook series, the Hook2 does not come with manual ducer-selection in the menu. That means using another ducer in it than the 3 new ducers will not give optimal results.
Medium CHIRP
While the older Hook version will boast of an 83/200/medium/high chirp, when it is connected to a ducer, the Hook2 has no 83 kHz (or medium chirp).
The reason for this change in the Hook2 has upgraded its 22-degree cone angle at 200 kHz to 42 degrees cone angle with Bullet/ SplitShot/ TripleShot. So there's really no need for the 83/ medium-frequency.
Broadband Sounder Module
The Lowrance Hook did not include the gorgeous Broadband Sounder Module we all loved in Elite Ti and HDS. But thank goodness, the Hook2 features the BSM-based software, even at a low price to give you less tinkering with settings.
Auto-Tuning Sonar
Unlike the Hook device, the Lowrance Hook2 flaunts an "Autotuning Sonar" feature to help you clutter noise and give you a precise fish targets as the conditions change.
Apart from this, the autotuning feature is built around the Lowrance 200kHz ultra-wide beam transducer.
SolarMax
While the Lowrance Hook failed to include the SolarMax feature, the Hook2 decide to pick up the mantle by housing a SolarMax Display with LED backlight.
This gives more optimal visibility and direct sunlight and a colorful display, alongside a delivering very sharp and crisp imaging.
Final Verdict
With a touchscreen display, the Hook series open the doors for ease of operations with just a single touch of the screen. But the truth is that the touchscreen is expensive and often cost more than other models.
Hence, one of the reasons why the new Lowrance Hook2 offers an easy to use interface, which translates to easy to use operations and high-end features to make your fishing hunt a lot more fun.
The fact that the Hook2 provides a more comprehensive screen format to allow you have a viewable screen area and gorgeous features that let you use the device to catch fish, make it the go-to unit for anglers.
FAQ's
1. My Lowrance Hook2 7 will restart randomly when I have downscan turned on. How to fix it?
To have this fixed, get the 57.6.94 software Navico and the issue will be fixed.
2. Why is my Lowrance Hook2 4X not showing speed?
When this happens, edit the data fields by heading to the menu options of the page you want to edit. After that, select the SOG option. This will show you the unit to display the speed ground in the data location you have selected.
3. Lowrance or Ipad Screen ?
Marine electronics monitors can be seen in the sunlight. These screens have more powers compared to displays on a phone and tablet screens of the same size.
4. Does The Lowrance Hook2 Have A Mapping Problem?
The Hook2 has no X supports Map, and the ones with X does not support mapping ( avionics and charting capability).
Most people confuse this concept. So, ensure you don't get confused when want to choose a version with Map support.
5. Which is better; the Lowrance Hook2 7 vs. Garmin Striker 7?
The Lowrance Hook2 7 offers a split-shot with maps for a reasonable price, but it excluded the side view imaging. The Garmin on its own has no maps. So, I think the Hook2 takes Lion's share.
6. Has Lowrance retired its HSTWSBL era transducer with Hook2?
The answer is No! The HST-WSBL isn't retired yet. It is still a gorgeous and a standard transducer for HDS series. The Hook2 still stand firm and blazing with its new line of transducers, Bullet Skimmer, charting, TripleShot, and SplitShot HDI.
To use the Hook2 with the WSBL is a breeze. You can use this via the WSBL adapter, and it is not the conventional transducer that comes out of the box. Also, keep this in mind that Hook2 transducers are not compatible with any other displays beside Hook2.
Conclusion
While the Hook series seem to hold a solid ground when it comes to the best fishfinders for the money, the best model that blew other brands out of the water is the Lowrance Hook2 - 5 TripleShot Transducer. The reason why this fishfinder comes as a clear winner over other models is that:
It comes with the ability to supply navigation features for inland fishing, and an optimal array of sonar
The introduction of the SplitShot transducer paves the way for a Wide-Angle High CHIRP and DownScan to let you scan depths up to 500 ft (152 m).
The Wide-Angle High CHIRP mode scans up to 300ft (91m) when using DownScan.
It can maintain efficient fish targets reading at speeds up to 20-30 MPH.
The SplitShot transducer also integrates a temperature sensor and features 20 ft (6 m) of cable, alongside an 8-pin connector.
The DownScan Overlay features let you use both the two sonar technologies to help you get a clear understanding of the position of the fish arches and their vegetation structure.
The GPS Features high-sensitivity internal GPS can also use the information from, EGNOS, WAAS and MSAS satellites to deliver the most accurate results possible if they are available in your area.
The GPS will calculate the speed of your vessel and show you coordinate patterns.
The C-MAP Charts will give a high-detail US mapping alongside 1-foot contours for more than 3,000 lakes.
You will get to use premium charts C-MAP Navionics, C-MAP Genesis and more, to give you superior detail and, contour shading, tide information, etc.
The SolarMax Display has a LED backlight to give you optimal visibility even in direct sunlight and has a colorful display coupled with a horizontal layout.
The included Waterproofing Feature can withstand rainfall, water exposure, and snow with no problem. Thanks to its tightly sealed design to prevent water from entering the unit.
All these exceptional features are nicely and neatly packed in the Hook2 - 5 fishfinder. It will be a wise choice to go with this fishfinder for the next fish hunt.
Do you have any thought or experience about the best fishfinders to share with us? Let us know in the comments below.
https://ift.tt/2UbD5mL
0 notes
Link
Universal remote system Caavo is addressing some of the complaints with its first-generation hardware with today’s release of a new, more affordable system. Unlike the original, $400 home theater product, this second device arrives at consumer-friendly price point of $99.95 and adds support for 4K HDR, as well as other features focused on playlist creation and community sharing.
Caavo has always gotten points for being unique. It designed an odd device solving a pain point a number of people don’t have – that of owning too many streamers, game consoles, and other set-top boxes, and struggling with constantly switching remotes and flipping between various devices.
In reality, the people reviewing systems like these – tech reporters, generally – face this exact problem, with Fire TVs, Apple TVs, Chromecasts, Rokus, and other gaming consoles and boxes cluttering up their living rooms. But most consumers they are not.
The mainstream is still just now cutting the cord with cable TV and picking up their first media streaming device, or adding one to the mix in addition to their cable box. They may or may not have a traditional game console. Switching in between a couple of HDMI inputs on a TV set hasn’t felt like an overwhelming struggle to be solved. And finding something good to watch isn’t so hard either – if anything, there’s too much great TV these days.
Caavo then, wasn’t for everyone – it was for a sliver of the market.
The new, low-cost Control Center by Caavo aims for broader appeal.
The Control Center lets you connect up to four devices and a soundbar, compared with the original Caavo’s eight devices. It ditches the pricier device’s fancy cable management system that used posts to organize cables for just a set of standard HDMI ports on the back of its box. It also doesn’t ship with the 3″ red-and-white HDMI cable – you bring your own.
And it drops its design-forward real wood covers and decorative touches for a shiny black look instead.
In the box: Control Center, Universal Remote with batteries, power supply, IR Blaster
Most importantly, the new device supports 4K HDR and Dolby Atmos – which the flagship product lacked, and was a definite hurdle in getting consumers to buy. (After all, if you’re the type of person with too many streamers, you’re probably rocking a nice TV, too. And at $400, lacking HDR was seen as a non-starter for those in the market for something like this.)
The company says the Control Center will be able to detect that the TV and source are HDR capable. It then negotiates with the source to allow the source to send an HDR bit stream and sends it to the TV.
The Control Center’s universal remote keeps the same button layout as before, for the most part, with its big, centered “Caavo” button for calling up the software’s main menu for switching devices and apps, alongside its various other navigation and TV controls. It’s simple enough to use, and still has the little stand, too, which has always been a nice touch.
Of course, the big selling point for a universal remote system is universal support for TVs. Caavo works to control TV power and volume across a range of top devices, like LG, Panasonic, Phillips, RCA, Samsung, Sharp, Sony, Toshiba and Vizio.
Setting up my (crappy!) Polaroid TV was more cumbersome. It figured out the volume controls, but not the power on/off. I still have two remotes. Oh well. (I was never really the target demographic, though. We’re not home media geeks – we watch just as often on mobile devices than the big screen. And we’re generally happy here with just a Roku.)
Caavo can connect a variety of streaming devices – Roku, Fire TV, Apple TV with Siri Remote, Nvidia Shield TV, cable set-top boxes (Xfinity, UVerse, Dish, DirecTV, etc.), DVD/Blu-ray players, and game consoles. But adding something weird – like this goofy AirTV Player from Dish – was more trouble than it was worth. (You would probably need a bit a tech support to try to map the buttons correctly here.)
The Control Center adds support for Amazon Alexa and Google Assistant voice controls through a voice app. (e.g. Alexa, tell Caavo to…”) But it doesn’t feel natural. And if you want to use Alexa with your Fire TV, or Siri on Apple TV for their device-specific commands, you’ll still need their remotes. You can, however, use verbal commands to power on the Control center, search for shows and movies, control the volume, play content, and other remote-control functions.
Some of this still feels gimmicky, but that’s not Caavo’s fault, necessarily. Talking to TVs just isn’t as natural as grabbing a remote and mashing a button. It may not be for everyone.
You can locate a lost remote by pressing a button on the top – a standard feature on Roku’s high-end device, too.
With some of Caavo’s earlier key problems – like lack HDR support and a too-high price point – addressed, the company turned its focus to its software with the launch of Control Center.
“We want to provide a solution for people who are as entertainment obsessed as we are – who want to see all their options across all their devices and apps and subscriptions in one place,” says co-founder Andrew Einaudi. “The only thing we are more obsessed with than watching great shows is talking about them, so we wanted to create a new community where you could always find something great to watch.”
Like the first device, Caavo’s Control Center offers universal search across streaming services – an unbiased list of places where you can watch what you want. (Roku does this too, so it’s not really a Caavo exclusive.)
While individual streaming services like Netflix use a combination of algorithms based on viewing behavior to make suggestions, Caavo is going a different route in Control Center – it’s offering its own editorial suggestions. The interface will now feature hand-picked, curated lists compiled by editors and tastemakers in the Caavo community.
You can contribute, too, through the new “My Lists” feature which let you make lists of things to watch across streaming services and live TV alike, then share them with the Caavo community through the Crowd Surfing feature. You can also keep them private, if you choose.
“We are improving our algorithms on the software side but there’s also something to be said for real recommendations from real people,” noted Einaudi.
I’m not convinced this feature is all that useful, however. Because “anyone” can contribute, the lists section is cluttered with random suggestions, often without titles that make any sense to anyone but the original creator. “Things are about to get weird,” offered one list. “Pumpkin Spiced Scares,” was another. (Frankly, I’d take an algorithm, if I’m being honest.)
Caavo’s team includes those with deep expertise in hardware and media services, and it’s raised over $32 million in funding to get off the ground. The company now has 60 patents and patents-pending on its home entertainment system – something of value for a future acquirer, perhaps.
There’s a sort of obsessive, home media center geek quality to the original Caavo and now this new Control Center. It’s not perfect and even at $100, it’s still not for everyone. At the end of the day, universal remote systems feel like a luxury, not a necessity.
But Caavo has built a lot of technology here in an attempt to make difficult things feel seamless, from switching in between inputs to finding you a movie or show across streaming services then letting you launch it right in your favorite app on the device you prefer. But when it struggles or lags, you definitely notice – and wonder why you needed so many boxes in the first place.
Beyond the upfront cost, the new device requires a Control Center Service Plan of $1.99/month or $19.99/year, in order to use universal search, voice control, editorial guides, My Lists, Crowd Surfing, app launching, deep linked content, and Caavo Cache (a history and privacy feature). It’s, at least, cheaper than TiVo.
Control Center is available at Best Buy, BestBuy.com and Caavo.com beginning today, October 1.
Tech specs are below.
Main Unit Size: 263 x 150 x 35 mm Weight: 1.0kg HDMI: 4 inputs, 1 output. HDMI 2.0, HDCP 2.2 USB: Service port only IR: 3.5mm IR out Power: Adaptor: 110-240V 50-60Hz AC. Draws up to 700mA; Set: DC 12V 2A Ethernet: 100Mbps Wireless: 2.4 and 5 GHz (802.11 2×2 ac) and Bluetooth 4.0
Supported Audio Formats PCM, 8 Channels, 24 bits, 192kHz Dolby Digital, Dolby Digital Plus, Dolby TrueHD and Dolby Atmos up to 8 channels and up to 192kHz DTS and DTS-HD Master Audio up to 8 channels and up to 192kHz
Supported Video Formats max RGB/YUV444/YUV422/YUV420 4K (3840×2160) 10-bit at 60Hz HDR pass-through (HDR 10)
Remote Control Size: 38 x 174 x 22 mm Weight: 0.1kg Range: 6m-12m, under typical conditions Connection: Bluetooth LE Batteries: 2 x AAA
via TechCrunch
0 notes
Text
Caavo returns with a $100 HDR-capable universal remote system
Universal remote system Caavo is addressing some of the complaints with its first-generation hardware with today’s release of a new, more affordable system. Unlike the original, $400 home theater product, this second device arrives at consumer-friendly price point of $99.95 and adds support for 4K HDR, as well as other features focused on playlist creation and community sharing.
Caavo has always gotten points for being unique. It designed an odd device solving a pain point a number of people don’t have – that of owning too many streamers, game consoles, and other set-top boxes, and struggling with constantly switching remotes and flipping between various devices.
In reality, the people reviewing systems like these – tech reporters, generally – face this exact problem, with Fire TVs, Apple TVs, Chromecasts, Rokus, and other gaming consoles and boxes cluttering up their living rooms. But most consumers they are not.
The mainstream is still just now cutting the cord with cable TV and picking up their first media streaming device, or adding one to the mix in addition to their cable box. They may or may not have a traditional game console. Switching in between a couple of HDMI inputs on a TV set hasn’t felt like an overwhelming struggle to be solved. And finding something good to watch isn’t so hard either – if anything, there’s too much great TV these days.
Caavo then, wasn’t for everyone – it was for a sliver of the market.
The new, low-cost Control Center by Caavo aims for broader appeal.
The Control Center lets you connect up to four devices and a soundbar, compared with the original Caavo’s eight devices. It ditches the pricier device’s fancy cable management system that used posts to organize cables for just a set of standard HDMI ports on the back of its box. It also doesn’t ship with the 3″ red-and-white HDMI cable – you bring your own.
And it drops its design-forward real wood covers and decorative touches for a shiny black look instead.
In the box: Control Center, Universal Remote with batteries, power supply, IR Blaster
Most importantly, the new device supports 4K HDR and Dolby Atmos – which the flagship product lacked, and was a definite hurdle in getting consumers to buy. (After all, if you’re the type of person with too many streamers, you’re probably rocking a nice TV, too. And at $400, lacking HDR was seen as a non-starter for those in the market for something like this.)
The company says the Control Center will be able to detect that the TV and source are HDR capable. It then negotiates with the source to allow the source to send an HDR bit stream and sends it to the TV.
The Control Center’s universal remote keeps the same button layout as before, for the most part, with its big, centered “Caavo” button for calling up the software’s main menu for switching devices and apps, alongside its various other navigation and TV controls. It’s simple enough to use, and still has the little stand, too, which has always been a nice touch.
Of course, the big selling point for a universal remote system is universal support for TVs. Caavo works to control TV power and volume across a range of top devices, like LG, Panasonic, Phillips, RCA, Samsung, Sharp, Sony, Toshiba and Vizio.
Setting up my (crappy!) Polaroid TV was more cumbersome. It figured out the volume controls, but not the power on/off. I still have two remotes. Oh well. (I was never really the target demographic, though. We’re not home media geeks – we watch just as often on mobile devices than the big screen. And we’re generally happy here with just a Roku.)
Caavo can connect a variety of streaming devices – Roku, Fire TV, Apple TV with Siri Remote, Nvidia Shield TV, cable set-top boxes (Xfinity, UVerse, Dish, DirecTV, etc.), DVD/Blu-ray players, and game consoles. But adding something weird – like this goofy AirTV Player from Dish – was more trouble than it was worth. (You would probably need a bit a tech support to try to map the buttons correctly here.)
The Control Center adds support for Amazon Alexa and Google Assistant voice controls through a voice app. (e.g. Alexa, tell Caavo to…”) But it doesn’t feel natural. And if you want to use Alexa with your Fire TV, or Siri on Apple TV for their device-specific commands, you’ll still need their remotes. You can, however, use verbal commands to power on the Control center, search for shows and movies, control the volume, play content, and other remote-control functions.
Some of this still feels gimmicky, but that’s not Caavo’s fault, necessarily. Talking to TVs just isn’t as natural as grabbing a remote and mashing a button. It may not be for everyone.
You can locate a lost remote by pressing a button on the top – a standard feature on Roku’s high-end device, too.
With some of Caavo’s earlier key problems – like lack HDR support and a too-high price point – addressed, the company turned its focus to its software with the launch of Control Center.
“We want to provide a solution for people who are as entertainment obsessed as we are – who want to see all their options across all their devices and apps and subscriptions in one place,” says co-founder Andrew Einaudi. “The only thing we are more obsessed with than watching great shows is talking about them, so we wanted to create a new community where you could always find something great to watch.”
Like the first device, Caavo’s Control Center offers universal search across streaming services – an unbiased list of places where you can watch what you want. (Roku does this too, so it’s not really a Caavo exclusive.)
While individual streaming services like Netflix use a combination of algorithms based on viewing behavior to make suggestions, Caavo is going a different route in Control Center – it’s offering its own editorial suggestions. The interface will now feature hand-picked, curated lists compiled by editors and tastemakers in the Caavo community.
You can contribute, too, through the new “My Lists” feature which let you make lists of things to watch across streaming services and live TV alike, then share them with the Caavo community through the Crowd Surfing feature. You can also keep them private, if you choose.
“We are improving our algorithms on the software side but there’s also something to be said for real recommendations from real people,” noted Einaudi.
I’m not convinced this feature is all that useful, however. Because “anyone” can contribute, the lists section is cluttered with random suggestions, often without titles that make any sense to anyone but the original creator. “Things are about to get weird,” offered one list. “Pumpkin Spiced Scares,” was another. (Frankly, I’d take an algorithm, if I’m being honest.)
Caavo’s team includes those with deep expertise in hardware and media services, and it’s raised over $32 million in funding to get off the ground. The company now has 60 patents and patents-pending on its home entertainment system – something of value for a future acquirer, perhaps.
There’s a sort of obsessive, home media center geek quality to the original Caavo and now this new Control Center. It’s not perfect and even at $100, it’s still not for everyone. At the end of the day, universal remote systems feel like a luxury, not a necessity.
But Caavo has built a lot of technology here in an attempt to make difficult things feel seamless, from switching in between inputs to finding you a movie or show across streaming services then letting you launch it right in your favorite app on the device you prefer. But when it struggles or lags, you definitely notice – and wonder why you needed so many boxes in the first place.
Beyond the upfront cost, the new device requires a Control Center Service Plan of $1.99/month or $19.99/year, in order to use universal search, voice control, editorial guides, My Lists, Crowd Surfing, app launching, deep linked content, and Caavo Cache (a history and privacy feature). It’s, at least, cheaper than TiVo.
Control Center is available at Best Buy, BestBuy.com and Caavo.com beginning today, October 1.
Tech specs are below.
Main Unit Size: 263 x 150 x 35 mm Weight: 1.0kg HDMI: 4 inputs, 1 output. HDMI 2.0, HDCP 2.2 USB: Service port only IR: 3.5mm IR out Power: Adaptor: 110-240V 50-60Hz AC. Draws up to 700mA; Set: DC 12V 2A Ethernet: 100Mbps Wireless: 2.4 and 5 GHz (802.11 2×2 ac) and Bluetooth 4.0
Supported Audio Formats PCM, 8 Channels, 24 bits, 192kHz Dolby Digital, Dolby Digital Plus, Dolby TrueHD and Dolby Atmos up to 8 channels and up to 192kHz DTS and DTS-HD Master Audio up to 8 channels and up to 192kHz
Supported Video Formats max RGB/YUV444/YUV422/YUV420 4K (3840×2160) 10-bit at 60Hz HDR pass-through (HDR 10)
Remote Control Size: 38 x 174 x 22 mm Weight: 0.1kg Range: 6m-12m, under typical conditions Connection: Bluetooth LE Batteries: 2 x AAA
Via Sarah Perez https://techcrunch.com
0 notes
Text
Samsung Q80T series (2020) review: High-end design, excellent picture, approachable price
New Post has been published on https://appradab.com/samsung-q80t-series-2020-review-high-end-design-excellent-picture-approachable-price-2/
Samsung Q80T series (2020) review: High-end design, excellent picture, approachable price

In 2020, Samsung’s TV lineup seems skewed more than ever toward higher-end models: There are three series with 8K resolution, a bunch of lifestyle models such as The Frame, The Sero and even a crazy-expensive outdoor television called The Terrace. Among relatively “normal” TVs, the Q80T stands out. It’s not cheap, but it is the least expensive Samsung QLED TV to feature full-array local dimming, which gives it an excellent picture.
Like
Excellent overall image quality
Superior styling
Wide range of sizes
Numerous features, voice options
Don’t Like
More expensive than competing TVs with similar picture quality
The Q80T’s big brother, the Q90T, also has FALD and I expect it to perform even better, but once again there’s an issue with price. In the 55- and 65-inch sizes the Q90T costs basically the same as my favorite high-end TV for 2020, the OLED-powered LG CX, and in my experience the OLED will have a better picture overall. That puts the Q80T in roughly the same price-to-performance sweet spot as the Sony X900H, the Vizio P-Series and TCL 6-Series.
I compared all four in my basement TV lab side-by-side and the Samsung Q80T was indeed excellent, but despite costing more than the other three, it didn’t put out a better picture. Instead its strength lies in design, with sleeker looks, an excellent remote and, yes, that Samsung nameplate. Like the others it’s also well-suited to pair with an Xbox Series X or PS5 thanks to variable refresh rate capability and 4K/120Hz input.
If you have your heart set on a Samsung, you want a great picture and you don’t have money to burn, the Q80T is pretty sweet. But if you’re brand-agnostic, the Vizio and TCL are both better values.
Sleekness from the stand up
When you pay a little extra for a Samsung you expect superior design, and the Q80T delivers. The most obvious upgrade is the stand: Samsung uses a central pedestal, which to my eye looks a lot sleeker than the two separate legs to either side that most new TVs employ. The base is a single slab of metal, flush against the tabletop. An angled chunk of metal and plastic supports the panel, creating a nice floaty effect.
Black with a minimal frame around the image, the Q80T also has a textured backside and a cable management system that lets you channel power and HDMI from their ports through the stand, making for a cleaner look.

David Katzmaier/CNET
Samsung’s clicker is also among my favorites, with minimal buttons and just the right feel in-hand. Channel and volume keys click up and down, Ambient mode gets its own button as does the mic for voice, and even the Netflix and Amazon app shortcut keys are nicer than on other remotes: They lack garish colors and instead just match the rest of the wand.
Ambient mode is designed to show stuff on the screen when you’re not watching TV. It’s a cool feature if you don’t like the big black rectangle of an inert TV, and can display your photos, designer art, the weather, headlines and even adjust backgrounds to match your wall.

David Katzmaier/CNET
Alexa and Google join Bixby
Samsung’s homebrew Bixby voice assistant is built into the Q80T, as you’d expect, but new for 2020 you can choose the overwhelmingly more-popular Amazon Alexa or Google Assistant instead. You can select between the three in the menus and whichever one you choose will be available when you press the mic button on the clicker.
Alternately you can set the remote’s mic to listen for the “Alexa” or “Hey, Google” wake words, allowing you to issue commands hands-free (it worked well as long as I stayed relatively close to the remote). And like most TVs you can also pair the Q80T with separate Alexa or Google speakers.

David Katzmaier/CNET
Beyond voice, Samsung’s on-screen smart TV system is excellent, with quick responses and plenty of apps, and I’d take it over LG or Vizio’s systems. I still like Roku and Android TV (found on Sony TVs) better overall, however, because they have even more apps. Just like most TVs now (including Roku), Samsung has the Apple TV app and works with Apple’s AirPlay system.
Full-fledged features and HDMI connectivity
Full-array local dimming sets the Q80T apart from cheaper Samsung TVs. This technology, which improves LCD image quality significantly in our experience, boosts black levels and contrast by making certain areas of the picture dimmer or brighter in reaction to what’s on the screen. The step-up Q90T and the company’s 8K models have more dimming zones and brighter images than the Q80T, but Samsung doesn’t say exactly how many zones each has.
Key features
Display technology LED LCD LED backlight Full array with local dimming Resolution 4K HDR compatible HDR10, HDR10+ Smart TV Tizen Remote Standard voice
Like all of Samsung QLED TVs, as well as most higher-end TVs from Vizio and TCL, the Q80T’s LCD panel is augmented by a layer of quantum dots — microscopic nanocrystals that glow a specific wavelength (i.e. color) when given energy. The effect is better brightness and color compared to non-QD-equipped TVs. The Q80T uses a true 120Hz panel, which improves the TVs’ motion performance, but as usual the “Motion Rate 240” specification is made up (note that the 49- and 50-inch sizes are 60Hz/MR 120).
The set supports high dynamic range content in the HDR10 and the HDR10 Plus formats. It lacks the Dolby Vision HDR support found on most competitors’ HDR TVs. I’ve seen no evidence that one HDR format is inherently “better” than the other, so I definitely don’t consider lack of Dolby Vision a deal-breaker on this TV — instead it’s just one more factor to consider.
Gaming features are one of the Q80T’s strong points. It’s compatible with variable refresh rate, as well as the FreeSync and G-synch VRR formats, available from devices including select PCs, the Xbox Series X and PS5, although the latter doesn’t support VRR yet. The Q80T also accepts 4K/120Hz input on HDMI 4, which is conveniently marked with a little game controller icon. The TV supports Auto Game Mode too, which lets it automatically switch to game mode to reduce input lag when it detects you’re playing a game. (Note that the 49- and 50-inch sizes lack 4K/120Hz input and VRR.)

David Katzmaier/CNET
4x HDMI inputs
2x USB ports
Ethernet (LAN) port
Optical digital audio output
RF (antenna) input
Remote (RS-232) port (EX-LINK)
This list is mostly solid, unless you happen to own a legacy device that requires analog video (component or composite) or audio. The Q80T is one of the few TVs that doesn’t at least offer one analog input, audio or video.
Picture quality comparisons

Click the image above for picture settings and HDR notes.
David Katzmaier/CNET
The Q80T is an excellent performer overall, with good local dimming and contrast, excellent brightness, color and video processing. It fell short of the black levels and brightness of some less-expensive TVs, such as the Vizio P-Series and TCL 6 series, especially with HDR material, but showed less blooming and a slightly cleaner image, earning the same score of 8 (Excellent) in this category. I preferred the Vizio and TCL overall for image quality and liked the Sony X900H a bit less, but all four occupy the same general plane.
Click the image above to see the picture settings used in the review and to read more about how this TV’s picture controls worked during calibration.
Dim lighting: I started with the excellent-looking Blu-ray of Parasite. In brighter scenes the Samsung generally matched the image quality of the others — all four were excellent overall. Differences emerged in darker scenes, for example during Park Dong-ik’s ride in the back of the car in Chapter 4. The TCL and the Vizio both showed darker, more realistic “black” in the shadows and letterbox bars, with less bleed from bright areas into dark, compared to the Sony and Samsung. The latter two were close, but the Samsung has a slight edge over the Sony. The differences weren’t drastic — all four TVs have very good black levels and contrast — but still visible side-by-side.
Here’s where I mention an unusual thing Samsung did with settings, which I liked. The Brightness control handles backlight level but there’s an additional Shadow Detail slider under Gamma (where it should be) that controls exactly that (and does a lot of the same work as a standard Brightness/black level setting). According to my measurements it does what it claims: boosts brightness at low levels (5% to 20%) as you creep up. The default “0” setting is the most accurate but cranking it up did reveal more, yes, details like the car seat cushions and floor of Parks car became more visible.
Bright lighting: These days TVs just seem to be getting brighter but the Q80T is an exception, measuring dimmer than many TVs at its level including the TCL, Vizio P and Sony, and even slightly dimmer than the Q70 from 2019. It’s still bright enough for just about any room, however, and has plenty of punch to make HDR look impactful.
Light output in nits
TV Brightest (SDR) Accurate color (SDR) Brightest (HDR) Accurate color (HDR) Hisense H9G 1,239 1,238 1,751 1,498 TCL 65R635 1,114 792 1,292 1,102 Sony XBR-65X900H 841 673 989 795 Vizio P65Q9-H1 768 629 1,305 1,084 Hisense 65R8F 717 717 770 770 Samsung QN65Q80T 664 503 1,243 672 Vizio M65Q7-H1 595 424 588 480 LG OLED65CX 377 290 690 634
Don’t let the high score in Dynamic fool you. Aside from being woefully inaccurate, it fluctuated quite a bit, starting out at over 1,200 nits but falling almost immediately to around 300. Most other TVs don’t show such dramatic fall-off, and none of the Q80T’s other modes did either.
For the Accurate measurements in SDR I used the Natural picture mode in combination with the Warm color temperature setting (the default temperature for Natural is quite blue). I prefer Vizio and TCL’s approach of a dedicated, accurate bright-room picture mode.
Unlike previous Samsung TVs I’ve tested the Q80T didn’t excel at handling ambient light. In a bright room all of the TVs in my lineup were better at reducing the brightness of reflections to preserve the fidelity of the image. The difference wasn’t massive but definitely noticeable in dark areas of program material.
Color accuracy: The Samsung’s Filmmaker Mode and Movie modes are both accurate before calibration but I prefer the former because it disables most video processing by default (see below). After calibration, as expected, it was excellent. During Parasite, colors like the green lettuce and red kimchi in the cafeteria in Chapter 4, as well as the skin tones of the family as they eat, looked natural and well-balanced. Then again so did the other displays — it was difficult to see any real color differences even side-by-side with non-HDR colors.
Video processing: As usual the Samsung aced my tests in this category, delivering true 1080p/24 film cadence with film-based sources and plenty of motion resolution (1,000 lines) with video-based sources. The TV achieved both results with a Picture Clarity setting of Custom with Blur Reduction at 10 and Judder Reduction at 0, so if I had this TV I’d “set it and forget it” right there. Note that Filmmaker Mode’s default setting is to turn Picture Clarity off, which results in less motion resolution, but you can adjust it to taste.
You can also add more smoothing or soap opera effect by increasing Judder Reduction or choosing Auto instead of Custom. Meanwhile the LED Clear Motion option makes motion even sharper with the help of black frame insertion, at the expense of flicker and a dimmer image.
Samsung continues its tradition of excellent input lag in game mode with a score just over 14 milliseconds with both 1080p and 4K HDR sources.
Uniformity: With demanding, full-field test patterns the Q80T’s screen was quite uniform, with more-even lighting from edge to edge than the Vizio, whose sides looked slightly dark, and slightly less-even lighting than the TCL. With program material I saw the same minor issue on the Vizio while the others were very similar (note that uniformity can vary from sample to sample). From off-angle the Samsung was the best LCD TV I’ve tested, maintaining color fidelity, brightness and contrast better than the others.
HDR and 4K video: With high dynamic range sources the differences between the four TVs became more apparent, and the Vizio and TCL looked slightly better than the Sony and the Samsung overall. The Q80T’s highlights appeared a bit dimmer than the others, including the Sony, while its black levels were lighter and less realistic than the TCL and Vizio, it’s contrast did beat the Sony’s.
Watching the Spears and Munsil HDR benchmark’s test montage, the ferris wheel at night (4:51) was a good example, with a slightly gray-blue cast to the sky, and less pop in the lights on the Q80T. It still looked great, with plenty of punch and contrast I expect from HDR, but next to the TCL and Vizio it didn’t convey quite the same sense of realism — although it looked better overall then the Sony.
Brighter scenes, like the closeups of flowers and insects (3:26), showed less of a difference but the Samsung still appeared very slightly dimmer than the TCL and Vizio, an impression backed up by spot measurements of my light meter. Colors were crisp and vibrant, however, and the orange of the monarch butterfly for example appeared a bit deeper and more saturated than the TCL, if not quite as powerful as the Vizio.
The Samsung and Sony had one advantage during the montage however: they were slightly cleaner than the TCL and Vizio in the first fade up from black to a bright sky. The latter two showed faint, subtle banding in the sky as the image brightened, while the two “S” TVs didn’t.
Another advantage: The Q80T was the best among the three at controlling blooming, so stray illumination wasn’t an issue even in difficult mixed bright-and-dark scenes. One major reason, I suspect, was its less-aggressive brightness compared to the more blooming-prone TCL and Vizio.
Switching over to Parasite in HDR, the Samsung’s image held up better than before thanks to its ability to control blooming and maintain black levels (at the expense of brightness). During the dark Chapter 4 car ride, for example, the Q80T’s black levels were darkest and it showed less stray illumination in the passing streetlights. On the other hand those lights and other bright spots were more brilliant on the TCL and Vizio, and both exposed more shadow detail than the Samsung — while the Sony had the best shadow detail and the worst contrast. I still ended up preferring the TCL and Vizio overall, but the Samsung was much closer.
In brighter scenes where blooming is less visible the superior light output of the other TVs shined gave them more characteristic HDR punch, particularly in highlights like the sun as TK approaches the house in Chapter 3. The Samsung still looked brilliant, saturated and impressive, but the TCL and Vizio looked just a notch more-so in my side-by-side comparison.
Geek Box
Test Result Score Black luminance (0%) 0.003 Good Peak white luminance (SDR) 664 Good Avg. gamma (10-100%) 2.22 Good Avg. grayscale error (10-100%) 0.64 Good Dark gray error (30%) 0.90 Good Bright gray error (80%) 1.37 Good Avg. color checker error 2.70 Good Avg. saturation sweeps error 2.01 Good Avg. color error 1.29 Good Red error 1.34 Good Green error 0.59 Good Blue error 1.13 Good Cyan error 1.38 Good Magenta error 1.61 Good Yellow error 1.70 Good 1080p/24 Cadence (IAL) Pass Good Motion resolution (max) 1000 Good Motion resolution (dejudder off) 1000 Good Input lag (Game mode) 20.77 Good HDR10 Black luminance (0%) 0.005 Good Peak white luminance (10% win) 1243 Good Gamut % UHDA/P3 (CIE 1976) 91.85 Average ColorMatch HDR error 5.52 Poor Avg. color checker error 2.65 Good Input lag (Game mode, 4K HDR) 20.37 Good
Samsung QN65Q80T CNET revie… by David Katzmaier
Portrait Displays Calman calibration software was used in this review.
0 notes