#obd tool
Explore tagged Tumblr posts
Visit Tumblr Blog
Explore Tumblr blogs with no restrictions, modern design and the best experience.
Last Seen Tumblr Blogs


Fun Fact
China blocked Tumblr because of pornography and censorship problems in 2013.
Video
youtube
OBD Car Diagnostic Tool | MUCAR CDE900 Pro OBD2 Scanner
#youtube#mucar cde900 pro obd2 scanner#obd car diagnostic tool#car engine diagnostic tool#scan tool#scan tool for car#scan tool review#scan tool diagnostic#car scanner#diagnostic car scanner#diagnostic car tool#mucar#CDE900#obd2 scanner
2 notes
·
View notes
Text
The importance of computer-generated diagnostic testing for your Renault vehicle
Keeping your Renault in optimal condition has become relatively easier with the help of advanced computer-generated diagnostics. This advanced technology helps mechanics identify and fix issues with your car quickly and accurately. Your Renault has an OBD-II port, which is usually found under the dashboard. Connecting a diagnostic scanner to this port lets our mechanics read diagnostic trouble…
#Accurate diagnostic testing for Renault engine performance#Advanced computer diagnostic testing for Renault vehicles#Benefits of computer diagnostics for Renault cars#car engine repair#car repair#Car service#car service center melbourne#car tips#Emission and performance checks with Renault diagnostics#How computer-generated diagnostics work in Renault vehicles#How long does a Renault computer diagnostic test take?#Importance of OBD-II port in Renault diagnostic testing#Prevent costly repairs with early Renault diagnostics#Quick and accurate Renault diagnostic testing#Renault computer diagnostics for transmission issues#Renault mechanic near me#Renault service Centre Melbourne#Renault service centre with advanced diagnostic tools#Renault service Melbourne#Routine Renault maintenance with diagnostic testing#Specialized Renault diagnostic tools and trained mechanics#Why choose our Renault service centre for diagnostics?
0 notes
Text
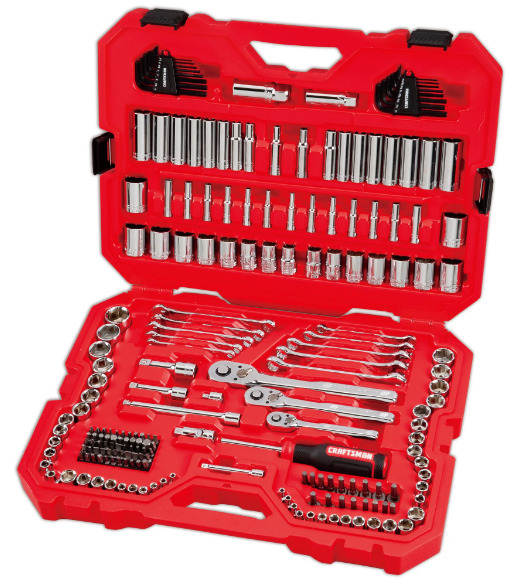
These Are The Essential Tools That Every DIY Mechanic Should Have
Having a basic set of tools for a DIY mechanic is essential. In this article I'll try to give the most comprehensive list I can think of at least for basic tools.
Even if you’re not a seasoned ASE certified mechanic and only do occasional work on your vehicle, there’s still plenty of tools that you should own. You’d be surprised at just how useful some tools are at things around the house and not just for working on a car. In this article I’m going to try to go through a comprehensive list of tools that every DIY mechanic should have. Now, I already know…
View On WordPress
#Adaptors#Auto Maintenance#automotive#car-maintenance#Creepers#Extension#Jack#Jack Stand#OBD II Scanner#Ratchet#Screwdrivers#Socket#Tools#Torx Bits#vehicle-maintenance#Wrenches
1 note
·
View note
Text
How to change a car battery
The car battery is an essential component of your car’s electrical system, and it powers everything from the starter motor to the headlights. Over time, car batteries can lose their charge or fail completely, and it’s important to know how to change them safely and correctly. Here’s how to change a car battery: Gather your tools: To change a car battery, you will need a few basic tools,…

View On WordPress
#automobile#automotive#Automotive battery#Automotive Electrical#automotive electrician#Automotive Repair#automotive workshop#battery#Car battery#charging system#Fix#mechanic#mechanic auto#obd#Tools#vehicle
0 notes
Text
Become A Distributor | OBD X BOX Distributors | Code Reader
More than just a scanner. OBD X BOX Technicians tool. Selective OBD Code Deletion. Limp Mode to Go Mode. For Industry Professional. Contact Us Now.
#obd x box#obd scan tools#obd code deleter#on board diagnostics#obd selective code deleter#limp mode
0 notes
Text
CAR DIAGNOSTIC TOOLS 2023
An automotive professional diagnostic tool is a device used to identify mechanical or electronic problems in a vehicle. It generally connects to the vehicle's OBD2 (On-Board Diagnostics) port to read trouble codes and display live data. Professional diagnostic tools can support multiple OBD2 protocols and can be used to diagnose issues with a vehicle's mechanical, electrical, and electronic systems.
#mercedes w 203 battery replacement#w203#hm203-6#hm203-7#p0171 w203#nexpeak a203#mercedes w203#w203 abs light on#w203 diagnostic#where is w203 obd#w203 abs light off#playstation 4 f203#p0171 mercedes w203#mercedes w203 p0413#w203 airbag light on#w203 engine light on#w203 diagnostic tool#w203 airbag light off#w203 engine light off#w203 secondary air pump#o2 sensor mercedes w203#w203 air injection system#climate control on the w203
0 notes
Text

Highest Quality Tools At The Best Price With In-house Technical Support
Shop in confidence knowing that all of our tools are backed by Australian support and warranty. Premium Diagnostics provide you the highest quality tools at the best price with in-house technical support and a one year factory warranty Launch - Officially the largest scan tool manufacturer in the world!
0 notes
Text
Engine Repair Instruction Full Guide
Engines are the heart of any vehicle, powering everything from your daily commute to long road trips. Knowing how to repair an engine can be a game-changer, whether you're an enthusiast who loves getting your hands dirty or someone looking to save money on mechanic bills. This guide will walk you through the entire process of engine repair, from diagnosing problems to reassembling your engine and ensuring it runs smoothly.

Understanding the Basics of an Engine
Before diving into the repair process, it’s crucial to understand how an engine works. Most vehicles use an internal combustion engine, which combines fuel and air, ignites it, and transforms that explosion into mechanical energy.
Components of an Internal Combustion Engine
The main components include:
Cylinder Block: The engine's core where combustion occurs.
Cylinder Head: Houses the valves and spark plugs.
Pistons: Move up and down to create the force needed to turn the crankshaft.
Crankshaft: Converts the pistons' up-and-down movement into rotational motion.
Camshaft: Controls the opening and closing of the valves.
Valves: Regulate the flow of fuel and air into the engine and exhaust gases out.
How an Engine Works: A Simple Explanation
An engine works by pulling in a mixture of air and fuel, compressing it, igniting it with a spark (in gasoline engines), and then expelling the exhaust gases. This cycle—intake, compression, power, and exhaust—happens in each cylinder and repeats hundreds of times per minute.
Tools and Equipment Needed for Engine Repair

Whether you're performing a basic repair or diving into more complex work, having the right tools is essential.
Essential Tools for Basic Repairs
Socket Set: For removing and tightening bolts.
Wrenches: Different sizes for various engine parts.
Screwdrivers: Flathead and Phillips for screws and clips.
Pliers: For handling wires and small parts.
Torque Wrench: Ensures bolts are tightened to the correct specifications.
Specialized Equipment for Advanced Engine Work
Engine Hoist: For removing the engine from the vehicle.
Cylinder Hone: Prepares cylinders for new piston rings.
Compression Tester: Checks the health of each cylinder.
OBD-II Scanner: Diagnoses engine codes and issues.
Safety Gear and Precautions
Gloves: Protect your hands from cuts and chemicals.
Safety Glasses: Shield your eyes from debris.
Work Boots: Offer protection against heavy parts or tools.
Diagnosing Engine Problems
Accurately diagnosing engine problems is the first step in any repair process. Understanding the symptoms can save time and prevent unnecessary work.
Common Symptoms of Engine Issues

Check Engine Light: Indicates a problem detected by the car's computer.
Strange Noises: Knocking, tapping, or grinding sounds can signal internal damage.
Excessive Smoke: Blue smoke might mean burning oil, while white could suggest a coolant leak.
Loss of Power: Often linked to fuel or air delivery issues.
Step-by-Step Diagnostic Process
Listen and Observe: Note any unusual sounds, smells, or behaviors.
Check Engine Light Codes: Use an OBD-II scanner to retrieve error codes.
Perform Compression Test: Assesses the health of your engine’s cylinders.
Inspect Fluids: Look for contamination or leaks in oil, coolant, and other fluids.
Step-by-Step Guide to Reassembly
Prepare Your Workspace: Ensure that your workspace is clean, organized, and well-lit. Lay out all the parts and tools you'll need in the order of reassembly. Keep the engine manual handy for specific torque specs and sequences.
Install the Crankshaft: Place the crankshaft back into the engine block, ensuring it is seated correctly. Use assembly lube on the main bearings to prevent damage during the initial startup. Torque the main caps to the manufacturer's specifications.
Insert the Pistons: Install the pistons and connecting rods. Be sure to align the piston rings correctly and use a ring compressor to insert the pistons into the cylinder bore. Attach the connecting rods to the crankshaft and torque the rod bolts to spec.
Install the Camshaft and Timing Components: If your engine uses a timing chain or belt, install it according to the timing marks on the camshaft and crankshaft gears. This step is crucial for ensuring the engine's valves open and close at the correct times.
Attach the Cylinder Head: Place the cylinder head gasket on the engine block, followed by the cylinder head. Torque the head bolts in the correct sequence and to the proper specifications. This ensures a good seal and prevents head gasket failure.
Install Valves, Lifters, and Pushrods: If applicable, install the engine's valves, lifters, and pushrods. Make sure they are properly aligned and that the lifters are seated correctly in their bores.
Reassemble the Valve Train: Install the rocker arms and adjust the valve lash according to the engine manual. Proper valve lash is critical for engine performance and longevity.
Reattach External Components: Begin reattaching external components like the water pump, oil pump, timing cover, oil pan, and intake manifold. Replace any gaskets and seals during this process to prevent leaks.
Reconnect the Fuel and Ignition Systems: Reinstall the fuel injectors, spark plugs, and ignition wires. Ensure all electrical connections are secure and properly routed to avoid short circuits or malfunctions.
Final Checks: Before moving on, double-check all connections, bolts, and components. Make sure nothing is left loose or unconnected.
Applying Proper Torques and Specifications
Every engine has specific torque settings for each bolt. Over-tightening can strip threads or warp components, while under-tightening can lead to leaks or parts coming loose. Use a torque wrench and follow the manufacturer's specifications closely.
Double-Checking Work for Mistakes

It's easy to miss a step or make a mistake during reassembly. Double-check your work:
Ensure all components are installed in the correct order.
Verify all bolts are torqued to spec.
Check for any leftover parts or tools in the engine bay.
Testing the Repaired Engine
With the engine reassembled, the next step is testing it to ensure everything is functioning properly.
Preparing for Initial Startup
Before starting the engine, perform a few preparatory checks:
Prime the oil system: This can be done by cranking the engine with the fuel system disabled until oil pressure is achieved.
Fill the engine with fresh oil and coolant.
Double-check all electrical connections and fuel lines.
Checking for Leaks and Unusual Noises

Once you start the engine, pay close attention to any unusual noises or leaks:
Oil Leaks: Check around the oil pan, valve covers, and front and rear seals.
Coolant Leaks: Inspect the radiator, hoses, and water pump area.
Unusual Noises: Listen for knocking, tapping, or whining sounds, which could indicate an issue with the timing components or internal parts.
Fine-Tuning and Adjusting the Engine
After the initial startup, the engine may require some adjustments:
Timing Adjustments: Use a timing light to set the ignition timing.
Idle Speed: Adjust the idle speed according to the manufacturer’s specifications.
Fuel Mixture: On carbureted engines, you may need to adjust the air-fuel mixture for optimal performance.
Common Engine Repair Mistakes to Avoid
Engine repair is complex, and mistakes can be costly. Here are some common errors to watch out for:
Misalignments and Incorrect Torques
Misaligned timing components can lead to poor engine performance or damage.
Incorrectly torqued bolts can cause leaks, parts failure, or engine damage.
Overlooking Small Parts and Connections
Small parts like washers, clips, or gaskets are easy to overlook but crucial for preventing leaks and ensuring proper function.
Electrical connections: Double-check that all sensors and connectors are properly seated.
Skipping Diagnostic Steps
Skipping steps in the diagnostic process can lead to unnecessary repairs or missed issues. Always perform thorough diagnostics before and after repairs.
Maintaining Your Engine After Repair
Proper maintenance is key to ensuring the longevity of your newly repaired engine.
Importance of Regular Maintenance
Regular maintenance, such as oil changes, air filter replacements, and coolant checks, is essential to keep your engine running smoothly and prevent future problems.

Tips for Extending Engine Life
Use high-quality oil and filters.
Avoid hard driving until the engine is fully warmed up.
Regularly check and maintain fluid levels.
When to Seek Professional Help
While DIY repairs can save money, some issues are best left to professionals, especially if you encounter complex problems or lack the necessary tools and expertise.
Dealing with Advanced Engine Repairs
Some engine repairs are too complex for the average DIYer. Here's when to consider professional help:
Understanding When It’s Beyond DIY
Extensive internal damage: Cracked blocks or severely worn bearings usually require professional expertise.
Advanced electrical issues: Problems with engine management systems often need specialized diagnostic tools and knowledge.
Overview of Complex Repairs: Timing Belt, Engine Rebuilds
Timing Belt Replacement: Involves precise alignment of engine components and is critical for preventing engine damage.
Engine Rebuilds: This is a time-consuming and complex task that often requires professional machining and specialized tools.
Working with a Professional Mechanic
When the repair is beyond your capabilities, working with a professional mechanic ensures that the job is done correctly and safely. They have the tools, experience, and resources to handle complex engine repairs.
Cost Considerations in Engine Repair
Engine repair costs can vary widely depending on the scope of work, parts required, and whether you do it yourself or hire a professional.
Estimating Costs for DIY vs Professional Repair
DIY Repairs: Typically cost less but require an investment in tools and time.
Professional Repairs: Can be expensive but come with the assurance of experience and often a warranty.
Budgeting for Tools, Parts, and Time
Consider the cost of any special tools or equipment you might need, as well as the cost of replacement parts. Factor in the time required, especially if the vehicle is your daily driver.
Understanding the Cost of Mistakes
Mistakes can be costly. Stripping a bolt, breaking a part, or incorrect assembly can lead to additional expenses. Always weigh the risks before starting a major repair.
Conclusion
Recap of Key Points
Engine repair is a rewarding but challenging task that requires careful planning, the right tools, and attention to detail. Whether you’re fixing a minor issue or performing a complete rebuild, following the correct procedures is crucial for success.
Encouragement for DIY Enthusiasts
For those who love working on their vehicles, engine repair can be a satisfying and cost-effective way to maintain your car. With patience and persistence, even complex repairs can be tackled with confidence.
Final Thoughts on Engine Repair
Always approach engine repair with a clear plan and the right resources. Don’t hesitate to seek professional help when needed, and remember that regular maintenance is the best way to avoid major repairs.
FAQs
How do I know if my engine needs repair?
Common signs include unusual noises, excessive smoke, loss of power, and a check engine light. Regular diagnostics can help catch issues early.
Can I repair my engine without professional help?
Basic repairs like replacing gaskets or sensors can often be done at home with the right tools. However, more complex tasks like engine rebuilds may require professional expertise.
What are the signs of a failing engine?
Signs include knocking noises, excessive oil consumption, smoke from the exhaust, and persistent overheating.
How long does it take to repair an engine?
The time required varies greatly depending on the complexity of the repair. Simple repairs might take a few hours, while a full rebuild could take several days or longer.
2 notes
·
View notes
Text
From Engine to Electronics: Proper Diagnostic Techniques for Resolving Maserati Problems

Maserati, the epitome of Italian luxury and performance, is renowned for its stylish design and high-performance capabilities. However, like any high-end vehicle, Maserati can encounter a range of issues, from engine troubles to electronic malfunctions. Proper diagnostics is crucial in maintaining the health and performance of these sophisticated machines. This article will guide you through the common problems Maserati face and the proper diagnostic techniques to resolve them.
Common Maserati Problems
1. Engine Issues
Maserati engines are marvels of engineering, but they can develop problems over time. Common engine issues include:
Misfires and Rough Idling: This can be caused by faulty spark plugs, ignition coils, or fuel injectors.
Overheating: Often due to a malfunctioning cooling system, such as a failed water pump or a clogged radiator.
Oil Leaks: These can originate from various seals and gaskets, leading to low oil levels and potential engine damage.
2. Transmission Problems
Maserati transmissions are designed for performance but can experience:
Slipping Gears: This could indicate worn-out clutch plates or issues with the transmission fluid.
Delayed Shifts: Often due to problems with the transmission control module or low fluid levels.
3. Electrical and Electronic Failures
Modern Maseratis are equipped with advanced electronics that can sometimes fail, including:
Dashboard Warning Lights: These can indicate issues ranging from simple sensor failures to serious engine problems.
Infotainment System Glitches: Problems with the touch screen, navigation, or audio system are not uncommon.
Diagnostic Techniques
1. OBD-II Scanner
The On-Board Diagnostics II (OBD-II) scanner is an essential tool for diagnosing Maserati problems. It can read error codes from the car's computer, providing insight into various issues.
How to Use: Connect the OBD-II scanner to the port located under the dashboard. Turn on the ignition and follow the scanner’s instructions to retrieve the error codes.
Interpreting Codes: Each code corresponds to a specific problem. For example, P0300 indicates a random/multiple cylinder misfire, while P0128 points to a coolant thermostat issue.
2. Visual Inspection
A thorough visual inspection can reveal obvious issues such as leaks, damaged components, or worn-out parts.
Engine Bay: Check for oil leaks, loose connections, and the condition of belts and hoses.
Undercarriage: Inspect for fluid leaks and damage to the exhaust system.
Electrical Connections: Look for corroded or loose battery terminals and wiring issues.
3. Multimeter Testing
A multimeter is useful for diagnosing electrical issues in a Maserati.
Battery Voltage: Measure the voltage across the battery terminals. A healthy battery should read around 12.6 volts when the car is off and around 14 volts when running.
Sensor Checks: Test various sensors, such as the oxygen sensor or mass airflow sensor, to ensure they are functioning correctly.
4. Compression Test
A compression test helps diagnose internal engine problems such as worn piston rings or valves.
Procedure: Remove the spark plugs and insert a compression gauge into each cylinder. Crank the engine and note the pressure readings. Low or uneven readings indicate internal engine issues.
5. Professional Diagnostic Tools
Maserati dealerships and specialized repair shops use advanced diagnostic tools that can access proprietary systems and provide more detailed information.
SD2/SD3 Diagnostic Systems: These are specialized tools used by Maserati technicians to diagnose and program vehicle systems accurately.
Diagnostic Software: Tools like Xentry or PIWIS can interface with Maserati's electronic systems for comprehensive diagnostics.
Addressing Common Issues
1. Engine Repairs
Misfires and Rough Idling: Replace faulty spark plugs, ignition coils, or fuel injectors. Regular maintenance and using high-quality fuel can prevent these issues.
Overheating: Ensure the cooling system is functioning correctly by checking the water pump, radiator, and thermostat. Flushing the coolant system periodically is also recommended.
Oil Leaks: Identify the source of the leak and replace the necessary seals or gaskets. Regularly check oil levels and change the oil according to the manufacturer's recommendations.
2. Transmission Solutions
Slipping Gears: Inspect and replace worn clutch plates and ensure the transmission fluid is at the correct level. Consider a fluid change if necessary.
Delayed Shifts: Diagnose and repair issues with the transmission control module or solenoids. Regular transmission servicing can prevent many of these problems.
3. Electrical Fixes
Dashboard Warning Lights: Use an OBD-II scanner to identify and address the underlying issue. Reset the warning lights after repairs are completed.
Infotainment System Glitches: Perform software updates and check for any loose connections or faulty components. In some cases, a complete system reset may be required.
Conclusion
Proper diagnostics are essential for maintaining the performance and reliability of your Maserati. By using the right tools and techniques, you can identify and resolve issues promptly, ensuring your luxury car continues to deliver the driving experience it was designed for. Regular maintenance and timely repairs are key to keeping your Maserati in top condition, from the engine to the sophisticated electronics.
#maserati car#maserati car diagnosis#maserati service center#maserati car maintenance#maserati car mechanic
2 notes
·
View notes
Text
Gm Tech 2 Scanner-TECH 2 Scanner for sale,OEM Vetronix GM Tech 2 Scanner
Buy the best scan tool GM TECH 2 Scanner products and get the best deals at the lowest prices on obd2sales,Vetronix GM Tech2 Diagnostic Scanner Support GM/SAAB/OPEL/SUZUKI/ISUZU/Holden From 1992 to 2014 Years.You can use for OBD scan and Modules Reprogramming .
The Vetronix GM Tech 2 Scanner is the best scan tool used in all GM dealers. Model coverage includes all makes and models of GM vehicles including passenger cars, trucks and vans. GM TECH2 Diagnostic Kit will support Vehicles from 1996 to 2014 year. For GM vehicles before 1996 you will need a Tech1A achieve OEM level functionality.After 2014 year You will need use GM MDI Interface with GDS2 Programmer.
4 notes
·
View notes
Text
Autel IM608 Program Key for BMW CAS4 CAS4+ via OBD
Autel MaxiIM IM608 II can program BMW CAS4 and CAS4+ keys using OBD, without needing to open the ECU box. Remember, a network connection is essential during the whole process.
For instance, let’s consider BMW F30 key programming:
Important Notes:
For CAS4, the procedure for adding a key in case of all keys lost remains the same; ISN retrieval is unnecessary.
For CAS4+ all key lost scenarios, attempt to read the Engine ISN code under ISN code management. If this is not supported, explore alternative methods to acquire the ISN code.
The subsequent steps are identical to adding a key. To determine the CAS system type, access “ECU information.”
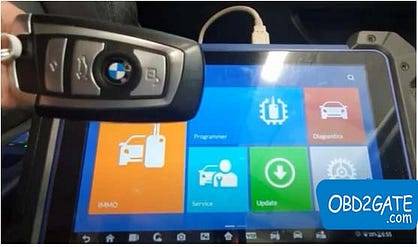
Programming Procedure:
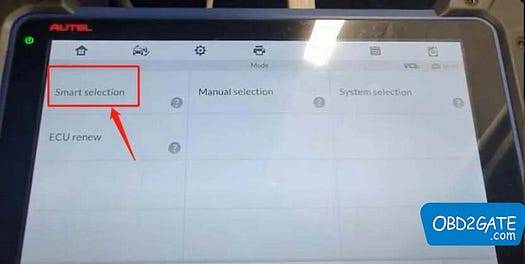
Connect IM608 II to the OBD2 port of your BMW.
Navigate to “BMW” in the device.
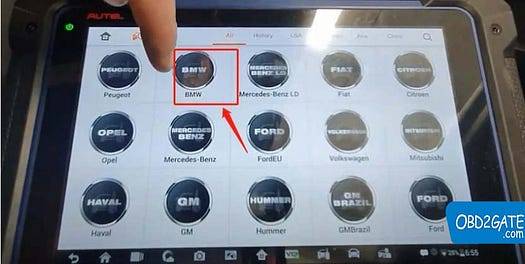
Opt for “Smart Selection.”
Choose “Mini (Europe) > Smart Mode.”
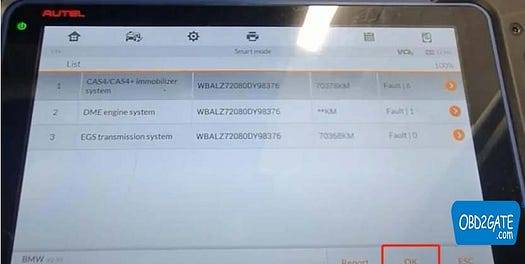
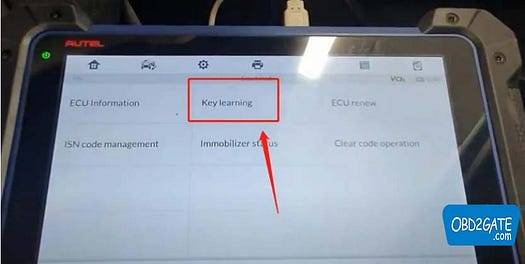
Select “Key Learning�� followed by confirming vehicle information with “OK.”
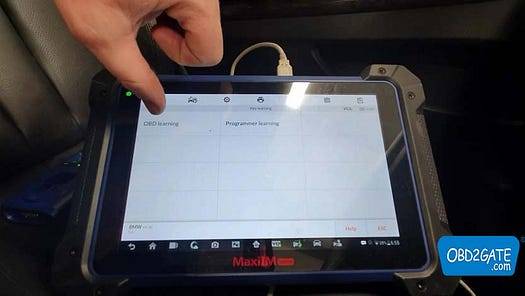
Proceed to “OBD Learning” >read the provided instructions, click ‘OK’
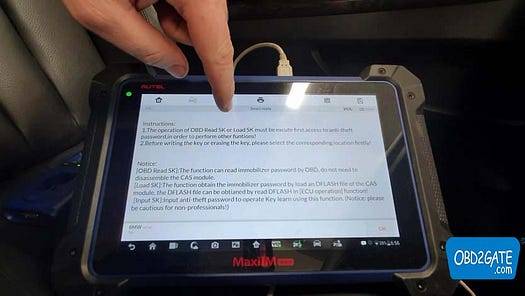
Click “OBD Read SK” on MaxiIM IM608> read notes.
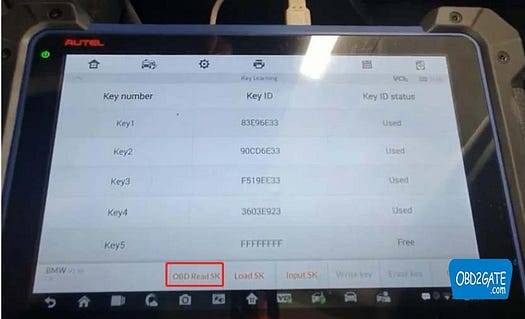

Respond to the question about having a working key with “Yes” or “No.”

Position a working key as close to the start coil as possible.
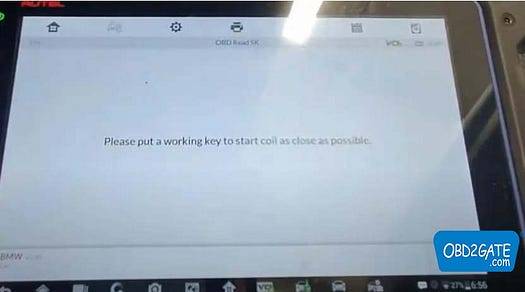
Successful reading of the password.
Pick an empty key position for key writing.
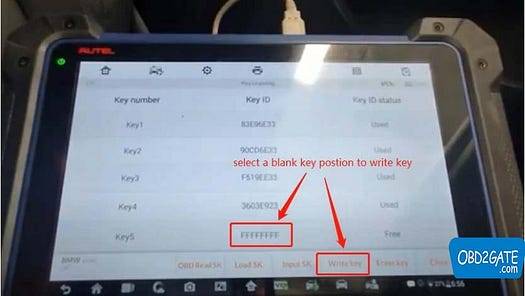
Place the new key near the starting coil. Key frequency: 868MHZ.
The key learning process consists of two steps.

Key writing is completed successfully.
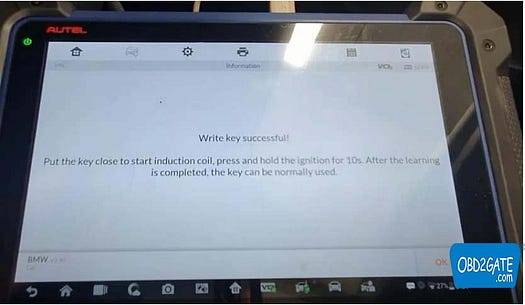
By adhering to the instructions on Autel MaxiIM IM608 II, the entire process will be effortlessly accomplished!
Check Autel im608 pro II price on OBD2GATE.com:
2 notes
·
View notes
Text
obd scan tool
Forum: Land Rover Posted By: PierreJo Post Time: 2024/11/24 at 08:01 AM http://dlvr.it/TGMBHY
0 notes
Text
Top Reasons Why the Check Engine Light Turns on in a Mini Cooper

The check engine light (CEL) in your Mini Cooper is a vital component of your vehicle's onboard diagnostics system. While its illumination might be alarming, it serves as a critical alert to potential issues that could affect your car's performance and longevity. Understanding the top reasons behind this warning can help you address the problem promptly and avoid costly repairs.
1. Oxygen Sensor Failure
The oxygen (O2) sensor measures the level of oxygen in the exhaust gases to ensure optimal fuel-air mixture for combustion. A failing O2 sensor can cause:
Poor fuel economy
Increased emissions
Engine misfires
Solution: Replace the faulty oxygen sensor promptly. Driving with a malfunctioning sensor can lead to further damage to the catalytic converter.
2. Loose or Damaged Gas Cap
One of the simplest yet common triggers for the check engine light is a loose, cracked, or damaged gas cap. This can lead to fuel vapor leakage, impacting your vehicle’s evaporative emissions system.
Solution: Check if the gas cap is securely tightened. If damaged, replace it with a compatible one to resolve the issue.
3. Catalytic Converter Problems
The catalytic converter reduces harmful emissions by converting exhaust gases into less toxic substances. Common issues include clogging or damage, often caused by neglected maintenance or prolonged driving with engine misfires.
Symptoms:
Decreased fuel efficiency
Sulfur-like odor (rotten egg smell)
Poor acceleration
Solution: Have the catalytic converter inspected and repaired or replaced by a professional mechanic.
4. Faulty Ignition Coils or Spark Plugs
Faulty ignition coils or worn-out spark plugs can lead to incomplete combustion, causing engine misfires and triggering the CEL.
Symptoms:
Rough idling
Engine hesitation or loss of power
Poor fuel economy
Solution: Replace spark plugs and ignition coils as per the manufacturer's recommendations or when they show signs of wear.
5. Mass Airflow Sensor (MAF) Issues
The mass airflow sensor monitors the amount of air entering the engine to adjust the fuel injection system accordingly. A faulty MAF sensor can result in:
Reduced fuel efficiency
Difficulty starting the car
Stalling during idle
Solution: Clean or replace the MAF sensor and check for associated air intake system issues.
6. Vacuum Leaks
Your Mini Cooper’s engine relies on a network of vacuum lines for various functions, such as operating the brake booster and controlling emissions. Cracks or loose connections in these lines can trigger the CEL.
Symptoms:
Rough idling
Hissing noise under the hood
Decreased engine performance
Solution: Inspect vacuum hoses and connections for damage and have them repaired or replaced as needed.
7. Malfunctioning Exhaust Gas Recirculation (EGR) System
The EGR system reduces nitrogen oxide emissions by recirculating a portion of the exhaust gases into the engine. A clogged EGR valve can affect engine performance and trigger the CEL.
Symptoms:
Increased emissions
Rough engine performance
Reduced fuel efficiency
Solution: Clean or replace the EGR valve and inspect the related components.
8. Faulty Sensors or Wiring Issues
Modern Mini Coopers rely on a network of sensors and electronic components to ensure proper functioning. Faulty sensors (such as the crankshaft position sensor) or damaged wiring can disrupt communication with the engine control module (ECM).
Solution: Use diagnostic tools to identify the problematic sensor or wiring issue and replace or repair it.
Diagnosing the Problem
When the check engine light comes on, it's essential to address the issue promptly. Here’s how to proceed:
Check for Obvious Issues: Inspect the gas cap, visible wires, and connections.
Scan for Trouble Codes: Use an OBD-II scanner to retrieve diagnostic trouble codes (DTCs) from the ECM.
Consult a Professional: If the issue isn’t clear, visit a certified mechanic experienced in Mini Cooper repairs for a thorough diagnosis.
Preventive Maintenance Tips
Schedule regular engine tune-ups and inspections.
Replace components like spark plugs, filters, and sensors at recommended intervals.
Use high-quality fuel and follow the manufacturer’s guidelines for oil changes and other services.
By understanding the common reasons for the check engine light in your Mini Cooper, you can take proactive steps to maintain its performance and reliability. Prompt attention to these issues not only extends your car’s lifespan but also ensures a smoother and more enjoyable driving experience.
#mini cooper#mini cooper check engine light#mini cooper service center#mini cooper maintenance#mini cooper mechanic#mini cooper services
0 notes
Text
Technicians Tool Kit | OBD X BOX
Equip yourself with the Technicians Tool Kit from OBD X BOX. This comprehensive kit includes high-quality diagnostic tools and accessories, designed …
#TechnicianTools#AutoRepair#CarDiagnostics#OBDTools#MechanicLife#AutoTech#CarRepairKit#DiagnosticTools#OBD2#TechToolKit#AutoMechanic#VehicleMaintenance#FixAssist#OBDXBOX#MechanicsToolBox
0 notes
Text
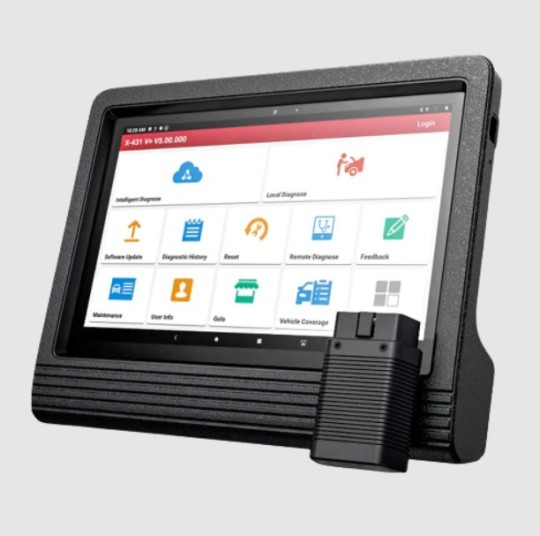
Launch X431 Pro V + Diagnostic Tool For 12v / 24v Professional Scan Tool
LAUNCH X431 V+, the latest high-end handheld vehicle fault diagnostic tool developed by LAUNCH, featuring fully updated software and powerful design of widespread vehicle coverage, abundant professional diagnostic features and exceptional hardware configuration etc, is the ideal scanner for professional mechanics and auto repair stores to perform all-around fixes and comprehensive tests. https://premium-diagnostics.com.au/collections
0 notes
Text
Top Ford Diagnostic Tools for Accurate Vehicle Analysis
Discover premium Ford diagnostic tools at GlobalDiag.co.uk. These advanced tools provide accurate diagnostics for Ford vehicles, helping you identify and fix issues efficiently. Compatible with a wide range of models, they support functions like ECU reading, DTC clearing, and real-time data monitoring. Whether you're a professional mechanic or a DIY enthusiast, our tools are user-friendly and deliver dealership-level precision. Enhance your car maintenance routine with reliable diagnostic equipment tailored for Ford vehicles. Explore our collection today and ensure optimal performance for your car. Visit GlobalDiag.co.uk for affordable prices and fast shipping on Ford diagnostic tools.
0 notes