#OBD II Scanner
Explore tagged Tumblr posts
Visit Tumblr Blog
Explore Tumblr blogs with no restrictions, modern design and the best experience.
Last Seen Tumblr Blogs


Fun Fact
Tumblr has been providing a Korean-language service since 2013.
Text
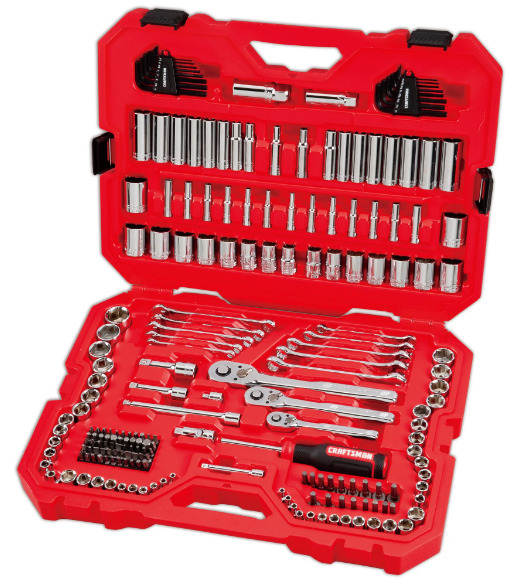
These Are The Essential Tools That Every DIY Mechanic Should Have
Having a basic set of tools for a DIY mechanic is essential. In this article I'll try to give the most comprehensive list I can think of at least for basic tools.
Even if you’re not a seasoned ASE certified mechanic and only do occasional work on your vehicle, there’s still plenty of tools that you should own. You’d be surprised at just how useful some tools are at things around the house and not just for working on a car. In this article I’m going to try to go through a comprehensive list of tools that every DIY mechanic should have. Now, I already know…
View On WordPress
#Adaptors#Auto Maintenance#automotive#car-maintenance#Creepers#Extension#Jack#Jack Stand#OBD II Scanner#Ratchet#Screwdrivers#Socket#Tools#Torx Bits#vehicle-maintenance#Wrenches
1 note
·
View note
Text
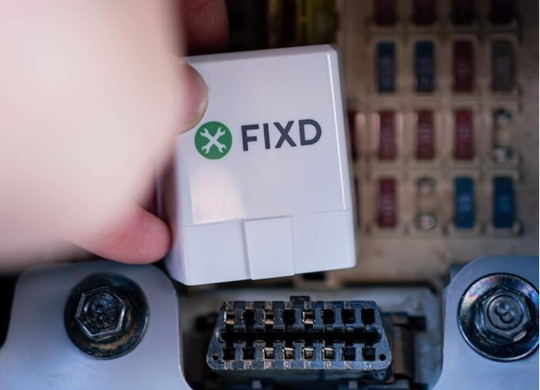
Bluetooth OBD2 Scanner and Car Code Reader for iPhone & Android
The FIXD car scanner and OBD app instantly translates 7000+ engine fault codes into plain English on your phone. Wireless Bluetooth connection. Set up in minutes. No car knowledge needed.
2 notes
·
View notes
Text
Ancel AD310 Classic Enhanced Universal OBD II Scanner – Your Essential Car Diagnostic Tool
Meta Description: Quickly diagnose and troubleshoot car issues with the Ancel AD310 Classic Enhanced Universal OBD II Scanner. This user-friendly and reliable scanner provides accurate readings to keep your vehicle in top shape. Keeping your car in peak condition is crucial for both safety and performance. The Ancel AD310 Classic Enhanced Universal OBD II Scanner is an invaluable tool that gives…
0 notes
Note
What are the Autobots' opinions on OBD-II Scanners?
Sometimes desperate times call for desperate measures if you don’t have a medic.
#transformers#transformers multiverse#multiverse#earthspark#transformers earthspark#transformers roleplay#tf multiverse newsletter
5 notes
·
View notes
Text
7 Incredibly Useful Check Engine Light Tips for Small Businesses
For small businesses that rely on vehicles for daily operations, the check engine light (CEL) can be a frustrating and costly issue. Whether you own a fleet of delivery vans, rideshare vehicles, or service trucks, understanding and addressing the check engine light effectively can save time and money. If you're searching for "car repair near me" or "auto repair near me," here are seven useful tips to keep your business vehicles running smoothly and minimize downtime.
1. Don’t Ignore the Check Engine Light (CEL)
Many small business owners make the mistake of ignoring the check engine light, hoping it will turn off on its own. However, the CEL is an early warning system for potential problems that can escalate if left unaddressed. If your business vehicles are frequently on the road, timely action is essential to avoid expensive repairs and unexpected breakdowns.
2. Use a Diagnostic Tool for Quick Answers
Investing in an OBD-II scanner can help you quickly determine the cause of the CEL. These scanners provide error codes that indicate issues with the engine, transmission, or emissions system. If you’re unfamiliar with these codes, a professional mechanic in Vancouver can interpret them and recommend the necessary repairs.
3. Check for Common Issues First
Before rushing to a repair shop, check for simple causes like a loose or damaged gas cap, which can trigger the CEL. Ensuring your gas cap is tightly sealed can sometimes turn off the warning light without needing further repairs. If the light remains on, it’s time to seek professional assistance.

4. Find a Reliable Auto Repair Shop
Finding a trusted car repair near me or auto repair near me can save your business significant money in the long run. Regular maintenance and prompt repairs prevent minor issues from turning into costly breakdowns. If you're in the Vancouver area, look for a specialized check engine light repair Vancouver service to diagnose and fix the issue efficiently.
5. Keep Up with Regular Maintenance
Routine maintenance, such as oil changes, spark plug replacements, and air filter checks, can prevent the CEL from coming on. Small businesses should establish a maintenance schedule to keep their vehicles in peak condition. Partnering with a reliable mechanic in Vancouver can help keep track of necessary services.
6. Act Fast if the Light is Flashing
A steady CEL typically indicates a less urgent issue, but a flashing check engine light signals a severe problem that requires immediate attention. Driving with a flashing CEL can cause severe engine damage, potentially leading to costly repairs or even complete engine failure.
7. Consider Professional Check Engine Light Repair in Vancouver
If your business is based in Vancouver, seeking a professional check engine light repair Vancouver service can save you time and ensure accurate diagnostics. Many repair shops offer quick turnaround times, helping small businesses minimize vehicle downtime and keep operations running smoothly.
Conclusion
For small businesses that rely on vehicles, the check engine light should never be ignored. Whether it's a minor issue like a loose gas cap or a more serious engine malfunction, addressing the CEL promptly can prevent costly repairs and disruptions. Searching for auto repair near me or mechanic Vancouver can help you find the right professional for the job. Regular maintenance and professional diagnostics are key to keeping your business vehicles in top shape and ensuring long-term reliability.
#Check engine light#check engine light repair vancouver#car repair near me#auto repair near me#Mechanic Vancouver
2 notes
·
View notes
Text
Engine Repair Instruction Full Guide
Engines are the heart of any vehicle, powering everything from your daily commute to long road trips. Knowing how to repair an engine can be a game-changer, whether you're an enthusiast who loves getting your hands dirty or someone looking to save money on mechanic bills. This guide will walk you through the entire process of engine repair, from diagnosing problems to reassembling your engine and ensuring it runs smoothly.

Understanding the Basics of an Engine
Before diving into the repair process, it’s crucial to understand how an engine works. Most vehicles use an internal combustion engine, which combines fuel and air, ignites it, and transforms that explosion into mechanical energy.
Components of an Internal Combustion Engine
The main components include:
Cylinder Block: The engine's core where combustion occurs.
Cylinder Head: Houses the valves and spark plugs.
Pistons: Move up and down to create the force needed to turn the crankshaft.
Crankshaft: Converts the pistons' up-and-down movement into rotational motion.
Camshaft: Controls the opening and closing of the valves.
Valves: Regulate the flow of fuel and air into the engine and exhaust gases out.
How an Engine Works: A Simple Explanation
An engine works by pulling in a mixture of air and fuel, compressing it, igniting it with a spark (in gasoline engines), and then expelling the exhaust gases. This cycle—intake, compression, power, and exhaust—happens in each cylinder and repeats hundreds of times per minute.
Tools and Equipment Needed for Engine Repair

Whether you're performing a basic repair or diving into more complex work, having the right tools is essential.
Essential Tools for Basic Repairs
Socket Set: For removing and tightening bolts.
Wrenches: Different sizes for various engine parts.
Screwdrivers: Flathead and Phillips for screws and clips.
Pliers: For handling wires and small parts.
Torque Wrench: Ensures bolts are tightened to the correct specifications.
Specialized Equipment for Advanced Engine Work
Engine Hoist: For removing the engine from the vehicle.
Cylinder Hone: Prepares cylinders for new piston rings.
Compression Tester: Checks the health of each cylinder.
OBD-II Scanner: Diagnoses engine codes and issues.
Safety Gear and Precautions
Gloves: Protect your hands from cuts and chemicals.
Safety Glasses: Shield your eyes from debris.
Work Boots: Offer protection against heavy parts or tools.
Diagnosing Engine Problems
Accurately diagnosing engine problems is the first step in any repair process. Understanding the symptoms can save time and prevent unnecessary work.
Common Symptoms of Engine Issues

Check Engine Light: Indicates a problem detected by the car's computer.
Strange Noises: Knocking, tapping, or grinding sounds can signal internal damage.
Excessive Smoke: Blue smoke might mean burning oil, while white could suggest a coolant leak.
Loss of Power: Often linked to fuel or air delivery issues.
Step-by-Step Diagnostic Process
Listen and Observe: Note any unusual sounds, smells, or behaviors.
Check Engine Light Codes: Use an OBD-II scanner to retrieve error codes.
Perform Compression Test: Assesses the health of your engine’s cylinders.
Inspect Fluids: Look for contamination or leaks in oil, coolant, and other fluids.
Step-by-Step Guide to Reassembly
Prepare Your Workspace: Ensure that your workspace is clean, organized, and well-lit. Lay out all the parts and tools you'll need in the order of reassembly. Keep the engine manual handy for specific torque specs and sequences.
Install the Crankshaft: Place the crankshaft back into the engine block, ensuring it is seated correctly. Use assembly lube on the main bearings to prevent damage during the initial startup. Torque the main caps to the manufacturer's specifications.
Insert the Pistons: Install the pistons and connecting rods. Be sure to align the piston rings correctly and use a ring compressor to insert the pistons into the cylinder bore. Attach the connecting rods to the crankshaft and torque the rod bolts to spec.
Install the Camshaft and Timing Components: If your engine uses a timing chain or belt, install it according to the timing marks on the camshaft and crankshaft gears. This step is crucial for ensuring the engine's valves open and close at the correct times.
Attach the Cylinder Head: Place the cylinder head gasket on the engine block, followed by the cylinder head. Torque the head bolts in the correct sequence and to the proper specifications. This ensures a good seal and prevents head gasket failure.
Install Valves, Lifters, and Pushrods: If applicable, install the engine's valves, lifters, and pushrods. Make sure they are properly aligned and that the lifters are seated correctly in their bores.
Reassemble the Valve Train: Install the rocker arms and adjust the valve lash according to the engine manual. Proper valve lash is critical for engine performance and longevity.
Reattach External Components: Begin reattaching external components like the water pump, oil pump, timing cover, oil pan, and intake manifold. Replace any gaskets and seals during this process to prevent leaks.
Reconnect the Fuel and Ignition Systems: Reinstall the fuel injectors, spark plugs, and ignition wires. Ensure all electrical connections are secure and properly routed to avoid short circuits or malfunctions.
Final Checks: Before moving on, double-check all connections, bolts, and components. Make sure nothing is left loose or unconnected.
Applying Proper Torques and Specifications
Every engine has specific torque settings for each bolt. Over-tightening can strip threads or warp components, while under-tightening can lead to leaks or parts coming loose. Use a torque wrench and follow the manufacturer's specifications closely.
Double-Checking Work for Mistakes

It's easy to miss a step or make a mistake during reassembly. Double-check your work:
Ensure all components are installed in the correct order.
Verify all bolts are torqued to spec.
Check for any leftover parts or tools in the engine bay.
Testing the Repaired Engine
With the engine reassembled, the next step is testing it to ensure everything is functioning properly.
Preparing for Initial Startup
Before starting the engine, perform a few preparatory checks:
Prime the oil system: This can be done by cranking the engine with the fuel system disabled until oil pressure is achieved.
Fill the engine with fresh oil and coolant.
Double-check all electrical connections and fuel lines.
Checking for Leaks and Unusual Noises

Once you start the engine, pay close attention to any unusual noises or leaks:
Oil Leaks: Check around the oil pan, valve covers, and front and rear seals.
Coolant Leaks: Inspect the radiator, hoses, and water pump area.
Unusual Noises: Listen for knocking, tapping, or whining sounds, which could indicate an issue with the timing components or internal parts.
Fine-Tuning and Adjusting the Engine
After the initial startup, the engine may require some adjustments:
Timing Adjustments: Use a timing light to set the ignition timing.
Idle Speed: Adjust the idle speed according to the manufacturer’s specifications.
Fuel Mixture: On carbureted engines, you may need to adjust the air-fuel mixture for optimal performance.
Common Engine Repair Mistakes to Avoid
Engine repair is complex, and mistakes can be costly. Here are some common errors to watch out for:
Misalignments and Incorrect Torques
Misaligned timing components can lead to poor engine performance or damage.
Incorrectly torqued bolts can cause leaks, parts failure, or engine damage.
Overlooking Small Parts and Connections
Small parts like washers, clips, or gaskets are easy to overlook but crucial for preventing leaks and ensuring proper function.
Electrical connections: Double-check that all sensors and connectors are properly seated.
Skipping Diagnostic Steps
Skipping steps in the diagnostic process can lead to unnecessary repairs or missed issues. Always perform thorough diagnostics before and after repairs.
Maintaining Your Engine After Repair
Proper maintenance is key to ensuring the longevity of your newly repaired engine.
Importance of Regular Maintenance
Regular maintenance, such as oil changes, air filter replacements, and coolant checks, is essential to keep your engine running smoothly and prevent future problems.

Tips for Extending Engine Life
Use high-quality oil and filters.
Avoid hard driving until the engine is fully warmed up.
Regularly check and maintain fluid levels.
When to Seek Professional Help
While DIY repairs can save money, some issues are best left to professionals, especially if you encounter complex problems or lack the necessary tools and expertise.
Dealing with Advanced Engine Repairs
Some engine repairs are too complex for the average DIYer. Here's when to consider professional help:
Understanding When It’s Beyond DIY
Extensive internal damage: Cracked blocks or severely worn bearings usually require professional expertise.
Advanced electrical issues: Problems with engine management systems often need specialized diagnostic tools and knowledge.
Overview of Complex Repairs: Timing Belt, Engine Rebuilds
Timing Belt Replacement: Involves precise alignment of engine components and is critical for preventing engine damage.
Engine Rebuilds: This is a time-consuming and complex task that often requires professional machining and specialized tools.
Working with a Professional Mechanic
When the repair is beyond your capabilities, working with a professional mechanic ensures that the job is done correctly and safely. They have the tools, experience, and resources to handle complex engine repairs.
Cost Considerations in Engine Repair
Engine repair costs can vary widely depending on the scope of work, parts required, and whether you do it yourself or hire a professional.
Estimating Costs for DIY vs Professional Repair
DIY Repairs: Typically cost less but require an investment in tools and time.
Professional Repairs: Can be expensive but come with the assurance of experience and often a warranty.
Budgeting for Tools, Parts, and Time
Consider the cost of any special tools or equipment you might need, as well as the cost of replacement parts. Factor in the time required, especially if the vehicle is your daily driver.
Understanding the Cost of Mistakes
Mistakes can be costly. Stripping a bolt, breaking a part, or incorrect assembly can lead to additional expenses. Always weigh the risks before starting a major repair.
Conclusion
Recap of Key Points
Engine repair is a rewarding but challenging task that requires careful planning, the right tools, and attention to detail. Whether you’re fixing a minor issue or performing a complete rebuild, following the correct procedures is crucial for success.
Encouragement for DIY Enthusiasts
For those who love working on their vehicles, engine repair can be a satisfying and cost-effective way to maintain your car. With patience and persistence, even complex repairs can be tackled with confidence.
Final Thoughts on Engine Repair
Always approach engine repair with a clear plan and the right resources. Don’t hesitate to seek professional help when needed, and remember that regular maintenance is the best way to avoid major repairs.
FAQs
How do I know if my engine needs repair?
Common signs include unusual noises, excessive smoke, loss of power, and a check engine light. Regular diagnostics can help catch issues early.
Can I repair my engine without professional help?
Basic repairs like replacing gaskets or sensors can often be done at home with the right tools. However, more complex tasks like engine rebuilds may require professional expertise.
What are the signs of a failing engine?
Signs include knocking noises, excessive oil consumption, smoke from the exhaust, and persistent overheating.
How long does it take to repair an engine?
The time required varies greatly depending on the complexity of the repair. Simple repairs might take a few hours, while a full rebuild could take several days or longer.
2 notes
·
View notes
Text
From Engine to Electronics: Proper Diagnostic Techniques for Resolving Maserati Problems

Maserati, the epitome of Italian luxury and performance, is renowned for its stylish design and high-performance capabilities. However, like any high-end vehicle, Maserati can encounter a range of issues, from engine troubles to electronic malfunctions. Proper diagnostics is crucial in maintaining the health and performance of these sophisticated machines. This article will guide you through the common problems Maserati face and the proper diagnostic techniques to resolve them.
Common Maserati Problems
1. Engine Issues
Maserati engines are marvels of engineering, but they can develop problems over time. Common engine issues include:
Misfires and Rough Idling: This can be caused by faulty spark plugs, ignition coils, or fuel injectors.
Overheating: Often due to a malfunctioning cooling system, such as a failed water pump or a clogged radiator.
Oil Leaks: These can originate from various seals and gaskets, leading to low oil levels and potential engine damage.
2. Transmission Problems
Maserati transmissions are designed for performance but can experience:
Slipping Gears: This could indicate worn-out clutch plates or issues with the transmission fluid.
Delayed Shifts: Often due to problems with the transmission control module or low fluid levels.
3. Electrical and Electronic Failures
Modern Maseratis are equipped with advanced electronics that can sometimes fail, including:
Dashboard Warning Lights: These can indicate issues ranging from simple sensor failures to serious engine problems.
Infotainment System Glitches: Problems with the touch screen, navigation, or audio system are not uncommon.
Diagnostic Techniques
1. OBD-II Scanner
The On-Board Diagnostics II (OBD-II) scanner is an essential tool for diagnosing Maserati problems. It can read error codes from the car's computer, providing insight into various issues.
How to Use: Connect the OBD-II scanner to the port located under the dashboard. Turn on the ignition and follow the scanner’s instructions to retrieve the error codes.
Interpreting Codes: Each code corresponds to a specific problem. For example, P0300 indicates a random/multiple cylinder misfire, while P0128 points to a coolant thermostat issue.
2. Visual Inspection
A thorough visual inspection can reveal obvious issues such as leaks, damaged components, or worn-out parts.
Engine Bay: Check for oil leaks, loose connections, and the condition of belts and hoses.
Undercarriage: Inspect for fluid leaks and damage to the exhaust system.
Electrical Connections: Look for corroded or loose battery terminals and wiring issues.
3. Multimeter Testing
A multimeter is useful for diagnosing electrical issues in a Maserati.
Battery Voltage: Measure the voltage across the battery terminals. A healthy battery should read around 12.6 volts when the car is off and around 14 volts when running.
Sensor Checks: Test various sensors, such as the oxygen sensor or mass airflow sensor, to ensure they are functioning correctly.
4. Compression Test
A compression test helps diagnose internal engine problems such as worn piston rings or valves.
Procedure: Remove the spark plugs and insert a compression gauge into each cylinder. Crank the engine and note the pressure readings. Low or uneven readings indicate internal engine issues.
5. Professional Diagnostic Tools
Maserati dealerships and specialized repair shops use advanced diagnostic tools that can access proprietary systems and provide more detailed information.
SD2/SD3 Diagnostic Systems: These are specialized tools used by Maserati technicians to diagnose and program vehicle systems accurately.
Diagnostic Software: Tools like Xentry or PIWIS can interface with Maserati's electronic systems for comprehensive diagnostics.
Addressing Common Issues
1. Engine Repairs
Misfires and Rough Idling: Replace faulty spark plugs, ignition coils, or fuel injectors. Regular maintenance and using high-quality fuel can prevent these issues.
Overheating: Ensure the cooling system is functioning correctly by checking the water pump, radiator, and thermostat. Flushing the coolant system periodically is also recommended.
Oil Leaks: Identify the source of the leak and replace the necessary seals or gaskets. Regularly check oil levels and change the oil according to the manufacturer's recommendations.
2. Transmission Solutions
Slipping Gears: Inspect and replace worn clutch plates and ensure the transmission fluid is at the correct level. Consider a fluid change if necessary.
Delayed Shifts: Diagnose and repair issues with the transmission control module or solenoids. Regular transmission servicing can prevent many of these problems.
3. Electrical Fixes
Dashboard Warning Lights: Use an OBD-II scanner to identify and address the underlying issue. Reset the warning lights after repairs are completed.
Infotainment System Glitches: Perform software updates and check for any loose connections or faulty components. In some cases, a complete system reset may be required.
Conclusion
Proper diagnostics are essential for maintaining the performance and reliability of your Maserati. By using the right tools and techniques, you can identify and resolve issues promptly, ensuring your luxury car continues to deliver the driving experience it was designed for. Regular maintenance and timely repairs are key to keeping your Maserati in top condition, from the engine to the sophisticated electronics.
#maserati car#maserati car diagnosis#maserati service center#maserati car maintenance#maserati car mechanic
2 notes
·
View notes
Text

Take the guesswork out of your vehicle's dreaded check engine light! The AUTOPHIX 3210 Bluetooth OBD2 Enhanced Car Diagnostic Scanner can save you time, worry, and even costly repairs down the road. Read and diagnose your check engine light, understand the severity of the issue, and clear fault codes in a blink of an eye. The AutoPhix also features more functions compared to other scanners, including I/M Readiness, Battery Health Check, Freeze frame, O2 sensor test, On-Board Monitoring, Evap system test, Performance Test, Data Stream, and Diagnostic reports, a handy Google search button, and a Built-in OBD II Fault code look-up library.
Check my shopping network https://www.tripleclicks.com/tcsearch/category:7
#autotest, #automotoveelectrical,#enginetest, #enginecomputer #enginecomputertest,#bluetoothautotest,
5 notes
·
View notes
Text


#Sinotruck Diagnostic Sinotruck II Scanner EOL OBD Diesel Truck Scanner Diagnostic Tool For #HOWO A7T7HSitrakHohan Diagnostic Tool
Whatsapp / Wechat : +86 13691674080
Skype : [email protected]
0 notes
Text
Why are my low beams not turning on when lights are set to auto 2012 Cadillac? Running lights and high beams work.
### Why Your 2012 Cadillac’s Low Beams Aren’t Working in Auto Mode
If your 2012 Cadillac’s low beams fail to activate when the lights are set to **Auto**, but the daytime running lights (DRLs) and high beams work, the issue likely stems from **electrical faults**, **sensor/control module issues**, or **component failures**. Here’s a structured breakdown of potential causes and solutions based on Cadillac-specific data and general automotive electrical principles:
---
#### **1. Faulty Headlight Switch or Auto Sensor**
• **Auto Mode Dependency**: The "Auto" setting relies on ambient light sensors to trigger low beams. If the sensor is dirty, misaligned, or malfunctioning, it may fail to detect low-light conditions, preventing the low beams from activating.
• **Switch Wear**: A worn-out headlight switch (common in older vehicles) might not properly engage the low beam circuit in Auto mode. Test the switch’s continuity with a multimeter or replace it if faulty.
---
#### **2. Blown Fuse or Relay**
• **Circuit Isolation**: Low beams often use a separate fuse or relay from high beams and DRLs. Check the fuse box (refer to your owner’s manual) for blown fuses labeled "Low Beam" or "Headlight." Replace as needed.
• **Relay Failure**: Swap the low beam relay with a matching one (e.g., high beam relay) to test functionality.
---
#### **3. Adaptive Front Lighting (AFL) System Error**
• **AFL Malfunction**: Cadillacs with adaptive headlights may display warnings like **"AFL Lamps Need Service"** if the system detects an issue. Moisture intrusion, damaged wiring, or a faulty motorized headlight actuator can disable the low beams.
• **Diagnosis**: Inspect headlight housings for condensation or cracked seals. Use an OBD-II scanner to check for AFL-related error codes.
---
#### **4. Bulb or Wiring Issues**
• **Burnt Bulbs**: Even if DRLs work, low beam bulbs (often dual-filament) can burn out independently. Replace both low beam bulbs to rule this out.
• **Corroded Wiring**: Check for damaged or corroded connectors in the headlight harness. Focus on areas near the radiator or wheel wells, where heat and moisture accelerate wear.
---
#### **5. Body Control Module (BCM) Glitch**
• **Software/Electrical Fault**: The BCM manages lighting systems. A software glitch or voltage irregularity (e.g., from a weak battery) can disrupt low beam operation. Reset the BCM by disconnecting the battery for 10 minutes. If the issue persists, professional reprogramming or replacement may be required.
---
### **Troubleshooting Steps**
1. **Check Fuses/Relays**: Start with the simplest fixes.
2. **Test Bulbs and Wiring**: Replace bulbs and inspect connectors.
3. **Scan for Codes**: Use an OBD-II tool to identify AFL or BCM errors.
4. **Clean/Reset Sensors**: Wipe the ambient light sensor (usually on the dash) and reset the BCM.
5. **Consult a Mechanic**: For complex electrical faults, seek professional diagnostics.
---
### **Key Takeaways**
The problem likely involves **isolated electrical components** (fuses, relays) or **system-specific failures** (AFL, BCM). Prioritize checking fuses, bulbs, and wiring integrity. For persistent issues, modern Cadillacs’ integrated systems often require advanced diagnostics.
If unresolved, refer to your vehicle’s manual or visit a certified Cadillac service center for targeted repairs.

#led lights#car lights#led car light#youtube#led auto light#led headlights#led light#led headlight bulbs#ledlighting#young artist#car
0 notes
Text

OBD2 Bluetooth Scanner with Vehicle Diagnostics App for iOS & Android
The newly upgraded V011 OBD2 Scanner supports most car makes and models, making it one of the most versatile diagnostic tools on the market. It is compatible with many brands, including Toyota, Honda, Chevrolet, Ford, Mercedes-Benz, Jeep, BMW, Porsche, Subaru, Nissan, Cadillac, Volkswagen, and Lexus.
0 notes
Text
you don't need a robotgirl for that just come over to my garage I'll grab the OBD-II scanner

need a robotgirl to shove a cable in my neck and run some diagnostics to figure out what the fuck is wrong with me
2K notes
·
View notes
Text
Auto Repair in Lebec: Common Car Problems and How to Fix Them
Lebec, CA, is known for its scenic roads and long drives, but vehicle issues can be frustrating for any driver. Whether you're commuting daily or heading out for a road trip, understanding common car problems can save you time and money. At Mechamedix, we believe that awareness is the first step toward maintaining your vehicle’s health. Here are some of the most common car problems in Lebec and how to fix them.
1. Battery Failure
Problem:
Extreme weather conditions, age, and poor maintenance can cause your car’s battery to fail.
Fix:
Regularly check battery terminals for corrosion and clean them with a baking soda solution.
Ensure the battery is charged, especially during extreme weather conditions.
If the battery is more than three years old and struggles to hold a charge, consider replacing it.
2. Overheating Engine
Problem:
Lebec's warm temperatures can cause engines to overheat, especially if the cooling system isn’t well-maintained.
Fix:
Regularly check coolant levels and top up when necessary.
Inspect radiator hoses for leaks or cracks.
If your engine overheats while driving, pull over, turn off the engine, and allow it to cool before adding coolant.
3. Brake Issues
Problem:
Worn-out brake pads or low brake fluid can make stopping difficult and unsafe.
Fix:
Listen for squealing or grinding noises, indicating worn-out brake pads.
Regularly check brake fluid levels and refill as needed.
If braking feels weak or inconsistent, visit Mechamedix for a professional inspection.
4. Tire Wear and Punctures
Problem:
Lebec’s highways and backroads can be tough on tires, leading to uneven wear or punctures.
Fix:
Rotate tires every 5,000–7,500 miles to ensure even wear.
Keep tires inflated to the recommended pressure to prevent blowouts.
Inspect tires regularly for nails, cuts, or bulges, and replace damaged ones promptly.
5. Check Engine Light On
Problem:
A flashing or steady check engine light can indicate anything from a loose gas cap to a serious engine issue.
Fix:
Tighten your gas cap to see if the light turns off.
Use an OBD-II scanner to read diagnostic trouble codes.
If unsure, bring your vehicle to Mechamedix for a thorough inspection.
6. Transmission Problems
Problem:
Delayed shifting, slipping gears, or unusual noises can indicate a failing transmission.
Fix:
Check transmission fluid levels and condition regularly.
Avoid aggressive driving and overheating the transmission.
If symptoms persist, seek professional repairs immediately.
Conclusion
Routine maintenance and early diagnosis of car problems can save you from costly repairs and breakdowns. At Mechamedix, we specialize in Auto Repair in Lebec, ensuring your vehicle stays in top condition. Whether it’s a simple fix or a major repair, our expert technicians are here to help. Don’t wait for minor issues to turn into major problems—schedule a service with us today!
0 notes
Text

An Audi check engine light can indicate issues like faulty oxygen sensors, ignition coil failures, or catalytic converter problems. Start by scanning for error codes using an OBD-II scanner. Address minor fixes like a loose gas cap or seek professional diagnostics for complex repairs. Expert technicians ensure accurate troubleshooting and long-term solutions to keep your Audi running smoothly.
0 notes
Text
Top 10 Common Engine Problems and How to Fix Them

Your vehicle’s engine is a complex machine, and even minor issues can lead to costly repairs if ignored. Whether you’re dealing with overheating, strange noises, or reduced performance, identifying problems early can save time and money. If you're looking for engine repair in Sri Lanka, understanding these common issues will help you maintain your vehicle better.
1. Overheating of the engine
Low coolant levels, a broken radiator, or a dysfunctional cooling system are frequently the causes of overheating. Make sure the thermostat is operating correctly and periodically inspect your radiator and coolant for leaks.
2. Examine the engine light
Anything from a leaky gas cap to a major engine failure can be indicated by a flashing check engine light. To identify the issue, use an OBD-II scanner or go to a mechanic for an expert evaluation.
3. Misfire of the Engine
Fuel system problems, malfunctioning spark plugs, or damaged ignition coils can all cause misfires. This problem can be avoided by changing the spark plugs and making sure the gasoline is injected correctly.
4. Low Pressure in the Oil
A broken oil pump, clogged filters, or outdated or inadequate oil can all cause low oil pressure. Maintaining enough lubrication is aided by routine oil changes and filter replacements.
5. The sound of an engine knocking
Generally speaking, a knocking sound indicates incorrect fuel combustion, which is frequently brought on by carbon deposits or poor fuel quality. The issue can be fixed by using premium fuel and cleaning the fuel injectors.
6. Untidy idle
Clogged fuel injectors, malfunctioning sensors, or unclean air filters may be the cause of your engine's choppy idle. Restoring smooth operation frequently involves cleaning or replacing these parts.
7. Excessive Exhaust Smoke
A coolant leak may be indicated by white smoke, oil burning is indicated by blue smoke, and excessive fuel usage is suggested by black smoke. Finding the problem might be aided by inspecting the gaskets, piston rings, and fuel injectors.
8. Power Outage
Clogged air filters, worn-out spark plugs, or unclean fuel injectors can all cause an engine to lose power. Maintaining your engine on a regular basis guarantees optimal performance.
9. Problems with the Starter Motor
A bad starter motor, a weak battery, or rusted wiring could be the reason your engine won't start. To identify the issue, check the battery voltage and look at the connections.
10. Decline in Fuel Efficiency
A blocked air filter, dirty sensors, or broken fuel injectors could be the cause of an abrupt drop in fuel efficiency. Fuel economy is increased by utilising high-quality fuel and performing routine maintenance.
Taking proactive measures can extend the lifespan of your vehicle’s engine and reduce unexpected repair costs. If you’re facing engine troubles, Dimo Engineering Solutions offers expert diagnostics and repairs to keep your vehicle running smoothly.
0 notes
Text
car repair,
car repair,
Car repair is an essential part of vehicle ownership. Whether you're dealing with a minor issue like a flat tire or a major engine malfunction, understanding the basics of car repair can save you time and money. In this guide, we'll explore the most common car repair issues, maintenance tips, and when to seek professional help.
Common Car Repair Issues
Flat Tires – Punctures and worn-out treads can lead to flat tires. Regularly checking your tire pressure and tread depth can help prevent unexpected blowouts.
Battery Problems – A dead battery is one of the most common issues. Keeping jumper cables in your car and checking your battery’s health periodically can help avoid breakdowns.
Brake Issues – Squeaky or grinding brakes indicate a problem. Brake pads and rotors wear out over time and should be replaced to ensure safety.
Engine Overheating – Overheating can result from low coolant levels, a malfunctioning thermostat, or a broken radiator. Regular coolant checks are essential.
Check Engine Light – This warning sign can indicate various issues, from a loose gas cap to serious engine trouble. Using an OBD-II scanner can help diagnose the problem.
Oil Leaks – Regular oil changes help maintain engine performance. If you notice oil spots under your car, it’s important to check for leaks.
Essential Car Maintenance Tips
Regular Oil Changes – Change your oil every 3,000 to 5,000 miles to keep the engine running smoothly.
Inspect Your Brakes – Have your brakes checked at least once a year.
Monitor Tire Condition – Rotate your tires every 5,000 miles to ensure even wear.
Check Fluid Levels – Keep an eye on coolant, brake fluid, transmission fluid, and windshield washer fluid.
Replace Air Filters – A clean air filter improves fuel efficiency and engine performance.
DIY Repairs vs. Professional Help
Some repairs, like changing a flat tire or replacing windshield wipers, can be done at home with basic tools. However, complex issues like transmission repairs or electrical system failures require the expertise of a professional mechanic. If you’re unsure, consulting a certified technician can prevent further damage.
Conclusion
Car repair doesn’t have to be overwhelming. By understanding common issues, following maintenance tips, and knowing when to seek professional help, you can keep your vehicle in top condition and avoid costly repairs. Regular inspections and timely repairs will ensure a smooth and safe driving experience.
0 notes