#no way/the entire class frame took me the longest (1 hour and 8 minutes)
Explore tagged Tumblr posts
Text
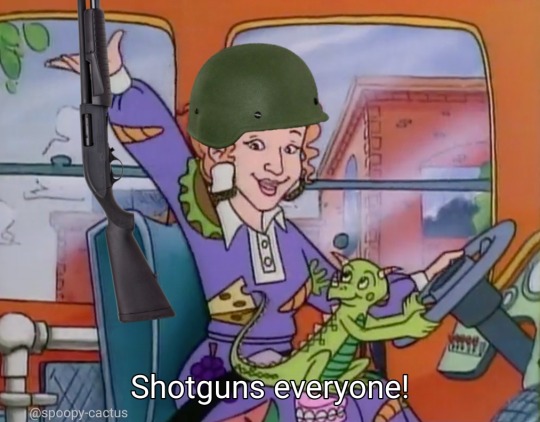
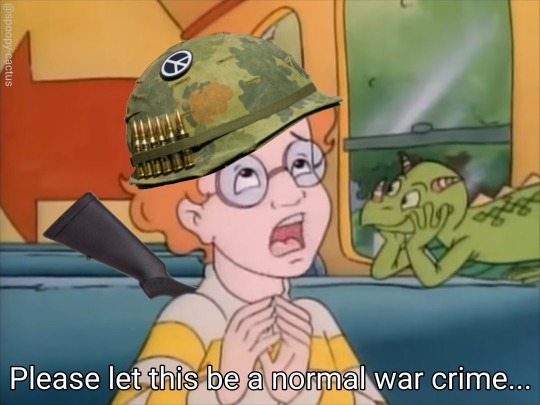
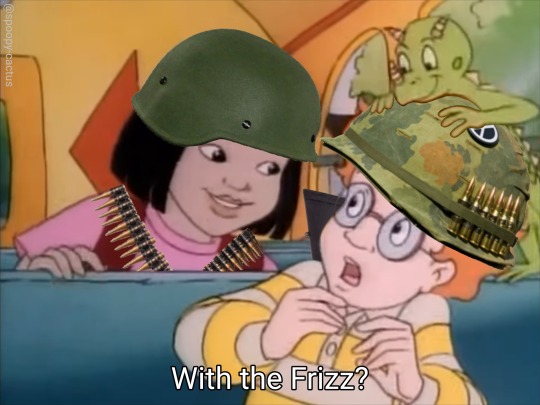
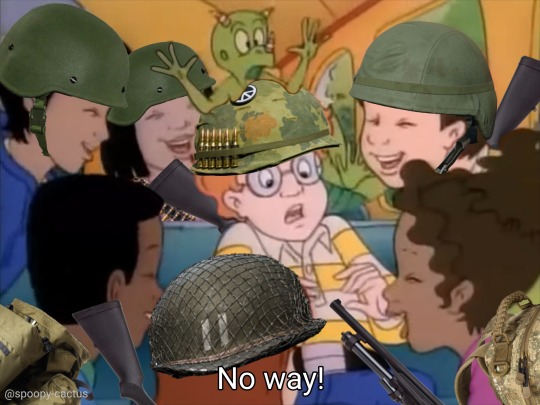
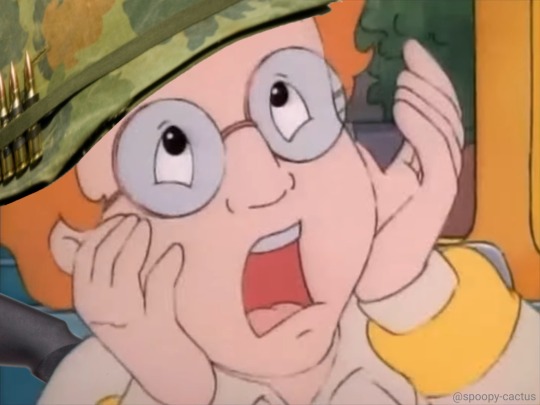
Had an idea
Inspired by this post
#the magic school bus#spoopy's meme edits#gun tw#took me about 2 and a half hours#nearly 3 hours if you want to count the combined frames image#first and last frame took me the shortest time (12 minutes each)#no way/the entire class frame took me the longest (1 hour and 8 minutes)#another frame took me 20 minutes and another one took half an hour#yes i put way too much effort in this#it better become a world heritage post#my art#spoopy's art corner
51 notes
·
View notes
Text
“Horror Vacui” or the fear of the blank page [for amateur artists]
[A really long post]
If you fit this description, this post is for you:
I’m a hobby artist/writer/creator with a broad interest and I don’t have enough to time to practice any of my interests beyond the amateur level. Creating is something I commit to about 10 to 15 times a year - when I need help, I don’t want to take an online course, just give it to me quick and dirty and I’ll see to the turnover.
This post contains:
mandatory motivation delineation
step-by-step drawing guide for amateur artists by an amateur artist
all reference pictures for the above
tracing - a technique shunned by my Grade 8 art teacher and the last time I attended art class
cross-hatching and contours
a tiny bit of perspective
a bit of shading
tools
tips for shaky hands
Why this post, when the internet has countless of tips to overcoming writers’/artists’/creators’ block already?
I mean, Google churns out some 20 million search results in under 0.55 seconds! That’s like 10 search results you are might look at tops - 20 if you’re desperate enough to go to page 2 - and realize most of the tips a lot of work, not worth the trouble, things you’ve tried before, or too abstract to be applicable to the thing.
One thing most of these guides get right: getting started is the most crippling step of the creative process.
The most common advice to overcoming your block - so I have read countless times - is establishing a routine until you “instinctively” know how to achieve your goal. Are they wrong? No, definitely not. Is it good advice though? Depends; at least not for me - and if you’ve read this far, then not for you either.
What are my other options?
Planning. And being aware of all the tools at your disposal. I documented the process of this drawing as an example. This process has limited applicability to paintings.
You will need:
an idea
drawing utensils
paper (some scraps to start with)
patience
Step 1: Rough Sketching
Take scrap paper. Unless your documenting this (hi, mom) you’ll throw this away asap. Get down the rough shape. This may a while and will involve you questioning your sanity - barge through the doubt, don’t erase what you’ve made, use the best parts and try again.
Example:
I would like to draw a cat. I take a pencil and...
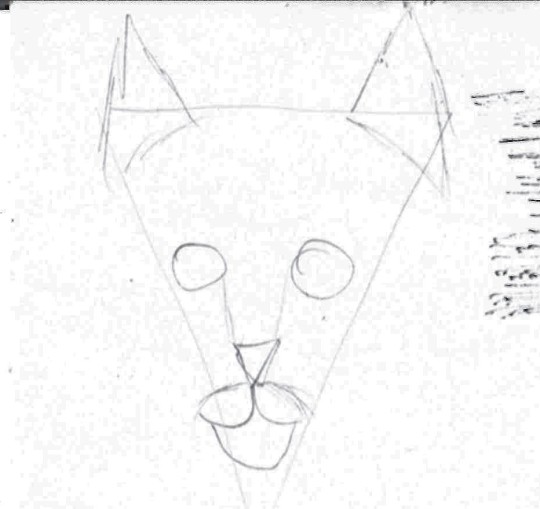
Lol, no. Cats are not pizza with ears.
Let’s try that again. Maybe a reference picture will help.
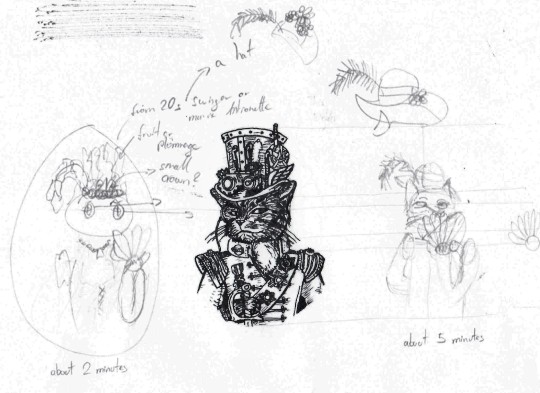
Much better. Start with some crude shapes but sketch out the entire body with shapes like they do in some drawing guides - only draw what you need. In this case about two and a half ovals are enough. Now make a better copy beside that initial sketch - I hate doing them on top of the first because that gets messy real quick. Draw some helping lines from the reference image. Don’t bother too much with proportions or posture, or going big; all these sketches are about 6 by 4 cm.
I want to draw a companion for this steampunk cat, about the same shape and posture with a head tilted one way and the torso another. She’ll need a proper headdress too - I went through three options visually and added some notes for other ideas I had in case neither of these worked out.
Step 2: Break it down
Break down the drawing into smaller bits and pieces and look up reference images if you need them.
I broke down my sketch into:
Head/Face
Torso/Clothes
Hat
Fan
The head
I want my cat to look slightly to the left and this is what I found online:
Not quite
Almost
Perfect
The torso
I found this image, which contained most of the parts I needed. I didn’t like the hat, head, fan, and all the mice scampering about ‘er so I just took the torso - the corset is really neat. Unfortunately, her posture is not quite what I need so that will be the biggest challenge for this body part.
The hat
I considered a few options such as this 1920s flapper’s headpiece and a couple of Victorian hats before settling on this one.
The fan
I own two so no reference image necessary.
You can keep a couple of tabs (or books, if you have some at hand) open in case you change your mind while drafting.
Step 3: Fine Sketching
This is the hardest part but if you’ve made it this far, you might as well go all the way, right? Understand how your brain operates and beat it at its own mind-game: create a sunk-cost-fallacy and drive yourself forward.
There three ways to get your fine sketch onto paper:
Cool, if you can pull it off go for it, usually takes the longest if you lack the practice (like I do)
Generally a good approach, especially when scaling up
Use a ruler to measure and plot key points of your outline
Print it and hold it against a window.
If it’s dark outside unhinge that glass cabinet door, duct tape it between two tables and put a lamp beneath.
Pull it up on your screen and adjust your zoom. Be careful with the pressure of your pen!
Use sticky tape to prevent it from slipping
(Below) Using a reference grid (the dots) on a canvas for another project.
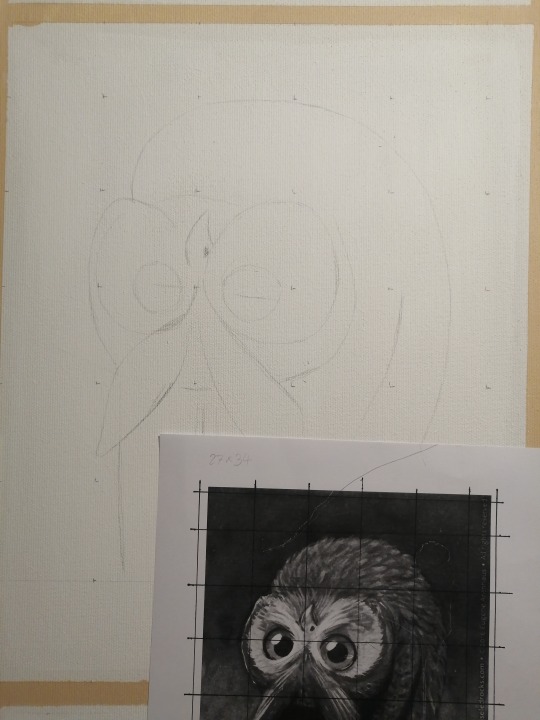
(Below) Tracing the head. Slight rotation of the page to achieve the desired orientation of the head.
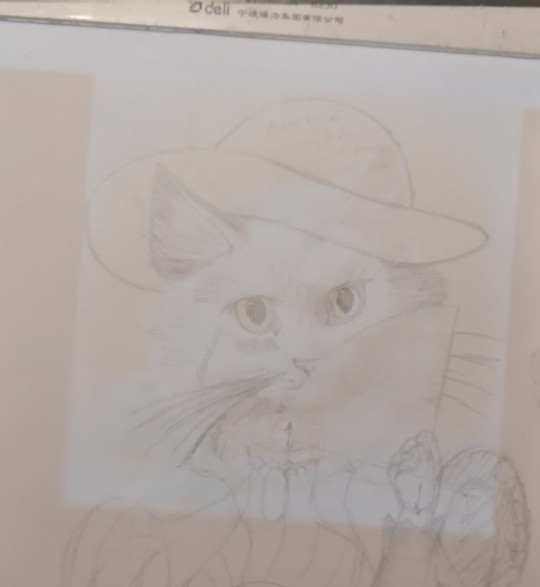
I also traced the torso and the head first. Then I added some rough shapes for the arms and the fan - this was also when I realized I can use the fan to hide parts of the face I don’t want to draw. Everything ended up a little twisted and short so I dashed lines where I want these limbs to go. The fabric of the corset also needs to be pulled up on the right and pushed down on the left, hence the arrow there. The neck is way too long too. Add some more notes of things you want to change - like adding a fuck-ton of flowers to the hat.
To judge whether the proportions make sense take a look at yourself in the mirror or ask random people in the hallway to pose for you - afterwards exchange a friendly, confused smile and move on.
(Below) First fine draft after about 5 hours of intermittent work - just take breaks when you’re bored, but leave it prominently lying in your way so you don’t forget about it. I reconstructed the arms’ outlines and added some bold comments.
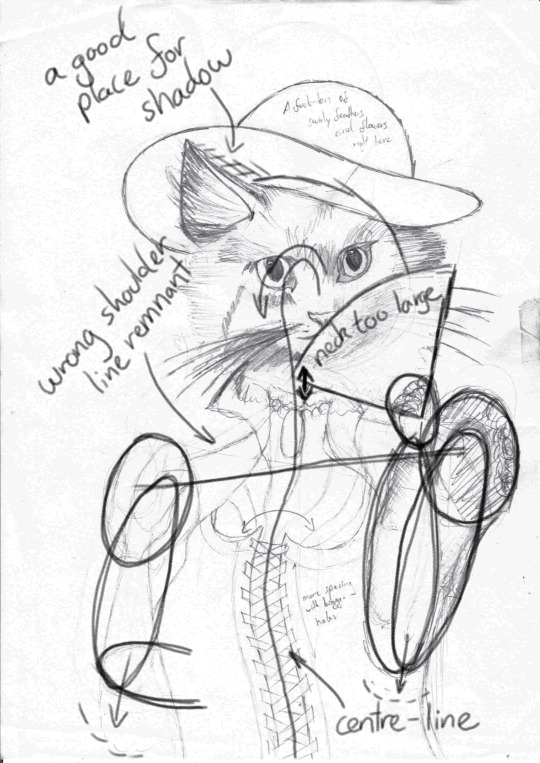
Once you have everything you need, clean up your first draft as much as possible by erasing help lines and drawing strong borders. Next, open something bright on your screen (or whatever your tracing equipment happens to be), tape a blank paper to your first sketch and take down all the details you want to keep. You can move the paper around to shorten or elongate distances.
Add borders if you want to frame the drawing later.
Now change all the things you don’t like. I changed the cat lady’s hat to be less round because I didn’t want her to wear a wide-brimmed bowler and added a fuck-ton of flowers and - for good measure - a feather. If you can’t draw the feather flicking back up like me, hide it behind the brim of the hat.
Think about any fur you want interacting with the fabric (hat or collar). I added one curl to flow down the left side of her collar - didn’t really work out but A for effort.
Add any major decorative elements like the fish on her corset or the patterns on her fan.
Add major textures like the lines on the brim of her straw hat. The dotted texture on her sleeve was way too fine and didn’t carry over to the next tracing. The same goes for the shading from the last draft, which didn’t carry over well and I ended up bundling all the fur together in larger bundles.
Save the puffy shoulders for last (because I had no idea what to do there and eventually opted for “brains”).
(Below) About 90 minutes on the face to compartmentalize all strands of fur into proper bundles. Note six key bushels that define her expression: on both side of her nose, her “eyebrows” and the trailing of her eyes. Look up cartoon cats for help. 2 hours on her torso and another hour on her shoulders.
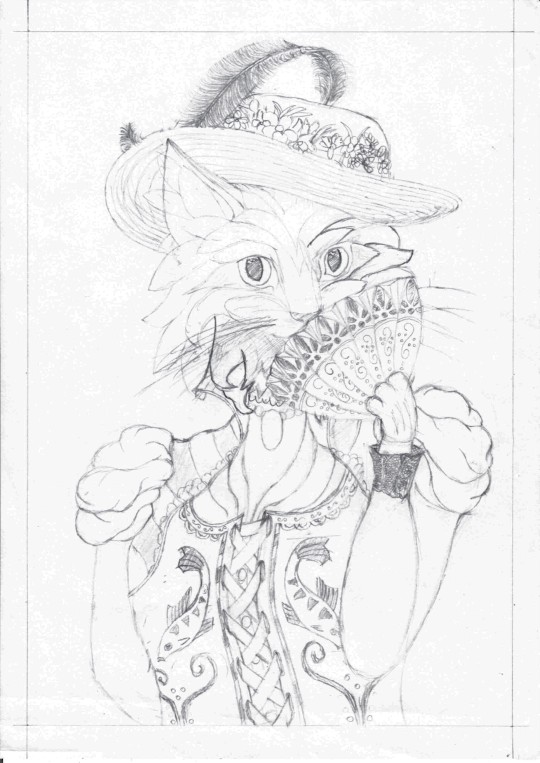
Clean it up again and judge your work. If you are still unhappy with the positioning, do another tracing. Don’t forget to embolden all important features
Step 4: Inking the outline!
You’re patience is paying off! Next up is inking! Inking is fun!
Oh shit-
Don’t ink your final draft!
Step 4a: Screw up
I never get my inking right on the first try and it’s hard to hide mistakes you made with ink. I ran my draft through the photocopier once (because I didn’t want to trace it) so my mistake here wasn’t that big a deal - I lost five minutes and this paper went into the my scrap tray. Always start inking the most difficult part so you don’t regret screwing up after being almost done.
At this point I realized I couldn’t erase the pencil lines anymore and went back to tracing paper on paper on screen. Be aware of the ink you use and how thick your paper is or you might end up leaving marks on the draft below.
(Below) The pattern on her brow is off in two places.
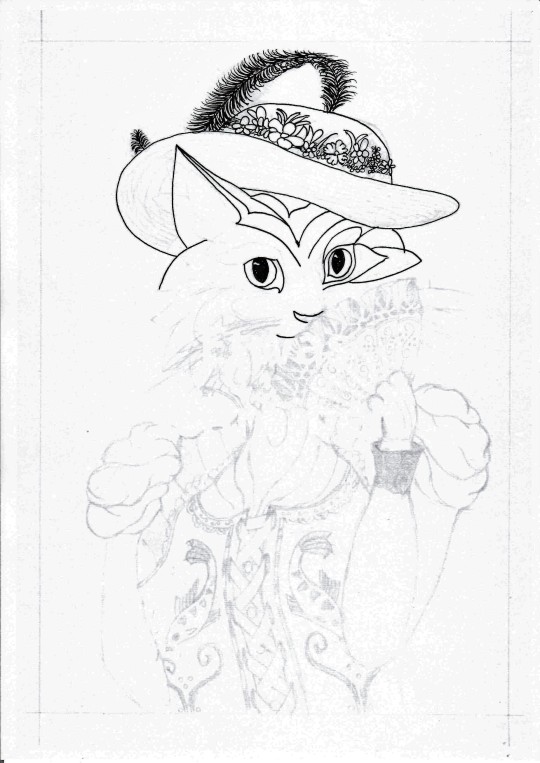
Step 4b: Finish inking the outline
As before focus on borders and major textures; about now you’ll notice which parts of your draft are to fine to trace well and which ones need some extra weight. Drop any lines you don’t like.
By now you probably have a couple of pages with sketches and bad inkings lying around - make sure you label them or find some other method to remove them from your line of work (like throwing them in the bin).
(Below) About 45 minutes, 5 of which were spent on the feather, 5 on the flowers, 10 on the fan, 10 on the face, and 15 on the torso including arms.

At this point you could scan and stick it into a colouring book.
Step 5: Textures!
This is the best part. Texturing a drawing is so satisfying it makes up for all the hardship up to this point.
Make a couple of copies this time to practice your texturing. Afterwards, feel free to continue the page you traced or run it through the photocopier once again.
(Below) Two versions with different types of shading.
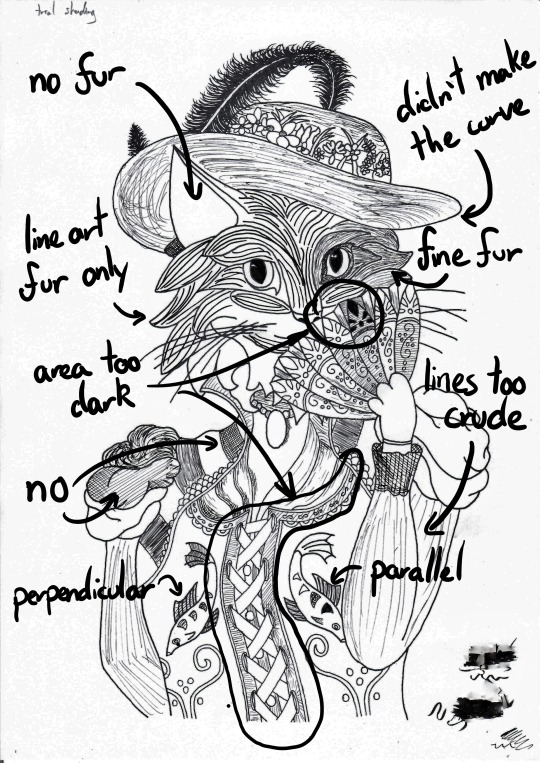
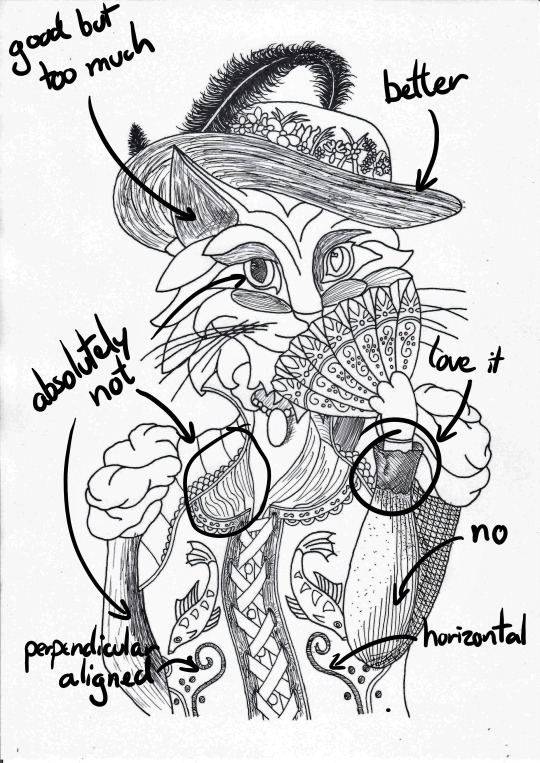
It’s very easy to get carried away when shading; always go for a little less than you think you need. You can always add more later, but you can’t take it away.
Fur
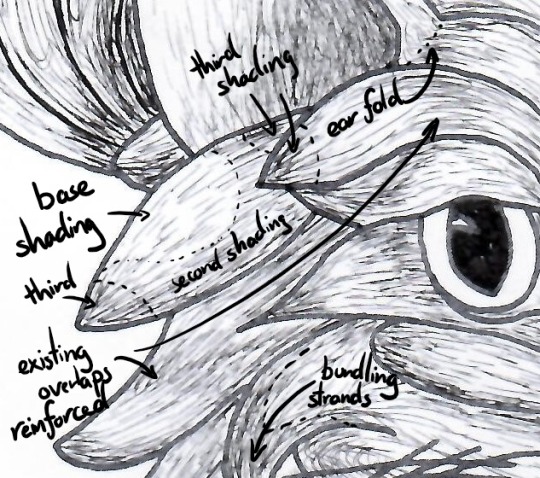
Use lines that flow parallel to the outlines you’ve already drawn. Make the strands flow apart at the beginning and back together at the end. Try to keep the numbers of strands that begin and end constant. This will result in a larger spacing and thus a lighter centre of your bushel.
I like shading an entire area, in this case the entire head uniformly but very lightly, then I start thinking about accents and where light could come from. Wherever fur bundles together (usually at the end of a bushel) I add some more of the same texture to make it darker. You can lift some of the shading from your reference pictures and just copy it. But don’t limit yourself to what your references provide.
To be honest, I only roughly take notice of where I place my imaginary source of light and just emphasize parts of a bushel that were darker to begin with. Usually turns out okay.
Fabric
Generally, keep your texturing parallel, perpendicular or at a fixed angle to the next leading edge. The lines don’t have to be - and most of the time shouldn’t be - straight. Allow them to trace out wrinkles in your fabric or reinforce the fabric’s rigidity by copying the leading edge at short intervals.
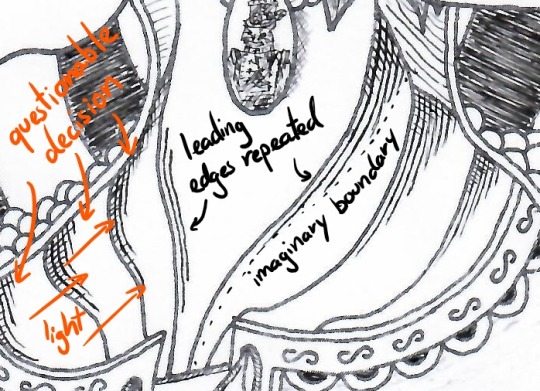
The same formula of repeat the leading edge applies to other parts of the clothing - just vary the line separation and how strictly you follow the leading edges.
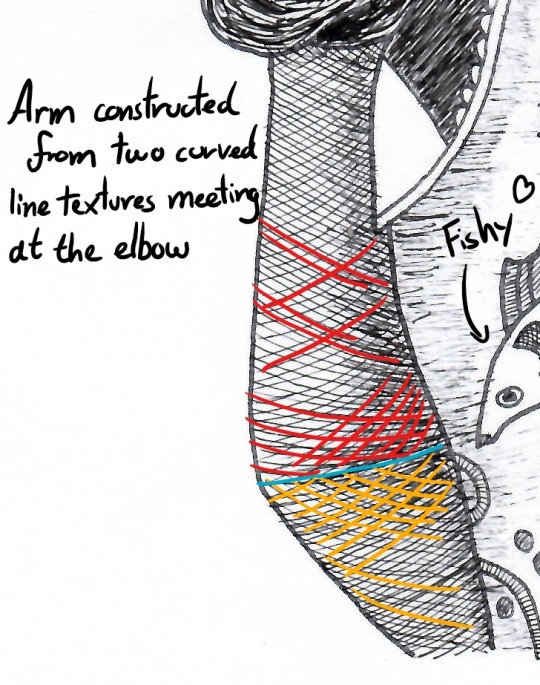
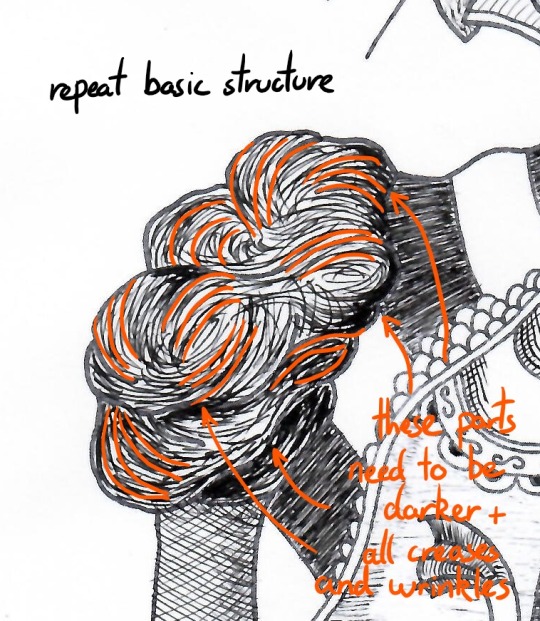
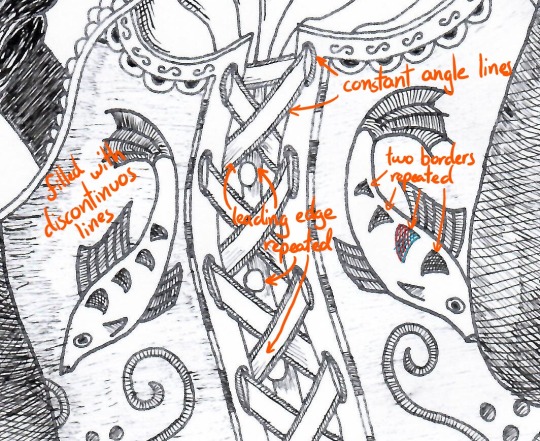
In other places lines placed at constant angles make a good texture.
Know your tools: my pens stop drawing at an angle of about 30-45° and drawing lines at this angle will make them lighter and discontinuous. This is a good approach to lightly shading a large area like most of the corset.
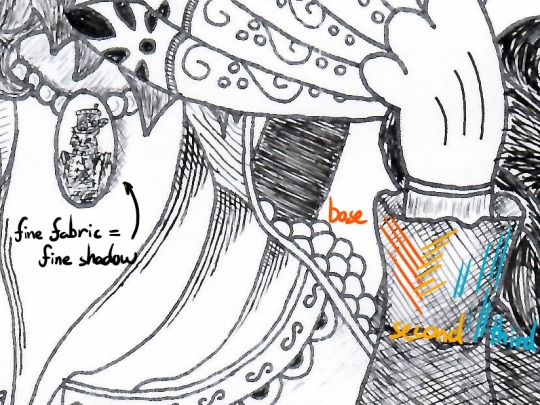
Cross-hatching gives the sleeve a wrinkle and two light-spots. Two layers at roughly 70-90° gives a good hatch, only add a third layer if you need it really dark - careful: this will make any contours established with two layers disappear.
Shadows
Some places just ought to be darker though, like the spot I marked behind the ear or below the chin. This gives your drawing some depth. Just reiterate the same local texture over and over again until it’s dark enough.
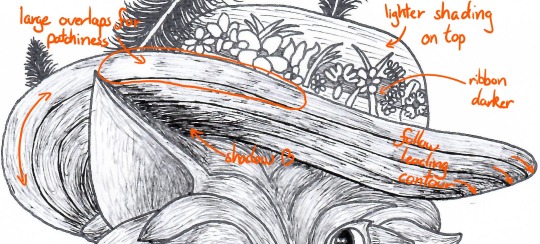
Without my annoying comments, the final result will look like this:
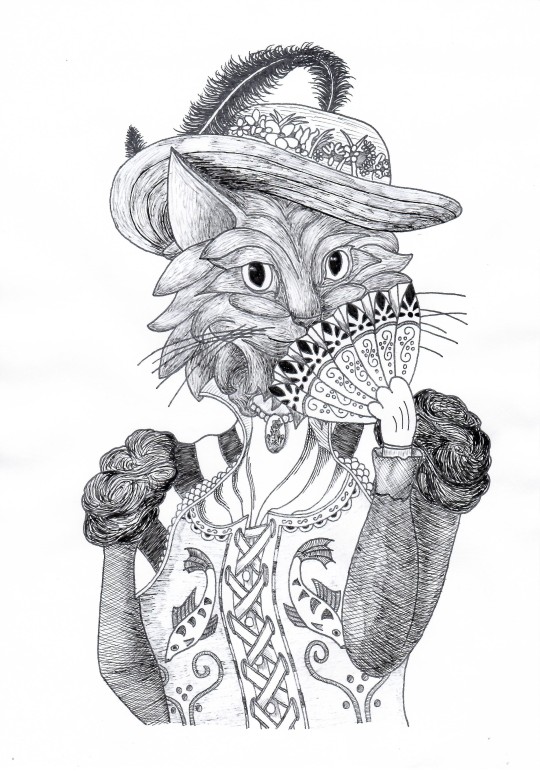
Is it perfect? Fuck no. Is it pretty good? Aye, meets my standards.
By the way, this is what we started with:

Tips for shaky hands
Sugar, caffeine, medical condition? Hands come in all degrees of shaky but don’t let that discourage you. Here’s how I approach the most important elements in my art.
Long lines
Long lines are hard to draw, if you don’t have practice sliding your hand across the page. I can do it sometimes but not reliably. Instead I place my wrist firmly on the page and draw the part of the line that is within my mobile range. The more of my wrist rests on the page, the less I shake. Then I lift my pen and move on to the next bit - sounds trivial?
Wrong.
Whenever you start or end a line you go from rest to drawing speed or vice versa. During these moments the constant flow of ink is spread over a shorter distance, resulting in a thicker line. Appending a new segment causes a brief overlap and results in a blotch, especially when you need longer than an instant to correctly put down your pen.
Coming in at an angle prevents the ink from flowing prematurely and gives you more control of your line.
Curved lines
Place your wrist on the inside of the curve (segment) - drawing towards yourself is easier than away. Rotate the page to make it happen or rotate yourself if the page is stationary (like a large canvas). Additionally, I like to keep my fingers stiff and only rotate around my wrist.
Textures
For very fine textures I keep the tip of my pen above the page and start repeating the pattern. About two thirds of the strokes will go into thin air but the shaking will make one third hit the page - a statistical approach to texturing.
Conclusion
My longest post so far - I starting making this almost 8 hours ago. A blank page is a scary thing, so many possibilities, so many ways to screw up. The most important advice to take from this post is plan, save, trace, repeat. You don’t have to be ashamed for tracing art; just don’t parade an exact copy as your own work and always keep your references at hand.
Why does this feel like academic writing 101...
I invite anyone to contribute their own quick and dirty drawing tips for amateurs to this post. DM me, if you have any questions or would like to use this a last-minute-Christmas gift - I’ll send you a free high-res. I don’t judge, not this year nor any other.
Best, Ocelittle
#tutorial#art tutorial#artists on tumblr#ink#ink drawing#drawing#art#amateur art#christmas gifts#horror vacui
0 notes
Photo
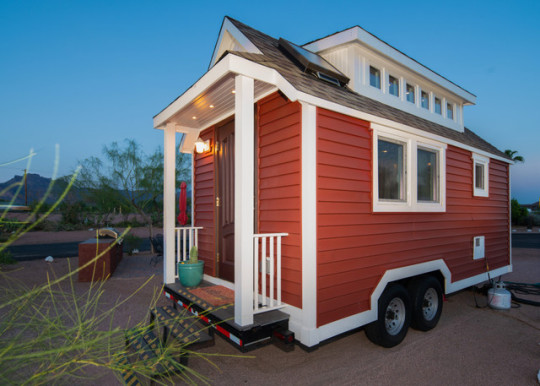
New Post has been published on https://fitnesshealthyoga.com/8-minimalist-vacation-packing-tips-i-absolutely-swear-by/
8 Minimalist Vacation Packing Tips I Absolutely Swear By
I’m an under-packer by nature. I try to travel with one carry-on only (usually a backpack)—even when I’m leaving the country for a while and even when I’m traveling with my 3-year-old son. Sounds crazy, I know. And while it’s true this method has occasionally led me to seriously questionable hiking footwear (and definitely led me to 10 days in Scandinavia with only one pair of pants), for the most part, it is a truly liberating way to travel. Doing a one-backpack trip forces me to sit down and think about what I—and my son—truly need and what we can live with out. It almost turns last-minute packing an hour before the airport drive into a moving meditation on materialism and our existence as a human society… almost.
But even with the most minimalist of packing, I usually end up on a vacation with a decidedly un-minimalist schedule—and an overburdened frame of mind. There are hotels to book and tours to take and sights to see and reservations to make, not to mention inevitable souvenir shopping that completely undoes the whole one-backpack logic in the first place.
And after a week or so of that plus who knows how many flights/hours on the road? Well, I end up back home needing a vacation from my vacation. Sound familiar?
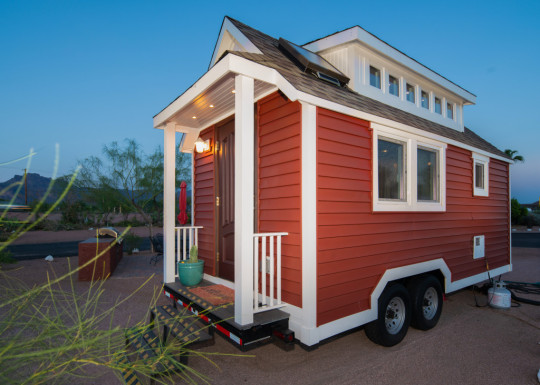
That’s why I decided it was time for me, the minimalist packer, to become and actual minimalist traveler—to plan a vacation that involved bringing, using, planning and doing as little as possible. Enter the plastic tiny house, a 170-square-foot energy-efficient home chilling (or rather, heating up) in the desert outside Phoenix, Arizona. (It was designed by Tiny House Nation host Zack Giffin, NBD). Just by the nature of choosing this as my temporary home, I was already hopping on the minimalist bandwagon. This particular 170-square-foot and super-energy-efficient tiny house made of plastic is a testimony to how little we can use if we just think creatively (and a sink that feeds gray water directly into the toilet system doesn’t hurt).

Image: Courtesy of Tony Marinella.
That’s right. I headed to the Arizona desert in August to spend my vacation in 170 square feet with the bare necessities, no other humans and certainly no restaurant reservations. And just to make my minimalist vacation extra-official, I brought: one pair of shoes, six items of clothing (including underwear) and a toothbrush/toothpaste. And that’s it. And it was the best vacation I’ve taken in a long time.
Image: apedelman/Instagram.
So if you’re the type who thinks travel has to involve endless planning, scheduling, packing multiple suitcases, booking hotels, tours and dining options, think again. This is how deciding to take that minimalist vacation to a tiny house in the desert, packing essentially nothing, changed the game for this traveling mom.
Image: Courtesy of Jennifer Verrier.
Why you should take a minimalist vacation
It’s cheaper
That part’s a given. If you’re doing less, you’re spending less. Aim to spend on the bare-bones.
Lodging: No hotels! Aim for an affordable Airbnb, or better yet, arrange a free home exchange through a site like Kid & Coe.
Transportation: Bonus if you drive or take public transport to your destination rather than flying.
Food: Groceries, not restaurant bills.
Leave the entertainment part of the budget at $0—and see where it takes you.
It requires less planning beforehand
With an entertainment budget and schedule set at zero, you can save your at-home hours before the trip and those frantic last-minute Google searches for places to stay/eat/see. Instead, let your vacation “plans” involve walking out your door in the morning and seeing where your stroll takes you.
The getting-there part is way easier
Embarking on a six-hour (or 16-hour) flight is exhausting enough already. Do you really need to add multiple pieces of luggage and a trip to baggage claim to your already (literally) burdened shoulders? No. Pack only the essentials—and then remove five things from your bag before you go. You’ll be surprised what you can do without.
It forces you to be resourceful
I stand by the statement, “You’ll be surprised what you can do without.” That said, for my tiny house trip, I wildly under-packed—on purpose, of course—and in my minimization discovered two things I hadn’t packed it turned out I sorely missed, especially in the dry Arizona summer: a hair tie and lip balm. But you’d better believe I scavenged through that house to find an old elastic tag that I used to tie my hair up for the whole trip. Oh, and I absolutely put kitchen olive oil on my lips every night. #NoRegrets
It forces you to focus on yourself (for better or worse)
Guess what. When you’re alone in a tiny house in the desert (or a cabin in the woods or a yurt on the mountain or whatever your preferred solo-minimalist vacation locale may be), you cannot just keep busy and la-la-la your way through life and ignore whatever it is you really need/need to work on/need to give up. Your shit will rise up to the surface, and you will have to confront it. But hey, the only way out is through, baby.
I do want to note here that I don’t equate a minimalist vacation to “roughing it.” Any sort of camping/backpacking/what-have-you trip that involves trekking through the woods, setting up a tent, conjuring up a fire and all your meals and hauling ass to some dark bug-infested corner of the forest in order to “go to the bathroom” is all very admirable—but it’s not quite what I mean by minimalist. Because that shit involves work. Camping/backpacking, strangely like taking a fancy multi-hotel tour of Europe, does involve a lot of planning and preparing (isn’t that literally the Boy Scout motto?) and pretty much constant effort to keep that whole staying-alive-in-the-wilderness thing afloat.
For me, in this moment, I wanted a trip that still landed solidly in the vacation category of travel: somewhere warm and habitable with pre-appointed (indoor) lodgings and an actual toilet. You know, the basics that roughing it doesn’t quite provide. And I lucked out in that my tiny house was pre-stocked with some basic food as well: milk, coffee, eggs, butter. All of this is to say that this precise midpoint between roughing it and your typical vacation got me exactly where I wanted to get: the middle of the desert with absolutely nothing to do.
Image: Courtesy of Jennifer Verrier.
So, how do you take a minimalist vacation?
Book early
This is key both for planning-stress levels as well as pricing.
Pack light (duh)
See above re: items of clothing, toothbrush, sunscreen. I promise you can do it.
Don’t pack shoes—I mean it
This is my No. 1 packing tip for all forms of travel, but especially if you’re aiming for minimalism. You’re not going to a wedding here, nor are you climbing Everest. Whatever isolated locale you choose, plan to wear—not pack—one pair of sturdy, oh-so-comfortable footwear that will actually last you the whole week or however long you’re gone. If you’re heading to the hills, hiking boots. If you’re beaching it, Birkenstocks. As long as they’re comfy, who cares what they look like? Nobody will be looking at your feet anyway.
Get outside your comfort zone with food
Yes, sure, you have favorite meals and favorite recipes and favorite restaurants. But what’s something super-simple you can cook just for yourself literally every day for a week? Make yourself one big epic pot of soup and see how long it lasts or dive into the wondrous world of kitchari. It won’t be fancy, but you will be full. And just see how much brain space you end up with when you’re not thinking about meal planning every single day.
Move your body in new ways
This whole thing goes out the window if you sit in your tiny house like a rock for a week. You will not feel good if your minimalist vacation involves being horizontal the entire time. But no, you will not have access to SoulCycle or a hotel gym. So get creative. Take a walk, a hike, a run, a jump-around-the-lake-five-times. Try your hand at a solo at-home yoga practice even if you’ve only ever taken two classes before. Get in your body and see what feels good. Bonus points if you really see what feels good. You are on a solo vacation, after all.
Expect to go without
So, you’ve never gone a week without makeup? Or shampoo? What about deodorant? I see you cringing. But remember, this is your minimalist vacation. You are likely all alone—or as is so often my case, “alone” with a child in tow—and nobody cares about how your hair looks. Of course, this is not to say you should go a week without key prescription medication or brushing your teeth. But that hairdryer/concealer/five-step facial-moisturizing system? Leave it behind. And while you’re at it, see if you can leave your social media accounts behind too. I dare you.
Do pack one (tech-free) thing to “do”
Whether it’s that poetry book you’re reading (or writing!), a journal, a sketchbook or even your knitting, there will be times your mind needs a break from all that quiet time with itself. Give it one that will also fuel it.
For me, in my borrowed tiny house, the sheer lack of stuff to do—no tent-setting, fire-building, bear-repelling, or shit hole-scouting, but also no sightseeing, navigating, appointment-setting or museum-hopping—left me no choice but to face what I had come to face: myself. I wrote. I meditated. I walked. I cooked some eggs. I took the longest shower possible because, as opposed to my showers at home that are hastily sandwiched between dishes, laundry, lunch-packing, school drop-off and the workday (it’s a wonder working single moms shower at all, honestly), I had no schedule to rush off to, nothing to be inevitably late to and no reason to feel guilty or ashamed for happily standing under hot water for half an hour. Other than, you know, water waste and the environment. Damn it.
On my minimalist vacation, I had zero plans. I had to—I got to—face many small, strange situations and feelings that are entirely alien in my regular life: silence, solitude, boredom, ease, freedom, peace.
And guess what (this is the sixth and possibly most important reason to take a minimalist vacation)…
The effects extend way beyond the trip itself
All that solo soul-searching? You will definitely carry the aftereffects home with you. There’s nothing quite like a trip that’s based on packing/planning/paying/doing/using less to inspire you to take stock in your life and think about what you actually need going forward—you know, out of the tiny house and back into real life.
One thing’s for certain: You’ll never again forget to appreciate the value of a hair tie.
Originally posted on SheKnows.
!function(f,b,e,v,n,t,s)if(f.fbq)return;n=f.fbq=function()n.callMethod? n.callMethod.apply(n,arguments):n.queue.push(arguments);if(!f._fbq)f._fbq=n; n.push=n;n.loaded=!0;n.version='2.0';n.queue=[];t=b.createElement(e);t.async=!0; t.src=v;s=b.getElementsByTagName(e)[0];s.parentNode.insertBefore(t,s)(window, document,'script','//connect.facebook.net/en_US/fbevents.js'); // Insert Your Facebook Pixel ID below. fbq('init', '1130306277008218'); fbq('track', 'PageView'); (function(d)var id="facebook-jssdk";if(!d.getElementById(id))var js=d.createElement("script"),ref=d.getElementsByTagName("script")[0];js.id=id,js.async=true,js.src="https://connect.facebook.net/en_US/all.js",ref.parentNode.insertBefore(js,ref))(document)
Source link
#health news united states#health news usa today#Lifestyle#minimalist vacation#Packing Tips#travel#traveling#us public health news#vacation tips#Skin Care
0 notes