#my screenshotting methods had to be a little...unorthodox
Explore tagged Tumblr posts
Photo
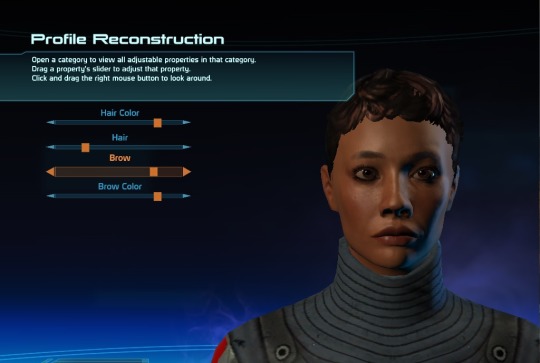


hey @persephinae guess what I started playing? :D
#photoset#playin mass effect#video game blogging#forgive the weirdass quality#my screenshotting methods had to be a little...unorthodox
5 notes
·
View notes
Text

Allright, finally got around to writing another part of my tutorial. In this part I will go over how I paint shadows on the body and some other stuff. Let’s just get into it!
Open this in dashboard for best view of the screenshots.
Disclaimer: I have no formal training for any kind of graphics stuff, I work in an office as a receptionist - I serve coffee for a living. I am absolutely self taught and while I consider myself pretty comfortable with photoshop, that doesn’t mean that there isn’t about a gazillion of other things that can be done that I have no idea about. There are people far superior than me in the Sims community. This is just how I do it, with techniques I have picked up through the years. Some things I go over in these will be pretty basic, some things a little more unorthodox. Disclaimer 2: My edits take time. This is what I do to relax, one edit takes several hours for me. Sometimes days :))) Disclaimer 3: My photoshop is in Swedish, which is my first language. I tried my best to find the English translations for every step that I do.
Tools used: The Sims 4, Adobe Photoshop 2020, One by Wacom Pen Tablet (very basic and unfancy).
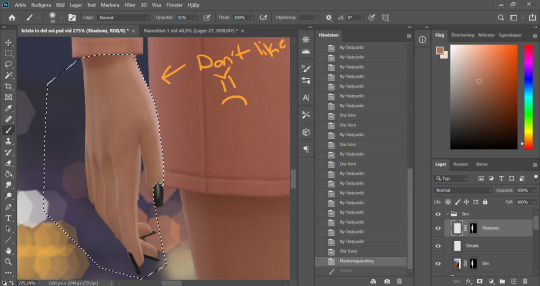
When we stopped the last time we had just painted some shadows on the face and chest area. Now I continue with all other parts that’s showing skin. The hand has some of that wrongly places highlight thing going on, so I use the pen tool to section the hand out.
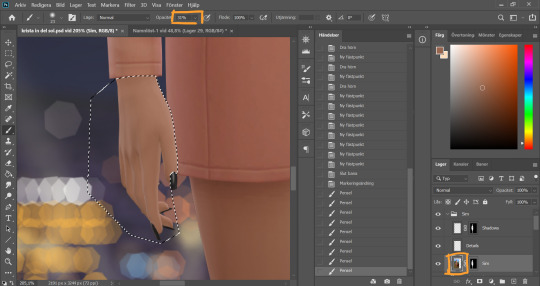
On the Sim layer, I choose a color of the hand that suits my purpose and I go over the area I want to "correct". I also removed the shadow on the wrist because I wanted to add my own.
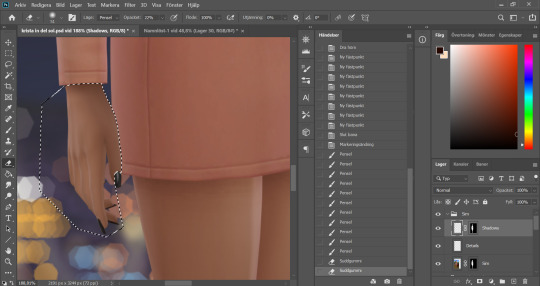
Going back to the shadow layer, I use my shadow color and go over the part of the hand that would be facing away from our imaginary light source, as well as the part just under the clothing line. Then I blend by going over with a low opacity eraser brush again.
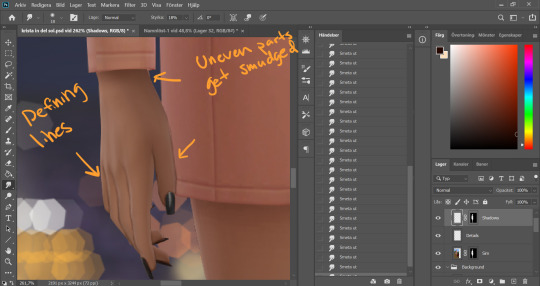
Between and around the fingers I usually add some extra definition with a smaller soft brush, using the same shadow color. Any uneven parts gets blended with the smudge tool.
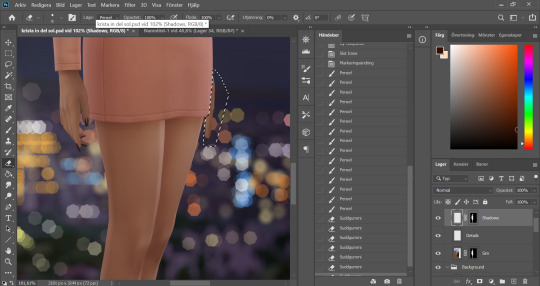
The other hand just needed some shadow.
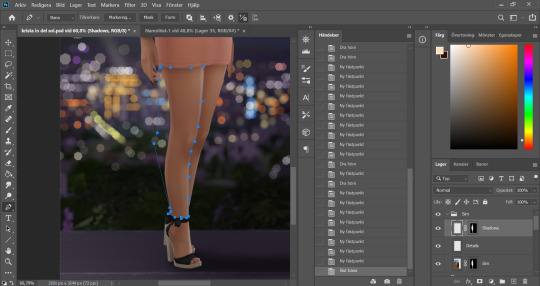
She's got leeeegs… Anyone else old enough to remember ZZ Top? No? Just me? Ok. I section out one of the legs, yes, using pen tool again.
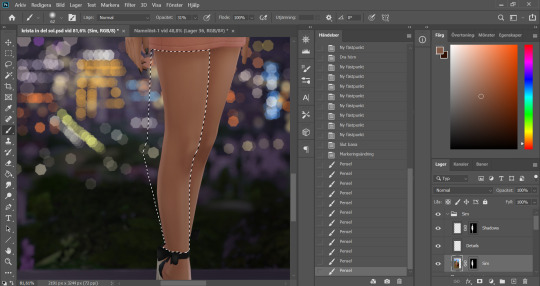
I "color correct" the highlighted part on the front of the leg that I feel is in the wrong place.
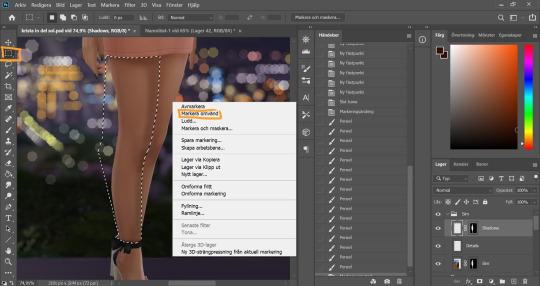
I add my shadows on the front of the legs and under the skirt. Then I reverse my selection by clicking the Marquee tool, and right clicking in my picture. The english option should be called "Inverse Selection" or something like that.
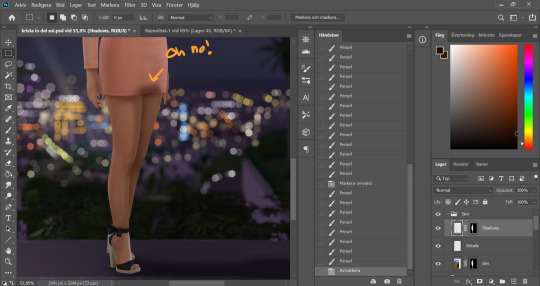
I paint my shadow on the other leg, building up a little more color closest to the other leg to add separation between the two. And now since my selection didn´t section off the leg from the dress we've got some bleeding because I can´t be bothered by being precise.
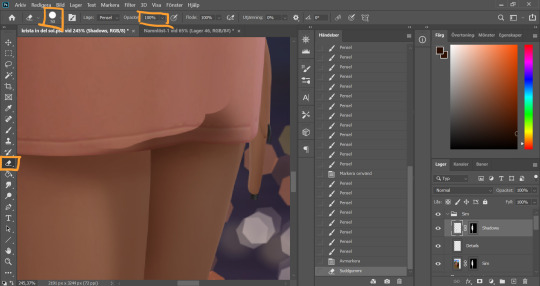
I deselect and use the eraser tool with a hard brush and 100% opacity and start erasing the shadow parts I don't want, I'm careful not to go over any skin parts on the leg and hand. So this is a perfectly good method to use if you don’t want to section off using the pen tool all the time. I switch between the two depending on the size of the area.
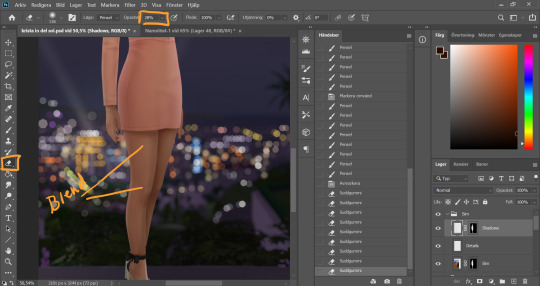
I blend the parts of the shadows that I feel are too harsh with a low opacity soft eraser brush.
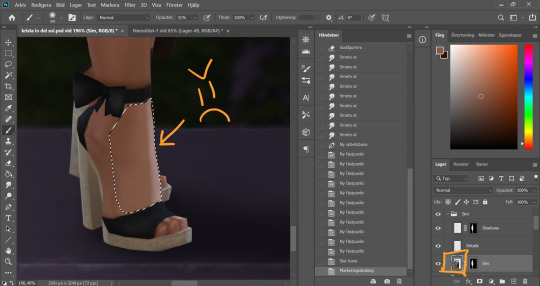
The foot had a little of that mucky highlight thing going on as well, so I mark that part of (pen tool) and go to my Sim layer.
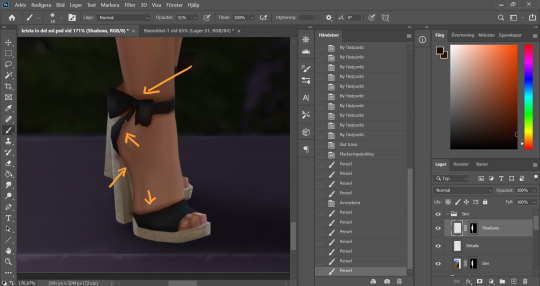
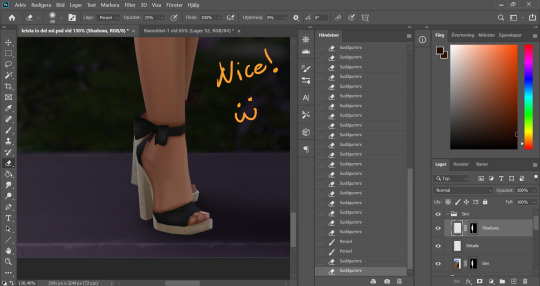
I go over with an eyedropped color, and go back to my Shadow layer to start adding shadow with my shadow color. I draw shadows along the shoe part and underneath the sole of the foot. This is just to add some dept. Since this was such a small area I opted to not section the skin parts off, I just painted over the whole damn thing and went back in with an eraser to remove any unwanted shadow from the shoe parts.
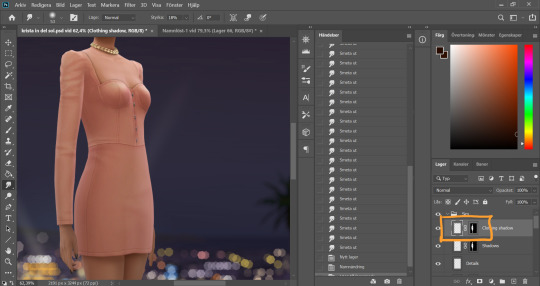
I make a new layer for my Clothing Shadow, and copies the Sim layer mask onto this one as well by holding Alt, grabbing the layer mask and dropping it onto my new layer.
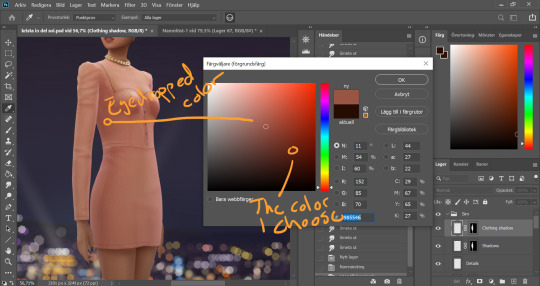
I eyedrop a color from the darker part of her dress and choose a darker more saturated version of that color. Usually I go with black for the clothing shadow, but it depends on the original colors of the clothes. With bright colors like this dress I go for a darker version of that color.
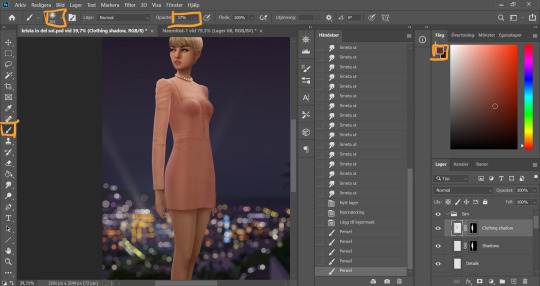
I definitely did not do myself any favours when I decided to have the light come from the back of this sim. Straight from the front is always easiest but hey, challenges is how we grow. I use a big ass soft brush and go over the front of the dress.
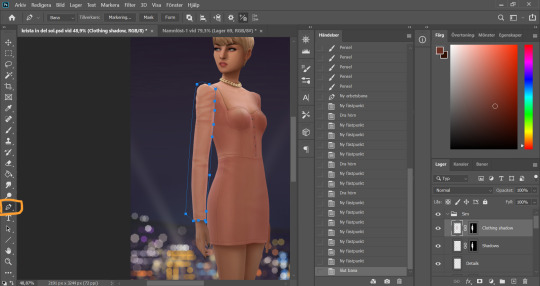
Aaaaand the pen tool is back again. I section off the arm of the dress.
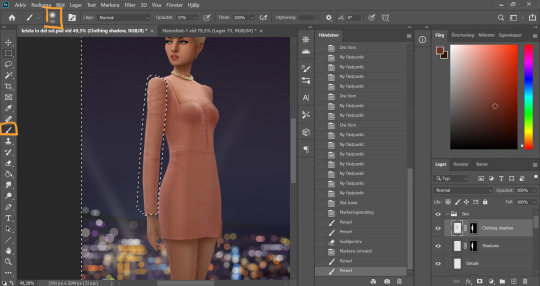
I chose a slightly smaller brush than before (still pretty big though) and go over the part of the arm that´s facing away from the light. Then I invert the selection and paint shadows on the body under the arm, I build up a little more color here.
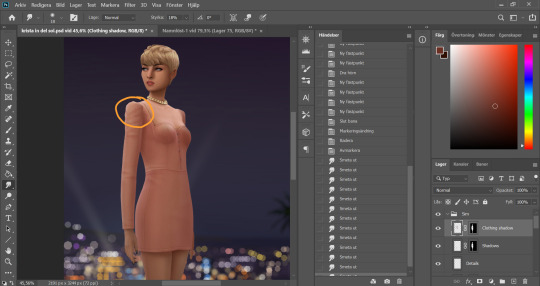
I deselect and now we´ve got a pretty sharp line around the shoulder where there naturally would not be. I go in with the eraser brush (low opacity, soft brush) and blend it out. I also blend the shadow that was on the front of the body since it was to harsh.
Now I realized that the light would not hit the hip that directly since the lower part of the arm is in the way, so I section off a big of the hip.
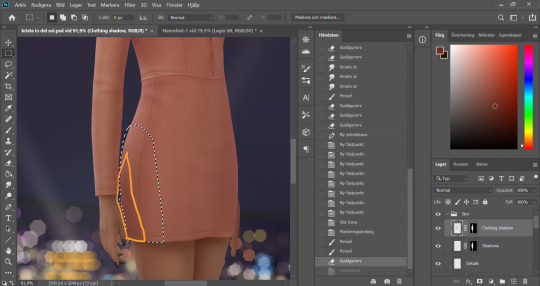
Since I don't work with especially harsh shadows, and since the arm is not directly in touch with the hip, I draw sort of a cone shaped shadow here. Not letting the tip of the cone reach all the way to the edge of the back.
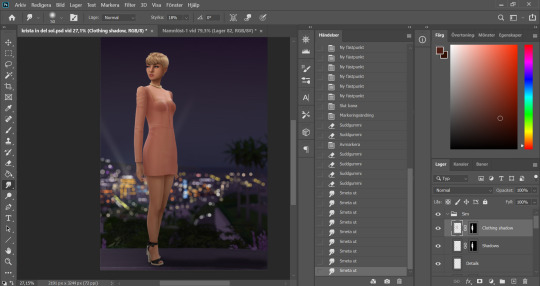
I clean up a little more using smudge and eraser tool. She´s starting to look pretty good eh?
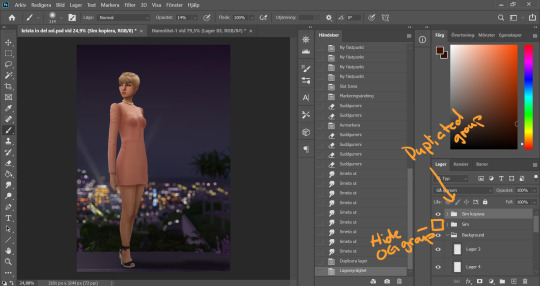
Now I want to merge all my Sim layers, but since I suffer from anxiety and can´t committ fully I want to keep all the layers as well. So I mark the Sim layer group and duplicate it (ctrl+ J), and hide the original Sim layer group.
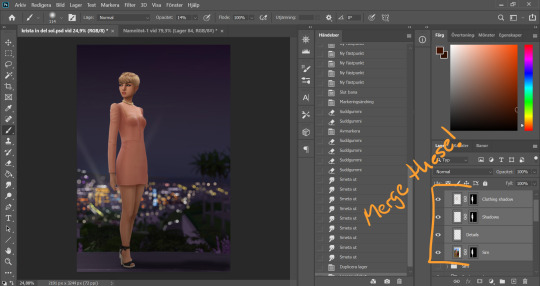
I select all the layers in my new Sim layer group and merge them by pressing ctrl + E.
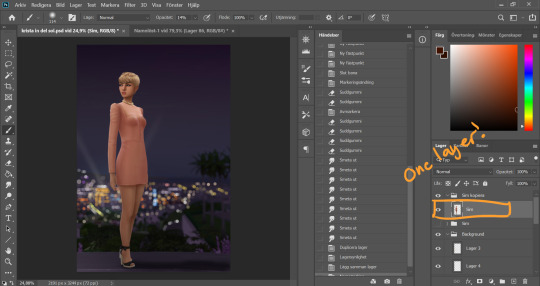
Now they´re one layer, without any layer masks. For the purpose of this tutorial I rename this layer Sim (when merging the way I do the new layer will take the name of the top Layer). Now this is our new Sim base layer, the old one is hidden away and hopefully we don´t have to touch that again because that would mean I would have made a major mistake somewhere that I can´t correct on this new layer. It’s very unlikely, but it feels nice still having those other layers as backup.
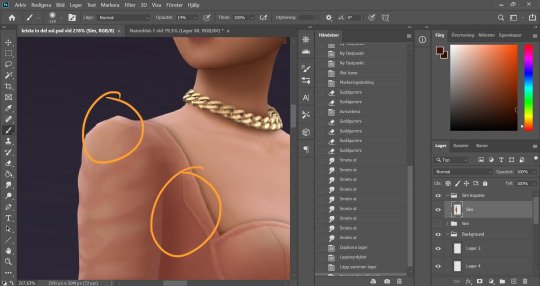
Since Sims is a video game we have some parts that are pretty square in our picture even though they wouldn´t be in real life. Time to smooth things out.
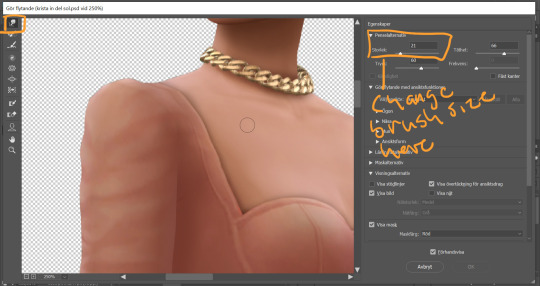
I go to Filter -> Liquify. This is like the smudge tool on crack. There´s a lot of things that can be done in here but in this particular case I'm going pretty simple. I use the smudge and go over any pointy bits that are'nt supposed to be pointy. I change the brush sizes to fit the area I'm working on. Some places need smaller brushes, some benefit from bigger ones.
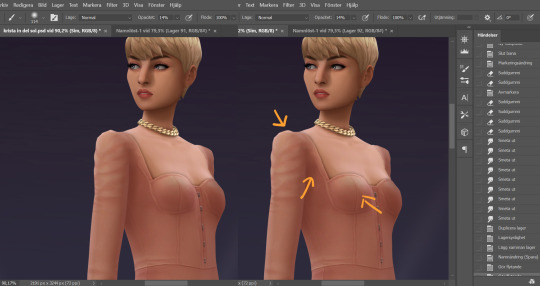
Here's a comparison before and after of some of the things I corrected in Liquify. It's not a huge difference but it does looks nicer.
And that concludes part 4 of this tutorial. Don’t hesitate to message me if you have any questions.
116 notes
·
View notes
Photo

This Gen Z founder is pitching hundreds of investors… via Venmo – TechCrunch
My cellular phone buzzes as I get a text from a good friend who’s a spouse at a VC agency. It is a screenshot of a Venmo notification that just arrived in. “My 2 cents on why you should invest in my business,” reads the message she been given, along with a $.02 transfer. I tracked down and emailed the founder who sent the transfer to determine out what they were being up to.
“In the earlier two and a 50 % weeks I have reached out to above a hundred VCs, angels, stars, athletes and influencers as a result of Venmo,” suggests Chip Herndon, CEO and co-founder at Chatterbox , in an job interview with TechCrunch. He statements that his unorthodox marketing marketing campaign has been pretty productive. “I’ve been given multiple responses, two of them becoming terribly significant excellent. The first was a partner at [a venture firm], the other was an angel investor.”
Herndon promises that messages people were being the starting of a string of conferences that may perhaps perfectly result in an investment.
Chatterbox is a system that describes by itself as a Nextdoor for Gen Z. It connects youthful folks in their neighborhood communities by way of a medium they understand — team chats.
A screenshot from the Chatterbox website. Impression Credit history : Chatterbox .
“In our early phase we’re targeting school campuses. We have a few core attributes: person-created chats, emergency chats and lasting chats. For case in point, we’ll start at UCLA in partnership with the USAC President this October,” promises Herndon. “As portion of the MVP we’ll have long lasting chats for each dorm building, library and other substantial-person-density destinations we’ll also allow for people to generate chats for attention-grabbing situations they experience, and lastly we’ll automatically generate chats for emergency conditions.”
The founder claims that the Venmo-fueled outreach campaign stems from a want to be discovered in an intensely aggressive landscape.
“I had to get scrappy. I set aside four hours with only a pen and a piece of paper in front of me, not letting myself to do anything at all other than brainstorm until finally I experienced a method,” states Herndon. “In that time, I believed of various untraditional avenues to speak to anyone, but in the conclusion I made the decision that Venmo would be the ideal.”
Leveraging the Venmo platform’s research and profile pictures options, he established out to uncover the traders he was hunting for, and he claims this allows him to “gain their awareness in a way that does not truly feel intrusive.”
Not all investors agree on that certain stage. “It feels a minor creepy,” famous 1 trader who acquired just one of the Venmo transfers.
That may well not be the circumstance for everyone, while.
“You’ve obtained to do what you can to stand out,” stated an associate at another undertaking fund I spoke with for this story, and for a minute seemed impressed by the creativeness. “Would I adore to receive a ton of $.02 donations with a bunch of random pitches for startups? No, but the first just one or two could possibly stand out plenty of that I’d shell out notice.”
Kudos for hoping a little something new, I suppose, but be aware that gimmicks normally backfire.
So, is this the next major way to arrive at out to investors? Individually, I consider it will come across as really spammy. Let’s set it this way: The initially PR human being that tries to pitch a story to me through Venmo will get on their own banned and blacklisted my e mail tackle is uncomplicated to obtain , and in my view, it feels really skeevy to consider to go around the channels that are in area to get oneself to the front of the record. But then, I’m a tiny OldManYellsAtCloud.gif about these items your mileage may perhaps range. Just be knowledgeable of the to start with perception you are building it may not be as favourable as you consider.
https://socialwicked.com/this-gen-z-founder-is-pitching-hundreds-of-investors-via-venmo-techcrunch/
0 notes