#my aadhaar
Explore tagged Tumblr posts
Visit Tumblr Blog
Explore Tumblr blogs with no restrictions, modern design and the best experience.
Last Seen Tumblr Blogs


Fun Fact
25% of US internet users with an annual income of $80-100K use Tumblr.
Text
My Aadhaar - Latest News, Update & Changes 2023-24

Aadhar ENrollement form.
A crucial piece of documentation that has significantly aided India's digitization efforts is the Aadhaar Card. The person receives a digital identity as a result. Indian nationals receive this identification card from the Unique Identification Authority of India (UIDAI). The entire My Aadhaar part of the official UIDAI website allows users to access a variety of Aadhaar services without logging in. One person may only apply for this ID card once, although there are features to make adjustments and get it back if it becomes lost.
What is myAadhaar?
The initial tab on the UIDAI website that users can access to access a variety of Aadhaar services without having to log in is called My Aadhaar. When you place your mouse over it, a dropdown menu containing all of its services organised by categories displays.
You can retrieve your lost Aadhaar card, validate your Aadhaar number, produce VID (Virtual ID), and learn more about Aadhaar in its knowledge centre using the My Aadhaar portion of the UIDAI website. Even an appointment can be scheduled there.
How to Download Aadhaar Online?
Using your Aadhaar or Enrolment number, you can access the UIDAI website and get your Aadhaar card. The steps are listed below.
Step 1: Navigate to the My Aadhaar tab on the official UIDAI website.
Step 2: Select Download Aadhaar from the Get Aadhaar menu.
Step 3: Scroll down to the Download Aadhaar option from the options that are given after being redirected to a new website.
Step 4: On the screen, a brief form will appear. You must provide both your Aadhaar number and the security code.
Step 5: Go to the menu and choose Send OTP.
Step 6: Complete the OTP that UIDAI sent to your registered phone number.
Step 7: Tap the Verify and Download button, and your Aadhaar will be downloaded to your phone or computer instantly.
Step 8: To read the password-protected file, you must type the password, which consists of your first four names in capital letters (just as they appear on your Aadhaar), and your birth year in YYYY format. As an illustration, your e-Aadhaar password would be SHIV1980 if your name is Shivam Singh and your birth year is 1980.
Step 9: To view your Aadhaar Card, press enter.
How to Verify Email/Mobile using My Aadhaar?
To verify your 16-digit Aadhaar number, along with your registered email address and phone number, on the UIDAI official website, follow the steps listed below.
Step 1: Navigate to My Aadhaar on the Unique Identification Authority of India (UIDAI) website.
Step 2: Click the Verify Email/Phone Number option under Aadhaar Services.
Step 3: After a brief form displays on your screen, choose the option that best suits your needs between Verify Mobile Number and Verify Email Address.
Enter your Aadhaar number in Step 4. Enter your registered phone number if you selected Verify Mobile Number. Enter your registered email address if you selected Verify Email Address.
Step 5: Enter the security code and select Send OTP from the menu.
Step 6: Correctly enter the OTP or verification code you were sent through email or smartphone (depending on what you are validating).
Step 7: After inputting the verification code, the following page will display the following text: The provided phone number and/or email address have been validated.
How to Verify Aadhaar?
The methods to use My Aadhaar to verify your Aadhaar on the UIDAI official website are shown below.
Step 1: Click on Verify An Aadhaar Number in the Aadhaar Services section of the My Aadhaar tab on the official UIDAI website.
Step 2: Enter your Aadhaar Number on the new page after being routed there, enter the security code, and then select the Proceed And Verify Aadhaar option.
Step 3: The message "Aadhaar Verification Completed" will appear on the following page.
How to Locate an Aadhaar Enrolment Centre?
On the UIDAI website, there are three ways to find the enrollment centre. By state, postal code, or search box, you can do a search. We will go over each of these three methods for finding an enrollment centre nearby in this section.
Search by State
To find the nearby enrolment centres in your state, follow these instructions:
Step 1: Click Locate an Aadhaar Enrolment Centre in the Get Aadhaar column of the My Aadhaar tab on the UIDAI website.
Step 2: On the new page that appears after being redirected, choose the State option under Search By.
Step 3: Enter the necessary information, including the name of your state, your district, subdistrict, village, town, or city, and check the box next to Show only permanent centres.
Step 4: Enter the security code, then click Find a Centre. Your screen will show a list of every permanent enrolment centre nearby.
Search by Postal (PIN) Code
To find the closest enrollment centres by state, follow these instructions:
Step 1: You will be taken to a new page after choosing Locate an Enrolment Centre from the Get Aadhaar column under My Aadhaar.
Step 2: Select "Postal (PIN) Code" under "Search By."
Step 3: Enter the security code and 6-digit postal code, then click "Locate a Centre." On your screen, a list of enrollment centres will appear.
Search by Search Box
If you want to use the Search Box to find the closest Aadhaar Enrolment Centre, follow the instructions below.
Step 1: You will be taken to a new website after clicking on Locate an Enrolment Centre in the Get Aadhaar column under the My Aadhaar button.
Step 2: Under Search By, choose the Search Box option.
Step 3: Type in your neighbourhood, city, and location.
Step 4: Correctly enter the security code and tap Find a Centre. On your screen, a list of enrollment centres will appear.
How to Book an Appointment via My Aadhaar?
The My Aadhaar option on the UIDAI website allows you to schedule an appointment with the closest Aadhaar Seva Kendra. An Aadhaar Seva Kendra offers a variety of services, including the following:
New Aadhaar enrolment
Updations of:
Gender
Email ID
Name
Address and Phone Number
Date of Birth
Biometric Update (Iris + Fingerprints + Photo).
To make an appointment at the closest Aadhaar Seva Kendra, follow these steps:
Step 1: Go to My Aadhaar on the official UIDAI website and select the Book an Appointment option under the Get Aadhaar column.
Step 2: Pick your city or location on the redirected Aadhaar Seva Kendra page, then press the Proceed to Book Appointment button.
Step 3: Select the cause for your appointment from the three options (Aadhaar Update, New Aadhaar, Manage Appointments) when a new page opens on the screen.
Step 4: Type in the phone number you registered.
Step 5: Enter the security code and select Generate OTP from the menu.
Step 6: Complete the OTP and select the option to verify the OTP.
Step 7: Enter the information.
Step 8: Decide which field needs updating.
Step 9: Choose the date of your appointment based on your preferences.
Review the application in Step 10 and then click the "Submit" button. Your attempt to arrange a meeting was successful.
Page URL : https://www.bigproperty.in/blog/my-aadhaar-latest-news-update-changes-2023-24/
0 notes
Text
How Do I Apply for a 10,000 Loan Using My Aadhaar Card?
You can complete the following steps to apply for a 10,000 loan on an aadhar card: Before submitting a loan application, verifying your credit score is a good idea. With the help of several web resources, you may check your credit score for free. Research lenders: Examine different lenders and contrast their interest rates, costs, and requirements. Choose a lender that can meet your demands and…

View On WordPress
0 notes
Photo
So, you’ve dipped your toes into the world of Bitcoin in India and now you’re wondering, “How do I actually get my money out? How do I withdraw my bitcoins to cash?” It’s a perfectly valid question – Bitcoin’s a fascinating technology, but it needs a route to connect with our everyday rupees. This guide helps you understand the various methods for converting your Bitcoin holdings into Indian Rupees (INR), navigating the process smoothly and with confidence. We’ll cover different options catering to varying levels of tech-savviness and risk tolerance, keeping things clear and simple throughout the process. Let’s dive in!
Understanding the Bitcoin to INR Conversion Process
Converting your cryptocurrencies into traditional Indian Rupees takes a few steps, and understanding the process upfront is key.Essentially you require a platform that either directly deals in Bitcoin or offers a gateway to convert it on external platforms to obtain your INR.. But this involves the added consideration of a fee for doing a conversion (a small commission paid by you is involved as compensation for the services provided by third-party exchanges) along with certain banking related challenges specific to India. Each method has specific instructions, security procedures, fees and processing time.
Choosing a Reliable Bitcoin Exchange
Selecting the right bitcoin exchange platform or Peer-to-Peer (P2P) trading platform is arguably among the most crucial aspect of converting to INR. Your financial security along with time involved also heavily factors into exchange platform selection. Here in this section we explore some of India’s popular and also reliable choices of exchange based bitcoin platforms and also p2p options.
Popular and Reliable Bitcoin Exchanges:
Several regulated/legal Bitcoin exchanges/payment gateways operate within india These include CoinDCX, WazirX, ZebPay & CoinSwitch Kuber. They bridge the gap between your digital wallet and exchanging Bitcoin for rupees and vice-versa while enabling secure storage as well within certain limitations based on exchange regulations and safety protocols in place from respective exchanges. Be wary of the regulatory and technological safety requirements when considering such platforms.
Peer-to-Peer (P2P) Trading Platforms:
Alternatively, P2P platforms serve as essentially a secure platform to let you and another entity perform a direct exchange where no exchange is needed unlike other exchanges/platforms These aren’t as regulated as traditional exchanges, but also they can sometimes offer improved and customzied exchanges due to more autonomy offered between seller/buyer of Bitcoin during the transactions involved LocalBitcoins is, however you should always check for reviews to ascertain exchange security along with background checks and reliability. Always prioritize well-vetted and reputed trading partners.
The Process of Selling Bitcoin on an Exchange
Let’s say you choose one of India’s well recognised BTC exchange. After creating an Account:
1. Verify Your Account: Exchanges require you to verify your identity using KYC (Know Your Customer) and AML (Anti-Money Laundering) procedures – it should be painless and necessary requirement in this field. You’re generally required to furnish your PAN card, Aadhaar card, along sometimes also proof of address etc.
2. Add Funds Securely: Now fund your account via several choices within an exhange’s rules and also your discretion of course– this is usually an immediate action
3. Initiate the Sale: Initiate selling Bitcoin at currently available market rates offered through your chosen platform at that very instant. Often a “sell order” is the equivalent way most platforms will state for trading processes
4. Receiving Your Rupees: Check on the status carefully as the number in Rupees (INR) proceeds you generate are credited into your bank account, or perhaps a direct bank transfer based on platform policies for direct deposits which is very useful to you. The time this aspect takes fully varies depending on processing, banking systems involvement as expected
Avoiding Scams and Protecting Yourself During Withdrawal:
Given the nature of cryptocurrency, an awareness that numerous instances occur to victimize unwitting individuals using very sophisticated approaches such as phishing scam sites imitating their structure & name. These scams occur both in other countries as well as in India where numerous people even experts in the trading field remain victims!Always diligently follow secure practices to secure your bitcoins & funds, for instance, a few key points as follows:
Verify exchange legitimacy: There’s quite often reports of numerous bitcoin trading platforms and or payment gateways claiming false affiliation with various institutions that appear legitimate but not associated whatsoever!
Secure Passwords and Multi-Factor Authentication (MFA): Use strong, unique passwords for all your accounts. Utilize the strong account protections given to reduce unauthorized chances
Only Deal With Trusted Exchanges or individuals Do thorough research via multiple legitimate and reliable sources (online sources too) and also reviews before you get started otherwise before you know it you may have experienced a rather unfortunate event with your money gone forever never to recover ever!! A common method in India involves fraud exchanges giving false claims of crypto holdings via misleading trading offers.
Using Peer-to-Peer (P2P) Exchanges for Bitcoin Withdrawals
P2P trading has its benefits especially with higher conversion rate that comes with some drawbacks but not always and its the advantage of a faster overall transaction speed if you were selecting the suitable alternative such as an Indian or foreigner seller offering an exchange option for you personally
But this comes with added considerations too if relying on India individuals without established P2P platforms with trust issues. Therefore ensure to always get sufficient feedback ratings based also within your personal risk tolerance to make a call However , there too a risk that may end in financial losses when engaging individuals via P2P unless using highly vetted P2P Platforms with suitable features to lower this particular risk
Always check these 3 security aspects of your selected P2P exchange. The more suitable that satisfy your concerns or even those that offer more assurances or even several additional security layers involved. Your risk tolerance heavily decides for the decision after checking against sufficient feedback metrics & safety protocols put in place :
1. Escrow System: Reliable escrow method ensures your bitcoins are only released to the buyer upon satisfactory proof/conclusion of the funds transferred into sellers account details as designated by you which offers buyer and also importantly the seller (you) added safeguards & security both equally
* Verification Look always into background checks especially important too to gauge the trustworthyness if you plan conducting exchange between users in this scenario as lack of thorough background checking would make for a larger possible risk that an individual fraudulent transaction to occur
Secure Communication: Use only legitimate secure messaging communication with sellers such as Telegram which generally should involve using appropriate encryption with a feature to allow message self-destruction/deletion
Regulations and Taxation of Bitcoin in India
Stay ahead of the Taxman! The taxation on Bitcoin income/profit gain within India for 9 year periods is 30%. You need a detailed understanding for this purpose.
FAQs: Withdrawing Bitcoins to Cash in India
Q1: Are there any legal restrictions on withdrawing Bitcoin to INR in India?
A1:Currently, no explicit outright bans exist when comparing it against other countries on withdrawing your Bitcoin in INR through authorized/officially established exchange platform in compliance with the prevailing legal tax regulations, however the tax regulations remain. A common misunderstanding is regarding legality, this is actually a bit of confusion within the field since there’s still clarity & discussion that continuously evolve around regulatory frameworks within the field itself given that various newer platforms arise for various financial instruments. Therefore its wise to stay up-to-date.
Q2: What are the fees involved in withdrawing Bitcoin to INR?
A2: The particular fees generally vary with any withdrawal from bitcoin (depending of Bitcoin conversion fees depending on which exchange) network/transaction fees (this could vary slightly) in INR are included for the entire transactions, other operational and processing fees via the exchange (they will disclose their exact process including the fees so check there ahead of such transactions ) along depending on banking, processing of transactions involved. A rough but conservative range may approximate that somewhere about perhaps approximately 2-4% plus some cases there may added external fees depending upon situations
Q3: How long does it typically take to withdraw Bitcoin as INR?
A3: This period generally varies. It heavily does dependent based for the choice of methods made using other factors being the nature of platform used, that is, it can be as short as a small number less than say hours , yet may sometimes unfortunately take upto multiple several days (upto a week at most is quite a bit, generally these cases do arise fairly infrequently within the normal cases however and it could take far longer for many reasons including system delays beyond what individual company usually can remedy themselves independently or immediately unless the underlying banks themselves resolve issues at source) Before that actually goes into place within some companies for some scenarios and you would want to consider checking whether delays may already exist by their support network or communications to be fully clear & better understand situations before a loss unfortunately incurred and a need occurs too at times if major banks etc are affected
Q4: Is it safe to withdraw Bitcoin to a bank account through an exchange?
A4:Selecting regulated reliable platforms (the type having formal establishment & licensing such cases are the important point therefore choose such institutions to work only!), this increases that there’s far reduced chances of occurring any fraud/unsafe withdrawal but with adequate security procedures put fully in place helps lower this risk to relatively small but of course absolutely not none-existent, never expect this type situation especially unless suitable precautions are carried out & sufficient security steps are performed then as soon additional vulnerabilities always are discovered (in reality security generally requires neverending vigilance)! Its far better have a safe scenario and avoid cases that prove unfortunately negative so follow this good advice.
Let’s wrap up. Converting Bitcoin to INR is accessible; its possible via several options. Carefully choosing how to choose with best suitability matters greatly to you so read our comprehensive guide here again for that! Always check for legitimacy via research before choosing the exchange carefully and also understand there are fees to be aware along with reasonable time periods until fully into a receipt which has occured successfully from being transferred therefore keep to mind time is needed along process. We also talked about this process throughout! Make all these preparations if needing to convert Bitcoin in INR – its essential even if quite involved for your added benefit always check on this in advance, to protect fully, before any such procedures otherwise you could regret it a few days & weeks afterwards!
Let me know more in comments if even if anything we explained remains unclear, especially to clear this point even from a detailed discussion on regulatory legal aspects too. Share anything below in the comment below. Perhaps you discovered an easier method recently not included. Your ideas on this subject would be quite enlightening to assist greatly for not only the existing many readership of our viewers/followers here at present but as very often we receive a high influx of several newcomers frequently for this field in addition! therefore this would improve readability for far more readers! Your ideas always welcome here, kindly help others using examples from what you did and feedback via posting comments therefore allowing any such advice or information useful which you acquired first-handy based upon what you did would therefore help several readers immensely therefore enabling us to provide readers a highly improved reader experience here when such feedback available!! Thank you so very much! Share this info with your friends, families – please disseminate this far & wide!
0 notes
Text
Common Mistakes to Avoid During LLP Registration Online

Limited Liability Partnership (LLP) is a famous business shape in India but, many entrepreneurs make errors through LLP Registration Online, main to delays, rejections, and compliance problems.
This article highlights what an LLP is, the common errors and the way to avoid them for a clean registration technique. What is an LLP? A Limited Liability Partnership (LLP) is a business structure where companions have restrained legal responsibility, meaning they aren’t in my view chargeable for money owed. How is it Registered Online?
Obtain DSC & DIN: Digital Signature Certificate (DSC) and Director Identification Number (DIN) for partners.
Reserve Name: Apply on the MCA portal.
File Incorporation Form: Submit Form FiLLiP with the required files.
Draft LLP Agreement: Define roles and income-sharing.
Get LLP Certificate: MCA has problems with the registration certificates.
1. Choosing an Invalid LLP Name Many applicants make the mistake of choosing names that: Resemble existing groups or LLPs. Contain confined words without approval. Do not comply with MCA (Ministry of Corporate Affairs) pointers.
Tip: Check name availability at the MCA portal and follow naming hints earlier than applying. 2. Errors in Documentation Common mistakes include: Mismatched information in PAN, Aadhaar, or deal with proof. Missing No Objection Certificate (NOC) for rented workplace area. Submitting uncertain or unsigned copies of files.
Tip: Double-take a look at all details and ensure documents are well-signed and scanned. 3. Not Obtaining a Digital Signature Certificate (DSC) and Director Identification Number (DIN) in Advance DSC and DIN are obligatory for distinct companions, but applicants regularly delay their procurement, inflicting pointless registration holdups. Tip: Apply for DSC and DIN at the beginning of the method to avoid delays. 4. Incomplete or Improper LLP Agreement Common errors include: Not specifying clear earnings-sharing ratios. Missing dispute decision clauses. Delaying settlement submission past 30 days of incorporation leads to consequences. Tip: Draft a comprehensive settlement and file it on time with the MCA. 5. Ignoring Post-Registration Compliance Filing annual returns with the MCA. Maintaining the right monetary information and tax filings. Adhering to GST registration requirements if relevant. Tip: Stay updated on compliance time limits to keep away from penalties.
Conclusion LLP Registration Online is an easy but element-oriented process. By avoiding commonplace errors like selecting an invalid name, submitting incorrect files, or neglecting compliance, organizations can ensure problem-free registration and clear operations.
1 note
·
View note
Text
Stock Market Basics for Beginners: How to Start Trading in India
Picture this: You open a stock market chart for the first time, and it looks like something out of a sci-fi movie. Been there! When I first started, those squiggly lines and mysterious numbers might as well have been ancient hieroglyphs. But here’s the good news—if this confused beginner could figure it out, you absolutely can too.

The Story That'll Surprise You:
Did you know something fascinating? Right here in India, our National Stock Exchange (NSE) isn’t just big—it’s the world’s largest derivatives exchange by volume. Pretty impressive, right? But wait till you hear this: from 2019 to 2023, Demat accounts in India exploded from 35 million to over 110 million. Think about it—that’s like the entire population of a small country joining the investment world!
And if you’re thinking, “Isn’t this just for rich folks?”—the Sensex has a story to tell. From a modest 1,000 points in the ‘90s to dancing above 60,000 today, it’s proof that patience pays off in the market.
Getting Started: Your Step-by-Step Journey
The Essential Toolkit 🗂️
Just like you wouldn’t cook without ingredients, you can’t trade without these basics: ✔ PAN Card (Your financial identity) ✔ Aadhaar Card ✔ An active bank account ✔ Proof of address ✔ A few passport photos ✔ Recent bank statements (especially if you’re eyeing derivatives)
Setting Up Your Trading Hub 💻
You’ll need two key players:
A Demat Account – Your digital share vault.
A Trading Account – Your market gateway.
💡 Pro Tip: Check out platforms like Zerodha Kite, ICICI Direct, or Angel Broking. They’ve made the process so smooth that you can set everything up online in just 2-3 days!
Speaking Stock Market Language 📚
Remember how confusing cricket commentary was before you learned the game? Market terms are similar:
Market Cap = A company’s league ranking.
Volume = Today’s popularity contest.
P/E Ratio = The “Is it worth it?” number.
Dividend Yield = Your patience reward.
Volatility = The stock’s drama quotient.
Your Path to Success 💰
Let me share some wisdom I wish someone had shared with me:
The Golden Rules ✨
✔ Start tiny (seriously, no need to go big). ✔ Only invest what won’t keep you up at night. ✔ Mix things up (different stocks = better sleep). ✔ Keep emotions in the backseat. ✔ Always have an exit plan (for both wins and losses).
Smart Money Moves 💡
The 20% Rule: Save first, then invest.
Age-Based Planning: 100 minus your age = stock percentage.
Time Horizon: Think 5+ years for real results.
Mistakes to Skip (Thank Me Later!) 🚫
We all stumble, but here’s your cheat sheet to avoid the big ones: ❌ Going in blind (research is your best friend). ❌ Following random “experts” (social media isn’t your financial advisor). ❌ The one-stock gamble (spread those wings!). ❌ Playing with borrowed money (just… no). ❌ Emotional trading (your gut isn’t always right).
Level Up Your Market Game 📈
Think of this like building a skill tree:
Foundation Skills:
✔ Make financial news your morning coffee companion. ✔ Join investor communities (learn from others’ wins and oops moments). ✔ Attend Mudrank webinars & workshops (knowledge = power). ✔ Practice with paper trading (free mistakes!).
Track Your Journey:
✔ Keep a trading diary. ✔ Note your “why” for every trade. ✔ Monthly review sessions (celebrate wins, learn from losses).
Your Reading List 📚
Want to dig deeper? These books changed my game:
📘 Trading Adventures:
Technical Analysis of Financial Markets – Murphy’s chart magic.
How to Make Money in Stocks – O’Neil’s success blueprint.
Trading in the Zone – Master your trading mindset.
📗 Long-term Wealth Building:
The Intelligent Investor – Buffett’s bible.
Common Stocks and Uncommon Profits – Fisher’s wisdom gems.
One Up On Wall Street – Lynch’s street-smart guide.
Ready to Begin? 🚀
Remember: The stock market isn’t a casino—it’s more like growing a garden. Plant your seeds, tend them carefully, and watch your wealth flourish over time.
Your Launch Sequence:
✔ Document collection ✅ ✔ Account setup ✅ ✔ Basic learning (you’re doing it now!) ✅ ✔ Paper trading practice ✅ ✔ Small, real investments ✅
Every market wizard started exactly where you are. They just took that first step and kept walking.
📢 Drop your questions below! What’s holding you back from starting your investment journey? Let’s tackle those concerns together! 🌱
💡 Remember: The best investment you can make is in learning. Start small, stay curious, and enjoy the journey!
0 notes
Text
What Makes The Gem Portal Login Secure and User Friendly?

1. It should be safe to get into GreM.
When you log in, be careful:
Some information about your sales and business may be hidden.
You can't sign in until you buy something. Some people don't like it. To protect people's privacy, it keeps a close eye on them. People are more likely to join if they trust each other.
2. Things you can do to keep your GeM Portal account safe
a) Looking at an item (MFA)
These are the things that GeM users have to show about themselves:
Name and key of someone.
You should still be able to use the phone number or email address you used to make the account.
This card says that you work for the government.
You can feel better about the things you buy if you use a digital signing certificate (DSC) and e-sign.
b) A place to keep coins safe
People who go to the website need to have strong passwords. For them to work, they need numbers, letters (big and small), and other icons. Here's how to keep the keys safe. Roles (RBAC) decide what people in this case can see. When you buy, own, or are in charge, you can do different things. Because of this, there aren't many safety risks.
d) Captcha and other security measures are used to keep hackers out.
Cryptographic key exchange (CAPTCHA) makes sure that only real people can log in. Everything will be safe if you use Security Layer (SSL). Use SSL to protect your information when you pay or sign in to the GeM page. If you keep this a secret, only the right people will be able to see it. This will protect your privacy.
f) Automatic Logout When Not Used
GeM logs people out right away if they don't do anything within a certain amount of time. The person is less likely to let someone else in without getting out first. The word "DSC" in English means "digital signing certificate." We're going to look at this. GeM checks with DSC to make sure the information is right and can't be changed before doing business or signing important papers.
(h) A lot of moving and checking
The GeM page's security is checked often to make sure it follows the most current rules.
3. Parts of the GeM Portal that are simple to use Type in your password.
GeM works hard to make signing in quick and easy, even though safety is very important.
1) Single Sign-On (SSO) is a service People who use SSO only have to log in once to get to a lot of services. They don't need to type their passwords over and over. In this way, the process goes better. Making the sign up process easy.
2) IDs based on Aadhaar make it easy for people who buy from the government to sign up. People who want to sell can quickly sign up with their PAN. The place where laws start Check what you think you know about a business.
3) A simple look that gadgets can handle GeM login works on phones and computers, so it's easy for people to join.
4) More than one language to talk to each other if you know more than one language, you can use the page.
5) Forgot your email address? Get it with an OTP. People can quickly change their passwords because it's easy to get back in.
6) It's easy for many computers to use. That lets you use GeM from anywhere. It works on Google Chrome, Mozilla Firefox, or Microsoft Edge on Windows PCs.
7) Help with bugs and customer service People who can't join can get help from other users or the help line. It takes place every day. A lot of people come in after a long time.
4. Common Login Issues and Troubleshooting
Q1: I have a hard time remembering my GeM pin. How can I get it to work again?
Solution: When you click "Forgot Password," enter your registered email address or phone number. Then, to make a new password, follow the steps for OTP proof.
Q2: I tried to log in several times but failed, so my account is now locked. What should I do?
Solution: Your account could be locked if you kept typing in the wrong password. You have 15 minutes to either try again or use an OTP to change your password.
Q3: The OTP won't go to the number I gave you, right? What should I do?
Solution: Make sure the number on your smart phone is correct. Also, check your trash or junk box if you used an email OTP. To stop it, ask GeM for help.
Q4: Easy to change the email address or phone number I signed up for GeM with.
When you log in, you can change your picture. You might need to use an OTP to confirm the changes for safety reasons.
Q5: When I try to sign in, I see "Session Expired."
You might not have done anything or your plans might have changed. There are two ways to log in again: clear your cookies or start over with the page.
People who work for the Indian government, public sector units (PSUs), and autonomous bodies can buy and sell things and services online through the Government e-Marketplace (GeM).
How to Get into the GeM Portal
People who buy from the government GeM can only be used to buy things for the government. People from the following groups can buy:
Departments of the Centre and the State Government
Government-run businesses
The government and groups that work alone
Schools, colleges, and study groups
Panchayati Raj Institutions (PRIs)
Municipal Corporations and Government-Linked Organizations
If you work for the government, you have to use either your official email address or an ID that is based on Aadhaar to sign up.
2. Sellers and Service Providers
A lot of different types of businesses can join GeM to sell or provide services.
Producers and traders are the people who make or sell things that the government buys a lot.
MSMEs: These are tiny, small, or medium-sized businesses. Because they follow certain rules, MSMEs can buy things from the government more easily.
New businesses: Through the Start-up India program, well-known new businesses can join GeM.
An OEM is a company that makes something for the first time. They sell things that have their own brand name or patent on them.
The people who work for service providers do a lot of different work, such as IT support, human resources, coaching, transportation, building management, and plenty more.
Groups for men, hobby shops, and self-help groups (SHGs): People who live in the country and run craft shops can also get help from GeM.
3. Not having the chance to sign up
They might not be able to join the program if they don't meet the GeM compliance standards, if they don't have a recent GST registration (except for certain categories that are exempt), or if they fail verification. A company that the government has banned also can't join.
Conclusion:
It's safe and easy for anyone to log in to GeM online. The site has strong protection, digital signatures, automatic proof, and more than one way to prove who you are. This keeps bad people out. SSO, or secure one-sign-on, can be used in more than one language. It's easy to use the new one. Business and the government can use it this way. As long as you follow the rules, GeM is still a safe place to shop or do business. It's getting better. GeM makes it easy, quick, and safe for everyone to do business. GeM changes the way India gets things because it makes it easy for the government and public companies to do business together. No matter if they work for the government, a PSU, an MSME, a maker, or a service provider, GeM makes it easy and safe to buy things. If you meet the requirements and sign up for GeM, you can work for the government in many ways. For more details visit : https://bidhelp.co/
#RWRDC karnataka#northern railway tenders#bihar state electricity board#gujarat revenue department#earthwork tenders#delhi tenders#Secure login on GeM#Easy login on GeM#Effortless bidding on GeM#Consultancy services
0 notes
Text
How to Register a One Person Company (OPC) in Bangalore: A Step-by-Step Guide
overview of the OPC Registration in Bangalore and highlighted some advantages, such as ease of getting loans, perpetual succession, and limited liability. OPC is a legal structure in India designed for single entrepreneurs to operate as a company while enjoying limited liability. Let me elaborate on the points you've mentioned:
Formation with a Single Person:
OPC allows a single person to form and operate a company, eliminating the need for multiple members, which is required in other companies.
Eligibility Criteria:
Only a natural person who is an Indian citizen and resident in India is eligible to act as a member and nominee of an OPC. Foreign nationals or entities cannot form an OPC.
Perpetual Succession:
OPC enjoys perpetual succession, meaning that the company continues to exist even if its sole member dies or becomes incapacitated. In such cases, the nominee appointed by the member takes over the company's affairs.
Limited Liability:
The concept of limited liability protects the member's assets. In financial obligations or legal issues, the member's liability is limited to the extent of the capital invested in the company.
Ease of Getting Loans:
While OPCs provide certain advantages, the ease of getting loans depends on various factors, including the company's financial health, the member's creditworthiness, and lending institutions' policies. A separate legal identity can facilitate borrowing, but lenders may still assess the individual's creditworthiness.
Options for Loans:
Like other companies, OPCs can explore various financing options, including personal loans, loans against gold or securities, and credit cards. The availability and terms of loans will depend on the individual's and company's financial standing and credit history.
Compliance Requirements:
OPCs are subject to specific compliance requirements, including filing annual returns and financial statements with the Ministry of Corporate Affairs (MCA).
Entrepreneurs considering OPC registration must carefully evaluate their business needs, the legal requirements, and the potential advantages and limitations of this structure. To ensure compliance with applicable laws and regulations, it is advisable to seek professional advice from a company secretary, chartered accountant, or legal expert during registration.
Documents required for OPC registration in Bangalore
The documents required for OPC Registration in Bangalore or anywhere in India typically include both identity and address proofs of the proposed director(s) and some documents related to the company. Please note that these requirements may change, and checking the latest guidelines and regulations is crucial. As of my last knowledge update in January 2022, here is a general list of documents needed for OPC registration:
For the Director:
- PAN Card
- Aadhaar Card
- Passport (for foreign nationals)
- Passport-sized photograph
- Voter ID or Driver's License
For the Registered Office:
- Proof of the registered office address, such as a recent utility bill (electricity, water, or gas) or property tax receipt.
- No-Objection Certificate (NOC) from the property owner if the property is rented.
For the Nominee:
- PAN Card
- Aadhaar Card
- Passport-sized photograph
Other Documents:
- Memorandum of Association (MOA) and Articles of Association (AOA)
- Declaration in Form INC-9 by the first subscriber(s) and director(s)
- Affidavit from the director and the nominee confirming their eligibility and consent
- Consent to act as a director and declaration of the directorship in other companies
- Proof of the company's registered office address, such as a rent agreement (if rented), along with the landlord's PAN card and utility bills.
Additional Documents:
- Digital Signature Certificate (DSC) for the director and nominee
- Director Identification Number (DIN) for the director
- Name Reservation Application (INC-1) approval
- Certificate of Incorporation (if the company is being converted from another business structure)
Form Filing Documents:
- Various forms need to be filed during the registration process. These forms include SPICe+ (INC-32), INC-22 (Notice of situation of registered office), and INC-20A (Declaration for commencement of business).
Ensure that all documents are prepared and submitted in the prescribed format and comply with the rules and regulations set by the Ministry of Corporate Affairs (MCA).
It's advisable to consult with a professional, such as a company secretary or a chartered accountant, to guide you through the registration process and ensure compliance with the latest requirements. Additionally, you can check the MCA website or portal for the most up-to-date information and forms.
One-Person Company Registration Process in Bangalore
OPC Registration in Bangalore, or anywhere in India, involves several steps. Here is a general overview of the OPC registration process:
Digital Signature Certificate (DSC):
- The first step is to obtain a Digital Signature Certificate for the proposed director of the OPC., which is necessary for filing online forms with the Ministry of Corporate Affairs (MCA).
Director Identification Number (DIN):
- Apply for a Director Identification Number (DIN) for the proposed director. DIN can be obtained by filing Form DIR-3 online.
Name Reservation:
Choose a unique name for your OPC and check its availability. Then, file the name reservation application (INC-1) with the MCA. The new SPICe+ (INC-32) form includes a web service for reserving a name and the incorporation application.
Drafting Memorandum of Association (MOA) and Articles of Association (AOA):
Draft the MOA and AOA, which define the company's objectives and rules. These documents need to be filed along with the registration application.
Incorporation Form Filing (SPICe+):
- Complete the incorporation process by filing the SPICe+ (INC-32) form online. This form combines services, including DIN allotment, name reservation, and incorporation. Attach the necessary documents, including MOA, AOA, and the first subscriber(s) and director(s) declaration.
Payment of Fees:
- Pay the prescribed incorporation fees, which may vary depending on the company's authorised capital.
Certificate of Incorporation:
- After verifying the documents, the Registrar of Companies (RoC) will issue the Certificate of Incorporation. This document confirms that the company is now officially registered.
PAN and TAN Application:
- Once you receive the Certificate of Incorporation, apply for the company's PAN (Permanent Account Number) and TAN (Tax Deduction and Collection Account Number).
Bank Account and GST Registration:
- Open a bank account in the company's name and obtain the Goods and Services Tax (GST) registration if applicable.
Post-Incorporation Compliance:
- Fulfill post-incorporation compliance requirements, such as maintaining statutory registers, conducting board meetings, and filing annual returns with the MCA.
It is advisable to consult with a professional, such as a company secretary or a chartered accountant, to guide you through the registration process and ensure compliance with the latest regulations. Remember that processes and requirements may change, so it is crucial to check the Ministry of Corporate Affairs' official website for the latest information.
0 notes
Text
Laxmi Bhandar: A Revolutionary Financial Assistance Scheme for Women

Laxmi Bhandar is a flagship financial assistance scheme launched by the West Bengal government to support women from economically weaker sections. This initiative provides direct cash benefits to eligible women, helping them achieve financial stability and independence. Laxmi Bhandar is aimed at uplifting women’s economic conditions by ensuring a steady source of income, thereby improving their quality of life.
What is Laxmi Bhandar?
Laxmi Bhandar is a financial assistance scheme launched by the West Bengal government to provide monthly financial support to women from economically weaker sections (EWS), Scheduled Castes (SC), and Scheduled Tribes (ST). The primary goal of this scheme is to empower women financially by ensuring a steady source of income, improving their quality of life and economic security.
Under the Laxmi Bhandar scheme:
SC/ST women receive ₹1,000 per month
General category women receive ₹500 per month
Direct Bank Transfer (DBT) ensures timely payments
Objectives of Laxmi Bhandar
The Laxmi Bhandar scheme was launched with the following goals:
Empower women financially by providing direct cash transfers.
Ensure economic security for women in lower-income groups.
Promote inclusive development across West Bengal.
Enhance women’s participation in household decision-making.
Eligibility Criteria for Laxmi Bhandar
To avail benefits under Laxmi Bhandar, applicants must meet these eligibility conditions:
Permanent Residency: The applicant must be a resident of West Bengal.
Age Limit: Women aged 25 to 60 years can apply.
Income Criteria: Women from SC, ST, and economically weaker general categories are eligible.
Government Employees: Women working in government jobs are not eligible.
Financial Assistance Under Laxmi Bhandar
The Laxmi Bhandar scheme provides:
₹1,000 per month for SC/ST category women.
₹500 per month for general category women.
Payments are processed through Direct Bank Transfer (DBT) for timely disbursement.
How to Apply for Laxmi Bhandar?
Eligible women can apply for Laxmi Bhandar by following these steps:
Visit the official website for registration.
Fill out the application form with necessary details.
Attach required documents, including Aadhaar card, bank passbook, and residential proof.
Submit the application and receive an acknowledgment slip.
Check the payment status through the official Laxmi Bhandar portal or by visiting your bank.
Frequently Asked Questions (FAQs)
Q1. What is Laxmi Bhandar?
Ans. Laxmi Bhandar is a West Bengal government welfare scheme that provides monthly financial assistance to eligible women from SC, ST, and EWS general categories.
Q2. Who is eligible for Laxmi Bhandar?
Ans. Women aged 25-60 years who are permanent residents of West Bengal and belong to SC/ST or economically weaker general categories can apply.
Q3. How much financial aid is provided under Laxmi Bhandar?
Ans. The scheme provides ₹1,000 per month for SC/ST women and ₹500 per month for general category women.
Q4. How can I check my Laxmi Bhandar payment status?
Ans. Beneficiaries can check their payment status through the official Laxmi Bhandar portal or by visiting their bank.
Q5. Can I apply for Laxmi Bhandar online?
Ans. Currently, applications are accepted offline via Duare Sarkar camps, but an online process may be introduced in the future.
Conclusion
The Laxmi Bhandar scheme is a significant step toward women’s economic empowerment in West Bengal. By offering monthly financial aid, it ensures economic stability for thousands of women. With a simple application process, direct bank transfers, and inclusive eligibility criteria, Laxmi Bhandar continues to be a lifeline for many households.
#goverment jobs#government policy#goverment#government#sarkariyojana#sarkarinaukri#sarkari exam#pm narendra modi#narendra modi#shikshakosh
0 notes
Text
Cost of Name Change Advertisement in Newspapers

Cost of Name Change Advertisement in Newspapers
Publishing a name change ad in a newspaper is a crucial legal step in the name change process in India. It is generally required to be published in two newspapers:
One English national daily (e.g., The Times of India, Hindustan Times, etc.)
One regional/local newspaper (e.g., Navbharat Times, Hindustan, Amar Ujala, etc.)
Cost Breakdown
The cost of a name change ad depends on several factors:
Choice of newspaper (premium newspapers like The Times of India cost more)
City/Edition (ads in metropolitan editions cost more than regional ones)
Word count (newspapers usually charge per line or per word)
Enhancements (bold text, border, or highlighted text may increase cost)
Here are approximate price ranges:
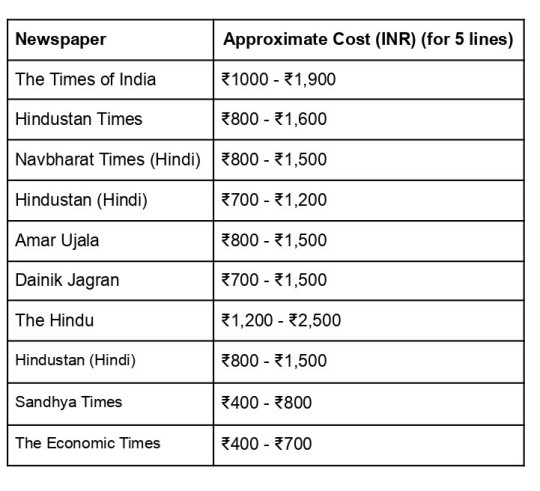
➡️ Additional costs may apply if your ad exceeds the basic word/line limit. Newspapers typically charge ₹100-₹300 per additional line.
How to Book a Name Change Ad?
Prepare a Name Change Affidavit
Get it notarized before proceeding with the ad.
Choose Newspapers
One English daily and one regional newspaper.
Draft Your Ad
Follow the standard format: I, [Old Name], son/daughter of [Father’s Name], residing at [Address], have changed my name to [New Name] and will be known as [New Name] from now on.
Submit Documents (Easily handled by NiroDocs!)
You need to submit a notarized affidavit along with a valid ID proof to the newspaper.
NiroDocs can take care of this process for you, ensuring hassle-free submission and compliance with newspaper requirements.
Newspaper ads can be booked online or by visiting the publication office.
NiroDocs simplifies this step by handling the entire booking process, selecting the right newspapers, and ensuring your ad is published without delays.
Receive & Keep the Newspaper Copy
You may need this for legal or official updates (passport, Aadhaar, bank records, etc.).
💡 Let NiroDocs Handle It! With NiroDocs, you don’t have to worry about any paperwork or booking procedures—we take care of everything from affidavit preparation to newspaper publication.
📞 Contact NiroDocs Today! 📧 Email: [email protected] 📱 Phone: +91 9355305666
💼 From Old to New, We’ve Got You Covered!
#CostOfNameChange#NameChangeAdvertisement#NewspaperAds#LegalNameChange#ChangeYourName#NameChangeProcess#NameChangeCost#MaximizeYourFunds#BrandYourself#AdvertiseInNewspapers#PublicNotification#LegalNaming#NameChangeGuide#CostEffectiveAds#NewspaperAdvertisement#CraftingYourIdentity#IdentiyTransformation#FinanceYourNameChange#FindYourMe#NameChangeAwareness
0 notes
Text
How to Cancel Udyam Registration Online: A Step-by-Step Guide Introduction Udyam
Registration is a government initiative in India aimed at simplifying the process of recognizing Micro, Small, and Medium Enterprises (MSMEs). While registration provides numerous benefits, including access to various government schemes, subsidies, and easier compliance with regulations, there may be instances where a business needs to cancel its udyam certificate download pdf. This guide provides a detailed step-by-step process to cancel Udyam registration online.
Why Cancel Udyam Registration?
There are several reasons why an entrepreneur may want to cancel their Udyam registration:
Business Closure – If the business has ceased operations, Udyam registration is no longer required.
Change in Business Structure – If the entity has undergone structural changes, such as transitioning from a sole proprietorship to a private limited company.
Merger or Acquisition – In cases where the business is merged or acquired by another entity, its Udyam registration may need to be canceled.
Incorrect Registration – If there was an error during the registration process or duplicate registrations were created.
Voluntary Withdrawal – Some business owners may choose to withdraw from Udyam registration if they no longer wish to avail themselves of its benefits.
Eligibility for Cancelling Udyam Registration Before proceeding with the cancellation process, ensure that:
The registered business is no longer operational.
Any government benefits availed under Udyam registration are settled.
The business owner has access to the registered mobile number and email ID used during the Udyam registration process.
Steps to Cancel Udyam Registration Online
The Ministry of Micro, Small, and Medium Enterprises (MSME) has not provided a direct online option for cancellation. However, businesses can request cancellation through an official email process.
Step 1: Gather Required InformationBefore initiating the cancellation, ensure you have the following details:
Udyam Registration Number (URN)
Aadhaar number linked to the registration
Business details (name, address, type of enterprise)
Registered mobile number and email ID
Reason for cancellation
Step 2: Draft an Official Cancellation Request EmailWrite an email requesting the cancellation of your Udyam registration. The email should be addressed to the official MSME support team.
Step 3: Attach Supporting DocumentsTo strengthen your request, attach relevant documents such as:
A copy of the Udyam registration certificate
Aadhaar card of the business owner
Any government-issued closure certificate (if applicable)
Business deregistration certificate (if applicable)
Step 4: Submit the RequestSend the email to the official MSME support team. You should receive an acknowledgment of your request within a few days.
Step 5: Follow Up on the Cancellation RequestIf you do not receive a response within 10-15 days, follow up via email or contact the Udyam helpline at MSME support contact details available on the official website.
Alternative Method: Contact the Udyam Registration HelpdeskIf you face difficulties canceling your registration through email, consider contacting the MSME help desk directly. Provide them with your details and follow their guidance on the cancellation process.
Frequently Asked Questions (FAQs)
1. Can I cancel my Udyam registration online?
Currently, there is no direct online cancellation portal. You must send an email request to the official MSME support team.
2. How long does it take to process the cancellation?
It typically takes around 10-15 working days, depending on the volume of requests and MSME department processing time.
3. Will I receive any confirmation after cancellation?
Yes, once your registration is canceled, you should receive a confirmation email from the MSME department.
4. What happens after I cancel my Udyam registration?
After cancellation, your business will no longer be recognized under the MSME framework, and you will lose access to related benefits.
5. Can I reapply for Udyam registration after cancellation?
Yes, if your business resumes operations or you meet the eligibility criteria again, you can reapply for a new Udyam registration.
Conclusion
Canceling Udyam registration online is a straightforward process, although it requires submitting a request via email rather than using an automated system. By following the steps outlined above and ensuring all necessary documents are attached, you can successfully cancel your udyam certificate download . If you need assistance, the MSME helpline is always available to help guide you through the process.
#udyam registration#udyam registration online#print udyam certificate#apply udyam registartion#udyam registartion portal
0 notes
Text
Weddings are special, but they can also be costly, from booking the venue to hosting your guests. A marriage loan can ease the financial strain. This guide breaks down the key details of marriage loans, their benefits, interest rates, and how to choose the right one for your dream wedding. This guide will inform you of the essential features of marriage loans, including types and benefits and determining the interest rate. In it, you will find the fundamental discussion of what you will require for any ceremonial expenses; to help you in getting the ideal personal loan for wedding that will cater to your wedding.
What is a marriage loan?
Marriage loan, as suggested by its name, is a personal loan usually taken out to bolster funds required for wedding expenses. They are unsecured and do not require collateral. Such loans are available from a majority of banks and NBFCs, along most online websites, owing to their ease of access.
Why choose a marriage loan?
Most have an idea about their fancy wedding but on the other hand have to live within a budget. That is why several couples go for a marriage loan.
Easy to Use: These loans can facilitate anything from your wedding attire and decor ordering to honeymoon bookings.
No Need to Put up Collateral: You do not have to put in any of your assets to get the loan.
Quick Disbursement: Getting access to funds is quite simple and usually takes around 1-2 days.
Flexible Repayment: Hence the loan is structured so that you can clear off your dues over a period of time without putting too much burden on you.
What are the most important features of a marriage loan?
Here are some unique features common to the marriage loan that can help with planning for the wedding:
The least amount a borrower can avail is ₹ 50,000 and a maximum of ₹ 2,500,000, all influenced by the qualification requirements of the applicant.
The repayment period varies between 1 and 5 years, whichever is preferred.
The applicable rates of interest on marriage loans range from 10% to 20%, depending upon the borrower's credit rating history.
Potential Use of Marriage Loans You can utilize marriage loans in the following manner:
*Venue and Decor:* A beautiful venue with simple yet elegant decorations for your guests.
*Catering:* For sure, good food will cheer everyone up.
*Outfits and Jewelry:* There will be no trouble with buying wedding clothes and jewelry.
*Photography:* Hire a good professional to capture the moments.
*Honeymoon:* A sweet, quiet getaway with your spouse may strike as a trip.
Marriage Loan Eligibility Requirements
Regulations change with each lender, yet there are common requirements that nonetheless exist, such as:
Age: Between 21 and 59 years.
Income: Minimum of ₹15,000; maximum ₹25,000.
Credit score: If you are assessed at above 750, it should help you in raising the most favorable range.
Employment: Both employed and self-employed are eligible to apply.
Documents Required for a Marriage Loan
Have these documents ready for smooth processing of applications, such as:
*ID Proof:* You must carry Aadhaar, PAN, Passport or Voter ID.
*Address Proof:* Same as above but can also be a utility bill or rental agreement.
*Income Proof:* Salary slips, bank statements, tax returns, and many more can be the source of proof.
*Photographs:* A few recent passport-sized photographs.
Requirements for Marriage Loan
Keep the following documents handy for hassle-free application processes:
Proof of Identity- Aadhar card, PAN card, Voter ID, or passport.
Proof of Address- Same as above, but utility bills and/or rental agreements are acceptable as well.
Proof of Income- Salary slips, bank statements, tax returns are more than sufficient to serve your purpose of application.
Photographs- Some recent passport-sized photographs.
How to Apply For A Marriage Loan
Funding any event is easy and should raise no issues and here is how to apply for a marriage loan:
Compare Options- Take time to check lenders and the type of marriage loans offered together with interest rates.
Check Eligibility- Use online tools or calculative means to ascertain your eligibility for a loan.
Prepare Documents- Ensure you have all the necessary documentation.
Factors determining Marriage Loan Interest Rates
Economics is simple. The following few crucial determinants affect the marriage loan interest rate.
Credit Score- A good score tells the lender that one is likely to repay the loan. This almost always means you get a lower interest rate than others.
Income-The income must generally be adequate enough to allow for loan repayment. This can also factor into other recommendations for a better loan.
Loan Amount- Larger loans nowadays generally have larger than usual interest rates only slightly so.
Loan Repayment Tenures- A longer repayment term allows for a higher interest rate to ensure the return.
Best practices in acquiring a marriage loan
When you consider taking a loan, enlist these pointers.
Inquire for rates: It should not be a crime or something extremely wrong to canvas around for the interest rates on a marriage loan, investing extra time to win that battle.
An eye out for hidden processed fees: You check for any other costs-to-process charges, early payment fines, etc.
Arrange an affordable monthly payment: Grab an EMI calculator on the net and have a look at possible amounts for your monthly payment.
Go for reports: Choose another good performer with favorable reports.
Conclusion
A marriage loan rate of interest could be a good way to finance your dream wedding without emptying out your life savings. And by understanding the workings of loans, comparing lenders, and doing the repayments responsibly, you can concentrate on creating memories that will last a lifetime. Then what is the delay for? Go ahead and plan your big day while it takes care of the rest!
0 notes
Text
Sell Old Gold for Cash in Hyderabad | Amruta Gold - Best Rates & Instant Payment

Introduction
Selling old gold for cash is a common practice in Hyderabad, especially during financial emergencies. Whether you need funds for medical expenses, business investments, or family functions, selling unused gold can be a quick and effective solution. But where should you sell it to get the best value? This guide explores everything you need to know about selling gold in Hyderabad, particularly with Amruta Gold.
Why Sell Old Gold?
Gold is not just a precious metal; it is an asset. Here are some common reasons why people sell their gold:
Financial emergencies – Quick cash for urgent needs.
Gold price hike – Take advantage of high market rates.
Unusable jewelry – outdated designs.
Investing in new assets – Sell gold and invest in property or stocks.
Debt clearance – Settle loans and liabilities.
Best Place to Sell Gold in Hyderabad
Finding a trustworthy gold buyer in Hyderabad is crucial to getting the best price. Many shops claim to offer high rates, but hidden charges can reduce your profit. Amruta Gold is a well-known and transparent gold buyer with a reputation for fair dealings.
Why Choose Amruta Gold?
Amruta Gold stands out from other gold buyers in Hyderabad due to:
Highest market rates – We offer competitive prices based on live gold rates.
Instant cash payment – Get paid in cash, bank transfer, or UPI.
Transparent evaluation – Advanced gold purity testing with no hidden fees.
Secure transactions – 100% safe and verified process.
Trusted by thousands – Positive customer reviews and testimonials.
For a detailed understanding of our process, visit Amruta Gold’s Gold Selling Process.
How Does the Process Work?
Selling gold at Amruta Gold is simple and hassle-free:
Visit our store – Walk into any Amruta Gold branch with your gold.
Gold evaluation – Experts assess weight, purity, and market value.
Instant quote – Get the best possible price.
Agreement – Accept the price and complete paperwork.
Get paid instantly – Receive cash, UPI transfer, or bank deposit.
Documents Required for Selling Gold
To prevent fraud, legal documentation is necessary. You need:
Government-issued ID (Aadhaar, PAN, Passport, etc.)
Proof of purchase (if available)
Address proof
Factors Affecting Gold Rates
Gold prices fluctuate daily. Major factors include:
International market trends
Demand and supply
Inflation rates
Currency exchange rates
Government policies
Understanding Gold Purity and Weight
Gold’s value depends on its purity and weight. Purity is measured in karats (K):
24K – Pure gold (99.9%)
22K – 91.6% purity
18K – 75% purity
14K – 58.3% purity
Amruta Gold uses certified machines to check purity without damaging your jewelry.
How to Get the Best Price for Your Gold?
Follow these tips:
Check gold rates before selling.
Choose a trusted buyer like Amruta Gold.
Avoid middlemen to get the full price.
Sell during high market trends for better rates.
Safety Measures When Selling Gold
Always check buyer credentials.
Request an evaluation in front of you.
Ensure secure payment methods.
Avoid selling to unverified street vendors.
Common Myths About Selling Gold
Myth: Selling gold is complicated.
Fact: At Amruta Gold, it's a quick and easy process.
Myth: You lose money when selling gold.
Fact: Selling at the right time ensures good returns.
Customer Testimonials
“I sold my gold at Amruta Gold and received instant cash. The process was transparent and hassle-free.” – Ravi Kumar
Frequently Asked Questions (FAQs)
1. How do I know if I’m getting a fair price?
Amruta Gold follows live market rates and transparent evaluation.
2. Do I need an appointment?
No, walk-ins are welcome.
3. How is the gold tested?
We use certified XRF machines for accurate testing.
4. Can I get payment via bank transfer?
Yes, we offer multiple payment options.
5. Are there any hidden fees?
No, we provide a transparent and fair evaluation.
Conclusion
Selling old gold in Hyderabad is easy, safe, and profitable with Amruta Gold. Our transparent process, instant payments, and best market rates make us the preferred choice. Visit Amruta Gold today and turn your old gold into instant cash.
#amrutagold#1 gold buyers#best place to sell gold in vijayawada#gold buyers hyderabad#business#gold buyers in vijayawada#gold buyers bhimavaram#best gold buyers hyderabad#best gold buyers vijayawada#gold buyers vijayawada
0 notes
Text
LAP Loan Guide: Eligibility, Interest Rates & Best Banks
A loan against property (LAP) is a secured loan where you pledge your residential or commercial property as collateral to obtain funds. This type of property mortgage loan is an excellent way to secure a substantial amount at lower interest rates compared to personal loans. Whether you need funds for business expansion, medical emergencies, or education, a LAP loan can be an ideal solution.
How Does a Loan Against Property Work?
A loan against property allows borrowers to unlock the financial value of their real estate. Banks and financial institutions assess the market value of the property and typically offer loans ranging from 50% to 75% of its value. The funds can be used for various purposes except for speculative activities.
Benefits of a Loan Against Property
Lower Interest Rates – Since it is a secured loan, the interest rates are significantly lower than unsecured loans.
High Loan Amount – Depending on the value of the property, borrowers can avail of a larger loan amount.
Flexible Repayment Tenure – Most lenders provide tenures ranging from 10 to 20 years, reducing EMI burdens.
No Usage Restrictions – The borrowed funds can be used for business, education, weddings, or medical emergencies.
Quick Processing – With proper documentation, approvals are faster compared to unsecured loans.
Eligibility Criteria for LAP Loan
Eligibility depends on several factors such as income, credit score, property value, and repayment capacity. Typically, both salaried and self-employed individuals can apply. Having a stable income and a good credit history increases approval chances.
Documents Required for Property Mortgage Loan
Identity Proof (Aadhaar, PAN Card, Passport, Voter ID)
Address Proof (Utility Bills, Rental Agreement, Passport)
Income Proof (Salary Slips, ITR, Bank Statements)
Property Documents (Title Deed, Tax Receipts, Encumbrance Certificate)
Factors Affecting LAP Loan Interest Rates
The interest rate for a loan against property depends on:
Credit Score: A higher score results in lower interest rates.
Property Type: Residential properties fetch better rates than commercial properties.
Loan Amount: Higher loan amounts may have slightly higher interest rates.
Lender Policies: Different banks offer varying rates based on risk assessment.
How to Apply for a Loan Against Property
Check Eligibility – Use online LAP eligibility calculators to assess loan qualification.
Compare Lenders – Analyze different banks and NBFCs for the best interest rates.
Prepare Documents – Keep all required documents ready for faster processing.
Apply Online or Offline – Submit an application through the lender’s website or visit a branch.
Property Valuation & Approval – The lender assesses the property before final approval.
Loan Disbursal – Once approved, the loan amount is credited to your account.
Common FAQs on Loan Against Property
What is the maximum tenure for a LAP loan? Most banks offer repayment tenure ranging from 10 to 20 years.
Can I get a loan against a property if I have an existing home loan? Yes, you can avail of a LAP loan, but the property should have sufficient market value and equity.
What happens if I fail to repay the LAP loan? The lender has the right to take possession of the property and sell it to recover the outstanding amount.
Is a loan against property tax-deductible? Tax benefits depend on the usage of funds. If used for business purposes, interest paid can be claimed as an expense.
Can I prepay my loan against property? Yes, most banks allow prepayment, though some may charge a foreclosure fee.
A loan against property is a smart financial tool to leverage your assets for various needs. Always compare different lenders and read the terms carefully before applying.
0 notes
Photo

Let’s talk about something that’s causing a lot of confusion for Non-Resident Indians (NRIs): the Aadhaar card and the 182-day rule. Many NRIs wonder, “Do I need an Aadhaar card? What happens if I stay in India for less than 182 days? What are my options?” This post will clear up the mystery surrounding Aadhaar and the 182-day rule for NRIs, providing a comprehensive guide to help you navigate this complex issue. We’ll cover everything from eligibility criteria to the application process and address common concerns. By the end, you’ll have a much clearer understanding of your rights and responsibilities regarding Aadhaar as an NRI.
Understanding Aadhaar and the 182-Day Rule for NRIs
The Aadhaar card, India’s unique identification number, is a crucial document for various purposes, from accessing government services to opening bank accounts. However, the rules surrounding Aadhaar for NRIs are often misunderstood. The 182-day rule is a key element of this confusion. It doesn’t mean you can’t get an Aadhaar card if you spend less than 182 days in India annually; it simply affects your eligibility and the process.
Who is Eligible for an Aadhaar Card as an NRI?
Essentially, any Indian citizen residing abroad can apply for an Aadhaar card. However, the 182-day rule comes into play when determining your residency status for Aadhaar purposes. The Unique Identification Authority of India (UIDAI) considers several factors, including the purpose of your visit, the frequency of your visits, and your overall intention to reside in India.
Short-term visits: If your visits to India are infrequent and short (less than 182 days a year), obtaining an Aadhaar card might be more challenging. You might need to provide substantial evidence to prove your intention to reside in India.
Long-term stays: If you spend more than 182 days in India annually, you’re generally considered a resident, making the Aadhaar application process simpler.
Proof of residency: Regardless of the duration of your stay, you’ll need to provide proof of your Indian citizenship and address while in India. This might include your passport, visa, and rental agreement.
The 182-Day Rule: A Deeper Dive
The 182-day rule isn’t a strict cutoff. It’s more of a guideline used by the UIDAI to assess your residency status. Spending less than 182 days in India doesn’t automatically disqualify you, but it might require you to provide additional documentation to prove your eligibility. The UIDAI looks at the overall picture, not just the number of days spent in India.
Purpose of visit: Are you visiting for tourism, business, or family reasons? The purpose of your visit can influence the UIDAI’s decision.
Frequency of visits: Do you visit India regularly, or are your visits infrequent? Regular visits might suggest a stronger connection to India.
Tax residency: Your tax residency status in India can also be a factor.
Documents Required for Aadhaar Application as an NRI
The documents required for an Aadhaar card application as an NRI are similar to those required for Indian residents, but with a few key differences. You’ll need to provide proof of your Indian citizenship, address in India (even if temporary), and other supporting documents.
Passport: Your valid Indian passport is essential.
Visa: Your current Indian visa is crucial.
Proof of address: This could be a rental agreement, utility bill, or other official document showing your address in India.
Proof of identity: This could be a PAN card, driving license, or other official identification.
Photographs: Recent passport-sized photographs.
Navigating the Aadhaar Application Process as an NRI
Applying for an Aadhaar card as an NRI involves several steps. While the process is similar to that for residents, certain aspects require extra attention.
Step-by-Step Aadhaar Enrollment for NRIs
1. Find an Enrollment Center: Locate an Aadhaar enrollment center near your temporary address in India. You can find a list of centers on the UIDAI website. 2. Gather Required Documents: Ensure you have all the necessary documents, as mentioned earlier. Having everything organized will streamline the process. 3. Fill out the Application Form: Complete the Aadhaar enrollment form accurately and completely. Double-check all information for accuracy. 4. Biometric Data Collection: You’ll need to provide your biometric data, including fingerprints and iris scans. 5. Acknowledgement Slip: You’ll receive an acknowledgement slip with an enrollment ID. Keep this safe. 6. Aadhaar Card Generation: The UIDAI will process your application, and your Aadhaar card will be generated and mailed to your address in India.
Addressing Common Challenges Faced by NRIs
Many NRIs face challenges during the Aadhaar application process. Here are some common issues and how to address them:
Proof of address: Securing proof of address can be difficult for those staying temporarily. Consider using a rental agreement or a letter from a hotel.
Long processing times: The Aadhaar application process can take time. Be patient and follow up if necessary.
Incorrect information: Double-check all information on the application form to avoid delays.
Lost or damaged documents: Keep copies of all your documents safe.
Alternatives to Aadhaar for NRIs
While Aadhaar is beneficial, it’s not mandatory for all services. Some services might accept other forms of identification for NRIs. Always check the specific requirements of the service provider.
Maintaining Your Aadhaar Card as an NRI
Once you have your Aadhaar card, it’s important to maintain its validity and accuracy.
Updating Your Aadhaar Information
If your address or other information changes, you’ll need to update your Aadhaar details. You can do this online or by visiting an Aadhaar enrollment center.
Aadhaar and Other Government Services
Your Aadhaar card can simplify accessing various government services in India, even if you’re an NRI. It can be used for banking, tax filing, and other official purposes.
Aadhaar and Banking Services
Many banks in India require Aadhaar for account opening and other transactions. Having an Aadhaar card can streamline your banking experience.
Summary: Aadhaar for NRIs – Key Takeaways
The 182-day rule for NRIs and Aadhaar is not a strict barrier. While spending more than 182 days in India annually simplifies the process, it doesn’t preclude those with shorter stays from applying. The key is providing sufficient evidence of your connection to India and your reason for needing an Aadhaar card. Remember to gather all necessary documents, complete the application accurately, and be patient throughout the process. Understanding the nuances of the Aadhaar application process as an NRI can significantly ease your experience in India.
We hope this comprehensive guide has answered your questions about Aadhaar and the 182-day rule for NRIs. Do you have any experiences or questions you’d like to share? Let’s discuss in the comments below! And don’t forget to share this post with other NRIs who might find it helpful.
0 notes
Text
A wedding is a special event, but it can also be expensive, with everything from the venue to hosting guests. It is safe to say that marriage loans are a viable solution. This guide will help you understand the most important aspects of marriage loans including types, benefits, and interest rates. It also addresses how to find the best marriage loan that can help you afford the wedding of your dreams.
What is a Marriage Loan?
As the name suggests, a marriage loan is a form of personal loan that is specifically designed to help an individual raise funds to cover expenses related to the wedding. There is no requirement for security since the loan is unsecured. Such loans are available from most banks, NBFCs, and even through online websites, owing to their ease of access.
Why Choose a Marriage Loan?
Most people have a dream wedding in mind and on the other hand they have a budget to live within. This is the reason why a lot of couples opt to take out marriage loans.
Easy to Use: Everything from ordering your wedding attire and decoration to going on your honeymoon can be funded with the help of a marriage loan.
No Need for Security: You are not required to provide any of your assets to avail the loan.
Quick Release of Money: Getting the amount is easy and can take from 1 to 2 days.
Repayment: The way the loan is structured allows you to slowly pay back the marriage loan without adversely affecting your finances.
What are the core features of a marriage loan?
Here are some features that are associated with a marriage loan that can help in planning the wedding:
Min-max Amount
The borrowing amount ranges from a minimum of ₹ 50000 to a maximum of ₹ 2500000. The range is largely contingent on whether the borrower meets qualification requirements.
Repayment Duration
You can repay the loan across periods between one year and five years, depending on your preference.
Rates Of Interest
A personal loan for marriage will attract an interest rate that ranges between 10 percent and 20 percent based on the credit rating history of the borrower.
Common Uses for Marriage Loans
In the following way can take advantage of marriage loans:
Venue and Décor: Reserve a venue that is attractive with minimal yet stylish decorations.
Catering: Prepare good quality food for the guests, as it will brighten their moods.
Outfits and Jewelry: Buy wedding dresses and jewelry without breaking a sweat.
Photography: Engage a skilled expert to help document your memories.
Honeymoon: If you desire a quiet getaway with your spouse, consider taking a trip.
Marriage Loan Eligibility Requirements
Regulations are different for each lender, however, there are a few common prerequisites, including:
Age: Aged between 21 and 59.
Income: Min salary must be ₹15,000 and max can go upto ₹25,000.
Credit Score: Enhancing your most likely ranges helps if you score over 750.
Employment: Employed and self-employed individuals are eligible as well.
Documents Required for a Marriage Loan
Have these documents prepared to ensure easy application processes:
ID Proof: You must carry Aadhaar, PAN, Passport or Voter ID.
Address Proof: Same as above but can also be a utility bill or rental agreement.
Income Proof: You can show salary slips, bank statements, tax returns and more.
Photographs: A few recent passport sized pictures.
How to Apply for a Marriage Loan
Getting the money for an event should be easy and raise no complications and here’s how you can make a request for a marriage loan:
Compare Options: Do a thorough research on lenders and the kind of marriage loans they offer along with the interest rates.
Eligibility Check: To get an estimate of your worthiness make use of online tools or calculators.
Document Preparation: Ensure that you have all the necessary papers required.
The factors that determine the marriage loan interest rate
Economics tends to be pretty simple. There are few key determinants that influence the marriage loan rate of interest
Credit Score: If you have a good credit score, a lender is likely to be confident in your ability to repay the loan. Nearly always, this results in you being offered lower interest rates.
Income: If you are earning a reasonable salary, then you should be able to repay the loan. This can also be used as a factor in why a better loan can be recommended.
Loan Amount: Bigger loans, generally speaking, have a bigger than normal interest rate, but not much.
Repayment tenures: Longer repayment periods often have a higher interest rate.
Best practices for securing a marriage loan
When taking a loan, it is important to remember the following pieces of advice:
Comparative shopping for rates: Spending extra time to try and find the optimal marriage loan interest rate should be considered a priority.
Hiding stuff like extra charges: You should examine for other expenses, such as processing costs or penalties for late payments.
Don't arrange for monthly payments which are too large: reach for an EMI calculator to check out suitable amounts for your monthly payments.
Buy a reputation: Go for someone with favorable reviews.
Conclusion
A marriage loan is an excellent solution to finance your dream wedding without dipping into your life savings. By understanding the loan terms, comparing lenders, and managing repayment responsibly, you can focus on creating memories that last a lifetime. So why wait? Start planning your big day and let a marriage loan handle the rest!
0 notes
Text
UGC NET NTA December 2024 Admit Card: A Complete Guide
The UGC NET NTA December 2024 exam is a significant milestone for candidates aspiring for Junior Research Fellowship (JRF) or Assistant Professorship. The release of the UGC NET NTA admit card marks a crucial step in this journey. This guide will provide all the essential details about the admit card, including how to download it, key exam tips, and FAQs.
Importance of UGC NET NTA Admit Card
The UGC NET NTA admit card is mandatory for candidates appearing in the examination. It serves as an official entry pass and ensures that all aspirants are eligible and prepared for the exam. Ensure you download your admit card well in advance to avoid last-minute issues.
Steps to Download UGC NET NTA December 2024 Admit Card
Here’s how you can download your UGC NET NTA admit card:
Visit the official NTA website.
Navigate to the “Admit Card” section for UGC NET December 2024.
Enter your application number, date of birth, and the security code displayed.
Download and print your admit card.
Details to Verify on the UGC NET NTA Admit Card
Once you have downloaded the UGC NET NTA admit card, double-check the following details:
Candidate’s Name
Roll Number
Exam Date and Time
Examination Center Address
Subject Code
Exam Day Instructions
If you notice any discrepancies, immediately contact the NTA helpline to resolve them.
Preparation Tips for UGC NET NTA December 2024
Understand the Syllabus: Familiarize yourself with the detailed syllabus of UGC NET NTA for effective preparation.
Take Mock Tests: Practice with mock tests and previous years’ papers to build confidence.
Revise Key Concepts: Focus on revising the core topics and avoid picking new topics at the last minute.
Manage Time Efficiently: Allocate specific hours for each subject during your preparation.
FAQs About UGC NET NTA Admit Card
Can I appear for the exam without the UGC NET NTA admit card? No, carrying the admit card is mandatory to enter the examination hall.
What should I do if I lose my admit card? Re-download it from the official NTA website using your login credentials.
What documents should I carry along with the admit card? Carry a valid photo ID (Aadhaar, PAN, or Passport) and a recent passport-sized photograph.
Bookmark This Page for Updates
Stay updated with all news related to UGC NET NTA December 2024 by bookmarking this page. Sharing this with peers can also help others stay informed and prepared.
Conclusion
The UGC NET NTA December 2024 admit card is a critical document for all aspirants. Download it as soon as it is released, verify the details, and focus on your preparation. With dedication and the right strategy, you can achieve your goals. Good luck!
0 notes