#mockup blazer
Explore tagged Tumblr posts
Text
How to Use Blazer Mockup PSD to Showcase Your Clothing Line
#blazer mockup psd#mockup blazer#nike blazer#mockupsuit blazer#mockupt shirt blazer mockup#blazer mockup free
2 notes
·
View notes
Note
Hey! I found this blog while looking for cosplay tips
I'm going to start making my first ever cosplay soon, so I'm looking for some tips!
I'm hoping to thrift as much of the outfit as I can but I'm guessing I'm gonna have to alter a lot.
But of course I have to choose a character with so many details. . . (I may simplify)
Anyways, any tips for this character? If you wanna look into him more it's Martin from Rune Factory 5 but I have refs all around

Hello there!
I love to see that you are doing Rune Factory cosplay!
That said, some parts of this will be very easy to thrift and modify, and others will need a little creativity and perhaps sacrificing of accuracy. I'd suggest something with fewer armor details for a first cosplay, but that's still doable with some work.
I'm coming at this from the angle that you are thrifting due to both skill level and budget.
From the top:
The grey shirt will be quite easy. Find a white or light grey ribbed shirt or sweater, cut off the sleeves and sew the edges so they don't fray. If you got a white shirt, check the fiber content -- I'd recommend a natural fiber like cotton -- and dye it to light grey. Use the cutoff sleeves to test the dye.
If you can't find a sweater with ribs, you can get one without the ribs and sew with a twin needle to fake it.
The vest is going to be difficult to get from a thrift store and alter due to the shape. You MIGHT be able to get a blazer or vest in the correct color and alter it, but that would probably be more difficult than making it from scratch.
If altering: remove the sleeves. Cut off the lapels and the collar. Cut open the front to the correct shape, and add the side dart to fit it, as well as fitting from the side seams.
If making: Alter a pattern to have the correct front opening shape, do a mockup, and take it in to fit.
Either way, you will need to sew on the brown leather portion and then line the vest. You can add the straps yourself by sewing them out of the same fabric as your vest.
The apron is easy -- simply take a rectangle of fabric, hem it, and sew a strip of fabric onto it so you can tie it around your waist. For the pockets, I'd do patch pockets and glue on fake rivets (painted googly eyes, anyone?). The zigzags can be done just with topstitching.
For the pants, you can buy the widest leg pants you can find, paint on the stripes, and take in the bottoms. You can use the excess fabric you cut off the length of the pants to create the cuffs.
For the armor, look through our website for armor tutorials -- I'd recommend foam for budget reasons.
Good luck! This will be a challenge to thrift most of, but with some mods, you can probably get something close enough.
—Fabrickind / Q&A Staff / Twitter
31 notes
·
View notes
Text

@antis-hell And so I did :3
[Like a week and a half ago I said] I wanted to try making a mockup of a Barbie inspired by an Ego. It's not so much Barbie just dressed 1-to-1 like a character, it's more akin to [the 2020 Star Wars Barbies] that are more like runway looks. Of course I had to kick it off with Dark, because who would I be if I didn't lol
I call her.......... ✨️DarkiBarbie✨️
If this inspires someone else to make their own Ego-flavored Barbies, please tag me in the post! I'd love to see it! Here's a [master list of Barbie headsculpts] and a [list of Barbie body types] for inspiration!
Pure concentrated Neurodivergence™️ (details/thought process) under the cut 👇👇👇
Okay so details details detailssssssss
Just like I planned, I used the Claudette headsculpt, and it worked out in my favor. I like to make Dark look like a fusion of Mark and Pam when I can, and I knew the perfect head that would do Pam's cheekbones justice
To that end, I did a facemorph of Pam and Mark yet again to get the eye shape I used... and then I covered it in eyeliner lol
I briefly considered giving her lip a pearly finish, but I wanted the main focus of her face to be her eyes so I left the lips matte
Also she's on a "Tall" Fashionistas body. I'm not sorry, I'm on team Dark Is Tall, burn me at the stake about it idc /j /lh
Drop-earrings because they're my shit
Double-breasted blazer because they're also my shit
idk if you can see it if you zoom in, but her shirt collar has a lace trim
I'm....... really pleased with how she came out, honestly. I may need to make her IRL in the future 🖤
22 notes
·
View notes
Text
PSD Blazer Mockups
2 notes
·
View notes
Text
Athena redesign take 1
These are my first 2 mockups, I plan to continue, let’s hear some opinions though


I’ve done both a skirt and pants outfit because personally I don’t have issues with Athena’s skirt and quite like that she is a sporty and tomboyish character who has one, but the untucked shirt and cropped blazer combined with that are a mess,
so I slightly lengthened her blazer by a bit and tucked her shirt in, I moved the huge bow from her head onto her chest as a tie that combines with widget in order to try and unclutter that area
With the pants I ended up giving her a t-shirt so that she could keep it untucked and it feels much more free for movement cause looking through some of her design stuff and focusing on her personality that seems to fit with her much better than a button up, while also being professional, I ended up making widget into a pair of headphones which I’m not 100% sold on but, feel like they better communicate her ability while also feeling young and sporty. This design feels more plain than I intended but does help her fit more into the cast of the defense better as that is my biggest pet peeve with her design, she doesn’t feel like she fits next to Apollo and Phoenix because of the layers of her design, while her design isn’t bad it doesn’t feel like an ace attorney defense attorney design. I’ve had family members tell me she looks like a Pokémon character so I feel this is a valid criticism.
#Athena cykes#character design#ace attorney#I love Athena so much#this is just for my own personal design inclinations#the only thing I feel really needs to change with her in game design if anything would be the untucked shirt#only because of how it breaks apart the design and adds to visual clutter#that or uncrop her jacket#if you have anything you’d like to add or comment on I’d love to hear it#Wyrm aa Designs
46 notes
·
View notes
Text
My friends and I decided to do a Genshin Impact group Trio cosplay. I will attempt to make Furina. As an enthusiastic sewist I strive to sew most of it.
As this is a huge project, I hope to document my thought process whilst making it.
Let’s break down Furina, Shoe to hat.

Shoes:
Most shoes do not fit me. Wearing uncomfortable shoes on long Con Days is one of the dumbest ideas to have. I like buying things, which I can reuse for multiple occasions. I also planned to do a Lenore Cosplay from Castlevania (Netflix, Blue Dress). So, I will look for a Black half boot with a small heel, that I can either use for both characters, or that I would wear on a daily bases too.
Socks: I got white socks, and the ruffle part is in the making. I found a YouTube instruction video on how to make a Shakespeare Ruff
youtube
White Pants: I do not wish to wear hotpants to a convention and often visit Cons in autumn / early winter. It rains a lot here and most cons are outside.
I bought a pair of white suit pants and altered them to fit me better (Those are currently not in season, and it took me 6 hours of my life just running into stores trying to locate a pair that is not not-white-but-called-white/beige)
Black blouse:
I will probably buy a pair and likely must add the sleeve ruffles as a detail. The collar ruffles will be sown, and I want to wear them like a necklace or a safety pin.
White vest:
Will be sown by me, no details yet. Fabric matching the pants is available in the local fabric store. No further plans yet.
Blue Blazer:
Currently my number one priority as it is the outer layer. If the rest is not done until the Con, I can close it. Life Hack.
I found a nice dark blue fabric that is sitting in the corner waiting it's turn
The sewing pattern I currently have and made a mockup for needs a lot of alteration. I found a better one: McCalls M7641. Still needs alterations but waaaaay less.
The squares on the back will be left out. I don’t care.
Further plans to be developed whilst making the second mockup.

Tail:
I am considering making the tail out of different tulle layers. I found a nice dark blue glittery fabric online that I want to use for the left tail and have lots of white tulle at home, probably not enough, but those are available at the fabric store too. The result of the consultation will determine how I do the appliqués on the Tail of the blazer.
For the right tail I found two possible shell/scale fabrics that I must decide between.

Whether I embroider the golden Fontain Fleur de Lis or get them plotted is still up for debate. I have a contact for plotting that I need to reach out to.
I think embroidered would be nicer.
Bow:
Light blue tulle, available at fabric store
Wig:
Doki Doki Cosplay, other sellers did not have picture reviews. They had a styling tutorial on their website. Comes with lashes.
Hat:
Possibly 3D printed like the rest of the details, most likely smaller. I own a tophat for a steampunk costume and I do not wish to wear one with a wig beneath.
Details:
3D Files , drops might get cast in resin or bought
First test print

The blue waves on the back and the gold ones on the shoulders & sleeves could be plotted or a fabric appliqué, if I find a fitting one. I think I'd prefer appliqués.
1 note
·
View note
Photo


I know it’s not 2006 anymore, but I was playing around with Bodyshop mockups a long while back and thought these two outfits made a cute pair!
TM Skinny Jeans with Blazer | Download This one took forever! It’s a mashup of emBlazer and amRockstar, with the shoe UVs altered to match everyone’s favourite sneakers. :)
TF Corset Dress with Sneakers | Download This is Cloudlessnights’ tie-less version of tfGoth merged with tfElite and tfNantesdrshightops.
Both outfits have thin and fat morphs, and have been compressorised.
288 notes
·
View notes
Text
Organizational Structures –Month 6 Reflection
Connecting/ Synthesizing/Transforming
Research conducted in this course mainly consisted of reading Animated Storytelling by L. Blazer as a base point. Then for each week, I gathered sources based on the assignments. For Lesson one’s “Planning for Motion” assignment, I was accustomed to creating storyboards so I did not find a lot of notable outside sources. Lesson two’s “Communicating with Motion” I researched more technical resources such as how to reduce background noise in a video. Lesson three “Motion in Context” is where I researched the most articles. I researched further into each category, Kinetic typography, animatics, cinemographs, 2.5d parallax, and motion posters. I also researched about how these could be applied in advertising. I found articles on ad formats and how they can be viewed by viewers. I also researched technical videos for cinemographs, 2.5d Parallax and motion posters as I researched which was the best approach for my tone and theme.

Month 5′s Static Vision Board
youtube
Dynamic Vision Board
Problem Solving
The design problem is relaying to the client an approach for advertising the city of Curitiba. The design problem was solved through using advertising to promote architects to come to Curitiba Brazil and see the architecture and urban planning that the city has created, then in turn, sharing their knowledge with the city. This was shown by creating a dynamic vision board and 2.5d Parallax approach that would be shown on social media such as Instagram. The client would see the dynamic vision board as well as the static one both shown above to clearly see the new “Curitiba, Brazil: Welcoming innovation” brand. Also below, the client would see the 2.5d parallax gifs (shown as videos) that would be used as future advertisements.
youtube
youtube
youtube
2.5d Parallax approach
Innovative Thinking
As found in the previous course, In the industry many advertisements for cities show food, culture, nature and things of the like. For my vision board (shown above), I had hoped that using multiple voices would create an even more welcoming feel that I had not found in my research. However, possibly because I could not get enough voices and the time constraint, it did not come across as intended. For Motion in context, I only found architecture as a focal point in researching 2.5d parallax and cinemagraphs. In the example I found for cinemagraphs, the architecture Andrea Mottinelli used color to show emphasis on his buildings while other examples animated around it. However, the approach to animate around the building draws the eye to what’s animated and not the building itself. For Andre Mottinelli, her cinemographs use color to emphasize and by adding color it would take away from the city of Curitiba and add a playful tone that is not part of the campaign. Below is a mockup of the 2.5d Parallax approach shown on Instagram to portray how this movement will catch the audience’s attention on the platform.
youtube
Parallax Instagram Mockup
Acquiring Competencies
While I already am familiar with animation I was not familiar with sound types as I do not have to work with them very often. I knew there were different types of sounds but didn’t know the diegetic vs. non-diegetic terminology for sound in videos and animations. I learned in lesson 3 about motion posters, cinemagraphs, 2.5d Parallax and animatics while kinetic type was the only one that I had learned in undergrad. While researching the others, I indirectly learned some or the process to doing them as well as my final approach of 2.5d parallax.

Video peer review and discussion
References

1 note
·
View note
Text
Fashion Trends of 2022 to Feel Your Fashionable Best!

Woman sunglasses photo created by svetlanasokolova - www.freepik.com
Building your personal style by incorporating the latest fashion trends that have blessed the runway in 2022 is a great way to feel like a fashionista! This year is full of new fun trends that you can mesh with your personal style to build outfits that can turn heads. If you wish to upgrade your wardrobe this year with the latest and trending clothing items, hello and welcome! This is the year to elevate your fashion sense and feel absolutely fabulous. Learn about the top trends in fashion this year and look your stylish best!
What's New in Fashion in 2022?
This year, fashion trends have been heavily inspired by streetwear, social media, celebrities, and youth culture. The trends this year are heavily focused on comfort mixed with a generous dose of fun! It's all about donning colorful outfits that express artistry and uplift one's mood! A list of the best trends for 2022 has been listed below:
Blazers with Hoodies
Florals for the win
Cute cropped cardigans
Boiler suits
Puffy sleeves
Pretty pastels
Flowy maxis
Blazers with Hoodies
2022 is all about adding that element of fun to your outfits! And what can be more fun and colorful than combining something formal and structured, like a blazer, with something casual like a hoodie! Pairing a structured blazer on top of a hoodie is like combining the best of both worlds. Imagine that you're relaxing at home in your comfy oversized hoodie and joggers. You suddenly get a call from your friend who wants to meet you for lunch. All you have to do is throw on a nice blazer that goes with your hoodie, add sunglasses and a cute crossbody bag, and, voila! You're ready to walk out of the door and have a fun day with your friend! If you're wearing jeans instead of joggers, you can even wear a nice pair of heels instead of trainers to give it a chic feel!

Florals for the Win
There is something so dreamy yet fun about floral prints. If you love florals, you're in luck in 2022! This year is all about floral outfits. Whether it's a cute floral dress with small floral prints all over the fabric or big bold floral prints on a blouse or skirt, you can wear it all in 2022. The element of fantasy that floral fabrics add to an outfit is undeniably beautiful! If you don't wish to wear floral clothes, you can even incorporate it by adding a floral scarf or a floral print bag or shoes! Florals are fun and delicate and a great way to enjoy the summer season!
Cute Cropped Cardigans
This is the definition of contemporary fashion trends. This trend has a vintage appeal to it. If you get your hands on a few cute cropped cardigans, building outfits will become super easy. When in doubt just add a cute cropped cardigan to your high-waisted jeans and you're ready to conquer the world! These cardigans are available in a variety of designs from simple button-up options to embroidered or embellished variants. Printed knits are also trending. If you want to make it even more fun, you can opt for joggers to lose flowy midi-skirts instead of jeans with your cardigan! You can even pair your cropped cardigan with a pair of relaxed-fit trousers and heels.

People woman photo created by lookstudio - www.freepik.com
Boiler Suits
If you want to try out the utilitarian aesthetic, boiler suits are perfect! This hero piece is a one-and-done option. This utilitarian take on jumpsuits will have you looking like a supermodel! This trend represents practicality and comfort. You don't have to go through the hassle of finding the right pair of bottoms to go with the right to wear. Just throw this zip-up one-piece with a nice handbag and matching shoes and you're ready! These one-pieces are very durable because they're made from heavy fabrics like denim and canvas.

Brochure mockup psd created by freepik - www.freepik.com
Puffy Sleeves
This is not the first time that puffed sleeves have become a trend in the last decade. There are just certain fashion trends that are here to stay for the long haul because of how versatile and appealing they are. The puff sleeve is one such trend. This dramatic fashion trend is the 2022 highlight. If you love creating that sense of drama to tor outfits and like to turn heads when you're out and about, puff-sleeve outfits are the way to go.

Whether it's a blouse or a dress or a crop top, puffed sleeves add that over-the-top feel to your outfit. The best thing about this trend is that you can pick and choose which style appeals to you the most. There are the billowing sleeves, the balloon sleeves, bishop sleeve, circular flounce, trumpet sleeve, and so on! The options are endless! You can own a variety of tops, blouses, jumpsuits, playsuits, and dresses with puff sleeves. If you want to add that element of drama, you can even sport a scarf with your puff-sleeve outfits!
Pretty Pastels
The calming and delicate vibe that pastels emanate is undeniable! There's just something so soothing yet fun about donning pastel outfits. In 2022, pastels are in and it seems like they're here to stay. If you like to add some drama to your outfit or make it a bit more daring, go for unique fabrics that are pastel-colored. You can opt for a pastel chiffon button-down with exaggerated sleeves to create that over-the-top feel. If you like a basic vibe, there's nothing easier than pairing a pastel mini dress or midi dress with some cute sneakers and a shoulder bag! Pastels and white go well together. So, you can wear white chunky boots with your pastel outfit to look bold and trendy at the same time!
Flowy Maxis
Maxi dresses are perfect for spring and summer. There's nothing comfier than a flowy and loose maxi dress. For people who like to look and feel effortlessly elegant and chic, get your hands on some maxi dresses this year! 2022 is the year for sporting maxi dresses. This is a classic item that has come to the forefront this year. It combines elegance and comfort in the best possible way. Pastel maxi dresses, floral maxi dresses, color-blocked maxi dresses, etc, are all perfect for 2022.

Big size photo created by ASphotofamily - www.freepik.com
Feel fabulous and stylish with these fashion trends of 2022 and buy these fashion accessories along with the other trending pieces to create the perfect look! Your wardrobe will thank you!
0 notes
Text
Loki progress masterpost
So now that I have this gorgeous fucking photo:

... and now that I’ve won a costume contest with it:
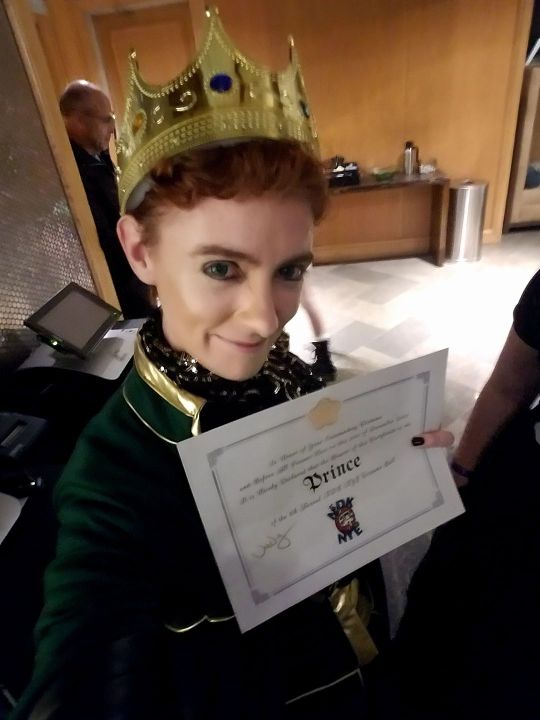
(... technically second place but don’t tell Loki that)
I should probably talk about the design and construction process and such, since I have an actual fuckton of progress photos for this. LONG POST so I’m gonna put this all under a cut:
ALRIGHT SO. This was made on a fucking whim because I was hypomanic and wanted to make something, so I raided my stash, found some lovely Loki-colored wool, and went “hey, I should make a Loki for NYE” because I always go to an event where dressing as a formal version of a character is part of the point. I wasn’t sure what to do, but I remembered there being a male Elsa design I had really liked, and went to find it:
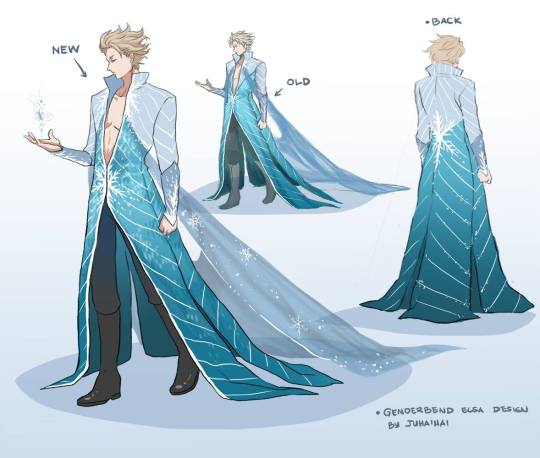
(I still love this design and might actually make it some day)
Anyway, a little while later I had a plan:

I am not an artist; this is better than my usual cosplay plans. And it has color! Hypomanic Vady is fun. Anyway, I did not bother doing a muslin mockup; you all should probably do so, especially when you have limited fabric but who cares I got this, right?
I started with the torso:

Had I felt like not winging the entire thing, I’d have pulled out pattern pieces from a blazer I’ve used before; it’s what I usually do. You can see where I had chalked the outline-- I measured where I wanted that line to be on my body and drew it on the fabric, then cut it with extra for seam allowance.
Next was the black:

You can see that on one side I have sewn the leather strips on; that was a fun process. I started with the top one and stitched where I wanted the top to lay, sewing along the center of the strip with the strip face down; that way, when I folded it over, I had no visible seam line. I did the same with the others, using that center stitch line to secure the bottom edge of the one above it. Sadly, I didn’t take photos of that process, but I can do so for demonstration purposes if anyone wants.
Since I was going to line this, I also used the pinned-together green and black bases as patterns for my lining, since it didn’t need to be pieced-- one piece is always easier to manage than two. I don’t have any photos of the lining, but it’s an identical jacket, without the adornments, inside out.
Once I had gotten the leather strips on the torso done, I took a break to make piping. I used yarn I had lying around instead of a nicer cording, cut strips about an inch and a half wide of the gold, and stitched it into basically a tube with a tail-- fold the fabric around the yarn and stitch it in place with a zipper foot. The tail lets you install it much easier by putting it in between two pieces, like so:
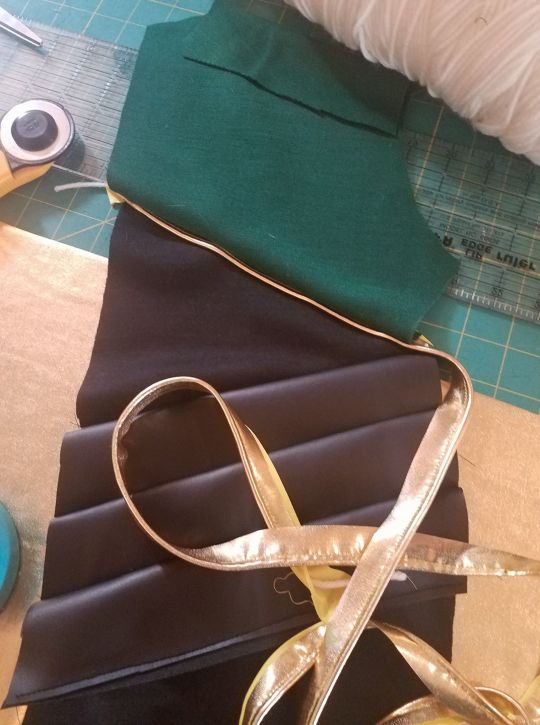
Generally speaking, it is easier to make inset sleeves if you leave the sides of the torso open and attach the top of the sleeve, then sew the length of the sleeves and the sides at the same time (seriously, life hack, sleeves are so much easier that way), but since I was improvising I forgot to do it that way. So I got the torso done first, and promptly discovered that I had made it ever so slightly too small, so I added gold trim to the front:

Turns out I had drafted it with the wool, which has a bit of stretch, and forgotten that the pleather emphatically does not. Lesson learned. Anyway, I like this look, so... happy accident?
NEXT UP, SLEEVES. I did something very similar with the leather on the sleeves as I had done on the torso, but this time I alternated back and forth:

You’ll notice that I changed my design a bit; the leather is lower on the sleeve and the gold doesn’t have the point that it did in the artwork. The first was not entirely on purpose, but I decided not to fix it when I noticed that it lined up really nicely with the torso; the line between the green and black is continuous this way, and I really like it, even if I didn’t actually mean to do it, initially. The change to the “gauntlets” was pure laziness. This was much easier, and I like the look anyway.
I went back and forth on whether I wanted piping at the shoulders; I had planned to include it but ultimately I chose to leave it out, because I liked the uninterrupted green, especially with that delightful through line I had created with the sleeve.

As you can tell, in the mean time, I attached the lining. I left the bottom open because I was going to be attaching the tails anyway. I also did it in sort of a cheater way, lining torso and sleeves separately and attaching the lining of the sleeves to the lining of the body by hand. While I do not like hand-stitching, I do not shy away from it; sometimes, it’s the best available technique. I’ll show you an example in a bit.
Also, I don’t have many photos of the back, so here’s one while I was trying to decide on the piping:

Anyway, next up was the tails. They ended up short than I planned, mostly because I didn’t have a lot of fabric, partly because I accidentally made them backwards and had to cut a few inches in order to attach them correctly. More reason to not simply wing it, lol.
I pinned them on before sewing because I wanted to see what it was going to look like; I wasn’t sure whether I wanted the gold I had drawn on the design.
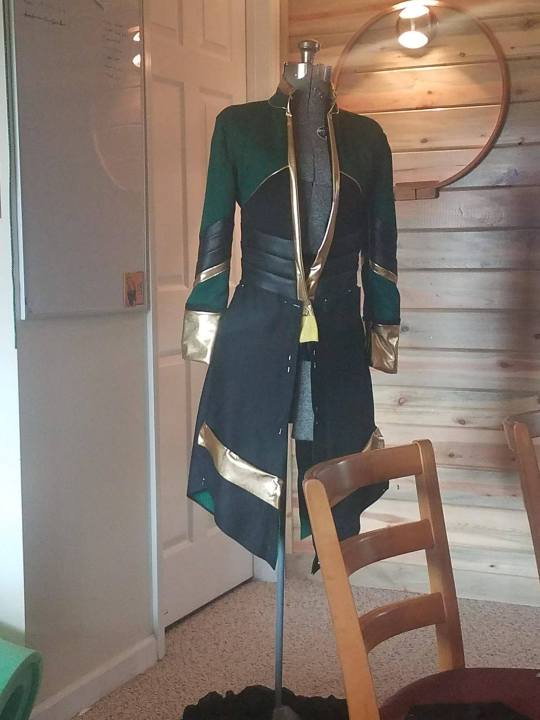
While I like this look, I eventually decided it did need something... and that something was more than just piping at the waist. See, Loki has all these goddamned zipper stops as trim:

I had no intention of doing that-- in part because I was working from my stash and didn’t have any-- but I could add piping around the edges of the tails in order to mimic it.
I mentioned up above the idea of hand stitching being the best thing for some jobs-- on this, I used it to attach the gold details to the tails. I was able to stitch one edge down with the right side of the fabric facing in, like I had done on the leather strips, but to get the other side attached with no visible seam, I used a slip-stitch.
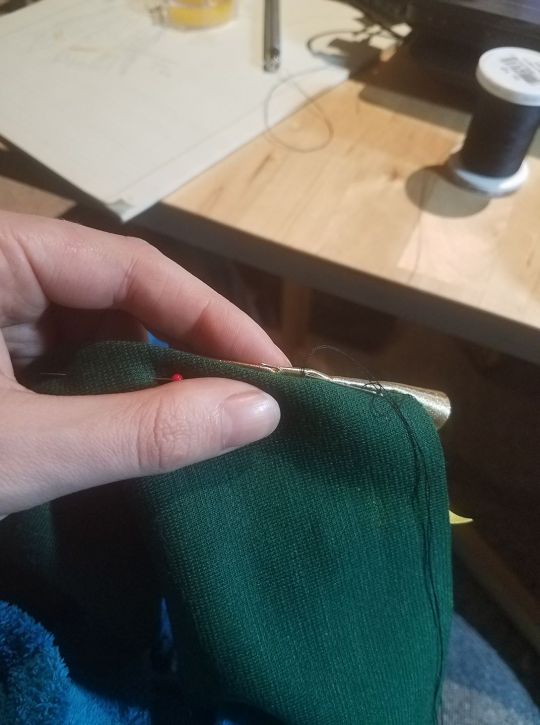
It’s a technique that allows you to sew something from the outside without having the stitches be visible. You also use it when closing lining (I used it to attach the sleeve linings) and things like repairing upholstery, where you literally can’t sew from the inside. If you learn no other hand stitch, learn a slip stitch. It’s more useful than you think.
I attached the gold detail, then put them together with right sides in and pinned the piping in place between them so that when they were turned right side out, the piping would edge the pieces. I did topstitch around the edges of the tails, just to make sure they would stay relatively flat. Then the only thing left to do was attach them and close up the jacket lining, which I had left loose until this point so I could do this all at once.

The first time I wore it I did not attach the sparkly cape; I was planning to wear it to school on Halloween and I didn’t want to have to deal with a train. I also wore it with a shirt, even though it was designed to be open, because, well, dress code. And it was cold.
I don’t have a picture of the method I used to close it, but I attached a black panel to one side and some snap tape, so I could have it closed without a visible closure-- the panel allowed me to have the matching snaps underneath the opposite side’s trim. It’s not perfect and I usually have safety pins to help it look nice, but it works.
When I did attach the cape, I edged it just with my serger, gathered it with pleats, and stitched it to the jacket by hand-- I wanted it attached to the outer layer but not to the lining, and it would have been hard to do that on the machine.
For the day I shot it without a shirt, I used fashion tape to hold it in place. See how it’s bunching there? That’s because it’s pulling against the tape in a weird way.
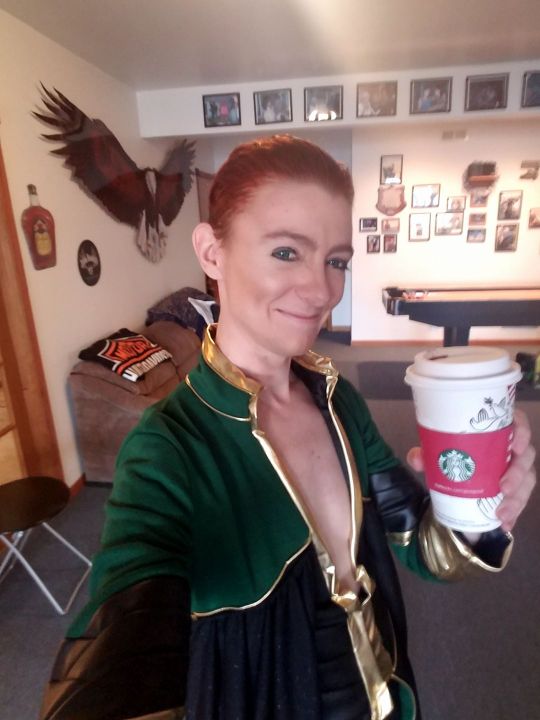
Anyway, that’s basically it! If you have any questions I’ll happily answer them. And Happy New Year!
6 notes
·
View notes
Text
3 UNIQUE WAYS TO STYLE CUSTOM MADE PATCHES
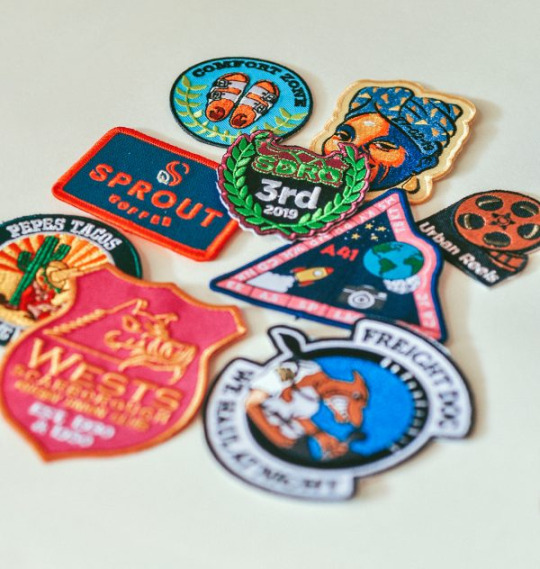
You can strut your custom made patches in many ways. Just as you can design your own custom patches with different materials and numerous textures, showing off your custom made patches does not end on your favorite denim jacket or your plain tees. You can use patches to upgrade any piece of clothing, but you can even take it further with your accessories. Here are three ways to style patches that you may want to try the next time you’re looking for creative ways to upgrade your look.
NECKLACE
You read it right, custom made patches can be used to personalize your accessories! It’s cheaper, and can be done on your own by piercing holes in your patches and putting them on gold or silver chains. Not only will you save money, but this simple DIY project will result in a colorful twist to your classic accessories.
PHONE CASE
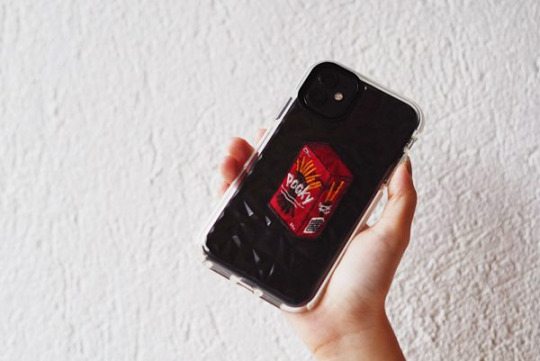
Phone cases now come in plastic, silicone, rubber, wooden, leather, and fabric variants. As fabrics became trendy for phone cases, denim covers started becoming popular too. It didn’t take long before people started sewing custom embroidered patches at the back of their phones. Show off your cute, grunge phone case by matching it with your denim outfit!
BLAZER

If you are the adventurous type, you can try styling your regular tweed blazers with a couple of custom patches for an unconventional chic look! Blazers automatically make any outfit more polished and sophisticated, but the unique addition of colorful patches will help you stand out fashionably.
Custom Made Patches from EmbroideredPatches.com.au
Let out your creative side and work with us in creating your custom made patches! We are a trusted maker and manufacturer of high quality custom patches of any kind. Send us your design today and receive a free custom patch mockup with unlimited revisions available to guarantee your satisfaction.
#customembroideredpatches#custompatches#custompatchesbulk#manufacturer#freecustompatchmockup#sublimatedpatches#customchenillepatches#customwovenpatches
0 notes
Text
Custom Blazer Mockup | High-Res PSD Template
#BlazerTemplate#BlazerDesign#DesignSolutions#MensFashion#CustomBlazerMockup#PSDTemplates#ApparelMockup#CreativeTools#CreativeMockups#FashionDesignTools#GraphicsDesign#MockupDesign#FashionMockup#MockupMagic#Digitalbranding#DigitalMockup#CreativeFashion#DesignInnovation
0 notes
Text
Styling tricks to make most of your Isolation Wardrobe
Now is an ideal time to take a long hard look at your clothing collection, and the perfect moment to create your winter capsule wardrobe.
Let's be honest, wardrobes can be stressful affairs. And no matter how many pieces you own, it's easy to feel like you “never have anything to wear”. That's why it's so important to dedicate some time every now and then to going through the clothes that have hanging up or stuffed in the back of drawers and see what we could actually use.

“Spring clean” is a term that is too lighthearted to describe the nature of the operation we’d recommend – you likely have an array of pieces that you could donate to charity (post-quarantine) plus some that deserve a new lease of life.
Capsule Wardrobe
The three “re” affixes – re-home, re-discover and re-love – are a solid place to start when it comes to editing your winter capsule wardrobe. While re-home is giving a new perspective to your home and organizing to make yourself feel home. Re-discover items you totally forgot about, which feels a bit like winning your own personalized lottery. The most rewarding part can be looking at your newly refreshed wardrobe, with less clutter and more room for the clothes you love which defines re-love.
Comfort is one of the main features to bear in mind when seeking your seasonal staples; Jackets, Barely there sandals, and some no-fuss dresses are the essentials for the season.
1. Blazers

The blazer’s transition from corporate classic to a closet essential. Choose an unstructured blazer for a casual look. Stick to lightweight materials, such as cotton and linen, for summer and heavy fabrics, like wool and tweed, for winter. Pair with denim for a truly modern hi/low mix. Try on some printed blazers to keep them fun and flowy.
Best PSD Mockups
2. Those New Jeans

After what seems like a lifetime, skinny jeans have officially lost their strangle hold on our closet. Consider high-rise, distressed and straight-leg jeans styles your new default. Cool and universally flattering, retro-inspired denims which is also called as "boyfriend Jeans" is all you need for a maximum impact and comfort.
3. Knits

Knitwear is a perfect garment for creating layers. It will provide you more warmth and comfort. You can mix these layers with coats, jackets, and blazers.
4. The over-sized Tote

This season’s over-sized tote bags strike the elusive balance between pretty and practical. Spacious enough to carry all your essentials, while also promising to elevate every look in your existing closet, a butter-soft leather tote is a worthwhile addition to every woman’s wardrobe collection.
5. Slip-on Dresses

Leave your blouse unbuttoned and wear it on top of your dress or pair it with a long sweater and heels or just throw a floral jacket on top. Nothing can go wrong with these slip on dresses. These could also be used in any season.
Free PSD Collection
6. Barely there Sandals

These barely-there designs are a minimalist’s dream. The best bit? They work with everything. After-dark denim? Slip dress? City shorts? Check, check and check. Better book that pedicure now. This season’s most covetable sandals leave little to the imagination.
7. Everyday Embellishments

Elevate a simple shirt dress with a selection of layered chokers and chains. Pair it with a stylish pair of ear studs and flaunt your look. As for high-ticket items like diamonds and investment watches, don’t let them languish in your jewelry box, these envy-inducing pieces were made to be worn – and admired.
8. Combat Boots

Undoubtedly one of this season’s most definitive designs, elevated combat boots are a must haves. The perfect complement to everything from diaphanous dresses and over-sized knits to micro mini dresses, invest in a pair and they’re sure to become one of the most-worn pieces in your closet. Teaming yours with blue denim? Stay one step ahead by tucking your jeans in.
Best Free Mockups
0 notes
Photo

Considering clothing which could be used within Y and P’s collection.
These clothing items are things to consider adding within Y and Ps clothing collection. Items such as jumpsuits, safari jackets and blazers have been added because these were used within Saint Laurent's iconic clothing collection within the late 60s, which is the time I am referring to within Y and Ps collection. Clothing such as shirts, shorts, waistcoats have also been added in order to reference masculinity aspects as YSL did.
I am going to different charity shops to find pieces and items which best associate with Y and P which can then be adapted for the Y and P collection in order to be photographed. It should be highlighted that these are just mockups in order to give an idea of what Y and Ps clothing collection could potentially look like. If this was done properly, the clothing listed above would be created professionally and purposefully for Y and P.
0 notes
Text
Unsurprisingly I didn't end up drafting the blazer/jacket/what is English?/
But I did just make a list of all the steps and tutorials and resources I need so I'll only have to focus on one step at a time... step one is getting mockup fabric which I'll look for tomorrow at the fabric market... might take a look at the local fabric store too because they have some suiting wools and. So pretty.
#they mostly sell sweaty synthetics which i don't like to wear but make alright mockup fabric#i should probably get a slightly hideous one so i wont feel bad about cutting into it for mocking up#sewing adventures
4 notes
·
View notes
Photo

Off-White Blazers Ad Mockup:
After I picked these up, I decided it would be a fun project to shoot them and create a “what if” advert mock-up for them using all the iconic Off-White motifs.
#offwhite#off white#off-white#nike#blazers#sneakers#shoes#spooky#grim reapers#virgil abloh#design#graphic#graphic design#print design
0 notes