#made it from scratch in blender and put it into plushify
Explore tagged Tumblr posts
Text

it is happening
the plush red centipede is approaching
#made it from scratch in blender and put it into plushify#for the legs im just might make a custom patern and diplicate as the legs here look a lil goofy#marketable plushie#wip#art#my art#??? i think#i dunno#rw#rainworld#rainworld red centipede#red centipede
38 notes
·
View notes
Text
Crafting!! (sorta)
A few months ago I was making passing references to learning Blender so I could make a pattern for a DJ plushie via Plushify, learn to sew, and then make a DJ plushie. (And maybe make a Music plushie and/or bio-DJ plushie too at some point but those are far more distant goals.)
So I finally got started on that this weekend. I decided DJ is a bit too complex a character for my first outing with Blender AND my first outing with sewing a plush, so I picked DogDay.
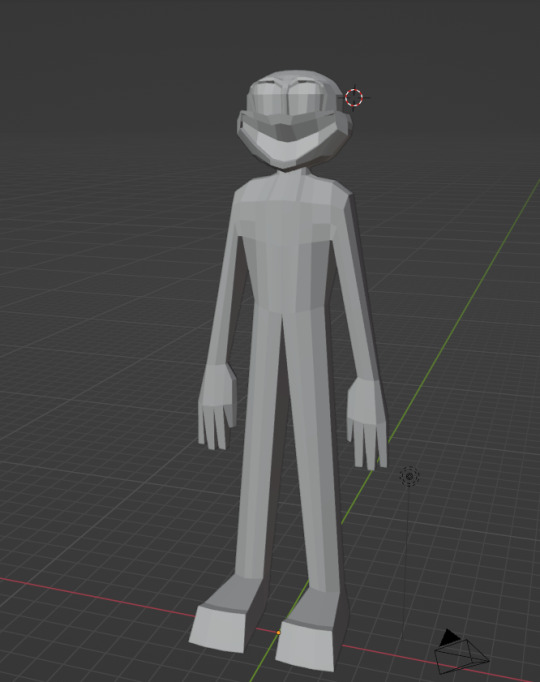
Tail and ears would be separate pieces, and the nose would probably be a plastic stuffie nose, which is why all those are not modeled here. His toes should also probably be thread loops, hence the blocky feet in the model. However as I was making him I started to think his big smile and concave mouth might STILL be a bit difficult for a first outing, so I decided to go even simpler. (I will probably toss this model and start from scratch now that I know a bit more about not only Blender, but what Plushify expects in a model.)
Enter this dude:
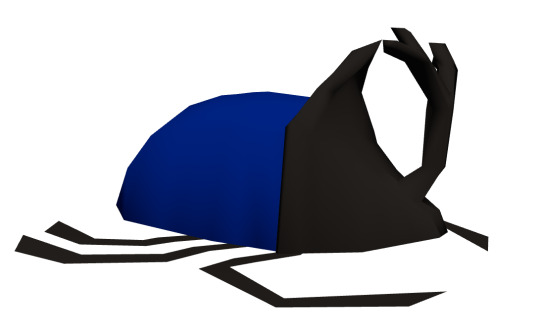
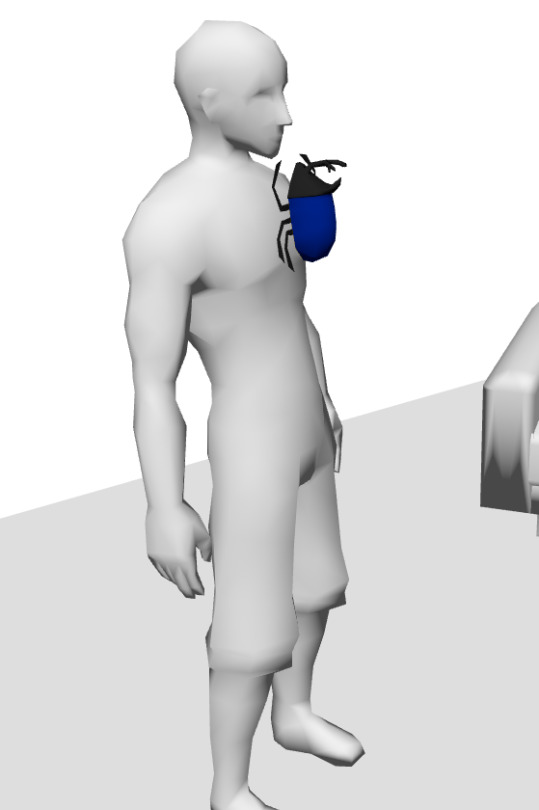
Plushify provides you with a mock room to get an idea of how big your critter will be!
I'm still tweaking this, at first I had the legs fully 3D and attached to the body, but this meant the underside would be sliced into multiple pieces and I think that just made the whole thing needlessly complicated. (But I don't know sewing yet so maybe this is a mistake on my part.) So I did the legs as flat panes that aren't attached to the body in Blender.
I think the shape of his ridge will be good practice for the shape of DogDay's mouth. The horn might be a bit tricky, it seemed to be throwing the pattern maker off so I might separate that from the model as well. I'm also not sure how I'm going to get it to stand up like that but we'll see.
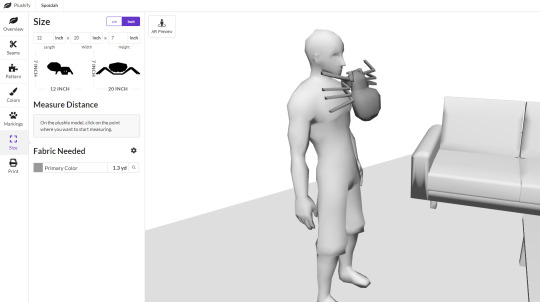
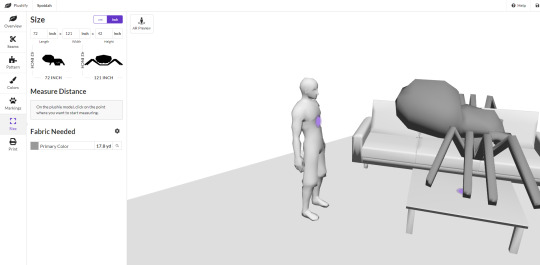

Also made a spider for the heck of it, because I thought that might be a bit more basic of a shape than the beetle. I was...partially correct. I think posing the legs like that in Blender confused the hell outta Plushify so I'm probably going to have to flatten them. Maybe run a wire through them when I make the stuffy so that they're posable?
As for the size...well, 6 feet is a nice thought but 18 yards of fabric...at probably about 10 bucks/yard MINIMUM...yeeeaahhhh, tis but a dream.
Also!! Needle felting progress:
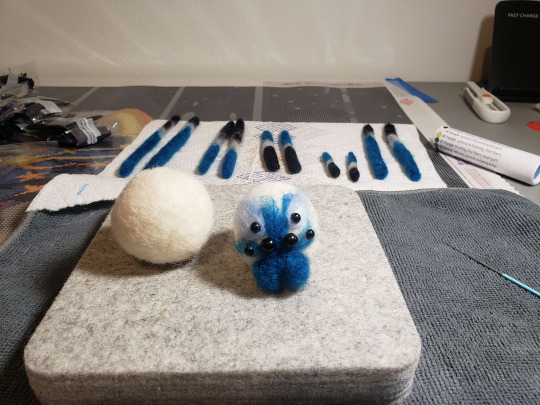
No, it's not DJ, but I wanted to practice assembling pieces before I tried to put his pieces together. So I made this guy, kinda a jumping spider but I'm not good enough at needle felting or spiders to get too fussed about exact species, heh.
I uh...probably will not make a needle felted spider again unless things go really pear-shaped with the Blender/Plushify path. Doing all 8 legs + 2 pedipalps is incredibly tedious...but I MIGHT see if
So yeah. None of these are DJ but they are all in the service of DJ.
I inch ever closer to making my own DJ stuffie.
18 notes
·
View notes
Text
I am back, after fighting my lapt every step of the way, with an update. Gonna put my rambling under the cut!
I followed your tutorial and it worked great! I merely struggled with Paragon, as maturin really really hates my pc and my windows' python installation was all kinds of fucked to hell and back, so I lost a bunch of time there. Until I decided to just hand search like an idiot. (Thank you for the screenshots, they minimized the amount of time I spent looking for Grima's files by undoubtedly many many hours) After I got it into Blender, I kinda gave up merging the face plates onto the model (this is a problem for future Leve).
So, for shit and giggles, I didn't do any edits, exported as .obj for plushify, and threw the file in.
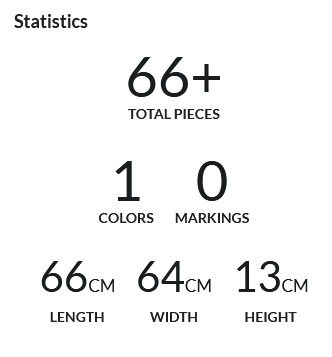
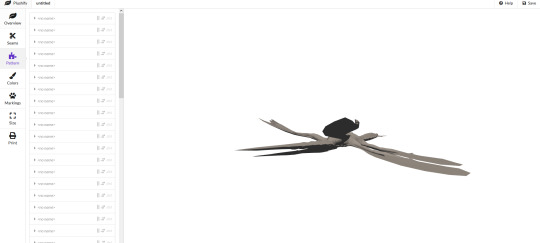
This is what you get when you try and keep the UV map it comes with, aka I broke the webapp lmfao ദ്ദി ( ᵔ ᗜ ᵔ )
So, back to the beginning, this time telling plushify to ignore and discard the UV map. So now, it looks like this:
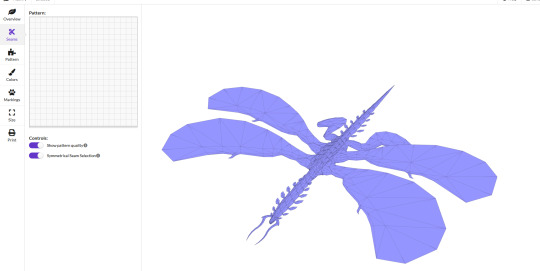
I'll be honest with you, at this point I'd be willing to make my own pattern from scratch.
Grima may look complex to pattern, but that is only if you do not break them down into the core shapes. Overall, how difficult Grima is depends on the level of detail you want and its size - you'll undoubtedly have to make compromises at some point and ignore details. At their base level, Grima is essentially a noddle with some flat wings, as shown in this very high effort artist rendition here:
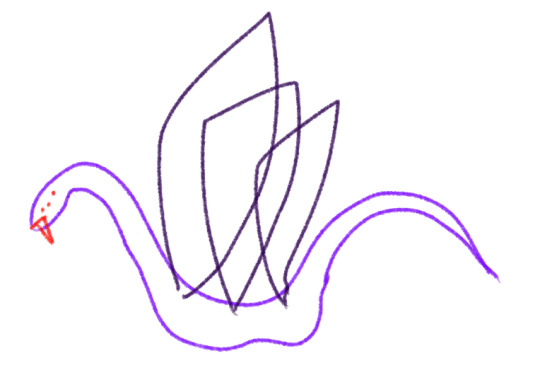
those "Grima is a big mean worm on a string" memes were not kidding. In fact I'll probably modify one of my worm-on-a-strings to a Grima one day.
That aside though, this is a rather simple pattern - the wings can simply be 2d shapes, traced right off the model. The body would be the same as you would do for a snake, merely modifying the areas that get thicker or slimer.
So, there is plenty of material to go off of- and personally, the process of paper-patterning is usually much faster to me than navigating the very bumpy 3d model that is Grima in Plushify and selecting every single seam with some difficulty - that being said I'll try that anyway, because I wouldn't be a Fire Emblem gamer without some degree of masochism.
In fact, I'll probably working off of another pattern I already made - the process is probably quite the same. Here it is!

Yes this is a pattern I made in order to make a Nel, Rafal and Sombron dragon at some point and the armholes were moved downwards in the final version.
Regardless, applied to Grima, quickly scribbled down we'd probably get something like this:
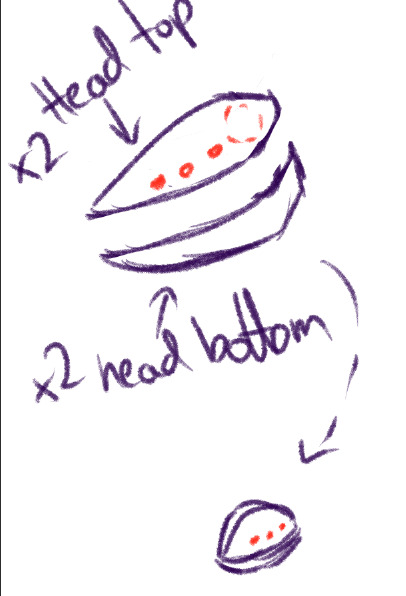
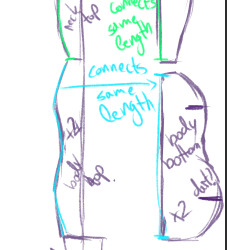
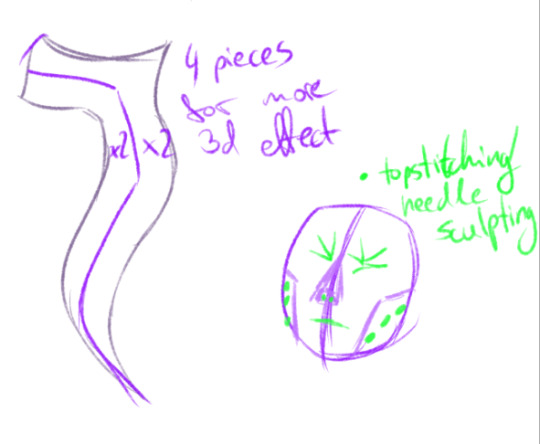

I'd add scales and extra details as 2d pieces to be top-stitched or needle-sculpted on top or insewn (such as the neck plates). For general plush purposes, I'd ignore the mask thing Grima has - although it is certainly an option to give a big plush Grima a mask structure - and then model the face with probably borrowing techniques from fursuit makers.... but then we're no longer really making a cuddly plush so much as a plush figure. Also valid, but different detail level is all!
Also needless to say that pattern is not tested nor scaled properly to begin with - work off it if you want at your own risk lmfao. I may post the Grima pattern I come up with one day, if it's not too complex and if I can be arsed to clean up the pattern enough that it's not only readable by myself. I'm not terribly afraid of complex plushies. I did make an Eternatus after all... My standards have been lowered by it lmao.
And well, if you give up, you can always just- resort to this sort of fella! Potatogrima
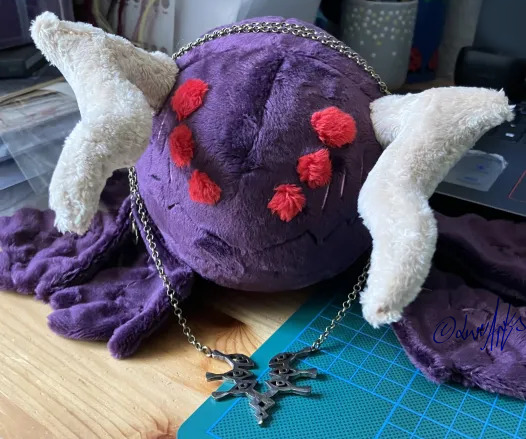
(In fact I can offer that pattern up for free - I'd just have to scan in the pieces and clean it up a lil bit)
Anyway, long rant over. Thank you once more for your tutorial, it is bookmarked and saved for any future reference. I will have fun with this new knowledge of extracting Awakening models ৻( •̀ ᗜ •́ ৻)

@levemetal Hope you don't mind my bringing this out to its own post - I saw your tags and wanted to try to help!
So, ripping models is going to be a different process depending on how the game was made; what console it was on, what game engine its built in... There's no one-size-fits-all process, and it's going to require some baseline tech-savvy-ness.
But given that these tags were regarding Grima; I'll tell you more or less how I get models out of Fire Emblem Awakening.
A Ramble-y Overview of Fire Emblem Awakening Model Ripping:
Step 0: Gather your Tools
There's a lot of tools floating around intended to help with 3DS model ripping. Some are very pleasant to use and others are janky, so brace yourself.
For this, you will need:
Citra emulator (for extracting game files)
Paragon (for figuring out where models you want are)
FEAT (for decompressing game files)
SPICA (for exporting models + textures to usable formats)
Blender (for actually working with the models) (or whatever 3d modelling program you like; I only know blender though)
Step 1: Get a ROM of Awakening
Legally obtain one, of course. Assuming you have the game cartridge the 3DS hacking community can help you more with that. Definitely do not download any game roms from any online websites, why, that would be piracy!
Step 2: Extract the Game Files
Open up Citra, add a game directory and tell it where your rom is.
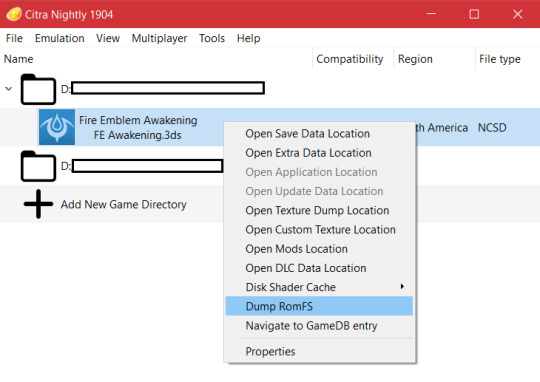
Right click the rom and select "Dump RomFS" to get Citra to start extracting all the game files. This will take a while. Wait for it to be done.
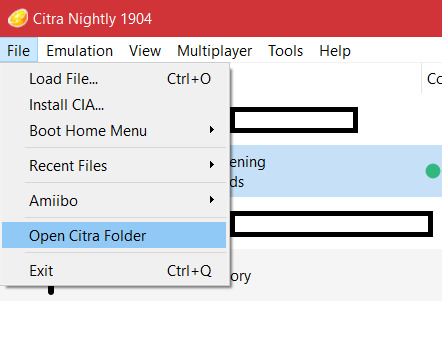
Once its done dumping the files, you're going to want to go to File > Open Citra folder. From there, navigate into "dump", then "romfs", then click the big nonsense folder name - that nonsense is Awakening's game ID, so, this folder is Awakening's game files.
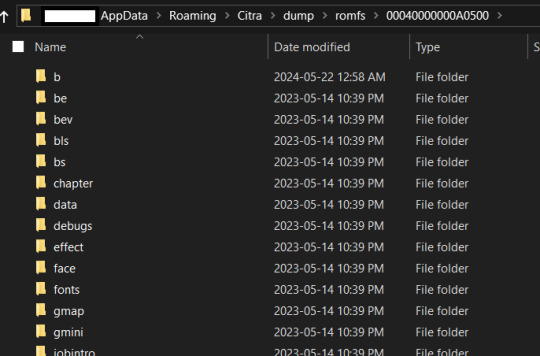
All the models you could ever wish for are in here!!! We just need to actually find them now.
Step 3: Figure out which model(s) you want.
Time to go open up Paragon. This is technically a tool for creating mods of several fire emblem games, but we're not going to mod anything, we're just going to use it to figure out what models belong to which characters.
The github page has instructions on it, but basically you want to open up Paragon and start a new project for FE13. Create some random output folder for it and direct it to that, we don't care. But the "Extracted RomFS Directory" should be the citra folder I just told you how to get to.
Once you have the project open, there will be a lot of buttons and things. Don't worry about all this. The only two you care about right now are "Asset Definitions" and "Presets".
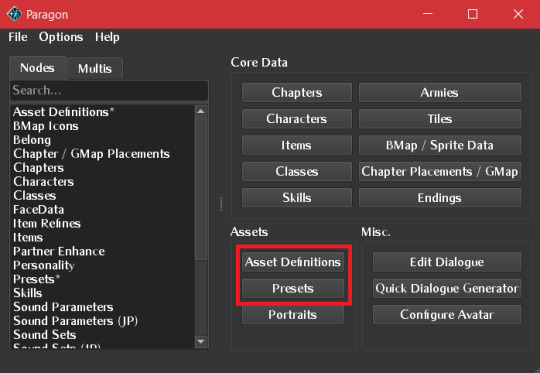
(Ignore the font; I changed paragon's font to awakening's font because i'm a nerd)
Most of the human characters are easiest to find in "Asset Definitions"; some under their english name, others (like Chrom) under their english base class' name.
Grima, though, you can find in "Presets" by searching for "boss".
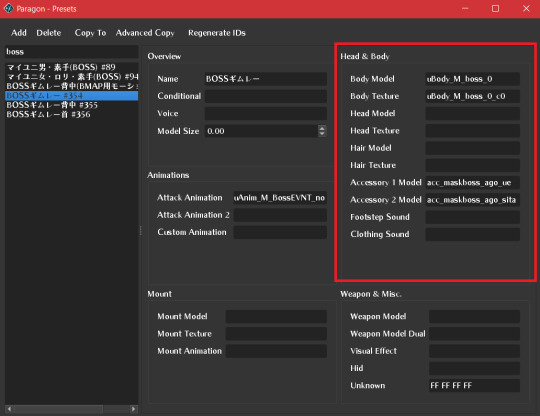
This entry specifically is the one pertaining to grima's full body model. There's a lot of info here, but the highlighted panel on the right is the information you need; this is telling you the names of the files containing Grima's models and textures!
For human characters, typically the head and body fields will be filled in, and possibly the hair for characters with long hair. some have accessories, some don't.
This complexity is why we use paragon to check instead of checking every single model file manually like fools. (it's me, i'm fools)
Keep this window open for reference at the side for the next step.
Step 4: Go Get the Models
Make a folder somewhere on your computer to keep this character's models.
Then, go back to that Citra folder we opened up earlier.
Awakening's assets are split up into several folders. The folder you want is "b", which has most of the character and weapon models and textures. (This organization scheme is Not consistent between Awakening and the other 3DS fire emblems, watch out.)
In here, find the files paragon is telling you belong to this character, and copy them into your dedicated folder for this model ripping project.
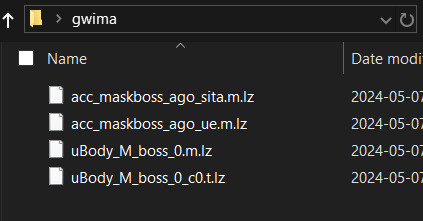
Wow, look at all those files we can't use. Time to make them usable.
Step 5: Decompress the Files
Open up FEAT. Drag all those files onto the FEAT window. It will decompress them; there will be a copy of each file without the .lz file extension. You did it! They're decompressed!
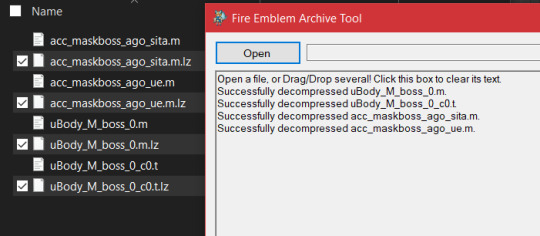
Step 6: Extract the Models and Textures
Open up SPICA.
Click the little Folder button in the top left to open a file. Navigate to this folder you have your decompressed files in. Click on one of the decompressed files.
For MODELS, as in the .m files, you are going to click the Save button. Save each model as a .dae file, and give each a name that will make it clear which model this is - the body, the head, a specific accessory, whatever. (you can choose .smd instead if you want, but you will need a blender addon for importing smd files if you do.)
For TEXTURES, which are the .t files, there is an extra step. In the panel on the right, there is a small anime eye. That is the textures tab. Click on it, and the panel will change to a list of textures that are in that file. You should export all of them by using the special texture export button. DO NOT CHANGE THE NAMES the texture names are important.
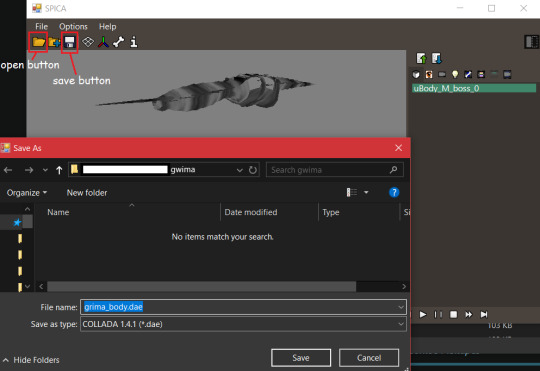
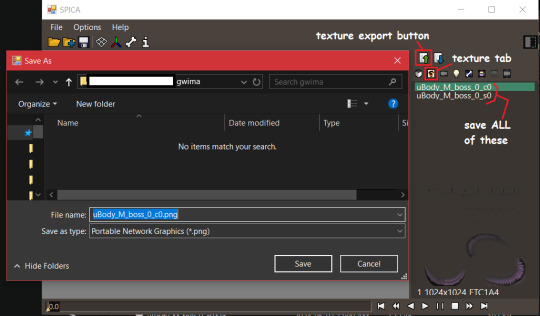
Step 7: Blender Time
Tragically this is the most annoying part, and I can't even give you very detailed instructions off the top of my head because the exact steps are so tailored to each specific character.
Open up Blender. Go to File > Import > Collada (.dae) and import the character's component models one by one.
Each individual file will come with its own armature for posing! If you want to have a functional, posable model, you are going to have to join them together yourself. Normally this means taking a component armature, positioning it properly in relation to the body, parenting the component meshes to the body armature, joining the component armature to the body armature, and then taking whatever root bone the component had and setting it's parent bone to the right bone from the body armature. If you just joined a character's head on the body, take the root bone from the head armature and set its parent to the head bone from the body armature. Stuff like that.
Some of the weight painting may be broken, so when you pose joints on the armature some things will move incorrectly. I do not know how to get SPICA not to do that, and I haven't found any other 3DS model exporter that works with awakening that doesn't do that. Try exporting as an SMD instead. If neither dae format nor smd format works right, You're going to have to go in and re-do the broken weight painting manually. There is no shortcut to this. I am sorry.
You will also notice everymodel is split up into several meshes. If you need the character to be one singular manifold mesh, you're going to have to edit it to be that way yourself, in a way that does not destroy the UV maps. There is no shortcut to this. I am sorry.
Also: If it's Grima, be aware that their model is like 3000 blender units long. You will want to scale all their armatures down to 0.1 or something, because Blender does NOT play nice with stuff that big.
Anyway, textures.
In Awakening, a texture name ending in c0 is the base colours. A texture name ending in s0 is a specular map.
If the base colour file looks mostly transparent, that's because it's channel packed; the color and alpha channels contain two different textures. In Grima's case, the color channel is their actual colors, and the alpha channel appears to be an emission map.
So, go on into the shader editor, click on each mesh to open its material, and plug the textures into the right spots on basic shader node provided. Make sure to set the Alpha mode of the channel packed textures to say "Channel Packed". And you're good to go! You can see what the character looks like now!
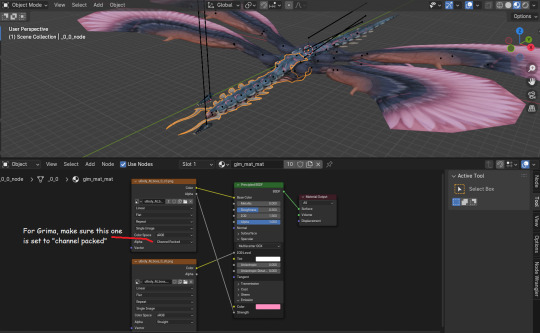
If parts of textures should be transparent but aren't (like grima's eyes and wing feathers) you're going to have to figure out a solution for that yourself. I manually made my own alpha map for grima's eyes and wings, and it was Annoying but it was the only solution I could find.
Congratulations, you've done it!
You have successfully ripped a model from Awakening. Now go on and modify it however you need to; make better shaders for it, clean up the mesh and unwrap its UVs again for free plushie patterns, do silly posing shenanigans with it. Whatever your heart desires.
Good luck, dear reader, for you will probably need it.
#grima#fe13#if anyone wants a detailed guide on plush making and specifically patterns#i can try but you'll have to give me a while to gather everything and make the doc readable#as well as gather all the resources and pictures and stuff#model extraction adventures are to be continued one day when my apartment isn't a warzone from freshly moving in#and my depression and migraine is not kicking me into doing nothing with my freetime
13 notes
·
View notes