#macubecleaner
Explore tagged Tumblr posts
Text
How to Clear Trash on Mac in 4 different Ways
Managing storage efficiently is essential for maintaining the performance and organization of your Mac. One of the simplest ways to free up space is by regularly emptying your Trash. The Trash can hold a significant amount of deleted files, and over time, this can accumulate and take up valuable disk space. Regularly clearing the Trash not only helps reclaim storage but also keeps your system running smoothly, preventing potential slowdowns caused by an overloaded hard drive. In this guide, we will explore four different methods to clear Trash on Mac, ensuring that you can choose the one that best fits your workflow and preferences.
Whether you prefer a straightforward approach using Finder, a quick solution with Terminal commands, a scheduled cleanup with Automator, or a secure deletion process, we've got you covered. Each method is outlined with step-by-step instructions to help you efficiently manage your Mac's storage. By the end of this guide, you'll be equipped with the knowledge to clear Trash on Mac and keep it clutter-free and operating at its best. Let's dive into these four techniques and discover how easy it is to clear Trash on Mac and keep your storage optimized.
What is Trash on Mac?
On a Mac, the "Trash" is a special folder where files and folders are temporarily stored after you delete them. It's similar to the Recycle Bin in Windows. When you move an item to the Trash, it's not immediately and permanently deleted from your storage drive; instead, it remains in the Trash folder, allowing you to recover it later if you change your mind. Here's an overview of its functions and why you need to empty it:
Functions of Trash
Temporary Storage: The Trash provides a holding area for deleted files and folders, giving you a safety net to recover items if you delete them accidentally.
Recovery Option: You can easily restore items from the Trash to their original location or any other location on your Mac.
Organization: The Trash helps in managing files by letting you group all deletions in one place before deciding to permanently remove them.
Why You Need to Empty Trash
Free Up Disk Space: Files in the Trash still occupy disk space. Emptying the Trash removes these files from your storage drive, freeing up space for other data and applications.
System Performance: Keeping the Trash empty can help maintain optimal system performance, especially if the Trash contains large files or a large number of files.
Privacy and Security: Permanently deleting files from the Trash ensures that sensitive or personal data cannot be easily recovered, protecting your privacy and security.
Housekeeping: Regularly emptying the Trash helps keep your system organized and prevents it from getting cluttered with unnecessary files.
How to Empty Trash on a Mac That Won’t Delete: 4 Ways
Way 1. Macube Cleaner
Macube Cleaner is a powerful and efficient utility designed to help Mac users effortlessly free up gigabytes of storage space. It provides a comprehensive solution to clear system junk, caches, logs, and, importantly, securely empty the Trash on Mac. With a user-friendly interface and advanced features, Macube ensures that your Mac remains in optimal condition, improving performance and reclaiming valuable disk space. The software offers a 7-day free trial with full functionality and is compatible with macOS 10.11 or later.
Key Features:
Clean System Junk:
Quickly clears system caches, user logs, and outdated system logs to free up space and enhance performance. By regularly removing these files, your Mac can run more smoothly and efficiently.
Smart Scan:
Utilizes an industry-leading algorithm for fast, powerful, and secure scanning. The Smart Scan feature locates junk files across the entire Mac, providing an efficient way to clean up and optimize your storage.
App Cache Removal:
Deletes unnecessary files generated by apps, freeing up additional storage space. This feature ensures that old and unused app data does not clog up your system.
Other Storage Cleanup:
Sorts out and cleans mysterious “Other Storage” files, including caches, archives, and system files, to reclaim more disk space. This helps demystify the "Other" category in your storage and keeps it under control.
Securely Empty Trash on Mac:
Ensures that deleted files are permanently removed from the Trash, freeing up space and preventing data recovery. This feature is essential for maintaining privacy and maximizing available storage on your Mac.
Large and Old Files Finder:
Identifies large and old files that take up significant space, helping users decide what to keep and what to remove. This helps you manage your storage more effectively and remove unnecessary files.
Application Uninstaller:
Completely removes apps and their associated files to ensure no residual data is left behind. This thorough uninstallation process helps keep your system clean and organized.
Duplicate Finder:
Detects and deletes duplicate files and images, saving space and organizing your storage. This feature is particularly useful for cleaning up redundant data and maintaining an orderly file system.
Privacy Protection:
Clears cookies and browsing histories to protect user privacy. This feature is crucial for maintaining security and preventing tracking by websites.
How to Use:
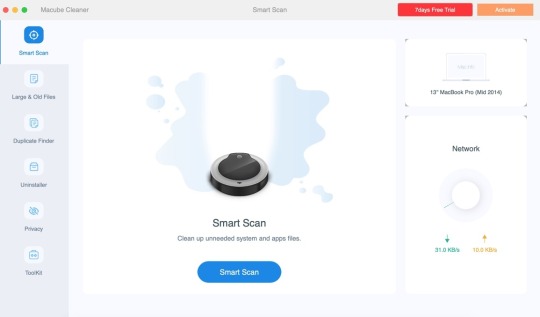
Step 1: Download and Open Macube Cleaner
Begin by downloading and opening Macube Cleaner, a specialized application for cleaning junk files on Mac. This software aids in pinpointing and eliminating redundant files from your system.
Step 2: Execute a Smart Scan
With Macube Cleaner active, select the "Smart Scan" option. This feature will thoroughly scan your Mac, identifying all unnecessary data such as cache and temporary files. The scan will highlight files that are safe to remove, helping to optimize your system's performance.

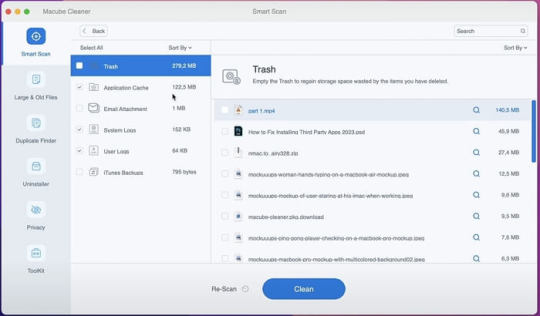
Step 3: Clear the Trash
Once the scan is finished, go to the Trash section in Macube Cleaner. Review the items listed and click "Clean" to completely empty the Trash. If you prefer to delete only certain files, select those specific items before proceeding with the cleaning.

Pros and Cons
Pros
Enhanced Security: Ensures deleted files are completely overwritten and unrecoverable.
User-Friendly Interface: Intuitive design makes it easy to navigate and use.
Comprehensive Toolset: Offers additional features for overall system optimization and maintenance.
Configurable Settings: Allows customization of shredding passes for varying levels of security.
Efficiency: Quickly and effectively removes files, improving system performance.
Cons
Cost: Macube Cleaner is a paid utility, which may be a consideration for some users.
Way 2. Using Terminal
Clearing the Trash on a Mac using Terminal is a quick and effective method to delete unwanted files that might not empty properly through the Finder. This approach is particularly useful for troubleshooting issues related to the Trash.
How to Use:
Step 1: Access Terminal
Start by opening the Terminal application. You can find it in the Utilities folder within Applications, or use Spotlight (Cmd + Space) to search for "Terminal".
Step 2: Execute Commands
Navigate to the Trash directory by typing cd ~/.Trash. To delete all items in the Trash, use rm -rf *. This command removes all files and folders within the Trash directory.
Step 3: Confirmation and Administrative Privileges
Ensure the process completes without errors. If issues arise, you can use sudo rm -rf ~/.Trash/* and enter your administrator password when prompted.
Pros and Cons
Pros:
Efficiency: Clears Trash instantly, bypassing graphical processes.
Effectiveness: Can delete stubborn files that Finder struggles to remove.
Cons:
Data Loss Risk: Files deleted via Terminal cannot be recovered from the Trash.
Caution Required: Misuse of commands can lead to unintentional deletion of important files.
Way 3. Using Finder Preferences:
Keeping your Mac tidy and optimizing disk space is crucial for smooth performance. One effective way to manage your Trash is through Finder Preferences, which offers an automated solution for emptying the Trash after 30 days. This ensures your Trash stays clear without needing manual intervention.
How to use
Step 1: Access Finder Preferences
Open Finder either from your Dock or by clicking on your desktop.
Navigate to the top menu bar, click on "Finder," and select "Preferences" from the dropdown.
Step 2: Activate Automatic Trash Removal
Within the Finder Preferences window, switch to the "Advanced" tab.
Check the box next to "Remove items from the Trash after 30 days."
Pros and Cons
Pros
Automated Maintenance: Keeps your Trash clear without manual effort.
Space Optimization: Efficiently manages disk space by regularly deleting old files.
Ease of Use: Simple setup with no ongoing maintenance required.
Cons
Delayed Deletion: Files stay in the Trash for 30 days before removal.
Limited Control: Less control over individual item deletion timing since it's automated.
Way 4. Safe Mode:
Clearing unwanted files from a Mac can sometimes prove challenging, especially when certain files refuse to be deleted. One effective method to tackle this issue is using Safe Mode, which temporarily disables certain software and processes that could hinder file deletion.
How to Use
Step 1: Restart in Safe Mode
Shut Down Your Mac: Click on the Apple menu and select "Shut Down".
Start in Safe Mode: Press the power button, then immediately hold down the Shift key until you see the login window with "Safe Boot" displayed in the top-right corner.
Step 2: Empty the Trash
Open the Trash: Click on the Trash icon located in the Dock.
Empty the Trash: Right-click on the Trash window and choose "Empty Trash". Confirm your action when prompted.
Step 3: Restart Normally
Restart Your Mac: Click on the Apple menu and select "Restart" to exit Safe Mode and return your Mac to its regular operation mode.
Pros and Cons
Pros:
Effective Deletion: Safe Mode can delete files that are otherwise stubborn due to active system processes or applications.
Enhanced Safety: By disabling unnecessary processes, Safe Mode reduces the chance of software conflicts during file deletion.
Cons:
Performance Impact: Safe Mode may run slower because it disables certain drivers and limits functionality temporarily.
Accessibility Issues: Some users might find the process of entering Safe Mode inconvenient, especially if it needs to be done frequently.
Conclusion:
In conclusion, effectively managing your Mac's storage by regularly clearing the Trash is crucial for maintaining optimal performance and organization. This guide has explored four distinct methods using Finder, Terminal commands, Automator, and Safe Mode—that cater to different user preferences and scenarios. Each method offers a straightforward approach to reclaiming disk space and ensuring that deleted files are either securely removed or managed automatically.
By incorporating these techniques into your routine, you can streamline maintenance tasks and keep your Mac running smoothly, free from the clutter that can impede performance. Whether you opt for the simplicity of Finder's preferences or the versatility of Terminal commands, taking proactive steps to clear Trash ensures your system remains efficient and responsive for your everyday tasks.
0 notes