#linseed oil removal
Explore tagged Tumblr posts


Text
Hobby - May Prompts (8)
John slams the door.
“Careful! I’m monitoring the coagulation of linseed oil when inserted diagonally into boars’ spleens. The samples require gravitational equilibrium.”
Sherlock’s lounging cattywompus on the sofa, limbs and ringlets artfully disarranged.
John wrestles his arms out of his jacket.
Sherlock looks him over. “You’re upset.”
“That’s the weirdest thing you’ve said today.”
Sherlock’s nose crinkles. “Weirder than boars’ spleens?”
“You actually noticed I exist.”
“To be fair—”
“Do you plan it? Hm? How many miles shall I make John hike back to Baker Street after I abandon him at a crime scene, AGAIN? Let’s make it a perfect ten today, he only did seven on Tuesday. It’s like it’s your hobby.” John moves closer, then at the last second swerves towards Sherlock’s open laptop on the coffee table. Sherlock is quicker but John has the better angle and wrenches it out of his hands.
“What—!?” Sherlock scrambles off of the sofa. “Nope—boring—”
“If I find a bloody spreadsheet, your laptop’s going out the window.”
John squints at the screen, then turns the brightness all the way up.
Sherlock turns the colour of June blooms in Regent’s Park.
It’s not a spreadsheet.
“Hang on, is that my face on the Vitruvian Man?”
“Well spotted.” No use denying it.
“Right. Why?”
Because Da Vinci got it wrong, Sherlock thinks.
+
*Yes, I know in the episode Sherlock actually cuts and pastes the photo, but consider this his test run, lol.*
Thank you to @calaisreno for the fun prompt series!
Tags in replies for some folks who've requested or commented or reblogged previously (please let me know if you'd like a tag or like yours removed). Thanks for reading!
93 notes
·
View notes
Text
Welcome Home

~AO3~ F!Eivor/Reader, gen
Kinktober prompt: stripping, massaging
Kinktober Masterlist

The blast of the raiding horn carried all the way from the river, up the hill to the small house you shared with Eivor. A smile touched your face- they were back.
Rather than meet them at the docks, you bustled about preparing clean water, rags, and a small pot of linseed oil scented with wildflowers. Eivor preferred for your reunions after long months of raiding to be more private and thorough than a sloppy kiss at the docks.
Sure enough, no more than an hour later, the door was flung open to reveal a victorious Eivor. Her arms were spread wide, and ice blue eyes immediately sought you out. “I have returned!” she crowed in that raspy voice that never failed to make you shiver.
She crossed the room to you in three heavy strides and immediately enfolded you in her arms. You laughed when she gave a little hoist, your feet leaving the ground as she spun you in a circle before gently placing you back down. A hand cupped the back of your head and drew you into a searing kiss that stole your breath.
When Eivor finally released your lips, she whispered, “I missed you, my love.”
“And I missed you.” You gave her a little peck on the tip of her nose, your eyes smoldering despite the innocence of the gesture. “Come, let’s get you cleaned up.” Eivor smirked, equal parts devious and delighted. So that’s how this evening was going to go.
Eivor toed off her boots and removed her weapons before sitting on the edge of your shared bed. She stretched her arms above her head with a soft groan as you gathered your supplies and knelt behind her on the straw-stuffed mattress. Careful fingers freed her from her leather armor and set it all aside to be cleaned later. Once that was done, you slid your hands under her tunic, caressing the muscles you found there. Eivor hummed as she lifted her arms and let you remove the sweat and river soaked shirt.
You followed the same process for her lower half. When Eivor was in nothing but her underclothes, she swung her legs onto the bed and laid down on her stomach, her head pillowed on her arms. You straddled her thighs and got to work.
You dipped a rag in the bowl of water and gently began scrubbing the grime off her skin. You could feel Eivor melt beneath you, her muscles going loose and sinking into the mattress. A low, throaty hum vibrated all the way through her torso; you could feel the tremors beneath your fingers. “Feels good love?” you asked softly as you dipped the rag back in the water and wiped her lower back.
Eivor only gave you another hum in reply, but you could see the tiny smile pulling at her lips. Once she was clean, you took the pot of oil and poured some into your palm, warming it between your hands. Smiling to yourself, you placed your hands on Eivor’s shoulders and dug in, strong fingers massaging away the tension of weeks spent sailing and raiding.
Eivor let out a deep groan, her brow crinkling slightly as you worked your fingers into a particularly tense spot. A wave of heat bloomed low in your gut as you pressed the heels of your hands into the meat of her shoulders. You chuckled to yourself and continued to massage the rest of her back. Every now and then, Eivor would mumble and groan directions and encouragement- “Up a bit,” or “To the left,” or “Fuck that’s it right there.”
By the time you had reached the base of her spine, Eivor was a puddle, the oil on her back shining in the firelight. Smiling to yourself, you leaned over her and brushed your lips over the nape of her neck. The taste of the linseed oil was hardly pleasant, but it was worth it to feel Eivor shiver and shudder beneath your lips. “Glad to be home?” you breathed in her ear. Gooseflesh broke out where your words landed.
Eivor only managed a hum in reply as you kissed all the way down her spine and back up to her shoulders. An eye cracked open, and before you knew it Eivor was using her drengr strength and speed to her advantage- she quickly turned over onto her back, grabbed your shoulders, and pushed you back onto the mattress. You let out a startled yelp, even though you knew you were going to end up on your back at some point this evening. She hovered over you, teeth bared in a feral, lust-filled grin. Wolf-kissed indeed.
You shivered as she scraped her teeth down your neck. “You always take such good care of me,” she growled in your ear, the praise sending shivers down your spine. “Now let me show you just how much I missed you.”
75 notes
·
View notes
Text
Saddle
I don't want the prior post to get obnoxiously long, so I'll start a new one. I began with this:

Managed to remove the girth and girth strap, also one stirrup
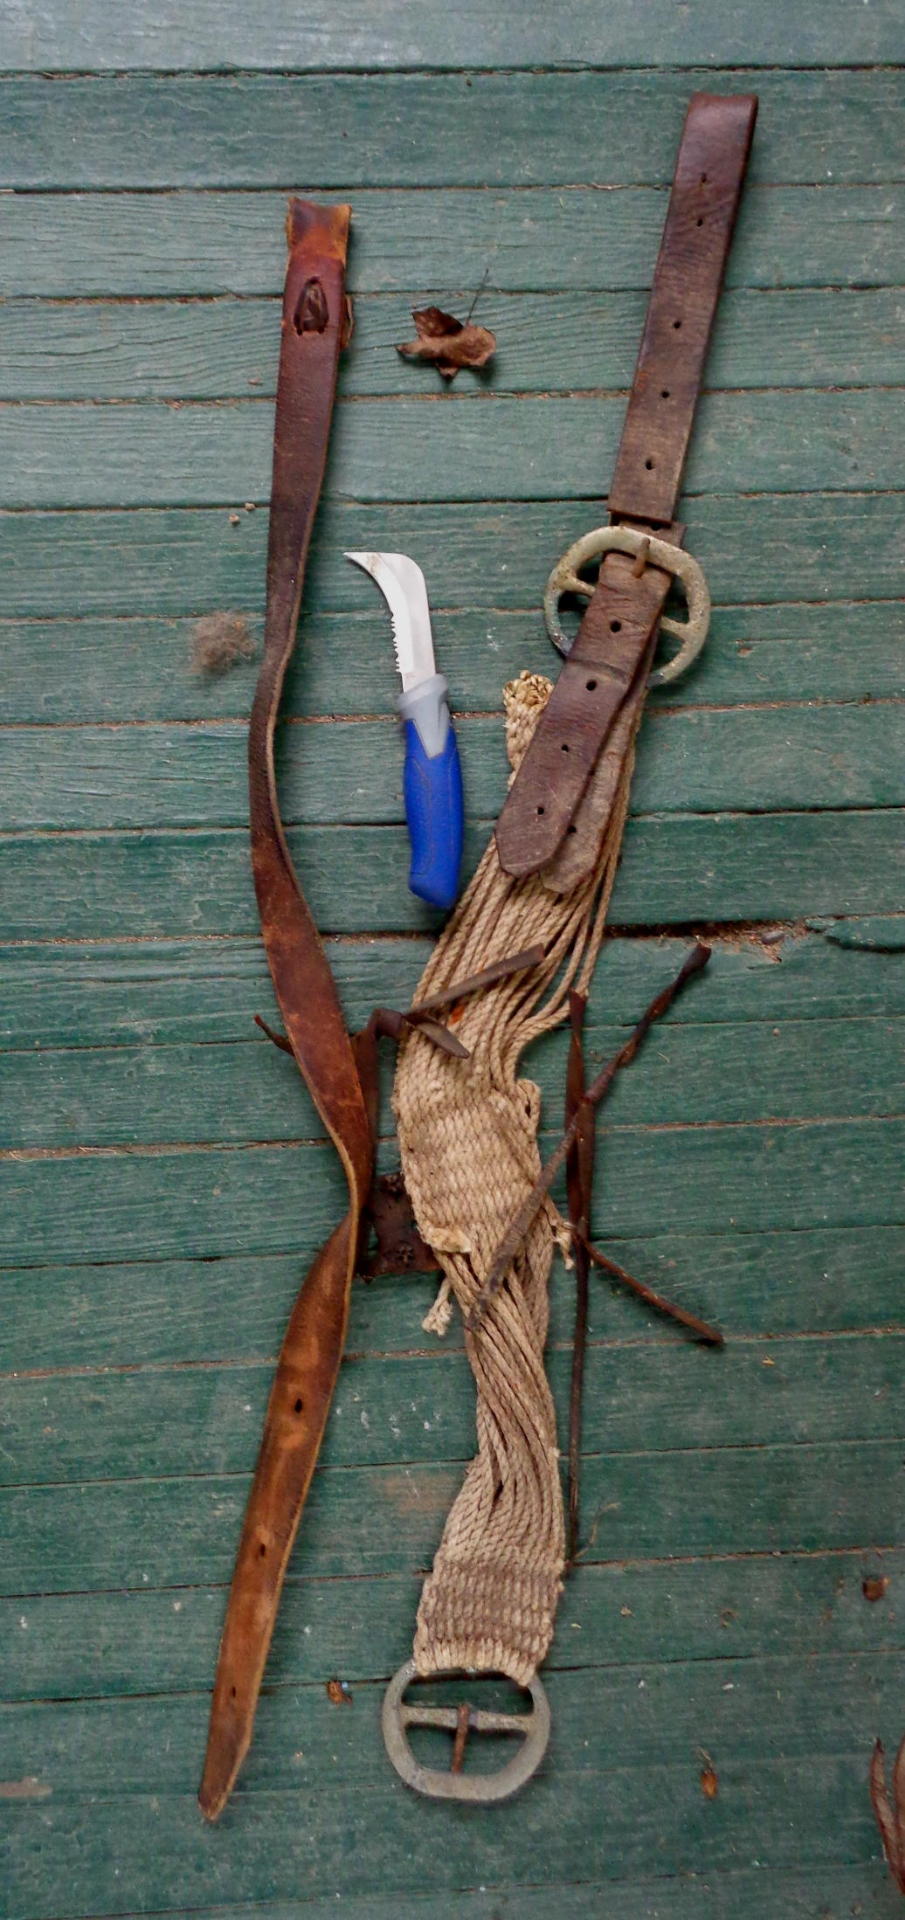
However, that knife is deadly! And I will need a little piece of wood to put behind the other pieces that I'm cutting off, to keep the knife from cutting the layer below. I wiped off a lot of dust and crud, then started with linseed oil.

I'm undecided about the metal ornamentation (conchos). They're too tarnished to ever look good again, but if I remove them completely the spot where they attached will look . . odd? Hmm. Buying new ones is not an option.
I always found that seat very comfortable, though; I'm looking forward to having that in front of my easel and seeing if it isn't a little friendlier for my back when I paint.
57 notes
·
View notes
Note
smth smth mary looking at every place shannon has never touched. running her fingers along stone, over bark. at night taking out that tube of pb33 just to feel closer to her, sketches all gathered and sifted through her hands.
beatrice telling her to handle everything with care, so that it lasts. a basin of warm water because this is an archive. the oils all dried, old pallet knives, their edges still rough with paint.
mary looking at suds dripping off her fingers and feeling helpless. knowing that shannon would have painted her if she’d disappeared first. would have captured her from every angle and papered the walls with her presence, her absence. but mary sees shannon as a light pressed against the fabric of her world, leaking through and always, always out of reach.
shannon used to whisper colours sometimes, in such a whisper you had to be close to make out the sound of her voice. now, mary hears it in the quiet, in the ocean, in the wind and the rain. cadmium, sienna, cerulean, ultramarine, umber. telling her about linseed, gum arabic, pigments worked into binding agents and the way solvents and pigments are all derived from other things. pine resin and cobalt and titanium. others from organisms - bone, ivory, wood. how a painting is just pieces of the world lifted up and shaped.
so mary goes and tries to do the same. in her own way, threading shannon’s ghost in everything she touches.
thinking of shannon at the end. her bloody hand lifting that pendant high, knowing that it would serve as an anchor. shannon silently asking her to stay, to witness, to go looking for her on mountain trails, in art supply stores and galleries and in watching ava taste a milkshake for the first time.
mary puts the drawing of the cornflower into her skin as a way of saying to shannon, i’m carrying you with me.
i can never put you down
the day mary comes home with her fresh tattoo, raw and painful, an open wound, ava stops by, sits in the living room with her, interlaces their fingers. tells her, in a voice schooled away from her usual scattershot rapidity, about the dream she'd had all that time ago on jillian's couch. tells her about shannon soft and steady, still loving her family from beyond the grave. tells her about the strength it had imbued in her, the understanding of purpose. the understanding of the need to protect those she loved.
mary, unsteady with it all, trying desperately to find ways to keep hold of shannon, of the memory of her. driving ava to her physio appointments and relaxing with her on windswept beaches with her afterwards. ava, as shannon had been, always happy to soak up every bit of sun she can.
the ache in mary's chest dulls over time, with each and every sunrise and sunset ava gets to experience, with each and every moment bea gets to spend by her side. with each time lilith flickers in and out of their shared apartment, each time she carefully dusts the mantel and presents a dredged up memory to mary like a gift, like an apology, like a benediction.
lilith pulls the three of them, she and bea and mary, to far-flung destinations every so often, to sit on remote peaks or wander downtown streets of places shannon never got to visit. beatrice takes up watercolours and looks surprised, eyes shining with tears, when mary pulls shannon's supplies out for her, tubes of paint and pans and half-pans still labeled in shannon's careful print
"she'd want them to be put to use," she says, voice half caught in her throat as she shows bea how to fill pans, how to use a toothpick to remove air pockets, a q-tip to clean up the edges before slotting it into a travel palette. practiced movements, now, after spending afternoon upon afternoon relaxing and watching shannon's hands at work.
beatrice makes a soft request and mary finds herself on the rooftop at the old cat's cradle, bracketed by bea and lilith, travel palette in hand for bea's ease of use as lilith leans heavily against her other side. the light of the setting sun paints them in quinacridone gold and alizarin crimson and pyrrol orange, paints them in brushstrokes as even and careful as beatrice's beside her, and mary finds herself at peace
42 notes
·
View notes
Text
fragments: 06 (snarry)
[I'm clearing out my incomplete wips and posting fragments that might stand alone as a bit of an amnesty of old projects.]
In the dark, with the pale light of the candle in one hand, he turns the pages of his sketches, watching Potter’s form appear over and over again in endless repetition. A shoulder in dark charcoal, a thigh in graphite. Gleaming and bright, perfectly captured in light and shadow. One and other. A sketch evokes the scene for him, the hot, dusty air of his studio, windows cast wide to release the fumes of oil paint and linseed oil, the drape of cloth at Potter’s waist, the perfect arc of his spine as he stretches, the impish grin as he yawns and ducks Severus’ censure. A saint of his very own, half-clad in only loose silk. A man would have to be a saint to resist; Severus has never been accused of being a saint.
He has been accused of other things. Witchcraft, at times. Devil worship. The devoted of Baphomet. Those he didn’t mind. Worse yet, the Prince accuses him of being a monk. Each visit, the Prince comes to review the progress of the picture, stepping with clear disdain into the spare, sparsely furnished room. His displeasure extends to every corner: the bottles and jars of curious specimens, preserved for future study, the cadavers Severus buys from the city, removing them for dissection and anatomical interest, the cheap wine Severus has to offer, watered down. He curls his lip at the wine and shakes his head at Severus’ appearance, wearing the same threadbare black doublet and cloak, same black tights, all poorly and dearly mended over and over and over again. The high-necked collar of Severus’ shirt is sorely out of fashion; the Prince clucks. “Do you expect to be a monk, Severus?”
The body has a price. Everything has its price, everything charges admission. The price of his body is want. He curses himself and the hard furious thing between his thighs.
Begin here, with the sketch, with the underpainting. The saint, with all of Potter’s lithe, loose grace, is posed bound, his wrist tied to the trunk of a tree, his stomach sucked in and convex, as if caught on the inhale. His eyes, the bright green of chlorophyll, turned upward to Heaven as if in both supplication and reproach. Severus spreads the paint, building layers of smooth, pale skin, bared to archers and Heaven alike. Two arrows pierce him, penetrate him, wounding the perfect spread of flesh, taking the first bite of the feast.
To paint, Severus will prime and stretch a coarse linen canvas, then prepare the surface with a smoothly ground gesso made of gypsum and animal skins. This color, this brilliant color. This is the only color he allows himself. He applies the paint in careful, thin layers, building up depth and texture piece by bright piece. For the saint’s draped loincloth, he paints a layer of deep, brilliant red to enhance the future ultramarine hue. Blue, he thinks, is the most appropriate shade. Blue, the color of the Virgin’s cloak and tears alike.
Take all that wretched want within you, Severus, and make something beautiful out of it.
34 notes
·
View notes
Text
Finally back at the dorms, the heat was cranked because it’s in the negatives here.
Our mother was digging through our bags, found a bottle she thought was part of a chemistry set. Her front people don’t know about that, it was something we had for homebrew drugs.
One of our subsystems has dangerous progs with the beakers, but the bottle only had linseed oil in it. The actual beakers were in the Christmas bag to her left. Not sure what we’ll do with them, but it’s better they don’t know where those things are.
We have removed everything sentimental and necessary from their house, which they didn’t comment on. Even the prom dress, so we can sleep in hotel halls if we have to leave earlier than expected.
They tried to keep us there for the semester, but we asked for a week to decide and pack up if we wanted to go back. It’s so hard not to, but we won’t. It isn’t safe.
The deep slash on our side is gone. That probably means missing time, and the calendar agrees. We’re going to have to reforge our communication and undo some programming, but it was okay. We are neither dead nor dismembered.
We’re looking for work again, and I don’t understand why we are unwanted. They don’t even see us before turning us away.
The weather makes our joints worse, but it’s better in the dorm than camping outside. We are debating when to disappear, and we have written our account information in preparation.
We have three months before the next huge date, and will be relatively available until then. Wish us luck.
7 notes
·
View notes
Text
Dushkin recorder musings
Despite my name and majority of my posts on Tumblr alluding to piano, I do also play the recorder.
Originally, I was playing on a cheap soprano recorder made of wax-impregnated maple that utilized German fingering (a bad "habit" from my school days that I put up with for some time). However, I did promise myself that I would switch over to Baroque/English fingering if I stumbled across a reasonable vintage alto recorder at an affordable price. And last weekend that promise came to fruition at an estate sale. Behold, my new alto!


It's a Dushkin, purchased for quite a steal ($20 USD!). No information was provided about its original owner, but whoever previously owned it seems to have been a woodwind enthusiast (the sale included various woodwinds) and likely played the Dushkin alto a lot (the thumbhole in the back looks fairly worn and could benefit from a bushing).
About Dushkin recorders:
There seems to be very limited information about recorder maker David Dushkin. The Powerhouse Collection in Australia has a Dushkin soprano recorder in its collection and helpful anecdotes on Dushkin's work along with links to its sources - David Dushkin, it appears, was the first recorder maker in the USA. Beyond that, searching up Dushkin recorders is more likely to show a variety of online sale listings, though one listing on Etsy was very useful as it provided images of the original fingering chart and instructions for use.
A look at the instructions say to oil the recorder with olive oil (a non-drying oil) or linseed oil (a drying oil) once a month or so. I used neither when oiling the instrument after cleaning (opted for a seed-based oil instead, so non-drying oil). The fire hazards of linseed cannot be emphasized enough (spontaneous combustion!); I think if I had to go for a drying oil, I'd opt for walnut oil because the recorder's wood structure is, well, walnut!
I think anyone familiar with wooden recorders will agree that walnut is a very unusual choice for recorder construction. An educated guess of mine is that Dushkin opted for walnut due to accessibility of this particular hard wood in North America (some Native American flutes are made of the same material).
Also unusual was Dushkin's mouthpiece design, which supposedly could be dissembled to some degree to remove the block.

The instructions on the Etsy listing indicate the mouthpiece can be pulled off when cleaning. During the cleaning process I was able to wiggle the outer wood sleeve by about a millimeter before it would not budge anymore - caution made push it back into place. I don't think it would be worth the risk of trying to figure out how the mouthpiece is supposed to be removed, and I'll settle for dripping alcohol into the windway if/when necessary.
Overall, it seems to be a well-made collector's item instrument that is sought-after for its historical value.
How it plays:
Brian Blauch's blog (online moniker reedplayerncnc) gives a brief firsthand description on its playability - "The alto has a beautiful tone, but it's super quiet. And you need to blow extremely hard." My experience was not quite the same as Blauch's - I needed to blow more softly!
Though, for full disclosure, I have a tendency to overblow so I could be biased. My particular Dushkin alto seems to be fairly forgiving at the upper registers for both overblowing and underblowing, but the lowest note requires significantly slow air flow, so much so that I have to drop my jaw when playing he lowest note, otherwise the note is at risk of squeaking.
An unusual one-time observance was that I somehow managed to get lowest note, 'F', to emit a wolf tone despite the bore being conical, but I've only been able to recreate this once during my very first play during the break-in period, and I have not gotten a wolf tone since then, just squeaks from bad fingering or overblowing.
An eBay listing mentions "the sound is a bit airy and responsiveness is on the slow side", which is more closer to what I experienced. When comparing the head of my alto to Blauch's photo's and the eBay photo, I noticed my alto's head more closely resembles the eBay listing, and that the head of Blauch's alto is different around the base of the mouthpiece (slightly more fancy) - so therefore Blauch and I have different models. My suspicion is that the models might also have some variation in bore size, maybe mine might be an older model given how less fancy it appears (and the poor placement of the stamp!).

Sadly, this is where my research into Dushkin recorder models comes to a dead end. Dushkin is mentioned in a few old articles published by the American Recorder Society, and one PowerPoint presentation in particular shows a few more of his recorders, but no documentation online exists regarding how Dushkin's recorder models changed over time.
Perhaps when I have the recorder fully played in and have sufficiently practiced enough, I'll do a reblog of this post with the sound of my Dushkin alto.
In the meantime, if you wish to follow in my footsteps down the Dushkin research rabbit hole, my sources are below.
Sources:
Powerhouse Collection listing: https://collection.powerhouse.com.au/object/407869
Etsy listing (with images of instructions below) https://www.etsy.com/listing/1538597243/vintage-dushkin-tenor-recorder-1950s-era?show_sold_out_detail=1&ref=nla_listing_details


Brian Blauch's blog post on Dushkin recorders: https://reedplayer.info/2021/12/29/dushkin-recorders/
eBay listing: https://www.ebay.com/itm/266504730326
American Recorder Society PowerPoint presentation containing images of some Dushkin recorder models. https://www.google.com/url?client=internal-element-cse&cx=011443274990293341649:ouyrdo9fbeu&q=https://americanrecorder.org/docs/von_Huene_ARS_FIN.pptx&sa=U&ved=2ahUKEwj19bOz64aEAxUwD1kFHTsIA3AQFnoECAUQAQ&usg=AOvVaw21O3FmjQIOBp2lcz2bmuiR
6 notes
·
View notes
Text
How to Keep Wooden Handle Garden Tool Clean?
Gardening, a hobby cherished by many, not only requires dedication and love for plants but also demands proper care of the tools that help make a garden thrive. A crucial aspect of this care involves understanding "How to keep wooden handle garden tool clean." This comprehensive guide will walk you through the essential steps in the wooden handle garden tool cleaning process, ensuring your tools remain in top-notch condition for years of gardening bliss.

Understanding the Need for Cleanliness
First things first, why is it so important to keep your wooden handle garden tools clean? Well, dirt, sap, and moisture can damage the wood, leading to a shorter lifespan for your tools. Regular cleaning not only prolongs their life but also ensures they are safe and effective for use.
Step-by-Step Cleaning Guide
1. Start with Basic Cleaning
After each use, it's vital to remove any soil or debris from the wooden handle. Use a stiff brush to scrub off dry dirt. For sticky substances like sap, a damp cloth can be more effective.
2. Dealing with Tough Stains
Sometimes, you might encounter stubborn stains. In such cases, a mild soap solution can be used. However, be sure to dry the handle thoroughly afterward to prevent any water damage.
Sanding and Smoothening
1. Smoothen the Surface
Regular use can lead to the development of rough patches or splinters on wooden handles. To address this, use fine-grit sandpaper to gently sand the surface. This step is crucial for maintaining a comfortable and safe grip.
2. Avoiding Over-Sanding
It's important not to overdo the sanding. Excessive sanding can weaken the handle and reduce its durability.
Oiling and Conditioning
1. The Role of Oiling
One of the key aspects of the wooden handle garden tool cleaning process is oiling. Oiling the wood with linseed oil or a similar wood preservative nourishes and protects it from moisture and decay.
2. Frequency of Oiling
It’s recommended to oil the handles at least once or twice a year, depending on the frequency of use and exposure to elements.
Storing Your Tools Properly
1. Choose a Dry Place
Moisture is the biggest enemy of wooden handles. Store your tools in a dry, well-ventilated place to prevent rot and mold growth.
2. Hanging the Tools
Hanging your tools vertically is a great way to keep them off damp floors and prevent any warping or bending of the handles.
Addressing Wear and Tear
1. Checking for Damage
Regularly inspect your tools for any signs of wear or damage. Cracks or splinters can be dangerous and should be addressed immediately.
2. Replacing Handles When Necessary
If a handle is beyond repair, don't hesitate to replace it. A sturdy, well-fitted handle is essential for safe and effective gardening.
Conclusion
"How to keep wooden handle garden tool clean" is not just about the act of cleaning; it's about preserving and respecting the tools that help you create and maintain your garden. By following these steps, you ensure that your wooden handle garden tools are always ready for action.
For more in-depth guidance, do check out How to Care for Wooden Handled Garden Tools?, which further elaborates on caring for these essential gardening companions.
Remember, a well-cared-for garden tool is a gardener's best ally. So, keep them clean, and your garden will thank you! Happy gardening!
2 notes
·
View notes
Text
Mokulito printing
This week we tried Mokulito printing. This is a lithography process. To do this we used a smooth piece of cherry wood plywood and sanded it with fine sandpaper. This removed any fingerprints. We then took any greasy material and used it to draw on our image. This could be anything from makeup to acrylic to Sharpie as long as it has a strong grease content. I chose oil pastels. Then we coated our boards in gum Arabic and let to dry over night. The gum soaks into the wood to reject oil. The areas with grease will not absorb the gum. We then cleaned the gum off with water and continuously kept the board wet so it would not become sticky. We used soft rollers and mixed our ink with linseed oil to make it runny. We coated the boards, continuously wetting them with a sponge as we did so and then printed using the press. The result was the ink remained on the greasy parts only. On my last print I forgot to wet my board before I inked it however I was able to remove majority of the unwanted ink and the result was surprisingly pleasant as it created a shaded background. As my theme is on the impact we leave on a space, I did the inside front passenger seat area of my car as my print image. Showing the imprint I leave on it as my space.


#print #mokulito
3 notes
·
View notes
Photo

Whether spring has sprung or is just starting to peek through the winter cold, it will soon be time to get your spring garden planted. Before you break out your trusty garden tools and seed packets, there are a few spring garden tasks you need to tackle to get your garden off on the right foot. While I say this about practically every season, I do think spring is my favourite time of year. There is SO much excitement when it comes to springtime. By then, we’re tired of the cold and snow (or if you’re like me, the rain!) and ready for some spring weather and gardening. The best part about spring is witnessing the transition from hibernation to new growth. All winter, I’ve been dreaming up my plans for the next season’s garden, and I’m itching to get outside and garden again. Before there are new greens or spring bulbs, there are a few tasks that we can cover to get ready for spring, even if spring isn’t quite ready for you! This post will cover… How to Prepare Your Spring Garden 1. Inspect Raised Garden Beds Check garden beds for any damage. Over the winter, soggy soil from rain and snow can put a strain on the wood frames of a raised garden bed. You want to make sure all your beds are structurally sound and ready to house plants and soil. To do so, repair any bowed or split wood on the frames. Wood raised beds last about 5-10 years. 2. Check Your Garden Tools Like you, your garden tools have patiently been waiting for the next gardening season. Get your garden tools in tip-top shape before the planting season gets in full swing. Give them a good wipe down and inspect for rust on the tool heads. If rusty, soak the tool in 50% water and 50% vinegar. Then, give them a good scrub with steel wool. If your tools have wooden handles and are showing signs of splits and cracks, rub them down with boiled linseed oil. I have a whole post dedicated to tips for cleaning your tools. You should take apart your pruners to fully clean at least once a year. 3. Turn Your Compost While your plants have been hibernating, your compost has been brewing. It’s time to turn your compost pile and check for any that is ready to use. Making your own compost is one of the best natural soil amendments, and it’s free! Add compost to improve the soil by scratching in the finished compost into the top one inch of soil. This will give your soil plenty of nutrients to house new seedlings. 4. Top Dress Garden Beds If you run short of home-grown compost, you can still give your soil a nutrient boost. Use well-seasoned manure to top-dress your garden beds in preparation for planting. If you planted a winter cover crop, now is the time to till it into the soil in preparation for planting the beds. 5. Divide Perennials If you’re like me, you have spent the winter dreaming up a new garden plan or map. Spring is a great time to transplant divisions or move plants around. If you don’t have room for your new divisions or want something new, share or trade some of your plants with neighbours and gardener friends. This is a cost-efficient way to add more plants to your landscape, but be mindful of sharing pests, diseases, and weeds. Only share healthy plants from your garden, and inspect plants from friends or plant sales thoroughly. If there are any signs of distress or discoloration, do not plant it in your garden. The risk often far outweighs the reward! Potted up divisions ready to be moved and shared. 6. Weed and Mulch Eradicate those pesky early spring weeds before they get too comfortable in your garden. The key to successful weeding is to start early in order to stay on top of it. Remove any young, sprouting weeds first. Next, put down a layer of cardboard or landscape fabric onto the bare ground before you add mulch. A three to four-inch layer of mulch is sufficient to discourage any new weed growth. Alternatively, you can plant your garden tightly with perennials, annuals, trees, and shrubs to crowd out weeds. More plants, the better, right? 7. Seed Starting Seed starting may be one of the most exciting spring garden tasks. Seeing new sprouts germinate and rise from the soil definitely brings me a little dopamine hit. Not all seeds will begin at the same time, so be sure to check their packet for growing timelines. I like to sow warm-weather vegetables and annuals indoors before the last frost date. To aid in germination, pre-soak larger seeds and seeds with thick coats, such as beets and nasturtium, the night before you sow them in starter pots. Seed starting is a gardening art form and there is a lot to cover on this topic. For more on how to start seeds both indoors and out, check out my seed starting 101 guide. Many plants are started indoors in the spring before the last frost. 8. Early Spring Vegetables You may not have to wait long to plant some of your vegetables! Once the soil is workable, direct sow any early spring vegetables. Cool-weather veggies like lettuce, cabbage, radishes and scallions will germinate in cooler soil. With careful planning, you can have vegetables in the spring, summer, and fall. Dedicate a section of your garden to speedy vegetables for harvest that you can turn over throughout the growing season. Zucchini is a great vegetable to start early. 9. Prune Some people are scared to prune in the spring because they are unsure whether or not a branch is dead or still hibernating. The key is to do so after new growth has begun and not beforehand. You will want to remove any dead branches from shrubs, trees, and perennial foliage. Prune the spring bloomers, like forsythia and rhododendrons, as needed soon after flowering is complete. Thin and shape hedges after the first flush of new spring growth. If you’re new to pruning, check out my pruning guide. This plant is ready to be pruned, as the new growth helps distinguish the dead branches. 10. Plan to Protect Seedlings As much as we try to predict the weather, a late-season frost or freeze can happen anytime in the spring. Make sure you have enough cloth and plastic to protect tender plants. If a frost is predicted, just a cloth over your plants will suffice. For nights when the temps are forecast to dip below freezing, it’s better to put a layer of cloth on first, then lay plastic on top. Condensation on the plastic can freeze and damage foliage. You can also protect new seedlings with your own mini greenhouse. Check out my guide on how to utilize umbrella greenhouses for container gardening. Taking the time to complete a few essential spring garden tasks will bring you benefits for the rest of the season. Plus, it just feels amazing to get back outside and dive deep into the garden! More Spring Garden Ideas Source link
0 notes